Badger Meter PI400 Portable Interrogator (Hand-Held) User Manual 1

Badger Meter Inc Portable Interrogator (Hand-Held) 1

Contents

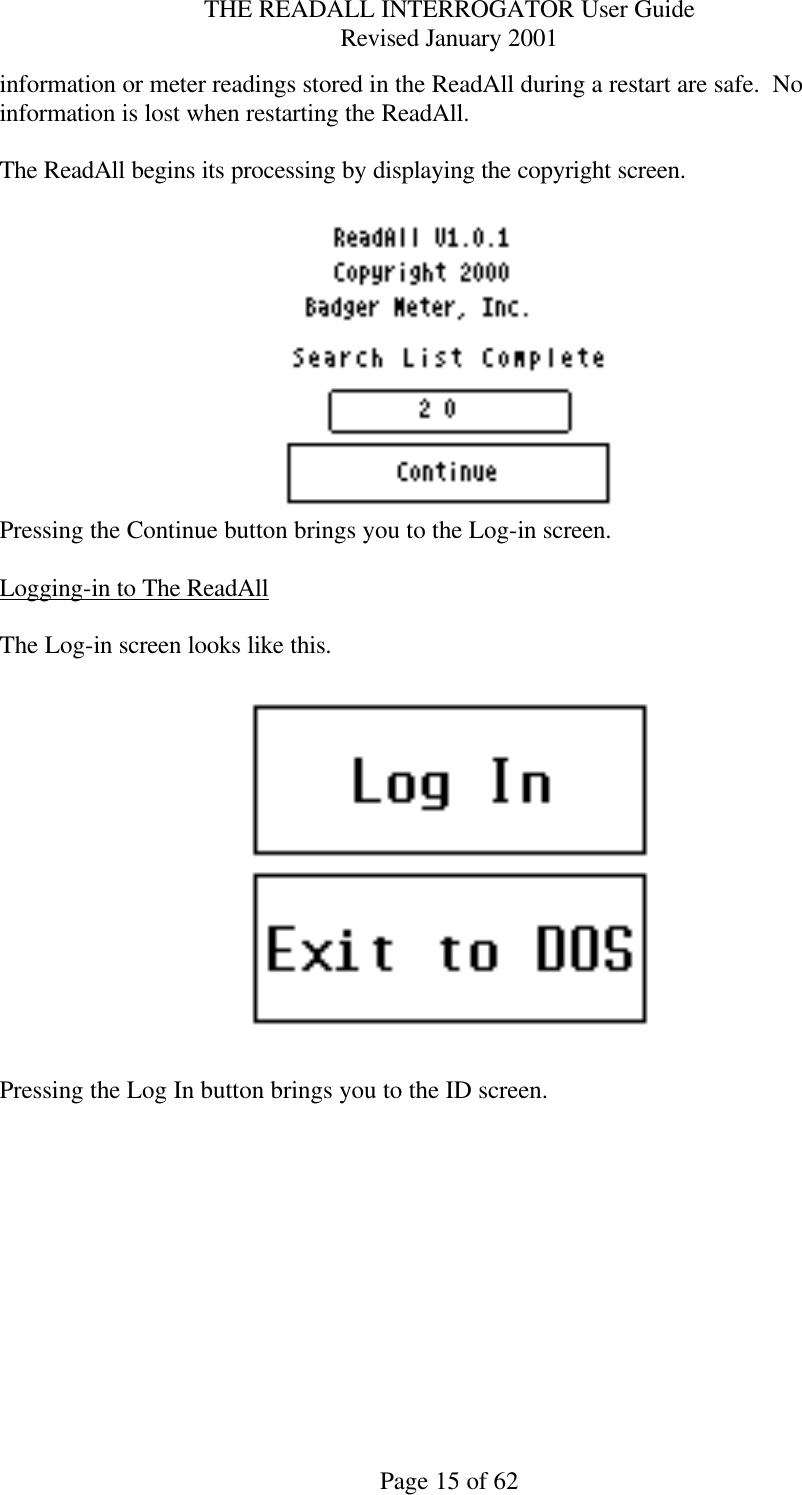
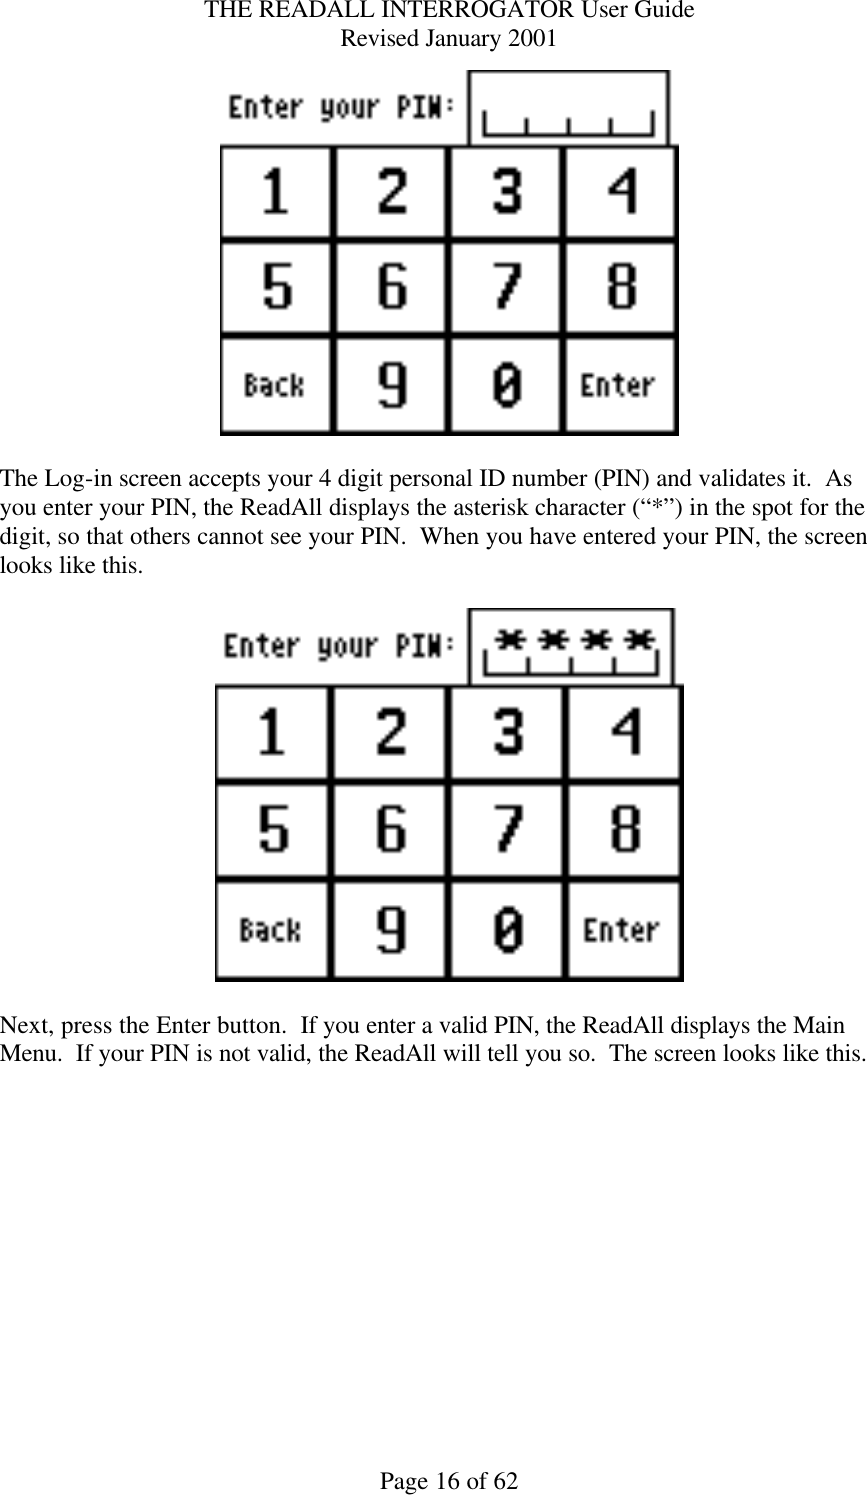
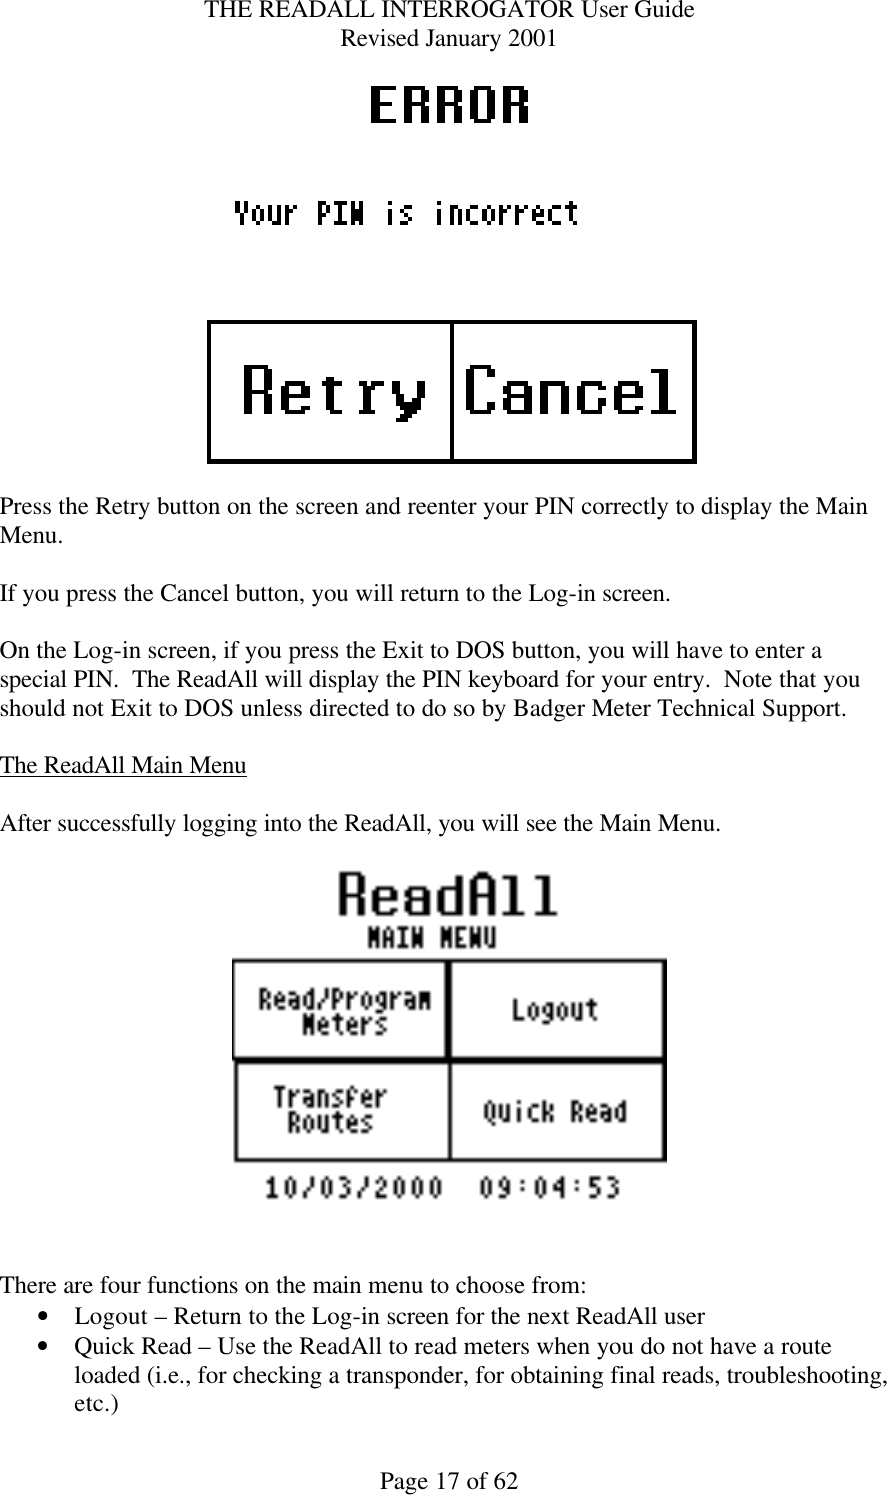
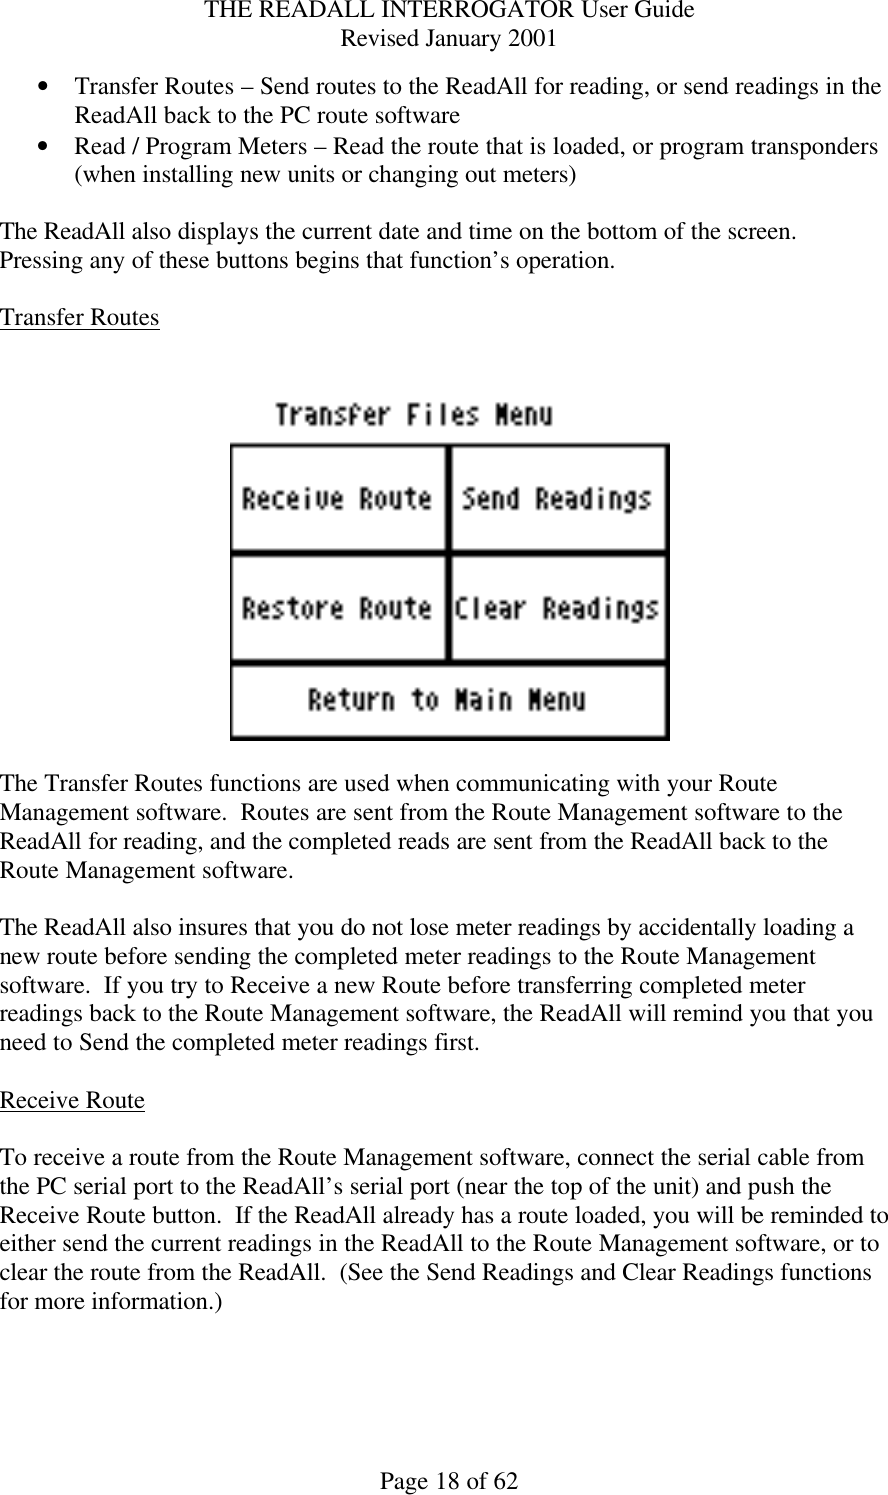
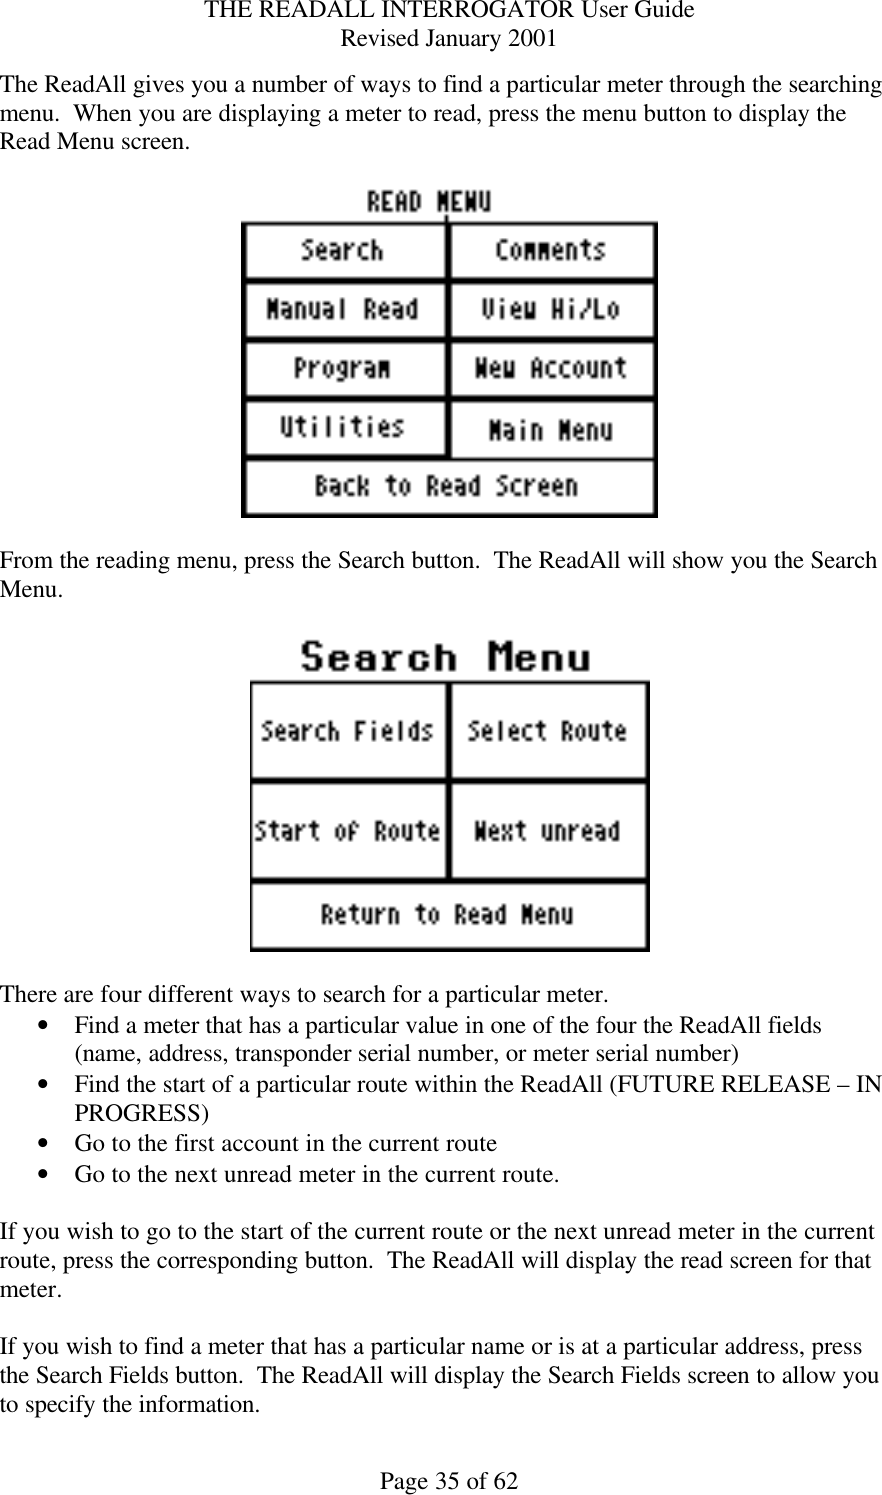
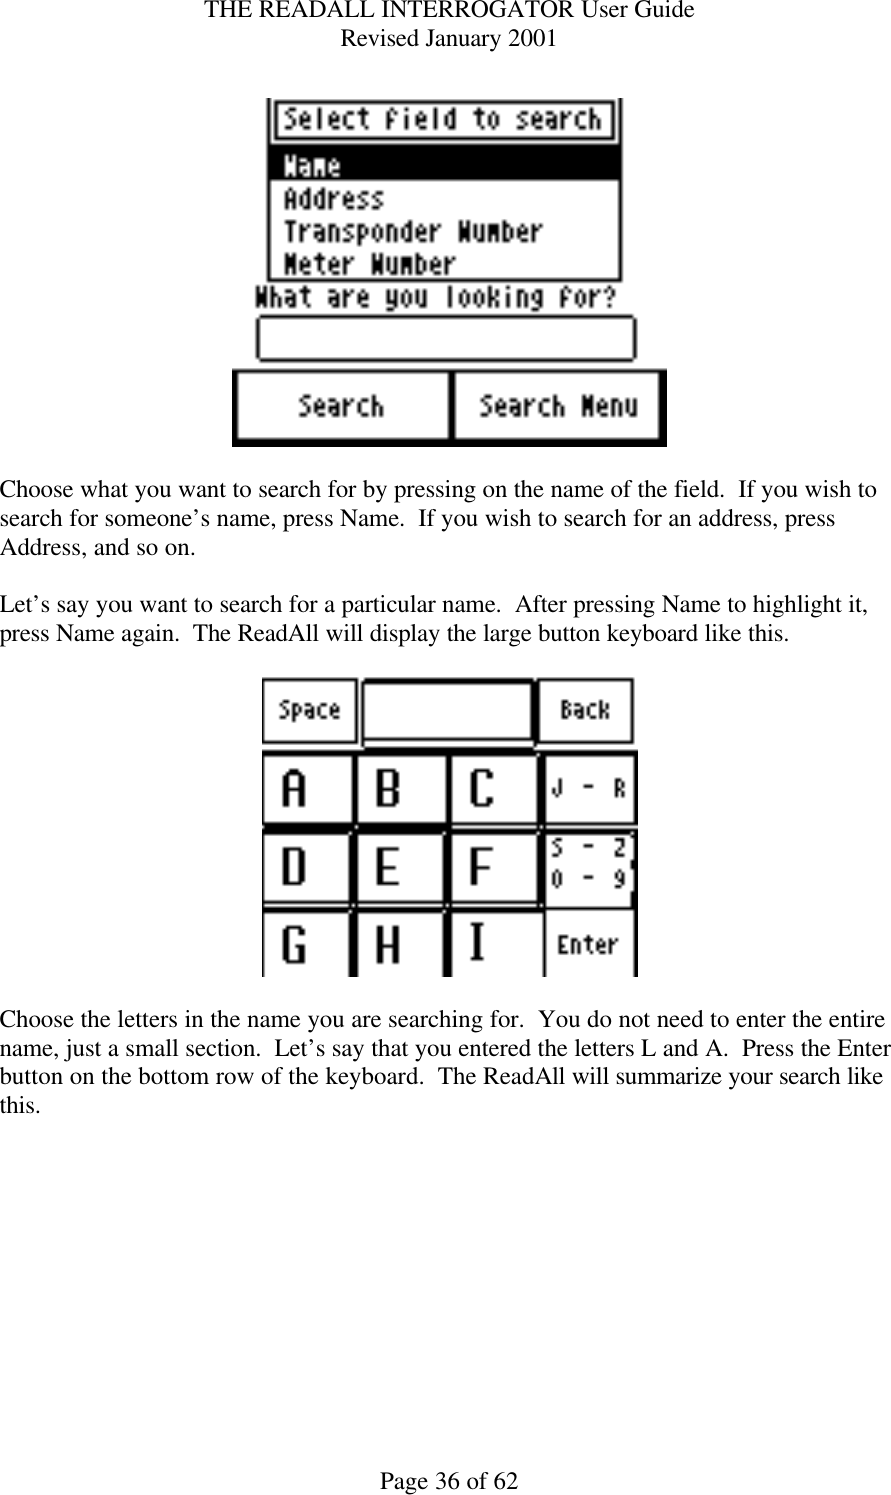
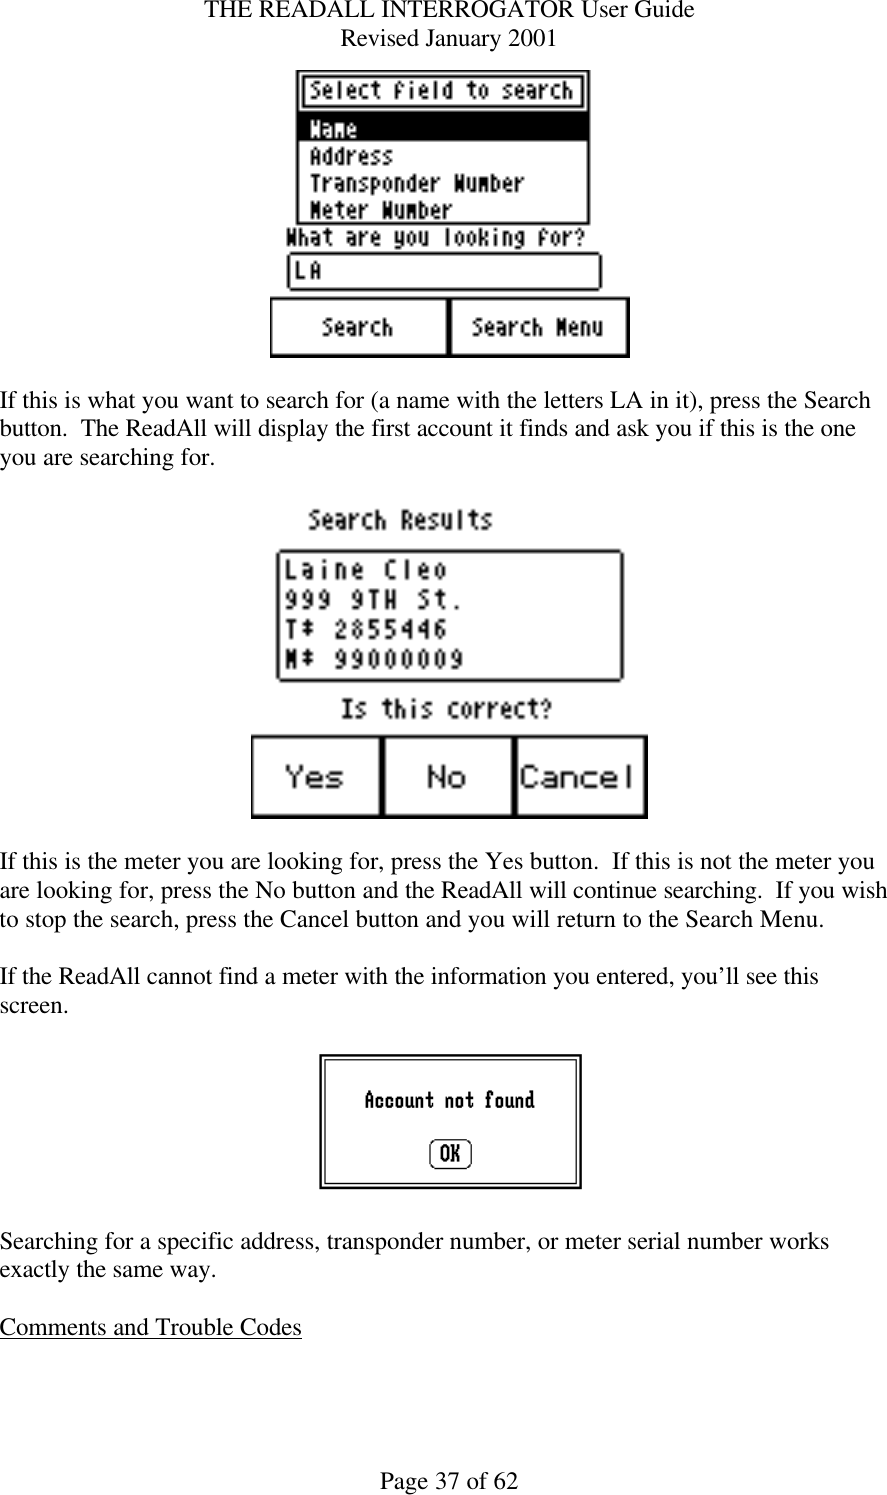
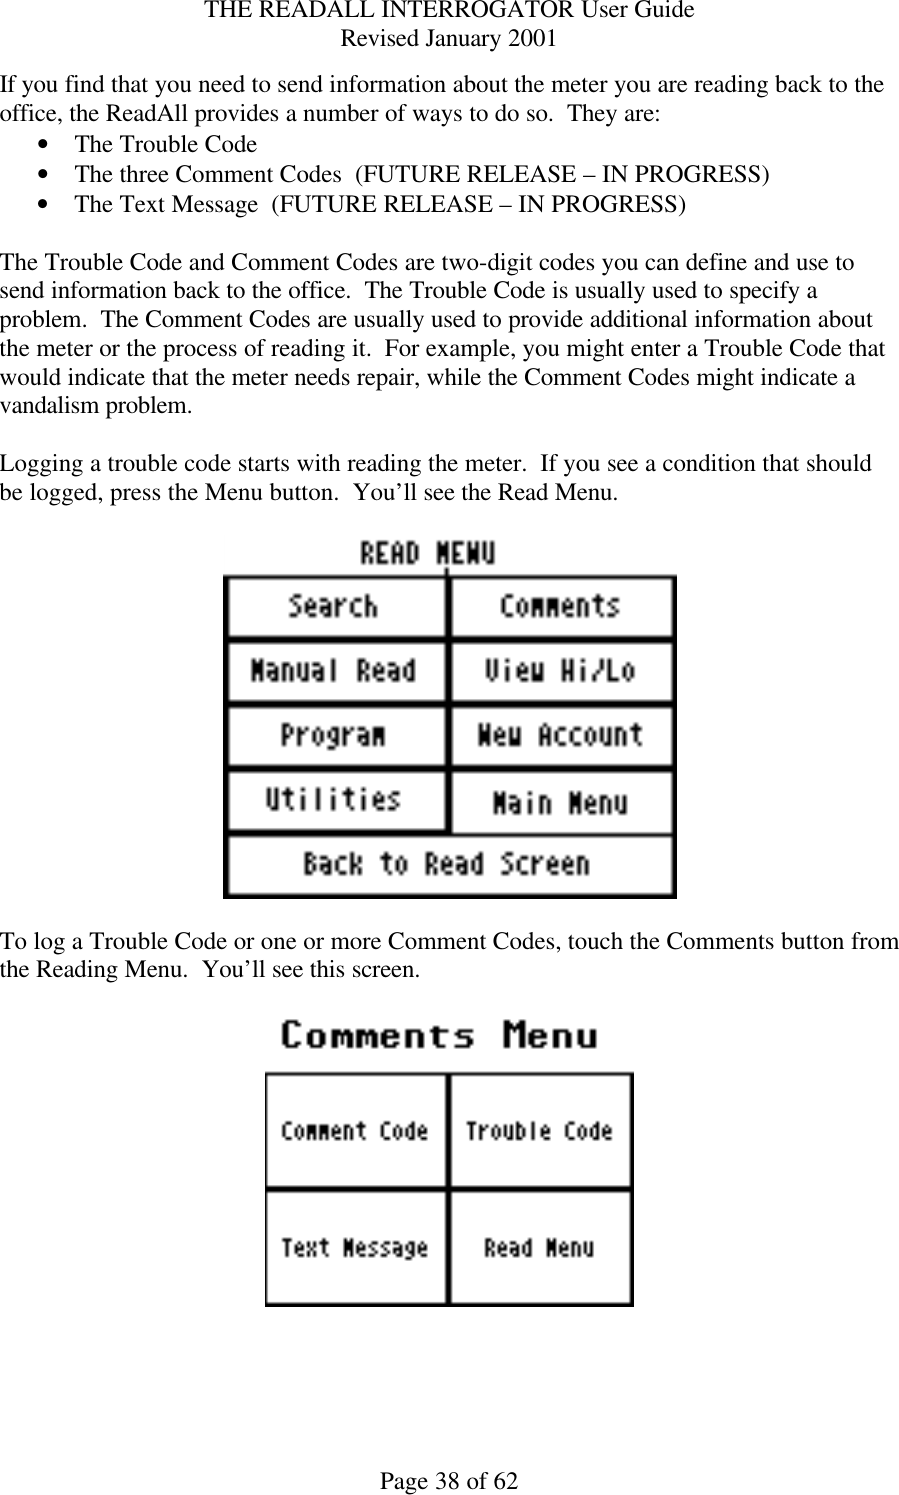
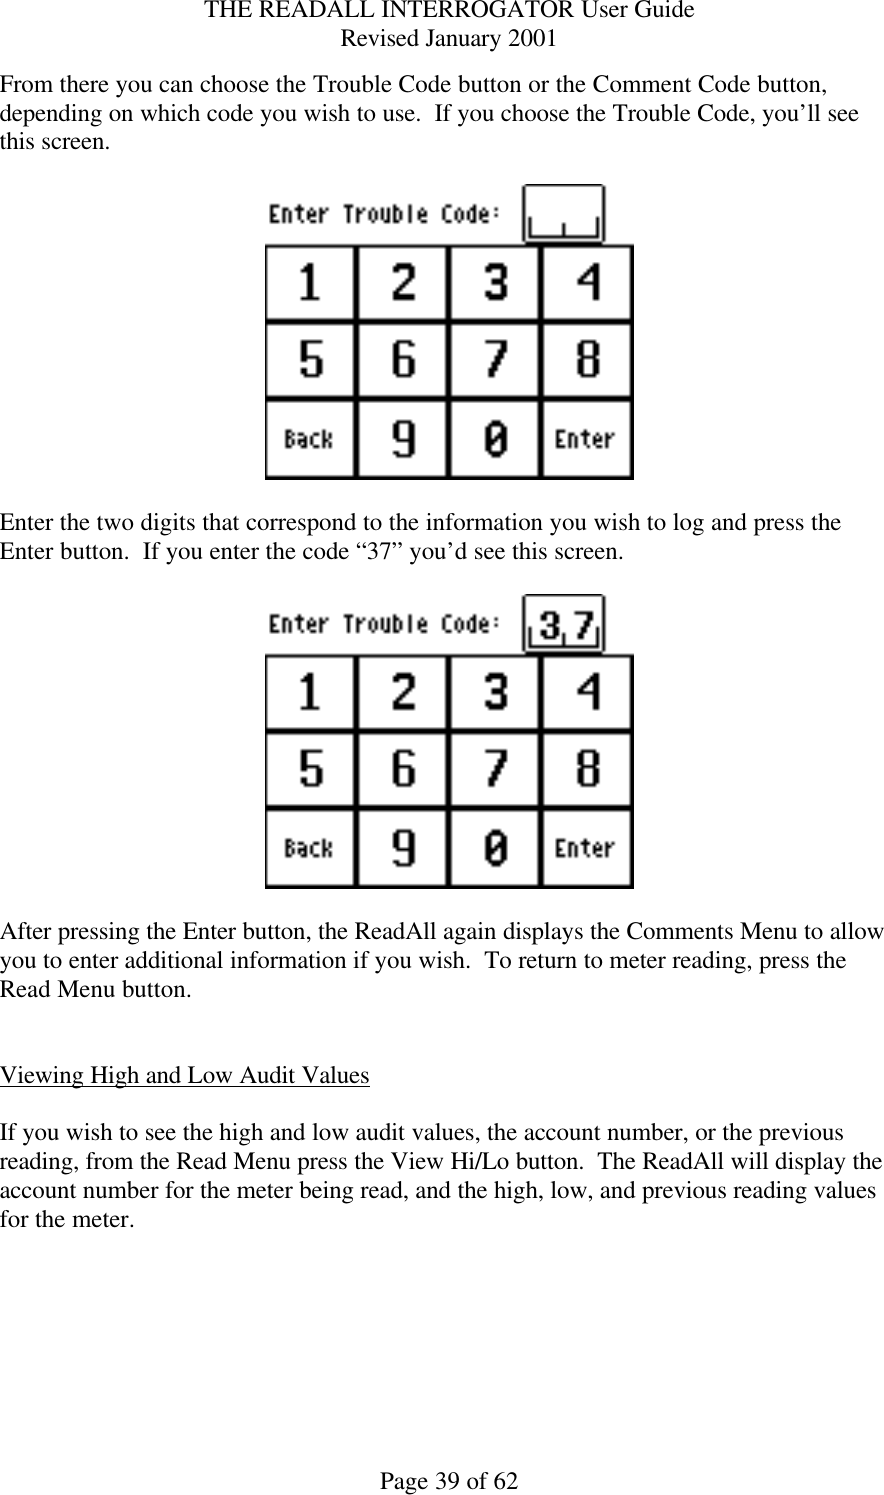
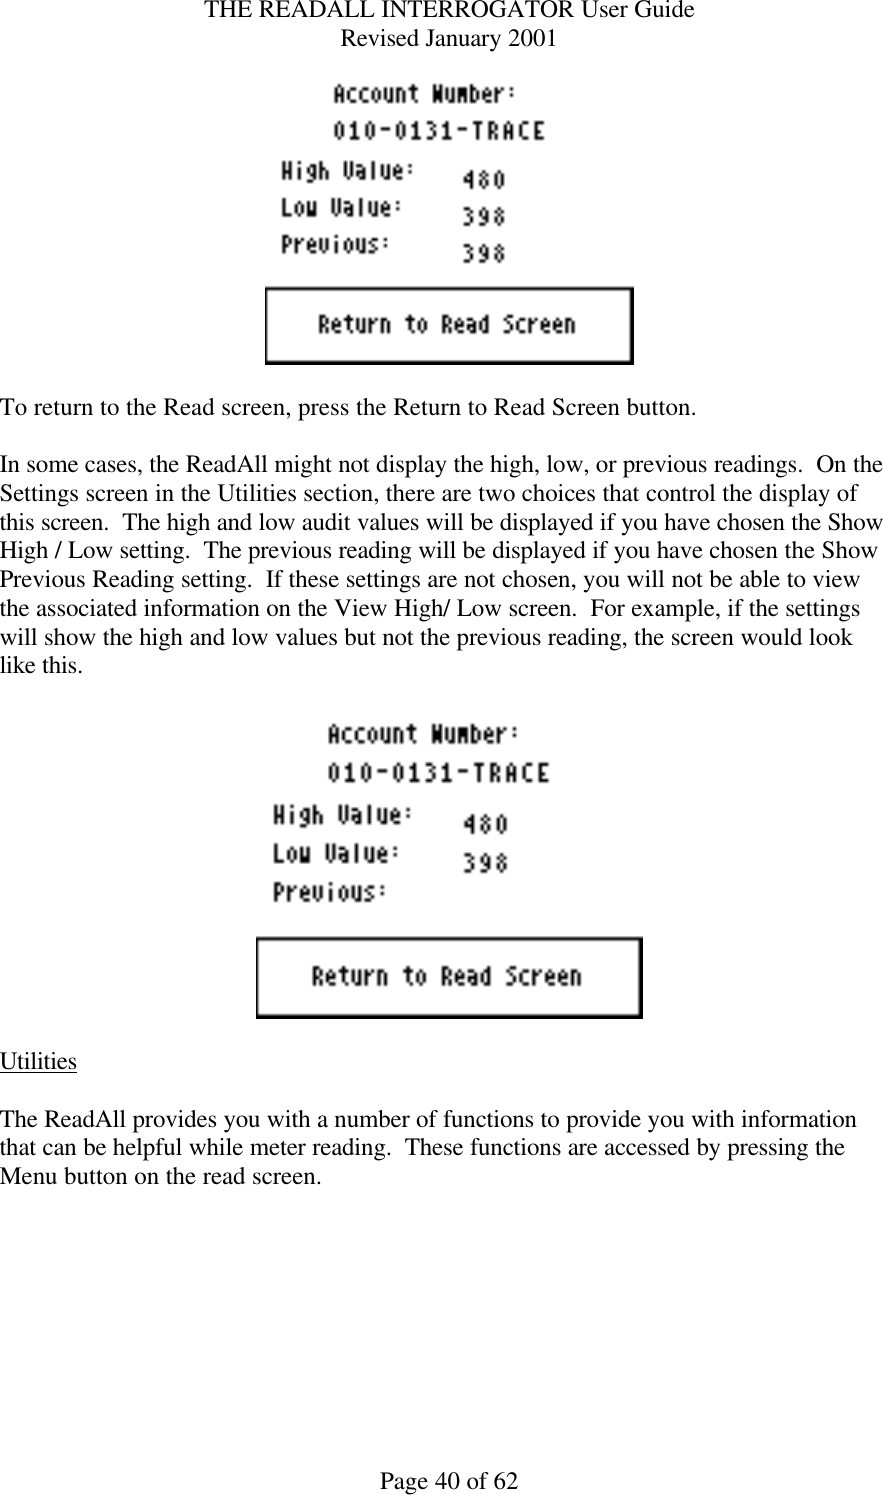
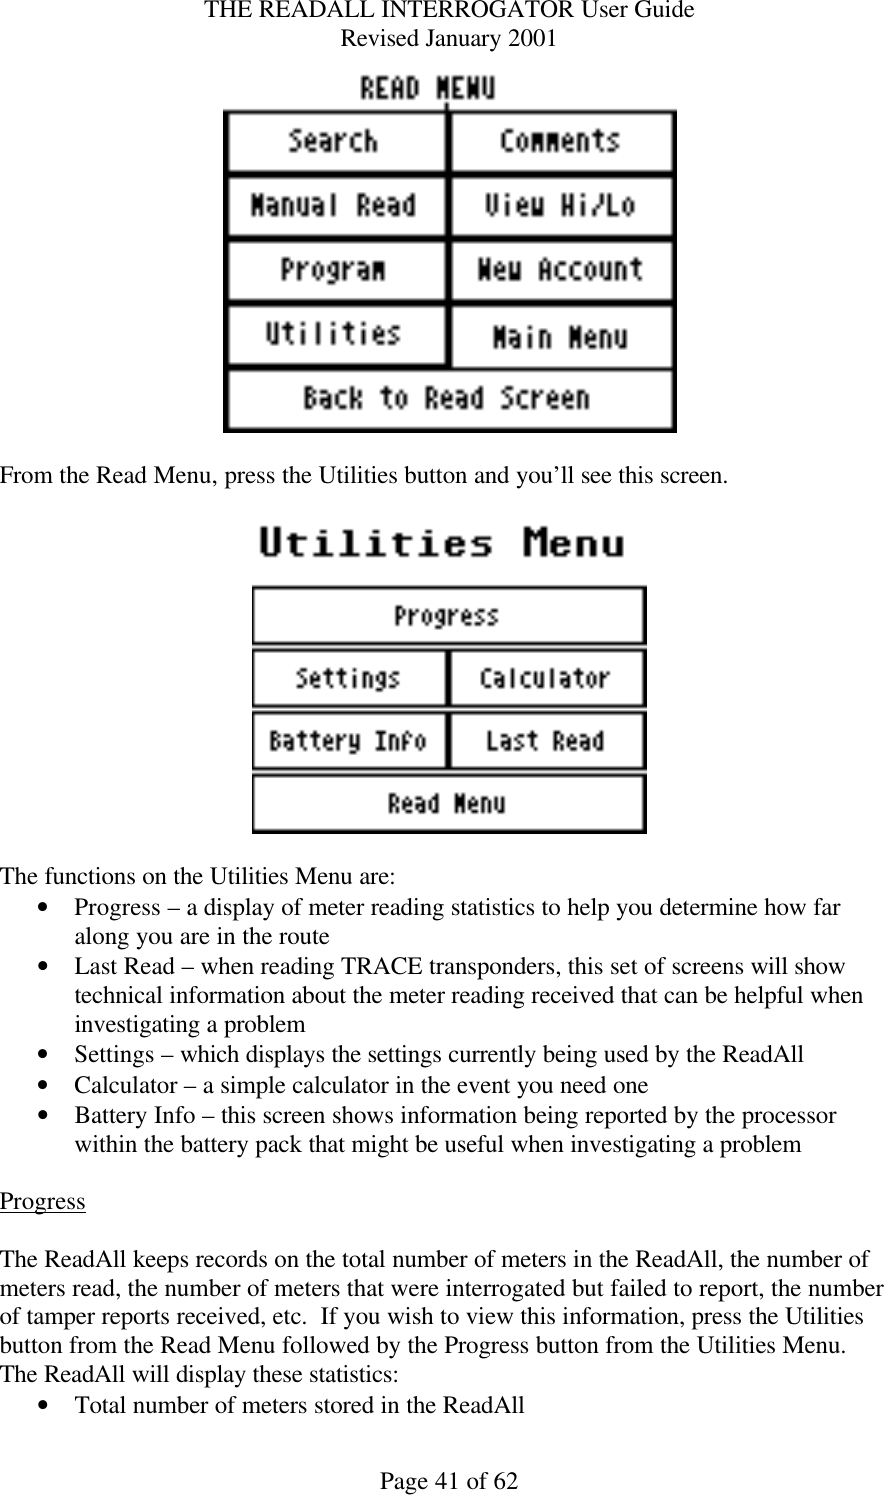
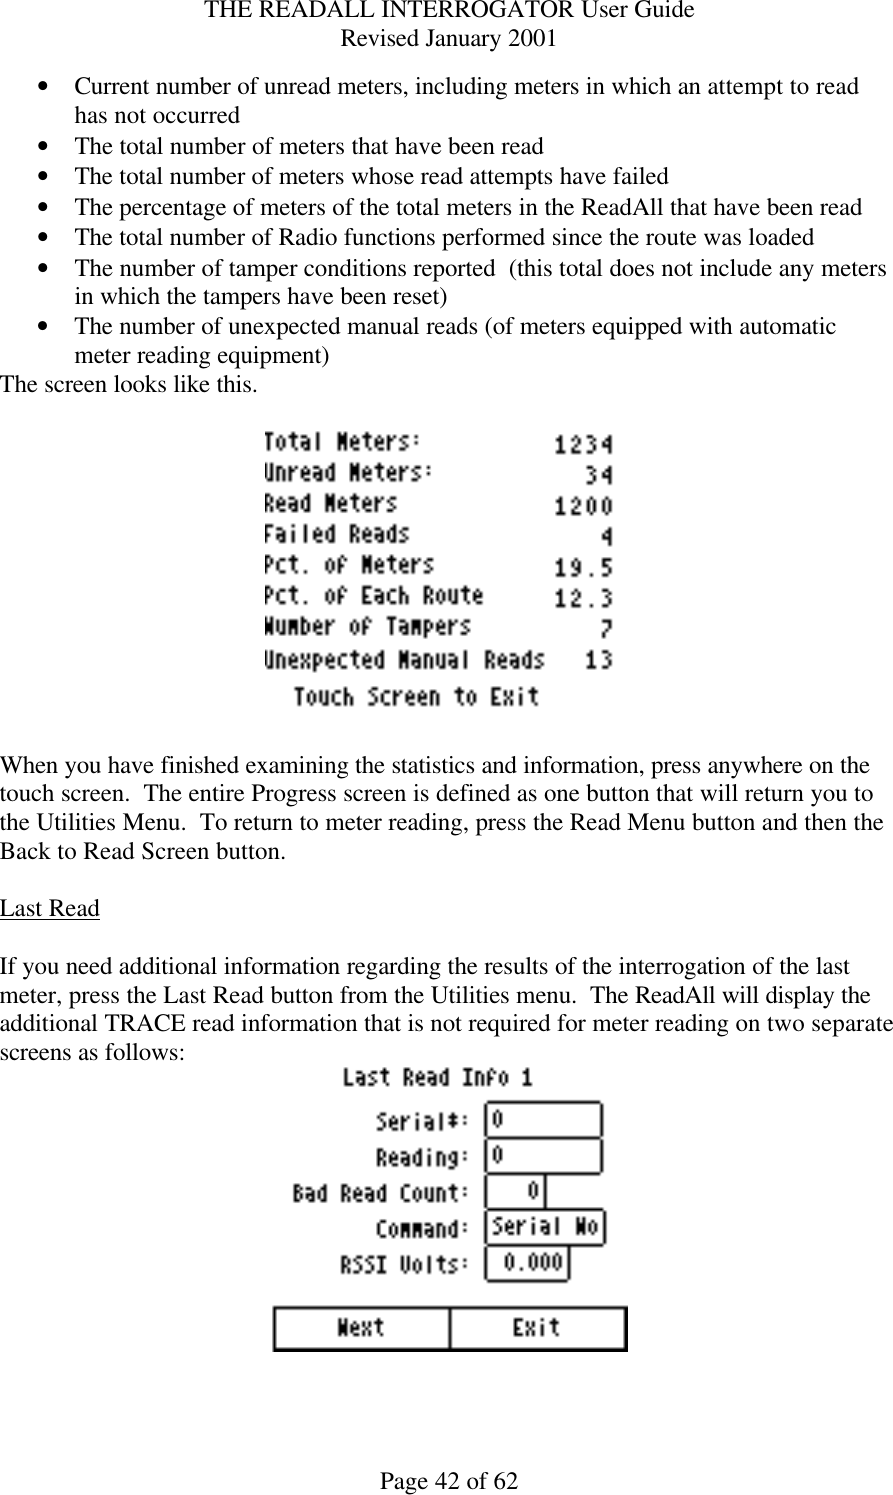
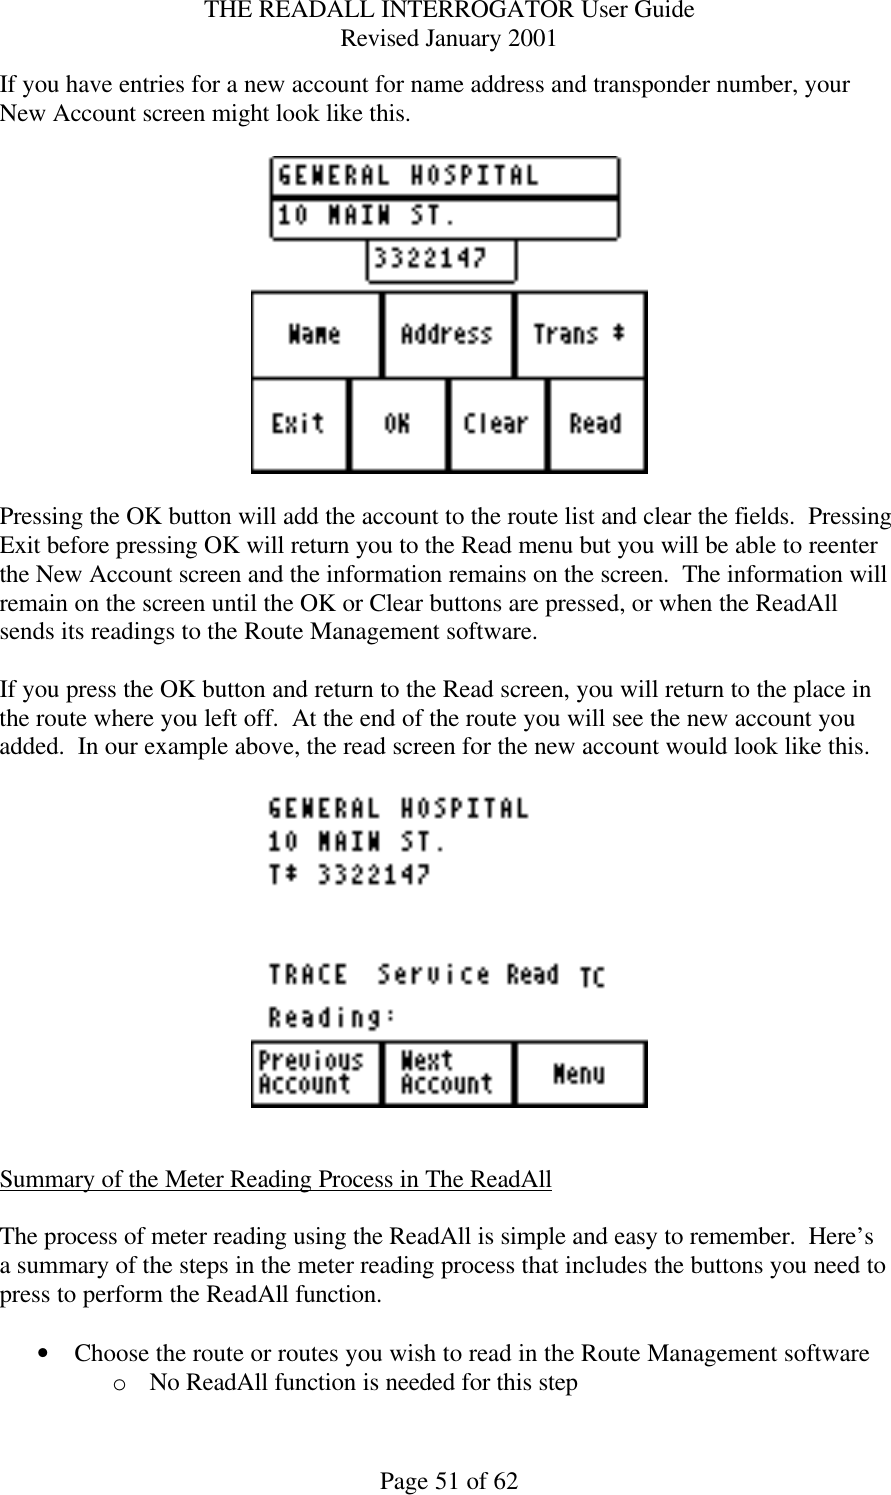
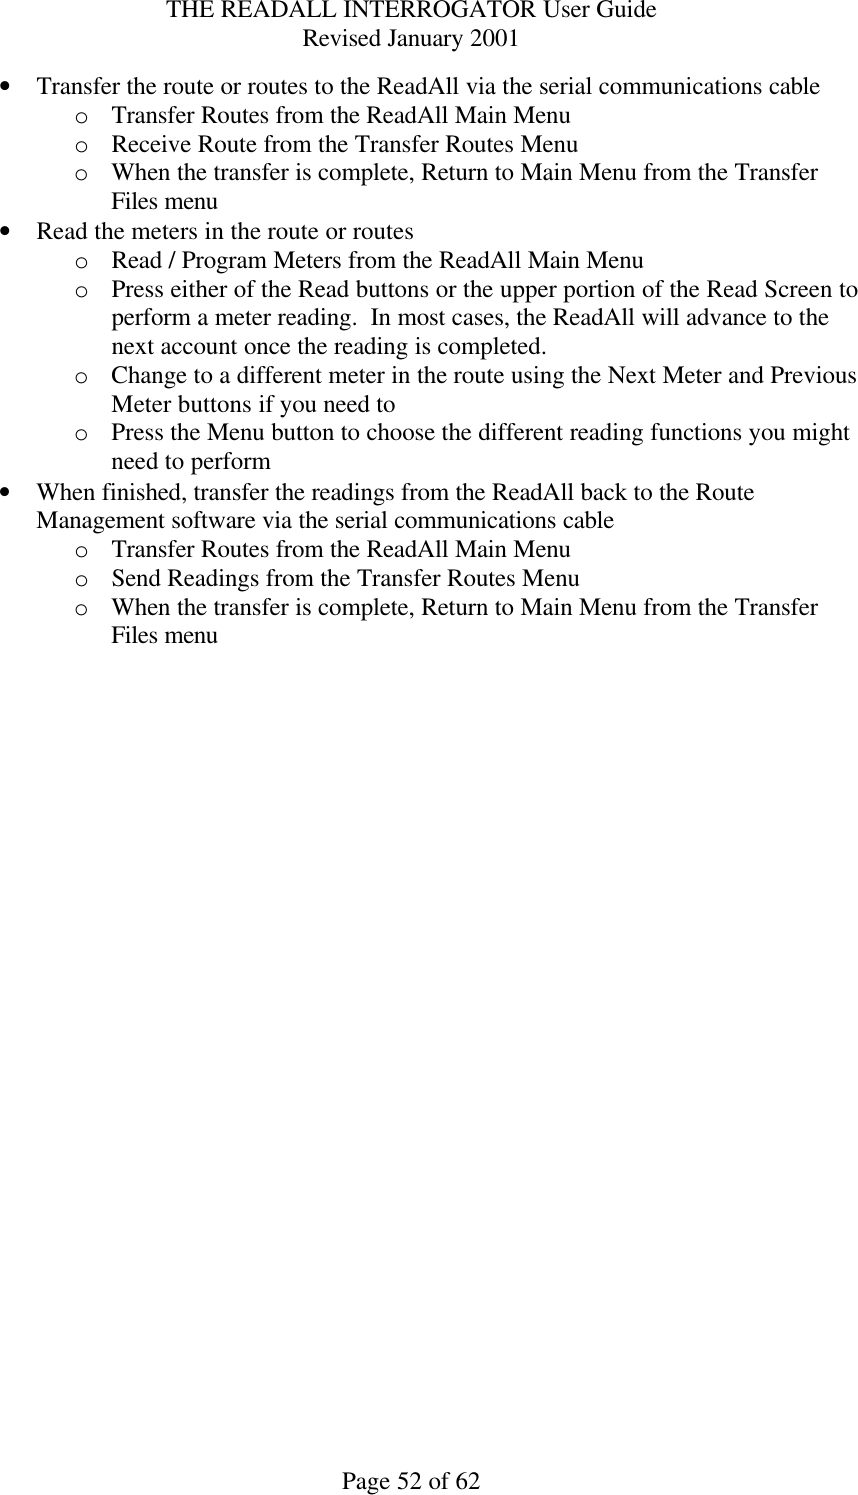
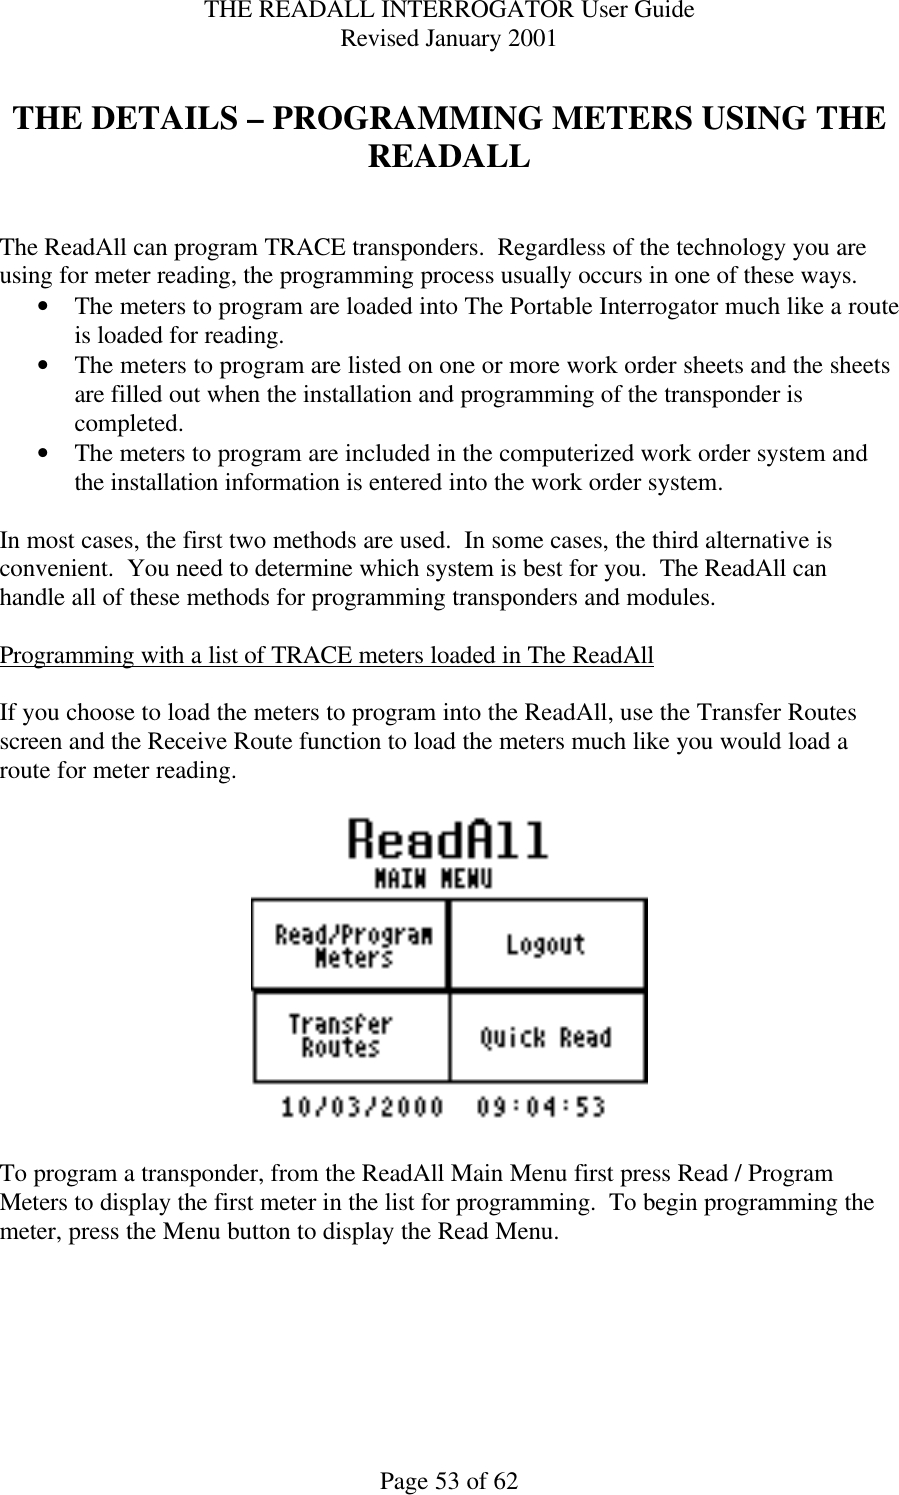
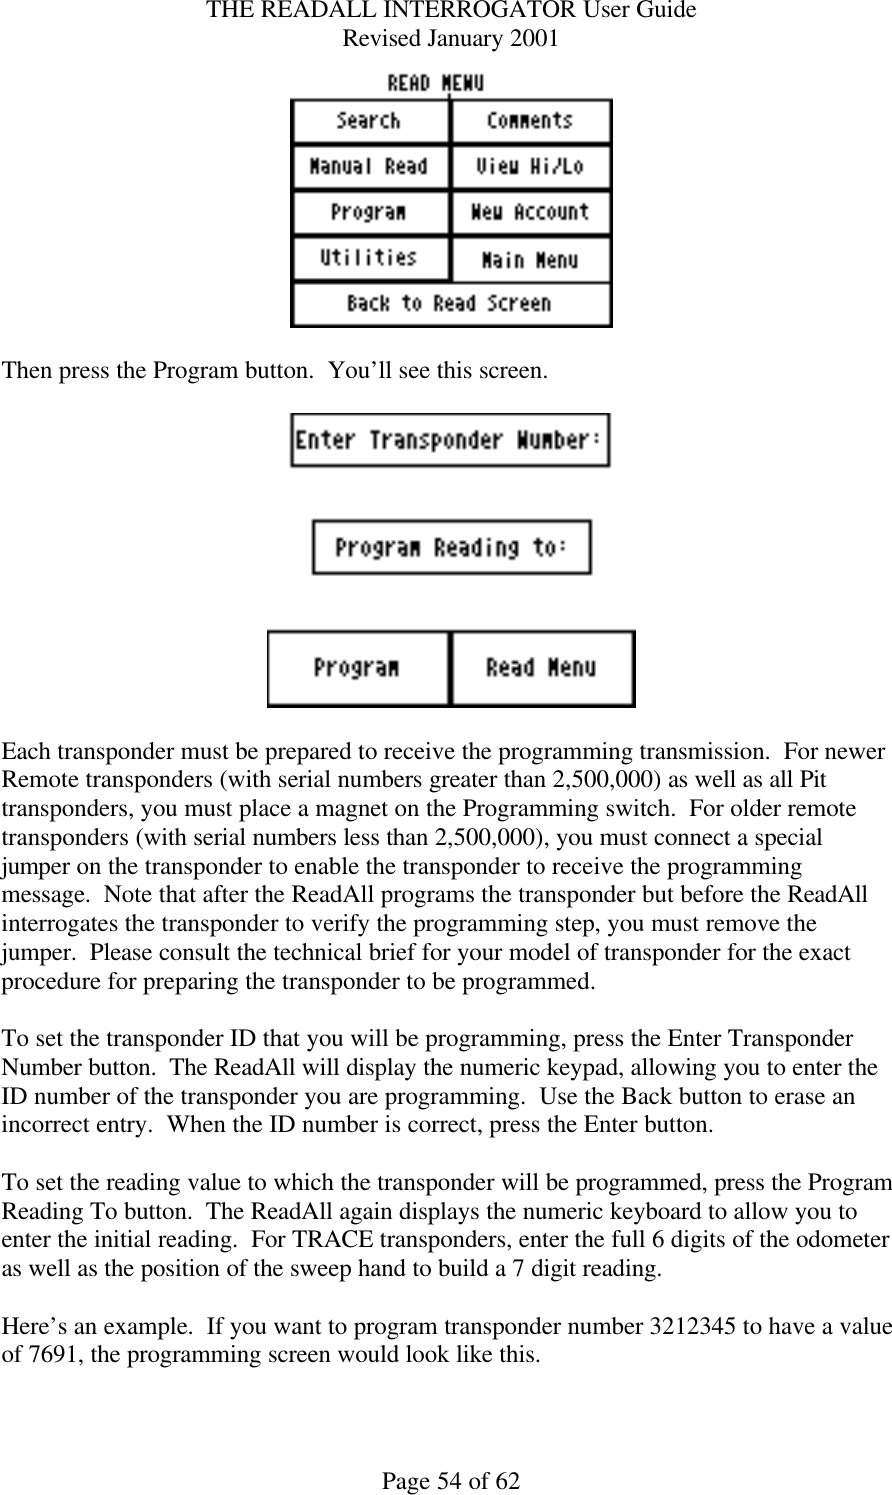
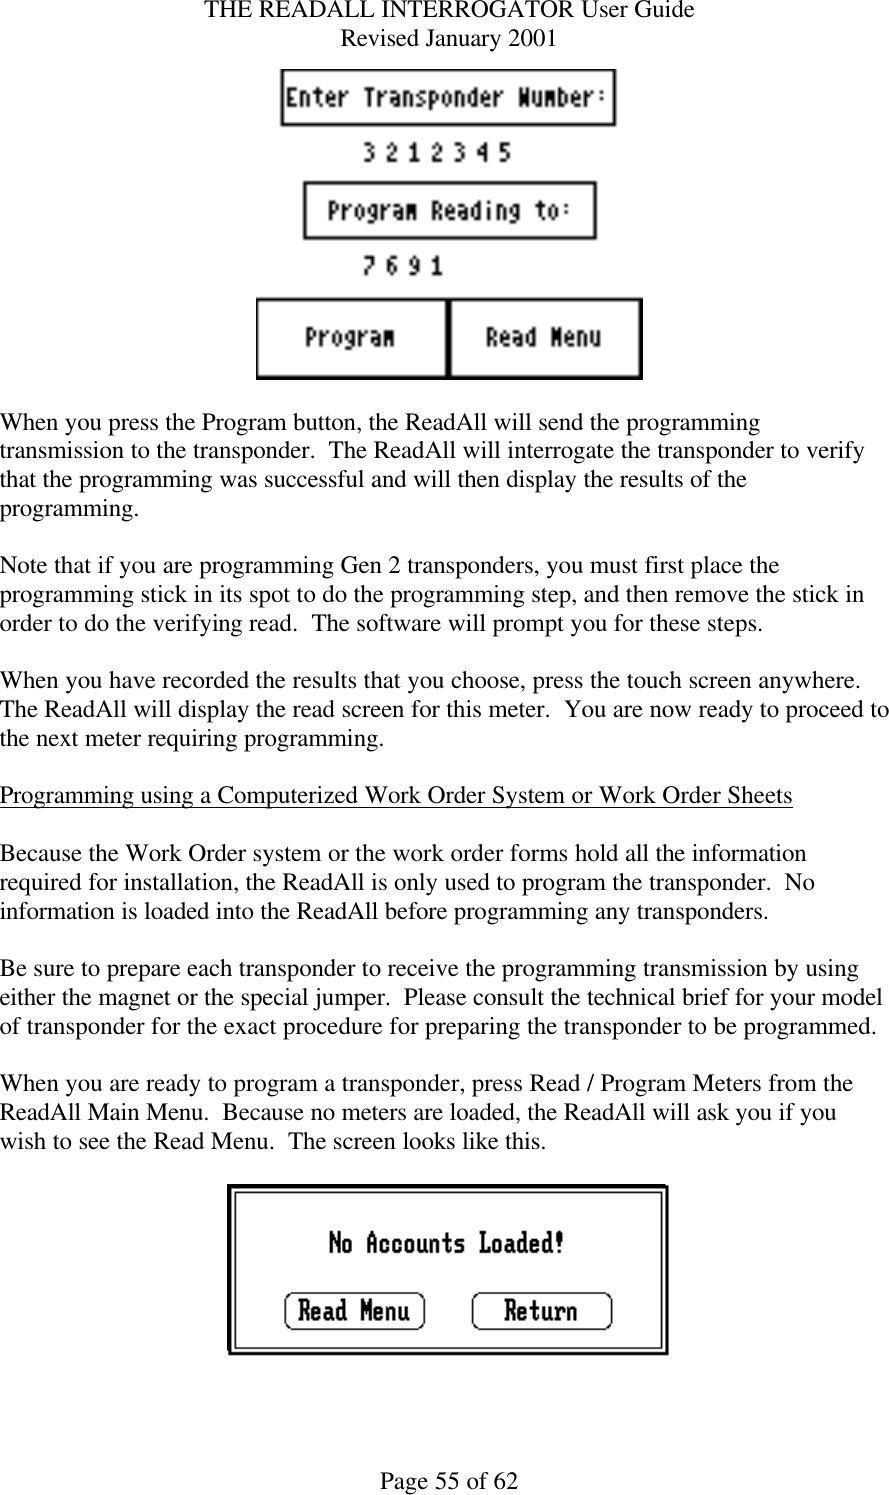
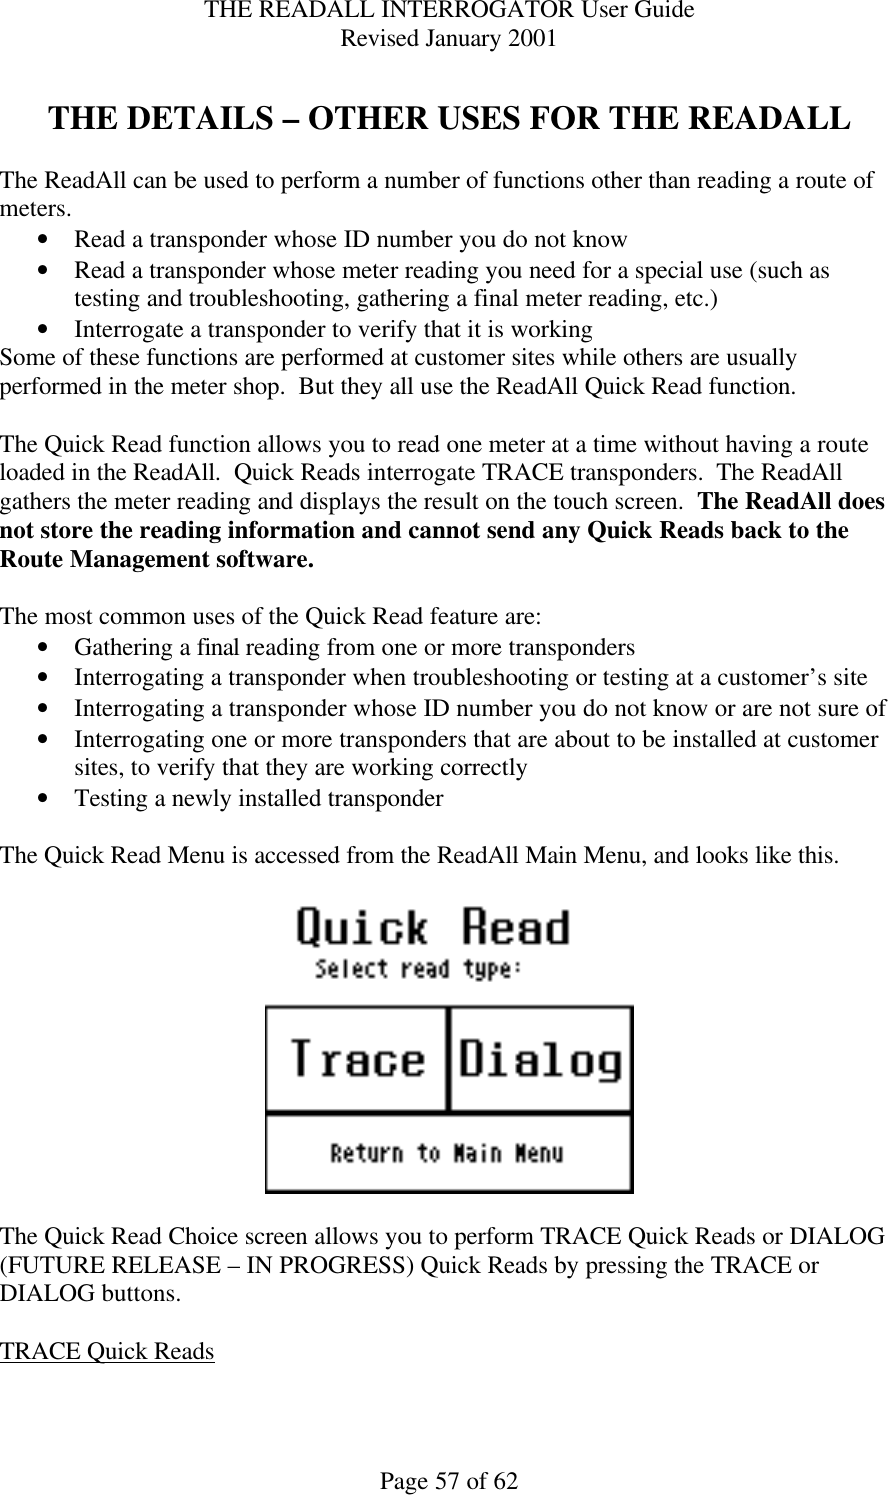
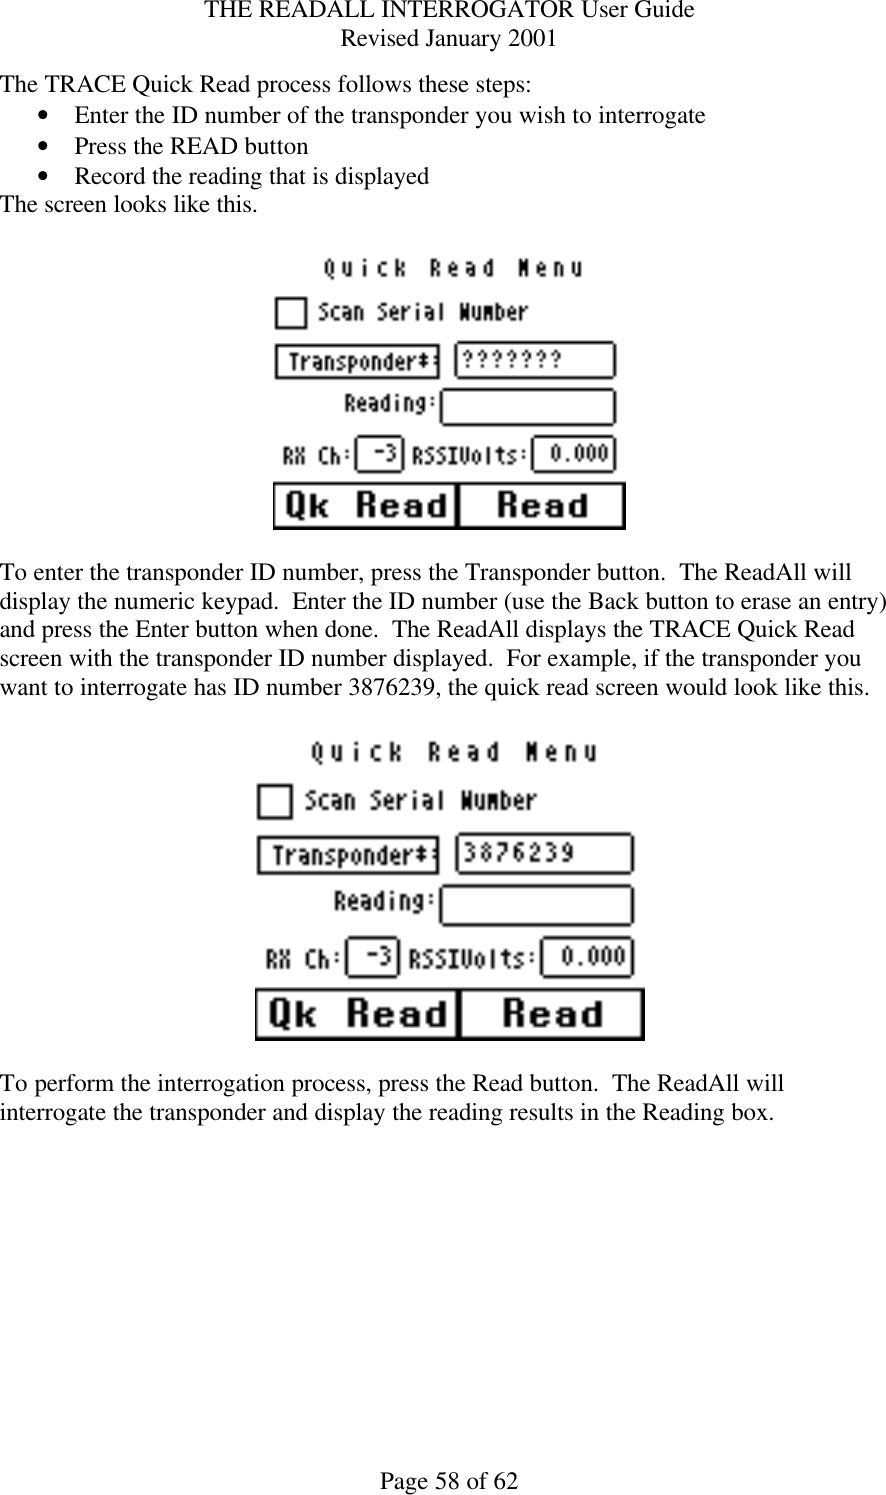
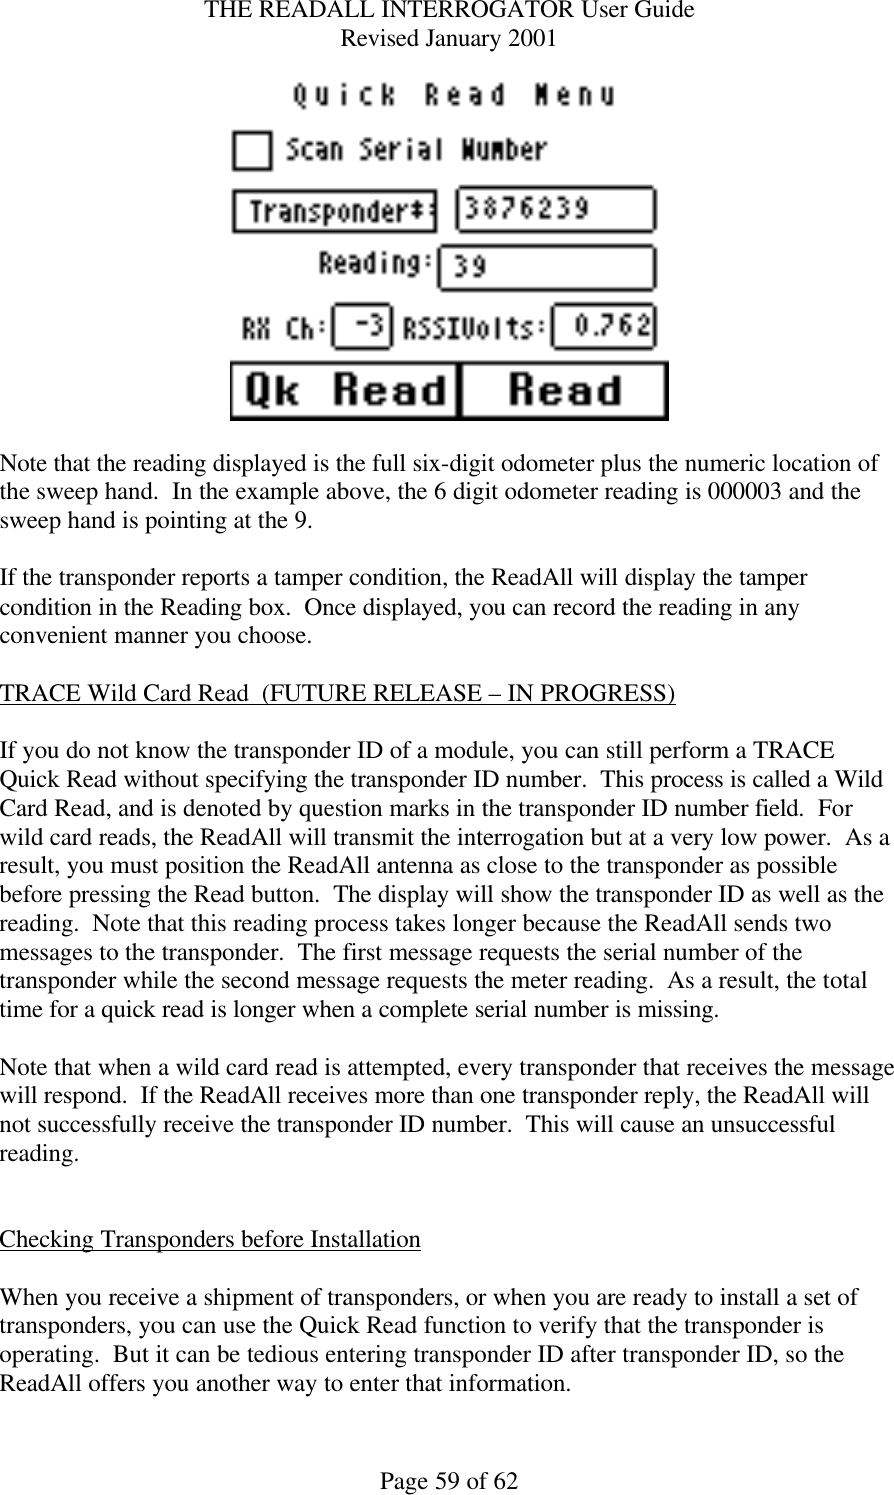
Exhibit D users manual part 1 per 2 1033 c 3

THE READALL INTERROGATOR User Guide Revised January 2001 Page 1 of 62  THE READALL INTERROGATOR - INTRODUCTION -  Welcome  Welcome to using the ReadAll, the Interrogator to use for all meter reading technologies.  The ReadAll is unique in automated meter reading in that it is the most lightweight and easy to use hand held interrogator, using touch screen technology to simplify the meter reading process.  The ReadAll can gather meter readings in these ways.   • It interrogates TRACE transponders to receive meter readings via radio.   • It accepts meter readings that are visually read and manually entered.    To Our New Friends  If you are new to Badger Meter Automated Meter Reading (AMR) products, or are new to AMR products in general, please take some time to go through all the sections of the user manual.  We think it will be well worth your time.  In particular, please pay attention to how each segment of the ReadAll performs its function in relation to the goal:  getting a meter reading from the meter to the billing system in the quickest and easiest way possible.  Keeping this goal in mind as you learn about the ReadAll’s features will make your learning easier, too.  To Our Established Friends  If you are already familiar with Badger Meter AMR products, you will still find it helpful to go through the Introduction and Details sections in order to understand how the features in the ReadAll work together, and what information is needed to perform each feature.  What Is The ReadAll?  The ReadAll is the Hand Held AMR Interrogator for all Badger Meter AMR products.  It can be used as a replacement for the older TRACE Portable Interrogator (PI), because the ReadAll can perform all interrogation and programming functions for TRACE transponders and can use the same communications methods as the PI.  As a result, the host software package will not know the difference between the ReadAll and a PI.  If you are currently using a PI, you’ll find that the ReadAll can be immediately used in place of a PI.  You‘ll also find that the ReadAll’s features are much easier to use than the features of the PI.  The TRACE ReadAll Interrogator conforms to Part 90.63 of the Federal Communications Commission (FCC) regulations and requires a site license prior to use as a RF data collector.  The ReadAll transmitter operates within the 451 MHz utility band that requires
THE READALL INTERROGATOR User Guide Revised January 2001 Page 2 of 62 site license application coordination through the Utility Telecommunications Council (UTC).  Transmit frequency license application preparation is provided as a service at no charge by Badger Meter, Inc.     NOTE:  License application submittal, payment, and renewal of fees are the responsibility of the utility.   The ReadAll’s Features  When using CONNECT, the ReadAll can perform all the TRACE functions.  Specifically, the ReadAll performs these types of meter reading: • Reading TRACE transponders • Programming TRACE transponders • Reading manually read meters including high and low audit checking  In addition, the ReadAll performs a number of additional functions to make working with AMR much easier. • The ReadAll contains a feature called “Quick Read” with which you can enter a transponder’s serial number and perform an immediate interrogation.  This feature makes Final Reads and trouble shooting much easier to perform.  The ReadAll accepts the information from a bar code reader, connected via the serial port, in the Quick Read feature.  This allows you to check in a shipment of TRACE transponders simply by scanning each of the bar code labels on the outside of the shipping box for each transponder’s serial number.  This is much easier then entering each transponder ID number by hand. • The ReadAll allows you to easily search through the route you are reading for ANY information that is displayed on the reading screen • The ReadAll allows you to send Trouble codes back to the PC host software.   • The ReadAll reports its progress in reading the current route at your request.  The Progress feature displays the current statistics for the route being read. • The ReadAll’s responses to different meter reading conditions can be customized.  For example, you can choose how the ReadAll responds when a transponder does not report, or reports a tamper.  In this way, the ReadAll responds to the way you read meters.  You do not have to change your meter reading procedures in order to accommodate the ReadAll.  About This Manual  The manual is divided into these sections: • Introduction - What is the ReadAll? • The ReadAll Glossary • The Makeup of the ReadAll • The Details – a number of sections explaining how to perform the ReadAll’s functions
THE READALL INTERROGATOR User Guide Revised January 2001 Page 3 of 62 • What If Things Go Wrong  You’ve almost completed the Introduction section.  The Glossary section will introduce you to the terminology of automatic meter reading and the ReadAll Interrogator.  The Makeup of the ReadAll describes the different features of the ReadAll Interrogator, and the differences between the ReadAll and the PI.    The Details devotes a chapter to each of the ReadAll features, showing you everything you need to know about each one.  Finally, the What If Things Go Wrong section details the steps you need to follow to successfully solve just about any problem you might run into.
THE READALL INTERROGATOR User Guide Revised January 2001 Page 4 of 62  THE READALL GLOSSARY  Listed below in alphabetical order are a number of terms used in the ReadAll.  Take a few minutes to look them over.  It will help to make the following chapters easier to understand.  (You may want to mark this page so that if you have a question about a term later on, you can reach this page quickly.)   TERM DEFINITION Clear Readings This function will remove an unneeded route from the ReadAll in the event you wish to load the ReadAll with another route. Comment codes Comment codes consist of up to three sets of two alphanumeric characters each, each of which represents a message to the utility office. DIALOG The Badger Meter close proximity meter reading technology Field A piece of information in the ReadAll, such as the service address or the meter serial number, that resides on the Read screen.   Final read A meter reading that is taken at the end of a customer’s relationship with the utility in order to send the customer their final bill. Main menu The screen in the ReadAll that is displayed immediately after successfully logging in. Module In general, an electronic product used to report a meter’s reading.   Programming menu The ReadAll screen which allows programming of TRACE transponders. Quick read The ReadAll feature that reads a TRACE transponder whose serial number you just entered. Reading menu The ReadAll screen holding the list of different functions that you can perform when reading meters Receive a route The ReadAll function that communicates with the route management software (such as CONNECT or RMS) to transfer the route from the PC to the ReadAll. Restore a route The ReadAll function that brings back the route information that was last uploaded to the route management software on the PC. Route A list of meters to read Route Management software The software product or system that loads route information into the hand held computer, and accepts completed meter readings from the hand held computer (such as Connect or RMS). Route progress The ReadAll function that displays the number of meters read in the current route, along with other related information. Send readings The ReadAll function that communicates with the route management software to transfer the completed meter readings from the ReadAll to the PC. Service The type of utility being measured by the meter, for example Gas,
THE READALL INTERROGATOR User Guide Revised January 2001 Page 5 of 62 Water, Electricity Settings The ReadAll variables that can be changed by the user to control behavior to certain conditions. Tamper A status reported by a TRACE transponder showing that the lead line between the RTR and the transponder is cut or shorted (water transponder), or that the transponder has been tilted (gas transponder).   Text message A message entered by the meter reader to be sent to the route management software TRACE A Badger Meter AMR technology for reading meters via radio. Transponder The electronics module used in TRACE meter reading technology that both transmits meter reading information and receives interrogations Trouble code A two digit code entered by the meter reader that is sent back to the route management software to document a condition or status at the meter.
THE READALL INTERROGATOR User Guide Revised January 2001 Page 6 of 62  THE MAKEUP OF THE READALL  The ReadAll Interrogator is made up of a number of functions that all work together to perform meter reading quickly and easily. • The ReadAll has an internal computer utilizing an Intel CMOS 80186 processor running the DOS operating system to perform all of its functions • The ReadAll uses a touch screen for easy operation • The ReadAll has special transmit / receive circuitry to send interrogations to TRACE transponders and receive meter readings from them • The ReadAll has a serial port that can be used for  o transferring routes to and from the route management system o read bar coded transponder IDs for interrogation • The ReadAll has an easily replaceable and rechargeable battery that will provide power for up to 1500 readings (a minimum of 4 hours) • The ReadAll has a hand strap that makes holding the unit seem almost effortless.  The strap allows you to hold the unit and use the thumb on the same hand for performing meter reading functions:  true one-handed operation!
THE READALL INTERROGATOR User Guide Revised January 2001 Page 7 of 62   THE READALL COMPANION CRADLE  An optional companion cradle is also offered with the ReadAll.  The cradle can be used to hold the ReadAll when reading meters in the vehicle.  The cradle will charge the ReadAll battery as well as automatically connect the ReadAll to separate transmit and receive antennas for reading TRACE meters.  Note that these antennas should be mounted at least 3 feet apart with the transmit (shorter) antenna in the front area of the roof of the vehicle, and the receive (longer) antenna in the center or back part of the roof of the vehicle.  THE TOUCH SCREEN AND THE UNIT  The most important feature of the ReadAll is the touch screen.  The screen is large enough to make viewing the meter reading functions very easy.  The screen is designed so that glare is not a problem, even in very bright sunshine.
THE READALL INTERROGATOR User Guide Revised January 2001 Page 8 of 62 The touch screen is actually a pane of glass with special electronics to sense where you touched the screen.  The screen is then sealed and a plastic cover is used to protect it.  You actually touch the plastic cover, not the touch screen itself.  This protects the electronics from moisture, dirt, oil, etc.    In addition to the plastic covering for the touch screen, the ReadAll also has an additional plastic cover that fits over the touch screen.  This recommended cover protects the touch screen from stones, dirt, grime, and sharp objects.  The cover can be removed and replaced when needed.  When the ReadAll displays a screen, there will be boxes shown on the screen that represents your choices for the next step in meter reading.  To choose the function described by the box, simply press the screen inside the area of the box.  The ReadAll will perform that function.  The ReadAll software has been designed so that the buttons are easy to see and touch.  If you read meters in cold climates, you’ll be happy to know that the buttons are designed so that they can be pressed even when you are wearing gloves.   THE READALL’S CONTROLS  Besides the touch screen, the ReadAll has four additional function buttons above the screen.  The outside buttons are marked “READ” and will begin the reading process for the meter displayed on the screen.  If the meter is attached to a TRACE transponder, the ReadAll will interrogate the transponder.  If the meter uses no automatic meter reading technology, the ReadAll will display the numeric keyboard for entering the meter reading manually.  The left-inside button marked with “I/O” is the on / off button.  Pressing the button when the unit is off will turn it on.  Pressing the button when the unit is on will turn it off.  When you turn the unit back on, the ReadAll will display the same screen that was active when you turned the unit off.  The right-inside button marked with a “” is a special key to use when you are unsure of your next ReadAll entry.  The “” key will cancel the current the ReadAll function and return you to the main menu screen.  This key is especially handy if you believe you are in the wrong function and you wish to restart at a known state, or if you are lost and not sure what you should do next.  Simply press the “” key and the ReadAll will cancel the current function and return to the main menu.  READALL INTERROGATION PROCESS  The ReadAll Interrogation process is slightly different than the PI process because of differences in the makeup of the receiver electronics.  The PI used a wide band receiver to receive meter readings from transponders.  The wide band in the receiver, however,
THE READALL INTERROGATOR User Guide Revised January 2001 Page 9 of 62 was very sensitive to interference from many different sources.  This result of the interference was reduced range and/or inconsistent reading range.  Usually this would show itself as being able to read a meter easily at one time, and having problems reading it at another time.  The ReadAll Receiver electronics has been changed to use many narrow channel bands for receiving the meter reading.  This approach greatly reduces the chance of interference causing problems in meter reading.  However, the ReadAll must first determine which channel the transponder will use to transmit its meter reading.  It does this by sending out an interrogation signal and listening on different channels for any type of response.  If no response is found, it transmits again and listens on other channels.  Once a channel is found, the interrogation is performed and the response is gathered on the chosen channel.  When the ReadAll is scanning for a channel, you will see a green XMIT light.  When the XMIT light goes red, the ReadAll is performing the interrogation.  Once the interrogation is successfully completed, the ReadAll will sound the completion tones and automatically move to the next meter in the route.  Because the ReadAll must first determine the receive channel, the reading process for the ReadAll has more steps than the process for the PI.  When reading meters with the PI, if you receive the meter reading on the first button press, the meter reading time will be shorter than the read time for the ReadAll.  However, if you press the PI interrogate button more than once, the speed of the ReadAll is comparable to the PI.  USING THE READALL TO REPLACE THE PI  If you are currently using the Badger Meter PI for gathering TRACE meter readings, the ReadAll can replace the PI directly.  The ReadAll will communicate with your Route Management software (such as CONNECT or RMS) using the same communications method and passing the same information as the PI.  Your Route Management software will not know the difference between a PI and the ReadAll.   CONSERVING THE BATTERY  The ReadAll conserves battery power by turning itself off when not in use.  If you are using the ReadAll as a replacement for the PI, the ReadAll will turn the backlight off after two minutes of no use, and will turn itself off after four minutes of no use.     CHARGING THE BATTERY  The battery charger is designed to plug into a 120V 60 Hz outlet and connect directly to the smart lithium battery pack.  Output from the charger is 12V DC with a maximum of 1000 mA typical.  The battery pack connection for the battery charger is located on the end of the battery opposite from the thumbscrew.  Typical charging time of a lithium
THE READALL INTERROGATOR User Guide Revised January 2001 Page 10 of 62 battery is 4 hours.  The lithium battery pack is designed with a feature that senses when the battery is fully charged and stops the charging process to eliminate over charging.  Once a battery pack has been fully charged, it is recommended that it be removed from the charger.    CHANGING THE BATTERY  Changing the ReadAll’s battery is quick and easy.  Because of the ReadAll’s design, meter readings will not be lost when changing the battery.  However, the ReadAll should be turned off when replacing a battery.  If the ReadAll is on, press the power button to turn the ReadAll off.    First, if you have the hand strap connected, disconnect the back portion of the strap from the bottom of the case.  Underneath the strap is the battery.  Unscrew and remove the battery.  Insert the new battery and tighten the screw.  Note that no tools are required.  Simply unscrew the old battery, remove it, insert the new one, and screw it in!  Once the new battery is installed,  the ReadAll will restart itself.  This is normal and will happen each time you change the battery.  Note that even though the ReadAll restarts, no meter readings are lost.   BATTERY MONITORING  As you use the ReadAll, it constantly checks the power in the battery.  If the battery power starts running low, the ReadAll will display a yellow BATT light.  If the battery power is too low to interrogate a meter, the ReadAll will display a red BATT light.  You’ll always know the status of the ReadAll battery just by monitoring the BATT light.  Note that if the ReadAll is getting power from the cradle (and not from the battery), the battery checking is not needed and not performed.   COMPARING THE READALL AND THE PI  The following chart compares the ReadAll with the PI for reading meters.   FEATURE PI THE READALL HARDWARE     -  Type of battery NiCad Lithium -  Life on one charge – Interrogations 1800 interrogations, limited ability to change the battery while reading meters 1500 interrogations, very easy to change the battery while reading meters with no loss of meter readings -  Change the battery during meter reading? Yes, but the backup battery must be turned on and Easily with no loss of data possible and no backup battery
THE READALL INTERROGATOR User Guide Revised January 2001 Page 11 of 62 working. needed -  Backup battery needed for integrity Lithium required for data integrity when changing batteries. None needed -  Display the date / time Yes Yes -  Data Entry Membrane keyboard for function buttons, numeric, and alphanumeric entries Touch screen for all entries.  Also interrogation buttons on either side of the unit. -  Automatic shutoff to conserve battery No Backlight turns off after two minutes of no use, unit turns off after four minutes of no use -  Screen backlight Must turn on and off manually Light sensor turns backlight on and off automatically COMMUNICATION INFORMATION    -  Port type for load and unload Serial Serial -  Protocol used Proprietary Proprietary or Y-Modem -  baud rate 19200 19200 or 156K ROUTE INFORMATION    -  Max number of meters that can be loaded at one time 3000 3000 -  Possible to overwrite and loose readings? Yes No -  Ability to add a new account? Yes Yes DISPLAY     -  Size of the display 4 X 20 5 X 20 -  Information displayed Name, address, meter serial #, transponder ID Up to 5 fields you wish to use from Connect OR Name, address, meter serial #, transponder ID -  Searching Yes, but not easy to do Search any portion of any field -  Find next unread Yes Yes -  Find start of next route No Yes -  Ability to view the previous read No Can be configured to allow or disallow viewing -  Ability to immediately go to the main screen when lost No Yes, if lost press one button to return to the main screen CODES / MESSAGES     - Number of 2 digit codes 1 4 -  Length of text 20 characters 80 characters
THE READALL INTERROGATOR User Guide Revised January 2001 Page 12 of 62 message INTERROGATIONS     -  Transmission power 1 watt 1 watt -  Time to receive a reading 1.5 seconds 1.5 seconds -  Reports lead line tamper Yes Yes -  Ability to reset tamper Yes Yes -  Ability to read a particular meter for final read Using Edit mode feature, or using New Account function in the Data Collection mode Using Quick Read feature -  Ability to read a module without knowing its serial number Yes, using edit mode Yes, using the Quick Read feature -  Types of audible alerts given High reading, low reading, tamper received, no response received High reading, low reading, tamper received, no response received -  Automatically retry when no response is received from a transponder No Yes -  Automatically attempt to clear a tamper condition No Yes PROGRAMMING     -  Ability to program units Yes Yes -  Clear tamper when programming Yes Yes CHECKING TRANSPONDERS    -  Ability to read the transponder ID using a bar code scanner, then interrogating the unit No Yes MANUAL READS     -  Direction of reads Choose L-R or R-L for the route Choose L-R or R-L for each meter -  Verify a high or low entered reading No Yes, choose re-entering the reading or visually verifying the entered read -  Verification reads for interrogated meters Reading entered over the first 7 digits of the address field Reading entered in a special field
THE READALL INTERROGATOR User Guide Revised January 2001 Page 13 of 62 OTHER     -  built-in calculator  No  Yes    GENERAL CARE OF THE READALL  Cleaning the ReadAll Interrogator is easy.  Use only a slightly dampened (water only) chamois or a clean dry cloth to remove fingerprints or residue from the touch screen and the case.  Do not use alcohol or ammonia based cleaners.  If you are using the optional screen cover to protect the ReadAll’s touch screen, it is best to remove the cover, clean it separately in the same manner, and reinstall the cover.
THE READALL INTERROGATOR User Guide Revised January 2001 Page 14 of 62  THE DETAILS – THE READALL OPERATION   THE READING CYCLE USING THE READALL  Using the ReadAll for meter reading is easy.  The reading cycle consists of these steps: • STEP 1 – Prepare the ReadAll to accept the route from the Route Management software by pressing the Transfer Routes button from the Main Menu.  On the Transfer File Menu, press the Receive Route button.  If a route is already loaded into the ReadAll, the ReadAll will alert you to unload the current route before loading the new route.  If the ReadAll is ready to accept the route, communications begins and the route is transferred from the Route Management software to the ReadAll. • STEP 2 – You can begin meter reading by pressing the Read / Program Meters button.  The ReadAll will display the Reading screen that allows you to interrogate TRACE transponders and enter manual meter readings for those meters without a TRACE transponder.   • STEP 3 – To begin the reading process for the meter shown on the Read screen, press either of the two Read button, or press the information area on the Reading screen.  If the meter is monitored by TRACE, the ReadAll will interrogate the transponder, report the reading, and display the next meter in the route.  If the meter is manually read, the ReadAll will display a numeric keypad, allowing you to enter the reading manually. • STEP 4 – The ReadAll is unloaded, when all the readings have been gathered, by pressing Transfer Routes from the main menu, and then Send Readings on the Transfer Readings screen.  The ReadAll will communicate the readings to the Route Management system on the PC.  Starting The ReadAll software  The ReadAll unit is a computer, and can be reset like a desktop computer.  A desktop computer can be reset by turning the power switch off and then on.  The ReadAll can be turned on and off with the On/Off button, but that does not take power away from the unit (like turning off your desktop computer does).  Replacing the ReadAll’s battery will have the same effect as turning off your desktop computer.  Your desktop computer can also be reset by pressing three keys (Ctrl, Alt, and Delete), all at the same time.  You can reset the ReadAll by pressing three buttons at the same time:  the left Read key, the back arrow key, and the right Read key, all at the same time.  (The easiest way to do this is to place the ReadAll on a flat surface before pressing the keys.)  Whether you restart the ReadAll by changing the battery or by pressing the three restart keys, the effect is the same.  The computer restarts itself, performs checks to insure that it can operate properly, and then starts the ReadAll software.  Note that any route
THE READALL INTERROGATOR User Guide Revised January 2001 Page 15 of 62 information or meter readings stored in the ReadAll during a restart are safe.  No information is lost when restarting the ReadAll.  The ReadAll begins its processing by displaying the copyright screen.     Pressing the Continue button brings you to the Log-in screen.  Logging-in to The ReadAll  The Log-in screen looks like this.    Pressing the Log In button brings you to the ID screen.
THE READALL INTERROGATOR User Guide Revised January 2001 Page 16 of 62   The Log-in screen accepts your 4 digit personal ID number (PIN) and validates it.  As you enter your PIN, the ReadAll displays the asterisk character (“*”) in the spot for the digit, so that others cannot see your PIN.  When you have entered your PIN, the screen looks like this.    Next, press the Enter button.  If you enter a valid PIN, the ReadAll displays the Main Menu.  If your PIN is not valid, the ReadAll will tell you so.  The screen looks like this.
THE READALL INTERROGATOR User Guide Revised January 2001 Page 17 of 62   Press the Retry button on the screen and reenter your PIN correctly to display the Main Menu.  If you press the Cancel button, you will return to the Log-in screen.  On the Log-in screen, if you press the Exit to DOS button, you will have to enter a special PIN.  The ReadAll will display the PIN keyboard for your entry.  Note that you should not Exit to DOS unless directed to do so by Badger Meter Technical Support.  The ReadAll Main Menu  After successfully logging into the ReadAll, you will see the Main Menu.       There are four functions on the main menu to choose from: • Logout – Return to the Log-in screen for the next ReadAll user • Quick Read – Use the ReadAll to read meters when you do not have a route loaded (i.e., for checking a transponder, for obtaining final reads, troubleshooting, etc.)
THE READALL INTERROGATOR User Guide Revised January 2001 Page 18 of 62 • Transfer Routes – Send routes to the ReadAll for reading, or send readings in the ReadAll back to the PC route software • Read / Program Meters – Read the route that is loaded, or program transponders (when installing new units or changing out meters)  The ReadAll also displays the current date and time on the bottom of the screen.  Pressing any of these buttons begins that function’s operation.    Transfer Routes     The Transfer Routes functions are used when communicating with your Route Management software.  Routes are sent from the Route Management software to the ReadAll for reading, and the completed reads are sent from the ReadAll back to the Route Management software.    The ReadAll also insures that you do not lose meter readings by accidentally loading a new route before sending the completed meter readings to the Route Management software.  If you try to Receive a new Route before transferring completed meter readings back to the Route Management software, the ReadAll will remind you that you need to Send the completed meter readings first.  Receive Route  To receive a route from the Route Management software, connect the serial cable from the PC serial port to the ReadAll’s serial port (near the top of the unit) and push the Receive Route button.  If the ReadAll already has a route loaded, you will be reminded to either send the current readings in the ReadAll to the Route Management software, or to clear the route from the ReadAll.  (See the Send Readings and Clear Readings functions for more information.)
THE READALL INTERROGATOR User Guide Revised January 2001 Page 19 of 62   If the ReadAll currently has no route for meter reading, the ReadAll will remind you to connect the cable to its serial port and the port on the PC.      Press the OK button and you’ll see this screen.     Pressing the Start button begins the communication process.  Note that the ReadAll uses the same serial communications method and the same transfer file format as the PI.  If you are using CONNECT or RMS, choose the PI as the device to which you are communicating.  In this manner, no changes are required for your Route Management software to work with the ReadAll.
THE READALL INTERROGATOR User Guide Revised January 2001 Page 20 of 62 If you wish to cancel the communications when they are in progress, press the reset button above the touch screen (“”).  The ReadAll will cancel its communications with the Route Management Software.  In a future release, CONNECT will communicate directly with the ReadAll when it is placed into the office cradle.  This method will be faster and allow for easier loading and unloading of the routes to and from CONNECT.  Send Readings  When you have finished reading meters, you are ready to send the readings to the Route Management software.  From the Transfer Routes menu press the Send Readings button.  If the ReadAll has no route stored, it will suggest that you first load a route before sending readings back to the Route Management software.      If the ReadAll has a route loaded, it will remind you to connect the serial cable to the ReadAll serial port, and to verify that the PC is also correctly connected to the serial cable.      Once that is complete, you can press the OK button and you’ll see this screen.
THE READALL INTERROGATOR User Guide Revised January 2001 Page 21 of 62   Pressing the Send button begins the communications process.  When the route has been sent to the Route Management software, the ReadAll will ask you if the route was successfully transferred.  The screen looks like this.    The ReadAll does this to insure that problems in other systems do not cause the readings to be lost.  If the readings were successfully transferred and the Route Management software now has them, press the Yes button.  If a problem occurred, press the No button.  (Note that when the route is successfully transferred to the PC, the ReadAll automatically clears the route and reading information.  This allows you to load the next route without manually clearing out the old readings.  Also note that if you press the No button, the readings remain in ReadAll.)  Canceling Communications  Sometimes communications between two computers has problems.  One computer might crash, stopping the communications process in its tracks, or the cable between the two computers becomes dislodged from one of the two ports.  When these types of conditions occur, the communications process must be cancelled and both computers returned to their original states.  The ReadAll has two important communications safeguards.  First, if the ReadAll sees no communications on the serial line for more than three minutes, it will automatically stop the communications process and return to the Transfer Routes menu as if nothing
THE READALL INTERROGATOR User Guide Revised January 2001 Page 22 of 62 happened.  Second, the back arrow button near the right READ button (“”) allows you to cancel the communications process.  If you push the button, the communications process will be halted and the ReadAll will return to the Transfer Routes menu.    These safeguards insure that, whether you are monitoring the communications or you have just stepped out, if a problem occurs in the communications with the Route Management software, the ReadAll will detect the problem and take the appropriate action.  Clear Readings  In the event that the ReadAll has a route stored in it for meter reading, and you wish to replace it with a different route, you can use the Clear Reading function.  For example, if you just loaded the ReadAll with the wrong route, you can use Clear Readings to remove the incorrect route before loading the correct one.  Clear Readings will remove the current route and all gathered meter readings from the ReadAll, as if it had never been loaded.    We recommend that you use the Clear Readings function ONLY when you are absolutely sure that no meter readings will be lost.  If you are not sure, it is best to use the Send Readings function to send the route back to the Route Management software.  For example, if you are using CONNECT, use the Unload Collector screen to take the route from the ReadAll, and review the route information using the View Unloaded Readings button.  You can then determine if you wish to save the readings in Connect or ignore them.  The Clear Readings function begins when you press the Clear Readings button.  The ReadAll will show you this screen, reminding you that if this route contains meter readings, those readings will be lost.      Pressing the Yes button will remove the route from the ReadAll.  Pressing the Do Not Clear button will return you to the Transfer Routes menu without removing the route information from the ReadAll.  If you press the YES button, the ReadAll will clear the route.  You’ll see this screen.
THE READALL INTERROGATOR User Guide Revised January 2001 Page 23 of 62    When the ReadAll has completed its work, you will return to the Transfer Files menu.  Restore Route  Sometimes a route that you have already unloaded to the Route Management software needs to be sent again.  For example, you might find that a communication error occurred and the readings in the Route Management software are unusable.  Restore Route allows you to transfer the readings from the ReadAll to the Route Management software a second time.    In the ReadAll, after you successfully send readings to the Route Management software, the route is removed to make room for a new route.  However, the ReadAll stores a backup copy of the route last sent to the Route Management software.  If you need to send the readings to the Route Management software again, the Restore Route function will restore the route information, including any gathered meter readings, from the ReadAll’s backup copy.  The backup copy remains in the ReadAll until you send the next group of readings to the Route Management Software.  Then that group of readings is held as the new backup.  The Restore Route function begins when you press the Restore Route button.  The ReadAll will check to be sure that no new route information has been loaded.  If so, the ReadAll will remind you that restoring the old route will overwrite the current route, including any meter readings that might have been gathered.
THE READALL INTERROGATOR User Guide Revised January 2001 Page 24 of 62 If you still wish to restore the route, press the OK button.  The current route will be removed from the ReadAll and the previous route will be restored.  If you do not wish to restore the route, press the Do Not Restore button.
THE READALL INTERROGATOR User Guide Revised January 2001 Page 25 of 62  THE DETAILS – READING METERS WITH THE READALL   After loading a route, the next step in the reading cycle is to read the meters in the route.  To begin reading, press the Read / Program Meters button on the Main Menu.  You will see the first account in the route.  (If you have pressed the Read / Program Meters button and have read some meters in the route already, when you press the button the ReadAll will display the account that was next to be read in the route when you left the Read / Program Meters function.)  The Read screen looks like this.    The reading screen display shows customer information in the top section of the screen, and three buttons along the bottom of the screen.  The first two of the bottom buttons allow you to browse through the meters in the route.  When you press the Previous Account button, the ReadAll will display the meter just before the current one in the route.    If the current meter is the first one in the route and you press the Previous Account button, the ReadAll will ask you if you want to stay at the beginning of the route or if you wish to go to the end of the route.
THE READALL INTERROGATOR User Guide Revised January 2001 Page 26 of 62   Pressing the Stay button will keep you at the first meter in the route.  Pressing the End button will take you to the last meter in the route.  Similarly, if you press the Next Account button, the ReadAll will display the next meter in the route.  If you are viewing the last meter in the route, the ReadAll will ask you if you want to stay at the end of the route or if you want to display the first meter in the route.      Pressing the Stay button will keep you at the last meter in the route.  Pressing the First button will display the first meter in the route.  The Reading Menu  Pressing the Menu button will show you the different functions that can be performed.
THE READALL INTERROGATOR User Guide Revised January 2001 Page 27 of 62   The functions are: • Searching for specific accounts by name, address, meter serial number, or transponder ID number • Entering comment codes and messages • Perform a manual read for this meter • View the High and Low audit limits for this meter (if you have the permission to do so – more on this later) • Program this transponder • Define a new account • View Progress, settings, or RF diagnostics via the ReadAll Utilities • Return to the main menu • Return to the Read screen  More information on these functions is included later in this section.  Reading Meters  The Read Screen shows specific information about the meter to be read including: • An account name • The service address • The serial number of the TRACE transponder or AMR Reading module • The serial number of the meter • The type of meter reading technology in use for this meter (TRACE, MANUAL) • The service that this meter is measuring (Water, Gas, Electric, Reclaim, etc.) • The meter reading (after the reading has been gathered) Here is an example.
THE READALL INTERROGATOR User Guide Revised January 2001 Page 28 of 62   In this example, the customer’s name is Mickey Dolenz, and he lives at 111 1st St..  The transponder ID number is 4368172 and the meter serial number is 99586212.  (Note that the order of the name is determined by the Route Management software.  If the Route software downloads the last name first, the ReadAll will display the name in that manner.  If the Route software downloads the first name first, the ReadAll will display the name in that way.)  Starting the Reading Process  To gather a reading for any meter, press either of the READ buttons on the unit above the screen on the left and right sides.  If it is more convenient, you can also start the meter reading process by pressing the touch screen anywhere in the customer and meter information area.  Once the meter reading processing has started (by pressing the screen or one of the READ buttons), the ReadAll will begin the reading process for the AMR technology for this meter. • For TRACE meters, the ReadAll will interrogate the transponder to gather the meter reading. • For meters read manually, the ReadAll will display a numeric keypad to allow you to enter the manual meter reading.  Manual Meter Reading  When you press a READ button or the customer area on the read screen for a meter that is read manually, the ReadAll will display a numeric keypad to allow you to enter the meter reading.
THE READALL INTERROGATOR User Guide Revised January 2001 Page 29 of 62   To enter a manual meter reading once the numeric keypad is displayed, view the meter’s register and note the reading.  Next, enter the reading onto the keypad that is displayed on the touch screen and press the enter key when you are done.    Water meters are typically read from left to right, while electric meters are typically read right to left.  The ReadAll can handle meter readings gathered in either direction.  When the numeric keypad is displayed, the upper right hand corner of the display shows the direction of the read.  An arrow pointing to the right (  ) denotes that the meter reading is from left to right.  When you enter a meter reading, the reading will be displayed in the box at the top of the display, from left to right.  For example, if you entered the reading as 7826 going from left to right, you’d see this screen.    To change the direction of the meter reading, press the arrow.  The ReadAll will change the direction of the arrow to pointing to the left (  ).  When you enter a meter reading now, the reading will be shown on the display from right to left.  Using the same example, if you entered 7826 going from right to left (the arrow pointing to the left), you’d see this screen.
THE READALL INTERROGATOR User Guide Revised January 2001 Page 30 of 62   In either case, when the meter reading is completely entered, press the Enter key.  If the reading is within the high and low limits, the ReadAll will record the meter reading and advance the display to the next meter in the route.  If the reading is above the high limit or below the low limit, the ReadAll will tell you that the entered meter reading was high or low, and it will ask you to re-enter the reading.  This is what you will see if you enter a reading that is above the high limit.      Here is what you will see if you enter a reading below the low limit.    Press the OK button and the ReadAll will display the numeric keypad again.  Re-enter the meter reading and press Enter.  If the second meter reading matches the first meter reading, the ReadAll records the reading and displays the next meter in the route.  If the two meter readings do not match, the ReadAll will alert you that the two readings are different and will return to the read screen for this meter as if nothing happened.
THE READALL INTERROGATOR User Guide Revised January 2001 Page 31 of 62   In this case, the meter reading process begins again for this meter.  Reading TRACE Meters   Once either of the READ buttons have been pressed, or the touch screen has been pressed in the customer and meter area, the ReadAll begins the reading process.   For TRACE meters, the ReadAll interrogates the transponder whose serial number is shown on the Read Screen.    Performing a TRACE read is a two step process:  first the ReadAll must determine the receive channel that the transponder will use.  Once the channel is determined, the ReadAll can interrogate the meter and listen on the channel for the response.  A number of possible results can occur when a transponder is interrogated. • The transponder receives the transmission and sends its meter reading response, which is received by the ReadAll successfully.  The ReadAll reports a successful reading. • The transponder receives the transmission and sends its meter reading response, but the ReadAll does not successfully receive it.  The ReadAll reports no response received. • The transponder receives the transmission and sends its meter reading response, but the ReadAll is too far away for the transmission to be received given the current conditions.  The ReadAll reports no response received. • The transponder is too far away to receive the transmission.  As a result it does not respond.  The ReadAll reports no response received. • The transponder receives the interrogation but has lost its programming or has not yet been programmed.  The transponder sends its current state as a response.  The ReadAll successfully receives the response and reports a Corrupt Data response received. Note that each successful meter reading response includes the meter reading and the current Tamper status.  In the event that no response is received, one of following conditions has occurred. • The ReadAll is too far away from the transponder for the transponder to receive the interrogation signal. • The transponder receives the interrogation signal from the ReadAll but, because the ReadAll’s transmission power is greater than the transponder’s, the ReadAll was not close enough to the transponder to receive the signal.
THE READALL INTERROGATOR User Guide Revised January 2001 Page 32 of 62 • There may be something obstructing the line of site between the ReadAll and the transponder. In any of these cases, getting closer to the transponder or improving the line of site before trying the interrogation again may result in receiving the transponder’s response.  Keep in mind that a TRACE transponder’s radio transmissions are affected by weather conditions and by the way the transponder was installed.  Summer conditions, such as warm humid air with lots of leafy foliage can affect a transponder’s response distance.  As a result, a transponder’s response can be received from a particular spot during one reading cycle, and yet the same transponder’s response may not be received in the next reading cycle, even when interrogated from the same spot.  Keep this in mind when determining if a transponder is not read on the first attempt.  It may just be the weather.  When the ReadAll cannot receive a response from a transponder, it sounds the No Response audio signal and displays a red light in the XMIT light.  Processing the TRACE Meter Reading  Once the ReadAll has received a transponder response, it processes the information in a number of steps: • Determines if the message from the transponder was received correctly • Determines the tamper status of the transponder • Determines the reading value reported by the transponder • Evaluates the reading value against the high and low audit values to determine if the reading is high or low  The ReadAll first analyzes the transponder response to determine if the communication was completed without errors.  If an error is found, the ReadAll assigns the status as Bad Response.  If no error is found, the ReadAll determines if a tamper was reported by the transponder.  If a tamper condition was reported, the ReadAll assigns the correct tamper status.  If the transponder is tamper free, the reading is compared to the high and low audit values that were sent to the ReadAll from the Route Management software.  If the reading value is greater than the high audit value or lower than the low audit value, the ReadAll assigns either the High Reading or Low Reading status.  If the reading is within the audit values, the ReadAll assigns a Good Reading status.  After analyzing the transponder’s response, the ReadAll reports the results.  First the ReadAll sounds the audio signals for the reading.  If the reading is within limits, high, or low, the appropriate sound is played.  If a bad response is received or a tamper is reported, those sounds are played.  Next, the ReadAll lights the XMIT light according to the status of the reading:  green for successful, red for unsuccessful, yellow for tamper.  Finally, the screen is updated for the next operation.  Advancing the Display
THE READALL INTERROGATOR User Guide Revised January 2001 Page 33 of 62 In the case of a high or low reading, the ReadAll allows you to control the advance of the display through the settings.  If there are tasks to perform when a meter reading is high or low (such as dropping off a brochure on finding leaks when a high meter reading is received or checking the meter itself on a low reading or a tamper), not advancing the display allows you to perform the necessary tasks and report information via codes and messages.  Once the steps are performed and any necessary codes or messages are entered, you can press the Next Meter button on the display and continue reading the route.  Processing Tamper Reports  If the transponder reports a tamper, the ReadAll will sound the special tamper audio signal and light the XMIT light yellow.  The ReadAll then updates the screen to show you the different options you can choose to respond to the tamper condition .    Choose one of the four options by pressing the corresponding button. • Skip – You can skip this meter and go on to the next one in the route.  This is a handy option if someone will come back later to do some troubleshooting on the meter or the transponder. • Manual Read – This option brings up the manual read numeric keypad so that you can enter the reading manually.  This is handy if the meter is in a pit, but less helpful if the meter is inside (unless you can access the meter). • Trouble Code – Using this option you can enter a trouble code to report the status of the meter to the office.  See the Trouble Code section for more details. • Retry – Pressing this button causes the interrogation process to be repeated.  Note that if you press either of the two Read buttons, they will also perform the Retry function.  If you choose Manual Read or Trouble Code, the ReadAll will return to this screen once the reading or code is entered and stored.  For example, if you choose Manual Read and you have entered the manual read, the ReadAll will display this screen again to allow you to enter a trouble code.  Similarly, if you first pressed the Trouble Code button and
THE READALL INTERROGATOR User Guide Revised January 2001 Page 34 of 62 entered that code, the ReadAll will display this screen to allow you to enter a manual read.  When you have completed entries for this meter, press the Skip button.  Automatic Retry and Tamper Clearing  The ReadAll offers two settings to make meter reading more convenient when an exception condition occurs.  They are: • Automatic Retry for meters with a No Response status • Automatic Tamper Clearing for meters reporting tamper conditions  If you have chosen Automatic Retry in the Settings, and the ReadAll assigns a No Response status, the ReadAll will automatically retry the interrogation a second and third time.  If No Response is received after three attempts, the ReadAll keeps the No Response status, sounds the No Response tone, and lights the XMIT light red.  If you have chosen Automatic Tamper Clearing in the Settings and the ReadAll assigns a tamper status, the ReadAll will automatically attempt to clear the tamper by interrogating the transponder a second time and asking it to clear its tamper.  If the tamper is cleared, the ReadAll reports the status as Tamper Reset, shows the green XMIT light, and proceeds to check if the reading is high, low, or within limits.  If the tamper is not cleared, the ReadAll reports the status as Tamper Failed to Reset and shows the XMIT light yellow.  Note that if you have chosen either the Automatic Retry or the Automatic Tamper Clearing, the ReadAll will not show a status of any kind (audible tones or light) until all of the automatic operations have completed.  However, if an automatic operation is in progress, the display will be updated to show that an automatic operation is in progress.   Verification Readings  In some states, water utilities are required to gather a visual read periodically when using AMR equipment.  The ReadAll Verification Read is built to perform this very function.  If the Perform Verification Read setting is set, the ReadAll will request a manual reading immediately after every successful reading.  This second reading is stored separately and reported to the Route Management software, which will report on any reading differences.  Because it is a verification reading, the normal checking for high and low entries will not occur.  Once the verification reading is entered, the ReadAll will advance the display to the next meter in the route.  Searching
THE READALL INTERROGATOR User Guide Revised January 2001 Page 35 of 62 The ReadAll gives you a number of ways to find a particular meter through the searching menu.  When you are displaying a meter to read, press the menu button to display the Read Menu screen.    From the reading menu, press the Search button.  The ReadAll will show you the Search Menu.    There are four different ways to search for a particular meter. • Find a meter that has a particular value in one of the four the ReadAll fields (name, address, transponder serial number, or meter serial number) • Find the start of a particular route within the ReadAll (FUTURE RELEASE – IN PROGRESS) • Go to the first account in the current route • Go to the next unread meter in the current route.  If you wish to go to the start of the current route or the next unread meter in the current route, press the corresponding button.  The ReadAll will display the read screen for that meter.  If you wish to find a meter that has a particular name or is at a particular address, press the Search Fields button.  The ReadAll will display the Search Fields screen to allow you to specify the information.
THE READALL INTERROGATOR User Guide Revised January 2001 Page 36 of 62    Choose what you want to search for by pressing on the name of the field.  If you wish to search for someone’s name, press Name.  If you wish to search for an address, press Address, and so on.  Let’s say you want to search for a particular name.  After pressing Name to highlight it, press Name again.  The ReadAll will display the large button keyboard like this.    Choose the letters in the name you are searching for.  You do not need to enter the entire name, just a small section.  Let’s say that you entered the letters L and A.  Press the Enter button on the bottom row of the keyboard.  The ReadAll will summarize your search like this.
THE READALL INTERROGATOR User Guide Revised January 2001 Page 37 of 62   If this is what you want to search for (a name with the letters LA in it), press the Search button.  The ReadAll will display the first account it finds and ask you if this is the one you are searching for.    If this is the meter you are looking for, press the Yes button.  If this is not the meter you are looking for, press the No button and the ReadAll will continue searching.  If you wish to stop the search, press the Cancel button and you will return to the Search Menu.  If the ReadAll cannot find a meter with the information you entered, you’ll see this screen.    Searching for a specific address, transponder number, or meter serial number works exactly the same way.  Comments and Trouble Codes
THE READALL INTERROGATOR User Guide Revised January 2001 Page 38 of 62 If you find that you need to send information about the meter you are reading back to the office, the ReadAll provides a number of ways to do so.  They are: • The Trouble Code • The three Comment Codes  (FUTURE RELEASE – IN PROGRESS) • The Text Message  (FUTURE RELEASE – IN PROGRESS)  The Trouble Code and Comment Codes are two-digit codes you can define and use to send information back to the office.  The Trouble Code is usually used to specify a problem.  The Comment Codes are usually used to provide additional information about the meter or the process of reading it.  For example, you might enter a Trouble Code that would indicate that the meter needs repair, while the Comment Codes might indicate a vandalism problem.  Logging a trouble code starts with reading the meter.  If you see a condition that should be logged, press the Menu button.  You’ll see the Read Menu.    To log a Trouble Code or one or more Comment Codes, touch the Comments button from the Reading Menu.  You’ll see this screen.
THE READALL INTERROGATOR User Guide Revised January 2001 Page 39 of 62 From there you can choose the Trouble Code button or the Comment Code button, depending on which code you wish to use.  If you choose the Trouble Code, you’ll see this screen.    Enter the two digits that correspond to the information you wish to log and press the Enter button.  If you enter the code “37” you’d see this screen.    After pressing the Enter button, the ReadAll again displays the Comments Menu to allow you to enter additional information if you wish.  To return to meter reading, press the Read Menu button.   Viewing High and Low Audit Values  If you wish to see the high and low audit values, the account number, or the previous reading, from the Read Menu press the View Hi/Lo button.  The ReadAll will display the account number for the meter being read, and the high, low, and previous reading values for the meter.
THE READALL INTERROGATOR User Guide Revised January 2001 Page 40 of 62   To return to the Read screen, press the Return to Read Screen button.  In some cases, the ReadAll might not display the high, low, or previous readings.  On the Settings screen in the Utilities section, there are two choices that control the display of this screen.  The high and low audit values will be displayed if you have chosen the Show High / Low setting.  The previous reading will be displayed if you have chosen the Show Previous Reading setting.  If these settings are not chosen, you will not be able to view the associated information on the View High/ Low screen.  For example, if the settings will show the high and low values but not the previous reading, the screen would look like this.    Utilities  The ReadAll provides you with a number of functions to provide you with information that can be helpful while meter reading.  These functions are accessed by pressing the Menu button on the read screen.
THE READALL INTERROGATOR User Guide Revised January 2001 Page 41 of 62   From the Read Menu, press the Utilities button and you’ll see this screen.    The functions on the Utilities Menu are: • Progress – a display of meter reading statistics to help you determine how far along you are in the route • Last Read – when reading TRACE transponders, this set of screens will show technical information about the meter reading received that can be helpful when investigating a problem • Settings – which displays the settings currently being used by the ReadAll • Calculator – a simple calculator in the event you need one • Battery Info – this screen shows information being reported by the processor within the battery pack that might be useful when investigating a problem  Progress  The ReadAll keeps records on the total number of meters in the ReadAll, the number of meters read, the number of meters that were interrogated but failed to report, the number of tamper reports received, etc.  If you wish to view this information, press the Utilities button from the Read Menu followed by the Progress button from the Utilities Menu.  The ReadAll will display these statistics: • Total number of meters stored in the ReadAll
THE READALL INTERROGATOR User Guide Revised January 2001 Page 42 of 62 • Current number of unread meters, including meters in which an attempt to read has not occurred • The total number of meters that have been read • The total number of meters whose read attempts have failed • The percentage of meters of the total meters in the ReadAll that have been read • The total number of Radio functions performed since the route was loaded • The number of tamper conditions reported  (this total does not include any meters in which the tampers have been reset) • The number of unexpected manual reads (of meters equipped with automatic meter reading equipment) The screen looks like this.    When you have finished examining the statistics and information, press anywhere on the touch screen.  The entire Progress screen is defined as one button that will return you to the Utilities Menu.  To return to meter reading, press the Read Menu button and then the Back to Read Screen button.  Last Read  If you need additional information regarding the results of the interrogation of the last meter, press the Last Read button from the Utilities menu.  The ReadAll will display the additional TRACE read information that is not required for meter reading on two separate screens as follows:
THE READALL INTERROGATOR User Guide Revised January 2001 Page 43 of 62   This information is only useful to members of the Badger Meter Technical Support and Engineering groups.  Do not use this information unless directed to do so by Badger Meter personnel.  To return to the Utilities Menu, press the Exit button.  Battery Info  If you need additional information regarding the electronics of the battery, press the Battery Info button from the Utilities menu.  The ReadAll will display the additional battery information as follows:    This information is only useful to members of the Badger Meter Technical Support and Engineering groups.  Do not use this information unless directed to do so by Badger Meter personnel.  Settings  As mentioned earlier, the ReadAll has the ability to change how it operates or what it displays based on your choices.  These choices are called Settings, and are accessed from the Settings button from the Utilities Menu.  The Settings are displayed and changed in a series of four screens.  Each setting describes a behavior in the ReadAll that you can control.  If the box has an “X” in it, the ReadAll will perform that function.  If the box has no “X” in it, the ReadAll will not perform the function.
THE READALL INTERROGATOR User Guide Revised January 2001 Page 44 of 62 Note that, if the Route Management Software (such as CONNECT or RMS) is set to communicate with a PI, the settings are stored internally in the ReadAll.  The Route Management Software does not change the settings of the ReadAll when the ReadAll is communicating via the serial port.  Here are samples of the three Settings screens.         To choose a setting, touch the screen on the empty box and an “X” will appear in the box.  To remove a setting, touch the “X” and the box will be cleared.  Here’s the list of each of the different settings and how it controls the ReadAll’s operation.
THE READALL INTERROGATOR User Guide Revised January 2001 Page 45 of 62 SETTING WHAT IT DOES HOW YOU MIGHT USE IT Advance on High / Low When a high or low reading is encountered in an interrogated reading and this setting is chosen, the ReadAll will advance the display to the next account.  If not chosen, the ReadAll will continue to display the current meter being read. If you wish to investigate a high or low reading, leave a brochure with the customer, or perform some other function on a high or low reading, clear this setting and choose the next one.  You will be alerted to the high and low meters by the audio tones and the display. Beep on High / Low When a high or low reading is encountered for a meter that is interrogated and this setting is chosen, the ReadAll will sound the high and low audio signals.  If not chosen, the ReadAll will sound the successful read audio tone. If you wish to investigate a high or low reading, leave a brochure to the customer, or perform some other function on a high or low reading, choose this setting and clear the previous one.  You will be alerted to the high and low meters by the audio tones and the display. Show High and Low This setting and the previous one control the amount of information available to the meter reader.  When this setting is chosen, the high and low audit values are displayed when the View High / Low button is pressed.   To insure accuracy of the meter readings, some utilities will choose to clear this setting.  Other utilities will choose this setting so that if an investigation on the operation of the meter is needed, this information is available.  You need to determine which option is right for you. Find on Wrong This setting pertains only to touch meter reading (FUTURE RELEASE).  The gathered meter reading information contains the module ID number.  If the number is different than the ID number for the current meter on the read screen, the ReadAll will search for the correct meter if this setting is chosen.  If the setting is not chosen, the ReadAll will alert you to the fact that the reading indicates that the wrong meter is being read. This setting is very handy for touch meter reading because it allows you to read meters out of the normal reading sequence.  If you need to resequence the route, using this setting you can read the route in the new reading sequence order with ease.
THE READALL INTERROGATOR User Guide Revised January 2001 Page 46 of 62 Run Consumption (FUTURE RELEASE)  This setting pertains only to programming modules.  When chosen, the ReadAll will request you to run a unit of consumption after successfully programming a transponder or a module.  Once the consumption is performed, the ReadAll will request that you again read the meter to verify that the consumption shows on the meter reading. The setting is useful only when you wish to verify that the meter and the meter reading transponder is registering flow.  In almost all cases, you will not need this setting. Auto Clear Tamper This setting is used for TRACE meter reading only.  When this setting is chosen and the ReadAll finds a transponder that has responded to the interrogation with a tamper report, the ReadAll will automatically interrogate the meter again requesting the transponder to clear its tamper condition.  If the ReadAll receives a tamper condition after requesting it be cleared, the ReadAll will set the tamper status to Tamper Failed to Reset. This setting provides a great convenience when reading TRACE meters, in that when a tamper condition is reported, it is one that could not be reset.  Such a transponder will require service before it can operate correctly again.    To be on the safe side, if a transponder reports that a tamper has been reset, it is a good idea to verify that the meter is operating correctly, and that the reported meter reading matches the odometer reading. Verification When this setting is chosen, the ReadAll will request a manual reading for each successful reading.  This manual verification of the interrogated reading can be used to satisfy requirements in some states. If you are required by state law to periodically verify an interrogated meter reading with a visual reading, the ReadAll will request your required visual reading when this setting is chosen. Show Previous Reading This setting (as well as Show High and Low) controls the amount of information available to the meter reader.  When this setting is chosen, the previous reading value is displayed when the View High / Low button is pressed.   To insure accuracy of the meter readings, some utilities will choose to clear this setting.  Other utilities will choose this setting so that if an investigation on the operation of the meter is needed, this information is available.  You need to
THE READALL INTERROGATOR User Guide Revised January 2001 Page 47 of 62 determine which option is right for you. Auto Retry This setting is used for TRACE meter reading only.  When this setting is chosen and the ReadAll finds a transponder that has not responded to the interrogation, the ReadAll will automatically retry the interrogation for the number of times specified from 1 to 5.  To change the retry count, double tap on the number field with your stylus, and enter the new count value. This setting provides a great convenience when reading TRACE meters, in that retries due to location or weather are performed automatically.  While this does use a bit more of the battery life, it saves you the effort of pressing the Read button each time the interrogation is not successful, and it speeds the process of getting a good read by avoiding the delays caused by the unit waiting for you to press the Read button. Scanner Timeout This setting controls the amount of time the ReadAll will wait for a transponder ID from the bar code scanner. This setting allows you to specify the maximum amount of time between bar code scans before the ReadAll stops checking the scanner for a transponder ID number.  A good value for this time is 30 seconds.  Setting the time lower may cause you to press the Read button again to reactivate the bar code scanner.  Setting a longer time may cause extra battery usage. Retry Count This setting controls the number of times (from 1 to 5) the ReadAll interrogator will try reading a TRACE transponder before determining that the transponder cannot be read.  If the box is checked and the transponder does not respond to the interrogation, the ReadAll will retry the interrogation for the number of times specified. This setting is useful when reading TRACE meters.  In the event that the response from the transponder is not immediately received, the ReadAll will retry the transmission a number of times, up to the number of retry counts that you specify.  While this does use a bit more of the battery life and increases interrogation time, it saves you the effort of pressing the Read button each time the interrogation is not
THE READALL INTERROGATOR User Guide Revised January 2001 Page 48 of 62 successful, and it speeds the process of getting a good read by avoiding the delays caused by the unit waiting for you to press the Read button.  You need to determine if the automatic retries will work for you.   Calculator  If you find you need a calculator, possibly to compute a consumption value, press the Calculator button on the Utilities menu.  The ReadAll’s built in calculator will start.  You’ll see this screen.    Simply enter the first number and press the function button you wish • Add – by pressing the “+” button • Subtract – by pressing the “-“ button • Multiply – by pressing the “*” button • Divide – by pressing the “/” button  Note that decimal numbers can be entered using the decimal point button.  Next enter the second number and press the Equal sign button.  The ReadAll will display the result in the box.  Let’s do an example.  Enter “355” and press the divide by ( / ) key.  Next, enter “113” and press the equal sign.  You should see this screen.
THE READALL INTERROGATOR User Guide Revised January 2001 Page 49 of 62   Pressing the Exit button will return you to the Utility Menu.   Entering New Accounts  The ReadAll can add accounts to the list of stored accounts it received from the Route Management software.  But before you add a new account in the ReadAll, be sure that your Route Management software and your billing system can process the new account.  Both systems must be able to add new accounts from a file of meter readings in order to take advantage of the adding of a new account within the ReadAll.    Note that if you need to read a few transponders, there is no need to create a new account.  Simply use the ReadAll Quick Read feature.  See the Quick Read section of the manual for more information.  If you need to enter a new account into the ReadAll, press the New Account button from the Read Menu.    Pressing the New Account button will bring up this screen.
THE READALL INTERROGATOR User Guide Revised January 2001 Page 50 of 62   The buttons perform these functions. • Name – Enter the name for the new account • Address – Enter the service address for the customer • Trans # – Enter the transponder number if this is a TRACE account • Exit – Return to the Read Menu (if you have not saved the new account information, the new account will not be added to the route list) • OK – Saves the new account information in the route list, and clears the entries • Clear – Clear the name, address, and transponder number fields • Read – This button will be used in a Future release to allow you to read the new transponder immediately.  Pressing the Name, Address, or Trans # buttons will produce the same result.  A special keyboard screen will be displayed to allow you to enter alphanumeric information into the field.  It looks like this.    Pressing any of the letter buttons displays that letter in the top center window.  Pressing the space button adds a space.  If you wish to use the letters J through R, press the “J-R” button; if you wish to use the letters “S-Z” or the numbers 0 to 9, press the “S-Z / 0-9” button.  If you want to delete the last letter or number entered into the window, press the Back button.  When you have completed the entry, press the Enter button, and you will return to the New Account screen with the field filled in with your entry.
THE READALL INTERROGATOR User Guide Revised January 2001 Page 51 of 62 If you have entries for a new account for name address and transponder number, your New Account screen might look like this.    Pressing the OK button will add the account to the route list and clear the fields.  Pressing Exit before pressing OK will return you to the Read menu but you will be able to reenter the New Account screen and the information remains on the screen.  The information will remain on the screen until the OK or Clear buttons are pressed, or when the ReadAll sends its readings to the Route Management software.  If you press the OK button and return to the Read screen, you will return to the place in the route where you left off.  At the end of the route you will see the new account you added.  In our example above, the read screen for the new account would look like this.     Summary of the Meter Reading Process in The ReadAll  The process of meter reading using the ReadAll is simple and easy to remember.  Here’s a summary of the steps in the meter reading process that includes the buttons you need to press to perform the ReadAll function.  • Choose the route or routes you wish to read in the Route Management software o No ReadAll function is needed for this step
THE READALL INTERROGATOR User Guide Revised January 2001 Page 52 of 62 • Transfer the route or routes to the ReadAll via the serial communications cable o Transfer Routes from the ReadAll Main Menu o Receive Route from the Transfer Routes Menu o When the transfer is complete, Return to Main Menu from the Transfer Files menu • Read the meters in the route or routes o Read / Program Meters from the ReadAll Main Menu o Press either of the Read buttons or the upper portion of the Read Screen to perform a meter reading.  In most cases, the ReadAll will advance to the next account once the reading is completed. o Change to a different meter in the route using the Next Meter and Previous Meter buttons if you need to o Press the Menu button to choose the different reading functions you might need to perform • When finished, transfer the readings from the ReadAll back to the Route Management software via the serial communications cable o Transfer Routes from the ReadAll Main Menu o Send Readings from the Transfer Routes Menu o When the transfer is complete, Return to Main Menu from the Transfer Files menu
THE READALL INTERROGATOR User Guide Revised January 2001 Page 53 of 62  THE DETAILS – PROGRAMMING METERS USING THE READALL   The ReadAll can program TRACE transponders.  Regardless of the technology you are using for meter reading, the programming process usually occurs in one of these ways.   • The meters to program are loaded into The Portable Interrogator much like a route is loaded for reading. • The meters to program are listed on one or more work order sheets and the sheets are filled out when the installation and programming of the transponder is completed. • The meters to program are included in the computerized work order system and the installation information is entered into the work order system.  In most cases, the first two methods are used.  In some cases, the third alternative is convenient.  You need to determine which system is best for you.  The ReadAll can handle all of these methods for programming transponders and modules.  Programming with a list of TRACE meters loaded in The ReadAll  If you choose to load the meters to program into the ReadAll, use the Transfer Routes screen and the Receive Route function to load the meters much like you would load a route for meter reading.      To program a transponder, from the ReadAll Main Menu first press Read / Program Meters to display the first meter in the list for programming.  To begin programming the meter, press the Menu button to display the Read Menu.
THE READALL INTERROGATOR User Guide Revised January 2001 Page 54 of 62   Then press the Program button.  You’ll see this screen.    Each transponder must be prepared to receive the programming transmission.  For newer Remote transponders (with serial numbers greater than 2,500,000) as well as all Pit transponders, you must place a magnet on the Programming switch.  For older remote transponders (with serial numbers less than 2,500,000), you must connect a special jumper on the transponder to enable the transponder to receive the programming message.  Note that after the ReadAll programs the transponder but before the ReadAll interrogates the transponder to verify the programming step, you must remove the jumper.  Please consult the technical brief for your model of transponder for the exact procedure for preparing the transponder to be programmed.  To set the transponder ID that you will be programming, press the Enter Transponder Number button.  The ReadAll will display the numeric keypad, allowing you to enter the ID number of the transponder you are programming.  Use the Back button to erase an incorrect entry.  When the ID number is correct, press the Enter button.  To set the reading value to which the transponder will be programmed, press the Program Reading To button.  The ReadAll again displays the numeric keyboard to allow you to enter the initial reading.  For TRACE transponders, enter the full 6 digits of the odometer as well as the position of the sweep hand to build a 7 digit reading.    Here’s an example.  If you want to program transponder number 3212345 to have a value of 7691, the programming screen would look like this.
THE READALL INTERROGATOR User Guide Revised January 2001 Page 55 of 62   When you press the Program button, the ReadAll will send the programming transmission to the transponder.  The ReadAll will interrogate the transponder to verify that the programming was successful and will then display the results of the programming.    Note that if you are programming Gen 2 transponders, you must first place the programming stick in its spot to do the programming step, and then remove the stick in order to do the verifying read.  The software will prompt you for these steps.  When you have recorded the results that you choose, press the touch screen anywhere.  The ReadAll will display the read screen for this meter.  You are now ready to proceed to the next meter requiring programming.  Programming using a Computerized Work Order System or Work Order Sheets  Because the Work Order system or the work order forms hold all the information required for installation, the ReadAll is only used to program the transponder.  No information is loaded into the ReadAll before programming any transponders.  Be sure to prepare each transponder to receive the programming transmission by using either the magnet or the special jumper.  Please consult the technical brief for your model of transponder for the exact procedure for preparing the transponder to be programmed.  When you are ready to program a transponder, press Read / Program Meters from the ReadAll Main Menu.  Because no meters are loaded, the ReadAll will ask you if you wish to see the Read Menu.  The screen looks like this.
THE READALL INTERROGATOR User Guide Revised January 2001 Page 56 of 62 Press the Read Menu button to display the menu.  Next, press the Program button to display the Programming screen.  Enter the transponder ID and the initial reading as described above.  Press the Program button to program the transponder in the manner described above.  The ReadAll will program the transponder and verify it by performing an interrogation.
THE READALL INTERROGATOR User Guide Revised January 2001 Page 57 of 62  THE DETAILS – OTHER USES FOR THE READALL  The ReadAll can be used to perform a number of functions other than reading a route of meters. • Read a transponder whose ID number you do not know • Read a transponder whose meter reading you need for a special use (such as testing and troubleshooting, gathering a final meter reading, etc.) • Interrogate a transponder to verify that it is working Some of these functions are performed at customer sites while others are usually performed in the meter shop.  But they all use the ReadAll Quick Read function.  The Quick Read function allows you to read one meter at a time without having a route loaded in the ReadAll.  Quick Reads interrogate TRACE transponders.  The ReadAll gathers the meter reading and displays the result on the touch screen.  The ReadAll does not store the reading information and cannot send any Quick Reads back to the Route Management software.  The most common uses of the Quick Read feature are: • Gathering a final reading from one or more transponders  • Interrogating a transponder when troubleshooting or testing at a customer’s site • Interrogating a transponder whose ID number you do not know or are not sure of • Interrogating one or more transponders that are about to be installed at customer sites, to verify that they are working correctly • Testing a newly installed transponder  The Quick Read Menu is accessed from the ReadAll Main Menu, and looks like this.      The Quick Read Choice screen allows you to perform TRACE Quick Reads or DIALOG  (FUTURE RELEASE – IN PROGRESS) Quick Reads by pressing the TRACE or DIALOG buttons.  TRACE Quick Reads
THE READALL INTERROGATOR User Guide Revised January 2001 Page 58 of 62 The TRACE Quick Read process follows these steps: • Enter the ID number of the transponder you wish to interrogate • Press the READ button • Record the reading that is displayed  The screen looks like this.    To enter the transponder ID number, press the Transponder button.  The ReadAll will display the numeric keypad.  Enter the ID number (use the Back button to erase an entry) and press the Enter button when done.  The ReadAll displays the TRACE Quick Read screen with the transponder ID number displayed.  For example, if the transponder you want to interrogate has ID number 3876239, the quick read screen would look like this.    To perform the interrogation process, press the Read button.  The ReadAll will interrogate the transponder and display the reading results in the Reading box.
THE READALL INTERROGATOR User Guide Revised January 2001 Page 59 of 62   Note that the reading displayed is the full six-digit odometer plus the numeric location of the sweep hand.  In the example above, the 6 digit odometer reading is 000003 and the sweep hand is pointing at the 9.  If the transponder reports a tamper condition, the ReadAll will display the tamper condition in the Reading box.  Once displayed, you can record the reading in any convenient manner you choose.  TRACE Wild Card Read  (FUTURE RELEASE – IN PROGRESS)  If you do not know the transponder ID of a module, you can still perform a TRACE Quick Read without specifying the transponder ID number.  This process is called a Wild Card Read, and is denoted by question marks in the transponder ID number field.  For wild card reads, the ReadAll will transmit the interrogation but at a very low power.  As a result, you must position the ReadAll antenna as close to the transponder as possible before pressing the Read button.  The display will show the transponder ID as well as the reading.  Note that this reading process takes longer because the ReadAll sends two messages to the transponder.  The first message requests the serial number of the transponder while the second message requests the meter reading.  As a result, the total time for a quick read is longer when a complete serial number is missing.  Note that when a wild card read is attempted, every transponder that receives the message will respond.  If the ReadAll receives more than one transponder reply, the ReadAll will not successfully receive the transponder ID number.  This will cause an unsuccessful reading.   Checking Transponders before Installation  When you receive a shipment of transponders, or when you are ready to install a set of transponders, you can use the Quick Read function to verify that the transponder is operating.  But it can be tedious entering transponder ID after transponder ID, so the ReadAll offers you another way to enter that information.
THE READALL INTERROGATOR User Guide Revised January 2001 Page 60 of 62  For transponders you have just received or are ready to install, each of the IDs is bar coded on a label on the outside of the box.  Using the optional bar code scanner connected to the serial port, the ReadAll will accept the transponder ID from the scanner and immediately interrogate the transponder and display the results.    To use the bar code scanner to enter the transponder ID numbers, touch the center of the box marked Scan Serial Number to place an “X” in the box.  When an “X” is marked in the box, the Quick Read will receive the transponder ID number via the serial port from the bar code scanner, interrogate the given transponder, and display the results.  To read the next transponder ID, read the next bar code.  When you are done reading the bar code labels, clear the “X” from the Scan Serial Number box.  You can use the bar code scanner to verify that transponders you have just been shipped are operating.  Just follow this simple procedure. • Display the ReadAll TRACE Quick Read screen • Connect the bar code scanner to the ReadAll’s serial port and check the Scan Serial Number box • Read the transponder number from the bar code on the side of the shipping box by squeezing the trigger on the bar code reader while lining the scan line on the bar code you want to readThe ReadAll will perform the quick read and display one of these results:   o The reading will be displayed in the reading box, and the successful audio tones will be sounded o The tamper status will be displayed in the reading box and the tamper audio tones will be sounded. • No Response will be displayed in the reading box and the no response audio tones will be sounded.
THE READALL INTERROGATOR User Guide Revised January 2001 Page 61 of 62 WHAT IF THINGS GO WRONG  In the unlikely event that you experience difficulty using the ReadAll, we’d like you to take some steps to help us return your ReadAll to proper operation.  This section gives you guidelines on how to respond to the times when the ReadAll reports a problem.  Questions  If the ReadAll displays something out of the ordinary, there is no need to panic.  If you see information on the screen that you do not understand, please record the information that you see and call the Badger Meter Technical Support telephone number:  1-800-456-5023.  The technical support specialist will help you gather any additional information, and will assist you in restarting the ReadAll.  Your telephone call will alert the software engineers to your problem, who will investigate to find the cause of the problem.    It is also very helpful for you to record the situation that led to the strange behavior.  Record the steps you took, and the entries you made, that brought about the display.  This information will be very valuable in the investigation, and will help find the solution more quickly.  When You Call the Technical Support Hotline  When you call the 800 technical support number, a support specialist will answer.  Explain the situation, and go over the information you recorded.  This is where your notes on the display or the behavior and the steps you took will be very valuable.  If possible, give this information to the support specialist: • The ReadAll screen that was active • The steps being performed at the time • Any entries that were made on the screen • Any error message displayed, including any error code or explanation that is shown • The current state of the ReadAll  Your support specialist may ask you to fax notes or other information to Badger Meter to assist in the resolution of the problem.  What To Report To Technical Support  It is important that you report all occurrences of errors to the Technical Support Hotline.  It allows Badger Meter to improve its products and improve your system at the same time.  In some cases, the problem may have already been solved, and the Specialist can send you a software upgrade to correct the problem.  In other cases, the Specialist can direct you to perform a function in a certain way so that the error does not occur.  In some cases, the Specialist will direct you to perform some steps if the problem happens again.  This is very valuable information that will speed the investigation of the
THE READALL INTERROGATOR User Guide Revised January 2001 Page 62 of 62 problem.  If the problem does happen again, please follow those steps and call the Hotline.  The Specialist will gather the information for that particular problem, and direct you if further action is needed.  Faxing the Technical Support Group  The Badger Meter Technical Support Group can also be reached by fax at 1-888-371-5982.  This may be a convenient way to follow up with your support specialist on particular steps.  The number is available 24 hours per day, 7 days per week.  E-Mailing the Technical Support Group  The Badger Meter Technical Support Group is also available via electronic mail through the Internet.  To send questions or comments to the Technical Support group, address your e-mail to TechSupport@BadgerMeter.com.  The Technical Support Group can respond to your comments or questions via phone, fax, or e-mail.  Just let us know in your message the type of response you would prefer.

Navigation menu