Baumer Ident OIS-LSRSER Identification System User Manual Manual
Baumer Ident GmbH Identification System Manual
Manual
OIS-L RF/ID System
Read/Write – Short Range
System Manual
OIS-L

Contents
Baumer I dent G mbH Read/Write S hort R ange System Manual Page 2 of 59
Reg. Nr. LM.0401.EN
Issue 1 / April 2002
- Friday, 26. April 2002 -
Baumer Ident GmbH, Hertzstrasse 10, D-69469 Weinheim,
Deutschland, Tel +49 6201 9957-0, Fax +49 6201 9957-99
www.baumerident.com
Subject to alteration without prior notice.
© Copyright Baumer Ident GmbH 2002
Pri nted in Germ any

Contents
Page 3 of 59 Read/Write S hort R ange System Manual Baumer I dent G mbH
Table of Contents
1 Safety precautions .............................................................................................. 7
2 Foreword.............................................................................................................. 11
2.1 General Information........................................................................................11
2.2 FCC rules for the USA .....................................................................................11
2.3 Central units covered by this manual.............................................................11
2.4 Documents available......................................................................................12
2.5 Available Central Units...................................................................................13
3 System description...........................................................................................15
3.1 Introduction....................................................................................................15
3.2 System Principles ..........................................................................................15
3.3 Typical System Configuration ........................................................................16
3.4 Part Number Identification (Type) ...................................................................17
3.5 Basic Functionality Overview.........................................................................18
4 System Components ........................................................................................19
4.1 Central units...................................................................................................19
4.1.1 Common Technical Details of Central Units..............................................19
4.1.1.1. Electronic Design .......................................................................19
Electronic Design – Multiplexer Extension................................................20
4.1.1.2.1. Common parts of every central unit ...................................20
4.1.1.2.2. Communication modules...................................................21
4.1.2 77LA04/2-SER, -MD, -ET, -DP................................................................22
4.1.2.1. Connector pin assignment...........................................................22
4.1.2.1.1. Power supply, Terminal and Digital I/Os..............................22
4.1.2.1.2. Host interface...................................................................23
4.1.2.2. System Diagnostics....................................................................25
4.1.2.3. Technical Data ...........................................................................26
Central Unit 77LA04/4 –SER, -DP...................................................................27
4.1.3.1. Connector pin assignment...........................................................27
4.1.3.1.1. Power supply, Terminal and Digital I/Os..............................27
4.1.3.1.2. Host interface...................................................................28
4.1.3.2. System Diagnostics....................................................................30
4.1.3.3. Technical Data ...........................................................................31
4.1.4 Central Unit 77LA04/2-IBS .....................................................................32
4.1.4.1. Connector pin assignment...........................................................32
4.1.4.1.1. Power supply, Terminal and Digital I/Os..............................32

Contents
Baumer I dent G mbH Read/Write S hort R ange System Manual Page 4 of 59
4.1.4.1.2. Host interface ..................................................................33
4.1.4.2. Status display of Interbus-S......................................................... 34
4.1.4.2.1. Monitor (77LA04-IBS only!)...............................................35
4.1.4.3. System Diagnostics.................................................................... 35
4.1.4.4. Technical Data........................................................................... 36
4.2 The Antennae.................................................................................................37
4.2.1 Standard Frame Antennae.....................................................................38
4.2.1.1. Common data for all frame antennae........................................... 39
4.2.2 Special Antennae ..................................................................................39
4.2.2.1. Common data for all special antennae......................................... 39
4.2.2.2. 77LS05 ..................................................................................... 39
4.2.2.3. 77LS06 ..................................................................................... 39
4.2.2.4. 77LS07 ..................................................................................... 40
4.2.2.5. 77LS13 ..................................................................................... 40
4.2.2.6. 77LS14 ..................................................................................... 40
4.3 Data Tags .......................................................................................................41
4.3.1 Accessing Data Tags..............................................................................41
4.3.1.1. Basic Definitions......................................................................... 41
4.3.1.2. Read Only Tags.......................................................................... 41
4.3.1.3. 256 Bit Read/Write Tag Type....................................................... 42
4.3.1.4. 2kBit Read/Write Tag Type.......................................................... 42
5 Hints on Installation and System Design....................................................45
5.1 Basic considerations .....................................................................................45
5.2 The antenna lobe ...........................................................................................45
5.3 Useful antenna field.......................................................................................45
5.3.1 Width ∅D and W and reading range at distance Ha.................................47
5.3.2 Operational Read/Write range Ha...........................................................47
5.3.3 Peak Read/Write range Hmax................................................................48
5.3.4 Static applications..................................................................................49
5.3.5 Dynamic applications.............................................................................49
5.4 Calculating the Passing Speed ......................................................................49
5.4.1 Communication: Reader – Antenna – Data Tag .......................................50
5.4.1.1. Read Only Tag – 76LDxxx ......................................................... 50
5.4.1.2. General formulas for Read / Write Tag Types............................... 50
5.4.2 Communication: Reader – Host (PC or PLC)...........................................51
5.4.2.1. Serial communication time.......................................................... 51
5.4.3 Correlation of Passing Speed vs. Amount of Read/Write Data..................51
5.4.3.1. Component selection.................................................................. 51
5.5 Installation Guidelines ...................................................................................53
5.5.1 Metal-free environment..........................................................................54
5.5.2 Mounting examples................................................................................55
5.5.3 Distance between antennae or tags........................................................56

Contents
Page 5 of 59 Read/Write S hort R ange System Manual Baumer I dent G mbH
5.6 EMC Guidelines..............................................................................................57
5.6.1 General.................................................................................................57
5.6.2 Shielding concept ..................................................................................57
6 FAQ’s.....................................................................................................................59
6.1 Digital Input / Trigger......................................................................................59
6.2 Miscellaneous ................................................................................................59

Contents
Baumer I dent G mbH Read/Write S hort R ange System Manual Page 6 of 59
Safet y prec autions
Page 7 of 59 Read/Write S hort R ange System Manual Baumer I dent G mbH
1 Safety precautions
This product contains components that are sensitive to electrostatic discharges. Please
observe the special instructions for their protection. Incorrect handling can damage the
unit and cause the invalidation of the warranty.
Minimum safety precautions against electrostatic discharge:
• Establish earth contact before you touch the unit. For example, touch the earthing screw on the unit.
even better: Use an antistatic ribbon and earth yourself permanently for the time you handle the unit.
• Avoid unnecessary contact with the unit connectors and assemblies inside the unit.
• Only open the unit if the operational settings (as described in the manual) expressly require this.
• Use antistatic tools for the setting of the unit. (Warning: Do not touch life-threatening voltages with
these tools).
• Do not store unit and components without protective packaging.
• Only remove unit and components from the packaging immediately prior to installation.
These notes are not sufficient to guarantee complete protection from electrostatic discharges! We
recommend the use of suitable protective equipment.

Safet y prec autions
Baumer I dent G mbH Read/Write S hort R ange System Manual Page 8 of 59
Safety Instructions
The system described in this manual is for
exclusive operation by trained employees.
Only qualified personnel that know the po-
tential dangers involved should perform the
installation, settings, maintenance and repair
of the units used.
Safety Documents
This OIS-L system was designed, tested and
supplied in perfect condition according to docu-
ment IEC348 Safety Requirements for Electronic
Uni ts o f Cl ass 1.
Operational Safety
The correct and safe use of these systems as-
sumes that operating and service personnel fol-
low the safety measures described in the man-
ual alongside the generally acceptable safety
procedures.
If there is a possibility that safe operation cannot
be guaranteed the system must be switched off
and secured against accidental use. Then the
service unit responsible must be informed.
Condensing Water / Change of Temperature
Moving the systems from a cold to a warm envi-
ronment could lead to dangerous situations due
to condensation. Therefore it must be ensured
that the system can adjust itself to the warmer
temperature.
Opening the Cov ers or the Housing
Do not open the housing. There is no need to
open the housing in order to set the series 77
reader devices. The unit does not have any in-
ternal setting elements or displays. All settings
are performed via the test terminal port.
The internal parts of the unit, especially the
printed circuit boards must be protected against
oil, moisture and air contamination. When re-
moving the protective covers make sure that no
mechanical damage of the sensitive electronics
occur or metal objects (nuts, washers, etc) fall
into the unit. Therefore do not open the unit.
Earthing
Before establishing any connections the housing
of the system must be earthed.
Connections / Power Supply
The supply circuits must comply with the condi-
tions set out for the SELV circuits (see
EN60950).
The signal circuits must comply with the condi-
tions set out for the SELV circuits (see
EN60950).
Use screened cables for the power supply. This
is the only way to achieve the prescribed EMC.
During maintenance damage could occur if
printed circuit boards or cables are connected or
disconnected whilst the power supply is still on.
Therefore only work on the connection and the
components when they are not live.
SELV – Safety Extra Low Voltage – Protective meas-
ure against dangerous body currents, formerly: pro-
tective first voltage range
EMC – Electromagnetic Compatibility,
Fuses
Only experts who are aware of the dangers in-
volved may replace the fuses. It must be en-
sured that only fuses of the required current rat-
ing and the correct type are used for replace-
ment. The use of repaired fuses and/or short-
circuiting the fuse holders is prohibited.
Spare Parts
We recommend that only personnel, original
products, spare and replacement parts author-
ised by Baumer Ident be used for installation,
service and repair. Otherwise Baumer Ident
does not accept any responsibility for materials
used, work carried out or possible conse-
quences.
Electrostatic Discharges
Semi-conductors of the type MOS or CMOS as
well as two-pin types and precision resistance
are extremely sensitive to ESD. All components,
printed circuit boards and auxiliary systems
should therefore always be classed as sensitive
to electrostatic discharges.
Before opening the cover the unit should be
placed onto an ESD-protected surface. As with
all work on modern electronic modules the use
of ESD clamps and ESD mats during work on
the unit is recommended.
• Sufficiently protect all printed circuit boards
that were removed from the unit from dam-
age.

Safet y prec autions
Page 9 of 59 Read/Write S hort R ange System Manual Baumer I dent G mbH
• Observe all normal precautions for the use
of tools.
• Use ESD-protected packaging material.
Never use measuring units with low impedance
for measuring or testing systems with semi-
conductor components. Never use high voltage
te sti ng units o r diel ectri c te st u ni ts to test sy s-
tems with semi-conductor components.
When it becomes necessary to check the iso-
lating properties of the field wiring, the assem-
blies (electronic units and sensors) should be
disconnected.
Earth the test units.
Baumer Ident does not accept returns of prod-
ucts where the regulations concerning the ESD
precautions and protective packaging materials
were not followed.
ESD – Electrostatic Discharge

Safet y prec autions
Baumer I dent G mbH Read/Write S hort R ange System Manual Page 10 of 59

Foreword
Page 11 of 59 Read/Write S hort R ange System Manual Baumer I dent G mbH
2 Foreword
2.1 General Information
This manual is intended to provide the user with
assistance in product selection and project plan-
ning for the OIS-L Short Range inductive identi-
fication system. All relevant product data as well
as guidelines for the correct product combina-
tions and installation are included.
This description is valid for all different
Read/Write devices of the OIS-L Series 77. A
special controller like the PC-Card Read/Write
device only supports the subset command set,
presented in this document.
News on products and applications for our iden-
tification systems are updated on a regular basis
and are available under the following Internet
address:
http://www.baumerident.com
2.2 FCC rules for the USA
Any changes or modifications of the OIS-L system
not expressly approved by Baumer Ident could
void the user's authority to operate the equipment.
The OIS-L system consisting of central unit
77LA04/2-SER and antennae 77LS03 complies
with the rules of FCC. Only this system configura-
ton ist allowed to operate in USA.
It ´s FCC ID is: PNTOIS-LSRSER
The device complies with part 15 of the FCC rules.
Operation is subject to the following two conditions:
(1) this device may not cause harmful interference,
and (2) this device must accept any interference re-
ceived, including interference that may cause unde-
sired operation.
The connections to the antennae, to the power
supply and to the host computer must be done with
shi elded cabl es.
The antenna connector contains speciel parts to set
the resonance of the antenna at 125 KHz.This can
only be done by Baumer Ident in Weinheim.
2.3 Central units covered by this manual
Central units for 2 antennae
Designation Type Description Order code
77LA04/2-SER ZE.77.SR.02.11 serial interface RS232/422/485 configurable
by user 9633-001-SER
77LA04/2-SER-ET ZE.77.SR.02.13 serial interface RS232/422/485 configurable
by user, version for use at extended tem-
peratures: -20 °C … 50 °C
DD100039
77LA04/2-MD ZE.77.SR.02.12 serial interface pre-configured for RS485 mul-
tidrop use DD100116
77LA04/2-IBS ZE.77.SR.02.21 Interbus-S interface DD100110
77LA04/2-DP ZE.77.SR.02.31 Profibus DP interface 9633-001-DP

Foreword
Baumer I dent G mbH Read/Write S hort R ange System Manual Page 12 of 59
Central units for 4 antennae
Designation Type Interface Order code
77LA04/4-SER ZE.77.SR.04.11 serial interface RS232/422/485 configurable
by user DD100129
77LA04/4-DP ZE.77.SR.04.31 Profibus-DP interface DD100173
77LA04/4-MD ZE.77.SR.04.12 serial interface pre-configured for RS485 mul-
tidrop use DD100201
The central unit 77LA04/4 is an extension of the
77LA04/2 controller. This central unit can control
up to four antennae in a multiplexing arrange-
ment.
2.4 Documents
available
Manuals
Central Units Short Range
This document
LM.0401.EN
Central Units Long Range LM.0402.EN
Interbus-S Interface LM.0403.EN
Profibus-DP Interface LM.0404.EN
Manual Handheld Reader 77HH03 LM.0405.EN
Configuration Software Short LM.0406.EN
Mounting of special Ring Data Tags LM.0407.EN
Mounting of ring data tag into floor LM.0408.EN
Serial Interface LM.0409.EN
Quick Start Guide [ Long Range ] LM.0440.EN
Data Sheets
Central Units Short Range LD.0301.EN
Central Units Long Range LD.0302.EN
Interbus-S Interface LD.0303.EN
Profibus-DP Interface LD.0304.EN
Standard Antennae (Short Range) LD.0305.EN
Standard Data Tags LD.0306.EN
Standard Antennae (Long Range) LD.0307.EN
Special Frame Antennae LD.0330.EN
Antenna 77LS05 LD.0331.EN
Antenna 77LS06 LD.0332.EN
Antenna 77LS07 LD.0333.EN
Antenna 77LS14 LD.0334.EN
Antenna 77LS13 LD.0335.EN
General papers
Our company profile AB.0001.ED
Technical Product Overview AB.0003.EN

Foreword
Page 13 of 59 Read/Write S hort R ange System Manual Baumer I dent G mbH
2.5 Available Central Units
Product
designation Type Description
77LA04/2-SER ZE.77.SR.02.11 Central Unit, Read/Write, Short Range, for two Antennas,
Serial interface RS232/422/485 configurable by user
77LA04/2-MD ZE.77.SR.02.12 Central Unit, Read/Write, Short Range, for two Antennas,
Interface pre-configured for RS485 Multidrop use
77LA04/2-SER-ET ZE.77.SR.02.13 Central Unit, Read/Write, Short Range, for two Antennas,
Serial interface RS232/422/485 configurable by user, Ver-
sion for use at extended temperatures: -20°C ... 50°C
77LA04/4-SER ZE.77.SR.04.11 Central Unit, Read/Write, Short Range, for four Antennas,
Serial interface RS232/422/485 configurable by user
77LA04/2-IBS ZE.77.SR.02.21 Central Unit, Read/Write, Short Range, for two Antennas,
Glass Fibre Interbus Interface
77LA04/2-DP ZE.77.SR.02.31 Central Unit, Read/Write, Short Range, for two Antennas,
Profibus DP Interface
77LA02-SER ZE.77.LR.01.11 Central Unit, Read/Write, Long Range, for one Antenna, Se-
rial Interface RS232/422/485 configurable by user
77LA02-DP ZE.77.LR.01.31 Central Unit, Read/Write, Long Range, for one Antenna,
Profibus DP Interface
76LA02-SER ZE.76.LR.01.11 Central Unit, Read-only, Long Range, for one Antenna, Se-
rial Interface, RS232/422/485
76LA02-DP ZE.76.LR.01.31 Central Unit, Read-only, Long Range, for one Antenna, Pro-
fibus DP Interface
77HH03 ZE.77.HH.03 Handheld Unit, Read/Write, based on PSION workabout® or
alternativelly with Barcode Scanner
77PC01 ZE.77.PC.01.91 PC Card Type II Unit, Read/Write, for one Antenna

Foreword
Baumer I dent G mbH Read/Write S hort R ange System Manual Page 14 of 59
System description
Page 15 of 59 Read/Write S hort R ange System Manual Baumer I dent G mbH
3 System description
3.1 Introduction
The OIS-L Series 77 is an inductive identifica-
tion system, generally referred to as RF-ID. It
is intended for applications in logistics sys-
tems. The OIS-L standard system consists of
three units:
• Transponder with a Read/Write memory
• Antenna for energy and data transmission
• Central unit with analogue and digital data
processing
The OIS-L Series 77 Standard Range RF-ID
system is a family of products that have been
developed to meet the market demands for in-
dustrial identification products with a high de-
gree of modularity to solve a variety of tasks in
logistics and other applications.
3.2 System Principles
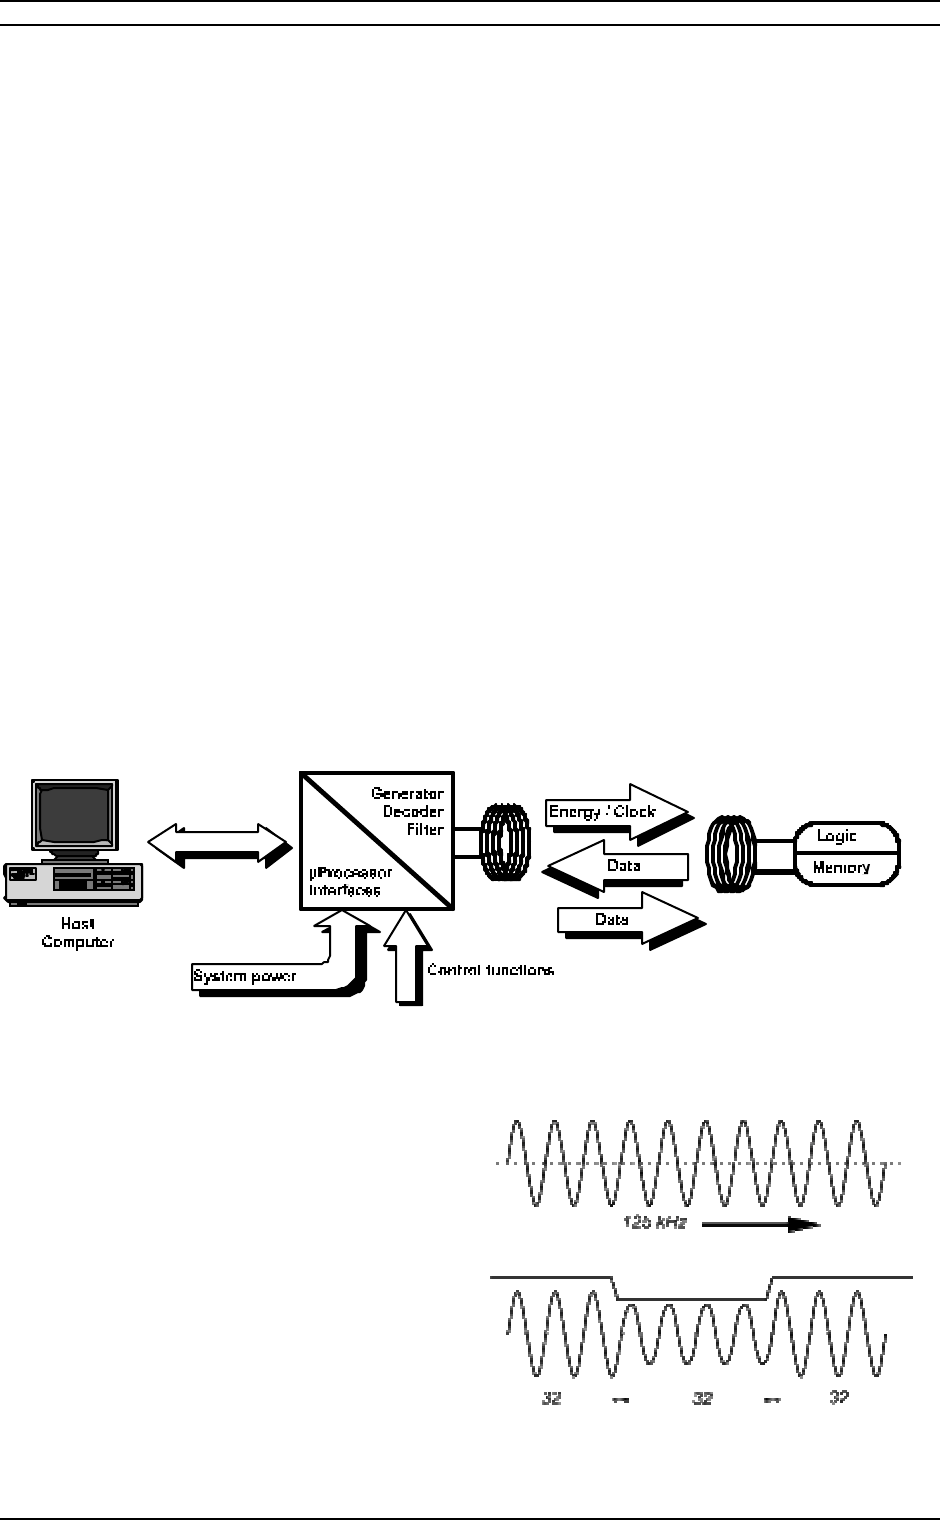
The OIS-L-system is a passive RF-system in the
lower 125 kHz frequency band (ca. 125 kHz).
The programmable data tag consists of a CMOS-
Chip with an EEPROM memory and a coil. The
reader, is made up of all of the components re-
quired for the transmission of energy and the re-
ception of the demodulated signals from the tag.
The energy is transmitted to the tag via an alter-
nating magnetic field, analogous with the principle
of a transformer.
If a transponder comes within the useful area of
the magnetic field it receives the required energy
it is then ready to receive commands, to either
store a code in memory or to send the contents of
all or a part of the memory.
System overview
The signals are detected (demodulated) by an
analogue circuit and passed on to the digital
circuitry. Here the microprocessor and related
software checks the data transmission, con-
verts the code and in the event that the trans-
mission was read the code is made available
to the host computer for further data process-
ing.
The chip requires a field voltage of about 3,5V
to become active. This tension is induced by
the alternating magnetic field. The data trans-
mission is done by means of an amplitude
modulation, using the Manchester code.
The detection of 32 full oscillations, indicates
that one bit has been transmitted. This kind of
data transmission is very insensitive to external
disturbances from other electrical equipment
and is particularly suited for industrial applications.
The reading distance is dependant on the power
of the magnetic field and the exact frequency
tuning (compare radio reception). Normally an up-
System description
Baumer I dent G mbH Read/Write S hort R ange System Manual Page 16 of 59
per limit for this technology is set at 1 meter
(40") however for small tag/reader combina-
tions these values are in the range 1 to 30
centimetres (0.5" - 12").
3.3 Typical System
Configuration
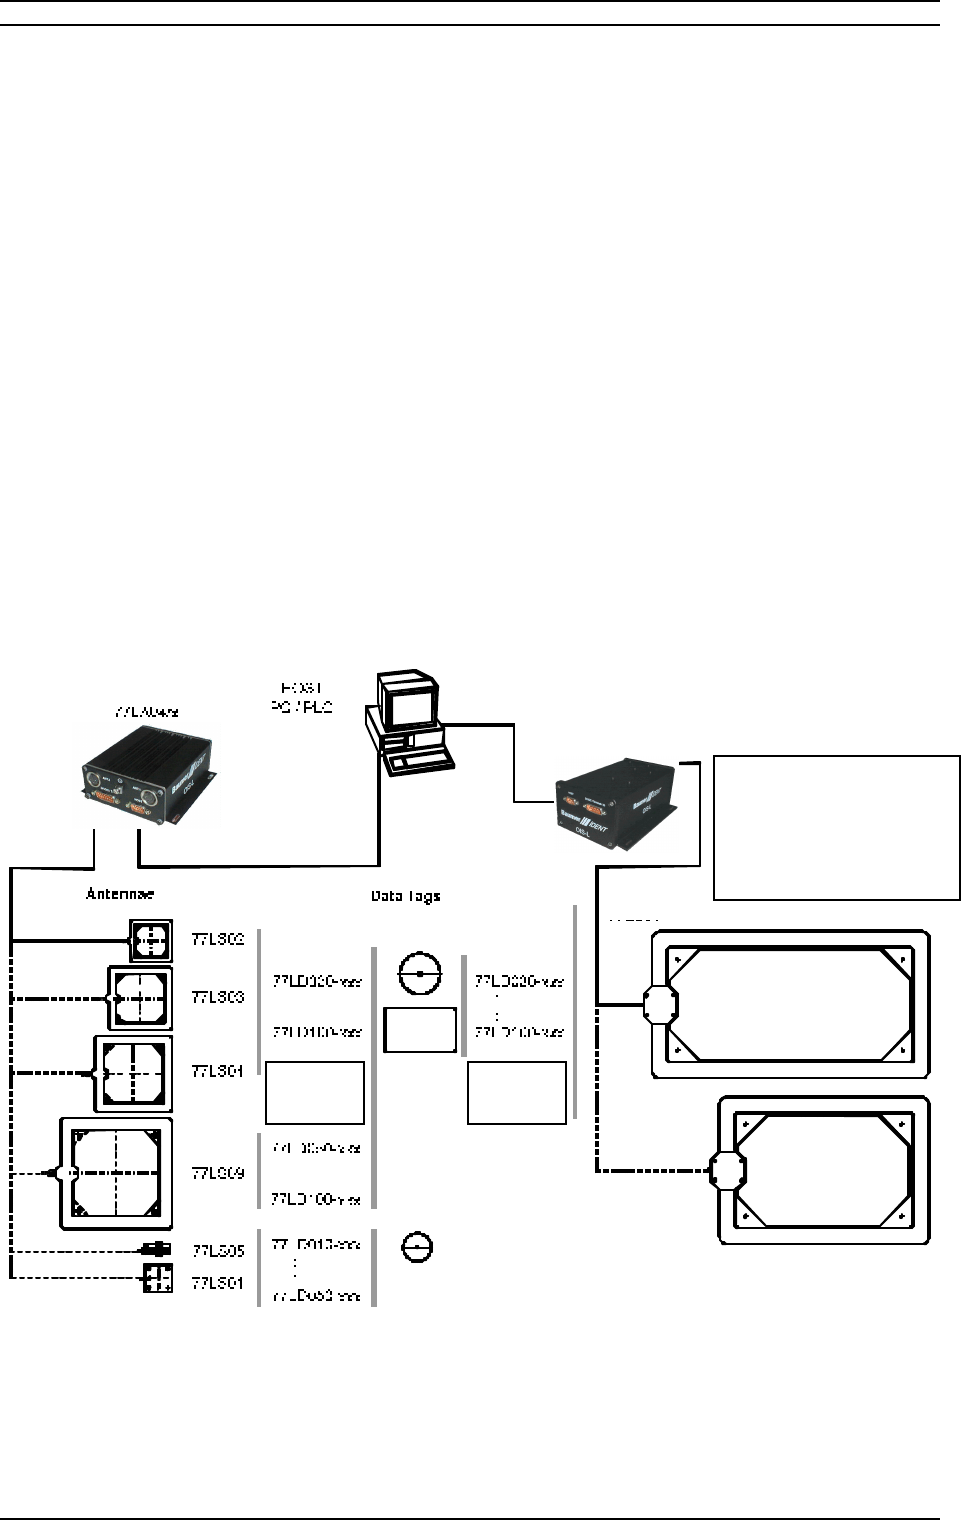
The OIS-L Series 77 Standard Range
Read/Write system consists of the central unit
77LA04-X and one or two short range anten-
nae (selected from the 77 Series Antenna
range). The data tags can be either the fixed
code type (series 76) or the Read/Write type
(series 77): The Read/Write data tags come in
two different memory sizes, 256 bit or 2 kbit.
The following diagram shows an overview of
the standard products in the Read/Write sys-
tem. The data tags come in differing shapes,
sizes, and housing materials. Some are coin-
shaped; others are packaged in PVC and are
the size and shape of a credit card.
Although the majority of data tags would function
in combination with any of the antennae, we have
grouped them into logical groups highlighting the
desired combinations, that enable the user to
achieve tled information relating to the reading
distances for the various antennae/tag combina-
tions are shown later in this document.
76LA02-x
76LS61
76LS62
Or equiva-
lent series
76 type
Or equiva-
lent series
76 type
Frame Antennae
77LS04, 77LS09 are also a-
vailable for long rang e, read
onl y, applications on request,
call for special offers

System description
Page 17 of 59 Read/Write S hort R ange System Manual Baumer I dent G mbH
3.4 Part Number Identification (Type)
General form: $$.NN.$$.$$.$$, where $ is a letter, and N is a number.
Explanation
In order to have a structured part numbering system the following definitions apply.
An existing part numbering system is already in circulation e.g. 77 LA04. These names are easy for the
existing user to identify, however they are not always unique to a particular product. An example would be
the part number 77LS03 this identifies an antenna but the version or tuning of this antenna is not included
in this part number.
Field No. Description Possible Values
$$ 1 Class of com-
ponent ZE: Central unit
AN: Antenna
KA: Cable
etc.
N 2 System group 76: Read only System
77: Read/Write System
$$ 3 Subclass LR: Long Range
SR: Short Range
HH: Hand-held reader or related component
PC: PC-Card Reader or related component
$$ 4 Product de-
nomination 00 … 99
For antennae: Indicator for antenna size/geometry
For central units (Field 1=ZE):
Number of antennae connectors
$$ 5 Product modifi-
cations 00 … 99
For antennae: Indicates modifications like special tuning, or special
material etc., consecutively numbered
For central units (Field 1 = ZE) First digit: 1: serial Interface
2: Interbus-S
3: Profibus-DP
Second digit: indicates modification like different mounting holes, sur-
face colour, special connectors, etc. Consecutively numbered
$$ 1 Always = DT, for data tag
N 2 Indicates inter-
nal chip type 00: EM4102, read only
01: Hitag1, 2kBit
02: Hitag2, 256 bit
N 3 000 … 999
Related to coil size, tags with identical values in this field will have
identical communication range within air
N 4 Housing 00 … 99
For different materials or geometries, consecutively numbered

System description
Baumer I dent G mbH Read/Write S hort R ange System Manual Page 18 of 59
3.5 Basic Functionality Overview
Basic functionality overview
Central Unit Antenna Data Tags
Short Range R/W
Product designation:
Type:
77LA04/x-yy
ZE.77.SR.xx.yy 77LS01 … 77LS14
AN.77.SR.xx.yy 76LDxxx-yy, 77LDxxx-yyy
DT.0x.yyy.zz
Sys tem Components
Page 19 of 59 Read/Write S hort R ange System Manual Baumer I dent G mbH
4 System Components
4.1 Central units
The Baumer Ident short range inductive identifi-
cation system OIS-L has been developed with re-
spect to the regulation EN 300330 class 2. Thus,
passive antennae connected to a central unit is
the basic system concept. Antennae can be easily
designed for customers request. No additional
approbation or certification of the complete sys-
tem is necessary. By the technique of multiplex-
ing, some central units can handle more than one
antenna.
The high protection class of all central units make
them ready to use within an industrial environ-
ment. Whether outdoor-use, rain or dust, the
system always operates reliably. Direct mounting
on vehicles in particular lift trucks is possible.
Various bus interfaces including high layer soft-
ware facilitate the connection to host systems for
engineers. The intelligent configuration software
provides easy installation and system start-up by
the customers qualified personnel. A special
Baumer Ident feature is the possibility of auto-
matic on-site antenna adjustment by software.
This enables the optimisation of already installed
systems whereby the environment is automati-
cally considered by the adjustment process.
The system works with EM4102, HiTag 1 and Hi-
Tag 2 chip transponders.
4.1.1 Common Technical Details of Central Units
4.1.1.1. Electronic Design
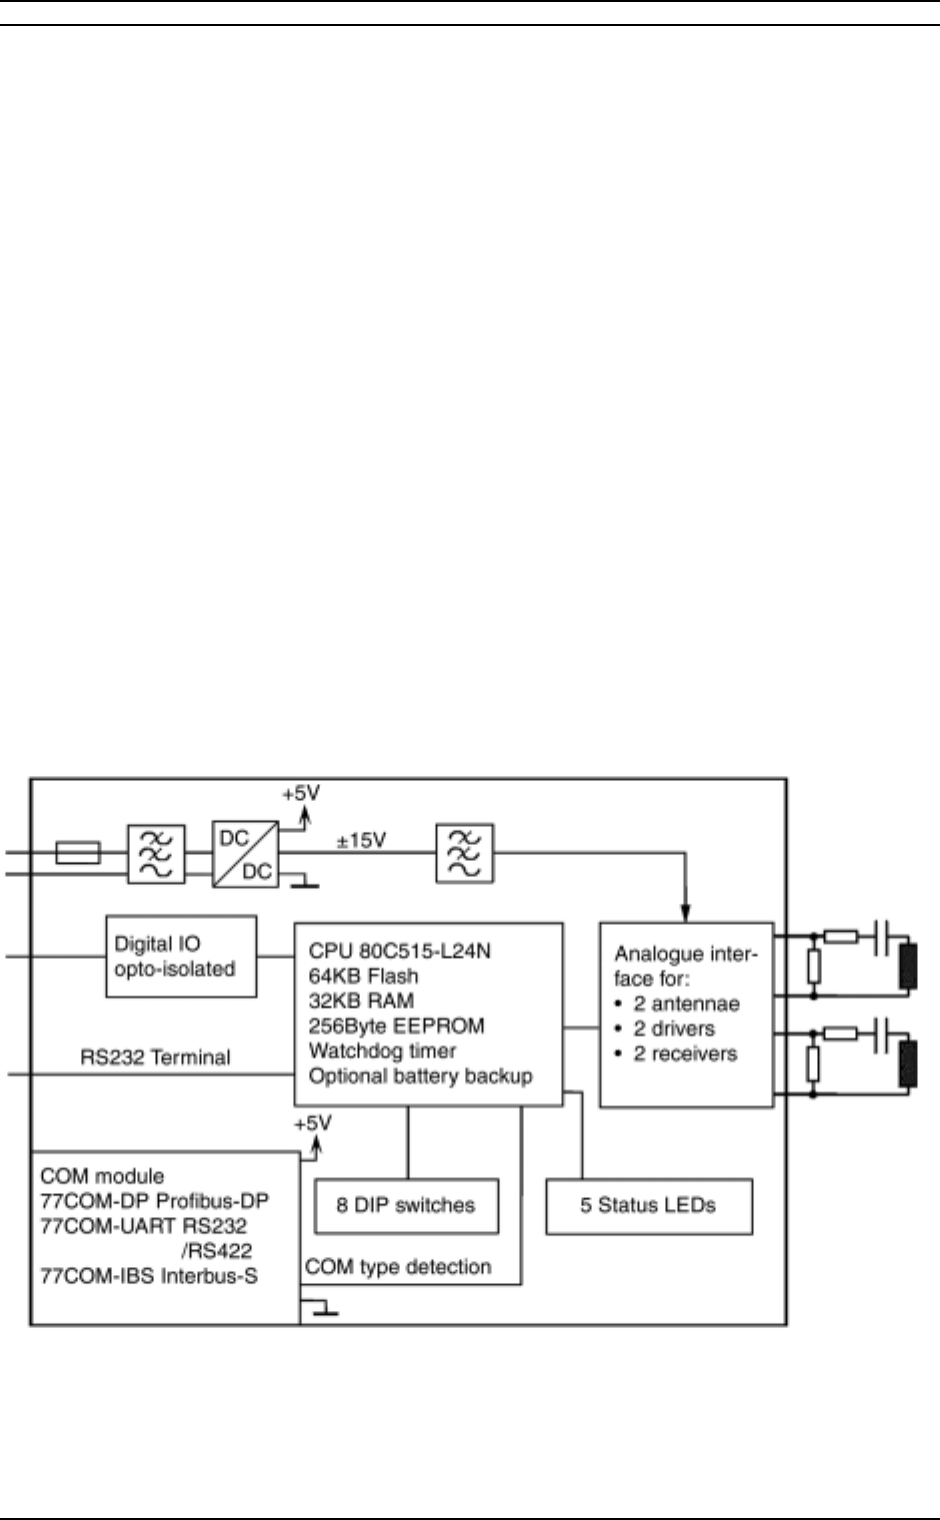
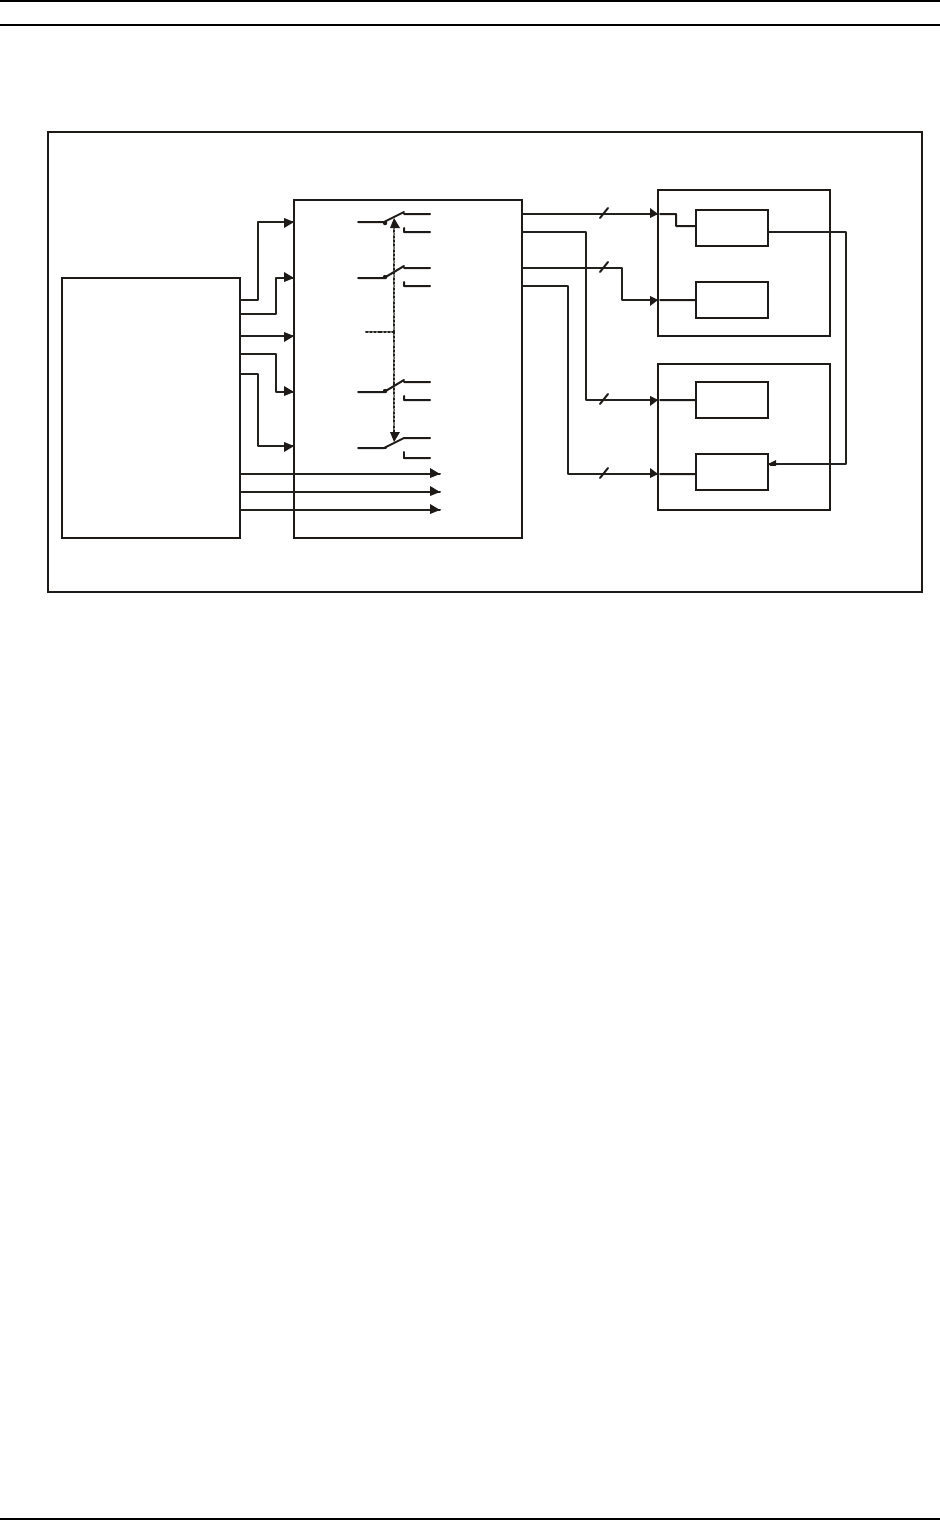
Block diagram of the central unit 77LA04/2
Sys tem Components
Baumer I dent G mbH Read/Write S hort R ange System Manual Page 20 of 59
4.1.1.2. Electronic Design – Multiplexer Extension
Block diagram of the central unit 77LA04-04
4.1.1.2.1. Common parts of every
central unit
Power supply
The processor board contains the power supply
in the form of a galvanically separated DC-DC
converter, operating between 18 and 36 V DC.
The converter provides the different internal ten-
sions for the analogue board, the COM-module
and ancillary electronics. This converter is pro-
tected against polarisation errors.
Analogue module
The analogue module handles the energy
transmission to the tag over the antenna and the
demodulation of the data signals received from
the data tag. The analogue board receives con-
trol signals, required for the communication with
the data tag, from the processor board. The
board contains two separate, identical circuits to
handle two separate antennae.
Processor board
A non-galvanically separated RS232 interface is
provided for the configuration of the central unit.
The digital inputs and outputs (I/Os) are opto-
coupled.
The processor of the central unit handles the com-
mands from a host computer (PC or PLC) as well
as the data transfer to and from the antenna. This
electronic circuitry consists of the following compo-
nents:
• Micro controller C515A-L24M or
• Micro controller 80C515
• System memory 32 kByte RAM
Programme memory
• 64 kByte EPROM
This memory contains the programme for the sys-
tem self-test and the operating system
• Serial EEPROM 32 kByte
This memory serves the purpose of storing the
configuration data. The data may be altered via the
terminal
Digital I/Os
The two galvanically separated digital inputs have a
permissible input voltage of:
77CU04
Controller
CPU and
HOST-Port
Electronic
Multiplexer
2 : 4
Analo
g
ue RF boards
125kHz
4MHz quartz based
Ant 1
Ant 2
Select
Led 1
Led 2
Ant 1
Ant 3
Ant 2
Ant 4
Ant Led 1
Ant Led 3
Ant Led 2
Ant Led 4
Led 5
Led 6
Led 7
77MP01 77LP04 (1)
77LP04 (2)
IC1
IC1
IC2
IC2
Ant
1+2
Ant
3+4
Ohne
Q2
77LA04/4
ANT1 (SCL DIN DOUT)
ANT2 (SCL DIN DOUT)
Select
Led1
Led2
Led3
Led4
Led5
3
Reader Asic
Reader Asic
Reader Asic
Reader Asic
3
3
3
Sys tem Components
Page 21 of 59 Read/Write S hort R ange System Manual Baumer I dent G mbH
`1'-signal 16 ... 36 V (max. 10 mA)
`0'-signal -2 ... +2 V
The above is valid when using an input resistor
of about 3kΩ.
The two galvanically separated digital outputs
have an allowed switching voltage of:
10 ... 36 V / 0,05 A (50 mA)
See also the following section for further details.
Terminal
The terminal interface is used for system con-
figuration and diagnostics purposes. It is in-
tended to be connected to a personal computer
running a terminal emulation software. The ter-
minal is a RS232 interface. It is not galvanically
separated (not opto-isolated).
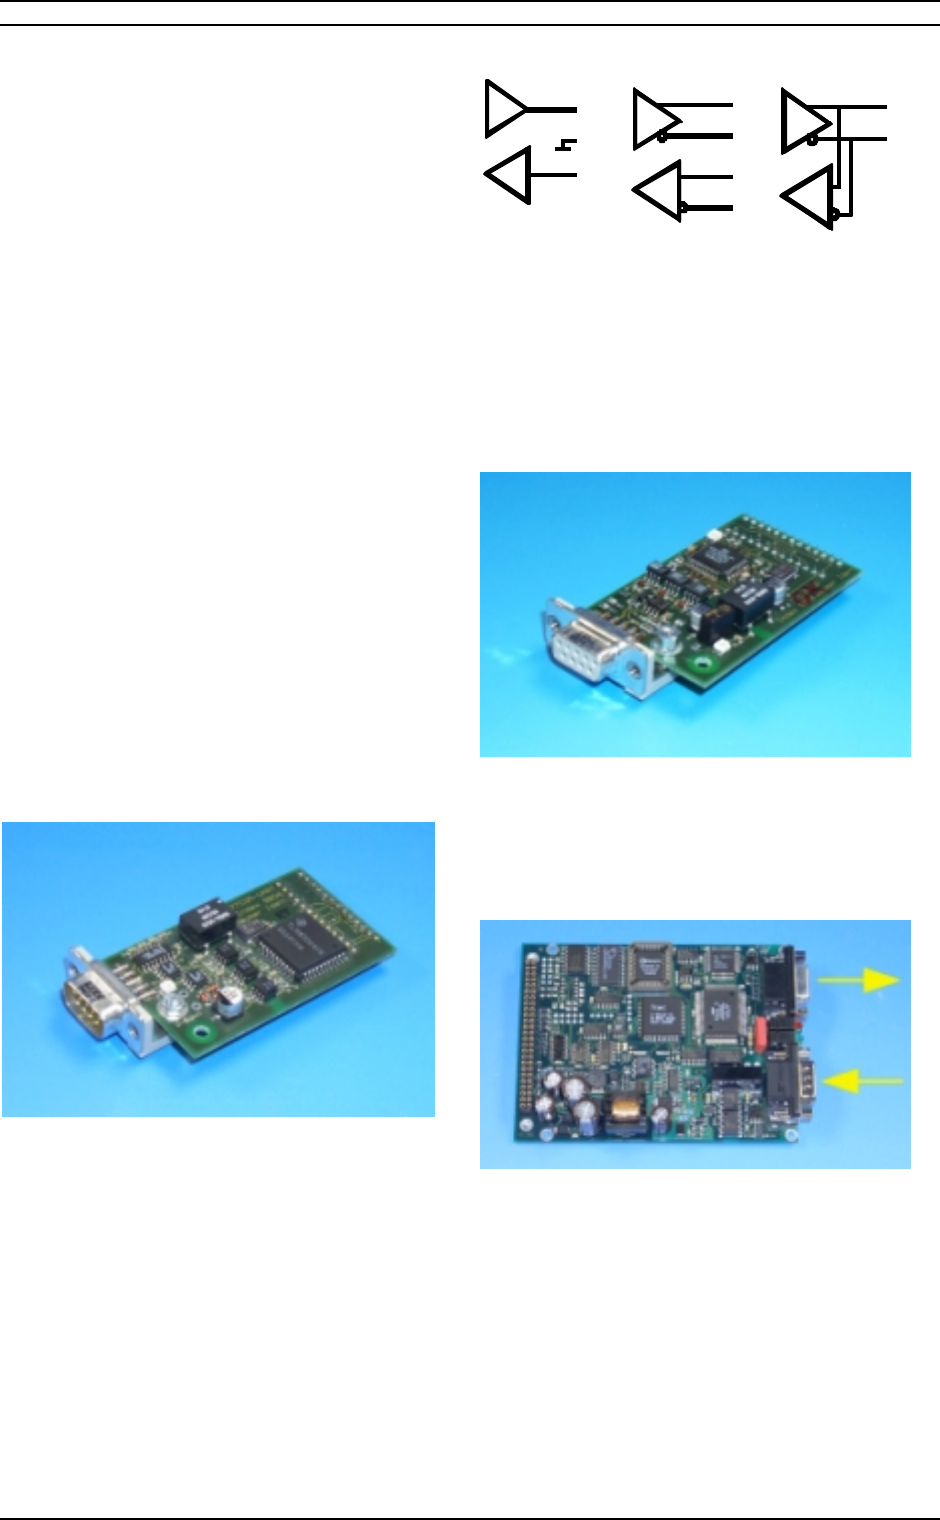
4.1.1.2.2. Communication modules
The communication modules make up the sys-
tem interface between the reader and a host
computer (PC or PLC).
The system has automatic interface detection so
that no setting is necessary.
77COM-SER
The serial communication module 77COM-SER
integrates a UART of the type 16C550 as a se-
rial interface in the respective memory area of
the processor. The driver-ICs are fed from a
DC/DC converter via galvanically separated
opto-couplers. They provide the following host
interfaces:
TxD (3)
GND (5)
RxD (2)
TA (6)
TB (7)
RA (8)
RB (9)
A (6)
B (7)
RS 232 RS 422 RS 485
Only one of these options may be connected at any
given time.
You must not connect any unused wires!
77 COM-DP
The communication module 77COM-DP integrates
a Profibus-DP interface with maximally 12 Mbaud in
the memory area of the processor.
77COM-IBS
upper connector IBS-OUT, lower connector IBS-IN
Interbus module and integrated SUPI3 controller
with 10 IBS words IN and 10 IBS words OUT. Con-
nection with the OIS-L controller is via a serial in-
terface.
Sys tem Components
Baumer I dent G mbH Read/Write S hort R ange System Manual Page 22 of 59
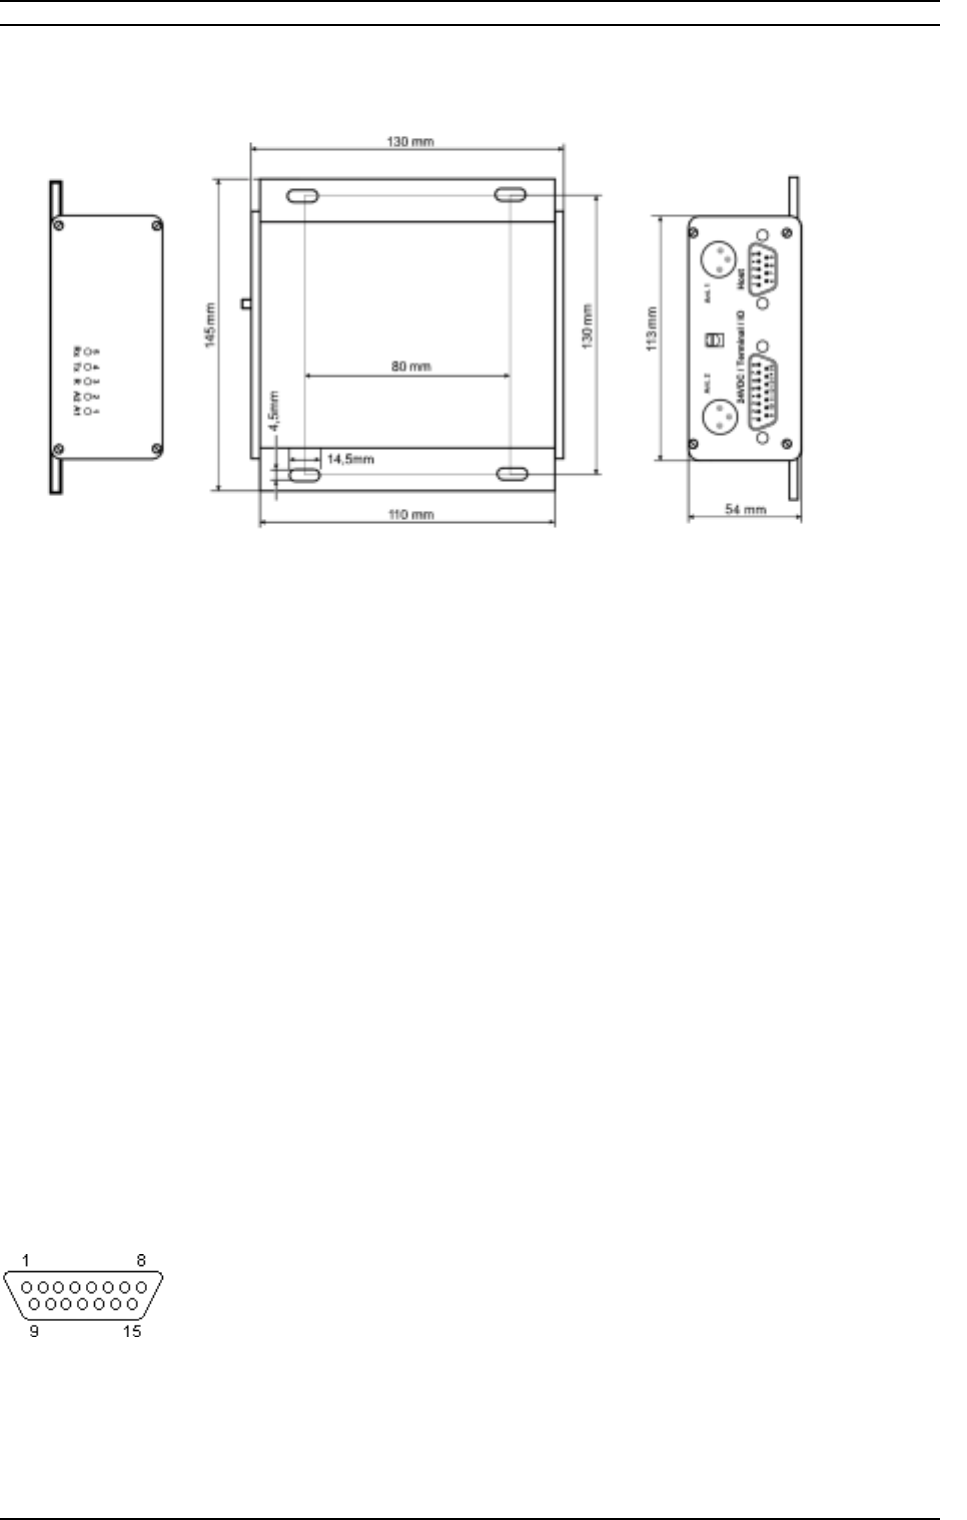
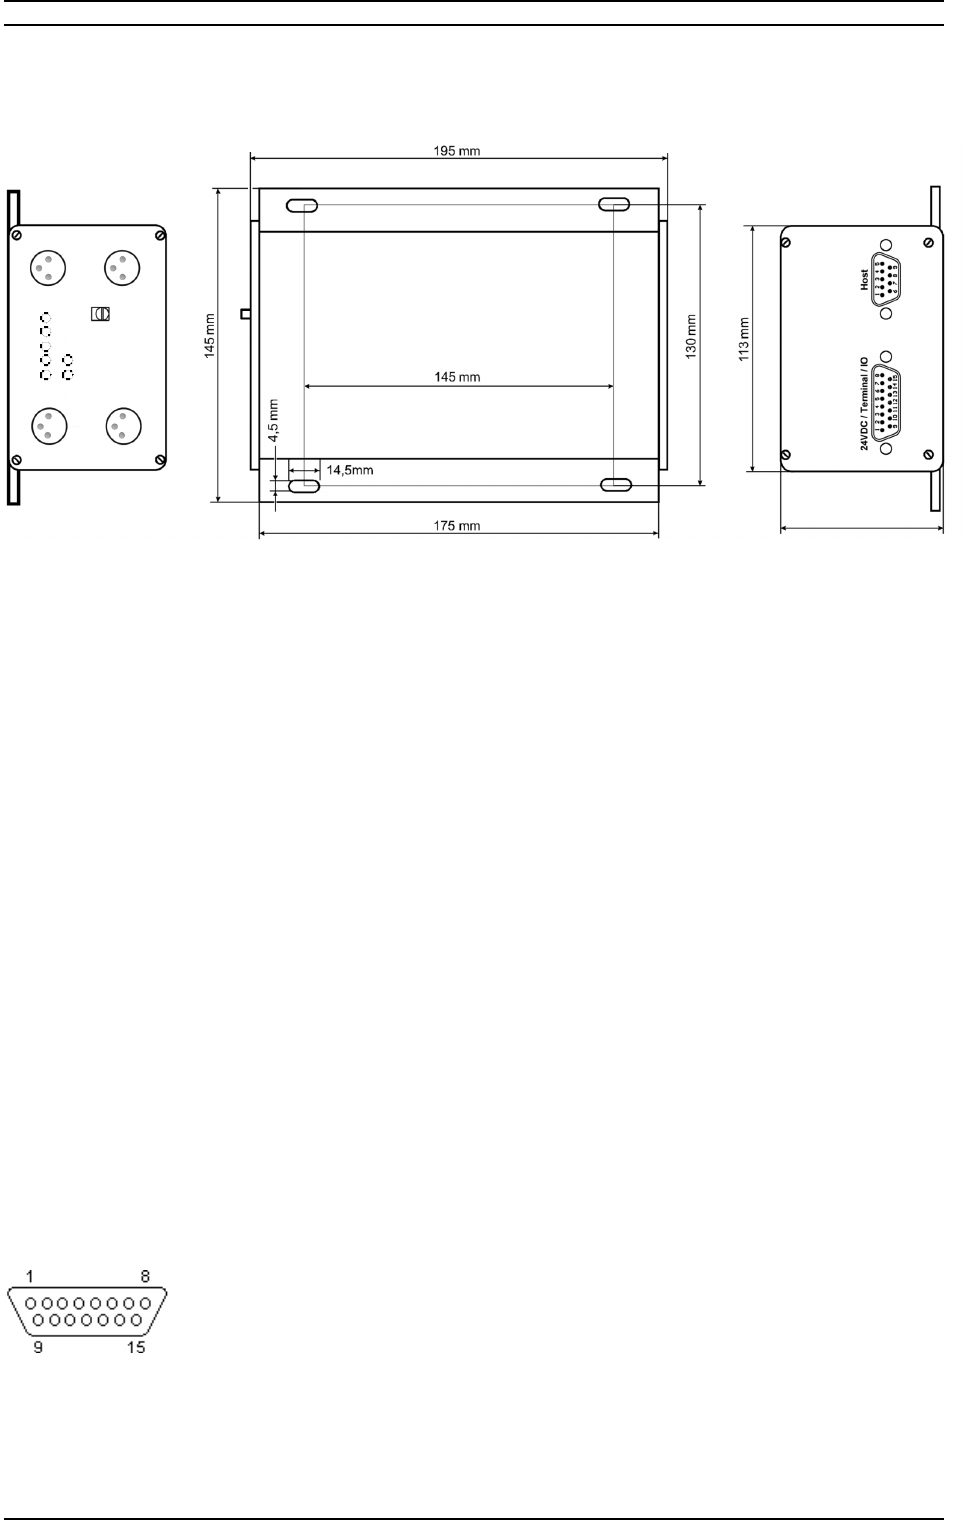
4.1.2 77LA04/2-SER, -MD, -ET, -DP
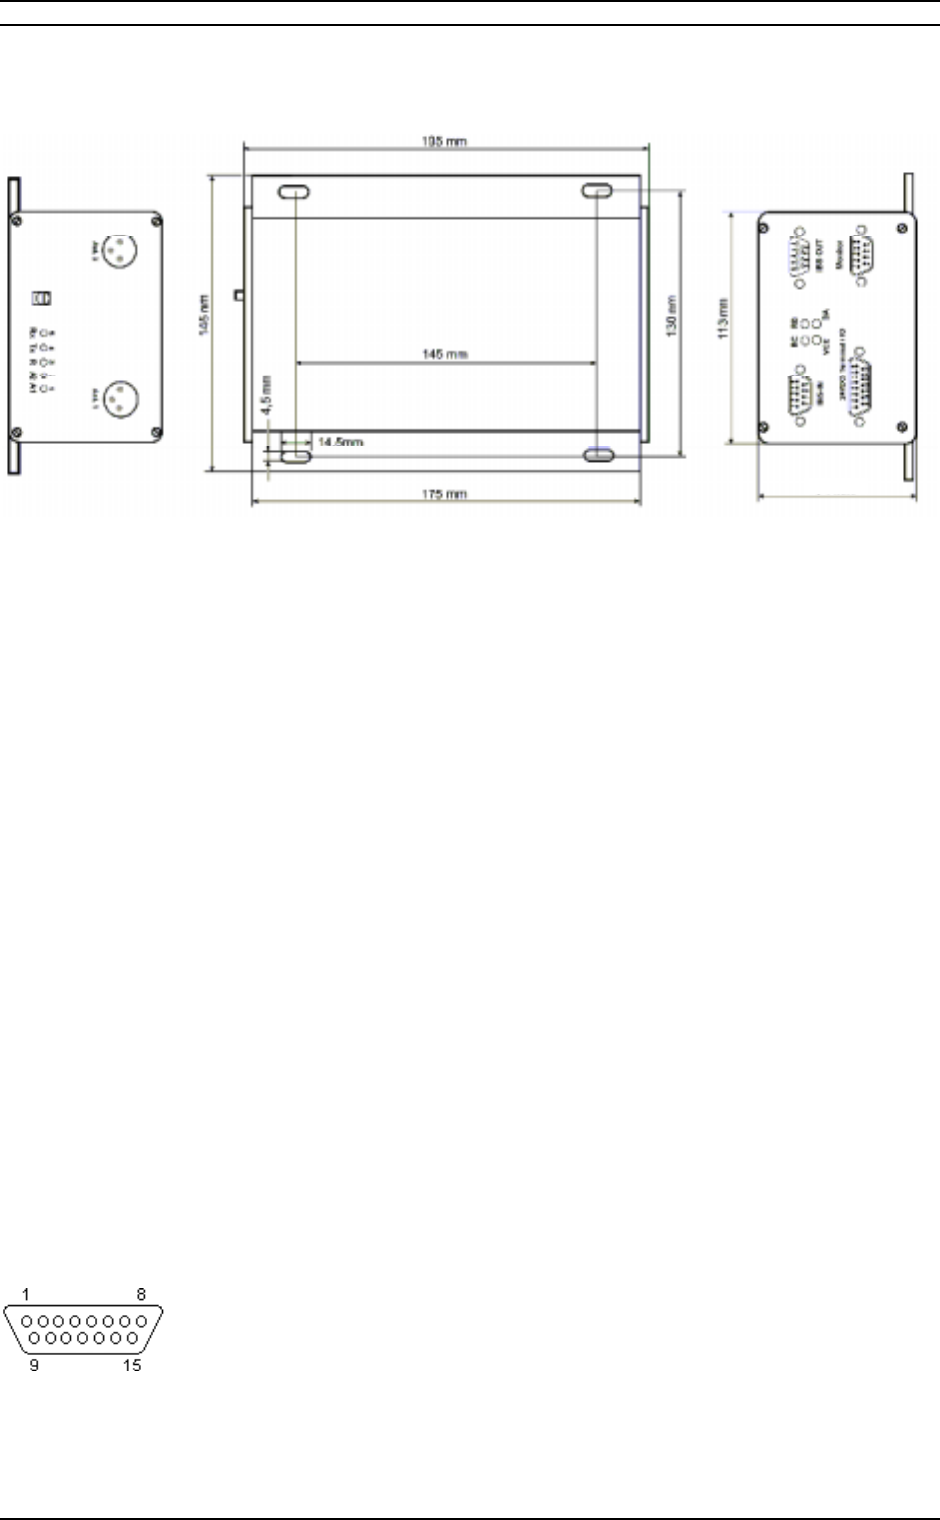
Dimensional drawing – 77LA04/2-SER, -SER-ET, -MD, -DP
4.1.2.1. Connector pin assignment
The supply circuits must comply with the re-
quirements of the SELV circuits (see
EN60950).
A screened cable must be used for the power
supply. Only in that way the required EMC is
achieved.
SELV – Safety Extra Low Voltage – Protective measure
against dangerous body currents. Protective first volt-
age, circuit not floating.
EMC – Electromagnetic Compatibility
The signal circuits must comply with the re-
quirements of the SELV circuits (see
EN60950).
SELV – Safety Extra Low Voltage – Protective measure
against dangerous body currents. Protective first volt-
age, circuit not floating
4.1.2.1.1. Power supply, Terminal and
Digital I/Os
Pin Signal description
1, 9 Power supply, 24 VDC, V+
2, 10 Power supply, 0 VDC, V-
14 Digital input 1, anode, +
6 Digital input 1, cathode, -
13 Digital input 2, anode, +
5 Digital input 2, cathode, -
12 Digital output 1, collector, +
4 Digital output 1, emi tter, -
11 Digital output 2, coll ector, +
3 Digital output 2, emi tter, -
7 Terminal interface GND
8 Terminal interface RxD
15 Terminal interface TxD
Terminal Interface
On the 15-pin D-sub connector there is a terminal
Interface RS232 available for service and diag-
nostic purposes.
When the central unit is equipped with the Pro-
fibus-DP communication module 77COM-DP, the
terminal interface is also used to set the correct
Profibus slave address.
Warning! The terminal Interface is not galvani-
cally Separated!
Sys tem Components
Page 23 of 59 Read/Write S hort R ange System Manual Baumer I dent G mbH
Digital I/Os
The two galvanically separated digital inputs have
a permissible input voltage of:
‘1’-signal 16 … 36 V (max. 10 mA)
‘0’-signal -2 … +2 V
The above is valid when using an input resistor of
about 3kΩ.
The two galvanically separated digital outputs
have an allowed switching voltage of:
10 … 36 V / 0,05 A (50 mA)
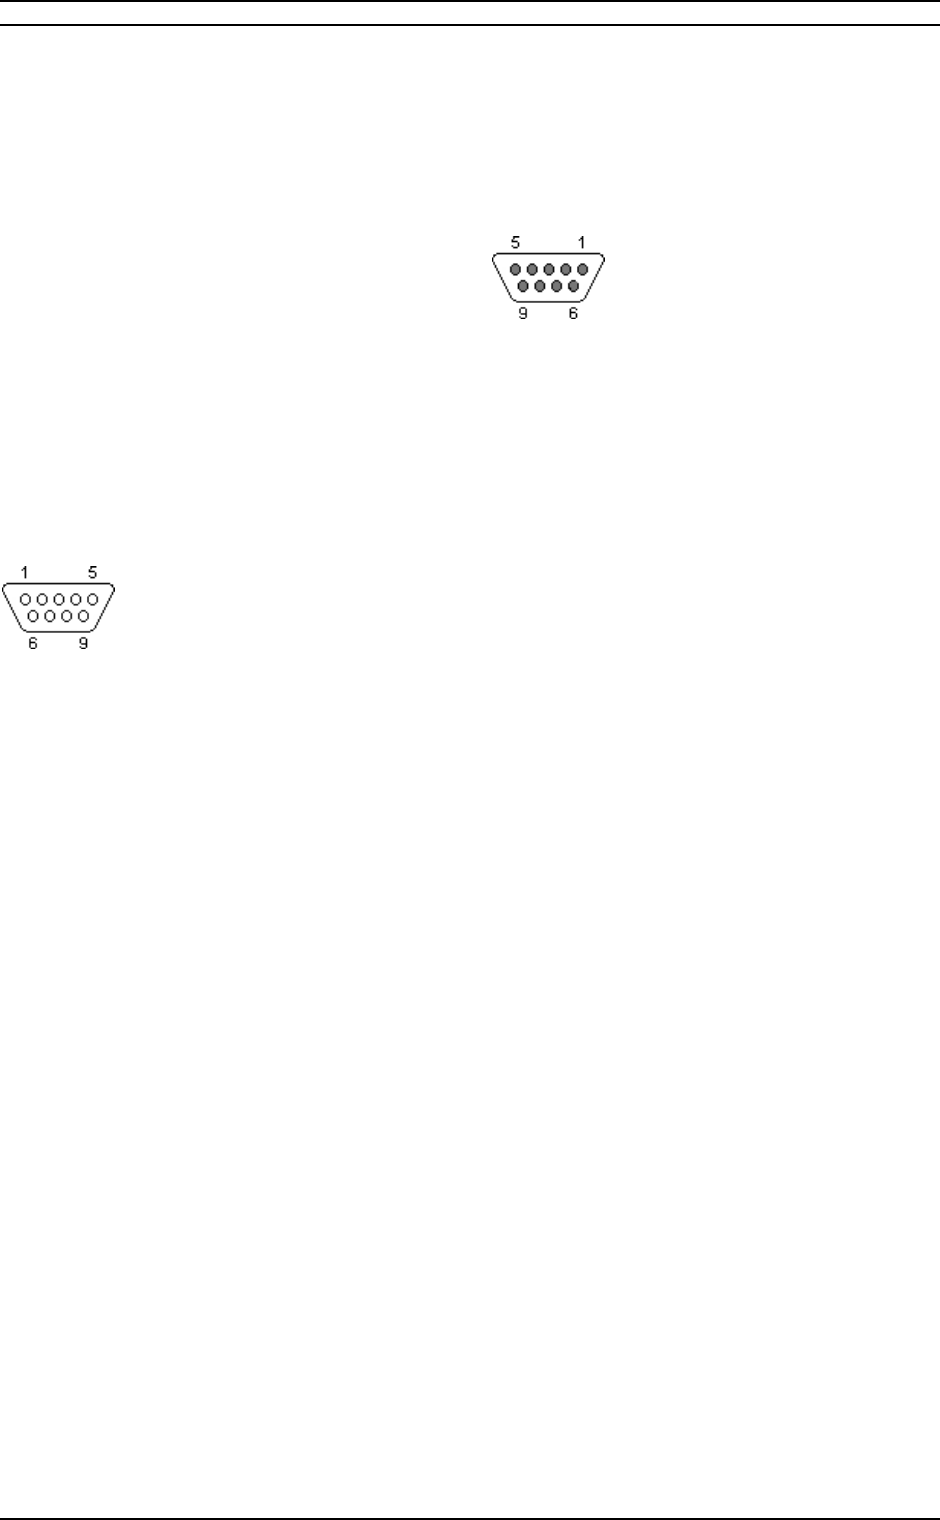
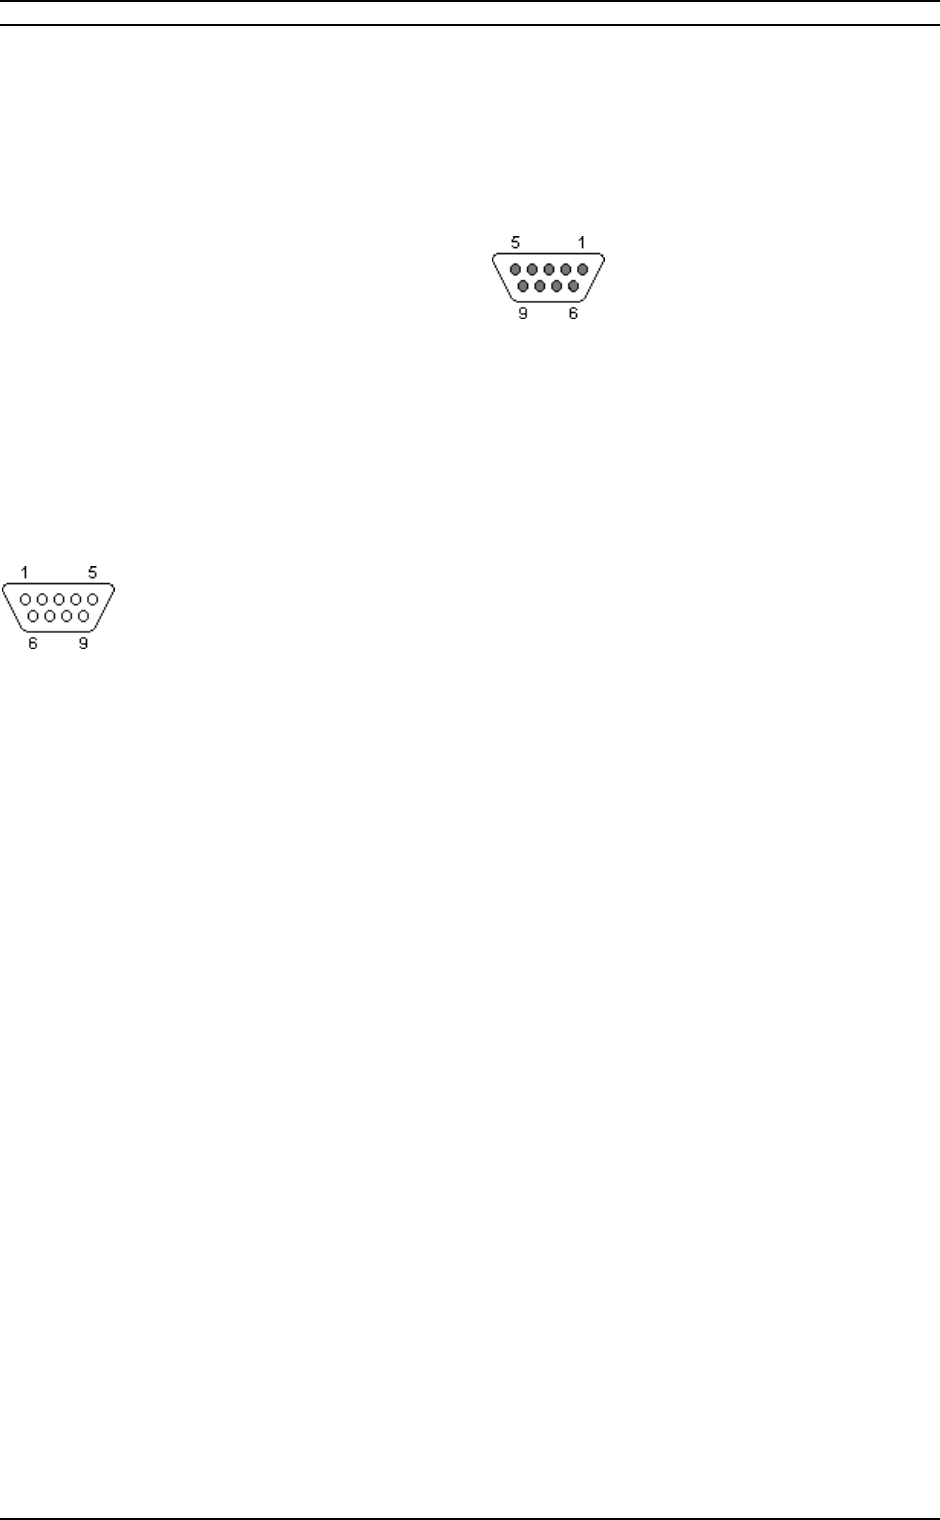
4.1.2.1.2. Host interface
Serial host interface (in central unit
77LA04-SER only)
Pin Signal description
2 RS 232 RxD
6 RS 232 TxD
5 RS 232 GND
6 RS 422 TA and RS 485 A
7 RS 422 TB and TS 485 B
8 RS 422 RA
9 TS 422 RB
1 VTERM for RS 422 and RS 485
(max 20 mA)
You must not connect any unused wires!
Profibus DP host interface (in central
unit 77LA04-DP only)
The host interface corresponds to the Profibus-DP
specifications.
Pin Name Signal description
1 Shi eld Shi eld / Protective ground
2 M24 Earth for 24 V voltage out
3 RxD/TxD-P Receive / Transmit signals –
positive
4 CNTR-P Control signal for repeater
– posi ti ve
5 DGND Data ground
(ground to VP)
6 VP Voltage supply for the termi-
nation resistors (+5V)
7 P24 voltage out 24V
8 RxD/TxD-N Receive / Transmit
– negative
9 CNTR-N Control signal for repeater
– negative
Figures in bold typeface are mandatory and must be
provided by the user.
Cable parameters
The bus cable is specified as cable type A within
the standard EN50170 and can be applied ac-
cording to the following table:
Parameter Cable A
Wa ve re si stan ce 135 .. 165 Ω
Line Capacity < 30 pF/m
Loop resistance 110 Ω/m
Core di ameter of the signal ca-
ble Ø 0,64 mm
Core cross se cti on > 0 ,34 m m ²
Sys tem Components
Baumer I dent G mbH Read/Write S hort R ange System Manual Page 24 of 59
In adhering to the above parameters, the following
distances for a bus segment (branch) can be
achieved:
Baudrate (Kbit/sec) Max. cable length
9.6 1,200
19.2 1,200
93.75 1,200
187.5 1,200
500 400
1500 200
12,000 100
• Short branch cables (< 6,6 m) may be used
up to 1.500 kbit/sec.
• above this speed no branch cables should
be used.
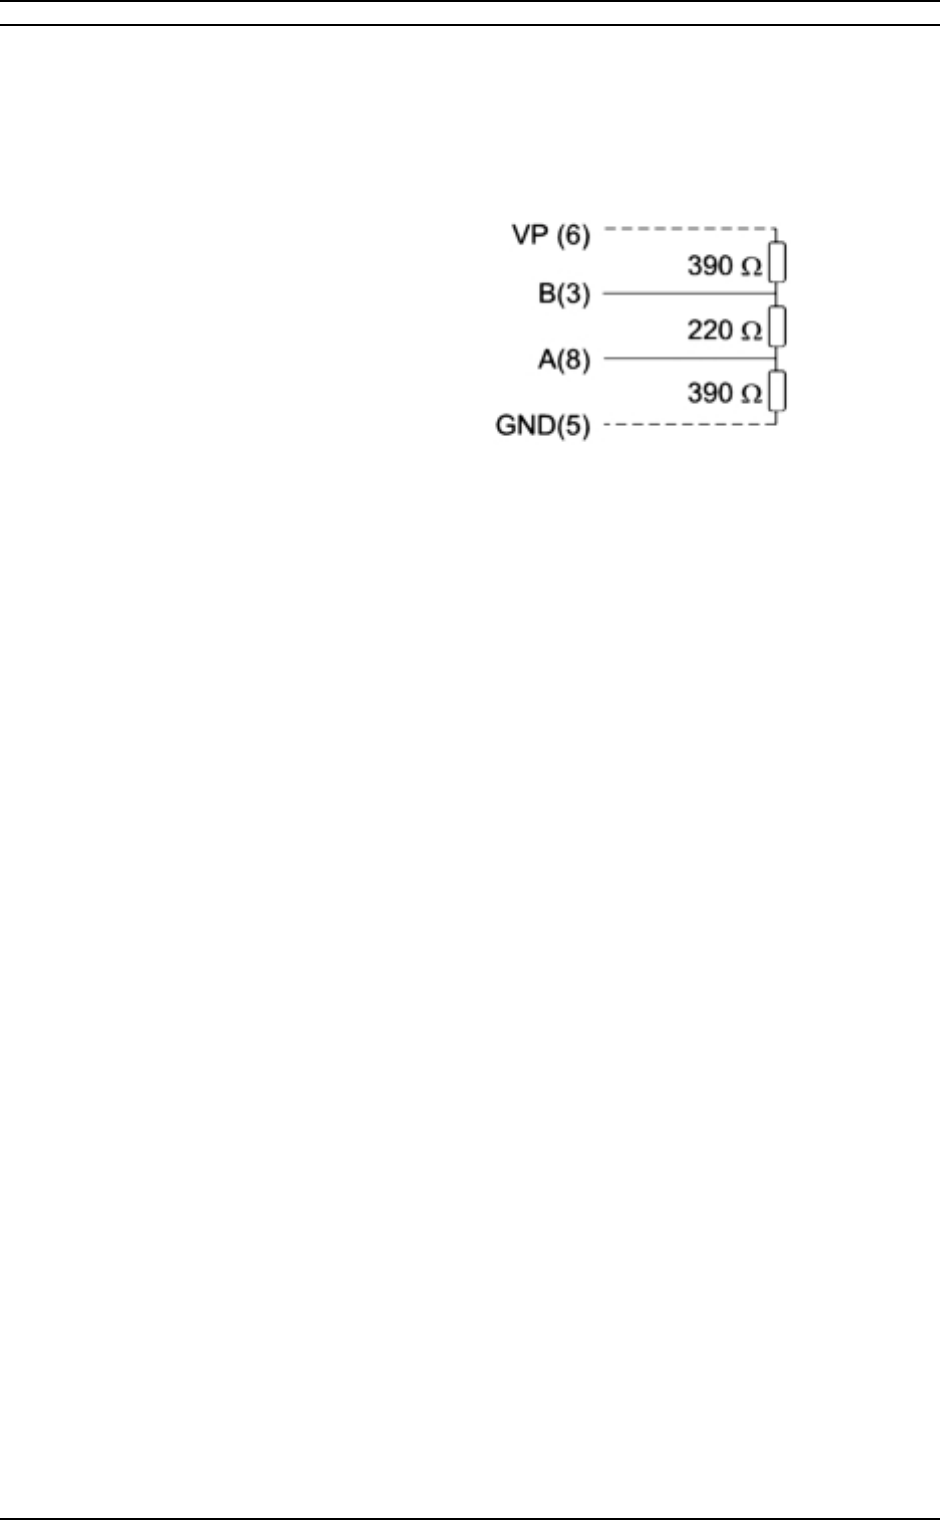
Bus termination
If cable A according to EN50170 is used, a resis-
tor combination should be used as bus termina-
tion to warrant a defined potential on the line.
Schematic of bus termination
The cable shield must be connected to the pro-
tective ground to prevent EMC disturbances from
reaching into the central unit. The power supply to
the termination resistors on pin 6 is only intended
for that purpose and thus restricted to 10 mA.
It is important that the connectors at both ends of
the Profibus-DP cable are equipped with termina-
tion resistors. If this is not the case there may be
problems with the transmission.
Sys tem Components
Page 25 of 59 Read/Write S hort R ange System Manual Baumer I dent G mbH
4.1.2.2. System Diagnostics
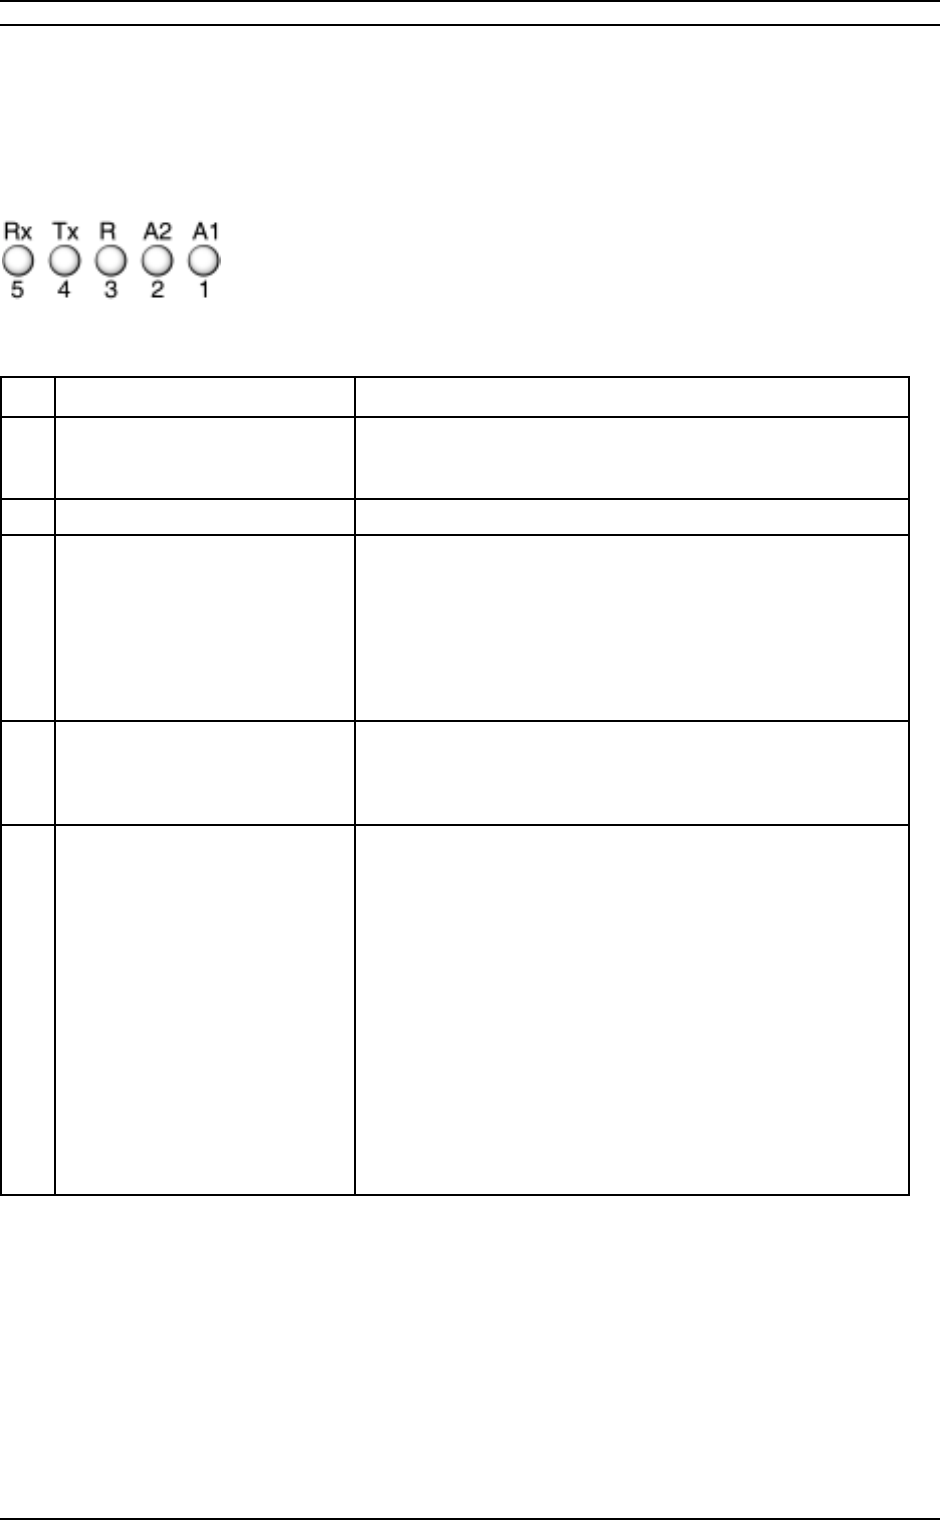
LED Description
On the rear side of the controller there are 5
LED’s situated as shown in the diagram below:
LED Layout on backpanel
No. Signal name Function
1 A1 – Antenna 1 active When lit, the antenna is active, executing a Read/Write
command with a tag or the controller is waiting for a tag at
this antenna (automatic Read/Write mode)
2 A2 – Antenna 2 active ditto with antenna 2
3 R – RUN mode – flashing 1/2s A flashing LED indicates that the controller is running. When
entering the Monitor – the LED stops flashing – the last LED
state remains active until the normal program operation con-
tinues.
Note: the Monitor program stops automatically on missi ng
terminal inputs after about 30 seconds and the normal op-
eration continues.
4 Tx – Transmitting data The controller sends data via the host port (Serial or Pro-
fibus) – the LED is switched ON just before the data is put
into the output FIFO buffer and switched OFF when the last
character of data is placed in the communication device.
5 Rx – Receiving data When the controller fetches a complete command from the
communication device the LED switches ON. The LED
switches OFF when the message receive has completed.
With Profibus DP the LED switches ON at any change of the
controller inputs state (CTL-octet) and switches OFF when
the decoded command transfer to the command execution
module (command parser) has completed.
Hint:
A flickering Rx-LED on Profibus without any flickering of the
Tx-LED (for responses) indicates that the host does not
handle the command handshake bits correctly – in this case
refer to the section in this manual describing the CTL Bit
Handshake Protocol.

Sys tem Components
Baumer I dent G mbH Read/Write S hort R ange System Manual Page 26 of 59
4.1.2.3. Technical Data
The protection class IP65 is only valid when
protective caps are fitted to the unused con-
nectors and cables with sealed connectors
are used.
Operating Data
Operating frequency 125 kHz
Antenna type separate, series 77LSxx
No. of antennae 1
Data transfer speed 9600 baud (-SER)
Interfaces
Serial RS 232/422/485
9-pin D-Sub male
Profibus-DP 9-pin D-Sub female
Device addressing software command or
dip-switch (optional)
Electrical Data
Supply voltage 24 VDC ±10%
Power consumption max. 200 mA
Supply connector D-Sub 15-pin, combined
with IO and testterminal
Antenna connection
Immunity EN50082-2, Class 3
Emission EN55022, Class A
Mechanical data
Housing
Housing material aluminium
Outer dimensions
77LA04/2-SER,
-ET, -MD, -DP 145 × 130 × 54 mm
Weight
77LA04/2-SER,
-ET, -MD, -DP 700 g
Environmental Conditions
measured according to EN 60068-2-30
Temperature range 0 … +50 °C (Operating)
-10 … +60 °C (Storage)
77LA04/2-ET -10 … +50 °C (Operating)
Protection class IP 63 *
Climate, Upper
temperature +55 °C, 93 % rel. humidity
Climate, Lower
temperature +25 °C, 97 % rel. humidity
Duration of climate
test 2 cycles, 24 h each
* IP65 when protective caps are fitted to the unused
connectors and cables with sealed connectors are
used.
Vibration test IEC 68 Part 2-6
Wave type Sine form
Frequency band 2 – 500 Hz
Amplitude 2 – 8 Hz 7,53 mm
peak./peak.
8 – 200 Hz, 2 g
200 – 500 Hz, 4 g
Sweep speed 1 oct / min
Duration of test 2 h per axis
Shock test (long-term) IEC 68 Part 2-29
Shock form half sine form
Amplitude 15 g
Duration of shock 6 ms
Number of shocks 4.000 *
Shock test IEC 68 Part 2-27
Shock form half sine form
Amplitude 30 g
Duration of shock 15 ms
Number of shocks 3 *
* Measured in both directions of the 3 main axis of the
test object, oriented orthogonal to each other.
Sys tem Components
Page 27 of 59 Read/Write S hort R ange System Manual Baumer I dent G mbH
4.1.3 Central Unit 77LA04/4 –SER, -DP
Dimensions 77LA04/4-SER, -DP
4.1.3.1. Connector pin assignment
The supply circuits must comply with the re-
quirements of the SELV circuits (see
EN60950).
A screened cable must be used for the power
supply. Only in that way the required EMC is
achieved.
SELV – Safety Extra Low Voltage – Protective measure
against dangerous body currents. Protective first volt-
age, circuit not floating.
EMC – Electromagnetic Compatibility
The signal circuits must comply with the re-
quirements of the SELV circuits (see
EN60950).
SELV – Safety Extra Low Voltage – Protective measure
against dangerous body currents. Protective first volt-
age, circuit not floating
4.1.3.1.1. Power supply, Terminal and
Digital I/Os
Pin Signal description
1, 9 Power supply, 24 VDC, V+
2, 10 Power supply, 0 VDC, V-
14 Digital input 1, anode, +
6 Digital input 1, cathode, -
13 Digital input 2, anode, +
5 Digital input 2, cathode, -
12 Digital output 1, collector, +
4 Digital output 1, emi tter, -
11 Digital output 2, coll ector, +
3 Digital output 2, emi tter, -
7 Terminal interface GND
8 Terminal interface RxD
15 Terminal interface TxD
Terminal Interface
On the 15-pin D-sub connector there is a terminal
Interface RS232 available for service and diag-
nostic purposes.
When the central unit is equipped with the Pro-
fibus-DP communication module 77COM-DP, the
terminal interface is also used to set the correct
Profibus slave address.
Warning! The terminal Interface is not galvani-
cally Separated!
!" !#
!$ !%&' ( ' &
%$")#
78 mm
Sys tem Components
Baumer I dent G mbH Read/Write S hort R ange System Manual Page 28 of 59
Digital I/Os
The two galvanically separated digital inputs have
a permissible input voltage of:
‘1’-signal 16 … 36 V (max. 10 mA)
‘0’-signal -2 … +2 V
The above is valid when using an input resistor of
about 3kΩ.
The two galvanically separated digital outputs
have an allowed switching voltage range of:
10 … 36 V / 0,05 A (50 mA)
4.1.3.1.2. Host interface
Serial host interface (in central unit
77LA04-SER)
Pin Signal description
2 RS 232 RxD
6 RS 232 TxD
5 RS 232 GND
6 RS 422 TA and RS 485 A
7 RS 422 TB and TS 485 B
8 RS 422 RA
9 TS 422 RB
1 VTERM for RS 422 and RS 485
(max 20 mA)
You must not connect any unused wires!
The cable has to be shielded!
Profibus DP host interface (in central
unit 77LA04-DP)
The host interface corresponds to the Profibus-DP
specifications.
Pin Name Signal description
1 Shi eld Shi eld / Protective ground
2 M24 Earth for 24 V voltage out
3 RxD/TxD-P Receive / Transmit signals –
positive
4 CNTR-P Control signal for repeater
– posi ti ve
5 DGND Data ground
(ground to VP)
6 VP Voltage supply for the termi-
nation resistors (+5V)
7 P24 voltage out 24V
8 RxD/TxD-N Receive / Transmit
– negative
9 CNTR-N Control signal for repeater
– negative
Figures in bold typeface are mandatory and must be
provided by the user.
Sys tem Components
Page 29 of 59 Read/Write S hort R ange System Manual Baumer I dent G mbH
Cable parameters
The bus cable is specified as cable type A within
the standard EN50170 and can be applied ac-
cording to the following table:
Parameter Cable A
Wa ve re si stan ce 135 .. 165 Ω
Line Capacity < 30 pF/m
Loop resistance 110 Ω/m
Core di ameter of the signal ca-
ble Ø 0,64 mm
Core cross se cti on > 0 ,34 m m ²
In adhering to the above parameters, the following
distances for a bus segment (branch) can be
achieved:
Baudrate (Kbit/sec) Max. cable length
9.6 1,200
19.2 1,200
93.75 1,200
187.5 1,200
500 400
1500 200
12,000 100
• Short branch cables (< 6,6 m) may be used
up to 1.500 kbit/sec.
• above this speed no branch cables should
be used.
Bus termination
If cable A according to EN50170 is used, a resis-
tor combination should be used as bus termina-
tion to warrant a defined potential on the line.
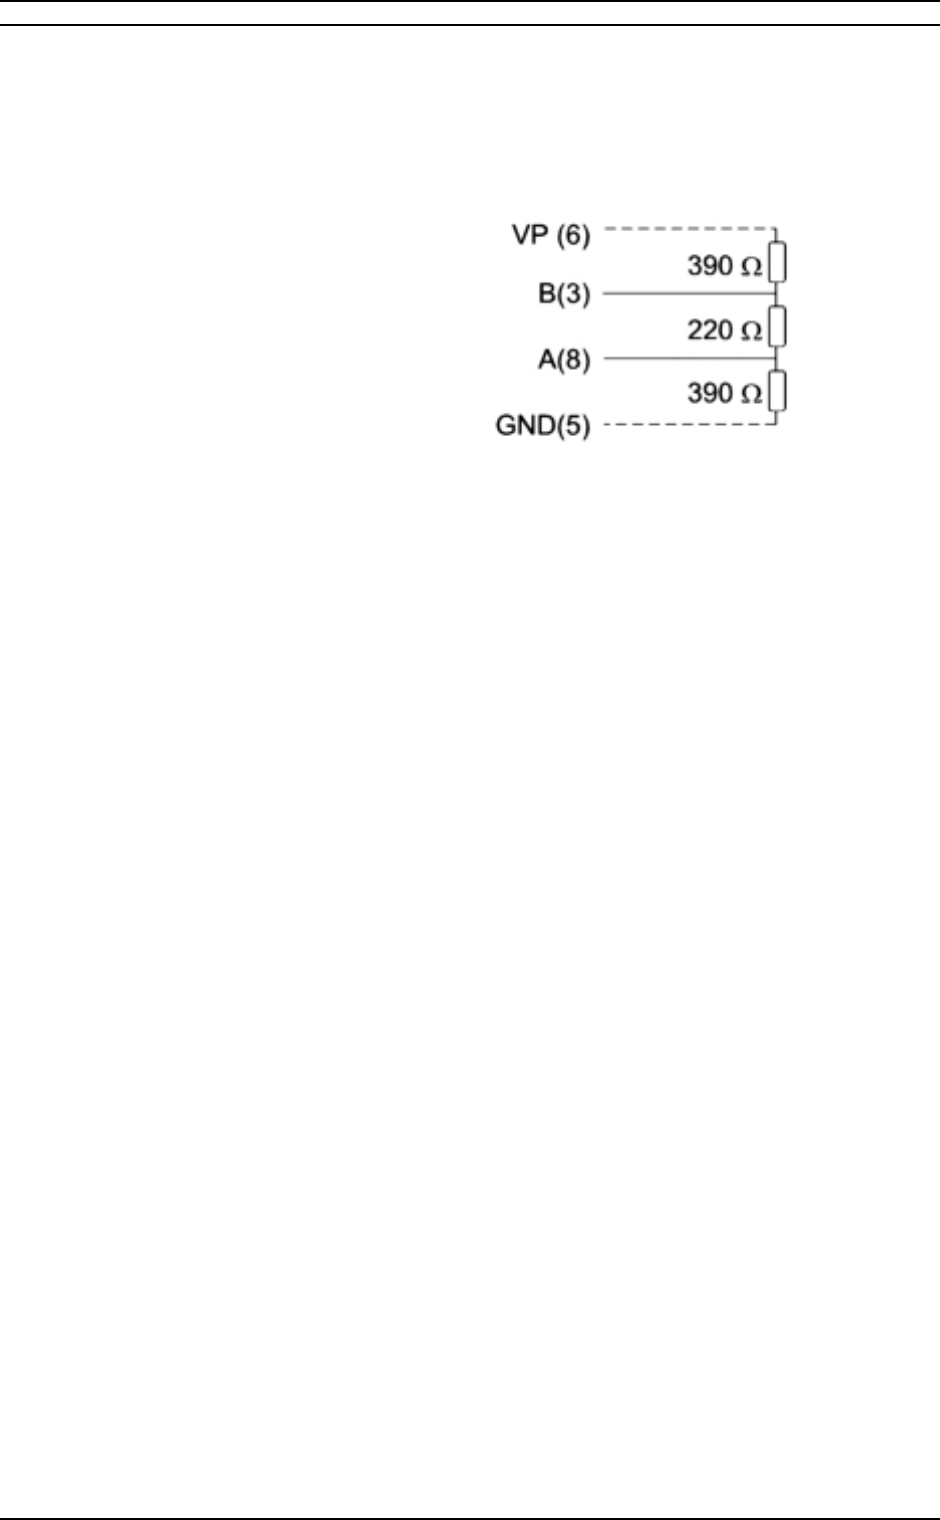
Schematic of bus termination
The cable shield must be connected to the pro-
tective ground to prevent EMC disturbances from
reaching into the central unit. The power supply to
the termination resistors on pin 6 is only intended
for that purpose and thus restricted to 10 mA.
It is important that the connectors at both ends of
the Profibus-DP cable are equipped with termina-
tion resistors. If this is not the case there may be
problems with the transmission.
Sys tem Components
Baumer I dent G mbH Read/Write S hort R ange System Manual Page 30 of 59
4.1.3.2. System Diagnostics
LED Description
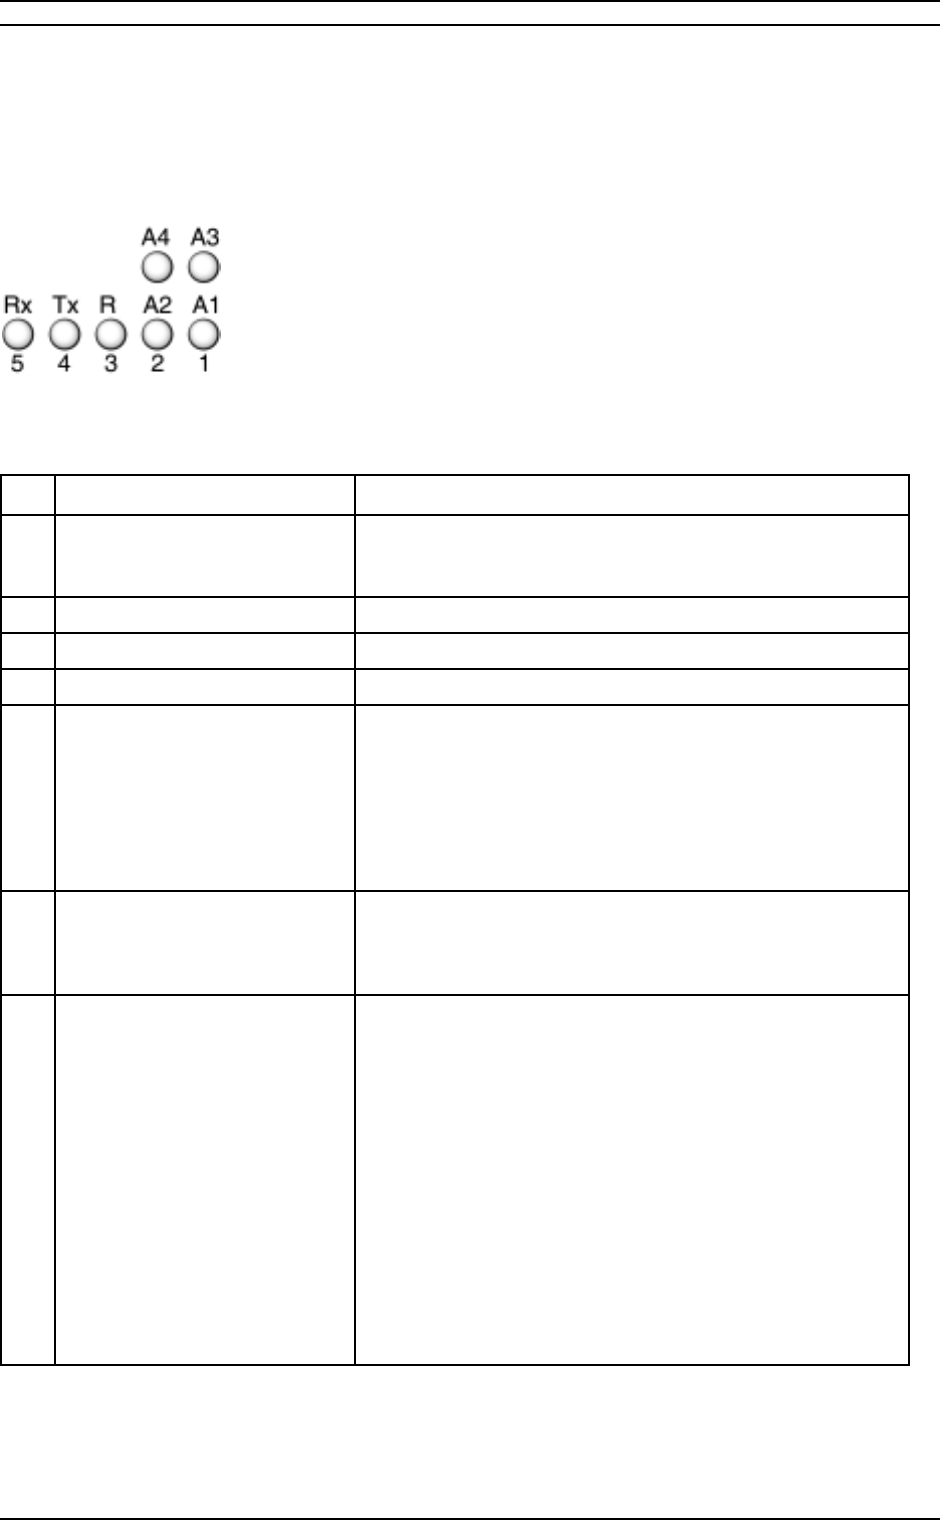
On the rear side of the controller there are 7
LED’s situated as shown in the diagram below:
LED Layout on backpanel
No. Signal name Function
1 A1 – Antenna 1 active When lit, the antenna is active, executing a Read/Write
command with a tag or the controller is waiting for a tag at
this antenna (automatic Read/Write mode)
2 A2 – Antenna 2 active ditto with antenna 2
1 up A3 – Antenna 3 active ditto with antenna 3
2 up A4 – Antenna 4 active ditto with antenna 4
3 R – RUN mode – flashing 1/2s A flashing LED indicates that the controller is running. When
entering the Monitor – the LED stops flashing – the last LED
state remains active until the normal program operation con-
tinues.
Note: the Monitor program stops automatically on missi ng
terminal inputs after about 30 seconds and the normal op-
eration continues.
4 Tx – Transmitting data The controller sends data via the host port (Serial or Pro-
fibus) – the LED is switched ON just before the data is put
into the output FIFO buffer and switched OFF when the last
character of data is placed in the communication device.
5 Rx – Receiving data When the controller fetches a complete command from the
communication device the LED switches ON. The LED
switches OFF when the message receive has completed.
With Profibus DP the LED switches ON at any change of the
controller inputs state (CTL-octet) and switches OFF when
the decoded command transfer to the command execution
module (command parser) has completed.
Hint:
A flickering Rx-LED on Profibus without any flickering of the
Tx-LED (for responses) indicates that the host does not
handle the command handshake bits correctly – in this case
refer to the section in this manual describing the CTL Bit
Handshake Protocol.

Sys tem Components
Page 31 of 59 Read/Write S hort R ange System Manual Baumer I dent G mbH
4.1.3.3. Technical Data
The protection class IP65 is only valid when
protective caps are fitted to the unused con-
nectors and cables with sealed connectors are
used.
Operating Data
Operating frequency 125 kHz
Antenna type separate, series 77LSxx
No. of antennae 1
Data transfer speed 9600 baud (-SER)
Interfaces
Serial RS 232/422/485
9-pin D-Sub male
Profibus-DP 9-pin D-Sub female
Device addressing dip-switch or software
command
Electrical Data
Supply voltage 24 VDC ±10%
Power consumption max. 200 mA
Supply connector D-Sub 15-pin, combined
with IO and testterminal
Antenna connection
Immunity EN-50082-2, Class 3
Emission EN-55022, Class A
Mechanical data
Housing
Housing material aluminium
Outer dimensions
77LA04/4-SER,
-DP 195 × 145 × 78 mm
Weight
77LA04/4-SER,
-DP 1.1 kg
Environmental Conditions
measured according to EN 60068-2-30
Temperature range 0 … +50 °C (Operating)
-10 … +60 °C (Storage)
Protection class IP 63 *
Climate, Upper
temperature +55 °C, 93 % rel. humidity
Climate, Lower
temperature +25 °C, 97 % rel. humidity
Duration of climate
test 2 cycles, 24 h each
* IP65 when protective caps are fitted to the unused
connectors and cables with sealed connectors are
used.
Vibration test IEC 68 Part 2-6
Wave type Sine form
Frequency band 2 – 500 Hz
Amplitude 2 – 8 Hz 7,53 mm
peak./peak.
8 – 200 Hz, 2 g
200 – 500 Hz, 4 g
Sweep speed 1 oct / min
Duration of test 2 h per axis
Shock test (long-term) IEC 68 Part 2-29
Shock form half sine form
Amplitude 15 g
Duration of shock 6 ms
Number of shocks 4.000 *
Shock test IEC 68 Part 2-27
Shock form half sine form
Amplitude 30 g
Duration of shock 15 ms
Number of shocks 3 *
* Measured in both directions of the 3 main axis of the
test object, oriented orthogonal to each other.
Sys tem Components
Baumer I dent G mbH Read/Write S hort R ange System Manual Page 32 of 59
4.1.4 Central Unit 77LA04/2-IBS
78 mm
Picture 1
Dimensions 77LA04/2-IBS
4.1.4.1. Connector pin assignment
The supply circuits must comply with the re-
quirements of the SELV circuits (see
EN60950).
A screened cable must be used for the power
supply. Only in that way the required EMC is
achieved.
SELV – Safety Extra Low Voltage – Protective measure
against dangerous body currents. Protective first volt-
age, circuit not floating.
EMC – Electromagnetic Compatibility
The signal circuits must comply with the re-
quirements of the SELV circuits (see
EN60950).
SELV – Safety Extra Low Voltage – Protective measure
against dangerous body currents. Protective first volt-
age, circuit not floating
4.1.4.1.1. Power supply, Terminal and
Digital I/Os
Pin Signal description
1, 9 Power supply, 24 VDC, V+
2, 10 Power supply, 0 VDC, V-
14 Digital input 1, anode, +
6 Digital input 1, cathode, -
13 Digital input 2, anode, +
5 Digital input 2, cathode, -
12 Digital output 1, collector, +
4 Digital output 1, emi tter, -
11 Digital output 2, coll ector, +
3 Digital output 2, emi tter, -
7 Terminal interface GND
8 Terminal interface RxD
15 Terminal interface TxD
Terminal Interface
On the 15-pin D-sub connector there is a terminal
Interface RS232 available for service and diag-
nostic purposes.
Warning! The terminal Interface is not galvani-
cally Separated!
Sys tem Components
Page 33 of 59 Read/Write S hort R ange System Manual Baumer I dent G mbH
Digital I/Os
The two galvanically separated digital inputs have
a permissible input voltage of:
‘1’-signal 16 … 36 V (max. 10 mA)
‘0’-signal -2 … +2 V
The above is valid when using an input resistor of
about 3kΩ.
The two galvanically separated digital outputs
have an allowed switching voltage of:
10 … 36 V / 0,05 A (50 mA)
4.1.4.1.2. Host interface
Interbus S host interface (in central
unit 77LA04/2-IBS only)
Interbus S IN – Remote Bus (female)
Pin Name Description
1 DO Data Out
2 DI Data In
3 COM Data Ground
4 GND Power supply for opto con-
verter
5
6 /DO Data Out inverted
7 /DI Data In inverted
8 +5V Power supply for opto con-
verter
9U
Interbus S OUT – Device Side (male)
Pin Name Description
1 DO Data Out
2 DI Data In
3 COM Data Gound
4 GND Power supply for opto con-
verter
5 BC Bus Control (+5V)
6 /DO Data Out inverted
7 /DI^ Data In inverted
8 +5V Power supply for opto con-
verter
9U
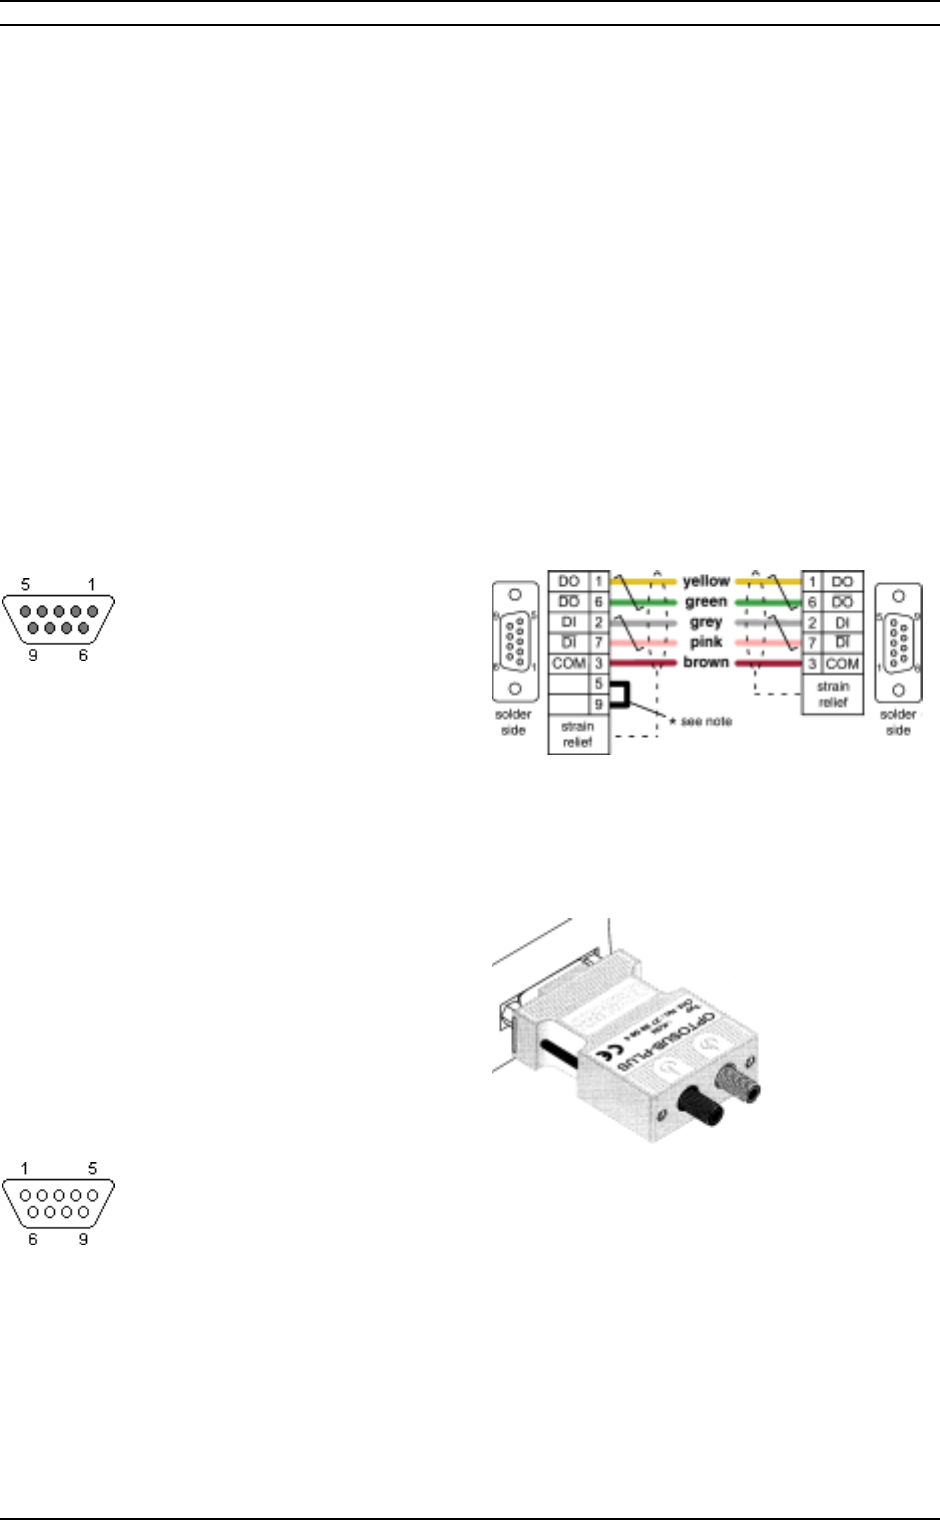
Recommended wiring
IBS-Out IBS-In
* This bridge is made if another module follows down
the line and is only on the Out-Port.
Conversion to fibre optic transmission
Available converters
• Remote-OUT to glass fibre
OPTOSUB-PLUS-G/OUT – 27 99 63 6
• Remote-OUT to polymer fiber
OPTOSUB-PLUS-K/OUT – 27 99 61 0
• Remote-IN to glass fiber
OPTOSUB-PLUS-G/IN 27 99 62 3
• Remote-IN to polymer fibre
OPTOSUB-PLUS-K/IN 27 99 58 4
Sys tem Components
Baumer I dent G mbH Read/Write S hort R ange System Manual Page 34 of 59
Please contact the manufacturer for detailed in-
formation. PDF files are available on the internet
at:
http://www.phoenixcontact.com
Cables required for Interbus S wiring
Characteristic quantity @ 20 °C Value Test method
Number of conductors 3 × 2, twisted pair with common
shi e ld
Conductor cross section Min. 0.2 mm²
DC conductor resistance per 100m Max. 9.6 ΩIEC 189-1 clause 5.1
Characteristic impedance 120 Ω ± 20 % @ f = 0.064 MHz
100 Ω ± 15 Ω @ f > 1 MHz
IEC 1156-1 clause
3.3.6
Dielectric strength
- Conductor / conductor 1000 Vrm s, 1 min IEC 189-1 clause 5.2
- Conductor / shield 1000 Vrm s, 1 min IEC 189-1 clause 5.2
Insulation resistance (after dielectric
strength test) Min. 150 MΩ for a cable of 1
km
IEC 189-1 clause 5.3
Maximum transfer impedance @ 30 MHz 250 mΩ/m IEC 96-1
Working capacitance @ 800 Hz Max. 60 nF for a cable of 1 km IEC189-1 clause 5.4
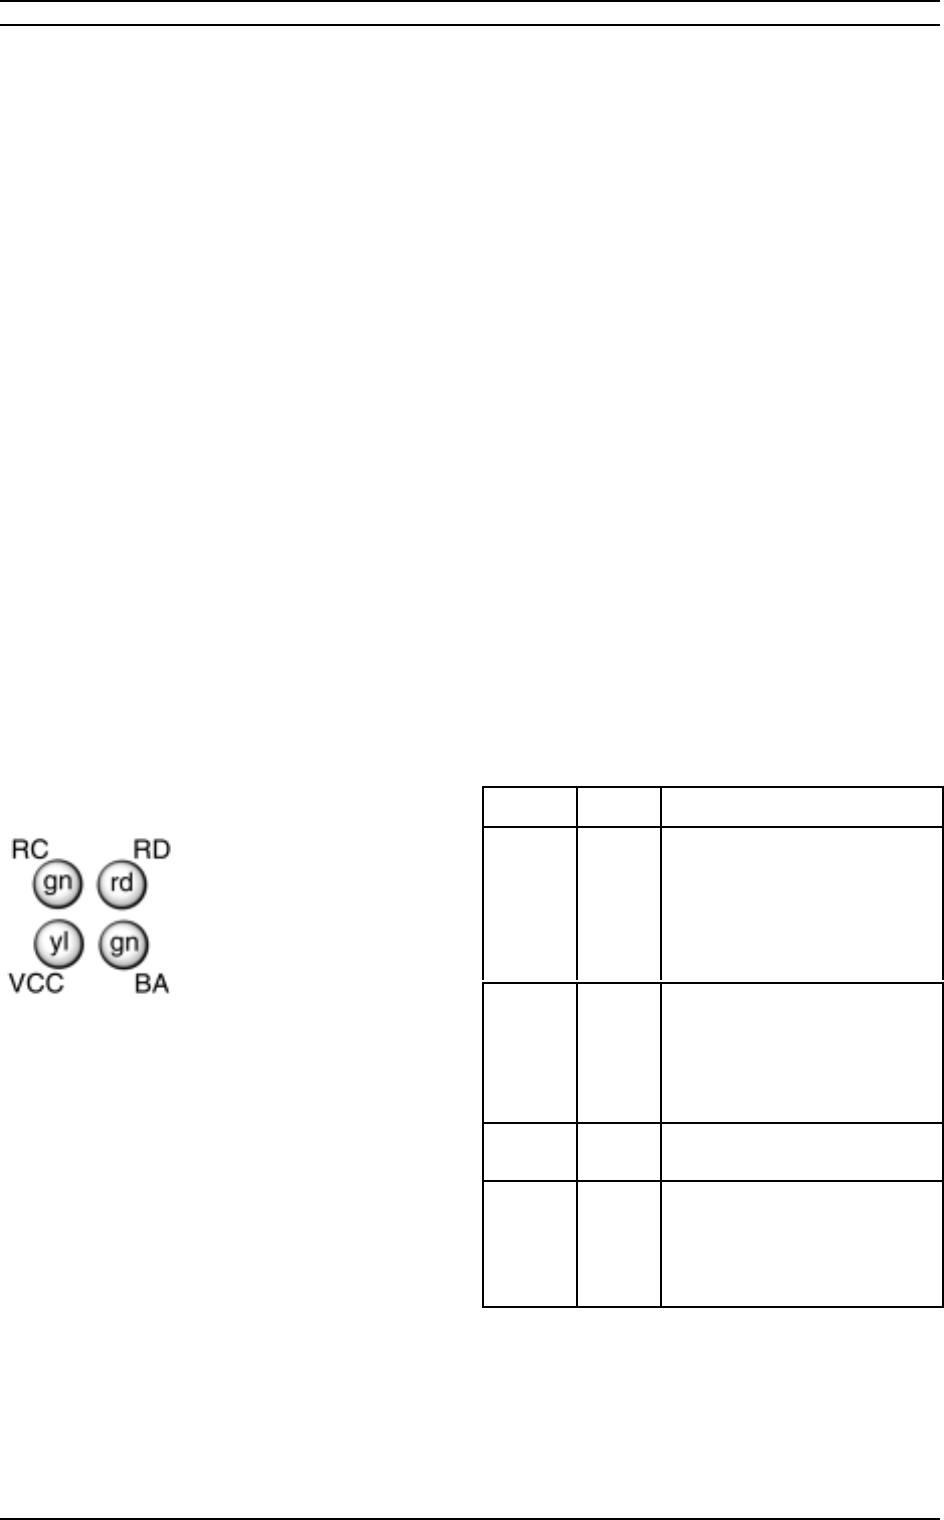
4.1.4.2. Status display of Interbus-S Colour Name Description
gn RC Remote bus Check. Shows
existing connection to fore-
going Remote bus. It is ac-
tive, if the in coming remote
Bus is okay and the master
is switched on.
rd RD Disabled remote Bus. Shows
the status of the remote In-
terface.
ON means the remote inter-
face is switched off.
yl VCC Positive supply voltage on an
IC plus 5V
gn BA Bus active. This LED shows
the data on the Interbus cy-
cles ON while sending a mes-
sage to the PLC/PC via the
HOST-Port
Sys tem Components
Page 35 of 59 Read/Write S hort R ange System Manual Baumer I dent G mbH
4.1.4.2.1. Monitor (77LA04-IBS only!)
This connection is intended to listen to the internal
data transfer between CPU and interface board.
You must not feed signals into any one of the
pins!
Pin Signal description
2RS 232 RxD – Monitor output 1)
3RS 232 TxD – Monitor output 1)
4 - do not use -
5RS 232 GND 1)
6 - do not use -
7 - do not use -
8 - do not use -
9 - do not use -
1 - do not use -
1) connector requires special cable!
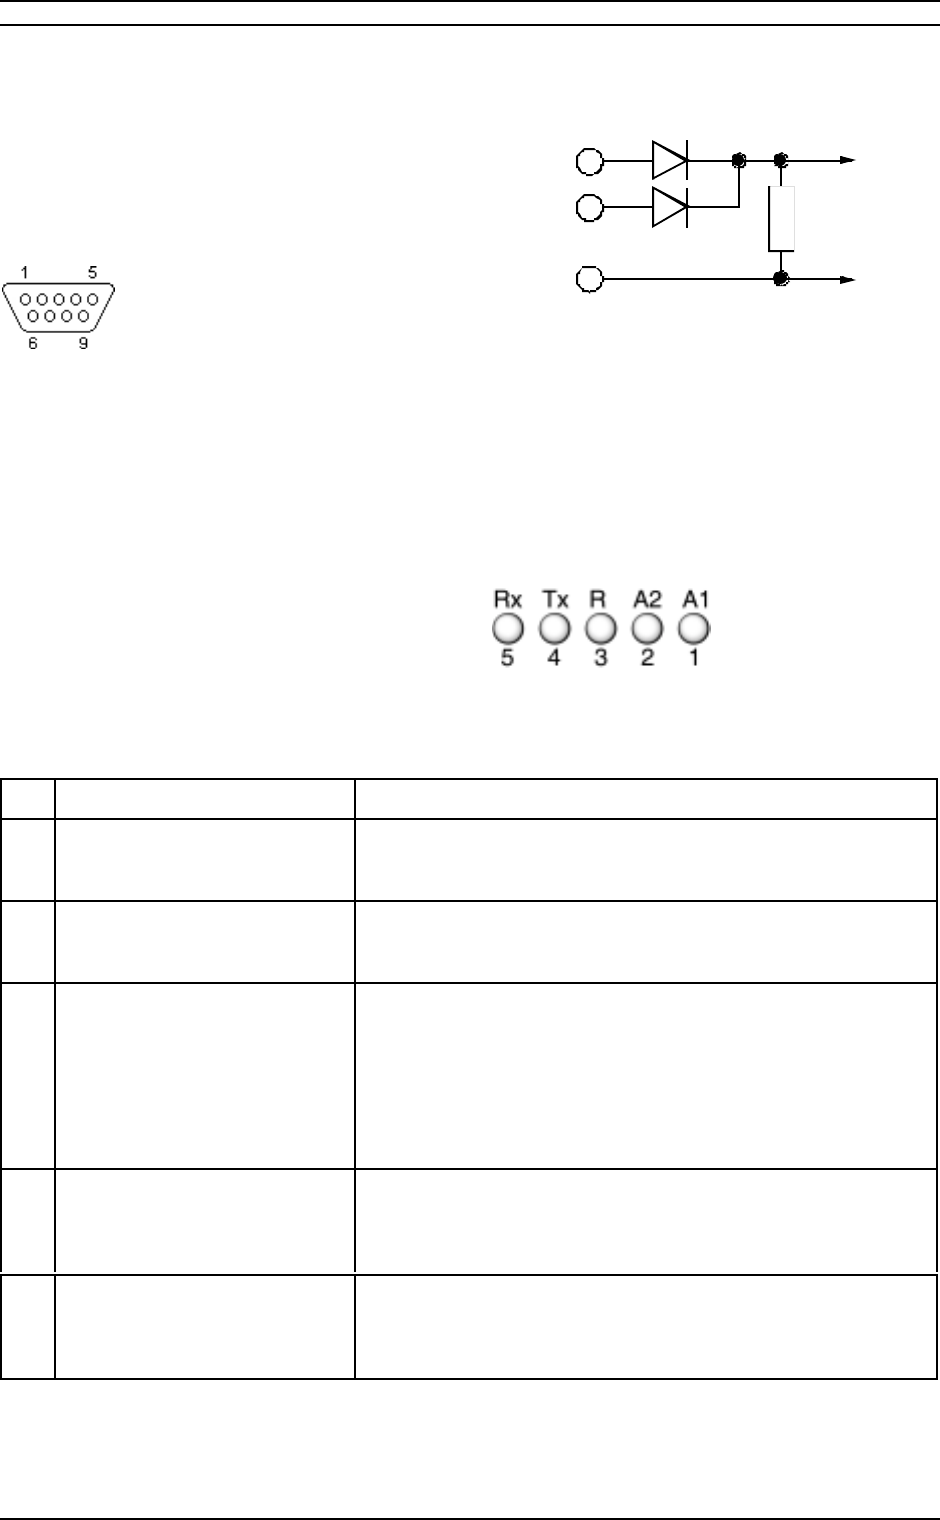
4.1.4.3. System Diagnostics
LED Description
On the rear side of the controller there are 5
LED’s situated as shown in the diagram below:
LED Layout on backpanel
No. Signal name Function
1 A1 – Antenna 1 active When lit, the antenna is active, executing a Read/Write com-
mand with a tag or the controller is waiting for a tag at this an-
tenna (automatic Read/Write mode)
2 A2 – Antenna 2 active When lit, the antenna is active executing a Read/Write com-
mand with a tag or the controller is waiting for a tag at this an-
tenna (automatic Read/Write mode)
3 R – RUN mode – flashing 1/2s A flashing LED indicates that the controller is running. When
entering the Monitor – the LED stops flashing – the last LED
state remains active until the normal program operation contin-
ues.
Note: the Monitor program stops automatically on missi ng ter-
minal inputs after about 30 seconds and the normal operation
continues.
4 Tx – Transmitting data The controller sends data via the host port (Serial or Profibus) –
the LED is switched ON just before the data is put into the out-
put FIFO buffer and switched OFF when the last character of
data is placed in the communication device.
5 Rx – Receiving data When the controller fetches a complete command from the
communication device the LED is switched ON. The led is
switched OFF when the complete message is received.
Monitor connector
2
TxD
5
SGnd
3
RxD
PC / Terminal
3RxD
5SGnd
DSUB 9
Monitor cable circuit
10kΩ
ΩΩ
Ω

Sys tem Components
Baumer I dent G mbH Read/Write S hort R ange System Manual Page 36 of 59
4.1.4.4. Technical Data
The protection class IP65 is only valid when
protective caps are fitted to the unused con-
nectors and cables with sealed connectors are
used.
Operating Data
Operating frequency 125 kHz
Antenna type separate, series 77LSxx
No. of antennae 1
Data transfer speed 9600 baud (-SER)
Interfaces
Interbus-S IBS-IN 9-pin D type male
IBS-OUT, 9-pin D type
female
Device addressing dip-switch or software
command
Electrical Data
Supply voltage 24 VDC ±10%
Power consumption max. 200 mA
Supply connector D-Sub 15-pin, combined
with IO and testterminal
Antenna connection
Immunity EN50082-2, Class 3
Emission EN55022, Class A
Mechanical data
Housing
Housing material aluminium
Outer dimensions
77LA02/-IBS 195 × 145 × 78 mm
Weight
77LA02/-IBS 1.1 kg
Environmental Conditions
measured according to EN60068-2-30
Temperature range 0 … +50 °C (Operating)
-10 … +60 °C (Storage)
77LA04/2-ET -10 … +50 °C (Operating)
Protection class IP 63 *
Climate, Upper
temperature +55 °C, 93 % rel. humidity
Climate, Lower
temperature +25 °C, 97 % rel. humidity
Duration of climate
test 2 cycles, 24 h each
* IP65 when protective caps are fitted to the unused
connectors and cables with sealed connectors are
used.
Vibration test IEC 68 Part 2-6
Wave type Sine form
Frequency band 2 – 500 Hz
Amplitude 2 – 8 Hz 7,53 mm
peak./peak.
8 – 200 Hz, 2 g
200 – 500 Hz, 4 g
Sweep speed 1 oct / min
Duration of test 2 h per axis
Shock test (long-term) IEC 68 Part 2-29
Shock form half sine form
Amplitude 15 g
Duration of shock 6 ms
Number of shocks 4.000 *
Shock test IEC 68 Part 2-27
Shock form half sine form
Amplitude 30 g
Duration of shock 15 ms
Number of shocks 3 *
* Measured in both directions of the 3 main axis of the
test object, oriented orthogonal to each other.
Sys tem Components
Page 37 of 59 Read/Write S hort R ange System Manual Baumer I dent G mbH
4.2 The Antennae
The system OISL has been developed with re-
spect to the European regulation EN300330/Class
2. T hi s cl a ss i s i nten ded fo r syste m s wi th cus-
tomised antennae.
The regulation requires an approval for the central
unit only whereas antennae of class 2 systems
are not subject to any approval or permission re-
quirements.
These antennae are passive; in particular any
OIS-L antenna is only the inductive part of the
systems resonance circuit.
There are two different types:
• AN.76.SR.xx.yy: These antennae are only
for compatibility with an older Baumer Ident
inductive identification system, 76LA01/xx
• AN.77.SR.xx.yy: These antennae are stan-
dard use for the Baumer Ident OISL short
range system with central units
ZE.77.Sr.xx.yy.
The different antennae have been designed with
respect to a wide variety of applications. In gen-
eral antennae have to be used in an air environ-
ment.
For mounting in close proximity to metal please
read the appropriate chapter in this system man-
ual. Specifications about reading distances and
recommended transponder types are also given in
this system manual or in the OIS-L transponder
data sheet LD.0306.EN.
Special antennae for mounting directly onto metal
are available.
The antenna transmits energy and data signals to
and from the data tag. The coil and necessary
electronics are enclosed in a sturdy frame hous-
ing made of polystyrene. The frame is fully sealed
and is protected to an IP67 rating.
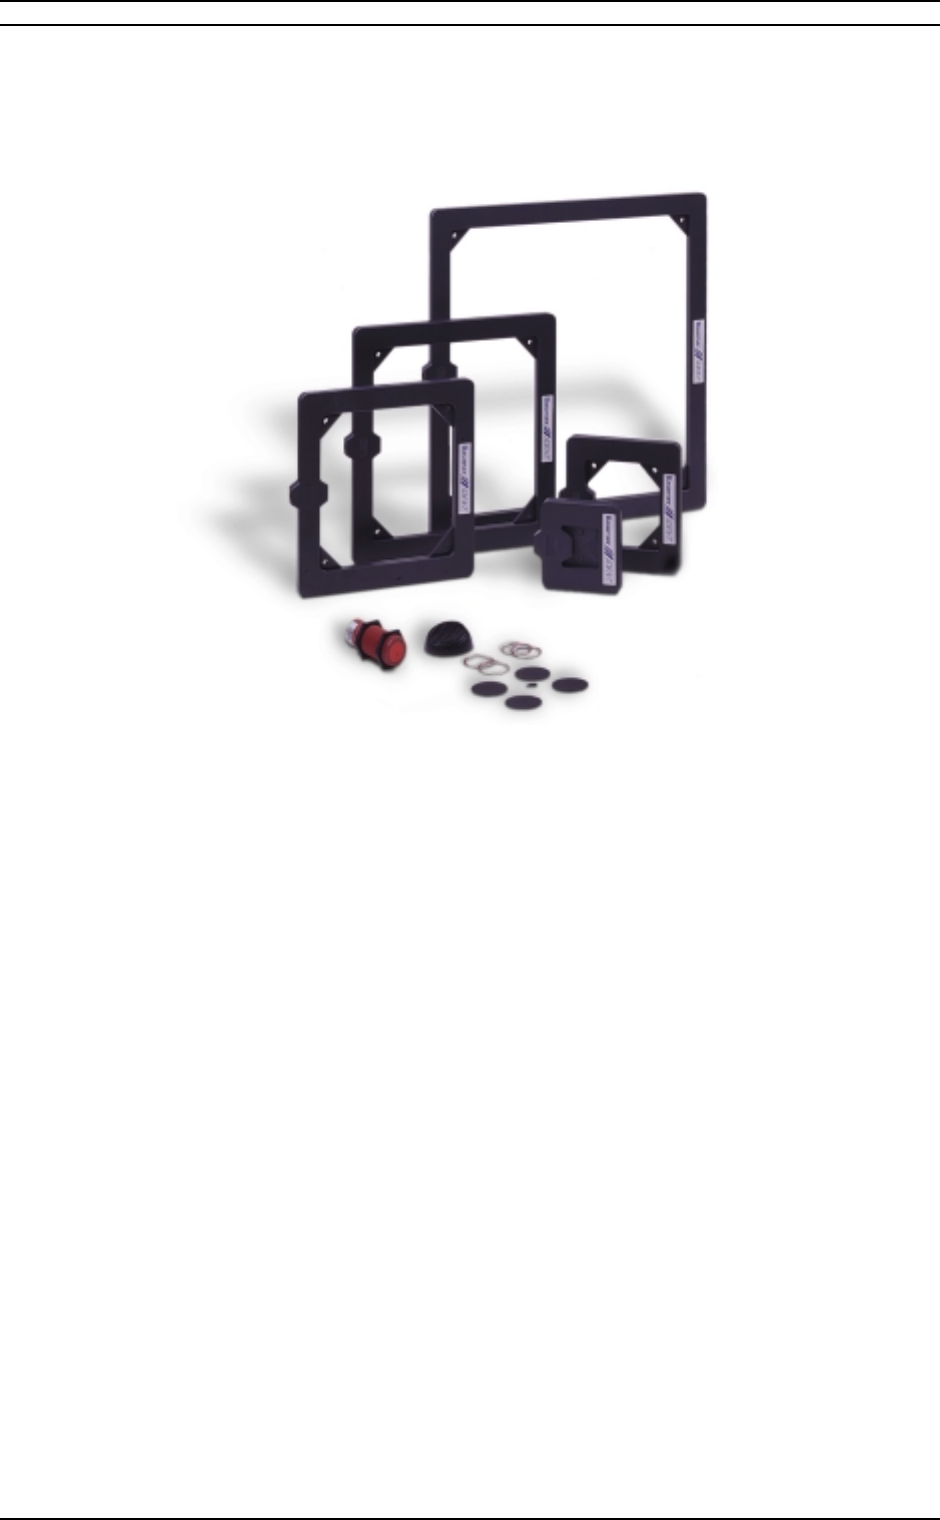
On a standard frame antenna the housing ac-
commodates four mounting holes size M6 for
screws. A mounting kit (optional) containing
brackets and vibration dampeners is available to
facilitate the simple and correct mounting of the
antenna.
Sys tem Components
Baumer I dent G mbH Read/Write S hort R ange System Manual Page 38 of 59
4.2.1 Standard Frame Antennae
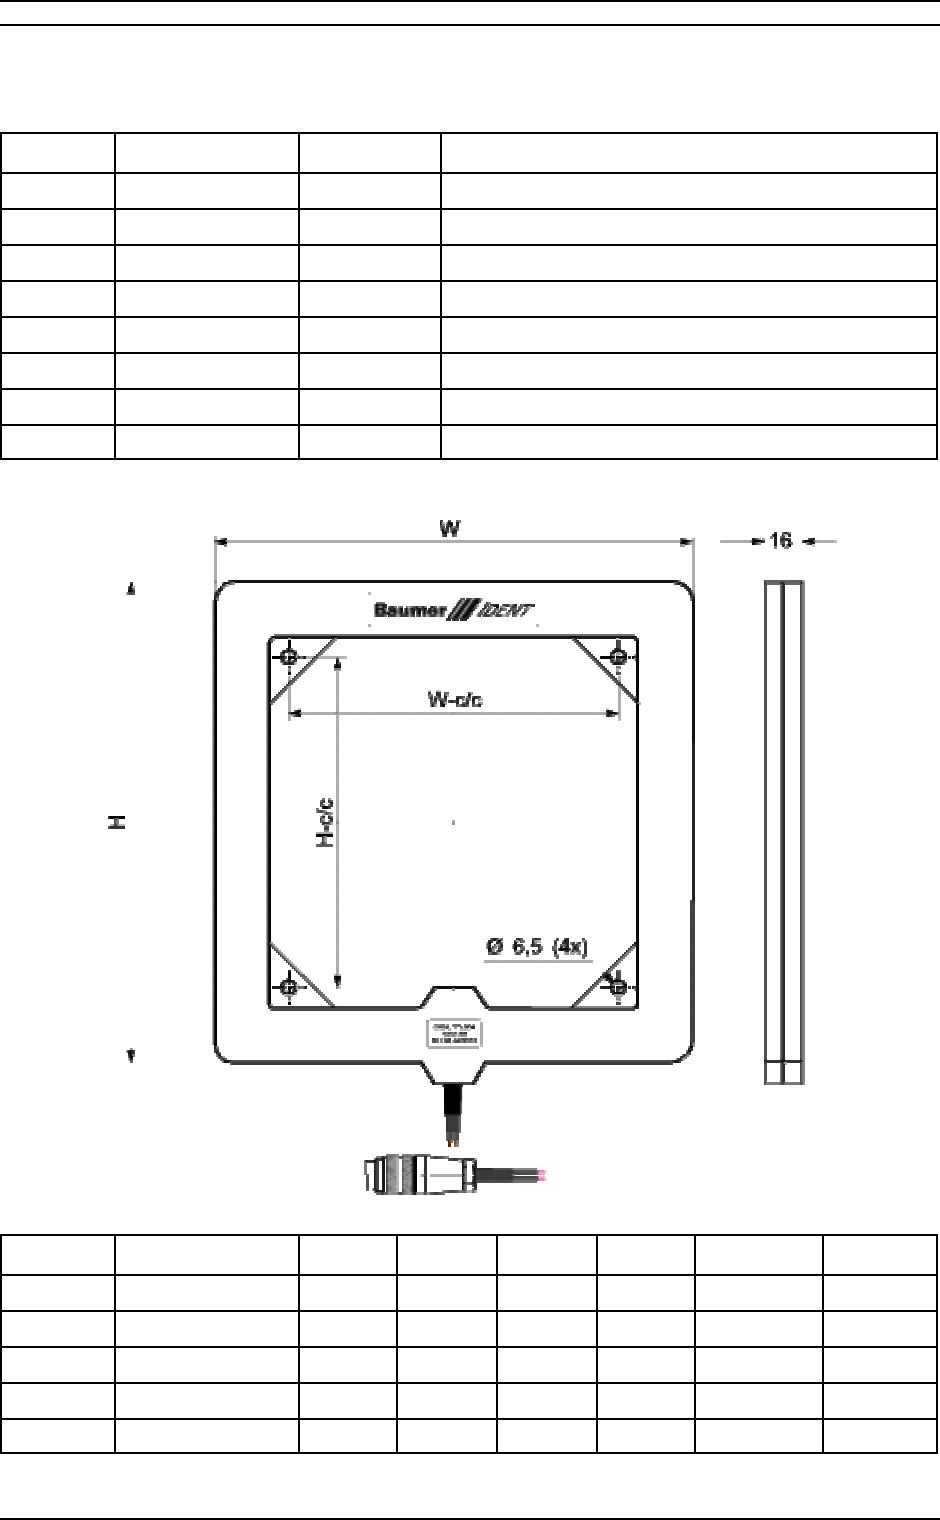
Name Type Order No. Remarks
77LS01 AN.77.SR.01.01 DD100014 Standard Tuning
77LS01 AN.77.SR.01.02 DD100008 Tuned for 20 distance mm to steel
77LS02 AN.77.SR.02.01 DD100015 Standard Tuning
77LS03 AN.77.SR.03.01 DD100016 Standard Tuning
77LS04 AN.77.SR.04.01 DD100017 Standard Tuning
77LS09 AN.77.SR.09.01 DD100019 Standard Tuning
77LS09 AN.77.SR.09.02 DD100113 Tuned for 20 distance mm to steel
77LS09 AN.77.SR.09.03 DD100040 Tuned for 20 distance mm to steel, ET Version *
* Extended Temperature
Name Type H W H-c/c W-c/c Weight, kg Mounting
77LS01 AN.77.SR.01.xx 100 100 85 85 0,5 2 x M4
77LS02 AN.77.SR.02.xx 150 150 81 81 0,8 4 x M6
77LS03 AN.77.SR.03.xx 225 225 156 156 1,2 4 x M6
77LS04 AN.77.SR.04.xx 275 275 206 206 1,5 4 x M6
77LS09 AN.77.SR.09.xx 400 400 331 331 1,8 4 x M6
Frame antennae – mechanical data – All dimensions in mm

Sys tem Components
Page 39 of 59 Read/Write S hort R ange System Manual Baumer I dent G mbH
4.2.1.1. Common data for all frame
antennae
Cable 5 m included
Temperature
range 0 … +50 °C (Operating)
-10 … +60 °C (Storage)
Housing Polystrol (PS), dark grey
Protection
class IP65
Tuning Free air
The –ET version has an extended temperature
range of
Temperature
range -10 … +50 °C (Operating)
-10 … +80 °C (Storage)
4.2.2 Special Antennae
The different antennae have been designed with
respect to a wide variety of applications. In gen-
eral antennae have to be used in an air environ-
ment.
In difference to 77LS05 the antenna 77LS06 has
an internal ferrite rod while the housing is identi-
cal. Thus, the antenna field has a special shape
which influences reading distance an maximum
passing speed of a transponder.
The antenna 77LS07 is designed for direct
mounting onto metal.
∅
4.2.2.1. Common data for all spe-
cial antennae
Cable fixed cable, 5 m length (other
lengths on request), min. bending
radius: 50 mm, static use
Temperature
range 0 … +50 °C (Operating)
-10 … +60 °C (Storage)
Protection
class IP67
4.2.2.2. 77LS05
Technical Data
Type AN.77.SR.05.01
Order code DD100018
Housing PVC
Tuning Free air
Dimensions Ø M30 × 1,5 × 80 (see
drawing below)
Weight 60 g (320 g incl. cable)
Data sheet LD.0331.EN
Dimensional drawing of 77LS05 & 77LS06
4.2.2.3. 77LS06
Technical Data
Type AN.77.SR.06.01
Order code DD10139
Housing PVC
Tuning Free air
Dimensions/
mounting Ø M30 × 1,5 × 80 (see
drawing before)
Weight 80 g (340 g incl. cable)
Data sheet LD.0332.EN
Sys tem Components
Baumer I dent G mbH Read/Write S hort R ange System Manual Page 40 of 59
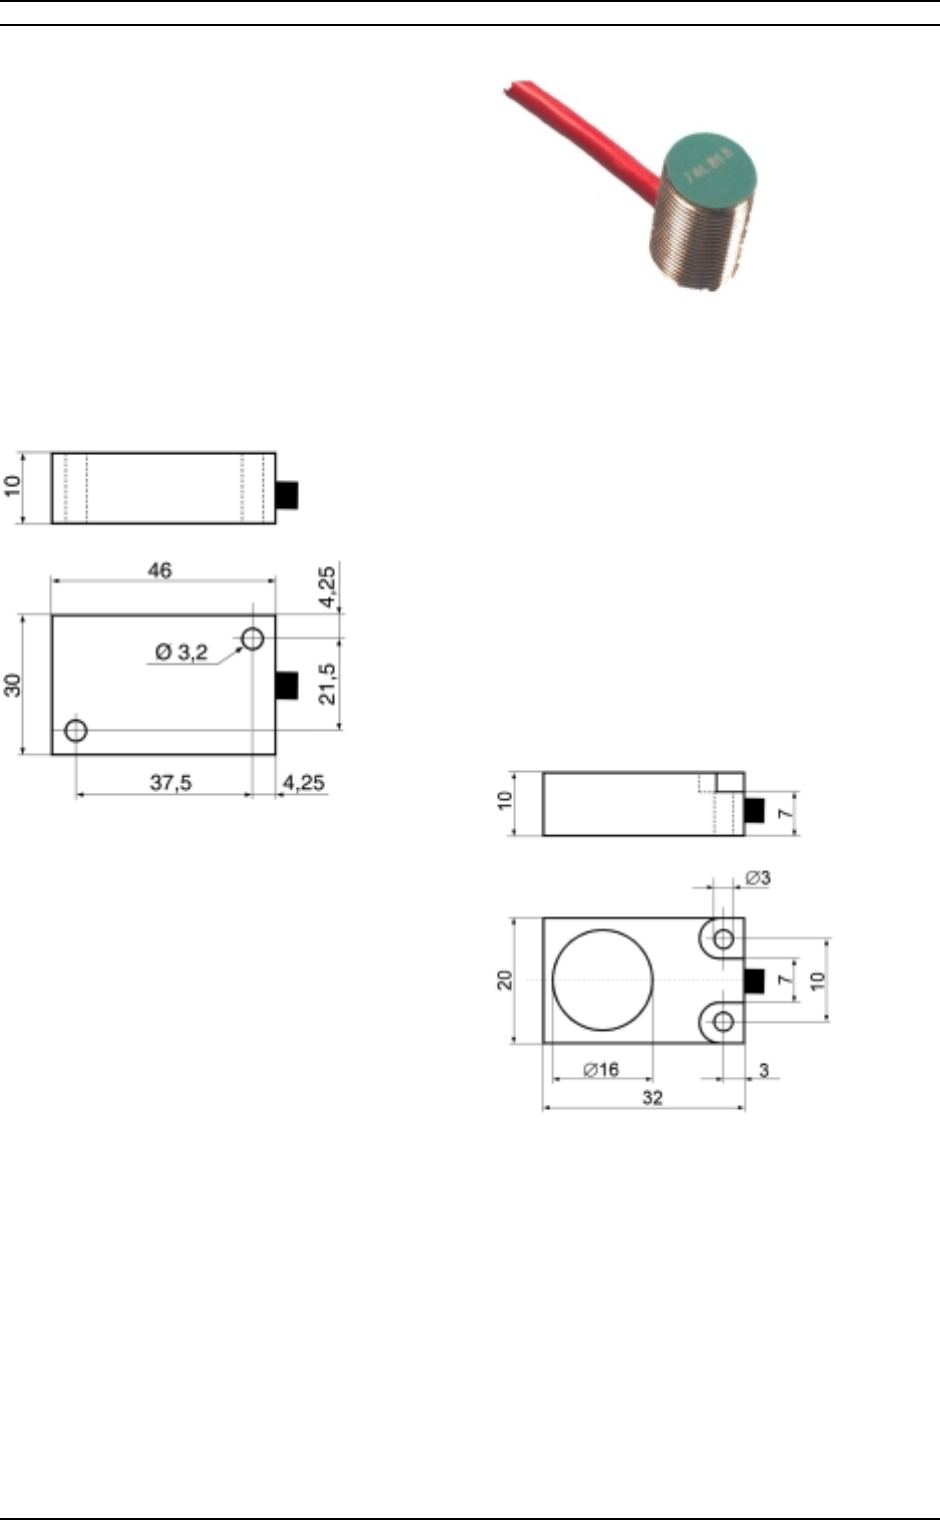
4.2.2.4. 77LS07
Technical Data
Type AN.77.SR.07.01
Order code DD100182
Housing PVC
Tuning Free air or direct on metal
Dimensions/
mounting 46 × 30 × 10 mm, 2 × M 3
Weight 230 g (incl. cable)
Data sheet LD.0333.EN
Dimensional drawing of 77LS07
4.2.2.5. 77LS13
Technical Data
Type AN.77.SR.13.01
Order code DD100128
Housing Brass/PBTP
Tuning Free air
Dimensions/
mounting M 18 × 1 × 20 mm
Weight 260 g (incl. fixed cable)
Data sheet LD.0335.EN
Photo of 77LS13
4.2.2.6. 77LS14
Technical Data
Type AN.77.SR.14.01
Order code DD100098
Housing Brass/PBTP
Tuning Free air
Dimensions/
mounting 32 × 20 × 10 mm, 2 × M 3
Weight 230 g (incl. fixed cable)
Data sheet LD.0334.EN
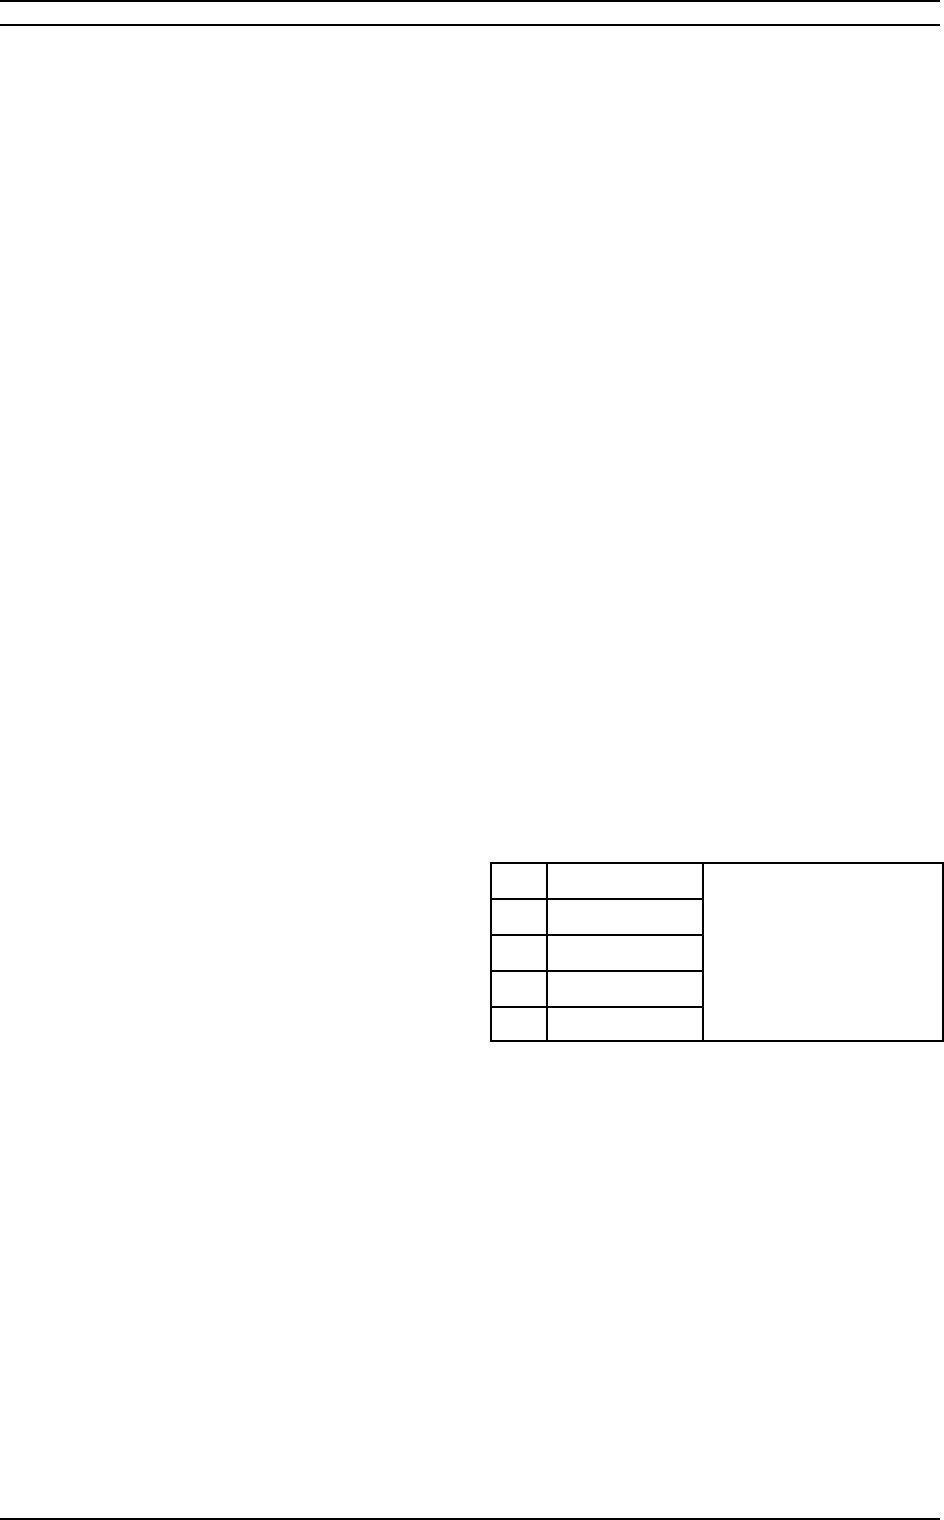
Dimensional drawing of 77LS14
Sys tem Components
Page 41 of 59 Read/Write S hort R ange System Manual Baumer I dent G mbH
4.3 Data Tags
By offering the opportunity to handle various tag
types it is necessary to provide information on
how to access read only and read write tags. This
overview gives a short overview about different
tag types and their special access parameters.
Series 76 tags
Read-only tags – EM series 4001, 4003, and
4103 compatible.
40 Bit Code ID, read only
Type 76LDxxx-yy
• xxx = housing diameter or size specification
• yy = material, housing, ... code
Example
76LD050-01:
• read only tag (series 76)
• 50mm diameter
• Epoxy housing
Series 77 tags
Read/Write tags – 128 Bit, 1536 Bit user memory
space
Type 77LDxxx-syy
• xxx = housing diameter or size specification
• s = capacity specification 1 = 2 kBit Tag 2 =
256Bit Tag
• yy = material, housing, ... code
Example
77LD100-101
• 2kBit Read write tag
• 100mm diameter
• PVC housing
77LD030-201:
• 256 Bit Read/Write tag
• 30mm diameter
• EPOXY housing
In the following chapters the ‘xxx’ and ‘yy’, etc.
abbreviations are replacements for the specific
tag type specifications (housing, type, material,
diameter, size, etc.).
4.3.1 Accessing Data Tags
4.3.1.1. Basic Definitions
The memories of the various read write tag types
(77LDxxx) are physically organized in pages. One
page contains 4 Bytes or 32 Bits of data. Only a
page can be accessed as a smallest unit. The
Read/Write data tag’s memory size allows to ac-
cess 4 to 48 pages (16 to 192 Bytes, 128 to
1536Bit) of user pages depending on the specific
tag type. Byte access is supported only on the
base ‘page read, modify byte, page write back’.
Read-only tags (76LDxxx) are not organized in
pages. The memory contains a total net size of 5
Bytes (40 bits) of fixed sized programmed data.
The memory size including extra synchronization
bits and parity bits is 64 bits.
4.3.1.2. Read Only Tags
The 76LDxxx read only tag family offers a mem-
ory size of 64 bits. These bits are transmitted se-
quentially while the tag is in the active antenna
field. 24 bits are used as the message frame with
the SYNC-Header, parity bits and stop bit. 40 bits
are used as the UNIQUE ID. Only these 40 bits
are delivered to the user.
The logical memory map on the data tag looks
like the following:
1 ID Byte [MSB]
2ID Byte
3ID Byte
4ID Byte
5 ID Byte [LSB]
40Bit unique. (Read
only)
[64 Bits with sync bits
and parity bits]
Tag data logical memory map
The TAG-ID has a length of 40 bits packed into 5
bytes. Each byte is transmitted as 2 hexadecimal
ASCII characters ‘0’...’9’, ‘A’...’F’. The higher order
nibble is sent first following the lower order nibble.
With read-only tags there is no need to set any
page numbers since the tag has a fixed code
length and is not divided into pages.
Sys tem Components
Baumer I dent G mbH Read/Write S hort R ange System Manual Page 42 of 59
4.3.1.3. 256 Bit Read/Write Tag
Type
When using the Read/Write data tag 77LDxxx-2yy
it is important to state which page you want to
read from. The 256 Bit type contains 8 pages,
each having 32 Bit. The first page contains the
unique serial number of the tag, the next three
pages are reserved and the remaining 4 pages
are available for user data.
Optional read only configuration
A specialty of this tag type is that it can mimic a
read only tag. Using this feature PREDEFINED or
multiple READ ONLY TAGS with the same ID may
be produced that are completely compatible to the
Series 76 tags. Series 77LDxxx-2yy data tags
may be used in a mixed environment with
76LDxxx tags.
This tag function must be set-up in factory or re-
quires special controllers and controller software
at the customer site.
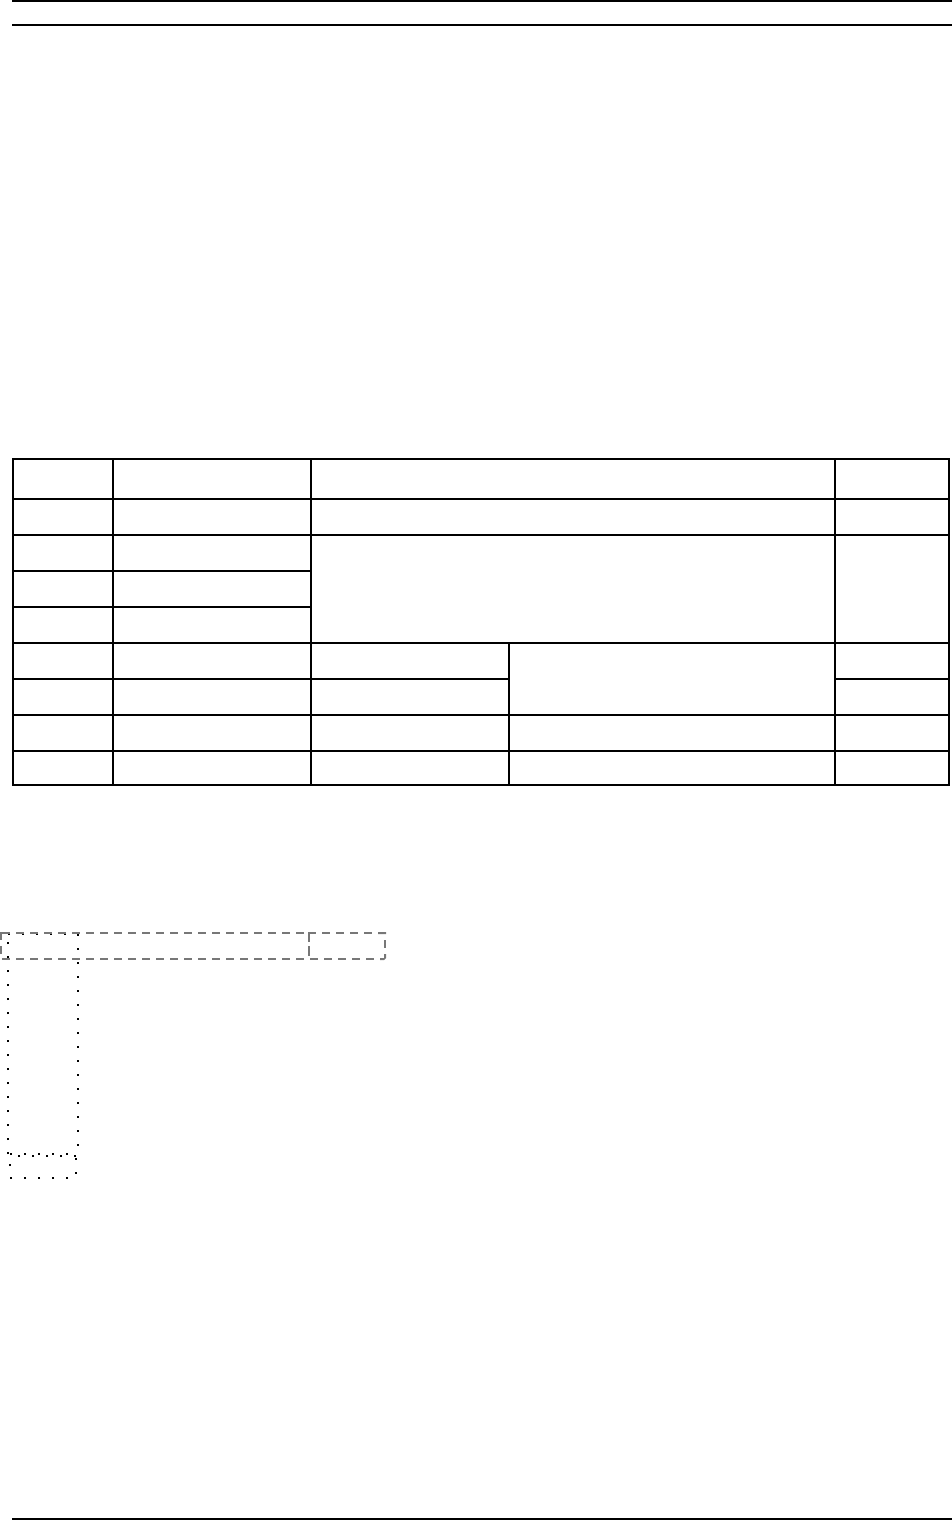
The data on the tag has the following layout
Page # Contents Access
0 Serial number 32 Bit unique. (Read only) Publi c
1 Reserved
2 Reserved
3 Reserved
No access available to this 3 pages Not public
4 User data 1 Read and write Public
5 User data 2 -“-
Option: 64 Bit Read only memory
layout for RO operation Public
6 User data 3 -“- Public
7 User data 4 -“- Public
Tag data logical memory map
The Read Only Memory Option – Bit Map
111111111
Sync-Headerbits Page4
D03 D02 D01 D00 LP0 Digit 1 Line Parity 1 Page 4
D13 D12 D11 D10 LP1 Digit 2 Line Parity 2 Page 4 8 bit version
custumer ID
D23 D22 D21 D20 LP2 Digit 3 Line Parity 3 Page 4
D33 D32 D31 D30 LP3 Digit 4 Line Parity 4 Page 4
D43 D42 D41 D40 LP4 Digit 5 Line Parity 5 Page 4 / Page5
D53 D52 D51 D50 LP5 Digit 6 Line Parity 6 Page5
D63 D62 D61 D60 LP6 Digit 7 Line Parity 7 Page5
D73 D72 D71 D70 LP7 Digit 8 Line Parity 8 Page5
D83 D82 D81 D80 LP8 Digit 9 Line Parity 9 Page5
D93 D92 D91 D90 LP9 Digit 10 Line Parity 10 Page5
32 bit unique
identifier
allowing
~4 billion of
combinations
CP3 CP2 CP1 CP0 4 Bit Column Parity Page5
Line
Parity
0Stop bit Page5
The parity is calculated as even parity.
4.3.1.4. 2kBit Read/Write Tag
Type
The 2kBit data tag is operating functionally
similar to the 256 Bit tag introduced above. The
main differences are the larger amount of pages
that can be read by an atomic command (up to
16 pages max.) and different page start ad-
dresses of user data area and its greater size.
Sys tem Components
Page 43 of 59 Read/Write S hort R ange System Manual Baumer I dent G mbH
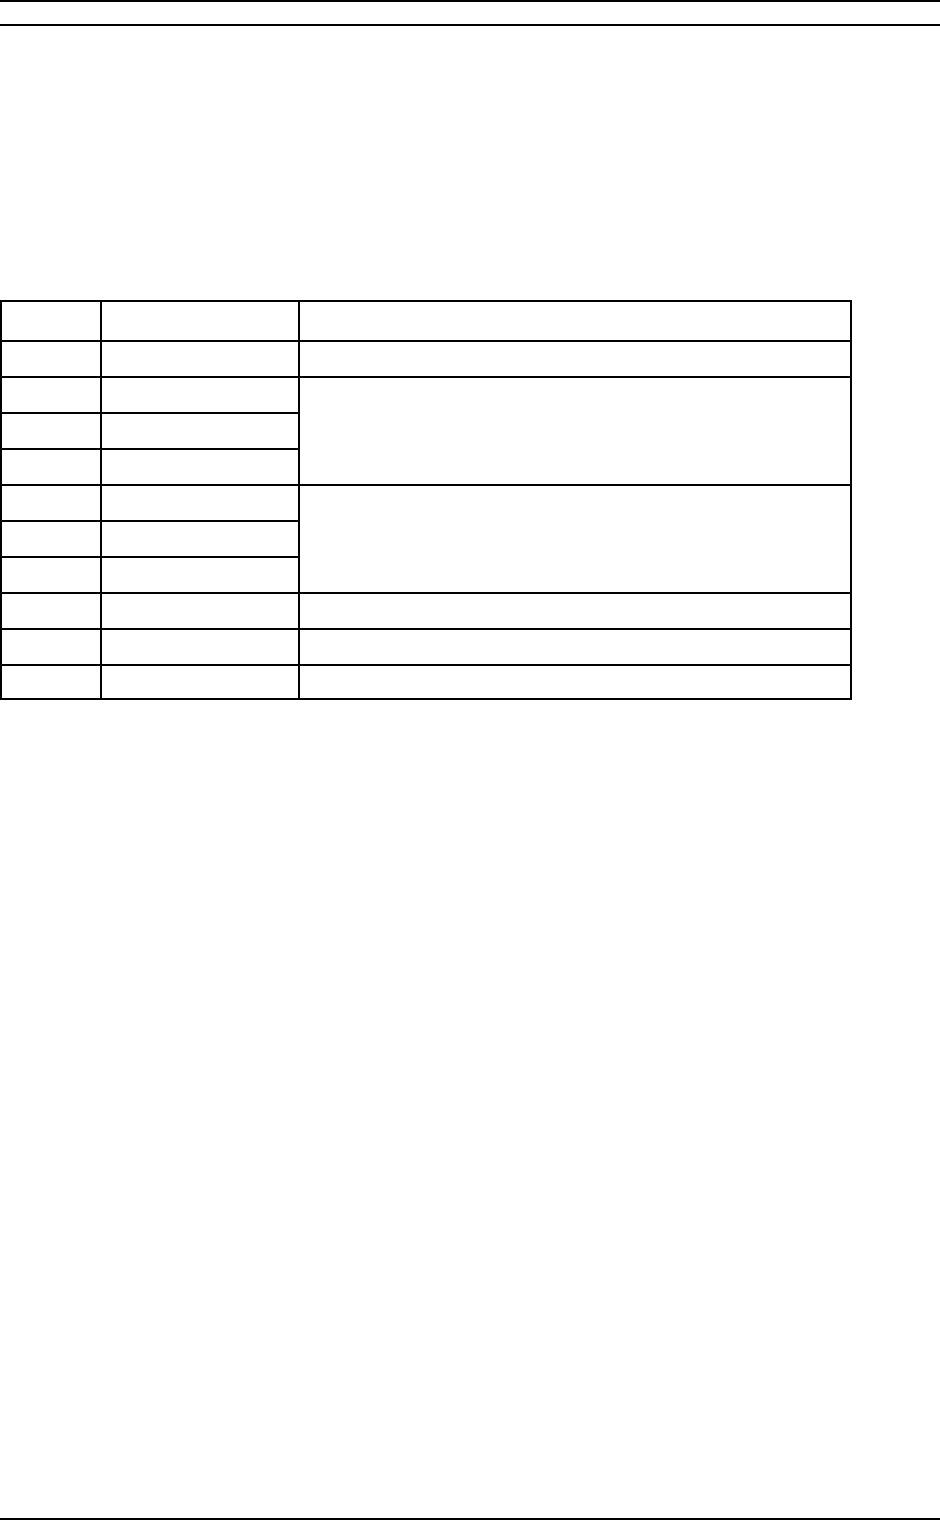
The memory of the 2kBit data tag 77LDxxx-1yy
contains 64 pages, each having 32 Bit. The first
page contains the unique serial number of the
tag, the next seven pages are reserved and not
accessable. Pages 8 to 15 are reserved and are
accessable with Long Range Reader Devices
only The remaining 48 pages are available for
user data without any restriction.
The data on the tag has the following layout
Page # Contents
0 Serial number 32 Bit unique. (Read only)
1 Reserved
… -“-
7 -“-
No access available to 7 pages
8 -“-
… -“-
15 Reserved
No access available to 8 pages for short range reader
Standard: no access with long range reader.
Access with long range reader requires special firmware.
16 User data 1 page Read and write
… -“- -“-
64 User data 48 page -“-
Tag data logical memory map

Sys tem Components
Baumer I dent G mbH Read/Write S hort R ange System Manual Page 44 of 59

Hints on Installation and System Design
Page 45 of 59 Read/Write S hort R ange System Manual Baumer I dent G mbH
5 Hints on Installation and System
Design
5.1 Basic considerations
We would all like to ensure that all of the efforts
that have gone into planning and designing a new
system will enable it to be installed problem free
in an efficient and reliable manner. Enabling the
new system to meet all of the planned project cri-
teria. When selecting the correct OIS-L compo-
nents for an application, there are a few more
items to be considered:
The environment
• Is i t free from metal around antenna and
data tag
• Electrical noise close to the antenna -or data
tag
• Humidity
• Temperature
• Aggressive media
• Vibrations, shock
Required distance between antenna and data
tag
Writing data to the tag
• Number of write cycles per time unit
• Static
• Dynamic
Passing speed required
Amount of data to be transmitted
Max. out of centre deviation (± mm)
5.2 The antenna lobe
The antenna field runs concentric with the coil
windings. Hence the field is stronger towards the
centre of the antenna, where the fields from all
four sides coincide. A certain field also occurs on
the outside of the antenna frame. Thisis the rea-
son why the field close to the antenna surface is
larger than the actual coil winding itself. The fol-
lowing graph shows a typical antenna field form
and spread when both the antenna and data tag
are free from metal influences.
5.3 Useful antenna field
It is important to distinguish between static and
dynami c applications. The tag needs to be withi n
the active field for approximately 80-150 ms (de-
pending on tag type for one page or read only
Code-ID) to guarantee a correct code reading or
data programming. The higher up on the lobar
antenna field form the tag passes the antenna,
the shorter the useful field gets resulting in a re-
duction of the max. passing speed possible.
The reading range achievable depends on differ-
ent factors, e.g. antenna type, data tag position,
and interferences in the environment. Typical val-
ues achievable are listed in the following tables
under conditions as stated in the respective table.
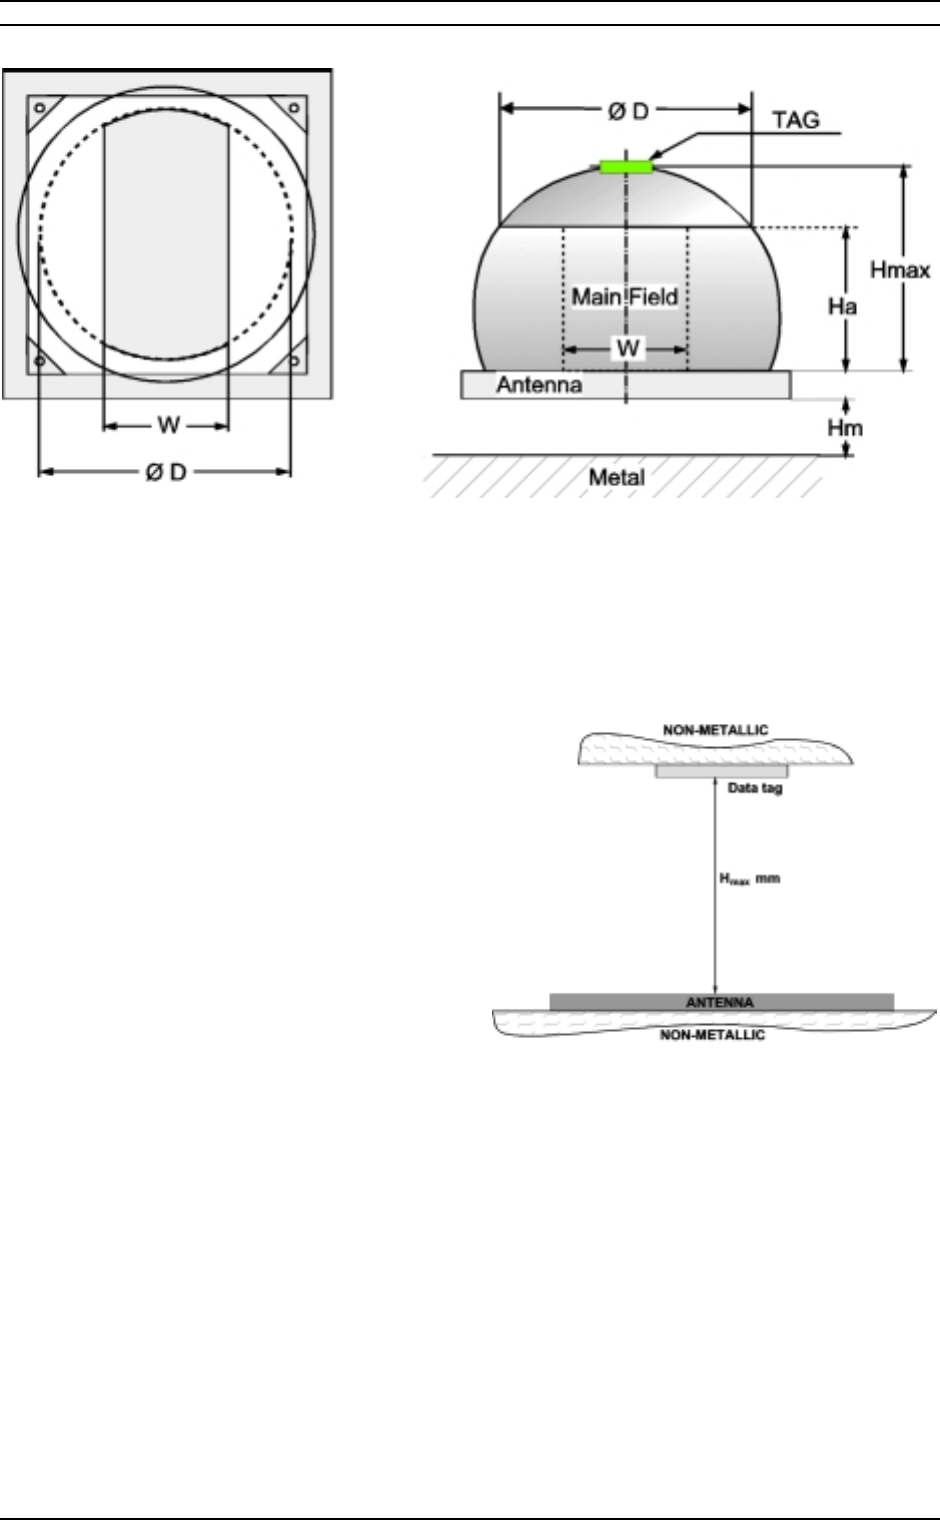
Hints on Installation and System Design
Baumer I dent G mbH Read/Write S hort R ange System Manual Page 46 of 59
Antenna field – Communication – range definition for static and dynamic application
The various reference numbers in the previous
graph have the following meanings:
Hmax This is the maximum distance pos-
sible between the antenna and the
data tag where the field strength is
high enough to power up the data
tag. Since the diameter at this point
is close to zero, it can only be used
for static applications.
Ha This is the main field and should be
used for dynamic applications. The
max diameter Ø D indicates the up-
per limit for dynamic applications.
For maximum allowable passing
speeds please refer to the appro-
priate manual section.
Hm Defines the distance between a
metal surface and the antenna. For
optimal system performance it is
essential to keep a minimum dis-
tance to any metal surface.
W The W stands for the maximum al-
lowable ± offset from the centreline,
having just a minor influence on the
passing speed in dynamic applica-
tions.
Ø D The maximum diameter Ø D indi-
cates the upper limit for dynamic
applications.
Note
The tags of the same size e.g. 77LD03-xx have
the same communication distance; hence not all
variants are displayed in the table.
Set-up to establish Read/Write distances
Hints on Installation and System Design
Page 47 of 59 Read/Write S hort R ange System Manual Baumer I dent G mbH
5.3.1 Width ∅D and W and reading range at distance Ha
∅
∅∅
∅D, W [mm]
Data tag
Antenna 76LD020 76LD030 76LD050 76LD060 76LD100 76LD500 Reader
77LS01 100, 50 100, 90 100, 95 100, 100 100, 140 1) 100, 95 77LA04/x
77LS02 150, 100 150, 130 150, 125 150, 140 150, 145 150, 125 77LA04/x
77LS03 225, 170 225, 170 225, 190 225, 200 225, 220 225, 190 77LA04/x
77LS04 275, 160 275, 190 275, 220 275, 230 275, 265 275, 220 77LA04/x
77LS05 50, 30 50, 30 50, 50 50, 60 1) 50, 80 1) 50, 50 77LA04/x
77LS09 * 400, 335 400, 375 400, 380 400, 395 400, 375 77LA04/x
Dimensions of communication field, mm at distance Ha for read-only tags of series 76
∅
∅∅
∅D, W [mm]
Data tag
Antenna 77LD020 77LD030 77LD050 77LD100 77LD500 Reader
77LS01 100, 50 100, 90 100, 90 100, 140 1) 100, 90 77LA04/x
77LS02 150, 100 150, 120 150, 125 150, 145 150, 125 77LA04/x
77LS03 225, 170 225, 170 225, 190 225, 220 225, 190 77LA04/x
77LS04 275, 160 275, 180 275, 220 275, 265 275, 220 77LA04/x
77LS05 50, 30 50, 30 50, 50 50, 80 1) 50, 50 77LA04/x
77LS09 * 400, 330 400, 355 400, 395 400, 355 77LA04/x
Dimensions of communication field, mm at distance Ha for Read/Write tags of series 77
1) if the tag is larger than the antenna – W is determined by the tag size!
5.3.2 Operational Read/Write range Ha
Ha[mm]
Data tag
Antenna 76LD020 76LD030 76LD050 76LD060 76LD100 76LD500 Reader
77LS01 50 70 100 110 130 100 77LA04/x
77LS02 60 80 120 130 170 130 77LA04/x
77LS03 70 110 150 170 210 160 77LA04/x
77LS04 60 120 170 180 220 180 77LA04/x
77LS05 30 40 60 60 70 60 77LA04/x
77LS09 * 120 180 210 290 190 77LA04/x
Typical communication distance for read-only tags of series 76
* Combination of data tag and antenna not recommended!
Hints on Installation and System Design
Baumer I dent G mbH Read/Write S hort R ange System Manual Page 48 of 59
Ha[mm]
Data tag
Antenna 77LD020 77LD030 77LD050 77LD100 77LD500 Reader
77LS01 35 60 90 130 100 77LA04/x
77LS02 50 70 100 150 150 77LA04/x
77LS03 45 90 150 200 170 77LA04/x
77LS04 35 100 170 250 190 77LA04/x
77LS05 30 50 70 100 70 77LA04/x
77LS09 * 100 170 290 200 77LA04/x
Typical communication distance for Read/Write tags of series 77
5.3.3 Peak Read/Write range Hmax
Hmax[mm]
Data tag
Antenna 76LD020 76LD030 76LD050 76LD060 76LD100 76LD500 Reader
77LS01 70 100 140 150 190 150 77LA04/x
77LS02 90 130 170 190 250 180 77LA04/x
77LS03 100 160 220 240 300 230 77LA04/x
77LS04 90 170 240 260 320 250 77LA04/x
77LS05 40 60 80 90 100 80 77LA04/x
77LS09 * 170 260 300 410 270 77LA04/x
Maximum communication distance for read-only tags of series 76
Hmax[mm]
Data tag
Antenna 77LD020 77LD030 77LD050 77LD100 77LD500 Reader
77LS01 50 90 130 190 160 77LA04/x
77LS02 75 100 150 220 220 77LA04/x
77LS03 75 130 220 260 250 77LA04/x
77LS04 50 150 240 310 280 77LA04/x
77LS05 40 60 80 120 80 77LA04/x
77LS09 * 160 260 380 310 77LA04/x
Maximum communication distance for Read/Write tags of series 77
* Combination of data tag and antenna not recommended!

Hints on Installation and System Design
Page 49 of 59 Read/Write S hort R ange System Manual Baumer I dent G mbH
5.3.4 Static applications
From the above statement it is evident that the
upper part of the field may only be used in static
applications. Local environmental influences may
have an adverse effect on the achievable
Read/Write distances. It is therefore vitally im-
portant to measure the distances on site with the
equipment to be used, to avoid problems in the
field.
A particular problem to look out for when consid-
ering an installation, can be caused by the close
proximity to strong fields generated from AC-
servo s.
Note! Watch out for possible disturbances in
the area surrounding the antenna.
5.3.5 Dynamic applications
For dynamic applications For dynamic applica-
tions only the lower section of the lobar field
should be used. This is demonstrated in the
graph given on the previous page.
A second important factor to consider in dynamic
applications is the off-centre deviation. The corri-
dor W in the graph indicates the maximum devia-
tion +/- from the antenna centre line. The field
varies slightly with the data tag size. For practical
purposes a value between 0,4 and 0,5 × Ø D can
be used as a start value. If the data tag extends
beyond these values, the contact length with the
active field gets shorter, reducing the achievable
passing speed.
Do not forget to consider the deviation from
the antenna’s centre line!
5.4 Calculating the
Passing Speed
The achievable passing speed depends on the
size of the antenna, data tag and the number of
Bytes to be transferred. The contact time for
reading the fixed-code serial number i.e. the time
the data tag is required to be within the useful
area of the antenna field is about 140 ms. This
gi ves a si m ple rul e-of-th um b to cal cul ate th e
maximum passing speed for a particular an-
tenna/data tag combination.
Desired passing speed in mm/ms × 100 =
Length of useful antenna field required in
mm.
Example
passing speed = 30m/min (100 ft/min)
This equals 0.5 mm/ms × 100 = 50 mm
useful antenna field length.
100 ft/min = 0.02"/msec. × 100 = 2" useful
antenna field length
The tables before show typical values for different
antennae and different tags used. The values
have been established from measurements from
several tags and the average value has been
taken.
Temperature variations and production tolerances
may produce values that differ from the above by
±20%. Hence we recommend to perform tests
with the equipment on the site in question, to es-
tablish the Read/Write distances and passing
speeds achievable in the actual application.
Note! Local conditions may affect the
Read/Write distances achievable. Production
tolerances and temperature changes may also
cause a deviation from the values in the table!

Hints on Installation and System Design
Baumer I dent G mbH Read/Write S hort R ange System Manual Page 50 of 59
5.4.1 Communication:
Reader – Antenna – Data
Tag
5.4.1.1. Read Only Tag – 76LDxxx
The read only tag has a fixed timeing therefore
three constant describe the typical tag-reporting
rates to be expected
Read:
80 ms: reading of tag in antenna field, continu-
ously.
117 ms: Tag enters antenna field newly, 1 time
then 80ms continuously
150 ms: worst case under influence of distur-
bance
5.4.1.2. General formulas for Read
/ Write Tag Types
256Bit Tag: Type family 77LDxxx-2yy
Pages: 0, 4...7,
Number of Pages: 1..4
Read:
Tread [ms] = 60+ 36 * ‘Number of Pages’
Example:
2 pages to read
Tread [ms] = 60+ 36 * 2 = 132ms
Write:
Twrite [ms] = 65 + 39 * ‘Number of Pages’
Example:
3 pages to write
Twrite [ms] = 65 + 39 * 3 = 182ms
2kBit Tag: Type family 77LDxxx-1yy
Pages: 0, 16,..,63
Number of Pages: 1..15 or 0 for 16 pages
Note: 16 possible when using 0 as number of
pages in the standard host commands using Se-
rial, Profibus-DP or Interbus-S protocols.
Read:
Number of Pages < 16
Tread [ms] = 81+ 44 * ‘Number of Pages’
Number of Pages = 16
Tread [ms] = 81+ 44 * 16 = 785ms
Example:
11 pages to read
Tread [ms] = 81+ 44 * 11 = 565ms
Write:
Number of Pages < 16
Twrite [ms] = 86 + 48 * ‘Number of Pages’
Number of Pages = 16
Twrite [ms] = 86 + 48 * 16
Example:
9 pages to write
Twrite [ms] = 86 + 48 * 9 = 518ms

Hints on Installation and System Design
Page 51 of 59 Read/Write S hort R ange System Manual Baumer I dent G mbH
5.4.2 Communication:
Reader – Host (PC or PLC)
The communication time required between the
central unit and the host depends mainly on three
factors:
• Type of communication
• Cycle time of the host
• Software used
The communication can be split into three main
steps as follows:
1) A command is prepared and executed in the
host and transmitted to the central unit.
2) The central unit performs the instructions i.e.
writes data to and/or reads data from the tag. The
data exchange between central unit and tag starts
as soon as the tag has entered the active antenna
field. The data received from the tag is evaluated
and verified and subsequently stored in the mem-
ory of the central unit
3) The host polls the central unit and the code
stored is transmitted to the host.
5.4.2.1. Serial communication time
The communication between the host, the central
unit and tag is asynchronous at a standard trans-
fer rate of 9.600 Bps. This is the base for calcu-
lating the amount of data that may be transferred
during the time the tag is within the active field of
the antenna. For the serial and Interbus-S con-
troller versions the transfertime via the serial link
must be added to any read / write execution
times. The Profibus-DP versions provide a faster
internal transfer rate and must be handled differ-
ently.
Read command:
Tre ad_c omm [ms] = T rhost + Troisl =
(Trhost) 10 * 1,1 +
(Troisl) (9 + 4 * 2 * <number of pages>) * 1,1
Example: read 16 pages
Tre ad_c omm [ms] = [10 + (9 + 8 * 16)] * 1,1
= 161,7[ms]
Write command:
Twrite_comm [m s] = T wh os t + Twoisl =
(Twhost) (10 + 4 * 2 * <number of pages>) * 1,1 +
(Twoisl)9 * 1,1
Example: write 15 pages
Twrite_comm [ms] = [(10 + 8 * 15) + 9] * 1,1
= 152,9 ms
5.4.3 Correlation of
Passing Speed vs. Amount
of Read/Write Data
It isn’t possible to give a general formula for the
correlation of speed vs amount of data to handle
due to the fact that too many different parameters
are influencing this calculation. It is only possible
to show the graphical representation of the corre-
lation for typical combinations of tags, antennae to
help the user to estimate the key limits of this
scheme. The following information only applies to
data tags within the field with the boundary Wshort
and Wlong of the main field Ha
5.4.3.1. Component selection
Selecting the best antenna, tag combination for a
given application is executed as an iterative proc-
ess. Various different parameters must be varied
to get a proper component match to the specific
application and environmental conditions.
The following steps must be taken to determine
the required parameters.
1. Select the antenna for the required read/write
distance antenna – tag from tables:
‚Operational Read/Write range Ha’
2. Check the antenna selected for matching
against the table:
‚Width W of reading range at distance
Ha’
3. As result the Tag-Type and the Antenna are
selected.
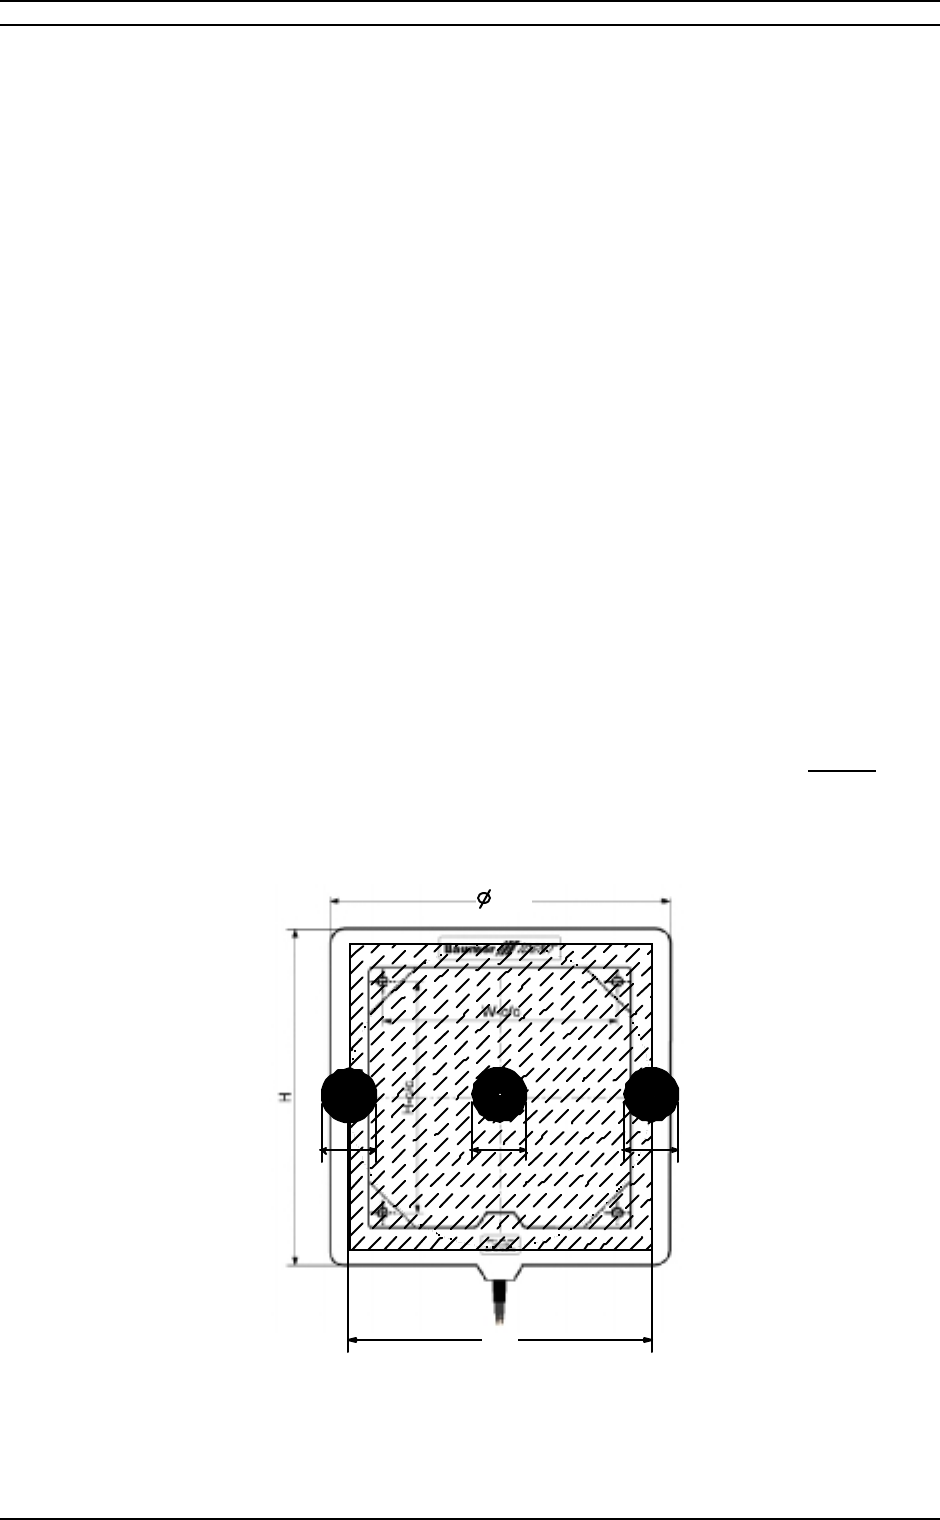
Hints on Installation and System Design
Baumer I dent G mbH Read/Write S hort R ange System Manual Page 52 of 59
4. The given antenna size ∅D and the Tag di-
ameter give the available physical reading
length as result.
The parameter ∅D can be determined from ta-
ble:
‚Width W of reading range at distance
Ha’
Now all parameters referring the available length
of the read/write area Spr oc _l e n are determined.
5. With the next step the available time for
communication with the data tags is calculated
from the application specifications.
The user must determine the number of pages
to transfer between antenna and tag.
With the parameters tag type and number of
pages to transfer over all, the user can calculate
the amount of time Tproc_len required to proceed.
6 The best case passing speed vopt_proceed is
calculated (using the general formula v = s/t):
vopt_proceed
= Sproc_len
/ Tproc_len
Example:
The following conditions are given by the appli-
cation specifications:
Controller 77LA04/2-SER with one antenna.
Required read range ~50mm (distance tag / an-
tenna), minimum distance 30mm, max. distance
70mm.
Data tag type read only – 76LDxxx
Step 1 (Antenna/Tag) Select Antenna/Tag pairs
with Ha > 70mm
Antennae 77LS02..77LS04 are matching
Data tag 76LD030 or 76LD050 are matching
Start with 77LS02 and 76LD030
Step 2 (Antenna / Tag verification)
From the table W = 120mm is taken.
Step 3 W should be OK this selection seems ac-
ceptable
Step 4 Check read width W
The antenna 77LS02 has an effective coil di-
ameter of 120mm (150mm – 2*15mm), using a
data tag with an effective coil diameter of 30mm.
The estimated resulting field size is:
W = Sproc_len = 150mm – 30mm = 120mm.
See the following drawing for details.
.
W
D
Estimated coil diameter
Dta g
Dta g Dta g
Estimate antenna reading area using given antenna diameter and tag diameter.
Step 5 Estimate the time required for Read / Write
operations:

Hints on Installation and System Design
Page 53 of 59 Read/Write S hort R ange System Manual Baumer I dent G mbH
Read only tag Tag 76LD030 read time is 117ms
when the tag enters the field. The worst case is
typically 150ms. To be on the save side 150ms is
taken for the following calculation.
Tread = Tproc_len = 150ms.
Step 6: Determine the maximum tag passing
speed.
vopt_proceed
= Sproc_len / Tproc_len = W / Tread =
= 120mm/150ms = 120/150 m/s
= 0,8m/s = 48m/min
If this doesn’t meet the application requirement
(speed is too low) then the calculation with the
next larger antenna / data tag pair, i.e. 77LS03
antenna and 76LD050 data tag must be repeated
with step 1.
5.5 Installation
Guidelines
In an ideal situation, the system is free from envi-
ronmental influences, proximity to metal and
electrical noise. An industrial environment is nor-
mally far from being the ideal situation.
For that reason the installation can only be
done by a technician, who has enough know
ledge about the OIS-L system. Baumer Ident
offers support and training in Germany.
The nearness of the antenna and/or data tag to a
metal surface has more than one adverse effect
on system performance.
The distance between two adjacent antennae and
/ or two tags plays an important role for optimal
system function. Guidelines for min. distances are
given in a following section.
For optimum performance please ensure that the
antenna is mounted as follows:
• No metal closer than 100 mm to the antenna
in any direction (Hx and Hm)
• Data tag should be arranged as parallel as
possible to the antenna surface
The writing/reading range achievable depends on
various factors, e.g. data tag type and position,
environmental interference. For accurate values,
tests should be carried out on-site. Typical values
for certain antenna/tag combinations are listed in
the subsequent section
All values are valid for a metal free environment at
an ambient temperature of 20 °C. Due to compo-
nent and production tolerances as well as tem-
perature influences, a variance of ±20 % is al-
lowed.
A set of mounting brackets is available and can be
ordered separately.
When the tags are flush-mounted in iron or alu-
minium, the reading distance is substantially re-
duced due to the loss of energy through eddy cur-
rents and other losses.
By applying certain application techniques, it is
possible to obtain reading distances of 50% as
compared to the readings in air.
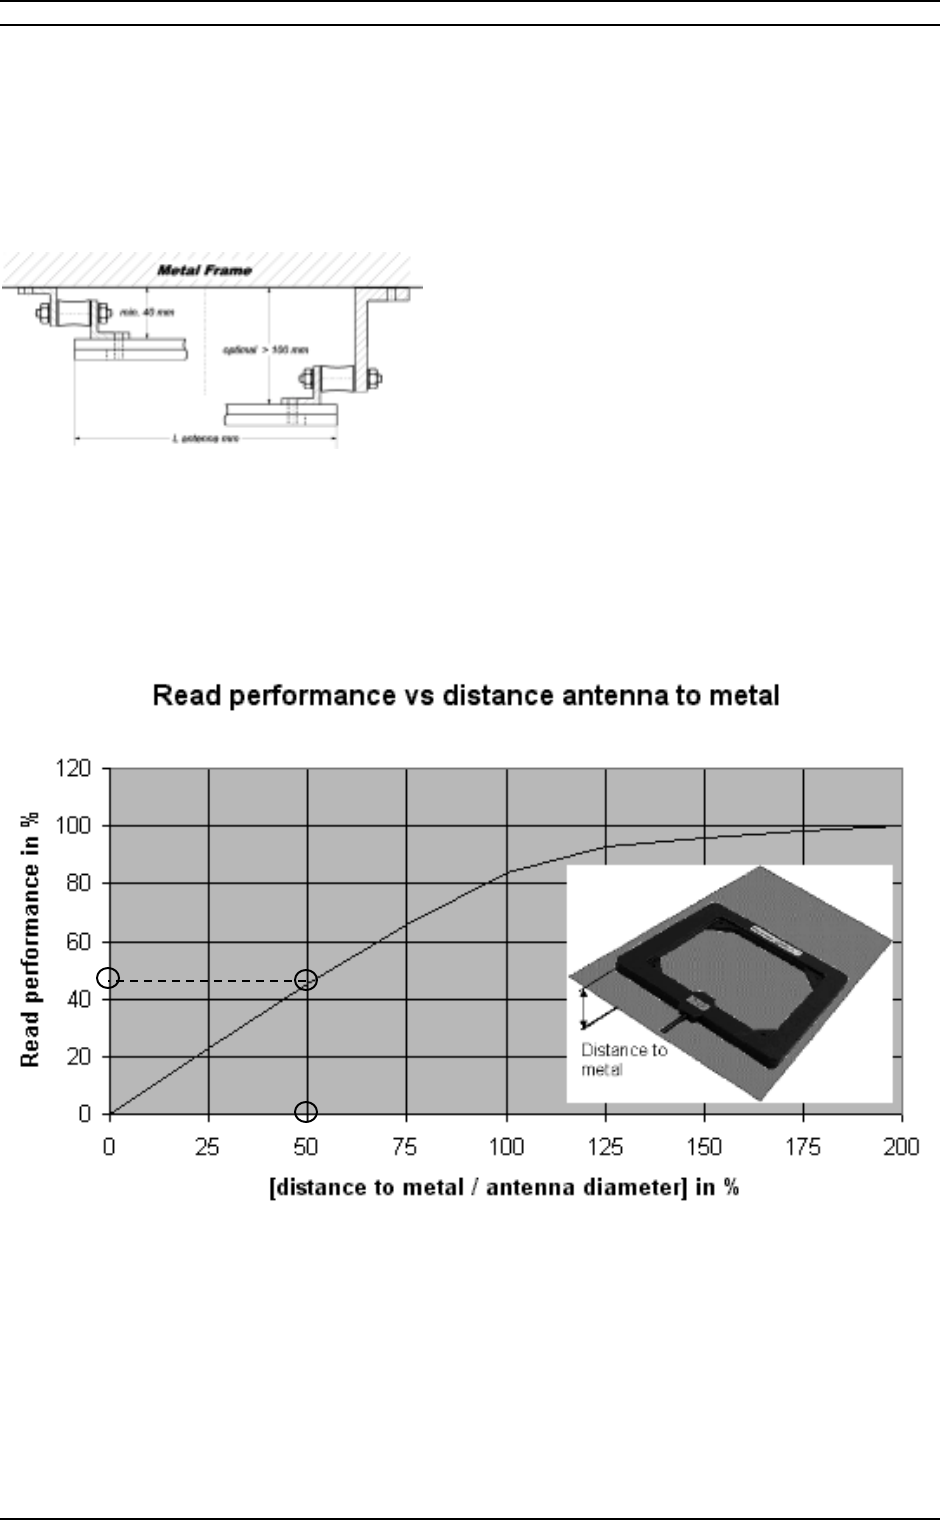
Hints on Installation and System Design
Baumer I dent G mbH Read/Write S hort R ange System Manual Page 54 of 59
5.5.1 Metal-free
environment
The closeness of the antenna and/or data tag to a
metal surface has more than one adverse effect
on the system performance.
Installation Diagram
A major effect on the system is caused when a
metal surface close to the coil detunes the fre-
quency from its nominal value of 125 kHz. An iron
surface will normally increase the frequency by
approximately 6 kHz. An aluminium surface will
increase the frequency even more; in the worst
case it will cause the system to fail.
A second negative influence is the loss of energy.
The metal in the form of Eddy currents will absorb
a certain amount of the energy transmitted from
the antenna. Hence, it is important to strictly ad-
here to the mounting recommendations provided
in the user manual.
If mounting is required on or close to metal parts,
special antennae and data tags are needed.
Baumer Ident has extensive experience in this
field and is therefore able to offer a solution.
The following graph shows the typical drop in
system performance for any combination antenna
/ data tag when the antenna is mounted in close
proximity to metal (Fig. 5-5). The reduction in
performance is given as the distance to metal in
relation to the size of the antenna loop, expressed
as percentage.
Influence on system performance by nearness to metal – distance antenna - Metal in % of antenna loop Ø
Example
The antenna 77LS09 has an antenna loop (Ø D)
of 340 mm. If the antenna is mounted at a dis-
tance of 170 mm to a metal surface (=50% of
loop) the system performance will be reduced to
45% of the performance it has in a metal free en-
vi ronment.
In order to reduce this great performance loss,
antennae especially tuned to metall are available.
This special antennae guarantee a performance
of better than 90% of a standard antenna without
influence of metal.
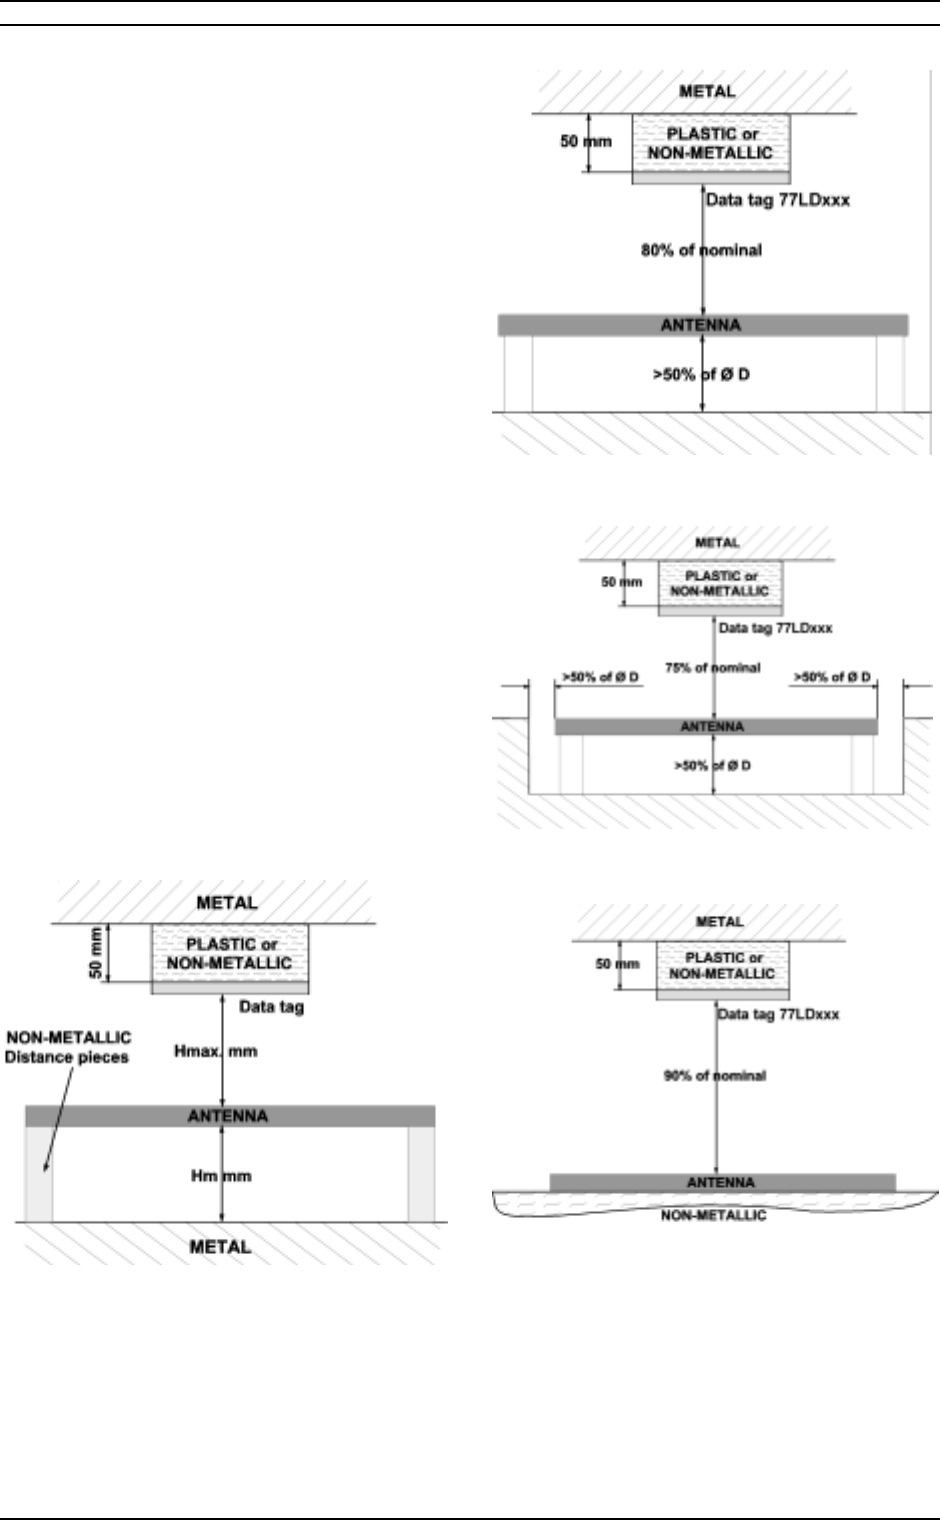
Hints on Installation and System Design
Page 55 of 59 Read/Write S hort R ange System Manual Baumer I dent G mbH
In the previous sections the various negative in-
fluences on system performance have been dis-
cussed. To recap, the main points are as follows:
• Mounting of the antenna and tag close to
metal is not recommended. If certain critical
values are not adhered to, the system per-
formance will not only drop considerably - it
can fail completely.
• Flush mounting of the antenna and/or tag in
a metal environment requires special atten-
tion. There must be a metal free area in all
directions (distance values for antennae, pls.
refer to Fig. 5-5). For the tags it is normally
sufficient to have a distance of 50 mm to
metal in any direction.
• No metal brackets (or any other metal ob-
ject) should be within the active field, since
this will distort the field lines and reduce
system performance.
5.5.2 Mounting examples
The diagrams below show a typical mounting
used in industrial applications. Indicated is the
recommended minimum distances between two
antennae, as well as between two adjacent tags.
Should it become necessary to mount the anten-
nae closer to each other than Shown in Fig. 5-6
an electronic interlock has to be arranged to pre-
vent one antenna from "damping " the other.
Antenna mounted close to metal
Performance with tag and antenna close to metal
Performance with metal on three sides of antenna
System performance with tag close to metal
Important Note!
The more metal free area there is around the an-
tenna and tag, the betterthe system performance.
Should the antenna be mounted at a distance of
less than 20% of the loop diameter Ø D, there is a
risk that the system will fail.
Generally it is less detrimental to system perform-
ance if the tag is closer to the metal than recom-
mended.
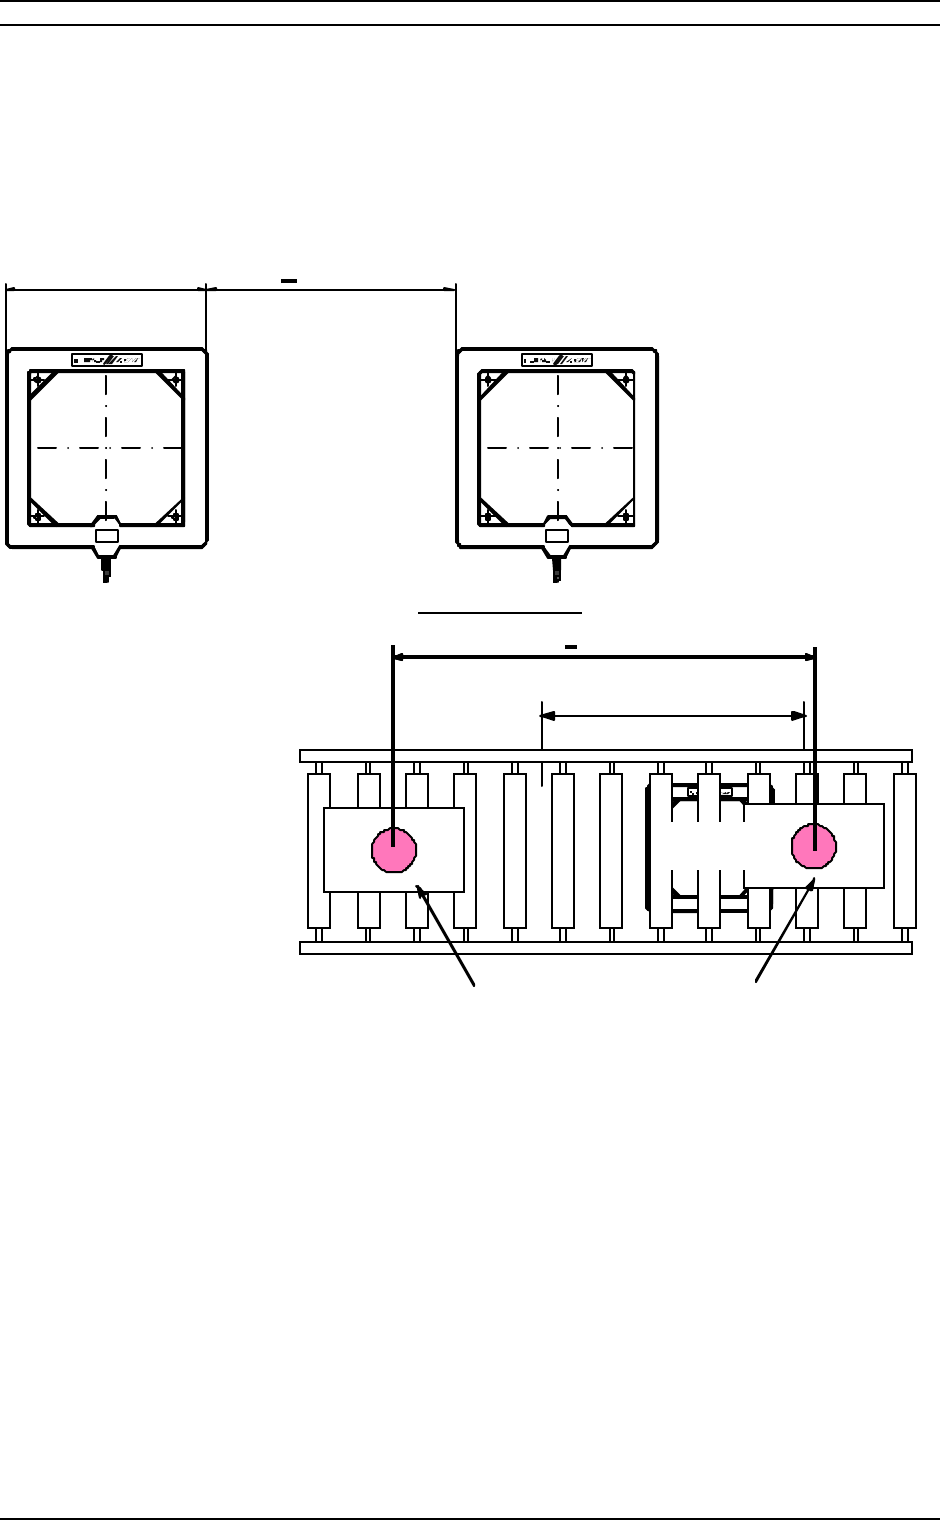
Hints on Installation and System Design
Baumer I dent G mbH Read/Write S hort R ange System Manual Page 56 of 59
5.5.3 Distance between
antennae or tags
Should it become necessary to mount the anten-
nae closer to each other than shown in Fig. 5-6 an
electronic interlock has to be arranged to prevent
one antenna from “killing” the other.
OIS-L 77LS04
1234-56
BI I 98 34/0001
OIS-L 77LS04
1234-56
BI I 98 34/0001
>3 x BB
Minimum distance between two antennae driven by different central units.
OIS-L 77LS04
1234-56
BI I 98 34/0001
B
> 2 x B
Transport box with tag 77LD07
Antenna
77LS04
Minimum distance between two data tags – Communication with the tags through metal transport reels

Hints on Installation and System Design
Page 57 of 59 Read/Write S hort R ange System Manual Baumer I dent G mbH
5.6 EMC Guidelines
EMC stands for ElectroMagnetic Compatibility.
The EMC guidelines are constantly being updated
and more stringent demands are applied to elec-
tronic components and equipment.
A considerable increase in the use of electronic
equipment and appliances has taken place in re-
cent years. The required performance of the
equipment increases and the physical size of the
equipment decreases. The component power
consumption is reduced and the communication
and processing speeds increase.
The more units that are in operation, the higher
the risk that they will influence each other. Hence,
the reason for the stricter rules that constantly
challenge the electronic companies.
Note! It is the responsibility of the general
contractor of the total system to adhere to the
EMC guidelines for the total installation.
Measurements taken at the planning and in-
stallation stage will prevent expensive system
changes at a later stage
Specific regional or country regulations and
legal requirements must not be neglected
5.6.1 General
With EMC we understand the ability of electric or
electronic equipment to function without any
problems in an electromagnetic environment. At
the same time, the equipment is not allowed to
influence or interfere with other equipment in the
vi cini ty, beyond certain limits.
EMC can be separated into three general types:
Self-immunity
The immunity against internal (own) electrical
disturbances
General immunity
The immunity against foreign electromagnetic
disturbances
Emission
The degree of radiation and interference onto
other equipment. EMC tests are performed ac-
cording to all three types. All Baumer Ident
equipment undergoes these rigorous tests.
Since the Baumer Ident equipment is only part of
a total system, it is vital for the system perform-
ance that all system components adhere to these
EMC gui delines.
5.6.2 Shielding concept
In the OIS-L system the data exchange between
the central unit and the host is performed at a rate
of at least 9600 Baud via an RS 422 interface.
When Profibus DP is used, the rate is considera-
bly higher. The maximum cable length at 9600
Baud is 1000 meters. This necessitates good
shielding of the data cables.
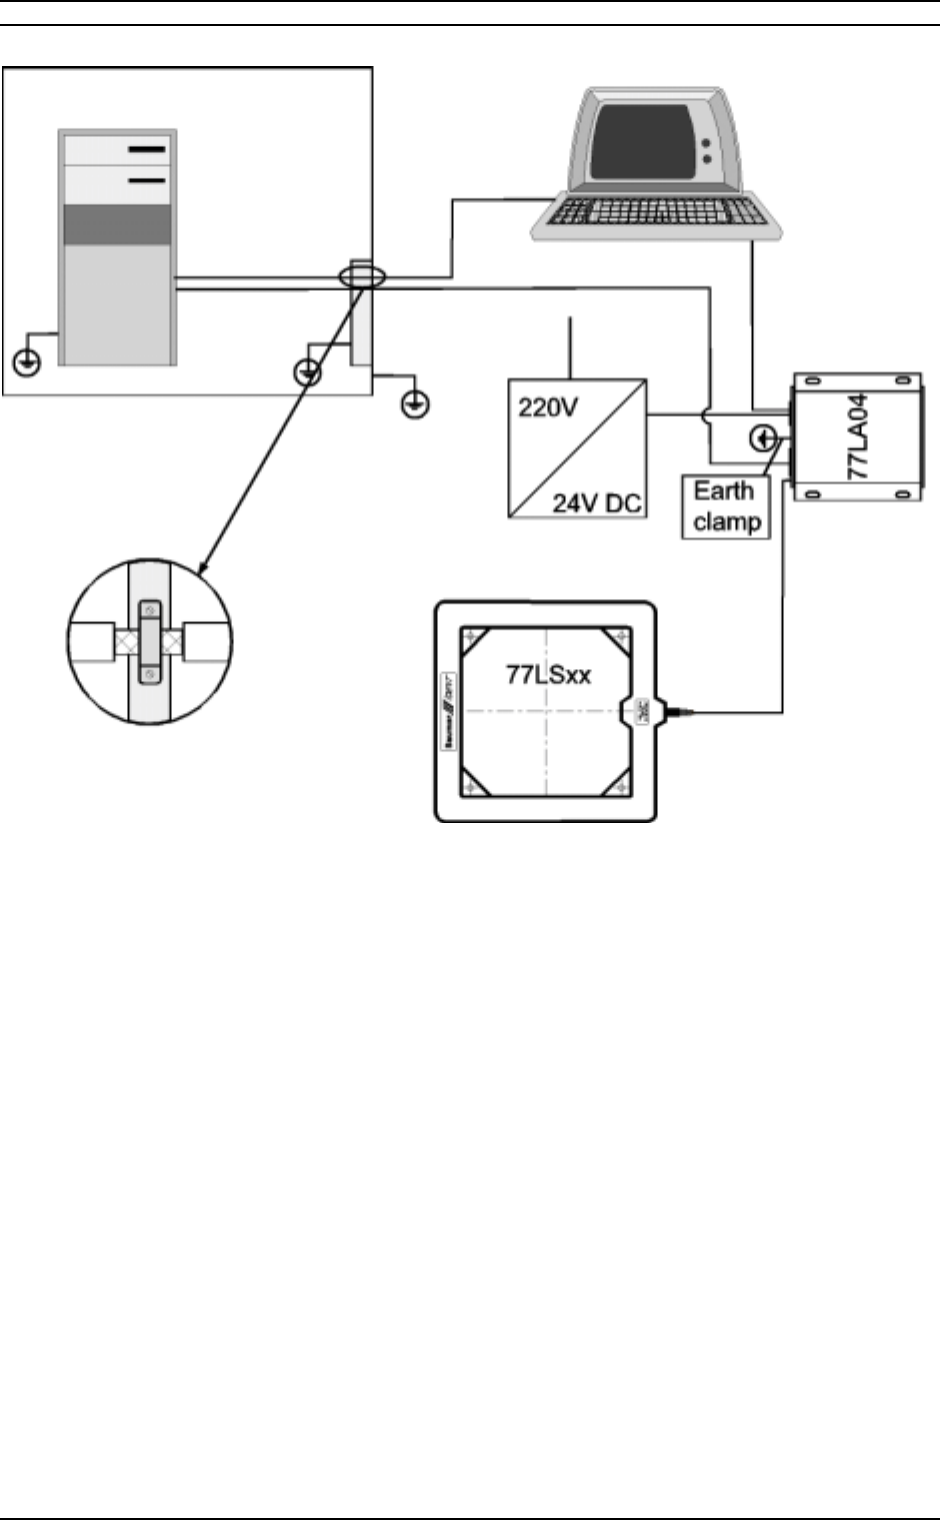
Hints on Installation and System Design
Baumer I dent G mbH Read/Write S hort R ange System Manual Page 58 of 59
shielding

FAQ’s
Page 59 of 59 Read/Write S hort R ange System Manual Baumer I dent G mbH
6 FAQ’s
6.1 Digital Input /
Trigger
To force a continuous operation with a trigger
function, a 15pole adapter must be used. This
sets the dedicated trigger input to an active state.
For Input 1 active
Connect Pin1-Pin14 or Pin9-Pin14 and Pin6-Pin2
with a little isolated wire
For Input 2 active
Connect Pin1-Pin13 or Pin9-Pin13 and Pin5-Pin2
with a little isolated wire
6.2 Miscellaneous
What happens if there is a polarisation
error to the power supply?
Nothing. The unit is protected against such errors.
The onl y chance to kill the central unit i s to feed
mains voltage or DC Voltage above the limit of
36VDC into it. So don’t even try it!
What happens if there are spikes or
drops on the power supply?
Normally nothing. The galvanically isolated DC-
DC-Converters inside can stand an input voltage
between 18 and 36 VDC. Spikes from usual elec-
trostatic discharges should also do no harm onto
this connector.
The digital outputs are also protected against
m i su se.
But be careful with overvoltages into the host in-
terfaces.