Bbq Pro 23669 User Manual SMOKER Manuals And Guides 1304133L
User Manual: Bbq-Pro 23669 23669 BBQ-PRO SMOKER - Manuals and Guides View the owners manual for your BBQ-PRO SMOKER #23669. Home:Lawn & Garden Parts:Bbq-Pro Parts:Bbq-Pro SMOKER Manual
Open the PDF directly: View PDF ![]() .
.
Page Count: 16
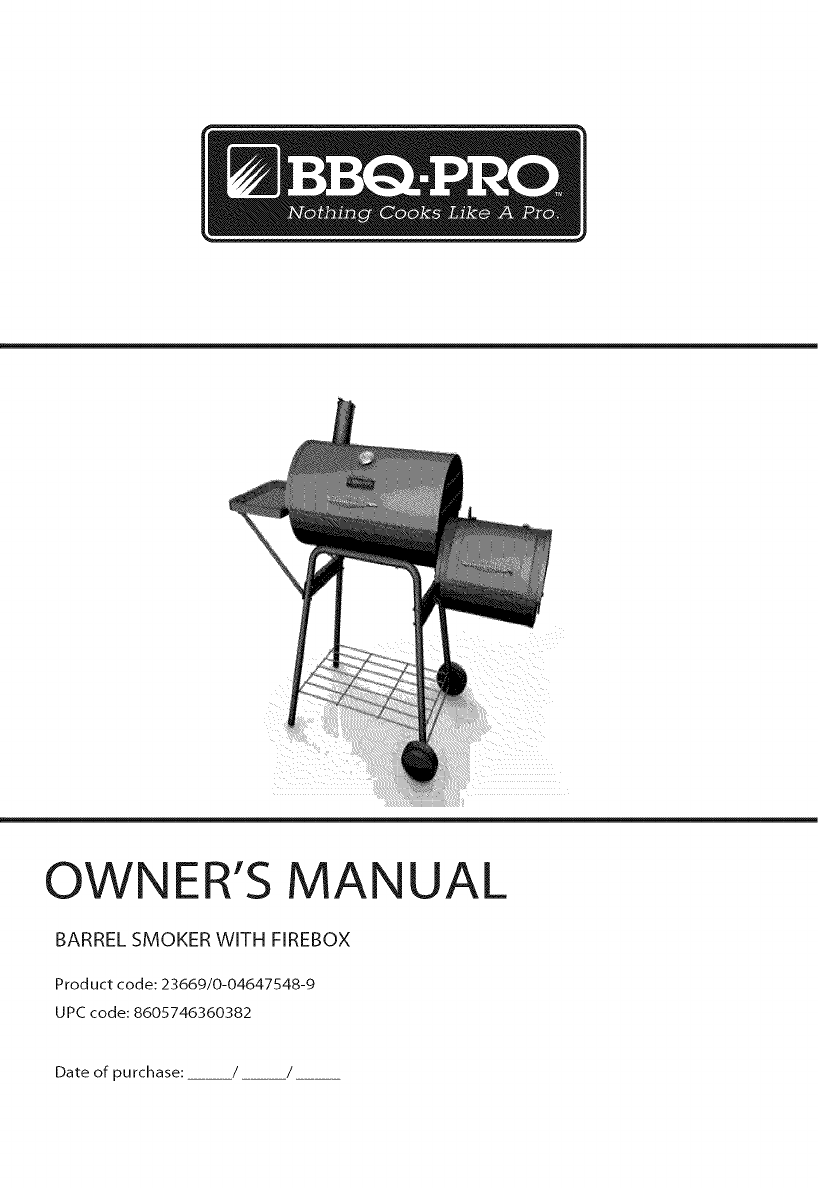
OWNER'S MANUAL
BARREL SMOKER WITH FIREBOX
Product code: 23669/0-04647548-9
UPC code: 8605746360382
Date of purchase: / /
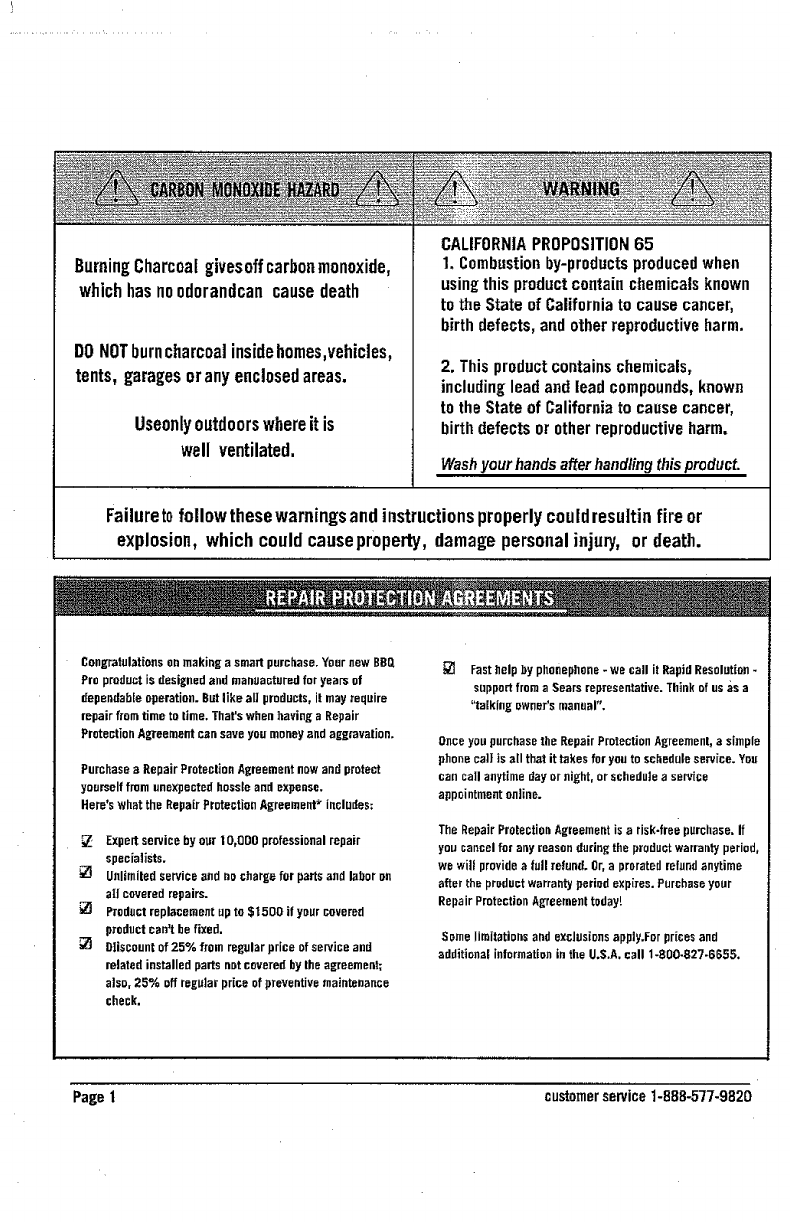
BurningCharcoalgivesoffcarbonmonoxide,
whichhasnoodorandcancausedeath
DONOTburncharcoalinsidehomes,vehicles,
tents,garagesoranyenclosedareas.
Useonlyoutdoorswhereit is
well ventilated.
CALIFORNIAPROPOSITION65
1. Combustionby-productsproducedwhen
usingthis productcontainchemicalsknown
to the State of Californiato causecancer,
birthdefects,and otherreproductiveharm.
2. Thisproductcontainschemicals,
includingleadand leadcompounds,known
to theState of Californiato causecancer,
birthdefectsor otherreproductiveharm.
Wash your hands afterhandling this producL
Failuretofollowthesewarningsandinstructionsproperlycouldresultinfireor
explosion,which couldcauseproperty,damagepersonalinjury, or death.
Congratulations on making a smart purchase. Your new BBQ
Pro product is designed and manuaaturnd for years of
dependable operation. But like a[| products, it may require
repair from time to time. That's when having aRepair
Protection Agreement can save you money and aggravation.
Purchasea RepairProtectionAgreementnowand protect
yourselffrom unexpectedhossleand expense.
Here'swhatthe RepairProtectionAgreement'_includes;
,_ Expertserviceby our 10,000 professionalrepair
specialists.
Unlimitedserviceand nochargefor partsand labornn
of! coveredrepairs.
Productreplacementupto $t500 if yourcovered
productcan'tbe fixed.
D]iseountof25% fromregularprice ofserviceand
relatedinstalledpartsnatcovered by the agreement;
also, 25% offregularprice ofpreventivemaintenance
check,
Fast help by phonephone -we call it Rapid Resolution -
support from aSears representative. Think of us ,_s a
_'taikiog owner's manual".
Once you purchase the Repair Protection Agreement, a simpfo
phone col! is atl that it takes for you to schedule service. You
can call anytime day or night, or schedule aservice
appointment on]ine.
The Repair Protection Agreement is a risk-free purchase, If
you cancel for any reason during the product warranty period,
we wiif provide a furl refund. Or, a prorated refund anytime
after the prudent warranty period expires. Purchase your
Repair Protection Agreement today!
Somelimitationsand exclusions apply.Forpricesand
adflitiona[ informationin the U.S.A,call 1-800-827-6655,
Page t customerservice1-888-577-9820
BBQPROGRILLWARRANTY
90 DaysFull Warrantyon BBQPro Grill
If this grill fails dueto a defectin material
orworkmanshipwithin90 daysfrom the
date of purchase,call ] =800_-MY-HOME®
to arrangefor free parts replacement(if
repair provesimpossible).
Allwarrantycoverageexcludesgrill part
paint loss, discolorationorrusting,which
are eitherexpendablepartsthat can wear
outfromnormalusewithinthewarranty
period, or are conditionsthat canbe the
resultof normaluse,accidentor improper
maintenance.
All warrantycoverageis void if thisgrill is
ever usedforcommercialor rentalpurposes.
All warrantycoverageappliesonlyif this
grill is usedin the UnitedStates.
Thiswarrantygivesyouspecific legalrights,
andyoumay also haveotherrightswhich
vary fromstateto state.
Sears, Roebuck and Co.,
Hoffman Estates, IL 60179
Call Grill Service Center For Help and
Parts
If youhavequestionsorneedassistanceduring
assembly,please call 1-888-577-9820. Youwill
be speakingto arepresentativeof Grill
Manufacturerand not a Searsemployee.
To order new partscall Sears at
1-8004-MY-HOME®.
ProductRecord
IMPORTANT:Fill out the productrecord
informationbelow.
Model Number
!
SerialNumber
See rating label oi=Eriilforserial number,
Oate Pu_hose_
TOENSURETHM IT ISSAFETOEAT,FOODMOSTBECOOKEDTOTHEMINIMUMINTERNAL
TEMPERATURESLISTEDINTHETABLEBELOW.
USDA*SafeMinimumInternaITemperatures
Fish 145_F (63_C)
Pork 160°F (71_C)
Eg£ Dishes t60°F (71°C) _
Steaks and Roasts of Beef, Veal or Lamb [ 145°F (63'_C)
Ground Deer, Veal or Lamb [ 160_F (71°C)
Whole Poultry (Turkey, Chicken, Duck, etc,) J165°F (74°C)
Ground or Pieces Poultry (Chicken Breast, etc,) 1DS°F (74°C)
* United States Department of Agriculture
customerservice1-888-577-9820 Page2
•Keepa fire extinguisheraccessible at all
timeswhile operatinggrill.
•Neverleavegrill unattendedwhile inuse_
*Never useinsidean enclosedarea suchas
apatio, garage, buildingor tent.
• Never useinsidea vehicle, not evena
recreationalvehicle suchas amotorhome,
camper_or truckbed.
•Neveroperate this grill underanyoverhead
constructionsuchas roofcoverings,
carports,awningsor overhangs.
oMaintaina minimum distanceof loft. (3m)
fromall structures.
oKeeparea clear of all combustible
materialssuchas wood,dry plants,grass,
brush,paperor canvas.
•Never operatethisgrill within25 ft. (7.5mi
of flammableliquids.
=Neveroperatethisgrill within 10 ft. (3m) of
a gascylinder.
• Never use thisgrill as a heater(READ
CARBONMONOXIDEHAZARD),
•Use thisgrill onlyon a stable,level surface
to preventtipping.
oUse onnon-combustiblesurfacessuchas
dirt, concrete,brick or rock.
•Keepchildrenand petsawayfromgrill at
all times. Donotallow childrento usegrill.
• Onlyuse charcoal lightingfluid, Never use
gasoline, alcoholor otherhighlyvolatile
fluids to ignite charcoal,Thesefluidscan
explodecausinginjuryordeath.
•Grill is HOTwhile in use andwilt remain
HOTfor a periodof time afterwards.Donot
touchanypart of thegrill withoutwearing
protectivegloves.
• Nevermovegrill when in use. Allowgrili to
cool completelybeforemovingor storing.
J Neverleave HOTcoals orashesunattended.
•Donot storegrill with HOTashesor
charcoal insidegrill. Storeonlywhen fire is
completelyoutandall surfacesare cold.
•Disposeof cold asheshy placingthemin
aluminumfoil, soakingwithwaterand
discardinginanon-combustiblecontainer,
"Accessoryattachmentsnotsuppliedby
SearsOutdoorProductsare not
recommended.
• Neverusethis productfor anythingother
• than its intendedpurpose.Thisgrill is not
for commercialuse.
Alwaysusethis grill in accordancewitheli
Page3 customerservice1-888-577-9820
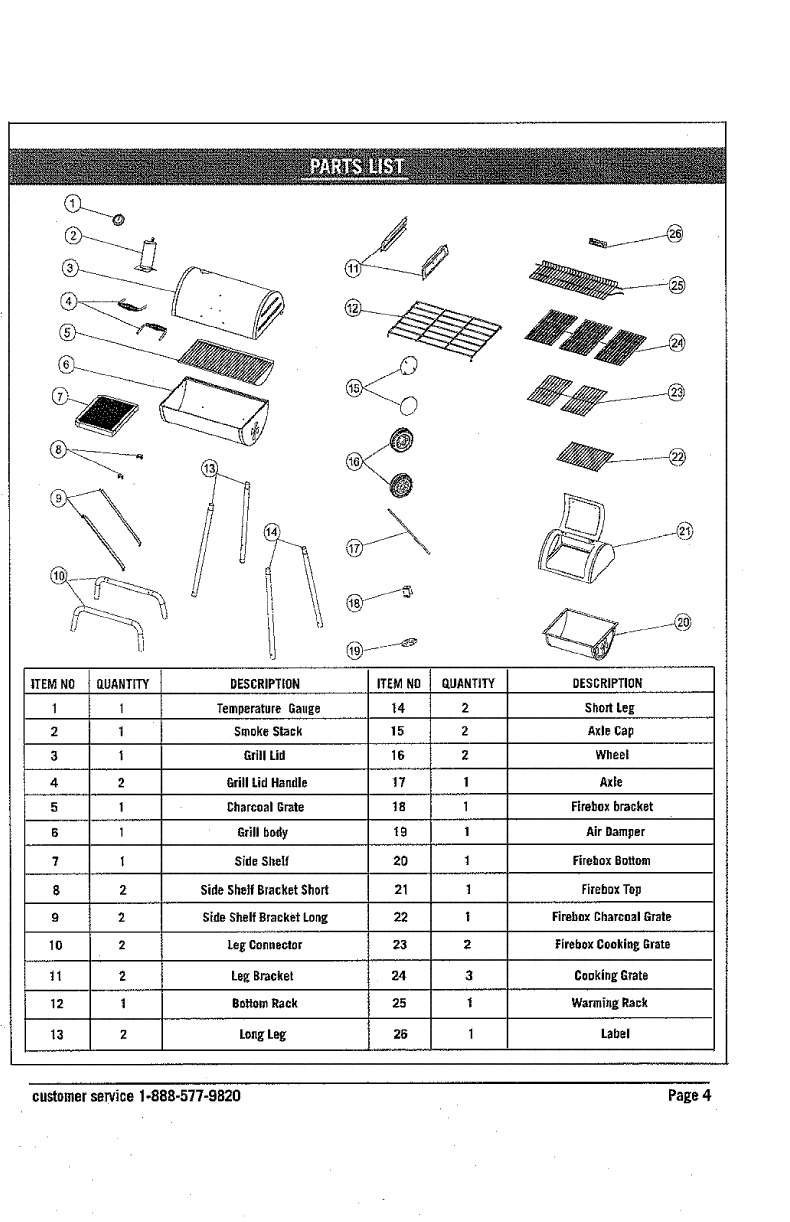
.... @
ITEMNO QUANTITY
1 1
2 1
3 t
4 2
5 l
?1
8 2
9 2
to 2
tl 2
12 1
13 2
DESCRIPTION ITEMNO QUANTITY
TemperatureGauge t4 2
SmokeStack 15 2
Grill Lid 16 2
Grill LidHandle 17 t
CharcoalGrate 18 1
Z
Grill body _9
SideShelf 20 1
SideShelfBracketShort 21 t
Side ShelfDraoketLong 22 t
LegConnector 23 2
DESCRIPTION
Short Leg
Axle Cap
Wheel
Axle
F[rabox bracket
Air Damper
Firebox Bottom
Firebox Top
Firebox Charcoal Grate
Firebox Cooking Grate
LegBracket 24 3
BottomRack 25 1
LongLeg 26 1
CookingG_ate
Warmi.gRaok
Label
customerservice1-888-577-9820 Page4
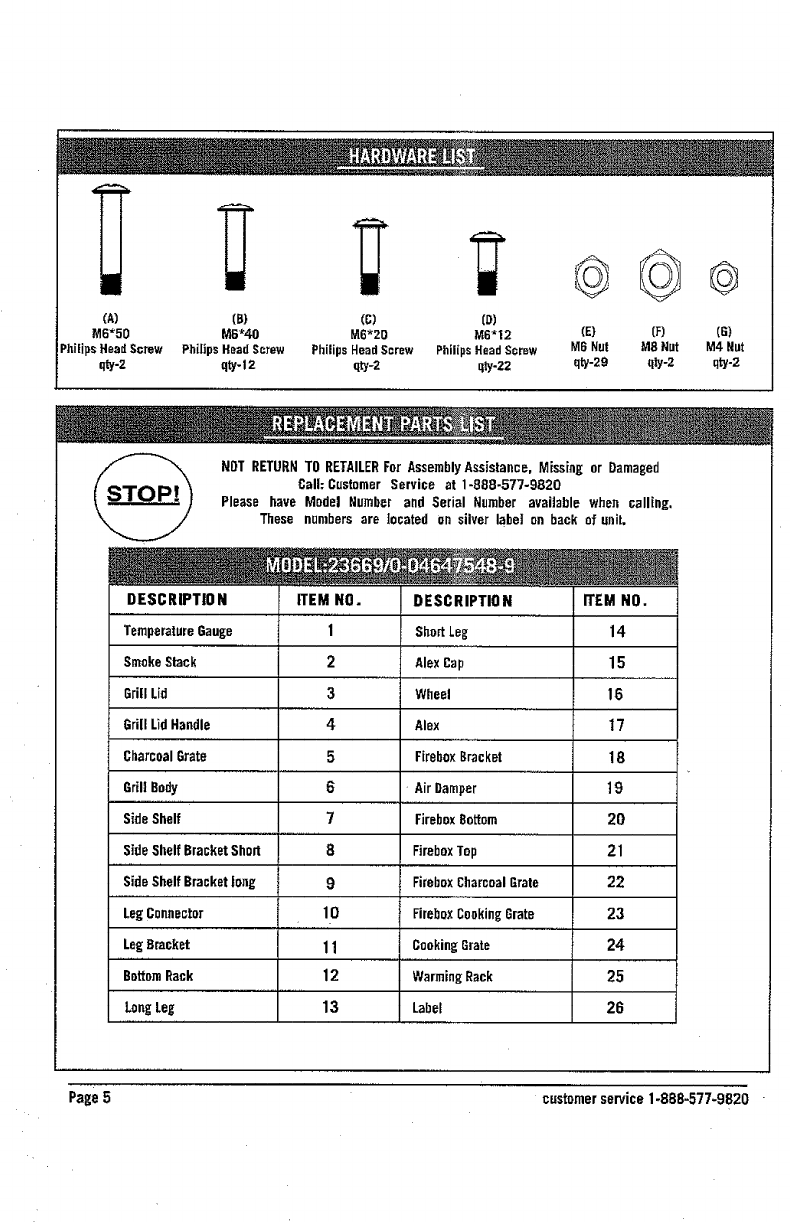
(A) (B) {C} {l))
M6"50 M6"40 M6"20 M6"12 (E} {F)
PhJiJpsHead Screw PhilJps Head Screw Phiiips Head Screw Phiiips Head Screw M6 Nut M8 Nut
qty-2 qty- 12 qty-2 qty-22 qty-29 _ty-2
@
{G}
M4Nut
qty-2
NOT RETURN TO RETAILERFor Assembly Assistance, Missing or Damaged
Call: Customer Service at 1-888-577-9820
Please have Model Number and Serial Number available when calling.
These numbers are located On silver label on back of unit,
DESCRIPTION ITEMNO. DESCRIPTION
1
TemperatureGauge
Smoke Stack
Grill Lid
Grill Lid Handle
Charcoal Grate
Grill Body
Side Shelf
Side Shelf Bracket Short
Side Shelf Bracket long
Leg Connector
Leg Bracket
BottomRank
LongLeg
3
4
5
6
7
8
9
10
_,,,,,,,,,-
11
12
13
Short Leg
Alex Cap
Wheel
Alex
Firebox Bracket
- Air Damper
FireboxBottom
FireboxTop
FireboxCharcoalGrate
FireboxCookingGrate
CookingGrate
WarmingBack
Label
ITEM NO.
14
15
16
17
18
t9
2O
21
22
23
24
25
26
Page5 customerservice1-888-577-9820 -

Beforeassemblyreadinstructionscareful[y.Assemblegri]lonaclean,fiatsurface.Thisunitis heavy.
DONOTASSEMBLEWITHOUTASSISTANCE,GETAHELPER!
Toolsneededforassembly:
AdjustableWrench
PhilipsHeadScrewdriver
CAUTION:Unitisheavy.Carefullyorientgrilllid
&body(1)asshown.
Becarefulwhenmovinggrillbody,installed
charcoalpanmaymove.
STEP1
Pay close attention to when assecobling
grill legs. Left log (14) is shorter to
accomco odate wherels.
|risert ]eftshort leg (14) and right bag leg (I3)
into leg connector(10) as shown.
@STEP2
Attach leg bracket (11) to shortleg (14) as
shown using M6*4OPhilips head screw (B)
and M6 nut (E).
Repeat step2 on oppositeside.
Do notf ulty tighten screws at this time.
customerservice1-888-577-9820 Page6
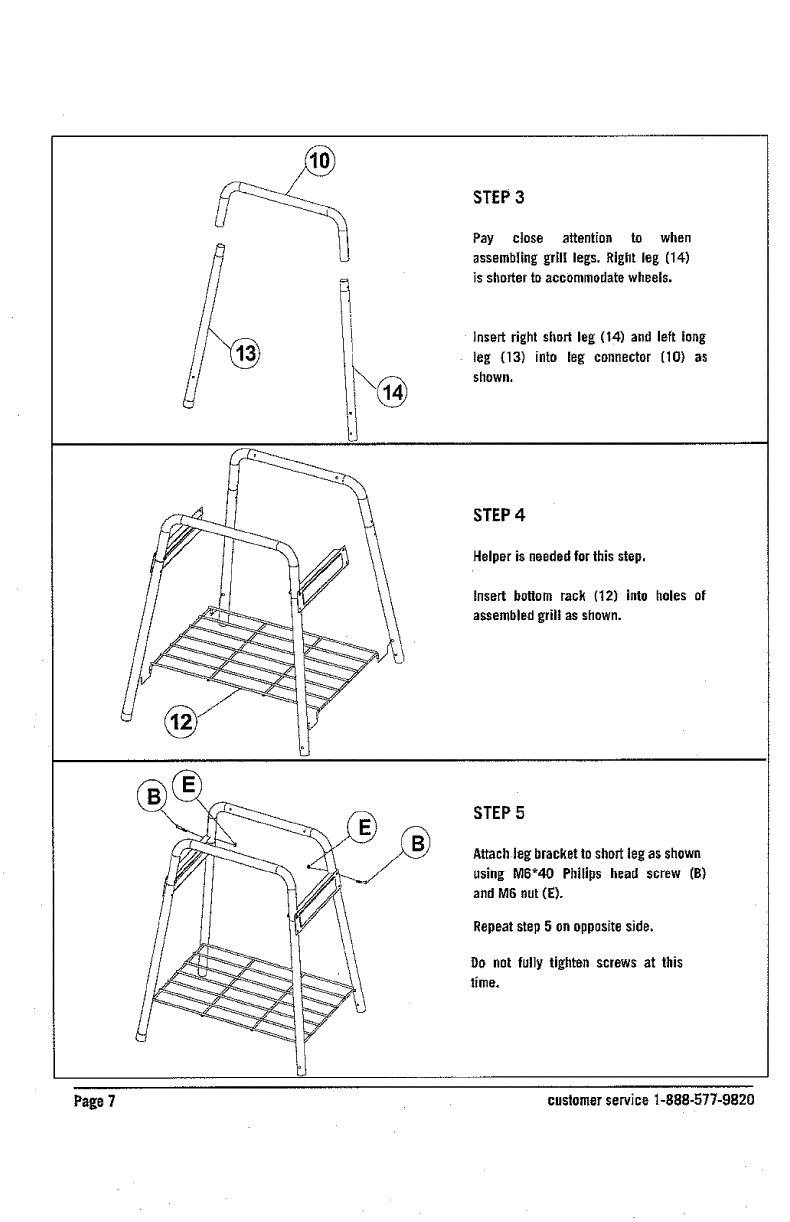
STEP3
Pay close attention to when
assembling gril! legs. Right leg (14)
is shorter to accommodatewheels.
]nsert right short leg (14) and left long
leg [13) into leg connector (10) as
shown.
STEP4
Helper is needed for this step.
insert bottom rack (t2) into holes of
assembled grill as shown.
STEP5
Attach leg bracket to short leg as shown
using M6"40 Phitips head screw (B)
and M6 nut(E).
Repeat step 5 on opposite side.
])o not fully tighten screws at this
time.
Page 7 customerservicet-888-577-9820
®
customerservice1-888-577-9820
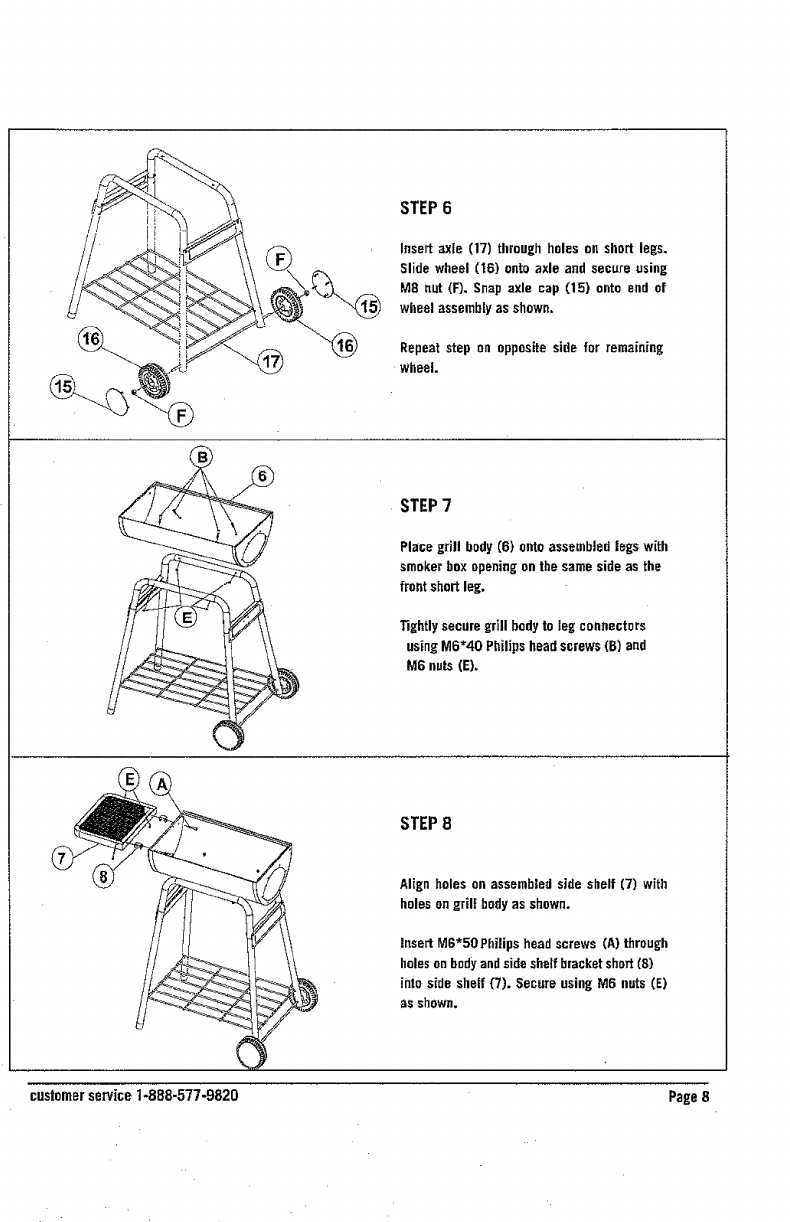
STEP6
Insert axle (17) through holes on short legs.
Slide wheel (16) onto axle and secure using
M8 nut {F). Snap axle cap (15) onto end of
wheel assemblyas shown,
Repeat step on opposite side for remaining
Wheel.
STEP 7
Place grill body (6) onto assembled legs with
smoker box opening on the same sifle as the
front short leg.
Tightly secure grill bodyto leg connectors
using M6"40 Philips head screws(B) and
M6 nuts (E).
STEP8
Align holes on assembled side shelf (7) with
holes on grill bodyas shown.
Insert M6*5OPhilips head screws (A) through
holeson bodyandside shelf bracket short (8)
into side shelf (7). Secure using M6 nuts (E)
as shown,
Page8
Page9
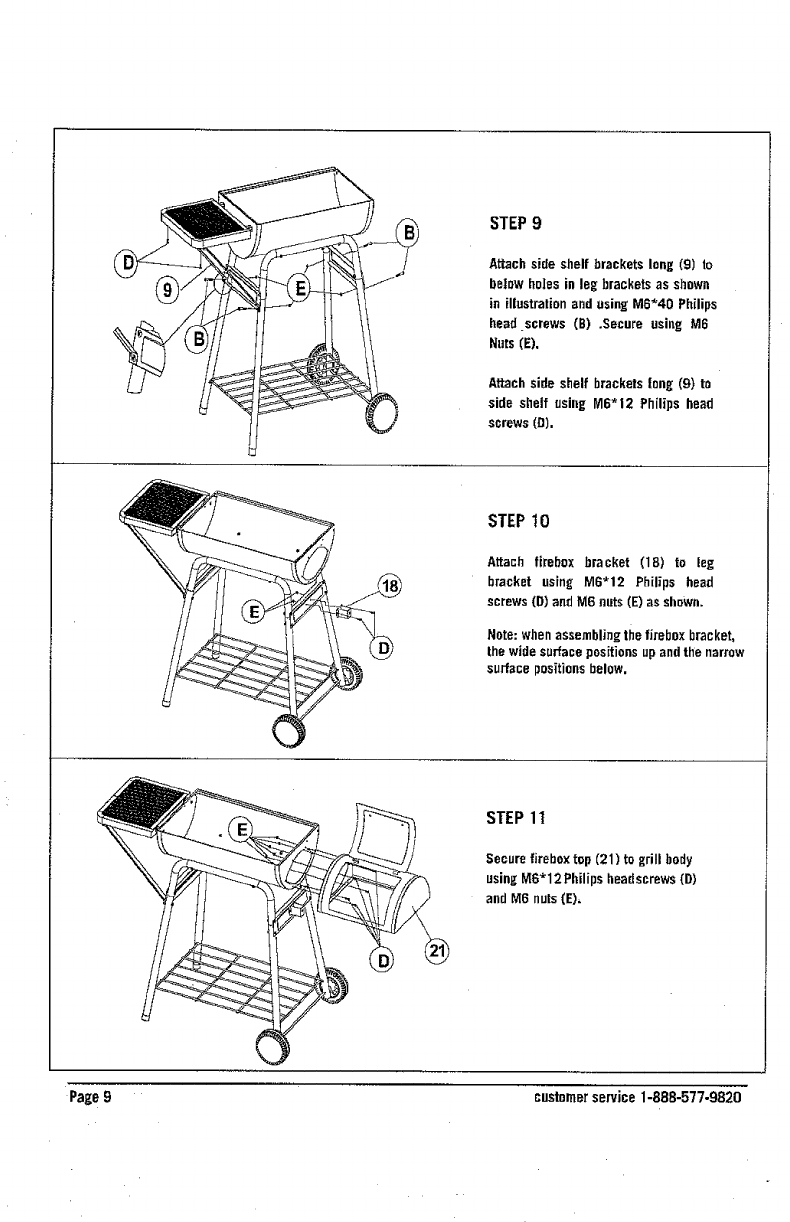
STEP9
Attach side shelf brackets long (9) to
betow holes in leg brackets as shown
in illustration and using M6"40 Philips
headscrews (B) .Secure using M6
Nuts (E).
Attach side shelf brackets long (9) to
side shelf using M6"12 Philips head
screws (8).
STEPt0
Attach firebox bracket (18) to leg
bracket using M6"12 Philips head
screws (D) and M6 nuts (E) as shown.
Note: when assembling the firebox bracket,
the wide surface positions up and the narrow
surface positionsbelow,
STEP11
Secure firebox top (21) to griil body
using M6*12Philips headscrews (D)
and M6 nuts (E),
customerservice1-888-577-9820
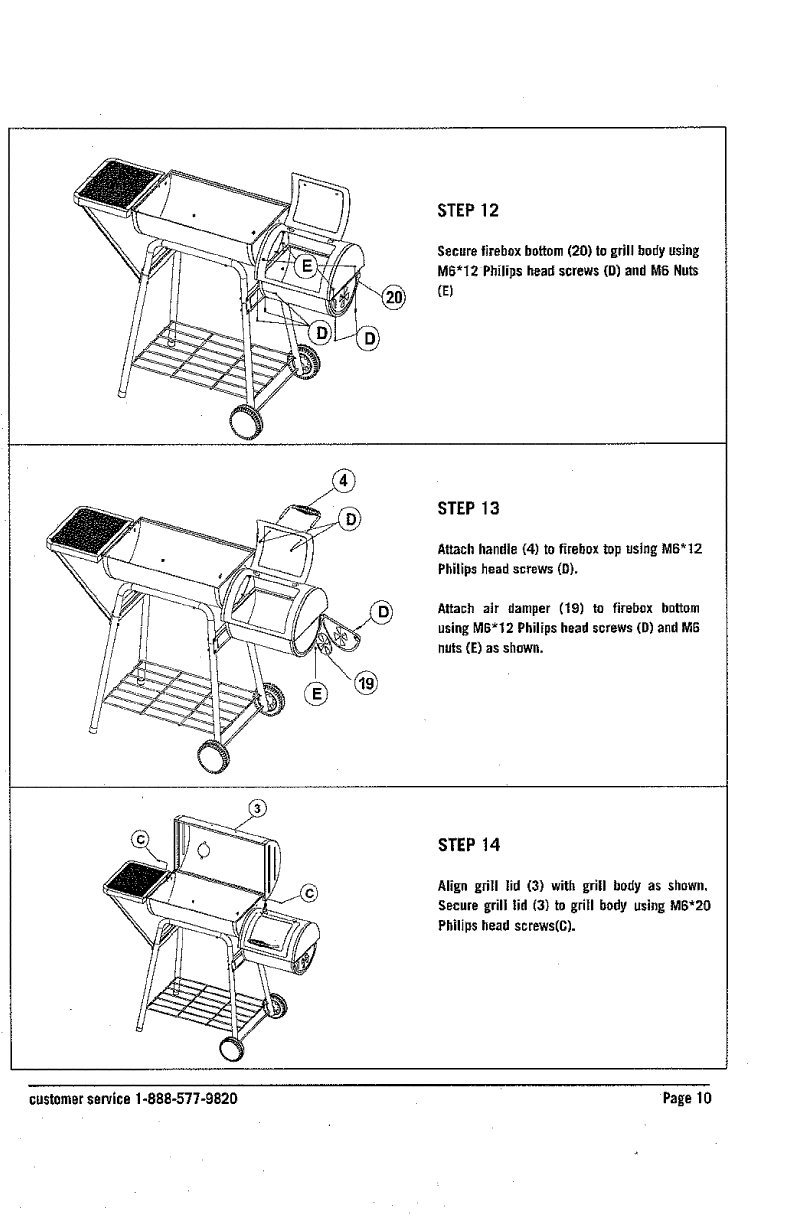
STEP12
Secure firebox bottom(20) to grill body using
M6"I2 Philips head screws (D) and MG Nuts
(E)
STEP13
Attach handle (4) to firebox top using M6"t2
Philips head screws (g).
Attach air damper (19) to firebox bottom
using MG*12 Philips head screws (D) and M6
nuts(E) as shown.
STEP14
Align gTill |id (3) with grill body as shown,
Secure grill lid (3) to grill body using M6"20
customerservice1-888-577-9820
PhilJpshead screws(C).
Page 10
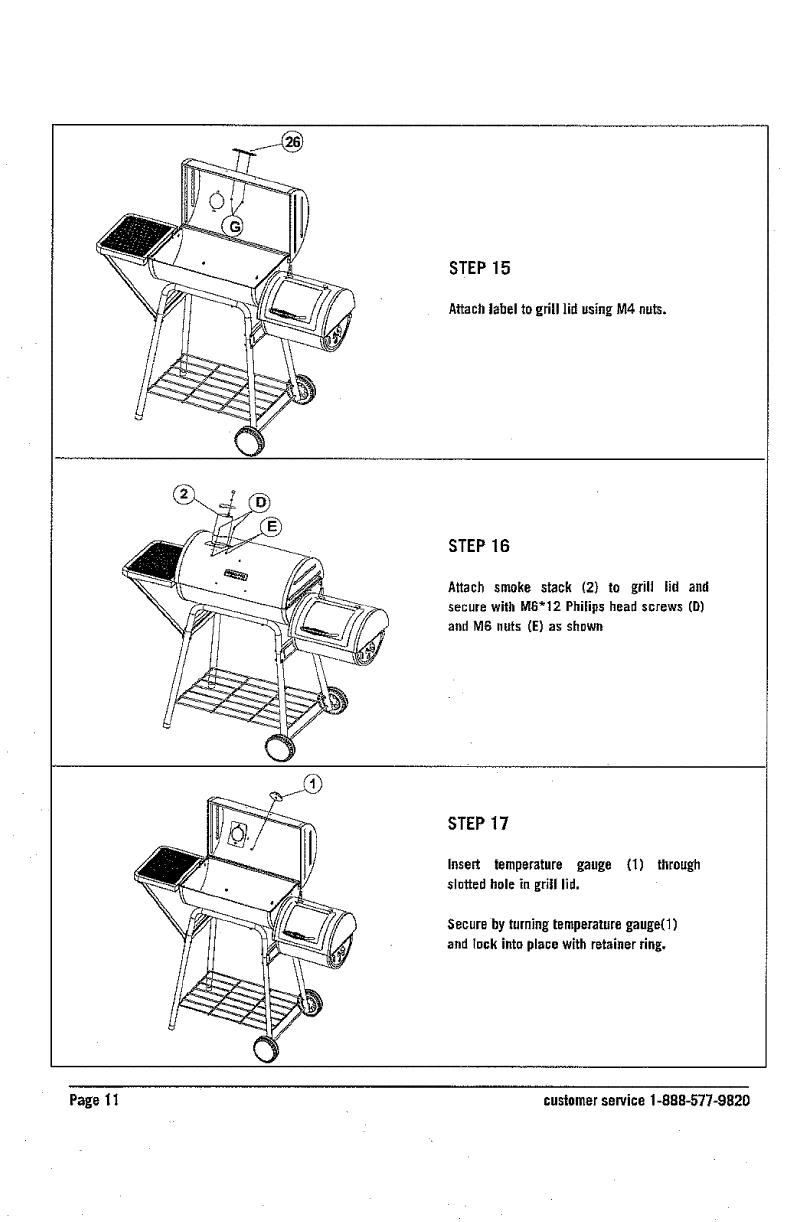
STEP15
Attach label to grill lid using M4 nuts.
STEP16
Attach smoke stack (2) to grilJ lid and
secure with M6"12 Phiiips head screws (D)
and M6 nuts (E) as shown
STEP17
Insert temperature gauge (1) through
slotted hole in grill lid.
Securebyturningtemperaturegauge(l)
andIock intoplacewithretainerring,
Page t Icustomerservice1-888-577-9820
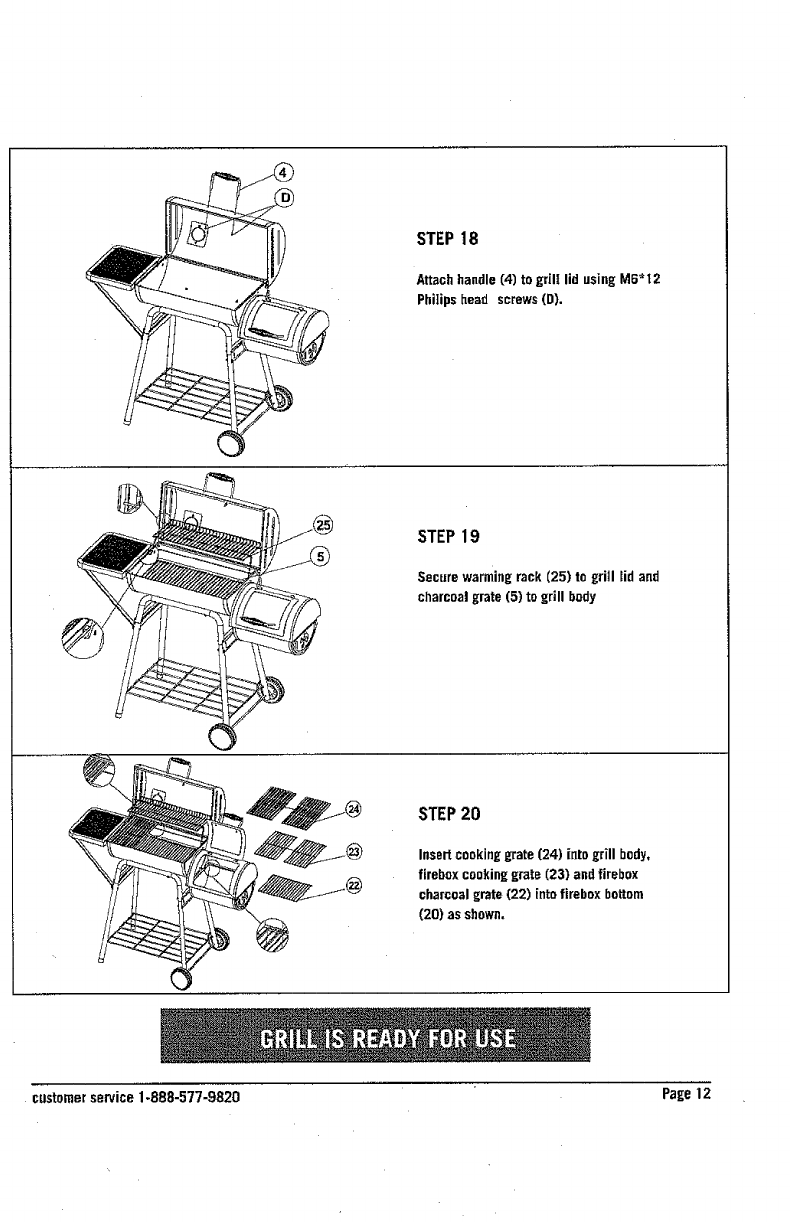
STEP18
Attach handle (4) to gril! lid using M6"_2
Philips head screws (D).
STEP19
Secure warming rack (25) to grill lid and
charcoal grate (5) to grill body
STEP20
Insert cooking grate (24) into grill body,
firebox cooking grate (23) and firebox
charcoal grate (22) into firebox bottom
(20) as shown,
customerservice1-888-577-9820 Page12
FREQUENTLYASKEDQUESTIONS
Q:My grateshaverustonthem. Howdo I get rid of it?.
If rust occurs,clean with asteel brush.Reapplyvegetable
shorteningand heatas indicatedabove.
Q:Thepaintfinishinsidemy lid is peeling,Whatcan I do?
Youare seeingadepositof greaseandsmokethat collects
duringnormalusethat resemblespaint.These carbon
depositsare non-toxic,butyoumaywantto regularlyremove
the build-up.Removebuildupusinga brassor stiffbristle
brushbeforegrilling, Futurebuild-upcan be avoidedby
simply wiping the grid lid while slightly warm with a
mild soap-and-water solution.
Q: When can I put my meat on the grill?
Grill is ready for use when charana! is asked over and
no visible flames are present.
Q: How do I regulate the heat on my grill?
Adjusting the dampers will increase and decrease
airflow and heating.
Inspect hardware tightness on aregular basis to
insure grill is insafe working condition.
ALWAYS allow grin to cool completely before
handling.
ALWAYS empty charcoal pan alter use only when
ashes have completely cooled.
This will help prolong charcoal pan life.
C_ean grill, including special surfaces such as
cooking grates with mild cleaning agents. Wipe
outside of grill with damp rag. DO NOT use oven
cleaner.
ALWAYS cover and store cold griJi in a protected
area.
Indoorstorageof grill is permissibleonly ifthe
charcoa]hasburnedtoa completeashANDis
cold, Rememberto removecoldashesbefore
storing,
GriRis madeof steelandmay rustover time. If
resting occursonoutsidesurfaces,cleanarea
with sand paperor steelwool,then coverwith
heatresistant paint.
if rustingoccursonthe insidesurface of grill,
clean area with sandpaperor steelwool,then
coatwith cookingoil.
NEVERUSEPAINTONINSIDESURFACESOFGRILL
Readall instructionsand warningson charcoalbag and]n
manualbeforeusing.
1. Stack briquetsin a pyramid,
2. Addlighterfluid following directionsonfluid
container.Beforelighting,placelighterfluid at
least25 ft. (7.5m) awayfromgriiL Donotlean
overgril! when Lightingcharcoal Lightcharcoal,
LEAVEGRILLUNCOVERED.
3, Inabout15 minutes, flames wilt die outand
briquetswill beginto ashover.Oncethe
briquetsare completelyashedover,spread
briquetsin a s[nglelayerand begincooking,
NEVERUSEGASOLINETO LIGHT
CHARCOAL.
OVERFILLINGCHARCOALPANCANCAUSE
SERIOUSINJURYANDDAMAGETHEUNIT,
NEVERADDADDITIONALLIGHTERFLUID
ONCECHARCOALHASIGNITED,
HOTCOALSSHOULDNOTBELEFT
UNATTENDED.
GRILLIS HOT.USEPROTECTIVEGLOVES
ANDLONG,STURDYCOOKINGUTENSILS.
Paget3 customerservice1-888-577-9820
Avoid bumping or impacting grill,
Keep your hands, hair and face away from burning
charcoal.
This grill has an open flame. Be careful of loose hair
and clothing during operation. They may catch fire.
Use protective gloves when handling this grill or
working with fire. Use protective gloves or long,
sturdy fireplace tools when adding wood or charcoal.
Do net allow anyone to conduct activities around this
grill during or following its use until the unit has
cooled.
This grill is HOT during operation and remains HOT
for a period of time following its use.
Fatty foods like hamburgers can have excess grease
that can cause flare ups. When cooking fatty foods,
use caution when opening lid and during cocking to
avoid being burned.
Be careful when removing food from grill A|I
surfaces are HOT and may cause burns. Use
protective g|oves or lanD, sturdy cooking tools.
Never use glass, plastic or ceramic cookware on this
grill
• The use ofalcohe],prescriptionor non-prescriptio,
drugsmayimpairtee user'sability to properly
assembleor safely operatethis grill.
.Grit!]id andbodyare HOTwhile in useandduring
coolingprocess,
• Do notremoveadjustablecharcoalpan whileashes
andcharcoa|are HOT.
• Airdampersam HOTwhitethe grill is in use and
during cooling;wear protective gloveswhen
adjusting.
. Nevereverfit| charcoa|pan,Thiscan causeserious
injuryaswell as damagethe unit,
•Onlyusecharcoallightingfluid, neveruse gasoline,
alcohol or otherhighlyvolatilefluidsto ignite the
charcoal.Thesefluidscanexplodecausinginjuryor
death.
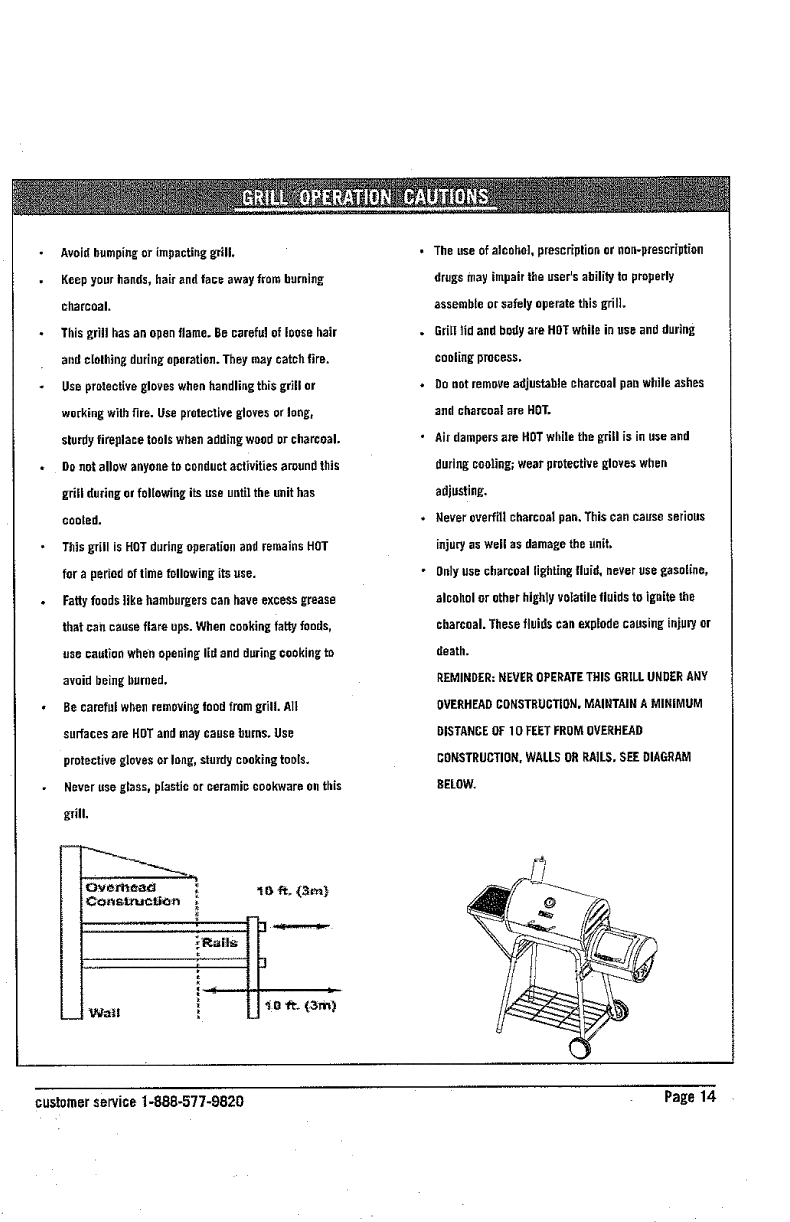
REMINDER:NEVEROPERATETHISGRILLUNDERANY
OVERHEADCONSTRUCTION,MAINTAINA MINIMUM
DISTANCEOF10 FEETFROMOVERHEAD
CONSTRUCTION,WALLSORRAILS,SEEDIAGRAM
BELOW.
customersenfice1-888-577-9820 Page14

sesrs
Made in /Hecho en CHINA
Distributed by Sears, Roebuck and Co., Hoffman Estates, IL 60179
See our extensive assortment of outdoor living products
on-line at www.sears.com and www.kmart.com
