Beijing Choice Electronic Technology MD100P10 Heart Observer USB Equipment User Manual
Beijing Choice Electronic Technology Co., Ltd. Heart Observer USB Equipment
User Manual
HEART OBSERVER
INSTRUCTION
MANUAL
Edition: V1.0P10
Non-medical Equipment
2
Customer Instructions
Distinguished customers, thank you for purchasing our product Heart Observer. Please be sure to
read the manual carefully before using this unit for the first time. Failure to follow these instructions
may cause measuring abnormality, equipment damage or personal injury. We assume no
responsibility for personal injury or damage sustained by or through use of this product.
We have the ultimate right to explain this manual. No part of this manual may be photocopied,
reproduced or translated into another language without the prior written consent. We reserve the right
to improve and amend it at any time without prior notice.
In case of modifications, you will NOT be advised with a Modification Notice. The information in this
manual should NOT be regarded as the promise of our company.
All rights reserved!
Issue Date: February 2, 2010
3
Notes on Safety
This unit is designed for monitoring the heart rate for users. It is not designed or intended for medical
diagnosis. Never use the unit in critical situations!
-Self-diagnosis and treatment is dangerous.
The measurement results are for monitoring purpose only, and should never be used as a basis for
starting or modifying treatment without independent confirmation by medical examination. DO NOT
make diagnosis yourself by the measurement and analysis results; always consult your doctor if
abnormal information is presented frequently.
-The values displayed by the unit are the ones at the time of measurement. Medical conditions
can change suddenly. If you notice any change in your condition, consult your doctor, regardless of the
measurement results.
- DO NOT use the unit for treatment, we will not be responsible for the suddenness happened during a
measurement.
- When using the equipmentplease caution the changes or modifications not expressly approved by
our company responsible for compliance could avoid your authority to operator the equipment.
- This device complies with part 15 of the FCC Rules. Operation is subject to the following two
conditions: (1) This device may not cause harmful interference, and (2) this device must accept any
interference received, including interference that may cause undesired operation.

4
Warnings!
Do not use with a cardiac pacemaker.
Do not use with a defibrillator.
DO NOT use the pulse oximeter in an MRI or a CT environment.
Do not use in the presence of flammable anesthetics, drugs or pressurized oxygen (such as in a
hyperbaric chamber, ultraviolet sterilizer or oxygen tent).
Do not attempt self-diagnosis of the measurement results and analysis. Always consult your doctor.
- Self-diagnosis may lead to deterioration in your condition.
Do not use on people with sensitive skin or allergies.
- This may result in exanthema, skin irritation, or eczema.
Keep out of reach of small children and people who can not express their consent.
Do not use for any purpose other than obtaining an electrocardiograph.
Do not expose the unit to strong shocks or vibrations, or drop or step on the unit.
Do not use batteries of a type other than that specified in this manual.
Do not apply over clothing.
Do not take measurements when there are drops of water on your skin, such as from sweat or after
bathing.
Do not take measurements where the unit will be exposed to strong electromagnetic forces.
5
Caution!
Do not expose the unit to static electricity. Always disperse any static electricity from your body
before handling the unit.
Do not take measurements in a moving vehicle.
Do not use a cellular phone near the unit.
Do not disassemble, repair, or modify the unit.
Do not insert batteries with their polarities reversed.
The chest electrode will be impeded by excessive body hair, regularly remove hair at the electrode
contact point.
General
Avoid extremes in temperature and humidity. Do not use this unit in locations subject to high or low
temperatures or humidity.
Use at a temperature within 5°C to 40 °C and below 80% RH.
Do not sterilize this unit in an autoclave or gas sterilizer (EOG, formaldehyde, high density ozone
etc.)
Do not wash this unit with water.
Do not store the unit in the following ambient conditions.
--- Locations exposed to direct sunlight.
--- Locations subject to high temperatures and high humidity.
6
--- Wet or damp locations where water may get on the unit.
--- Dusty locations.
--- Near fires or open flames.
--- Locations exposed to strong vibration.
--- Locations exposed to strong electromagnetic fields.
Dispose of the unit and its accessory according to applicable local regulations.
Federal Law(U.S.A) restricts this device to sale by or on the order of a physician.
All Choice devices are designed to be compliant with rules and regulations in locations they are
sold and will be labeled as required.
Any changes or modifications to Choice equipment, not expressly approved by Choice, could avoid
the user’s authority to operate the equipment.
All necessary information, as regards toxicity and/or action on tissues, about materials with which
the patient or any other person can come into contact.
7
Content
1. General Description ............................................................................................... 1
1.1 Know Your Unit ................................................................................................ 1
1.2 Product Features ............................................................................................. 4
1.3 Display ............................................................................................................. 5
2. Inserting and Replacing Batteries ......................................................................... 6
3 Date and Time.......................................................................................................... 8
4. ECG Measurement ............................................................................................... 11
5 ECG Replay ........................................................................................................... 20
6 System Settings .................................................................................................... 21
8
6.1 Date Settings ............................................................................................... 22
6.2 Time Settings ............................................................................................... 22
6.3 Beep sound settings ................................................................................... 22
6.4 ECG replay speed setting ........................................................................... 23
6.5 Auto power-off interval settings ................................................................. 24
6.6 Exit the “Sys setup” .................................................................................... 25
7 Data management ................................................................................................. 26
8 About P10 .............................................................................................................. 28
9 Trouble Shooting ................................................................................................... 29
10. Maintenance and Storage .................................................................................. 30
11 Key Symbols ........................................................................................................ 32
11 Technical Specifications ..................................................................................... 32
Appendix .................................................................................................................. 37

Heart Observer Instruction Manual
1
1. General Description
Thank you for purchasing and using Heart Observer monitor. The unit is designed for business men
and sub-health men. Business men should pay more attention to their health conditionfatigue and
work stress can lead to physical decline. Heart Observer is convenient for checking and improving
poor living habits.
The unit provides helpful ECG and analysis for the user, and can help you learn the condition for user’s
heart in a short period. If the measurement result is frequently abnormal, it is recommended the user
see a doctor, so that the detail or exact diagnosis can be done in time at hospital.
Note: The instruction describes all the functions of which some might not be applied to your units.
1.1 Know Your Unit
Heart Observer Instruction Manual
2
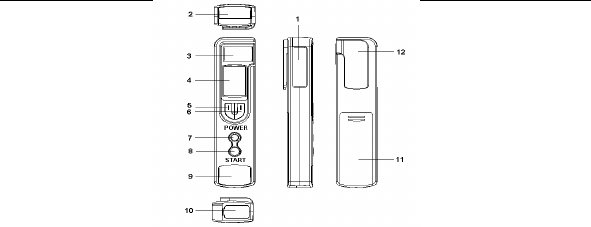
Picture 1-1
1:Right index finger Electrode:
2: USB Interface: Transmit data and ECG to the PC through this interface.
3: Right thumb finger Electrode
4: Displaying screen: Display of date and time, ECG and analysis result, menu items etc.

Heart Observer Instruction Manual
3
5: Left button: Press this button you can sequentially increase the parameter under adjustment by one
increment. And you can skim the main menu items by pressing this button.
6:Right buttonPress this button you can sequentially decrease the parameter under adjustment by
one decrement. And you can skim the main menu items by pressing this button.
7: POWER Button:
Press this button for 3 seconds to turn unit on.
Short press: press it for 1 second to confirm your setting.
Long press: press it for 2 seconds to return to the previous level menu.
Notethe unit can not be powered off by the POWER button and will power off after a time(set by you).
8: START button: Shortcut key for taking measurements. And press this button to start measurements.
When operation in “ECG Replay” and “Data Management” items, this key is used as confirmation key.
9: Left thumb finger Electrode
10: Left index finger Electrode
11: Battery cover:
12: Clip for fixing the unit

Heart Observer Instruction Manual
4
1.2 Product Features
Small, portable and easy to use
Completely cable free
Measurementrecord and deletion of ECG and HR
Two measuring modes for selection
Transmit data to management software by USB data
Fast measurement in just 30 seconds
20 records of heart rate, data analysis and ECG
Organic Light Emitting Display (OLED) screen display
Auto power-off during a period no operation is taken
Automatically analysis of heart status
Powered by two AAA batteries
Suitable for business men and sub-health men
Heart Observer Instruction Manual
5
1.3 Display
The screen is used to display analysis results, electrocardiograph and all kinds of parameters, such as
time & date, battery status etc., and manage the data stored in inner memory.
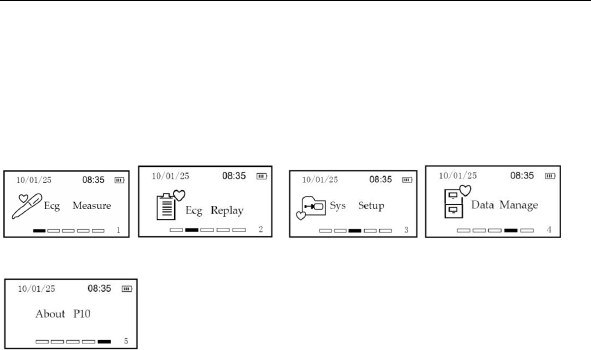
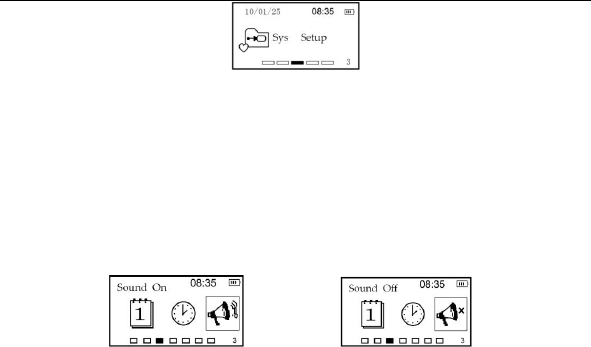
Main menus
Press the POWER button for 3 seconds to power on the unit and enter the main menu. Five items are
included in the main menu, refer to Picture 1-2. short press the LEFT button or RIGHT button to move
to the last or next item.
1 2 3 4

Heart Observer Instruction Manual
6
(5)
Picture. 1-2
ECG Measure by this item, you can set the measurement mode. The options are easy mode,
continue mode and exit for selection.
ECG Replayby this item, you can replay the saved ECG data and waveforms.
Sys Setupby this item, you can set the system parameters, such as the date and time, beep sound on
/off, and the time of auto-power offECG replay speed, filter setting etc.
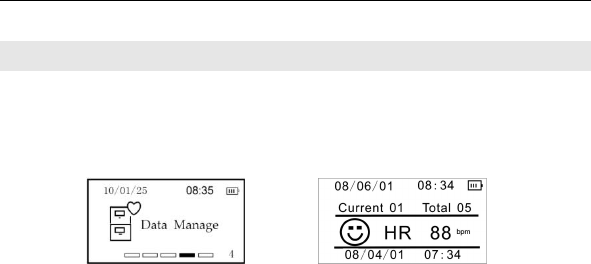
Data Manageby this item, you can review or delete the measured records.
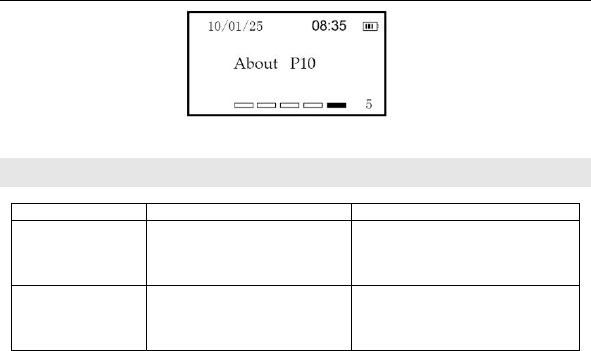
About P10by this item, you can learn the software version of the unit.
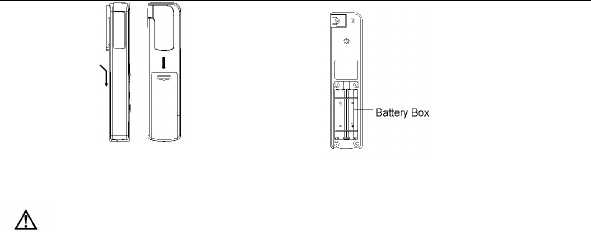
2. Inserting and Replacing Batteries
2.1 Open the cover of battery box on the back of the unit, refer to the picture 2-1.
2.2 Insert two AAA batteries lightly as indicated by the polarity sign:(refer to Picture 2-2
Note: Make sure the polarity of the batteries is correctly inserted.
Heart Observer Instruction Manual
7
Picture 2-1 Picture 2-2
2.3 Close battery box cover
Make sure that the polarity of the batteries is correct. Otherwise the unit cannot
operate normally.
Battery life and replacement
When the power is deficient, the power icon will become an empty box, please replace battery in
time, avoiding the measurement is affected.
Always make sure the unit is turned off before replacing the batteries.
Dispose of the used batteries according to the applicable local regulations.

Heart Observer Instruction Manual
8
Warnings!
If battery fluid should get in your eyes, immediately rinse with plenty of clean water. Consult a
doctor immediately.
Caution!
Do not use batteries not specified for this unit. Do not insert the batteries with the polarities in the
wrong direction.
Do not dispose of batteries in fire.
If battery fluid should get on your skin or clothing, immediately rinse with plenty of clean water.
Remove the batteries from this unit when you are not going to use it for a long period of time
(approximately three months or more).
Do not use batteries of a different type together.
Do not use new and used batteries together.
3 Date and Time
Always set the date and time before using the unit for the first time.
Heart Observer Instruction Manual
9
Make sure the date and time are correct before using the unit, reset them if necessary. The ID
number, date and time are important indicators when a measurement is taken.
3.1 Date and time setting
Note: The date and time on this unit can be viewed in the
format of “Date/Month/Year”; “Hour/Minute” on the above
of the screen.
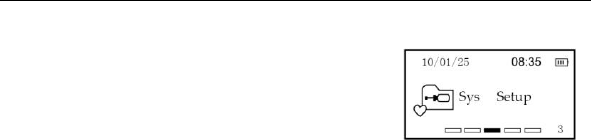
(1)Press the POWER button for 3 seconds to turn on
the unit.
(2)Press the LEFT or the RIGHT button to navigate to
the “Sys setup” itemrefer to picture 3-1. And then short press the POWER button to enter the
“sys setup” screen.
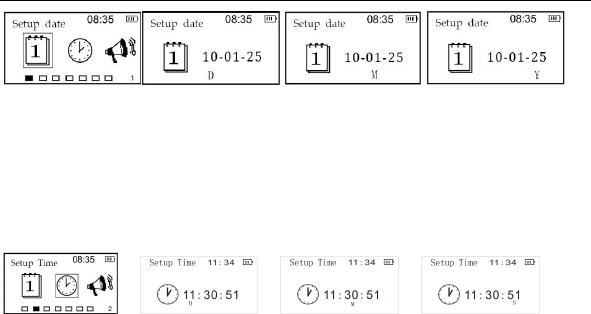
Setup Date: Short press the POWER button to enter the date setting screen, refer to the Picture
3-2(1).
And then short press the POWER button to select the item you want to set, the order is D(Date)->
M(month)->Y(year). Make the item selected and press the LEFT or RIGHT button to increase or
decrease the parameter’s value.
Once the parameter’s value is made set, the system will save it automatically. Long press the
POWER button to return the previous screen.
Picture. 3-1
Heart Observer Instruction Manual
10
(1) (2) Day (3) Month (4) Year
Picture 3-2
Setup time: After returning to “system setup” screen, press the LEFT or RIGHT button to move to
the “Setup Time” item, refer to Picture 3-3(1). And then short press the POWER button to enter the
time setup screen.
Short press the POWER button to select the item you want to set, the order is H(Hour)->
M(Minute)->S(Second). Press the LEFT or RIGHT button to increase or decrease the parameter’s
value. After finshing the settings, long press the POWER button to return to the previous screen.
(1) (2) Hour (3) Minute (4) Second
Picture 3-3

Heart Observer Instruction Manual
11
4. ECG Measurement
Important Notes on Taking a Measurement
In order to obtain a good heart rate reading, it is important that measurements are taken correctly.
Before taking a measurement for the first time, read these instructions carefully and make sure you
observe the following tips each time you take a measurement.
Make sure that the electrodes are directly touching your skin.
If your hands or skin are dry, wipe them with a damp towel so that they are slightly moist.
If the electrodes are dirty, wipe any dirt off with a soft cloth moistened with disinfectant alcohol or a
cotton swab.
----- Take care not to use too much disinfectant alcohol when cleaning the electrodes.
----- Do not spray or apply disinfectant alcohol on parts other than the electrodes.
Do not move during measurement.
----- Movement, including talking, coughing, or sneezing, during measurement may affect the
measurement results.
If the position of your finger or arm is inappropriate during measurement, the results may be
unreliable, so make sure to check their position before taking a measurement.

Heart Observer Instruction Manual
12
After taking a measurement, disinfect the electrodes by wiping them with a soft cloth or cotton swab
moistened with disinfectant alcohol. If you do not disinfect the electrodes there is a risk of skin
disease.
Measurement methods
Preparation
Make sure that you are in relaxed position. And user can take a measurement as the following
methods. Prepare your pose and then press the START button to start a measurement. The
measuring mode is depended on your setting in“ECG measure”menu. Refer to“Measurement
Mode settings”.
NoteThe ideal posture is one where you are seated comfortably with your back straight. You can also
take a measurement while you are standing or while lying down.
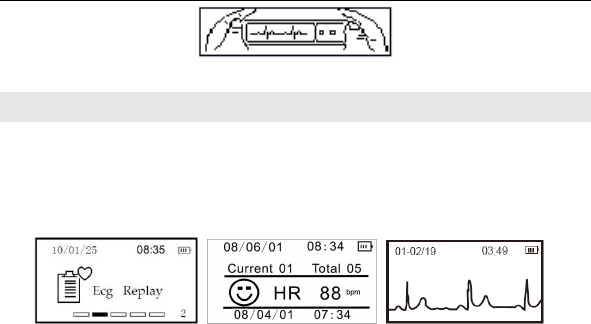
Palm-palm measurement
Make sure that hold the metal electrode 3 of the unit with the right
thumb and the electrode 1 with the right index fingerthen hold the
electrode 9 with left thumb and the electrode 10 with the left index
finger, refer to Picture 4-1.
Palm-chest measurement:
Picture 4-1

Heart Observer Instruction Manual
13
If palm measurement is not ideal, please adopt palm-chest measurement. Hold the unit with right hand;
make sure that the index finger touch metal electrode 1 and right thumb touch metal electrode 3
comfortably and closely. Place the electrode 10 against left chest on bare skin about 5 cm bellow your
left nipple. (Refer to picture 4-2 )
Picture 4-2
Note: If you have any problems applying the unit when measuring in palm-chest mode, please ask
your doctor for advice.
Improper Operation Methods:
A. The touch point of the right hand does not contact well with the unit.
B. The handheld gesture is NOT correct.

Heart Observer Instruction Manual
14
C. The electrode 10 does not contact fully the skin.(E.g. with clothes on body while taking
measurements).
Measurement for Female
Locate the unit at the lower end of breastbone and move horizontally
to the middle of the left part of the chest. If necessary, gently lift the breast
and place the “10” electrode under the left breast. Unless the electrode
comes in contact with the brassiere, it is NOT necessary to remove it;
if you have any problem, please consult your doctor.
Important: The small open circle indicates the proper position of electrodes, as shown in Picture 4-3.
Notes:
Make sure that you are relaxed and that your chest is free of tension.
Press the electrode 10 to make it closely against your bare chest. Do not place the electrode
on clothing as this will result in an inaccurate measurement.
If measuring in dry circumstance, which might cause weak heart pulse signal, please wet
your skin or hands with some diluted salt water or clean water. This would strengthen the
Picture 4-3
Heart Observer Instruction Manual
15
heart pulse signals, and make the analysis much more accurate.
When taking an palm-chest measurement, if you have problems applying the unit so that the
metal electrodes 10 is flat against your chest, please ask your doctor for advice.
Measurement Mode settings
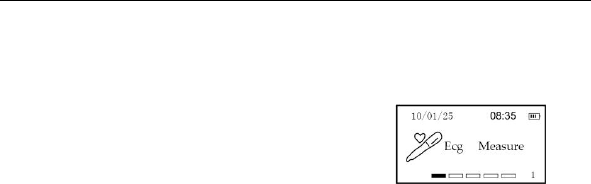
Select “Ecg Measure” item, shown in picture 4-4, and then
Short press the POWER button to enter the screen such as
in pic.4-5(1).
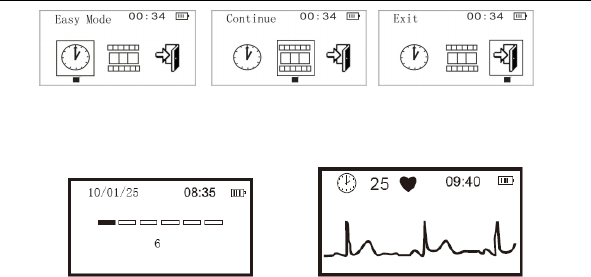
There are two measurement modes for selection, such as Easy
and Continue, refer to pic.4-5(1) and pic.4-5(2).
Press the LEFT or RIGHT button to move the selection box.
Then short press the POWER button and the little black quadrate macula shifts to below the item
and indicates the item is selected. The unit will perform the measurement in this mode whenever
pressing the START button until you change the mode to the other one.
By the “Exit” item, you can return to the previous screen; Additionally, you can also long press the
POWER button to exit.
Picture 4-4
Heart Observer Instruction Manual
16
(1) (2) (3)
Picture 4-5
(1) Easy Mode: quickly take a measurement in 30 seconds and display measurement results and
heart analysis. The results measured in this mode can be selected to be saved into the unit.
Count down before measurement Heart ratewaveform( 0836)
Picture 4-6
Description of pic 4-6:

Heart Observer Instruction Manual
17
10/01/25: indicates the datein the format of Day/month/year (ie. 10th January,2025 ).
: The clock icon flicks with the heartbeat icon.
25 indicates the countdown of measurement in Easy modewhich is from 29-0 (seconds).
08:35/08:36: indicates the timein the format of Hour/minute.
: simulates the heartbeat and beep sound may be issued if the“Beep sound”is set ON.
: ECG waveform
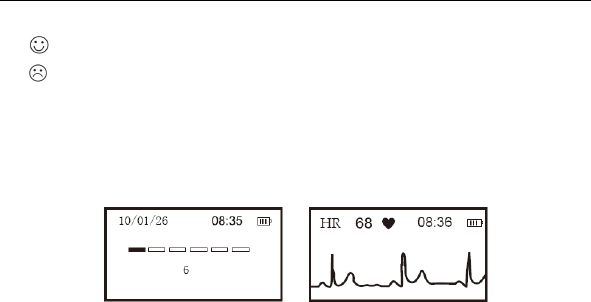
Display and analysis of Measurement results (ONLY in Easy mode)
After 30-second measurementthe unit will display the measurement results and result analysis. There
are two analysis results
Heart Observer Instruction Manual
18
(1) (2)
Picture 4-7
(1) : Stable waveform;
(2) : Suspected abnormal waveform;
Under the screen in pic.4-7, short press the POWER button, you can save this piece of measurement
result and analysis. After that, the display returns to the main menu screen.
For the details of ECG analysis, transfer the data to the accompanying software.
(2) Contiune Mode: For continually measuring and displaying heart rate data. This mode is applied
for user to monitor heart rates in a period. But the results are not be recorded into the unit.
Count down before measurement Heart rate waveform
Picture 4-8
Description of pic 4-8:

Heart Observer Instruction Manual
19
10/01/26: indicates the datein the format of Day/month/year (ie. 10th January,2026 ).
HR : heart rate.
68 indicates the measured real heart rate in Easy modewhich is from 29-0 (seconds).
08:35/08:36: indicates the timein the format of Hour/minute.
: simulates the heartbeat and beep sound may be issued if the“Beep sound”is set ON.
: ECG waveform
(3) ExitBy this itemyou can return to the previous screen; Additionally, you can long press the
POWER button to exit.
Notes:
If the contact of the electrodes becomes loose, or the conditions change during measurement, the
measurement may not proceed.
When the electrodes are not contacted well during the measurement, the display will switch to the
screen such as in pic 4-9. Thus, please adjust your gesture for accurate measurement.
Heart Observer Instruction Manual
20
Picture 4-9
Important: Keep still and do not move until the measurement is complete.
5 ECG Replay
Select the “ECG Replay” item in the main menu screen, refer to pic.5-1(1). Short press the POWER
button to enter the ECG replay screen, such as in pic.5-1(2). Short press the POWER button again to
display the corresponding ECG waveform.
The first data record is the lately measured one. Press the LEFT or RIGHT button to display and
review the last or next record.
(1) (2) (3)

Heart Observer Instruction Manual
21
Picture 5-1
Description of Pic 5-1(2)&(3)
08/06/01: indicates the current datein the format of Day/month/year.
08: 34: indicates the current timein the format of Hour/minute.
Total 05: indicates that the unit stores 5 pieces of records.
Current 01: indicates the current record is the first one.
: the heart rate value is 88bpm and the status of heart rate is judged as
normal(indicated by a smile face);
08/04/01: indicates the measurement date, in the format of Day/month/year.
07:34: indicates the measurement time, in the format of Hour/minute.
01-02/19: 01: indicates the first record02/19: indicates that the waveform of the record rolls from the
first screen to the 19th screen and the current screen is the second one.
: ECG waveform
6 System Settings
Enter the “Sys Setup” screen by short pressing the POWER button under the screen as shown in
picture 6-1. By this menu item, you can make settings to the measurement system, such as date, time,
beep sound, ECG replay speedfilter or automatically power-off time.
Heart Observer Instruction Manual
22
Picture 6-1
6.1 Date Settings
For more information on the date setting, please refer to section “Date and Time”.
6.2 Time Settings
For more information on the time setting, please refer to section “Date and Time”.
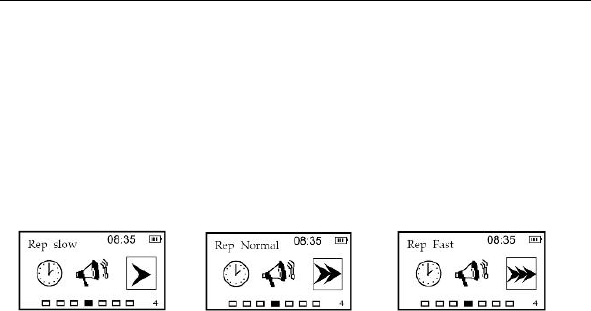
6.3 Beep sound settings
In the “Sys setup” screen, press the LEFT or RIGHT button to move the selection box to the “Sound
off(on)” item, and then short press the POWER button to change simulant heartbeat sound switch.
Refer to Pic 6-2.
Heart Observer Instruction Manual
23
Picture 6-2
Sound on: during measuring, the unit gives off the simulative heartbeat sound.
Sound off: during measuring, the simulative heartbeat sound is off..
6.4 ECG replay speed setting
In the “Sys setup” screen, press the LEFT or RIGHT button to move the selection box to the “Rep
Normal(Fast/Slow)” item and short press the POWER button to change ECG replay speed.
ECG Replay speeds contain Rep Normal, Rep Slow, Rep Fast. Please set according to your need.
Picture 6-3

Heart Observer Instruction Manual
24
6.5 Filter setting
In the “Sys setup” screen, press the LEFT or RIGHT button to move the selection box to the “Filter
On(Off)” item and short press the POWER button to select Filter On or Filter off.
If setting filter on, the system may filter out the interferential waves and the ECG waveform is
evener.
Picture 6-4
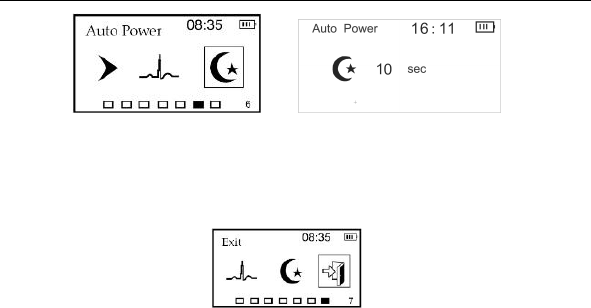
6.5 Auto power-off interval settings
In the “Sys setup” screen, press the LEFT or RIGHT button to move the selection box to the “Auto
power” item such as in picture 6-5 (1) and then short press the POWER button to enter its setting
screen(refer to picture 6-5 (2)). And then press the LEFT or RIGHT button to increase or decrease
the auto power-off interval, the adjustable intervals are 10, 30, 60, 120 (seconds).
If no operation is performed on the unit during the set interval, the unit will power off automatically.
Heart Observer Instruction Manual
25
(1) 12 (2)
Picture 6-5
6.6 Exit the “Sys setup”
In the “Sys setup” screen, press the LEFT or RIGHT button to move the selection box to the “Exit”
item, refer to pic .6-6. And then short press the POWER button again to exit.
Picture 6-6
Additionally, you can directly return to the previous screen whenever long pressing the POWER
Heart Observer Instruction Manual
26
button.
7 Data management
By this item, you can review the data record measured in Easy mode, or delete any data item.
Data review
In the main screen, press the LEFT or RIGHT button to move to the “Data Manage” item (see
picture 7-1(1)) and then short press the POWER button to enter the screen such as in picture 7-1(2).
And then, press the LEFT or RIGHT button to review the next or last data record.
(1) (2)
Picture 7-1
Caution!
The measurements from the heart observer are regarded as useful guides for your doctor, it is not able

Heart Observer Instruction Manual
27
to detect all changes in heart conditions, for medical conditions can change suddenly. Always consult
your doctor if you notice any changes in you condition, regardless of the measurement results. Consult
a doctor even if “Stable waveform” is displayed as the measurement results, if you have been
diagnosed with a heart condition.
Data deletion:
On the screen such as in picture 7-1(2), press the LEFT or RIGHT button to select the data item you
want to delete and short press the POWER button to confirm and the following screen appear.
Picture 7-2
Short press the POWER button to delete this data record or long press the POWER button to return
to the previous screen.
If no data item is stored in the unit, you may see the following screen when entering into the “Sys
setup” screen.

Heart Observer Instruction Manual
28
Picture 7-3
Data transmission
For more information, please refer to the accompanying Software Instruction Manual.
8 About P10
In the main menu screen, press the LEFT or RIGHT button to move to the “About P10” item and
then short press the POWER button to enter. Then you will learn the software version information
such as in Picture 8-1.
Heart Observer Instruction Manual
29
Picture 8-1
9 Trouble Shooting
Problem Cause Solution
The unit can NOT be
turned on.
1 The batteries are worn out.
2.The batteries are inserted
incorrectly.
3. The unit might be broken out.
1.Replace batteries with new ones.
2. Reinstall batteries with their polarities
correctly.
3. Please contact the local service center.
The unit is failure in
measuring heart rate.
1. The electrodes are not making
good contact with your body.
2. Have not kept still during
measurement.
1 Place the electrode correctly.
2.Keep motionless and avoid moving
when measuring
3.Keep away from electromagnetic

Heart Observer Instruction Manual
30
3. Electromagnetic interference.
4. The signal is too weak.
interference
4. Attempt to take another measurement.
(e.g. Chest/Cable measurement)
Others Please contact our company.
10. Maintenance and Storage
Clean the unit with a cloth lightly dampened with water, disinfectant alcohol or detergent, and then
wipes it dry with a dry cloth.
Wipe the electrodes using a cloth dampened with disinfectant alcohol.
Do not wipe the unit with benzene, gasoline, paint thinner, concentrated alcohol, or other volatile
detergents.
Do not drop this unit or subject it to strong impact. This could damage the unit.
Do not attempt to disassemble the unit. There are no user serviceable parts. Repairs should only
be carried out by authorized personnel.
Do not sterilize this unit in an autoclave, ultraviolet sterilizer or gas sterilizer (EOG, formaldehyde,

Heart Observer Instruction Manual
31
high density ozone etc.)
This unit does not require calibration during the expected life cycle.
When display the low voltage mark “ ”, please change the batteries in time. Dispose the used
batteries according to the applicable local regulations.
Please take out the batteries if the unit is not to be used for a long period of time.
The environment temperature for transport or storage of the packaged unit is -2055, and
the humidity is 93%, no condensation.
Caution:
Keep operating environment clean, quiet, no erodent and no flammable material. Do not use this
unit in the environment with too high or too low temperature and humidity
If this unit is splashed or contaminated by water drop, please stop operating.
Please do not use the unit at once when it is moved from cold place to the warm and moist place.
Please do not use sharp tools to operate any of buttons.
Heart Observer Instruction Manual
32
Do not immerge the unit into liquids or clean the surface with organic liquid, and do not splash
liquids on the unit.
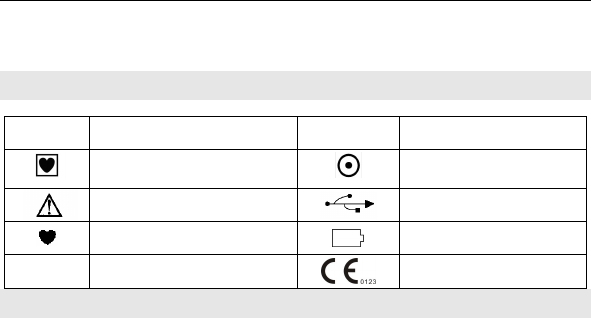
11 Key Symbols
Symbol Meaning Symbol Meaning
Type CF applied part POWER/return button
Warnings! Consult ACCOMPANYING
DOCUMENTS. USB interface
Heart rate: Unit: bpm (beat per
minute) Low battery voltage
SN Serial Number European union approval
11 Technical Specifications
Classification: According to the tip-and-run protection, it can be classified into the internal power;

Heart Observer Instruction Manual
33
its application type is CF and it is the movable common facility with no defibrillator
or protection.
heart rate Measurement
Lead Position Lead I- Hand lead only
Sampling Rate 250Hz
Heart Rate Measurement Range 30bpm~240bpm
ECG Bandwidth 1HZ40HZ
Accuracy of Heart Rate Measurement
30 bpm~100 bpm±2bpm
101 bpm~240 bpm±4bpm
Display
Type OLED
ParametersHeart Rate
Environment Requirement
Operation temperature 540

Heart Observer Instruction Manual
34
Storage temperature -2055
Operation humidity 80%, no condensation
Storage humidity 93%, no condensation
Atmospheric pressure 80 Kpa -106Kpa
POWER Supply
2 AAA alkaline batteries
Classification
Type of protection Internally powered equipment
Degree of protection CF type
Safety IEC 60601-1
Accessories
Two AAA Batteries
One Instruction manual
One Quick Operation Guide

Heart Observer Instruction Manual
35
One Warranty card
One sheet of material
Optional Accessories
One USB cable
One Data Management Software
Mechanical
Dimension 130×30×20 mm
Weight 110g(with alkaline batteries)
Storage
Data and heart rate strips storage
Heart rate Strips 20-measurement result storage in Easy mode
Notes:
Specifications may be changed without prior notice.
Disposal of this product and used batteries should be carried out in accordance with

Heart Observer Instruction Manual
36
the local regulations for the disposal of electronic products.
12 Declaration
FCC-ID: WWIMD100P10
This equipment has been tested and found to comply with the limits for a Class B digital device,
pursuant to Part 15 of the FCC Rules. These limits are designed to provide reasonable protection
against harmful interference in a residential installation.
This equipment generates, uses and can radiate radio frequency energy and, if not installed and
used in accordance with the instructions, may cause harmful interference to radio communications.
However, there is no guarantee that interference will not occur in a particular installation.
If this equipment does cause harmful interference to radio or television reception, which can be
determined by turning the equipment off and on, the user is encouraged to try to correct the
interference by one or more of the following measures:
-- Reorient or relocate the receiving antenna.
-- Increase the separation between the equipment and receiver.
-- Connect the equipment into an outlet on a circuit different from that to which the receiver is
connected.
-- Consult the dealer or an experienced radio/TV technician for help
Heart Observer Instruction Manual
37
Appendix
General information about the Heart Rate Measurements
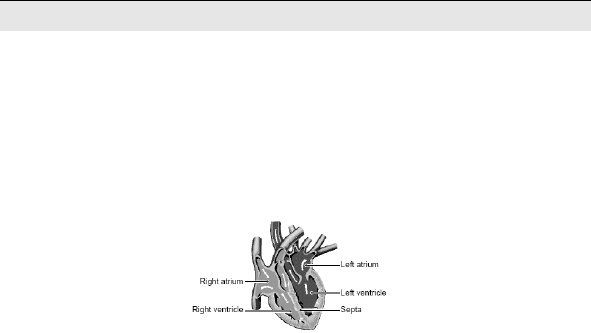
The heart is a muscular pump controlled by electrical impulses generated by the body. It is divided
into two by the septa and each side has two chambers –an atrium and a ventricle-linked by a
one-way valve. The left atrium and ventricle control oxygenated blood, and the right atrium and
ventricle control de-oxygenated (“used”) blood.
The electrical impulse that causes the heart to beat spreads across the atria, causing the left and
right atrium to contract and pump blood into the left and right ventricles respectively. The tow
ventricles then contract and pump blood out of the heart. The heart muscle then relaxes, or
re-polarises, allowing blood to fill up the heart again.

Heart Observer Instruction Manual
38
An Heart Observer is able to measure the electrical impulse as it passes across and through the
heart, causing the heart to beat. An ECG does not measure the movement of your heartbeat, but
rather the electrical activity that causes the heart to beat. The measurements recorded by an Heart
Observer, when combined with a medical examination, can help your doctor monitor your heart
condition. The ECG measurements recorded by the unit are NOT designed or intended for medical
diagnosis. Conditions such as arrhythmia and Ischemia can only be diagnosed by a doctor through
a special examination.
About the ECG
The ECG waveform shows the rhythm of your heartbeat during the 30-second measurement and
displays the electrical activity causing the heart to beat. The waveform for each heartbeat shows
the progress of the electrical impulse across and through the heart.
Ventricular contraction
(QRS complex)
Re
-
polarization (T wave)
Atrial contraction (P wave)

Heart Observer Instruction Manual
39
The first peak indicates the spread of the impulse over the atria and the beginning of their
contraction. This is known as the P wave. The second peak indicates the spread of impulse over
the ventricles and the beginning of their contraction. This is known as the QRS complex. The third
peak indicates the activity as the heart relaxes (re-polarization), and is known as the T wave.
What is Arrhythmia?
Arrhythmia is a condition where the heartbeat rhythm is abnormal due to flaws in the bio-electrical
system that drives the heartbeat. Typical symptoms are skipped heartbeats, premature contraction,
an abnormally rapid (tachycardia) or slow (bradycardia) pulse. This can be caused by heart disease,
ageing, physical predisposition, stress, lack of sleep, fatigue etc. Arrhythmia can only be diagnosed
by a doctor through a special examination.
What is Ischemia?
Ischemia is a condition in which insufficient oxygen is supplied to parts of the heart or other parts of
the body. This is usually due to a blockage or partial blockage of an artery.
Ischemia can only be diagnosed by a doctor through a special examination.

Heart Observer Instruction Manual
40

Heart Observer Instruction Manual
41

Heart Observer Instruction Manual
42