Beijing TierTime Technology X5 Tiertime X5 (3D Printer) with 2.4G WiFi User Manual
Beijing TierTime Technology Co. Ltd Tiertime X5 (3D Printer) with 2.4G WiFi
user manual

3DP-23-4A
Beijing TierTime Technology Co., Ltd.
Company:Tiertime Corporation
Name / Position:Joseph GuO/Sales Manager
Tel:888-288-6124
Mail:
Address:
sales.us@tiertime.net
1765 Landess Ave. #338 Milpitas 95035 U.S.A
Chapter 1. Safety and Printing Environment
1.1 Safety Precautions
1. The 3DP-23-4A printer requires the power adapter provided by the original
manufacturer, otherwise the machine could be damaged or even cause fire.
Keep the power adapter away from water and out of high temperature
environments.
2.During printing, the temperature of the nozzle of the printer could reach
260°C and the temperature of print platform could be over 70°C. Do not touch
these parts with your bare hands when the printer is in the operation mode, not
even with the heat resistant gloves included in the accessories, as the
temperature could damage the gloves and injure your hands.
WARNING, HOT SURFACES!
High Temperature: Do not touch!
3. During printing, the print head and other mechanical parts move at high
speed. Touching these parts while they are moving could cause injuries.
Moving parts: Do not touch!
4. Wear goggles when removing the supporting material from models or
detaching models from the build plates.
5. When printing with plastic filaments, the process could generate light and,
for some people, annoying odor. It is recommended to run the printer in a well
ventilated environment. We also suggest to keep the printer in an environment
with a stable temperature as unwanted cooling could cause adverse effects to
the print quality.
6. When using the “Extrude” function, make sure there is enough space
between the print head nozzle and the build platform. 50mm is recommended,
otherwise the nozzle could be blocked.
7. Fasten moving parts. Tie back loose hair, secure loose clothing and keep all
printer doors closed during operation.
8. Do not leave the printer unattended during operation. Watch to make sure
the first a few layers adhere correctly.
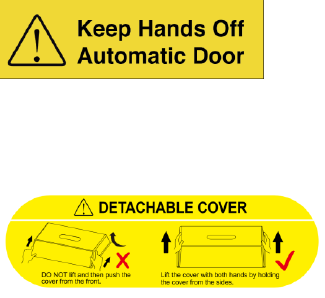
9.The left door is automatic, do not force it to open or hinder its operation.
10. The top lid is not physically connected to the printer body, do not push the
lid, should use both hand to left the lid to avoid damage and injury.
1.4 Compliance
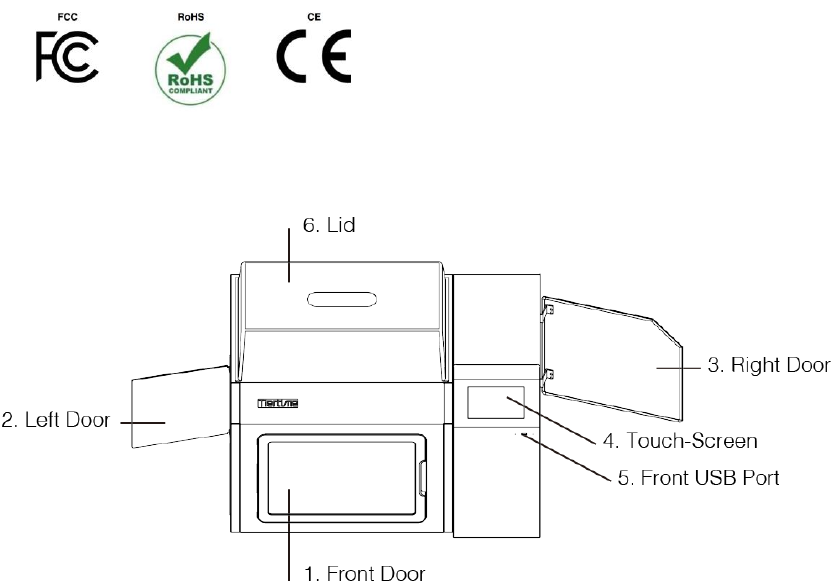
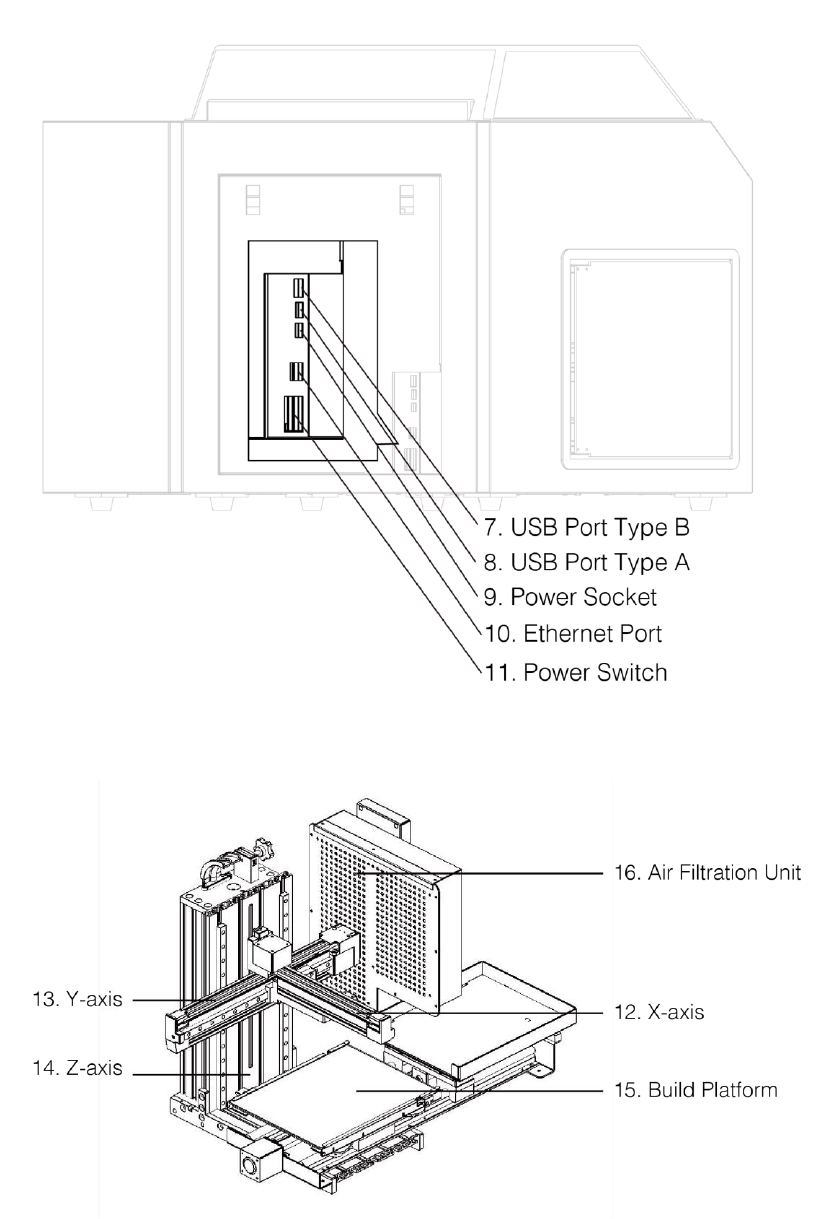
Chapter 2. Machine Introdcution
UnPacking
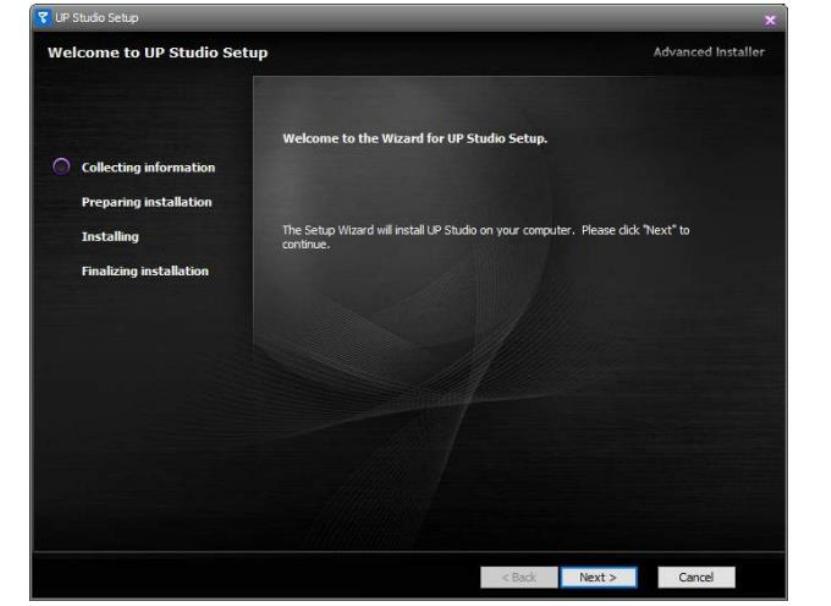
Chapter 3. Download and install Software
3.1To operate the X5, you need to install the UP Studio software version 2.5 or
above on your computer. You can download the installation files of UP
Studio software from the following url:
www.tiertime.com/download/software or search UP Studio in the App
Store.
System Requirements:
Support Operating Systems:
Windows 7 (SP1) or higher
(32 bit and 64 bit)
Mac OS 10.10 or higher
Hardware requirements:
Open GL 2.0
At least 4GB of RAM
Installation
Make sure you download correct version of software based on your
computer’s
configuration.
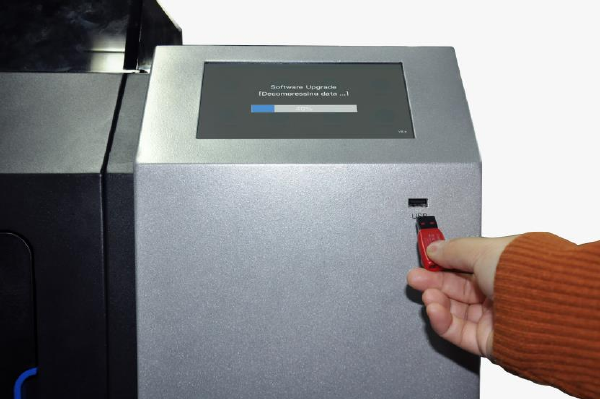
3.2 Updating the touchscreen firmware.
Go to tiertime.com/downloads/
Download touchscreen firmware and copy the file into a usb disk. Please note
the file name should not be changed and the file have to be in the root folder.
Switch off the machine and insert USB disk into front USB port. Switch on the
machine and the touchscreen will prompt message asking whether update to
the touch screen firmware.

Chapter 4. Connecting The Machine:
4.1 USB
Connect machine to comptuer through the USB type B port.
4.2 Ethernet
The machine and computer must be connected with an router.
4.3 WIFI
Connect to machie with USB cable and then go to printer setting. Setup the
network SSID and Passoword.
Click the button to setup the WIFI
This figure is replaced with an Ethernet connection
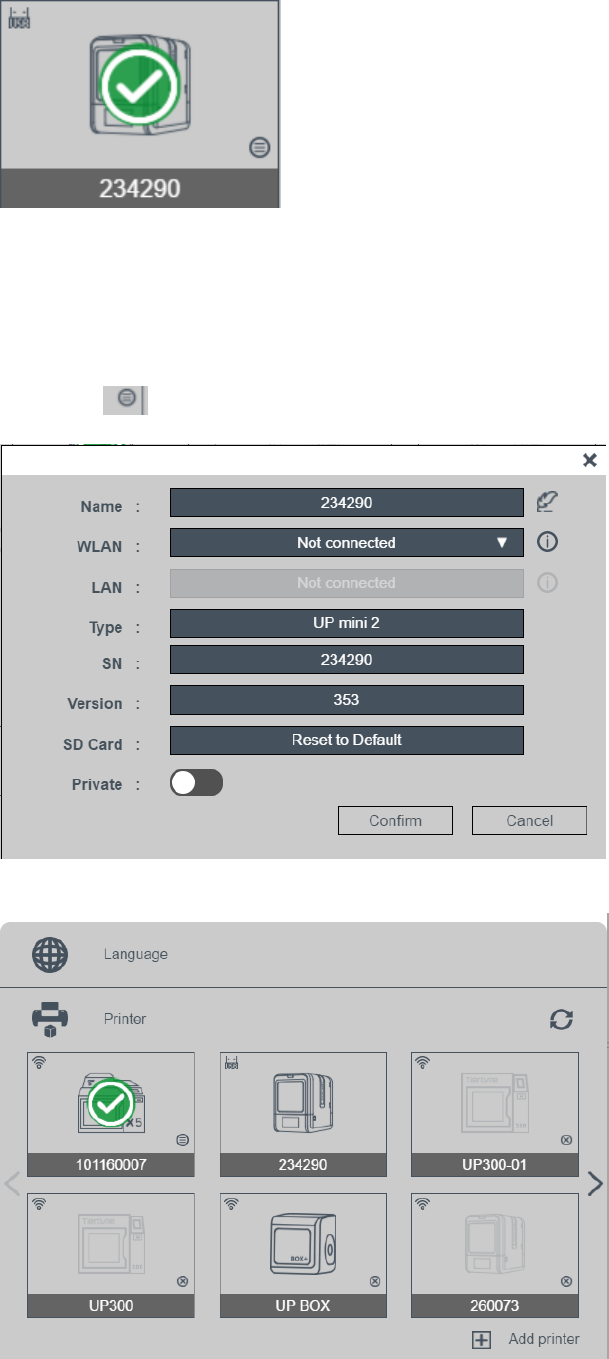
Adding a Printer
Please note, for wifi connection, a printer will be first added to printer list before
the software can recognize the printer. After adding the printer, software will
actively scan for the presence of the machine and display in the list of avaialble
machines appear in on upper left corner.
Chapter 5. Printer Operation
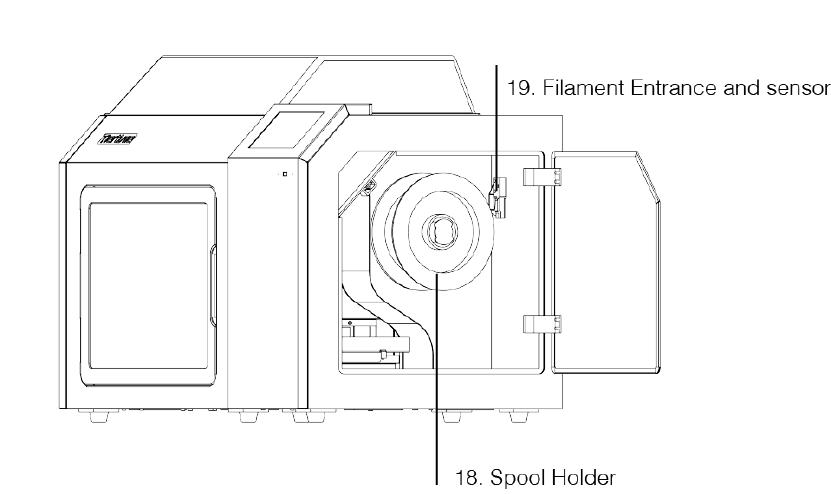
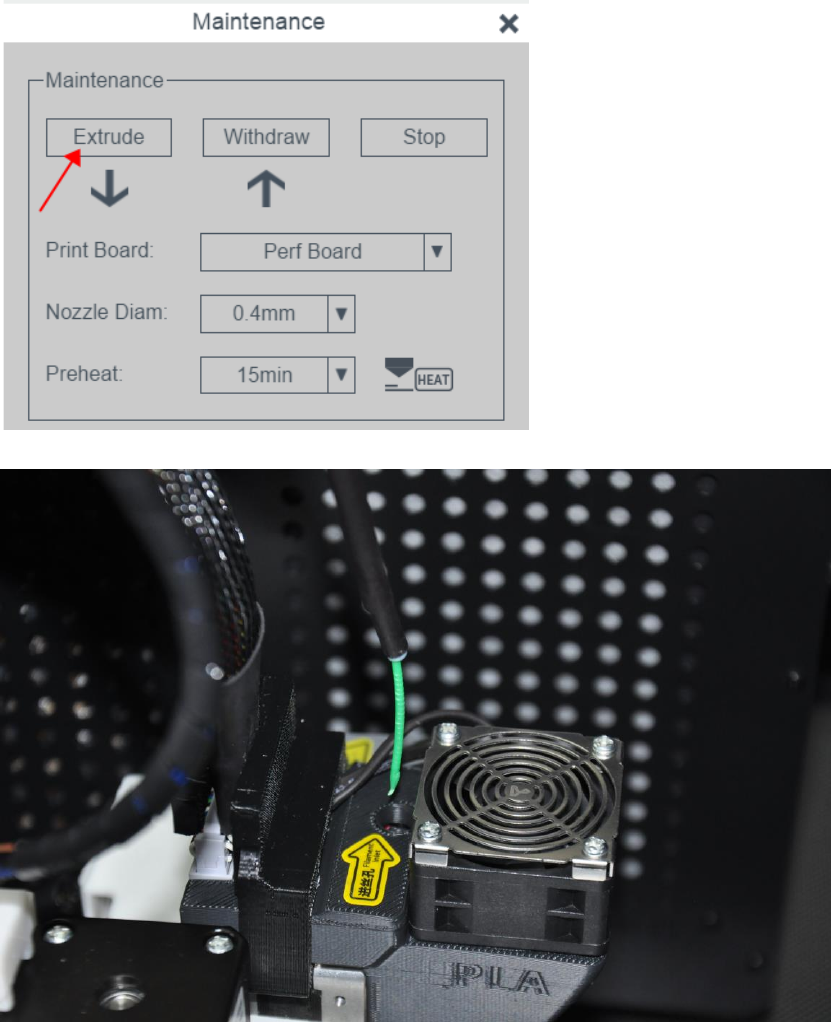
5.1 Load filaments
Insert filament from the filament entrance in the spool chamber on right side.
Go to software, maintenance, select the material type, click extrude button.
When nozzle temperature reach target, machine will buzz and start extruding,
gently put filament into extruder until filament appear from the nozzle.
Extrusion will stop autoamtically.
5.2 Overhead Spool rack
The overhead spool rack is designed for using flexible material.
Insert the rack onto socket, put spool onto the rack, inset filament without using
the filament guiding tube.
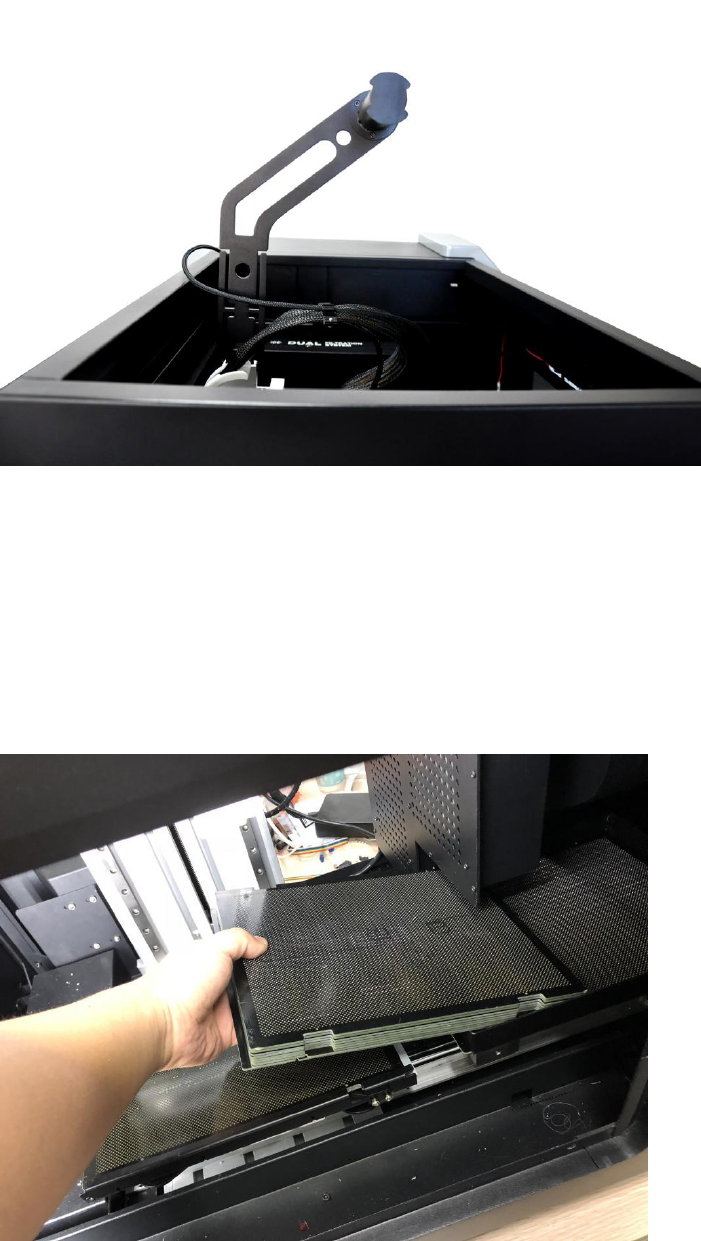
5.3 Load the Build Plates
The auto swapping platform can load up to 12 build plates. Due to the
mechanism of swapping the last build plate cannot be used for printinig. Load
the build plate from the front door.
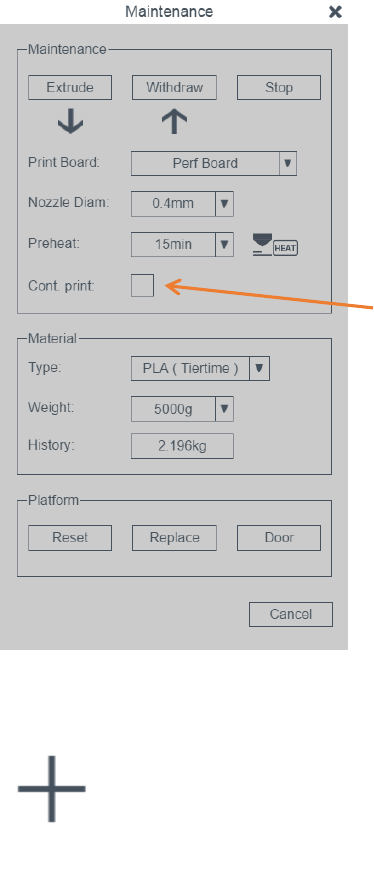
5.5 Printing
Switching on continuous mode by going to maintenance. If continuous mode is
not checked, the printing will stop after finish the current print job.
Load model into software
Use the + button to load models into software.
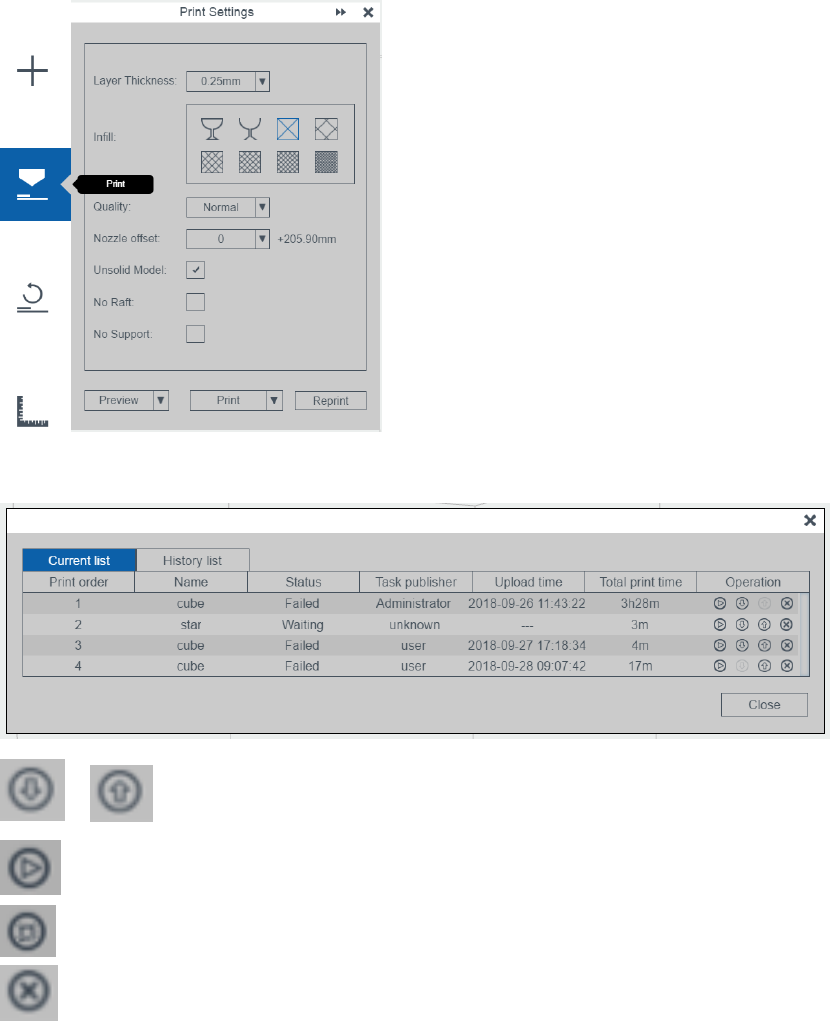
5.6 Tiertime Print Queue explained
Moving queued print job up on the list
Start Print Job
Stop Print Job
Remove Print Job from list (will move to history list)
Status
Failed:Print job failed due to error or stop by users
Waiting: Print job waiting to be printed, will printed from according to the print
order of the list.
History List
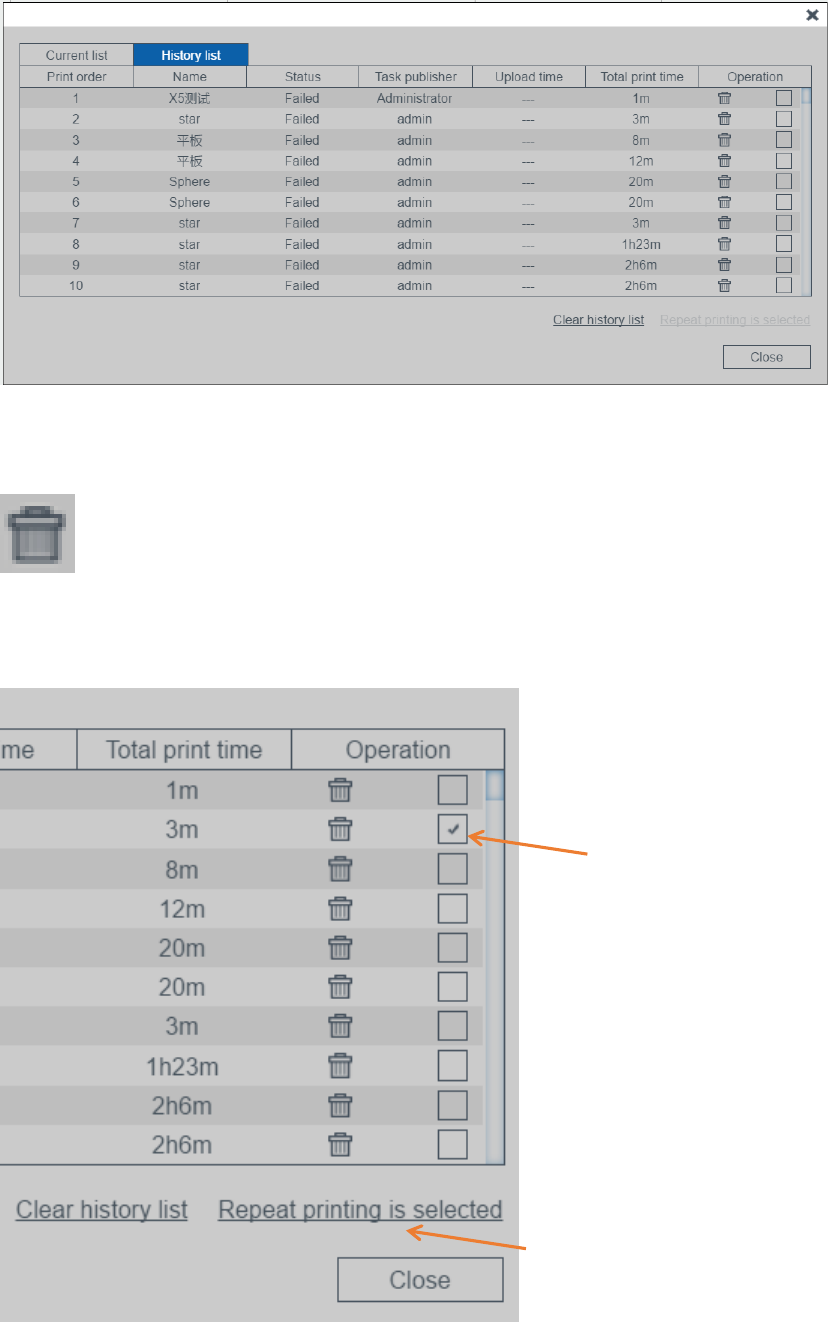
Finished print jobs and print jobs removed from print queue will go to history
list.
Delete the print job completely
Operation Check Box: When checked will able to reactivate the print job and
send it back to print queue.
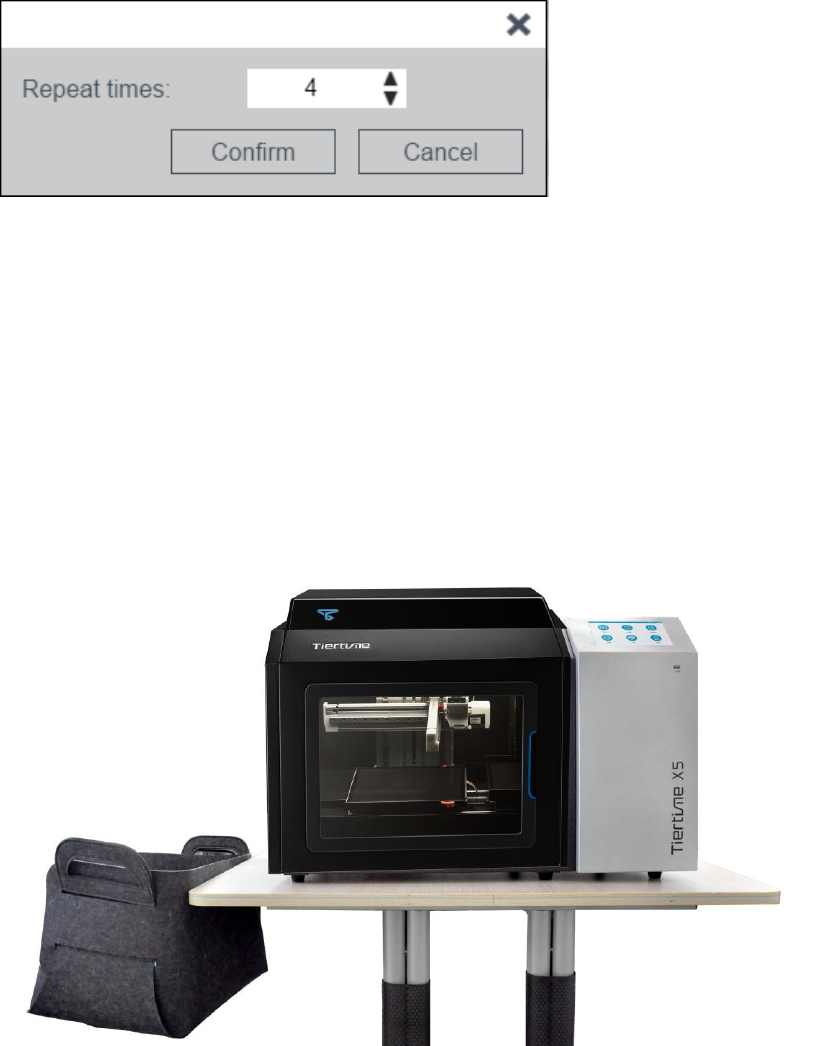
Select number of time to repeat this print job.
5.7 Setup a collection device:
It is recommended to setup a collection bucket or similar device to collect the
finished prints. Soft bastket is included in the package.
Chapter 6. Machine Maintenance
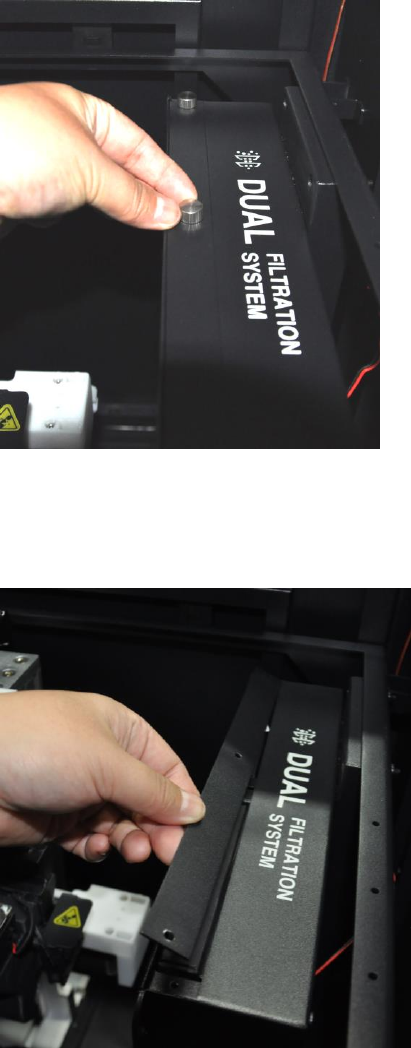
6.1 Changing Air Filter
To remove the air filers, remove 3 screws on the filtration unit.
Remove the cover.
Pull out the filter
Chapter 7.Touchscreen Instruction
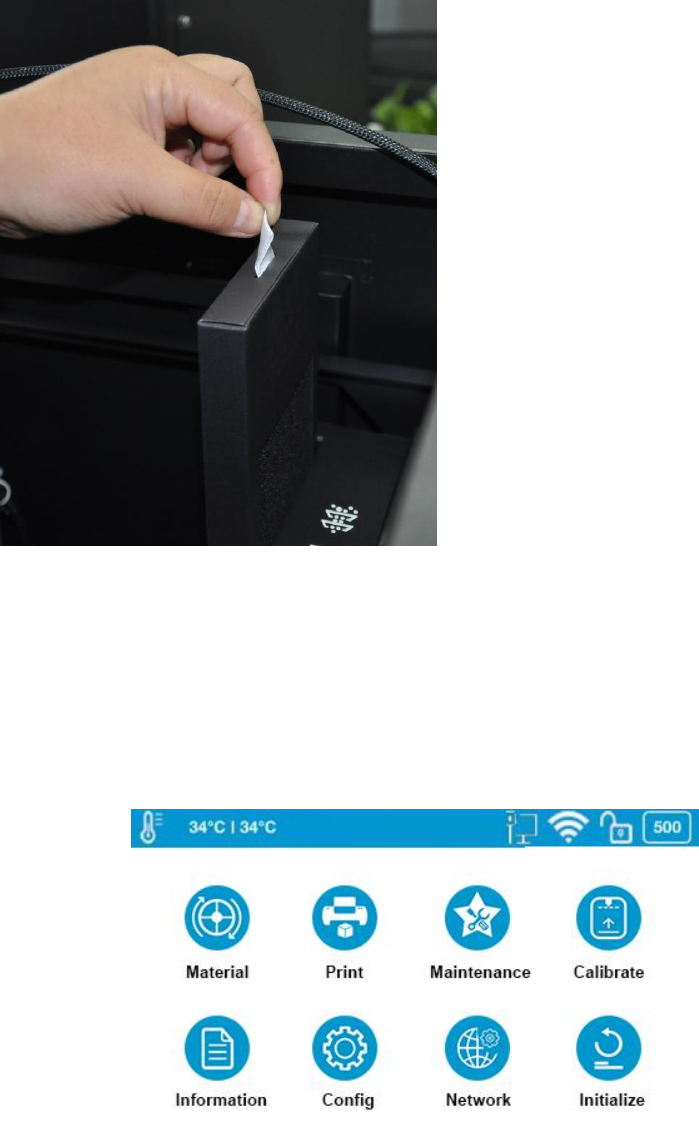
Tiertime X5 Touchscreen consists of two sections,the Printer Status Bar and
the Main Menu.
Figure 5.1 X5 Touchscreen Display
5.1 Touchscreen Introductions
Printer Status Bar
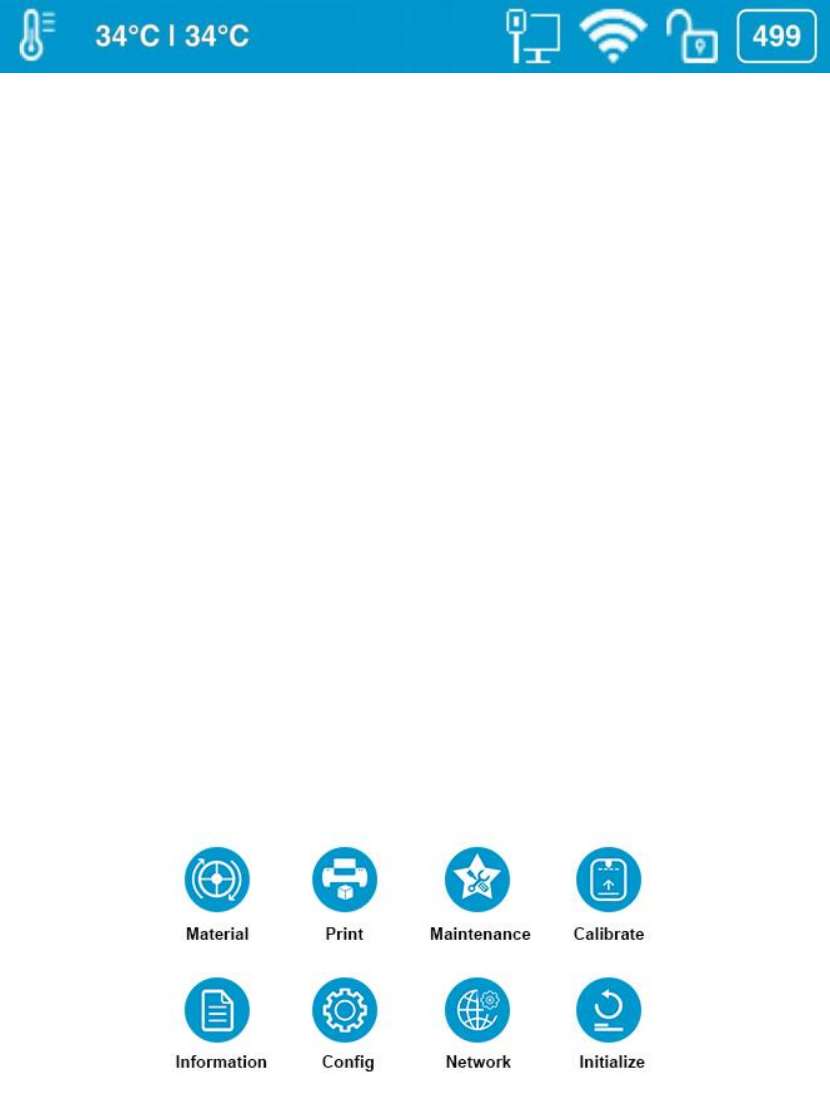
The Printer Status Bar is at the top of the X5 Touchscreen, which is easier for
you to monitor the printer’s status regularly. There are five icons in the Printer
Status Bar, each of which represents different aspects as explained in the
following, starting from left to right:
Left Figure 5.2 Printer Status Bar
Right
1. Temperature Icon: It has the thermometer icon, the nozzle temperature
indicator, and the build plate temperature indicator.
2. Ethernet Status Icon: It indicates the Ethernet connection status.
3. Wi-Fi Status Icon: It shows the Wi-Fi network connection status. If there is a
red exclamation mark on the top, it indicates that the Wi-Fi network has been
detected but it is not connected to the printer. If there is no red exclamation
mark on the top, it means that your printer has been connected to the Wi-Fi
network successfully.
4. Private Status Icon: This lock icon indicates whether the printer has been
set as private use to one particular user.
5. Material Information Icon: This icon represents the material’s type name and
the remaining weight of the current material roll. (It may appear alternatively as
Name/ Weight)
Main Menu
There are eight buttons in the Main Menu:Material, Print, Maintenance,
Calibrate, Information, Config, Network and Initialize.
Figure 5.3 Main Menu
The following table lists all the information of icons in the Main Menu and
summarizes the actions associated with each icon.
Table 5.1 Main Menu Icon Description
Name
Icon
Description
Material
1.Change Material Type.
2. Withdraw Material.
3. Extrude Material.
4. Set Material Weight.
Print
1.Print Job Current List
2.Print Job History List (Print Task Management).
3.USB Stick Print Job.
4.Print Job’s Details.
5.Pause the ongoing print job, and change the
material.
Maintenan
ce
1.Switch plates.
2.Reset plates.
3.Door control.
Calibrate
Set Nozzle Height Manually
Informatio
n
1. Basic Printer Information: Model Name, Serial
Number, Firmware Version, Screen Version, Total
Print Time, Total Weight of the Material Consumed,
LAN M.A.C., WLAN M.A.C.. 2. Reset Printer
Profile.
3.System Language Settings.
4.Touchscreen Update option.
Config
1.Printer Name Information
2.Basic Printer setting: Sound, Preheat, Auto
Update, Continuous Print, Private and Password
setting
Network
1.Ethernet connection setting
2.WIFI connection setting
Initialize
Initialize the printer
5.2 Material
In the material section, there are Extrude, Withdraw, Change Material Type
and Set Total Weight buttons functions.
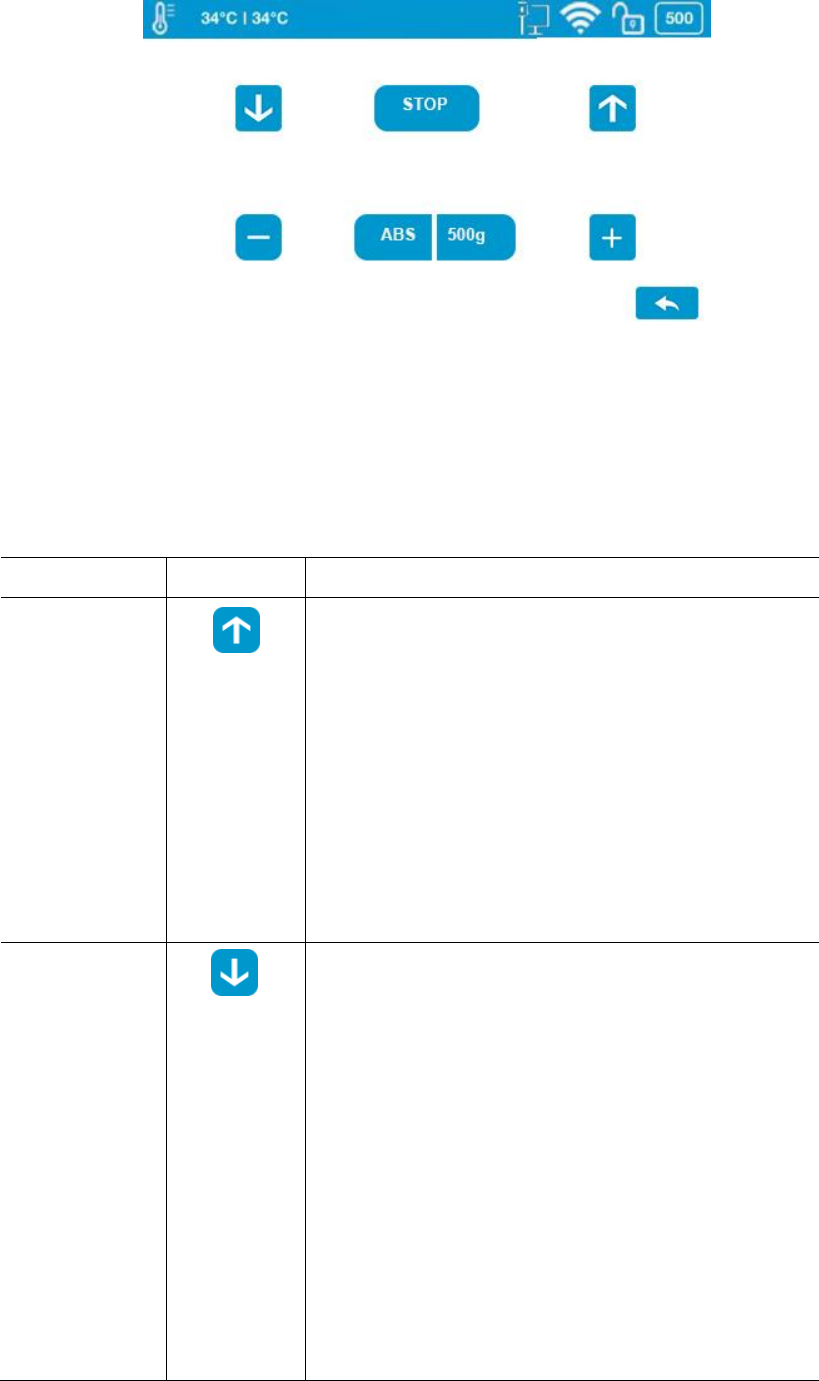
Figure5.4 Material
To change the material type, click the Material Type button, and then input your
filament’s weight. Make sure the material settings properly reflect your
situations, because the default setting may not fit yours.
Table 5.2 Material Icon Description
Name
Icon
Description
Withdraw
To take out the filament inserted in the
extruder unit with the preset temperature.
Click the Withdraw icon. The up arrow on the
button will start moving upwards, indicating the
extruder is heating up. The extruder will start
pushing the filament out once the temperature
reaches the melting temperature with a beep.
You now can remove the filament from the tip
of the extruder
Extrude
To load the filament into the extruder unit with
the preset temperature.
Click the Extrude icon. The down arrow on
the button will start moving downwards,
indicating the extruder is heating up. Once the
extruder temperature reaches the filament’s
melting point, the machine will give off a beep,
and you can push the filament into the
extruder and the extruder will heat up the
filament, and extrude through the nozzle.
If the machine works properly, you will find an
evenly extruded string of filament coming out
of the nozzle, without bubbles or tangling as
the extrusion goes on
Stop
To stop the printer in the middle of an
extruding or withdrawing process.
Click the STOP icon, the up/down arrow on
the buttons will stop moving. The printer
should stop fully from extruding or withdrawing
the filament.
Material
Type
To change the material type.
Click the Material Type icon button to change
the material type.
Also, you can add customized types of
material under Maintenance in the software
first, and then the new type will be available on
the touchscreen for you to select.
Default Settings: The default material type is
ABS. The default material selection includes
ABS, ABS+, PLA, and TPU. The button will
show the current selected material type.
Material
Weight
To change the total weight the material
remaining manually.
Click Plus icon to increase the value or
Subtract icon to decrease the value. The
value ranges from 0g- 9999g.
The material weight will be adjusted
automatically based on how much the material
is consumed by print jobs
Default Setting: The default value of material
weight is 500g.
Exit
Exit the Material section and back back to the
main menu
5.3 Print
In the Print section, you can start a print job or manage the print jobs that
currently in the print queue or have finished.
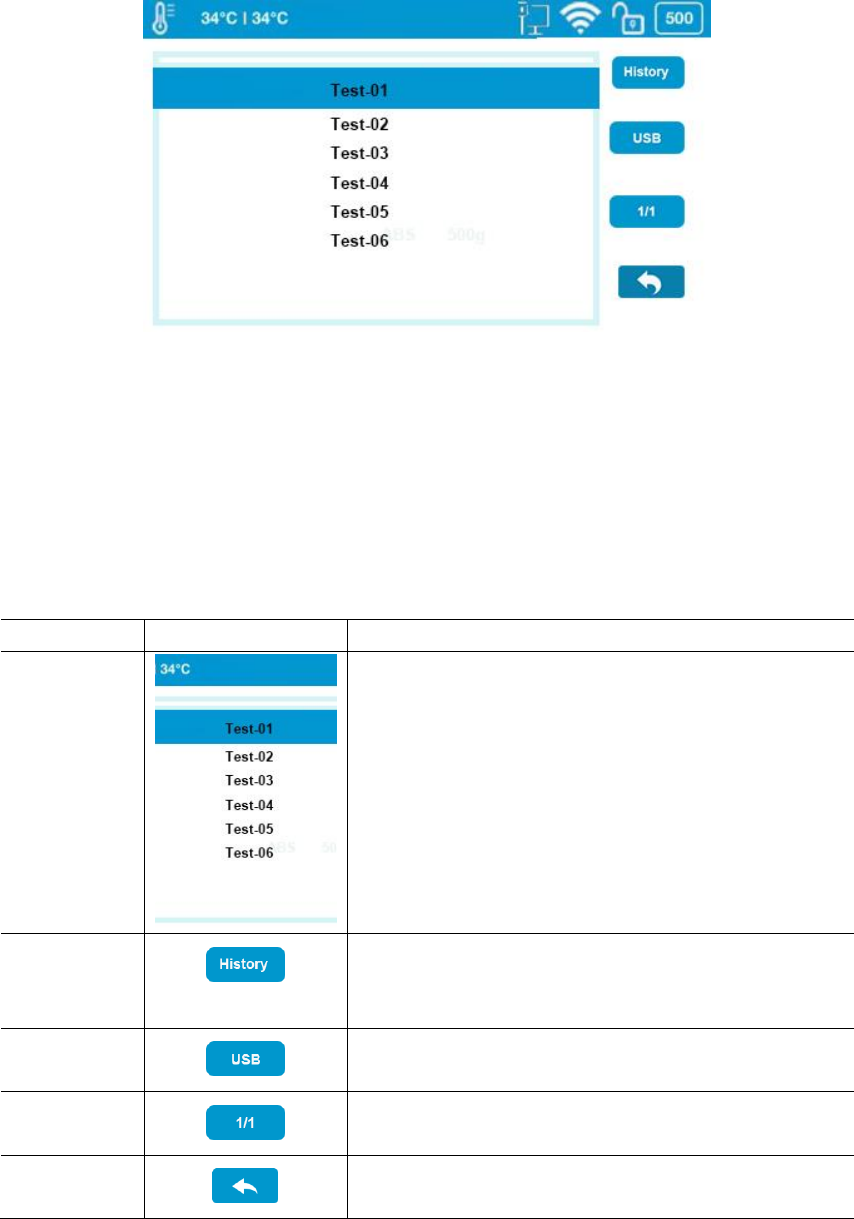
Figure 5.5 Print
There are three sections: The Print Job Current List lists the print jobs that
have been assigned to the printer. The Print Job History List contains all the
print jobs that have finished. It is the same content that shows in the software
Wait Assignment Section.The USB button will show the print jobs lists from
external USB stick.
Table 5.3 Print Description
Name
Icon
Current
Print Job
List
The print job list contains the print jobs that
are assigned to the printer. The highlighted
row is the current print job.
Click the Print Job Name to view more
settings and detail information for the print
job. You can start the printing process by
clicking Print, or delete the print job by
clicking Delete.
History
Entering the history list of the print jobs which
has previously been printed on the printer, or
ended with errors.
USB
Entering the print job list from the external
USB stick
Page
Click to go to the next page
Exit
Exit and go back to the main menu
Print Job History List
The Print Job History List contains all the print jobs that have finished.
Tap the Print Job Name in the list to view the detail print settings. You can add
the print job back to the Current Print Job List by tapping the Add button. The
Clear button will erase the entire history print list.
Table 5.4 Print Job History List
Print Job History List
Print Job Information
Start A Print
Table 5.5 Printing Process
Table 5.6 Print Description
Name
Icon
Description
Pause
Pause the on-going print job.
Resume
Resume the paused print job.
Stop
The printer will stop the print job completely.
Extrude
To extrude the inserted filament.
Withdraw
To withdraw the inserted filament.
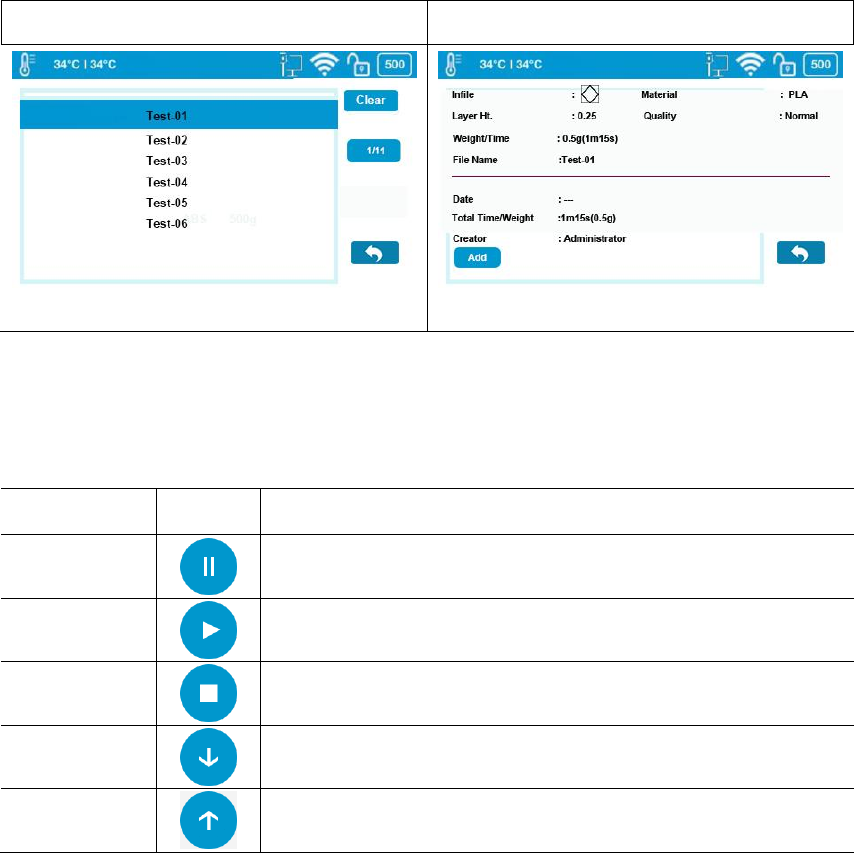
5.4 Maintenance
There are three sections under this function, Switch Plate, Reset Plate and
Door Control
Figure 5.6 Maintenance Page
Table5.7 Maintenance Description
Name
Icon
Description
Switch
Plate
Switch the current build plate to the next one
Rest Plate
Reset the current build plate and not switch it to the
next one
Door
Control
Control the side door to open/close automatically
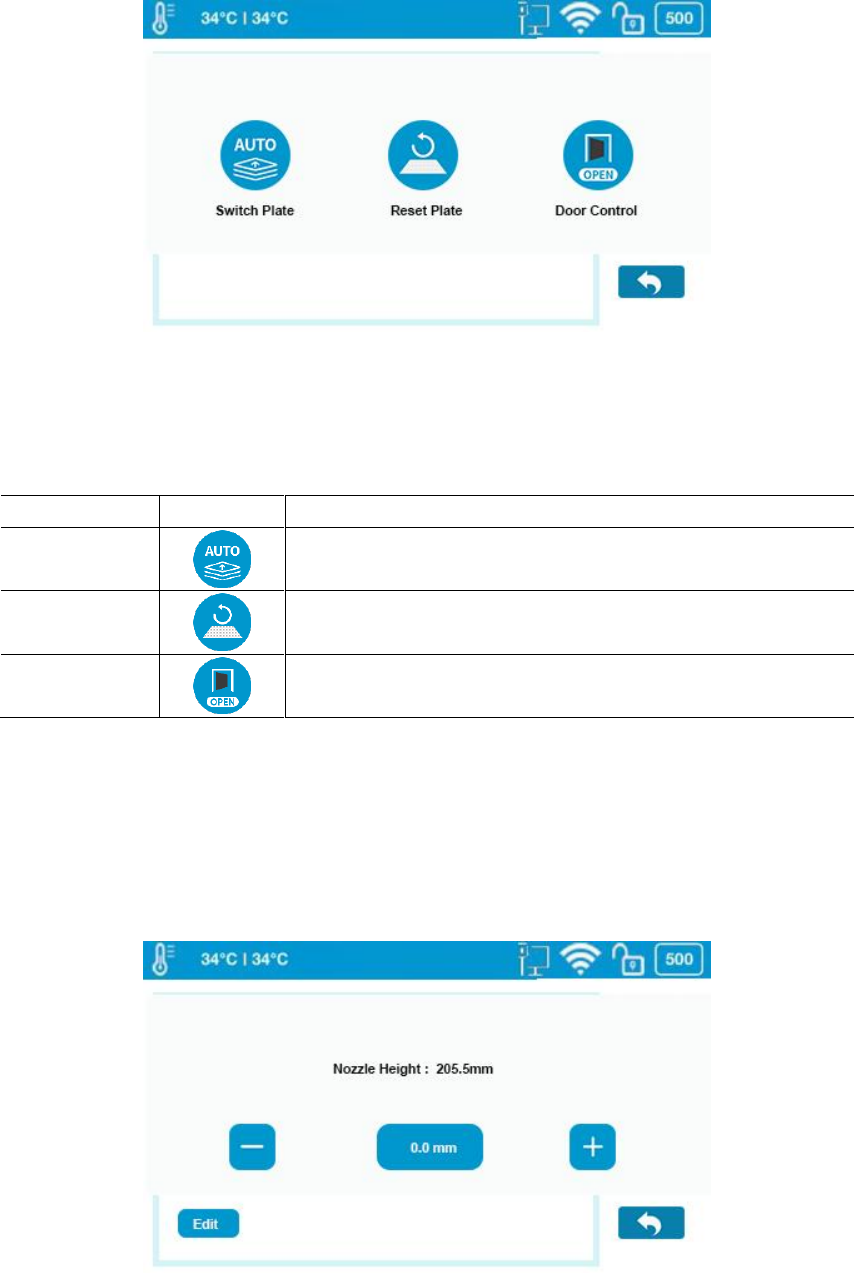
5.5 Calibrate
The nozzle height of a printer is a key parameter that needs properly set
before any print jobs. It can be calibrated manually on X5’s touchscreen or set
it from UP studio software.
Figure 5.7 Calibrate

Click Edit on the touchscreen, and enter the suitable value for your printer.
You can also use either +/- button to adjust the value in the Value Box, and
then tap the Value Box to move the nozzle to the value height you set in the
Value Box.
Nozzle Height: is the current printer’s nozzle height.
The default value for the nozzle height for each Tiertime printer has been set
as 0mm before leaving factory floor for safety reasons. Therefore, calibration is
the mandatory step prior to your first print.
Table 5.8 Calibration Icon Description
Name
Icon
Description
Live
Nozzle
Height
Indicating the present nozzle height.
Using +/- to adjust the nozzle height manually.
Edit
To edit the nozzle height by inputing numbers
manually
Exit
Exit Calibration section and back to main menu.
5.6 Information
Within this section, it displays all the information of your printer, it also provide
gateway icons for language setting and touchscreen updating.
•Model: The Model Name of your printer’s model.
•S.N.: Your printer’s ID, which will be required if you looking for customer
service.
•Firmware Ver.: Stands for firmware version of your printer.
•Screen Vers.: Stands for the touchscreen version. You can check whether
your touchscreen is operating using the latest touchscreen system.
•Total Time: This represents the total printing time of your printer from the
beginning.
•Total Weight: This indicates the total material weight which accumulated from
the first print.
•LAN M.A.C: The unique LAN M.A.C address of your printer in Ethernet .
•WLAN M.A.C: It’s the unique printer’s M.A.C address in your Wi-Fi network.
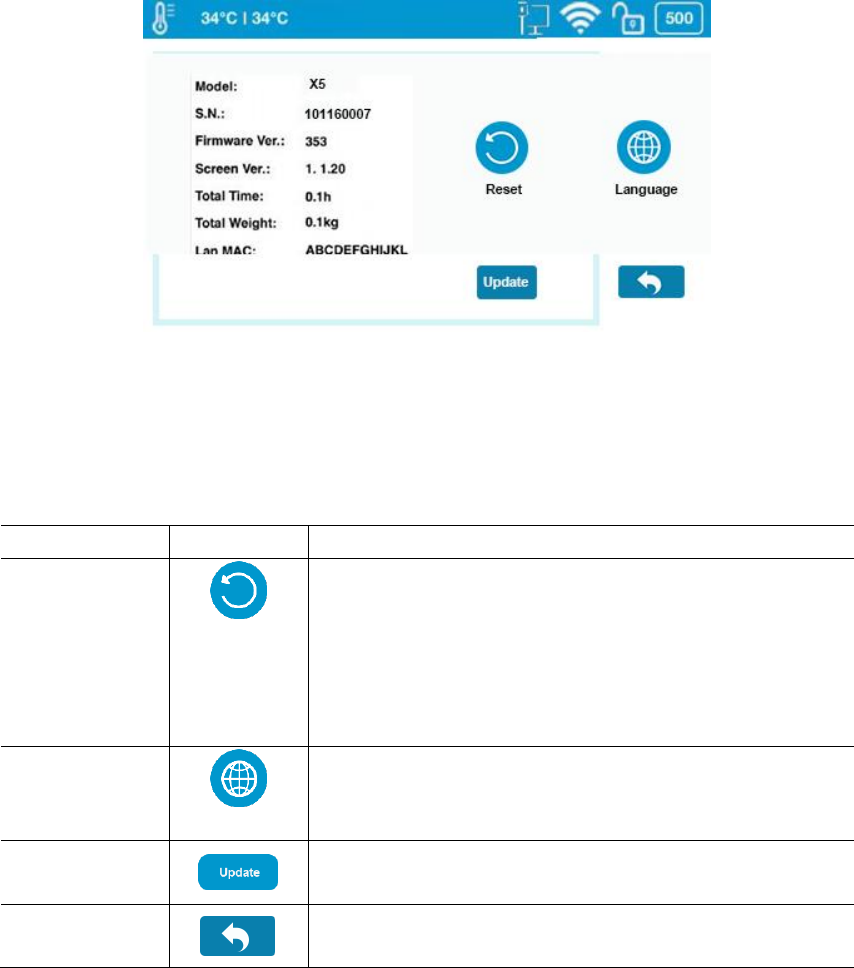
Figure 5.8 Information
Table5.9 Information Icon Description
Name
Icon
Description
Reset
This reset button will erase the following
three sets of values which has been stored in
your printer.
Nozzle height: 0mm.
Material type set to ABS, and total weight set
to 500g. Name to its defaulted S.N number.
Language
There are two types of languages available for
you to choose from, Simplified Chinese
Simplified and English.
Update
Users can update the touchscreen manually
from a USB stick by tapping this button
Exit
Exit Information section and get back to the
main menu.
5.8 Config
Config section contains seven parameters.
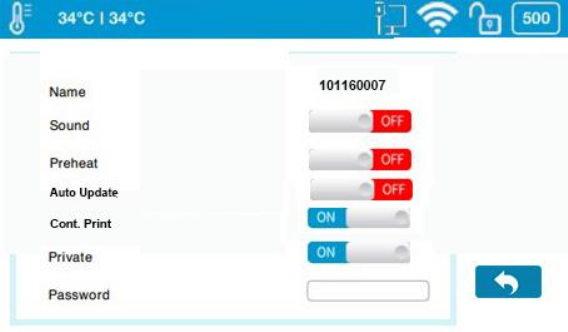
Figure 5.9 Config
Name: it’s the printer’s name, you can change it on the UP Studio software.
The default name is the printer’s S.N number.
Sound: Toggle the click sound while using touchscreen.
Preheat: Toggle the build plate preheating option. If it is on, the machine will
start pre-heating 15 minutes ahead of the start of the print job. You can read
the introduction of Preheating in Maintenance -> Preheat in the Software User
Manual.
Auto Update: Toggle the touchscreen update automatically.If switch it
off,Then the touchscreen can only update manually.
Cont.Print: Toggle the continuous print function for the printer
Private: Toggle the printer to set a password for private use. Once this option
is on, you can set a password for your printer and your printer will not be
accessible by other users on the same network without obtaining the
password.
Password: The password for the printer to protect your printer from other
people’s access. Click the text field to enter your password.
5.9 Network
This section includes Ethernet Network Settings and Wi-Fi Network Settings.
Ethernet Network Settings:
1.Plug an Ethernet cable to the LAN socket at the back of X5.
2.The Ethernet connection Status icon should be appear in the Printer Status
Bar.
3. You now can go to Config to enter Network Settings section.
4. Click Information button to edit the printer’s Ethernet Network Settings
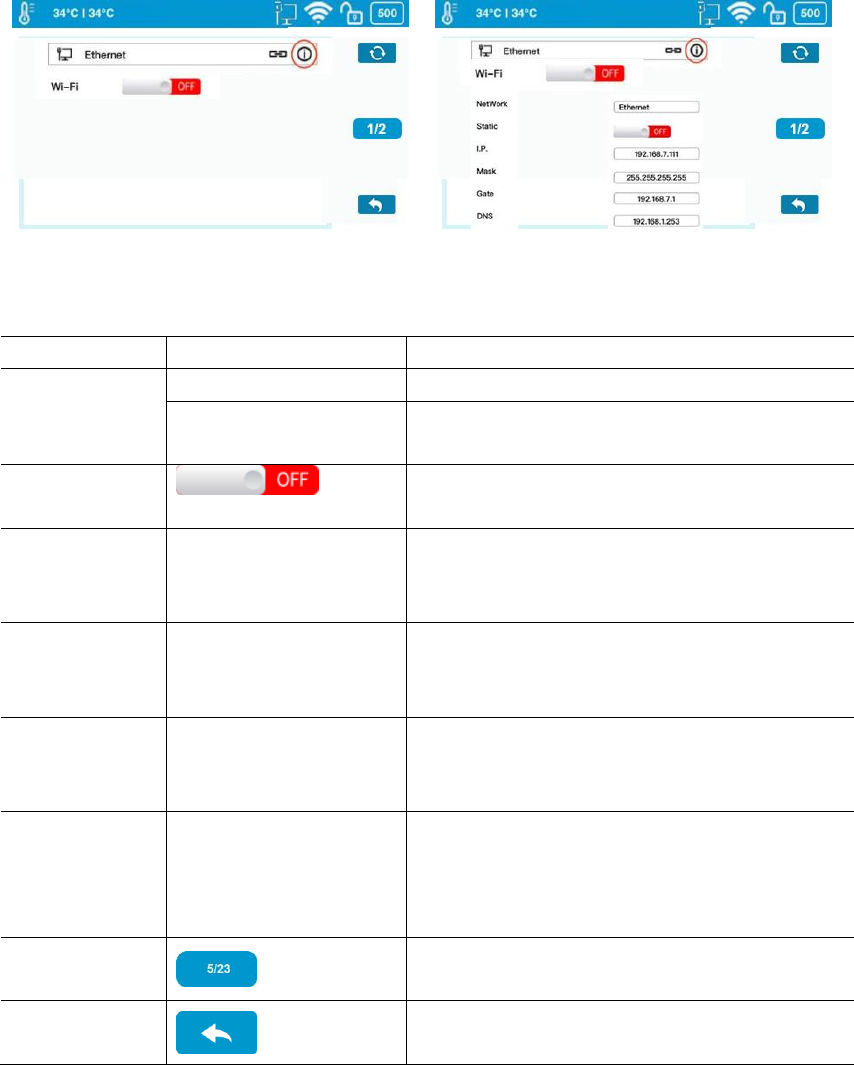
Figure 5.10 Figure 5.11
Table 5.10 Network Setting Icon Description
Name
Icon
Description
Network
Type/Name
Network Ethernet
The printer is connect with Ethernet
Network Tiertime
The name of connected WiFi
network.
Static
Toggle the static IP option to edit
following settings for static IP
IP
IP
192.168.7.111
This is printer’s IP address in the
network. Click the text field to edit,
click Return to save and exit editing.
Mask
Mask
255.255.255.0
This is printer’s mask in the network.
Click the text field to edit, click
Return to save and exit editing.
Gateway
Gate
192.168.7.1
This is where you define the printer’s
gateway. Click the text field to edit,
click Return to save and exit editing.
DNS
DNS
192.168.1.253
This is where you define the printer’s
domain name system. Click the text
field to edit, click Return to save and
exit editing.
Page
Go to the next page.
Exit
Exit and get back to the Network
Section.
The following descriptions also applies for Wi-Fi network settings.
Wi-Fi Network Connection and Settings:
1. Go to Config, enter Network Settings section.
2. Toggle on Wi-Fi Network Connection.
3. Find the desired Wi-Fi Network’s name in the list below.
4. Tap the name to connect the Wi-Fi Network.
5. The 3DP-23-4A is connect to the Wi-Fi Network successfully, when the red
exclamation mark disappeared, a interlock and Information icon appears.
6. Tap the Information icon to edit the printer’s Wi-Fi Network Settings.

5.10 Initialize
The printer requires initialization before printing.
The Material, Calibration and Print buttons on the Main menu of the
touchscreen will be greyed out before the printer is properly initialized.
Figure 5.10
Click Initialize and confirm the printer will start initializing by clicking “√”. After
the printer is initialized, you can start sending print jobs to the printer.
This equipment has been tested and found to comply with the limits for a Class
B digital device, pursuant to part 15 of the FCC Rules. These limits are
designed to provide reasonable protection against harmful interference in a
residential installation. This equipment generates, uses and can radiate radio
frequency energy and, if not installed and used in accordance with the
instructions, may cause harmful interference to radio communications.
However, there is no guarantee that interference will not occur in a particular
installation. If this equipment does cause harmful interference to radio or
television reception, which can be determined by turning the equipment off and
on, the user is encouraged to try to correct the interference by one or more of
the following measures:
• Reorient or relocate the receiving antenna.
• Increase the separation between the equipment and receiver.
• Connect the equipment into an outlet on a circuit different from that to which
the receiver is connected.
• Consult the dealer or an experienced radio/TV technician for help.
Caution: Any changes or modifications to this device not explicitly approved
by manufacturer could void your authority to operate this equipment.
This device complies with part 15 of the FCC Rules. Operation is subject to the
following two conditions: (1) This device may not cause harmful interference,
and (2) this device must accept any interference received, including
interference that may cause undesired operation.
The device has been evaluated to meet general RF exposure requirement.
This equipment should be installed and operated with minimum distance 20cm
between the radiator & your body.