Beko WMB 71031 PTM User's Manual User To The D2af465c E1f3 4e99 Bfee E1f2b0db87da
User Manual: Beko WMB 71031 PTM to the manual
Open the PDF directly: View PDF ![]() .
.
Page Count: 54

Washing Machine
Стиральная машина
Lavadora
WMB 71031 PTM

2EN
1 Important safety instructions
This section contains safety instructions that will
help protect from risk of personal injury or property
damage. Failure to follow these instructions shall
void any warranty.
General safety
• 8yearsandolderchildrenandpeoplewith
reduced physical, sensory, and mental abilities
as well as unskilled or inexperienced persons
can use this appliance provided that they are
supervised and instructed on safe use of the
appliance as well as to the related dangers.
Children should not play or tamper with the
appliance. Cleaning and user maintenance
should never be performed by children unless
supervised by a responsible adult.
• Neverplacetheproductonacarpet-covered
floor; otherwise, lack of airflow beneath the
machine will cause electrical parts to overheat.
This will cause problems with your product.
• Donotoperatetheproductifthepowercable
/ plug is damaged. Call the Authorized Service
Agent.
• Haveaqualifiedelectricianconnecta
16-Amperefusetotheinstallationlocationof
the product.
• Iftheproducthasafailure,itshouldnot
be operated unless it is repaired by the
Authorized Service Agent. There is the risk of
electric shock!
• Thisproductisdesignedtoresumeoperating
in the event of powering on after a power
interruption.Ifyouwishtocancelthe
programme, see "Cancelling the programme"
section.
• Connecttheproducttoagroundedoutlet
protected by a fuse complying with the values
inthe"Technicalspecifications"table.Donot
neglect to have the grounding installation
madebyaqualifiedelectrician.Ourcompany
shall not be liable for any damages that
will arise when the product is used without
grounding in accordance with the local
regulations.
• Thewatersupplyanddraininghosesmustbe
securely fastened and remain undamaged.
Otherwise,thereistheriskofwaterleakage.
• Neveropentheloadingdoororremovethe
filter while there is still water in the drum.
Otherwise,riskoffloodingandinjuryfromhot
water will occur.
• Donotforceopenthelockedloadingdoor.
The loading door will be ready to open just a
few minutes after the washing cycle comes to
anend.Incaseofforcingtheloadingdoorto
open, the door and the lock mechanism may
get damaged.
• Unplugtheproductwhennotinuse.
• Neverwashtheproductbyspreadingor
pouring water onto it! There is the risk of
electric shock!
• Nevertouchtheplugwithwethands!Never
unplug by pulling on the cable, always pull out
by grabbing the plug.
• Usedetergents,softenersandsupplements
suitable for automatic washing machines only.
• Followtheinstructionsonthetextiletagsand
on the detergent package.
• Theproductmustbeunpluggedduring
installation, maintenance, cleaning and
repairing procedures.
• Alwayshavetheinstallationandrepairing
procedures carried out by the Authorized
Service Agent. Manufacturer shall not be
held liable for damages that may arise from
procedures carried out by unauthorized
persons.
Intended use
• Thisproducthasbeendesignedfordomestic
use.Itisnotsuitableforcommercialuseandit
must not be used out of its intended use.
• Theproductmustonlybeusedforwashing
and rinsing of laundry that are marked
accordingly.
• Themanufacturerwaivesanyresponsibility
arisen from incorrect usage or transportation.
Children's safety
• Electricalproductsaredangerousforthe
children. Keep children away from the product
whenitisinuse.Donotletthemtotamper
withtheproduct.Usechildlocktoprevent
children from intervening with the product.
• Donotforgettoclosetheloadingdoorwhen
leaving the room where the product is located.
• Storealldetergentsandadditivesinasafe
place away from the reach of the children.
2 Installation
Refer to the nearest Authorised Service Agent for
installation of the product. To make the product
ready for use, review the information in the user
manual and make sure that the electricity, tap
water supply and water drainage systems are
appropriate before calling the Authorized Service
Agent.Iftheyarenot,callaqualifiedtechnician
and plumber to have any necessary arrangements
carried out.
C Preparation of the location and electrical,
tap water and waste water installations at
the place of installation is under customer's
responsibility.
B Installationandelectricalconnectionsofthe
product must be carried out by the Authorized
Service Agent. Manufacturer shall not be
held liable for damages that may arise from
procedures carried out by unauthorized
persons.
A Prior to installation, visually check if the
producthasanydefectsonit.Ifso,donot
haveitinstalled.Damagedproductscause
risks for your safety.

3EN
C Make sure that the water inlet and discharge
hoses as well as the power cable are not
folded, pinched or crushed while pushing
the product into its place after installation or
cleaning procedures.
Appropriate installation location
• Placethemachineonarigidfloor.Donot
place it on a long pile rug or similar surfaces.
• Totalweightofthewashingmachineandthe
dryer-withfullload-whentheyareplaced
on top of each other reaches to approx.
180kilograms.Placetheproductonasolid
and flat floor that has sufficient load carrying
capacity!
• Donotplacetheproductonthepowercable.
• Donotinstalltheproductatplaceswhere
temperaturemayfallbelow0ºC.
• Placetheproductatleast1cmawayfromthe
edges of other furniture.
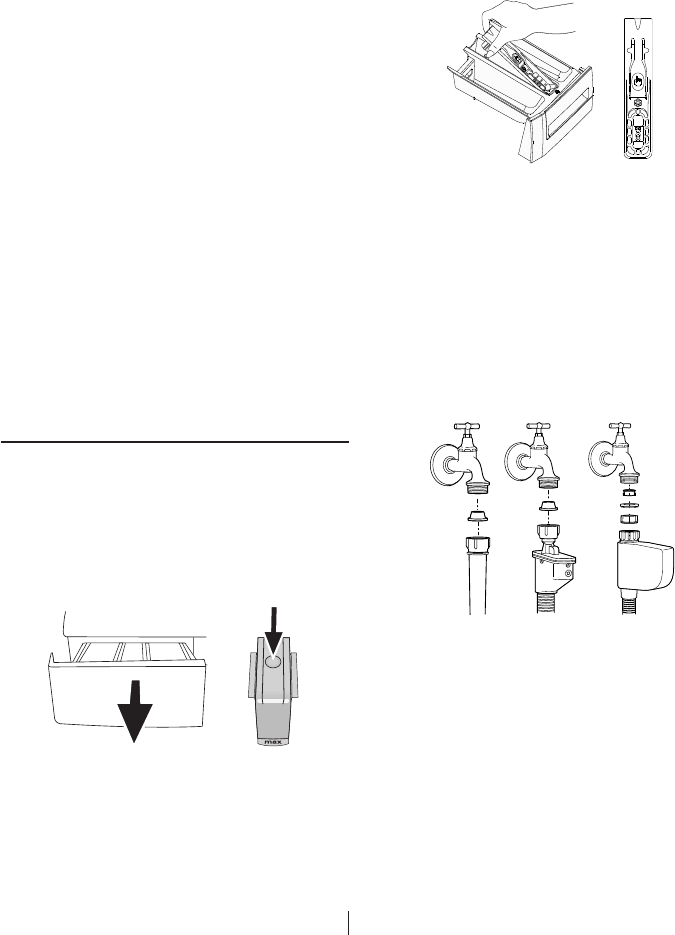
Removing packaging reinforcement
Tilt the machine backwards to remove the
packaging reinforcement. Remove the packaging
reinforcement by pulling the ribbon.
Removing the transportation locks
A Donotremovethetransportationlocksbefore
taking out the packaging reinforcement.
A Remove the transportation safety bolts before
operating the washing machine, otherwise,
the product will be damaged.
1. Loosen all the bolts with a spanner until they
rotate freely (C).
2. Remove transportation safety bolts by turning
them gently.
3. AttachtheplasticcoverssuppliedintheUser
Manual bag into the holes on the rear panel.
(P)
C Keep the transportation safety bolts in a safe
place to reuse when the washing machine
needs to be moved again in the future.
C Never move the product without the
transportation safety bolts properly fixed in
place!
Connecting water supply
C Thewatersupplypressurerequiredtorun
theproductisbetween1to10bars(0.1–10
MPa).Itisnecessarytohave10–80litersof
water flowing from the fully open tap in one
minute to have your machine run smoothly.
Attach a pressure reducing valve if water
pressure is higher.
C Ifyouaregoingtousethedoublewater-inlet
productasasingle(cold)water-inletunit,you
must install the supplied stopper to the hot
water valve before operating the product.
(Applies for the products supplied with a blind
stopper group.)
C Ifyouwanttousebothwaterinletsofthe
product, connect the hot water hose after
removing the stopper and gasket group from
the hot water valve. (Applies for the products
supplied with a blind stopper group.)
A Models with a single water inlet should not
beconnectedtothehotwatertap.Insuch
a case the laundry will get damaged or the
product will switch to protection mode and will
not operate.
A Donotuseoldorusedwaterinlethoseson
thenewproduct.Itmaycausestainsonyour
laundry.
1. Connect the special hoses supplied with the
product to the water inlets on the product.
Redhose(left)(max.90ºC)isforhotwater
inlet,bluehose(right)(max.25ºC)isforcold
water inlet.
A Ensure that the cold and hot water
connections are made correctly when
installingtheproduct.Otherwise,yourlaundry
will come out hot at the end of the washing
process and wear out.
2. Tighten all hose nuts by hand. Never use a
wrench when tightening the nuts.
3. Openthetapscompletelyaftermakingthe
hose connection to check for water leaks at
theconnectionpoints.Ifanyleaksoccur,turn
off the tap and remove the nut. Retighten
the nut carefully after checking the seal. To
prevent water leakages and damages caused
by them, keep the taps closed when the
machine is not in use.
Connecting to the drain
• Theendofthedrainhosemustbedirectly
connected to the wastewater drain or to the
washbasin.
A Your house will be flooded if the hose comes
out of its housing during water discharge.
Moreover, there is risk of scalding due to
high washing temperatures! To prevent such
4EN
situations and to ensure smooth water intake
and discharge of the machine, fix the end of
the discharge hose tightly so that it cannot
come out.
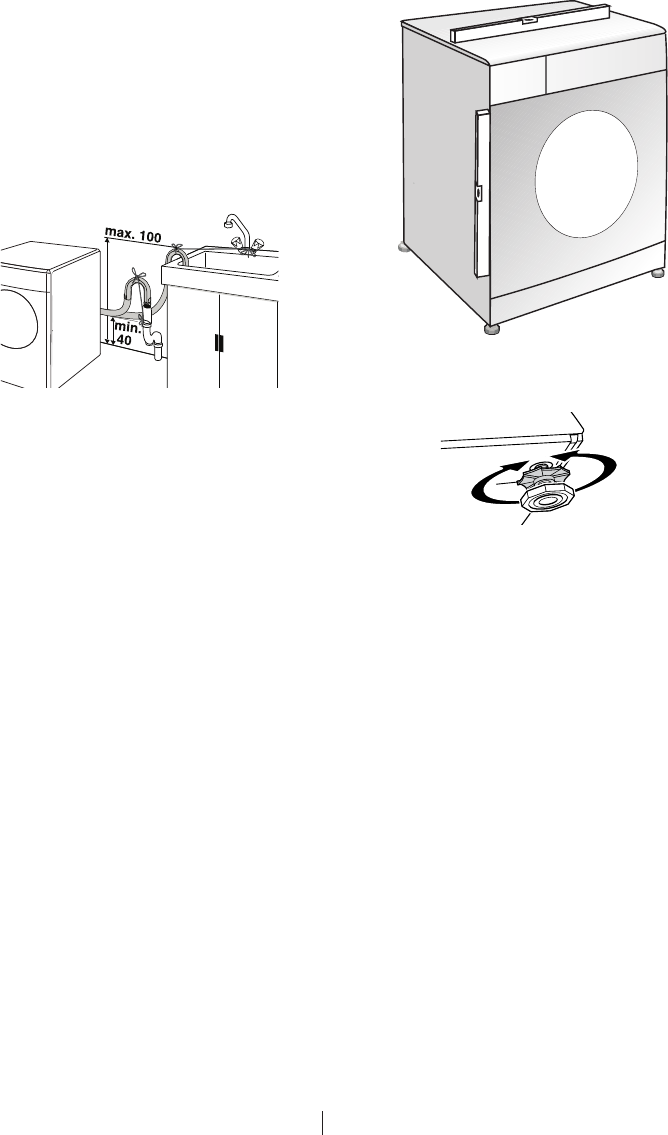
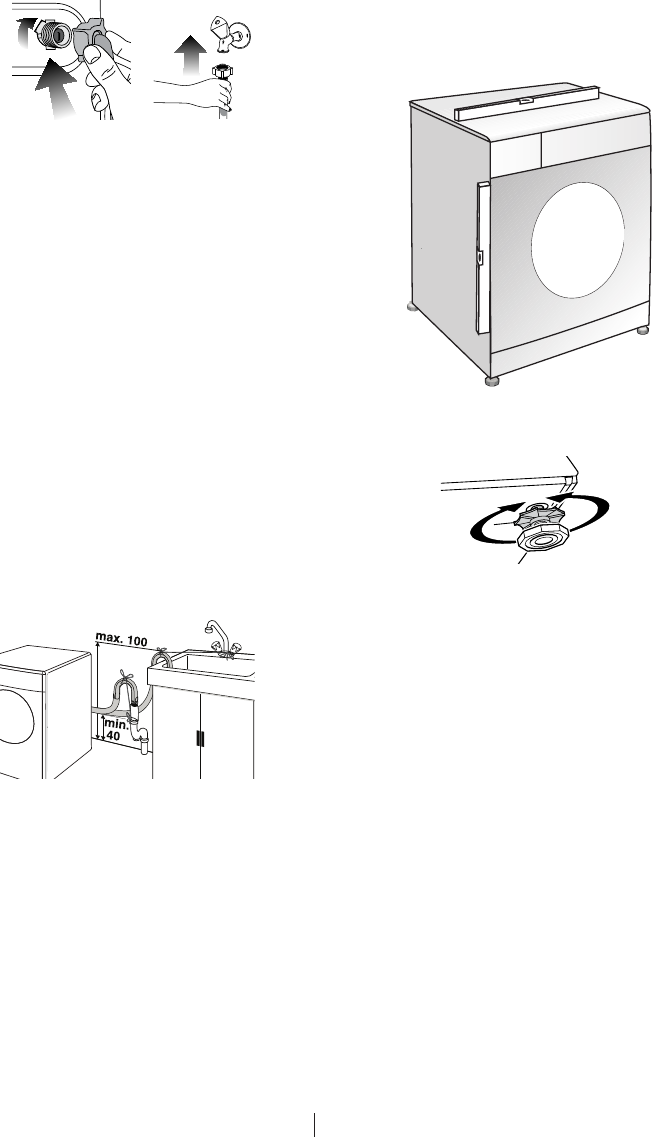
• Thehoseshouldbeattachedtoaheightofat
least40cm,and100cmatmost.
• Incasethehoseiselevatedafterlayingiton
the floor level or close to the ground (less than
40cmabovetheground),waterdischarge
becomes more difficult and the laundry may
come out excessively wet. Therefore, follow
the heights described in the figure.
• Topreventflowingofdirtywaterbackintothe
machine and to allow for easy discharge, do
not immerse the hose end into the dirty water
ordriveitinthedrainmorethan15cm.Ifitis
too long, cut it short.
• Theendofthehoseshouldnotbebent,it
should not be stepped on and the hose must
not be pinched between the drain and the
machine.
• Ifthelengthofthehoseistooshort,useit
by adding an original extension hose. Length
of the hose may not be longer than 3.2 m.
To avoid water leak failures, the connection
between the extension hose and the drain
hose of the product must be fitted well with
an appropriate clamp as not to come off and
leak.
Adjusting the feet
A Inordertoensurethattheproductoperates
moresilentandvibration-free,itmuststand
level and balanced on its feet. Balance the
machinebyadjustingthefeet.Otherwise,the
product may move from its place and cause
crushing and vibration problems.
1. Loosen the lock nuts on the feet by hand.
2. Adjust the feet until the product stands level
and balanced.
3. Tighten all lock nuts again by hand.
A Donotuseanytoolstoloosenthelocknuts.
Otherwise,theywillgetdamaged.
Electrical connection
Connect the product to a grounded outlet
protected by a fuse complying with the values in
the"Technicalspecifications"table.Ourcompany
shall not be liable for any damages that will arise
when the product is used without grounding in
accordance with the local regulations.
• Connectionmustcomplywithnational
regulations.
• Powercableplugmustbewithineasyreach
after installation.
• Thevoltageandallowedfuseorbreaker
protection are specified in the “Technical
specifications”section.Ifthecurrentvalueof
the fuse or breaker in the house is less than
16Amps,haveaqualifiedelectricianinstalla
16 Amp fuse.
• Thespecifiedvoltagemustbeequaltoyour
mains voltage.
• Donotmakeconnectionsviaextension
cablesormulti-plugs.
B Damagedpowercablesmustbereplacedby
the Authorized Service Agents.
First use
Before starting to use the product, make sure
that all preparations are made in accordance
withtheinstructionsinsections"Importantsafety
instructions"and"Installation".

5EN
To prepare the product for washing laundry,
performfirstoperationinDrumCleaning
programme.Ifyourmachineisnotfeaturedwith
DrumCleaningprogramme,useCottons-90
programme and select Additional Water or Extra
Rinse auxiliary functions as well. Before starting
theprogramme,putmax.100gofpowder
anti-limescaleintothemainwashdetergent
compartment(compartmentnr.II).Iftheanti-
limescale is in tablet form, put only one tablet into
compartmentnr.II.Drytheinsideofthebellow
with a clean piece of cloth after the programme
has come to an end.
C Useananti-limescalesuitableforthewashing
machines.
C Some water might have remained in the
productduetothequalitycontrolprocesses
intheproduction.Itisnotharmfulforthe
product.
Disposing of packaging material
Packaging materials are dangerous to children.
Keep packaging materials in a safe place away
from reach of the children.
Packaging materials of the product are
manufacturedfromrecyclablematerials.Dispose
of them properly and sort in accordance with
recycledwasteinstructions.Donotdisposeof
them with normal domestic waste.
Transportation of the product
Unplugtheproductbeforetransportingit.Remove
waterdrainandwatersupplyconnections.Drain
the remaining water in the product completely;
see,"Drainingremainingwaterandcleaningthe
pumpfilter".Installtransportationsafetybolts
in the reverse order of removal procedure; see,
"Removing the transportation locks".
C Never move the product without the
transportation safety bolts properly fixed in
place!
Disposing of the old product
Disposeoftheoldproductinanenvironmentally
friendly manner.
Refer to your local dealer or solid waste collection
centre in your area to learn how to dispose of your
product.
For children's safety, cut the power cable and
break the locking mechanism of the loading door
so that it will be nonfunctional before disposing of
the product.
3 Preparation
Things to be done for energy saving
Following information will help you use the product
inanecologicalandenergy-efficientmanner.
• Operatetheproductinthehighestcapacity
allowed by the programme you have selected,
but do not overload; see, "Programme and
consumption table".
• Alwaysfollowtheinstructionsonthe
detergent packaging.
• Washslightlysoiledlaundryatlow
temperatures.
• Usefasterprogrammesforsmallquantitiesof
lightly soiled laundry.
• Donotuseprewashandhightemperatures
for laundry that is not heavily soiled or stained.
• Ifyouplantodryyourlaundryinadryer,select
the highest spin speed recommended during
washing process.
• Donotusedetergentinexcessoftheamount
recommended on the detergent package.
Sorting the laundry
• Sortlaundryaccordingtotypeoffabric,
colour, and degree of soiling and allowable
water temperature.
• Alwaysobeytheinstructionsgivenonthe
garment tags.
Preparing laundry for washing
• Laundryitemswithmetalattachmentssuch
as, underwired bras, belt buckles or metal
buttons will damage the machine. Remove
the metal pieces or wash the clothes by
putting them in a laundry bag or pillow case.
• Takeoutallsubstancesinthepocketssuch
as coins, pens and paper clips, and turn
pockets inside out and brush. Such objects
may damage the product or cause noise
problem.
• Putsmallsizeclothessuchasinfant'ssocks
and nylon stockings in a laundry bag or pillow
case.
• Placecurtainsinwithoutcompressingthem.
Remove curtain attachment items.
• Fastenzippers,sewloosebuttonsandmend
rips and tears.
• Wash“machinewashable”or“hand
washable” labeled products only with an
appropriate programme.
• Donotwashcoloursandwhitestogether.
New, dark coloured cottons release a lot of
dye. Wash them separately.
• Toughstainsmustbetreatedproperlybefore
washing.Ifunsure,checkwithadrycleaner.
• Useonlydyes/colourchangersandlimescale
removers suitable for machine wash. Always
follow the instructions on the package.
• Washtrousersanddelicatelaundryturned
inside out.
• KeeplaundryitemsmadeofAngorawoolin
the freezer for a few hours before washing.
6EN
This will reduce pilling.
• Laundrythataresubjectedtomaterialssuch
as flour, lime dust, milk powder, etc. intensely
must be shaken off before placing into the
machine. Such dusts and powders on the
laundry may build up on the inner parts of the
machine in time and can cause damage.
Correct load capacity
The maximum load capacity depends on the type
of laundry, the degree of soiling and the washing
programme desired.
The machine automatically adjusts the amount
of water according to the weight of the loaded
laundry.
A Follow the information in the “Programme
and consumption table”. When overloaded,
machine's washing performance will drop.
Moreover, noise and vibration problems may
occur.
Loading the laundry
• Opentheloadingdoor.
• Placelaundryitemslooselyintothemachine.
• Pushtheloadingdoortocloseuntilyouhear
a locking sound. Ensure that no items are
caught in the door.
C The loading door is locked while a programme
is running. The door can only be opened a
while after the programme comes to an end.
A Incaseofmisplacingthelaundry,noiseand
vibration problems may occur in the machine.
Using detergent and softener
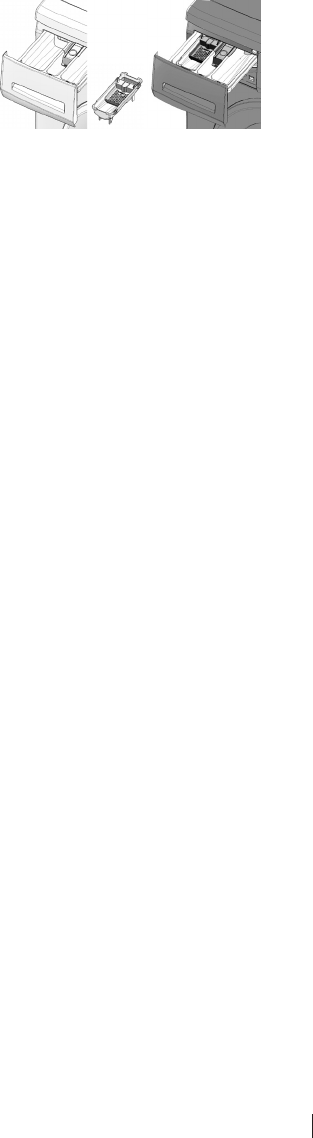
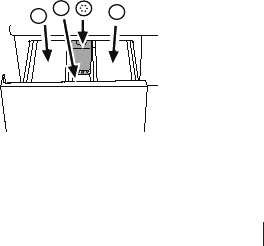
Detergent Drawer
The detergent drawer is composed of three
compartments:
-(1)forprewash
-(2)formainwash
–(3)forsoftener
–(*)inaddition,thereissiphonpieceinthe
softener compartment.
1
23
Detergent, softener and other cleaning agents
• Adddetergentandsoftenerbeforestartingthe
washing programme.
• Neveropenthedetergentdrawerwhilethe
washing programme is running!
• Whenusingaprogrammewithoutprewash,
do not put any detergent into the prewash
compartment(compartmentnr.I).
• Inaprogrammewithprewash,donot
putliquiddetergentintotheprewash
compartment(compartmentnr.I).
• Donotselectaprogrammewithprewashif
you are using a detergent bag or dispensing
ball. Place the detergent bag or the
dispensing ball directly among the laundry in
the machine.
• Ifyouareusingliquiddetergent,donotforget
toplacetheliquiddetergentcupintothemain
washcompartment(compartmentnr.II).
Choosing the detergent type
The type of detergent to be used depends on the
type and colour of the fabric.
• Usedifferentdetergentsforcolouredand
white laundry.
• Washyourdelicateclothesonlywithspecial
detergents(liquiddetergent,woolshampoo,
etc.) used solely for delicate clothes.
• Whenwashingdarkcolouredclothesand
quilts,itisrecommendedtouseliquid
detergent.
• Washwoolenswithspecialdetergentmade
specifically for woolens.
A Useonlydetergentsmanufacturedspecifically
for washing machines.
A Donotusesoappowder.
Adjusting detergent amount
The amount of washing detergent to be used
depends on the amount of laundry, the degree
of soiling and water hardness. Read the
manufacturer's instructions on the detergent
package carefully and follow the dosage values.
• Donotuseamountsexceedingthedosage
quantitiesrecommendedonthedetergent
package to avoid problems of excessive
foam, poor rinsing, financial savings and finally,
environmental protection.
• Uselesserdetergentforsmallamountsor
lightly soiled clothes.
• Useconcentrateddetergentsinthe
recommended dosage.
Using softeners
Pour the softener into the softener compartment of
the detergent drawer.
• Usethedosagesrecommendedonthe
package.
• Donotexceedthe(>max<)levelmarkingin
the softener compartment.
• Ifthesoftenerhaslostitsfluidity,diluteitwith
water before putting it in the detergent drawer.
Using liquid detergents
If the product contains a liquid detergent cup:
• Makesurethatyouhaveplacedtheliquid
detergent cup in compartment nr. “2”.
• Usethedetergentmanufacturer'smeasuring
cup and follow the instructions on the
package.
• Usethedosagesrecommendedonthe
package.
• Iftheliquiddetergenthaslostitsfluidity,dilute
it with water before putting in the detergent
cup.
7EN
If the product does not contain a liquid
detergent cup:
• Donotuseliquiddetergentfortheprewashin
a programme with prewash.
• Usethedetergentmanufacturer'smeasuring
cup and follow the instructions on the
package.
• Liquiddetergentstainsyourclotheswhen
usedwithDelayedStartfunction.Ifyouare
goingtousetheDelayedStartfunction,do
notuseliquiddetergent.
Using gel and tablet detergent
When using tablet, gel, etc. detergents, read
the manufacturer's instructions on the detergent
packagecarefullyandfollowthedosagevalues.If
there is not any instruction on the package, apply
the following.
• Ifthegeldetergentthicknessisfluidaland
yourmachinedoesnotcontainaspecialliquid
detergent cup, put the gel detergent into the
main wash detergent compartment during first
waterintake.Ifyourmachinecontainsaliquid
detergent cup, fill the detergent into this cup
before starting the programme.
• Ifthegeldetergentthicknessisnotfluidalor
intheshapeofcapsuleliquidtablet,putit
directly into the drum before washing.
• Puttabletdetergentsintothemainwash
compartment(compartmentnr.II)ordirectly
into the drum before washing.
C Tablet detergents may leave residues in the
detergentcompartment.Ifyouencounter
such a case, place the tablet detergent
between the laundry, close to the lower part of
the drum in future washings.
C Usethetabletorgeldetergentwithout
selecting the prewash function.
Using starch
• Addliquidstarch,powderstarchorthe
dyestuff into the softener compartment as
instructed on the package.
• Donotusesoftenerandstarchtogetherina
washing cycle.
• Wipetheinsideofthemachinewithadamp
and clean cloth after using starch.
Using bleaches
• Selectaprogrammewithprewashandadd
the bleaching agent at the beginning of the
prewash.Donotputdetergentintheprewash
compartment. As an alternative application,
select a programme with extra rinse and add
the bleaching agent while the machine is
taking water from the detergent compartment
during first rinsing step.
• Donotusebleachingagentanddetergentby
mixing them.
• Usejustalittleamount(approx.50ml)of
bleaching agent and rinse the clothes very
wellasitcausesskinirritation.Donotpourthe
bleaching agent onto the clothes and do not
use it for coloured clothes.
• Whenusingoxygenbasedbleaches,
follow the instructions on the package and
select a programme that washes at a lower
temperature.
• Oxygenbasedbleachescanbeusedtogether
with detergents; however, if its thickness is
not the same with the detergent, put the
detergent first into the compartment nr. “2”
in the detergent drawer and wait until the
detergent flows while the machine is taking in
water. Add the bleaching agent from the same
compartment while the machine is still taking
in water.
Using limescale remover
• Whenrequired,uselimescaleremovers
manufactured specifically for washing
machines only.
• Alwaysfollowinstructionsonthepackage.

8EN
Tips for efficient washing
Clothes
Light colours and
whites Colors Dark colors Delicates/
Woolens/Silks
(Recommended
temperature range
based on soiling level:
40-90C)
(Recommended
temperature range based
onsoilinglevel:cold-40C)
(Recommended
temperature range
based on soiling
level:cold-40C)
(Recommended
temperature range
based on soiling
level:cold-30C)
Soiling Level
Heavily Soiled
(difficult stains
such as grass,
coffee, fruits and
blood.)
Itmaybenecessary
topre-treatthe
stains of perform
prewash. Powder
andliquiddetergents
recommended
for whites can be
used at dosages
recommended for
heavily soiled clothes.
Itisrecommendedto
use powder detergents
to clean clay and soil
stains and the stains
that are sensitive to
bleaches.
Powder and
liquiddetergents
recommended for
colours can be used at
dosages recommended
for heavily soiled clothes.
Itisrecommendedtouse
powder detergents to
clean clay and soil stains
and the stains that are
sensitive to bleaches.
Usedetergentswithout
bleach.
Liquiddetergents
suitable for
colours and dark
colours can be
used at dosages
recommended
for heavily soiled
clothes.
Preferliquid
detergents
produced for
delicate clothes.
Woollen and silk
clothes must
be washed with
special woollen
detergents.
Normally Soiled
(For example,
stains caused by
body on collars
and cuffs)
Powder and
liquiddetergents
recommended for
whites can be used at
dosages recommended
for normally soiled
clothes.
Powder and
liquiddetergents
recommended for
colours can be used at
dosages recommended
for normally soiled
clothes.Usedetergents
without bleach.
Liquiddetergents
suitable for
colours and dark
colours can be
used at dosages
recommended
for normally soiled
clothes.
Preferliquid
detergents
produced for
delicate clothes.
Woollen and silk
clothes must
be washed with
special woollen
detergents.
Lightly Soiled
(No visible stains
exist.)
Powder and
liquiddetergents
recommended for
whites can be used at
dosages recommended
for lightly soiled clothes.
Powder and
liquiddetergents
recommended for
colours can be used at
dosages recommended
for lightly soiled clothes.
Usedetergentswithout
bleach.
Liquiddetergents
suitable for
colours and dark
colours can be
used at dosages
recommended
for lightly soiled
clothes.
Preferliquid
detergents
produced for
delicate clothes.
Woollen and silk
clothes must
be washed with
special woollen
detergents.
9EN
4 Operating the product
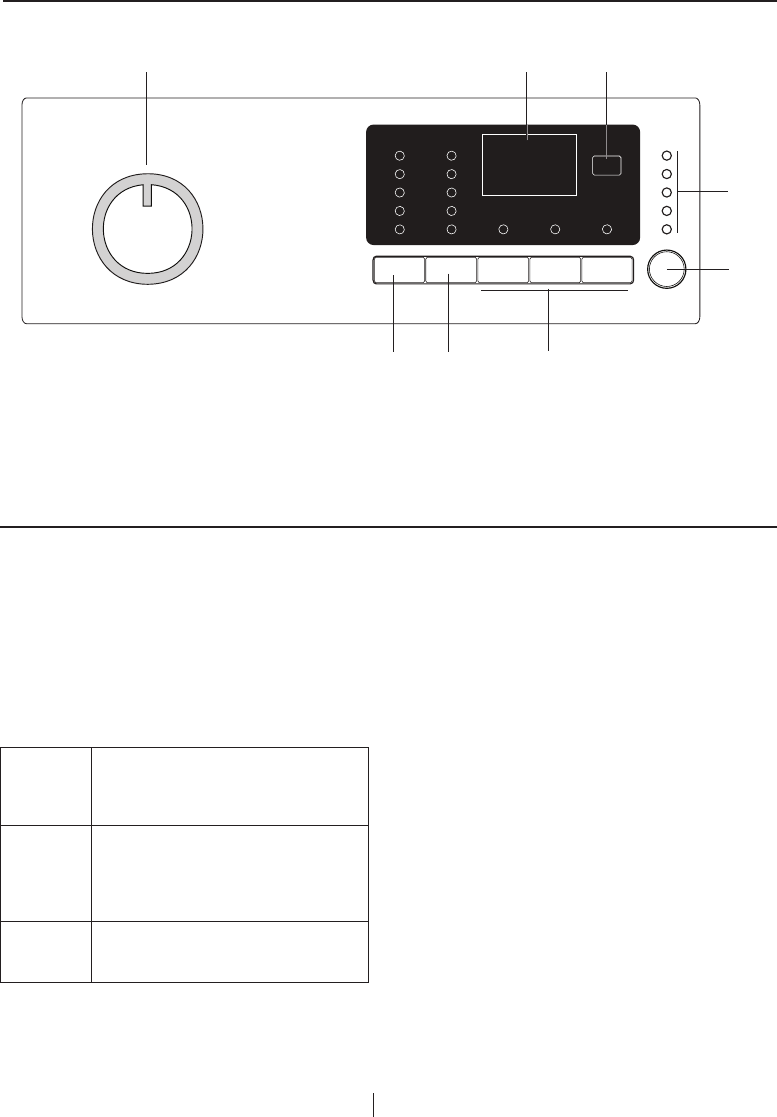
Control panel
1-ProgrammeSelectionknob(Uppermost
positionOn/Off)
2-Display
3-DelayedStartbutton
4-ProgrammeFollow-upindicator
5-Start/Pausebutton
6-AuxiliaryFunctionbuttons
7-SpinSpeedAdjustmentbutton
8-TemperatureAdjustmentbutton
Preparing the machine
Make sure that the hoses are connected tightly.
Plug in your machine. Turn the tap on completely.
Place the laundry in the machine. Add detergent
and fabric softener.
Programme selection
1. Select the programme suitable for the type,
quantityandsoilingdegreeofthelaundry
in accordance with the "Programme and
consumption table" and the temperature table
below.
90˚C
Heavilysoiledwhitecottons
and linens. (coffee table covers,
tableclothes, towels, bed sheets,
etc.)
60˚C
Normally soiled, coloured, fade
proof cottons or synthetic clothes
(shirt, nightgown, pajamas, etc.)
and lightly soiled white linens
(underwear, etc.)
40˚C-
30˚C-
Cold
Blended laundry including delicate
textile (veil curtains, etc.), synthetics
and woolens.
2. Select the desired programme with the
Programme Selection button.
C Programmes are limited with the highest spin
speed appropriate for that particular type of
fabric.
C When selecting a programme, always
consider the type of fabric, colour, degree of
soiling and permissible water temperature.
C Alwaysselectthelowestrequired
temperature.Highertemperaturemeans
higher power consumption.
C For further programme details, see
"Programme and consumption table".
Main programmes
Dependingonthetypeoffabric,usethefollowing
main programmes.
• Cottons
Usethisprogrammeforyourcottonlaundry(such
as bed sheets, duvet and pillowcase sets, towels,
bathrobes, underwear, etc.). Your laundry will be
washed with vigorous washing action for a longer
washing cycle.
• Synthetics
Usethisprogrammetowashyoursynthetic
clothes (shirts, blouses, synthetic/cotton blends,
etc.).Itwasheswithagentleactionandhasa
shorter washing cycle compared to the Cottons
programme.
Forcurtainsandtulle,usetheSynthetic40˚C
programmewithprewashandanti-creasing
functions selected. As their meshed texture
causes excessive foaming, wash the veils/tulle
by putting little amount of detergent into the main
washcompartment.Donotputdetergentinthe
prewash compartment.
1 2 3
4
5
6
8 7

10 EN
• Woollens
Usethisprogrammetowashyourwoolenclothes.
Select the appropriate temperature complying
withthetagsofyourclothes.Useappropriate
detergents for woolens.
Additional programmes
For special cases, additional programmes are
available in the machine.
C Additional programmes may differ according
to the model of the machine.
• Cotton Economic
You may wash your normally soiled durable cotton
and linen laundry in this programme with the
highest energy and water saving compared to
all other wash programmes suitable for cottons.
Actual water temperature may differ from the
declared cycle temperature. Programme duration
may automatically be shortened during later stages
of the programme if you wash less amount (e.g. ½
capacityorless)oflaundry.Inthiscaseenergyand
water consumption will be further decreased giving
you the opportunity for a more economical wash.
This feature is available for certain models having
remaining time display.
• BabyProtect
Usethisprogrammetowashbabylaundry,and
the laundry that belongs to allergic persons.
Longer heating time and an additional rinsing step
provide a higher level of hygiene.
• Hand wash
Usethisprogrammetowashyourwoolen/delicate
clothesthatbear“notmachine-washable”tags
andforwhichhandwashisrecommended.It
washes laundry with a very gentle washing action
to not to damage clothes.
• Daily express
Usethisprogrammetowashyourlightlysoiled
cotton clothes in a short time.
• Darkwash
Usethisprogrammetowashyourdarkcoloured
laundry or the laundry that you do not want it get
faded. Washing is performed with little mechanic
actionandatlowtemperatures.Itisrecommended
touseliquiddetergentorwoolenshampoofor
dark coloured laundry.
• Mixed 40 (Mix 40)
Usethisprogrammetowashyourcottonand
synthetic clothes together without sorting them.
Special programmes
For specific applications, select any of the following
programmes.
• Rinse
Usethisprogrammewhenyouwanttorinseor
starch separately.
• Spin + Drain
Usethisprogrammetoapplyanadditionalspin
cycle for your laundry or to drain the water in the
machine.
Before selecting this programme, select the
desired spin speed and press Start / Pause button.
First, the machine will drain the water inside of
it. Then, it will spin the laundry with the set spin
speed and drain the water coming out of them.
Ifyouwishtodrainonlythewaterwithoutspinning
your laundry, select the Pump+Spin programme
and then select the No Spin function with the help
of Spin Speed Adjustment button. Press Start /
Pause button.
C Usealowerspinspeedfordelicatelaundries.
Temperature selection
Whenever a new programme is selected,
the maximum temperature for the selected
programme appears on the temperature indicator.
To decrease the temperature, press the
Temperature Adjustment button. Temperature will
decrease gradually.
C Iftheprogrammehasnotreachedtheheating
step, you can change the temperature without
switching the machine to Pause mode.
Spin speed selection
Whenever a new programme is selected, the
recommended spin speed of the selected
programme is displayed on the spin speed
indicator.
To decrease the spin speed, press the Spin
Speed Adjustment button. Spin speed decreases
gradually. Then, depending on the model of the
product,"RinseHold"and"NoSpin"options
appear on the display. See "Auxiliary function
selection" section for explanations of these
options.
C Iftheprogrammehasnotreachedthe
spinning step, you can change the speed
without switching the machine to Pause
mode.

11 EN
Programme and consumption table
•: Selectable
*: Automaticallyselected,nocanceling.
**: EnergyLabelprogramme(EN60456Ed.3)
***:Ifmaximumspinspeedofthemachineislowerthenthisvalue,youcanonlyselectuptothe
maximum spin speed.
-: Seetheprogrammedescriptionformaximumload.
C Water and power consumption may vary subject to the changes in water pressure, water hardness
and temperature, ambient temperature, type and amount of laundry, selection of auxiliary functions
and spin speed, and changes in electric voltage.
C You can see the washing time of the programme you have selected on the display of the machine.
Itisnormalthatsmalldifferencesmayoccurbetweenthetimeshownonthedisplayandthereal
washing time.
C The auxiliary functions in the table may vary according to the model of your machine.
EN 2
Programme
Max. Load (kg)
Water Consumption (l)
Energy Consumption
(kWh)
Max.Speed***
Prewash
Quick Wash
Rinse Plus
Anti-Creasing
RinseHold
Soaking
Pet hair removal
Selectable
temperature range
°C
Cottons 90 7 69 2.15 1600 • • • • • • • Cold-90
Cottons 60 7 66 1.40 1600 • • • • • • • Cold-90
Cottons 40 7 66 0.70 1600 • • • • • • • Cold-90
Cotton Economic 60** 748 1.00 1600 • 40-60
Cotton Economic 60** 3.5 39 0.82 1600 • 40-60
Cotton Economic 40** 3.5 39 0.80 1600 • 40-60
Dailyexpress 90 7 55 1.80 1400 • • Cold-90
Dailyexpress 60 7 55 1.10 1400 • • Cold-90
Dailyexpress 30 7 55 0.25 1400 • • Cold-90
Darkwash 40 370 0.50 800 * • Cold-40
BabyProtect 90 784 2.15 1600 • * • • 30-90
Handwash 30 1 41 0.15 600 Cold-30
Woollens 40 1.5 56 0.27 600 • • Cold-40
Mixed40(Mix40) 40 350 0.73 800 • • • • • • • Cold-40
Synthetics 60 350 0.95 800 • • • • • • • Cold-60
Synthetics 40 350 0.73 800 • • • • • • • Cold-60
**“CottonEconomic40°CandCottonEconomic60°Carethestandardprogrammes.”These
programmesarereferredtoas‘standard40°Ccottonprogramme’and‘standard60°Ccotton
programme’

12 EN
Auxiliary function selection
Select the desired auxiliary functions before starting
the programme. Furthermore, you may also select
or cancel auxiliary functions that are suitable to
the running programme without pressing the Start
/ Pause button when the machine is operating.
For this, the machine must be in a step before the
auxiliary function you are going to select or cancel.
Iftheauxiliaryfunctioncannotbeselectedor
canceled, light of the relevant auxiliary function will
blink 3 times to warn the user.
C Some functions cannot be selected together.
Ifasecondauxiliaryfunctionconflictingwith
the first one is selected before starting the
machine, the function selected first will be
canceled and the second auxiliary function
selection will remain active. For example,
if you want to select Quick Wash after you
have selected the Prewash, Prewash will be
canceled and Quick Wash will remain active.
C An auxiliary function that is not compatible
with the programme cannot be selected. (See
"Programme and consumption table")
C Auxiliary Function buttons may vary according
to the model of the machine.
• Prewash
A Prewash is only worthwhile for heavily soiled
laundry. Not using the Prewash will save energy,
water, detergent and time.
C Prewash without detergent is recommended
for tulle and curtains.
• Quick Wash
This function can be used in Cottons and
Syntheticsprogrammes.Itdecreasesthewashing
times and also the number of rinsing steps for
lightly soiled laundry.
C When you select this function, load your
machine with half of the maximum laundry
specified in the programme table.
• Rinse Plus
This function enables the machine to make
another rinsing in addition to the one already made
after the main wash. Thus, the risk for sensitive
skins (babies, allergic skins, etc.) to be effected by
the minimal detergent remnants on the laundry can
be reduced.
• Anti-Creasing
This function creases the clothes lesser when they
arebeingwashed.Drummovementisreduced
and spinning speed is limited to prevent creasing.
Inaddition,washingisdonewithahigherwater
level.
• Rinse Hold
Ifyouarenotgoingtounloadyourclothes
immediately after the programme completes, you
may use rinse hold function to keep your laundry
in the final rinsing water in order to prevent them
from getting wrinkled when there is no water in
the machine. Press Start / Pause button after this
process if you want to drain the water without
spinning your laundry. Programme will resume and
complete after draining the water.
Ifyouwanttospinthelaundryheldinwater,adjust
the Spin Speed and press Start / Pause button.
The programme resumes. Water is drained,
laundry is spun and the programme is completed.
• Soaking
The Soaking auxiliary function ensures better
removal of stains ingrained into the clothes by
holding them in the detergent water prior to startup
of the programme.
• Pet hair removal
This function helps to remove pet hair that remain
on your garments more effectively.
When you select this function, Prewash and Extra
Rinse steps are added to the normal programme.
Thus,washingisperformedwithmorewater(30%)
and the pet hair is removed more effectively.
A Never wash your pets in the washing
machine.
Delayed Start
WiththeDelayedStartfunctionthestartupof
the programme may be delayed up to 19 hours.
Delayedstarttimecanbeincreasedbyincrements
of 1 hour.
C Donotuseliquiddetergentswhenyouset
DelayedStart!Thereistheriskofstainingof
the clothes.
Opentheloadingdoor,placethelaundryandput
detergent, etc. Select the washing programme,
temperature,spinspeedand,ifrequired,the
auxiliary functions. Set the desired time by pressing
theDelayedStartbutton.PressStart/Pause
button. The delayed start time you have set is
displayed.Delayedstartcountdownstarts.“_”
symbol next to the delayed start time moves up
and down on the display.
C Additional laundry may be loaded during the
delayed start period.
At the end of the countdown, duration of the
selectedprogrammewillbedisplayed.“_”symbol
will disappear and the selected programme will
start.
Changing the Delayed Start period
Ifyouwanttochangethetimeduringcountdown:
PressDelayedStartbutton.Timewillincreaseby
1houreachtimeyoupressthebutton.Ifyouwant
todecreasethedelayedstarttime,pressDelayed
Start button repeatedly until the desired delayed
start time appears on the display.
Canceling the Delayed Start function
Ifyouwanttocancelthedelayedstartcountdown
and start the programme immediately:
SettheDelayedStartperiodtozeroorturnthe
Programme Selection knob to any programme.
Thus,DelayedStartfunctionwillbecanceled.The
End/Cancel light flashes continuously. Then, select
the programme you want to run again. Press Start
/ Pause button to start the programme.

13 EN
Starting the programme
Press Start / Pause button to start the programme.
Programmefollow-uplightshowingthestartupof
the programme will turn on.
C Ifnoprogrammeisstartedornokeyis
pressed within 1 minute during programme
selection process, the machine will switch
to Pause mode and the illumination level of
the temperature, speed and loading door
indicatorlightswilldecrease.Otherindicator
lightsandindicatorswillturnoff.Oncethe
Programme Selection knob is rotated or
any button is pressed, indicator lights and
indicators will turn on again.
Child Lock
UseChildLockfunctiontopreventchildrenfrom
tampering with the machine. Thus you can avoid
any changes in a running programme.
C IftheProgrammeSelectionknobisturned
when the Child Lock is active, "Con" appears
on the display. The Child Lock does not
allow any change in the programmes and the
selected temperature, speed and auxiliary
functions.
C Even if another programme is selected with
the Programme Selection knob while the Child
Lock is active, previously selected programme
will continue running.
To activate the Child Lock:
Press and hold 1st and 2nd Auxiliary Function
buttons for 3 seconds. The lights on the 1st and
2nd Auxiliary Function buttons will flash, and
"C03","C02","C01"willappearonthedisplay
respectively while you keep the buttons pressed
for 3 seconds. Then, "Con" will appear on the
display indicating that the Child Lock is activated.
IfyoupressanybuttonorturntheProgramme
Selection knob when the Child Lock is active,
same phrase will appear on the display. The lights
on the 1st and 2nd auxiliary function buttons that
are used to deactivate the Child Lock will blink 3
times.
To deactivate the Child Lock:
Press and hold 1st and 2nd auxiliary function
buttons for 3 seconds while any programme is
running. The lights on the 1st and 2nd Auxiliary
Functionbuttonswillflash,and"C03","C02",
"C01"willappearonthedisplayrespectivelywhile
you keep the buttons pressed for 3 seconds.
Then,"COFF"willappearonthedisplayindicating
that the Child Lock is deactivated.
C Inadditiontothemethodabove,todeactivate
the Child Lock, switch the Programme
SelectionknobtoOn/Offpositionwhenno
programme is running, and select another
programme.
C Child Lock is not deactivated after power
failures or when the machine is unplugged.
Progress of programme
Progress of a running programme can be followed
fromtheProgrammeFollow-upindicator.At
the beginning of every programme step, the
relevant indicator light will turn on and light of the
completed step will turn off.
You can change the auxiliary functions, speed
and temperature settings without stopping the
programme flow while the programme is running.
To do this, the change you are going to make must
beinastepaftertherunningprogrammestep.If
the change is not compatible, relevant lights will
flash for 3 times.
C Ifthemachinedoesnotpasstothespinning
step,RinseHoldfunctionmightbeactive
or the automatic unbalanced load detection
system might be activated due to the
unbalanced distribution of the laundry in the
machine.
Loading door lock
There is a locking system on the loading door of
the machine that prevents opening of the door in
cases when the water level is unsuitable.
Loading door light will start flashing when the
machine is switched to Pause mode. Machine
checksthelevelofthewaterinside.Ifthelevelis
suitable,LoadingDoorlightilluminatessteadily
within1-2minutesandtheloadingdoorcanbe
opened.
Ifthelevelisunsuitable,LoadingDoorlightturns
offandtheloadingdoorcannotbeopened.If
youareobligedtoopentheLoadingDoorwhile
theLoadingDoorlightisoff,youhavetocancel
the current programme; see "Canceling the
programme".
Changing the selections after
programme has started
Switching the machine to pause mode
Press the Start / Pause button to switch the
machine to pause mode while a programme is
running. The light of the step which the machine
isinstartsflashingintheProgrammeFollow-up
indicator to show that the machine has been
switched to the pause mode.
Also, when the loading door is ready to be opened,
LoadingDoorlightwillalsoilluminatecontinuously
in addition to the programme step light.
Changing the speed and temperature settings
for auxiliary functions
Dependingonthesteptheprogrammehas
reached, you may cancel or activate the auxiliary
functions; see, "Auxiliary function selection".
You may also change the speed and temperature
settings; see, "Spin speed selection" and
"Temperature selection".
C Ifnochangeisallowed,therelevantlightwill
flash for 3 times.
Adding or taking out laundry
Press the Start / Pause button to switch the
machinetopausemode.Theprogrammefollow-
14 EN
up light of the relevant step during which the
machine was switched into the pause mode
will flash.
WaituntiltheLoadingDoorcanbeopened.
OpentheLoadingDoorandaddortakeout
thelaundry.ClosetheLoadingDoor.Make
changes in auxiliary functions, temperature
and speed settings if necessary. Press Start /
Pause button to start the machine.
Canceling the programme
To cancel the programme, turn the Programme
Selection knob to select another programme.
Previous programme will be canceled. End /
Cancel light will flash continuously to notify that
the programme has been canceled.
Pumpfunctionisactivatedfor1-2minutes
regardless of the programme step, and
whether there is water in the machine or not.
After this period, your machine will be ready to
start with the first step of the new programme.
C Dependingonthestepwherethe
programme was canceled in, you may
have to put detergent and softener again
for the programme you have selected
anew.
End of programme
“End” appears on the display at the end of the
programme. Wait until the loading door light
illuminatessteadily.PressOn/Offbuttonto
switch off the machine. Take out your laundry
and close the loading door. Your machine is
ready for the next washing cycle.
5 Maintenance and cleaning
Service life of the product extends and
frequentlyfacedproblemsdecreaseifcleaned
at regular intervals.
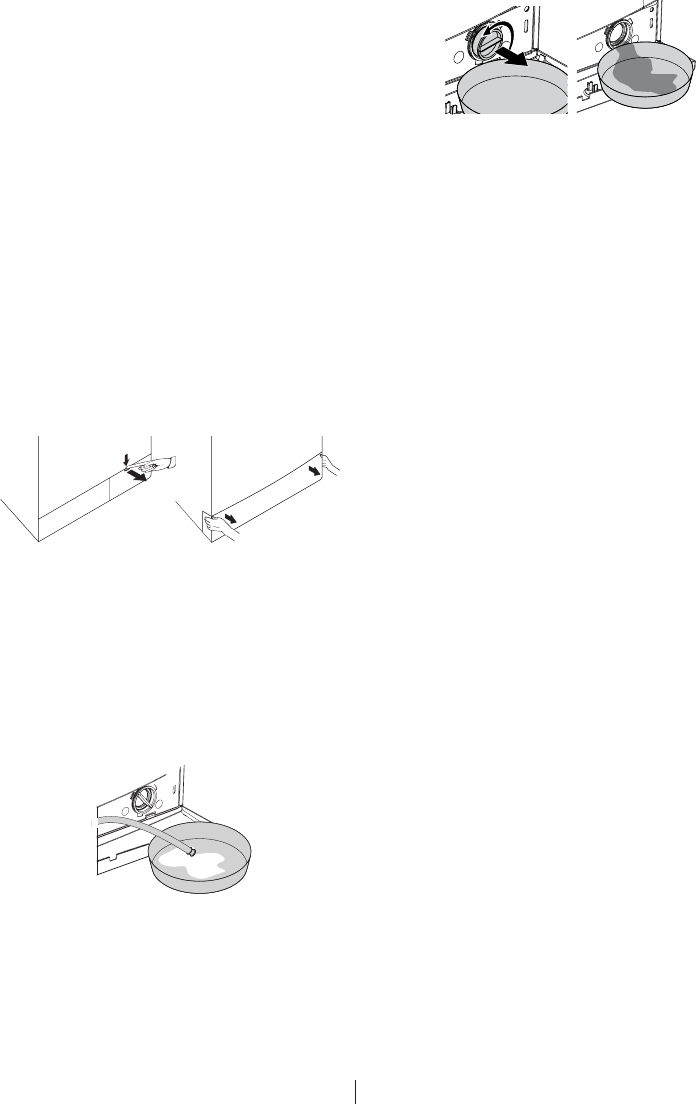
Cleaning the detergent drawer
Clean the detergent drawer at regular intervals
(every4-5washingcycles)asshownbelow
in order to prevent accumulation of powder
detergent in time.
Press the dotted point on the siphon in the
softener compartment and pull towards you
until the compartment is removed from the
machine.
C Ifmorethannormalamountofwaterand
softener mixture starts to gather in the
softener compartment, the siphon must
be cleaned.
Wash the detergent drawer and the siphon
with plenty of lukewarm water in a washbasin.
Wear protective gloves or use an appropriate
brush to avoid touching of the residues in the
drawerwithyourskinwhencleaning.Insertthe
drawer back into its place after cleaning and
make sure that it is seated well.
Ifyourdetergentdraweristheoneindicatedin
the following figure:
C Lift the rear part of the siphon to remove
it as illustrated. After performing the above
mentioned cleaning procedures, replace
the siphon back to its seating and push
its front section downwards to make sure
that the locking tab engages.
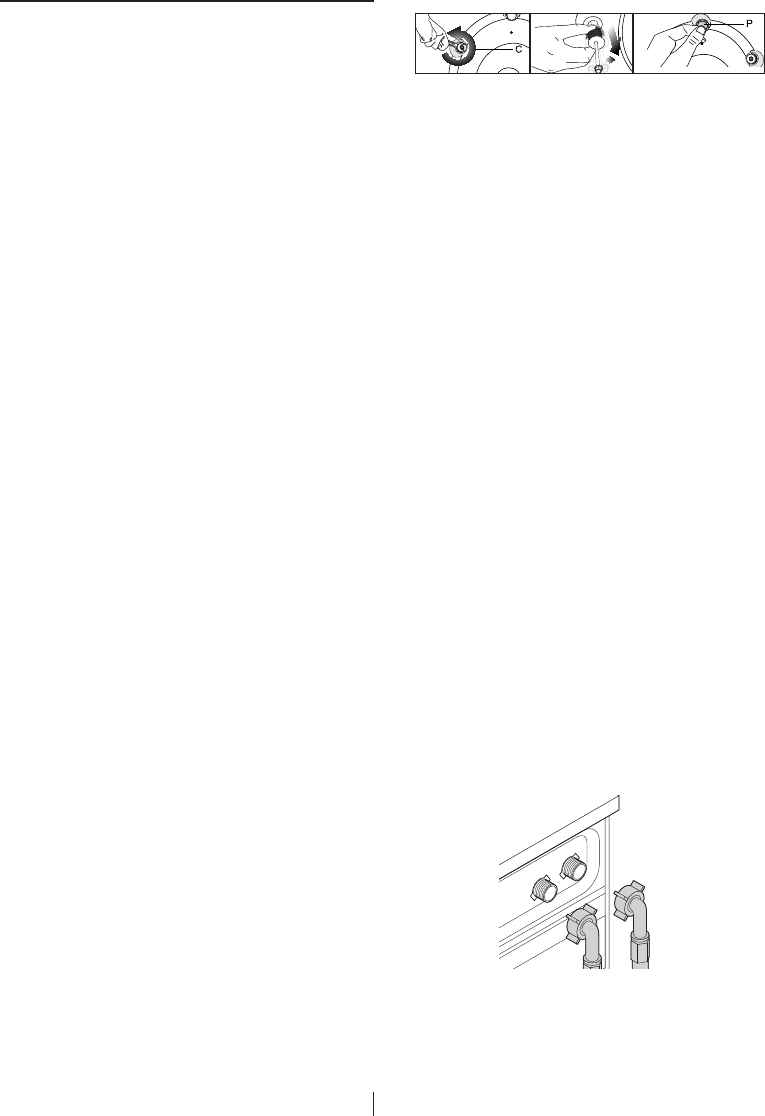
Cleaning the water intake filters
There is a filter at the end of each water intake
valve at the rear of the machine and also at
the end of each water intake hose where they
are connected to the tap. These filters prevent
foreign substances and dirt in the water to
enter the washing machine. Filters should be
cleaned as they do get dirty.
Close the taps. Remove the nuts of the water
intake hoses to access the filters on the water
intake valves. Clean them with an appropriate
brush.Ifthefiltersaretoodirty,takethemout
by means of pliers and clean them. Take out
the filters on the flat ends of the water intake
hoses together with the gaskets and clean
thoroughly under running water. Replace the
gaskets and filters carefully in their places and
tighten the hose nuts by hand.
Draining remaining water and
cleaning the pump filter
The filter system in your machine prevents solid
items such as buttons, coins and fabric fibers
15 EN
clogging the pump impeller during discharge of
washing water. Thus, the water will be discharged
without any problem and the service life of the
pump will extend.
Ifthemachinefailstodrainwater,thepumpfilter
is clogged. Filter must be cleaned whenever it
is clogged or in every 3 months. Water must be
drained off first to clean the pump filter.
Inaddition,priortotransportingthemachine
(eg., when moving to another house) and in case
of freezing of the water, water may have to be
drained completely.
A Foreign substances left in the pump filter may
damage your machine or may cause noise
problem.
Inordertocleanthedirtyfilteranddischargethe
water:
Unplugthemachinetocutoffthesupplypower.
A Temperature of the water inside the machine
mayriseupto90ºC.Toavoidburningrisk,
filter must be cleaned after the water in the
machine cools down.
Openthefiltercap.
Ifthefiltercapiscomposedoftwopieces,
press the tab on the filter cap downwards and
pull the piece out towards yourself.
Ifthefiltercapisonepiece,pullthecapfromboth
sides at the top to open.
C You can remove the filter cover by slightly
pushing downwards with a thin plastic tipped
tool, through the gap above the filter cover.
Donotusemetaltippedtoolstoremovethe
cover.
Some of our products have emergency draining
hose and some does not have. Follow the steps
below to discharge the water.
Dischargingthewaterwhentheproducthasan
emergency draining hose:
Pull the emergency draining hose out from its seat
Place a large container at the end of the hose.
Drainthewaterintothecontainerbypullingoutthe
plug at the end of the hose. When the container
is full, block the inlet of the hose by replacing the
plug. After the container is emptied, repeat the
above procedure to drain the water in the machine
completely. When draining of water is finished,
close the end by the plug again and fix the hose in
its place. Turn the pump filter to take it out.
Dischargingthewaterwhentheproductdoesnot
have an emergency draining hose:
Place a large container in front of the filter to
catch water from the filter. Loosen pump filter
(anticlockwise) until water starts to flow. Fill the
flowing water into the container you have placed
in front of the filter. Always keep a piece of cloth
handy to absorb any spilled water. When the water
inside the machine is finished, take out the filter
completely by turning it. Clean any residues inside
the filter as well as fibers, if any, around the pump
impellerregion.Installthefilter.
A Ifyourproducthasawaterjetfeature,be
sure to fit the filter into its housing in the
pump. Never force the filter while installing it
into its housing. Seat the filter into its place
completely.Otherwise,watermayleakfrom
the filter cap.
Ifthefiltercapiscomposedoftwopieces,close
thefiltercapbypressingonthetab.Ifitisone
piece, seat the tabs in the lower part into their
places first, and then press the upper part to close.

16 EN
6 Technical specifications
C Technicalspecificationsmaybechangedwithoutpriornoticetoimprovethequalityoftheproduct.
C Figures in this manual are schematic and may not match the product exactly.
C Values stated on the product labels or in the documentation accompanying it are obtained in
laboratoryconditionsinaccordancewiththerelevantstandards.Dependingonoperationaland
environmental conditions of the product, these values may vary.
Models (EN)
Maximum dry laundry capacity (kg)
Height(cm)
Width (cm)
Depth(cm)
Net weight (±4 kg.)
Electricalinput(V/Hz)
Total current (A)
Total power (W)
Spin speed (rpm max.)
Stand-bymodepower(W)
Off-modepower(W)
Dark wash
(Darkcare)
Dark wash
(Darkcare)
Synthetics Cottons Pre-wash Main
wash
Rinse Wash Spin
Drain
(Pump)
Anti-
creasing
Duvet
(Bedding)
Child-
proof lock
Hand
Wash
BabyProtect Cotton
Eco
Woollens
Delicate Pet hair
removal
Daily
Lingerie
expres 14
Super short
express
Daily
express
Rinse hold Start/
Pause
No spin Quick
wash
Finished Cold Self
Clean
Temperature
Mixed 40
(Mix40)
Super 40 Extra rinse
(Rinse Plus)
Freshen
up
Shirts Jeans Sport Time delay Intensive Fasion
care
mini 30
Eco Clean
Anti-
allergic
On/Off
Door Ready
Thisappliance’spackagingmaterialisrecyclable.Helprecycleitandprotectthe
environment by dropping it off in the municipal receptacles provided for this purpose.
Yourappliancealsocontainsagreatamountofrecyclablematerial.Itismarkedwith
this label to indicate the used appliances that should not be mixed with other waste.
This way, the appliance recycling organised by your manufacturer will be done under
thebestpossibleconditions,incompliancewithEuropeanDirective2002/96/ECon
WasteElectricalandElectronicEquipment.Contactyourtownhalloryourretailerforthe
used appliance collection points closest to your home. We thank you doing your part to
protect the environment.
WMB71031PTM
7
84
60
50
63
230V/50Hz
10
2200
1000
1.35
0.25

17 EN
7 Troubleshooting
Programme cannot be started or selected.
• Washingmachinehasswitchedtoselfprotectionmodeduetoasupplyproblem(linevoltage,
waterpressure,etc.).>>>Tocanceltheprogramme,turntheProgrammeSelectionknob
to select another programme. Previous programme will be cancelled. (See "Canceling the
programme")
Water in the machine.
• Somewatermighthaveremainedintheproductduetothequalitycontrolprocessesinthe
production.>>>This is not a failure; water is not harmful to the machine.
Machine vibrates or makes noise.
• Machinemightbestandingunbalanced.>>>Adjust the feet to level the machine.
• Ahardsubstancemighthaveenteredintothepumpfilter.>>>Clean the pump filter.
• Transportationsafetyboltsarenotremoved.>>>Remove the transportation safety bolts.
• Laundryquantityinthemachinemightbetoolittle.>>>Add more laundry to the machine.
• Machinemightbeoverloadedwithlaundry.>>>Take out some of the laundry from the machine
or distribute the load by hand to balance it homogenously in the machine.
• Machinemightbeleaningonarigiditem.>>>Make sure that the machine is not leaning on
anything.
Machine stopped shortly after the programme started.
• Machinemighthavestoppedtemporarilyduetolowvoltage.>>>It will resume running when the
voltage restores to the normal level.
Programmetimedoesnotcountdown.(Onmodelswithdisplay)
• Timermaystopduringwaterintake.>>>Timer indicator will not countdown until the machine
takes in adequate amount of water. The machine will wait until there is sufficient amount of water
to avoid poor washing results due to lack of water. Timer indicator will resume countdown after
this.
• Timermaystopduringheatingstep.>>>Timer indicator will not countdown until the machine
reaches the selected temperature.
• Timermaystopduringspinningstep.>>>Automatic unbalanced load detection system might
be activated due to the unbalanced distribution of the laundry in the drum.
C Machine does not switch to spinning step when the laundry is not evenly distributed in the drum
to prevent any damage to the machine and to its surrounding environment. Laundry should be
rearrangedandre-spun.
Foam is overflowing from the detergent drawer.
• Toomuchdetergentisused.>>>Mix 1 tablespoonful softener and ½ l water and pour into the
main wash compartment of the detergent drawer.
C Put detergent into the machine suitable for the programmes and maximum loads indicated in
the “Programme and consumption table”. When you use additional chemicals (stain removers,
bleachs and etc), reduce the amount of detergent.
Laundry remains wet at the end of the programme
• Excessivefoammighthaveoccurredandautomaticfoamabsorptionsystemmighthavebeen
activatedduetotoomuchdetergentusage.>>>Use recommended amount of detergent.
C Machine does not switch to spinning step when the laundry is not evenly distributed in the drum
to prevent any damage to the machine and to its surrounding environment. Laundry should be
rearrangedandre-spun.
A Ifyoucannoteliminatetheproblemalthoughyoufollowtheinstructionsinthissection,consultyour
dealer or the Authorized Service Agent. Never try to repair a nonfunctional product yourself.
2820522485_EN/240312.0901

19 RU
1 Правила техники безопасности
В этом разделе содержатся правила техники
безопасности, соблюдение которых позволит
избежать травмирования или материального
ущерба. При несоблюдении этих правил все
гарантийные обязательства аннулируются.
Общие правила безопасности
• Этоизделиенепредназначенодля
использованиялицамисограниченными
физическими,умственнымивозможностями
и способностями восприятия либо
необученнымиилинеопытнымилюдьми
(включаядетей),еслиониненаходятся
под присмотром лица, ответственного за
их безопасность, или не действуют по его
указаниям относительно использования
данного изделия.
• Неустанавливайтемашинунаковровом
покрытии,таккакнедостаточнаявентиляция
подднищеммашиныможетпривести
кперегревуэлектрическихдеталейи
проблемам в работе изделия.
• Непользуйтесьизделиемвслучае
повреждения кабеля питания или
штепсельнойвилки.Обратитесьвфирменный
сервисный центр.
• Установкупредохранителяна16Апоместу
подключенияэлектроприбораследует
поручитьквалифицированномуэлектрику.
• Непользуйтесьнеисправнымизделием,
так как это может привести к поражению
электрическимтоком.Обратитесьв
фирменный сервисный центр для проведения
ремонта.
• Вданномизделиипредусмотрено
возобновлении работы при восстановлении
подачиэлектроэнергиипослеперерыва.Для
отмены выполнения программы следуйте
указаниямвразделе"Отменапрограммы".
• Данноеизделиеследуетподключать
к розетке с заземлением, защищенной
предохранителем, параметры которого
соответствуют данным, приведенным в
таблице"Техническиехарактеристики".
Обязательноустановитезаземление.
Заземление должен выполнять
квалифицированный электрик. При
отсутствии заземления, выполненного
в соответствии с местными правилами,
компания-изготовитель снимает в себя
всякую ответственность по возмещению
ущерба.
• Дляпредотвращенияпротечекшлангподачи
водыисливнойшлангдолжныбытьнадежно
закреплены и не иметь повреждений.
• Неоткрывайтедверцузагрузочноголюка
и не извлекайте фильтр, если в барабане
есть вода. При несоблюдении этого условия
возникаетопасностьзатопленияиполучения
ожоговотгорячейводы.
• Непытайтесьоткрытьдверцузагрузочного
люка,когдаоназаблокирована.Дверцу
загрузочноголюкаможнооткрыватьчерез
несколькоминутпослеокончанияпрограммы
стирки. Попытка открыть заблокированную
дверцу может привести к повреждению
дверцы и замка.
• Отключайтемашинуотэлектрическойсети,
когда она не используется.
• Запрещаетсямытьмашинуструейводы.Это
можетпривестикпоражениюэлектрическим
током!
• Неприкасайтесьвлажнымирукамиквилке
шнурапитания.Извлекаявилкуизрозетки,
нетянитезашнур;беритесьтолькозавилку.
• Используйтетолькотемоющиесредства
идобавки,которыепредназначеныдля
автоматическихстиральныхмашин.
• Следуйтеуказаниямнаэтикеткаходежды
и белья, а также инструкциям на упаковке
моющих средств.
• Передвыполнениемустановки,технического
обслуживания,ремонтаилимытьямашины
обязательноотключитеееотэлектрической
сети.
• Работыпоустановкеиремонтумашины
должны выполнять только специалисты
фирменного сервисного центра. Компания-
изготовитель не несет ответственности за
ущерб,возникшийврезультатевыполнения
работ лицами, не имеющими на то права.
Назначение изделия
• Данноеизделиепредназначенодлябытового
применения. Запрещается применять изделие
вкоммерческихцелях,атакженепрямому
назначению.
• Изделиеможноиспользоватьтолькодля
стирки и полоскания одежды и белья,
имеющих соответствующую маркировку.
• Компания-изготовительненесет
ответственностизаущерб,возникшийв
результате неправильного применения или
транспортировки.
Безопасность детей
• Электроприборыпредставляютопасность
длядетей.Неподпускайтедетейк
работающеймашине.Следитезатем,чтобы
онинеповредилимашину.Используйте
блокировку от детей для предотвращения
вмешательствавработумашины.
• Уходяизпомещения,гдеустановлена
машина,обязательнозакрывайтедверцу
загрузочноголюка.
• Хранитемоющиесредстваидобавкив
безопасном месте, недоступном для детей.
20 RU
2 Установка
Установкуприборадолженпроизводить
уполномоченныйспециалист.Обратитесьв
ближайшийфирменныйсервисныйцентр.При
подготовке прибора к эксплуатации, прежде
чемобращатьсявфирменныйсервисный
центр,убедитесь,чтоэлектропитание,подача
воды и система слива воды функционируют
нормально. При необходимости обратитесь к
квалифицированному электрику или сантехнику
для устранения неисправностей.
C Подготовка места для установки прибора,
втомчислеподготовкакподключению
приборакэлектрическойсети,водопроводу
и канализации, является обязанностью
покупателя.
B Установкаприбораиподключениеегок
электрическойсетидолжнывыполняться
специалистами фирменного сервисного
центра. Компания-изготовитель не несет
ответственностизаущерб,возникшийв
результате выполнения работ лицами, не
имеющими на то права.
A Перед установкой необходимо выполнить
осмотрприборананаличиедефектов.Если
таковые имеются, не устанавливайте прибор.
Поврежденные приборы могут представлять
угрозу безопасности людей.
C Недопускайтеперегибов,защемленияили
разрывовшнураэлектропитания,наливногои
сливногошланговприперемещенииизделия
наместововремяустановкииличистки.
Выбор места для установки
• Машинуследуетустанавливатьнатвердом
полу.Неустанавливайтеприборнаковровом
покрытии с длинным ворсом или подобных
поверхностях.
• Вслучаеустановкинастиральнуюмашину
сушильногоавтоматаобщийвесприборов
при полной загрузке составляет около 180 кг,
поэтому их следует устанавливать только на
ровном твердом полу, способном выдержать
такую нагрузку.
• Неставьтеприборнашнурпитания.
• Неустанавливайтеприборвпомещениях,где
температура может опускаться ниже 0ºC.
• Междуприборомидругоймебельюдолжен
оставаться зазор не менее 1 см.
Удаление элементов жесткости упаковки
Чтобы удалить элементов жесткости, наклоните
машинуназадипотянитезаленту.
Удаление транспортировочных
фиксаторов
A Неснимайтетранспортировочныефиксаторы,
пока не удалите элементы жесткости.
A
Передэксплуатациейстиральноймашины
снимитетранспортировочныеболты;
несоблюдение этого условия приведет к
поломкемашины.
1. Гаечнымключомослабьтеболтытак,чтобы
онисвободновращались(C)
2. Снимитепредохранительные
транспортировочныеболты,осторожно
поворачиваяих.
3. Закройте отверстия на задней стенке
пластиковымизаглушками,которые
находятся в пакете с руководством
пользователя.(P)
C Сохранитепредохранительные
транспортировочныеболтынаслучай,
еслистиральнуюмашинупонадобиться
перевозить.
C Запрещается перевозить прибор, если
предохранительныетранспортировочные
болты не установлены.
Подключение к водопроводной сети
C Длянормальнойработымашинынеобходимо
подавать воду под давлением в пределах от 1
до10бар(0,1-10MПа).Приэтомрасходводы
при полностью открытом кране составит 10-
80литровводывминуту.Есливводопроводе
более высокое давление, необходимо
установить редукционный клапан.
C Еслипредполагаетсяиспользоватьприбор
сдвумяпатрубкамидляподачиводыкак
приборсоднимподводомводы(холодной),
следуетустановитьзаглушкунавпускной
клапангорячейводы(относитсякизделиям,
которыекомплектуютсязаглушкой).
C Чтобы использовать оба подвода воды,
выньтезаглушкуиуплотненияизвпускного
клапананапатрубкедлягорячейводы
иподсоединитешлангдлягорячей
воды (относится к изделиям, которые
комплектуютсязаглушкой).
A Моделисоднимпатрубкомдляподачиводы
неследуетподключатьккранугорячейводы.
Вэтомслучаелибобудетиспорченобелье,
либосработаетсистемазащитыимашина
перестанет работать.
A Неиспользуйтесновойстиральной
машинойшлангиподачиводы,ужебывшие
вупотреблении.Этоможетстатьпричиной
появления пятен на белье.
1. Подсоединитеспециальныешланги,
которые входят в комплект, к водоприемным
патрубкамстиральноймашины.Красный
шланг(слева)(макс.90ºC)подсоединяетсяк
патрубкудлягорячейводы,аголубой(справа)
(макс. 25 ºC)–кпатрубкудляхолоднойводы.
A Приустановкемашиныубедитесь,что
подсоединенияккранамхолоднойигорячей
водывыполненыправильно.Иначепо
окончаниистиркибельебудетгорячим,что
приведет к его быстрому износу.
2. Затянитевсегайкивручную.Неиспользуйте
длязатяжкигаекгаечныйключ.
21 RU
3. Послеподсоединенияшланговполностью
откройте краны для проверки мест
подсоединениянаналичиепротечек.В
случаепротечкизакройтекраниотвинтите
гайку. Проверьте прокладку и тщательно
затяните гайку еще раз. Во избежание
возможныхпротечекисвязанногосэтим
ущербазакрывайтекраны,когдамашинане
используется.
Слив воды
• Конецсливногошлангаследуетподсоединить
непосредственно к канализации или вывести
в раковину.
A Есливовремясливашлангвырветсяизместа
подсоединения, вода может разлиться по
всему дому. Кроме того, существует опасность
ожогов, поскольку температура воды
можетбытьоченьвысокой!Воизбежание
такихситуаций,атакжедляобеспечения
нормальнойработысистемподачиислива
воды, надежно закрепите конец сливного
шланга.
• Шлангследуеткрепитьнавысотеот40смдо
100 см.
• Еслипроложитьшлангнавысотеменее40
см от уровня пола с последующим подъемом,
слив воды будет затруднен, и белье будет
оставаться мокрым. По этому следует
соблюдать параметры высоты, указанные на
рисунке.
• Дляпредотвращенияпопаданиягрязнойводы
обратновстиральнуюмашинуиобеспечения
беспрепятственногосливаконецшланга
не следует погружать в сливное отверстие
глубже,чемна15см.Еслишлангслишком
длинный, его нужно обрезать.
• Следитезатем,чтобысливнойшлангбыл
проложенбезперегибовиничемнеприжат,а
конецсливногошланганебылскручен.
• Еслишлангслишкомкороткий,нараститеего
фирменнымудлинительнымшлангом.Общая
длинашланганедолжнапревышать3,2м.Во
избежаниепротечекводыдлясращивания
сливногошлангаиудлинительногошланга
следует использовать соответствующий
хомут.
Регулировка ножек
A Чтобыстиральнаямашинаработалатишеи
без вибрации, ее необходимо выровнять в
горизонтальной плоскости, отрегулировав
высотуножек.Еслиэтогонесделать,
машинаможетсдвинутьсясосвоегоместа,
чтоприведеткповышеннойвибрациии
повреждениям.
1. Вручнуюослабьтеконтргайкинаножках.
2. Отрегулируйтевысотуножек,чтобымашина
стояларовноинешаталась.
3. Затемвручнуюзатянитевсеконтргайки.
A Неиспользуйтесьдляослабленияконтргаек
какие-либоинструменты,чтобынеповредить
их.
Подключение к электрической сети
Данноеизделиеследуетподключатькрозетке
с заземлением, защищенной предохранителем,
параметры которого соответствуют данным,
приведеннымвтаблице"Технические
характеристики". При отсутствии заземления,
выполненного в соответствии с местными
правилами, компания-изготовитель снимает в себя
всякую ответственность по возмещению ущерба.
• Подключениедолжноосуществляться
в соответствии с местными нормами и
правилами.
• Приборследуетустанавливатьтаким
образом,чтобыместоподключенияшнура
питания к электросети было легкодоступным.
• Напряжениепитанияидопустимые
характеристики предохранителя или
автоматическоговыключателяуказаныв
разделе"Техническиехарактеристики".Если
ввашемдомеустановленпредохранитель
илиавтоматическийвыключателя,
рассчитанныйнатокменьше16А,обратитесь
к квалифицированному электрику для
установкипредохранителяна16А.
• Напряжениевсетидолжносоответствовать
напряжению,указанномувтехнических
характеристиках.
• Запрещаетсяподключениеприбораксети
электропитания с помощью удлинителей или
розеток с несколькими гнездами.

22 RU
B Заменуповрежденногошнурапитания
должен производить только специалист
фирменного сервисного центра.
Первоначальный запуск
Передначаломэксплуатациистиральной
машинывыполнитевсенеобходимыепроцедуры,
описанныевразделе"Установка",соблюдаяпри
этом правила техники безопасности (см. раздел
"Правилатехникибезопасности").
Чтобыподготовитьстиральнуюмашинудлястирки
белья,запуститепрограмму"Очисткабарабана".
Есливданноймоделипрограмма"Очистка
барабана" не предусмотрена, запустите программу
"Хлопок-90"сдополнительнымифункциями
"Добавитьводы"и"Дополнительноеполоскание".
Перед запуском программы положите средство
дляудалениянакипи(неболее100гпорошка
илиоднутаблетку)вотделениераспределителя
моющихсредств,предназначенноедляосновной
стирки(отделениеII).Позавершениипрограммы
отогните складку уплотнительной манжеты и
протритееечистойсухойтканью.
C Используйтетолькотесредстваотнакипи,
которыепредназначеныдлястиральных
машин.
C Встиральноймашинеможетоставаться
немноговоды,использовавшейсявпроцессе
контролякачестванапредприятии-
изготовителе.Этонепредставляетопасности
длямашины.
Утилизация упаковочных материалов
Упаковочныематериалыпредставляютопасность
длядетей.Хранитеупаковочныематериалыв
безопасном месте, недоступном для детей.
Упаковкастиральноймашиныизготовленаиз
материалов,подлежащихвторичнойпереработке.
Ихнеобходимоотсортироватьиутилизироватьв
соответствиисправиламиутилизацииотходов.Не
выбрасывайтеупаковочныематериалывместес
обычнымибытовымиотходами.
Транспортировка прибора
Передтранспортировкойотключитеприбор
отэлектрическойсети.Отсоединитешланги
от водопровода и системы слива. Полностью
слейтеводуизприбора(см.раздел"Слив
оставшейсяводыиочисткафильтранасоса").
Установитетранспортировочныеболтывпорядке,
обратномихснятию(см.раздел"Удаление
транспортировочныхфиксаторов").
C Запрещается перевозить прибор, если
предохранительныетранспортировочные
болты не установлены.
Утилизация старого прибора
Утилизациястарогоприборадолжнавыполняться
экологическибезопаснымспособом.
Сведенияоправилахутилизацииможнополучить
у местного дилера или в службе утилизации
твердых отходов.
Перед утилизацией прибора необходимо
обрезатьшнурпитанияисломатьзамокдверцы
загрузочноголюка,чтобыисключитьвозможную
опасность для детей.
3 Подготовка к стирке
Рекомендации по эффективной
эксплуатации
Этирекомендациипомогутвамстиратьэкономнои
не загрязняя окружающую среду.
• Загружайтевмашинумаксимальное
количествобельядлявыбраннойпрограммы,
нонеперегружайтемашинусверхмеры(см.
таблицу"Описаниепрограмм").
• Строгособлюдайтеинструкции,приведенные
на упаковке моющего средства.
• Стирайтеслабозагрязненноебельепри
низкой температуре.
• Длястиркинебольшогоколичестваслабо
загрязненного белья используйте короткие
программы.
• Используйтепредварительнуюстиркуи
стирку при высокой температуре только
для сильно загрязненного белья или белья с
пятнами.
• Еслипланируетсясушитьбельевсушильном
автомате, установите максимально
допустимую скорость отжима.
• Соблюдайтерекомендациипоколичеству
моющего средства, указанные на его
упаковке.Неиспользуйтебольшепорошка,
чемтребуется.
Сортировка белья
• Рассортируйтебельепотипуткани,
цвету, степени загрязнения и допустимой
температуре стирки.
• Следуйтеуказаниямнаэтикеткаходеждыи
белья.
Подготовка белья к стирке
• Бельесметаллическимиэлементами
(например,бюстгальтерынакосточках,
пряжкиремнейиметаллическиепуговицы)
можетповредитьмашину.Передстиркой
снимитевсеметаллическиедеталиилиже
вложитебельевсетчатыймешочекили
наволочку.
• Выньтеизкармановвсепредметы(монеты,
ручки,скрепкиит.п.),вывернитеихи
очистите.Наличиепостороннихпредметов
можетпривестикповреждениюмашиныилик
сильномушумувовремяработы.
• Сложитемелкиевещи(детскиеносочки,
нейлоновыечулкиит.п.)всетчатыймешочек
илинаволочку.
• Гардиныследуетпомещатьвбарабанв
расправленном виде. Перед стиркой снимите с
них крепления.
• Застегнитемолнии,пришейтеослабленные
пуговицы,заштопайтедырыизашейте
разрывы.
• Используйтедлястиркиизделийсознаком
"машиннаястирка"или"ручнаястирка"
только соответствующие программы.
• Нестирайтевместецветноеибелоебелье.
Новоецветноебельеможетсильнолинять.
Стирайтеегоотдельно.
• Передстиркойнеобходимосоответствующим
образом обработать сильно загрязненные
местаипятна.Всомнительныхслучаях
23 RU
обратитесьвхимчистку.
• Используйтетолькотакиесредствадля
подкрашиванияиливосстановленияцвета
и средства для удаления накипи, которые
подходятдлямашиннойстирки.Обязательно
соблюдайте инструкции на упаковке.
• Стирайтебрюкиитонкоебелье,вывернув
наизнанку.
• Изделияизангорскойшерстипередстиркой
поместитенанесколькочасоввморозильную
камеру.Этоуменьшитскатываниешерсти.
• Белье,значительнозагрязненноемукой,
известью, сухим молоком и т.п., перед
загрузкойвмашинуследуетвытряхнуть.Со
временем загрязнения такого рода могут
накопиться на внутренних компонентах
машиныистатьпричинойееповреждения.
Правильный объем загрузки
Максимальныйобъемзагрузкизависитоттипа
белья, степени загрязнения и используемой
программы стирки.
Машинаавтоматическирегулируетобъемводыв
соответствии с весом загруженного белья.
A Используйтесведения,приведенныев
таблице"Описаниепрограмм".Превышение
допустимого объема загрузки приведет
кухудшениюкачествастирки,атакжек
повышеннойвибрацииишумувовремя
работымашины.
Загрузка белья
• Откройтедверцузагрузочноголюка.
• Расправьтебельеизагрузитееговмашину,не
утрамбовывая.
• Закройтедверцуиприжмитеее,чтобы
раздалсящелчокзамка.Следите,чтобы
белье не защемило дверцей.
C Во время выполнения программы дверца
загрузочноголюкаблокируется.Дверцуможно
открытьтолькочерезнекотороевремяпосле
завершенияпрограммы.
A Еслибельераспределеновбарабане
неправильно, это может привести к
повышеннойвибрацииишумувовремя
работымашины.
Использование моющего
средства и кондиционера
Распределитель моющих средств
Распределительмоющихсредствимееттри
отделения:
-(1)дляпредварительнойстирки
-(2)дляосновнойстирки
–(3)длякондиционера
–(*)вотделениидлякондиционераестьсифон.
1
23
C Распределителимоющихсредствбываютдвух
типов.Этозависитотмоделимашины.
Моющее средство, кондиционер и прочие
средства для стирки
• Передзапускомпрограммыстиркизагрузите
моющее средство и кондиционер.
• Неоткрывайтераспределительмоющих
средств во время выполнения программы
стирки!
• Еслииспользуетсяпрограммабез
предварительной стирки, не загружайте
моющее средство в отделение для
предварительнойстирки(отделение1).
• Прииспользованиипрограммыс
предварительной стиркой не загружайте
в отделение для предварительной стирки
жидкиемоющиесредства(отделение1).
• Невыбирайтепрограммуспредварительной
стиркой, если используется моющее средство
вспециальноммешочкеилираспределяющем
шарике.Поместитемоющеесредствов
специальноммешочкеилираспределяющий
шариквбарабанмашинысредибелья.
• Прииспользованиижидкогомоющего
средства поместите его в отделение для
основнойстиркивдозировочнойемкости
(отделение2).
Выбор моющего средства
Выбор типа моющего средства зависит от типа и
цвета ткани.
• Дляцветногоибелогобельяследует
использовать разные моющие средства.
• Длябелья,требующегобережногообращения,
следует использовать только специальные
моющие средства (жидкие средства, средства
дляшерстиит.д.).
• Длястиркиизделийизтемныхтканейи
лоскутных одеял рекомендуется использовать
жидкие моющие средства.
• Длястиркишерстяныхизделийследует
использовать только моющие средства,
предназначенныедляшерсти.
A Используйтетолькотемоющиесредства,
которыеспециальнопредназначеныдля
автоматическихстиральныхмашин.
A Неиспользуйтемыльныйпорошок.
Дозировка моющих средств
Дозировкамоющегосредствазависитот
количествабелья,степенизагрязненияи
жесткостиводы.Следуйтеинструкциямпо
дозировке на упаковке моющего средства.
• Непревышайтедозировку,рекомендованную
на упаковке моющего средства, во
избежаниеповышенногопенообразования,
некачественногополоскания,атакжедля
экономиисредстви,вконечномитоге,для
защиты окружающей среды.
• Длястиркинебольшогоколичестваслабо
загрязненногобельяиспользуйтеменьшее
количествомоющегосредства.
• Соблюдайтерекомендацииподозировке
концентрированных моющих средств.
Кондиционеры
Кондиционер следует загружать в
соответствующее отделение распределителя
моющих средств.
• Соблюдайтерекомендацииподозировкена
упаковке.
• Незагружайтекондиционервотделение
распределителявышеотметкимаксимального
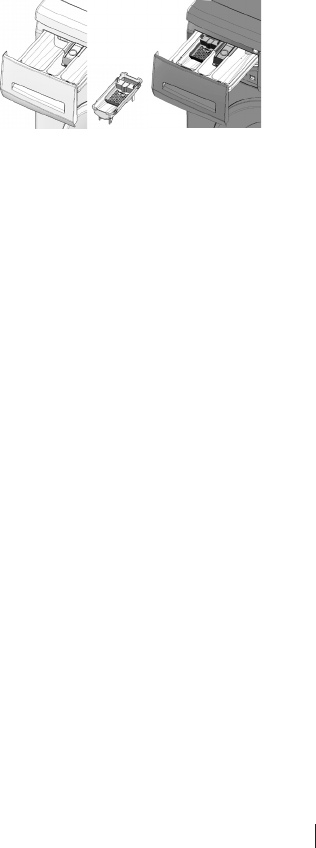
24 RU
уровня(>max<).
• Есликондиционерутратилтекучесть,перед
загрузкой в распределитель разбавьте его
водой.
Жидкие моющие средства
Если в комплект стиральной машины входит
дозировочная емкость
• Обязательнопоместитедозировочную
емкость для жидких моющих средств в
отделение 2.
• Используйтедозировочнуюемкость,
прилагаемую к моющему средству, и
соблюдайте инструкции на упаковке.
• Соблюдайтерекомендацииподозировкена
упаковке.
• Еслижидкоемоющеесредствоутратило
текучесть,передзагрузкойвраспределитель
разбавьте его водой.
Если дозировочная емкость не входит в
комплект стиральной машины
• Неиспользуйтежидкиемоющиесредства
для предварительной стирки в программах с
предварительной стиркой.
• Используйтедозировочнуюемкость,
прилагаемую к моющему средству, и
соблюдайте инструкции на упаковке.
• Приотложенномзапускежидкиемоющие
средства могут оставлять на белье пятна.
Еслииспользуетсяфункцияотложенного
запуска, жидкие моющие средства применять
не следует.
Гелеобразные и таблетированные моющие
средства
При использовании моющих средств в виде
таблеток, гелей и т.п. строго следуйте инструкциям
изготовителя на упаковке моющего средства
поприменениюидозировке.Еслинаупаковке
нет соответствующих инструкции, следуйте
приведенным ниже указаниям.
• Еслииспользуетсягелеобразноемоющее
средствотекучейконсистенции,новкомплект
стиральноймашиныдозировочнаяемкость
для жидкостей не входит, загрузите моющее
средство в отделение для основной стирки во
времяпервоначальногозаполнениямашины
водой.Есливкомплектстиральноймашины
входитдозировочнаяемкость,передзапуском
программы поместите моющее средство в
дозировочнуюемкость.
• Еслииспользуетсягустоегелеобразное
моющее средство или же используются
моющее средство в капсулах, поместите его
перед стиркой прямо в барабан.
• Моющиесредствавтаблеткахможно
помещать как в распределитель моющих
средств(отделениеII),такипрямовбарабан.
C При использовании моющих средств в
таблетках в отделении распределителя может
оставатьсянекотороеколичествомоющего
средства.Такоемоющеесредстволучше
помещать перед стиркой прямо в барабан
средибелья(внижнюючастьбарабана).
C Неиспользуйтегелеобразныеили
таблетированные моющие средства в
программах с предварительной стиркой.
Крахмал
• Жидкийилипорошкообразныйкрахмал,а
такжесредствадляподкрашивания,следует
загружать в отделение для кондиционера в
соответствии с указаниями на упаковке.
• Неиспользуйтеодновременнокондиционери
крахмал.
• Послеиспользованиякрахмалапротрите
барабанчистойвлажнойтканью.
Отбеливатели
• Выберитепрограммуспредварительной
стиркойидобавьтеотбеливательвначале
циклапредварительнойстирки.Неследует
загружать моющее средство в отделения
дляпредварительнойстирки.Можнотакже
выбрать программу с дополнительным циклом
полоскания и загрузить отбеливатель в
отделениедляосновнойстирки,когдамашина
набирает воду для первого цикла полоскания.
• Несмешивайтеотбеливательсмоющим
средством.
• Используйтенебольшоеколичество
отбеливателя(около50мл)итщательно
прополаскивайте белье, поскольку
отбеливатель может вызывать раздражение
кожи.Неналивайтеотбеливательнабельеи
не используйте его при стирке цветного белья.
• Прииспользованиикислородного
отбеливателя соблюдайте инструкции на
упаковке и выбирайте программу стирки при
низкой температуре.
• Кислородныеотбеливателиможно
использовать вместе с моющим средством.
Однакоеслиониотличаютсяпоконсистенции,
сначалазагрузитевотделениеIIмоющее
средство и подождите, пока оно смоется
водой.Затем,покамашинавсееще
набирает воду, добавьте в это же отделение
отбеливатель.
Использование средств для удаления накипи
• Принеобходимостииспользуйтесредства
для удаления накипи, специально
предназначенныедлястиральныхмашин.
• Строгособлюдайтеинструкциинаупаковке.

25 RU
Рекомендации по эффективной стирке
Белье
Светлое и белое Цветное Темное
Деликатные/
шерстяные/
шелковые изделия
(Рекомендуемый
температурный
диапазон в
соответствии со
степенью загрязнения:
40-90ºC)
(Рекомендуемый
температурный
диапазон в
соответствии со
степенью загрязнения:
холоднаявода–40ºC)
(Рекомендуемый
температурный
диапазон в
соответствии со
степенью загрязнения:
холоднаявода–40ºC)
(Рекомендуемый
температурный
диапазон в
соответствии
со степенью
загрязнения:
холоднаявода–30ºC)
Степень загрязнения
Значительное
загрязнение
(Трудновыводимые
пятна, как-то
от травы, кофе,
фруктов и крови.)
Можетвозникнуть
необходимость в
предварительной
обработке пятен
или стирке.
Рекомендуемыедля
стирки белого белья
порошкообразные
и жидкие моющие
средства можно
использовать
в дозировках,
подходящих для
стиркизначительно
загрязненных вещей.
Порошкообразные
моющие средства
рекомендуется
использовать для
выведения пятен от
глины и земли, а также
чувствительныхк
отбеливателям.
Рекомендуемыедля
стирки цветного белья
порошкообразные
и жидкие моющие
средства можно
использовать
в дозировках,
подходящих для
стиркизначительно
загрязненных вещей.
Порошкообразные
моющие средства
рекомендуется
использовать для
выведения пятен
от глины и земли, а
такжечувствительных
к отбеливателям.
Используйте
моющие средства,
не содержащие
отбеливатель.
Рекомендуемыедля
стирки цветного и
темного белья жидкие
моющие средства
можно использовать
в дозировках,
подходящих для
стиркизначительно
загрязненных вещей.
Отдавайте
предпочтение
жидким моющим
средствам для
стирки деликатных
вещей.Шерстяные
ишелковыевещи
следует стирать
специальными
моющими средствами,
предназначенными
для стирки
шерстяныхвещей.
Среднее
загрязнение
(Например, пятна
от прикосновения
тела на воротниках
и манжетах.)
Рекомендуемыедля
стирки белого белья
порошкообразные
и жидкие моющие
средства можно
использовать
в дозировках,
подходящих для стирки
средне загрязненных
вещей.
Рекомендуемыедля
стирки цветного белья
порошкообразные
и жидкие моющие
средства можно
использовать
в дозировках,
подходящих для стирки
средне загрязненных
вещей.Используйте
моющие средства,
не содержащие
отбеливатель.
Рекомендуемыедля
стирки цветного и
темного белья жидкие
моющие средства
можно использовать
в дозировках,
подходящих для стирки
средне загрязненных
вещей.
Отдавайте
предпочтение
жидким моющим
средствам для
стирки деликатных
вещей.Шерстяные
ишелковыевещи
следует стирать
специальными
моющими средствами,
предназначенными
для стирки
шерстяныхвещей.
Незначительное
загрязнение
(Без видимых
пятен.)
Рекомендуемыедля
стирки белого белья
порошкообразные
и жидкие моющие
средства можно
использовать
в дозировках,
подходящих для
стиркинезначительно
загрязненных вещей.
Рекомендуемыедля
стирки цветного белья
порошкообразные
и жидкие моющие
средства можно
использовать
в дозировках,
подходящих для
стиркинезначительно
загрязненных
вещей.Используйте
моющие средства,
не содержащие
отбеливатель.
Рекомендуемыедля
стирки цветного и
темного белья жидкие
моющие средства
можно использовать
в дозировках,
подходящих для
стиркинезначительно
загрязненных вещей.
Отдавайте
предпочтение
жидким моющим
средствам для
стирки деликатных
вещей.Шерстяные
ишелковыевещи
следует стирать
специальными
моющими средствами,
предназначенными
для стирки
шерстяныхизделий.

26 RU
4 Эксплуатация
Панель управления
1-Ручкавыборапрограмм(крайнееверхнее
положение–"Вкл./Выкл.")
2-Дисплей
3 - Кнопка отложенного запуска
4-Индикаторвыполненияпрограммы
5-Кнопка"Пуск/Остановка"
6-Кнопкидополнительныхфункций
7 - Кнопка регулировки скорости отжима
8 - Кнопка регулировки температуры
Подготовка стиральной машины
Проверьте,надежнолиподсоединенышланги.
Включитемашинувэлектрическуюсеть.
Полностью откройте кран. Загрузите белье
вмашину.Загрузитемоющеесредствои
кондиционер.
Выбор программы
1. Выберитепрограммуизтаблицы"Описание
программ" в соответствии с типом белья,
егоколичеством,степеньюзагрязненияи
температурой стирки.
90˚C
Сильнозагрязненныеизделия
избелойхлопчатобумажнойили
льняной ткани (салфетки, скатерти,
полотенца,простыниит.д.)
60˚C
Среднезагрязненноенелиняющее
бельеизхлопчатобумажныхили
синтетическиетканей(мужские
сорочки,ночныерубашки,пижамы
ит.п.),атакжеслабозагрязненное
белое льняное белье (например,
нижнеебелье).
40˚C-
30˚C-
Холодная
Изделияизсмесовыхтканей,
втомчислеизтонкихтканей
(например,тюлевыегардины),а
такжесинтетическиеишерстяные
изделия.
2. Выберите необходимую программу с помощью
кнопки выбора программы.
C Во всех программах задана максимальная
допустимая скорость отжима для данного
типа белья.
C При выборе программы следует
учитыватьтипткани,цвет,степень
загрязнения и допустимую температуру
стирки.
C Следуетвыбиратьминимальную
температуру, необходимую для стирки.
Чемвышетемпература–тембольше
энергопотребление.
C Подробные сведения о программах см. в
таблице"Описаниепрограмм".
Основные программы
Основныепрограммыстиркисоответствуют
различнымтипамткани.
• Хлопок
Рекомендуетсядлястиркиизделийизхлопка
(простыни,пододеяльники,наволочки,купальные
халаты,нижнеебельеит.п.).Этапрограмма
предусматривает длительный цикл стирки в
интенсивном режиме.
• Синтетика
Рекомендуетсядлястиркиизделийиз
синтетическихтканей(мужскиесорочки,блузы,
изделияизсмесовыхтканейтипахлопок/
синтетическоеволокноит.п.).Посравнению
спрограммой"Хлопок"этапрограмма
предусматривает менее интенсивный режим и
более короткий цикл стирки.
Длястиркишторитюлевыхгардинрекомендуется
программа"Синтетика40°С"сфункциями
1 2 3
4
5
6
8 7

27 RU
предварительной стирки и защиты от сминания.
Пристиркеизделийизтюляиз-засетчатой
структуры образуется обильная пена, поэтому в
отделение для основной стирки следует загружать
меньшемоющегосредства,чемобычно.Не
следует загружать моющее средство в отделения
для предварительной стирки.
• Шерстяные ткани
Рекомендуетсядлястиркиизделийизшерсти.
Температуру стирки изделий следует выбирать
всоответствииссимволаминаэтикетках.Для
стиркишерстяныхизделийследуетиспользовать
моющиесредства,специальнопредназначенные
дляшерсти.
Дополнительные программы
Встиральноймашинепредусмотрены
дополнительные программы для особых видов
стирки.
C Наборыдополнительныхпрограммвразных
моделяхстиральныхмашинотличаются.
• Хлопок Eco
Спомощьюэтойпрограммывыможетестирать
среднезагрязненныепрочныеизделияизхлопка
и льна при минимальном расходе электроэнергии
и воды по сравнению с другими программами,
которые подходят для стирки изделий из хлопка.
Фактическаятемператураводыможетотличаться
от указанной на маркировке или в документации.
Продолжительность выполнения программы может
бытьавтоматическисокращенанаболеепоздних
стадиях выполнения программы при условии
стиркименьшегоколичествабелья(например,½
загрузкиилименее).Вэтомслучаепотребление
электроэнергии и воды также будет снижено с
цельюобеспеченияболееэкономичнойстирки.
Функция представлена в определенных моделях
сопциейотображениявремени,оставшегосядо
завершениявыполняемойпрограммы.
• BabyProtect (Защита)
Предназначенадлястиркидетскогобельяибелья
людей,подверженныхаллергическимреакциям.
В этой программе используется более длительный
цикл нагрева, а также дополнительный цикл
полоскания,чтопозволяетповыситьуровень
гигиеничности.
• Ручная стирка
Предназначенадлястиркишерстяныхизделий
итонкогобельяссимволом"Машинная
стирка запрещена" на этикетке, и для которых
рекомендуетсяручнаястирка.Вэтойпрограмме
стирка выполняется в особо бережном режиме,
чтобынеповредитьбелье.
• Ежедневн. экспресс
Программа с сокращенным циклом для
стиркиизделийизхлопкаснезначительными
загрязнениями.
• Темные ткани
Предназначенадлястиркитемногобельяи
цветного белья, которое может полинять. В
этой программе стирка выполняется в менее
интенсивномрежимепринизкойтемпературе.Для
стирки темного белья рекомендуется использовать
жидкие моющие средства или средства для
шерсти.
• Смешанные 40 (Mix 40)
Предназначенадляодновременной
стирки изделий из хлопка и синтетики без
предварительной сортировки.
Специальные программы
Встиральноймашинепредусмотреныследующие
программы для особых функций.
• Полоскание
Отдельныйциклполоскания,которыйможно
использовать для прополаскивания или
подкрахмаливания белья.
• Отжим + слив
Отдельныйцикл,которыйможноиспользовать
для дополнительного отжима белья или для слива
водыизмашины.
Перед запуском этой программы нужно выбрать
необходимую скорость отжима, а затем запустить
программу,нажавкнопку"Пуск/Остановка".
Вначалевыполняетсяоткачкаводыизмашины,
азатем–отжимбельяпривыбраннойскоростии
откачкаотжатойводы.
Еслиотжимнетребуется,анужнотолько
откачатьводуизмашины,выберитепрограмму
"Слив+Отжим",затемспомощьюкнопки
регулировки скорости отжима выберите функцию
"Безотжима"инажмитекнопку"Пуск/Остановка".
C Длятонкогобельяследуетустанавливать
пониженную скорость отжима.
Выбор температуры
При выборе новой программы на индикаторе
температуры отображается максимальная
температура для данной программы.
Еслинужнопонизитьтемпературу,нажмитекнопку
регулирования температуры: температура будет
постепенно понижаться.
C Покапрограмманеначнетциклнагрева,
температуруможнопонизить,непереключая
машинуврежим"Остановка".
Выбор скорости отжима
При выборе программы на индикаторе скорости
отжима отображается скорость отжима,
рекомендованная для данной программы.
Еслинужноснизитьскоростьотжима,нажмите
кнопкурегулировкискоростиотжима:Скорость
отжима будет постепенно снижаться. После этого
в зависимости от модели на дисплее отобразятся
функции"Остановкасводой"и"Безотжима".
Подробное описание этих функций см. в разделе
"Дополнительныефункции".
C Покапрограмманеначнетциклотжима,
скорость отжима можно изменить, не
переключаямашинуврежим"Остановка".

28 RU
Таблица "Описание программ"
•: Возможностьвыбора
*: Устанавливаетсяавтоматически,отменитьнельзя.
**: Энергоэффективнаяпрограмма(стандартEN60456Ed.3)
***: Еслимаксимальнаяскоростьотжимастиральноймашиныменьшеэтогозначения,выборвозможен
только в пределах максимальной скорости отжима.
-: Максимальнаязагрузкауказанавописаниипрограммы.
C Фактическиезначениерасходаводыиэлектроэнергиимогутотличатьсяотуказанныхвтаблице
в зависимости от давления, температуры и жесткости воды, температуры окружающей среды,
типаиколичествабелья,использованиядополнительныхфункцийискоростиотжима,атакжеот
напряжения в сети электропитания.
C Времявыполнениявыбраннойпрограммыотображаетсянадисплеемашины.Фактическоевремя
стиркиможетнесколькоотличатьсяотзначениянадисплее.
C Набордополнительныхфункцийможетотличатьсяотприведенноговтаблицевзависимостиот
моделистиральноймашины.
**Программы«ХлопокEco40°C»и«ХлопокEco60°C»являютсястандартными.Этипрограммыименуются
«стандартнаяпрограммаХлопок40°C»и«стандартнаяпрограммаХлопок60°C».
RU 20
Программа
Максимальнаязагрузка(кг)
Расходводы(л)
Потреблениеэнергии(кВт/ч)
Макс.скорость***
Предварительная стирка
Быстраястрика
Дополнительноеполоскание
Противосминаемость
остановка с водой
замачивание
Удалениешерстидомашних
животных
Регулируемыйдиапазон
температур,°C
Хлопок 90769 2.15 1600 • • • • • • • Безнагрева-90
Хлопок 60 766 1.40 1600 • • • • • • • Безнагрева-90
Хлопок 40 766 0.70 1600 • • • • • • • Безнагрева-90
ХлопокEco 60** 748 1.00 1600 • 40-60
ХлопокEco 60** 3.5 39 0.82 1600 • 40-60
ХлопокEco 40** 3.5 39 0.80 1600 • 40-60
Ежедневн.экспресс 90 7 55 1.80 1400 • • Безнагрева-90
Ежедневн.экспресс 60 7 55 1.10 1400 • • Безнагрева-90
Ежедневн.экспресс 30 7 55 0.25 1400 • • Безнагрева-90
Темные ткани 40 3 70 0.50 800 * • Безнагрева-40
BabyProtect(Защита) 90784 2.15 1600 • * • • 30-90
Ручнаястирка 30141 0.15 600 Безнагрева-30
Шерстяныеткани 40 1.5 56 0.27 600 • • Безнагрева-40
Смешанные40(Mix40) 40 3 50 0.73 800 • • • • • • • Безнагрева-40
Синтетика 60 3 50 0.95 800 • • • • • • • Безнагрева-60
Синтетика 40 3 50 0.73 800 • • • • • • • Безнагрева-60

29 RU
Дополнительные функции
Нужныедополнительныефункцииследует
выбиратьпередзапускомпрограммы.Можно
выбирать можно только те дополнительные
функции, которые совместимы с выбранной
программой. Во время выполнения
программы также можно выбирать и отменять
дополнительныефункции,непереключаямашину
врежим"Остановка",еслиещененачалось
выполнение этапа, к которому относится
дополнительная функция.
Есливыборилиотменадополнительнойфункции
невозможны, индикатор соответствующей
функции выдаст предупреждение в виде
3-кратного мигания.
C Некоторыекомбинациифункцийвыбрать
невозможно.Вслучаевыборафункции,
несовместимой с функцией, выбранной ранее,
включаетсяфункция,выбраннаяпоследней,а
предыдущаяфункцияотменяется.Например,
если выбрать функцию "Предварительная
стирка",азатем–функцию"Быстрая
стирка", то будет использоваться только
функция"Быстраястирка",афункция
"Предварительная стирка" будет отменена.
C Еслидополнительнаяфункциянесовместима
с программой, выбрать ее нельзя (см. таблицу
"Описаниепрограмм").
C Кнопки выбора дополнительных функций
могут быть другими в зависимости от модели
стиральноймашины.
• Предварительная стирка
Предварительнаястирканужнатолькодляочень
грязногобелья.Неиспользуйтепредварительную
стиркубезнеобходимости,чтобысэкономить
электроэнергию, воду, моющие средства и время.
C Дляшторитюлевыхгардинрекомендуется
применять предварительную стирку без
моющего средства.
• Быстрая стрика
Этуфункциюможноиспользоватьспрограммами
"Хлопок"и"Синтетика"дляслабозагрязненного
белья,чтобысократитьвремястиркииколичество
циклов полоскания.
C При выборе этой дополнительной функции
следуетзагружатьвмашинуполовину
максимальногоколичествабелья,указанного
в таблице программ.
• Дополнительное полоскание
При использовании этой функции после основной
стирки в дополнение к предусмотренным циклам
полоскания выполняется еще один цикл. Таким
образом,уменьшаетсяопасностьраздражения
чувствительнойкожиостаткамимоющего
средства,чтоважнодлядетей,аллергиковидр.
• Противосминаемость
При использовании этой функции движения
барабана будет менее интенсивными, а скорость
отжимабудетснижена,благодарячемубельев
процессестиркибудетменьшемяться.Крометого,
стирка будет выполняться при более высоком
уровне воды.
• остановка с водой
Еслинетнеобходимостивыгружатьбельесразу
послезавершенияпрограммыстирки,можно
использовать функцию остановки с водой, и после
последнего полоскания оставить белье в воде,
чтобыпредотвратитьегосминание.Еслипосле
этого необходимо слить воду без отжима белья,
нажмитекнопку"Пуск/Остановка".Послеслива
водыпрограммавозобновитработуизакончит
цикл стирки.
Чтобы отжать оставленное в воде белье, выберите
скоростьотжимаинажмитекнопку"Пуск/
Остановка".
Программа возобновит работу и выполнит слив
водыиотжим,послечегоциклстиркизакончится.
• Замачивание
Прииспользованиифункциизамачиваниябелье
передначаломстиркинаходитсявводесмоющим
средством.Этопозволяетболееэффективно
удалить застарелую грязь.
• Удаление шерсти домашних животных
Предназначенадляболееэффективногоудаления
содеждыприлипшейкнейшерстиживотных.
При выборе этой функции к стандартной
программе добавляется цикл предварительной
стирки и дополнительный цикл полоскания.
Крометого,стиркавыполняетсявбольшем
количествеводы(+30%).Всеэтоспособствует
болееэффективнойочисткеодеждыотшерсти
животных.
A Запрещаетсямытьдомашнихживотныхв
стиральноймашине.
Отложенный запуск
Спомощьюфункции"Отложенныйзапуск"
можноотложитьначаловыполненияпрограммы
наопределенныйсрок(максимумна19часа).
Отсрочказапускаустанавливаетсясинтервалом
1час.
C При установке отложенного запуска не
используйтежидкиемоющиесредства!На
одежде могут появиться пятна.
Откройтедверцузагрузочноголюка,
положите белье и загрузите моющее средство
в распределитель. Выберите программу
стирки, температуру и скорость отжима. При
необходимости выберите дополнительные
функции.Установкивремяотсрочкиспомощью
кнопки"Отложенныйзапуск":инажмитекнопку
"Пуск/Остановка".Надисплеебудетпоказано
заданноевремязапуска,иначнетсяобратный
отсчетвремени.Приэтомсимвол"_"надисплее
рядом со временем запуска будет двигаться вверх-
вниз.
C Покаидетотсчетвремениотсрочки,можно
добавлять белье в бак.
Поистечениивремениотсрочкинадисплее
будет показана продолжительность выполнения
выбраннойпрограммы.Символ"_"исчезнетс
экрана,иначнетсявыполнениепрограммы.
Изменение интервала отложенного запуска
Изменениевременизапускавовремяобратного
отсчета
Нажмитекнопку"Отложенныйзапуск".При
каждомнажатиикнопкиинтервалувеличивается
на1час.Чтобысократитьвремяотсрочки,
последовательно нажимайте кнопку отложенного
запуска, пока на дисплее не будет показано
нужное время запуска программы.
Отмена функции отложенного запуска
Чтобыотменитьотсчетвремениотсрочкизапуска
и немедленно запустить программу, выполните

30 RU
следующие действия.
Установитенулевойинтервалвремениотсрочки
илиповернитеручкувыборапрограммвлюбое
положение. После этого функция отложенного
запускаотменяетсяииндикатор"Завершение/
Отмена"начинаетнепрерывномигать.Послеэтого
следует снова выбрать необходимую программу.
Длязапускапрограммынажмитекнопку"Пуск/
Остановка".
Запуск программы
Длязапускапрограммынажмитекнопку"Пуск/
Остановка".Включитсяиндикатор,указывающий,
чтопрограмманачалаработу.
C Есливпроцессевыборапрограммына
протяжении одной минуты не будет запущена
ни одна программа или не будет нажата ни
однакнопка,стиральнаямашинаперейдет
врежим"Остановка".Приэтомуменьшится
яркость индикаторов температуры, скорости
отжимаиблокировкидверцы.Остальные
индикаторыисимволыпогаснут.Если
повернутьручкувыборапрограммыили
нажать какую-либо кнопку, индикаторы и
символывключатсяснова.
Блокировка от детей
Используйтефункциюблокировкиотдетейдля
предотвращенияихвмешательствавработу
машины.Когдаэтафункциявключена,изменить
настройки выполняемой программы нельзя.
C Еслиповернутьручкувыборапрограммы,
когдавключенаблокировкаотдетей,на
дисплеепоявитсянадпись"Con".После
включенияблокировкиотдетейневозможно
изменить температуру и скорость отжима, а
также выбрать или отменить дополнительные
функции.
C Еслиповернутьручкувыборапрограммыв
другоеположение,когдавключенаблокировка
от детей, продолжается выполнение текущей
программы.
Включениярежимаблокировкиотдетей
Нажмитеодновременнопервуюивторуюкнопки
дополнительных функций и не отпускайте
ихвтечение3секунд.Покакнопкинажаты,
индикаторы обеих кнопок будут мигать, и на
дисплее будут последовательно появляться
надписи "C03", "C02", "C01". Затем на дисплее
появитсянадпись"Con",означающая,что
блокировкаотдетейвключена.Такаяженадпись
появитсянадисплеевтомслучае,еслипри
включеннойблокировкеотдетейповернуть
ручкувыборапрограммыилинажатькакую-либо
кнопку.Индикаторыпервойивторойкнопки
дополнительных функций, которые используются
для отмены блокировки от детей, мигнут по три
раза.
Отменарежимаблокировкиотдетей
Во время выполнения программы одновременно
нажмите первую и вторую кнопки дополнительных
функцийинеотпускайтеихвтечение3секунд.
Пока кнопки нажаты, индикаторы обеих кнопок
будут мигать, и на дисплее будут последовательно
появляться надписи "C03", "C02", "C01". Затем на
дисплеепоявитсянадпись"COFF",означающая,
чтоблокировкаотдетейвыключена.
C Еслиниоднаизпрограммневыполняется,
режим блокировки от детей можно также
отменить поворотом кнопки выбора программ
вположение"Вкл./Выкл."споследующим
выбором другой программы.
C Приперебояхподачиэлектроэнергииили
отключениимашиныотсети,блокировкаот
детейостаетсявключенной.
Ход выполнения программы
За ходом выполнения программы можно следить
с помощью индикатора выполнения программы.
Вначалекаждогоциклапрограммывключается
соответствующий индикатор, при этом индикатор
выполненного цикла гаснет.
В ходе выполнения программы можно изменить
выбор дополнительных функций, скорость отжима
и температуру без остановки выполняющейся
программы. Все изменения можно выполнять
толькодоначалаэтапа,ккоторомуотносятсяэти
изменения.Еслиизменениянесоответствуют
выполняемой программе, соответствующий
индикатор трижды мигнет.
C Еслимашинанепереходиткэтапуотжима,то
либовключенафункцияостановкисводой,
либосработаласистемаавтоматического
контроля балансировки из-за неравномерного
распределения белья внутри барабана.
Блокировка дверцы загрузочного люка
Дверцазагрузочноголюкастиральной
машиныснабженасистемойблокировки,
предотвращающей возможность открывания
дверцы при высоком уровне воды.
Припереключениимашиныврежимостановки
индикатордверцызагрузочноголюканачинает
мигать,имашинаопределяетуровеньводывбаке.
Еслиуровеньводыдопустимый,тоиндикатор
дверцызагрузочноголюканачнетсветиться
ровнымсветом,ичерез1-2минутыдверцуможно
будет открыть.
Еслиуровеньводынедопустимый,индикатор
дверцызагрузочноголюкагаснет,иоткрыть
дверцуневозможно.Еслитребуетсяоткрыть
дверцузагрузочноголюка,когдаиндикатор
дверцы не светится, нужно отменить выполняемую
программу(см.раздел"Отменапрограммы").
Изменение настроек после
запуска программы
Переключение машины в режим остановки
Чтобы во время выполнения программы
переключитьстиральнуюмашинуврежим
остановкиследуетнажатькнопку"Пуск/
Остановка".Индикаторэтапастирки,который
выполнялсянамоментостановки,начнетмигать,
предупреждаяопереключениимашиныврежим
остановки.
Еслиприэтомможнооткрытьдверцузагрузочного
люка,кромеиндикатораэтапастиркивключитсяи
будет светиться ровным светом индикатор дверцы.
Изменение скорости отжима и температуры
для дополнительных функций.
Наразныхэтапахвыполненияпрограммы
можновключатьилиотменятьтеилииные
дополнительные функции (см. раздел
"Дополнительныефункции".
Кроме того, можно изменять скорость отжима и
температуру стирки (см. разделы "Выбор скорости
отжима" и "Выбор температуры".
C Еслиизменениенастроекзапрещено,
соответствующий индикатор трижды мигнет.
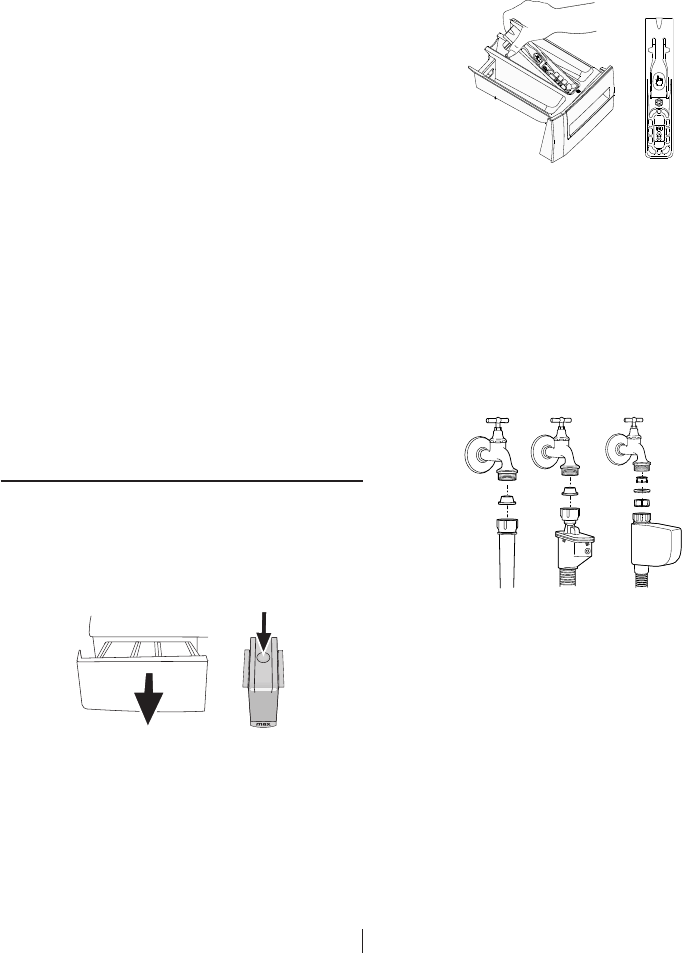
31 RU
Добавление или извлечение белья
Нажмитекнопку"Пуск/Остановка",чтобы
переключитьмашинуврежимостановки.
Индикаторэтапастирки,которыйвыполнялсяна
моментостановки,начнетмигать.
Подождите, пока можно будет открыть дверцу
загрузочноголюка.Откройтедверцуидобавьте
иливыньтебелье.Закройтедверцузагрузочного
люка. При необходимости измените настройки
дополнительных функций, температуры и
скоростиотжима.Длязапускапрограммы
нажмитекнопку"Пуск/Остановка".
Отмена программы
Чтобы отменить программу, поверните
ручкувыборапрограммывположение,
соответствующее другой программе. Выбранная
ранее программа будет отменена. После отмены
программыиндикатор"Завершение/Отмена"
начнетнепрерывномигать.
Независимоотэтапавыполненияпрограммы
иналичияводывмашинына1-2минуты
включитсянасосдляоткачкиводы.Послеэтого
можно запускать другую программу с первого
этапа.
C В зависимости от того, на каком этапе
была отменена предыдущая программа,
после выбора и запуска новой программы,
возможно, потребуется добавить моющее
средство и кондиционер.
Завершение программы
Послезавершенияпрограммынадисплее
появитсянадпись"End",Дождитесь,пока
индикатордверцызагрузочноголюканачнет
светиться ровным светом. После этого
выключитемашинувыключателем.Выньтеиз
машиныбельеизакройтедверцузагрузочного
люка.Послеэтогомашинаготоваквыполнению
следующей стирки.
5 Обслуживание и чистка
Регулярнаячисткаприборапозволитпродлить
срок его службы и избежать многих проблем.
Чистка распределителя
моющих средств
Регулярно(послекаждых4-5стирок)очищайте
распределительмоющихсредств,чтобы
избежатьотложенийстиральногопорошка.
Чтобывынутьизмашиныраспределитьмоющих
средств, нажмите на сифоне в отделении для
кондиционеранаточку,указаннуюпунктиром,и
потяните распределитель на себя.
CЕсливотделениидлякондиционера
начинаетскапливатьсясмесьводы
и кондиционирующего средства,
превышающаянормальныйобъем,сифон
следуеточистить.
Промойте распределитель моющих средств
исифонвраковинебольшимколичеством
теплойводы.Причисткераспределителя
надевайтезащитныеперчаткиилипользуйтесь
специальнойщеткой,чтобынеприкасаться
костаткаммоющихсредств.Послечистки
вставьте распределитель на место и проверьте,
правильно ли он установлен.
Есливашраспределительмоющихсредств
такой, как показано на рисунке:
C Поднимитезаднюючастьсифона,чтобы
его вынуть, как показано на рисунке. После
выполнениявышеупомянутыхпроцедур
чисткисноваустановитесифоннаместо
ивдвиньтеегопереднюючастьвнизтак,
чтобызащелкнулсястопорныйязычок.
Очистка фильтров впускных патрубков
Фильтры находятся на концах впускных
патрубковдляводыназаднейстенкемашины,
атакженаконцахзаливныхшланговвместах
подсоединения к водопроводным кранам.
Этифильтрыпредотвращаютпопаданиев
стиральнуюмашинупостороннихвеществи
грязи из водопровода. По мере загрязнения
фильтрыследуеточищать.
Закройтекраны.Снимитегайкиназаливных
шлангахдлядоступакфильтрамвовпускных
патрубках.Очиститеихподходящейщеточкой.
Еслифильтрысильнозагрязнены,ихможно
вытащитьплоскогубцамиипочистить.Извлеките
фильтрыизпрямыхконцовзаливныхшлангов
вместе с прокладками и тщательно промойте под
струейводы.Аккуратноустановитепрокладки
ифильтрынаместоизатянитегайкишлангов
вручную.
Слив оставшейся воды и
очистка фильтра насоса
Стиральнаямашинаоснащенасистемой
фильтров, которая предотвращает попадание в
крыльчаткунасосатвердыхпредметов(пуговиц,
монет,волоконтканиит.п.)вовремясливаводы.
Этообеспечиваетбеспрепятственныйсливводы
и позволяет продлить срок службы насоса.
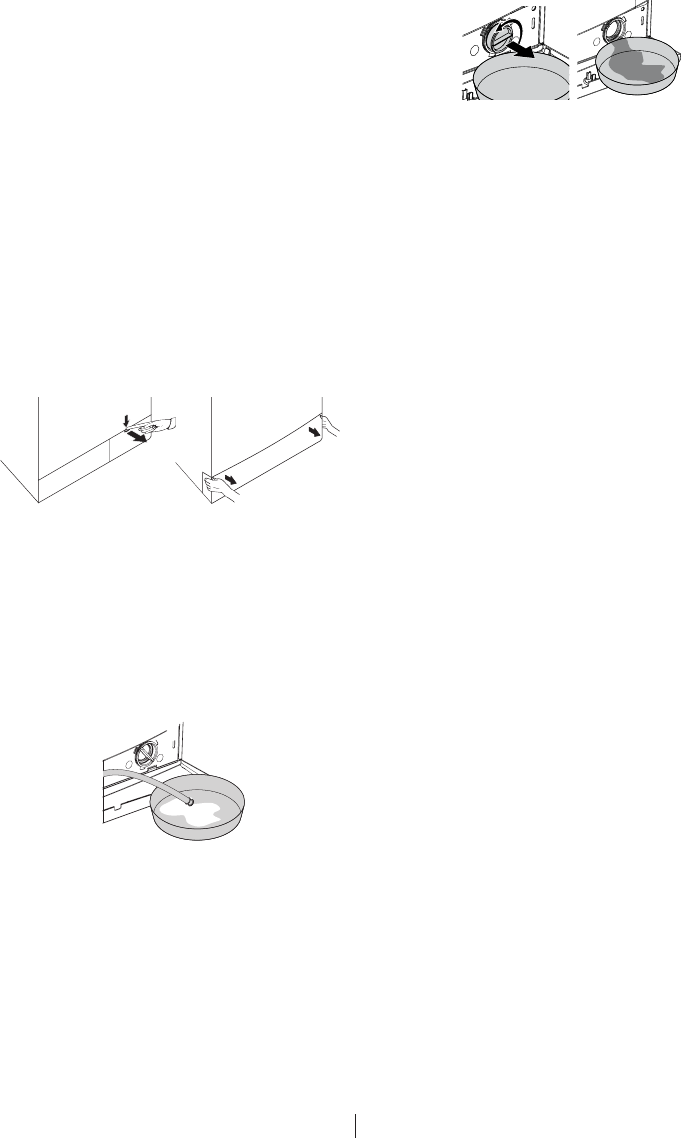
32 RU
Поставьте перед фильтром вместительную
емкость для слива воды. Понемногу
поворачивайтефильтрнасосапротивчасовой
стрелки,поканеначнетвыливатьсявода.Слейте
воду в установленную перед фильтром емкость.
Всегда держите под рукой тряпку для сбора
пролитой воды. Когда вода перестанет вытекать,
полностью выверните фильтр и выньте его из
машины.Очиститевнутреннюючастьфильтраи
пространствовокругкрыльчаткинасосаотмусора
и волокон. Вставьте фильтр на место.
A Еслимашинаимеетструйнуюсистему,плотно
вставьте фильтр на место в корпусе насоса.
Неприлагайтечрезмерныеусилияпри
установке фильтра в корпус. Фильтр должен
бытьвставленполностью,иначечерез
крышкуфильтрабудетпросачиватьсявода.
Чтобызакрытькрышкуфильтра,состоящуюиз
двухчастей,прижмитевыступнакрышке.Чтобы
закрытьцельнуюкрышкуфильтра,сначала
вставьтенаместовыступыснизукрышкиизатем
прижмитеверхнюючастькрышки.
Еслисливневыполняетсянормально,значит,
фильтрнасосазасорен.Фильтрследуеточищать
по мере загрязнения, но не реже одного раза
в3месяца.Передочисткойфильтранасоса
необходимо слить воду.
Кроме того, необходимо полностью сливать воду
измашиныпередтранспортировкой(например,
припереездевдругуюквартиру)иливслучае
опасности замерзания воды.
A Наличиепостороннихпредметоввфильтре
насоса может привести к повреждению
машиныиликсильномушумувовремя
работы.
Чтобыслитьводуиочиститьзагрязненный
фильтр, выполните следующее:
Отключитемашинуотэлектрическойсети(выньте
вилкуизрозетки).
A Температураводывмашинеможетдостигать
90 ºC. Во избежание ожогов дождитесь, пока
водавмашинеостынет.
Откройтекрышкуфильтра.
Есликрышкасостоитиздвухчастей,
прижмитевыступкрышкифильтраи
извлеките ее, потянув на себя.
Есликрышкафильтрацельная,откройтеее,
потянув двумя руками за верхний край.
C Чтобыснятькрышкуфильтра,можнослегка
прижать ее каким-либо инструментом с
тонкимпластиковымнаконечником,вставив
еговщельнадкрышкой.Неиспользуйте
дляоткрываниякрышкиинструментыс
металлическиминаконечниками.
Некоторыемоделиоснащенышлангомаварийного
сливаводы.Чтобыслитьводуизмашины,
выполните описанные ниже действия.
Сливводывмоделях,оснащенныхшлангом
аварийного слива:
Выньтешлангаварийногосливаизотсека.
Поместитеподконецшлангавместительную
емкость.Выньтепробкунаконцешлангаислейте
воду.Когдаемкостьнаполнится,закройтешланг
пробкой. Вылейте воду из емкости и повторяйте
описаннуювышепроцедуру,покаводанебудет
полностьюслитаизмашины.Послеокончания
сливазакройтешлангпробкойиуложитеегона
место. Поверните фильтр насоса и выньте его.
Сливводывмоделях,неоснащенныхшлангом
аварийного слива:
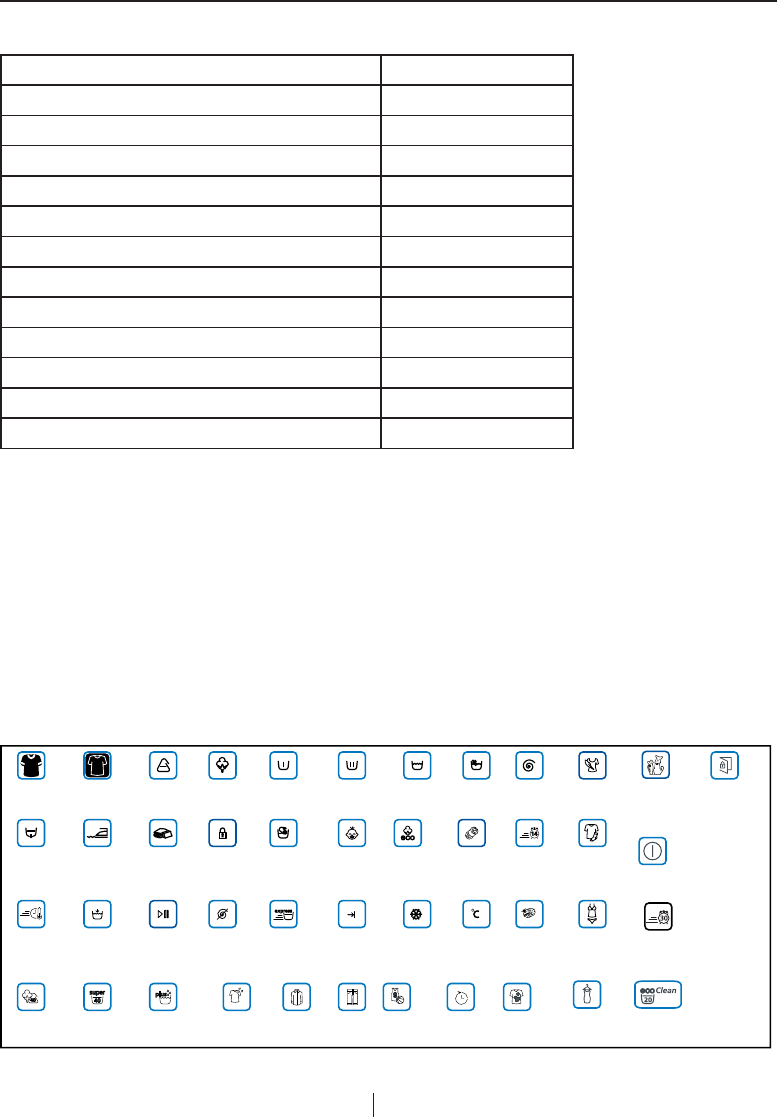
33 RU
6 Технические характеристики
C Приповышениикачестваизделиятехническиехарактеристикимогутбытьизмененыбез
предварительного уведомления.
C Рисункивданномруководствеявляютсяупрощеннымиимогутневполнесоответствовать
конкретному изделию.
C Данные,указанныенаэтикеткахизделияивсопроводительнойдокументации,полученыв
лабораторныхусловияхсогласносоответствующимстандартам.Этиданныемогутбытьинымив
зависимости от условий эксплуатации изделия.
Модели(RU)
Макс.загрузкасухогобелья(кг)
Высота(см)
Ширина(см)
Глубина(см)
Веснетто(±4кг)
Электропитание(В/Гц)
Ток(А)
Потребляемаямощность(Вт)
Макс.скоростьотжима(об./мин.)
Энергопотреблениеврежимеожидания(Вт)
Энергопотреблениеввыключенномсостоянии(Вт)
Классэнергетическойэффективности
Темные ткани Темные ткани Синтетика Хлопок Предварите
льная
стирка
Основная
стирка
Полоскание Стирка Отжим
Слив
(насос)
Противосмина
емость
Одеяло
(теплое одеяло)
(Постельное
белье)
Блокировка
от детей
Ручная
стирка
Защита
(BabyProtect)
Хлопок
Эконом. Шерстяные
изделия
(Шерстяные
ткани)
Деликатные
ткани
Ежедневн.
Нижнее
белье
Экспресс 14
Супер
короткая
экспресс
Ежедневн.
экспресс
Остановка с
водой
Пуск /
Пауза
Без
отжима
Быстрая
стирка
Завершена Холодная
(Без нагрева)
Очистка
барабана
Температура
Смешанные
40
Супер 40 Дополнительное
полоскание
Освежить Рубашки Джинсы Спорт
(sports)
Отстроченная
стирка
Интенсивная Fasion
care
Удаление
шерсти
домашних
животных
mini 30
Экостирка
(Эко-очистка)
(Eco Clean)
Вкл./Выкл
дверь готова
WMB71031PTM
7
84
60
50
63
230V/50Hz
10
2200
1000
1.35
0.25
A

Изготовитель:«ArcelikA.S.»
Юридическийадрес:КараачДжаддеси№2-634445СютлюджеСтамбул,Турция(Karaağaç CaddesiNo:2-6
Sütlüce,34445,Turkey)
Произведено в Турции
ИмпортернатерриторииРФ:ООО«БЕКО»
Юридическийадрес:601010,Владимирскаяобласть,Киржачскийрайон,завод«БЕКО»
ИнформациюосертификациипродуктаВыможетеуточнить,позвонивнагорячуюлинию
8-800-200-23-56.
Датапроизводствавключенавсерийныйномерпродукта,указанныйнаэтикетке,расположеннойна
продукте,аименно:первыедвецифрысерийногономераобозначаютгодпроизводства,апоследниедве
–месяц.Например,”10-100001-05»обозначает,чтопродуктпроизведенвмае2010года.
Наданноеизделиенанесенсимволизбирательнойсортировкидляотходов
электрическогоиэлектронногооборудования(WEEE).
Этозначит,чтосданнымизделиемследуетобращатьсявсоответствиис
ЕвропейскойДирективой2002/96/ECсцельюегопереработкиилиразборкидля
уменьшенияотрицательноговоздействиянаокружающуюсреду.Задополнительной
информацией обратитесь в местные или региональные органы власти.
Электроннаятехника,невключеннаявпроцессизбирательнойсортировкиотходов,
представляет потенциальную опасность для окружающей среды и здоровья людей
из-заналичиявнейопасныхвеществ.

35 RU
7 Устранение неисправностей
Невозможнозапуститьиливыбратьпрограмму.
• Стиральнаямашинапереключиласьврежимсамозащитыиз-занарушенияподачиводыили
электроэнергии(например,падениенапряжениявсети,давленияводыит.п.).>>>Нажмите
кнопку"Пуск/Остановка"инеотпускайтевтечение3секунд,чтобывосстановитьзаводские
настройкимашины(см.раздел"Отменапрограммы").
Вмашинеестьвода.
• Встиральноймашинеможетоставатьсянемноговоды,использовавшейсявпроцессеконтроля
качестванапредприятии-изготовителе.>>>Этонеявляетсянеисправностьюинепредставляет
опасностидлямашины.
Машинасильновибрируетилишумит.
• Машинастоитнеустойчиво.>>>Отрегулируйтеножки,чтобывыровнятьмашину.
• Вфильтрнасосапопалпостороннийпредмет.>>>Очиститефильтрнасоса.
• Неснятытранспортировочныепредохранительныеболты.>>>Удалитетранспортировочные
предохранительные болты.
• Загруженослишкоммалобелья.>>>Загрузитевмашинубольшебелья.
• Загруженослишкоммногобелья.>>>Выньтеизмашинычастьбельяилираспределитеего
равномерновручную.
• Машинанаклонена,посколькуподножкупопалпостороннийпредмет.>>>Уберитепосторонний
предмет,чтобывыровнятьмашину.
Машинаостановиласьвскорепослезапускапрограммы.
• Стиральнаямашинаможетвременноостановитьсяиз-западениянапряжениявсети.>>>Она
возобновит работу после восстановления нормального напряжения.
Непроизводитсяобратныйотсчетвремени,оставшегосядоокончанияпрограммы(вмоделяхс
дисплеем).
• Таймерможетостановитьсянаэтапенабораводы.>>>Индикатортаймеранепоказывает
обратныйотсчет,покамашинаненаберетнеобходимоеколичествоводы.Машинаожидает,
поканенаберетсядостаточноеколичествоводы,чтобыизбежатьнекачественнойстиркииз-за
недостаткаводы.Послеэтоготаймервозобновитобратныйотсчет.
• Таймерможетостановитьсянаэтапенагреванияводы.>>>Индикатортаймеранепоказывает
обратныйотсчет,покаводавмашинененагреетсядонужнойтемпературы.
• Таймерможетостановитьсянаэтапеотжима.>>>Возможно, сработала система
автоматическогоконтролябалансировкииз-занеравномерногораспределениябельявнутри
барабана.
C Еслибельевбарабанераспределенонеравномерно,машинанепереключаетсянаотжим
воизбежаниеповреждениясамоймашиныиокружающихпредметов.Бельеследует
перераспределить и снова запустить отжим.
Израспределителямоющихсредстввыходитпена.
• Слишкоммногомоющегосредства.>>>Размешайте1столовуюложкукондиционерав0,5литра
воды и залейте в отделение основной стирки распределителя моющих средств.
C Используйтемоющиесредства,соотвествующиепрограммамстирки,сучетомнормзагрузки
белья(см.таблицу"Описаниепрограмм").Прииспользованиидополнительныхсредств,таких
какпятновыводители,отбеливателиит.п.,количествомоющегосредстваследуетуменьшить.
Послезавершенияпрограммыбельеостаетсямокрым
• Возможно,из-заизбыточногоколичествамоющегосредстваобразоваласьобильнаяпена,
ивключиласьавтоматическаясистемаконтроляпенообразования.>>>Используйте
рекомендованноеколичествомоющегосредства.
C Еслибельевбарабанераспределенонеравномерно,машинанепереключаетсянаотжим
воизбежаниеповреждениясамоймашиныиокружающихпредметов.Бельеследует
перераспределить и снова запустить отжим.
A Еслиспомощьюэтихрекомендацийустранитьпроблемунеудается,обратитесьвфирменный
сервисныйцентр.Непытайтесьотремонтироватьнеисправныйприборсамостоятельно.
2820522485_RU/240312.0901

37 ES
1 Instrucciones importantes
sobre seguridad
Esta sección contiene instrucciones sobre
seguridadqueleayudaránaprotegerse
de posibles riesgos de lesiones o daños a
la propiedad. La no observancia de estas
instruccionesinvalidarálagarantía.
Seguridad general
• Losniñosmayoresde8añosylaspersonas
sin experiencia o con discapacidad
física,sensorialomentalpuedenutilizar
este aparato, siempre y cuando sean
supervisadosporunapersonaquese
responsabilice de su seguridad y les facilite
información acerca de su uso y de los
peligrosasociados.Nopermitaquelosniños
manipulen el aparato o jueguen con él. Nunca
deje las tareas de limpieza y mantenimiento
de usuario en manos de niños, a no ser
queesténbajolasupervisióndeunadulto
responsable.
• Nuncacoloqueelaparatosobreuna
alfombra,yaquelafaltadeflujodeaire
pordebajodelaparatoprovocaríael
sobrecalentamiento de las piezas eléctricas,
conelconsiguienteriesgodeavería.
• Nopongaelaparatoenfuncionamientosiel
cableoelenchufeestándañados.Enese
caso, llame al agente de servicio autorizado.
• Hagaqueunelectricistacualificadoinstale
un fusible de 16 amperios en su instalación
eléctrica.
• Sielaparatopresentaalgunaanomalía,nolo
usehastaquenohayasidoreparadoporel
agentedeservicioautorizado,yaqueexiste
riesgo de descarga eléctrica.
• Esteaparatoestádiseñadoparareanudar
su funcionamiento una vez restablecido
el suministro eléctrico después de una
interrupción del mismo. Si desea cancelar
el programa en curso, consulte la sección
"Cancelación del programa".
• Conectelalavadoraaunenchufeprovisto
de toma de tierra y protegido por un fusible
conforme a los valores indicados en la tabla
de especificaciones técnicas. Tenga en
cuentaquelainstalacióndetomadetierra
de su hogar debe realizarla un electricista
cualificado.Nuestraempresanosehará
responsable de daños provocados por el
uso de la lavadora sin una toma de tierra
conforme a las normativas locales.
• Lasmanguerasdetomayevacuaciónde
agua deben estar firmemente acopladas y
libres de daños. En caso contrario, existe el
riesgo de fugas de agua.
• Jamásabralapuertadecarganiquiteel
filtromientrashayaaguaeneltambor.De
locontrariocorreráelriesgodesufriruna
inundaciónydequemarseconelagua
caliente.
• Nointenteabriralafuerzalapuertadecarga
siestábloqueada.Lapuertasedesbloqueará
transcurridos unos minutos desde la
finalización del ciclo de lavado. Si fuerza la
aperturadelapuertadecarga,puedeque
dañe el mecanismo.
• Desenchufeelaparatocuandonoloutilice.
• Jamáslaveelaparatorociándoloconagua,
yaqueexisteriesgodedescargaeléctrica.
• Nuncatoqueelenchufeconlasmanos
húmedas. Nunca desenchufe el aparato
tirando del cable, tire siempre del enchufe.
• Useúnicamentedetergentes,suavizantesy
suplementos aptos para su uso en lavadoras
automáticas.
• Sigalasinstruccionesdelasetiquetasdelas
prendas y los envases de detergente.
• Elaparatodebeestardesenchufado
durante los procedimientos de instalación,
mantenimiento, limpieza y reparación.
• Dejesiemprelosprocedimientosde
instalación y reparación en manos del
agente de servicio autorizado. El fabricante
noseharáresponsabledelosposibles
daños derivados de la realización de dichos
procedimientos por parte de personas no
autorizadas.
Uso previsto
• Esteaparatohasidodiseñadoparauso
doméstico. No es adecuado para un uso
comercialynodebedárseleotrosusos
distintos del uso previsto.
• Elaparatosólodebeusarseparalavary
aclararprendascuyaetiquetaindiqueque
son aptos para lavadora.
• Elfabricantedeclinatodaresponsabilidad
derivada de un uso o transporte incorrectos.
Seguridad infantil
• Losaparatoseléctricossonpeligrosos
para los niños. Manténgalos alejados del
aparato cuando esté en funcionamiento y no
permitaquelomanipulen.Uselafunciónde
bloqueoparaniñosparaevitarquelosniños
manipulen el aparato.
• Noolvidecerrarlapuertadecargaal
abandonar la estancia en donde esté
instalado el aparato.
• Guardetodoslosdetergentesyaditivosen
un lugar seguro y fuera del alcance de los
niños.
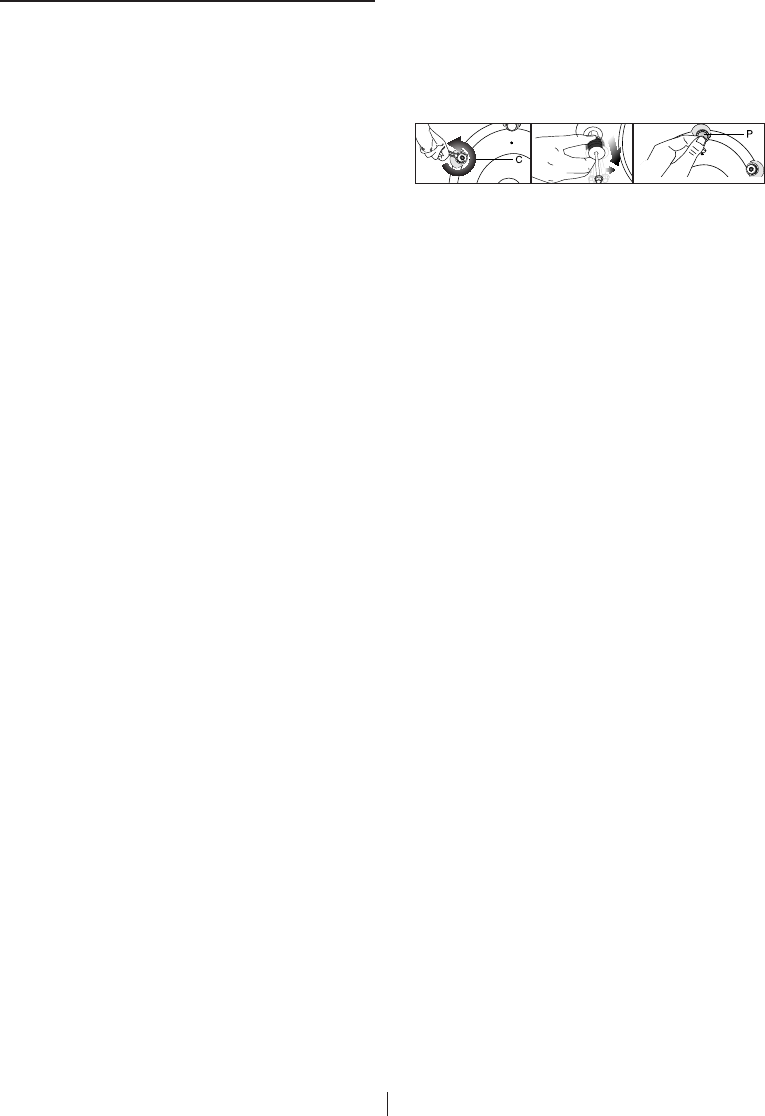
38 ES
2 Instalación
Dejelainstalacióndelalavadoraenmanosdel
agentedeservicioautorizadomáscercano.
Para preparar la lavadora para su uso, consulte
la información del manual de usuario y antes de
llamar al agente de servicio autorizado asegúrese
dequelossistemasdesuministrodeaguay
electricidadasícomoelsistemadedesagüesean
adecuados. Si no lo fuesen, solicite a un técnico
y a un fontanero cualificados la realización de las
adaptaciones pertinentes.
C La preparación del lugar de instalación,
asícomodelospuntosdeconexiónalas
redeseléctrica,deaguaydedesagüeson
responsabilidad del cliente.
B La instalación y las conexiones eléctricas
del aparato deben dejarse en manos de un
agente de servicio autorizado. El fabricante
noseharáresponsabledelosposibles
daños derivados de la realización de dichos
procedimientos por parte de personas no
autorizadas.
A Antes de proceder a la instalación,
compruebe visualmente si la lavadora
presenta algún defecto. En caso afirmativo,
no lo instale. Los aparatos dañados pueden
poner en peligro su seguridad.
C Asegúresedequenilasmanguerasdetoma
deaguaydedesagüenielcableeléctrico
se doblen, pincen o retuerzan al colocar la
lavadora en su lugar tras los procedimientos
de instalación o limpieza.
Ubicación adecuada
para la instalación
• Coloquelalavadorasobreunpisosólido.No
coloquelalavadorasobrealfombrasdepelo
o superficies similares.
• Elpesototaldelalavadoraconlasecadora
situada encima alcanza a plena carga los
180kilogramosaproximadamente.Coloque
lalavadorasobreunpisosólidoyplanoque
tenga una capacidad de carga suficiente.
• Nocoloquelalavadorasobredelcablede
alimentación.
• Noinstalelalavadoraenlugaresenlosquela
temperaturapuedaserinferioralos0ºC.
• Coloquelalavadoraaunadistanciadeal
menos 1 cm respecto de los bordes de otros
muebles.
Retirada de los refuerzos de embalaje
Inclinelalavadorahaciaatráspararetirarestos
refuerzos. Retire los refuerzos de embalaje tirando
de la cinta.
Retirada de las trabas de transporte
A No retire las trabas de transporte sin haber
retirado antes los refuerzos de embalaje.
A Retire los pernos de transporte de seguridad
antes de utilizar la lavadora; de lo contrario,
éstaresultarádañada.
1. Suelte todos los pernos con una llave hasta
quegirenlibremente(C).
2. Retire los pernos de seguridad para
transporte haciéndolos girar con suavidad.
3. Insertelascubiertasdeplásticoque
encontraráenlabolsaquecontieneelmanual
del usuario en los orificios del panel posterior.
(P)
C Guardelospernosdeseguridadenunsitio
seguro para volver a usarlos en el futuro
cuando deba transportar de nuevo la
lavadora.
C Jamástransportelalavadorasinlospernos
de seguridad firmemente colocados en su
sitio.
Conexión del suministro de agua
C Lapresiónrequeridaparaelfuncionamiento
delalavadoraesdeentre1y10bares(0,1
a10MPa).Paraquelalavadorafuncione
sin inconvenientes, el grifo abierto debe
suministrarunflujode10a80litrosdeagua
porminuto.Instaleunaválvulareductoradela
presión si la presión del agua fuese mayor.
C Si va a utilizar su lavadora de doble toma de
agua como unidad de una sola toma de agua
(fría),debeinstalareltapónsuministradojunto
conlalavadoraenlaválvuladelaguacaliente
antes de utilizarla. (Afecta a los aparatos
suministrados con un grupo de tapón ciego.)
C Si va a utilizar las dos tomas de agua de
la lavadora, conecte la manguera del agua
caliente tras retirar el conjunto de tapón y
juntadelaválvuladelaguacaliente.(Afectaa
los aparatos suministrados con un grupo de
tapón ciego.)
A Los modelos con una sola toma de agua no
deben conectarse al grifo de agua caliente.
Dehacerlo,lasprendassufriríandañosobien
lalavadorapasaríaalmododeproteccióny
nofuncionaría.
A No utilice mangueras de agua viejas o
usadasensunuevalavadora,yaquepodrían
ocasionar la aparición de manchas en sus
prendas.
1. Conecte las mangueras especiales
suministradas junto con la lavadora a las
válvulasdetomadeaguadelalavadora.La
mangueraroja(izquierda,máximo90ºC)es
para la toma de agua caliente, y la manguera
azul(derecha,máximo25ºC)esparalatoma
deaguafría.
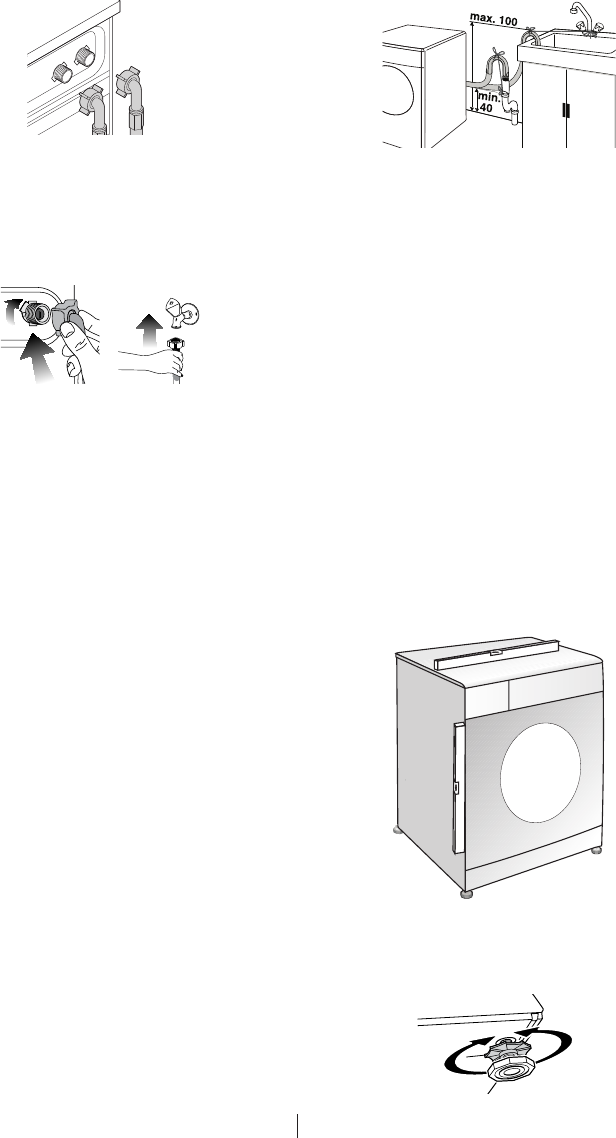
39 ES
A Asegúresedequelasconexionesdeagua
calienteyfríaesténbienhechascuando
seinstalelalavadora.Delocontrario,sus
prendaspodríanquedarcalientesalfinaldel
proceso de lavado y sufrir deterioro.
2. Apriete todas las tuercas de las mangueras a
mano.Jamásutiliceunallaveparaapretarlas
tuercas.
3. Abra completamente los grifos tras realizar la
conexión de la manguera para comprobar si
existe alguna fuga de agua en los puntos de
conexión. Si observa una fuga de agua, cierre
el grifo y retire la tuerca. Vuelva a apretar la
tuerca cuidadosamente tras comprobar el
sello. Para evitar fugas de agua y posibles
daños derivados, mantenga los grifos
cerrados cuando no utilice la lavadora.
Conexión al desagüe
• Elextremodelamangueradedesagüedebe
conectarsedirectamentealdesagüeoal
fregadero.
A Si la manguera se sale de su alojamiento
durante la evacuación del agua, su hogar
podríasufrirunainundaciónyustedpodría
quemarsedebidoalasaltastemperaturas
quealcanzaelaguaduranteellavado.Para
evitarestosriesgos,yparagarantizarque
la lavadora toma y evacúa el agua de forma
correcta, fije con firmeza el extremo de la
mangueradedesagüeparaevitarquepueda
salirse de su sitio.
• Lamangueradebecolocarseaunaalturade
entre40y100cm.
• Encasoquelamangueraseelevetras
colocarlaaniveldelsueloobienquede
muycercadelsuelo(amenosde40cm),la
evacuacióndeaguaresultarámásdificultosa
ylacoladapuedequedarexcesivamente
húmeda. Por lo tanto, respete las alturas
indicadas en la ilustración.
• Paraevitarelreflujodeaguasuciaalinterior
delalavadorayfacilitareldesagüe,no
sumerja el extremo de la manguera en el
aguasucianilainserteeneldesagüemásde
15 cm. Si la manguera es demasiado larga,
córtela a la longitud adecuada.
• Asegúresedequeelextremodelamanguera
noquededoblado,nohayaningúnobjeto
sobreélniquedepinzadoentreeldesagüey
la lavadora.
• Silamangueraesdemasiadocorta,añádale
una extensión de manguera original. La
manguera no debe superar los 3,2 m
de longitud. Para evitar fugas de agua,
es preciso conectar adecuadamente la
manguera de extensión y la manguera
dedesagüedelalavadoramedianteuna
abrazadera.
Ajuste de los pies
A Paraquesulavadorafuncionedeforma
silenciosa y sin vibraciones, debe estar
colocadadeformaniveladayequilibrada
sobresuspies.Equilibrelalavadora
ajustandolospies.Delocontrario,es
posiblequelalavadorasemuevadesusitio,
causando golpes y vibraciones.
1. Afloje con la mano las tuercas de las patas.
2. Ajustelaspatashastaquelalavadoraquede
correctamente nivelada.
3. Apriete de nuevo todas las tuercas de las
mangueras con la mano.
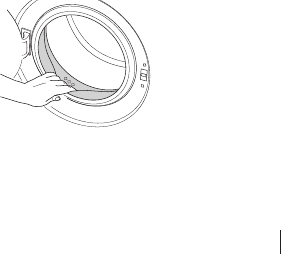
40 ES
A No utilice ninguna herramienta para aflojar las
tuercas,yaquepodríadañarlas.
Conexión eléctrica
Conecte la lavadora a un enchufe provisto
de toma de tierra y protegido por un fusible
conforme a los valores indicados en la tabla de
especificaciones técnicas. Nuestra empresa no se
haráresponsablededañosprovocadosporeluso
de la lavadora sin una toma de tierra conforme a
las normativas locales.
• Lasconexionesdebencumplirconlas
normativas nacionales.
• Traslainstalación,elenchufedelcablede
alimentacióndebequedaralalcancedela
mano.
• Latensiónylaprotecciónporfusible
permitida se indican en la sección
“Especificaciones técnicas”. Si el valor actual
del fusible o el disyuntor de su domicilio es
inferior a 16 amperios, solicite a un electricista
cualificado la instalación de un fusible de 16
amperios.
• Latensiónespecificadadebeserigualala
tensión de la red eléctrica de su domicilio.
• Noutilicecablesdeextensiónniladrones
para realizar la conexión eléctrica.
B Dejeenmanosdeunagentedeservicio
autorizado la sustitución de un cable de
alimentación dañado.
Uso por primera vez
Antes de empezar a utilizar la lavadora, asegúrese
de haber realizado todas las preparaciones
indicadasenlassecciones"Instrucciones
importantessobreseguridad"e"Instalación"del
manual de instrucciones.
Para preparar la lavadora para lavar sus prendas,
ejecute en primer lugar el programa Limpieza
de tambor. Si su lavadora no dispone de un
programa para la limpieza del tambor, utilice el
programaAlgodones-90yseleccionetambién
las funciones Agua adicional o Aclarado extra.
Antes de dar inicio al programa, vierta un
máximode100gdeanticalenpolvoenel
compartimento de detergente del lavado principal
(compartimentonºII).Sielproductoanticalviene
en forma de tabletas, ponga una sola tableta en el
compartimentonºII.Sequeelinteriordelfuellecon
un paño limpio una vez finalizado el programa.
C Useunproductoanticaladecuadopara
lavadoras.
C Esposiblequehayaquedadoalgode
agua en el interior de la lavadora como
consecuencia de los procesos de control
de calidad aplicados durante la fase de
producción. Este agua no es nociva para la
lavadora.
Eliminación del material de embalaje
Los materiales de embalaje son peligrosos para
losniños.Guardelosmaterialesdeembalajeen
lugar seguro, lejos del alcance de los niños.
Los materiales de embalaje de su lavadora se han
fabricadoconmaterialesreciclables.Deshágase
deellosdeformaadecuadayclasifíquelos
atendiendo a las directrices de reciclado de
residuos. No los tire a la basura junto con los
residuos domésticos normales.
Transporte de la lavadora
Desenchufelalavadoraantesdesutransporte.
Desconéctelodelasredesdedesagüey
suministro de agua. Evacúe por completo el agua
quepuedaquedarenelinteriordelalavadora,
vea la sección "Evacuación del agua restante
ylimpiezadelfiltrodelabomba".Coloquelos
pernos de seguridad para el transporte en el orden
inverso al de su retirada, vea la sección "Retirada
de las trabas de transporte".
C Jamástransportelalavadorasinlospernos
de seguridad firmemente colocados en su
sitio.
Eliminación de su viejo aparato
Deshágasedesuviejoaparatodeforma
respetuosa con el medio ambiente.
Consulte a su concesionario o centro de
recogidaderesiduosmáspróximoparaobtener
información acerca de cómo deshacerse de su
viejo aparato.
En aras de la seguridad de los niños, corte el
cable de alimentación e inutilice el mecanismo
debloqueodelapuertadecargaantesde
deshacerse del aparato.

41 ES
3 Preparativos
Ahorro de energía
Lasiguienteinformaciónleayudaráautilizarsu
lavadora de forma eficiente y respetuosa con el
medio ambiente.
• Utilicelalavadorasiemprealamáxima
capacidad de carga permitida por
el programa seleccionado pero sin
sobrecargarla. Consulte la tabla de programas
y consumos.
• Sigasiemprelasinstruccionesdelenvasedel
detergente.
• Lavelasprendasconpocasuciedada
temperaturas bajas.
• Uselosprogramasmáscortosparacoladas
de poco volumen o formadas por prendas
con poca suciedad.
• Noutiliceprelavadonitemperaturasaltas
paraprendasquenoesténmuysuciasni
presenten manchas resistentes.
• Sivaasecarsucoladaenunasecadora,
seleccione durante el proceso de lavado la
velocidaddecentrifugadomásaltadelas
recomendadas.
• Noutiliceunacantidaddedetergentesuperior
a la cantidad recomendada en el envase.
Clasificación de las prendas
• Ordenelacoladaportipoycolordeltejido,
grado de suciedad y temperatura admisible
para el agua.
• Sigasiemprelasinstruccionesdelas
etiquetasdelasprendas.
Preparación de las prendas
para el lavado
• Lasprendasconaccesoriosmetálicos
como sujetadores, hebillas de cinturones o
botonesmetálicosdañaránlalavadora.Retire
laspiezasmetálicasdelasprendasobien
introdúzcalas en una bolsa de lavado o funda
de almohada.
• Retiredelosbolsillosmonedas,bolígrafoso
clips,délavueltaalosbolsillosycepíllelos.Si
olvida ese tipo de objetos en los bolsillos de
lasprendas,esposiblequeseoiganruidos
durante el lavado.
• Introduzcalasprendasdepequeñotamaño,
por ejemplo calcetines de niños o medias
de nylon, en una bolsa de lavado o funda de
almohada.
• Introduzcalascortinasenlalavadorade
formaquequedenholgadas.Previamente,
retire los enganches de la cortina.
• Abrochelascremalleras,cosalosbotones
flojos y remiende los desgarrones.
• Lavelosproductosquellevenlaetiqueta
“lavaramáquina”o“lavaramano”conel
programa apropiado.
• Nopongaenlamismacoladalasprendas
blancas y de color. Las prendas nuevas de
coloresoscurosdestiñenmucho.Lávelaspor
separado.
• Lasmanchasresistentesdebentratarse
adecuadamente antes del lavado. En caso
de duda, consulte con un establecimiento de
limpieza en seco.
• Useúnicamentetintesyproductosantical
queseanadecuadosparalavadoras.Tenga
siempre en cuenta las instrucciones del
envase.
• Délavueltaalospantalonesyprendas
delicadas antes de lavarlos.
• MetalasprendasdelanadeAngoraenel
congelador durante unas horas antes de
lavarlas.Deestaformareducirálaformación
de bolas.
• Lasprendasquehayanestadoencontacto
continuado con materiales como levaduras,
polvo de cal, leche en polvo, etc., deben
sacudirse antes de introducirse en la lavadora,
yaquetalesmaterialespuedenacumularse
con el tiempo en los componentes internos
delalavadoraycausaraverías.
Capacidad de carga correcta
Lamáximacapacidaddecargadependedeltipo
de colada, el grado de suciedad y el programa de
lavadoquedeseeutilizar.
Lalavadoraajustaautomáticamentelacantidadde
agua al peso de la colada.
A Observelainformacióndelatablade
programas y consumos. Si sobrecarga la
lavadora,surendimientoseveráreducido,
pudiendoaparecerademásvibracionesy
ruidos.
Carga de la colada
• Abralapuertadecarga.
• Coloquelasprendasholgadamenteenel
interior de la lavadora.
• Cierrelapuertadecargaempujándolahasta
queoigaunclic.Asegúresedequeninguna
prendaquedeatrapadaenlapuerta.
C Duranteeltranscursodelosprogramasde
lavado,lapuertadecargaestábloqueada,
ysólopodráabrirsetranscurridosunos
instantes desde la finalización del programa
de lavado.
A Si coloca la colada de forma incorrecta,
esposiblequelalavadoraemitaruidosy
vibraciones.
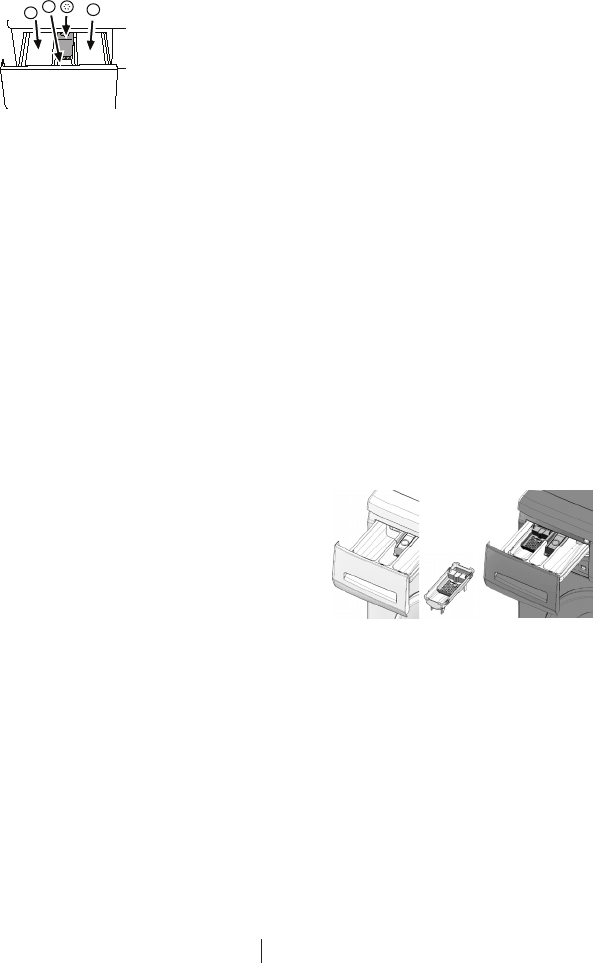
42 ES
Uso de detergente y suavizante.
Depósito de detergente
El depósito del detergente consta de tres
compartimientos:
-(1)paraprelavado
-(2)paralavadoprincipal
–(3)parasuavizante
–(*)además,elcompartimentodelsuavizante
tiene un sifón.
1
23
C Haydostiposdedispensadoresde
detergente, según el modelo de la lavadora,
tal como puede verse anteriormente.
Detergente, suavizante y otros agentes de
limpieza
• Añadadetergenteysuavizanteantesdeiniciar
el programa de lavado.
• Jamásabraeldepósitodedetergente
mientras el programa de lavado esté en
curso.
• Cuandoutiliceunprogramasinprelavado,
no vierta detergente en el compartimento de
prelavado(compartimentonº1).
• Enlosprogramasconprelavado,novierta
detergente en el compartimento de prelavado
(compartimentonº1).
• Noseleccioneunprogramaconprelavado
siestáutilizandodetergenteenbolsitaso
unaboladispensadora.Coloquelabolsita
de detergente o la bola dispensadora
directamente sobre la colada en el tambor de
la lavadora.
• Siutilizadetergentelíquido,noolvidecolocar
elrecipienteconeldetergentelíquido
en el compartimento de lavado principal
(compartimentonº2).
Selección del tipo de detergente
Eltipodedetergentequedebeutilizarsedepende
del tipo y el color del tejido.
• Utilicedetergentesdistintosparaprendas
blancas y para prendas de color.
• Lavesusprendasdelicadasúnicay
exclusivamente con detergentes especiales
(detergenteslíquidos,jabónparalana,etc.)
• Cuandolaveprendasoscurasycolchas,le
recomendamosusarundetergentelíquido.
• Lavelasprendasdelanaconundetergente
específico.
A Utiliceúnicamentedetergentesespecíficos
paraellavadoamáquina.
A No utilice jabón en polvo.
Ajuste de la cantidad de detergente
Lacantidaddedetergentequedebeusar
dependerádelvolumendelacolada,elgrado
de suciedad y la dureza del agua. Lea con
atención las instrucciones del fabricante incluidas
en el envase del detergente y respete las dosis
indicadas.
• Noutiliceunacantidadsuperiorala
recomendadaenelpaqueteconelfinde
evitar los problemas causados por el exceso
deespumayelenjuagueincorrecto,además
de ahorrar dinero y proteger el medio
ambiente.
• Utiliceunacantidadmenordedetergente
para coladas de poco volumen o formadas
por prendas no muy sucias.
• Uselosdetergentesconcentradosenlas
dosis recomendadas.
Uso de suavizantes
Vierta el suavizante en el compartimento del
suavizante o en el depósito de detergente.
• Respetelasdosisrecomendadasenel
envase.
• Norebaselamarcadenivelmáximo(>max<)
del compartimento del suavizante.
• Sielsuavizantehaperdidosufluidez,dilúyalo
en agua antes de verterlo en el depósito de
detergente.
Uso de detergentes líquidos
Si la lavadora contiene un recipiente para
detergente líquido:
• Asegúresedecolocarelrecipientepara
detergentelíquidoenelcompartimentonº"2".
• Useelvasomedidorsuministradopor
el fabricante del detergente y siga las
instrucciones del envase.
• Respetelasdosisrecomendadasenel
envase.
• Sieldetergentelíquidohaperdidosufluidez,
dilúyalo en agua antes de verterlo en el
recipiente para detergente.
Si la lavadora no contiene un recipiente para
detergente líquido:
• Noutilicedetergentelíquidoparaelprelavado
en los programas con prelavado.
• Useelvasomedidorsuministradopor
el fabricante del detergente y siga las
instrucciones del envase.
• Eldetergentelíquidodejamanchasensus
prendas si se usa junto con la función de
inicio demorado. Si va a utilizar la función de
iniciodemorado,noutilicedetergentelíquido.
Uso de detergente en gel y en tabletas
Siemprequeusedetergentesengeloentabletas,
lea con atención las instrucciones del fabricante
incluidas en el envase del detergente y observe las
dosis indicadas. Si el envase no contiene ninguna
indicación, siga el siguiente procedimiento:

43 ES
• Sieldetergenteengelesfluidoysu
lavadora no dispone de un recipiente
especialparadetergentelíquido,viertael
detergente en gel en el compartimento
del detergente de lavado principal durante
la primera toma de agua. Si su lavadora
contiene un recipiente para detergente
líquido,viertaenéleldetergenteantesde
dar inicio al programa.
• Sieldetergenteengelnoesfluidoobien
estáyadosificadoencápsulas,añádalo
directamente al tambor antes de iniciar el
lavado.
• Depositelosdetergentesentabletasen
el compartimento de lavado principal
(compartimentonúm.II)odirectamenteen
el tambor antes del lavado.
C Los detergentes en tabletas pueden
dejar residuos en el compartimento del
detergente. En tal caso, en futuros lavados
deposite la tableta de detergente entre
las prendas, cerca de la parte inferior del
tambor.
C No utilice la función de prelavado cuando
emplee detergente en tableta o en gel.
Uso de almidón
• Sivaausaralmidónlíquido,almidónen
polvo o tinte, viértalos en el compartimento
del suavizante, siguiendo las instrucciones
del envase del producto.
• Noutilicesuavizanteyalmidónalavezen
un mismo ciclo de lavado.
• Cuandousealmidón,limpieelinteriordela
lavadora con un paño limpio y humedecido
tras el lavado.
Uso de lejías
• Seleccioneunprogramaconprelavado
yañadalalejíaaliniciodelprelavado.No
añada detergente al compartimento de
prelavado. Como alternativa, seleccione un
programa con aclarado adicional y añada
lalejíamientraslalavadoratomaaguadel
compartimento del detergente durante el
primer paso del aclarado.
• Nomezclelalejíaconeldetergente.
• Utiliceunapequeñacantidaddelejía(aprox.
50ml)yaclarelasprendasbien,yaqueeste
tipo de productos pueden irritar la piel. No
viertalalejíasobrelasprendasnilautilice
para prendas de color.
• Cuandoutilicelejíaconoxígeno,sigalas
instrucciones del envase y seleccione un
programa de temperatura baja.
• Laslejíasconoxígenopuedenutilizarse
junto con otros detergentes; no obstante, si
su densidad es distinta a la del detergente,
vierta el detergente en primer lugar en el
compartimentonº"II"eneldepósitode
detergenteyesperehastaqueeldetergente
se absorba durante la toma de agua de la
lavadora.Acontinuación,viertalalejíaenel
mismo compartimento mientras la lavadora
esté aún tomando agua.
Uso de un producto antical
• Cuandoseanecesario,utiliceproductos
anticalespecíficamentefabricadosparasu
uso en lavadoras.
• Sigasiemprelasinstruccionesdelenvase.

44 ES
Consejos para un lavado eficiente
Prendas
Colores claros y
blancos Colores Colores oscuros
Prendas
delicadas/Lana/
Seda
(Rango de
temperaturas
recomendado
basado en el grado
de suciedad: 40 - 90
ºC)
(Rango de
temperaturas
recomendado basado
en el grado de
suciedad: fría - 40 ºC)
(Rango de
temperaturas
recomendado
basado en
el grado de
suciedad: fría -
40 ºC)
(Rango de
temperaturas
recomendado
basado en
el grado de
suciedad: fría -
30 ºC)
Grado de suciedad
Elevado
(manchas difíciles,
p. ej. de hierba,
café, fruta o
sangre.)
Puede que sea
necesario tratar las
manchas antes
del prelavado.
Los detergentes
líquidos y en polvo
recomendados
para las prendas
blancas pueden
utilizarse en las dosis
recomendadas
para las prendas
con un grado de
suciedad elevado.
Se recomienda el
uso de detergentes
en polvo para limpiar
manchas de arcilla
y tierra, así como las
manchas sensibles a
la lejía.
Los detergentes
líquidos y en polvo
recomendados para
las prendas de color
pueden utilizarse en las
dosis recomendadas
para las prendas
con un grado de
suciedad elevado. Se
recomienda el uso de
detergentes en polvo
para limpiar manchas
de arcilla y tierra, así
como las manchas
sensibles a la lejía. Use
detergentes sin lejía.
Los detergentes
líquidos aptos
para las
prendas de
color y oscuras
pueden utilizarse
en las dosis
recomendadas
para las prendas
con un grado
de suciedad
elevado.
Es preferible
el uso de
detergentes
líquidos para
las prendas
delicadas. Las
prendas de lana
y seda deben
lavarse con
detergentes
especiales para
lana.
Grado de suciedad
normal
(Por ejemplo,
manchas causadas
por la piel en puños
y cuellos)
Los detergentes
líquidos y en polvo
recomendados
para las prendas
blancas pueden
utilizarse en las dosis
recomendadas para
las prendas con un
grado de suciedad
normal.
Los detergentes
líquidos y en polvo
recomendados para
las prendas de color
pueden utilizarse en las
dosis recomendadas
para las prendas
con un grado de
suciedad normal. Use
detergentes sin lejía.
Los detergentes
líquidos aptos
para las
prendas de
color y oscuras
pueden utilizarse
en las dosis
recomendadas
para las prendas
con un grado de
suciedad normal.
Es preferible
el uso de
detergentes
líquidos para
las prendas
delicadas. Las
prendas de lana
y seda deben
lavarse con
detergentes
especiales para
lana.
Grado de suciedad
bajo
(sin manchas
visibles.)
Los detergentes
líquidos y en polvo
recomendados
para las prendas
blancas pueden
utilizarse en las dosis
recomendadas para
las prendas con un
grado de suciedad
bajo.
Los detergentes
líquidos y en polvo
recomendados para
las prendas de color
pueden utilizarse en las
dosis recomendadas
para las prendas con
un grado de suciedad
bajo. Use detergentes
sin lejía.
Los detergentes
líquidos aptos
para las
prendas de
color y oscuras
pueden utilizarse
en las dosis
recomendadas
para las prendas
con un grado de
suciedad bajo.
Es preferible
el uso de
detergentes
líquidos para
las prendas
delicadas. Las
prendas de lana
y seda deben
lavarse con
detergentes
especiales para
lana.
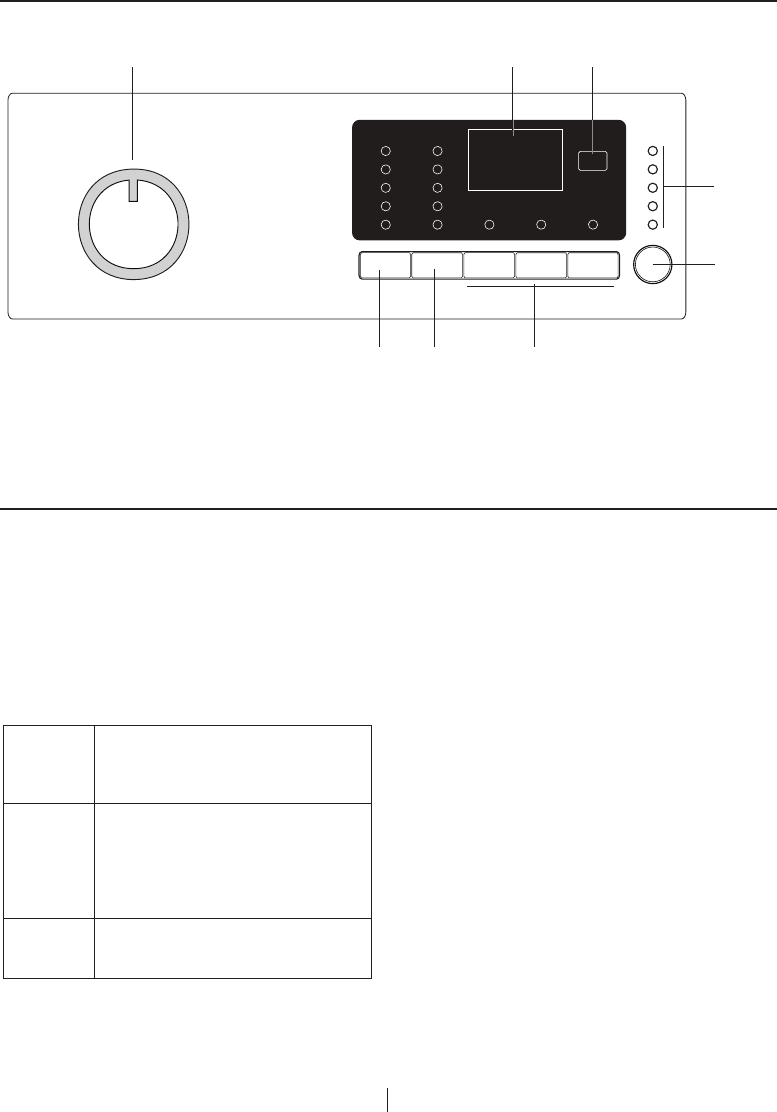
45 ES
4 Funcionamiento del aparato
Panel de control
1-Selectordeprogramas(Posiciónsuperior
Encendido/Apagado)
2-Pantalla
3-Botóndeiniciodemorado
4-Indicadordeseguimientodeprograma
5-BotóndeInicio/Pausa
6-Botonesdefuncionesauxiliares
7-Botóndeajustedelavelocidadde
centrifugado
8-Botóndeajustedelatemperatura
Preparación de la lavadora
Asegúresedequelasmanguerasestén
firmemente conectadas. Enchufe la lavadora. Abra
completamenteelgrifo.Introduzcalacoladaenla
lavadora. Añada detergente y suavizante.
Selección de programas
1. Seleccioneelprogramamásadecuadopara
el tipo, la cantidad y el grado de suciedad de
sus prendas, según lo indicado en la tabla
de programas y consumos y en la tabla de
temperaturasquefiguraacontinuación.
90˚C
Prendas de algodón y lino blanco
con un alto grado de suciedad
(cubremesas, manteles, toallas,
sábanas,etc.)
60˚C
Prendas de algodón o sintéticas
decolorquenodestiñanycon
un grado normal de suciedad
(camisas, camisones, pijamas,
etc.) y prendas de lino ligeramente
sucias (ropa interior, etc.)
40˚C-
30˚C-Fría
Coladas mixtas, incluidos tejidos
delicados (cortinas velo, etc.),
sintéticos o de lana.
2. Seleccione el programa deseado mediante el
selector de programas.
C Losprogramasestánlimitadosporlamayor
velocidad de centrifugado posible para ese
tipo particular de tejido.
C Alseleccionarelprogramaquevayaautilizar,
considere el tipo de tejido, el color, el grado
de suciedad y la temperatura recomendable
del agua.
C Seleccione siempre la menor temperatura
posible. A mayor temperatura, mayor
consumodeenergíaeléctrica.
C Sideseamásinformaciónacercadelos
programas, consulte la tabla de programas y
consumos.
Programas principales
Utilicelossiguientesprogramasprincipalessegún
el tipo de tejido.
• Algodón
Useesteprogramaparaprendasdealgodóntales
comosábanas,juegosdefundasdealmohaday
edredón, toallas, albornoces, ropa interior, etc. La
coladaselavaráconmovimientosvigorososenun
ciclodelavadomáslargo.
• Tejidos sintéticos
Useesteprogramaparalavarprendas
sintéticas (camisas, blusas, tejidos mezcla de
sintéticoyalgodón,etc.)Lacoladaselavará
con movimientos suaves en un ciclo de lavado
máscortoencomparaciónconelprograma
Algodones.
Para cortinas y encajes, use el programa
Sintético40ºCconlasfuncionesdeprelavado
y antiarrugas seleccionadas. Lave los velos y
losencajesvertiendounacantidadpequeña
de detergente en el compartimento del lavado
1 2 3
4
5
6
8 7

46 ES
principal,yaquesutexturamalladageneramucha
espuma. No añada detergente al compartimento
de prelavado.
• Tejidos de lana
Useesteprogramaparalavarsusprendasde
lana.Seleccionelatemperaturamásadecuada
segúnlasindicacionesdelasetiquetasdesus
prendas.Usedetergentesadecuadosparalavar
lana.
Programas adicionales
La lavadora dispone de programas adicionales
para casos especiales.
C Los programas adicionales pueden variar
según el modelo de su lavadora.
• Algodón Eco
Este programa le permite lavar sus prendas
resistentesdealgodónylinoquepresentenun
gradodesuciedadnormalconelmáximoahorro
deaguayenergíaencomparaciónconlosdemás
programas de lavado aptos para el algodón. La
temperatura real del agua puede ser distinta de
la indicada en el ciclo. La duración del programa
puedeversereducidaautomáticamentedurante
las últimas fases del programa si lava una colada
de menor volumen (p. ej. medio tambor o menos).
Enestecaso,elconsumodeaguayenergíase
reduciráaúnmás,proporcionándoleunlavado
aúnmáseconómico.Estafunciónestádisponible
en algunos modelos dotados de visor de tiempo
restante.
• BabyProtect (Protección de bebés)
Useesteprogramaparalavarprendasdebebé
y de personas alérgicas. Su mayor tiempo de
calentamiento y su fase adicional de aclarado
proporcionan un mayor nivel de higiene.
• Lavado a mano
Utiliceesteprogramaparaprendasdelanao
delicadasconlaetiqueta“nolavarconlavadora”
y para las cuales se recomiende lavar a mano.
La lavadora lava la colada con movimientos muy
suaves para no dañar las prendas.
• Lavado diario expreso
Useesteprogramaparalavarenpocotiempo
prendas de algodón con un grado ligero de
suciedad.
• Prendas oscuras
Useesteprogramaparalavarsusprendas
de colores oscuros, o bien las prendas cuyos
colores desee preservar. El lavado se lleva a cabo
conpocosmovimientosmecánicosyabajas
temperaturas. Para lavar prendas de colores
oscurosserecomiendautilizardetergentelíquidoo
jabón para lana.
• Mixtos 40 (Mix 40)
Useesteprogramaparalavarcoladasmixtasde
prendas de algodón y sintéticas sin necesidad de
separarlas.
Programas especiales
Paraaplicacionesespecíficas,seleccione
cualquieradelossiguientesprogramas:
• Aclarado
Useesteprogramacuandodeseeenjuagaro
almidonar por separado.
• Centrifugado + Vaciado
Useesteprogramaparaaplicarunciclode
centrifugado adicional a la colada o para evacuar
el agua de la lavadora.
Antes de seleccionar este programa, seleccione
la velocidad de centrifugado deseada y pulse la
tecla"Inicio/Pausa".Enprimerlugar,lalavadora
evacuaráelaguaacumuladaensuinterior.A
continuación,centrifugarálacoladaalavelocidad
seleccionadayevacuaráelaguaqueextraigade
ella.
Si desea únicamente evacuar el agua del tambor
sin centrifugar su colada, seleccione el programa
Vaciado+Centrifugado y a continuación seleccione
la función Sin centrifugado mediante el botón de
ajuste de velocidad de centrifugado. Pulse la tecla
"Inicio/Pausa”.
C Para prendas delicadas, seleccione una
velocidad de centrifugado inferior.
Selección de temperatura
Cadavezqueseleccioneunprogramanuevo,el
indicadordetemperaturamostrarálatemperatura
máximaparadichoprograma.
Para rebajar la temperatura, pulse de nuevo el
botón de ajuste de temperatura. La temperatura
descenderágradualmente.
C Si el programa no ha llegado aún al paso de
calentamiento, puede cambiar la temperatura
sin poner la lavadora en el modo Pausa.
Selector de velocidad de centrifugado
Cadavezqueseleccioneunprogramanuevo,el
indicadordevelocidaddecentrifugadomostrará
la velocidad de centrifugado recomendada para
dicho programa.
Para reducir la velocidad de centrifugado, pulse
la tecla de ajuste de la velocidad de centrifugado.
La velocidad de centrifugado se reduce
gradualmente. A continuación, y dependiendo
delmodelodelaparato,lapantallamostrarálas
opciones "Retener aclarado" o "Sin centrifugado".
Consulte la sección "Selección de funciones
auxiliares"paraobtenermásinformaciónsobre
estas opciones.
C Si el programa no ha llegado aún al paso de
centrifugado, puede cambiar la velocidad sin
poner la lavadora en el modo Pausa.

47 ES
Tabla de programas y consumos
•: Seleccionable
*: Seleccionadoautomáticamente,nosepuedecancelar.
**: ProgramaEtiquetadeEnergía(EN60456Ed.3)
***:Silavelocidadmáximadecentrifugadodesulavadoraesinferioraestevalor,podráseleccionar
comomáximolavelocidadmáximadecentrifugado.
-: Vealadescripcióndelprogramaparaobtenerinformaciónsobrelacargamáxima.
C Losconsumosdeaguayenergíaeléctricapuedenvariardependiendodeloscambiosenlapresión,
dureza y temperatura del agua, la temperatura ambiente, el tipo y la cantidad de prendas, las
funciones auxiliares seleccionadas, la velocidad de centrifugado y las fluctuaciones de la tensión de
alimentación.
C Lapantallamostraráeltiempotranscurridodelprogramaseleccionado.Esnormalquepuedan
producirsepequeñasdiferenciasentreeltiempomostradoenpantallayeltiemporealdelavado.
C Las funciones auxiliares de la tabla pueden variar según el modelo de su lavadora.
ES 5
Programa
Cargamáx.(kg)
Consumo de agua (l)
Consumo energético
(kWh)
Vel.Máx.***
Prelavado
Lavadorápido
Aclarado Extra
Antiarrugas
Sin aclarado
Remojo
Eliminación de pelusa
de mascotas
Rango de
temperaturas
seleccionableºC
Algodón 90 7 69 2.15 1600 • • • • • • • Frío-90
Algodón 60 7 66 1.40 1600 • • • • • • • Frío-90
Algodón 40 7 66 0.70 1600 • • • • • • • Frío-90
Algodón Eco 60** 748 1.00 1600 • 40-60
Algodón Eco 60** 3.5 39 0.82 1600 • 40-60
Algodón Eco 40** 3.5 39 0.80 1600 • 40-60
Lavado diario expreso 90 7 55 1.80 1400 • • Frío-90
Lavado diario expreso 60 7 55 1.10 1400 • • Frío-90
Lavado diario expreso 30 7 55 0.25 1400 • • Frío-90
Prendas oscuras 40 370 0.50 800 * • Frío-40
BabyProtect
(Protección de bebés) 90 784 2.15 1600 • * • • 30-90
Lavado a mano 30 1 41 0.15 600 Frío-30
Tejidos de lana 40 1.5 56 0.27 600 • • Frío-40
Mixtos40(Mix40) 40 350 0.73 800 • • • • • • • Frío-40
Tejidos sintéticos 60 350 0.95 800 • • • • • • • Frío-60
Tejidos sintéticos 40 350 0.73 800 • • • • • • • Frío-60
**“Algodóneco40°CyAlgodóneco60°Csonlosprogramasestándar.”Estosprogramasse
denominan“programaestándarparaalgodones40º”y“programaestándarparaalgodones60º”

48 ES
Selección de funciones auxiliares
Seleccionelasfuncionesauxiliaresquedesee
antesdedarinicioalprograma.Además,puede
seleccionar o cancelar funciones auxiliares
adecuadas para el programa en curso sin
pulsarlatecla"Inicio/Pausa"conlalavadora
en funcionamiento. Para ello, la lavadora debe
encontrarse en un paso anterior al de la función
auxiliarquedeseeseleccionarocancelar.
Si la función auxiliar no se puede seleccionar o
cancelar,laluzdeesafunciónauxiliarparpadeará
3 veces para alertar al usuario.
C Algunas funciones no se pueden seleccionar
al mismo tiempo. Si antes de poner en
marcha la lavadora selecciona una segunda
funciónauxiliarqueentraenconflictoconuna
función seleccionada en primer lugar, ésta
serálafunciónquepermaneceráactiva.Por
ejemplo,sideseaseleccionarLavadorápido
tras haber seleccionado Prelavado, la función
PrelavadoserácanceladaylafunciónLavado
rápidopermaneceráactiva.
C No es posible seleccionar una función auxiliar
incompatible con el programa. (Ver la tabla de
programas y consumos.)
C Los botones de las funciones auxiliares
pueden variar según el modelo de su
lavadora.
• Prelavado
Elprelavadosólovalelapenasilacoladaestá
muysucia.Sinoutilizaprelavadoahorraráenergía,
agua, detergente y tiempo.
C Se recomienda el prelavado sin detergente
para encajes y cortinas.
• Lavado rápido
Esta función puede utilizarse con los programas
Algodón y Sintéticos. Reduce el tiempo de lavado
para coladas ligeramente sucias y también el
número de pasos de enjuague.
C Siemprequeseleccioneestafunciónauxiliar,
cargue la lavadora a la mitad de la capacidad
máximaindicadaenlatabladeprogramas.
• Aclarado Extra
Estafunciónpermitequelalavadorahagaotro
aclarado,queseañadealaclaradoyarealizado
trasellavadoprincipal.Deestemodo,sepuede
reducir el riesgo para las pieles delicadas (bebés,
personasalérgicas,etc.)porlamínimacantidadde
restosdedetergentequepermaneceenlacolada.
• Antiarrugas
Esta función mitiga la formación de arrugas en
las prendas durante el lavado. El movimiento del
tambor se reduce y la velocidad de centrifugado
se limita para evitar la formación de arrugas.
Además,ellavadoserealizaconunamayor
cantidad de agua.
• Sin aclarado
Si no desea sacar la colada de inmediato una
vez finalizado el programa, puede usar la función
"Mantener el aclarado" para mantener la colada
enelaguadeaclaradofinalyasíevitarquelas
prendas se arruguen cuando no haya agua en la
lavadora.Pulseelbotón"Inicio/Pausa"después
de este proceso si desea evacuar el agua sin
centrifugarsucolada.Elprogramasereanudaráy
completaráunavezevacuadaelagua.
SIdeseacentrifugarlacoladaenremojo,ajustela
velocidaddecentrifugadoypulseelbotón"Inicio/
Pausa".
El programa se reanuda. El agua se evacúa, la
colada se centrifuga y el programa llega a su fin.
• Remojo
La función auxiliar Remojo garantiza una mejor
eliminacióndelasmanchasmásdifícilesaldejarlas
en remojo en el agua jabonosa antes de iniciar el
programa.
• Eliminación de pelusa de mascotas
Esta función ayuda a eliminar con mayor eficacia
lospelosdemascotaquequedenensusprendas.
Al seleccionar esta función, se añaden al programa
normal los pasos de prelavado y aclarado extra.
Asípues,ellavadoserealizaconmásagua
(30%)yelpelodemascotaseeliminaconmayor
eficacia.
A Jamáslaveasusmascotasenlalavadora.
Inicio demorado
LafunciónIniciodemoradopermiteretrasarlahora
de inicio del programa hasta 19 horas. El tiempo
de demora puede aumentarse en incrementos de
1 hora.
C Noutilicedetergenteslíquidosconlafunción
deiniciodemorado,yaquecorreelriesgode
manchar las prendas.
Abra la puerta de carga, deposite la colada, añada
detergente, etc. Seleccione el programa de lavado,
la temperatura, la velocidad de centrifugado y, si
esnecesario,lasfuncionesauxiliaresquedesee.
Seleccioneeltiempodedemoraquedesee
pulsandoelbotónIniciodemorado.Pulselatecla
"Inicio/Pausa”.Semuestraeltiempodedemora
delinicioquehaseleccionado.Seinicialacuenta
atrásparaeliniciodemorado.Elsímbolo“_”
situado al lado del tiempo de demora del inicio se
mueve arriba y abajo en la pantalla.
C Duranteeltiempoderetardo,puedeañadir
prendas a la colada si lo desea.
Alfinaldelacuentaregresivasemostrarála
duracióndelprogramaseleccionado.Elsímbolo
“_”desapareceráyelprogramaseleccionadose
iniciará.
Cambio del tiempo de inicio demorado
Si desea cambiar el tiempo durante la cuenta
atrás:
PulseelbotónIniciodemorado.Eltiempose
incrementaráenunahoracadavezquepulse
el botón. Si desea reducir el tiempo de demora
delinicio,pulserepetidamenteelbotónInicio
demoradohastaqueeltiempodedemoradel
inicioquedeseeaparezcaenlapantalla.
Cancelación de la función Inicio demorado
Sideseacancelarlacuentaatráseiniciarel
programa de inmediato:

49 ES
Ponga a cero el tiempo de demora del inicio
o bien seleccione otro programa mediante el
selectordeprogramas.Deestamaneralafunción
deiniciodemoradoquedarácancelada.Laluz
Finalizar/Cancelarparpadearádeformacontinua.
A continuación, seleccione de nuevo el programa
quedeseeejecutar.Pulselatecla"Inicio/Pausa"
para iniciar el programa.
Inicio del programa
Pulselatecla"Inicio/Pausa"parainiciarel
programa. La luz de seguimiento de programa se
encenderá,indicandoeliniciodelprograma.
C Si no inicia ningún programa o no pulsa
ninguna tecla en el plazo de 1 minuto durante
el proceso de selección de programa, la
lavadoracambiaráalmododepausay
sereduciráelniveldeiluminacióndelos
indicadores de temperatura, velocidad y
puertadecarga.Seapagarántambiénotras
luceseindicadores.Unavezhayagiradoel
selector de programas o haya pulsado algún
botón, las luces indicadoras y los indicadores
volveránaencenderse.
Bloqueo para niños
Uselafuncióndebloqueoparaniñospara
evitarquelosniñosmanipulenlalavadora.De
estamaneraevitaráquepuedanintroducir
modificaciones en el programa en curso.
C Si gira el selector de programas con el
bloqueoparaniñosactivo,lapantallamuestra
elmensaje"Con".Elbloqueoparaniños
nopermitirárealizarningúncambioenlos
programas ni en la temperatura, velocidad y
funciones auxiliares seleccionadas.
C Sielbloqueoparaniñosestáactivo,el
programapreviamenteseleccionadoseguirá
enfuncionamientoaunqueseleccioneotro
programa mediante el selector de programas.
Paraactivarelbloqueoparaniños:
Mantenga pulsados los botones de las funciones
auxiliares 1 y 2 durante 3 segundos. Las luces
de los botones de las funciones auxiliares 1 y
2parpadearánylosmensajes"C03","C02",
"C01"apareceránrespectivamenteenpantalla
mientras mantenga los botones pulsados durante
3segundos.Acontinuación,lapantallamostrará
elmensaje"Con"paraindicarqueelbloqueopara
niñosestáactivo.Sipulsacualquierbotónogira
elselectordeprogramasconelbloqueopara
niñosactivo,apareceráelmismomensajeenla
pantalla. Las luces de los botones de las funciones
auxiliares 1 y 2, utilizados para desactivar el
bloqueoparaniños,parpadearán3veces.
Paradesactivarelbloqueoparaniños:
Mantenga pulsados los botones de las funciones
auxiliares1y2durante3segundosconcualquiera
de los programas en funcionamiento. Las luces
de los botones de las funciones auxiliares 1 y 2
parpadearánylosmensajes"C03","C02","C01"
apareceránrespectivamenteenpantallamientras
mantenga los botones pulsados durante 3
segundos.Acontinuación,lapantallamostraráel
mensaje"COFF"paraindicarqueelbloqueopara
niños se ha desactivado.
C Ademásdelmétodoanterior,puede
desactivarelbloqueoparaniñossinohay
ningún programa en ejecución llevando
el selector de programas a la posición
Encendido/Apagado y seleccionando a
continuación otro programa.
C Elbloqueoparaniñosnosedesactivaráen
caso de corte de la alimentación eléctrica o al
desenchufar la lavadora.
Progreso del programa
El indicador de seguimiento de programa permite
comprobar el progreso de un programa en curso.
Al comienzo de cada paso del programa, se
encenderáelLEDindicadorcorrespondiente,
mientrasqueelcorrespondientealpasoanterior
yacompletadoseapagará.
Puede cambiar los ajustes de las funciones
auxiliares, la velocidad y la temperatura sin detener
elprogramaqueestéenfuncionamiento.Para
ello,elcambioquevayaaintroducirdebeestaren
unpasoposterioralpasoenqueseencuentreel
programa en curso. Si el cambio no es posible, la
luzpertinenteparpadearátresveces.
C Si la lavadora no pasa al centrifugado, es
posiblequelafunciónManteneraclarado
estéactivaoqueelsistemadedetección
automáticadedesequilibriodelacargase
hayaactivadodebidoaundesequilibrioenla
distribución de la colada en la lavadora.
Bloqueo de la puerta de carga
La puerta de carga dispone de un sistema de
bloqueoqueevitaquelapuertaseabracuando
el nivel de agua en el tambor desaconseje su
apertura.
Laluzdelapuertadecargaempezaráa
parpadear al poner la lavadora en el modo de
pausa. La lavadora comprueba el nivel del agua
en el interior del tambor. Si el nivel del agua es
adecuado,laluzdelapuertadecargasequedará
iluminada permanentemente en un plazo de 1 a 2
minutosylapuertadecargapodráabrirse.
Si el nivel de agua no es el adecuado, la luz de
lapuertadecargaseapagaráylapuertano
podráabrirse.Sidetodasformastienequeabrir
lapuertadecargaaunquelaluzdelapuertade
cargaestéapagada,deberácancelarelprograma
en curso, vea la sección "Cancelación del
programa".
Modificación de las selecciones
una vez iniciado el programa
Paso de la lavadora al modo en espera
Pulselatecla"Inicio/Pausa"parapasarlalavadora
al modo en espera mientras haya un programa en
curso.Laluzcorrespondientealpasoenelque
seencuentralalavadoracomenzaráaparpadear
en el indicador de seguimiento de programa para
indicarquelalavadorahapasadoalmodoen
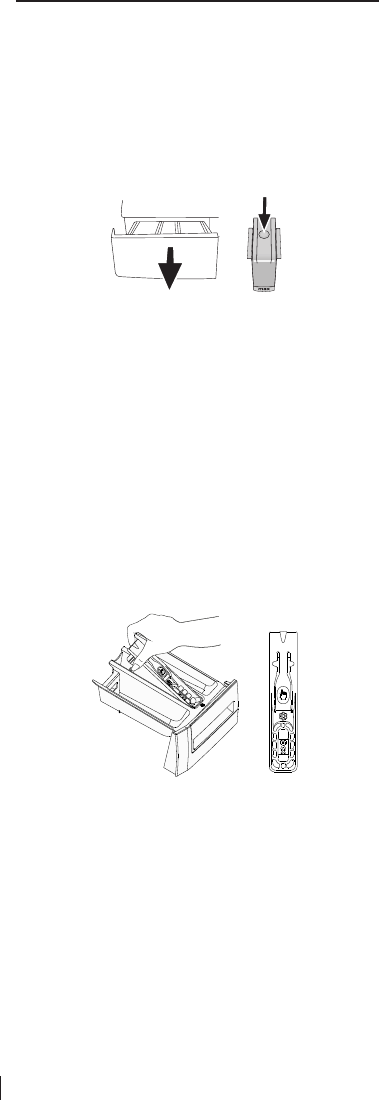
50 ES
espera.
Asimismo, cuando la puerta esté lista para
su apertura, tanto la luz de la puerta de carga
comolaluzdelpasodelprogramaseiluminarán
permanentemente.
Cambio de los ajustes de velocidad y
temperatura para funciones auxiliares
Dependiendodelpasoquehayaalcanzadoel
programa,podrácancelaroactivarlasfunciones
auxiliares; vea la sección "Selección de funciones
auxiliares".
También puede cambiar los ajuste de
temperatura y velocidad; vea las secciones
"Selección de la velocidad de centrifugado" y
"Selección de temperatura".
C Si no se permite ningún cambio, la luz
pertinenteparpadearátresveces.
Añadir o retirar prendas de la colada
Pulseelbotón“Inicio/Pausa”paraquela
lavadora pase al modo de pausa. La luz de
seguimiento de programa correspondiente al
pasoenelquelalavadorahapasadoalmodo
depausaparpadeará.
Esperehastaquelapuertadecargapueda
abrirse. Abra la puerta de carga y añada o retire
prendas de la colada. Cierre la puerta de carga.
Realiceloscambiosquedeseeenlasfunciones
auxiliares y en los ajustes de temperatura y
velocidaddecentrifugado.Pulseelbotón"Inicio/
Pausa" para poner en marcha la lavadora.
Cancelación del programa
Para cancelar el programa, gire el selector de
programas para seleccionar otro programa.
Elprogramaanteriorsecancelará.Laluz"Fin/
Cancelación"parpadearádeformacontinua
paraindicarqueelprogramahasidocancelado.
La función de vaciado se activa durante 1 o
2 minutos, independientemente de la fase en
laqueseencuentreelprogramaydesihay
agua en la lavadora o no. Tras este periodo,
sumáquinaestarálistaparainiciarelnuevo
programa a partir de su primer paso.
C Dependiendodelpasoenelquesecanceló
elprograma,esposiblequetengaque
añadir nuevamente detergente y suavizante
para el nuevo programa seleccionado.
Fin del programa
Unavezfinalizadoelprograma,lapantalla
muestra el mensaje "End" (Fin). Espere hasta
quelaluzdelapuertadecargasequede
iluminada de forma permanente. Pulse el botón
Encendido/apagadoparaapagarlamáquina.
Extraiga su colada y cierre la puerta de carga.
Sulavadoraestarálistaparaelpróximociclode
lavado.
5 Mantenimiento y limpieza
La limpieza a intervalos regulares del aparato
contribuye a prolongar su vida útil y a reducir la
frecuenciadeaparicióndelosproblemasmás
comunes.
Limpieza del depósito de detergente
Limpie regularmente (cada 4 ó 5 ciclos de
lavado) el depósito de detergente tal como
se indica a continuación con el fin de evitar la
acumulación de detergente en polvo con el
tiempo.
Hagapresiónsobreelpuntomarcadoenelsifón
del compartimiento del suavizante y tire hacia
usted hasta retirar el depósito de la lavadora.
C Si se empiezan a acumular cantidades
anormales de agua y suavizante en el
compartimentodelsuavizante,deberá
limpiar el sifón.
Lave el depósito de detergente y el sifón en el
fregadero con abundante agua tibia. Póngase
guantes o utilice un cepillo adecuado para
evitarquelosresiduosdeldepósitoentrenen
contacto con su piel durante el lavado. Tras
la limpieza, vuelva a colocar el depósito en su
sitioyasegúresedequesehayaasentado
correctamente.
Si el depósito de detergente de su lavadora se
corresponde con el de la siguiente ilustración:
C Levante la parte posterior del sifón para
retirarlo, tal como se indica en la ilustración.
Tras llevar a cabo las operaciones de
limpieza anteriormente mencionadas, vuelva
a colocar el sifón en su lugar y empuje
hacia abajo su parte delantera con el fin de
quelalengüetadefijaciónencajeensusitio.
Limpieza de los filtros
de la toma de agua
Enelextremodecadaválvuladetomade
agua ubicada en la parte trasera de la lavadora,
asícomoenelpuntodeconexióndecada
manguera de entrada de agua con el grifo,
hayunfiltro.Estosfiltrosevitanquelosobjetos
extraños y la suciedad del agua se introduzcan
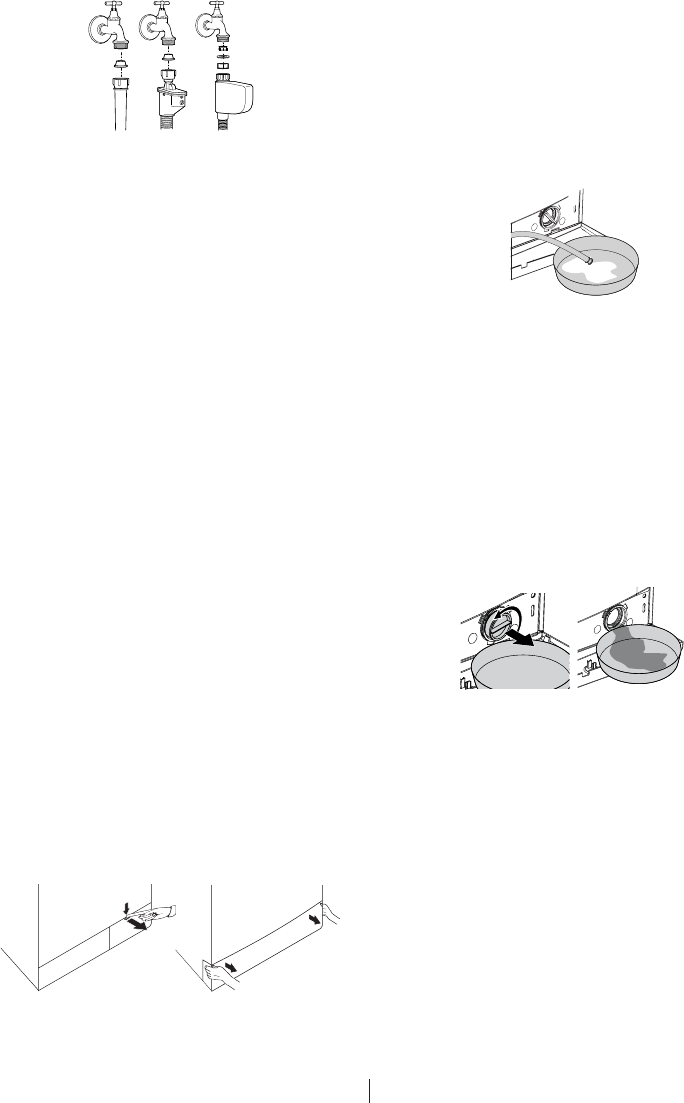
51 ES
C Puederetirarlacubiertadelfiltroempujándola
suavemente hacia abajo con un utensilio
delgadoconpuntadeplásticoatravésdela
abertura situada encima de la propia cubierta
del filtro. No utilice utensilios con punta
metálicapararetirarlacubierta.
Algunos de nuestros productos disponen de una
manguera de drenaje de emergencia y otros no.
Siga las siguientes instrucciones para evacuar el
agua de la lavadora.
Evacuacióndelaguaenaparatosquedisponen
de manguera de drenaje de emergencia:
Saquelamangueradedrenajedeemergencia
desuasentamiento.Introduzcaelextremodela
manguera en un contenedor de gran capacidad.
Vierta el agua en el contenedor tirando hacia
afuera del tapón situado en el extremo de la
manguera. Cuando el contenedor esté lleno,
bloqueeelextremodelamangueravolviendo
acolocareltapón.Vacíeelcontenedory
repita el procedimiento anterior para evacuar
completamente el agua del interior de la lavadora.
Unavezfinalizadoelprocesodeevacuación,
vuelva a colocar el tapón en el extremo de la
mangueraycoloqueéstadenuevoensulugar.
Gireelfiltrodelabombaparaextraerlo.
Evacuacióndelaguaenaparatosqueno
disponen de manguera de drenaje de emergencia:
Coloqueunrecipientedegrancapacidadfrenteal
filtroparaquerecibaelaguaprovenientedelfiltro.
Afloje el filtro de la bomba (en sentido contrario a
lasagujasdelreloj)hastaqueelaguacomience
asalir.Lleneelrecipientequehacolocado
frente al filtro. Tenga siempre a mano un paño
paraabsorberelaguaquesederrame.Unavez
evacuada la totalidad del agua contenida en la
lavadora, gire el filtro para extraerlo por completo.
Limpielosresiduosdesuinteriorasícomo
las fibras alrededor de la hélice, si las hubiera.
Coloqueelfiltro.
A Sisulavadoradisponedeboquillas
expulsorasdeagua,asegúresedequeelfiltro
quedeencajadodentrodesualojamientoen
labomba.Jamásintentecolocaralafuerza
elfiltroensualojamiento.Hagaqueelfiltrose
asientecompletamenteensualojamiento.De
locontrario,lacubiertadelfiltropodríasufrir
alguna fuga.
enelaparato.Límpielosregularmente,puestoque
se ensucian con el uso.
Cierre los grifos. Para acceder a los filtros de
lasválvulasdetomadeagua,retirelastuercas
de las mangueras de toma de agua. Limpie los
filtrosconuncepilloadecuado.Silosfiltrosestán
muysucios,extráigalosconunastenazasya
continuaciónlímpielos.Extraigalosfiltrosylas
juntas en el extremo plano de las mangueras de
entradadeaguaylímpielosconcienzudamente
bajo un chorro de agua corriente. Vuelva a colocar
con cuidado las juntas y los filtros en su sitio y
apriete con la mano las tuercas de la manguera.
Evacuación del agua restante y
limpieza del filtro de la bomba
Elsistemadefiltrosdesulavadoraevitaquelos
objetos sólidos tales como botones, monedas o
pelusasdelostejidosatasquenelpropulsordela
bomba durante la evacuación del agua de lavado.
Deestamanera,elaguaseevacuarásiningún
problemaylavidaútildelabombaserámayor.
Silalavadoranoevacúaelagua,esposiblequeel
filtro de la bomba esté atascado. Es preciso limpiar
elfiltrosiemprequeestéatascadoo,entodo
caso, cada 3 meses. Es preciso evacuar el agua
antes de proceder a limpiar el filtro de la bomba.
Tambiénhayqueevacuarelaguaantesde
transportar la lavadora (p. ej. en un traslado de
domicilio) o en caso de heladas.
A Lassustanciasextrañasquequedenenel
filtro de la bomba pueden dañar la lavadora o
producir ruidos molestos.
Para limpiar el filtro y evacuar el agua:
Desenchufelalavadoraparainterrumpirel
suministro eléctrico.
A La temperatura del agua en el interior del
tamborpuedellegaralos90ºC.Paraevitar
riesgosdequemaduras,dejequelalavadora
seenfríeantesdeprocederalimpiarelfiltro.
Abra la cubierta del filtro.
Si la cubierta del filtro se compone de dos
piezas, presione hacia abajo la pestaña de la
cubierta y tire de la pieza hacia usted.
Si la cubierta del filtro se compone de una sola
pieza, tire de la cubierta desde ambos lados para
abrirla.

52 ES
Si la cubierta del filtro se compone de dos
piezas, ciérrela haciendo presión sobre la
pestaña. Si la cubierta se compone de una
pieza, asiente las pestañas en su sitio en la parte
inferior y a continuación haga presión sobre la
parte superior para cerrar la cubierta.
53 ES
6 Especificaciones técnicas
C Las especificaciones técnicas pueden cambiar sin previo aviso para mejorar la calidad del aparato.
C Lasilustracionesdeestemanualsonesquemáticasypodríannocorresponderseexactamentecon
su aparato.
C Losvaloresespecificadosenlasetiquetasdelaparatooenladocumentaciónqueloacompaña
fueronobtenidosbajocondicionesdelaboratorio,deacuerdoconlosestándarespertinentes.Dichos
valorespodríanvariarenfuncióndelascondicionesambientalesydefuncionamientodelaparato.
Modelos (ES)
Máximacapacidaddesecado(kg)
Altura (cm)
Anchura (cm)
Profundidad (cm)
Peso neto (±4 kg)
Entradaeléctrica(V/Hz)
Corriente total (A)
Potencia total (W)
Velocidaddecentrifugado(máx.rpm)
Potencia en modo en espera (W)
Potencia en modo apagado (W)
Esteproductoincorporaelsímboloderecogidaselectivaderesiduosdeequipos
eléctricos y electrónicos.
EllosignificaqueesteproductodebesermanipuladoteniendoencuentalaDirectiva
Europea2002/96/EC,enordendeserrecicladoorecuperadoparaminimizarsu
impacto en el medio ambiente. Para mas información rogamos contacte con las
autoridadeslocalesoregionalesmáspróximasasudomicilio.
Los productos electrónicos no incluidos en el proceso de recogida selectiva son
potencialmente peligrosos para el medio ambiente y la salud humana debido a
laresencia de ciertas sustancias
(Delicado)
(Algodón)
(Aclarado Extra)
(Sin aclarado)
Encendido/
apagado
Puerta
Prendas
oscuras
Prendas
oscuras
Tejidos
sintéticos
Algodones Prelavado Lavado
principal
Aclarado Lavado Centrifugado
Secado
(Vaciado)
Antiarrugas Colchas
(Edredón)
(Ropa de cama)
Bloqueo
para niños
Lavado a
mano
Protección de
bebés
(BabyProtect)
Algodón
Eco
Tejidos de
lana
Prendas
delicadas
Lavado
diario
Ropa interior
expres 14
Expreso súper
corto
(Xpress Super Short)
Lavado diario
expreso
(Daily Express)
Mantenimiento
del aclarado
Inicio/Pa
usa
Sin
centrifugado
Lavado rápido Acabado Fría Limpieza del
tambor
Temperatura
Mixtos 40
(Mix 40)
Súper 40 Aclarado
adicional
Aireado Camisas Pantalones
tejanos
Deportes
(Sports)
Selección de
retardo
Intensivo Cuidado de
la moda
Eliminación de
pelusa de
mascotas
Mini 30
Limpieza Eco
(Eco Clean)
WMB71031PTM
7
84
60
50
63
230V/50Hz
10
2200
1000
1.35
0.25
54 ES
7 Resolución de problemas
No se puede iniciar ni seleccionar el programa.
• Esposiblequelalavadorahayapasadoalmododeautoprotecciónporunproblemaenlasredes
desuministro(tensióndelalínea,presióndeagua,etc.)>>>Para cancelar el programa, gire el
selector de programas para seleccionar otro programa. El programa anterior se cancelará. (Ver
"Cancelación del programa".)
Agua en la lavadora.
• Esposiblequehayaquedadoalgodeaguaenelinteriordelalavadoracomoconsecuenciadelos
procesosdecontroldecalidadaplicadosdurantelafasedeproducción.>>>No se trata de una
anomalía, el agua no es nociva para la lavadora.
La lavadora vibra o hace ruidos.
• Puedequelalavadoraestémalequilibrada.>>>Ajuste los pies para nivelar la lavadora.
• Esposiblequehayapenetradounasustanciaextrañaenelfiltrodelabomba.>>>Limpie el filtro de
la bomba.
• Lospernosdeseguridadparaeltransportenosehanretirado.>>>Retire los pernos de seguridad
para el transporte.
• Puedequeelvolumendelacoladaseademasiadopequeño.>>>Introduzca más prendas en la
lavadora.
• Esposiblequehayasobrecargadolalavadora.>>>Retire algunas prendas de la lavadora o bien
distribuya la carga a mano para que quede bien repartida en la lavadora.
• Puedequelalavadoraestéapoyadasobreunelementorígido.>>>Asegúrese de que la lavadora
no esté apoyada sobre ningún objeto o elemento.
La lavadora se detuvo poco después de haberse iniciado el programa.
• Esposiblequelalavadorasehayadetenidotemporalmentedebidoaunabajadadelatensión
eléctrica.>>>Volverá a ponerse en funcionamiento en cuanto la tensión vuelva al nivel normal.
Nohaycuentaatrásdelprograma.(Enmodelosprovistosdepantalla)
• Esposiblequeeltemporizadorsedetengadurantelatomadeagua.>>>El indicador del
temporizador suspenderá la cuenta atrás hasta que la lavadora haya tomado una cantidad
adecuada de agua. La lavadora esperará hasta que haya suficiente agua para evitar que el resultado
del lavado no sea satisfactorio por falta de agua. Posteriormente se reanudará la cuenta atrás.
• Esposiblequeeltemporizadorsedetengaduranteelcalentamiento.>>>El indicador del
temporizador no iniciará la cuenta atrás hasta que la lavadora no alcance la temperatura
seleccionada.
• Esposiblequeeltemporizadorsedetengaduranteelcentrifugado.>>>Es posible que el sistema
de detección automática de desequilibrio de carga se haya activado debido a una distribución
irregular de la colada en el tambor.
C Silasprendasnoestándistribuidasuniformementedentrodeltambor,seomiteelcentrifugado
para evitar dañar tanto la lavadora como su entorno. Es necesario reacomodar las prendas y volver
a centrifugar.
El depósito de detergente rebosa espuma.
• Sehautilizadodemasiadodetergente.>>>Prepare una mezcla de 1 cucharada de suavizante y ½
litro de agua y viértala en el compartimento de lavado principal del depósito de detergente.
C Añadaalalavadoradetergentequeseaadecuadoalosprogramasycargasmáximasindicadasen
latabladeprogramasyconsumos.Cuandouseproductosadicionales(quitamanchas,lejías,etc.),
reduzca la cantidad de detergente.
La colada permanece húmeda al final del programa
• Esposiblequesehayaproducidounexcesodeespumayqueelsistemaabsorciónautomáticade
laespumasehayaactivadodebidoalusodeunacantidadexcesivadedetergente.>>>Utilice la
cantidad recomendada de detergente.
C Silasprendasnoestándistribuidasuniformementedentrodeltambor,seomiteelcentrifugado
para evitar dañar tanto la lavadora como su entorno. Es necesario reacomodar las prendas y volver
a centrifugar.
A Si las indicaciones de esta sección no le permiten solucionar el problema, póngase en contacto
consuproveedorobienconunagentedeservicioautorizado.Silalavadoranofunciona,jamás
trate de repararla por su cuenta.
2820522485_ES/240312.0901
