Belkin F5D7051D Wireless G Plus USB Network Adapter User Manual
Belkin International, Inc. Wireless G Plus USB Network Adapter
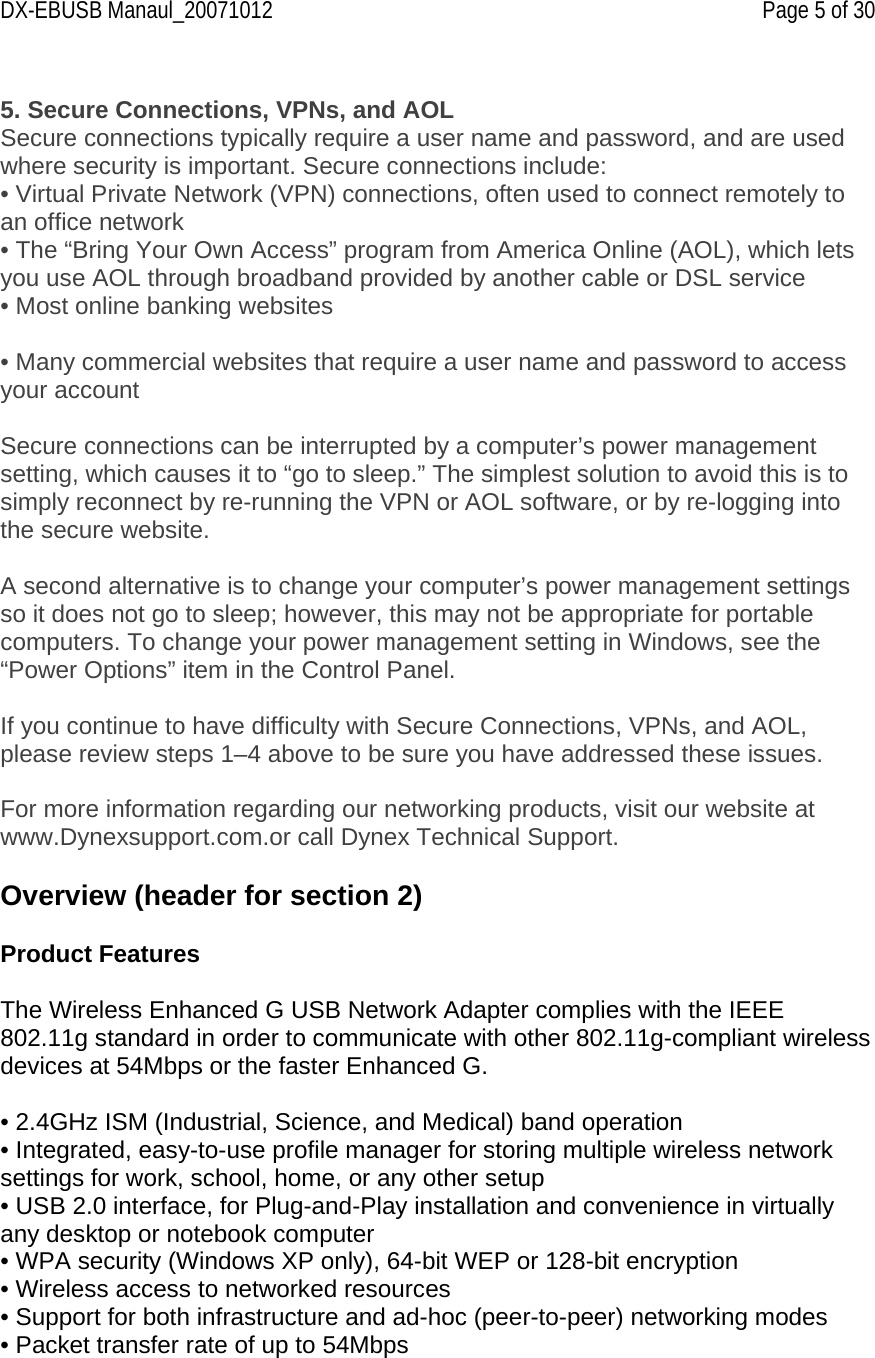
Belkin >
Contents
- 1. user manual model 1
- 2. user manual model 2
- 3. user manual model 3
user manual model 2
![DX-EBUSB Manaul_20071012 Page 14 of 30 3. Double-click on the network to which you want to connect. A blue circle (b) (Designer please use image found on P74845uk page 22) should appear around the network icon next to the name of the network you selected. This means you are connected to the network. If the network is using encryption security, you will be prompted to make a profile for that network in order to connect. See the section of this User Manual called “Profile Tab: Creating a Profile” on page xx [fill in correct page no.] for information. Windows XP Users If you are using Windows XP, please read this section. (Designer please bold text) Windows XP integrates a wireless management utility referred to as Windows XP Wireless Zero Configuration service (WZC). The WZC can be used to control your Adapter or you can use the Dynex Wireless LAN Monitor Utility. We suggest that you use the Dynex Utility to control your Adapter. If you choose to use the WZC, directions for operation of the WZC are available in the Windows XP help file. When you first install the Adapter, the Dynex Utility will be enabled. If you want to disable the Dynex Utility in order to use the WZC, follow the steps below to disable the Dynex Utility. Disabling the Windows Zero Configuration (WZC) in Windows XP 1. Right-click on the system tray icon. (Designer please use image found on P74845uk page23) 2. In the menu, select “Enable Windows Zero Configuration (WZC)”. (Designer please use image found on P74471-C page 23) 3. To enable the Dynex Utility, right-click on the system tray icon. 4. In the menu, select “Disable Windows Zero Configuration (WZC)” (Designer please use image found on P74471-C page 23) Setting up Windows XP Wireless Network Utility to use WPA-PSK In order to use WPA-PSK, ensure that you are using “Windows Wireless Network Utility” by doing the following: 1. Right-click on “Wireless Network Connection” and select “Properties”. 2. Clicking on the “Wireless Networks” tab will display the following screen. Ensure the “Use Windows to configure my wireless network settings” box is checked.](https://usermanual.wiki/Belkin/F5D7051D.user-manual-model-2/User-Guide-854547-Page-14.png)
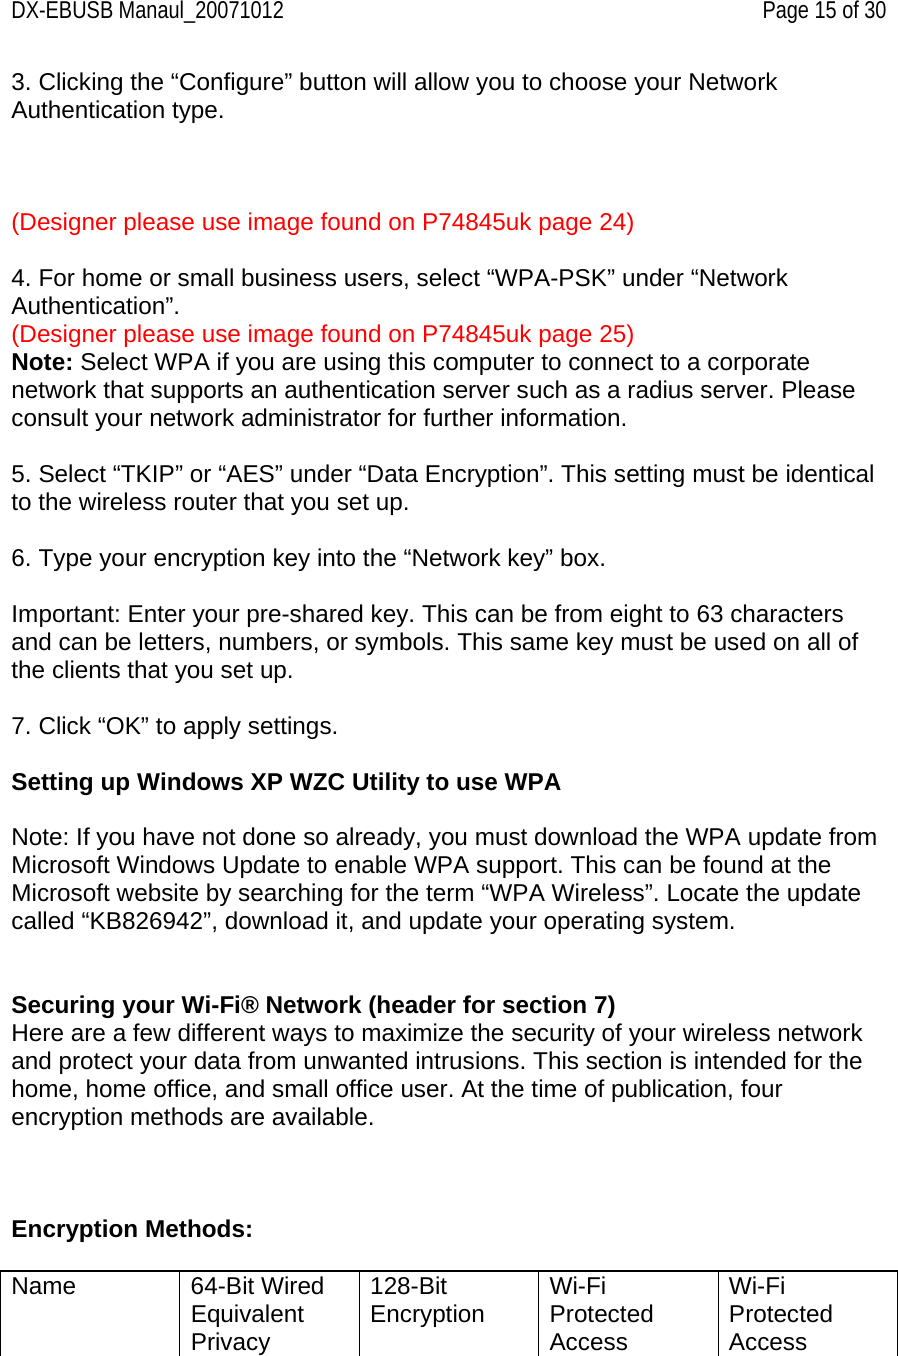
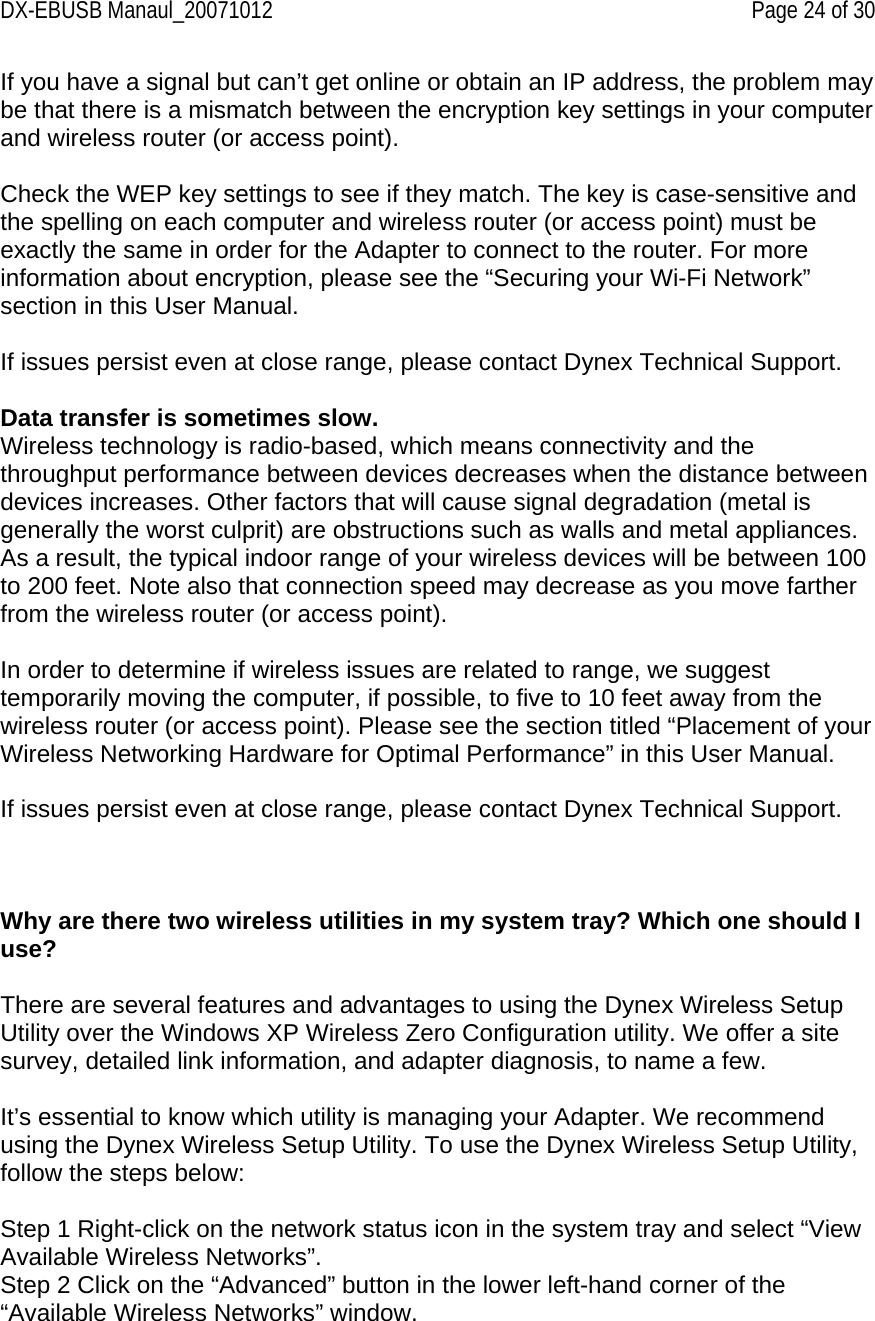
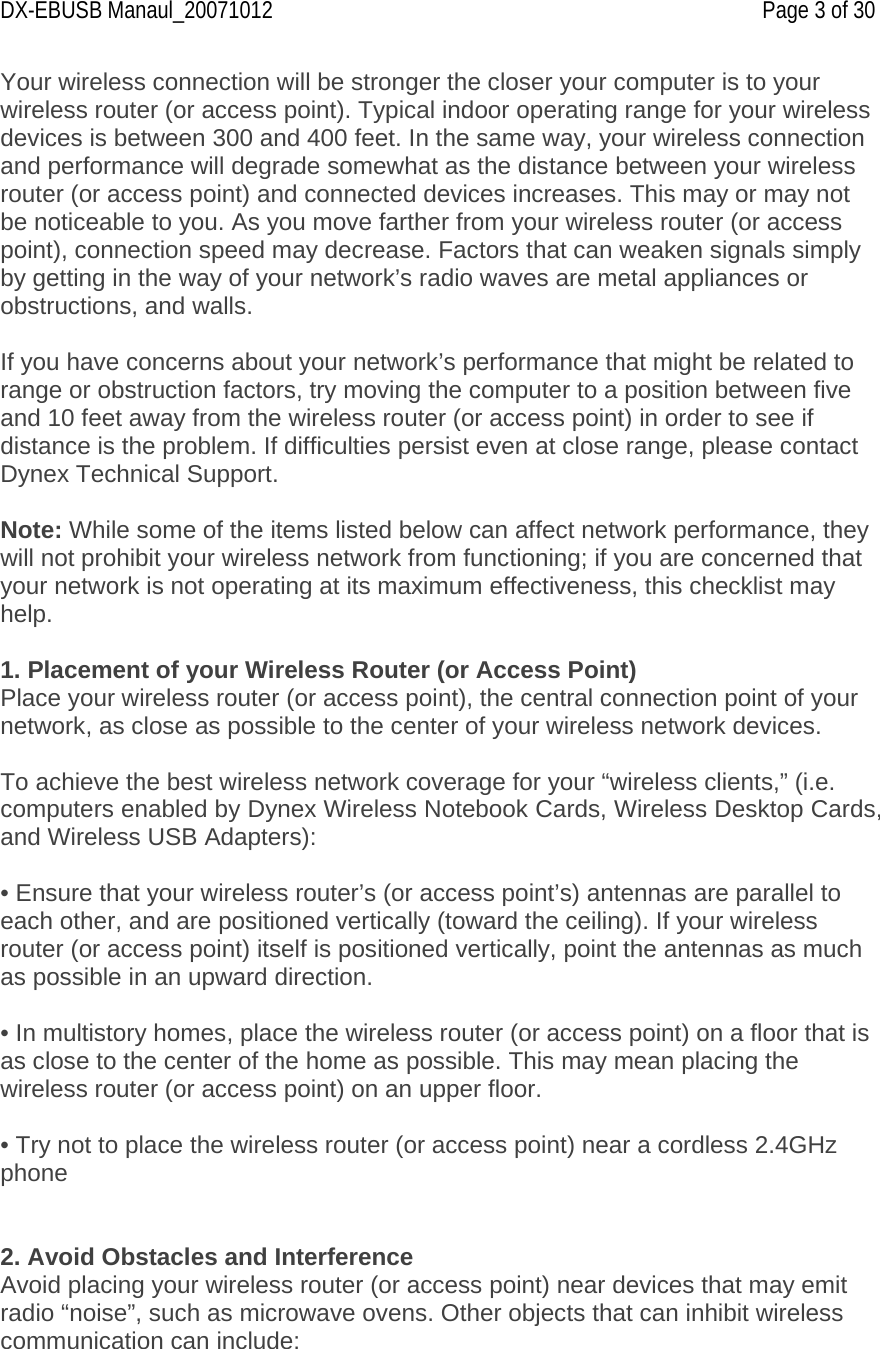
![DX-EBUSB Manaul_20071012 Page 16 of 30 Acronym 64-bit WEP 128-bit WPA-TKIP WPA-AES Security Good Better Best Best Features Static keys Static keys Dynamic key encryption and mutual authenticationDynamic key encryption and mutual authentication Encryption keys based on RC4algorithm (typically 40-bit keys) Added security over 64-bit WEP using a key length of 104 bits, plus 24 additional bits of system- generated data TKIP (Temporal Key Integrity Protocol) added so that keys are rotated and encryption is strengthened AES (Advanced Encryption Standard) does not cause any throughput loss Securing your Wireless Network Most wireless products ship with security turned off. This means that once you have your network working, you may need to activate WEP or WPA and make sure all your wireless devices are sharing the same network key. The following diagram shows the effect of not having the correct network key throughout your network. (Designer please use chart found on P74845uk page 27) [image – computer] Network Key= MyPassword [image – router] Network Key= MyPassword [image – computer] Network Key= MyPassword [image – computer] Network Key= WRONG Password The Adapter cannot access the network because it uses a different network key than the one configured on the wireless router.](https://usermanual.wiki/Belkin/F5D7051D.user-manual-model-2/User-Guide-854547-Page-16.png)


![DX-EBUSB Manaul_20071012 Page 22 of 30 The name of your wireless network appears in the AP list. If the correct network name is listed in the AP list, please follow the steps below to connect wirelessly: 1. Click on the correct network name in the AP list. 2. If the network has security (encryption) enabled, you will need to enter the network key. For more information regarding security, please see “Securing your Wi-Fi Network” on page XX [insert correct pg. no.] of this User Manual. 3. Within a few seconds, the tray icon in the lower right-hand corner of your screen should turn green, indicating a successful connection to the network. If you are still unable to access the Internet after connecting to the wireless network, please contact Dynex Technical Support. The name of your wireless network DOES NOT appear in the AP list. If the correct network name is not listed in the AP list in the Wireless Utility, please attempt the following troubleshooting steps: 1. Temporarily move computer, if possible, to five to 10 feet away from the wireless router (or access point). Close the Wireless Utility, and reopen it. If the correct network name now appears in the AP list, you may have a range or interference problem. Please see the suggestions listed in the “Placement of your Wireless Networking Hardware for Optimal Performance” section on page 2. 2. Using a computer that is connected to the wireless router (or access point) via a network cable (as opposed to wirelessly), ensure that “Broadcast SSID” is enabled. This setting is found on the router’s wireless “Channel and SSID” configuration page. For detailed instructions on accessing this page and changing settings, please see your wireless router’s (or access point’s) user manual. If you are still unable to access the Internet after completing these steps, please contact Dynex Technical Support. Installation CD-ROM does not start Wireless Setup Utility. If the CD-ROM does not start the Wireless Setup Utility automatically, it could be that the computer is running other applications that are interfering with the CD drive. If the Wireless Setup Utility screen does not appear within 15-20 seconds, open up your CD-ROM drive by double-clicking on the “My Computer” icon. Next,](https://usermanual.wiki/Belkin/F5D7051D.user-manual-model-2/User-Guide-854547-Page-22.png)