Belkin F5D7051D Wireless G Plus USB Network Adapter User Manual
Belkin International, Inc. Wireless G Plus USB Network Adapter
Belkin >
Contents
- 1. user manual model 1
- 2. user manual model 2
- 3. user manual model 3
user manual model 1
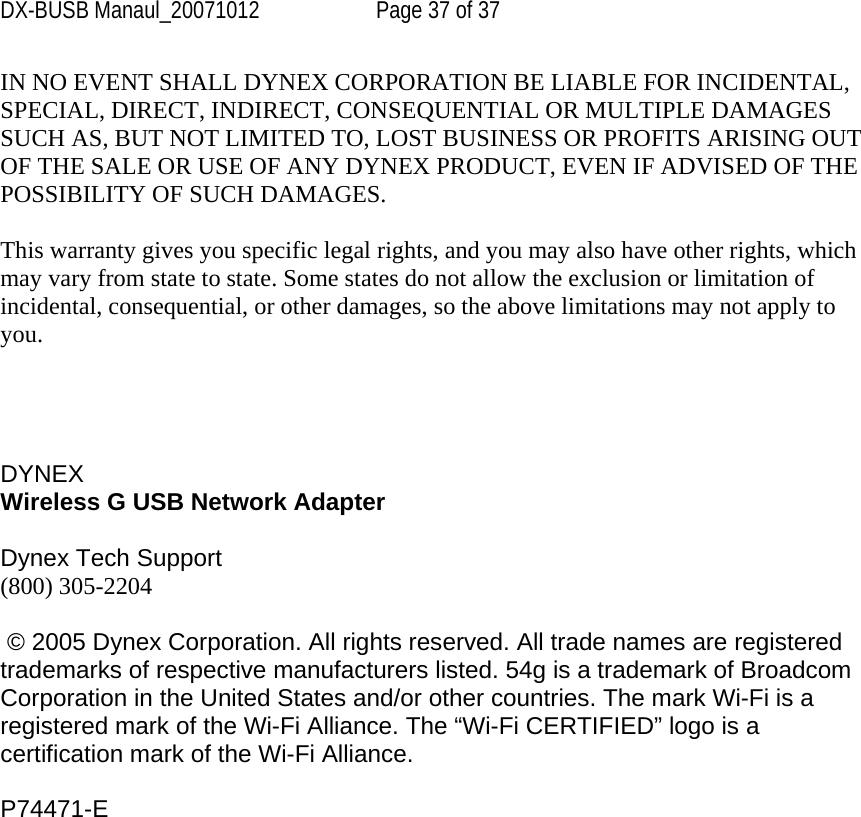
![DX-BUSB Manaul_20071012 Page 6 of 37 Applications and Advantages • Wireless roaming with a laptop around the home or office Offers the freedom of networking—without cables • Connection rates of up to 54Mbps Provides immediate wireless connectivity at home, work, and hotspot locations without compromising the use of existing 802.11b and 802.11g products • Compatibility with 802.11b products 802.11g wireless LAN solutions are backward-compatible with existing Wi-Fi (IEEE 802.11b) products and with other products that display the 54g logo • Difficult-to-wire environments Enables networking in buildings with solid or finished walls, or open areas where wiring is difficult to install • Frequently changing environments Adapts easily in offices or environments that frequently rearrange or change locations • Temporary LANs for special projects or peak time Sets up temporary networks such as at trade shows, exhibitions, and construction sites, which need networks on a short-term basis; also companies who need additional workstations for a peak activity period • SOHO (Small Office/Home Office) networking needs Provides the easy and quick, small network installation SOHO users need Product Specifications Host Interface: USB 2.0 interface Power Consumption: Tx/Rx peak 510/250mA @ 3.3VDC (max.) Operating Temperature: 32–140 degrees F (0–60 degrees C) Storage Temperature: -4–176 degrees F (-20–80 degrees C) Humidity: Max. 90% (non-condensing) Typical Operating Range: 100–200 ft. (30–60m) indoors [insert image from P74471-A, p.8] (a) Protective Cap The cap can be stored on the opposite end of the USB connector. Insert image from P74471-A, p.8](https://usermanual.wiki/Belkin/F5D7051D.user-manual-model-1/User-Guide-854546-Page-6.png)
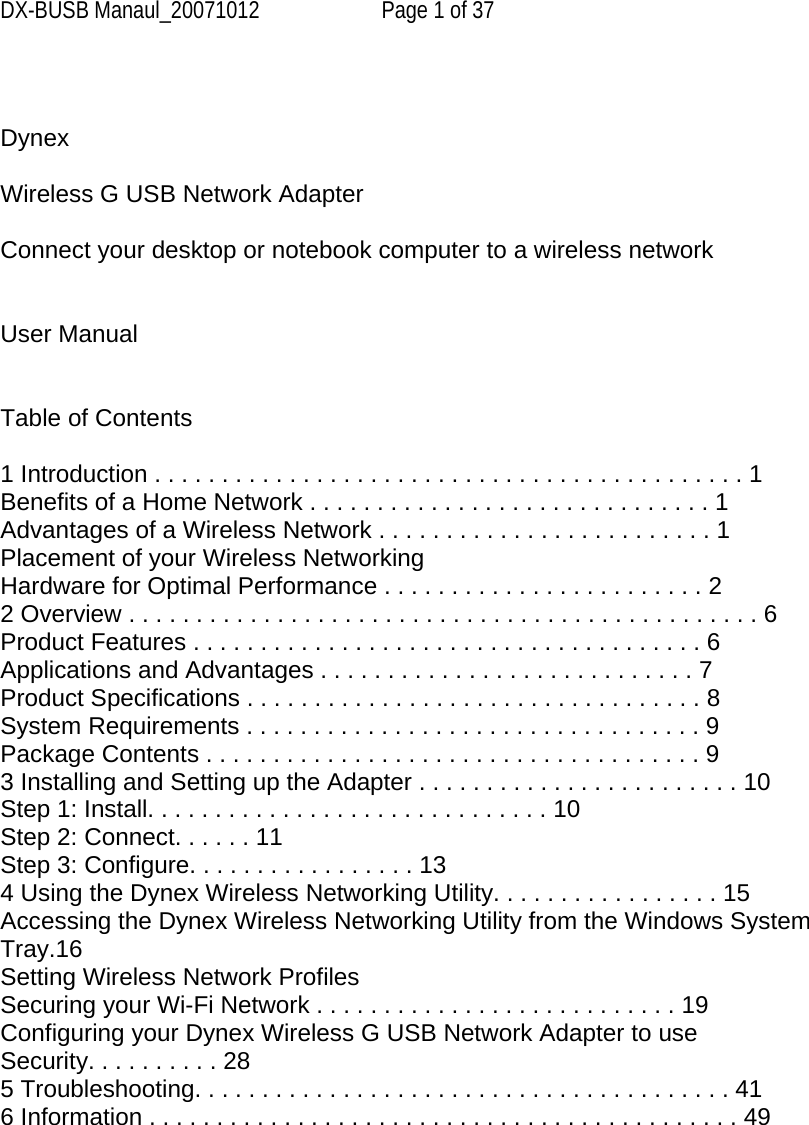
![DX-BUSB Manaul_20071012 Page 8 of 37 1.2 The Dynex Wireless Networking Utility setup screen will automatically appear (may take 15–20 seconds to appear). [insert splash page of Dynex Wireless Networking Utility setup screen, image 7050v4000-1] 1.3 Click “install” from the menu. Note: If the Dynex Wireless Networking Utility setup screen does not appear within 20 seconds, access your CD-ROM, double-click on the “My Computer” icon, and then double-click on the CD-ROM drive into which you have placed the installation CD. Double-click on the folder named “Files”, then double-click on the icon named “setup.exe”. 1.4 Choose an installation location, and click “Next” to accept the default location or click “Browse” to select a different location before clicking “Next”. (insert image DX-BUSBv4000-2) Step 2. Connect Plug the Adapter into an Available USB Slot on your Notebook Computer](https://usermanual.wiki/Belkin/F5D7051D.user-manual-model-1/User-Guide-854546-Page-8.png)
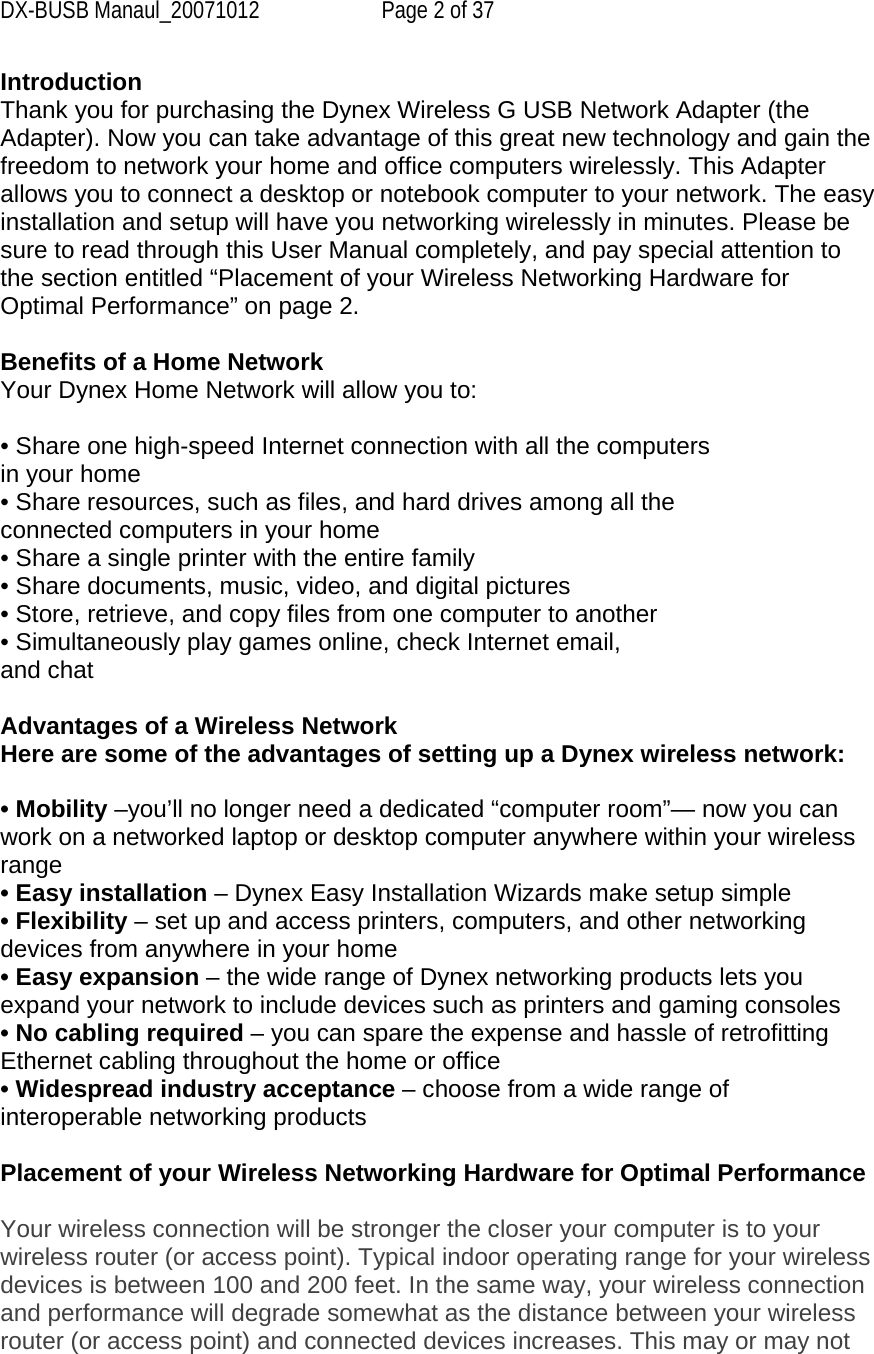
![DX-BUSB Manaul_20071012 Page 9 of 37 2.1 During the install process, you will be prompted to insert your Adapter. Plug the Adapter into an available USB port on your computer and follow the on-screen instructions. [insert F5D7010 QIG 01.jpg] (Insert image from P74472-A, p.4) Note: If your system did not prompt you to insert your Adapter after the installation is completed, please do so now. 2.2 Dynex Wireless Networking Utility installation is now complete. Click “Finish” to close the Wizard. Insert DX-BUSBv4000-5]](https://usermanual.wiki/Belkin/F5D7051D.user-manual-model-1/User-Guide-854546-Page-9.png)
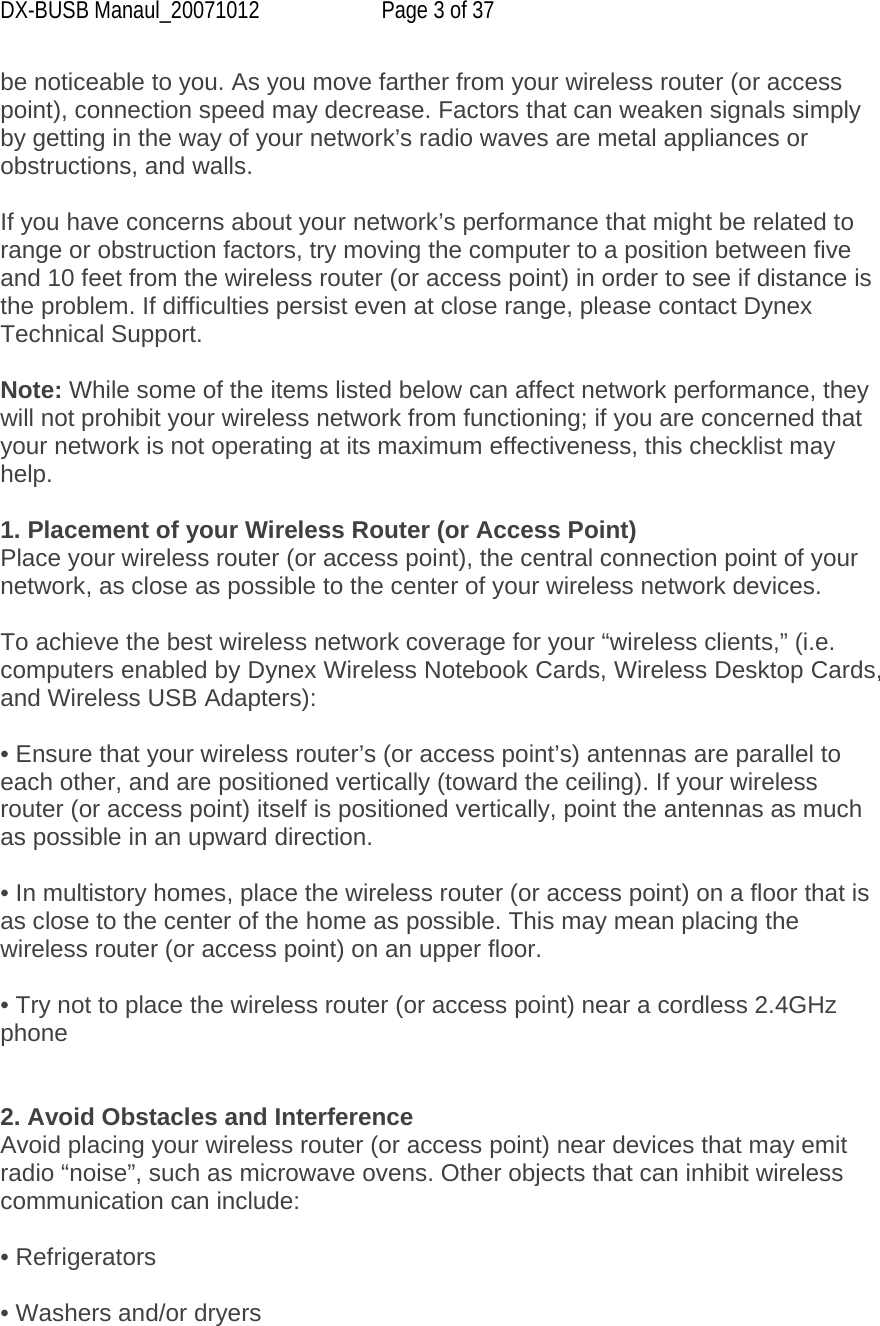
![DX-BUSB Manaul_20071012 Page 10 of 37 Step 3. Configure Use the Dynex Wireless Networking Utility 3.1 After successfully installing the Adapter, double-click the Dynex Wireless Networking Utility icon located on the desktop screen. [insert F5D7000 QIG 06.jpg] 3.2 The Wireless Networking Utility screen will appear. Select a network to connect to by selecting a network from the “Available Networks” list. Then, click “Connect”. [insert F5D7000 QIG 09.jpg]](https://usermanual.wiki/Belkin/F5D7051D.user-manual-model-1/User-Guide-854546-Page-10.png)
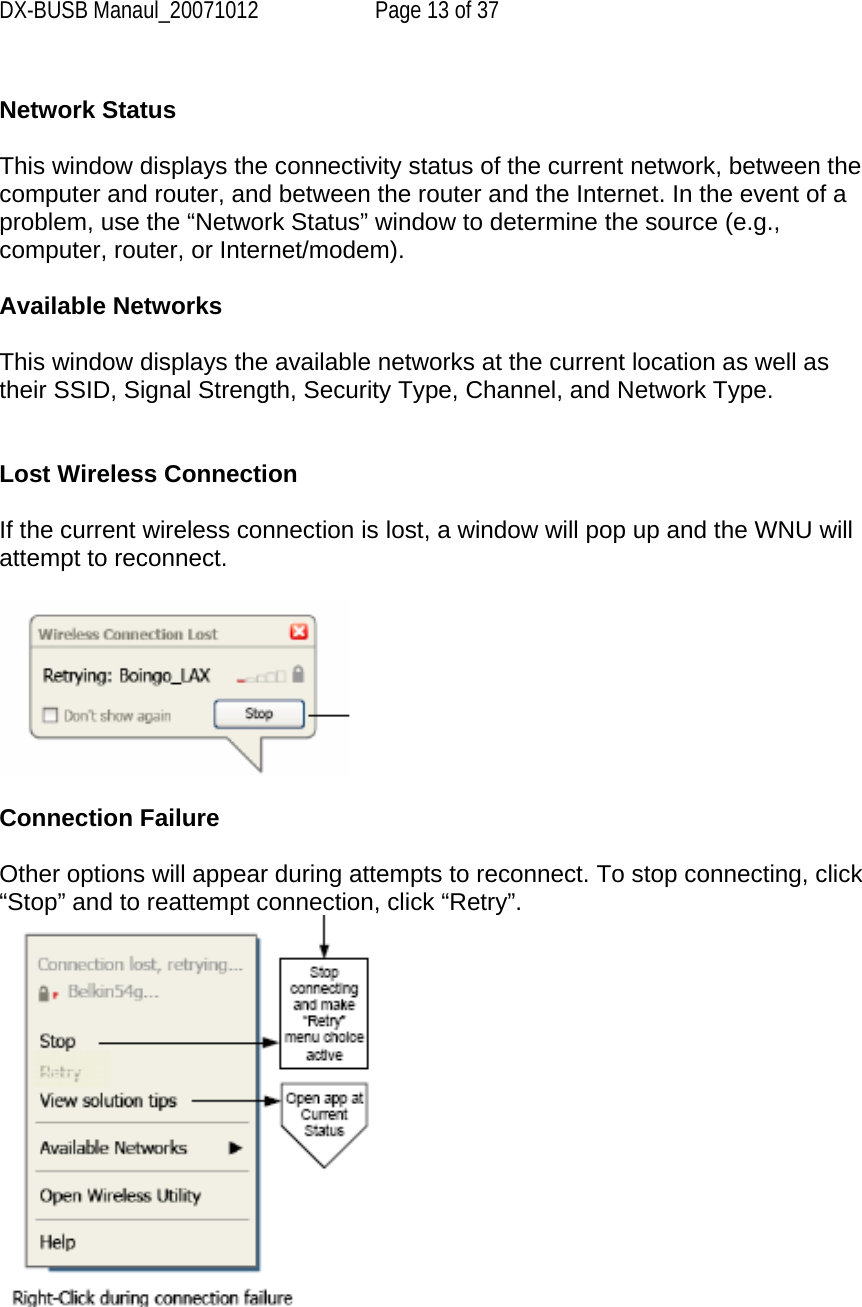
![DX-BUSB Manaul_20071012 Page 11 of 37 Note: In order to see your available networks, you must be near a working wireless router or access point. 3.3 The Dynex Wireless Networking Utility icon can also be found on the system tray. [insert F5D7000 QIG 10.jpg] (Note at bottom of page) Note: Double-clicking on the Dynex Wireless Networking Utility icon on the system tray will bring up the “Utility” screen. Installation is now complete. Using the Dynex Wireless Networking Utility After successfully installing the Dynex Wireless Networking Utility (WNU), configurations for wireless connection and security are just a few easy clicks away.](https://usermanual.wiki/Belkin/F5D7051D.user-manual-model-1/User-Guide-854546-Page-11.png)
![DX-BUSB Manaul_20071012 Page 12 of 37 Accessing the Dynex Wireless Networking Utility from the Windows System Tray To access the WNU, simply place your mouse pointer and right-click over the WNU icon on the Windows system tray on the lower right-hand corner of your computer’s desktop. [insert F5D7000-10.jpg] [insert F5D7000-11.jpg] If the icon is not present, click on “Start > Programs > Dynex > Wireless Networking Utility”. [insert F5D7000 22.jpg] The WNU’s default screen is the “Current Status” tab. The “Current Status” tab displays the current network status and available networks.](https://usermanual.wiki/Belkin/F5D7051D.user-manual-model-1/User-Guide-854546-Page-12.png)
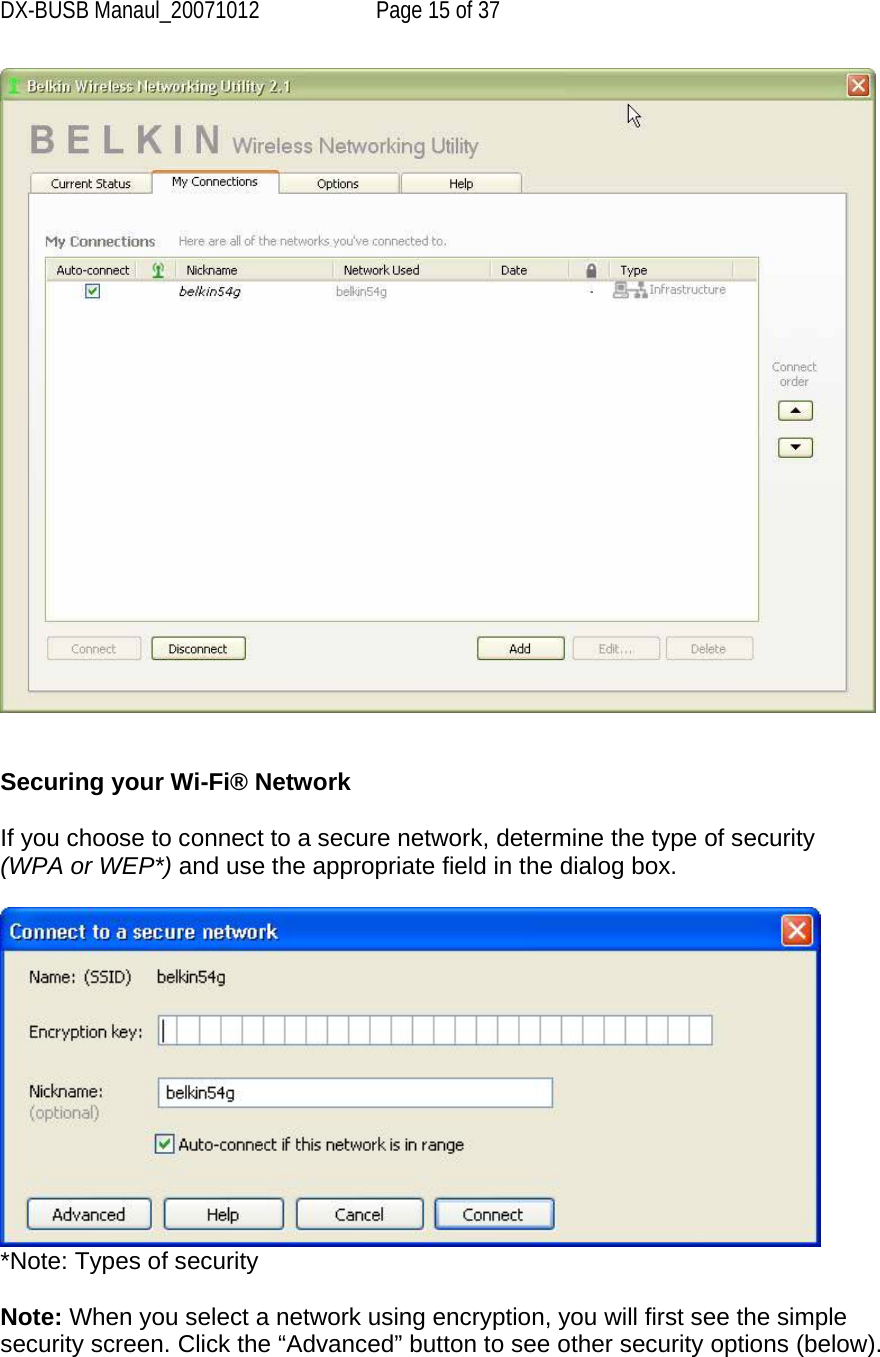
![DX-BUSB Manaul_20071012 Page 14 of 37 Network Status and Solution Tips To further understand the current Network Status, click “Open Wireless Utility”. The default screen will be the “Current Status” tab and the “Network Status” section determines which connections are good and/or faulty. [insert F5D7000-12.jpg] The WNU also features a “Solution Tips” section that provides troubleshooting guidelines. Setting Wireless Network Profiles The “My Connections” tab on the WNU allows you to add, edit, and delete connection profiles. It also displays signal strength, security, and network type. [insert F5D7000-13.jpg]](https://usermanual.wiki/Belkin/F5D7051D.user-manual-model-1/User-Guide-854546-Page-14.png)
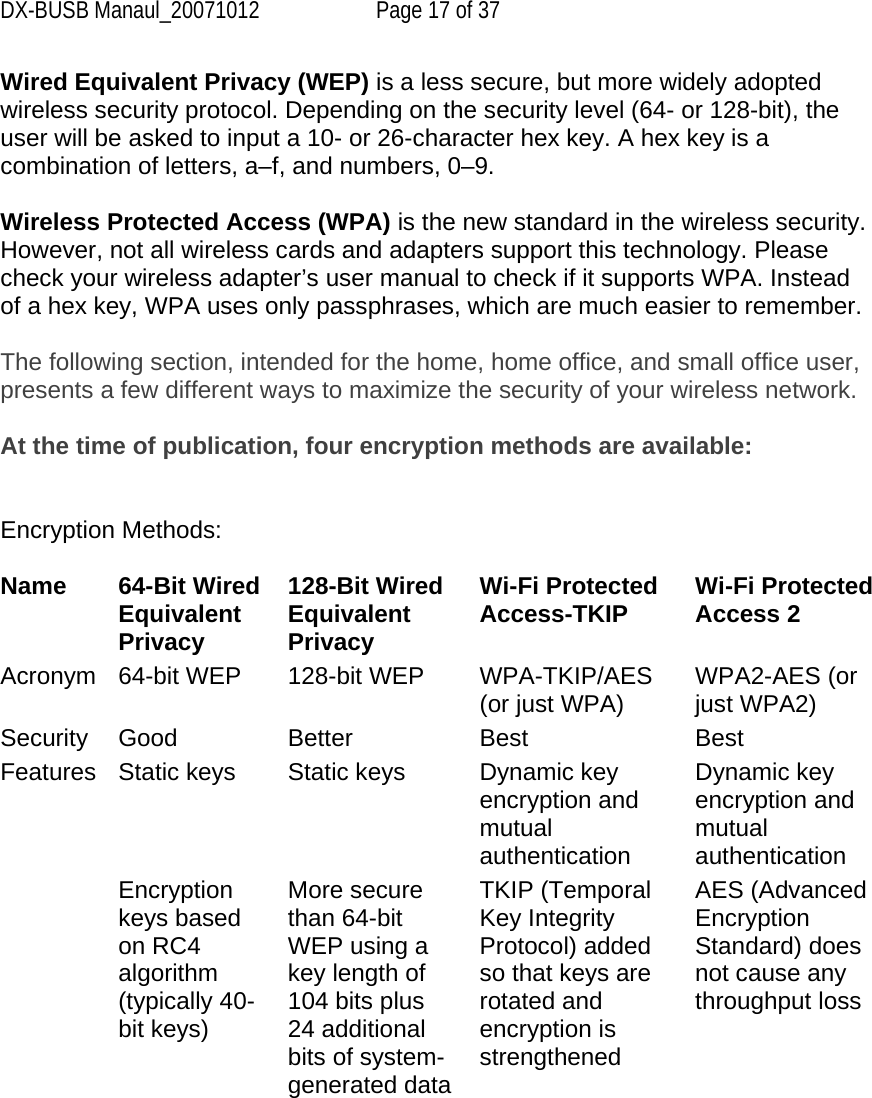
![DX-BUSB Manaul_20071012 Page 16 of 37 [insert F5D7000-14.jpg]](https://usermanual.wiki/Belkin/F5D7051D.user-manual-model-1/User-Guide-854546-Page-16.png)
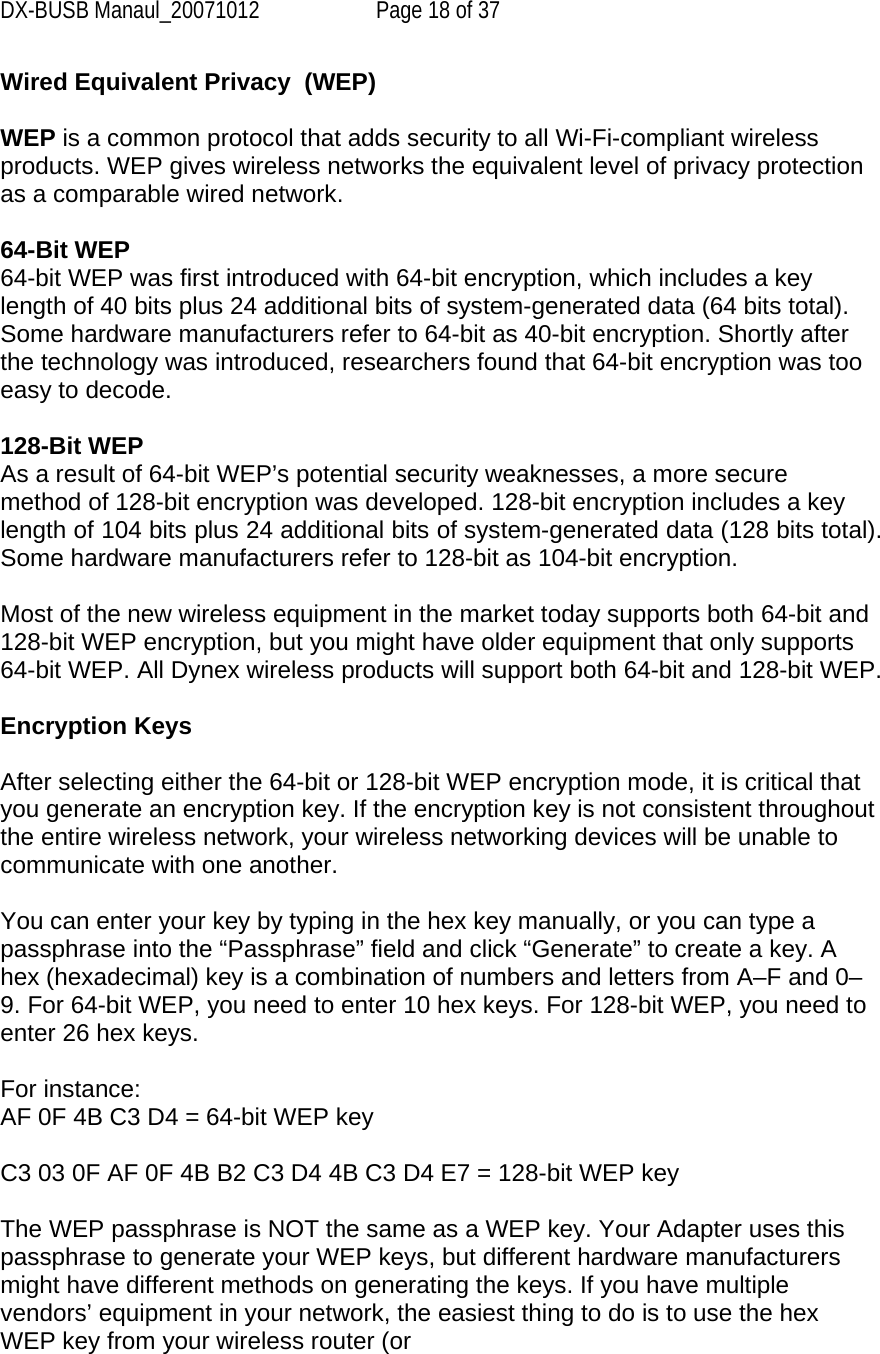
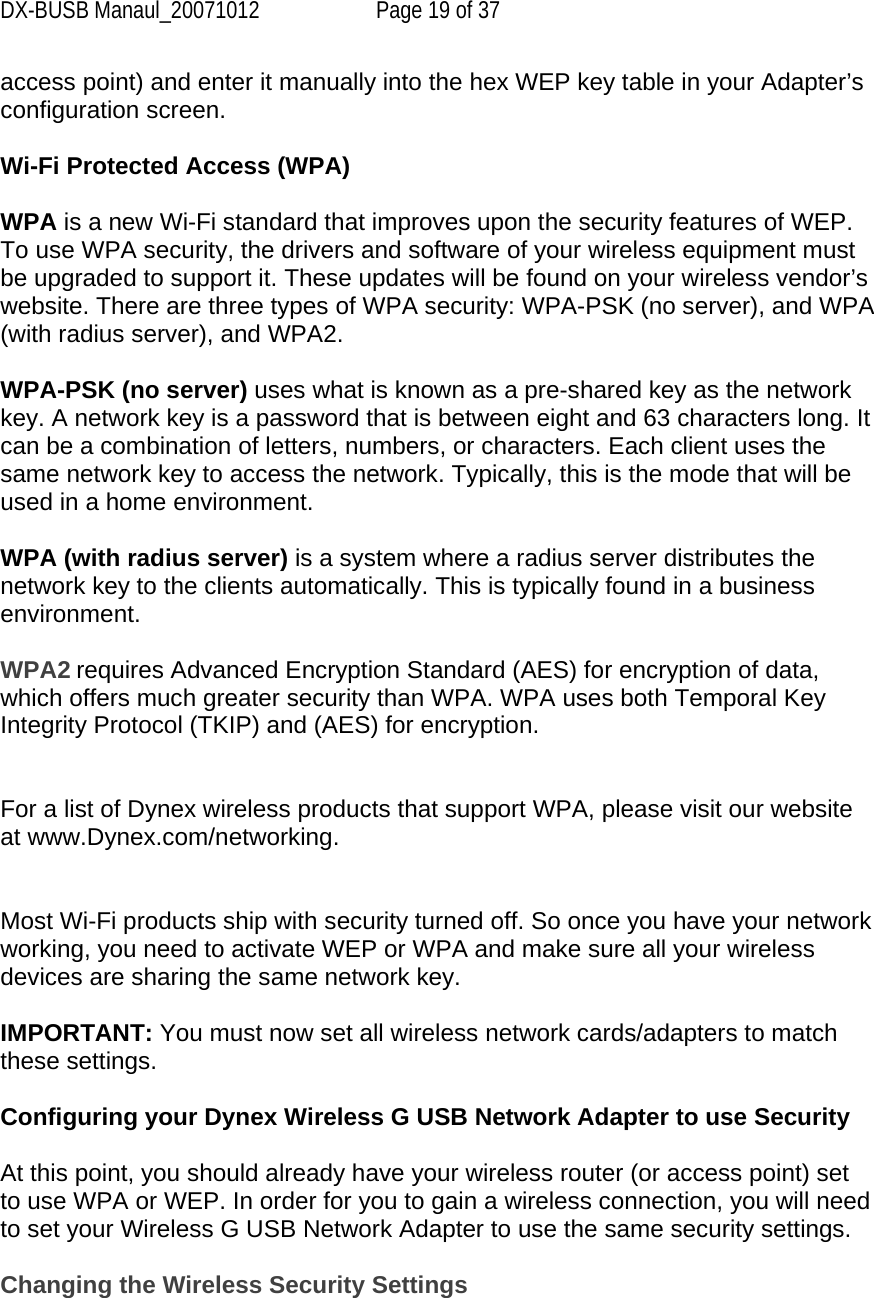
![DX-BUSB Manaul_20071012 Page 20 of 37 The Dynex Wireless G USB Network Adapter supports the latest WPA security feature as well as the legacy WEP security standard. By default, wireless security is disabled. To enable security, you will first need to determine which standard is used by the router or access point. (See your wireless router’s or access point’s manual for directions on how to access the security settings.) [insert F5D7000-18.jpg] To access the security settings on your Adapter, click the “My Connections” tab and point to the connection for which you want to change security settings. Click “Edit” to change settings. WEP Setup 64-Bit WEP Encryption 1. Select “WEP” from the drop-down menu. 2. After selecting your WEP encryption mode, you can enter your key by typing in the hex key manually, or you can type in a passphrase in the “Passphrase” field and click “Generate” to create a key. A hex (hexadecimal) key is a combination of numbers and letters from A–F and 0–9. For 64-bit WEP, you need to enter 10 hex keys.](https://usermanual.wiki/Belkin/F5D7051D.user-manual-model-1/User-Guide-854546-Page-20.png)
![DX-BUSB Manaul_20071012 Page 21 of 37 For instance: AF 0F 4B C3 D4 = 64-bit WEP key [insert F5D7000-15.jpg] 3. Click “Save” to finish. Encryption in the wireless router (or access point) is now set. Each of your computers on your wireless network will now need to be configured with the same](https://usermanual.wiki/Belkin/F5D7051D.user-manual-model-1/User-Guide-854546-Page-21.png)
![DX-BUSB Manaul_20071012 Page 22 of 37 security settings. WARNING: If you are using a wireless client to turn on the security settings in your wireless router (or access point), you will temporarily lose your wireless connection until you activate security on your wireless client. Please record the key prior to applying changes in the wireless router (or access point). If you don’t remember the hex key, your client will be locked out of the wireless router (or access point). 128-Bit WEP Encryption 1. Select “WEP” from the drop-down menu. 2. After selecting your WEP encryption mode, you can enter your key manually by typing in the hex key manually, or you can type in a passphrase in the “Passphrase” field and click “Generate” to create a key. A hex (hexadecimal) key is a combination of numbers and letters from A–F and 0–9. For 128-bit WEP, you need to enter 26 hex keys. For instance: C3 03 0F AF 0F 4B B2 C3 D4 4B C3 D4 E7 = 128-bit WEP key [insert F5D7000-16.jpg]](https://usermanual.wiki/Belkin/F5D7051D.user-manual-model-1/User-Guide-854546-Page-22.png)

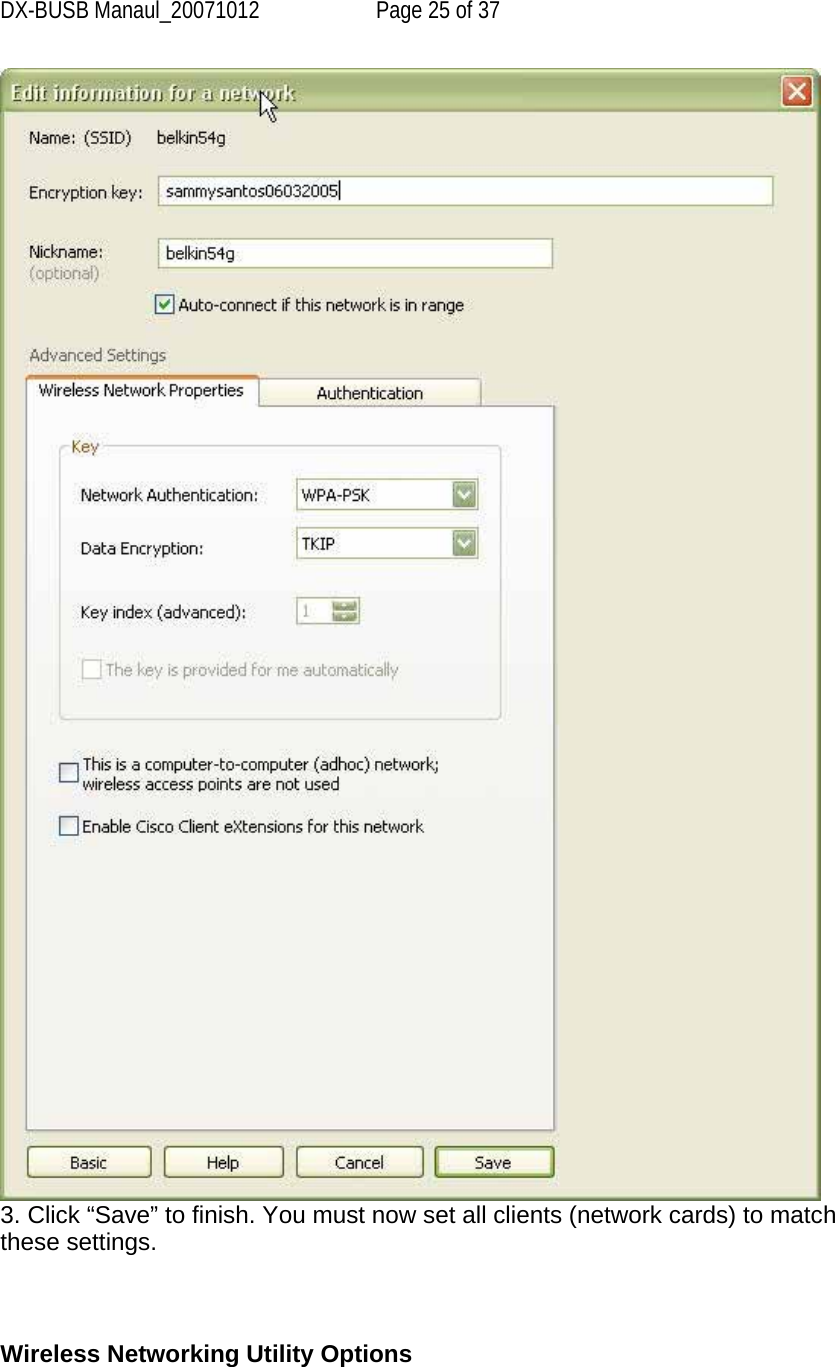
![DX-BUSB Manaul_20071012 Page 24 of 37 WARNING: If you are using a wireless client to turn on the security settings in your wireless router (or access point), you will temporarily lose your wireless connection until you activate security on your wireless client. Please record the key prior to applying changes in the wireless router (or access point). If you don’t remember the hex key, your client will be locked out of the wireless router (or access point). WPA-PSK (no server) Choose this setting if your network does not use a radius server. WPA-PSK (no server) is typically used in home and small office networking. 1. From the “Network Authentication” drop-down menu, select “WPA-PSK (no server)”. 2. Enter your network key. This can be from eight to 63 characters and can be letters, numbers, or symbols. This same key must be used on all of the clients (network cards) that you want to include in your network. [insert F5D7000-17.jpg]](https://usermanual.wiki/Belkin/F5D7051D.user-manual-model-1/User-Guide-854546-Page-24.png)
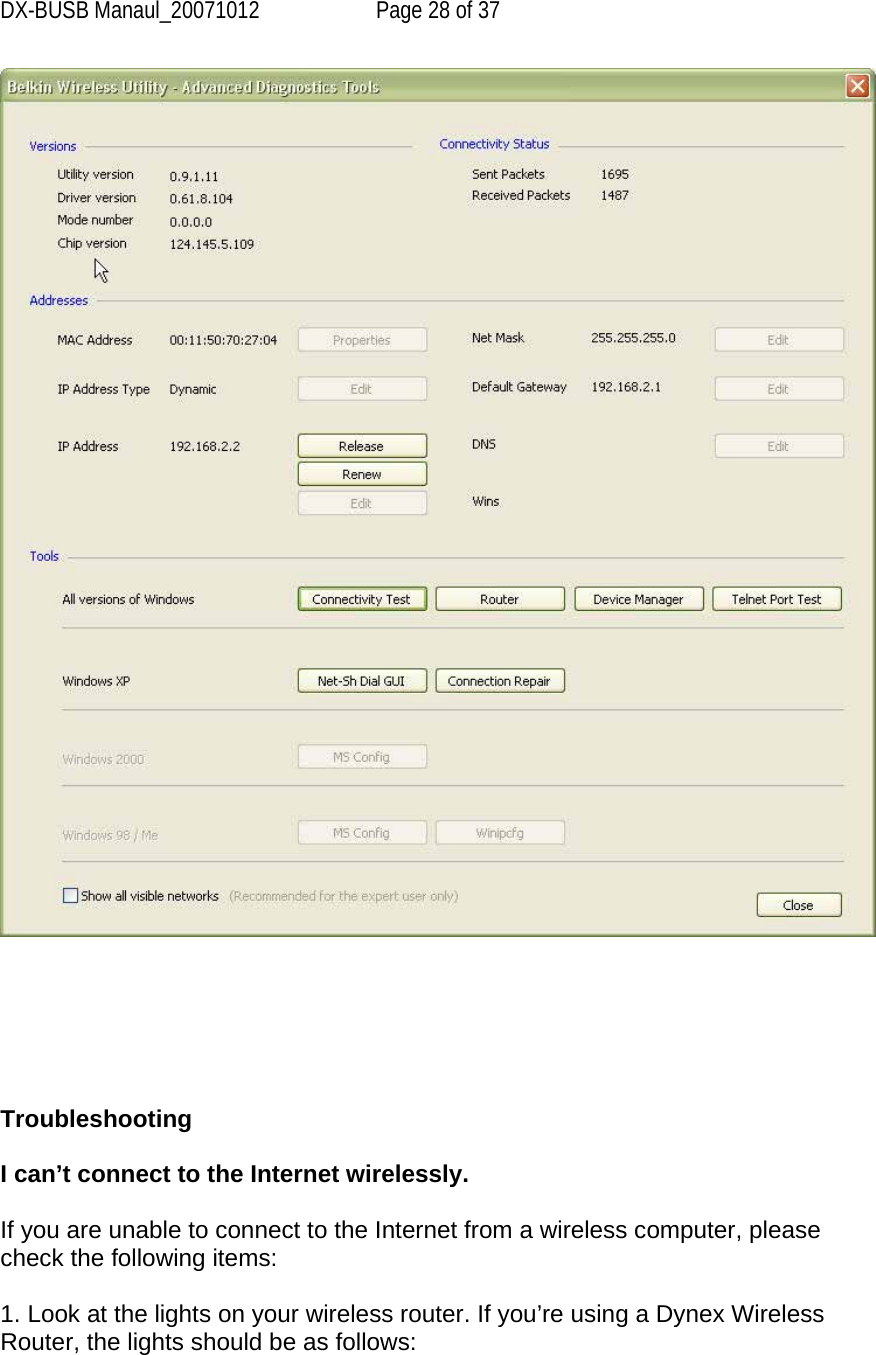
![DX-BUSB Manaul_20071012 Page 26 of 37 [insert F5D7000-19.jpg] The “Options” tab on the WNU provides the user the ability to customize his or her WNU settings. Wireless Networking Utility Help The WNU “Help” tab provides users with access to online and telephone support, as well as advanced diagnostic tools. [insert F5D7000-20.jpg]](https://usermanual.wiki/Belkin/F5D7051D.user-manual-model-1/User-Guide-854546-Page-26.png)
![DX-BUSB Manaul_20071012 Page 27 of 37 Advanced Diagnostic Tools The “Advanced Diagnostic Tools” section is the central control panel for all the settings of the hardware and software components of the wireless network. It provides an array of tests and connectivity services to ensure optimal network performance. [insert F5D7000-21.jpg]](https://usermanual.wiki/Belkin/F5D7051D.user-manual-model-1/User-Guide-854546-Page-27.png)