Belkin F5D7231B Wireless G Plus Router User Manual P74490 D F5D7231 4 man indd
Belkin International, Inc. Wireless G Plus Router P74490 D F5D7231 4 man indd
Belkin >
Contents
User manual 3
37
Alternate Setup Method
37
section
2
1
3
4
5
6
7
8
9
10
3. Password
Type in your password and retype it into the “Retype Password”
box to confirm it.
4. User Decide Login Server Manually
If your login server IP address is not available in the “Select Your
State” drop-down menu (6), you may manually enter the login
server IP address by placing a check in the box next to “User
decide login server manually” and typing in the address next to
“Login Server” (5).
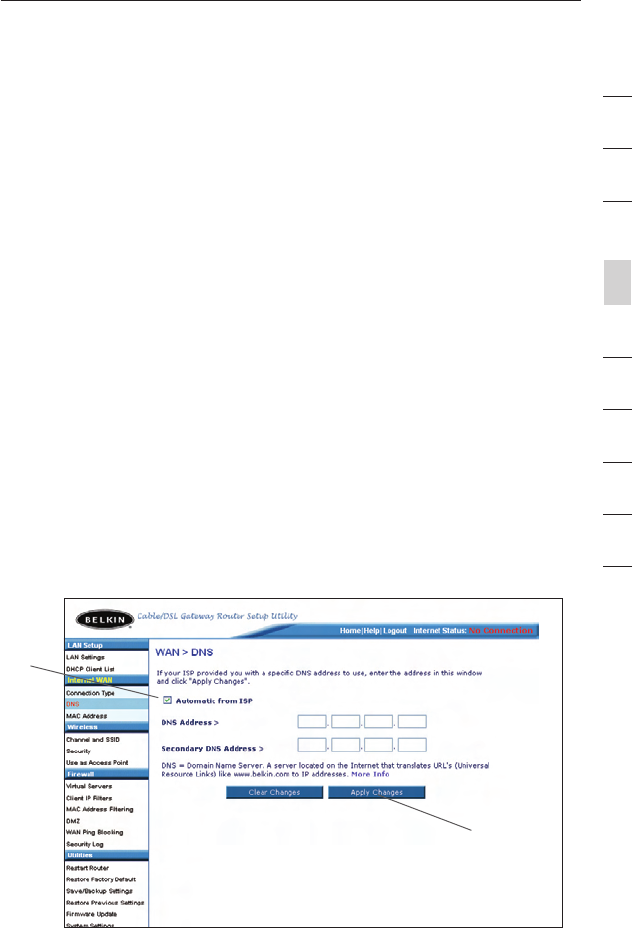
Setting Custom Domain Name Server (DNS) Settings
A “Domain Name Server” is a server located on the Internet that
translates Universal Resource Locators (URLs) like “www.belkin.com”
into IP addresses. Many Internet Service Providers (ISPs) do not require
you to enter this information into the Router. The “Automatic from ISP”
box (1) should be checked if your ISP did not give you a specific DNS
address. If you are using a static IP connection type, then you may
need to enter a specific DNS address and secondary DNS address for
your connection to work properly. If your connection type is dynamic
or PPPoE, it is likely that you do not have to enter a DNS address.
Leave the “Automatic from ISP” box checked. To enter the DNS address
settings, uncheck the “Automatic from ISP” box and enter your DNS
entries in the spaces provided. Click “Apply Changes” (2) to save
the settings.
(2)
(1)

3938
Alternate Setup Method
3938
Alternate Setup Method
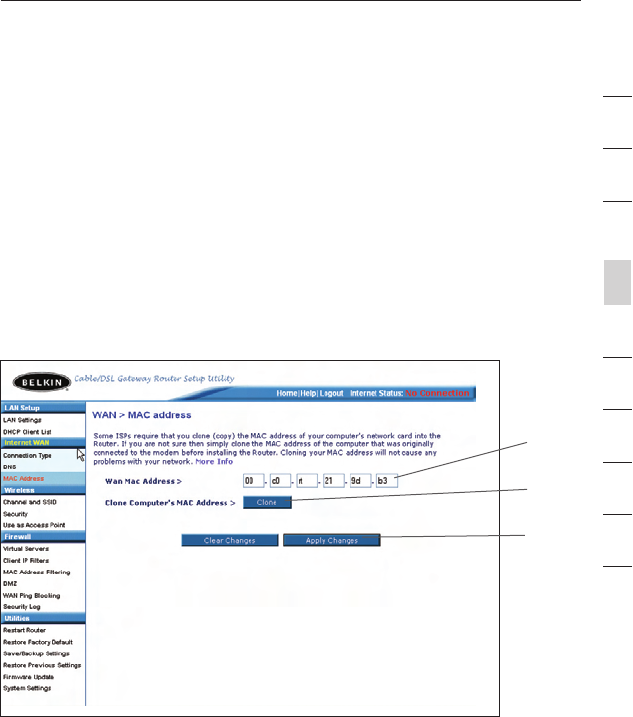
Configuring your WAN Media Access Controller (MAC) Address
All network components including cards, adapters, and routers, have
a unique “serial number” called a MAC address. Your Internet Service
Provider may record the MAC address of your computer’s adapter and
only let that particular computer connect to the Internet service. When
you install the Router, its own MAC address will be “seen” by the
ISP and may cause the connection not to work. Belkin has provided
the ability to clone (copy) the MAC address of the computer into the
Router. This MAC address, in turn, will be seen by the ISP’s system as
the original MAC address and will allow the connection to work. If you
are not sure whether your ISP needs to see the original MAC address,
simply clone the MAC address of the computer that was originally
connected to the modem. Cloning the address will not cause any
problems with your network.
39
Alternate Setup Method
39
section
2
1
3
4
5
6
7
8
9
10
Cloning your MAC Address
To clone your MAC address, make sure that you are using the
computer that was ORIGINALLY CONNECTED to your modem before
the Router was installed. Click the “Clone” button (1). Click “Apply
Changes” (3). Your MAC address is now cloned to the Router.
Entering a Specific MAC Address
In certain circumstances you may need a specific WAN MAC address.
You can manually enter one in the “MAC Address” page. Type in a
MAC address in the spaces provided (2) and click “Apply
Changes” (3) to save the changes. The Router’s WAN MAC address
will now be changed to the MAC address you specified.
(1)
(2)
(3)
4140
Using the Web-Based Advanced User Interface
4140
Using the Web-Based Advanced User Interface
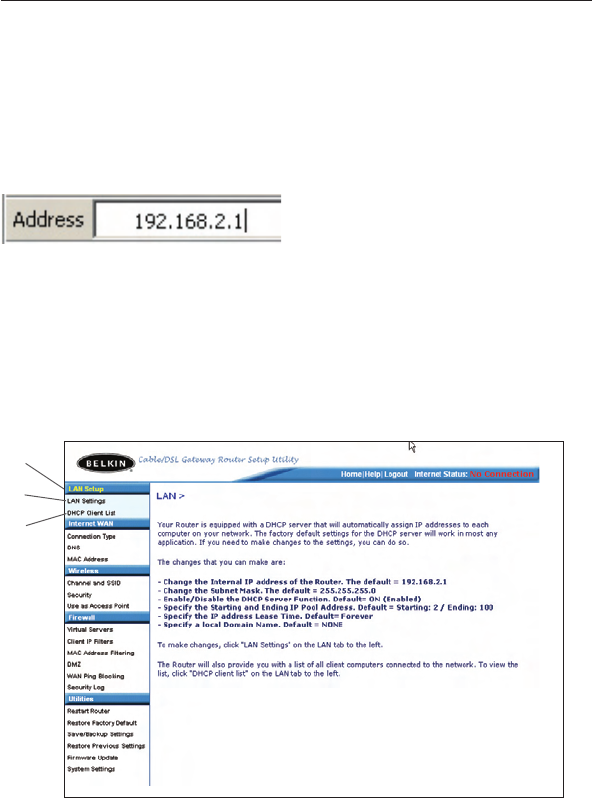
Using your Internet browser, you can access the Router’s Web-Based
Advanced User Interface. In your browser, type “192.168.2.1” (do
not type in anything else such as “http://” or “www”) then press the
“Enter” key.
You will see the Router’s home page in your browser window.
Viewing the LAN Settings
Clicking on the header of the “LAN Setup” tab (1) will take you to its
header page. A quick description of the functions can be found here.
To view the settings or make changes to any of the LAN settings, click
on “LAN Settings” (2) or to view the list of connected computers,
click on “DHCP Client List” (3).
(1)
(2)
(3)
41
Using the Web-Based Advanced User Interface
41
section
2
1
3
4
5
6
7
8
9
10
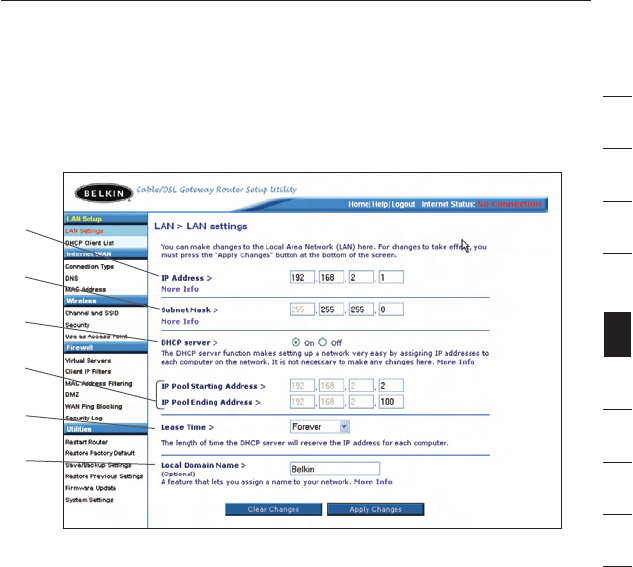
Changing LAN Settings
All settings for the internal LAN setup of the Router can be viewed
and changed here.
1. IP Address
The “IP address” is the internal IP address of the Router. The
default IP address is “192.168.2.1”. To access the Web-Based
Advanced User Interface, type this IP address into the address
bar of your browser. This address can be changed if needed.
To change the IP address, type in the new IP address and click
“Apply Changes”. The IP address you choose should be a
non-routable IP.
Examples of a non-routable IP are:
192.168.x.x (where x is anything between 0 and 255) and
10.x.x.x (where x is anything between 0 and 255).
2. Subnet Mask
There is no need to change the subnet mask. This is a unique,
advanced feature of your Belkin Router. It is possible to change
the subnet mask if necessary; however, do NOT make changes to
the subnet mask unless you have a specific reason to do so. The
default setting is “255.255.255.0”.
(1)
(2)
(3)
(4)
(6)
(5)

4342
Using the Web-Based Advanced User Interface
4342
Using the Web-Based Advanced User Interface
3. DHCP Server
The DHCP server function makes setting up a network very easy
by assigning IP addresses to each computer on the network
automatically. The default setting is “On”. The DHCP server
can be turned OFF if necessary; however, in order to do so you
must manually set a static IP address for each computer on
your network. To turn off the DHCP server, select “Off” and click
“Apply Changes”.
4. IP Pool
The range of IP addresses set aside for dynamic assignment to the
computers on your network. The default is 2–100 (99 computers). If
you want to change this number, you can do so by entering a new
starting and ending IP address and clicking on “Apply Changes”.
The DHCP server can assign 100 IP addresses automatically. This
means that you cannot specify an IP address pool larger than 100
computers. For example, starting at 50 means you have to end at
150 or lower so as not to exceed the 100-client limit. The starting
IP address must be lower in number than the ending IP address.
5. Lease Time
The length of time the DHCP server will reserve the IP address
for each computer. We recommend that you leave the lease
time set to “Forever”. The default setting is “Forever”, meaning
that any time a computer is assigned an IP address by the
DHCP server, the IP address will not change for that particular
computer. Setting lease times for shorter intervals such as one
day or one hour frees IP addresses after the specified period of
time. This also means that a particular computer’s IP address
may change over time. If you have set any of the other advanced
features of the Router such as DMZ or client IP filters, these are
dependent on the IP address. For this reason, you will not want
the IP address to change.
6. Local Domain Name
The default setting is “Belkin”. You can set a local domain name
(network name) for your network. There is no need to change this
setting unless you have a specific advanced need to do so. You can
name the network anything you want such as “MY NETWORK”.
43
Using the Web-Based Advanced User Interface
43
section
2
1
3
4
5
6
7
8
9
10
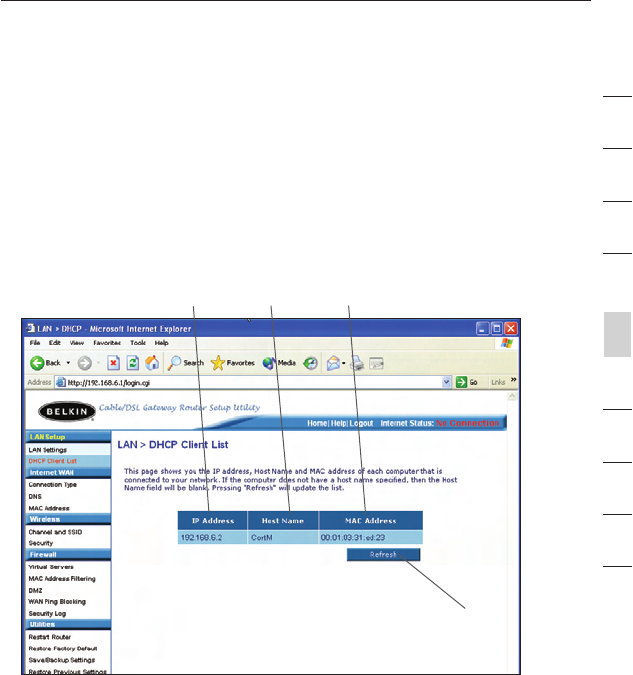
Viewing the DHCP Client List Page
You can view a list of the computers (known as clients), which are
connected to your network. You are able to view the IP address (1) of
the computer, the host name (2) (if the computer has been assigned
one), and the MAC address (3) of the computer’s network interface
card (NIC). Pressing the “Refresh” (4) button will update the list. If
there have been any changes, the list will be updated.
(1) (2) (3)
(4)
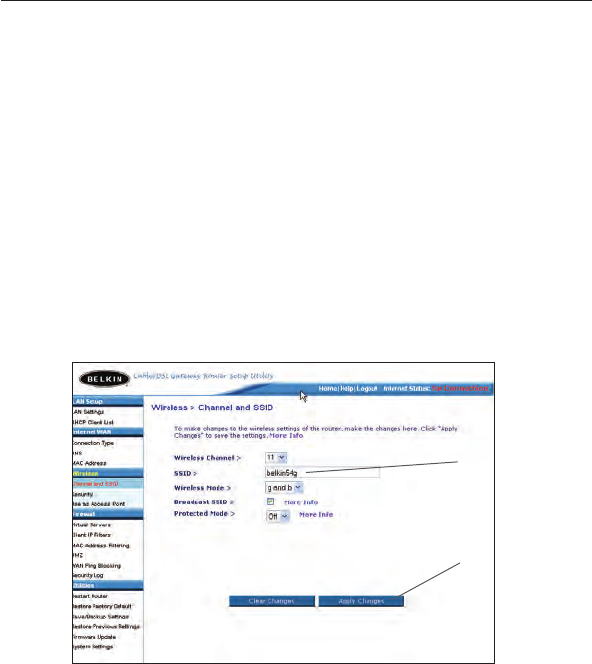
Configuring the Wireless Network Settings
The “Wireless” tab lets you make changes to the wireless network
settings. From this tab you can make changes to the wireless network
name (SSID), operating channel, encryption security settings, and
configure the Router to be used as an access point.
44
Using the Web-Based Advanced User Interface
Changing the Wireless Network Name (SSID)
To identify your wireless network, a name called the SSID (Service
Set Identifier) is used. The default SSID of the Router is “belkin54g".
You can change this to anything you want to or you can leave it
unchanged. If there are other wireless networks operating in your
area, you will want to make sure that your SSID is unique (does not
match that of another wireless network in the area). To change the
SSID, type in the SSID that you want to use in the “SSID" field (1) and
click “Apply Changes" (2). The change is immediate. If you make a
change to the SSID, your wireless-equipped computers may also need
to be reconfigured to connect to your new network name. Refer to the
documentation of your wireless network adapter for information on
making this change.
(1)
(2)
Using the Wireless Mode Switch
Your Router can operate in three different wireless modes:
“g and b", “g only", and “b only". The different modes are
explained below.
Note:This equipment marketed in USA is restricted by firmware to
only operate on 2.4G channel 1-11

45
Using the Web-Based Advanced User Interface
45
section
2
1
3
4
5
6
7
8
9
10
g and b Mode
In this mode, the Router is compatible with 802.11b and 802.11g
wireless clients simultaneously. This is the factory default mode and
ensures successful operation with all Wi-Fi-compatible devices. If
you have a mix of 802.11b and 802.11g clients in your network, we
recommend setting the Router to g and b mode. This setting should
only be changed if you have a specific reason to do so.
g only Mode
g only mode works with 802.11g clients only. This mode is
recommended only if you want to prevent 802.11b clients from
accessing your network. To switch modes, select the desired
mode from the “Wireless Mode” drop-down box. Then, click
“Apply Changes”.
b only Mode
We recommend you DO NOT use this mode unless you have a very
specific reason to do so. This mode exists only to solve unique
problems that may occur with some 802.11b client adapters and is
NOT necessary for interoperability of 802.11g and 802.11b standards.
When to use b only Mode
In some cases, older 802.11b clients may not be compatible with
802.11g wireless. These adapters tend to be of inferior design and
may use older drivers or technology. Switching to this mode can solve
problems that sometimes occur with these clients. If you suspect that
you are using a client adapter that falls into this category of adapters,
first check with the adapter vendor to see if there is a driver update. If
there is no driver update available, switching to b only mode may fix
your problem. Please note that switching to b only mode will decrease
802.11g performance.
4746
Using the Web-Based Advanced User Interface
4746
Using the Web-Based Advanced User Interface
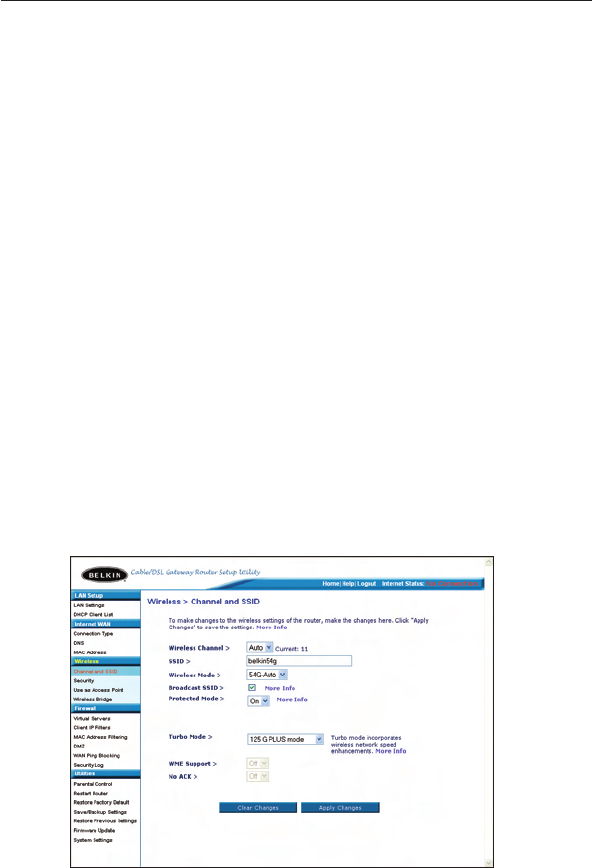
G Plus Mode*
The Router supports two high-speed modes, 125 G Plus mode and
Frame-Bursting mode.
Selecting “125 G Plus mode” will result in all devices running in
125 G Plus mode if all devices are capable of 125Mbps speeds. If
any non-125 G Plus devices connect or associates with the network,
the Router will automatically shift the entire network back to
Frame-Bursting mode.
Selecting “Frame Bursting” will result in all devices capable of
Frame-Bursting to function in Frame-Bursting mode, and all clients
not capable, to operate in normal 802.11g modes. Frame-Bursting
mode supports both Frame-Bursting-enabled devices and
non-Frame-Bursting-enabled devices simultaneously. Frame-Bursting
mode is based on the unreleased 802.11e specification.
Selecting “Off” will disable Turbo mode.
*When operating in 125 G Plus Mode, this Wi-Fi device achieves
an actual throughput of up to 34.1Mbps, which is the equivalent
throughput of a system following 802.11g protocol and operating at a
signaling rate of 125Mbps. Actual throughput will vary depending on
environmental, operational, and other factors.

44
Using the Web-Based Advanced User Interface
Changing the Wireless Network Name (SSID)
To identify your wireless network, a name called the SSID (Service
Set Identifier) is used. The default SSID of the Router is “belkin54g".
You can change this to anything you want to or you can leave it
unchanged. If there are other wireless networks operating in your
area, you will want to make sure that your SSID is unique (does not
match that of another wireless network in the area). To change the
SSID, type in the SSID that you want to use in the “SSID" field (1) and
click “Apply Changes" (2). The change is immediate. If you make a
change to the SSID, your wireless-equipped computers may also need
to be reconfigured to connect to your new network name. Refer to the
documentation of your wireless network adapter for information on
making this change.
(1)
(2)
Using the Wireless Mode Switch
Your Router can operate in three different wireless modes:
“g and b", “g only", and “b only". The different modes are
explained below.
Note:This equipment marketed in USA is restricted by firmware to
only operate on 2.4G channel 1-11

4948
Using the Web-Based Advanced User Interface
4948
Using the Web-Based Advanced User Interface
specific SSID; an SSID of “ANY” will no longer be accepted. Refer to
the documentation of your wireless network adapter for information
on making this change.
Protected Mode Switch
As part of the 802.11g specification, Protected mode ensures proper
operation of 802.11g clients and access points when there is heavy
802.11b traffic in the operating environment. When Protected mode
is ON, 802.11g scans for other wireless network traffic before it
transmits data. Therefore, using this mode in environments with
HEAVY 802.11b traffic or interference achieves best performance
results. If you are in an environment with very little—or no—other
wireless network traffic, your best performance will be achieved with
Protected mode OFF.
Securing your Wi-Fi® Network
Here are a few different ways you can maximize the security of your
wireless network and protect your data from prying eyes and ears.
This section is intended for the home, home office, and small office
user. At the time of this User Manual’s publication, there are four
encryption methods available.
Name 64-Bit Wired
Equivalent
Privacy
128-Bit Wired
Equivalent
Privacy
Wi-Fi Protected
Access-TKIP
Wi-Fi Protected
Access 2
Acronym 64-bit WEP 128-bit WEP WPA-TKIP/AES
(or just WPA)
WPA2-AES
(or just WPA2)
Security Good Better Best Best
Features Static keys Static keys Dynamic key
encryption
and mutual
authentication
Dynamic key
encryption
and mutual
authentication
Encryption
keys based
on RC4
algorithm
(typically
40-bit keys)
More secure
than 64-bit
WEP using a
key length of
104 bits plus
24 additional
bits of system-
generated data
TKIP (Temporal
Key Integrity
Protocol)
added so
that keys are
rotated and
encryption is
strengthened
AES (Advanced
Encryption
Standard) does
not cause any
throughput
loss

49
Using the Web-Based Advanced User Interface
49
section
2
1
3
4
5
6
7
8
9
10
WEP (Wired Equivalent Privacy)
WEP is a common protocol that adds security to all Wi-Fi-compliant
wireless products. WEP was designed to give wireless networks the
equivalent level of privacy protection as a comparable wired network.
64-Bit WEP
64-bit WEP was first introduced with 64-bit encryption, which includes
a key length of 40 bits plus 24 additional bits of system-generated
data (64 bits total). Some hardware manufacturers refer to 64-bit
as 40-bit encryption. Shortly after the technology was introduced,
researchers found that 64-bit encryption was too easy to decode.
128-Bit WEP
As a result of 64-bit WEP’s potential security weaknesses, a more
secure method of 128-bit encryption was developed. 128-bit
encryption includes a key length of 104 bits plus 24 additional bits of
system-generated data (128 bits total). Some hardware manufacturers
refer to 128-bit as 104-bit encryption.
Most of the new wireless equipment in the market today supports
both 64-bit and 128-bit WEP encryption, but you might have older
equipment that only supports 64-bit WEP. All Belkin wireless products
will support both 64-bit and 128-bit WEP.
Encryption Keys
After selecting either the 64-bit or 128-bit WEP encryption mode, it is
critical that you generate an encryption key. If the encryption key is
not consistent throughout the entire wireless network, your wireless
networking devices will be unable to communicate with one another
on your network and you will not be able to successfully communicate
within your network.
You can enter your key by typing in the hex key manually, or you can
type in a passphrase in the “Passphrase” field and click “Generate”
to create a key. A hex (hexadecimal) key is a combination of numbers
and letters from A–F and 0–9. For 64-bit WEP, you need to enter 10
hex keys. For 128-bit WEP, you need to enter 26 hex keys.
For instance:
AF 0F 4B C3 D4 = 64-bit WEP key
C3 03 0F AF 0F 4B B2 C3 D4 4B C3 D4 E7 = 128-bit WEP key

5150
Using the Web-Based Advanced User Interface
5150
Using the Web-Based Advanced User Interface
The WEP passphrase is NOT the same as a WEP key. Your Router
uses this passphrase to generate your WEP keys, but different
hardware manufacturers might have different methods on generating
the keys. If you have multiple vendors’ equipment in your network,
the easiest thing to do is to use the hex WEP key from your Router or
access point and enter it manually into the hex WEP key table in your
Router’s configuration screen.
WPA (Wi-Fi Protected Access)
WPA is a new Wi-Fi standard that was designed to improve upon
the security features of WEP. To use WPA security, the drivers and
software of your wireless equipment must be upgraded to support
WPA. These updates will be found on the wireless vendor’s website.
There are two types of WPA security: WPA-PSK (no server) and WPA2.
WPA-PSK (no server) uses what is known as a pre-shared key
as the network key. A network key is basically a password that is
between eight and 63 characters long. It can be a combination of
letters, numbers, or characters. Each client uses the same network
key to access the network. Typically, this is the mode that will be
used in a home environment.
WPA2 requires Advanced Encryption Standard (AES) for encryption
of data, which offers much greater security than WPA. WPA uses both
Temporal Key Integrity Protocol (TKIP) and AES for encryption.
For a list of Belkin wireless products that support WPA, please visit
our website at www.belkin.com/networking.
51
Using the Web-Based Advanced User Interface
51
section
2
1
3
4
5
6
7
8
9
10
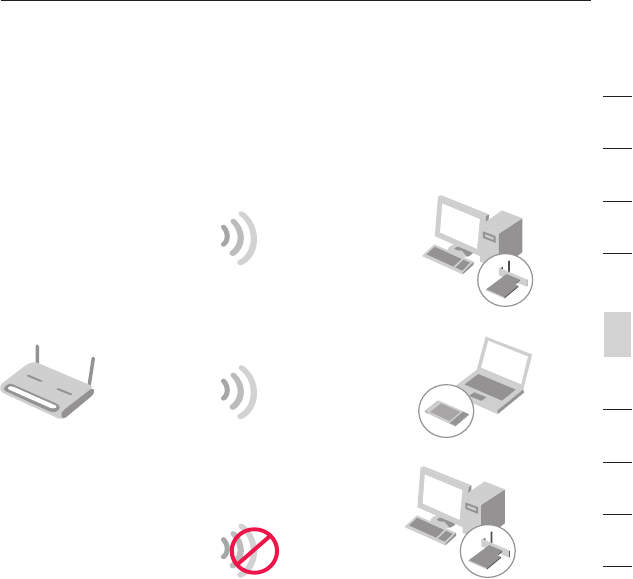
Sharing the Same Network Keys
Most Wi-Fi products ship with security turned off. So once you
have your network working, you need to activate WEP or WPA and
make sure your wireless networking devices are sharing the same
network key.
Network key=
WRONG Password
Network key=
MyPassword
Network key=
MyPassword
The Wireless G Plus Desktop Card cannot access the network
because it is using a different network key than the network key that
is configured on the Wireless G Plus Router.
Network key=
MyPassword
5352
Using the Web-Based Advanced User Interface
5352
Using the Web-Based Advanced User Interface
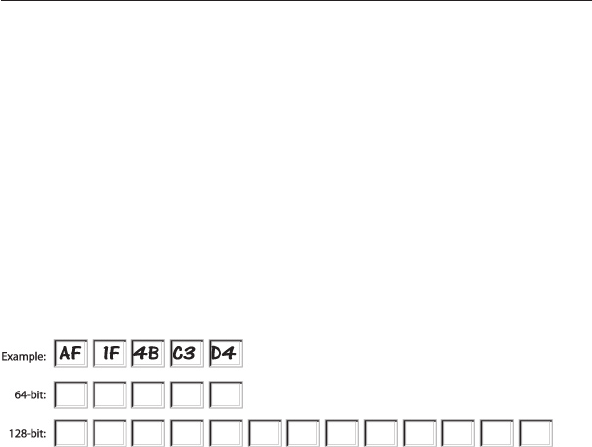
Using a Hexadecimal Key
A hexadecimal key is a combination of numbers and letters from A–F
and 0–9. 64-bit keys are five two-digit numbers. 128-bit keys are 13
two-digit numbers.
For instance:
AF 0F 4B C3 D4 = 64-bit key
C3 03 0F AF 0F 4B B2 C3 D4 4B C3 D4 E7 = 128-bit key
In the boxes below, make up your key by writing in two characters
between A–F and 0–9 in each box. You will use this key to program
the encryption settings on your Router and your wireless computers.
Note to Mac users: Original Apple® AirPort® products support
64-bit encryption only. Apple AirPort 2 products can support 64-bit or
128-bit encryption. Please check your product to see which version
you are using. If you cannot configure your network with 128-bit
encryption, try 64-bit encryption.