Belkin F5D7234V4 G Wireless Router User Manual F5D7234 4 v4 G RT Mnl Rev1
Belkin International, Inc. G Wireless Router F5D7234 4 v4 G RT Mnl Rev1
UserManual.wiki
>
Belkin
>
F5D7234V4 User Manual
User manual
Navigation menu
Upload a User Manual
Namespaces
Wiki Guide
HTML
PDF
Info
Views
User Manual
Discussion / Help
Navigation


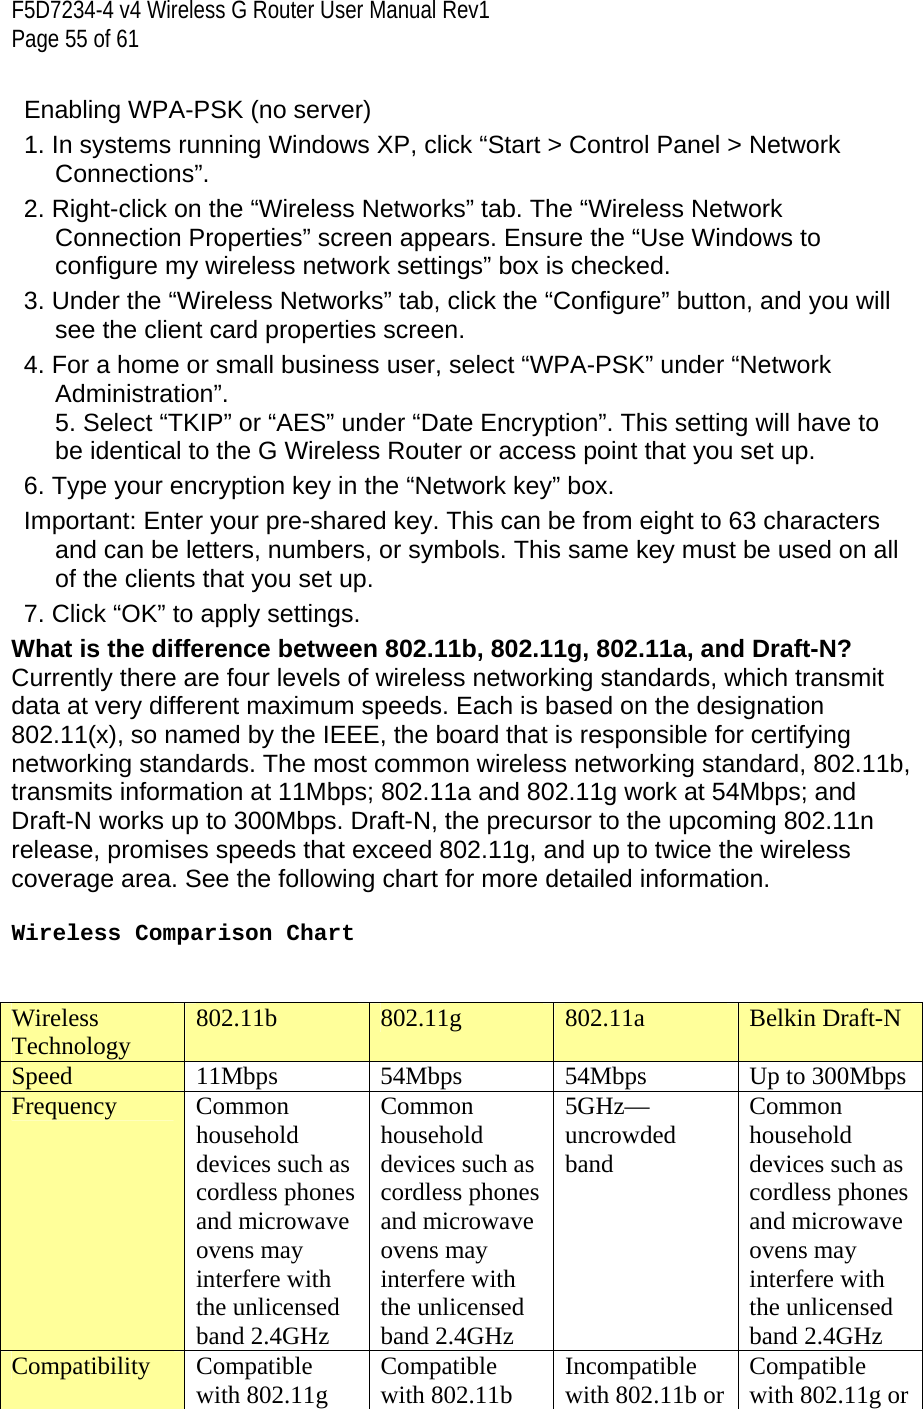
![F5D7234-4 v4 Wireless G Router User Manual Rev1 Page 12 of 61 of modem from your ISP, or you can, in some cases, purchase a modem that has an RJ45 Ethernet port on it. ALWAYS INSTALL YOUR ROUTER FIRST! IF YOU ARE INSTALLING NUMEROUS NETWORK DEVICES FOR THE FIRST TIME, IT IS IMPORTANT THAT YOUR ROUTER IS CONNECTED AND RUNNING BEFORE ATTEMPTING TO INSTALL OTHER NETWORK COMPONENTS SUCH AS NOTEBOOK CARDS AND DESKTOP CARDS. Setup Assistant Belkin has provided our Setup Assistant software to make installing your Router a simple and easy task. You can use it to get your Router up and running in minutes. The Setup Assistant requires that your Windows 2000/XP, Vista, or Mac OS X v10.4 or v10.5 computer be connected directly to your cable or DSL modem and that the Internet connection is active and working at the time of installation. If it is not, you must use the “Alternate Setup Method” section of this User Manual to configure your Router. Additionally, if you are using an operating system other than Windows 2000/XP, Vista, or Mac OS X v10.4 or v10.5, you must set up the Router using the “Alternate Setup Method” section of this User Manual. [1] Put the router next to your DSL or cable modem. Turn the antenna straight up. [2] Make sure your cable or DSL line is plugged into your modem. Connect the modem to the router's "modem" port with an Ethernet cable. (Your computer might be plugged in here already.) Connect your computer to the router with another Ethernet cable (temporarily if need be). [3] Plug the router's power supply into the router and a power outlet. Plug in your modem and make sure it turns on. If your modem is already on, unplug it, wait a few seconds, and plug it back in.](https://usermanual.wiki/Belkin/F5D7234V4/User-Guide-1084977-Page-12.png)

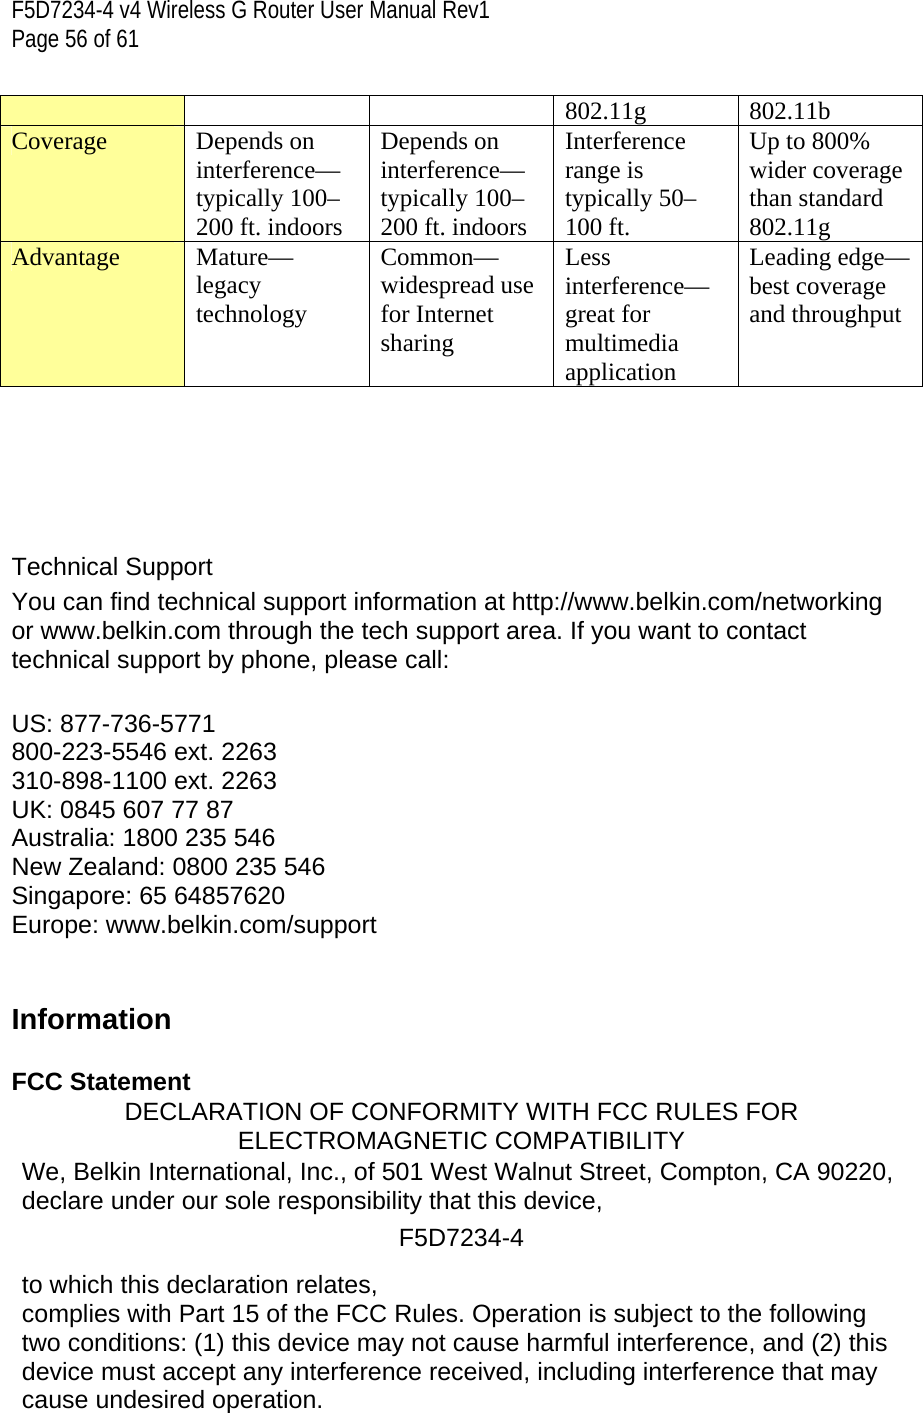
![F5D7234-4 v4 Wireless G Router User Manual Rev1 Page 21 of 61 Setting your Internet Service Provider (ISP) Connection Type to Point-to-Point Tunneling Protocol (PPTP) [European Countries Only]. Some ISPs require a connection using PPTP protocol, a type of connection most common in European countries. This sets up a direct connection to the ISP’s system. Type the information provided by your ISP in the space provided. When you have finished, click “Apply Changes”. After you apply the changes, the “Internet Status” indicator will read “connection OK” if your Router is set up properly. 1. User ID Provided by your ISP. Enter your PPTP User ID here. 2. Password Provided by your ISP. Type in your password here. 3. PPTP Gateway Provided by your ISP. Enter your PPTP gateway/service IP address here. 4. Idle Time Out This feature is used to automatically disconnect the Router from your ISP when there is no activity for a specified period of time. For instance, entering “10” into the minute field will cause the Router to disconnect from the Internet after 10 minutes of no Internet activity. This option should be used if you pay for your Internet service by the minute.5. Get IP by DHCP Select the method of getting your Internet IP address from your ISP server. It depends on your ISP service type. Check this box if your ISP will automatically assign an IP address for you. If you are not sure of this, please contact your ISP’s technical-support hotline. If your ISP provided an IP address for you, enter the information in the following fields. a. IP Address Provided by your ISP. Enter the IP address here. b. Subnet Mask Provided by your ISP. Enter the IP address here. c. Default Gateway Provided by your ISP. Enter the gateway address here. Setting your Connection Type if you are a Telstra® BigPond/OptusNet Cable User Follow the on-screen steps and click “Apply Changes” to complete your setup. Setting Custom Domain Name Server (DNS) Settings](https://usermanual.wiki/Belkin/F5D7234V4/User-Guide-1084977-Page-21.png)


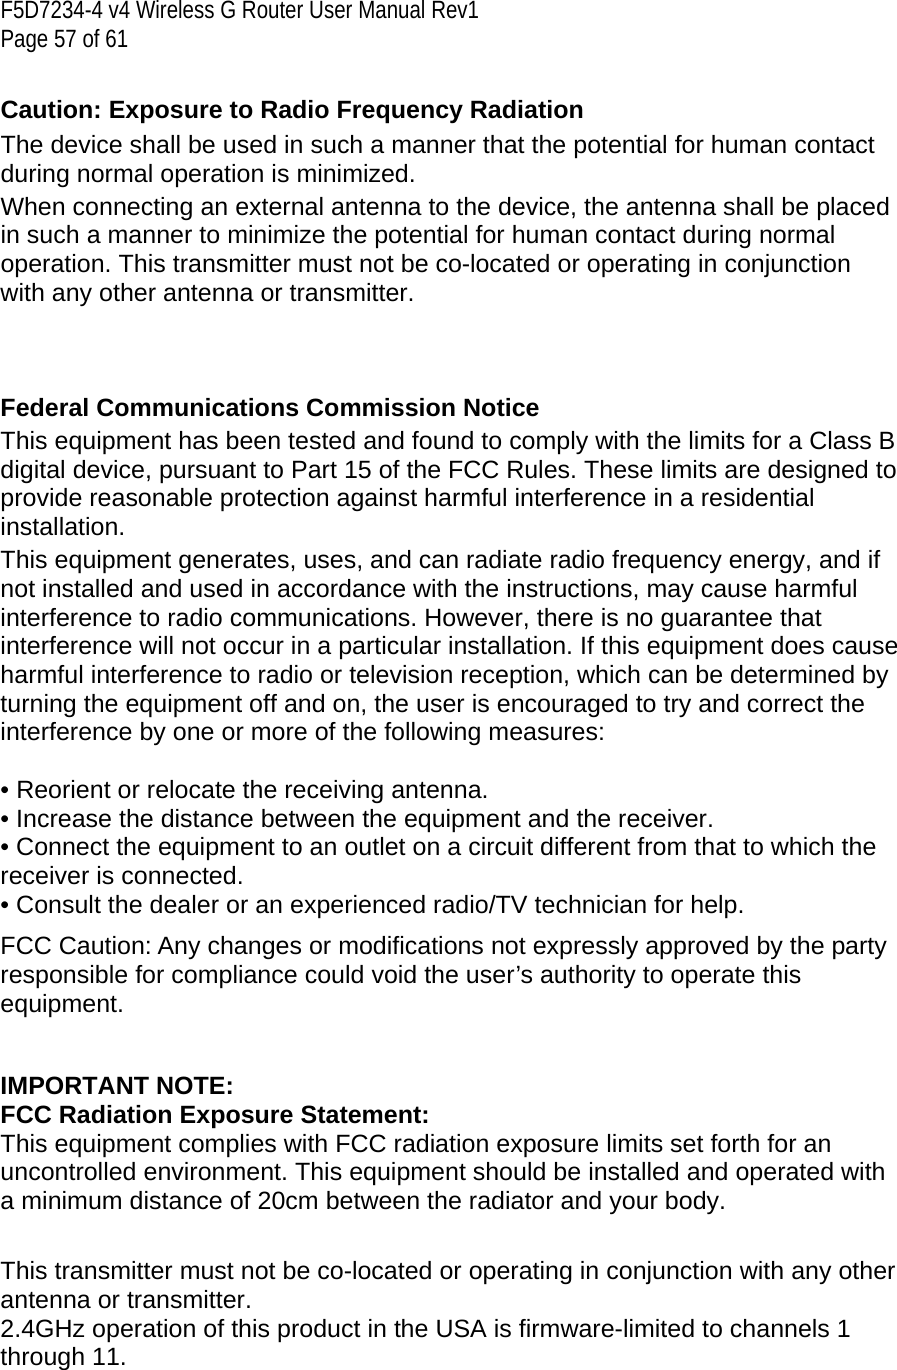
![F5D7234-4 v4 Wireless G Router User Manual Rev1 Page 52 of 61 2. Once the “Advanced” button is clicked, the Belkin Wireless LAN Utility will appear. This Utility will allow you to manage all the advanced features of the Belkin client card. 3. Under the “Wireless Network Properties” tab, select a network name from the “Available Networks” list and click the “Properties” button. 4. Under “Data Encryption”, select “WEP”. 5. Ensure the box “The key is provided for me automatically” at the bottom is unchecked. If you are using this computer to connect to a corporate network, please consult your network administrator if this box needs to be checked. 6. Type your WEP key in the “Network key” box. Important: A WEP key is a combination of numbers and letters from A–F and 0–7. For 128-bit WEP, you need to enter 26 keys. This network key needs to match the key you assign to your Wireless G Router or access point. For example: C3030FAF4BB2C3D44BC3D4E7E4 = 128-bit key 7. Click “OK”, and then “Apply” to save the settings. If you are NOT using a Belkin wireless client card, please consult the manufacturer’s user manual for that wireless client card. Problem: Do Belkin products support WPA? Solution: Note: To use WPA security, all your clients must be upgraded to drivers and software that support it. At the time of this publication, a security patch download is available, for free, from Microsoft. This patch works only with the Windows XP operating system. Download the patch here: http://www.microsoft.com/downloads/details.aspx?FamilyID=009d8425-ce2b-47a4-abec-274845dc9e91&displaylang=en [keep hyperlink since this will be on CD] You also need to download the latest driver for your Belkin Wireless 802.11g Desktop or Notebook Network Card from the Belkin support site. Other operating systems are not supported at this time. Microsoft’s patch only supports devices with WPA-enabled drivers such as Belkin 802.11g products. Download the latest drivers at http://www.belkin.com/support. Problem: I am having difficulty setting up Wi-Fi Protected Access (WPA) security on a Belkin Wireless Router or Belkin Access Point for a home network.](https://usermanual.wiki/Belkin/F5D7234V4/User-Guide-1084977-Page-52.png)
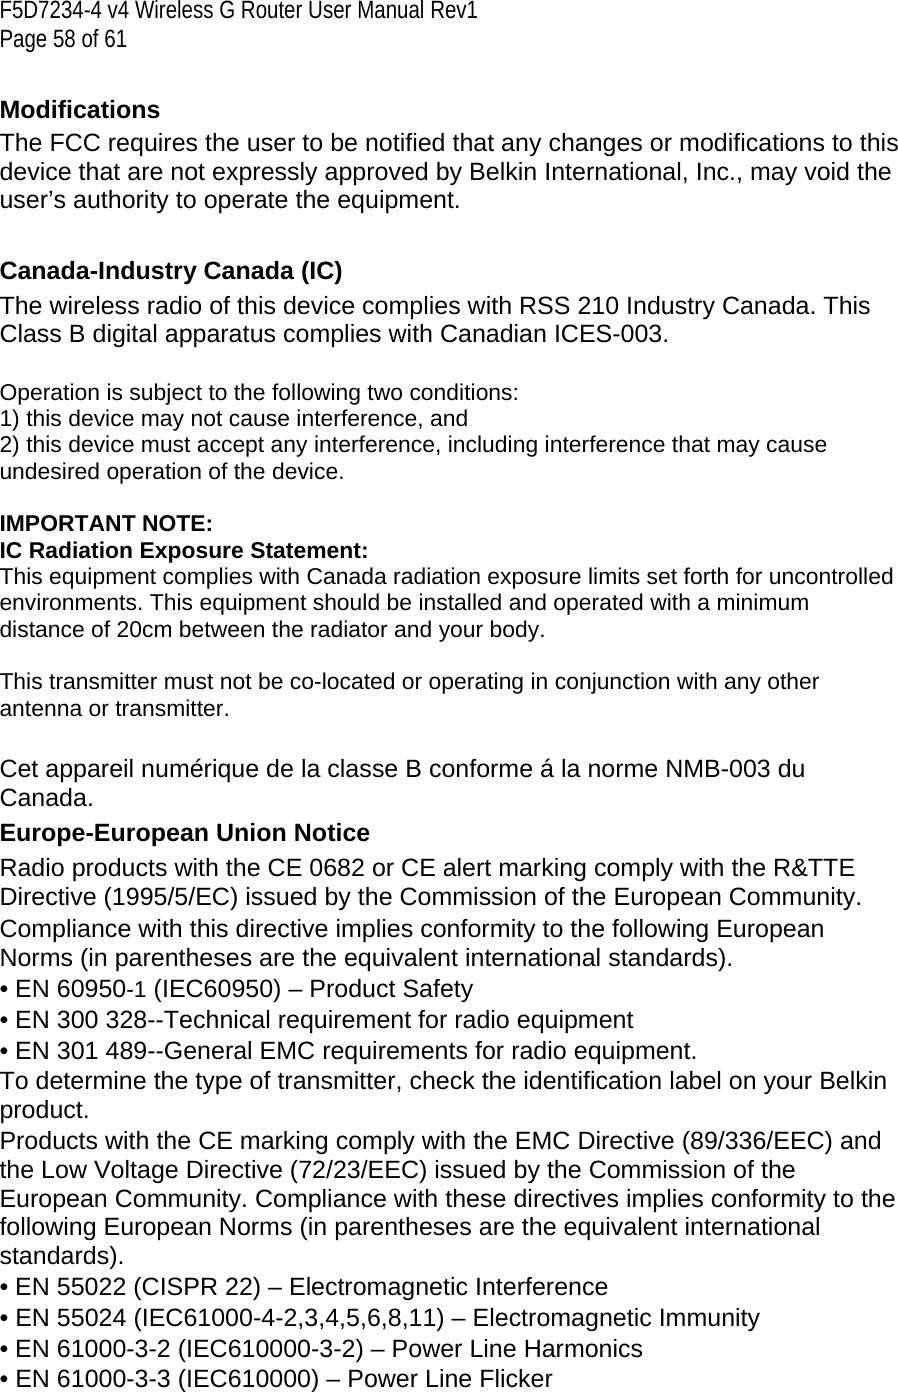
![F5D7234-4 v4 Wireless G Router User Manual Rev1 Page 54 of 61 I am having difficulty setting up Wi-Fi Protected Access (WPA) security on a Belkin client card (Wireless Network Card or Adapter) for a business. Solution: 1. Double-click the “Signal Indicator” icon to bring up the “Wireless Network Utility” screen. The “Advanced” button will allow you to view and configure more options of your client card. 2. Once the “Advanced” button is clicked, the Belkin Wireless LAN Utility will appear. This Utility will allow you to manage all the advanced features of the Belkin client card. 3. Under the “Wireless Network Properties” tab, select a network name from the “Available Networks” list and click the “Properties” button. 4. Under “Network Authentication”, select “WPA”. 5. In the “Authentication” tab, select the settings that are indicated by your network administrator. 6. Click “OK”, then “Apply” to save the settings. Problem: I am having difficulty setting up Wi-Fi Protected Access (WPA) security, and I am NOT using a Belkin client card for a home network. Solution: If you are NOT using a Belkin WPA Wireless Desktop or Wireless Notebook Network Card and it is not equipped with WPA-enabled software, a file from Microsoft called “Windows XP Support Patch for Wireless Protected Access” is available for free download: http://www.microsoft.com/downloads/search.aspx?displaylang=en [keep hyperlink since this is on CD] Note: The file that Microsoft has made available works only with Windows XP. Other operating systems are not supported at this time. You also need to ensure that the wireless card manufacturer supports WPA and that you have downloaded and installed the latest driver from their support site. Supported Operating Systems: • Windows XP Professional • Windows XP Home Edition](https://usermanual.wiki/Belkin/F5D7234V4/User-Guide-1084977-Page-54.png)