Belkin F5D8231-4D N1 Wireless Router User Manual P75170 C F5D8231 4 man indd
Belkin International, Inc. N1 Wireless Router P75170 C F5D8231 4 man indd
Belkin >
Contents
- 1. Manual 1
- 2. Manual 2
- 3. Manual 3
Manual 3
6867
Using the Web-Based Advanced User Interface
6867
Using the Web-Based Advanced User Interface
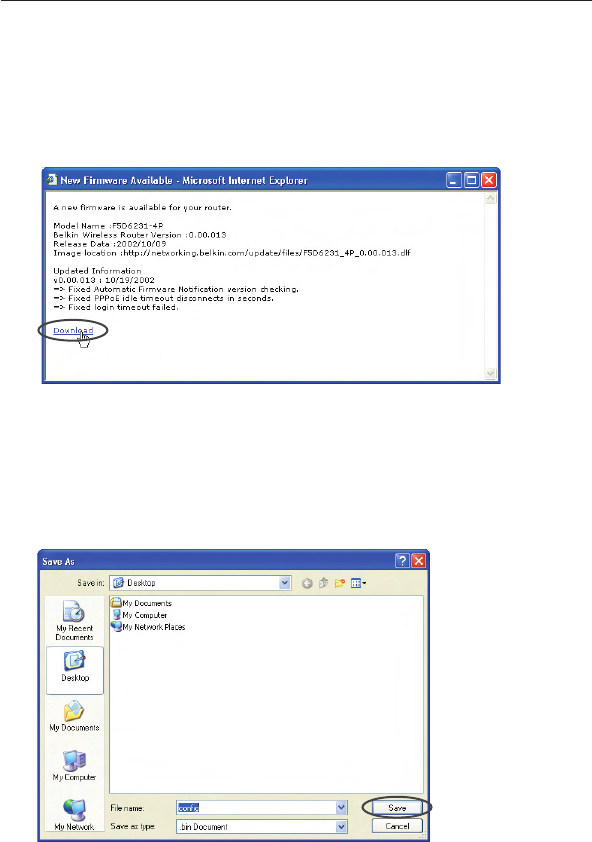
Downloading a New Version of Firmware
If you click the “Check Firmware” button and a new version of
firmware is available, you will see a screen similar to the one below:
1. To download the new version of firmware, click “Download”.
2. A window will open that allows you to select the location where
you want to save the firmware file. Select a location. You can
name the file anything you want, or use the default name. Be sure
to locate the file in a place where you can locate it yourself later.
When you have selected the location, click “Save”.
68
Using the Web-Based Advanced User Interface
68
section
2
1
3
4
5
6
7
8
9
10
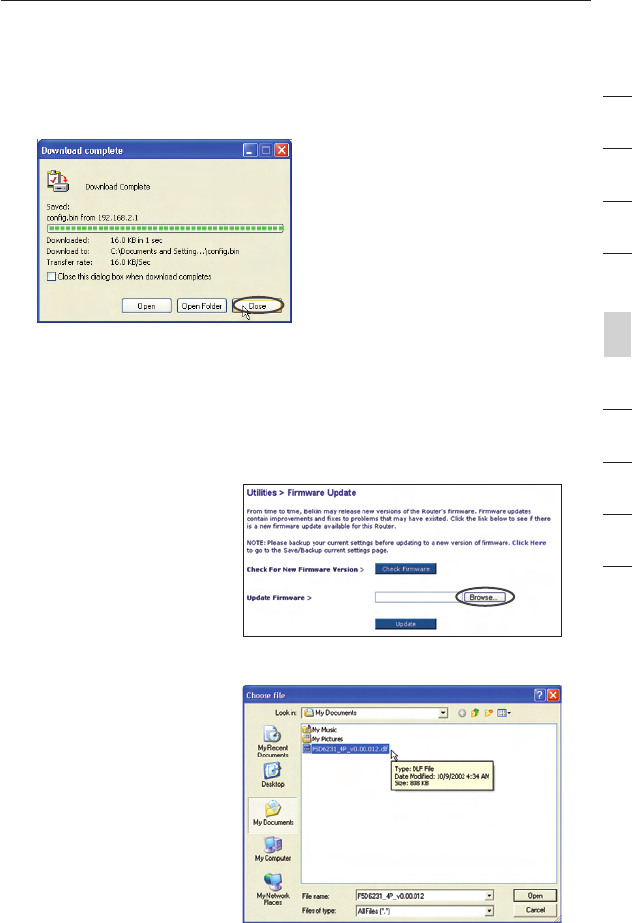
Updating the Router’s Firmware
1. In the “Firmware
Update” page, click
“Browse”. A window
will open that allows
you to select the
location of the firmware
update file.
2. Browse to the firmware
file you downloaded.
Select the file by
double-clicking on the
file name.
3. When the save is complete, you will see the following window.
Click “Close”.
The download of the firmware is complete. To update the firmware,
follow the next steps in “Updating the Router’s Firmware”.
7069
Using the Web-Based Advanced User Interface
7069
Using the Web-Based Advanced User Interface
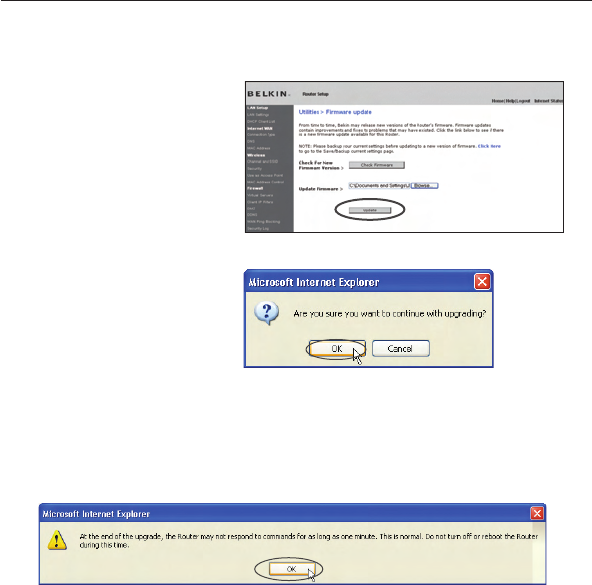
3. The “Update Firmware”
box will now display
the location and name
of the firmware file you
just selected. Click
“Update”.
4. You will be asked if you
are sure you want to
continue. Click “OK”.
5. You will see one more message. This message tells you that
the Router may not respond for as long as one minute as the
firmware is loaded into the Router and the Router is rebooted.
Click “OK”.
6. A 60-second countdown will appear on the screen. When the
countdown reaches zero, the Router firmware update will be
complete. The Router home page should appear automatically. If
not, type in the Router’s address (default = 192.168.2.1) into the
navigation bar of your browser.
70
Using the Web-Based Advanced User Interface
70
section
2
1
3
4
5
6
7
8
9
10
Changing System Settings
The “System Settings” page is where you can enter a new
administrator password, set the time zone, enable remote
management, and turn on and off the NAT function of the Router.
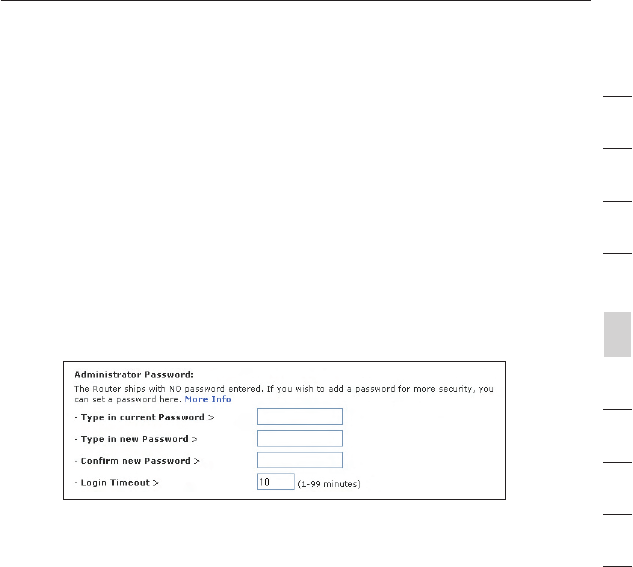
Setting or Changing the Administrator Password
The Router ships with NO password entered. If you wish to add a
password for greater security, you can set a password here. Write
down your password and keep it in a safe place, as you will need it if
you need to log into the Router in the future. It is also recommended
that you set a password if you plan to use the remote management
feature of your Router.
Changing the Login Time-Out Setting
The login time-out option allows you to set the period of time that you
can be logged into the Router’s advanced setup interface. The timer
starts when there has been no activity. For example, imagine you have
made some changes in the advanced setup interface, then left your
computer alone without clicking “Logout”. Assuming the time-out is
set to 10 minutes, 10 minutes after you leave, the login session will
expire. You will have to log into the Router again to make any more
changes. The login time-out option is for security purposes and the
default is set to 10 minutes.
Note: Only one computer can be logged into the Router’s advanced
setup interface at one time.
7271
Using the Web-Based Advanced User Interface
7271
Using the Web-Based Advanced User Interface
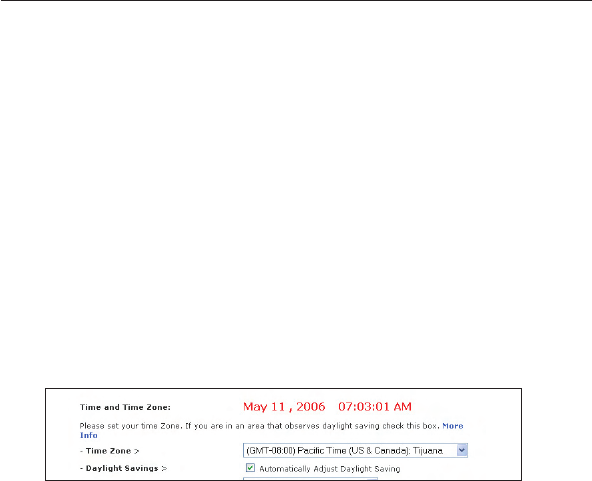
Setting the Time and Time Zone
The Router keeps time by connecting to a Simple Network Time
Protocol (SNTP) server. This allows the Router to synchronize the
system clock to the global Internet. The synchronized clock in the
Router is used to record the security log and control client filtering.
Select the time zone that you reside in. You have the option to select
a primary and a backup NTP server to keep your Router’s clock
synchronized. Select your desired NPT server from the drop-down
box, or simply keep it as is.
If you reside in an area that observes daylight saving, then place a
check mark in the box next to “Enable Daylight Saving”. The system
clock may not update immediately. Allow at least 15 minutes for the
Router to contact the time servers on the Internet and get a response.
You cannot set the clock yourself.
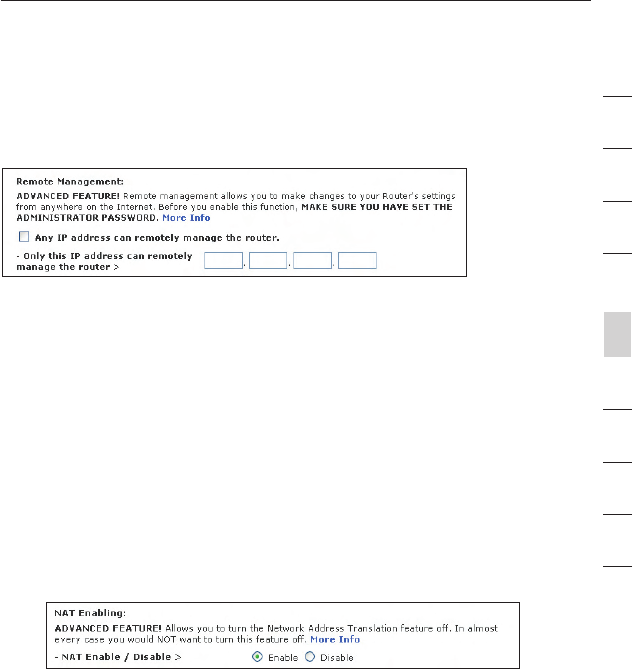
Enabling Remote Management
Before you enable this advanced feature of your Belkin Router, MAKE
SURE YOU HAVE SET THE ADMINISTRATOR PASSWORD. Remote
management allows you to make changes to your Router’s settings
from anywhere on the Internet. There are two methods of remotely
managing the Router. The first is to allow access to the Router from
anywhere on the Internet by selecting “Any IP address can remotely
manage the Router”. By typing in your WAN IP address from any
computer on the Internet, you will be presented with a login screen
where you need to type in the password of your Router. The second
method is to allow a specific IP address only to remotely manage the
Router. This is more secure, but less convenient. To use this method,
enter the IP address you know you will be accessing the Router from
in the space provided and select “Only this IP address can remotely
manage the Router”. Before you enable this function, it is STRONGLY
RECOMMENDED that you set your administrator password. Leaving
the password empty will potentially open your Router to intrusion.
72
Using the Web-Based Advanced User Interface
72
section
2
1
3
4
5
6
7
8
9
10
Advanced Feature: The “Remote Access Port” option allows you to
configure the desired “Remote Access Port for Remote Management”
feature. The default access port is set to port 80.
Enabling/Disabling NAT (Network Address Translation)
Note: This advanced feature should be employed by advanced
users only.
Before enabling this function, MAKE SURE YOU HAVE SET THE
ADMINISTRATOR PASSWORD. Network Address Translation (NAT) is
the method by which the Router shares the single IP address assigned
by your ISP with the other computers on your network. This function
should only be used if your ISP assigns you multiple IP addresses or
you need NAT disabled for an advanced system configuration. If you
have a single IP address and you turn NAT off, the computers on your
network will not be able to access the Internet. Other problems may
also occur. Turning off NAT will not affect your firewall functions.
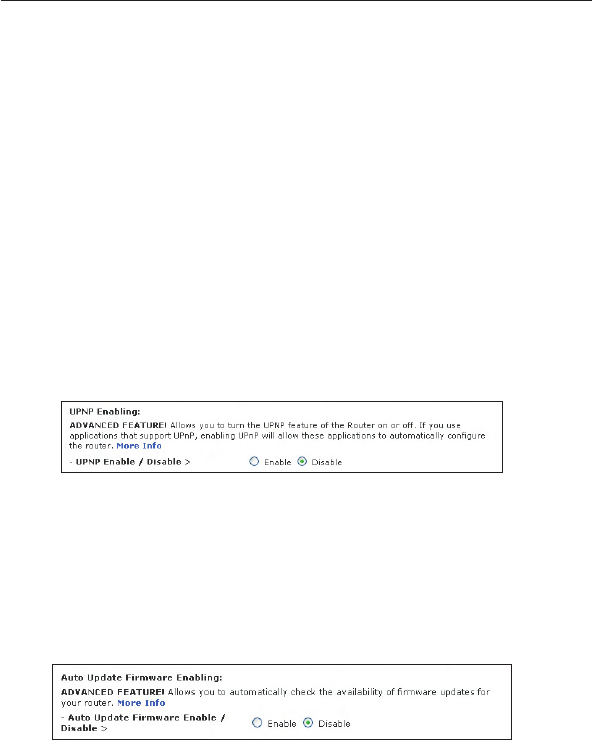
Enabling/Disabling UPnP
UPnP (Universal Plug-and-Play) is yet another advanced feature
offered by your Belkin Router. It is a technology that offers seamless
operation of voice messaging, video messaging, games, and other
applications that are UPnP-compliant. Some applications require the
Router’s firewall to be configured in a specific way to operate properly.
This usually requires opening TCP and UDP ports, and in some
instances, setting trigger ports. An application that is UPnP-compliant
has the ability to communicate with the Router, basically “telling” the
Router which way it needs the firewall configured. The Router ships
with the UPnP feature disabled. If you are using any applications that
are UPnP-compliant, and wish to take advantage of the UPnP features,
you can enable the UPnP feature. Simply select “Enable” in the “UPnP
Enabling” section of the “Utilities” page. Click “Apply Changes” to
save the change.
Enabling/Disabling Auto Firmware Update
This innovation provides the Router with the built-in capability to
automatically check for a new version of firmware and alert you
that the new firmware is available. When you log into the Router’s
advanced interface, the Router will perform a check to see if new
firmware is available. If so, you will be notified. You can choose to
download the new version or ignore it.
7473
Using the Web-Based Advanced User Interface
Set up the computer that is connected to the cable or DSL modem
FIRST using these steps. You can also use these steps to add
computers to your Router after the Router has been set up to connect
to the Internet.
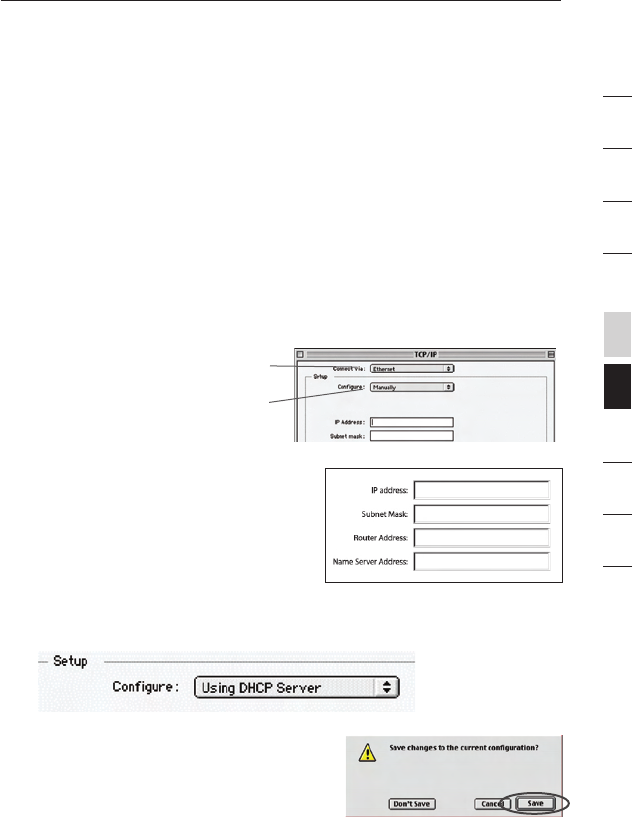
Manually Configuring Network Settings in Mac OS up to 9.x
1. Pull down the Apple menu. Select “Control Panels” and
select “TCP/IP”.
2. You will see the TCP/IP control panel. Select “Ethernet Built-In”
or “Ethernet” in the “Connect via:” drop-down menu (1).
3. Next to “Configure” (2),
if “Manually” is selected,
your Router will need to
be set up for a static IP
connection type. Write
the address information
in the table below.
You will need to enter
this information into
the Router.
4. If not already set, at “Configure:”, choose “Using DHCP Server”.
This will tell the computer to obtain an IP address from the Router.
5. Close the window. If you made any
changes, the following window will
appear. Click “Save”.
Restart the computer. When the computer restarts, your
network settings are now configured for use with the Router.
(1)
(2)
74
Manually Configuring Network Settings
section
2
1
3
4
5
6
7
8
9
10
7675
Manually Configuring Network Settings
7675
Manually Configuring Network Settings
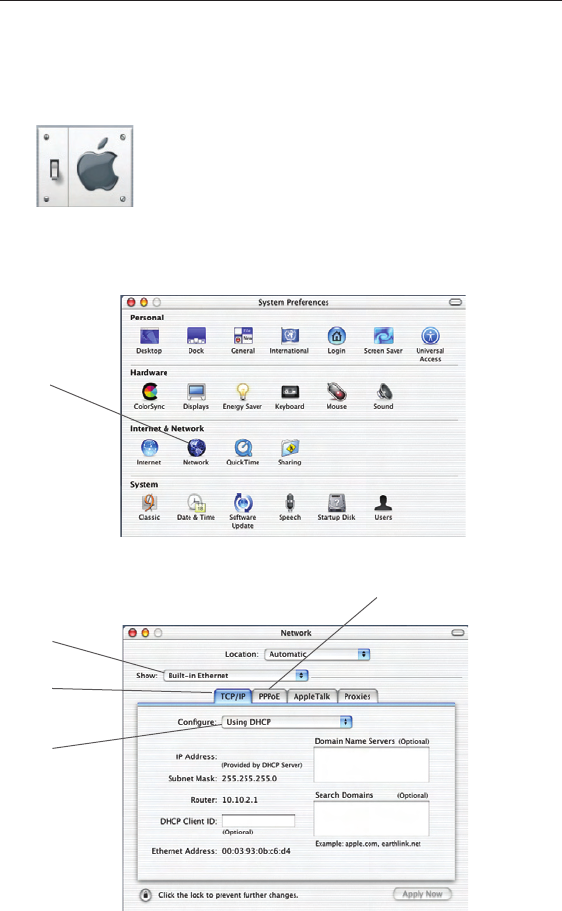
Manually Configuring Network Adapters in Mac OS X
1. Click on the “System Preferences” icon.
2. Select “Network” (1) from the “System Preferences” menu.
3. Select “Built-in Ethernet” (2) next to “Show” in the
Network menu.
(1)
(2)
(3)
(4)
(5)

76
Manually Configuring Network Settings
76
Manually Configuring Network Settings
section
2
1
3
4
5
6
7
8
9
10
Manually Configuring Network Settings
4. Select the “TCP/IP” tab (3). Next to “Configure” (4), you should
see “Manually” or “Using DHCP”. If you do not, check the
PPPoE tab (5) to make sure that “Connect using PPPoE” is NOT
selected. If it is, you will need to configure your Router for a
PPPoE connection type using your user name and password.
5. If “Manually” is selected, your Router will need to be set up
for a static IP connection type. Write the address information
in the table below. You will need to enter this information into
the Router.
6. If not already selected, select “Using DHCP” next to “Configure”
(4), then click “Apply Now”.
Your network settings are now configured for use with the Router.
7877
Manually Configuring Network Settings
7877
Manually Configuring Network Settings
Manually Configuring Network Settings in Windows 2000, NT, or XP
1. Click “Start”, “Settings”, then “Control Panel”.
2. Double-click on the “Network and dial-up connections” icon
(Windows 2000) or the “Network” icon (Windows XP).
3. Right-click on the “Local Area Connection” associated with
your network adapter and select “Properties” from the
drop-down menu.
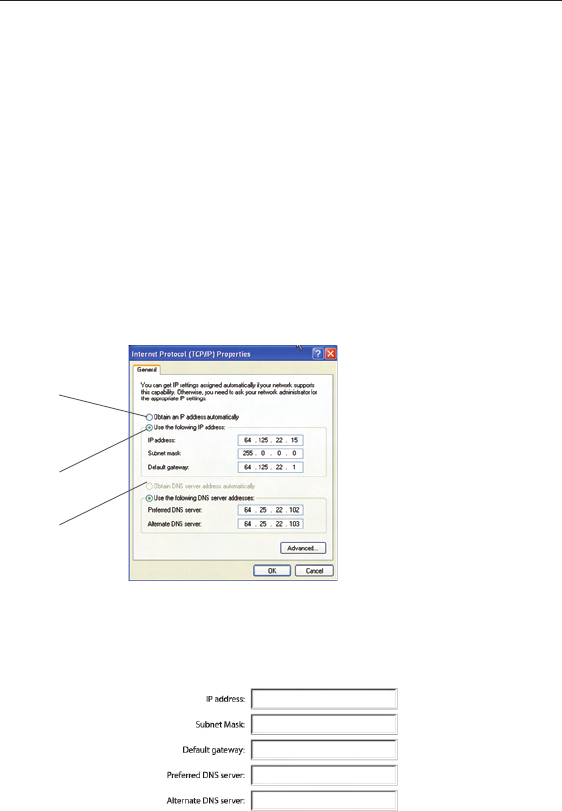
4. In the “Local Area Connection Properties” window, click “Internet
Protocol (TCP/IP)” and click the “Properties” button. The
following screen will appear:
(1)
(2)
(3)
5. If “Use the following IP address” (2) is selected, your Router
will need to be set up for a static IP connection type. Write the
address information the table below. You will need to enter this
information into the Router.
6. If not already selected, select “Obtain an IP address
automatically” (1) and “Obtain DNS server address automatically”
(3). Click “OK”.
Your network settings are now configured for use with the Router.
78
Manually Configuring Network Settings
78
Manually Configuring Network Settings
section
2
1
3
4
5
6
7
8
9
10
Manually Configuring Network Settings
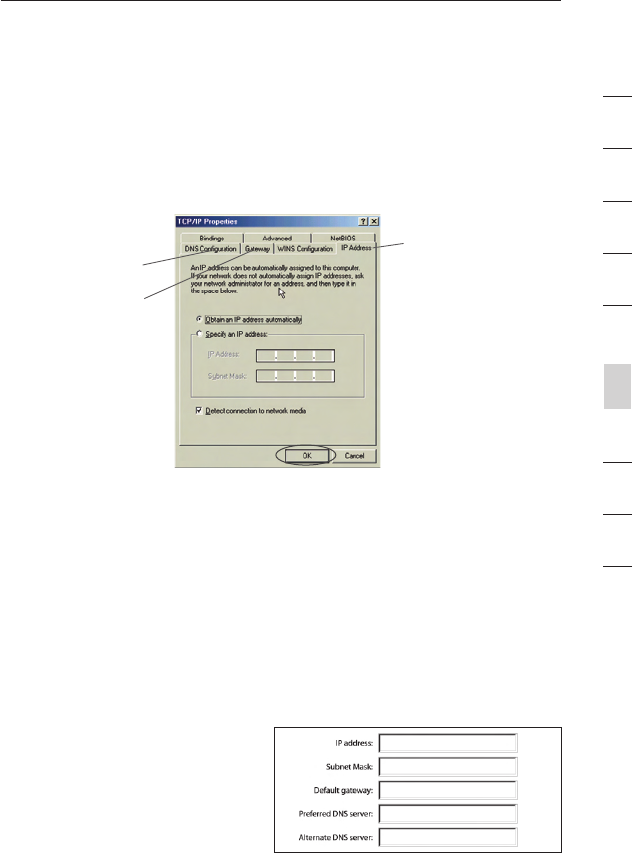
Manually Configuring Network Adapters in Windows 98SE or Me
1. Right-click on “My Network Neighborhood” and select
“Properties” from the drop-down menu.
2. Select “TCP/IP Settings” for your installed network adapter. You
will see the following window.
(1)
(2)
(3)
3. If “Specify an IP address” is selected, your Router will need to
be set up for a static IP connection type. Write the address
information in the table below. You will need to enter this
information into the Router.
4. Write the IP address and subnet mask from the “IP Address”
tab (3).
5. Click the “Gateway” tab (2). Write the gateway address down in
the chart.
6. Click the “DNS Configuration” tab (1). Write the DNS address(es)
in the chart.
7. If not already selected,
select “Obtain IP
address automatically”
on the IP address tab.
Click “OK”.
Restart the computer. When the computer restarts, your network
adapter(s) are now configured for use with the Router.
8079
Recommended Web Browser Settings
8079
Recommended Web Browser Settings
In most cases, you will not need to make any changes to your web
browser’s settings. If you are having trouble accessing the Internet or
the advanced web-based user interface, then change your browser’s
settings to the recommended settings in this section.
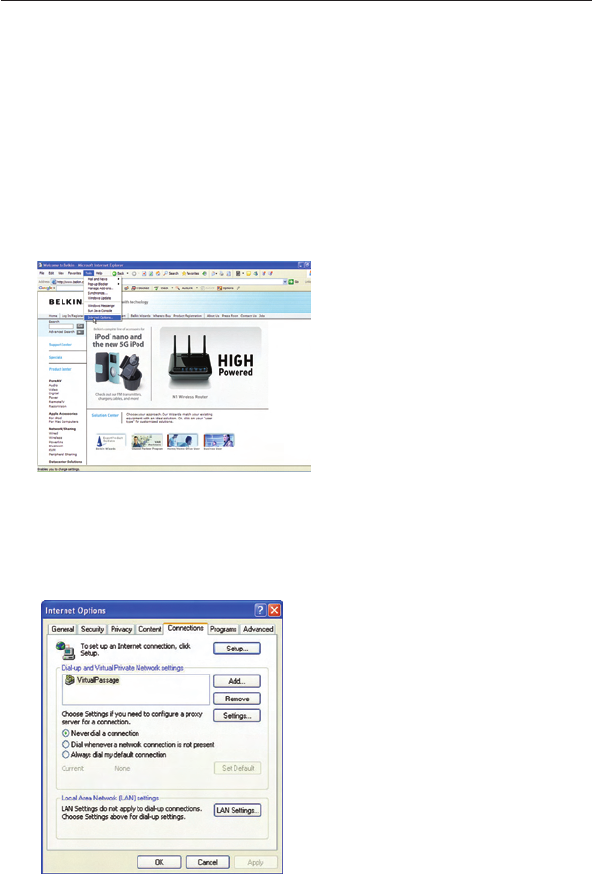
Microsoft® Internet Explorer 4.0 or Higher
1. Start your web browser. Select “Tools” then “Internet Options”.
2. In the “Internet Options” screen, there are three selections:
“Never dial a connection”, “Dial whenever a network connection
is not present”, and “Always dial my default connection”. If you
can make a selection, select “Never dial a connection”. If you
cannot make a selection, go to the next step.
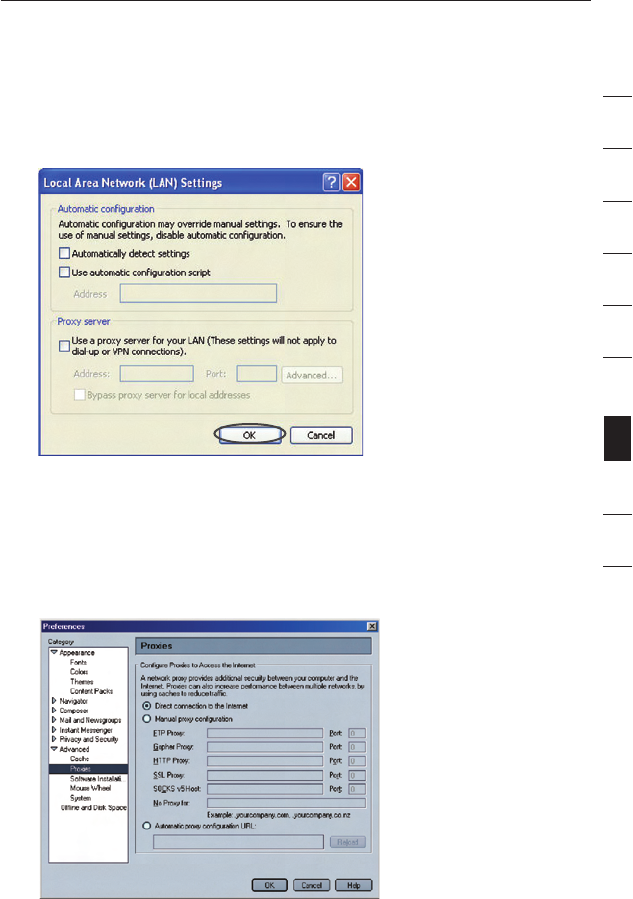
3. Under the “Internet Options” screen, click on “Connections” and
select “LAN Settings…”.
80
Recommended Web Browser Settings
80
section
2
1
3
4
5
6
7
8
9
10
4. Make sure there are no check marks next to any of the displayed
options: “Automatically detect settings”, “Use automatic
configuration script”, and “Use a proxy server”. Click “OK”. Then
click “OK” again in the “Internet Options” page.
Netscape® Navigator® 4.0 or Higher
1. Start Netscape. Click on “Edit” then “Preferences”.
2. In the “Preferences” window, click on “Advanced” then select
“Proxies”. In the “Proxies” window, select “Direct connection
to the Internet”.

8281
Troubleshooting
8281
Troubleshooting
Setup Assistant CD does not automatically start.
If the CD-ROM does not start the Setup Assistant automatically, it
could be that the computer is running other applications that are
interfering with the CD drive.
1. If the Setup Assistant Welcome screen does not appear within
15-20 seconds, open up your CD-ROM drive by double-clicking
on the “My Computer” icon that is located on your desktop.
2. Next, double-click on the CD-ROM drive that the Setup Assistant
CD has been placed in to start the installation.
3. The Setup Assistant should start within a few seconds. If,
instead, a window appears showing the files on the CD,
double-click on the icon labeled “SetupAssistant”.
4. If the Setup Assistant still does not start, reference the section
titled “Manually Configuring Network Settings” (page 74 of this
User Manual for an alternative setup method).
Setup Assistant cannot find my Router.
If the Setup Assistant is not able to find the Router during the
installation process, please check the following items:
1. If the Setup Assistant is not able to find the Router during the
installation process, there may be third-party firewall software
installed on the computer attempting to access the Internet.
Examples of third-party firewall software are ZoneAlarm,
BlackICE PC Protection, McAfee Personal Firewall, and Norton
Personal Firewall. If you do have firewall software installed on
your computer, please make sure that you properly configure it.
You can determine if the firewall software is preventing Internet
access by temporarily turning it off. If, while the firewall is
disabled, Internet access works properly, you will need to change
the firewall settings to function properly when it is turned on.
Please refer to the instructions provided by the publisher of your
firewall software for instructions on configuring the firewall to
allow Internet access.

82
Troubleshooting
82
section
2
1
3
4
5
6
7
8
9
10
2. Unplug power to the Router for 10 seconds, and then plug the
power back into the Router. Ensure that the Router’s “router”
LED is on; it should be solid BLUE. If not, check to make sure
that the AC adapter is connected to the Router and plugged into
a wall outlet.
3. Ensure that you have a cable connected between (1) the network
(Ethernet) port on the back of the computer and (2) one of the “to
Wired Computers” ports on the back of the Router.
Note: The computer should NOT be connected to the port labeled
“to Modem” on the back of the Router.
4. Try shutting down and restarting your computer, then rerunning
the Setup Assistant.
If the Setup Assistant is still unable to find the Router, reference
the section titled “Manually Configuring Network Settings” for
installation steps.
Setup Assistant cannot connect my Router to the Internet
If the Setup Assistant is not able to connect the Router to the
Internet, please check the following items:
1. Use the troubleshooting suggestions within the Setup Assistant.
2. If your ISP requires a user name and password, make sure
that you have typed in your user name and password correctly.
Some user names require that the ISP’s domain may be at the
end of the name. Example: “myname@myisp.com”. The “@myisp.
com” part of the user name may need to be typed as well as your
user name.
If you continue to have no Internet connection, reference the section
titled “Manually Configuring Network Settings” (page 74 of this User
Manual for an alternative setup method).

8483
Troubleshooting
8483
Troubleshooting
• The Setup Assistant completed installation, but my web
browser doesn’t work.
• I am unable to connect to the Internet. The “modem” LED on
my Router is off, and the “internet” LED is blinking.
If you cannot connect to the Internet, and the “modem” LED is off,
and the “internet” LED is blinking, the problem may be that your
modem and Router are not connected properly.
1. Make sure the network cable between the modem and the Router
is connected. The cable should be connected at one end to the
Router’s “to Modem” port, and at the other end to the network
port on your modem.
2. Unplug the cable or DSL modem from its power source for
three minutes. After three minutes, plug the modem back into its
power source. This may force the modem to properly recognize
the Router.
3. Unplug the power to your Router, wait 10 seconds, and then
reconnect the power. This will cause the Router to reattempt
communication with the modem. If the “modem” LED on the
Router is not lit after completing these steps, please contact
Belkin Technical Support.
4. Try shutting down and restarting your computer.

84
Troubleshooting
84
section
2
1
3
4
5
6
7
8
9
10
• The Setup Assistant completed installation, but my web
browser doesn’t work.
• I am unable to connect to the Internet. The “modem” LED on
my Router is on, and the “internet” LED is blinking.
1. If you cannot connect to the Internet, the “modem” LED is on,
and the “internet” LED is blinking, the problem may be that your
connection type may not match the ISP’s connection.
2. If you have a “static IP address” connection, your ISP must
assign you the IP address, subnet mask, and gateway address.
Please refer to the section entitled “Alternate Setup Method” for
details on changing this setting.
3. If you have a “PPPoE” connection, your ISP will assign you a
user name and password and sometimes a service name. Make
sure the Router’s connection type is configured to PPPoE and the
settings are entered properly. Please refer to the section entitled
“Alternate Setup Method” for details on changing this setting.
4. You may need to configure your Router to meet the specific
requirements of your ISP. To search our knowledge base for
ISP-specific issues, go to: http://web.belkin.com/support and
type in “ISP”.
If you are still unable to access the Internet after verifying these
settings, please contact Belkin Technical Support.

8685
Troubleshooting
8685
Troubleshooting
• The Setup Assistant completed, but my web browser
doesn’t work.
• I am unable to connect to the Internet. The “modem” LED on
my Router is blinking, and the “internet” LED is solid.
1. If the “modem” LED is blinking, and the “internet” LED is solid,
but you are unable to access the Internet, there may be third-
party firewall software installed on the computer attempting to
access the Internet. Examples of third-party firewall software are
ZoneAlarm, BlackICE PC Protection, McAfee Personal Firewall,
and Norton Personal Firewall.
2. If you do have firewall software installed on your computer,
please make sure that you properly configure it. You can
determine if the firewall software is preventing Internet access by
temporarily turning it off. If, while the firewall is disabled, Internet
access works properly, you will need to change the firewall
settings to function properly when it is turned on.
3. Please refer to the instructions provided by the publisher of your
firewall software for instructions on configuring the firewall to
allow Internet access.
If you are still unable to access the Internet after disabling any firewall
software, please contact Belkin Technical Support.

86
Troubleshooting
86
section
2
1
3
4
5
6
7
8
9
10
I can’t connect to the Internet wirelessly.
If you are unable to connect to the Internet from a wireless computer,
please check the following items:
1. Look at the lights on your Router. If you’re using a Belkin Router,
the lights should be as follows:
• The “router” LED should be on.
• The “radio wave” LED above the “router” LED should be on.
• The “modem” light should be on, and not blinking.
• The “internet” LED should be on, and not blinking.
• The “Wireless” light should be on, not blinking.
2. Open your wireless utility software by clicking on the icon in the
system tray at the bottom, right-hand corner of the screen.
3. The exact window that opens will vary depending on the model of
wireless card you have; however, any of the utilities should have
a list of “Available Networks”—those wireless networks it can
connect to.
Does the name of your wireless network appear in the results?
Yes, my network name is listed—go to the troubleshooting solution
titled “I can’t connect to the Internet wirelessly, but my network name
is listed”.
No, my network name is not listed—go to the troubleshooting solution
titled “I can’t connect to the Internet wirelessly, and my network name
is not listed”.

8887
Troubleshooting
8887
Troubleshooting
I can’t connect to the Internet wirelessly, but my network name
is listed.
If the name of your network is listed in the “Available Networks” list,
please follow the steps below to connect wirelessly:
1. Click on the correct network name in the “Available
Networks” list.
2. If the network has security (encryption) enabled, you will
need to enter the network key. For more information regarding
security, see the section entitled “Changing the Wireless
Security Settings”.
3. Within a few seconds, the tray icon in the lower, left-hand corner
of your screen should turn green, indication of a successful
connection to the network.
I can’t connect to the Internet wirelessly, and my network name
is not listed.
If the correct network name is not listed under “Available Networks” in
the wireless utility, please attempt the following troubleshooting steps:
1. Temporarily move computer, if possible, five to 10 feet from the
Router. Close the wireless utility, and reopen it. If the correct
network name now appears under “Available Networks”, you may
have a range or interference problem. Please see the suggestions
discussed in the section titled “Placement of your N1 Wireless
Router” of this User Manual.
2. Using a computer that is connected to the Router via a network
cable (as opposed to wirelessly), ensure that “Broadcast SSID” is
enabled. This setting is found on the Router’s wireless “Channel
and SSID” configuration page.
If you are still unable to access the Internet after completing these
steps, please contact Belkin Technical Support.

88
Troubleshooting
88
section
2
1
3
4
5
6
7
8
9
10
• My wireless network performance is inconsistent.
• Data transfer is sometimes slow.
• Signal strength is poor.
• Difficulty establishing and/or maintaining a Virtual Private
Network (VPN) connection.
Wireless technology is radio-based, which means connectivity
and the throughput performance between devices decreases
when the distance between devices increases. Other factors that
will cause signal degradation (metal is generally the worst culprit)
are obstructions such as walls and metal appliances. Note also
that connection speed may decrease as you move farther away from
the Router.
In order to determine if wireless issues are related to range, we
suggest temporarily moving the computer, if possible, five to 10 feet
from the Router.
Changing the wireless channel—Depending on local wireless traffic
and interference, switching the wireless channel of your network can
improve performance and reliability. The default channel the Router
is shipped with is channel 11; you may choose from several other
channels depending on your region. See the section on page 43
entitled “Changing the Wireless Channel” for instructions on how to
choose other channels.
Limiting the wireless transmit rate—Limiting the wireless transmit
rate can help improve the maximum wireless range and connection
stability. Most wireless cards have the ability to limit the transmission
rate. To change this property, go to the Windows Control Panel, open
“Network Connections” and double-click on your wireless card’s
connection. In the properties dialog, select the “Configure” button on
the “General” tab (Windows 98 users will have to select the wireless
card in the list box and then click “Properties”), then choose the
“Advanced” tab and select the rate property.
Wireless client cards are usually set to automatically adjust the
wireless transmit rate for you, but doing so can cause periodic
disconnects when the wireless signal is too weak; as a rule, slower
transmission rates are more stable. Experiment with different
connection rates until you find the best one for your environment.
Note that all available transmission rates should be acceptable for
browsing the Internet. For more assistance, see your wireless card’s
user manual.

9089
Troubleshooting
9089
Troubleshooting
I am having difficulty setting up Wired Equivalent Privacy (WEP)
security on my Belkin Router.
1. Log into your Router.
Open your web browser and type in the IP address of the Router.
(The Router’s default is 192.168.2.1.) Log into your Router by
clicking on the “Login” button in the top right-hand corner of the
screen. You will be asked to enter your password. If you never set
a password, leave the “Password” field blank and click “Submit”.
Click the “Wireless” tab on the left of your screen. Select
the “Encryption” or “Security” tab to get to the security
settings page.
2. Select “128-bit WEP” from the drop-down menu.
3. After selecting your WEP encryption mode, you can type in
your hex WEP key manually, or you can type in a passphrase
in the “Passphrase” field and click “Generate” to create a WEP
key from the passphrase. Click “Apply Changes” to finish. You
must now set all of your clients to match these settings. A hex
(hexadecimal) key is a mixture of numbers and letters from A-F
and 0-9. For 128-bit WEP, you need to enter 26 hex keys.
For example:
C3030FAF4BB2C3D44BC3D4E7E4 = 128-bit key
4. Click “Apply Changes” to finish. Encryption in the Wireless Router
is now set. Each of your computers on your wireless network will
now need to be configured with the same
security settings.
WARNING: If you are configuring the Router from a computer with
a wireless client, you will need to ensure that security is turned on
for this wireless client. If this is not done, you will lose your
wireless connection.
Note to Mac users: Original Apple AirPort products support 64-bit
encryption only. Apple AirPort 2 products can support 64-bit or
128-bit encryption. Please check your Apple AirPort product to see
which version you are using. If you cannot configure your network
with 128-bit encryption, try 64-bit encryption.

90
Troubleshooting
90
section
2
1
3
4
5
6
7
8
9
10
I am having difficulty setting up Wired Equivalent Privacy (WEP)
security on a Belkin client card.
The client card must use the same key as the Router. For instance, if
your Router uses the key 00112233445566778899AABBCC, then the
client card must be set to the exact same key.
1. Double-click the Signal Indicator icon to bring up the “Wireless
Network” screen.
2. The “Advanced” button will allow you to view and configure more
options of the card.
3. Once the “Advanced” button is clicked, the Belkin Wireless LAN
Utility will appear. This Utility will allow you to manage all the
advanced features of the Belkin Wireless Card.
4. Under the “Wireless Network Properties” tab, select a
network name from the “Available Networks” list and click the
“Properties” button.
5. Under “Data Encryption”, select “WEP”.
6. Ensure the check box “The key is provided for me automatically”
at the bottom is unchecked. If you are using this computer to
connect to a corporate network, please consult your network
administrator if this box needs to be checked.
7. Type your WEP key in the “Network key” box.
Important: A WEP key is a mixture of numbers and letters from
A-F and 0-9. For 128-bit WEP, you need to enter 26 keys. This
network key needs to match the key you assign to your Router.
For example:
C3030FAF4BB2C3D44BC3D4E7E4 = 128-bit key
8. Click “OK”, and then “Apply” to save the settings.
If you are NOT using a Belkin wireless client card, please consult the
manufacturer’s user manual for that wireless client card.

9291
Troubleshooting
9291
Troubleshooting
Do Belkin products support WPA?
Note: To use WPA security, all your clients must be upgraded
to drivers and software that support it. At the time of this FAQ
publication, a security patch download is available, for free,
from Microsoft. This patch works only with the Windows XP
operating system.
Download the patch here:
http://www.microsoft.com/downloads/details.
You also need to download the latest driver for your Belkin Wireless
802.11g Desktop or Notebook Network Card from the Belkin support
site. Other operating systems are not supported at this time.
Microsoft’s patch only supports devices with WPA-enabled drivers
such as Belkin 802.11g products
Download the latest driver at http://web.belkin.com/support
for the following products:
F5D7000, F5D7001, F5D7010, F5D7011, F5D7230-4,
F5D7231-4, F5D7130
I am having difficulty setting up Wireless Protected Access (WPA)
security on my Belkin Router for a home network.
1. From the “Security Mode” drop-down menu, select “WPA-PSK
(no server)”.
2. For “Encryption Technique”, select “TKIP” or “AES”. This setting
will have to be identical on the clients that you set up.
3. Enter your pre-shared key. This can be from eight to 63
characters and can be letters, numbers, symbols, or spaces.
This same key must be used on all of the clients that you set up.
For example, your PSK might be something like: “Smith family
network key”.
4. Click “Apply Changes” to finish. You must now set all clients to
match these settings.

92
Troubleshooting
92
section
2
1
3
4
5
6
7
8
9
10
I am having difficulty setting up Wireless Protected Access (WPA)
security on a Belkin wireless client card for a home network.
Clients must use the same key that the Router uses. For instance, if
the key is “Smith Family Network Key” in the Router, the clients must
also use that same key.
1. Double-click the Signal Indicator icon to bring up the “Wireless
Network” screen. The “Advanced” button will allow you to view
and configure more options of your card.
2. Once the “Advanced” button is clicked, the Belkin Wireless Utility
will appear. This Utility will allow you to manage all the advanced
features of the Belkin Wireless Card.
3. Under the “Wireless Network Properties” tab, select a
network name from the “Available Networks” list and click the
“Properties” button.
4. Under “Network Authentication”, select “WPA-PSK (no server).
5. Type your WPA key in the “Network key” box.
Important: WPA-PSK is a mixture of numbers and letters
from A-Z and 0-9. For WPA-PSK you can enter eight to 63
characters. This network key needs to match the key you assign
to your Router.
6. Click “OK, then “Apply” to save the settings.
9493
Troubleshooting
9493
Troubleshooting
I am NOT using a Belkin client card for a home network and
I am having difficulty setting up Wireless Protected Access
(WPA) security.
If you are not using a Belkin Wireless Desktop or Wireless Notebook
Network Card that is not equipped with WPA-enabled software, a
file from Microsoft called “Windows XP Support Patch for Wireless
Protected Access” is available for free download. Download the
patch from Microsoft by searching the knowledge base for Windows
XP WPA.
Note: The file that Microsoft has made available works only with
Windows XP. Other operating systems are not supported at this
time. You also need to ensure that the wireless card’s manufacturer
supports WPA and that you have downloaded and installed the latest
driver from their support site.
Supported Operating Systems:
• Windows XP Professional
• Windows XP Home Edition
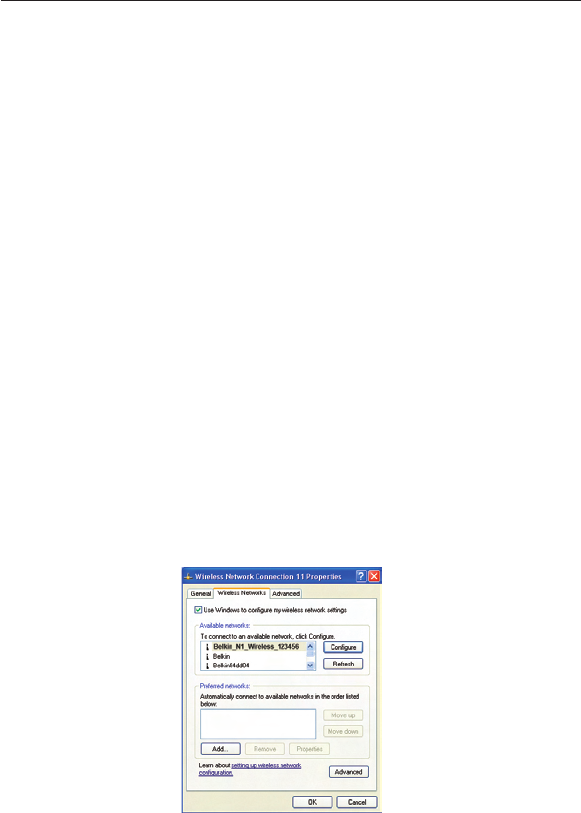
1. Under Windows XP, click “Start > Control Panel >
Network Connections”.
2. Right-clicking on the “Wireless Networks” tab will display the
following screen. Ensure the “Use Windows to configure my
wireless network settings” check box is checked.
94
Troubleshooting
94
section
2
1
3
4
5
6
7
8
9
10
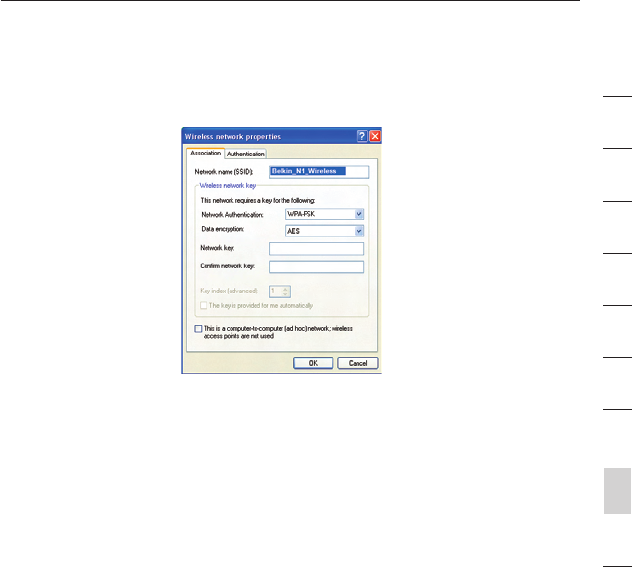
3. Under the “Wireless Networks” tab, click the “Configure” button
and you will see the following screen.
4. For a home or small business user, select “WPA-PSK” under
“Network Administration”.
Note: Select WPA (with radius server) if you are using this computer to
connect to a corporate network that supports an authentication server
such as a radius server. Please consult your network administrator for
further information.
5. Select “TKIP” or “AES” under “Date Encryption”. This setting will
have to be identical to the Router that you set up.
6. Type in your encryption key in the “Network key” box.
Important: Enter your pre-shared key. This can be from eight to 63
characters and can be letters, numbers, or symbols. This same key
must be used on all of the clients that you set up.
7. Click “OK” to apply settings.
What’s the difference between 802.11b, 802.11g, 802.11a, and
draft 802.11n?
Currently there are four levels of wireless networking standards,
which transmit data at very different maximum speeds. Each is
based on the designation for certifying network standards. The
most common wireless networking standard, 802.11b, transmits
information at 11Mbps; 802.11a and 802.11g work at 54Mbps; and
draft 802.11n works at 108Mbps. See the chart on the next page for
more detailed information.

9695
Troubleshooting
9695
Troubleshooting
Wireless Comparison Chart
Wireless
Technology
802.11b
G
(802.11g)
G Plus
(802.11g with
HSM)
G Plus MIMO
(802.11g with
MIMO MRC)
N1 MIMO
(draft 802.11n
with MIMO)
Speed*
11Mbps link
rate/baseline
5x faster than
802.11b*
10x faster
than 802.11b*
10x faster than
802.11b*
Wired speed
over the air*
Frequency
Common
household
devices such
as cordless
phones and
microwave
ovens may
interfere with
the unlicensed
band 2.4GHz
Common
household
devices such
as cordless
phones and
microwave
ovens may
interfere with
the unlicensed
band 2.4GHz
Common
household
devices such
as cordless
phones and
microwave
ovens may
interfere with
the unlicensed
band 2.4GHz
Common
household
devices such
as cordless
phones and
microwave
ovens may
interfere with
the unlicensed
band 2.4GHz
Common
household
devices such
as cordless
phones and
microwave
ovens may
interfere with
the unlicensed
band 2.4GHz
Compatibility
Compatible
with 802.11g
Compatible
with 802.11b/g
Compatible
with 802.11b/g
Compatible
with 802.11b/g
Compatible
with draft
802.11n** and
802.11b/g
Coverage*
Typically
100–200 ft.
indoors
Up to 400 ft.* Up to 700 ft.* Up to 1,000 ft.* Up to 1,400 ft.*
Advantage
Mature—legacy
technology
Common—
widespread
use for Internet
sharing
Enhanced
speed and
coverage
Better coverage
and consistent
speed at range
Leading
edge—best
coverage and
throughput
*Distance and connection speeds will vary depending on your networking environment.
**This Router is compatible with products based on the same version of the draft
802.11n specifications, and may require a software upgrade for best results.

96
Troubleshooting
96
section
2
1
3
4
5
6
7
8
9
10
Technical Support
You can find technical support information at www.belkin.com/
networking. If you want to contact technical support by phone,
please call:
US: 877-736-5771
310-898-1100 ext. 2263
UK: 0845 607 77 87
Australia: 1800 235 546
New Zealand: 0800 235 546
Singapore: 800 616 1790
Europe: www.belkin.com/support

>c[dgbVi^dc
&##3TATEMENT
$%#,!2!4)/./&#/.&/2-)497)4(&##25,%3&/2
%,%#42/-!'.%4)##/-0!4)"),)49
7E"ELKIN)NTERNATIONAL)NCOF7EST7ALNUT3TREET
#OMPTON#!DECLAREUNDEROURSOLERESPONSIBILITY
THATTHEPRODUCT
&$
TOWHICHTHISDECLARATIONRELATESCOMPLIESWITH0ART
OFTHE&##2ULES/PERATIONISSUBJECTTOTHEFOLLOWING
TWOCONDITIONSTHISDEVICEMAYNOTCAUSEHARMFUL
INTERFERENCEANDTHISDEVICEMUSTACCEPTANY
INTERFERENCERECEIVEDINCLUDINGINTERFERENCETHATMAY
CAUSEUNDESIREDOPERATION
#AUTION%XPOSURETO2ADIO&REQUENCY2ADIATION
4HERADIATEDOUTPUTPOWEROFTHISDEVICEISFARBELOWTHE&##RADIOFREQUENCY
EXPOSURELIMITS.EVERTHELESSTHEDEVICESHALLBEUSEDINSUCHAMANNERTHAT
THEPOTENTIALFORHUMANCONTACTDURINGNORMALOPERATIONISMINIMIZED
7HENCONNECTINGANEXTERNALANTENNATOTHEDEVICETHEANTENNASHALLBE
PLACEDINSUCHAMANNERTOMINIMIZETHEPOTENTIALFORHUMANCONTACTDURING
NORMALOPERATION)NORDERTOAVOIDTHEPOSSIBILITYOFEXCEEDINGTHE&##RADIO
FREQUENCYEXPOSURELIMITSHUMANPROXIMITYTOTHEANTENNASHALLNOTBELESS
THANCMINCHESDURINGNORMALOPERATION
&EDERAL#OMMUNICATIONS#OMMISSION.OTICE
4HISEQUIPMENTHASBEENTESTEDANDFOUNDTOCOMPLYWITHTHELIMITSFORA
#LASS"DIGITALDEVICEPURSUANTTO0ARTOFTHE&##2ULES4HESELIMITSARE
DESIGNEDTOPROVIDEREASONABLEPROTECTIONAGAINSTHARMFULINTERFERENCEINA
RESIDENTIALINSTALLATION
4HISEQUIPMENTGENERATESUSESANDCANRADIATERADIOFREQUENCYENERGY
)FTHISEQUIPMENTDOESCAUSEHARMFULINTERFERENCETORADIOORTELEVISION
RECEPTIONWHICHCANBEDETERMINEDBYTURNINGTHEEQUIPMENTOFFANDONTHE
USERISENCOURAGEDTOTRYANDCORRECTTHEINTERFERENCEBYONEORMOREOFTHE
FOLLOWINGMEASURES
s 2EORIENTORRELOCATETHERECEIVINGANTENNA
s )NCREASETHEDISTANCEBETWEENTHEEQUIPMENTANDTHERECEIVER
s#ONNECTTHEEQUIPMENTTOANOUTLETONACIRCUITDIFFERENTFROMTHATTO
WHICHTHERECEIVERISCONNECTED
s #ONSULTTHEDEALERORANEXPERIENCEDRADIO46TECHNICIANFORHELP
>c[dgbVi^dc
hZXi^dc
'
&
(
)
*
+
,
-
.
&%
-ODIFICATIONS
4HE&##REQUIRESTHEUSERTOBENOTIFIEDTHATANYCHANGESORMODIFICATIONSTO
THISDEVICETHATARENOTEXPRESSLYAPPROVEDBY"ELKIN)NTERNATIONAL)NCMAY
VOIDTHEUSERSAUTHORITYTOOPERATETHEEQUIPMENT
#ANADA)NDUSTRY#ANADA)#
4HEWIRELESSRADIOOFTHISDEVICECOMPLIESWITH233233)NDUSTRY
#ANADA4HIS#LASS"DIGITALAPPARATUSCOMPLIESWITH#ANADIAN)#%3
#ETAPPAREILNUMÏRIQUEDELACLASSE"CONFORMEÉLANORME.-"
DU#ANADA
%UROPE%UROPEAN5NION.OTICE2ADIOPRODUCTSWITHTHE
#%OR#%ALERTMARKINGCOMPLYWITHTHE244%$IRECTIVE
%#ISSUEDBYTHE#OMMISSIONOFTHE%UROPEAN#OMMUNITY
#OMPLIANCEWITHTHISDIRECTIVEIMPLIESCONFORMITYTOTHEFOLLOWING%UROPEAN
.ORMSINBRACKETSARETHEEQUIVALENTINTERNATIONALSTANDARDS
sEN 60950-1 (IEC60950-1) – Product Safety
s%.4ECHNICALREQUIREMENTFORRADIOEQUIPMENT
s EN 301 489 / EN50385
4ODETERMINETHETYPEOFTRANSMITTERCHECKTHEIDENTIFICATIONLABELONYOUR
"ELKINPRODUCT
0RODUCTSWITHTHE#%MARKINGCOMPLYWITHTHE%-#$IRECTIVE
%%#ANDTHE,OW6OLTAGE$IRECTIVE%%#ISSUED
BYTHE#OMMISSIONOFTHE%UROPEAN#OMMUNITY#OMPLIANCEWITHTHESE
DIRECTIVESIMPLIESCONFORMITYTOTHEFOLLOWING%UROPEAN
.ORMSINBRACKETSARETHEEQUIVALENTINTERNATIONALSTANDARDS
s%.#)302n%LECTROMAGNETIC)NTERFERENCE
s%.)%#n%LECTROMAGNETIC)MMUNITY
s%.)%#n0OWER,INE(ARMONICS
s%.)%#n0OWER,INE&LICKER
sEN 60950-1 (IEC60950-1) – Product Safety
0RODUCTSTHATCONTAINTHERADIOTRANSMITTERARELABELEDWITH#%OR#%
ALERTMARKINGANDMAYALSOCARRYTHE#%LOGO
0560

>c[dgbVi^dc
"ELKIN)NTERNATIONAL)NC,IMITED,IFETIME0RODUCT7ARRANTY
7HATTHISWARRANTYCOVERS
"ELKIN)NTERNATIONAL)NCh"ELKINvWARRANTSTOTHEORIGINALPURCHASEROFTHIS
"ELKINPRODUCTTHATTHEPRODUCTSHALLBEFREEOFDEFECTSINDESIGNASSEMBLY
MATERIALORWORKMANSHIP
7HATTHEPERIODOFCOVERAGEIS
"ELKINWARRANTSTHE"ELKINPRODUCTFORTHELIFETIMEOFTHEPRODUCT
7HATWILLWEDOTOCORRECTPROBLEMS
0RODUCT7ARRANTY
"ELKINWILLREPAIRORREPLACEATITSOPTIONANYDEFECTIVEPRODUCTFREEOFCHARGE
EXCEPTFORSHIPPINGCHARGESFORTHEPRODUCT
7HATISNOTCOVEREDBYTHISWARRANTY
!LLABOVEWARRANTIESARENULLANDVOIDIFTHE"ELKINPRODUCTISNOTPROVIDED
TO"ELKINFORINSPECTIONUPON"ELKINSREQUESTATTHESOLEEXPENSEOF
THEPURCHASERORIF"ELKINDETERMINESTHATTHE"ELKINPRODUCTHASBEEN
IMPROPERLYINSTALLEDALTEREDINANYWAYORTAMPEREDWITH4HE"ELKIN0RODUCT
7ARRANTYDOESNOTPROTECTAGAINSTACTSOF'ODSUCHASFLOODEARTHQUAKE
LIGHTNINGWARVANDALISMTHEFTNORMALUSEWEARANDTEAREROSION
DEPLETIONOBSOLESCENCEABUSEDAMAGEDUETOLOWVOLTAGEDISTURBANCES
IEBROWNOUTSORSAGSNONAUTHORIZEDPROGRAMORSYSTEMEQUIPMENT
MODIFICATIONORALTERATION
(OWTOGETSERVICE
4OGETSERVICEFORYOUR"ELKINPRODUCTYOUMUSTTAKETHEFOLLOWINGSTEPS
#ONTACT"ELKIN)NTERNATIONAL)NCAT77ALNUT3T#OMPTON#!
!TTN#USTOMER3ERVICEORCALLWITHINDAYSOF
THE/CCURRENCE"EPREPAREDTOPROVIDETHEFOLLOWINGINFORMATION
A4HEPARTNUMBEROFTHE"ELKINPRODUCT
B7HEREYOUPURCHASEDTHEPRODUCT
C7HENYOUPURCHASEDTHEPRODUCT
D#OPYOFORIGINALRECEIPT
9OUR"ELKIN#USTOMER3ERVICE2EPRESENTATIVEWILLTHENINSTRUCTYOUON
HOWTOFORWARDYOURRECEIPTAND"ELKINPRODUCTANDHOWTOPROCEED
WITHYOURCLAIM

>c[dgbVi^dc
hZXi^dc
'
&
(
)
*
+
,
-
.
&%
"ELKINRESERVESTHERIGHTTOREVIEWTHEDAMAGED"ELKINPRODUCT!LLCOSTSOF
SHIPPINGTHE"ELKINPRODUCTTO"ELKINFORINSPECTIONSHALLBEBORNESOLELYBY
THEPURCHASER)F"ELKINDETERMINESINITSSOLEDISCRETIONTHATITISIMPRACTICAL
TOSHIPTHEDAMAGEDEQUIPMENTTO"ELKIN"ELKINMAYDESIGNATEINITSSOLE
DISCRETIONANEQUIPMENTREPAIRFACILITYTOINSPECTANDESTIMATETHECOSTTO
REPAIRSUCHEQUIPMENT4HECOSTIFANYOFSHIPPINGTHEEQUIPMENTTOAND
FROMSUCHREPAIRFACILITYANDOFSUCHESTIMATESHALLBEBORNESOLELYBYTHE
PURCHASER$AMAGEDEQUIPMENTMUSTREMAINAVAILABLEFORINSPECTIONUNTILTHE
CLAIMISFINALIZED7HENEVERCLAIMSARESETTLED"ELKINRESERVESTHERIGHTTOBE
SUBROGATEDUNDERANYEXISTINGINSURANCEPOLICIESTHEPURCHASERMAYHAVE
(OWSTATELAWRELATESTOTHEWARRANTY
4()37!22!.49#/.4!).34(%3/,%7!22!.49/&"%,+).4(%2%
!2%.//4(%27!22!.4)%3%802%33%$/2%8#%04!32%15)2%$
"9,!7)-0,)%$).#,5$).'4(%)-0,)%$7!22!.49/2#/.$)4)/.
/&15!,)49-%2#(!.4!"),)49/2&)4.%33&/2!0!24)#5,!2
0520/3%!.$35#()-0,)%$7!22!.4)%3)&!.9!2%,)-)4%$).
$52!4)/.4/4(%4%2-/&4()37!22!.49
3OMESTATESDONOTALLOWLIMITATIONSONHOWLONGANIMPLIEDWARRANTYLASTS
SOTHEABOVELIMITATIONSMAYNOTAPPLYTOYOU
)../%6%.43(!,,"%,+)."%,)!",%&/2).#)$%.4!,30%#)!,
$)2%#4).$)2%#4#/.3%15%.4)!,/2-5,4)0,%$!-!'%335#(!3
"54./4,)-)4%$4/,/34"53).%33/202/&)43!2)3).'/54/&
4(%3!,%/253%/&!.9"%,+).02/$5#4%6%.)&!$6)3%$/&4(%
0/33)"),)49/&35#($!-!'%3
4HISWARRANTYGIVESYOUSPECIFICLEGALRIGHTSANDYOUMAYALSOHAVEOTHER
RIGHTSWHICHMAYVARYFROMSTATETOSTATE3OMESTATESDONOTALLOWTHE
EXCLUSIONORLIMITATIONOFINCIDENTALCONSEQUENTIALOROTHERDAMAGESSOTHE
ABOVELIMITATIONSMAYNOTAPPLYTOYOU