Belkin F9K1102V2 N600 DB Wireless N + Router User Manual
Belkin International, Inc. N600 DB Wireless N + Router
UserManual.wiki
>
Belkin
>
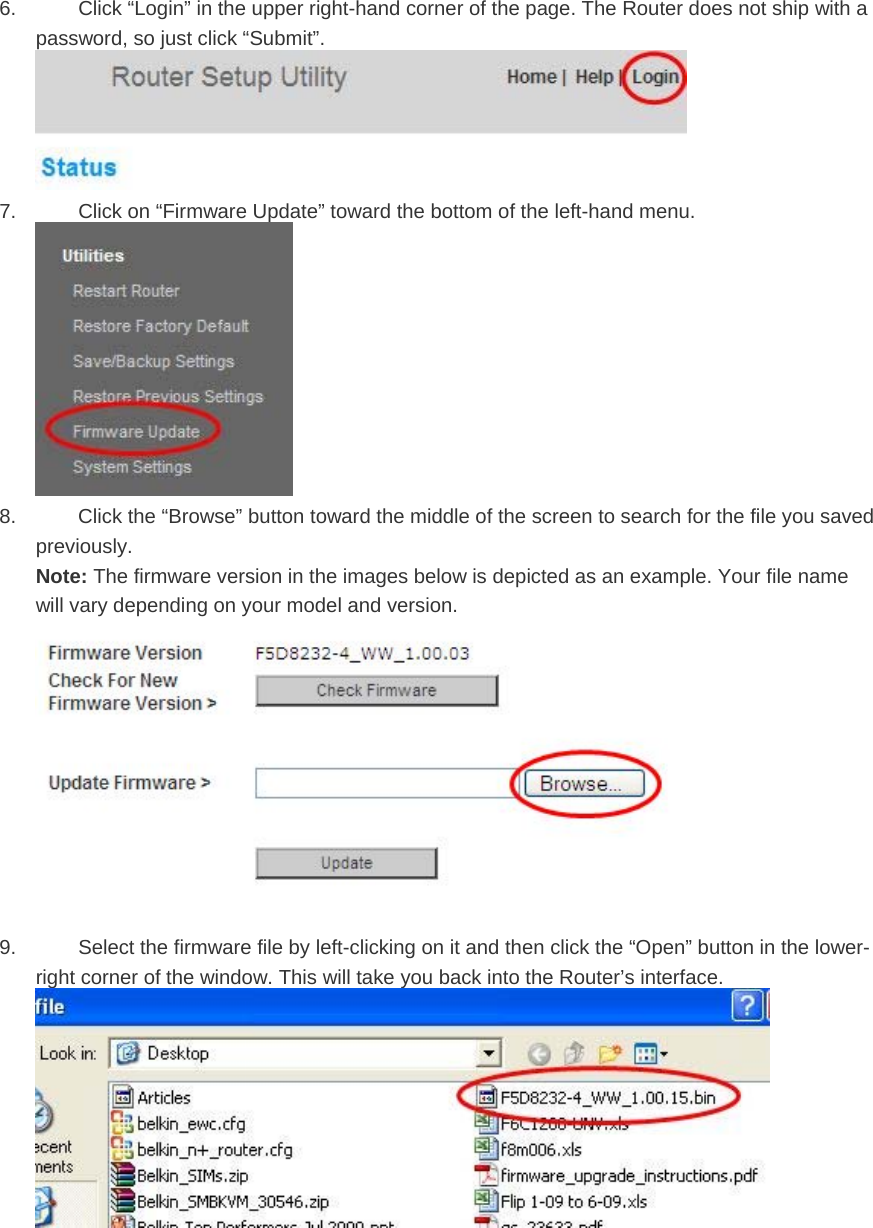
F9K1102V2 User Manual
User manual
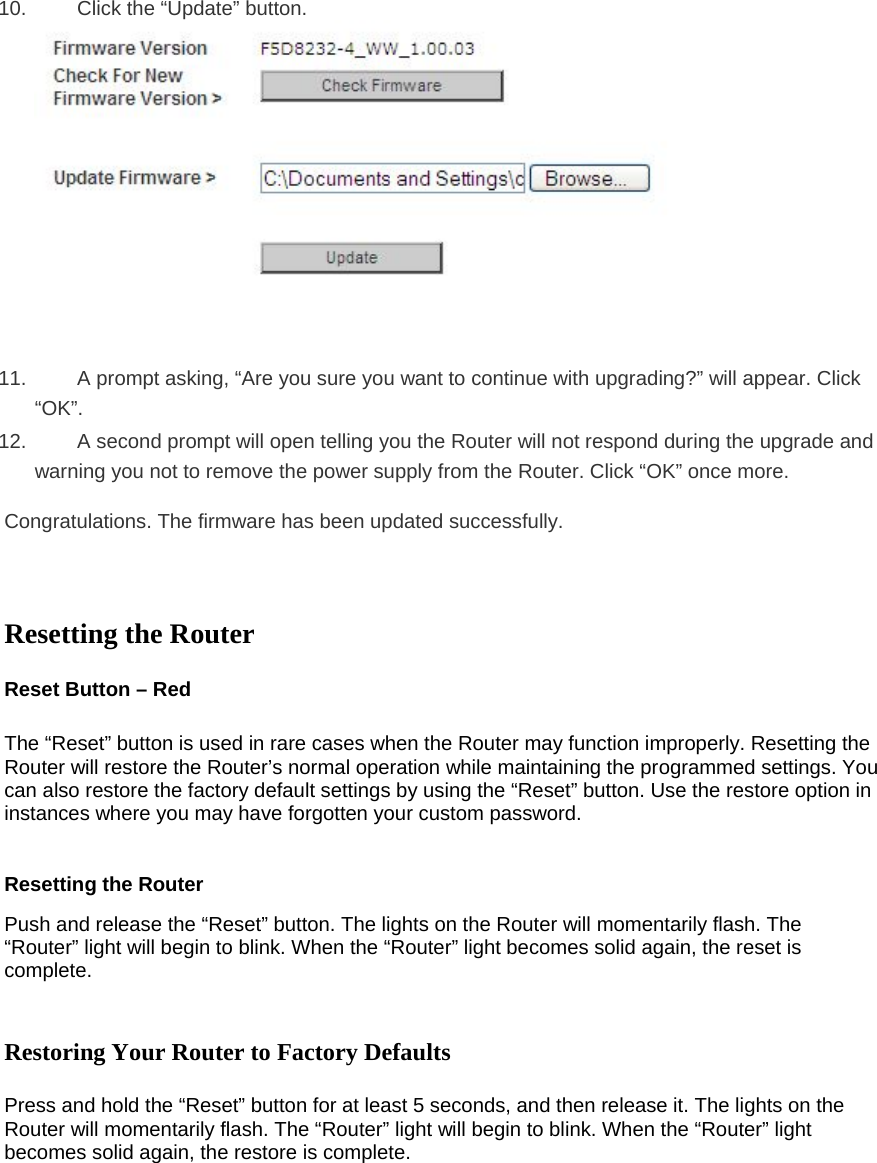
Navigation menu
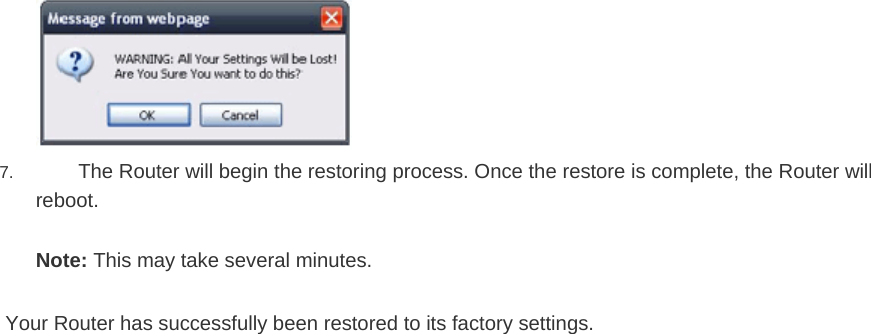
Upload a User Manual
Namespaces
Wiki Guide
HTML
PDF
Info
Views
User Manual
Discussion / Help
Navigation
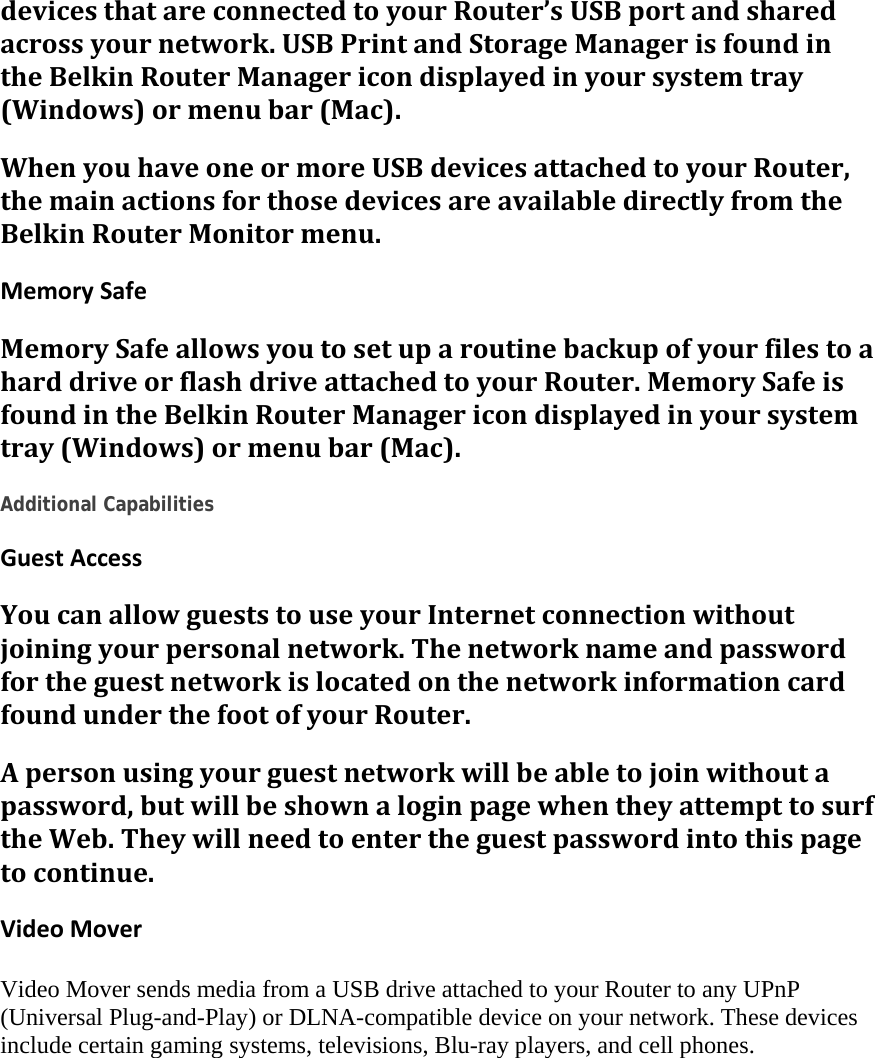
![[You can get the actual artwork from the N900DB QIG “QIG_F9K1104_8830-06656_N900.pdf”] 3. Power up your modem by plugging in its power supply. 4. Power up your Router by plugging in its power supply. [You can get the actual artwork from the N900DB QIG “QIG_F9K1104_8830-06656_N900.pdf”] Run the Installer Software](https://usermanual.wiki/Belkin/F9K1102V2/User-Guide-1734393-Page-3.png)
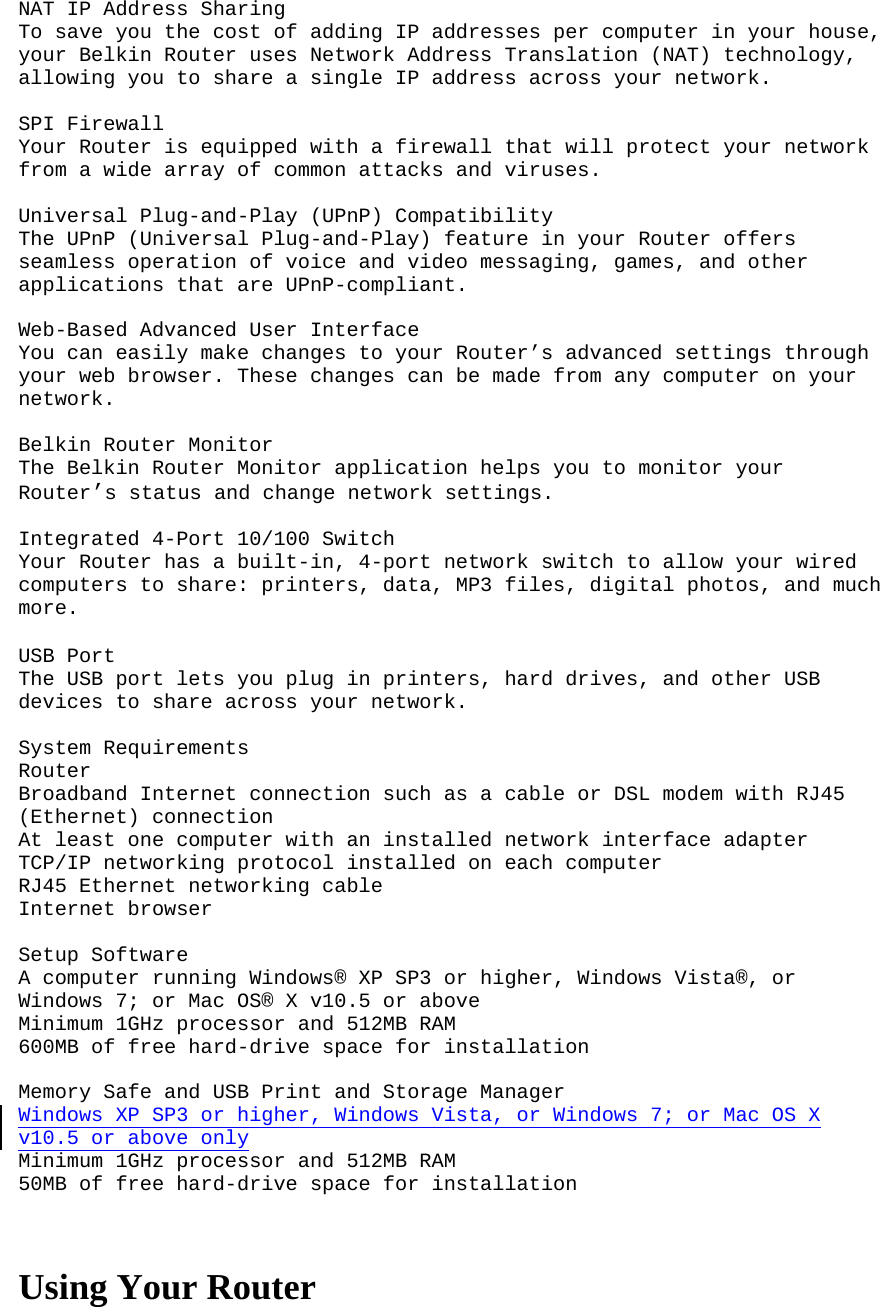
![Insert the included CD into your computer. Find the setup program and open it. It should run automatically; if not, find the setup program and open it. fFollow the prompts. The setup software will configure your Internet connection and let you know when things are working. If you have DSL, you may need a username and password from your Internet provider. [Image of laptop and CD] [You can get the actual artwork from the N900DB QIG “QIG_F9K1104_8830-06656_N900.pdf”]](https://usermanual.wiki/Belkin/F9K1102V2/User-Guide-1734393-Page-4.png)
![[SCREENSHOTOFSETUPMENUsetupmenu.png]1) ClicktheSetupiconontheCDmenu.[Diagramofbottomoftheroutershowingservicecard–canbeobtainedfrom“TestedQIG20110714.pdf”provided] 2) Afterabriefinstallation,thesetupsoftwarewillaskyouforthenetworknameandpasswordfromthenetworkinformationcardthatisstoredinthefootofyournewBelkinRouter.StorethecardunderthebaseofyourRouterforfuturereference.[SCREENSHOTOFSUCCESSsetupsuccess.png] 3) Aprogressscreenwillappearwhileadditionalsoftwareisinstalled.Thismaytakeafewminutestocomplete.Oncefinished,a“Success”messagewillappearindicatingthatyouareconnectedtotheInternetviayournewBelkinRouter.Duringsetupyoumaybeaskedforadditionalinformation.YoumayneedtoenterausernameandpasswordprovidedbyyourISP.ThisusernameandpasswordislikelytobefoundonmaterialsthatcamefromyourISPwhenyousignedupforservice.Ifnecessary,youmayneedtocontactyourISPtoretrieveyourusernameandpassword.IfyouhaveastaticIPaddress,youmayneedtoenteradditionalinformationalsoprovidedbyyourISP.Ifyourcomputerdoesn’thaveawirelessadapter,orthesetupsoftwareisunabletocontrolit,youmaybeaskedtoconnectyourcomputertotheRouterwithanetworkcable.](https://usermanual.wiki/Belkin/F9K1102V2/User-Guide-1734393-Page-5.png)
![Advanced Tools & Settings [SCREENSHOTOFADVANCEDMENUsetupadvanced2.png]Aftertheinitialsetupiscomplete,youhavetheoptiontochangesettingslikeyournetworkname,securitytype,andpassword.Tomakethesechangesandothers,clickontheAdvancedToolsiconattheCDSetupmenuandselectoneofthefollowingsettingsthatyouwouldliketochange:NetworkName&SecurityPersonalizeyournetworkname(SSID),password,andstrengthofwirelesssecurity.InternetServiceProvider&LoginSettingsHaveyoumovedorchangedInternetServiceProviders?Ifyou’dliketochangethesesettingswithoutrunningthroughthesetupprocessagain,thisistheplace. The Belkin Router Manager [N600SCREENSHOTOFTRAYAPPMENU(TBD)]TheBelkinRouterManagerappearsinyoursystemtray(Windows)ormenubar(Mac).ItsiconindicatesthecurrentstatusofyourRouterandalsoallowsyoutoaccessyourRouter’ssettingstomakechanges.ItalsoprovidesquickaccesstosoftwarethatcamebundledwithyourRouter.ToaccesstheRoutersettings,clickontheiconandselectfromthemenuthatappears.ThestatusofyourRouterisshownbytheBelkinRouterManagericon,whichcloselymimicsthelightonthefrontoftheRouter.Blue: You are connected to your Belkin Router and it is connected to the Internet. Amber: You are connected to your Belkin Router, but it is not connected to the Internet.](https://usermanual.wiki/Belkin/F9K1102V2/User-Guide-1734393-Page-6.png)

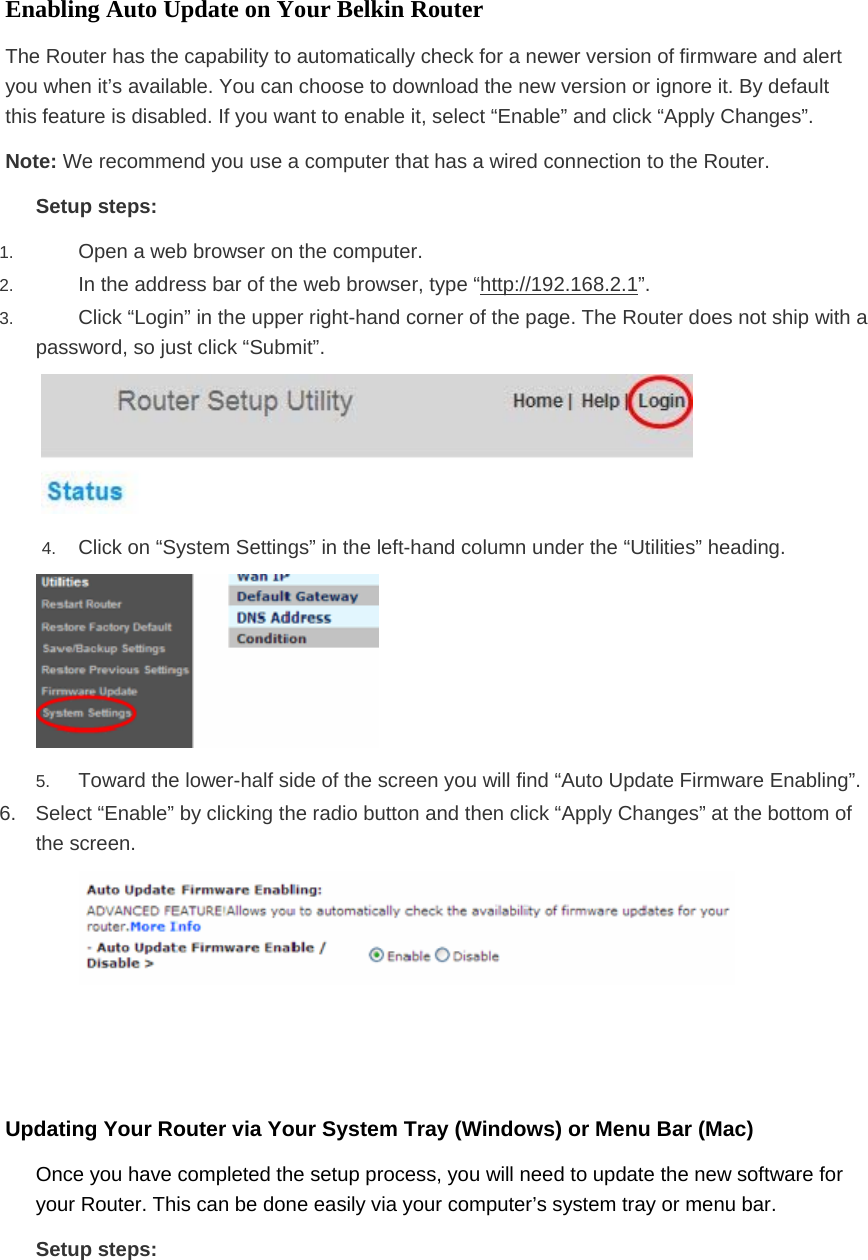
![[Diagram of bottom of the router showing service card – can be obtained from “Tested QIG 2011 07 14.pdf” provided] Can’t find the card? The default network name and password are also printed on the foot of the Router. Use your computer, tablet, or smartphone to connect to the wireless network shown on the network ID card. [Diagram of connecting to SSID screenshot – needs creating, take direction from “Tested QIG 2011 07 14.pdf” provided] When requested, please enter the password (security key) provided on the card. Take a moment to look at the light on the front of the Router. If it is solid blue, your Router was able to connect to the Internet automatically. [Image of front of the router with blue LED (needs creating)]](https://usermanual.wiki/Belkin/F9K1102V2/User-Guide-1734393-Page-8.png)
![If not, please proceed to “Manually Set Up Your Internet Connection” on page XX. UsingtheWPSButton1) StartWPSPushButtonConnection(WPSPBC)onyourcomputerorotherWi‐FidevicethatyouwouldliketoconnectwirelesslytoyourRouter.Oftentherewillbeabuttonforthispurposeinsoftwarethatcamewiththedevice,oraphysical“WPS,”“PBC,”or“Security”buttononthedeviceitself.2) Withintwominutes,presstheWPSbuttononyourRouterandholdfortwoseconds.TheWPSlight(smalllightaboveWPSbutton)willblinkbluewhileitlistensforyourWi‐Fidevice.Onceaconnectionisestablished,thelightwillturnblueandthengoout.Ifaconnectionisnotestablished,thelightwillblinkamber.Youmayrepeattheprocesstotryagain.YoucanrepeatthisprocessforeachWPS‐enableddeviceyou’dliketoaddtoyournetwork. Manually Set Up Your Internet Connection Use a browser to visit http://router/. The router homepage should appear. [Image of browser showing the router homepage – see “Tested QIG 2011 07 14.pdf” provided for guideline]](https://usermanual.wiki/Belkin/F9K1102V2/User-Guide-1734393-Page-9.png)
![You can also try visiting http://192.168.2.1/. The status of your Internet connection is shown in the upper right corner of the router homepage. If after a few moments it says “Connected,” you’re done! You can surf the Internet. [Image of browser showing “connected” homepage – see “Tested QIG 2011 07 14.pdf” provided for guideline] If not, select “Connection Type” from the menu on the left. [Zoomed in image of the “Connection Type” option in the homepage – see “Tested QIG 2011 07 14.pdf” provided for guideline] If a password screen appears, press “Submit.” [Image of the login screen showing the submit button – see “Tested QIG 2011 07 14.pdf” provided for guideline] Dynamic Connection Cable and fiber customers generally require a dynamic connection. Some DSL customers require a PPPoE connection. Let’s try dynamic first. Select “Dynamic” from the menu that appears and press “Next.” [Image of the connection type screen with dynamic selected – see “Tested QIG 2011 07 14.pdf” provided for guideline]](https://usermanual.wiki/Belkin/F9K1102V2/User-Guide-1734393-Page-10.png)
![A service name is generally not required. Hit “Apply Changes.” The Router will restart. [Image of the service name page – see “Tested QIG 2011 07 14.pdf” provided for guideline] If after a few minutes your Internet Status says “Connected,” you’re done! You can surf the Internet. [Image of browser showing “connected” homepage – see “Tested QIG 2011 07 14.pdf” provided for guideline] If these steps do not work, try restarting your modem and repeating the process. If not, we’ll try a PPPoE connection next. PPPoE Connection Some DSL customers require a PPPoE connection. Select PPPoE this time and press “Next.” [Image of the connection type screen with PPPoE selected – see “Tested QIG 2011 07 14.pdf” provided for guideline] Enter the username and password supplied by your Internet provider and click “Apply Changes.” Ignore the other fields. The Router will restart. [Image of the PPPoE page – see “Tested QIG 2011 07 14.pdf” provided for guideline]](https://usermanual.wiki/Belkin/F9K1102V2/User-Guide-1734393-Page-11.png)
![If after a few minutes your Internet Status says “Connected,” you’re done! You can surf the Internet. [Image of browser showing “connected” homepage – see “Tested QIG 2011 07 14.pdf” provided for guideline] If these steps do not work, try restarting your modem and repeating the process. [Be sure to use the correct icons, see the QIG F9K1104_8830-06656_N900.pdf for an idea] Connect Your Wireless Devices iOS (iPhone, iPad, and iPod touch) 1. Open the Settings app and select the Wi-Fi menu item. 2. Select your wireless network from the list that appears there. If asked to do so, enter the network password. Mac OS® X Your Mac® provides a menu of available wireless networks at the right end of the menu bar. 1. Click on the icon showing wireless waves. 2. Select your wireless network from the list that appears there. If asked to do so, enter the network password. Android (phones and tablets) 1. Open the Settings app and select Wireless and Network. 2. From there, select Wi-Fi to see the list of available networks. 3. Select your wireless network from the list. If asked to do so, enter your network password Windows® 7 Your computer provides a menu of available wireless networks at the right end of the task bar. 1. RightLeft-click on the icon that looks like signal strength bars.](https://usermanual.wiki/Belkin/F9K1102V2/User-Guide-1734393-Page-12.png)
![2. Select your wireless network from the list. If asked, enter your network password (network key). Windows Vista® and Windows XP Your device provides a menu of available wireless networks at the right end of the task bar. 1. Right-click on the icon that shows a computer with wireless waves (XP) or two computers (Windows Vista). 2. Choose “View Available Wireless Networks (XP)” or “Connect to a network (Vista)” from the menu. 3. Select your wireless network from the list. If asked, enter your network password (network key). Adding USB Devices [USBINVITATIONDIAGRAM(TBD)]AddingaDriveYoucanshareaUSBharddriveorflashdrivetoyournetworkviayourRouter’sUSBport.Onceconnected,youcansharefilesandmusicwithothercomputersanddeviceswithinyournetwork.PlugyourUSBharddriveintotheUSBportonthebackofyourRouter.WhenthelightabovetheUSBportislit,yourdriveisavailabletocomputersonyournetwork.YoucanmanuallycheckthestatusofyourshareddrivebyvisitingtheUSBPrintandStorageManager,foundundertheBelkinRouterManagericondisplayedinyoursystemtray(Windows)ormenubar(Mac).Ifyouhavedifficultysharingadriveonyournetwork,pleaseseethe“Troubleshooting”sectionofthismanual. A few USB hard disks require more power than the Router’s USB port provides. In these cases, you may notice the drive failing to come on or remaining on for a short time. If](https://usermanual.wiki/Belkin/F9K1102V2/User-Guide-1734393-Page-13.png)
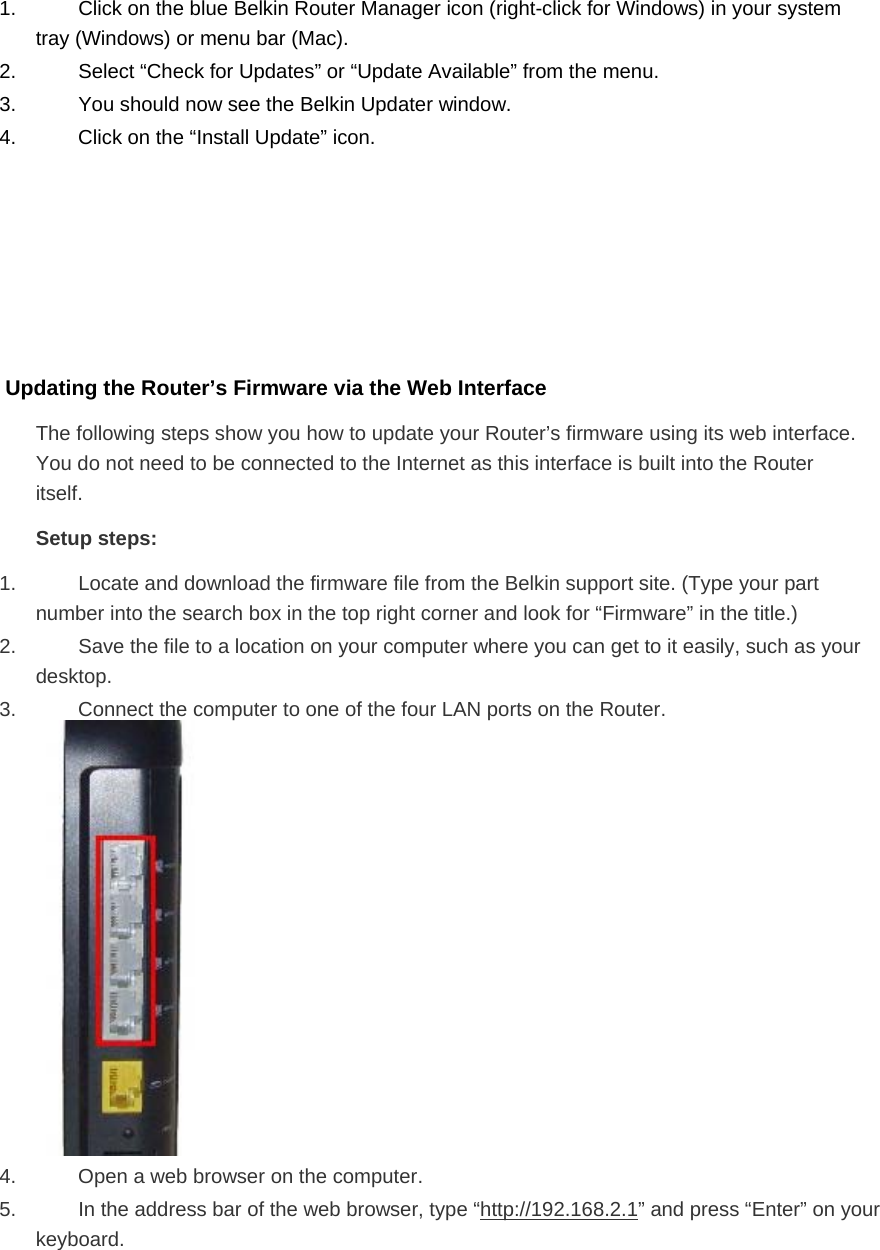
![Getting to Know Your Router Front Panel [DIAGRAMfront.ai]A)RouterStatusLightYourRouter’sstatusisshownbythelightonthefront.Off:TheRouterisnotpluggedintoapowersource.BlinkingBlue:TheRouterisstartingup.SolidBlue:TheRouterisconnectedtotheInternet.BlinkingAmber:TheRoutercan’tdetectthemodem.Eitherthemodemisoff,isnotpluggedintotheRouter,orisunresponsive.B)Wi‐FiProtectedSetup(WPS)LightandButtonTheWPSbuttononthefrontofyourRoutercanbeusedtohelpestablishasecureconnectionbetweenyourRouterandotherWPS‐enabledWi‐Fidevicessuchascomputers.TousetheWPSfeatureonyourRouter,see“GettingStarted>AddingComputerstoYourNetwork>UsingtheWPSButton”.ThesmalllightneartheWPSbuttonshowswhatishappeningwhileyouareusingWPStoestablishaconnection.Off:IdleBlinkingBlue:TheRouterislisteningforaWPS‐enabledcomputerorotherdevice.SolidBlue:TheRouterhasmadeasecureconnectionwiththecomputerorotherdevice.Amber:Aconnectionwasnotcreated.](https://usermanual.wiki/Belkin/F9K1102V2/User-Guide-1734393-Page-16.png)
![Back Panel [RDIAGRAMFORSHAREANDPLAYr_shareplay_back.ai]A)Modem(WAN)ConnectorConnectyourmodemtothisportusinganEthernetcable.B)Wired(LAN)ConnectorsConnectcomputersandotherwirednetworkdevicestotheseportsusingEthernetcables.C)USBPortUSBprinters,disks,andotherUSBdevicespluggedintothisportwillbesharedonyournetwork.EachUSBporthasalightthatindicatesitsstatus.Off:NoUSBdeviceisconnectedortheattachedUSBdeviceisnotinuse.Blinking:Pleasewaittounplugthedeviceuntilthelightturnsoff.On:TheUSBdeviceisconnectedandbeingsharedonyournetwork.D)ResetButtonThisbuttonisusedtorestartyourRouterinrarecaseswhenitfunctionsincorrectly.ResettingtheRouterwillpreserveyoursettings.Thisbuttonmayalsobeusedtorestorethefactorydefaultsettings.PleaseseetheTroubleshootingsectionformoreinformation.E)PowerConnectorConnecttheincludedpowersupplytothisjack. Technical Details Technical Features Integrated 802.11n Wireless Access Point Utilizing Dual-Band Network technology, your Router creates two separate networks (one at 2.4GHz band and the other at 5GHz band), allowing increased bandwidth to all your connected wireless devices and computers.](https://usermanual.wiki/Belkin/F9K1102V2/User-Guide-1734393-Page-17.png)


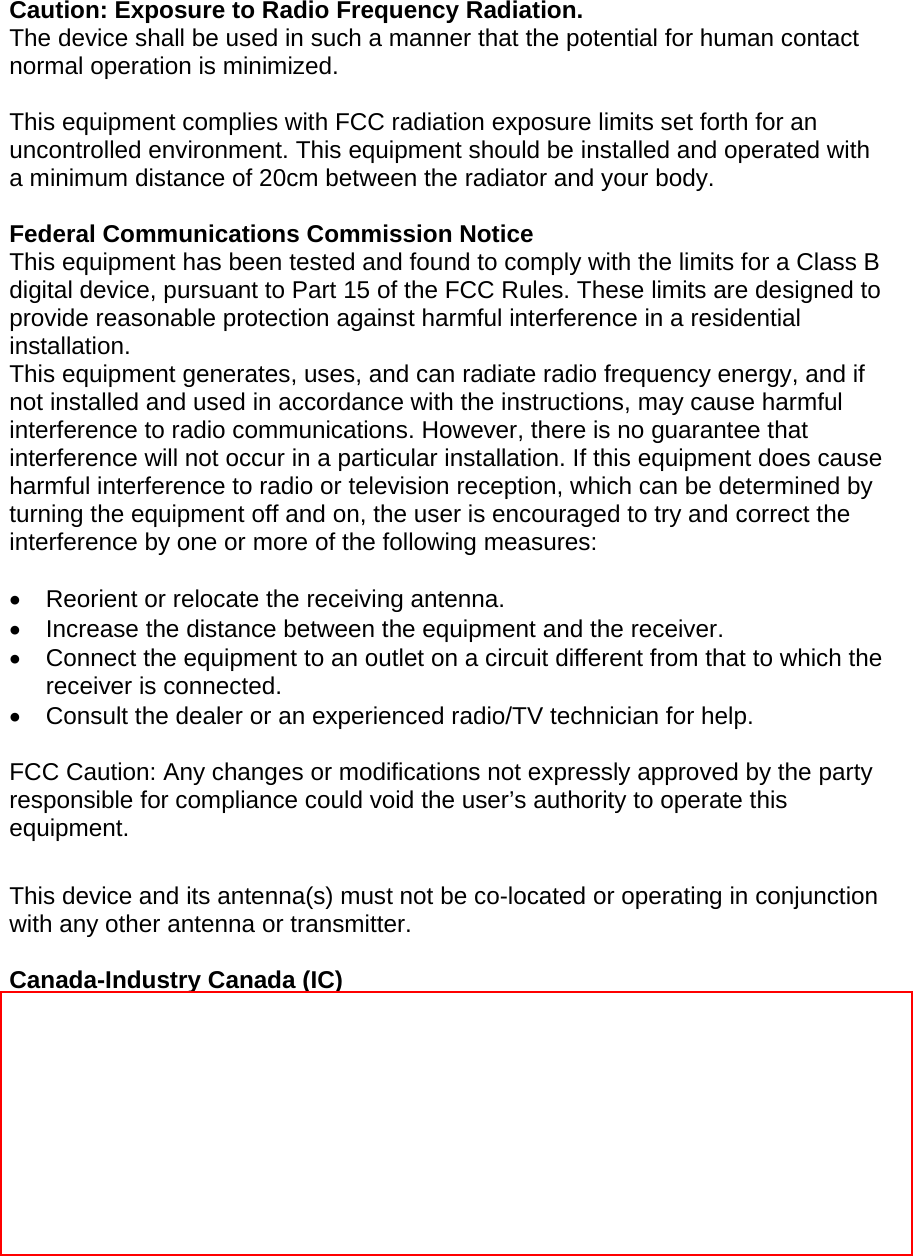
![This device complies with Industry Canada licence-exempt RSS standard(s). Operation is subject to the following two conditions: (1) this device may not cause interference, and (2) this device must accept any interference, including interference that may cause undesired operation of the device. IC Radiation Exposure Statement: This equipment complies with IC RSS-102 radiation exposure limits set forth for an uncontrolled environment. This equipment should be installed and operated with minimum distance 20cm between the radiator & your body. This Class [B] digital apparatus complies with Canadian ICES-003. Cet appareil numérique de la classe [B] est conforme à la norme NMB-003 du Canada.](https://usermanual.wiki/Belkin/F9K1102V2/User-Guide-1734393-Page-37.png)