Belkin F9K1104V1 Dual Band 3T3R Router User Manual
Belkin International, Inc. Dual Band 3T3R Router
Belkin >
User Manual

User Manual
F9K1104 v1 8820-00783 Rev. A03
WIRELESS DUAL-BAND N+ ROUTER
ADVANCE N900 DB
TABLE OF CONTENTS
Getting Started ........................................... 1
What’s in the Box .............................................1
Initial Setup..................................................1
Advanced Tools & Settings.....................................6
The Belkin Router Manager ....................................7
Manual Setup Using Your Browser ..............................8
Adding Computers to Your Network .............................9
Using the WPS Button........................................11
Adding USB Devices .........................................11
Bundled Software ...........................................14
Additional Capabilities .......................................15
Getting to Know Your Router .............................. 16
Front Panel .................................................16
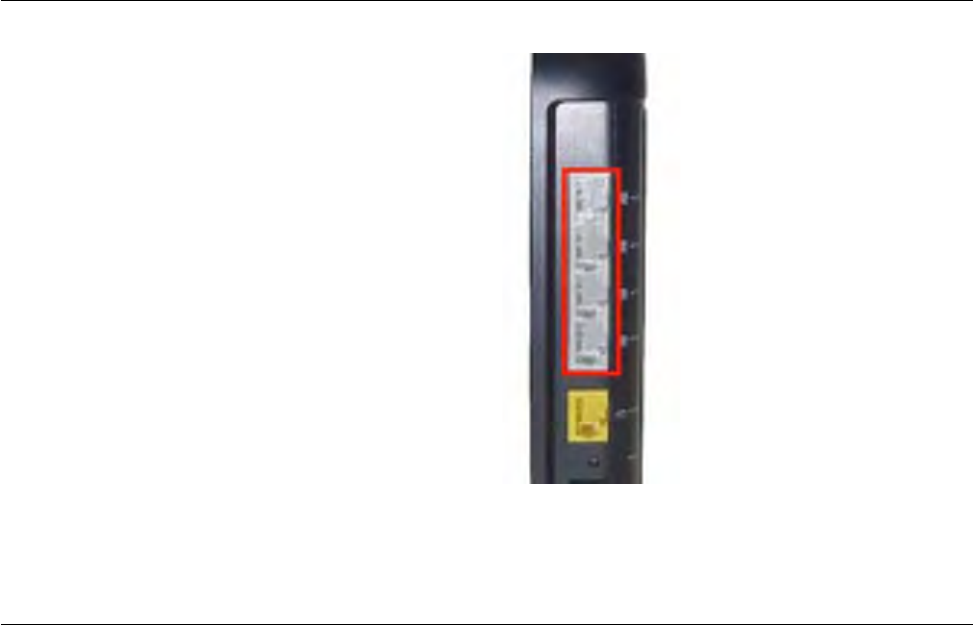
Back Panel .................................................17
Technical Details ........................................ 18
Technical Features ..........................................18
System Requirements........................................19
Using Your Router .......................................20
Enabling Auto Update on Your Belkin Router.....................21
Updating Your Router via Your System Tray (Windows)
or Menu Bar (Mac) ..........................................22
Updating the Router’s Firmware via the Web Interface ............23
Resetting the Router .........................................27
Restoring Your Router to Factory Defaults.......................27
Restoring the Router to Default Settings Using the Web Interface ...28
Troubleshooting, Support, and Warranty ................... 31
Troubleshooting .............................................31
Technical Support ...........................................40
Belkin International, Inc., Limited 2-Year Product Warranty.........41
Regulatory Information ................................... 44
FCC Statement..............................................44

1
What’s in the Box
ADVANCE N900 DB Wireless Dual-Band N+ Router
CAT6 Ethernet cable (attached to router)
Power supply (attached to router)
Network information card (attached to router)
Belkin Setup CD with User Manual
Initial Setup
Where to Place Your Router
For the best results, place the Router next to your modem in
an open location away from large metal objects and magnets
such as those found in speakers. Raising the Router above
floor level can improve the strength of your wireless signal.
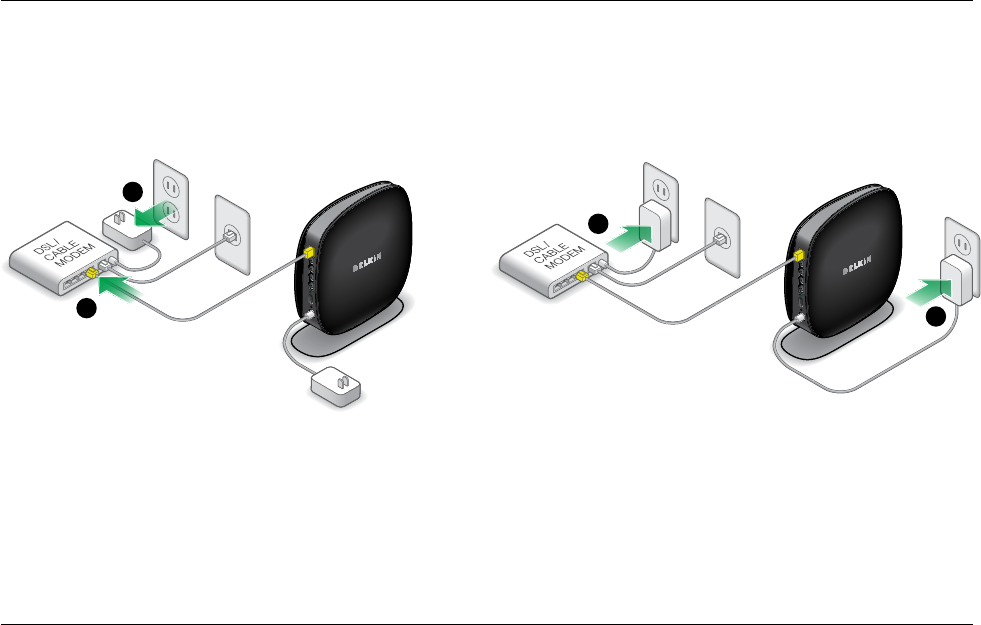
GETTING STARTED
2
GETTING STARTED
3) Power up your modem by plugging in its power supply.
4) Power up your Router by plugging in its power supply.
Connect Your N900 DB Router
1) Turn off your modem by disconnecting its power supply.
2) Connect your Router to your modem using
the cable (already attached).
3
4
1
2
3
GETTING STARTED
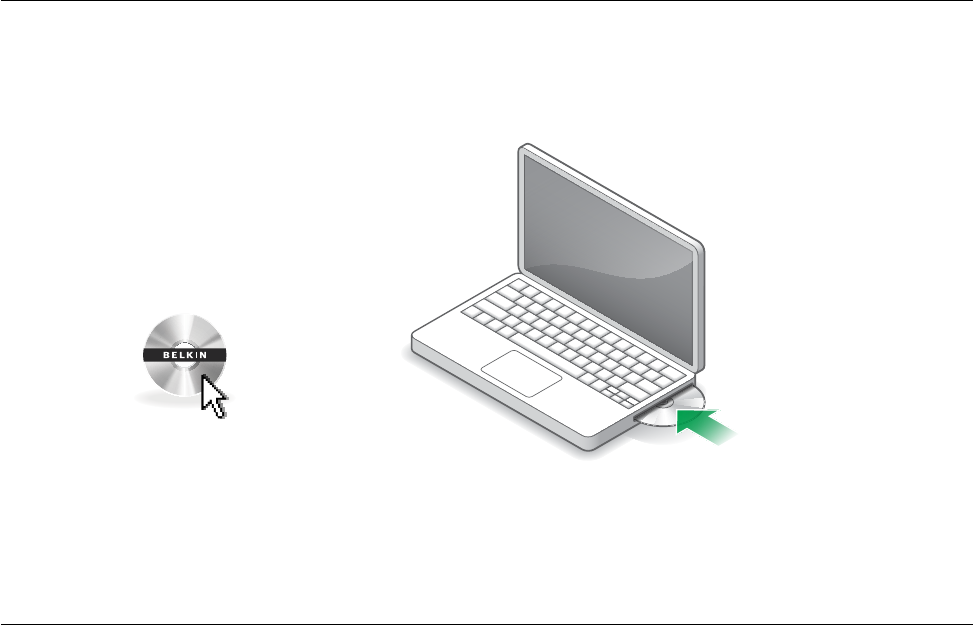
Run the Installer Software
Insert the included CD into your computer. It should run automatically;
if not, find the setup program and open it. Follow the prompts.
The setup software will configure your Internet connection
and let you know when things are working.
If you have DSL, you may need a username and
password from your Internet provider.
Setup
4
GETTING STARTED
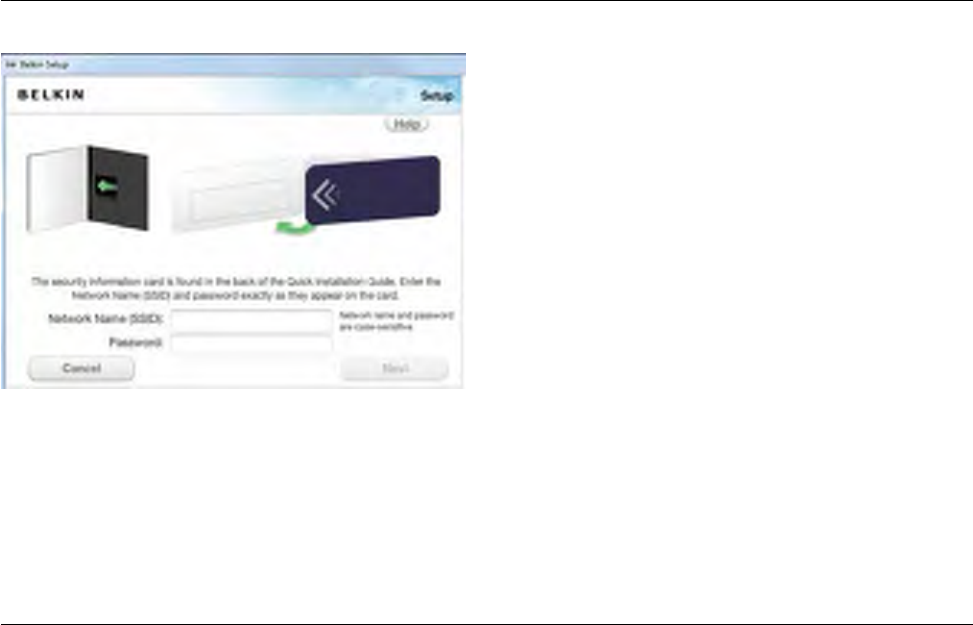
1) Click the Setup icon on the CD menu.
2) After a brief installation, the setup software will ask you for
the network name and password from the network information
card that is attached to the installation booklet. Store the
card under the base of your Router for future reference.
5
GETTING STARTED
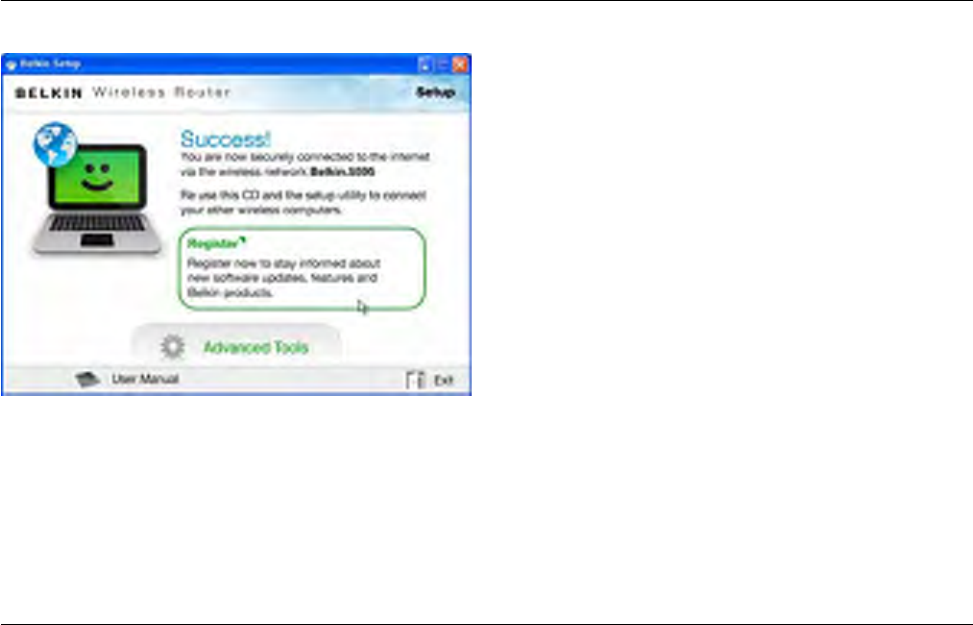
3) A progress screen will appear while additional software is
installed. This may take a few minutes to complete. Once
finished, a “Success” message will appear indicating that you
are connected to the Internet via your new Belkin Router.
During setup you may be asked for additional information.
You may need to enter a username and password provided
by your ISP. This username and password is likely to be
found on materials that came from your ISP when you
signed up for service. If necessary, you may need to contact
your ISP to retrieve your username and password.
If you have a static IP address, you may need to enter
additional information also provided by your ISP.
If your computer doesn’t have a wireless adapter, or the
setup software is unable to control it, you may be asked to
connect your computer to the Router with a network cable.
6
GETTING STARTED
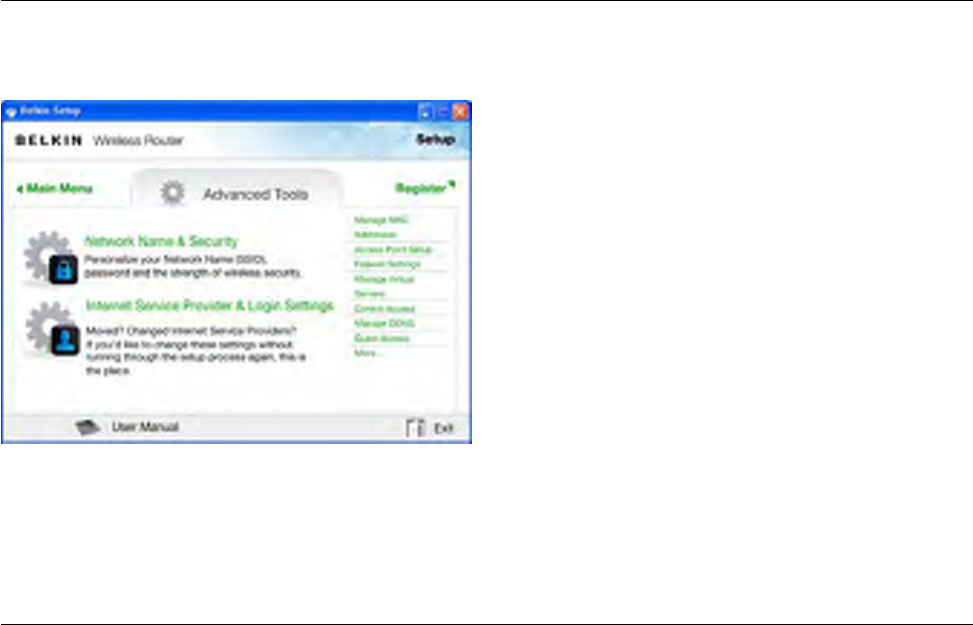
Advanced Tools & Settings
After the initial setup is complete, you have the option to
change settings like your network name, security type, and
password. To make these changes and others, click on the
Advanced Tools icon at the CD Setup menu and select one
of the following settings that you would like to change:
Network Name & Security – Personalize your network name
(SSID), password, and strength of wireless security.
Internet Service Provider & Login Settings – Have
you moved or changed Internet Service Providers?
If you’d like to change these settings without running
through the setup process again, this is the place.
7
GETTING STARTED
The Belkin Router Manager
The Belkin Router Manager appears in your system tray
(Windows) or menu bar (Mac). Its icon indicates the current
status of your Router and also allows you to access your
Router’s settings to make changes. It also provides quick
access to software that came bundled with your Router.
To access the Router settings, click on the icon
and select from the menu that appears.
The status of your Router is shown by the Belkin Router Manager
icon, which closely mimics the light on the front of the Router.
White: You are connected to your Belkin Router
and it is connected to the Internet.
Amber: You are connected to your Belkin Router,
but it is not connected to the Internet.
8
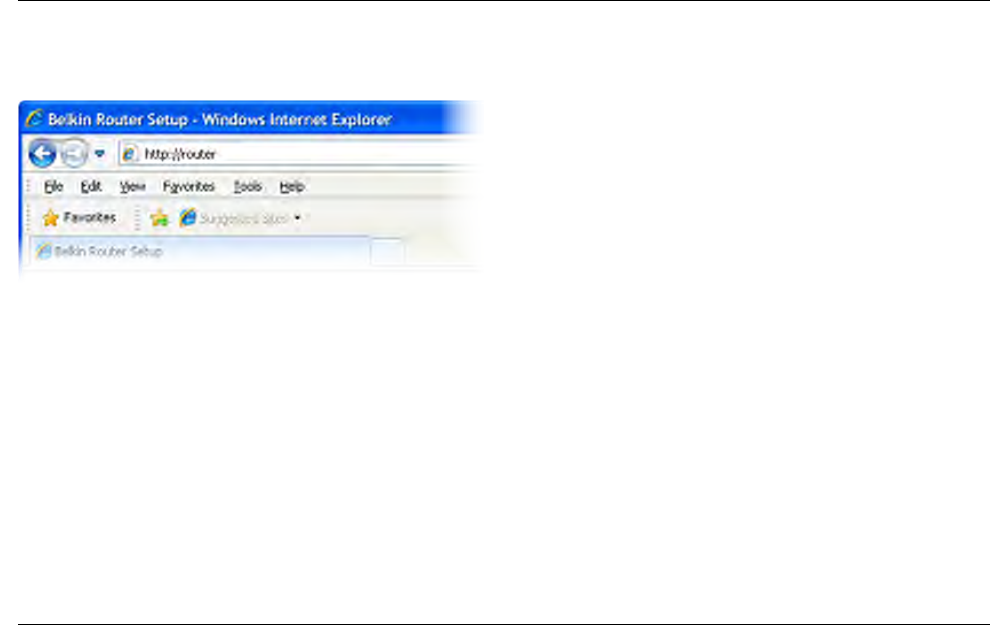
GETTING STARTED
In your browser, type “http://router” (you do not need to type
in anything else such as “www”). Then press the Enter key. If
you’re still having trouble running the manual setup option, type
“192.168.2.1” in your browser (you do not need to type in anything
else such as “http://” or “www”). Then press the Enter key.
Manual Setup Using Your Browser

9
GETTING STARTED
Adding Computers to Your Network
Wireless devices such as computers, network printers, and gaming
systems can connect to your Router with a few simple steps.
Using the CD
1. Put the Setup CD into your computer. If the CD
doesn’t open automatically, browse to your CD
drive and open the Belkin Setup CD icon.
2. Click the Setup icon on the CD menu.
3. After a brief installation, the setup software will ask you for the
network name and password from the network information card
that came with your Router. This card is most likely now located
underneath the foot of your Router in the provided card slot.
4. A progress screen will appear while additional software is
installed. This may take a few minutes to complete. Once
finished, a “Success” message will appear indicating that you
are connected to the Internet via your new Belkin Router.
Note: The setup software runs only on
Windows and Mac OS X systems.

10
GETTING STARTED
Manually
iOS
(iPhone, iPad, and iPod touch)
1. Open the Settings app and select the Wi-Fi menu item.
2. Select your wireless network from the list that appears
there. If asked to do so, enter the network password.
Mac OS® X
Your Mac® provides a menu of available wireless
networks at the right end of the menu bar.
1. Click on the icon showing wireless waves.
2. Select your wireless network from the list that appears
there. If asked to do so, enter the network password.
Android
(phones and tablets)
1. Open the Settings app and select Wireless and Network.
2. From there, select Wi-Fi to see the list of available networks.
3. Select your wireless network from the list. If asked
to do so, enter your network password.
Windows® 7
Your computer provides a menu of available wireless
networks at the right end of the task bar.
1. Left-click on the icon that looks like signal strength bars.
2. Select your wireless network from the list. If asked,
enter your network password (network key).
Windows Vista® and Windows XP
Your device provides a menu of available wireless
networks at the right end of the task bar.
1. Right-click on the icon that shows a computer with wireless
waves (XP) or two computers (Windows Vista).
2. Choose View Available Wireless Networks (XP) or
Connect to a network (Windows Vista) from the menu.
3. Select your wireless network from the list. If asked,
enter your network password (network key).

11
GETTING STARTED
Using the WPS Button
1) Start WPS Push Button Connection (WPS PBC) on your
computer or other Wi-Fi device that you would like to connect
wirelessly to your Router. Often there will be a button for this
purpose in software that came with the device, or a physical
“WPS,” “PBC,” or “Security” button on the device itself.
2) Within two minutes, press the WPS button on
your Router and hold for two seconds.
The WPS light (small light above WPS button) will blink white while it
listens for your Wi-Fi device. Once a connection is established, the
light will turn white and then go out. If a connection is not established,
the light will blink amber. You may repeat the process to try again.
You can repeat this process for each WPS-enabled
device you’d like to add to your network.

12
GETTING STARTED
Adding a Drive
You can share a USB hard drive or flash drive to your network via
your Router’s USB port. Once connected, you can share files and
music with other computers and devices within your network.
Plug your USB hard drive into the USB port on the back
of your Router. When the light above the USB port is lit,
your drive is available to computers on your network.
You can manually check the status of your shared drive by visiting
the USB Print and Storage Manager, found under the Belkin Router
Manager icon displayed in your system tray (Windows) or menu
bar (Mac). If you have difficulty sharing a drive on your network,
please see the “Troubleshooting” section of this manual.
A few USB hard disks require more power than the Router’s USB port
provides. In these cases, you may notice the drive failing to come on
or remaining on for a short time. If your disk has an optional power
supply, please use it while the disk is attached to your Router.
Adding USB Devices

13
GETTING STARTED
Adding Other USB Devices
Other USB devices may also be shared via your Router.
Plug your device into the USB port located on the back of
your Router. When the light above the USB port is lit, your
device is available to computers on your network.
Computers running the Belkin USB Print and Storage Manager will
be able to make use of the shared device by visiting the USB Print
and Storage Manager, found under the Belkin Router Manager
icon displayed in your system tray (Windows) or menu bar (Mac).
Adding a Printer
You can add a printer to your network via your Router’s
USB port. Once connected, you can print from various
computers and wireless devices within your network.
Plug your printer’s USB cable into the USB port located on
the back of your Router. When the light above the USB port is
lit, your printer is available to computers on your network.
You can manually check the status of your printer by visiting the
USB Print and Storage Manager, found under the Belkin Router
Manager icon displayed in your system tray (Windows) or menu
bar (Mac). If you have difficulty sharing a printer on your network,
please see the “Troubleshooting” section of this manual.
Note: Each computer that will use the printer must have
both the Belkin software and the printer’s driver installed.
If the print driver is not installed, you will be asked to install
it by the Belkin USB Print and Storage Manager.

14
GETTING STARTED
Bundled Software
USB Print and Storage Manager
The USB Print and Storage Manager helps to manage and
monitor the use of your USB printers, scanners, hard drives,
and other devices that are connected to your Router’s USB
port and shared across your network. USB Print and Storage
Manager is found in the Belkin Router Manager icon displayed
in your system tray (Windows) or menu bar (Mac).
When you have one or more USB devices attached to your
Router, the main actions for those devices are available
directly from the Belkin Router Monitor menu.
Memory Safe
Memory Safe allows you to set up a routine backup of your
files to a hard drive or flash drive attached to your Router.
Memory Safe is found in the Belkin Router Manager icon
displayed in your system tray (Windows) or menu bar (Mac).

15
GETTING STARTED
Additional Capabilities
Guest Access
You can allow guests to use your Internet connection without
joining your personal network. The network name and
password for the guest network is located on the network
information card found under the foot of your Router.
A person using your guest network will be able to join
without a password, but will be shown a login page when
they attempt to surf the Web. They will need to enter
the guest password into this page to continue.
Video Mover
Video Mover sends media from a USB drive attached to your
Router to any UPnP (Universal Plug-and-Play) or DLNA-compatible
device on your network. These devices include certain gaming
systems, televisions, Blu-ray players, and cell phones.

A
B
16
GETTING TO KNOW YOUR ROUTER
A) Router Status Light
Your Router’s status is shown by the light on the front.
Off: The Router is not plugged into a power source.
Blinking White: The Router is starting up.
Solid White: The Router is connected to the Internet.
Blinking Amber: The Router can’t detect the modem. Either the
modem is off, is not plugged into the Router, or is unresponsive.
Solid Amber: The Router is connected to your
modem but is not connected to the Internet.
B) Wi-Fi Protected Setup (WPS) Light and Button
The WPS button on the front of your Router can be used to
help establish a secure connection between your Router and
other WPS-enabled Wi-Fi devices such as computers. To use
the WPS feature on your Router, see “Getting Started > Adding
Computers to Your Network > Using the WPS Button”.
The small light near the WPS button shows what is happening
while you are using WPS to establish a connection.
Off: Idle
Blinking White: The Router is listening for a WPS-
enabled computer or other device.
Solid White: The Router has made a secure
connection with the computer or other device.
Amber: A connection was not created.
Front Panel

17
GETTING TO KNOW YOUR ROUTER
A) Modem (WAN) Connector
Connect your modem to this
port using an Ethernet cable.
B) Wired (LAN) Connectors
Connect computers and other
wired network devices to these
ports using Ethernet cables.
C) USB Port
USB printers, disks, and other
USB devices plugged into this
port will be shared on your
network. Each USB port has a
light that indicates its status.
Off: No USB device is
connected or the attached
USB device is not in use.
Blinking: Please wait to
unplug the device until
the light turns off.
On: The USB device is
connected and being
shared on your network.
D) Reset Button
This button is used to restart
your Router in rare cases when it
functions incorrectly. Resetting
the Router will preserve your
settings. This button may also
be used to restore the factory
default settings. Please see
the Troubleshooting section
for more information.
E) Power Connector
Connect the included power
supply to this jack.
Back Panel
A
B
C
DE

18
TECHNICAL DETAILS
Technical Features
Integrated Dual-Band 3x3 802.11n Wireless Access Points
Utilizing Dual-Band Network technology, your Router creates two
separate networks (one at 2.4GHz band and the other at 5GHz
band), allowing increased bandwidth to all your connected wireless
devices and computers. Both allow you to connect at up to 450Mbps
using 3-stream technology for the fastest wireless throughput*.
*Connecting at 450Mbps requires a Wi-Fi adapter capable of such.
Intellistream Technology
Intellistream is a technology (sometimes called Quality of Service,
or QoS) that intelligently and automatically manages and prioritizes
the stuff on your network so that everything flows smoothly.
For example, if you’re downloading 100 email messages
from your office VPN while watching a movie streamed
to your home theater, Intellistream will make sure your
movie plays smoothly while your email downloads.
It allows the smoothest, fastest video streaming, gaming,
and VoIP calls while working seamlessly in the background
without complex configuration or adjustments.
NAT IP Address Sharing
To save you the cost of adding IP addresses per
computer in your house, your Belkin Router uses Network
Address Translation (NAT) technology, allowing you to
share a single IP address across your network.
SPI Firewall
Your Router is equipped with a firewall that will protect your
network from a wide array of common attacks and viruses.
Universal Plug-and-Play (UPnP) Compatibility
The UPnP (Universal Plug-and-Play) feature in your Router
offers seamless operation of voice and video messaging,
games, and other applications that are UPnP-compliant.
Web-Based Advanced User Interface
You can easily make changes to your Router’s advanced
settings through your web browser. These changes can
be made from any computer on your network.
Belkin Router Monitor
The Belkin Router Monitor application helps you to monitor
your Router’s status and change network settings.
Integrated 4-Port Gigabit Switch
Your Router has a built-in, 4-port network switch to
allow your wired computers to share: printers, data,
MP3 files, digital photos, and much more.
2 USB Ports
The USB ports let you plug in printers, hard drives, and
other USB devices to share across your network.

19
TECHNICAL DETAILS
System Requirements
Router
Broadband Internet connection such as a cable or
DSL modem with RJ45 (Ethernet) connection
At least one computer with an installed network interface adapter
TCP/IP networking protocol installed on each computer
RJ45 Ethernet networking cable
Internet browser
Setup Software
Windows® XP 32-bit (SP3 or greater), Windows Vista® 32/64-bit,
or Windows 7 32/64-bit; or Mac OS® X v10.5, v10.6, or v10.7
Internet Explorer® v7 or above, Firefox®, Google Chrome™, or Safari®
Minimum 1.8GHz processor
Minimum 512MB RAM
600MB of free hard-drive space for installation
Memory Safe and USB Print and Storage Manager
Windows XP 32-bit (SP3 or greater), Windows Vista 32/64-bit,
or Windows 7 32/64-bit; or Mac OS X v10.5, v10.6, or v10.7
Minimum 1GHz processor and 512MB RAM
50MB of free hard-drive space for installation

20
USING YOUR ROUTER
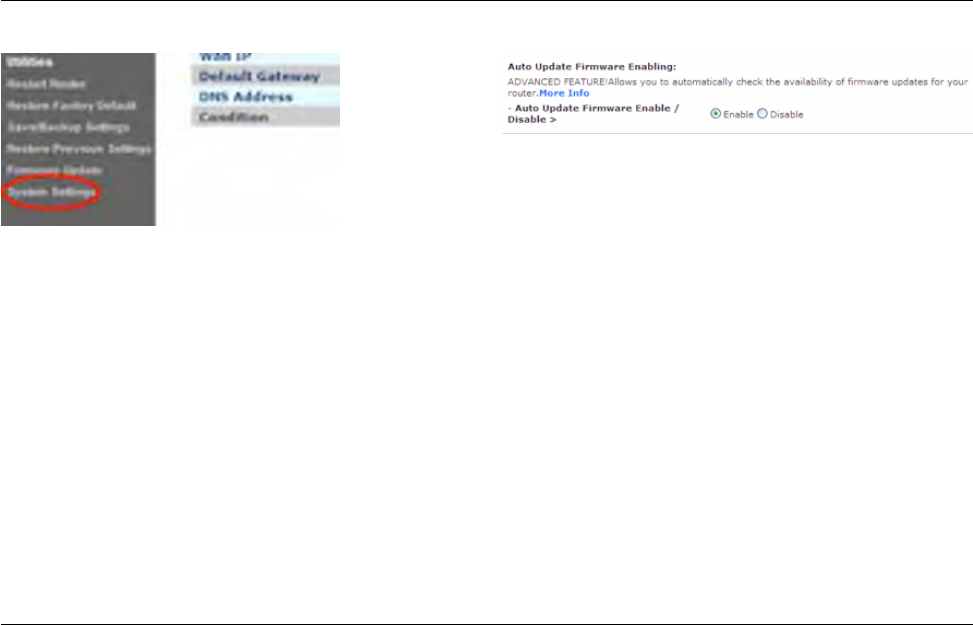
Enabling Auto Update on Your Belkin Router
The Router has the capability to automatically check
for a newer version of firmware and alert you when it’s
available. You can choose to download the new version or
ignore it. By default this feature is disabled. If you want to
enable it, select “Enable” and click “Apply Changes”.
Note: We recommend you use a computer that
has a wired connection to the Router.
Setup steps:
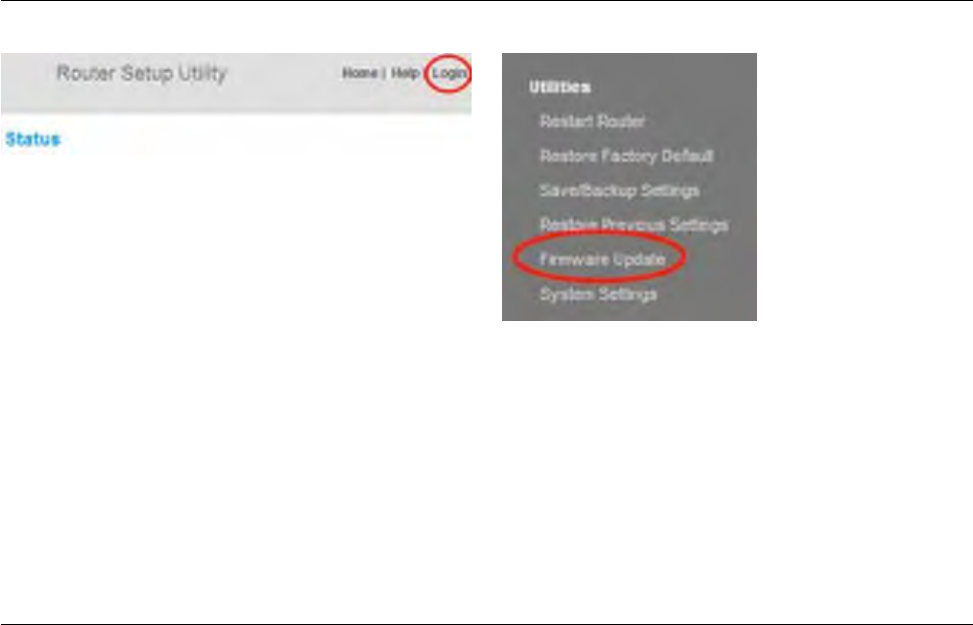
1. Open a web browser on the computer.
2. In the address bar of the web browser, type “http://192.168.2.1”.
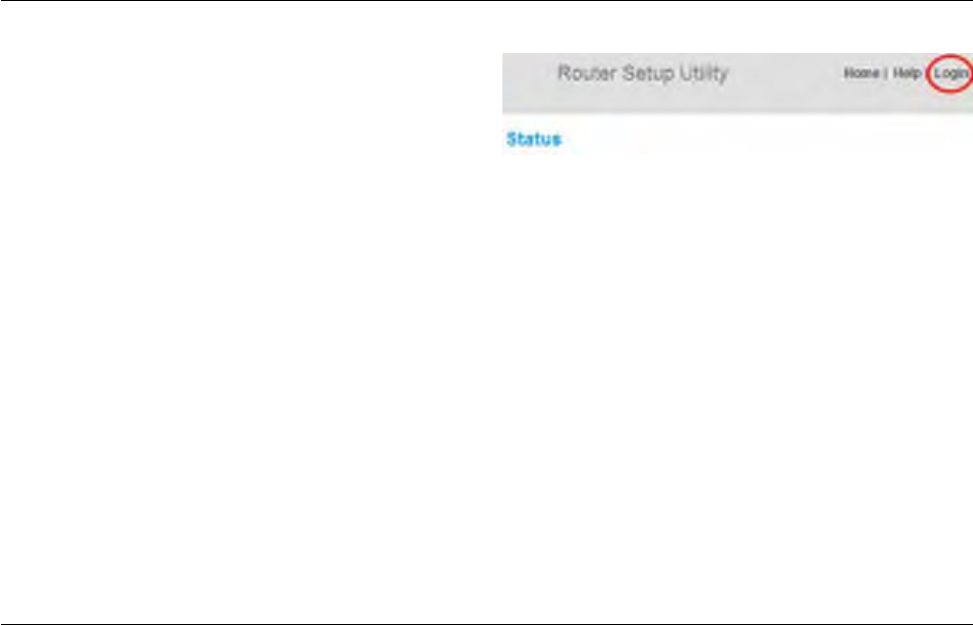
3. Click “Login” in the upper right-hand corner of the page. The
Router does not ship with a password, so just click “Submit”.
21
USING YOUR ROUTER
21
6. Select “Enable” by clicking the radio button and then
click “Apply Changes” at the bottom of the screen.
4. Click on “System Settings” in the left-hand
column under the “Utilities” heading.
5. Toward the lower-half side of the screen you will
find “Auto Update Firmware Enabling”.

22
USING YOUR ROUTER
22
Updating Your Router via Your System
Tray (Windows) or Menu Bar (Mac)
Once you have completed the setup process, you will need
to update the new software for your Router. This can be done
easily via your computer’s system tray or menu bar.
Setup steps:
1. Click on the white Belkin Router Manager icon (right-click for
Windows) in your system tray (Windows) or menu bar (Mac).
2. Select “Check for Updates” or “Update Available” from the menu.
3. You should now see the Belkin Updater window.
4. Click on the “Install Update” icon.
23
USING YOUR ROUTER
23
Updating the Router’s Firmware
via the Web Interface
The following steps show you how to update your Router’s
firmware using its web interface. You do not need to be connected
to the Internet as this interface is built into the Router itself.
Setup steps:
1. Locate and download the firmware file from the Belkin
support site. (Type your part number into the search box in
the top right corner and look for “Firmware” in the title.)
2. Save the file to a location on your computer where
you can get to it easily, such as your desktop.
3. Connect the computer to one of the four LAN ports on the Router.
24
USING YOUR ROUTER
24
4. Open a web browser on the computer.
5. In the address bar of the web browser, type
“http://192.168.2.1” and press “Enter” on your keyboard.
6. Click “Login” in the upper right-hand corner of the page. The
Router does not ship with a password, so just click “Submit”.
7. Click on “Firmware Update” toward the
bottom of the left-hand menu.
25
USING YOUR ROUTER
25
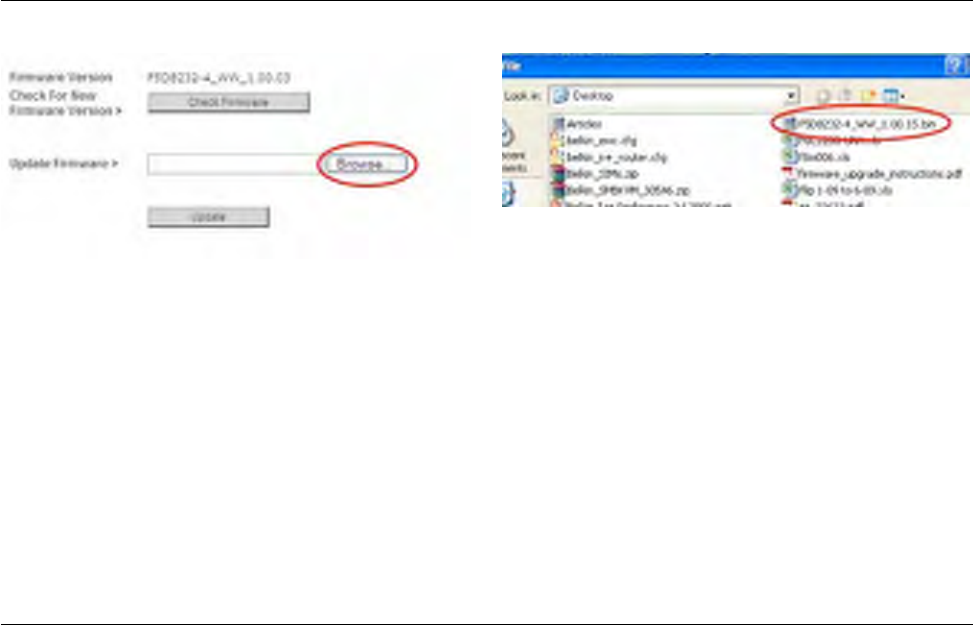
8. Click the “Browse” button toward the middle of the
screen to search for the file you saved previously.
Note: The firmware version in the images below is
depicted as an example. Your file name will vary
depending on your model and version.
9. Select the firmware file by left-clicking on it and then click
the “Open” button in the lower-right corner of the window.
This will take you back into the Router’s interface.
26
USING YOUR ROUTER
26
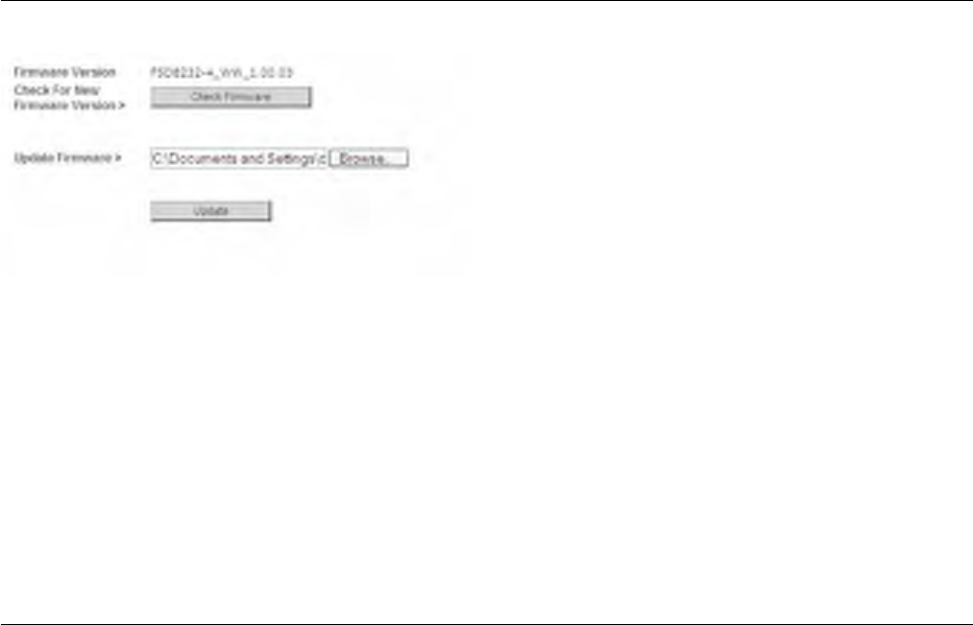
10. Click the “Update” button.
11. A prompt asking, “Are you sure you want to continue
with upgrading?” will appear. Click “OK”.
12. A second prompt will open telling you the Router will not
respond during the upgrade and warning you not to remove
the power supply from the Router. Click “OK” once more.
Congratulations. The firmware has been updated successfully.

27
USING YOUR ROUTER
Resetting the Router
Reset Button – Red
The “Reset” button is used in rare cases when the Router
may function improperly. Resetting the Router will restore the
Router’s normal operation while maintaining the programmed
settings. You can also restore the factory default settings by
using the “Reset” button. Use the restore option in instances
where you may have forgotten your custom password.
Resetting the Router
Push and release the “Reset” button. The lights on the Router will
momentarily flash. The “Router” light will begin to blink. When
the “Router” light becomes solid again, the reset is complete.
Restoring Your Router to Factory Defaults
Press and hold the “Reset” button for at least 10 seconds,
and then release it. The lights on the Router will momentarily
flash. The “Router” light will begin to blink. When the “Router”
light becomes solid again, the restore is complete.
28
USING YOUR ROUTER
Restoring the Router to Default
Settings Using the Web Interface
Symptoms
You need to restore the factory defaults using the web interface.
This may be because the Router is not performing as expected
or you wish to remove all previously configured settings.
Setup steps
1. Open a web browser on the computer.
2. In the address bar of the web browser, type “http://192.168.2.1”.
3. Click “Login” in the upper right-hand corner of the page. The
Router does not ship with a password, so just click “Submit”.
29
USING YOUR ROUTER
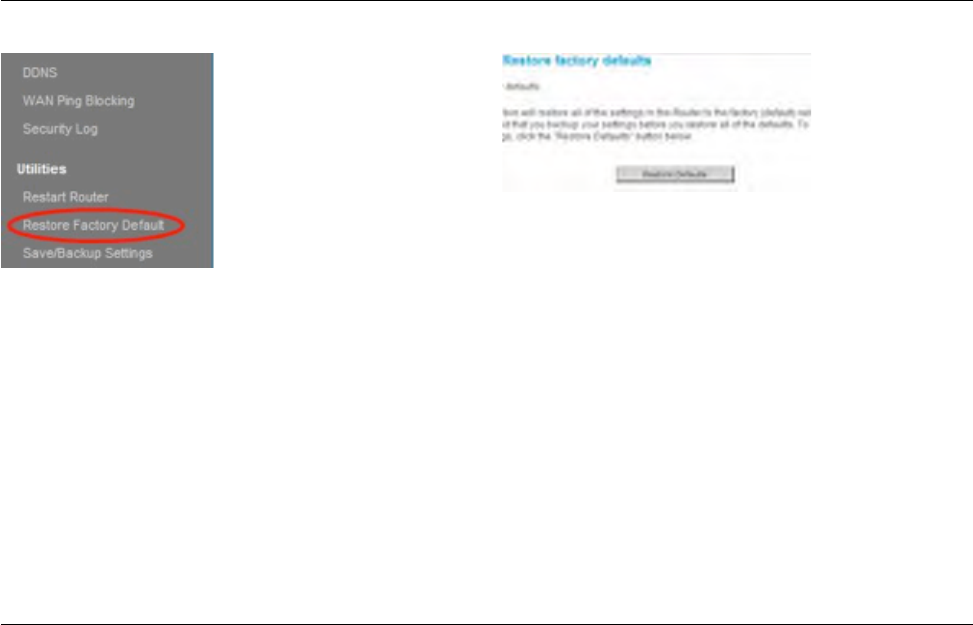
4. Click on “Restore Factory Defaults” in the left-
hand column under the “Utilities” heading.
5. Click on the “Restore Defaults” button.

30
USING YOUR ROUTER
6. A warning box will open that says, “Warning: All your settings
will be lost. Are you sure you want to do this?” Click “OK”.
7. The Router will begin the restoring process. Once
the restore is complete, the Router will reboot.
Note: This may take several minutes.
Your Router has successfully been restored to its factory settings.

31
TROUBLESHOOTING, SUPPORT, AND WARRANTY
Troubleshooting
The Setup CD does not automatically start.
If Belkin Setup does not run when you insert the CD-ROM, your
computer may not be configured to open CDs automatically.
If Belkin Setup does not appear within 15 seconds, browse to your
CD-ROM drive and open the “Belkin Setup” icon. Alternatively, if you
have connected your computer to the Router yourself, you can visit
http://router/ and perform the setup manually. Please see “Manual
Setup Using Your Browser” earlier in this manual for more information.
Belkin Setup cannot find my Router.
If Belkin Setup is not able to communicate with your Router during
the installation process, please check the following items.
1. Make sure that the wireless hardware on your
computer is turned on, if available.
2. Try connecting your computer to one of the four “wired”
ports on the Router with an Ethernet cable.
3. Ensure that the Router is on. The front-panel light should be on.
4. Unplug the Router’s power supply for 10
seconds, then plug it back in.
5. There may be firewall software on your computer preventing
an outgoing connection. You may choose to temporarily
disable this software before attempting setup.
If Belkin Setup still cannot find the Router, you might choose
to do a manual setup. Refer to “Manually Configuring
Network Settings” in this manual for details.

32
TROUBLESHOOTING, SUPPORT, AND WARRANTY
Belkin Setup cannot connect my Router to the Internet.
If Belkin Setup is not able to connect the Router to
the Internet, please check the following items:
1. Use the troubleshooting suggestions within Belkin Setup.
2. If your ISP requires a user name and password, make sure that
you have typed in your user name and password correctly. Some
user names require that the ISP’s domain may be at the end of the
name. Example: “myname@myisp.com”. The “@myisp.com” part of
the user name may need to be typed as well as your user name.
3. If you continue to have no Internet connection, refer
to “Manually Configuring Network Settings” in this
manual for an alternative setup method.
Belkin Setup completed installation, but I cannot browse the
Web. The light on the front of my Router is blinking amber.
1. Make sure the Router is connected to your modem with an
Ethernet cable via the Router’s one WAN (modem) port.
2. Unplug the modem from its power source and make sure
that it goes dark. Then reapply power to the modem.
3. Unplug your Router’s power supply, wait 10 seconds,
and plug it back in. This will cause the Router to try
to reestablish communication with the modem.

33
TROUBLESHOOTING, SUPPORT, AND WARRANTY
Belkin Setup completed installation, but I cannot browse the
Web. The light on the front of my Router is solid amber.
1. Use the troubleshooting suggestions within Belkin Setup.
2. If your ISP requires a user name and password, make sure that
you have typed in your user name and password correctly. Some
user names require that the ISP’s domain may be at the end of the
name. Example: “myname@myisp.com”. The “@myisp.com” part of
the user name may need to be typed as well as your user name.
3. If you have a static connection, your ISP will have
assigned you an IP address, subnet mask, and gateway
address. Please re-run Belkin Setup and enter this
information when a static connection is mentioned.
4. You may need to configure your Router to meet
the specific requirements of your ISP. To search
our knowledge base for ISP-specific issues, go to:
http://www.belkin.com/support and type in “ISP”.
5. If you continue to have no Internet connection, refer
to “Manually Configuring Network Settings” in this
manual for an alternative setup method.
I can’t connect to the Internet wirelessly.
If the light on the front of the Router is solid white, then your
Router is connected to the Internet. You may not be connected
to the Router’s wireless network. Please refer to “Adding
Computers to Your Network” in this manual for instructions.
If your Windows XP computer is running SP2, you will
not be able to set up the Router via the wireless setup
process. You will need to either update to Windows XP
SP3 or complete the setup via a wired connection.

34
TROUBLESHOOTING, SUPPORT, AND WARRANTY
I can’t connect to the Internet wirelessly and my
network name is not listed in Available Networks.
1. Verify that your Router is on and the
front-panel light shows solid white.
2. If you are far from the Router, you might try moving
closer to see if you might have been out of range.
3. Using a computer attached to the Router via a network cable,
visit http://router/ and ensure that “Broadcast SSID” is ON.
This setting is found on the “Channel and SSID” page.
My wireless network performance is slow, inconsistent,
suffers from weak signal, or I’m having difficulty maintaining a
VPN connection.
Wireless technology is radio-based, which means connectivity
and the throughput performance between devices
decreases when the distance between devices increases.
Other factors that will cause signal degradation (metal is
generally the worst culprit) are obstructions such as walls
and metal appliances. Note also that connection speed may
decrease as you move farther away from the Router.
In order to determine if wireless issues are related to
range, we suggest temporarily moving the computer
within 10 feet from the Router if possible.
Changing the wireless channel—Depending on local
wireless traffic and interference, switching the wireless
channel of your network can improve performance and
reliability. See the section titled “Changing the Wireless
Channel” for instructions on how to choose other channels.

35
TROUBLESHOOTING, SUPPORT, AND WARRANTY
I’ve installed this new Router and some of my network clients
(computers, game consoles, etc.) are now unable to connect.
Your new Router came pre-configured with a network name and
password, found printed on an attached card. All clients must use this
network name and password to connect wirelessly to your Router.
You will need to find the network settings on your client, select the
network name printed on the card from the list of available networks,
and enter the password when prompted to join the wireless network.
Limiting the wireless transmit rate—Limiting the wireless transmit
rate can help improve range and connection stability. Most wireless
cards have the ability to limit the transmission rate. To change this
property in Windows, go to the Windows Control Panel, open “Network
Connections”, and double-click on your wireless card’s connection. In
the properties dialog, select the “Configure” button on the “General”
tab, then choose the “Advanced” tab and select the rate property.
Wireless client cards are usually set to automatically adjust
the wireless transmit rate for you, but doing so can cause
periodic disconnects when the wireless signal is too weak; as
a rule, slower transmission rates are more stable. Experiment
with different connection rates until you find the best one
for your environment. Note that all available transmission
rates should be acceptable for browsing the Internet. For
more assistance, see your wireless card’s user manual.

36
TROUBLESHOOTING, SUPPORT, AND WARRANTY
Does the Router support Wireless
Protected Access (WPA) security?
The Router ships with WPA/WPA2 security turned on.
Windows XP and some older network hardware may
require a software update to support WPA/WPA2.
I am having difficulty setting up WPA security on my Router.
1. Log in to your Router by visiting http://router/ with your web browser.
Click on the “Login” button in the top right-hand corner of the
screen. You will be asked to enter your password. If you have never
set a password, leave the “Password” field blank and click “Submit”.
2. Click “Wireless” in the left-hand menu. Then
click “Security” just below that.
3. Select the “WPA/WPA2” option.
4. Enter a password. This can be from 8–63 characters of your choice,
including spaces and punctuation, OR a 64-digit hexadecimal
number (using only the numbers 0–9 and letters A–F).
5. Click “Apply Changes” to finish. Your wireless
connection is now encrypted. Each computer using your
wireless network will need to use the new key.
Note: If you are configuring the Router over a wireless
connection, you will have to re-connect to the
Router after changing any security settings.
Note: Some older networking hardware supports
only WEP encryption. If your older computers cannot
connect to your network, try 128-bit or 64-bit WEP, or
seek software updates from their manufacturers.

37
TROUBLESHOOTING, SUPPORT, AND WARRANTY
I am having difficulty setting up Wired Equivalent
Privacy (WEP) security on my Router.
1. Log in to your Router. Visit http://router/ with your web browser.
Click on the “Login” button in the top right-hand corner of the
screen. You will be asked to enter your password. If you have never
set a password, leave the “Password” field blank and click “Submit”.
2. Click “Wireless” in the left-hand menu. Then
click “Security” just below that.
3. Select the “128-bit WEP” option.
4. You may type in a WEP key manually, or generate one from
a passphrase. Type a phrase in the “Passphrase” field and
click the “Generate” button. A WEP key is composed of 26
hexadecimal digits (0–9, A–F.. For example, C3 03 0F AF
4B B2 C3 D4 4B C3 D4 EE 74 is a valid 128-bit WEP key.
5. Click “Apply Changes” to finish. Your wireless
activity is now encrypted. Each computer using your
wireless network will need to use the new key.
Note: If you are configuring the Router over a wireless
connection, you will have to re-connect to the
Router after changing any security settings.
Note: Some older networking hardware supports
only 64-bit WEP encryption. If your older computers
cannot connect to your network, try 64-bit WEP.

38
TROUBLESHOOTING, SUPPORT, AND WARRANTY
A disk I plugged into the USB port is not showing
up on my computer or in Memory Safe.
1. Is the light on over the USB port that the disk is plugged into?
If not, try unplugging and re-plugging the disk. Please check
that the USB connector is firmly plugged into the Router.
2. If your disk has an optional power supply, please use
it while the disk is attached to your Router.
3. The Router supports FAT16, FAT32-, or NTFS-
formatted disks. Disks in other formats will not appear
in the Finder (Mac OS X) or Windows Explorer.
A disk I plugged into the USB port is not coming
on or remains on only for a short time.
Some drives require more power than the Router’s USB
port provides. If your disk has an optional power supply,
please use it while the disk is attached to your Router.
A printer I plugged into the USB port is
not showing up on my computer.
1. Is the light on over the USB port that the printer is plugged into?
If not, try unplugging and re-plugging the printer. Please check
that the USB connector is firmly plugged into the Router.
2. To print to a printer attached to the Router, your
computer must have that printer’s driver installed.
Please check that the driver is installed.
3. The printer may not be set to auto-connect. Via the Belkin Router
Manager, open the USB Print and Storage Center. Check that the
printer appears in the list of available devices. View the properties
of the printer, and check that “auto-connect” is selected.

39
TROUBLESHOOTING, SUPPORT, AND WARRANTY
A different sort of USB device that I plugged into the
USB port is not showing up on my computer.
Most USB devices other than disks and printers must be
accessed via the USB Print and Storage Center.
1. Is the light on over the USB port that the device is plugged into?
If not, try unplugging and re-plugging the device. Please check
that the USB connector is firmly plugged into the Router.
2. Via the Belkin Router Manager, open the USB
Print and Storage Center. Check that the device
appears in the list of available devices.
3. Select the device and click the “Use” button. The device will be
virtually connected to your computer until you choose to “Stop
Using” the device, or another person requests use of the device.

40
TROUBLESHOOTING, SUPPORT, AND WARRANTY
Technical Support
US
http://www.belkin.com/support
UK
http://www.belkin.com/uk/support
Australia
http://www.belkin.com/au/support
New Zealand
http://www.belkin.com/au/support
Singapore
1800 622 1130
Europe
http://www.belkin.com/uk/support

41
TROUBLESHOOTING, SUPPORT, AND WARRANTY
Belkin International, Inc., Limited
2-Year Product Warranty
What this warranty covers.
Belkin International, Inc. (“Belkin”) warrants to the original
purchaser of this Belkin product that the product shall be free
of defects in design, assembly, material, or workmanship.
What the period of coverage is.
Belkin warrants the Belkin product for two years.
What will we do to correct problems?
Product Warranty.
Belkin will repair or replace, at its option, any defective product
free of charge (except for shipping charges for the product).
Belkin reserves the right to discontinue any of its products without
notice, and disclaims any limited warranty to repair or replace any
such discontinued products. In the event that Belkin is unable to
repair or replace the product (for example, because it has been
discontinued), Belkin will offer either a refund or a credit toward
the purchase of another product from Belkin.com in an amount
equal to the purchase price of the product as evidenced on the
original purchase receipt as discounted by its natural use.
What is not covered by this warranty?
All above warranties are null and void if the Belkin product is
not provided to Belkin for inspection upon Belkin’s request
at the sole expense of the purchaser, or if Belkin determines
that the Belkin product has been improperly installed, altered
in any way, or tampered with. The Belkin Product Warranty
does not protect against acts of God such as flood, lightning,
earthquake, war, vandalism, theft, normal-use wear and tear,
erosion, depletion, obsolescence, abuse, damage due to low
voltage disturbances (i.e. brownouts or sags), non-authorized
program, or system equipment modification or alteration.

42
TROUBLESHOOTING, SUPPORT, AND WARRANTY
How to get service.
To get service for your Belkin product you
must take the following steps:
1. Contact Belkin International, Inc., at 12045 Waterfront
Drive, Los Angeles, CA 90094, Attn: Customer Service,
or call (800)-223-5546, within 15 days of the Occurrence.
Be prepared to provide the following information:
a. The part number of the Belkin product.
b. Where you purchased the product.
c. When you purchased the product.
d. Copy of original receipt.
2. Your Belkin Customer Service Representative will then
instruct you on how to forward your receipt and Belkin
product and how to proceed with your claim.
Belkin reserves the right to review the damaged Belkin product.
All costs of shipping the Belkin product to Belkin for inspection
shall be borne solely by the purchaser. If Belkin determines,
in its sole discretion, that it is impractical to ship the damaged
equipment to Belkin, Belkin may designate, in its sole discretion,
an equipment repair facility to inspect and estimate the cost to
repair such equipment. The cost, if any, of shipping the equipment
to and from such repair facility and of such estimate shall be
borne solely by the purchaser. Damaged equipment must remain
available for inspection until the claim is finalized. Whenever
claims are settled, Belkin reserves the right to be subrogated
under any existing insurance policies the purchaser may have.

43
TROUBLESHOOTING, SUPPORT, AND WARRANTY
How state law relates to the warranty.
THIS WARRANTY CONTAINS THE SOLE WARRANTY OF
BELKIN. THERE ARE NO OTHER WARRANTIES, EXPRESSED
OR, EXCEPT AS REQUIRED BY LAW, IMPLIED, INCLUDING
THE IMPLIED WARRANTY OR CONDITION OF QUALITY,
MERCHANTABILITY OR FITNESS FOR A PARTICULAR
PURPOSE, AND SUCH IMPLIED WARRANTIES, IF ANY, ARE
LIMITED IN DURATION TO THE TERM OF THIS WARRANTY.
Some states do not allow limitations on how long an implied
warranty lasts, so the above limitations may not apply to you.
IN NO EVENT SHALL BELKIN BE LIABLE FOR INCIDENTAL,
SPECIAL, DIRECT, INDIRECT, CONSEQUENTIAL OR
MULTIPLE DAMAGES SUCH AS, BUT NOT LIMITED TO,
LOST BUSINESS OR PROFITS ARISING OUT OF THE
SALE OR USE OF ANY BELKIN PRODUCT, EVEN IF
ADVISED OF THE POSSIBILITY OF SUCH DAMAGES.
This warranty gives you specific legal rights, and you may also have
other rights, which may vary from state to state. Some states do
not allow the exclusion or limitation of incidental, consequential,
or other damages, so the above limitations may not apply to you.

44
REGULATORY INFORMATION
FCC Statement
DECLARATION OF CONFORMITY WITH FCC RULES
FOR ELECTROMAGNETIC COMPATIBILITY
We, Belkin International, Inc., of 12045 Waterfront Drive, Los Angeles,
CA 90094, declare under our sole responsibility that the device,
F9K1104 v1, complies with Part 15 of the FCC Rules. Operation is
subject to the following two conditions: (1) this device may not cause
harmful interference, and (2) this device must accept any interference
received, including interference that may cause undesired operation.
Caution: Exposure to Radio Frequency Radiation.
The device shall be used in such a manner that the potential
for human contact normal operation is minimized.
This equipment complies with FCC radiation exposure limits set forth for an
uncontrolled environment. This equipment should be installed and operated
with a minimum distance of 23cm between the radiator and your body.
Federal Communication Commission Interference Statement
This equipment has been tested and found to comply with the limits for a
Class B digital device, pursuant to Part 15 of the FCC Rules. These limits
are designed to provide reasonable protection against harmful interference
in a residential installation. This equipment generates uses and can radiate
radio frequency energy and, if not installed and used in accordance with the
instructions, may cause harmful interference to radio communications.
However, there is no guarantee that interference will not occur in a particular
installation. If this equipment does cause harmful interference to radio or television
reception, which can be determined by turning the equipment off and on, the user
is encouraged to try to correct the interference by one of the following measures:
• Reorientorrelocatethereceivingantenna.
• Increasetheseparationbetweentheequipmentandreceiver.
• Connecttheequipmentintoanoutletonacircuitdifferent
from that to which the receiver is connected.
• Consultthedealeroranexperiencedradio/TVtechnicianforhelp.
FCC Caution: Any changes or modifications not expressly
approved by the party responsible for compliance could
void the user’s authority to operate this equipment.
This device complies with Part 15 of the FCC Rules.
Operation is subject to the following two conditions:
(1) This device may not cause harmful interference, and
(2) This device must accept any interference received, including
interference that may cause undesired operation.
Operations in the 5.15-5.25GHz band are restricted to indoor usage only.

45
REGULATORY INFORMATION
IMPORTANT NOTE:
Radiation Exposure Statement:
This equipment complies with IC radiation exposure
limits set forth for an uncontrolled environment. This
equipment should be installed and operated with minimum
distance 23cm between the radiator & your body.
Déclaration d’exposition aux radiations:
Cet équipement est conforme aux limites d’exposition aux
rayonnements IC établies pour un environnement non contrôlé.
Cet équipement doit être installé et utilisé avec un minimum de 23
cm de distance entre la source de rayonnement et votre corps.
Caution
(i) the device for operation in the band 5150-5250 MHz is
only for indoor use to reduce the potential for harmful
interference to co-channel mobile satellite systems;
(ii) high-power radars are allocated as primary users
(i.e. priority users) of the bands 5250-5350 MHz and
5650-5850 MHz and that these radars could cause
interference and/or damage to LE-LAN devices.
IMPORTANT NOTICE:
FCC Radiation Exposure Statement:
This equipment complies with FCC radiation exposure
limits set forth for an uncontrolled environment. This
equipment should be installed and operated with minimum
distance 23cm between the radiator & your body.
This transmitter must not be co-located or operating in
conjunction with any other antenna or transmitter.
IC Statement:
This Class B digital apparatus complies with Canadian ICES -003
Cet appareil numérique de la classe B conforme
à la norme NMB-003 du Canada
Industry Canada statement:
This device complies with RSS standards of the Industry
Canada Rules. Operation is subject to the following two
conditions: (1) This device may not cause harmful interference,
and (2) this device must accept any interference received,
including interference that may cause undesired operation.
Ce dispositif est conforme a la norme CNR- standards d’Industrie
Canada applicable aux appareils radio exempts de licence. Son
fonctionnement est sujet aux deux conditions suivantes: (1) le
dispositif ne doit pas produire de brouillage prejudiciable, et (2) ce
dispositif doit accepter tout brouillage recu, y compris un brouillage
susceptible de provoquer un fonctionnement indesirable.

46
REGULATORY INFORMATION
Ce dispositif a été conçu pour fonctionner avec une antenne ayant
un gain maximal de PCB dipole antenne avec dB [3.1]. Une antenne
à gain plus élevé est strictement interdite par les règlements
d’Industrie Canada. L’impédance d’antenne requise est de 50 ohms.
Conformément à la réglementation d’Industrie Canada, le
présent émetteur radio peutfonctionner avec une antenne d’un
type et d’un gain maximal (ou inférieur) approuvé pourl’émetteur
par Industrie Canada. Dans le but de réduire les risques de
brouillage radioélectriqueà l’intention des autres utilisateurs, il
faut choisir le type d’antenne et son gain de sorte que lapuissance
isotrope rayonnée équivalente (p.i.r.e.) ne dépasse pas l’intensité
nécessaire àl’établissement d’une communication satisfaisante.
Le présent émetteur radio (IC: 3623A-F9K1104V1/ Model:
N900) a été approuvé par Industrie Canada pour fonctionner
avec les types d’antenne énumérés ci-dessous et ayant un
gain admissible maximal et l’impédance requise pour chaque
type d’antenne. Les types d’antenne non inclus dans cette
liste, ou dont le gain est supérieur au gain maximal indiqué,
sont strictement interdits pour l’exploitation de l’émetteur.
Avertissement:
(i) les dispositifs fonctionnant dans la bande 5 150-5 250 MHz
sont réservés uniquement pour une utilisation à l’intérieur
afin de réduire les risques de brouillage préjudiciable aux
systèmes de satellites mobiles utilisant les mêmes canaux;
(ii) De plus, les utilisateurs devraient aussi être avisés
que les utilisateurs de radars de haute puissance sont
désignés utilisateurs principaux (c.-à-d., qu’ils ont la
priorité) pour les bandes 5 250-5 350 MHz et 5 650-5 850
MHz et que ces radars pourraient causer du brouillage
et/ou des dommages aux dispositifs LAN-EL.
This device has been designed to operate with a PCB dipole
antenna having a maximum gain of [3.1] dBi. Antenna having
a higher gain is strictly prohibited per regulations of Industry
Canada. The required antenna impedance is 50 ohms.
Under Industry Canada regulations, this radio transmitter may only
operate using an antenna of a type and maximum (or lesser) gain
approved for the transmitter by Industry Canada. To reduce potential
radio interference to other users, the antenna type and its gain should
be so chosen that the equivalent isotropically radiated power (e.i.r.p.)
is not more than that necessary for successful communication.
This radio transmitter (IC: 3623A-F9K1104V1/ Model: N900) has
been approved by Industry Canada to operate with the antenna
types listed below with the maximum permissible gain and required
antenna impedance for each antenna type indicated. Antenna types
not included in this list, having a gain greater than the maximum gain
indicated for that type, are strictly prohibited for use with this device.

© 2012 Belkin International, Inc. All rights reserved. All trade names are registered trademarks
of respective manufacturers listed. iPad, iPhone, iPod, iPod touch, Mac, Mac OS, and
Safari are trademarks of Apple Inc., registered in the U.S. and other countries. Windows,
Windows Vista, Internet Explorer, Xbox 360, and DirectX are either registered trademarks
or trademarks of Microsoft Corporation in the United States and/or other countries.