Benq 57P50 GSM + WLAN + BT Phone User Manual P50 E
Benq Corporation GSM + WLAN + BT Phone P50 E
Benq >
Contents
- 1. Users Manual Part 1
- 2. Users Manual Part 2
Users Manual Part 2

Connectivity 47
Connectivity
ConnectivityConnectivity
Connectivity
Types of connections
The PDA phone can be very easily configured to access the Internet or a corporate net-
work to perform such tasks as browsing the World Wide Web, sending e-mail, or
exchanging instant messages with friends or co-workers. Connections can be made with a
dial-up modem, wireless modem (GPRS or Circuit Switched Data, CSD) or wireless LAN
(WLAN) card.There are two supported groups of connection settings: My ISP (which
allows you to access the Internet) and My Work Network (which allows you to access pri-
vate resources such as your Intranet, VPN, or other protected resources).
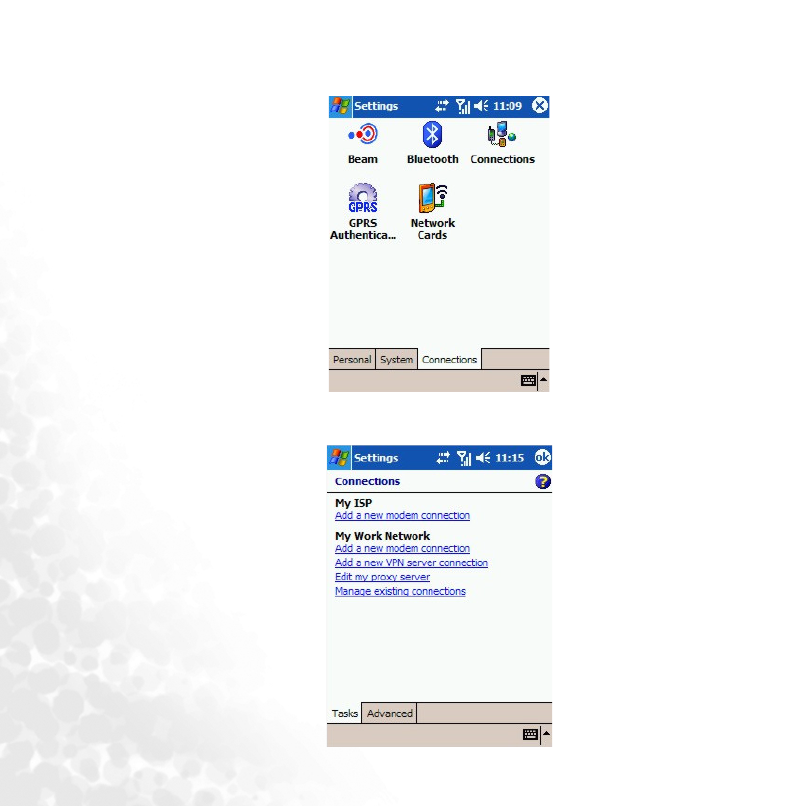
Tap S t a rt
Start Start
Start > Settings
Settings Settings
Settings > Connections
Connections Connections
Connections to enter the Connections settings page.
Setting up connections
Setting up a GPRS and CSD Connection to your ISP
Setting up a GPRS and CSD Connection to your ISPSetting up a GPRS and CSD Connection to your ISP
Setting up a GPRS and CSD Connection to your ISP
You can connect via modem dial-up to your ISP (Internet Service Provider), and use the
connection to send and receive e-mail messages and view Web or WAP pages. Your ISP is
usually your SIM card provider.
Creating an ISP Profile
Creating an ISP ProfileCreating an ISP Profile
Creating an ISP Profile
Obtain the following information from your ISP:
• ISP access point name (for GPRS service only)
• Dial-up access telephone number (for CSD service only)
• User name
• Password
• TCP/IP settings. (Some ISPs require a domain name in front of the user name, such as
MSN/username.)
Setting up a GPRS Connection to your ISP
Setting up a GPRS Connection to your ISPSetting up a GPRS Connection to your ISP
Setting up a GPRS Connection to your ISP
1. Tap Start
StartStart
Start > Settings
SettingsSettings
Settings.
48 Connectivity
2. Tap the ‘Connections’ tab and the ‘Connections’ icon to bring up the Connections Set-
Connections Set-Connections Set-
Connections Set-
tings
tingstings
tings screen.
3. Under ‘My ISP', tap ‘Add a new modem connection’.
Connectivity 49
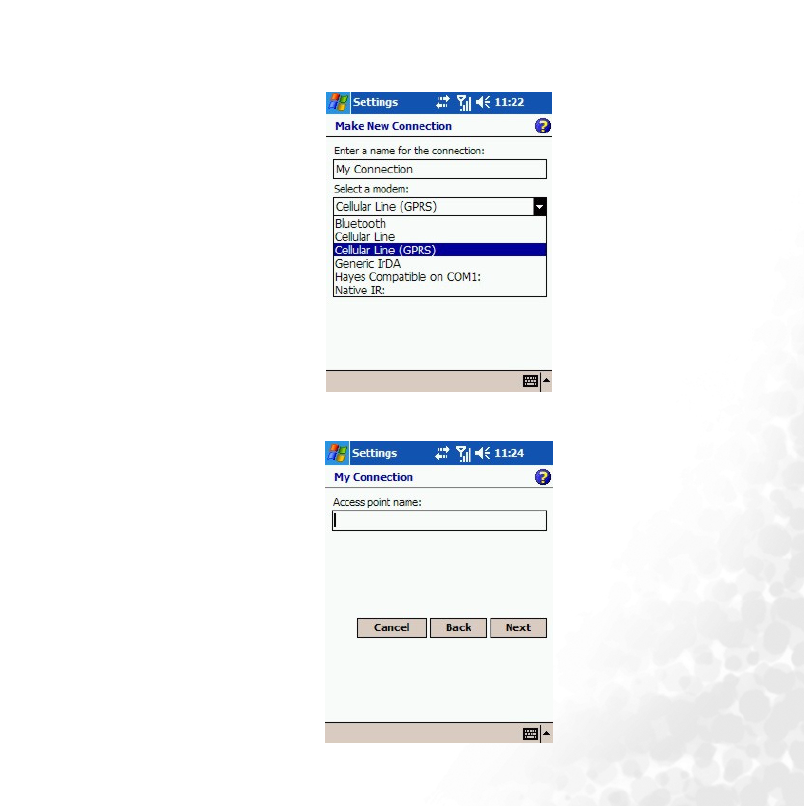
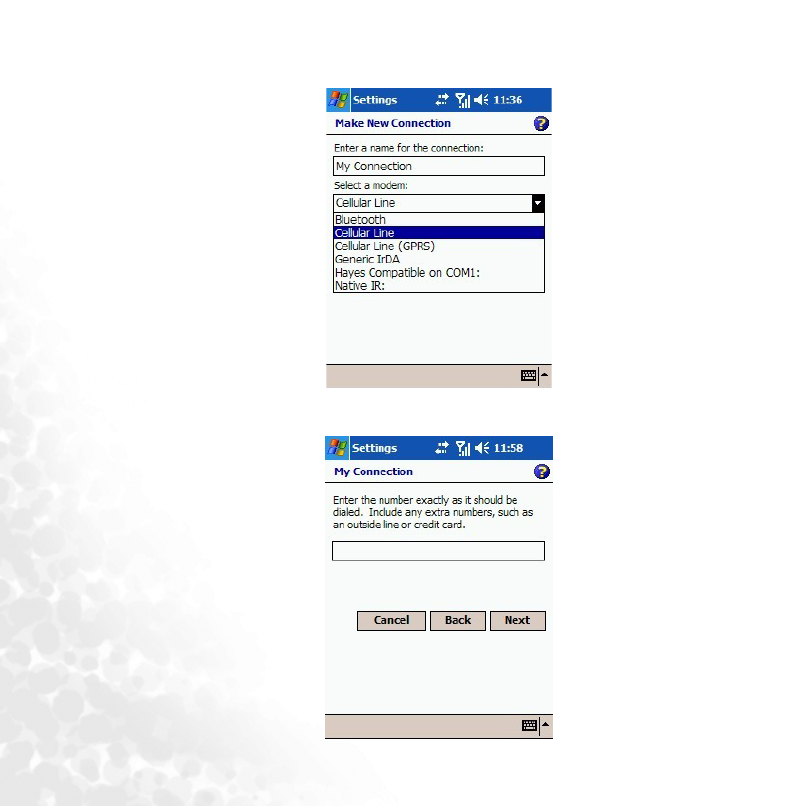
4. Next to ‘Enter a name for the connection’, enter a name for the connection, for exam-
ple, ‘My Connection’. Next to ‘Select a modem’, select your modem type.
5. Enter the Access Point Name (APN) of your ISP.
50 Connectivity
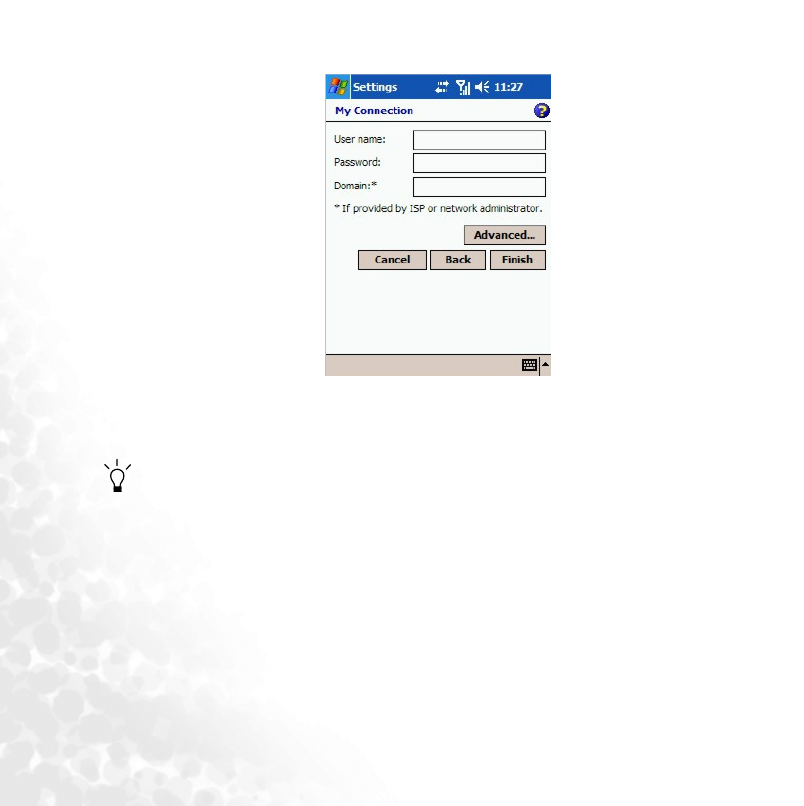
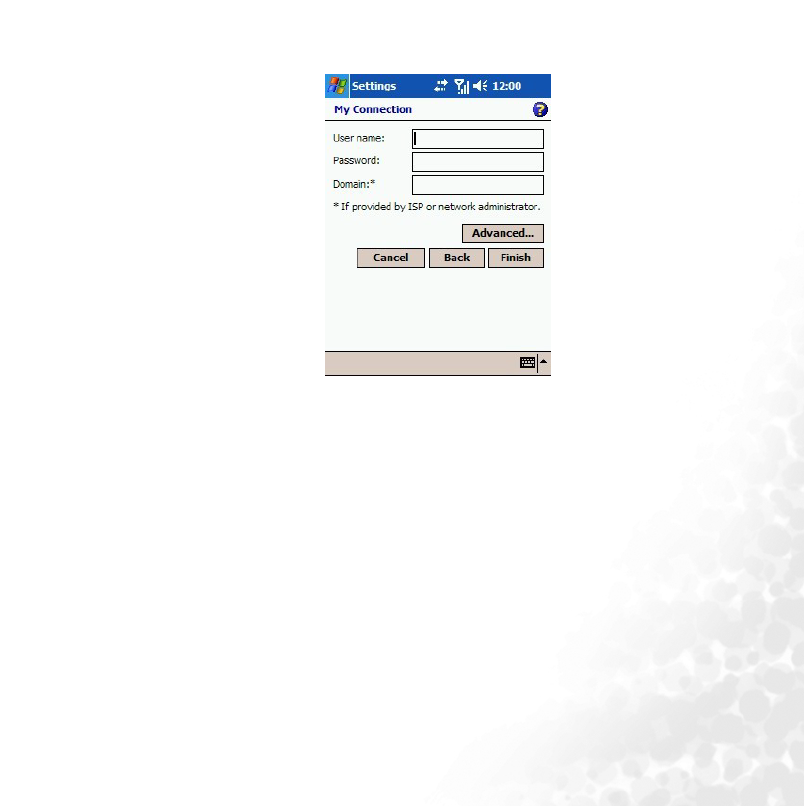
6. Now enter any authentication information your ISP requests.
7. You should not need to change any settings in ‘Advanced’. Most ISPs now use a dynam-
ically-assigned address.
8. Tap Finish
FinishFinish
Finish to complete this wizard.
Your PDA phone also provides you a shortcut to set a GPRS connection automatically. Fol-
low the below procedure to set the GPRS connection.
Please tap Programs > File Explorer > Program files > Tool > GPRS AutoSettings。
Setting up a CSD Connection to your ISP
Setting up a CSD Connection to your ISPSetting up a CSD Connection to your ISP
Setting up a CSD Connection to your ISP
1. Tap Start
StartStart
Start > Settings
SettingsSettings
Settings.
Connectivity 51
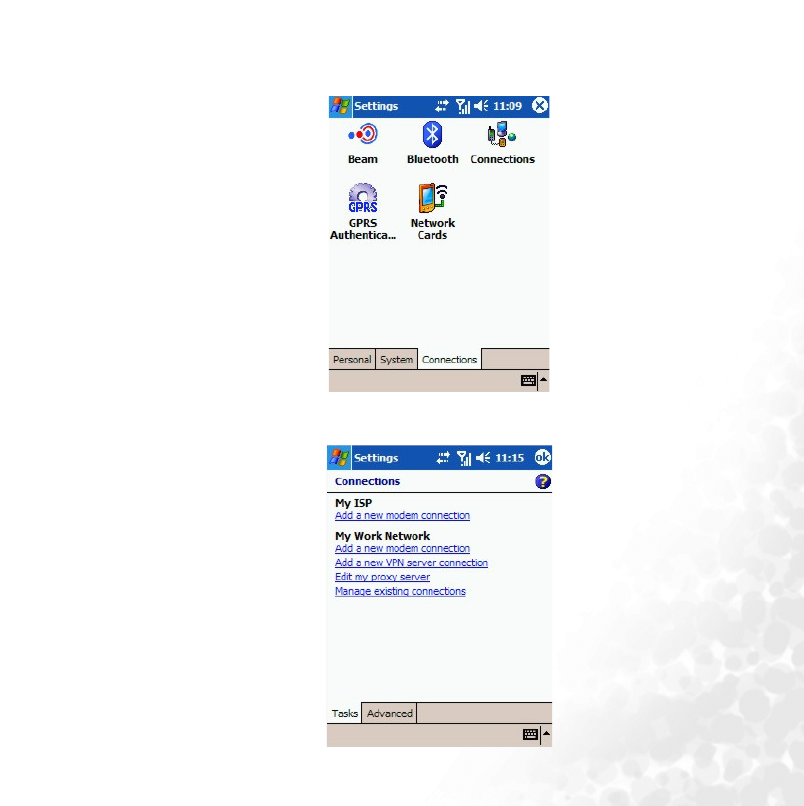
2. Tap the ‘Connections’ tab and the ‘Connections’ icon to bring up the Connections Set-
Connections Set-Connections Set-
Connections Set-
tings
tingstings
tings screen.
3. Under ‘My ISP’, tap ‘Add a new modem connection’.
52 Connectivity
4. Next to ‘Enter a name for the connection’, enter a name for the connection, for exam-
ple, ‘My Connection’. Next to ‘Select a modem’, select your modem type.
5. Now enter the dial-up number of your ISP. Include any special digits such as ‘*’ or ‘#’.
Connectivity 53
6. Now enter any authentication information your ISP requests.
7. You should not need to change any settings in ‘Advanced’. Most ISPs now use a dynam-
ically-assigned address.
8. Tap Finish
FinishFinish
Finish to complete this wizard.
Connecting to Your ISP
Connecting to Your ISPConnecting to Your ISP
Connecting to Your ISP
1. On the Connections
ConnectionsConnections
Connections screen, under ‘Connections’, tap ‘Manage existing connections’.
2. Tap and hold on a connection name from the listbox to bring up a pop-up menu.
3. Tap ‘Connect’ on the pop-up menu.
4. Your modem will start dialing out and attempt to create a connection.
Configuring Proxy Server Settings
Configuring Proxy Server SettingsConfiguring Proxy Server Settings
Configuring Proxy Server Settings
1. Contact your ISP or network administrator for the proxy server name, server type,
port, type of Socks protocol used, and your user name and password.
2. On the Connections Settings
Connections SettingsConnections Settings
Connections Settings screen, under ‘My Work Network, tap ‘Edit my proxy
server’.

54 Connectivity
3. Check the ‘This network connects to the Internet’ and ‘This network uses a proxy
server to connect to the Internet’ checkboxes.
4. Next to ‘Proxy server’ enter the proxy server name into the textbox.
5. If you need to change port number or proxy server type settings, tap the ‘Advanced’
button and change the relevant settings.
6. Tap the OK
OKOK
OK button to save and close the window.
Setting up a VPN connection to your corporate network
Setting up a VPN connection to your corporate networkSetting up a VPN connection to your corporate network
Setting up a VPN connection to your corporate network
With a Virtual Private Network (VPN) connection, you can connect to a server in your
corporate network via the Internet.
Creating a VPN profile
Creating a VPN profileCreating a VPN profile
Creating a VPN profile
1. Obtain the following information from the network administrator of your VPN
administrator:
• User name
• Password
• Domain name
• TCP/IP settings
• Host name or IP address of the VPN server
• TCP/IP settings. (Some ISPs require a domain name in front of the user name, such as
MSN/username.)
2. Tap Start
StartStart
Start > Settings
SettingsSettings
Settings.
3. Tap the ‘Connections’ tab and the ‘Connections’ icon to bring up the Connections
ConnectionsConnections
Connections
screen.
4. Under ‘My Work Network’, tap ‘Add a new VPN server connection’.
5. Enter the host name and follow the instructions on the screen to proceed.
Editing/deleting a VPN profile
Editing/deleting a VPN profileEditing/deleting a VPN profile
Editing/deleting a VPN profile
1. Tap Start
StartStart
Start > Settings
SettingsSettings
Settings.
2. Tap the ‘Connections’ tab and the ‘Connections’ icon to bring up the Connections
ConnectionsConnections
Connections
screen.
3. Under ‘My Work Network’, tap ‘Edit my VPN server’.

Connectivity 55
4. To edit a VPN profile, tap the profile you wish to edit and then tap ‘Edit’. To delete a
VPN profile, tap and hold the profile you wish to delete, and the tap ‘Delete’ from the
menu that appears.
Using Wireless LAN
Wireless LAN or WLAN allows your PDA phone to connect to the Internet or your VPN,
provided there is a Wireless Access Point available to you. Your PDA phone can connect to
an 802.11b wireless network or connect directly to other WLAN enabled devices.
Turn ing o n WLAN
Turn ing o n WLANTu r nin g on WL AN
Turn ing o n WLAN
1. From the Today
TodayToday
Today screen, tap the WLAN icon on the menu bar and bring up the
Wireless Lan screen.
2. Check the “Turn on wireless lan” checkbox and tap OK
OKOK
OK to close the window. (You will
notice that the WLAN icon on the menu bar changes from to .)
The Lower LED will light up green to indicate WLAN on.
56 Connectivity
Connecting to an existing wireless network
Connecting to an existing wireless networkConnecting to an existing wireless network
Connecting to an existing wireless network
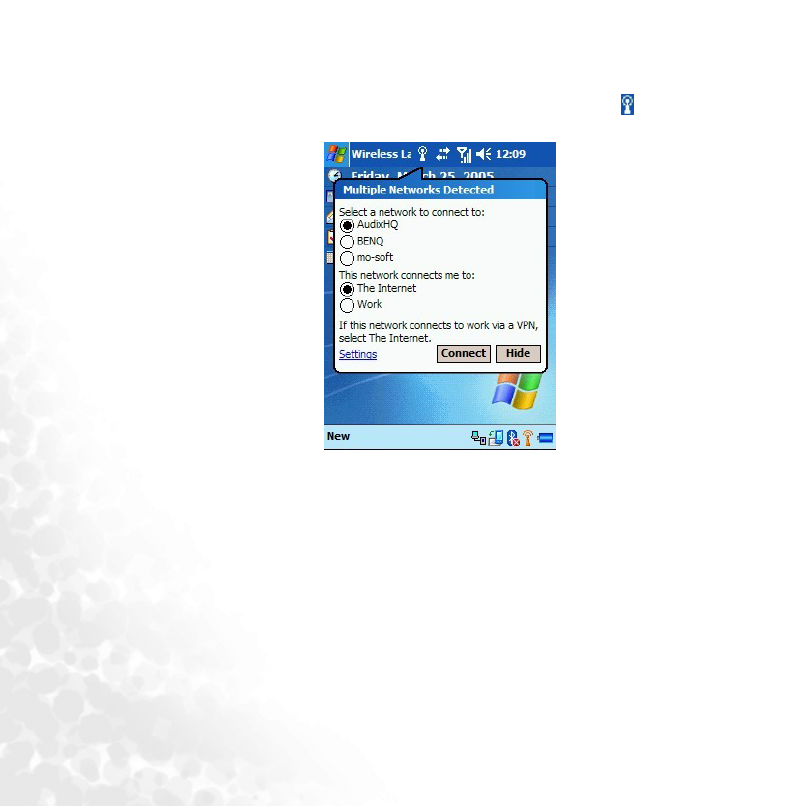
After WLAN is turned on, your phone will automatically try to detect what wireless net-
works are available in the surrounding areas. If any are found, the icon will appear on
the Navigation bar, and a pop-up window will appear indicating them.
Tap the network you wish to connect to, and then select whether the wireless network
connects to Internet or your work (office) network.
You can also go into the Network Card Settings
Network Card SettingsNetwork Card Settings
Network Card Settings screen to see what available networks have
been detected by your phone.
1. Tap Start
StartStart
Start > Settings
SettingsSettings
Settings.
Connectivity 57
2. Tap the ‘Connections’ tab and the ‘Network Cards’ icon to bring up the Network Card
Network Card Network Card
Network Card
Settings
SettingsSettings
Settings screen.
3. If your PDA phone can automatically detect wireless networks in the surrounding
areas, they will show up in the listbox.
4. Tap and hold on a network name in the listbox to bring up a pop-up menu.
5. Select ‘Connect’ from the pop-up menu to make connection to the network.
Adding a new wireless network
Adding a new wireless networkAdding a new wireless network
Adding a new wireless network
You can add a new wireless network into the listbox.
1. On the Network Card Settings
Network Card SettingsNetwork Card Settings
Network Card Settings screen, tap the first item in the listbox which is ‘Add
New’.
2. Enter a name in the ‘Network Name’ textbox.
3. Next to ‘Connects to’ , select where this new network will connect to (‘The Internet’ or
‘Work’.
4. If you want to connect to an ad-hoc connection, tap the ‘This is a device-to-device (ad-
hoc) connection’ checkbox.

58 Connectivity
5. If authentication information is needed, tap the ‘Network Key’ and ‘802.1x’ tabs to fill
in the setting values. (Check with your network administrator to obtain the setting val-
ues for your specific wireless network.)
6. Tap the ‘OK’ icon on the top-left corner to save and close the window.
Searching for wireless networks to access
Searching for wireless networks to accessSearching for wireless networks to access
Searching for wireless networks to access
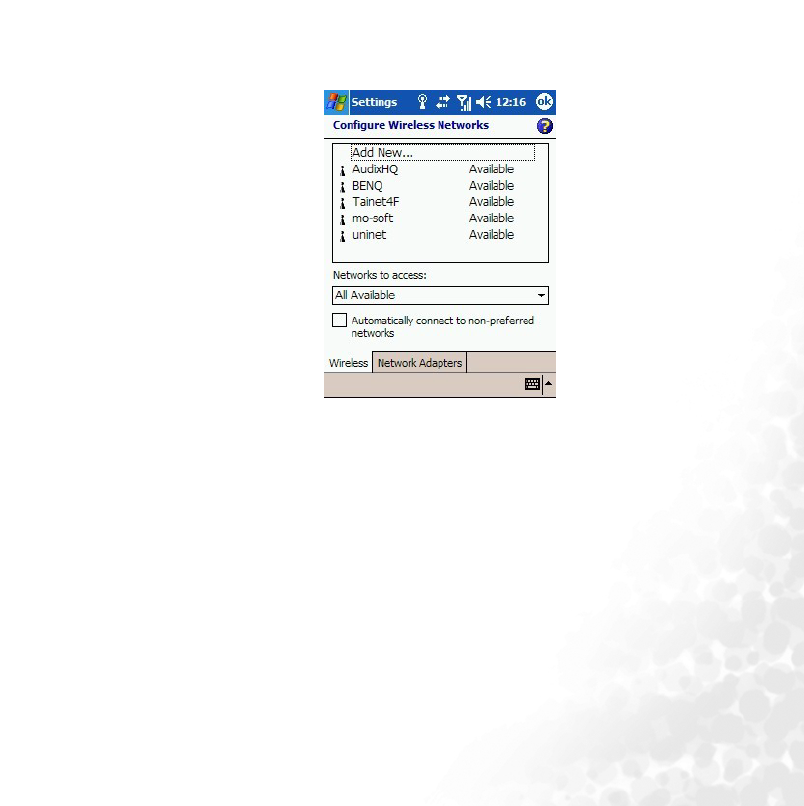
Networks that you have already configured are preferred networks and are listed in the
Wireless Networks listbox. You can choose whether to connect only to preferred networks
or to have your phone search for and connect to any network (preferred or not).
1. On the Network Card Settings
Network Card SettingsNetwork Card Settings
Network Card Settings screen, next to ‘Networks to access’, tap the type of net-
work you want to connect to (‘All Available’, ‘Only access points’, ‘Only computer-to-
computer).
2. To connect only to networks that have already been configured, clear the ‘Automatically
connect to non-preferred networks’ checkbox.
If you check the ‘Automatically connect to non-preferred networks’ checkbox, your phone
will detect any new network and provide you the opportunity to configure them.
Using Bluetooth
The PDA phone comes with built-in Bluetooth technology which allows you to commu-
nicate with other Bluetooth devices over a maximum approximately 10 meters (30 feet).
1. Tap the Bluetooth icon.
2. Check off the’ Turn on Bluetooth’ and ‘Make this device discoverable to other devices’
checkboxes.
When Bluetooth is powered on, the status LED will blink a blue light.
3. Tap the Devices
DevicesDevices
Devices tab.
4. Tap New
NewNew
New to begin searching for possible new Bluetooth devices to bond with in the sur-
rounding areas.
5. Once searching ends and devices are found, tap a device name to highlight it and tap
Next
NextNext
Next.
6. Enter the ‘Passkey’ for the device and Tap Finish
FinishFinish
Finish.

Connectivity 59
The passkey is device dependent. Please refer to the documentations of the Bluetooth
device for the passkey.
7. A pop-up dialog appears asking whether or not to designate the paired device as a
hands-free device. Tap Yes
YesYes
Yes if the paired device is a hands-free headset, otherwise tap No
NoNo
No.
If your paired device is a GPS device, please tap COM
COMCOM
COM Ports
Ports Ports
Ports > New Incoming Port
New Incoming PortNew Incoming Port
New Incoming Port to set
the COM port.
8. At this point you are ready to exchange data with your paired Bluetooth device. To send
a data object to your paired device, tap and hold on the data object (such as a file, con-
tact object, calendar object, etc) and select Beam File/Contact/Appointment, etc.
9. The Beam window appears listing all available neighboring devices ready to receive a
beam. Tap on the name of a Bluetooth device to begin sending.
Using Infrared (IrDA)
Another way to connect data over short distances and wirelessly is through IrDa or Beam-
ing. The PDA phone allows you to beam files and object (such as contacts and calendar
appointments) to IrDa receiving devices.
1. Beam is turned on by default. To double-check, tap Start
StartStart
Start > Settings > Connections
Settings > ConnectionsSettings > Connections
Settings > Connections and
tap the Beam icon to make sure the ‘Receive all incoming beams’ checkbox has been
checked.
2. Place the PDA Phone nearby a second IrDa device where their IrDa windows are in
alignment.
3. To send a data object to the neighboring IrDa device, tap and hold on the data object
(such as a file, contact object, calendar object, etc) and select Beam File/Contact/
Appointment, etc.
4. The Beam window appears listing all available neighboring devices ready to receive a
beam. Tap on the name of an IrDa device to begin sending.

60 Microsoft® ActiveSync®
Microsoft® ActiveSync®
Microsoft® ActiveSync®Microsoft® ActiveSync®
Microsoft® ActiveSync®
Using Microsoft ActiveSync, you can synchronize the information on your desktop com-
puter with the information on your device. Synchronization compares the data on your
device with your desktop computer and updates both computers with the most recent
information. For example:
• Keep Pocket Outlook data up-to-date by synchronizing your device with Microsoft Out-
look data on your desktop computer.
• Synchronize Microsoft Word and Microsoft Excel files between your device and desktop
computer. Your files are automatically converted to the correct format
• Back up and restore your device data.
• Copy (rather than synchronize) files between your device and desktop computer.
• Control when synchronization occurs by selecting a synchronization mode. For exam-
ple, you can synchronize continually while connected to your desktop computer or only
when you choose the synchronize command.
• Select which information types are synchronized and control how much data is synchro-
nized. For example, you can choose how many weeks of past appointments you want
synchronized.
Installing ActiveSync® on PC
To ensure that synchronization works properly you must install Microsoft ActiveSync on
your computer before connecting your PDA phone to the computer.
1. Insert the Companion CD into the CD-ROM drive in your computer.
Microsoft® ActiveSync® 61
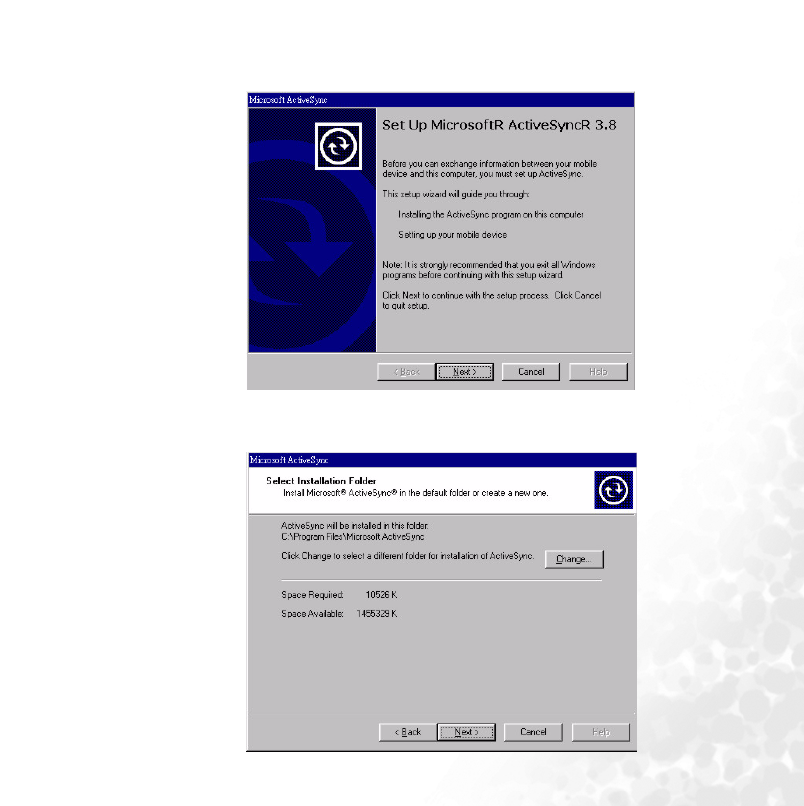
2. Run the ActiveSync installer program on the CD to install ActiveSync on your
computer and the following dialogue box appears. Click “Next” to proceed.
3. Click “Next” to install the ActiveSync to the default file folder or select “change” to
install the ActiveSync to the file folder you specify.
62 Microsoft® ActiveSync®
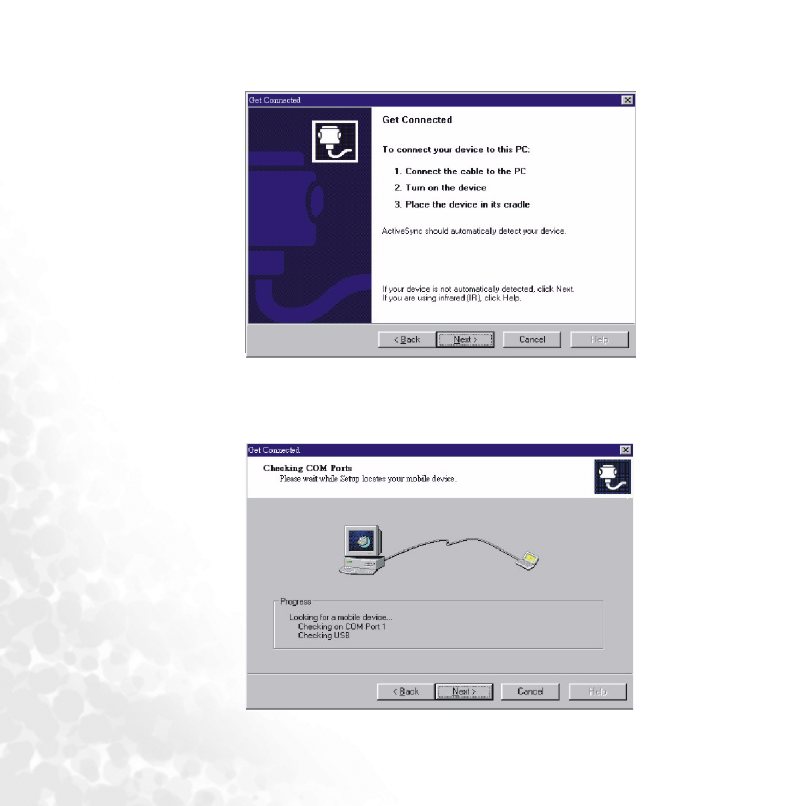
4. After the following dialogue box appears, connect your PDA phone to your PC and
click “Next”.
5. The installation program will start to link your PDA phone and PC as the following
dialogue box shows.
Microsoft® ActiveSync® 63
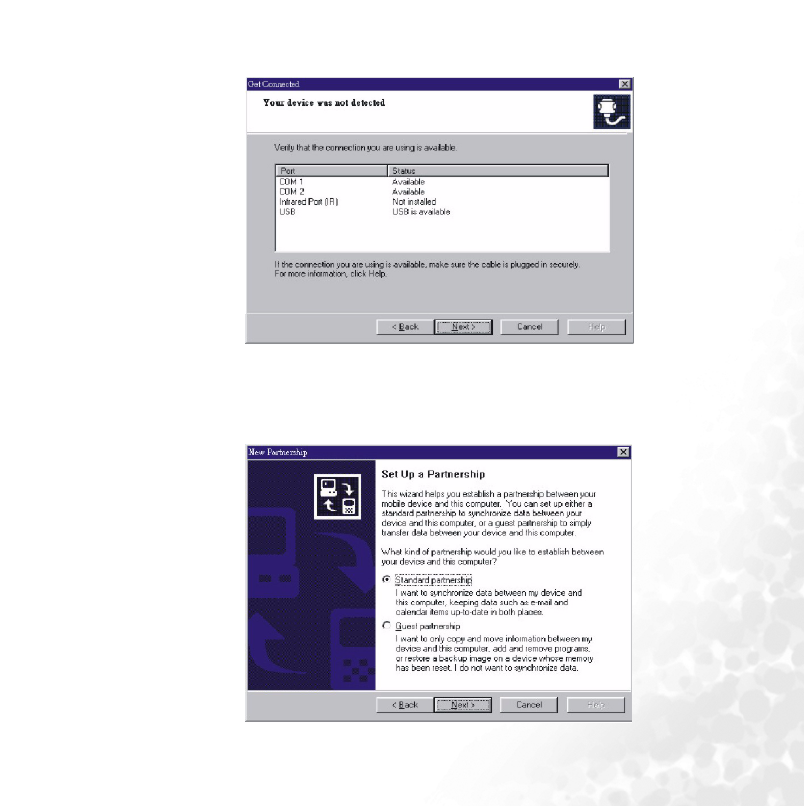
6. Click “Next” when the following dialogue box appears.
7. The below dialogue box shows and it allows you to choose data synchronization or data
transmission between your PDA phone and PC. Select your desired item and click
“Next” to proceed.
64 Microsoft® ActiveSync®
8. After the following dialogue box appears, choose the type of synchronization you want
to perform and click “Next”.
9. Select the synchronization settings and check the checkbox which you want to perform
data synchronization.
Microsoft® ActiveSync® 65
10. Click “Finish” to finish the Microsoft ActiveSync installation.
Creating a new partnership profile
After you’ve installed ActiveSync on your PC, you can begin to connect your PDA phone
to the PC. Take the included data cable and connect the mini-USB end to your PDA
phone’s mini-USB slot and the USB end to your computer’s USB slot.
Once the data cable connects the PDA phone to the PC, the PDA phone will emit a sound
indicating connection found. On the PC side, a ‘New Partnership’ wizard will automati-
cally pop up.
On the wizard, you can choose whether you wish to set up a standard partnership or guest
partnership profile between the PDA phone and PC. A standard partnership profile
allows you to copy and move files between your PDA phone and PC as well as synchro-
nize application data from PC’s Outlook to PDA phone’s Contacts, Inbox, Calendar, etc.
A guest partnership profile allows you to only copy and move files but not synchronize
application data. Follow the steps below to setup a standard partnership between the PDA
phone and a single desktop computer.
1. Select ‘Standard partnership’ and click Next
NextNext
Next.
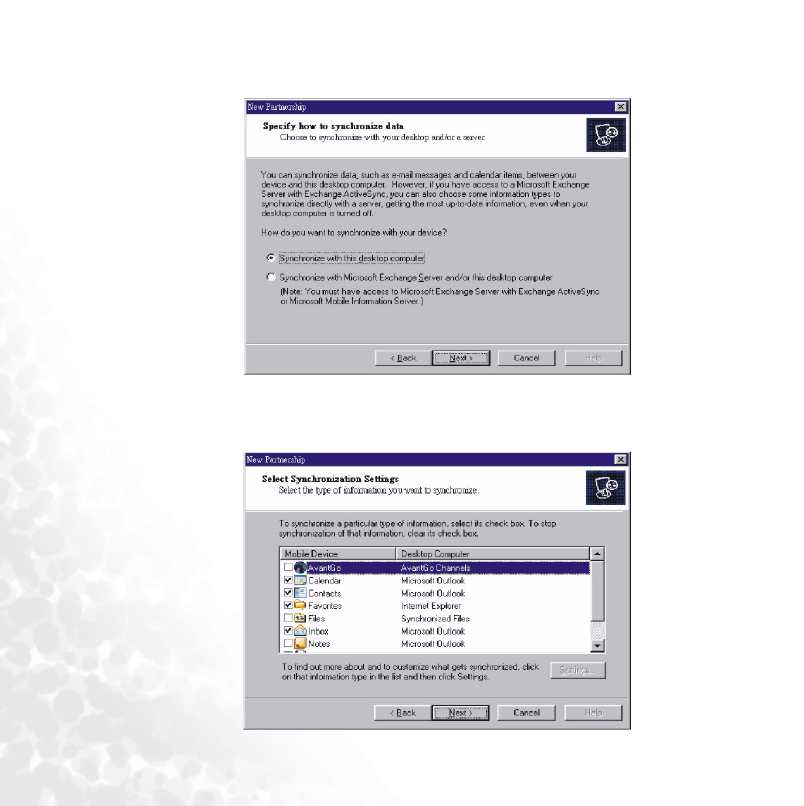
2. Select ‘Synchronize with this desktop computer’ and click Next
NextNext
Next.
3. Select ‘Yes, I want to synchronize with only this computer’ and click Next
NextNext
Next.
66 Microsoft® ActiveSync®
4. Check off from the list which application data types you wish to synchronize and click
Next
NextNext
Next.
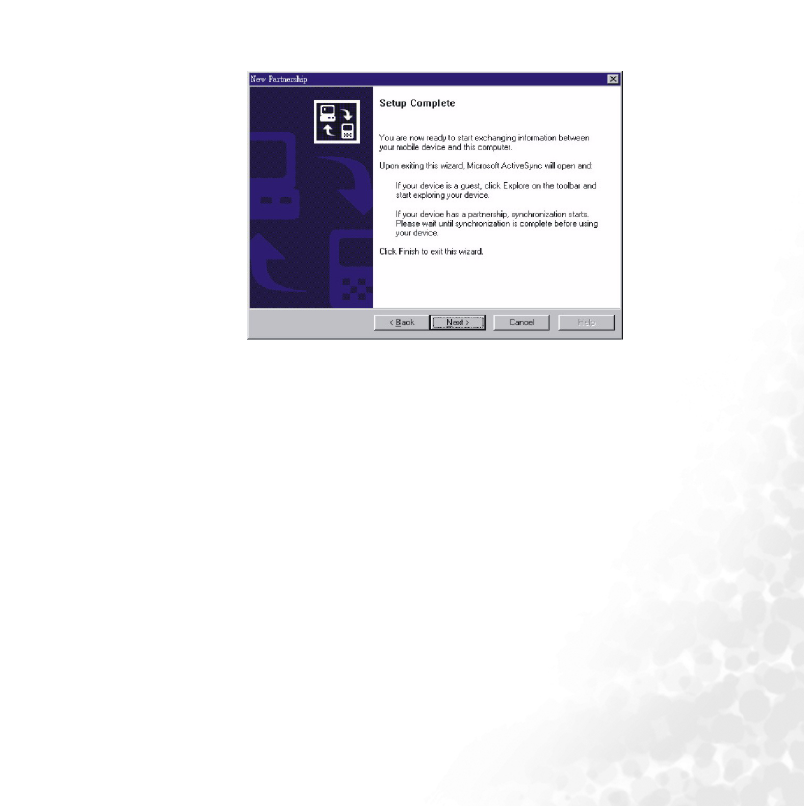
5. Click Finish
FinishFinish
Finish to complete the wizard.
Synchronizing the application data
After creating your profile (a new partnership) for the first time, ActiveSync will first
attempt to establish a connection with your PDA phone (so long as there is a physical
connection via USB).
Next ActiveSync will examine each of the application data types you have selected to be
synchronized and see which records are not the same on both the PDA phone and PC.
Once both the PDA phone and PC have the same information, all application data types
will be listed as synchronized.
After your first synchronization, take a look at Calendar, Contacts, and Tasks on your
PDA phone. You'll notice that information you've stored in Microsoft Outlook on your
PC has been copied to your PDA phone, and you didn't have to type a word. Disconnect
your PDA phone from your PC and you're ready to go.
Once you have set up ActiveSync and completed the first synchronization process, you
can initiate synchronization from your PDA phone. To switch to ActiveSync on your PDA
phone, tap Start
StartStart
Start > ActiveSync
ActiveSyncActiveSync
ActiveSync.
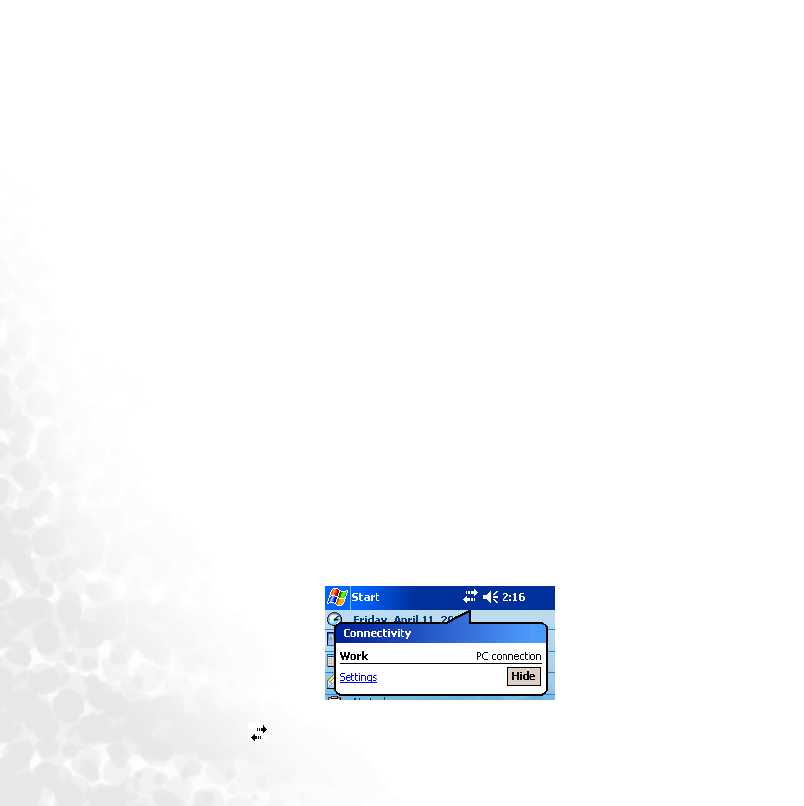
Once synchronization begins, a progress bar with indicators will keep you informed as to
the changes being made.
If both Exchange Server and desktop synchronization is enabled, following successful syn-
chronization you will see the above status screen.
Clicking on the icon in the notification area will reveal an active PC connection.

Microsoft® ActiveSync® 67
Adding programs
If you want to install a new program to your PDA phone, you will need to first install it on
your PC.
1. Determine your PDA phone’s processor type so that you know which version of the
software to install. Tap Start
StartStart
Start > Settings
SettingsSettings
Settings. On the System
SystemSystem
System tab, tap About
AboutAbout
About. In the Version
Vers ionVers ion
Ve rs io n
tab, make a note of the information in Processor.
2. Download the program to your PC (or insert the CD or disk that contains the program
into your PC). You may see a single *.xip,*.exe, or *.zip file, a Setup.exe file, or several
versions of files for different device types and processors. Be sure to select the program
designed for Microsoft Pocket PC and your device processor type.
3. Read any installation instructions, Read Me files, or documentation that comes with the
program. Many programs provide special installation instructions.
4. Connect your PDA phone and PC.
5. Double-click the *.exe file.
• If the file is an installer, the installation wizard will begin. Follow the directions on the
screen. Once the software has been installed on your PC, the installer will automatically
transfer the software to your PDA phone.
• If the file is not an installer, you will see an error message stating that the program is
valid but it is designed for a different type of computer. You will need to move this file to
your PDA phone. If you cannot find any installation instructions for the program in the
Read Me file or documentation, use ActiveSync Explore to copy the program file to the
Program Files folder on your device. For more information on copying files using
ActiveSync, see ActiveSync Help.
• Once installation is complete, tap Start
StartStart
Start > Programs
ProgramsPrograms
Programs, and then the program icon to switch
to it.
Removing programs
1. Tap Start
StartStart
Start > Settings
Settings Settings
Settings > System
System System
System > Remove Programs
Remove ProgramsRemove Programs
Remove Programs.
2. Highlight the name of the application you wish to remove from your device.
3. Click Remove
RemoveRemove
Remove.

68 Settings
Settings
SettingsSettings
Settings
You can customize how your PDA phone looks and behaves by changing its internal set-
tings. Tap Start
StartStart
Start > Settings
SettingsSettings
Settings to bring up the settings window. There are three categories in
settings that are available: Personal
PersonalPersonal
Personal, System
SystemSystem
System, and Connections
ConnectionsConnections
Connections. Tap the tabs at the bottom
of the window to get at each settings category.
Personal settings
Tap S t a rt
Start Start
Start > Settings
Settings Settings
Settings to enter the Personal settings page.
Phone
PhonePhone
Phone
This area allows you to change settings from the following four tabs:
• Phone
• Service
• Network
• More
1. The Phone tab allows you to change the settings of the following four items: the type of
ringtone, the tone of ringtone, keypad dial setting, and security on your PDA phone.
2. The Service tab allows you to change the settings of the following five items: call
barring, show your number, call divert, call waiting, and voicemail box and short
message.
3. Basically the choice of the network that your phone uses is configured automatically. If
you want to change the connection network, this Network tab will allow you to select
the network you want to use. When outside the coverage of your regular network in
your home country or when abroad, you can manually select the local network system.
4. The More tab allows you to change the following settings: answer mode, minute
minder, and band setting.
Buttons
ButtonsButtons
Buttons
This area allows you to change settings from the following two tabs:
• Program Buttons
• Up/Down Control

Settings 69
The first tab allows you to map hardware buttons on your PDA phone to functions and
installed applications. First, click the name of a button and then select from the pull-down
menu below Button assignment to choose among system functions and installed applica-
tions. Click the Restore Defaults button to reset button mappings to factory settings.
The second tab allows you to configure how the up and down control behaves for the joy-
stick. Delay before first repeat changes the time elapsed before scrolling begins. Repeat
rate changes the time it takes to scroll from one item to the next.
Input
InputInput
Input
This area allows you to set the default input method in Input Panel. You can also config-
ure various input settings such as whether to use large or small keys for soft-keyboard and
other details.
Menus
MenusMenus
Menus
This area allows you to:
• Select which applications appear in the Start menu
• Select which document types appear in the Today screen’s New Item pull-up box.
When you launch this dialog box, it scans your system for installed applications.Check off
the items you want to appear in the Start Menu.Bear in mind that you may only have nine
items selected at any time.
A useful feature, available from the Today screen or any other screen in which a New but-
ton appears is the New button menu, a pop-up menu that displays a list of document
types that can be transformed into new documents.
Still in the Menu control panel, via the New Menu tab you can turn this pop-up menu on
(if off, you will only see a New button without any pop-up menu).If New button menu is
enabled, you can select from a variety of document types that will be available from any-
where the New button menu appears.
Owner info
Owner infoOwner info
Owner info
Much as it is wise to label valuable assets with your name or e-mail address, so is it impor-
tant to stamp your Pocket PC device with your information.
Fill in the fields above to reflect your personal contact information.If you select Show
information when device is turned on, this information will appear whenever you soft
reset or suspend your device.

70 Settings
Password
PasswordPassword
Password
This area allows you to enable a password lock to your PDA phone if it is left unused for a
certain time.
1. Check the ‘Prompt if device unused for’ checkbox and tap the arrow beside it to select a
time in minutes or hours from the drop-down menu.
2. Enter a four digit password in the ‘Password’ textbox.
If password protection is enabled, you will always be prompted for password after a soft
reset or upon power up in addition to the specified frequency.
Sounds and notification
Sounds and notificationSounds and notification
Sounds and notification
System sounds provide an excellent visual clue when your attention is needed, whether
you have an upcoming appointment, a phone call is coming through or someone has sent
you an instant message.
This area allows you to enable sound for a number of occasions. You can turn on or turn
off event sounds (sounds produced by the operating system like errors), program sounds
(sounds produced by software you have downloaded) and their notifications. You can also
customize the intensity of screen taps or hardware buttons (these can be set to off, soft, or
loud).
From the same screen, choose the Notifications tab to change what sounds are associated
with various system events. Additionally, it is possible to change the system volume by
pressing in the notification area.
To d a y
To d a yTo d a y
To d a y
Aside from acting as the launch point for most activity on your PDA phone, the Today
screen is a powerful canvas on which you can add third-party modules to display perti-
nent information and is customizable to better suit you aesthetically.
Tap ‘Today’ to begin. First you will see a listing of Today themes installed on your device
and available for your use. Today screen themes offer a great way for you to personalize
your PDA phone to reflect your unique interests and tastes. By loading a new theme, you
can completely change the look of your device. To choose a theme, simply highlight its
name and tap OK. Alternatively, you can Beam a selected theme to a friend’s PDA phone
or any Pocket PC device or delete the theme from memory.
You also have the option of selecting a JPG or GIF image as a background skin for your
device.First check the Use this picture as the background checkbox. By tapping the
Browse button you will be given a list of available image files on your device.

Settings 71
In the same screen, tapping the Items tab allows you to configure the individual Today
screen components that have been installed on your device.Your device will already sup-
port Date, Owner Info, Calendar, Inbox, and Tasks.All of these plug-ins with exception of
Date can be Moved Up or Moved Down vertically on the Today screen.Press the appropri-
ate button to the right to move the plug-ins' positions.
Speech Commander
Speech CommanderSpeech Commander
Speech Commander
Here you can enable or disable the voice dialing function of P50. To enable this function,
tap to check the Voice dialing checkbox. Check the Caller name playback checkbox if you
want P50 to play the caller name (voice tag) before dialing.
System settings
Tap S t a rt
Start Start
Start > Settings
Settings Settings
Settings > System
SystemSystem
System to enter the System settings page.
About
AboutAbout
About
This control panel gives you technical details about the version of Microsoft Pocket PC
running, processor type, and total available internal memory.
It also shows expansion slot (storage slot) usage and owner name.
In the same screen, tap the Device ID tab to change the name displayed when performing
an ActiveSync with a desktop PC.
Finally, the Copyrights tab reveals licenses being used by your version of Microsoft Pocket
PC.
Backlight
BacklightBacklight
Backlight
Tapping on Brightness icon presents the following screen. Here you can choose how many
minutes of inactivity will result in the backlight going off when no AC adapter is plugged
into your PDA phone. In the second of the two checkboxes, you can have the backlight
automatically turn on upon tapping the screen. The External Power tab provides the same
options as Battery Power, but these settings affect behavior when external power is used
such as an AC adapter or car power adapter.
Certificates
CertificatesCertificates
Certificates
Public key certificates allow you to help establish your identity when you are logging onto
a secure network. Certificates also aide in establishing the identity of other computers that
you might want to connect to. Using certificates helps prevent unauthorized users from

72 Settings
accessing your device or data. There are two types of certificates that can be installed on
your device: personal certificates that identify who you are, and root certificates that iden-
tify the servers you connect to. Both personal and root certificates are managed in the
same way. Consult your IT department for information on certificates and device secu-
rity.
Tapping the Certificates icon will get you started. In the Personal tab, you will see certifi-
cates assigned to your device. By tapping and holding on an item, you can delete it.
From the same screen, tapping the Root tab brings you to the root certificates available for
your device.
Clock
ClockClock
Clock
Aside from being a powerful computational device, your PDA phone is also a handy time
keeper and alarm clock. This control panel applet allows you to ensure your system time
is correct.
Tapping Clock icon brings you to this screen. Here you can choose among the world's
time zones, set the hour, minutes, and seconds, and finally choose the date. The time can
be changed by typing in the numerical representation of the time or by manipulating the
clock hands to the left.
On the second half of the screen is a visiting clock, great for when you are traveling and
want to update the system time but be able to jump back to your home time zone when
your travels come to an end.
You can set an early morning wake-up call for yourself with your PDA phone. From the
same screen as above, tap on the Alarms tab. You can have up to four distinct alarms
enabled at a time. Tap on the <Description> text to give your alarm a friendly name.
When the alarm goes off, this text will display as the reasoning behind the alarm. Tap on
the ‘S’, ‘M’, ‘T’, etc. (indicating Sunday, Monday, Tuesday, etc., respectively) to indicate
which days the alarm should go off.
Tap on the time listed and use the time selector to specify the alarm time.
Finally, tapping above the time displayed to the right of an alarm gives you options that
let you customize how the alarm behaves. You can choose the sound played, whether the
sound should be looped, and whether you should be given a message indicating the pur-
pose of the alarm.
Additionally, it is possible to switch from a digital clock in the notification area to an ana-
log clock.
Settings 73
Tap-and-hold on the time in the notification area to switch between Analog and Digital.
Memory
MemoryMemory
Memory
You can use the slider bar to assign how much memory to be dedicated to storage or pro-
grams. In addition, this screen displays total storage and program memory, along with the
amount of allocated memory, in use memory, and free memory for both memory types.
Selecting the ‘Storage Card’ tab shows you free memory for any storage cards you've
installed in your PDA phone.
Selecting the ‘Running Programs’ shows you the currently running applications. By tap-
ping ‘Activate’, you will bring the highlighted program to the foreground so you can
begin work on it immediately. If you tap ‘Stop’, the highlighted program will be termi-
nated. Finally, tapping ‘Stop All’ will try to terminate all running programs, though not all
will necessarily respond to being closed in this manner.
Power
PowerPower
Power
Here you can see the current state of the battery and how much power it has left.
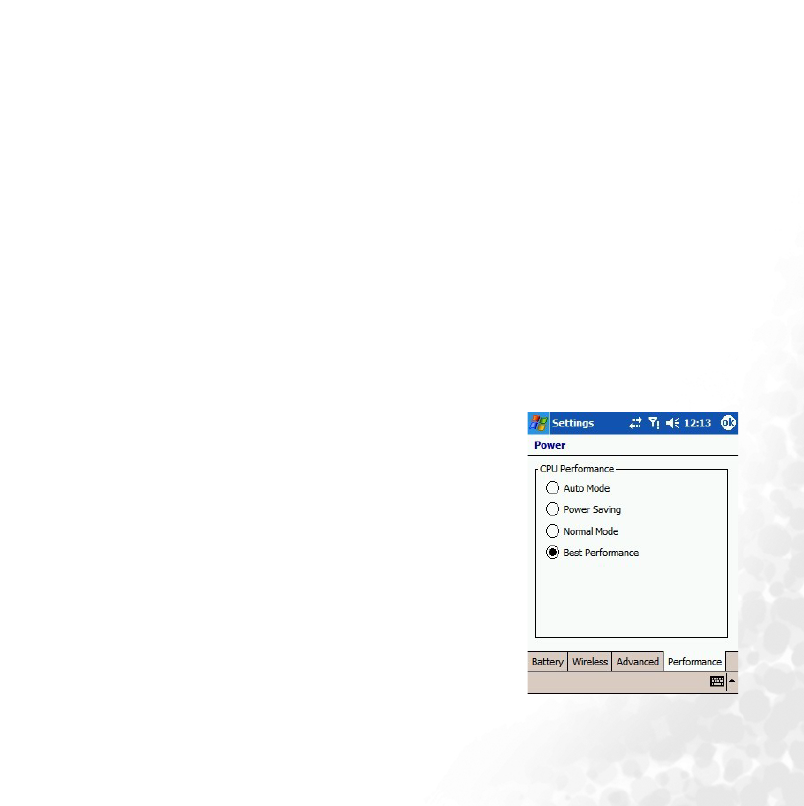
CPU Performance
CPU PerformanceCPU Performance
CPU Performance
This function allows you to adjust the CPU
performance of your PDA phone.
Automatic mode
Automatic modeAutomatic mode
Automatic mode: The mode adjusts the system
performance automatically.
Normal mode
Normal modeNormal mode
Normal mode: This mode maintains the efficiency and
power consumption for the normal
system performance.
Power saving mode
Power saving modePower saving mode
Power saving mode: This mode extends the standby
time of your PDA phone, but less
system efficiency.
Optimization mode
Optimization modeOptimization mode
Optimization mode: This mode maintains the best
system performance, but higher
power consumption.

74 Settings
Regional settings
Regional settingsRegional settings
Regional settings
This control panel allows you to customize how data appears on your PDA phone, such as
currency, times, dates, and numbers.
Selecting the ‘Regional Settings’ tab allows you to set the region of your choice.
Selecting the ‘Number’ tab allows you to customize every aspect of how numbers appear
including decimal symbol, how digits are groups, measurement system, and more.
Selecting the ‘Currency’ tab allows you to customize every aspect of how monetary figures
are displayed, including currency symbol, number of decimal places shown, and how neg-
ative values are shown.
Selecting the ‘Time’ tab allows you to customize every aspect of how time figures are dis-
played, including display style, separator character, and AM/PM symbols.
Selecting the ‘Date’ tab allows you to customize every aspect of how dates are displayed.
Screen
ScreenScreen
Screen
Periodically your touch display may not respond accurately to stylus/finger taps; when
this occurs, it is usually necessary to re-align the screen. This can be done by tapping the
Align Screen button from the Screen control panel icon. Also, you are able to change the
system font size under the Font Size menu.
Hotkey for screen alignment:
Hotkey for screen alignment:Hotkey for screen alignment:
Hotkey for screen alignment:
Press the Function Key
Function Key Function Key
Function Key and Audio Recorder Button
Audio Recorder Button Audio Recorder Button
Audio Recorder Button to align the screen.
Self Test
Self TestSelf Test
Self Test
Tap the Self Test tab to perform the self test of your PDA phone. Select the items you want
to perform self test and then tap Test.
Device Info
Device InfoDevice Info
Device Info
Tap the Device Info tab to show your device information.
Remove Programs
Remove ProgramsRemove Programs
Remove Programs
If you want to remove the programs installed in your PDA phone, tap the Remove
Programs tab to remove them. Select the programs you want to remove and then tap
Remove.

Settings 75
Connections settings
Tap S t a rt
StartStart
Start > Settings
SettingsSettings
Settings > Connections
ConnectionsConnections
Connections to enter the Connections settings page.
GPRS Authentication
GPRS AuthenticationGPRS Authentication
GPRS Authentication
This area allows you to select which GPRS authentication method to use. You have a
choice of either PAP or CHAP authentication. Please consult your GPRS service provider
to determine which value is appropriate for you.
Network Cards
Network CardsNetwork Cards
Network Cards
Please see "Connecting to an existing wireless network" on page 56.
Connections
ConnectionsConnections
Connections
Please see "Setting up connections" on page 47.
Bluetooth
BluetoothBluetooth
Bluetooth
Please see "Using Bluetooth" on page 58.
Beam
BeamBeam
Beam
Please see "Using Infrared (IrDA)" on page 59.

76 Troubleshooting Information
Troubleshooting Information
Troubleshooting InformationTroubleshooting Information
Troubleshooting Information
If you encounter problems when using your P50, please refer to the troubleshooting
information below to solve them. If the problem still persists after you have tried the
suggested solutions, please contact your dealer or BenQ customer service for assistance.
Do not attempt to disassemble P50 by yourself. There are no user serviceable parts inside.
Call Related Problems
Cannot make outgoing calls.
Cannot make outgoing calls.Cannot make outgoing calls.
Cannot make outgoing calls.
Check the following:
• Is your P50 in the Flight
FlightFlight
Flight mode? Change to the Phone on
Phone onPhone on
Phone on mode so you can use the call
related functions.
• Is there a SIM card in the phone? Install a valid SIM card.
• Is the signal strength strong enough? Try moving to a different location to obtain better
signal reception.
• Is the call barring feature activated? Deactivate the feature if necessary.
Cannot answer incoming calls.
Cannot answer incoming calls.Cannot answer incoming calls.
Cannot answer incoming calls.
Check the following:
• Is your P50 in the Flight
FlightFlight
Flight mode? Change to the Phone on
Phone onPhone on
Phone on mode so you can use the call
related functions.
• Is there a SIM card in the phone? Install a valid SIM card.
• Is the signal strength strong enough? Try moving to a different location to obtain better
signal reception.
Can not use certain call functions (call waiting, call barring.., etc).
Can not use certain call functions (call waiting, call barring.., etc).Can not use certain call functions (call waiting, call barring.., etc).
Can not use certain call functions (call waiting, call barring.., etc).
Depending on your network service provider, some call services may require extra sub-
scription. Please contact your network service provider for details.
There are noises during a call.
There are noises during a call.There are noises during a call.
There are noises during a call.
Check the following:
• Are you near a strong electromagnetic source (such as a TV or a microwave oven..., etc.)
during the call? Move to another location to reduce the interference effects.

Troubleshooting Information 77
• Check the status of signal reception. If necessary, move to another location where recep-
tion is better.
Poor reception.
Poor reception.Poor reception.
Poor reception.
Check the following:
• The network signal is too weak at your current location--for example, in a basement or
near a tall building-because wireless transmissions can not effectively reach it.
• The network is busy at the current time (for example, during peak times, there may be
too much network traffic to handle additional calls).
• You are too far away from a base station for your network operator.
Echo or noise.
Echo or noise.Echo or noise.
Echo or noise.
Check the following:
• Poor network trunk quality on the part of your network operator.
• Poor local telephone line quality.
SIM card error.
SIM card error.SIM card error.
SIM card error.
Check the following:
• SIM card malfunction or damage.
• SIM card inserted improperly.
• Debris on the SIM card contacts.
There are echoes when using
There are echoes when using There are echoes when using
There are echoes when using VoIP (Voice over IP)
VoIP (Voice over IP) VoIP (Voice over IP)
VoIP (Voice over IP) phone.
phone.phone.
phone.
Check the following:
• Suggest to use VoIP in a spacious area or with earphones in oreder to get the best recep-
tion and quality.
Message Problems
Cannot send or receive text messages.
Cannot send or receive text messages.Cannot send or receive text messages.
Cannot send or receive text messages.
Check the following:
• Is the phone in the Flight
FlightFlight
Flight mode? Switch it to the Phone on
Phone onPhone on
Phone on mode.
• Is the signal strength strong enough? Try moving to a different location to obtain better
signal reception.
Cannot send or receive multimedia messages.
Cannot send or receive multimedia messages.Cannot send or receive multimedia messages.
Cannot send or receive multimedia messages.

78 Troubleshooting Information
Check the following:
• Is the phone in the Flight
FlightFlight
Flight mode? Switch it to the Phone on
Phone onPhone on
Phone on mode.
• Have you subscribed the MMS service to your network service provider? The MMS ser-
vice may require extra subscription.
• Has the MMS setting been correctly configured? Check the setting with your network
service provider.
• The status of phone memory. Is there enough space? Delete some files if necessary.
Cannot send or receive Email.
Cannot send or receive Email.Cannot send or receive Email.
Cannot send or receive Email.
Check the following:
• Check your Network connection.
• Has the Email setting been correctly configured? Check the setting with your Email ser-
vice provider.
Internet Problems
Cannot connect to the Internet.
Cannot connect to the Internet.Cannot connect to the Internet.
Cannot connect to the Internet.
• Please refer to the “Connections settings” illustrtion on P. 46.
Connection Problems
Cannot connect P50 to PC using the Data cable.
Cannot connect P50 to PC using the Data cable.Cannot connect P50 to PC using the Data cable.
Cannot connect P50 to PC using the Data cable.
Check the following:
• Is the power of P50 turned on?
• Check the Data cable.
• Make sure the ActiveSync is installed.
System Problems
Cannot turn on the phone.
Cannot turn on the phone.Cannot turn on the phone.
Cannot turn on the phone.
Check the following:
• Make sure that you have slided the battery lock to the lock position.
• Is the battery fully charged? Check the battery and fully charge it if necessary.

Troubleshooting Information 79
• Are the battery contact terminals clean? Seek your dealer’s help to clean the terminals.
• If the problem remains, please refer to the “Hard Reset” information on P.14.
Battery Charging Problems
Can not turn on the P50 when charging.
Can not turn on the P50 when charging.Can not turn on the P50 when charging.
Can not turn on the P50 when charging.
Check the following:
This shows that the battery is over-discharged when you find the indicator on P50 turns
to orange and the P50 can not be turned on while charging it. When the battery is over-
discharged, it loses all its electric power. Please charge the phone for over 30 minutes and
the system will boot up automatically.
Can not turn on the P50 after charging for over 30 minutes.
Can not turn on the P50 after charging for over 30 minutes.Can not turn on the P50 after charging for over 30 minutes.
Can not turn on the P50 after charging for over 30 minutes.
Check the following:
When you find that you still can not turn on the P50 after charging it for over 30 minutes,
this means that the P50 system enter the deep sleep mode incorrectly and it makes the P50
can not be turned on normally. Please note that if there are still some programs running
and they are not closed correctly before the P50 system enters the deep sleep mode, the
P50 will enter the sleep mode incorrectly.
Solutions: Step 1. Press the Power button.
Step 2. If step 1 doesn’t work, please activate soft reset. For detail information
about soft reset, please refer to "Soft reset" on page 13 in Chapter 3
Start Up.
Step 3. If step 2 doesn’t work, please activate hard reset.For detail information
about hard reset, please refer to "Hard reset" on page 14 in Chapter 3
Start Up. (Note: If you activate Hard Reset, all your data stored in the
P50 will be deleted. We suggest you to backup your files and data
regularly.)

80 Troubleshooting Information
How to avoid data lost caused by over-discharging of P50?
How to avoid data lost caused by over-discharging of P50?How to avoid data lost caused by over-discharging of P50?
How to avoid data lost caused by over-discharging of P50?
Check the following:
A.Please charge your P50 within 72 hours after the system enters deep sleep mode.
B. If you find the P50 system fail to boot up, please charge the P50 within 24 hours and
activate soft reset.
C. The P50 still needs a minimun power supply to perform deep sleep mode. If you need
to remove the battery, please load the charged battery back to the P50 within 30
minutes in order to supply your P50 the power of maintaining deep sleep mode.
D. Please backup your files and data regularly。
When carry the phone to board a plane:
When carry the phone to board a plane:When carry the phone to board a plane:
When carry the phone to board a plane:
Check the following:
A. Switch the phone to Flight mode.
B. Or unlock the battery lock to let the phone enter deep sleep mode.