Benq MP780ST Digital Projector User Manual MP780 ST MW860USTi en
Benq Corporation Digital Projector MP780 ST MW860USTi en
Benq >
Contents
- 1. User manual
- 2. UserMan (statement)_JVPMP780ST
- 3. UserMan_JVPMP780ST
- 4. UserMan_JVPMP780ST 2
- 5. UserMan_JVPMP780ST 3
UserMan_JVPMP780ST 3
Operation 51
Infrastructure mode connection, you need to select the projector’s SSID which
you want to connect. See "Displaying image through Q Presenter" on page 60 for
details.
4. Use your computer’s wireless connection utility to connect the network.
If WEP Key is set in the projector, the user must enter the password of WEP Key to connect the
network.
Controlling the projector remotely through a web
browser
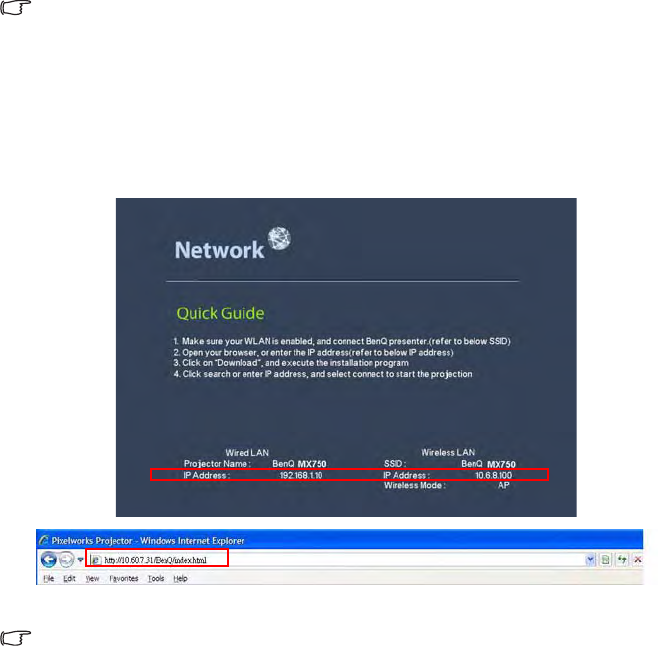
Once you have configured the LAN settings, you can find the IP address for the projector
in the bottom of the network screen. You can use any computer that is on the same local
area network to control the projector.
1. Enter the address of the projector in the address bar of your browser and press
Enter. For example: http://10.60.7.31
2. The BenQ remote network operation page opens.
• The web page control supports IE version 7.0 or higher.

Operation
52
• The illustrations in web page control, Q Presenter and USB Reader sections are for the
purpose of explanation and may differ from the actual design of your projector.
3. Click Download to save Q Presenter software on your computer.
You can also link to the web page control from Q Presenter > Settings > Advanced Setting >
Control projector via web page on page 63.
4. Execute the program installation.
5. Open Q Presenter, search and connect a network display. See "Displaying image
through Q Presenter" on page 60 for details.
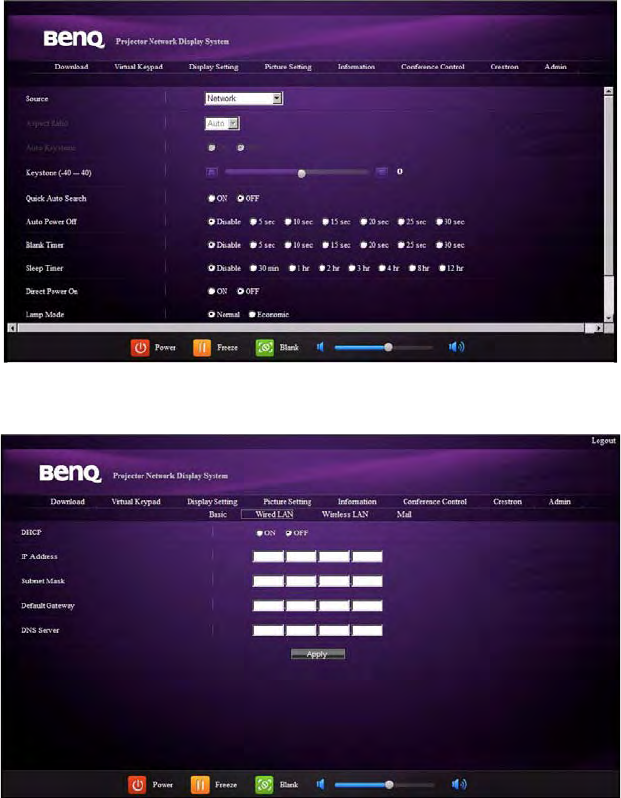
The Virtual Keypad page allows you to operate the projector as if you were using the
remote control or control panel on the projector.
i
i
Operation 53
i. These buttons function the same as the ones on the remote control. See
"Remote control" on page 13 for details.
The Display Setting page allows you to operate the projector as if you were using the
OSD menus. These functions are some useful menu settings.
The Picture Setting page allows you to manage the projector as if you were using the
PICTURE menu.
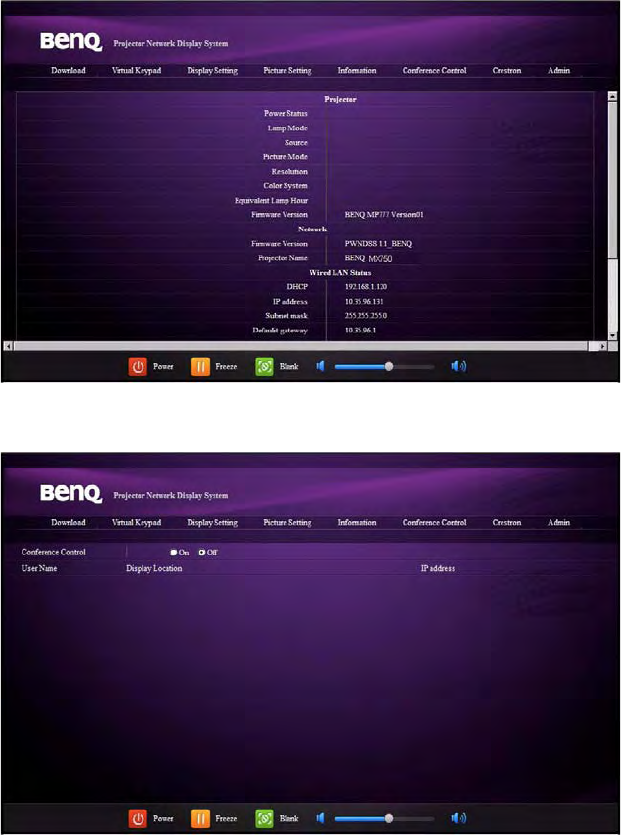
The Information page displays the information and status of this projector.
Operation
54
The Conference Control page allows you to control computer’s display status of all the
computers linked to this projector.
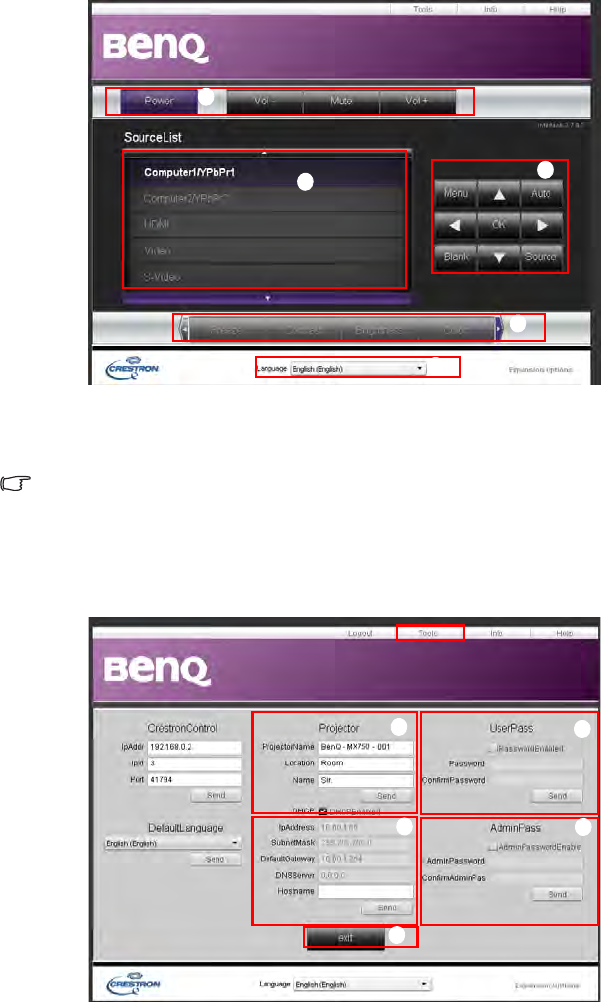
The Crestron page is only available when you are on a Wired LAN network. It also allows
you to control the projector remotely. The Crestron supports RoomView version 6.2.2.9.
Operation 55
i. These buttons function the same as the ones on the OSD menus or remote
control. See "2. PICTURE" on page 76 and "Remote control" on page 13 for
details.
The Menu button can also be used to go back to previous OSD menu, exit and save menu
settings.
ii. To switch input source, click on your desired signal.
iii. You can select a preferred OSD language.
The tools page allows you to manage the projector, configure the LAN control settings and
secure access of remote network operation on this projector.
i
i
i
ii
iii
iii
ii iv
v
i
Operation
56
i. You can name the projector, keep track of its location and the person in charge
of it.
ii. You can adjust the Wired LAN settings.
iii. Once set, access to the remote network operation on this projector has been
password-protected.
iv. Once set, access to the tools page has been password-protected.
After making the adjusents, press the Send button and the data will be saved in the projector.
v. Press exit to go back to the Crestron remote network operation page.
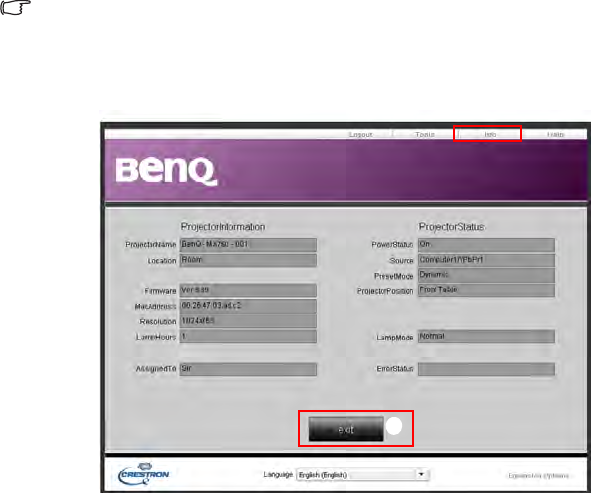
The info page displays the information and status of this projector.
i. Press exit to go back to the Crestron remote network operation page.
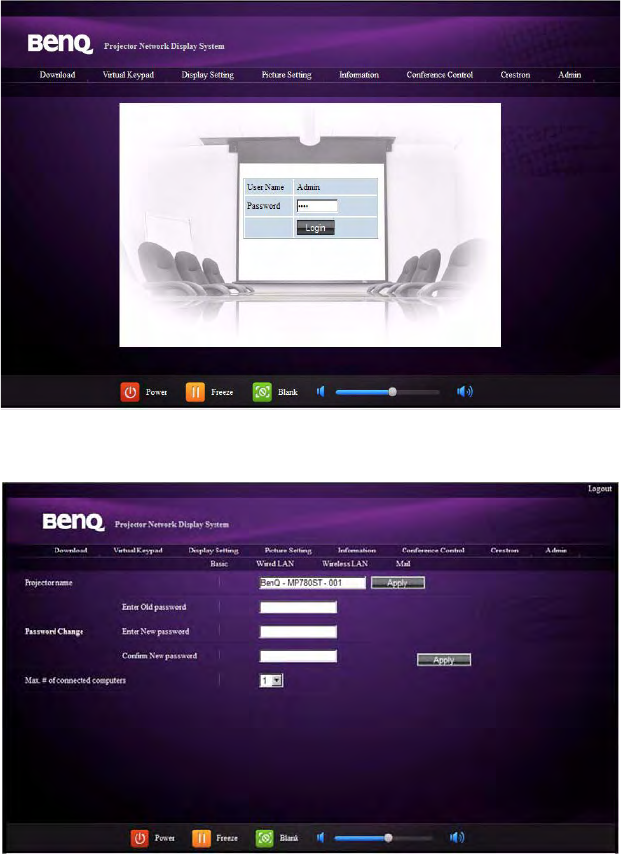
The Admin page allows you to enter Basic, Wired LAN, Wireless LAN and Mail pages
once the password is entered. The default password is “0000”. If you want to change the
password, please enter Basic page.
i
Operation 57
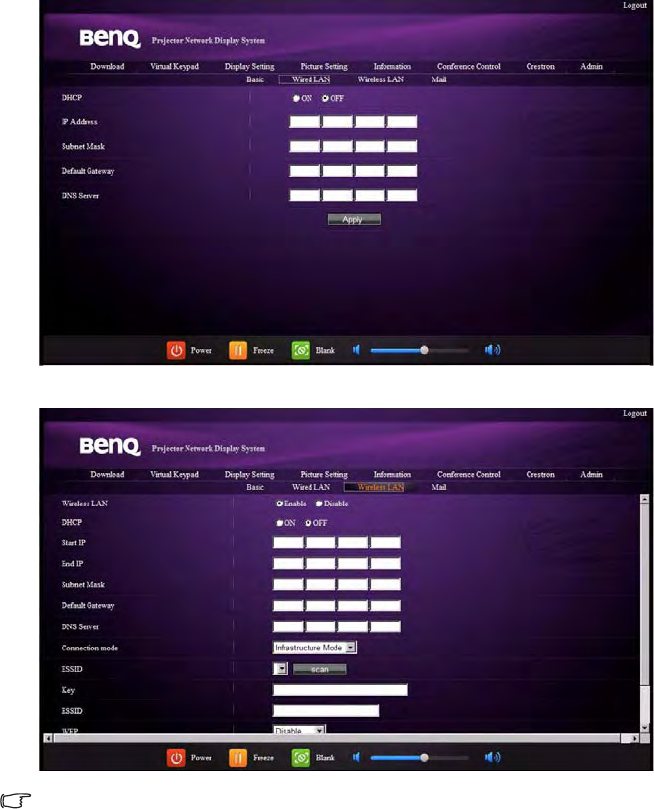
The Basic page allows you to change the password and select connected persons. The
number of connected persons may affect the network display performance.
Operation
58
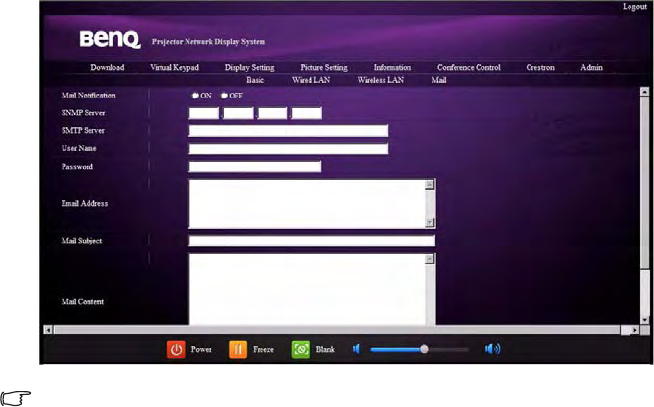
The Wired LAN page allows you to adjust the Wired LAN settings.
The Wireless LAN page allows you to adjust the Wirless LAN settings.
Max. length for SSID string is 16 bytes. Please use a different SSID when more than two
projectors are connecting through wireless LAN.
Operation 59
The Mail page allows you to send alert e-mail to your ITS administrator.
You can first try the Mail Test function to check if the Alert Mail works.

Operation
60
Displaying image through Q Presenter
The Q Presenter is an application running on the host PC. It connects to an available
network display and transfers the desktop contents to the network display via local
network connection.
Be sure to turn off other virtual network control programs before using Q Presenter.
1. Connect the projector with the RJ45 cable, and make sure your laptop or computer
also link to the LAN. See "Configuring the Wired LAN Settings" on page 50 and
"Configuring the Wireless LAN Settings" on page 50 for details.
2. Find the IP address and enter the address of the projector in the address bar of your
browser. See "Controlling the projector remotely through a web browser" on page
51 for details.
3. Download the Q Presenter, unzip it and complete program installation.
4. Once installed, double click the Q Presenter icon. The Q Presenter page appears.
5. Click the Search icon.
The Search page allows you to search and connect a network display.
i. You can key in the IP address (see "Controlling the projector remotely through a
web browser" on page 51 for details.) or just click “Search”.
i
ii
iii
iv
Operation 61
ii. Projectors linked in the LAN will be found. Then select the projector you want
to link.
iii. Click “Connect”. Then you should be able to see the image on projector.
iv. You can click to disconnect all connected projectors..
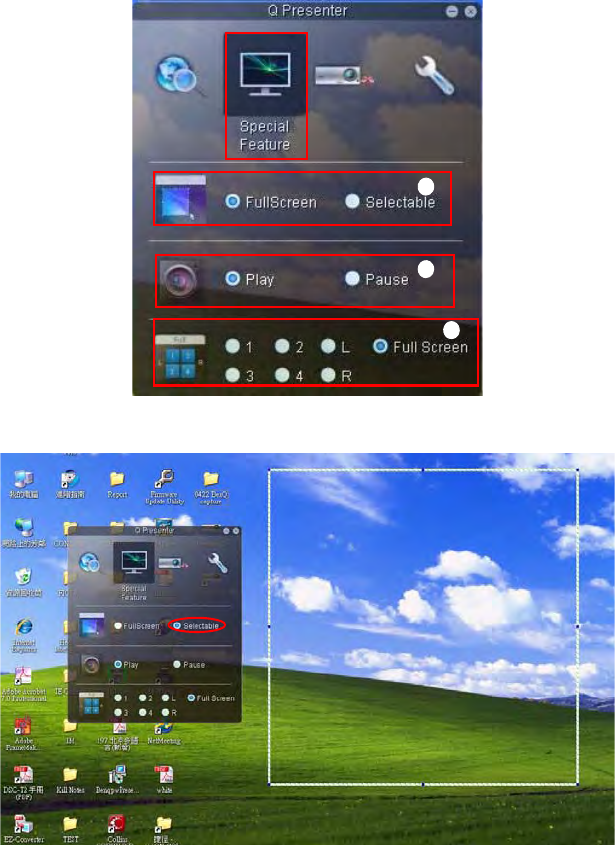
The Special Feature page allows you to have some advanced functions to manage the
display image on your projector.
i. Full Screen: whole image display on the projector. Selectable: a square will pop-
up then you can move and drag the area you want to show the audience.
i
ii
iii
Operation
62
ii. You can select to stop/start displaying desktop contents to connected network
display.
iii. 4-1 Display (up to 4 computers can shoot to 1 projector at the same time). Click
the location you want to display. 4locations can be chosen (1-4) or 2 places (L
and R) if it’s 2 computers. Once you click the place you want to display, the image
appers on th eprojector. You can change th elocation anytime you want, even
back to full screen or blank out.
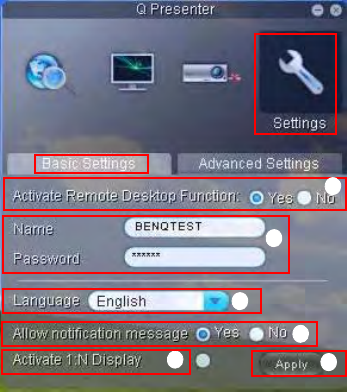
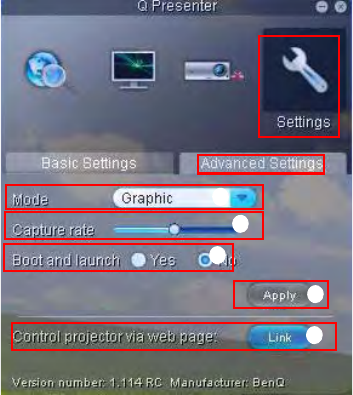
The Basic and Advanced Settings pages allow you to configure the Q Presenter.
i. You can select whether to activate Remote Desktop function. If the Remote
Desktop function is activated, you can change the Name and Password. If it isn’t
activated, the Name and Password will be gray out.
ii. You can set the name and password of the connected computer. The Name must
be eight capital letters from A-Z & 0-9. The Password must be 6 digits from 1 to
4.
iii. When you install the Q Presenter, the program will automatically identify the
language of your computer’s operating system and install the same language as
your operating system. If your language isn’t included, the system will keep
English as the default setting.
iv. You can select whether to allow notification message popup.
v. Once you set to activate 1:N display, 1PC/NB can display up to 8 projectors at
the same time.
vi. Once set, press Apply to save the changes.
i
v
ii
iii
iv
vi
Operation 63
vii. You can select Video or Graphic display mode. Graphic Mode: worse image
quality but faster tramsmission speed. Video Mode: better image quality but
slower transmission speed. However, the actual transmission performance was
determined by the status of network usage at that time.
viii. You can adjust the capture rate. The network bandwidth may also affect the
performance.
ix. You can select whether to automatically open the Q Presenter application when
the computer is powered on.
x. Once set, press Apply to save the changes.
xi. You can link to the BenQ remote network operation page on page 51.
ix
x
xi
vii
viii
Operation
64
Using the Web Control Lock
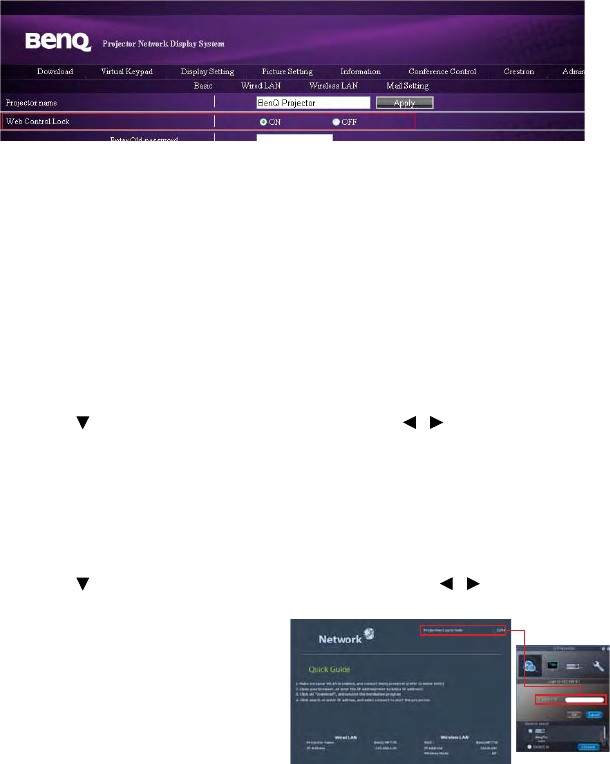
This function is designed to prevent unauthorized people from maliciously changing the
projector settings through the Projector Network Display System.
To enable the function:
1. After your computer is connected to the projector, enter the address of the
projector in the address bar of your browser and press Enter.
2. Go to the Admin page of the Projector Network Display System.
3. Enter the current password.
4. Click ON in the Web Control Lock row.
The next time someone connects to this projector, the Projector Network Display System
page provides limited functions.
To disable the function:
1. Go to the Admin page of the Projector Network Display System.
2. Enter the current password.
3. Click OFF in the Web Control Lock row.
You can also use the OSD menu to toggle this function:
1. Go to the SYSTEM SETUP: Advanced > Security Settings > Change
Security Settings menu after opening the OSD menu system. Press MODE/
ENTER. The message “INPUT PASSWORD” appears. Enter the current password.
2. If the password is correct, the OSD menu returns to the Security Settings page.
Press to highlight Web Control Lock and press / to select On or Off.
Using the Projection Login Code
This function is designed to ensure network display through the correct projector. To
toggle this function:
1. Go to the SYSTEM SETUP: Advanced > Network Settings menu after
opening the OSD menu system. Press MODE/ENTER.
2. Press to highlight Projection Log In Code and press / to select On or
Off.
When this function is on, the projector
generates a random 4-digit code in the
upper right corner when you switch the
source to Network Display. You need to
key in this 4-digit code in the Q
Presenter when connecting to the
projector.

Operation 65
Presenting From a USB Reader
This fature displays a slide show of images stored on a USB flash drive connected to the
projector. It can eliminate the need for a computer source.
Image File Types
USB Reader displays images files in JPEG, GIF, TIFF, PNG and BMP formats.
• A square box will display on the filename for unidentified characters.
• Thai filename is not supported.
• Files in GIF, TIFF, PNG and BMP formats can be displayed for the file size smaller than
WXGA (1280 x 800) only.
• If a folder consists of more than 200 photos, only the first 200 photos can be displayed.
Preparation
To view your pictures as a slideshow, follow these steps:
1. Connect a USB flash drive to your computer and copy files from your computer to
the USB flash drive.
2. Turn on your projector if needed.
3. Remove the USB flash drive from your computer and plug it into the USB TYPE-A
jack of the projector.
4. The thumbnails display.
Controlling USB Reader
While viewing thumbnails:
i. Thumbnails
i
iii iv
ii
Operation
66
ii. Selected folder
iii. Supported file format
iv. Unsupported file format
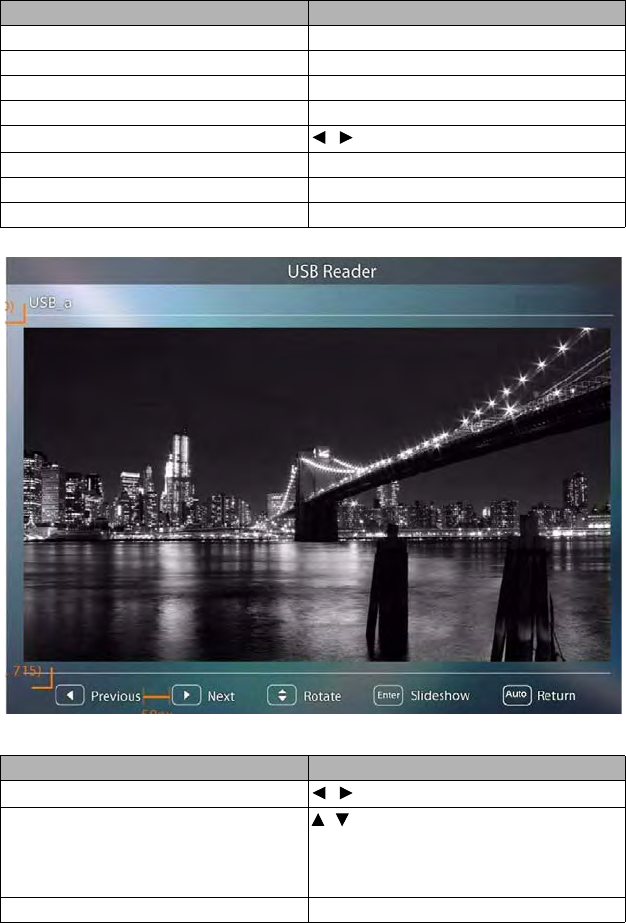
During slideshow:
To Press
open folder Enter
scroll through thumbnails four arrow keys
return to a previous page Auto
exit USB Reader Exit
change to a different page /
go back to the first page of that folder Back
start slide show Slideshow when an image is highlighted.
adjust USB Reader settings Setting
To Press
go to previous or next image /
rotate the image by 90 degree clockwise/
counterclockwise
/
(Rotation is temporary; the image returns to
its original orientation when you go back to
thumbnails)
return to a previous page Auto
Operation 67
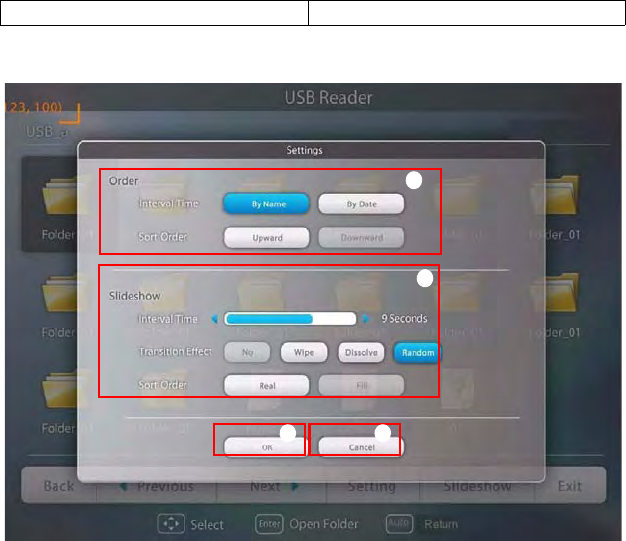
Settings page:
i. You can adjust order settings.
ii. You can adjust Slideshow settings.
iii. Press OK to save the settings.
iv. Press Cancel to ignore the change.
start/stop slideshow Enter
ii
iii iv
i
Operation
68
Remote Desktop Control through Q Presenter
The Q Presenter can proceed the Remote Desktop Control (RDC) the host PC from
projector site.
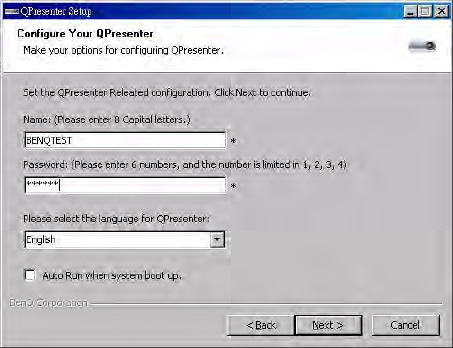
1. Setup the RDC login account (User name and Password ) in Q Presenter.
• Name: must be 8 English capital letters A~Z and number 0 ~9.
• Password: must be 6 digits and limit the range from 1~4.
• If there are lot of audience is watching the display while the user is entering the
password, the number will be transferred to up, left, down, right in order from 1
to 4 of remote control’s or projector’s keypads .
• If multiple same Q Presenter names are found, an error like “duplicate” is
displayed in projector OSD.
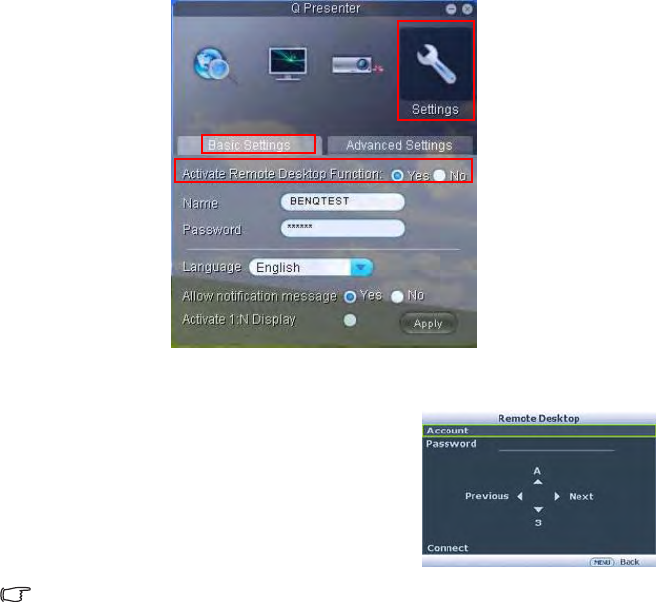
2. Activate Remote Desktop Control Function in Q Presenter > Settings > Basic
Settings.
Operation 69
3. Open the OSD menu and go to the SYSTEM SETUP: Advanced > Network
Settings menu. Press MODE/ENTER.
4. Highlight Remote Desktop and press MODE/
ENTER.
5. Enter the Account and Password the same as
step 1.
6. Highlight Connect and press MODE/ENTER
to connect the selected PC.
7. Connect USB keyboard or mouse to control the
host PC’s desktop through the projector.
• Remote Desktop Control does not support PC Standby mode.
• Remote Desktop Control only supports LAN source so the projector source is fixed on
LAN.
Operation
70
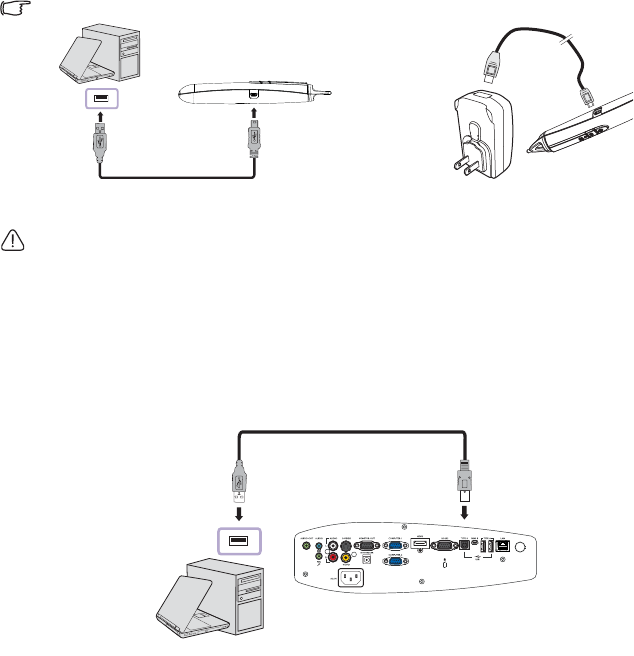
PointDraw™ Pen 2.0
The PointDraw™ pen works like a wireless mouse - but one that works in midair, not on
your desktop. Just hold the pen in your hand, and point it at the projected image to point,
click and drag.
1. Make sure the PointDraw™ pen’s battery is charged.
The charging time will take approximate 2.5 hours and will allow 30-35 hours of pen use.
• Do not use the PointDraw™ pen while the pen’s battery is charging.
• Do not disassemble the PointDraw™ pen yourself. Refer all servicing to qualified service
personnel.
• The lithium battery is only rechargeable, and not user replaceable. Not user serviceable.
2. Connect the projector and your computer with the supplied USB B type to A type
cable. If a pop-up window appears on the computer’s screen for requiring to provide
a driver, please use the original driver in your computer or the driver recommended
by your computer.
3. Turn on the projector and make sure it's displaying the computer's screen - set the
source to VGA 1, VGA 2, or HDMI (press SOURCE button on the projector or
remote control if needed - you may need to press it several times).
4. Point the pen at the screen to point, click, and drag - just like a normal mouse.
PUSH
PUSH
or
USB mini-B type to A type cable
Operation 71
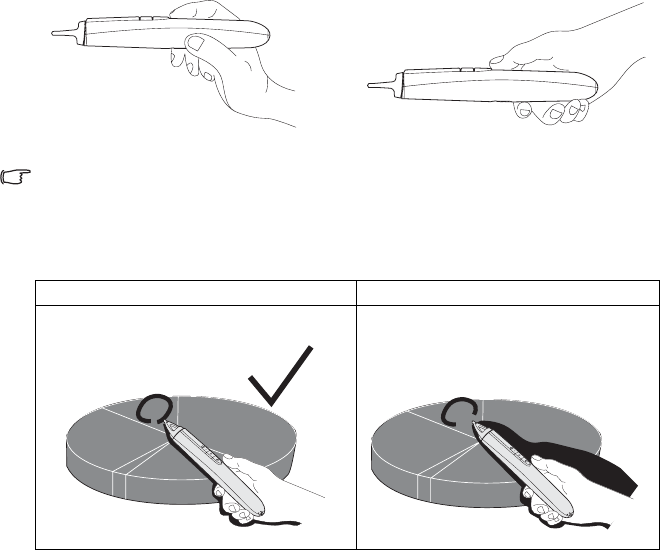
How to hold the PointDraw™ pen 2.0
You can hold the PointDraw™ the way you would hold a normal pencil or pen, or you can
hold it like a remote control - use in whichever position is most comfortable.
If the PointDraw™ pen is far away from the screen, be sure to press the left mouse button to
click and drag.
Avoid shadows!
The PointDraw™ pen won't work if its tip is in a shadow or if it is pointing at a shadow:
or
Correct (no shadow) Incorrect (shadow)
28%
12%
28%
28%
28%
12%
28%
X
28%
Operation
72
PointDraw™ pen 2.0 features
Dual Pen operation
Now, MP780 ST+/MW860USTi is ready for PointDraw™ pen 2.0 and support up to two
pens.
For Installing Q Draw software
1. Please ensure the BenQ projector is connected with the computer.
2. Please go to “System Setup: Basic” on projector OSD menu and change the
PointDraw™ to “Dual Pen” for dual pen function activation.
MP780 ST+/MW860USTi can select three PointDraw™ modes via OSD menu setting.
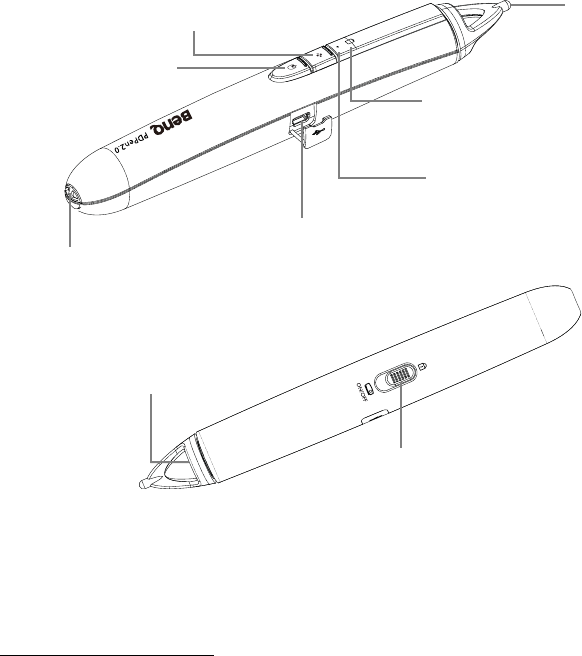
You can go to:
Right mouse button/
Color selection
Left mouse button
Tip
Battery status indicator
Solid Red: Battery charging
Blinking: Low battery
Connection indicator
Solid Blue: Paired with BenQ
projector
Blinking: Attempt to pair
with the projector
USB connector
Wrist strap holder
Projector’s On/Off switch
Sensor
Operation 73
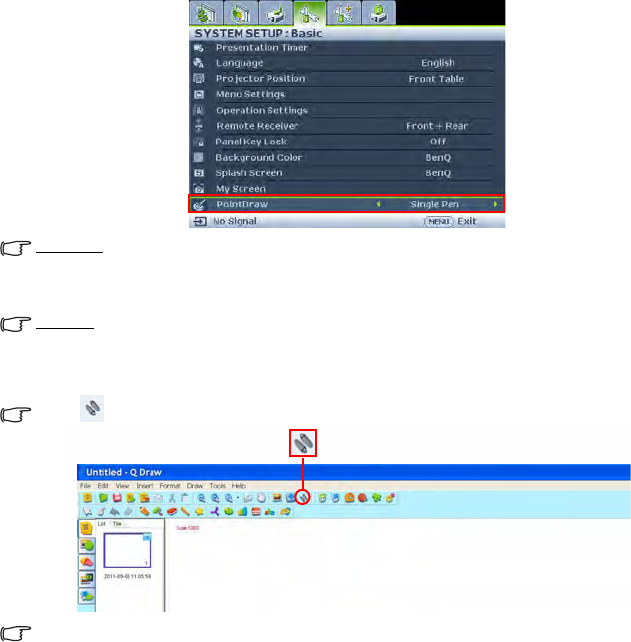
System Setup: Basic →PointDraw™ to select "Dual Pen", "Single Pen", or "Off".
Single Pen
For optimized interactive speed, it is recommended to select “Single Pen” in PointDraw™
settings.
Dual Pen
Please go to “System Setup: Basic” on projector OSD menu and change the PointDraw™ to
“Dual Pen” for dual pen function activation.
Select icon on Q Draw 2.0 software for dual pen feature activation.
When switching between PointDraw™ modes, it will take about 30 seconds to re-flash modes,
the delay time depends on computer response time.
Troubleshooting
• If the pen doesn't work at all, or it works intermittently, try one of these solutions:
- If the pen's battery light is blinking or lit, then the pen's battery is fully discharged;
connect the pen to the USB power adapter or your computer.
- Make sure the pen is not pointing at a shadow and make sure its tip is not in a
shadow.
- If the room is brightly lit, reduce the room illumination.
- If you're trying to use the computer's mouse at the same time as the pen, point the
pen away from the screen while using the mouse.
• If accurate clicking is difficult, hold the pen steadier when clicking.
• If the mouse pointer is in the wrong place on the screen, or the mouse pointer's
movement is restricted to only part of the screen, make sure your projector is
displaying the computer's screen and not some other source (such as DVD, VCR, etc.).
To change the source, press the SOURCE button on the projector or remote control.
Operation
74
• If the pen has the gap problem between the tip and the cursor on your Apple
computers, install the scaling fix that came with the user manual CD-ROM:
i. Mount the "ScalingFix.dmg" disk image - just double-clicking the file should
auto-mount it.
ii. If you don't see the file on the "ScalingFix" volume, you may need to double-click
the disk image icon on the desktop.
iii. Double-click "PointDraw Scaling Fix". The installer should run, follow the
prompts.
iv. Right-click on the "ScalingFix" disk image icon on the desktop, and choose
"Eject" to un-mount the volume.
v. If the USB device is already plugged-in, you'll need to un-plug and re-plug it in.
It is suggested to install the “ScalingFix.dmg” file on MAC OS 10.5.0 or higher.
PointDraw™ pen 2.0 specifications
Operation frequency 2.4 GHz ISM Band
Rechargeable battery
Model name
Normal voltage
Normal capacity
1 pcs
CR17360A
3.6V
780 mAh
Storage temperature -10°C-60°C
Operation temperature 0°C-40°C
Operation humidity 20%-85% (ambient temperature<40°C)
Power consumption DC3.3V, 35 mA (operation)
Dimensions Length*Diameter=204*30 (mm)
Weight 72g
Operation 75
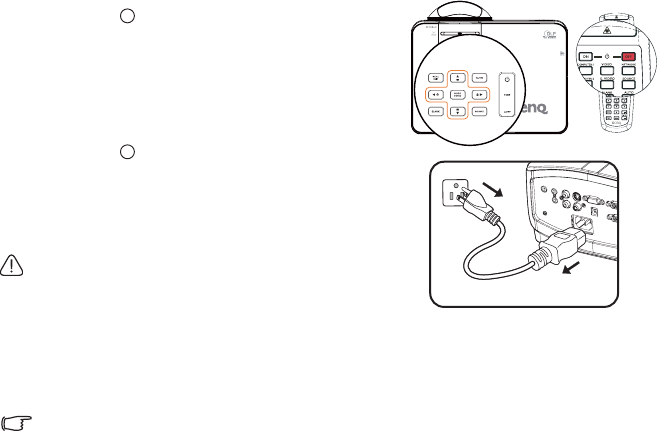
Shutting down the projector
1. Press Power on the projector. A
confirmation message displays prompting you.
If you don't respond in a few seconds, the
message will disappear. If you use the remote
control, press OFF to shut down the
projector.
2. Press Power on the projector a second
time. The POWER indicator light flashes
orange, the projection lamp shuts down, and
the fans will continue to run to cool down the
projector.
To protect the lamp, the projector will not respond to
any commands during the cooling process.
3. Once the cooling process finishes, the
POWER indicator light is a steady orange
and fans stop.
4. Disconnect the power cord from the power putlet if the projector will not be used
in an extended period of time.
• If the projector is not properly shut down, to protect the lamp, when you attempt to re-start
the projector, the fans will run for a few minutes to cool down. Press Power again to start
the projector after the fans stop and the POWER indicator light turns orange.
• Actual lamp lives may vary due to different environmental conditions and usage.
I
I
I
I

Operation
76
Menu operation
Menu system
Please note that the on-screen display (OSD) menus vary according to the signal type
selected.
Main menu Sub-menu Options
1.
DISPLAY
Wall Color Off/Light Yellow/Pink/Light Green/
Blue/Blackboard
Aspect Ratio Auto/Real/4:3/16:9/16:10
Auto Keystone On/Off
Keystone
Position
Phase
H. Size
Digital Zoom
3D Sync On/Off
3D Sync Invert Disable/Invert
2.
PICTURE
Picture Mode Dynamic/Presentation/sRGB/Cinema/User 1/User 2
Reference Mode Dynamic/Presentation/sRGB/Cinema
Brightness
Contrast
Color
Tint
Sharpness
Brilliant Color On/Off
Color
Temperature T1/T2/T3/T4
3D Color
Management
Primary Color R/G/B/C/M/Y
Hue
Saturation
Gain
Save Settings
3. SOURCE Quick Auto Search On/Off
Color Space Conversion Auto/RGB/YUV

Operation 77
4.
SYSTEM
SETUP:
Basic
Presentation
Timer
Timer period 1~240 minutes
Timer display Always/Last 1 Min/Last 2 Min/Last
3 Min/Never
Timer position Top-Left/Bottom-Left/Top-Right/
Bottom-Right
Timer counting
direction Count Down/Count Up
Sound Reminder On/Off
On/Off
Language
Projector Position Front Table/Rear Table/Rear
Ceiling/Front Ceiling
Menu Settings
Menu display time 5 sec/10 sec/15 sec/20 sec/25 sec/
30 sec
Menu position Center/Top-left/Top-right/Bottom-
right/Bottom-left
Reminder
Message On/Off
Operation
Settings
Direct Power On On/Off
Auto Power Off Disable/5 min/10 min/15 min/20
min/25 min/30 min
Blank Timer Disable/5 min/10 min/15 min/20
min/25 min/30 min
Sleep Timer Disable/30 min/1 hr/2 hr/3 hr/4 hr/
8 hr/12 hr
Remote
Receiver Front+Rear/Front/Rear
Panel Key Lock On/Off Ye s / N o
Background
Color BenQ/Black/Blue/Purple
Splash Screen BenQ/MyScreen/Black/Blue
MyScreen Capture Yes/No
PointDraw™Single Pen/Dual
Pen/Off
English/Français/Deutsch/Italiano/
Español/Русский/ᓄវ͛̚/ᖎᩄ͛̚0
͟ώᄬ0䚐ạ㛨/Svenska/Nederlands/
Türkçe/Čeština/Português/ไทย/Polski/
Magyar/Hrvatski/Română/Norsk/
Dansk/Български/Suomi/Indonesia/
Ελληνικά

Operation
78
5.
SYSTEM
SETUP:
Advanced
Quick Cooling On/Off
High Altitude Mode On/Off
Audio Settings
Mute On/Off
Volume
Microphone
Volume
Power on/off Ring
Tone On/Off
Lamp Settings
Lamp Mode Normal/Economic
Reset lamp timer
Equivalent lamp hour
Security
Settings
Change password
Change Security
Settings
Power on Lock
Splash Screen On Lock
Web Control Lock
Baud Rate 2400/4800/9600/14400/19200/
38400/57600/115200
Test Pattern On/Off
Closed Caption
Closed Caption
Enable On/Off
Caption Version CC1/CC2/CC3/CC4
Standby
Settings
Network On/Off
Microphone On/Off
Monitor Out On/Off
Network
Settings
Wired LAN
Status
DHCP
IP Address
Subnet Mask
Default Gateway
DNS
Apply
Wireless LAN
Status
SSID
IP Address
Connection Mode
Remote Desktop
Account
Password
Connect
Projection Log in
code On/Off
Reset All
Settings

Operation 79
Note that the menu items are available when the projector detects at least one valid signal.
If there is no equipment connected to the projector or no signal detected, limited menu
items are accessible.
6.
INFORMA
TION
FAQ-Image and Installation
FAQ-Features and Service
Current System Status
Source
Picture Mode
Resolution
Color System
Equivalent Lamp Hour
Firmware Version
Operation
80
Description of each menu
• The default values listed in this manual, especially on pages 80-89, are for reference only.
They may vary between the projectors due to the continuous improvement to the
products.
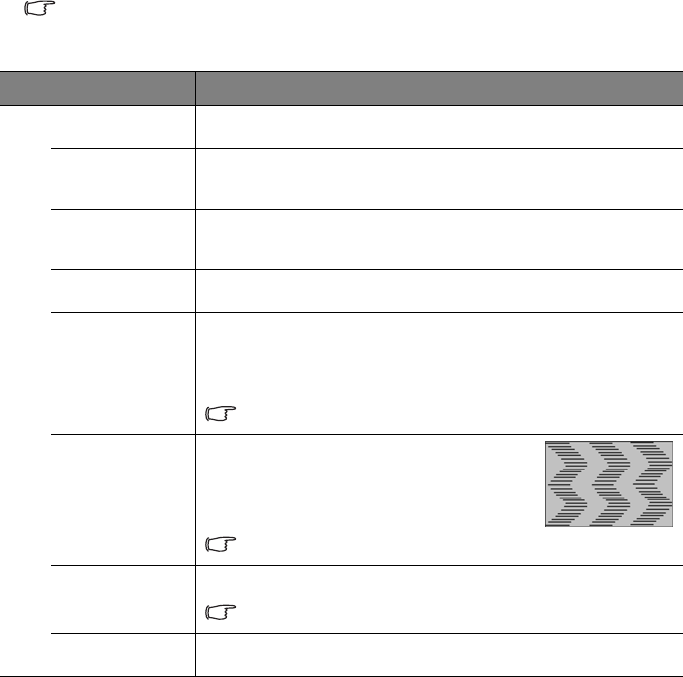
FUNCTION DESCRIPTION
Wall Color Corrects the projected picture’s color when the projection surface is
not white. See "Using Wall Color" on page 41 for details.
Aspect Ratio There are four options to set the image's aspect ratio depending on
your input signal source. See "Selecting the aspect ratio" on page 39
for details.
Auto
Keystone
Auto corrects any keystoning of the image.
Keystone Corrects any keystoning of the image. See "Correcting keystone" on
page 33 for details.
Position
Displays the position adjusent page. To move the projected image,
use the directional arrow keys. The values shown on the lower
position of the page change with every key press you made until they
reach their maximum or minimum.
This function is only available when a PC signal (analog RGB) is
selected.
Phase
Adjusts the clock phase to reduce image
distortion.
This function is only available when a PC
signal (analog RGB) is selected.
H. Size
Adjusts the horizontal width of the image.
This function is only available when a PC signal (analog RGB) is
selected.
Digital Zoom Magnifies or reduces the projected image. See "Magnifying and
searching for details" on page 38 for details.
1. DISPLAY menu
Operation 81
FUNCTION DESCRIPTION
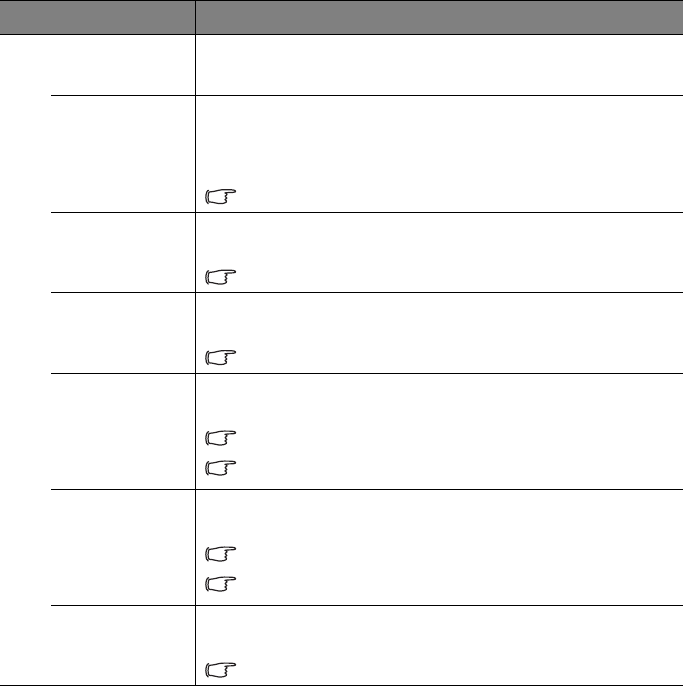
3D Sync
This projector features a 3D function which enables you to enjoy the
3D movies, videos, and sporting events in a more realistic way by
presenting the depth of the images. You need to wear a pair of 3D
glasses to view the 3D images.
• For a PC type signal:
When the vertical frequency is 120Hz, and the content being
projected is made with 3D technology, selecting On will present the
3D images.
When the input signal is PC@120Hz, 3D sync will be enabled
automatically.
• For a video type signal:
When the content being projected is made with 3D technology,
selecting On will present the 3D images.
When 3D Sync function is enabled, the projector will enter a special
picture mode and the current picture mode adjusent will be disabled.
This function is only enabled when the input signal is PC@120Hz,
60Hz@Video and S-video.
3D Sync
Invert
When you discover the inversion of the image depth, enable this
function to correct the problem.
This function is only enabled when the input signal is PC@120Hz,
Video and S-video.
1. DISPLAY menu
Operation
82
FUNCTION) DESCRIPTION
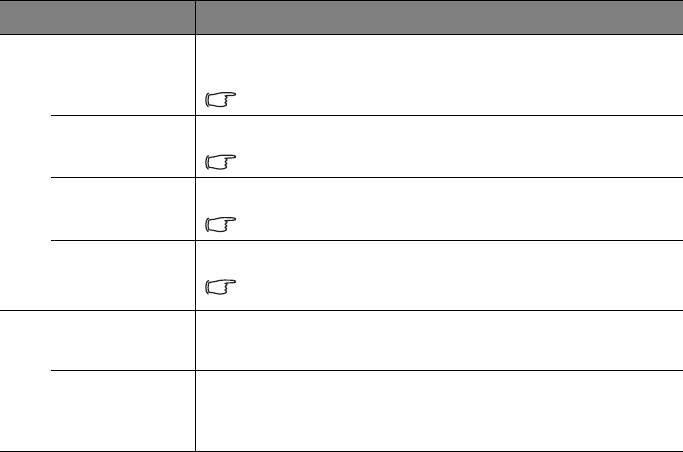
Picture Mode Pre-defined picture modes are provided so you can optimize your
projector image set-up to suit your program type. See "Selecting a
picture mode" on page 40 for details.
Reference
Mode
Selects a picture mode that best suits your need for the image quality
and further fine-tune the image based on the selections listed on the
same page below. See "Setting the User 1/User 2 mode" on page 41
for details.
This function is only available when User 1 or User 2 is selected.
Brightness
Adjusts the brightness of the image. See "Adjusting Brightness" on
page 41 for details.
This function is only available when User 1 or User 2 is selected.
Contrast
Adjusts the degree of difference between dark and light in the image.
See"Adjusting Contrast" on page 41 for details.
This function is only available when User 1 or User 2 is selected.
Color
Adjusts the color saturation level -- the amount of each color in a
video image. See "Adjusting Color" on page 41 for details.
This function is only available when User 1 or User 2 is selected.
This function is only available when a Video or S-Video signal is
selected and the system format is NTSC or PAL.
Tint
Adjusts the red and green color tones of the image. See "Adjusting
Tint" on page 41 for details.
This function is only available when User 1 or User 2 is selected.
This function is only available when a Video or S-Video signal is
selected and the system format is NTSC or PAL.
Sharpness
Adjusts the image to make it look sharper or softer. See "Adjusting
Sharpness" on page 42 for details.
This function is only available when User 1 or User 2 is selected.
2. PICTURE menu
Operation 83
FUNCTION DESCRIPTION
Brilliant
Color
Adjusts white peaking while maintaining correct color presentation.
See "Adjusting Brilliant Color" on page 42 for details.
This function is only available when User 1/2 is selected.
Color
Temperature
See "Selecting a Color Temperature" on page 42 for details.
This function is only available when User 1/2 is selected.
3D Color
Management
See "3D Color Management" on page 42 for details.
This function is only available when User 1/2 is selected.
Save Settings
Saves the settings made for User 1 or User 2 mode.
This function is only available when User 1/2 is selected.
Quick Auto
Search
See "Switching input signal" on page 37 for details.
Color Space
Conversion
See "Changing Color Space" on page 37 for
details.
2. PICTURE menu 3. SOURCE
menu

Operation
84
FUNCTION DESCRIPTION
Presentation
Timer
Reminds the presenter to finish the presentation within a certain
time frame. See "Setting the presentation timer" on page 45 for
details.
Timer period
Sets a preferred length of time for presentation.
Timer display
Sets whether to display the timer on screen.
Timer position
Sets the position where the timer displays on screen.
Timer counting direction
Sets the timer counting direction.
Sound Reminder
Sets a sound reminder if timer is up.
Language Sets the language for the On-Screen Display (OSD) menus. See
"Using the menus" on page 34 for details.
Projector
Position
The projector can be installed on a ceiling or behind a screen, or with
one or more mirrors. See "Choosing a location" on page 16 for
details.
Menu
Settings
Menu display time
Sets the length of time the OSD will remain active after your last key
press. The range is from 5 to 30 seconds in 5-second increments.
Menu position
Sets the On-Screen Display (OSD) menu position.
Reminder Message
Sets whether to display the reminder message.
Operation
Settings
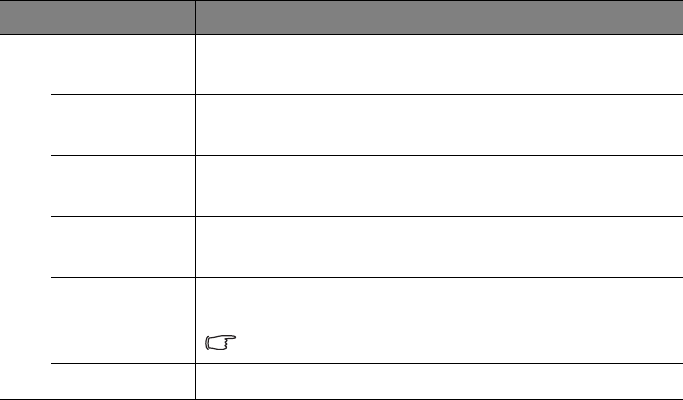
Direct Power On
Selecting On enables the function. See "Starting up the projector" on
page 30 for details.
Auto Power Off
Allows the projector to turn off automatically if no input signal is
detected after a set period of time. See "Setting Auto Power Off" on
page 91 for details.
Blank Timer
Sets the image blank time when the Blank feature is activated, once
elapsed the image will return to the screen. See "Hiding the image"
on page 46 for details.
Sleep Timer
Sets the auto-shutdown timer. The timer can be set to a value
between 30 minutes and 12 hours.
4. SYSTEM SETUP:
Basic menu
Operation 85
FUNCTION DESCRIPTION
Remote
Receiver
Sets which IR remote sensor of the projector will receive the signal
from the remote control.
Panel Key
Lock
Disables or enables all panel key functions except Power on the
projector and keys on the remote control. See "Locking control
keys" on page 47 for details.
Background
Color
Allows you to select which background color will display when no
signal is input into the projector. Four options are available: BenQ
logo, Black, Blue, or Purple.
Splash Screen Allows you to select which logo screen will display during projector
start-up. Four options are available: BenQ logo, MyScreen, Black, or
Blue.
MyScreen
Captures and stores the projected picture as My Screen. See
"Creating your own startup screen" on page 44 for details.
In the unlikely event that the capturing action fails, change your
target picture.
PointDraw™See "PointDraw™ Pen 2.0" on page 70 for details.
4. SYSTEM SETUP:
Basic menu

Operation
86
FUNCTION DESCRIPTION
Quick
Cooling
Selecting On enables the function and the projector cooling time will
be shortened to a few seconds.
If you attempt to restart the projector right after the quick
cooling process, it may not be turned on successfully and will
rerun its cooling fans.
High Altitude
Mode
A mode for operation in high altitude areas. See "Operating in a high
altitude environment" on page 48 for details.
Audio
Settings
Allows you to enter the audio setting menu. See "Adjusting the
sound" on page 48 for details.
Mute
Sets the mute function.
Volume
Adjusts the audio volume level.
Microphone volume
Adjusts the microphone sound level.
Power on/off Ring Tone
Sets the power on/off ring tone.
Lamp
Settings
Lamp Mode
See "Setting Lamp Mode as Economic" on page 91 for details.
Reset lamp timer
See "Resetting the lamp timer" on page 95 for details.
Equivalent lamp hour
See "Getting to know the lamp hour" on page 91 for details on
how the total lamp hour is calculated.
Security
Settings
Change password
You will be asked to enter the current password before changing to a
new one.
Change Security Settings
Power on Lock
See "Securing the projector" on page 35 for details.
Splash Screen On Lock
When Splash screen lock is activated, My Screen cannot be used
unless the correct password is entered every time when you attempt
to capture screen.
Web Control Lock
See "Presenting From a USB Reader" on page 65 for details.
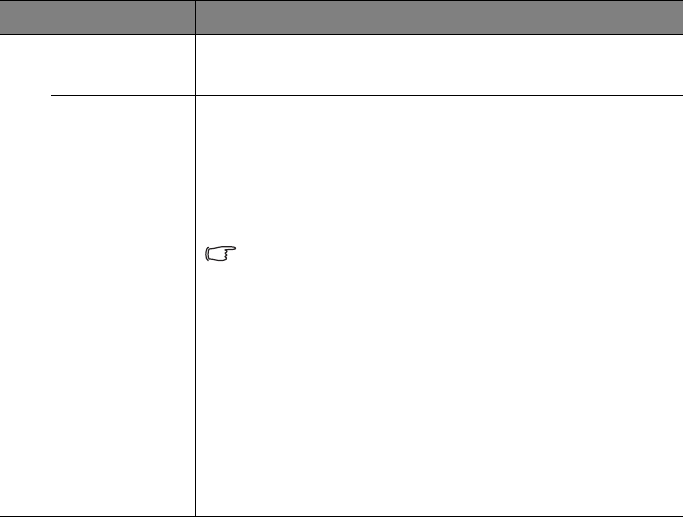
Baud Rate Selects a baud rate that is identical with your computer’s so that you
can connect the projector using a suitable RS-232 cable. This function
is intended for qualified service personnel.
5. SYSTEM SETUP: Advanced menu
Operation 87
FUNCTION DESCRIPTION
Test Pattern Selecting On enables the function and the projector displays the grid
test pattern. It helps you adjust the image size and focus and check
that the projected image is free from distortion.
Closed
Caption
Closed Caption Enable
Activates the function by selecting On when the selected input signal
carries closed captions.
• Captions: An on-screen display of the dialogue, narration, and
sound effects of TV programs and videos that are closed
captioned (usually marked as "CC" in TV listings).
Set your screen aspect ratio to 4:3. This function is not available
when the aspect ratio is “16:9”, “16:10” or “Real”.
Caption Version
Selects a preferred closed captioning mode. To view captions, select
CC1, CC2, CC3, or CC4 (CC1 displays captions in the primary
language in your area).
5. SYSTEM SETUP: Advanced menu
Operation
88
FUNCTION DESCRIPTION
Standby
Settings
Network
Selecting On enables the function, and the projector can be
monitored or controlled over a network when it is in standby mode.
Microphone
Selecting On enables the function, and the microphone can be used
even in standby mode
Monitor Out
Selecting On enables the function. The projector can output a VGA
signal when it is in standby mode and the COMPUTER 1 and
MONITOR OUT jacks are correctly connected to devices. See
"Connecting a monitor" on page 25 for how to make the connection.
Enabling this function slightly increases the standby power
consumption.
The Monitor Out only works when an appropriate D-Sub input is
made to the COMPUTER 1 jack.
Network
Settings
Wired LAN
See "Controlling the projector through a LAN environment" on page
50 for details.
Wireless LAN
See "Controlling the projector through a LAN environment" on page
50 for details.
Remote Desktop
See "Displaying image through Q Presenter" on page 60 for details.
Projection Log in code
See "Using the Projection Login Code" on page 64 for details.
Reset All
Settings
Returns all settings to the factory preset values.
The following settings will still remain: Position, Phase, H. Size,
User 1, User 2, Language, Projector Position, High Altitude
Mode, Security Settings, Baud Rate.
5. SYSTEM SETUP: Advanced menu

Operation 89
FUNCTION DESCRIPTION
FAQ-Image
and
Installation
Displays possible solutions to problems you may encounter.
FAQ-
Features and
Service
Current
System
Status
Source
Shows the current signal source.
Picture Mode
Shows the selected mode in the PICTURE menu.
Resolution
Shows the native resolution of the input signal.
Color System
Shows input system format, NTSC, PAL, SECAM, or RGB.
Equivalent Lamp Hour
Displays the number of hours the lamp has been used.
Firmware Version
Shows firmware version.
6. INFORMATION menu

Maintenance
90
Maintenance
Care of the projector
Your projector needs little maintenance. The only thing you need to do on a regular basis is to
keep the lens and case clean.
Never remove any parts of the projector except the lamp. Contact your dealer if other
parts need replacing.
Cleaning the lens
Clean the lens whenever you notice dirt or dust on the surface.
• Use a canister of compressed air to remove dust.
• If there is dirt or smears, use lens-cleaning paper or moisten a soft cloth with lens
cleaner and gently wipe the lens surface.
• Never use any type of abrasive pad, alkaline/acid cleaner, scouring powder, or volatile
solvent, such as alcohol, benzene, thinner or insecticide. Using such materials or
maintaining prolonged contact with rubber or vinyl materials may result in damage to
the projector surface and cabinet material.
Never rub the lens with abrasive materials.
Cleaning the projector case
Before you clean the case, turn the projector off using the proper shutdown procedure as
described in "Shutting down the projector" on page 75 and unplug the power cord.
• To remove dirt or dust, wipe the case with a soft, lint-free cloth.
• To remove stubborn dirt or stains, moisten a soft cloth with water and a neutral pH
detergent. Then wipe the case.
Never use wax, alcohol, benzene, thinner or other chemical detergents. These can damage the
case.
Storing the projector
If you need to store the projector for an extended time, please follow the instructions below:
• Make sure the temperature and humidity of the storage area are within the
recommended range for the projector. Please refer to "Specifications" on page 98 or
consult your dealer about the range.
• Retract the adjuster feet.
• Remove the battery from the remote control.
• Pack the projector in its original packing or equivalent.
Transporting the projector
It is recommended that you ship the projector with its original packing or equivalent.
Maintenance 91
Lamp information
Getting to know the lamp hour
When the projector is in operation, the duration (in hours) of lamp usage is automatically
calculated by the built-in timer. The method of calculating the equivalent lamp hour is as
follows:
Total (equivalent) lamp hour
= 1 (hours used in Economic mode) + 4/3 (hours used in normal mode)
See "Setting Lamp Mode as Economic" below for more information on Economic mode.
The lamp hour in Economic mode is calculated as 3/4 of that in Normal mode. That is, using the
projector in Economic mode helps to extend the lamp hour by 1/3.
To obtain the lamp hour information:
1. Press MENU/EXIT and then press / until the SYSTEM SETUP: Advanced
menu is highlighted.
2. Press to highlight Lamp Settings and press MODE/ENTER. The Lamp
Settings page displays.
3. You will see the Equivalent lamp hour information displaying on the menu.
4. To leave the menu, press MENU/EXIT.
You can also get the lamp hour information on the INFORMATION menu.
Extending lamp life
The projection lamp is a consumable item. To keep the lamp life as long as possible, you can do
the following settings via the OSD menu.
Setting Lamp Mode as Economic
Using Economic mode reduces system noise and power consumption by 20%. If the
Economic mode is selected, the light output will be reduced and result in darker
projected pictures.
Setting the projector in Economic mode also extends the lamp operation life. To set
Economic mode, go into the SYSTEM SETUP: Advanced > Lamp Settings >
Lamp Mode menu and press / .
Setting Auto Power Off
This function allows the projector to turn off automatically if no input source is detected
after a set period of time to prevent unnecessary waste of lamp life.
To set Auto Power Off, go into the SYSTEM SETUP: Basic > Operation Settings >Auto Power
Off menu and press / . The time period can be set from 5 to 30 minutes in 5-minute
increments. If the preset time lengths are not suitable for your presentation, select Disable. The
projector will not automatically shut down in a certain time period.
Maintenance
92
Timing of replacing the lamp
When the Lamp indicator lights up red or a message appears suggesting it is time to replace the
lamp, please install a new lamp or consult your dealer. An old lamp may cause a malfunction in
the projector and in some instances the lamp may explode.
The Lamp indicator light and Temperature warning light will light up if the lamp becomes too
hot. See "Indicators" on page 96 for details.
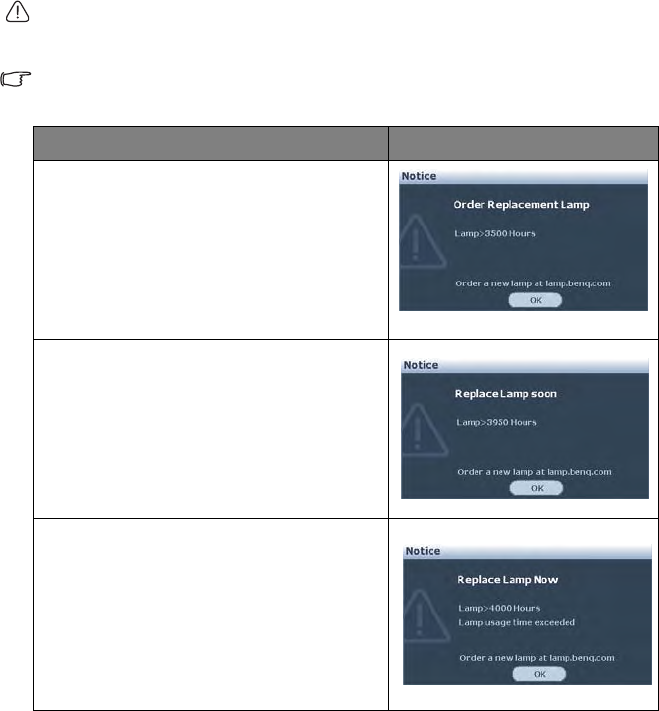
The following lamp warning displays will remind you to change the lamp.
The warning messages below are for reference only. Please follow the actual on-screen
instructions to prepare and replace the lamp.
Status Message
Install a new lamp for optimal performance. If the
projector is normally run with Economic selected
(see "Getting to know the lamp hour" on page 91),
you may continue to operate the projector until the
next lamp warning appears.
Press ENTER to dismiss the message.
It is strongly recommended that you replace the
lamp at this stage. The lamp is a consumable item.
The lamp brightness diminishes with use. This is a
normal lamp behavior. You can replace the lamp
whenever you notice that the brightness level has
significantly diminished.
Press ENTER to dismiss the message.
The lamp MUST be replaced before the projector
will operate normally.
Press ENTER to dismiss the message.
Maintenance 93
Replacing the lamp
• Hg - Lamp contains mercury. Manage in accordance with local disposal laws. See
www.lamprecycle.org.
• If lamp replacement is performed while the projector is suspended upside-down from the
ceiling, make sure that no one is underneath the lamp socket to avoid any possible injury or
damage to the human eyes caused by fractured lamp.
• To reduce the risk of electrical shock, always turn the projector off and disconnect the power
cord before changing the lamp.
• To reduce the risk of severe burns, allow the projector to cool for at least 45 minutes before
replacing the lamp.
• To reduce the risk of injuries to fingers and damage to internal components, use caution
when removing lamp glass that has shattered into sharp pieces.
• To reduce the risk of injuries to fingers and/or compromising image quality by touching the
lens, do not touch the empty lamp comparent when the lamp is removed.
• This lamp contains mercury. Consult your local hazardous waste regulations to dispose of
this lamp in a proper manner.
• To assure optimal performance from the projector, it is recommended that you purchase a
BenQ projector lamp for lamp replacement.
1. Turn the power off and disconnect the projector from the power outlet. If the lamp
is hot, avoid burns by waiting for approximately 45 minutes until the lamp has cooled.
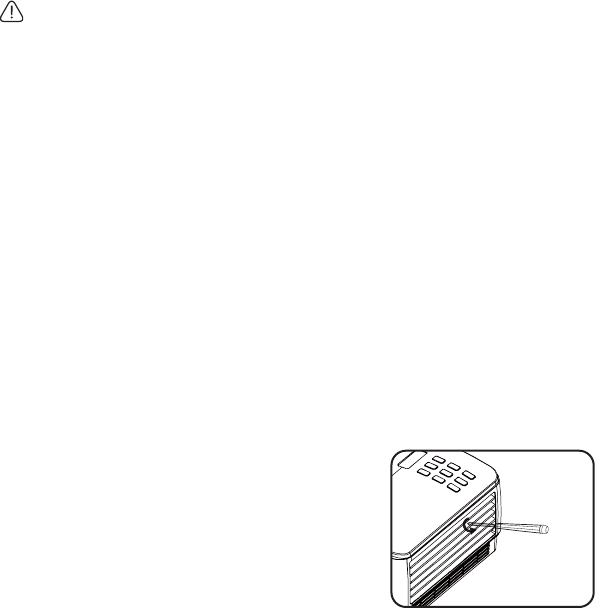
2. Loosen the screw on the lamp cover.
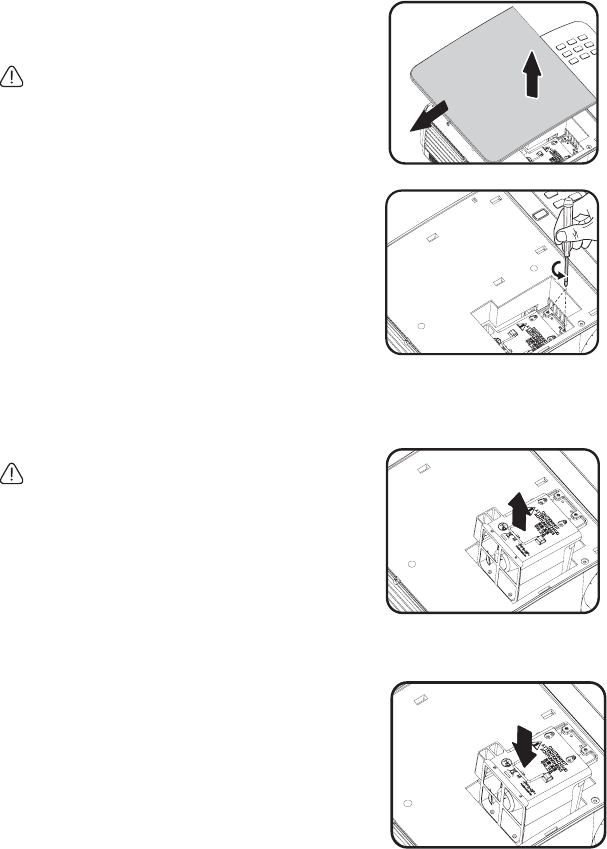
Maintenance
94
3. Remove the lamp cover by (a) sliding
the cover toward the side of the
projector and (b) lifting it off.
• Do not turn the power on with the lamp
cover removed.
• Do not insert your fingers between the
lamp and the projector. The sharp edges
inside the projector may cause injuries.
4. Loosen the screws that secure the
lamp.
5. Lift the handle so that it stands up. Use
the handle to slowly pull the lamp out
of the projector.
• Pulling it too quickly may cause the lamp to
break and scatter broken glass in the
projector.
• Do not place the lamp in locations where
water might splash on it, children can reach
it, or near flammable materials.
• Do not insert your hands into the projector
after the lamp is removed. If you touch the
optical components inside, it could cause
color unevenness and distortion of the
projected images.
6. Insert the new lamp into the lamp
comparent and make sure it fits in the
projector.
(b)
(a)
Maintenance 95
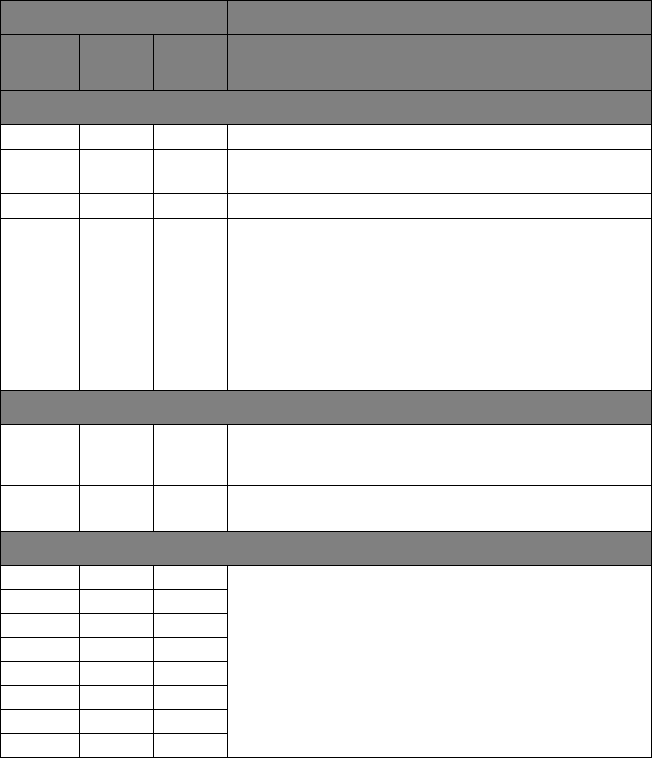
11. Restart the projector.
Do not turn the power on with the lamp cover removed.
Resetting the lamp timer
12. After the startup logo, open the On-Screen
Display (OSD) menu. Go to the SYSTEM
SETUP: Advanced > Lamp Settings
menu. Press MODE/ENTER. The Lamp
Settings page displays. Press to highlight
Reset lamp timer and press MODE/
ENTER. A warning message displays asking if you want to reset the lamp timer.
Highlight Reset and press MODE/ENTER. The lamp time will be reset to '0'.
Do not reset if the lamp is not new or replaced as this could cause damage.
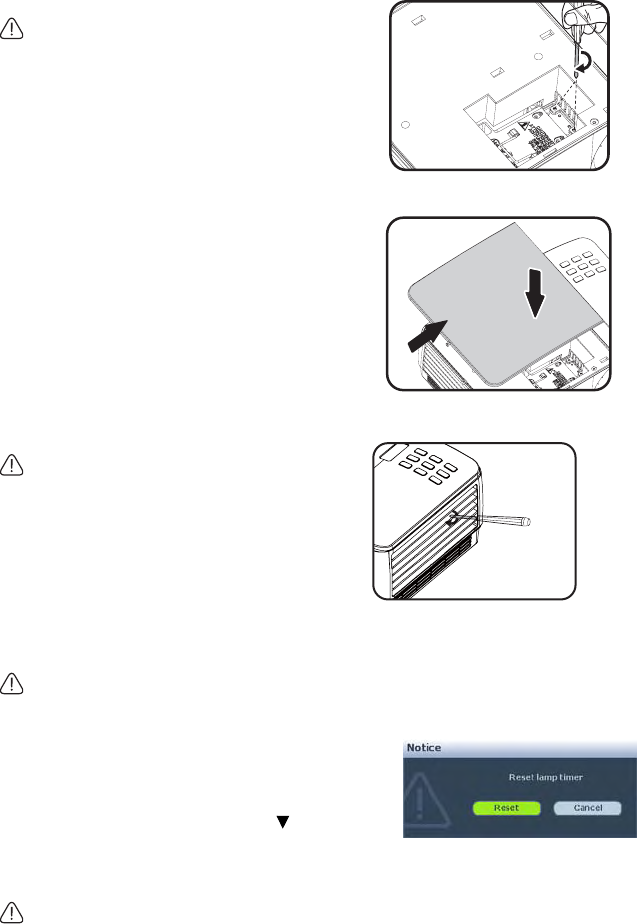
7. Tighten the screws that secure the
lamp.
• Loose screw may cause a bad connection,
which could result in malfunction.
• Do not over tighten the screws.
8. Ensure the handle is fully laid flat and
locked in place.
9. Replace the lamp cover by sliding it
into place.
10. Tighten the screw that secures the
lamp cover.
• Loose screw may cause a bad connection,
which could result in malfunction.
• Do not over tighten the screw.
(a)
(b)
Maintenance
96
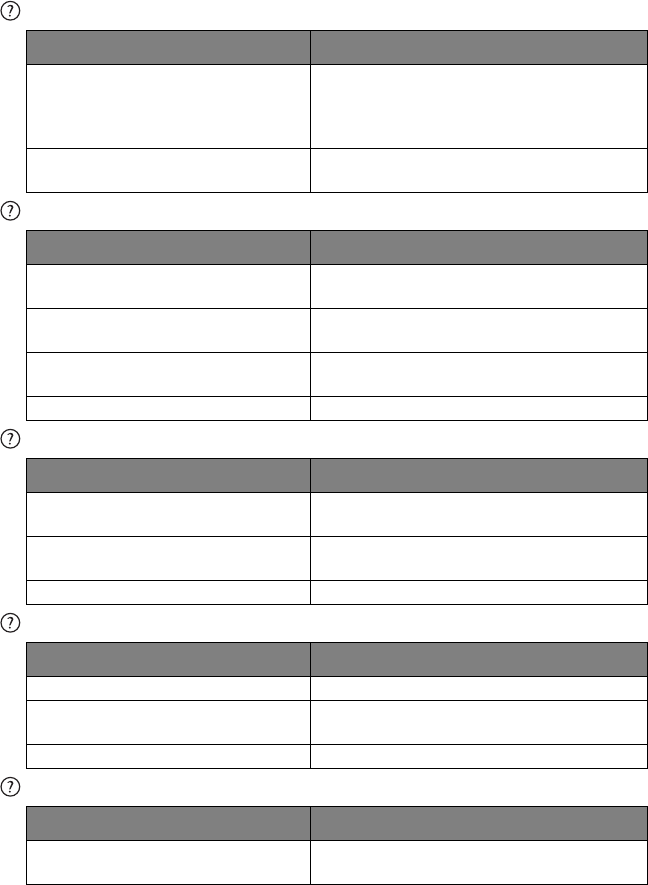
Indicators
Light Status & Description
POWE
RTEMP LAMP
Power events
Orange Off Off Stand-by mode
Green
Flashing Off Off Powering up
Green Off Off Normal operation
Orange
Flashing Off Off
1. The projector needs 90 seconds to cool down as it
was abnormally shut down without the normal cooling
down process. Or
2. The projector needs to cool for 90 seconds after the
power is turned off. Or
3. The projector has shutdown automatically. If you try
to re-start the projector, it will shutdown again. Please
contact your dealer for assistance.
Lamp events
Orange
Flashing Off Red
The projector has shutdown automatically. If you try to re-
start the projector, it will shutdown again. Please contact
your dealer for assistance.
Off Off Red 1. The projector needs 90 seconds to cool down. Or
2. Please contact your dealer for assistance.
Thermal events
Off Red Off
The projector has shutdown automatically. If you try to re-
start the projector, it will shutdown again. Please contact
your dealer for assistance.
Off Red Red
Off Red Green
Red Red Red
Red Red Green
Red Red Orange
Green Red Red
Green Red Green
Troubleshooting 97
Troubleshooting
The projector does not turn on.
No picture
Blurred image
Remote control does not work
The password is incorrect
Cause Remedy
There is no power from the power cable.
Plug the power cord into the AC inlet on the
projector, and plug the power cord into the
power outlet. If the power outlet has a switch,
make sure that it is switched on.
Attempting to turn the projector on again
during the cooling process.
Wait until the cooling down process has
completed.
Cause Remedy
The video source is not turned on or
connected correctly.
Turn the video source on and check that the signal
cable is connected correctly.
The projector is not correctly connected
to the input signal device. Check the connection.
The input signal has not been correctly
selected.
Select the correct input signal with the SOURCE
key on the projector or remote control.
The lens cover is still closed. Open the lens cover.
Cause Remedy
The projection lens is not correctly
focused. Adjust the focus of the lens using the focus ring.
The projector and the screen are not
aligned properly.
Adjust the projection angle and direction as well
as the height of the unit if necessary.
The lens cover is still closed. Open the lens cover.
Cause Remedy
The battery is out of power. Replace the battery with new one.
There is an obstacle between the remote
control and the projector. Remove the obstacle.
You are too far away from the projector. Stand within 8 meters (26 feet) of the projector.
Cause Remedy
You do not remember the password. Please see "Entering the password recall
procedure" on page 36 for details.

Specifications
98
Specifications
All specifications are subject to change without notice.
Optical
Resolution
1280 x 800 WXGA
Display system
1-CHIP DMD
Lens F/Number
(MP780 ST+)
F = 2.6
f = 6.9 mm
(MW860USTi)
F = 2.7
f = 5.45 mm
Lamp
(MP780 ST+)
185 W lamp
(MW860USTi)
225 W lamp
Electrical
Power supply
AC100–240V, 3.20 A,
50-60 Hz (Automatic)
Power consumption
(MP780 ST+)
260 W (Max.)
(MW860USTi)
310 W (Max.)
Mechanical
Weight
(MP780 ST+)
3.7 kg (8.1 lbs.)
(MW860USTi)
4.1 kg (9.04 lbs.)
Output terminals
RGB output
D-Sub 15-pin (female) x 1
Speaker
(Stereo) 10 watt x 2
Audio signal output
PC audio jack x 1
Control
RS-232 serial control
9 pin x 1
LAN controk
RJ45 x 1 (wired)
USB A type x 2 (wireless)
Screen control
12V trigger x 1 (0.5 A)
USB B type x 1
(Supports firmware upgrade)
Input terminals
Computer input
RGB input
D-Sub 15-pin (female) x 2
Video signal input
S-VIDEO
Mini DIN 4-pin port x 1
VIDEO
RCA jack x 1
SD/HDTV signal input
Analog - Component RCA jack x 3
(through RGB input)
Digital-HDMI V1.3 x 1
Audio signal input
Audio in
PC audio jack x 1
RCA audio jack (L/R) x 2
USB A type x 2
(Supports mouse/keyboard/card reader)
USB mini-B type x 1
(Supports USB display)
Environmental Requirements
Operating temperature
0°C-40°C at sea level
Operating relative humidity
10%-90% (without condensation)
Operating altitude
0-1499 m at 0°C-35°C
1500-3000 m at 0°C-30°C (with High Alti-
tude Mode on)
Specifications 99
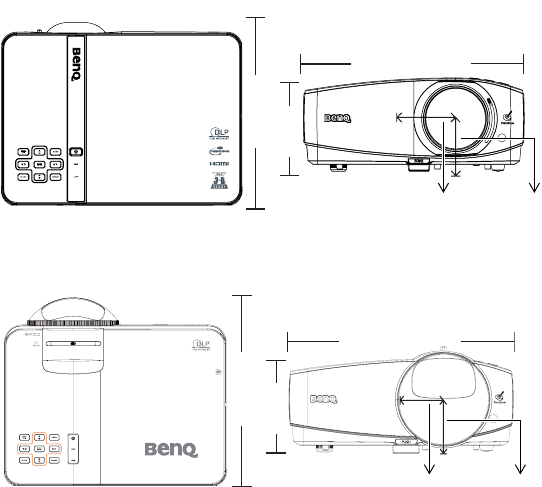
Dimensions
(MP780 ST+)
329 mm (W) x 137.2 mm (H) x 241.9 mm (D)
(MW860USTi)
330 mm (W) x 278 mm (H) x 154 mm (D)
329
241.9
137.2
62.5 77.4
330
278
154
62.5 77.5
Specifications
100
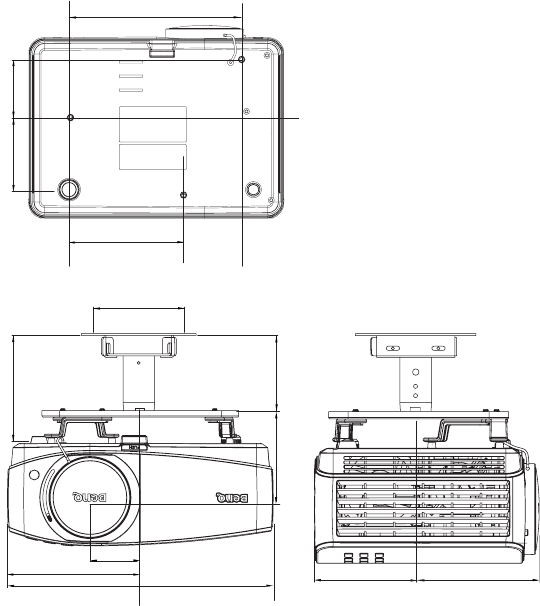
Ceiling mount installation
75.0
221.0
100.00
116.00
82.50
107.7
328.0
163.7
62.5
115.1
129.1
100.0
146.0
Ceiling mount screws:
M4 x 8 (Max. L = 8 mm)
Unit: mm
Specifications 101
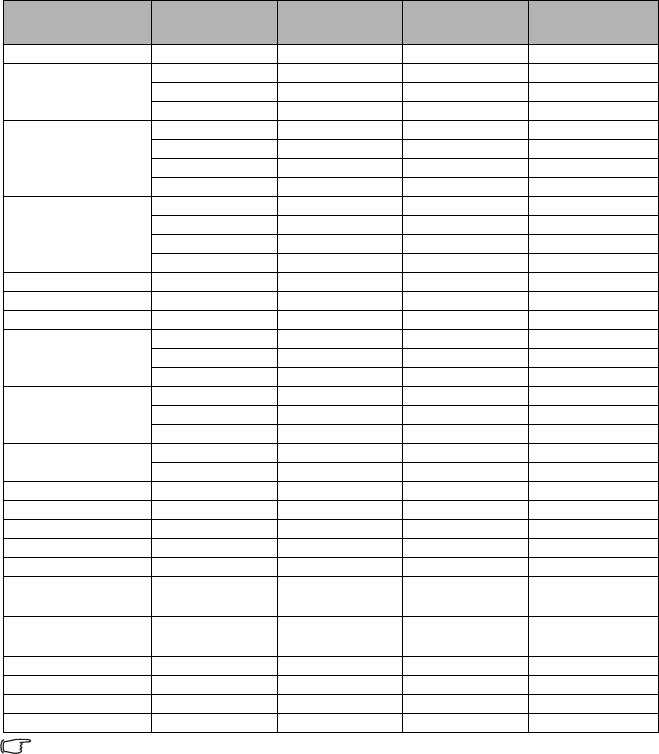
Timing chart
Supported timing for PC input
*Supported timing for 3D function.
Resolution
Horizontal
Frequency
(kHz)
Ver t ical
Frequency (Hz)
Pixel
Frequency
(MHz)
Mode
720 x 400 31.469 70.087 28.322 720 x 400_70
640 x 480
31.469 59.940 25.175 VGA_60
37.500 75.000 31.500 VGA_75
43.269 85.008 36.000 VGA_85
800 x 600
37.879 60.317 40.000 SVGA_60
48.077 72.188 50.000 SVGA_72
46.875 75.000 49.500 SVGA_75
53.674 85.061 56.250 SVGA_85
1024 x 768
48.363 60.004 65.000 XGA_60
56.476 70.069 75.000 XGA_70
60.023 75.029 78.750 XGA_75
68.677 84.997 94.500 XGA_85
1024 x 576 35.820 60.0 46.996 Netbook_1
1024 x 600 37.5 60.0 45.000 Netbook_2
1024 x 600 41.467 64.995 51.419 Netbook_3
1280 x 800
49.702 59.810 83.500 WXGA_60
62.795 74.934 106.500 WXGA_75
71.554 84.880 122.500 WXGA_85
1280 x 1024
63.981 60.020 108.000 SXGA_60
79.976 75.025 135.000 SXGA_75
91.146 85.024 157.500 SXGA_85
1280 x 960 60.000 60.000 108 1280 x 960_60
85.938 85.002 148.500 1280 x 960_85
1440 x 900 55.935 59.887 106.500 WXGA+_60
1400 x 1050 65.317 59.978 121.750 SXGA+_60
1600 x 1200 75.000 60.000 162.000 UXGA
640 x 480@67Hz 35.000 66.667 30.240 MAC13
832 x 624@75Hz 49.722 74.546 57.280 MAC16
1024 x
768@75Hz 60.241 75.020 80.000 MAC19
1152 x
870@75Hz 68.680 75.060 100.000 MAC21
640 x 480 61.910 119.518 52.500 VGA_120*
800 x 600 77.425 119.854 83.000 SVGA_120*
1024 x 768 97.551 119.989 115.5 XGA_120*
1280 x 720 89.520 120.000 148.960 WXGA_120*
Specifications
102
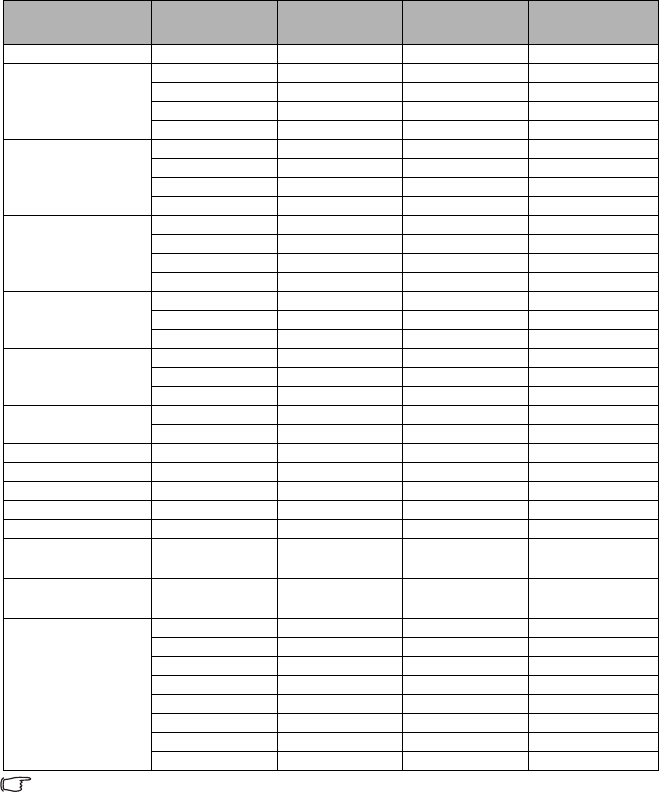
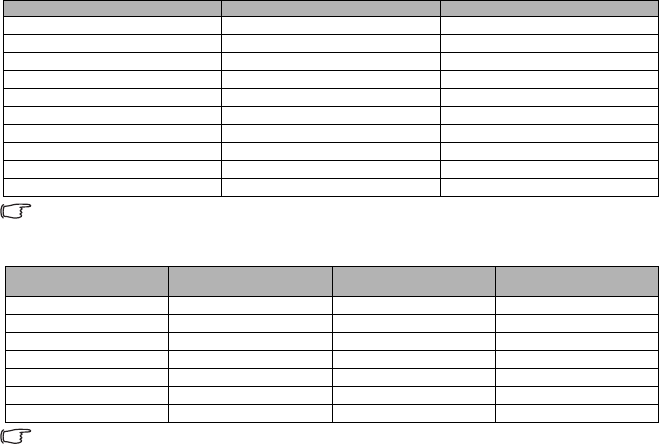
Supported timing for HDMI input
Displaying a 1080i(1125i)@60Hz or 1080i(1125i)@50Hz signal may result in slight image
vibration.
Resolution
Horizontal
Frequency
(kHz)
Ver t ical
Frequency (Hz)
Pixel
Frequency
(MHz)
Mode
720 x 400 31.469 70.087 28.322 720 x 400_70
640 x 480
31.469 59.940 25.175 VGA_60
37.861 72.809 31.500 VGA_72
37.500 75.000 31.500 VGA_75
43.269 85.008 36.000 VGA_85
800 x 600
37.879 60.317 40.000 SVGA_60
48.077 72.188 50.000 SVGA_72
46.875 75.000 49.500 SVGA_75
53.674 85.061 56.250 SVGA_85
1024 x 768
48.363 60.004 65.000 XGA_60
56.476 70.069 75.000 XGA_70
60.023 75.029 78.750 XGA_75
68.677 84.997 94.500 XGA_85
1280 x 800
49.702 59.810 83.500 WXGA_60
62.795 74.934 106.500 WXGA_75
71.554 84.880 122.500 WXGA_85
1280 x 1024
63.981 60.020 108.000 SXGA_60
79.976 75.025 135.000 SXGA_75
91.146 85.024 157.500 SXGA_85
1280 x 960 60.000 60.000 108 1280 x 960_60
85.938 85.002 148.500 1280 x 960_85
1440 x 900 55.935 59.887 106.500 WXGA+_60
1400 x 1050 65.317 59.978 121.750 SXGA+_60
1600 x 1200 75.000 60.000 162.000 UXGA
640 x 480@67Hz 35.000 66.667 30.240 MAC13
832 x 624@75Hz 49.722 74.546 57.280 MAC16
1024 x
768@75Hz 60.241 75.020 80.000 MAC19
1152 x
870@75Hz 68.680 75.060 100.000 MAC21
VIDEO
(HDCP)
31.47 60 27 480p
31.25 50 27 576p
45.00 60 74.25 720p_60
37.50 50 74.25 720_50
33.75 60 74.25 1080i_60
28.13 50 74.25 1080i_50
67.5 60 148.5 1080p
56.25 50 148.5 1080p
Specifications 103
Supported timing for Component-YPbPr input
Displaying a 1080i@60Hz or 1080i@50Hz signal may result in slight image vibration.
Supported timing for Video and S-Video inputs
*Supported timing for 3D function.
Signal Format Horizontal Frequency (kHz) Vertical Frequency (Hz)
480i(525i)@60Hz 15.73 59.94
480p(525p)@60Hz 31.47 59.94
576i(625i)@50Hz 15.63 50.00
576p(625p)@50Hz 31.25 50.00
720p(750p)@60Hz 45.00 60.00
720p(750p)@50Hz 37.50 50.00
1080i(1125i)@60Hz 33.75 60.00
1080i(1125i)@50Hz 28.13 50.00
1080p@60Hz 67.5 60.00
1080p@50Hz 56.25 50.00
Video mode Horizontal
Frequency (kHz)
Vertical Frequency
(Hz)
Color sub-carrier
Frequency (MHz)
NTSC* 15.73 60 3.58
PAL 15.63 50 4.43
SECAM 15.63 50 4.25 or 4.41
PAL-M 15.73 60 3.58
PAL-N 15.63 50 3.58
PAL-60 15.73 60 4.43
NTSC4.43 15.73 60 4.43
Warranty and Copyright information
104
Warranty and Copyright information
Patents
This BenQ projector is covered by the following patents:
U.S. patents 6,837,608; 7,275,834; 7,181,318; TW patents 202690; 205470; I228635;
I259932; China Patents ( 中国发明专利 ) ZL01143168.7; ZL03119907.0;
ZL200510051609.2
Limited warranty
BenQ warrants this product against any defects in material and workmanship, under
normal usage and storage.
Proof of purchase date will be required with any warranty claim. In the event this product
is found to be defective within the warranty period, BenQ's only obligation and your
exclusive remedy shall be replacement of any defective parts (labor included). To obtain
warranty service, immediately notify the dealer from which you purchased the product of
any defects.
Important: The above warranty shall be void if the customer fails to operate the product in
accordance with BenQ's written instructions, especially the ambient humidity must be in-
between 10% and 90%, temperature in-between 0°C and 35°C, altitude lower than 4920
feet, and avoiding to operate the projector in a dusty environment. This warranty gives you
specific legal rights, and you may have other rights which vary from country to country.
For other information, please visit www.BenQ.com.
Copyright
Copyright 2011 by BenQ Corporation. All rights reserved. No part of this publication may
be reproduced, transmitted, transcribed, stored in a retrieval system or translated into any
language or computer language, in any form or by any means, electronic, mechanical,
magnetic, optical, chemical, manual or otherwise, without the prior written permission of
BenQ Corporation.
Disclaimer
BenQ Corporation makes no representations or warranties, either expressed or implied,
with respect to the contents hereof and specifically disclaims any warranties,
merchantability or fitness for any particular purpose. Further, BenQ Corporation reserves
the right to revise this publication and to make changes from time to time in the contents
hereof without obligation to notify any person of such revision or changes.
*DLP, Digital Micromirror Device and DMD are trademarks of Texas Instruments. Others
are copyrights of their respective companies or organizations.