Bensussen Deutsch and Associates 1507507DA Enhanced Wireless Controller for Nintendo Switch - Black User Manual SWCH Wireless Controller UM 200K indd
Bensussen Deutsch & Associates, Inc. Enhanced Wireless Controller for Nintendo Switch - Black SWCH Wireless Controller UM 200K indd
User Manual
CONTENTS
• Enhanced Wireless Controller for Nintendo Switch
• (2) AA Batteries
• User Guide
SET UP
Check for system update. Nintendo system update version 6.0.0 or
later is required for use of PowerA Wireless controllers.
1. Connect your Nintendo Switch to the Internet
2. Typically, system updates will be downloaded automatically when
connected online.
3. Select ‘System Settings’ from HOME menu, then scroll down to
‘System’ to see System Update version and automatically check for
system update.
For additional help, search ‘system update’ from Nintendo
Support website.
INSTALL BATTERIES
1. Remove the battery door, and install (2) AA Alkaline
Batteries (included)
2. Confirm your Nintendo Switch Console is powered ON.
WIRELESS PAIRING
From the HOME Menu, select “Controllers,” then “Change Grip
and Order.” While the following screen is displayed, press and
hold down the SYNC Button for at least one second on the
Controller you wish to pair.
NOTE: Once controller is paired once, it will auto-connect next time.
UNDERSTANDING LED INDICATORS
There are three LED locations on this controller: top, front and bottom.
1. The top LED near the Sync button will flash Red when the Alkaline
batteries are getting near depletion. Replace Alkaline batteries once
low battery indicator is flashing to avoid interrupting gameplay.
2. The front LED (between Home/View buttons) indicates
controller is powered and will flash during programming of
Advanced Gaming Buttons.
3. The four LED on the bottom indicate player number 1-8 and
will cycle from left to right during wireless pairing.
ASSINGNING ADVANCED GAMING BUTTONS
1. Press and hold the program button for 2-3 seconds on the back
of the controller. The program LED indicator will flash, signaling the
controller is in assign mode.
2.Press 1 of the following buttons (A/B/X/Y/L/R/ZL/ZR/D-pad) to
re-assign. Then press the Advanced Gaming Button (AGR or AGL)
that you wish to assign. The Program LED indicator will stop flashing,
signaling the Advanced Gaming Button has been set.
3. Repeat for the remaining Advanced Gaming Button.
NOTE: Advanced Gaming Button assignments
will remain in memory even after disconnected.
RESETTING ADVANCED GAMING BUTTONS
1. Hold the program button down for 2-3 seconds. The LED
Connection Indicator will slowly flash, signaling the controller
is in program mode.
2. Press and hold the Assign Program Button for 5 seconds to
reset to no function.
TROUBLESHOOTING
Q1. My Wireless Controller is not pairing
A1. Confirm batteries are properly installed, and are not
drained, used or damaged
A2. Confirm you are following the pairing process listed above
A3. Remove and replace the Alkaline batteries to reset the
Wireless controller
SUPPORT
For support with your authentic PowerA accessories, please visit
the Support section of PowerA.com, email CustomerService@
PowerA.com or call (866)-308-4031. Mon-Fri 5:00AM-5:00PM PST
MOTION WARNING
Playing video games can make your muscles, joints, skin or eyes
hurt. Follow these instructions to avoid problems such as tendinitis,
carpal tunnel syndrome, skin irritation or eyestrain: • Avoid excessive
play. Take a 10 to 15 minute break every hour, even if you don’t think
you need it. Parents should monitor their children for appropriate
play. • If your hands, wrists, arms or eyes become tired or sore while
playing, or if you feel symptoms such as tingling, numbness, burning
or stiffness, stop and rest for several hours before playing again. • If
you continue to have any of the above symptoms or other discomfort
during or after play, stop playing and see a doctor.
FCC STATEMENT
This device complies with Part 15 of the FCC Rules. Operation
is subject to the following two conditions: (1) this device may
not cause harmful interference, and (2) this device must accept
any interference received, including interference that may cause
undesired operation.
Warning: Changes or modifications to this unit not expressly
approved by the party responsible for compliance could void the
user’s authority to operate the equipment.
NOTE: This equipment has been tested and found to comply with
the limits for Class B digital device, pursuant to Part 15 of the FCC
Rules. These limits are designed to provide reasonable protection
against harmful interference in a residential installation. This
equipment generates, uses and can radiate radio frequency energy
and, if not installed and used in accordance with the instructions,
may cause harmful interference to radio communications. However,
there is no guarantee that interference will not occur in a particular
installation. If this equipment does cause harmful interference to
radio or television reception, which can be determined by turning the
equipment off and on, the user is encouraged to try to correct the
Customer Service
Service client
Kundendienst
Servicio a clientes
Assistenza clienti
Apoio ao Cliente
interference by one or more of the following measures:
- Reorient or relocate the receiving antenna.
- Increase the separation between the equipment and receiver.
- Connect the equipment into an outlet on a circuit different from
that to which the receiver is connected.
- Consult the dealer or an experienced radio/ TV technician for help.
CAN ICES-3(B)/NMB-3(B):
This device contains licence-exempt transmitter(s)/receiver(s)
that comply with Innovation, Science and Economic Development
Canada’s licence-exempt RSS(s). Operation is subject to the
following two conditions:
1. This device may not cause interference.
2. This device must accept any interference, including interference
that may cause undesired operation of the device.
BATTERY LEAKAGE WARNING
Leakage of battery fluid can cause personal injury as well as damage
to your controller. If battery leakage occurs, thoroughly wash the
affected skin and clothes. Keep battery fluid away from your eyes
and mouth. Leaking batteries may make popping sounds.
To avoid battery leakage:
• Do not mix used and new batteries (replace all batteries at
the same time).
• Do not mix different brands of batteries.
• Alkaline batteries recommended. Do not use Lithium ion, nickel
cadmium (nicad), or carbon zinc batteries.
• Do not leave batteries in the remote for long periods of non-use.
• Do not recharge alkaline or non-rechargeable batteries.
• Do not put the batteries in backwards. Make sure that the positive
(+) and negative (-) ends are facing in the correct directions.
Insert the negative end first.
• When removing batteries, remove the positive end first.
• Do not use damaged, deformed or leaking batteries.
• Remove exhausted batteries from the remote
• Rechargeable batteries must be removed from the remote before
being charged
• Rechargeable batteries should be charged under adult supervision
• Do not short circuit the supply terminals
AUSTRALIAN WARRANTY STATEMENT:
This product comes with guarantees that cannot be excluded under
the Australian Consumer Law. You are entitled to a replacement
or refund for a major failure and for compensation for any other
reasonably foreseeable loss or damage. You are also entitled to have
the goods repaired or replaced if the goods fail to be of acceptable
quality and the failure does not amount to a major failure. If
purchased within Australia or New Zealand, this product comes with
a One-year warranty from date of purchase. Defects in the product
must have appeared within One year from date of purchase, in order
to claim the warranty.
All warranty claims must be facilitated back through the retailer
of purchase in accordance with the retailer’s return policies and
procedures. Any expenses incurred, as a result of returning the product
to the retailer of purchase are the full responsibility of the consumer.
AU WHOLESALE DISTRIBUTOR:
Level 2, 2 Darling Street South Yarra,
Australia VIC 3141 bluemouth.com.au
Email: support@bluemouth.com.au +613 9646 4011
MANUFACTURED BY:
Bensussen Deutsch & Associates, Inc. (BDA, Inc.)
15525 Woodinville-Redmond Rd. NE Woodinville, WA 98072
BDAINC.com | POWERA.com
SUPPORT/ADDITIONAL LEGAL
For more FAQs and support, visit support.powera.com. PowerA,
and the PowerA logo are trademarks of Bensussen Deutsch and
Associates, Inc. TM and © Bensussen Deutsch and Associates, Inc.
GERMAN
INHALT:
• Erweiterter kabelloser Controller für Nintendo Switch
• AA-Batterien (2)
• Bedienungsanleitung
AUF SYSTEMAKTUALISIERUNG PRÜFEN:
Für die Nutzung von kabellosen PowerA-Controllern wird die
Nintendo Systemaktualisierung Version 6.0.0 oder höher benötigt.
1. Verbinden Sie Ihren Nintendo Switch mit dem Internet
2. Im Normalfall werden Systemaktualisierungen automatisch
heruntergeladen, wenn eine Verbindung mit dem Internet besteht.
3. Wählen Sie im Home-Menü Systemeinstellungen aus, und
scrollen Sie dann bis zu System nach unten, um die Version
der Systemaktualisierung festzustellen und automatisch auf
Systemaktualisierungen zu prüfen.
Für weitere Hilfe suchen Sie nach Systemaktualisierung auf der
Support-Website von Nintendo.
BATTERIEN EINLEGEN
1. Öffnen Sie die Batteriefachklappe und legen Sie zwei AA-
Alkalibatterien ein
2. Stellen Sie sicher, dass Ihre Nintendo Switch-Konsole
eingeschaltet ist.
KABELLOSE KOPPLUNG
Wählen Sie im Home-Menü Controller, dann Griffweise/
Reihenfolge ändern. Halten Sie, während der folgende
Bildschirm angezeigt wird, die SYNC-Taste für mindestens eine
Sekunde lang an dem Controller gedrückt, den Sie verbinden wollen.
Wenn der Controller einmal verbunden wurde, verbindet er sich beim
nächsten Mal automatisch.
LED-ANZEIGEN VERSTEHEN
An diesem Controller gibt es drei LED-Positionen: Oben, vorne
und unten.
1. Die obere LED-Leuchte nahe der Sync-Taste blinkt
CustomerService@PowerA.com
2-Year Limited Warranty: Visit PowerA.com for details and to register your product
Garantía limitada de 2 años. Visita PowerA.com para obtener detalles y para registrarte.
Garantia limitada de 2 anos: Visita PowerA.com para obter detalhes e registar o teu produto
Beschränkte 2-Jahres-Garantie – Details und Informationen zur Anmeldung nden Sie unter PowerA.com.
Garantie limitée de 2 ans – Rendez-vous sur PowerA.com pour de plus amples informations et pour enregistrer votre achat.
Garantia limitada de 2 anos: Visita PowerA.com para obter detalhes e registar o teu produto
ENHANCED
WIRELESS
CONTROLLER
USER MANUAL
Manuel de l’utilisateur
Bedienungsanleitung
Manual de usuario
Manuale per l’uso
Manual do usuário
BDA Inc.
15525 Woodinville-Redmond Rd NE
Woodinville, WA 98072
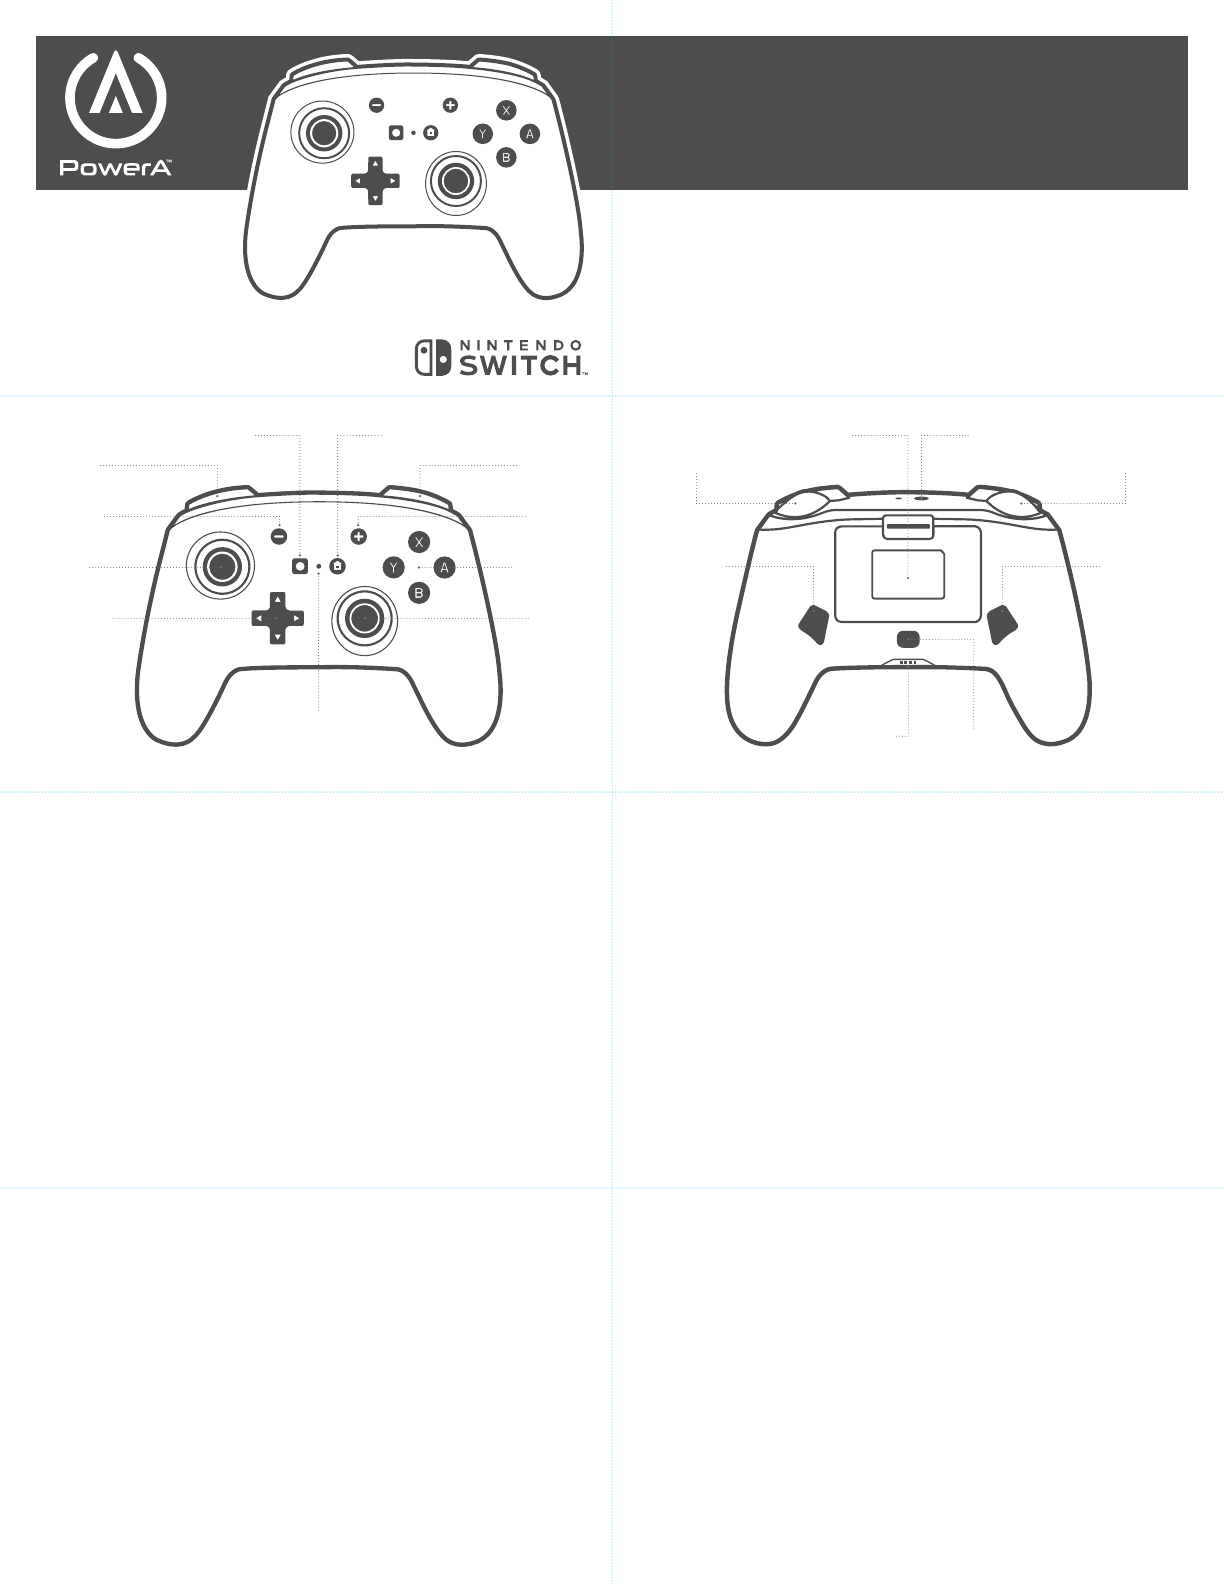
Directional Pad
Plus Button
Home Button
Minus Button
Right Bumper Right Trigger
Battery Compartment Sync button
AGR Button
LED Player Indicator Program Button
Left Bumper Left Trigger
AGL Button
Right Stick
Left Stick Action Buttons
LED Connection Indicator
Capture Button
AGR AGL

Para consultar las últimas preguntas frecuentes visita PowerA.
com/Support/”
ADVERTENCIA SOBRE PILAS ALCALINAS:
Si vas a almacenar el dispositivo durante un periodo largo de
tiempo, extrae las pilas. Extrae las pilas si están gastadas.
Extrae siempre las pilas viejas, a medio usar o gastadas
inmediatamente y recíclalas o deséchalas conforme a la
normativa de reciclaje local y nacional.
Si detectas una fuga de las pilas, extrae todas las pilas con cuidado
de que el líquido derramado no entre en contacto ni con las manos ni
con la ropa; a continuación, aclárate las manos con agua.
Antes de poner pilas nuevas, limpia a fondo el compartimento de las
pilas con un paño seco.
PORTUGUESE
CONTEÚDO:
• Comando sem fios avançado para a Nintendo Switch
• Pilhas AA (2)
• Guia do Utilizador”
VERIFICAR SE HÁ ATUALIZAÇÕES DO SISTEMA:
É necessária a atualização com a versão 6.0.0 ou posterior do
sistema Nintendo para utilizar os comandos sem fios PowerA.
1. Liga a Nintendo Switch à Internet.
2. Regra geral, as atualizações do sistema serão transferidas
automaticamente quando estás online.
3. Seleciona Definições do Sistema no menu HOME, desloca-te
para baixo para Sistema para ver a versão Atualização do Sistema e
procura automaticamente se há atualizações do sistema.
Para ajuda adicional, procura atualização do sistema no website de
Suporte da Nintendo.
INSTALAR PILHAS
1. Retire a porta do compartimento de pilhas e instale duas
pilhas alcalinas AA.
2. Confirme que a Consola Nintendo Switch está ligada.
EMPARELHAMENTO SEM FIOS
No menu HOME, selecione “Controllers”, em seguida, “Change Grip
and Order”. Enquanto o ecrã seguinte é apresentado, prima sem
soltar o botão SYNC durante pelo menos um segundo no comando
que pretende emparelhar.
Assim que o comando seja emparelhado, passará a ligar-se
automaticamente.
NOÇÕES SOBRE INDICADORES LED
Existem três LEDs neste comando: na parte superior, à frente e na
parte inferior.
1. O LED na parte superior, perto do botão Sync, irá piscar a
vermelho quando as pilhas alcalinas estiverem quase esgotadas.
Substitua as pilhas alcalinas assim que o LED começar a piscar para
evitar interrupções no jogo.
2. O LED da frente (entre os botões Home/Vista) indica que o
comando está aceso e irá piscar durante a programação dos Botões
de Jogo Avançados.
3. Os quatro LEDs na parte inferior indicam os números de jogador
1-8 e serão percorridos da esquerda para a direita durante o
emparelhamento sem fios.
MAPEAR BOTÕES DE JOGO AVANÇADOS:
1. Prime e mantém premido o Botão de Programação na parte
posterior do comando durante 2 a 3 segundos. O LED da frente irá
piscar para indicar que o comando está no modo de atribuição.
2. Em seguida, prime apenas a função do comando que queres
duplicar (o LED da frente irá piscar mais rapidamente):
A/B/X/Y/L/R/ZL/ZR/Botão direcional.
3. Em seguida, prime o botão AGR ou AGL para atribuir a função
selecionada a um Botão de Jogo Avançado. O LED da frente deixará
de piscar assim que o botão for definido. Repete o procedimento
para outro Botão de Jogo Avançado.
Nota: as funções do Botão de Jogo Avançado são guardadas no
comando para as sessões de jogo futuras.
REPROGRAMAR OU REPOR OS BOTÕES DE JOGO AVANÇADO:
1. Repete os 3 passos acima para substituíres a atribuição
anterior de um botão.
2. Prime e mantém premido o Botão de Programação durante 5
segundos para apagar todas as atribuições de botões.
RESOLUÇÃO DE PROBLEMAS:
P1. O meu comando sem fios não está a emparelhar
R1. Confirme se as baterias estão corretamente instaladas e se não
estão esgotadas, usadas ou danificadas.
R2. Confirme se seguiu o processo de emparelhamento indicado
anteriormente.
R3. Retire e substitua as pilhas alcalinas para repor o comando sem fios.
As Perguntas frequentes mais recentes estão disponíveis em
PowerA.com/Support/
AVISO RELATIVO ÀS PILHAS ALCALINAS:
Retire as pilhas antes de armazenar o dispositivo durante períodos
prolongados. Retire as pilhas se estiverem gastas. Retire sempre
as pilhas velhas, fracas ou gastas imediatamente e recicle ou
elimine-as em conformidade com os regulamentos de eliminação
nacionais e locais.
Em caso de fugas de pilhas, retire-as tendo o cuidado de evitar
que o fluido derramado entre em contacto com as suas mãos ou
o vestuário. Em seguida, lave imediatamente as mãos com água.
Antes de inserir novas pilhas, limpe rigorosamente o compartimento
das pilhas com um pano seco.”
controller è in modalità di programmazione.
2. Quindi, premere la singola funzione del controller che si
desidera duplicare (il LED anteriore lampeggerà più velocemente):
A/B/X/Y/L/R/ZL/ZR/Direzione D-pad.
3. Quindi premere AGR o AGL per assegnare le funzioni selezionate
ad un pulsante di gioco avanzato. Il LED frontale smetterà di
lampeggiare una volta che il pulsante è impostato. Ripetere per
l’altro pulsante di gioco avanzato.
Nota: le funzioni del pulsante di gioco avanzato sono salvate nel
controller per le sessioni di gioco future.
RIPROGRAMMAZIONE O RIPRISTINO DEI PULSANTI DI GIOCO
AVANZATI:
1. La ripetizione delle tre fasi precedenti sostituirà la precedente
assegnazione al pulsante con una nuova.
2. Tenere premuto il pulsante Program per 5 secondi per eliminare
tutte le assegnazioni dei pulsanti.”
“Risoluzione dei problemi:
D1. Il mio controller senza fili non esegue l’accoppiamento
R1. Verificare che le batterie siano installate correttamente e che
non siano scariche, usurate o danneggiate
R2. Verificare di attenersi alla procedura di accoppiamento sopra
illustrata
R3. Rimuovere e sostituire le batterie alcaline per resettare il
controller senza fili
Per le ultime domande frequenti, visitare PowerA.com/Support/
AVVERTENZA SULLE BATTERIE ALCALINE:
Rimuovere le batterie prima di conservare il dispositivo per lunghi
periodi di tempo. Rimuovere le batterie se usurate. Rimuovere
sempre immediatamente le batterie vecchie, scariche o usurate e
riciclare o smaltire conformemente alle normative nazionali/locali.
Se una batteria perde, rimuovere tutte le batterie facendo attenzione
a non far entrare a contatto mani o vestiti con il liquido fuoriuscito.
In caso contrario, sciacquare subito la pelle con acqua corrente.
Prima di inserire le batterie nuove, pulire accuratamente il vano
batterie con un panno asciutto.”
FRENCH
CONTIENT :
• Manette sans fil optimisée pour Nintendo Switch
• Piles AA (2)
• Manuel de l’utilisateur
VÉRIFIER LES MISES À JOUR DE LA CONSOLE :
La version 6.0.0 ou supérieure de la console Nintendo est requise
pour pouvoir utiliser les manettes sans fil PowerA.
1. Connectez votre Nintendo Switch à Internet
2. En général, les mises à jour de la console sont téléchargées
automatiquement dès que vous êtes connecté en ligne.
3. Dans le menu Home, sélectionnez « Paramètres de la console »,
puis faites défiler les options et sélectionnez Console pour afficher
la mise à jour de la console et vérifier automatiquement s’il existe
une nouvelle version.
Pour plus d’informations, recherchez « mise à jour de la console »
sur le site Web de l’assistance Nintendo.”
INSTALLATION DES PILES
1. Retirer le couvercle du compartiment des piles, puis insérer
deux piles alcalines AA
2. Vérifier que la console Nintendo Switch est allumée.
SYNCHRONISATION SANS FIL
Dans le menu « HOME », sélectionner « Manettes » (Controllers),
puis « Changer le style/l’ordre » (Change Grip and Order). Tandis
que l’écran suivant s’affiche, appuyer sur le bouton SYNC et le
maintenir enfoncé pendant au moins une seconde sur la manette
que vous souhaitez synchroniser.
Lorsque la manette a été synchronisée une fois, elle se
connectera automatiquement la fois suivante.
COMPRENDRE LES VOYANTS LED
Cette manette est dotée de trois voyants LED situés sur le haut, à
l’avant et à la base.
1. Le voyant LED du haut, près du bouton SYNC, clignotera en rouge
lorsque les piles alcalines seront presque déchargées. Afin d’éviter
les interruptions de jeu, remplacer les piles alcalines dès que le
voyant LED clignote.
2. Le voyant LED à l’avant (entre les boutons Home/Vue) indique que
la manette est allumée et clignotera pendant la programmation des
boutons de jeu programmables.
3. Les quatre voyants LED à la base indiquent le numéro du joueur
(1 à 8) et s’allumeront tour à tour de gauche à droite lors de la
synchronisation sans fil. “
PROGRAMMER LES BOUTONS DE JEU PROGRAMMABLES :
1. Appuyez sur le bouton de programmation à l’arrière de la manette et
maintenez-le enfoncé pendant 2 à 3 secondes. Le voyant LED à l’avant
clignotera, indiquant que la manette est en mode d’affectation.
2. Ensuite, appuyez sur une fonction de la manette à affecter (le
voyant LED à l’avant clignote plus rapidement) : A/B/X/Y/L/R/ZL/
ZR/Croix directionnelle.
3. Appuyez ensuite sur le bouton AGR ou AGL pour affecter la
fonction sélectionnée à un bouton de jeu programmable. Le voyant
LED à l’avant arrête de clignoter dès que le bouton est paramétré.
Répétez la procédure pour les autres boutons de jeu programmables.
Remarque : les fonctions des boutons de jeu programmables sont
enregistrées sur la manette pour les sessions de jeu suivantes.
REPROGRAMMER OU RÉINITIALISER LES BOUTONS
DE JEU PROGRAMMABLES:
1. Répétez les 3 étapes précédentes pour modifier l’affectation
d’un bouton.
2. Appuyez sur le bouton de programmation et maintenez-le enfoncé
pendant 5 secondes pour supprimer toutes les affectations de bouton.
DÉPANNAGE :
Q1. Ma manette sans fil ne parvient pas à effectuer la
synchronisation
R1. Vérifiez que les piles sont correctement insérées et qu’elles ne
sont pas déchargées, usées ou endommagées
R2. Vérifiez que vous suivez bien le processus de synchronisation
indiqué ci-dessus
R3. Retirez les piles alcalines, puis remplacez-les afin de réinitialiser
la manette sans fil
Pour consulter les dernières Questions fréquentes, rendez-vous sur
www.PowerA.com/Support/
AVERTISSEMENT CONCERNANT LES PILES ALCALINES :
Retirez les piles avant de ranger votre appareil pour une période
prolongée. Retirez les piles lorsqu’elles sont usées. Retirez toujours
les piles anciennes, faibles ou usées sans attendre, puis recyclez-les
ou mettez-les au rebut conformément aux réglementations locales et
nationales/régionales en vigueur.
En cas de fuite d’une pile, retirez toutes les piles en veillant à ce que
le liquide qui s’est écoulé ne touche ni vos mains ni vos vêtements. Si
cela arrive, rincez immédiatement et abondamment la peau avec de
l’eau. Avant d’insérer de nouvelles piles, nettoyez soigneusement le
compartiment des piles avec un chiffon sec.
L’émetteur/récepteur exempt de licence contenu dans le présent appareil
est conforme aux CNR d’Innovation, Sciences et Développement
économique Canada applicables aux appareils radio exempts de licence.
L’exploitation est autorisée aux deux conditions suivantes :
1. L’appareil ne doit pas produire de brouillage;
2. L’appareil doit accepter tout brouillage radioélectrique subi,
même si le brouillage est susceptible d’en compromettre le
fonctionnement.
SPANISH
CONTENIDO:
• Mando inalámbrico compatible para Nintendo Switch
• Pilas AA (2)
• Guía de usuario”
COMPROBACIÓN DE LA ACTUALIZACIÓN DEL SISTEMA:
Es necesaria la actualización del sistema Nintendo versión 6.0.0 o
posterior para el uso de los mandos inalámbricos PowerA Wireless.
1. Conecta tu Nintendo Switch a Internet
2. Normalmente, las actualizaciones del sistema se descargan de
forma automática al conectarte a Internet.
3. Selecciona ‘Configuración de la consola’ en el menú HOME
y, a continuación, desplázate hacia abajo hasta ‘Consola’ para
ver la versión de la Actualización de la consola y buscar nuevas
actualizaciones automáticamente.
Para obtener más ayuda, busca actualizar la consola en el sitio web
de asistencia de Nintendo.
INSTALA LAS PILAS
1. Retira la tapa de las pilas e instala dos pilas alcalinas AA
2. Comprueba que la consola Nintendo Switch esté encendida.
SINCRONIZACIÓN INALÁMBRICA
En el menú HOME, selecciona “Mandos”, luego “Cambiar agarre y
orden”. Mientras se muestra la pantalla siguiente, mantén pulsado
el botón SYNC durante un mínimo de un segundo en el mando que
desees sincronizar.
Una vez sincronizado el mando, la próxima vez se conectará
automáticamente.
QUÉ SIGNIFICAN LOS INDICADORES LED
Hay tres indicadores LED en este mando: el superior, el frontal
y el inferior.
1. El LED superior junto al botón Sync parpadea en color rojo cuando
las pilas alcalinas se están agotando. Sustituye las pilas alcalinas
cuando el LED esté parpadeando para evitar interrupciones en el juego.
2. El LED frontal (entre los botones de inicio/vista) indica que el
mando tiene batería y parpadeará durante la programación de los
botones de control avanzado de juego.
3. Los cuatro LED inferiores indican los números de jugador del 1 al 8 y
alternan de izquierda a derecha durante la sincronización inalámbrica.
ASIGNACIÓN DE LOS BOTONES DE JUEGO AVANZADO:
1. Mantén pulsado el botón de programación de la parte trasera
del mando durante 2-3 segundos. El LED frontal parpadeará para
indicar que el mando está en modo de asignación.
2. Después, pulsa la función única del mando que quieres duplicar
(el LED frontal parpadeará más rápido): A/B/X/Y/L/R/ZL/ZR/
Dirección de la cruceta.
3. Luego pulsa AGR o AGL para asignar la función seleccionada a
un botón de control de juego avanzado. El LED frontal dejará de
parpadear una vez configurado el botón. Repite la operación para el
otro botón de control avanzado de juego.
Nota: Las funciones de los botones de control avanzado de juego se
guardan en el mando para las próximas sesiones de juego.
REPROGRAMACIÓN O RESTABLECIMIENTO DE LOS BOTONES
DE CONTROL AVANZADO DE JUEGO:
1. Si repites los tres pasos anteriores se sustituirá la asignación
anterior del botón con una nueva.
2. Mantén pulsado el botón de programación durante 5 segundos
para borrar todas las asignaciones de botones.”
RESOLUCIÓN DE PROBLEMAS:
P1. El mando inalámbrico no se sincroniza.
R1. Confirma que las pilas estén bien instaladas y que no estén
agotadas, usadas ni dañadas.
R2. Confirma que estás siguiendo el proceso de sincronización
descrito anteriormente.
R3. Extrae y sustituye las pilas alcalinas para reiniciar el
mando inalámbrico.
rot, wenn die Alkalibatterien fast leer sind. Wechseln Sie
die Alkalibatterien, sobald die LED-Leuchte blinkt, um
Spielunterbrechungen zu vermeiden.
2. Die vordere LED (zwischen den Home- und View-Tasten)
zeigt an, dass der Controller geladen ist und blinkt während der
Programmierung der Tasten für erweiterte Spielfunktionen.
3. Die vier LEDs an der Unterseite zeigen die Spielernummern 1 bis 8
an und werden während des kabellosen Kopplungsvorgangs von
links nach rechts weitergeschaltet.
PROGRAMMIERUNG DER TASTEN FÜR
ERWEITERTE SPIELFUNKTIONEN:
1. Halten Sie die Programmtaste auf der Rückseite des
Controllers für zwei bis drei Sekunden gedrückt. Die LED an der
Vorderseite blinkt, und zeigt so an, dass sich der Controller im
Belegungsmodus befindet.
2. Drücken Sie als nächstes die einzelne Controller-Funktion, die
Sie duplizieren wollen (die vordere LED wird schneller blinken):
A/B/X/Y/L/R/ZL/ZR/Steuerkreuz-Richtung.
3. Drücken Sie dann entweder AGR oder AGL, um die ausgewählte
Funktion einer Taste für erweiterte Spielfunktionen zuzuordnen. Die
vordere LED wird aufhören zu blinken, wenn die Taste ausgewählt
wurde. Wiederholen Sie diese Schritte für andere Tasten für
erweiterte Spielfunktionen.
Hinweis: Die Funktionen der Tasten für erweiterte
Spielfunktionen werden innerhalb des Controllers für
zukünftige Spielsitzungen gespeichert.
TASTEN FÜR ERWEITERTE SPIELFUNKTIONEN NEU
PROGRAMMIEREN ODER ZURÜCKSETZEN:
1. Eine Wiederholung der drei oben beschriebenen Schritte
ersetzt die vorherige Tastenbelegung mit einer neuen.
2. Halten Sie die Programmtaste für fünf Sekunden gedrückt,
um alle Tastenbelegungen zu löschen.
FEHLERBEHEBUNG:
F1. Mein kabelloser Controller koppelt sich nicht
A1. Stellen Sie sicher, dass die Batterien richtig eingelegt und nicht
leer, benutzt oder beschädigt sind
A2. Stellen Sie sicher, dass Sie dem oben beschriebenen
Kopplungsprozess folgen
A3. Entnehmen und ersetzen Sie die Alkalibatterien, um den
kabellosen Controller zurückzusetzen
Die aktuelle Liste häufig gestellter Fragen finden Sie unter
PowerA.com/Support/
WARNHINWEIS - ALKALIBATTERIE:
Entnehmen Sie die Batterien, bevor Sie Ihr Gerät für längere
Zeiträume lagern. Entnehmen Sie die Batterien, wenn sie verbraucht
sind. Entnehmen Sie alte, schwache oder verbrauchte Batterien
sofort und recyceln oder entsorgen Sie sie gemäß lokalen und
nationalen/regionalen Entsorgungsvorschriften.
Läuft eine Batterie aus, entnehmen Sie alle Batterien mit Vorsicht,
um zu vermeiden, dass die ausgelaufene Flüssigkeit in Kontakt
mit Ihren Händen oder Ihrer Kleidung kommt. Spülen Sie die Haut
unverzüglich mit Wasser ab. Bevor Sie neue Batterien einlegen,
reinigen Sie das Batteriefach mit einem trockenen Tuch.”
ITALIAN
CONTENUTO:
• Controller senza fili migliorati per Nintendo Switch
• Batterie AA (2)
• Istruzioni per l’uso
CONTROLLO DEGLI AGGIORNAMENTI DI SISTEMA:
Per l’utilizzo dei controller PowerA Wireless è richiesto
l’aggiornamento del sistema Nintendo alla versione 6.0.0 o
successiva.
1. Collega il tuo Nintendo Switch a Internet
2. In genere, gli aggiornamenti di sistema verranno scaricati
automaticamente una volta connessi online.
3. Selezionare “”Impostazioni di sistema”” dal menu HOME, quindi
scorrere verso il basso fino alla voce “”Sistema”” per visualizzare la
versione di Aggiornamento Sistema e controllare automaticamente
la presenza di un aggiornamento del sistema.
Per ulteriore assistenza, cercare aggiornamento del sistema
dal sito web del supporto Nintendo.”
INSTALLAZIONE DELLE BATTERIE
1. Togliere il coperchietto del vano batteria e installare le due
batterie alcaline AA
2. Verificare che la consolle Nintendo Switch sia accesa.
ACCOPPIAMENTO WIRELESS
Nel menu HOME selezionare Controllers (Controller), quindi Change
Grip and Order (Modifica impugnatura e ordine). Durante la
visualizzazione della schermata seguente, tenere premuto il pulsante
SYNC per almeno un secondo sul controller da accoppiare.
Al termine dell’accoppiamento, la connessione sarà automatica al
successivo utilizzo del controller.
INFORMAZIONI SUGLI INDICATORI A LED
Su questo controller sono presenti tre posizioni dei LED: superiore,
anteriore e inferiore.
1. Il LED superiore accanto al pulsante Sync lampeggia in rosso
quando le batterie stanno per esaurirsi. Sostituire le batterie alcaline
quando il LED lampeggia per evitare interruzioni di gioco.
2. Il LED anteriore (tra i pulsanti Home/View) indica che il controller
è alimentato e lampeggerà durante la programmazione dei pulsanti
di gioco avanzati.
3. I quattro LED sulla parte inferiore indicano il numero di giocatore
(da 1 a 8) e vengono attivati ciclicamente da sinistra a destra
durante l’accoppiamento wireless. “
MAPPAGGIO DEI PULSANTI DI GIOCO AVANZATO:
1. Tenere premuto il Pulsante di Programmazione sul retro del
controller per 2-3 secondi. Il LED frontale lampeggia, a indicare che il