Berlin Group CON150US Internet Radio User Manual
Berlin Brands Group Inc. Internet Radio
User Manual

www.auna-multimedia.com
Internet Radio
US-10028153 US-10028154

ICH BIN
EIN BERLINER*
* John F. Kennedy on June 26, 1963 in his speech in Berlin, on the occasion of the 15th anniversary
of the Berlin Airlift.

3
EN
ICH BIN
EIN BERLINER*Technical Data 4
Warning 5
Warranty 7
Safety Instructions 8
Controls 10
Getting Started 12
Settings 14
Internet Radio 19
Spotify Connect 22
Media Player 22
FM 24
Other Features 25
Troubleshooting 26
CONTENTS
Dear Customer,
Congratulations on your purchase. Please carefully read the following
instructions for the connection and use of this product. It is important
to carefully follow these instructions to prevent serious personal injury
or damage to the product. We assume no liability for damage caused by
disregarding the instructions in this manual or otherwise for improper use
of this product. In this case, you assume all risk and responsibility.

4
EN
Made in China
Berlin Brands Group Inc.
101 Montgomery Street,
Suite 2050 in San Francisco, CA 94104
www.berlin-brands-group.com
TECHNICAL DATA
Item number US-10028153
US-10028154
Power supply input 100-240V ~ 50/60Hz 0.3A
Power supply output 5V 1.2 A
TFT Display Size 2.4", resolution 320 x 240
Supported network IEEE 802.11 b/g/n, Ethernet (LAN)
Supported encryption WEP, WPA, WPA2 (PSK), WPS
Streaming UPNP, DLNA
Supported le types MP3, WMA, WAV, AAC, FLAC
FM 87 - 108 MHz, with RDS
AC/DC adapter Input 100-240V 50/60Hz 0.3A
Output 7.5V 1200mA / 110V~ 60Hz
Standby power consumption <1 W
Connections 1 x 1/8 Aux-In, 1/8” headphone out, 1/8”
Aux-In, 1/8" Line Out, LAN (RJ45)
Dimensions 9.25" x 5.12" x 6.89"
Weight 4.85lb
5
EN
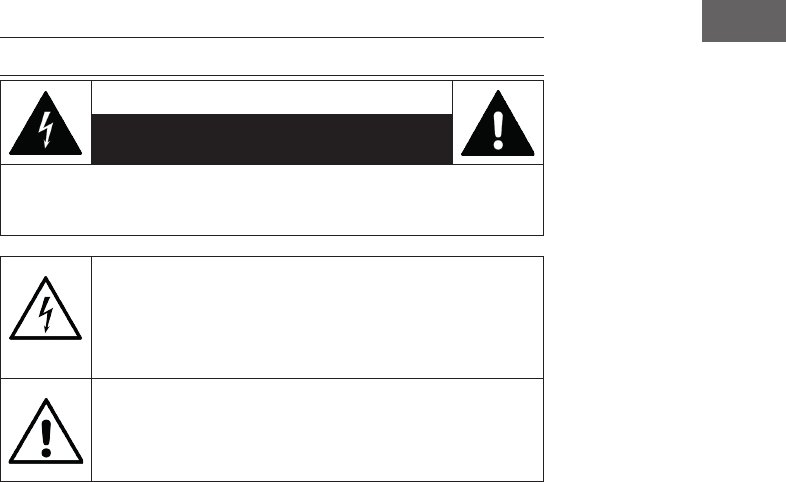
WARNING
CAUTION
RISK OF ELECTRIC SHOCK
DO NOT OPEN
CAUTION: TO REDUCE THE RISK OF ELECTRIC SHOCK AND SERIOUS PERSONAL
INJURY, DO NOT REMOVE ANY COVER. NO USER-SERVICABLE PARTS INSIDE. REFER
SERVICING TO QUALIFIED SERVICE PERSONNEL ONLY.
Triangle with lightening plus explanation as follows:
DANGEROUS VOLTAGE: The lightening ash with arrowhead symbol
within the equilateral triangle is intended to alert the user to the
presence of uninsulated dangerous voltage within the product‘s
enclosure that may be of suicient magnitude to constitute a risk of
electric shock to persons.
Triangle with exclamation point plus explanation as follows:
ATTENTION: The exclamation point within the equilateral triangle is
intended to alert the user to the presence of important operating and
maintenance (servicing) instructions in the literature accompanying
this product.
California Proposition 65 Warning: The product may contain chemicals
known to the State of California to cause cancer and birth defects or other
reproductive harm. (California law requires this warning to be given to
customers in the State of California.)
Ventilation Warning: Do not block any ventilation openings by situating
the product on a bed, sofa or similar surface that may block the ventilation
openings; or place in built-in installation. The product should be situated so
that its location or position does not interfere with its proper ventilation.

6
EN
FCC Warning: This equipment may generate or use radio frequency energy.
Changes or modications to this equipment may cause harmful interference
unless the modications are expressly approved in the instruction
manual. The user could lose the authority to operate this equipment if an
unauthorizied change or modication is made.
This device has been tested and found to comply
with Part 15 of FCC rules. Operation is subject
to the following two conditions: (1) the device
may not cause harmful interference and (2) the
device must accept any interference received,
including interference that may cause undesired
operation. These FFC rules are designed to
provide reasonable protection against harmful
interference in a residential installation.
PRODUCT COMPLIES WITH DHHS RULES 21 CFR
Chapter I, SUBCHAPTER J
DANGER
Invisible laser radiation can cause serious personal injury
when open and if the interlock fails or is defeated! Avoid
direct exposure to beam. Use of controls or adjustments other
than those specied herein may result in hazardous radiation
exposure and serious personal injury.

7
EN
WARRANTY
Berlin Brands Group (the “Company”) warrants to the original retail
purchaser of this Product that should this Product or any part thereof, under
normal use and conditions, be proven defective in material or workmanship
within twelve (12) months from the date of original purchase, such defect(s)
will be repaired or replaced with reconditioned Product (at the sole
discretion of the Company) without charge for parts and repair labor. To
obtain repair or replacement within the terms of this Warranty, the Product
is to be delivered with proof of warranty coverage (e.g. dated bill of sale),
specication of defect(s), transportation prepaid, to the Company at the
address provided herein
This warranty, as set forth above, may be extended for an additional six
(6) months for a total warranty period of up to eighteen (18) months by
registering the Product with the Company. In order to register the Product,
the original retail purchaser must complete and return the registration
documents provided along with the Product to the Company or register
online at www.auna-multimedia.com/warranty within ninety (90) days of
the days of the original purchase.
This Warranty does not apply to any product or part thereof which, in the
opinion of the Company, has suered or been damaged through alteration,
improper installation, mishandling, misuse, neglect, accident, or by removal
or defacement of the factory serial number/bar code label(s). THE EXTENT
OF THE COMPANY’S LIABILITY UNDER THIS WARRANTY IS LIMITED TO
THE REPAIR OR REPLACEMENT PROVIDED ABOVE AND, IN NO EVENT,
SHALL THE COMPANY’S LIABILITY EXCEED THE PURCHASE PRICE PAID BY
PURCHASER FOR THE PRODUCT.
THIS WARRANTY IS IN LIEU OF ALL OTHER EXPRESS WARRANTIES
OR LIABILITIES. ANY IMPLIED WARRANTIES, INCLUDING ANY IMPLIED
WARRANTY OF MERCHANTABILITY, SHALL BE LIMITED TO THE DURATION
OF THIS WRITTEN WARRANTY. ANY ACTION FOR BREACH OF ANY
WARRANTY HEREUNDER INCLUDING ANY IMPLIED WARRANTY OF
MERCHANTABILITY MUST BE BROUGHT WITHIN A PERIOD OF 18 MONTHS
FROM DATE OF ORIGINAL PURCHASE. IN NO CASE SHALL THE COMPANY
BE LIABLE FOR ANY CONSEQUENTIAL OR INCIDENTAL DAMAGES FOR
BREACH OF THIS OR ANY OTHER WARRANTY. No person or representative
is authorized to assume for the Company any liability other than expressed
herein in connection with the sale of this product.
Some states do not allow limitations on how long an implied warranty lasts
or the exclusion or limitation of incidental or consequential damage so the
above limitations or exclusions may not apply to you. This Warranty gives
you specic legal rights and you may also have other rights which vary from
state to state.

8
EN
SAFETY INSTRUCTIONS
FAILURE TO CAREFULLY FOLLOW THESE INSTRUCTIONS MAY LEAD TO
SERIOUS PERSONAL INJURY AND DAMAGE TO YOUR PRODUCT.
General Instructions
• DANGER. NOT FOR USE BY CHILDREN UNDER THE AGE OF 18.
• For home and personal use only. Any other usage shall be construed as
a misuse as set forth herein.
• For indoor use only. Outside usage shall be construed as a misuse as set
forth herein.
• Read, keep and follow the instructions carefully.
• Heed all warnings.
• Electrical equipment should never be kept or stored in rain or damp
environments. Storage of the Product under the aforementioned
conditions shall be construed as neglect as set forth herein
• Unplug the product during lightning storms or when unused for long
period of time. Any actions to the contrary shall be construed as a
neglect as set forth herein.
• When servicing only use identical replacement parts, as specied by
the manufacturer. Usage of any other parts shall be construed as an
alteration as set forth herein.
• Do not expose to direct sunlight and do not install near any heat
sources such as radiators, heat registers, stoves, or other apparatus that
produces heat. Conducting any of the foregoing shall be construed as a
misuse as set forth herein.
• Before rst use clean the Product. Failure to clean Product prior to its
initial usage shall be construed as neglect as set forth herein.
• DO NOT PLUG IN THE PRODUCT UNLESS IT IS TURNED OFF
COMPLETEY.
• DO NOT STORE FOOD OR LIQUIDS IN THE PRODUCT.
• Do NOT expose to dripping or splashing water. Do NOT place objects
on top of the product. Conducting any of the foregoing shall be
construed as a misuse as set forth herein.

9
EN
Special Instructions
This manual is intended to familiarize you with the operation of this device.
Keep this manual in a safe place for future reference.
• Please use the device only in its intended way. Any other use may result
in damage to the device or items in the vicinity of the device.
• Modifying or altering the device will compromise device safety.
• Caution: danger of injury. Never open the device without authorization.
Never attempt to perform any repairs yourself.
• Handle the device carefully. It can be damaged by bumps, impacts or
falls from low height.
• Do not drop metal objects into this device.
• Do not place heavy objects on this device.
• Clean only with a dry cloth.
• Do not block the ventilation openings.
• Use only accessories recommended by the manufacturer or a specialist
dealer.
Small objects / packaging parts (plastic bags, cardboard, etc.)
Keep small objects (for example, screws and other assembly materials,
memory cards) and packaging parts out of reach of children so that they
cannot be swallowed. Do not let small children play with plastic bags. Risk
of suocation.
Transporting the device
Please keep the original packaging. To ensure adequate protection when
transporting the device, pack the device tin its original packaging.
Cleaning the outer surfaces
Do not use volatile uids, such as insect sprays. The surface can be
damaged by excessive pressure during wiping. Rubber or plastic parts
should not be left in contact with the device for an extended period of time.
Use a dry cloth.
10
EN
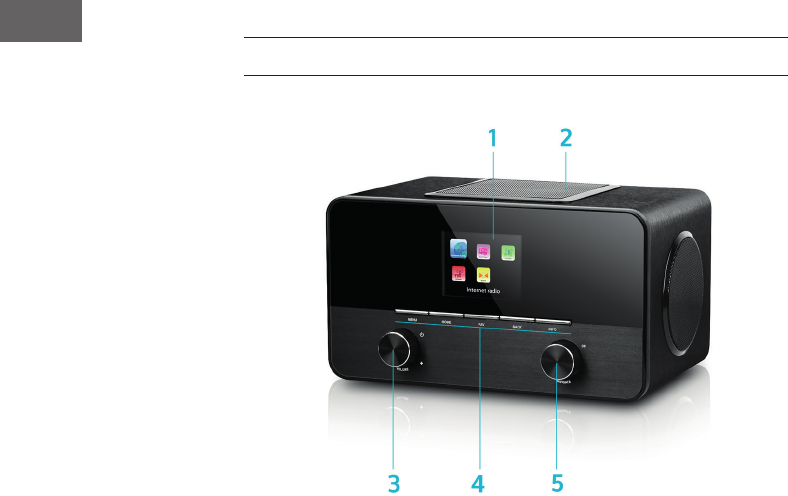
CONTROLS
Rear
1 Display
2 Subwoofer
3 Volume / On/Standby
4 Control panel
5 NAVIGATE (scroll) / OK
6 AUX IN: connect external media players (such as smartphones) here,
using a 3.5mm audio cable
7 Power on/o
8 USB slot
9 LAN (Rj45) socket
10 DC IN
11 Line-Out: connect external amplier here
12 Headphone jack: connect any headphones with a 1/8" audio cable
11
EN
Rear
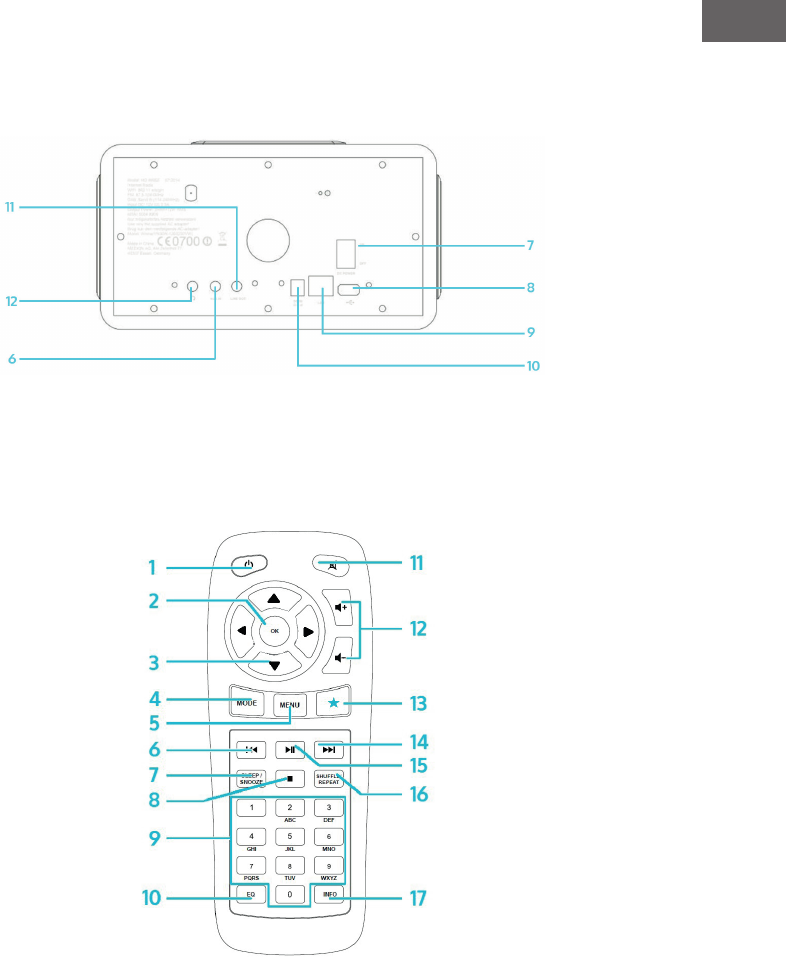
Remote Control

12
EN
1 On/Standby
2 OK
3 Arrow keys for navigating through menus or lists
4 MODE: Choose between FM, internet radio, AUX, Bluetooth, network
media player
5 MENU
6 PREVIOUS
7 SLEEP/SNOOZE
8 STOP
9 Num pad
10 EQ
11 Mute
12 VOL+/VOL- (change the volume)
13 FAV. Go to favourites / stored presets
14 NEXT
15 PLAY/PAUSE
16 SHUFFLE/REPEAT
17 INFO
Use your thumb to press the lid of the battery compartment and pull it out.
Install a CR2025 type 3V battery into the battery compartment, taking care
to insert it with the positive (+) side up.
Caution: Risk of explosion of battery if replaced by an incorrect type.
GETTING STARTED
The items enclosed in the packaging box are as follows:
• Main device
• Power adaptor
• Audio cable with 1/8" jack at both ends
• User manual
Connect the power adaptor to the back of the unit and plug it into power
socket.
Get the network environment ready
For wired LAN
Use an Ethernet cable (RJ45 jack) to connect the LAN ports on the unit and
your network device.Check if the light indicators on the network device are
in appropriatestatus.
13
EN
For WIFI
Make sure you have setup the wireless network and you have the WEP, WPA
or WPA2 security password to activate the connection.
You may also use the WPS (WiFi Protected Setup) function for easy pairing
between the network device and the unit. Check if the light indicators on the
network device are in appropriate status.
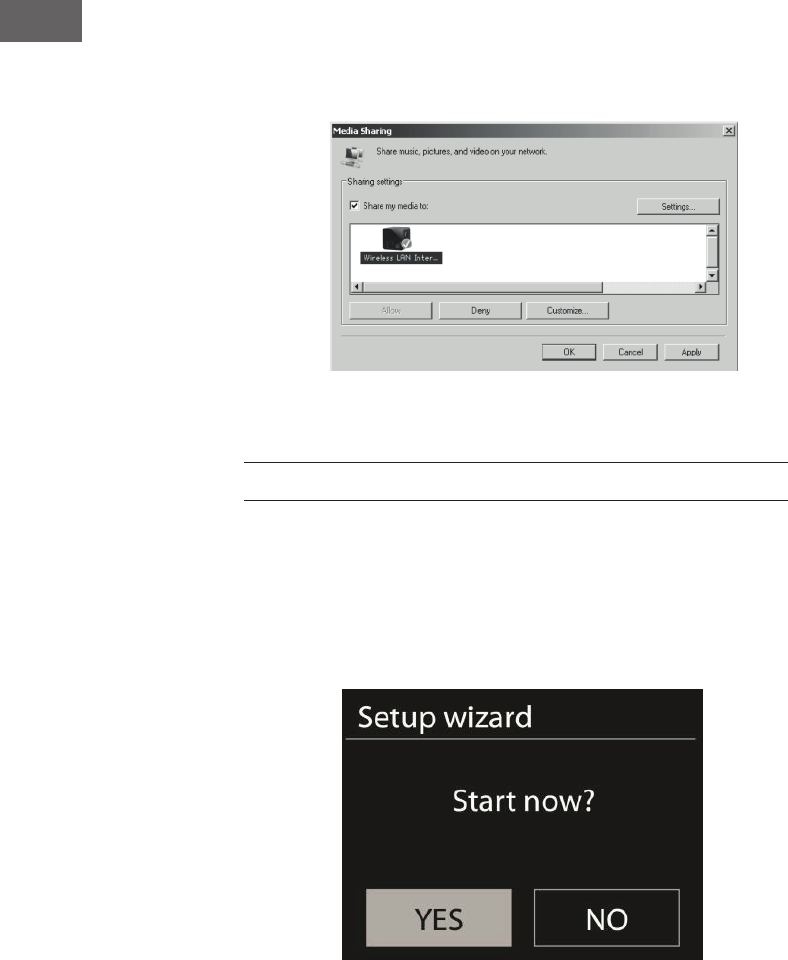
At initial use, the system asks whether you want to start the Setup Wizard.
Select YES to continue the setup. Details of the Setup Wizard will be
explained below. After choosing NO,
the next screen asks if you would
like to run the wizard next time unit
is started.
The unit will automatically connect
to the network that was set the last
time you had the radio powered
on. In case you want to change
the network, enter System Setting
to congure the corresponding
connection.
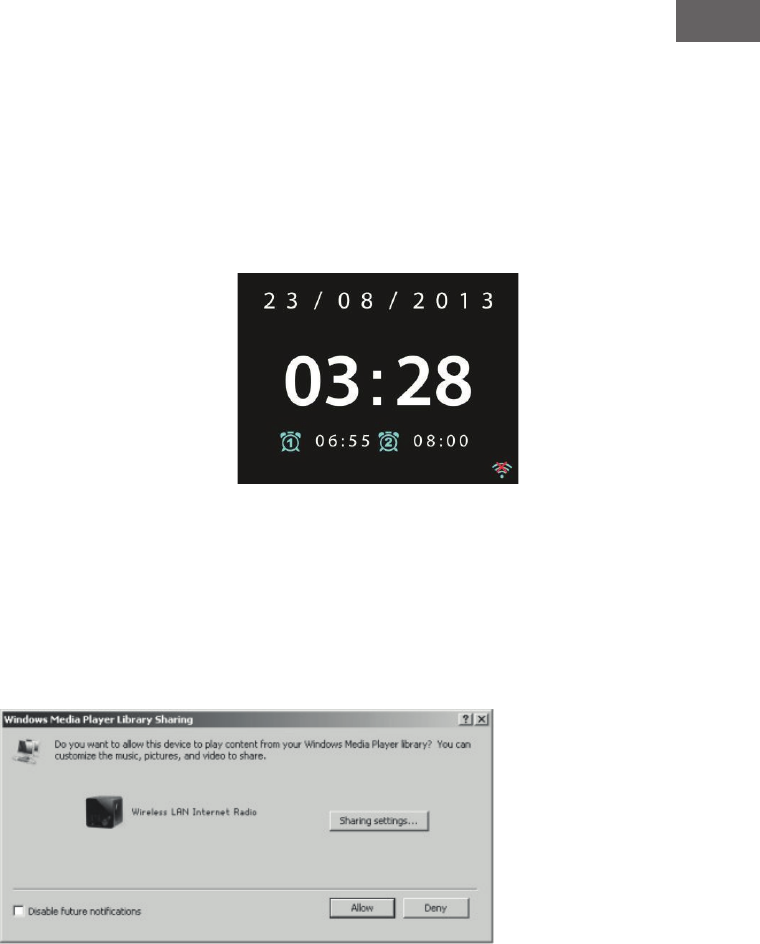
Music Sharing from PC
• • To share the music les from PC, the following steps are done on the
PC:
• • Connect the PC to the network. Ensure that unit is powered on and
connected to the same network.
14
EN
Open the UPnP platform Windows Media Player (11 or later). Alternatively,
other platforms or servers such as Windows Media Connection can be used.
Allow to share your media to Wireless LAN Internet Radio, which is the
device name for music streaming. Add the audio les and folders you want
to share to the media library.
SETTINGS
In the main menu, you can select the following modes: Internet Radio,
Media Player, FM, AUX IN, Sleep; Alarm and System Settings.
System Settings
Setup Wizard

15
EN
Time/date
Display format: Select 12or 24 as the time format.
Auto-update
The time and date can be updated manually or automatically from DAB, FM
or network.
Auto-update works with data sent over DAB, FM or the Internet. The clock is
only updated when in a corresponding mode, so it is best to select a mode
you use regularly.
DAB and FM use time signals broadcast with radio transmissions. Network
uses a time signal sent from the Internet radio portal when in any network-
connected mode.
Time zone, daylight
Set your time zone. If your country uses daylight saving and it is in
eect, turn on the Daylight savings option.
Manual update
If you set „No update“, the wizard prompts you to set the time and date
manually. The date and time are displayed as dd-mm-yyyy and hh:mm.
The active value appears ashing. Adjust each value with the navigation
wheel or on the remote control. Once the value is set, press to continue
setting the next value.
Network
WLan region
Select the WLan region to obtain the optimal WLan connectivity:
Canada, Spain, France, Japan, Singapore, Australia, and Republic of
Korea.
Scanning for the network
The unit is compatible with all common network protocols and encryption
methods. It searches for available networks and list them out for you
choose.
There will be hints for the type of network – if you plug the LAN cable, it will
highlight the network as [wired];
if your network device supports WPS function, it will display [WPS] before
the SSID (the name of network device). Select the one you want to connect
to.
For the wireless connection, you will be prompted to type in the pass
phrase.
16
EN
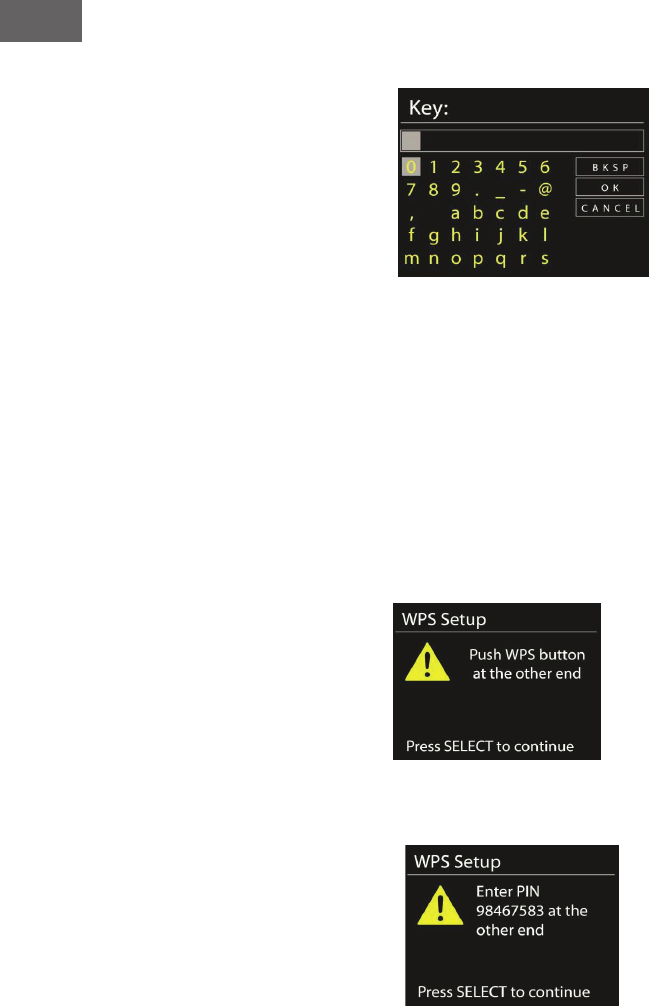
Standard encrypted network
To enter the network’s key, use the navigate wheel or the direction keys on
the remote control to move the cursor through the characters and press OK
to conrm.
There are three options accessible by tuning the navigation wheel back
before the rst characters – Backspace, OK and Cancel.
WPS encrypted network
WPS encrypted networks are identied by WPS at the start of the network
name when the unit searches the available AP. Useone of the following
methods of connection:
Push button
The unit prompts you to press the connect button on the router. It then
scans for a ready Push Button Connect network and connects.
Enter PIN
The device generates an 8-digit code number, which must be entered into
the wireless router or access point..
17
EN
Skip WPS
Enter key as for a standard encrypted network. For more information on
setting up a WPS encrypted network, see your WPS router’s instructions.
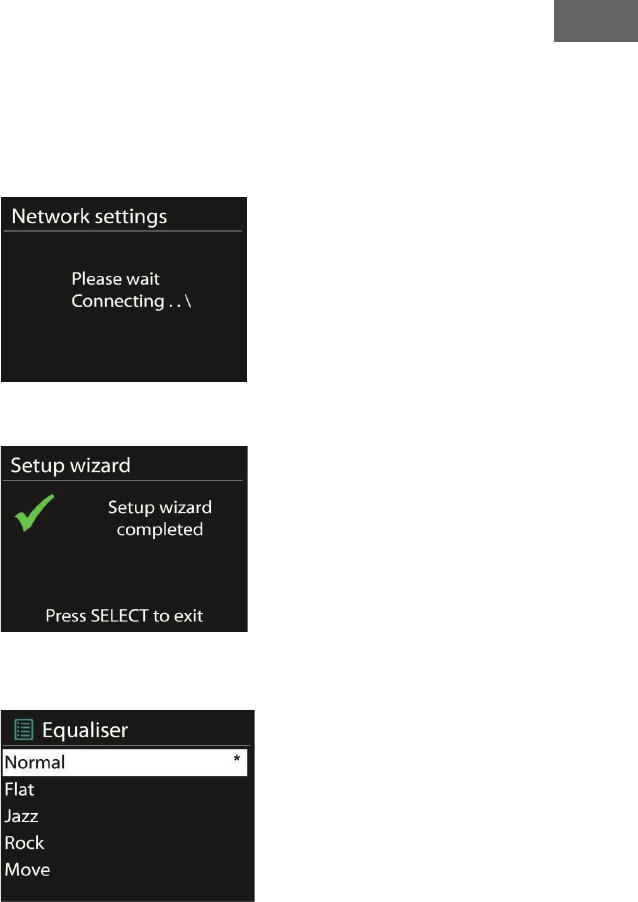
Completion
The Device attempts to connect to the selected network. It will display
“connected” if the setup is successful.
If connecting fails, the device returns to the previous screen. Try again.
Press SELECT to quit the setup wizard.
Equalizer
Several preset EQ modes are available: Normal, Flat, Jazz, Rock, Movie,
Classic, Pop and News. Also a user-dened setting is available; create your
own EQ with custom bass, treble and loudness settings. Press EQ on the
remote control to quick enter the equalizer menu.

18
EN
Network
Network wizard
Enter to search AP SSID, then input the WEP/WPA key or choose Push
Button/Pin/Skip WPS to connect to the wireless network.
PBC Wlan setup
• Push Button Conguration, it is to connect the AP that supports
WPS(Wi-Fi Protected Setup).
View settings
View the information of current connected network: Active connection,
MAC address, Wlan region, DHCP, SSID, IP address, Subnet mask, Gateway
address, Primary DNS and Secondary DNS.
Wlan region
Select the Wlan region to obtain the optimal Wlan connectivity: Canada,
Spain, France, Japan, Singapore, Australia, and Republic of Korea.
Manual settings
Choose wired or wireless network connection and enable or disable DHCP
(Dynamic Host Conguration Protocol).
Network prole
• Unit remembers the last four wireless networks it has connected to, and
automatically tries to connect to whichever one of them it can nd.
• From here you can see the list of registered networks. You can delete
unwanted networks by turning and pressing then choosing YES to
conrm delete.
•
Time/Date
Set the time manually or auto update, time format, time zone and daylight.
Language
The default language is English. Change it as your preference.
Factory reset
A factory reset resets all user settings to default values, so that time and
date, network conguration and presets are lost. However, the unit’s current
19
EN
software version is maintained, as is registration with the Internet radio
portal. Internet radio favourites therefore remain unless you re-register your
unit with another account on the portal website.
Software update
From time to time, software upgrades may be created with bug xes and/
or additional features. You can either check manually or set the unit to check
periodically automatically (this is the default). If newer available software is
detected, you will be asked if you want to go ahead with an update. If you
agree, the new software is then downloaded and installed. After a software
upgrade, all user settings are maintained.
NOTE: Before starting a software upgrade, ensure that unit is plugged into
a stable main power connection. Disconnecting power during an upgrade
may permanently damage the unit.
Info
View the rmware version and the radio ID.
Backlight
You may change the backlight of each environment (power on or standby)
to High, Medium or Low.And adjust the
timeout duration which the radio turns to standby backlight level when it
has not been controlled.
INTERNET RADIO
Unit can play thousands of radio stations and podcasts from around the
world though a broadband Internet connection.
When you select Internet radio, the unit directly contacts the Frontier Silicon
Internet radio portal (which is supported by v-tuner) to get a list of stations.
The portal also enables multiple lists of favourite stations that you can
personalize.
20
EN
If you are already listening to an Internet radio station, you can press
‘Return’ or ‘Play’ on the remote control to quickly return to the last visited
branch of the menu tree, rather than Menu to go tothe rst menu of Internet
radio mode.
Last listened
When Internet radio mode restarts, the last-listened station is selected. To
select another recently used station, enter here to select the listed station.
Most recent stations appear at the top of the list.
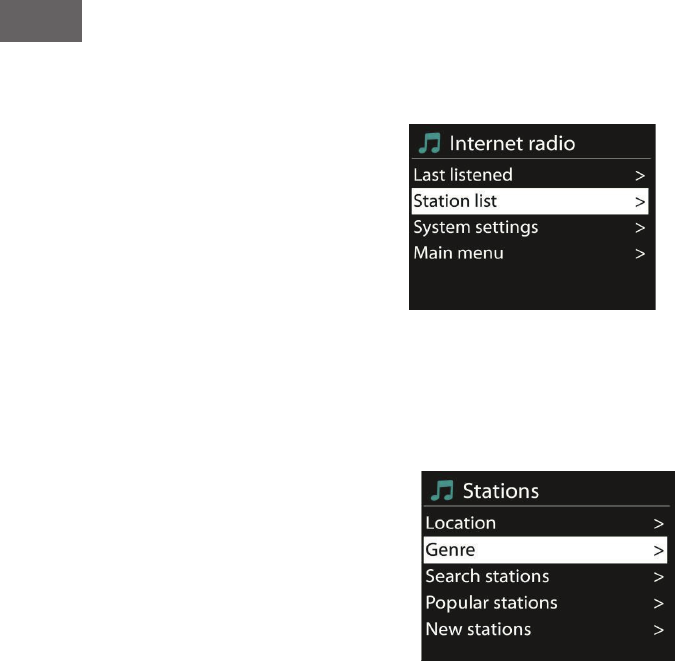
Station list
Browse Internet broadcasts that organized into dierent categories,
Location, Genre, Popular and New. You can also nd the station with Search
by keyword.
Favorites
Favourites are stored with the Internet radio portal, and are available
through all Internet radios registered on the same account. Before
favourites can be used, the radio has to be registered with the Internet radio
portal.
To register your unit, choose Station list > Help > Get access code to get
your radio’s unique portal access code rst. (Do not confuse the portal
access code with the Radio ID from System settings.

21
EN
Visit www.wiradio-frontier.com. If this is your rst visit to the portal,
register for a new account, entering the following information:
• access code
• your e-mail address
• password
• radio model.
If you already have an account and wish to add an additional radio, log in to
your account and select My preferences > Add another Wi-Fi radio.
Once your radio is registered with the portal, you can immediately use the
Internet radio favourites and added stations features.
To store a playing station as a favourite, press and hold select until
the display shows ‘Favourite added’. The station appears in the default
favourites list Stations.
My added stations
Even though the Internet radio portal contains thousands of stations, you
may want to listen to stations not listed. You can add your own via the
portal.
Presets
Presets are stored in the radio and cannot be accessed from other radios.
To store an Internet radio preset, press and hold ‘Preset’ until the display
shows the Save preset screen. Select one of the 10 presets to save the
currently playing station.
To select a preset, press ‘Preset’ , then select one of the listed preset
stations. When a preset station is playing, it shows Pn(P1, P2 etc) at the
bottom of the screen.
‘P1‘ to ‘P10‘on the remote control are for the use ofpreset station 1-10.
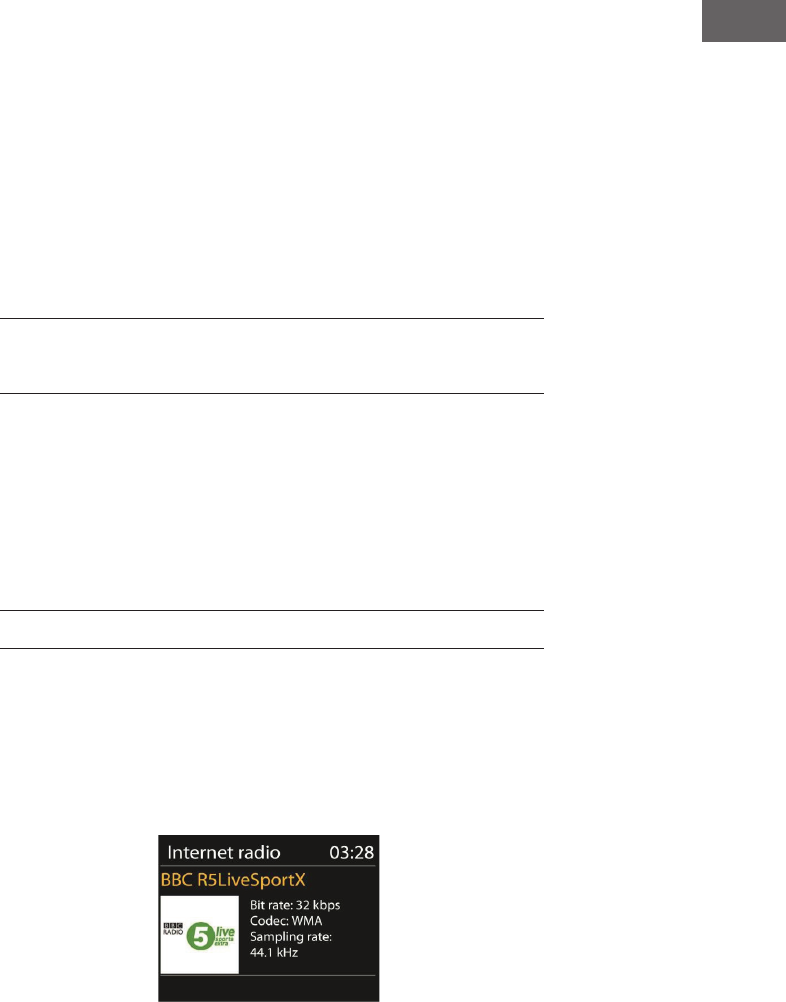
Now playing information
While the stream is playing, the screen shows its name and description. To
22
EN
view further information, press .
Each time you press , another set of information is displayed, cycle through
name/description, genre/location, reliability, codec/sampling rate,
playback buer and today’s date.
SPOTIFY CONNECT
Spotify Connect lets you play Spotify through your home speakers or TV,
using the Spotify app as remote. You’ll need
a Spotify Premium account to use Spotify Connect. If you don’t have it, just
go to http://www.spotify.com/freetrial for
your free trial.
• Connect your device to the same wi network as your phone, tablet or
PC running the Spotify app.
• Open the Spotify app, and play any song - tap the song image in the
bottom left of the screen.
• Tap the Connect icon.
• Pick your Connect-150 from the list.
For more information on how to set up and use Spotify Connect please visit
www.spotify.com/connect
The Spotify Software is subject to third party licenses found here: http://
www.spotify.com/connect/third-party-licenses
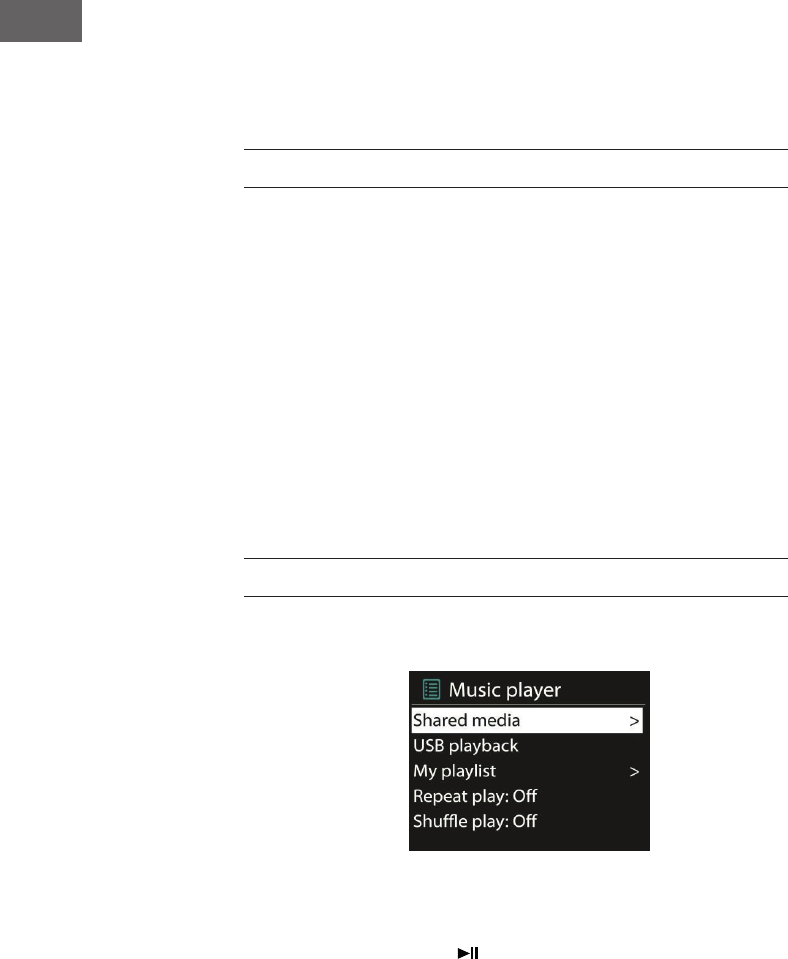
MEDIA PLAYER
Music player mode plays audio les in MP3, WMA, WAV, AAC or FLAC
format from a computer on the local network, or frm a USB stick .
If you are already playing a music le, you can press ‘Return’ or ‘Back’ on
the remote control rather than ‘Menu’ to quickly to quickly return to the last
visited branch of the menu tree.
You can use or to play the previous or next track, press and hold to
rewind or fast forward. Press to play or pause.
23
EN
Shared media
It you have set up shared media, you should see an entry consisting of
<computer name>: <Shared media name>. If you have more than one
computer sharing media, the alternatives are listed. Select the shared media
you want to play.
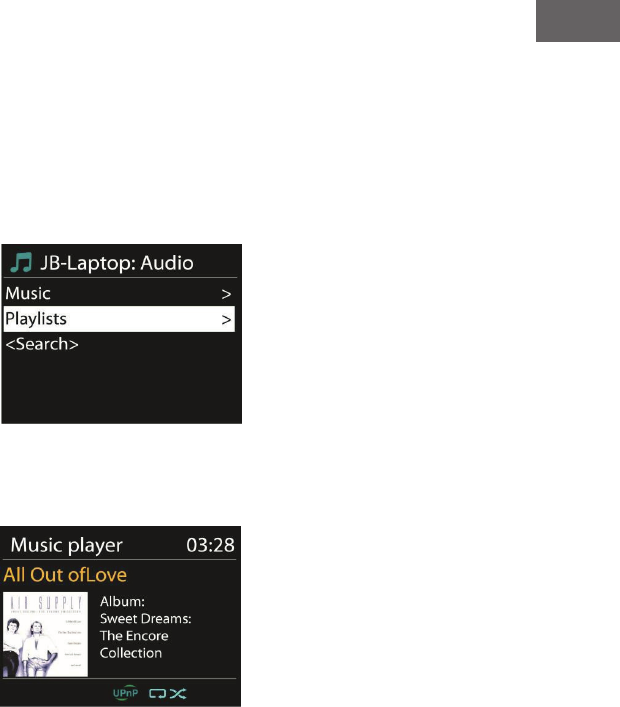
From this point on, the menus are generated from the shared media server.
The rst menu shows a list of media types, for example Music, Video,
Pictures and playlists. unit can only play music and playlists.
There is also a search function which nds tracks in a similar way toInternet
radio search.
From Music, there are numerous ways of selecting tracks including Genre,
Artist, Album, Composer and Rating.
Once you have found a track you want to play, press . A short press plays
the track immediately.
USB playback
From this point on, menus are generated from the folders on the USB
device. Browse folders with the navigatereel and ‘Return’ button, or
direction keys on the remote control. The display shows folder and le
names (not necessarily track names).
24
EN
Once you have found a track you want to play, press SELECT. A short press
plays the track immediately.
Repeat/shule
You can set to repeat tracks or play them in random order. Press and
on the remote control for shortcut.
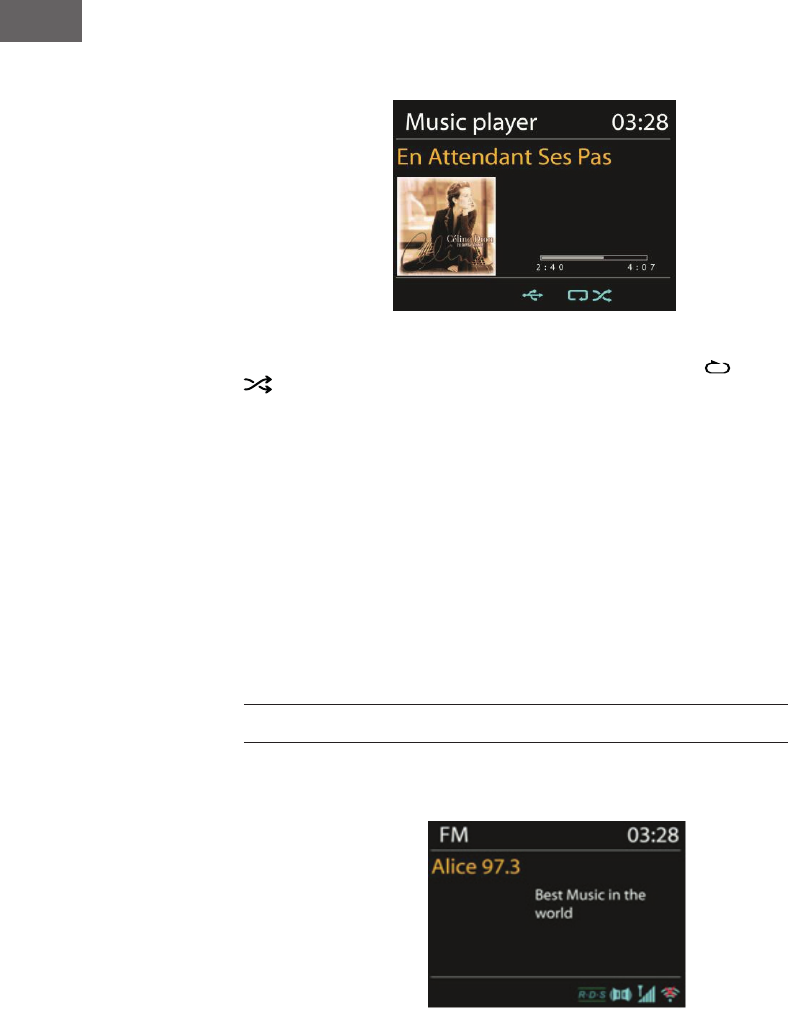
Now playing information
While a track is playing, the screen shows its track and artist (UPnP) or le
name (USB). There is also a progress bar with gures for elapsed and total
track time. At the bottom of the screen, an icon indicates UPnP or USB
depending on the source. To view further information, press INFO.
Each time you press INFO, another set of information is displayed, cycling
through the information:
UPnP: track/artist/progress bar/track times, album, codec/sampling rate,
playback buer and today’s date.
USB: le name, folder, path,codec/sampling rate, playback buer and
today’s date.
FM
FM radio mode receives analogue radio from the FM band and displays RDS
(Radio Data System) information about the station and where broadcast.

25
EN
Select the alarm number (1 or 2) then congure the following parameters:
• Enable: on/o,
• Frequency: Daily, Once, Weekends or Weekdays,
• Time,
• Mode: Buzzer, Internet Radio, DABor FM,
• Preset: Last listened 1-10,
• Volume: 0-20
To activate the new settings, scroll down and select Save.
The screen shows active alarms with an icon at the bottom left.
At the set time, the alarm will sound. To temporarily silence, press SNOOZE
button. You can change the snooze period with the SELECT control if you
like. The radio returns to standby for the set period, with the silenced alarm
icon ashing.
OTHER FEATURES
Headphone jack
The unit featured with headphone jack for you to continue enjoying the
music in vary environments, such as noisy background, or the area that
requires every one keeping silent.
It is recommended to reduce the volume before put on the headphones.
After the headphones are positioned properly, increase the volume to the
desired level.
Line out jack
It allows you to connect an audio cable from the unit to your own HiFi
speaker system to enhance sound performance.

26
EN
TROUBLESHOOTING
Error Remedy
The device does not switch on. Check it the power adaptor is connected properly
No sound - Turn on the sound as it may be muted
- Increase the volume
- Pull any connected headphone or speaker from
the connector jack.
No network connection
can be established.
- Check the LAN cable or the WLAN function
- Try to set an IP address at the device
- Activate the DHCP function on the router and
make the connection
again at the device
- A rewall is activated on the network — set the
respective program
in such a way that access is possible
- Reboot the router
WiFi connection cannot
be established
- Check the availability of WLAN network on the
router.
- Place the device closer to the router
- Make sure the password is correct..
Wired connection cannot
be established.
- Check the availability of LAN network on the
access point.
- Reconnect or even replace the LAN cable.
No station is found - Check the network as well as the access point
and rewall.
-
The station may not be available currently, try it
again later or select
another station.
- The link of the station is changed or the station
no longer transmits,
ask the provider for information.
- The link of manual added station is not correct,
make sure it is correct
and re—enter
Hiss in FM mode - Check/move the FM antenna
- Move the radio
No stations available /burbling
/ intermittent in DAB mode.
- Move the radio.
- Rescan local stations only (high-strength).
- Check the local DAB coverage.

27
EN
Alarm does not work. - Switch on the alarm.
- Due to the volume setting, refer to the solutions
of „No sound“.
-
The source of alarm was set to be station but there is
no network connection.
Change the source of alarm or recongure the
connection.
USB driver or MP3 player
is not detected.
- Check if the USB driver or MP3 player is
plugged properly.
- Some USB hard disks need external power
supply, make sure it is
connected to the power.
- Not all MP3 players can be read directly on the
device — use an USB
drive instead.
NetRemote does not show or
connect to CONNECT-150
- Reopen the App.
-
If you have several streaming from several devices at
the same time, it
may cause crash, reboot CONNECT-150 and/or your
device.
All other undetermined
cases.
- CONNECT-150 may process large amount of data
after a period of operation,
no matter in which mode, it will cause the system
freeze or malfunction.
Reboot CONNECT-150 if necessary.
- The normal function of the product may be disturbed
by strong Electro-
Magnetic Interference. If so, simply reset the product
to resume normal
operation by following the instruction manual. In
case the function could not
resume, please use the product in other location.
- The device may malfunction when used in areas with
strong radio interfe-
rence. The device will work properly again once there
is no more interfe
rence.

28
EN
FCC Part 15.19 Warning Statement
THIS DEVICE COMPLIES WITH PART 15 OF THE FCC RULES. OPERATION
IS SUBJECT TO THE FOLLOWING TWO CONDITIONS: (1) THIS DEVICE MAY
NOT CAUSE HARMFUL INTERFERENCE, AND (2) THIS DEVICE MUST
ACCEPT ANY INTERFERENCE RECEIVED, INCLUDING INTERFERENCE THAT
MAY CAUSE UNDESIRED OPERATION.
FCC Part 15.21 Warning Statement
NOTE: THE GRANTEE IS NOT RESPONSIBLE FOR ANY CHANGES OR
MODIFICATIONS NOT EXPRESSLY APPROVED BY THE PARTY RESPONSIBLE
FOR COMPLIANCE. SUCH MODIFICATIONS COULD VOID THE USER’S
AUTHORITY TO OPERATE THE EQUIPMENT.
FCC Part 15.105 Warning Statement
Note: This equipment has been tested and found to comply with the limits for a Class B
digital device, pursuant to part 15 of the FCC Rules. These limits are designed to provide
reasonable protection against harmful interference in a residential installation. This
equipment generates, uses and can radiate radio frequency energy and, if not installed and
used in accordance with the instructions, may cause harmful interference to radio
communications. However, there is no guarantee that interference will not occur in a
particular installation. If this equipment does cause harmful interference to radio or television
reception, which can be determined by turning the equipment off and on, the user is
encouraged to try to correct the interference by one or more of the following measures:
—Reorient or relocate the receiving antenna.
—Increase the separation between the equipment and receiver.
—Connect the equipment into an outlet on a circuit different from that to which the receiver
is connected.
—Consult the dealer or an experienced radio/TV technician for help.
RF warning statement:
The device has been evaluated to meet general RF exposure requirement.
To maintain compliance with FCC's RF exposure guidelines, this equipment should be
installed and operated with a minimum distance of 20cm between the radiator and your
body.