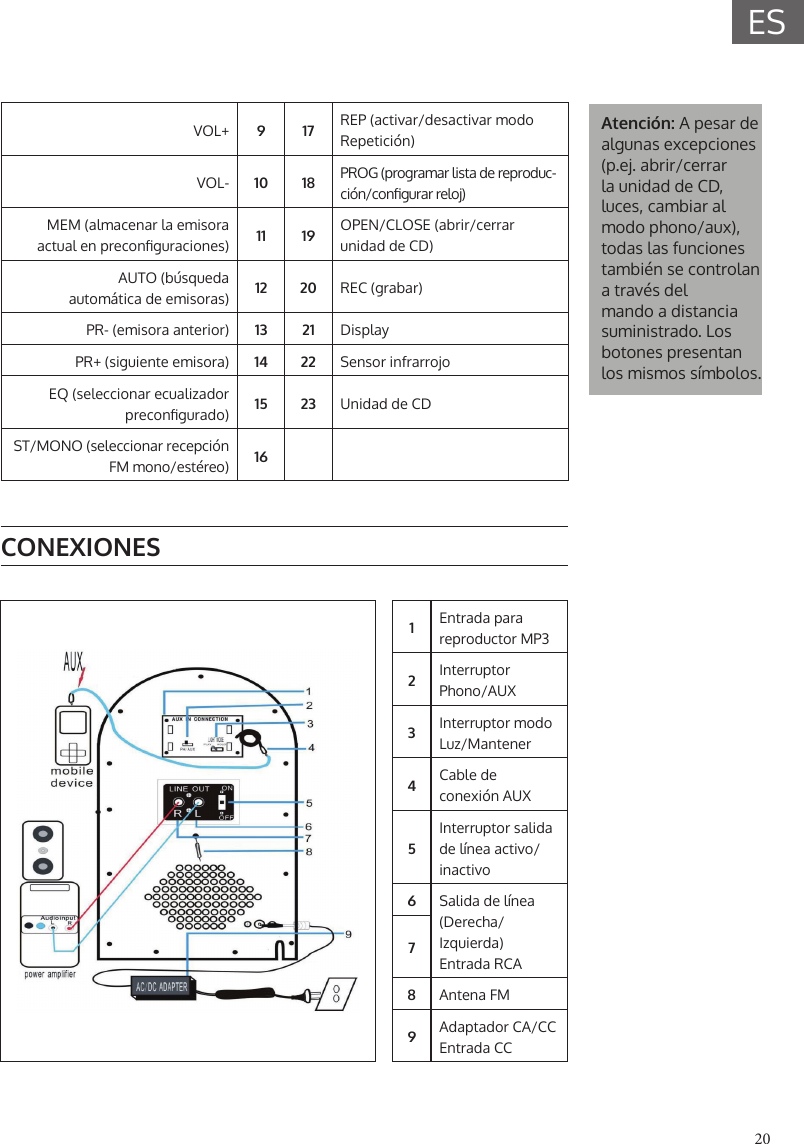
Berlin Group GRACELANDUS BX-Graceland TT, auna Jukebox W/ TT & BT wood User Manual US 10030442 Jukebox with Turntables Auna indd

Berlin Brands Group Inc. BX-Graceland TT, auna Jukebox W/ TT & BT wood US 10030442 Jukebox with Turntables Auna indd

User Manual

www.auna-multimedia.comBX-Graceland TT, auna Jukebox W/ TT & BT wood US-10030442
ICH BINEIN BERLINER** John F. Kennedy on June 26, 1963 in his speech in Berlin, on the occasion of the 15th anniversaryof the Berlin Airlift.
3ENDear customer,Congratulations on your purchase. Please carefully read the following instructions for the connection and use of the auna Vinylbox (the “Product”). It is important to carefully follow these instructions to prevent serious personal injury or damage to the Product. We assume no liability for damage caused by disregarding the instructions in this manual or otherwise for improper use of this product. In this case, you assume all risk and responsibility.CONTENTWarning 4Warranty 5Safety Instructions 6Product Overview 8Connections 9Operation 10Radio 10CD Functions 11USB/SD 11BT Functions 11Phono 12AUX 12Light eects 12TECHNICAL DATAItem number US-10030442Power supply 120 V / 60 HzPRODUCERMade in ChinaBerlin Brands Group Inc.101 Montgomery Street, Suite 2050San Francisco, CA 94104www.berlin-brands-group.com
4EN WARNINGCAUTIONRISK OF ELECTRIC SHOCKDO NOT OPENCAUTION: TO REDUCE THE RISK OF ELECTRIC SHOCK AND SERIOUS PERSONAL INJURY, DO NOT REMOVE ANY COVER. NO USER-SERVICABLE PARTS INSIDE. REFER SERVICING TO QUALIFIED SERVICE PERSONNEL ONLY.TO REDUCE THE RISK OF FIRE OR ELECTRICAL SHOCK, DO NOT EXPOSE THIS PRODUCT TO WATER, RAIN OR MOISTURE.Triangle with lightening plus explanation as follows: DANGEROUS VOLTAGE: The  lightening   ash  with  arrowhead  symbol within the equilateral triangle is intended to alert the user to the presence of uninsulated dangerous voltage within the product‘s enclosure that  may  be  of  su icient  magnitude  to  constitute  a  risk  of electric shock to persons.Triangle with exclamation point plus explanation as follows:ATTENTION: The exclamation point within the equilateral triangle is intended to alert the user to the presence of important operating and maintenance (servicing) instructions in the literature accompanying this product.CAUTIONTo reduce the risk of electric shock do not use this plug with an extension cord or receptacle.
5ENWARRANTYBerlin Brand Group (the “Company”) warrants to the original retail purchaser of this Product that should this Product or any part thereof, under normal use and conditions, be proven defective in material or workmanship within twelve (12) months from the date of original purchase, such defect(s) will be repaired or replaced with reconditioned Product (at the sole discretion of the Company) without charge for parts and repair labor. To obtain repair or replacement within the terms of this Warranty, the Product is to be delivered with proof of warranty coverage (e.g. dated bill of sale), specication of defect(s), transportation prepaid, to the Company at the address provided herein.This warranty, as set forth above, may be extended for an additional six (6) months for a total warranty period of up to eighteen (18) months by registering the Product with the Company. In order to register the Product, the original retail purchaser must complete and return the registration documents provided along with the Product to the Company or register online at www.auna-multimedia.com/warranty within ninety (90) days of the days of the original purchaseThis Warranty does not apply to any product or part thereof which, in the opinion of the Company, has suered or been damaged through alteration, improper installation, mishandling, misuse, neglect, accident, or by removal or defacement of the factory serial number/bar code label(s). THE EXTENT OF THE COMPANY’S LIABILITY UNDER THIS WARRANTY IS LIMITED TO THE REPAIR OR REPLACEMENT PROVIDED ABOVE AND, IN NO EVENT, SHALL THE COMPANY’S LIABILITY EXCEED THE PURCHASE PRICE PAID BY PURCHASER FOR THE PRODUCT.THIS WARRANTY IS IN LIEU OF ALL OTHER EXPRESS WARRANTIES OR LIABILITIES. ANY IMPLIED WARRANTIES, INCLUDING ANY IMPLIED WARRANTY OF MERCHANTABILITY, SHALL BE LIMITED TO THE DURATION OF THIS WRITTEN WARRANTY. ANY ACTION FOR BREACH OF ANY WARRANTY HEREUNDER INCLUDING ANY IMPLIED WARRANTY OF MERCHANTABILITY MUST BE BROUGHT WITHIN A PERIOD OF 18 MONTHS FROM DATE OF ORIGINAL PURCHASE. IN NO CASE SHALL THE COMPANY BE LIABLE FOR ANY CONSEQUENTIAL OR INCIDENTAL DAMAGES FOR BREACH OF THIS OR ANY OTHER WARRANTY. No person or representative is authorized to assume for the Company any liability other than expressed herein in connection with the sale of this product. Some states do not allow limitations on how long an implied warranty lasts or the exclusion or limitation of incidental or consequential damage so the above limitations or exclusions may not apply to you. This Warranty gives you specic legal rights and you may also have other rights which vary from state to state.
6ENSAFETY INSTRUCTIONSFAILURE TO CAREFULLY FOLLOW THESE INSTRUCTIONS MAY LEAD TO SERIOUS PERSONAL INJURY AND DAMAGE TO YOUR PRODUCT.General instructions•  DANGER. NOT FOR USE BY CHILDREN UNDER THE AGE OF 18.•  For home and personal use only. Any other usage shall be construed asa misuse as set forth herein.•  For indoor use only. Outside usage shall be construed as a misuse as setforth herein.•  Read, keep and follow the instructions carefully.•  Heed all warnings.•  Electrical equipment should never be kept or stored in rain or damp environments. Storage of the Product under the aforementionedconditions shall be construed as neglect as set forth herein•  Unplug the product during lightning storms or when unused for long period of time. Any actions to the contrary shall be construed as aneglect as set forth herein.•  When servicing only use identical replacement parts, as specied by the manufacturer. Usage of any other parts shall be construed as analteration as set forth herein.•  Do not expose to direct sunlight and do not install near any heat sources such as radiators, heat registers, stoves, or other apparatus thatproduces heat. Conducting any of the foregoing shall be construed as amisuse as set forth herein.•  Before rst use clean the Product. Failure to clean Product prior to its initial usage•  shall be construed as neglect as set forth herein.•  DO NOT PLUG IN THE PRODUCT UNLESS IT IS TURNED OFF COMPLETEY.•  DO NOT STORE FOOD OR LIQUIDS IN THE PRODUCT.•  DO NOT expose to dripping or splashing water. DO NOT place objects on top of the product. Conducting any of the foregoing shall be construed as a misuse as set forth herein.
7ENSpecial instructions•  Do not expose this unit to rain.•  Do not place any objects lled with liquids, such as vases, on this unit.•  Only use the recommended accessories.•  Do not attempt to repair this unit yourself.•  Contact qualied service personnel for maintenance.•  Do not drop metal objects into this unit.•  Do not place heavy objects on this unit.•  Clean only with a dry cloth.•  Do not block the ventilation openings.•  Do not install the equipment near sources of heat such as heaters,stoves, ovens, or other hot appliances (such as ampliers, etc.)Power Cable / Power Supply•  Ensure that the voltage of the power supply corresponds to the valuestated on this unit.•  Plug the mains plug completely into the socket.•  Do not pull, twist, or place heavy objects on the cable.•  Do not touch the plug with wet hands.•  Hold the plug by its body when you pull it out.•  Do not use a damaged power plug or a damaged power outlet.•  Install this device so that the power cord can be unplugged from the wall outlet immediately if any malfunctions occur.Setup•  For indoor use only.•  Place the unit on a dry, level, water resistant and heat resistant surface.•  Choose a location where children can not reach the unit.•  The socket must be easily accessible in order to be able to quicklydisconnect the device from the circuit in an emergency.•  Do not install or position this unit in a bookcase, cupboard, or othersmall space. Ensure good ventilation of the unit.•  Do not place the unit on ampliers or other equipment that maybecome hot. This heat could damage the unit.•  Do not expose this product to direct sunlight, high temperatures,excessive moisture, or excessive vibration.
8EN PRODUCT  OVERVIEWMODE (select mode) 1 5 SKIP/FAST FWDON/OFF 2 6 BACK/REVSTOP 3 7 F+10  (skip 10 tracks)PLAY/PAUSE 4 8 F-10  (go back 10 tracks)PhonoFig. 2-1End of tone armOPEN CLOSERemove the lock before releasing the tone arm.There is a screw to protect the phonograph chassis during transportation. Turn thescrew clockwise with a coin.Tone armSelect player speed: 33/45/78
9ENVOL+ 9 17 REP (toggle repeat modes)VOL- 10 18 PROG (programmed play / set clock)MEM (save current station to presets) 11 19 OPEN/CLOSE (CD tray)AUTO (automatic station scan) 12 20 RECPR- (previous station) 13 21 DisplayPR+ (next station 14 22 IR sensorEQ (select preset EQ) 15 23 CD trayST/MONO (select mono/ste-reo FM reception) 16Note: With few exceptions (e.g. open/close the CD tray, lights, switch phono/AUX), all functions can be accessed by the supplied remote control as well. Buttons are marked accordingly.Connections1MP3 box buckle bit2Phono/AUX switch3Light Mode/Hold switch4AUX connection cable5Line-Out active/inactive6Line-Out (R/L): RCA78FM antenna9AC/DC adaptor/ DC in
10ENOPERATIONGetting StartedUnpack the jukebox and all accessories. Remove all protective material.Connect to a household mains socket, using the supplied AC/DC adaptor (see p. 10). Press ON/OFF to switch the device on.Basics•  MODE: Press MODE repeatedly to toggle between the device modesFM, CD, USB, SD, BT and Phono.•  Output volume: Use VOL+/-  to adjust.•  Line Out: If you have connected your jukebox to any external audio devices such as a PA or HiFi, use the LINE OUT switch on the rear toactivate/de-activate the audio output.•  Setting the clock: After switching on, the display will show 00:00.Press and hold PROG for 3-5 secs., then use the arrow buttons to selectthe clock display format (12h/24h). Conrm by pressing PROG. The rstdigits will now ash. Use the arrow buttons to adjust the hour. Conrmwith PROG. Repeat the procedure for the minute digits.Note: The time will be reset to 00:00 when the device is disconnected from the mains power supply.RADIOCompletely unfold the antenna on the rear. After switching the device on, press MODE to switch to FM mode. Use the arrow buttons to adjust the desired receiving frequency (shown on display). To save the current station to presets, press PROG, then use the arrow buttons to select the desired preset. There are a total 20 presets available. Press PROG again to conrm and continue.
11ENCD FUNCTIONS•  Playback: Open the tray (OPEN/CLOSE) and insert a CD into the traywith the printed side facing up. Use the buttons PLAY/PAUSE, NEXT/BACK and STOP to operate the playback.•  Play mode: Press REP repeatedly to toggle between the modes REP1(repeat current track), REP (repeat all contained tracks) and RAN (playtrack in random order).•  Playlist: In STOP mode, press PROG to create a playlist. Use the arrowbuttons to select the rst track, conrm with PROG. Repeat this proce-dure to add up to 20 tracks. Press PLAY/PAUSE to play. Pressing STOP or opening the CD tray or selecting another mode will abort programmedplay.USB/SDInsert a USB or SD drive into the appropriate socket. After selecting the respective mode, the number of contained folders and les will be shown on the display. Use the convenient buttons PLAY/PAUSE, NEXT/BACK, F+10/-10 and STOP to navigate through your media library. Play mode and playlist functions are as stated in the CD operation section above.BT FUNCTIONSUse MODE to toggle to BT mode. Activate BT on your smart device and pair with JUKEBOX. Use your external device to play back your media. You can disconnect by switching to another mode or by unpairing your smart device.
12ENPHONO•  Slide the AUX/PHONO switch on the rear to PHONO position, when you want to use the record player.•  Toggle to PHONO mode with the MODE button. Adjust the rotation speed with the speed switch next to the tone arm holder.•  Place a record on the turntable. Use the spindle adaptor (puck) ifneeded.•  Take the tone arm o the holder and carefully move it to the desired track on the record before letting it touch down slowly.•  Place the tone arm on the tone arm holder after the record has nished.Note: If the auto stop area of the record is smaller than usual, switch the auto stop function o. AUXConnect external media players  (MP3 player, smartphone, laptop, etc.) to the AUX cable on the rear. Slide the AUX/PHONO switch to AUX position. Use your external player to operate playback.LIGHT EFFECTSPress LIGHT to toggle light on/o. The light eects will cycle through con-tinuously as long as the LIGHT MODE switch on the rear is on PLAY MODE. Switch to HOLD, stop the change at the current light status.
This device complies with part 15 of the FCC Rules. Operation is subject to the following two conditions: (1) This device may not cause harmful interference, and (2) this device must accept any interference received, including interference that may cause undesired operation.Note: This equipment has been tested and found to comply with the limits for a Class B digital device, pursuant to part 15 of the FCC Rules. These limits are designed to provide reasonable protection against harmful interference in a residential installation. This equipment generates, uses and can radiate radio frequency energy and, if not installed and used in accordance with the instructions, may cause harmful interference to radio communications. However, there is no guarantee that interference will not occur in a particular installation. If this equipment does cause harmful interference to radio or television reception, which can be determined by turning the equipment off and on, the user is encouraged to try to correct the interference by one or more of the following measures:—Reorient or relocate the receiving antenna.—Increase the separation between the equipment and receiver.—Connect the equipment into an outlet on a circuit different from that to which the receiver is connected.—Consult the dealer or an experienced radio/TV technician for help.Note: The Grantee is not responsible for any changes or modifications not expressly approved by the party responsible for compliance. such modifications could void the user's authority to operate the equipment.The device has been evaluated to meet general RF exposure requirement.  To maintain compliance with FCC's RF exposure guidelines, the distance must be at least 20 cm between the radiator and your body, and fully supported by the operating and installation configurations of transmitter and its antenna(s).EN13
14ESEstimado cliente:Le felicitamos por la adquisición de este aparato. Lea atentamente el siguiente manual de instalación y uso del producto. Es importante que siga cuidadosamente las instrucciones con el n de evitar posibles lesiones personales graves o daños al equipo. La empresa no se responsabiliza de los daños ocasionados por un uso indebido del producto o por haber desatendido las instrucciones de este manual. En este caso, usted asume toda responsabilidad y riesgo.ÍNDICEAdvertencia 14Garantía 15Instructiones de seguridad 16Vista generaldel producto 18Conexiones 19Uso 20Radio 20Funciones de cd 21Usb/sd 21Funciones bt 21Phono 22Aux 22Efectos de luz 22DATOS TÉCNICOSNúmero del artículo US-10030442Fuente de alimentació 120 V / 60 HzFABRICANTEFabricado en ChinaBerlin Brands Group Inc.101 Montgomery Street, Suite 2050San Francisco, CA 94104www.berlin-brands-group.com
15ES ADVERTENCIAATENCIÓNRIESGO DE DESCARGAS ELÉCTRICASNO ABRIRATENCIÓN: PARA REDUCIR EL RIESGO DE DESCARGAS ELÉCTRICAS, NO RETIRE LAS TAPAS. EL APARATO NO CONTIENE EN SU INTERIOR PIEZAS QUE EL USUARIO PUEDA REPARAR. TODA REPARACIÓN DEBE SER RALIZADA POR PERSONAL TÉCNICO CUALIFICADO.PARA EVITAR DESCARGA ELÉCTRICA, NO SUMERJA EL ENCHUFE, CABLE DE ALIMENTACIÓN O EL APARATO EN AGUA U OTROS LÍQUIDOS.Un triángulo con relámpago más la siguiente explicación:VOLTAJE PELIGROSO: El símbolo de relámpago con una  echa dentro de un triángulo equilátero indica al usuario que en el interior del producto puede haber tensiones peligrosas no aisladas de magnitud su ciente para constituir un riesgo de descarga eléctrica.Un triángulo con signo de exclamación más la siguiente explicación:ATENCIÓN: El signo de exclamación dentro de un triángulo equilátero indica al usuario que en esta guía existen instrucciones importantes de operación y mantenimiento (servicio). ATENCIÓNPara reducir el riesgo de descargas eléctricas, no utilice este enchufe con un alargador o receptáculo.
16ESGARANTÍABerlin Brands Group (la «Compañía») garantiza al comprador minorista original de este Producto que en caso de que este producto o cualquier pieza de este, durante uso y condiciones normales, presentara defectos en los materiales o mano probados dentro de un período de doce (12) meses a partir de la fecha de compra original, dicho o dichos defectos se repararán o reemplazarán con Producto reacondicionado (según la decisión de la Compañía) sin cargo por las piezas o la mano de obra. Para obtener reparaciones o reemplazo dentro de los términos de esta Garantía, el producto se debe entregar con prueba de cobertura de Garantía (por ejemplo, factura de venta con fecha), descripción del problema, transporte prepagado a la Compañía, a la dirección proporcionada en este documento.Esta garantía, tal como se ha establecido anteriormente, puede prolongarse durante seis (6) meses adicionales para un periodo total de garantía de dieciocho (18) meses si se registra el Producto ante la Compañía. Para registrar el Producto, el comprador minorista original debe completar y enviar los documentos de registro suministrados junto con el Producto a la Compañía o registrarlo en línea enwww.auna-multimedia.com/warranty en un plazo de noventa (90) días tras la compra original.Esta Garantía no se aplica a ningún producto o pieza de este que, en opinión de la Compañía, ha sufrido o ha sido dañado por alteración, mala instalación, mal manejo, uso indebido, descuido, accidente o porque se haya retirado o alterado su número de serie de fábrica/etiqueta(s) con código de barras. EL GRADO DE RESPONSABILIDAD DE LA EMPRESA BAJO ESTA GARANTÍA SE LIMITA A LA REPARACIÓN O SUSTITUCIÓN ANTERIORMENTE DESCRITA Y, EN NINGÚN CASO, LA RESPONSABILIDAD DE LA COMPAÑÍA PODRÁ EXCEDER EL PRECIO DE COMPRA QUE EL COMPADOR HA PAGADO POR EL PRODUCTO.ESTA GARANTÍA SUSTITUYE TODAS LAS OTRAS GARANTÍAS O RESPONSABILIDADES EXPRESAS. CUALQUIER GARANTÍA IMPLÍCITA, INCLUYENDO LAS GARANTÍAS IMPLÍCITAS DE COMERCIALIZACIÓN, SE LIMITARÁN A LA DURACIÓN DE ESTA GARANTÍA ESCRITA. CUALQUIER MEDIDA QUE SE TOME FRENTE AL INCUMPLIMIENTO DE UNA GARANTÍA SE DEBE REALIZAR EN UN PERIODO DE 18 MESES A PARTIR DE LA FECHA DE COMPRA ORIGINAL. EN NINGÚN CASO LA COMPAÑÍA SERÁ RESPONSIBLE DE DAÑOS INDIRECTOS O INCIDENTALES POR INCUMPLIMIENTO DE ESTA U OTRA GARANTÍA. Ninguna persona o representante está autorizado a asumir en nombre de la Compañía ninguna responsabilidad distinta a las expresadas en el presente documento, con relación a la venta de este Producto.Algunos estados no permiten limitaciones en la duración de una garantía implícita o la exclusión o limitación de daños incidentales o por consecuencia, de modo que las limitaciones o exclusiones anteriores podrían no aplicarse a usted. Esta Garantía le otorga derechos legales especícos, sin embargo, usted también puede tener otros derechos que varían de un estado a otro.
17ESINSTRUCTIONES DE SEGURIDADEL INCUMPLIMIENTO DE ESTAS INSTRUCCIONES PUEDE PROVOCAR LESIONES PERSONALES GRAVES Y DAÑO AL PRODUCTO.Instrucciones generales•  PELIGRO. NO PERMITA QUE NIÑOS MENORES DE 18 AÑOS UTILICEN EL PRODUCTO.•  Para uso doméstico y personal. Cualquier otro uso se interpretará comouso indebido, tal como se establece en el presente documento.•  Sólo para uso en el interior. El uso del Producto en el exterior seinterpretará como uso indebido, tal como se establece en el presentedocumento.•  Lea, guarde y siga atentamente las instrucciones.•  Preste atención a todas las advertencias.•  Nunca almacene ni guarde el equipo eléctrico en entornos lluviosos o húmedos. Almacenar el Producto en condiciones anteriores se interpretará como negligencia, tal como se establece en el presente documento.•  Desenchufe el aparato durante tormentas eléctricas o si no lo va autilizar durante periodos largos de tiempo. Cualquier acción contraria ala descrita se interpretará como negligencia, tal como se establece enel presente documento.•  Al realizar reparaciones, utilice únicamente piezas de repuesto idénticas a las originales. El uso de cualquier otra pieza se interpretará comoalteración, tal como se establece en el presente documento.•  No exponga el aparato a la luz directa del sol ni lo instale cerca defuentes de calor tales como radiadores, unidades de registro decalor, estufas u otros aparatos que produzcan calor. Cualquiera de lasacciones descritas anteriormente se interpretará como uso indebido, talcomo se establece en el presente documento.•  Limpie el aparato antes de usarlo por primera vez. La falta de limpiezadel Producto antes de su primer uso se interpretará como negligencia,tal como se establece en el presente documento.•  NO ENCHUFE EL PRODUCTO SI NO ESTÁ COMPLETAMENTE APAGADO.•  NO GUARDE ALIMENTOS O LÍQUIDOS EN EL PRODUCTO.•  El aparato NO debe exponerse a goteos ni salpicaduras de agua. NOcoloque ningún objeto sobre el aparato. Cualquiera de las acciones descritas anteriormente se interpretará como uso indebido, tal como seestablece en el presente documento.
18ESInstrucciones especiales•  No exponga este aparato a la lluvia.•  No coloque encima del aparato recipientes que contengan líquido, como botellas.•  Utilice únicamente los accesorios recomendados.•  Evite reparar el aparato por su cuenta. A la hora de realizar lasfunciones de mantenimiento, asegúrese de que se llevan a cabo por personal cualicado.•  No deje caer objetos de metal sobre el aparato.•  No coloque objetos pesados encima del aparato.•  Limpie el aparato utilizando un paño seco.•  No obstruya las ranuras de ventilación.•  No instale el aparato cerca de fuentes de calor como radiadores,fogones, hornos u otros aparatos que puedan calentarse (p.ej.amplicadores).Cable de alimentación•  Asegúrese de que la tensión del suministro eléctrico se adecua a los valores especicados en el aparato.•  El cable de alimentación debe encajar completamente en la toma de corriente.•  No tire, doble o coloque objetos pesados sobre el cable.•  No toque el enchufe con las manos mojadas.•  Para desenchufar el aparato no tire del cable, sino de cuerpo delenchufe.•  No utilice cables de alimentación o tomas de corriente dañadas.•  Instale el aparato de tal manera, que el cable de alimentación puedadesenchufarse inmediatamente de la toma de corriente en caso deavería.Instalación•  Coloque el aparato en una supercie seca, plana, resistente al agua y al calor.•   Coloque el aparato en un lugar fuera del alcance de los niños.•  La toma de corriente debe ser accesible para desconectar el aparato dela red eléctrica en caso de avería.•  No instale ni coloque este aparato en estanterías, armarios empotradoso en espacios muy estrechos. Asegúrese de que el aparato dispone deventilación suciente.•  No coloque el aparato encima de amplicadores u otros aparatos quepuedan generar calor, podrían dañarlo.•  No someta el aparato a la luz directa del sol, temperaturas ohumedades altas, así como movimientos demasiado bruscos.excessivemoisture, or excessive vibration.
19ES VISTA GENERALDEL PRODUCTOMODE (seleccionar modo) 1 5 SKIP/FAST FWD (siguiente pista/avance rápido)ON/OFF (encendido/apagado) 2 6 BACK/REV (pista anterior/rebo-binar)STOP (detener) 3 7 F+10 (saltar 10 pistas hacia delante)PLAY/PAUSE (reproducir/pausar) 4 8 F-10 (saltar 10 pistas hacia atrás)FonocaptorImag. 2-1Extremo del brazo de lecturaABRIR CERRARQuite el seguro para liberar el brazo de lectura.Tornillo de seguridad para proteger la carcasa del fonocaptor durante el transporte. Gire el tornillo a la derecha con la ayuda de una moneda.Brazo de lecturaVelocidad de reproducción: 33/45/78
20ESAtención: A pesar de algunas excepciones (p.ej. abrir/cerrar la unidad de CD, luces, cambiar al modo phono/aux), todas las funciones también se controlan a través del mando a distancia suministrado. Los botones presentan los mismos símbolos.VOL+ 9 17 REP (activar/desactivar modo Repetición)VOL- 10 18 PROG (programar lista de reproduc-ción/congurar reloj)MEM (almacenar la emisora actual en preconguraciones) 11 19 OPEN/CLOSE (abrir/cerrar unidad de CD)AUTO (búsqueda  automática de emisoras) 12 20 REC (grabar)PR- (emisora anterior) 13 21 DisplayPR+ (siguiente emisora) 14 22 Sensor infrarrojoEQ (seleccionar ecualizador precongurado) 15 23 Unidad de CDST/MONO (seleccionar recepción FM mono/estéreo) 16CONEXIONES1Entrada para reproductor MP32Interruptor Phono/AUX3Interruptor modo Luz/Mantener4Cable de conexión AUX5Interruptor salida de línea activo/inactivo6Salida de línea (Derecha/Izquierda)Entrada RCA78Antena FM9Adaptador CA/CCEntrada CC
21ESUSOPuesta en funcionamientoDesembale la gramola y todos los accesorios. Retire cualquier material protector. Conecte el aparato a una toma de corriente con la ayuda del adaptador CA/CC suministrado (ver pág. 10). Pulse el botón ON/OFF para encender el aparato.Funcionamiento básico• MODE: pulse MODE varias veces para elegir entre modos FM, CD, USB,SD, BT y Phono.• Volumen: pulse VOL+/- para ajustar el volumen.• Line Out: si ha conectado la granola a una fuente de audio externa,como equipo PA o dispositivo HiFi, utilice el interruptor LINE OUT ubicado en la parte posterior para activar/desactivar la salida de audio.• Congurarelreloj:después de encender el aparato, el displaymostrará 00:00. Mantenga pulsado el botón PROG durante 3-5segundos. A continuación, utilice los botones de echa para seleccionar el formato del reloj (12h/24h). Pulse el botón PROG para conrmar. Losprimeros dígitos empezarán a parpadear. Utilice los botones de echapara elegir la hora. Pulse PROG para conrmar. Repita el mismo pasopara congurar los dígitos de minutos.Atención: el reloj se reiniciará e indicará 00:00 si el aparato se apaga por un corte eléctrico.RADIOExtienda completamente la antena ubicada en la parte posterior. Después de encender el aparato, pulse MODE para cambiar al modo FM. Utilice los botones de echa para elegir la emisora deseada (se muestra en el display). Para almacenar la emisora actual, pulse PROG y, a continuación, utilice los botones de echa para elegir la posición deseada de la emisora. El aparato dispone de 20 posiciones. Vuelva a pulsar PROG para conrmar y continuar.
22ESFUNCIONES DE CD•  Reproducción: abra la unidad de CD (OPEN/CLOSE) e inserte un CDcon la parte impresa mirando hacia arriba. Utilice los botones PLAY/PAUSE, SKIP/BACK y STOP para controlar la reproducción.•  Modo de reproducción: pulse varias veces REP para elegir entre elmodo REP1 (repetir la pista actual), REP (reproducir todas las pistas) yRAN (reproducir las pistas en orden aleatorio).•  Lista de reproducción: en modo STOP, pulse PROG para crear una listade reproducción. Utilice los botones de echa para seleccionar la prim-era pista y pulse PROG para conrmar. Repita este paso hasta añadir 20 pistas. Pulse PLAY/PAUSE para iniciar la reproducción. Pulse STOP o abrirla unidad de CD, o seleccione otro modo para detener la reproducción.USB/SDInserte un lápiz USB o una tarjeta de memoria SD en la ranura correspondiente. Después de seleccionar el modo deseado, en el display aparecerán las carpetas y los archivos contenidos. Utilice los botones PLAY/PAUSE, NEXT/BACK, F+10/-10 y STOP para navegar a través de la biblioteca multimedia. Las funciones de modo de reproducción y lista de reproducción son las mismas que en el apartado CD.FUNCIONES BTPulse varias veces el botón MODE para elegir BT. Active la función BT en su teléfono inteligente y acóplelo con JUKEBOX. Utilice su dispositivo externo para controlar la reproducción del contenido musical. Para desconectar el aparato, elija otro modo o nalice el acoplamiento en su teléfono inteligente.
23ESPHONO•  Deslice el interruptor AUX/PHONO situado en la parte posterior hasta PHONO, si quiere utilizar el fonocaptor.•  Pulse varias veces el botón MODE para elegir PHONO. Ajuste la velocidad de reproducción con la ayuda del interruptor de velocidad situado cerca del brazo de lectura.•  Coloque un disco en el plato giratorio. De ser necesario, utilice un puck.•  Retire el brazo de lectura de su soporte y posiciónelo con cuidado encima del disco que desea reproducir.•  Una vez nalizada la reproducción, coloque el brazo de lectura en su soporte.Atención: si la zona de detención automática del disco es más pequeña de lo habitual, desconecte la función de detención automática.AUXConecte un dispositivo externo de reproducción (reproductor MP3, teléfono inteligente, ordenador portátil, etc.) a la entrada AUX situada en la parte pos-terior. Deslice el interruptor AUX/PHONO hasta AUX. Utilice su dispositivo externo para controlar la reproducción.EFECTOS DE LUZPulse LIGHT para encender/apagar la luz. Los efectos de luz se cambiarán constantemente siempre que el interruptor LIGHT MODE situado en la parte posterior esté en PLAY MODE. Cambie a HOLD para cambiar al estado actual de luz.

Navigation menu