Binatone Electronics IDECTX1I 1.9GHZ CORDLESS PHONE User Manual iDECT X1i UK 03 vp
Binatone Electronics International Ltd. 1.9GHZ CORDLESS PHONE iDECT X1i UK 03 vp
UserManual.wiki
>
Binatone Electronics
>
IDECTX1I User Manual
USERS MANUAL
Navigation menu
Upload a User Manual
Namespaces
Wiki Guide
HTML
PDF
Info
Views
User Manual
Discussion / Help
Navigation
![E:\Binatone2006\iDECT_X1i\iDECT_X1i_UK_03a.vp12 June 2006 09:15:00Color profile: Generic CMYK printer profileComposite Default screen This equipment is approved for connection to the Public Switched Telephone Network and complies with Part 15 and 68 of the FCC rules and the requirements adopted by the ACTA. Notification to Local Telephone Company On the bottom of this equipment is a label that contains, among other information, BINW400BIDECTX1I and Ringer Equivalence Number (REN) for the equipment. If requested, this number must be provided to the telephone company. The REN is used to determine the number of devices that may be connected to a telephone line. Excessive RENs on a telephone line may result in the devices not ringing in response to an incoming call. In most but not all areas, the sum of RENs should not exceed five (5.0). To be certain of the number of devices that may be connected to a line, as determined by the total RENs, contact the local telephone company. [For products approved after July 23, 2001, the REN for this product is part of the product identifier that has the format US:AAAEQ##TXXXX. The digits represented by ## are the REN without a decimal point (e.g., 03 is a REN of 0.3). For earlier products, the REN is separately shown on the label.] A plug and jack used to connect this equipment to the premises wiring and telephone network must comply with the applicable FCC Part 68 rules and requirements adopted by the ACTA. A compliant telephone cord and modular plug is provided with this product. It is designed to be connected to a compatible modular jack that is also compliant. See installation instructions for details. NOTICE: • If your home has specially wired alarm equipment connected to the telephone line, ensure the installation of this does not disable your alarm equipment. If you have questions about what will disable alarm equipment, consult your telephone company or a qualified installer. Equipment Approval Information X1i](https://usermanual.wiki/Binatone-Electronics/IDECTX1I/User-Guide-925563-Page-4.png)


![To store aRedial numberin the PhoneBook1Press the Redial button, then the áor âbutton until the number is displayed2Press and hold the PHONE BOOK button for2 secondsèThe display shows ENTER NAME3Key in a name then press the PHONE/OKbuttonèThe display show the name and STORED(See the list below for which buttons to usefor which characters.)4Press the HANG UP button to go back tostandby modeMaking and answering calls1E:\Binatone2006\iDECT_X1i\iDECT_X1i_UK_03.vp12 June 2006 10:53:57Color profile: Generic CMYK printer profileComposite Default screen7Buttons to press for text characters — press the button repeatedlyuntil you get the character you want1[space] 1- !,.:; 7PQRS72ABC2ÄàâÂÆÇ 8TUV8ÜÙúû3DEF3ëéèê 9WXYZ94GHI4Ìíîï 00Ø=<>()5JKL5 *+%@&$¥£¿§6MNO6Öòó Xbackspace/delete? ó ô Ñ](https://usermanual.wiki/Binatone-Electronics/IDECTX1I/User-Guide-925563-Page-26.png)


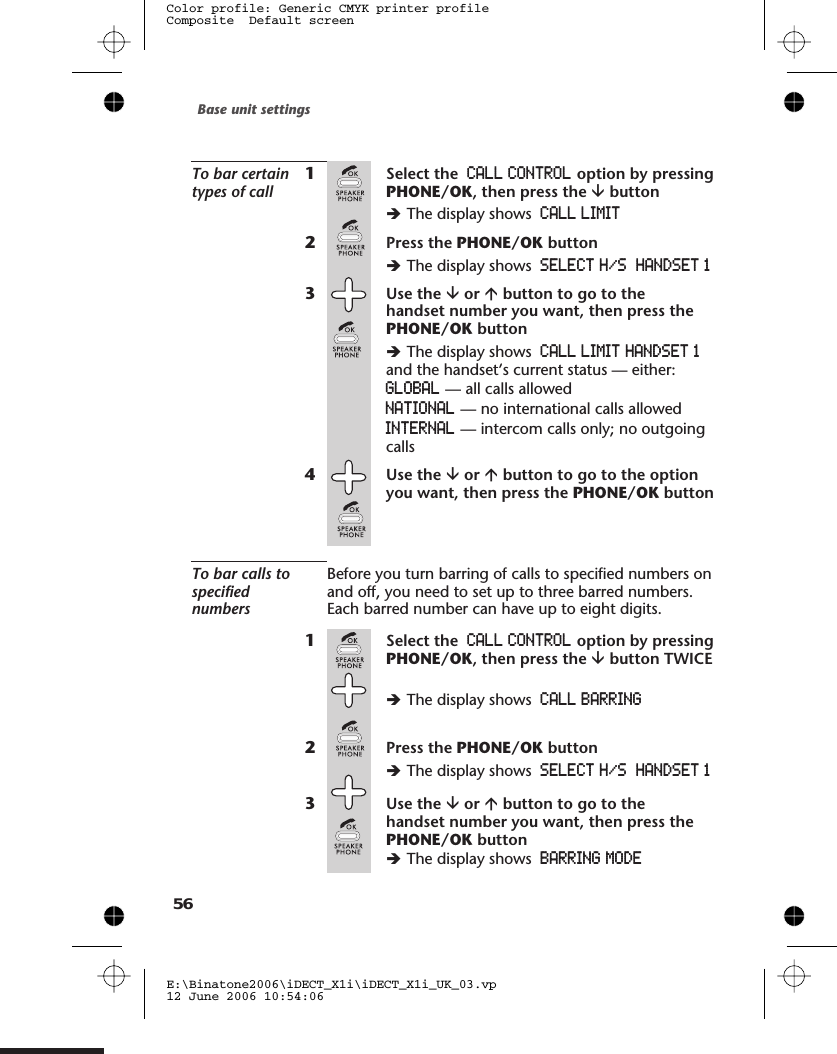
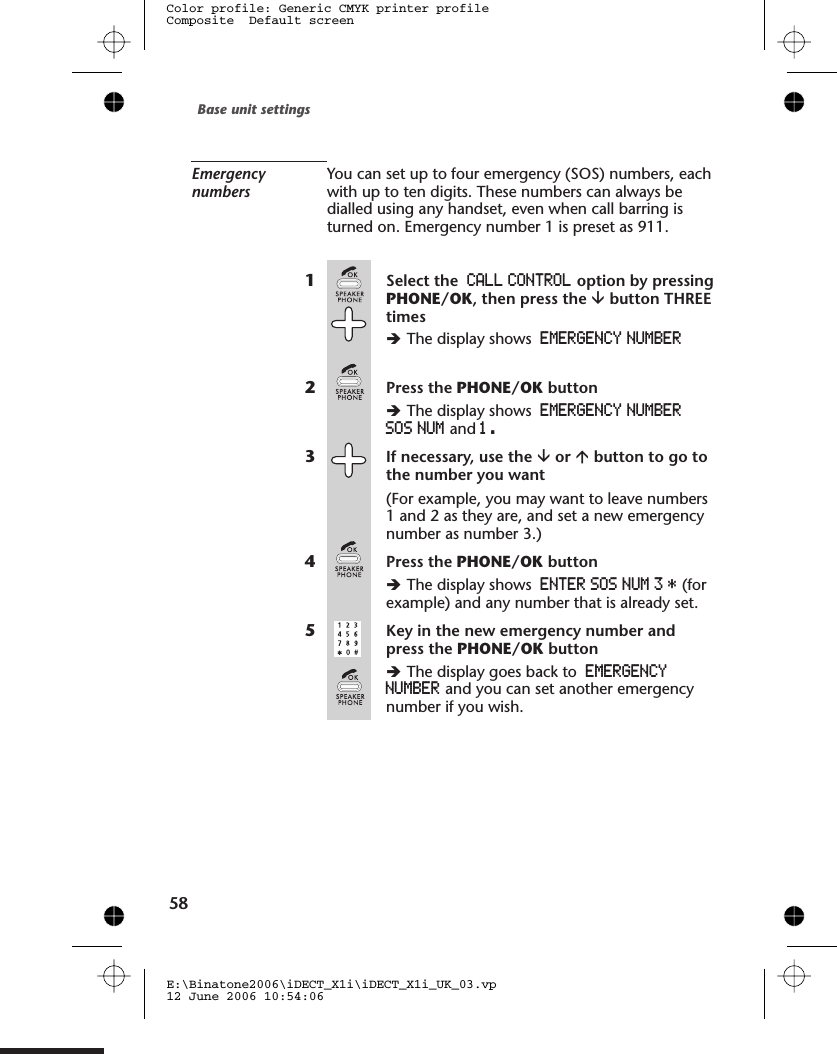
![4Press the âbuttonèThe display shows BARRING NUMBER5Press the PHONE/OK buttonèThe display shows SELECT BARRING NOBARR NUM 1. This lets you set the first barrednumber. There are three possible barrednumbers altogether.6(If you want to set a different barred number[2or 3], use the âor ábutton to go to it.)7Press the PHONE/OK buttonèThe display shows BARR NUM 1 *8Key in the number you want to bar, thenpress the PHONE/OK buttonYou can go on to set two more barred numbersif you wish.Now you’ve set the barred numbers, you can turn thiskind of call barring on and off:1Select the CALL CONTROL option by pressingPHONE/OK, then press the âbutton TWICEèThe display shows CALL BARRING2Press the PHONE/OK buttonèThe display shows SELECT H/S HANDSET 13Use the âor ábutton to go to the handsetnumber you want, then press the PHONE/OKbuttonèThe display shows BARRING MODE4Press the PHONE/OK buttonèThe display shows SET BAR MODE and OFFor ON5Use the âor ábutton to go to the settingyou want, then press the PHONE/OK buttonto confirmBase unit settingsE:\Binatone2006\iDECT_X1i\iDECT_X1i_UK_03.vp12 June 2006 10:54:06Color profile: Generic CMYK printer profileComposite Default screen57](https://usermanual.wiki/Binatone-Electronics/IDECTX1I/User-Guide-925563-Page-66.png)