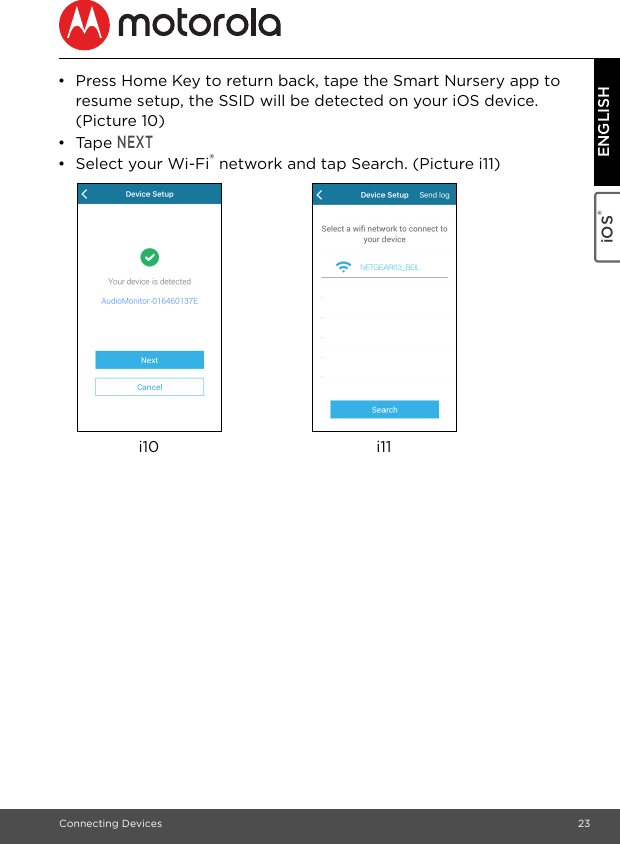
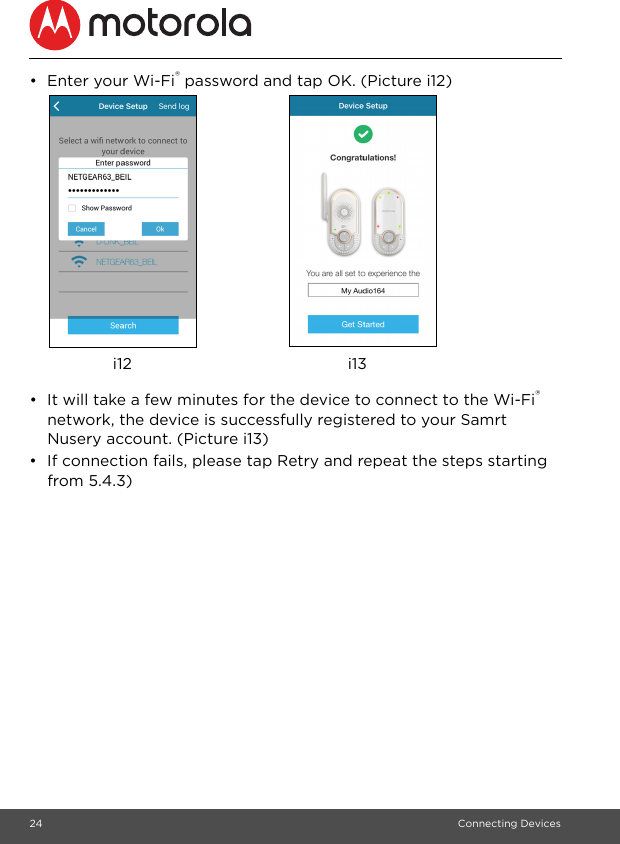
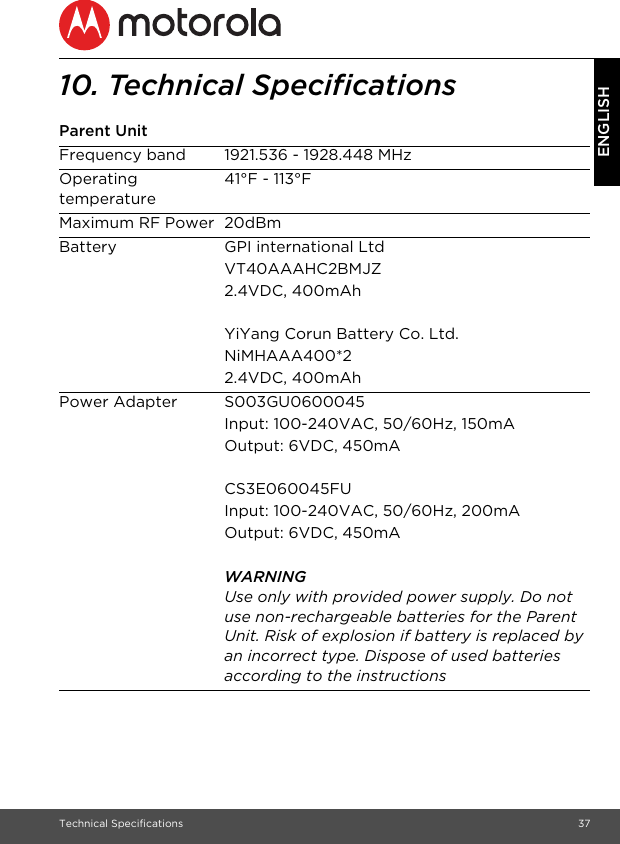
Binatone Electronics MBP164BU Baby Monitor with WiFi User Manual MBP164 Connect IFU US EN

Binatone Electronics International Ltd. Baby Monitor with WiFi MBP164 Connect IFU US EN

User Manual

User’s Guide All-in One Smart Monitor and IntercomModels: MBP164CONNECTThe features described in this guide are subject to modifications without prior notice.
Welcome...to your new Motorola All-in One Smart Monitor and Intercom!Thank you for purchasing All-in One Smart Monitor and Intercom. Now you can hear your baby sleep in the room or you can monitor your older children in their playroom. You can install the Unit only from your iPhone®/iPad® or Android™ devices and hear the Audio Stream from your PC or Notebook, as well as from your iPhone®/iPad® or Android™ devices. Please keep your original dated sales receipt for your records. For warranty service of your Motorola product, you will need to provide a copy of your dated sales receipt to confirm warranty status. Registration is not required for warranty coverage. For product-related questions, please call:This User’s Guide has all the information you need to make the most out of your product.Please read the Safety Instructions on pages 5 before you install the unit.Inside the Box•  1 x Baby Unit •  1 x Parent Unit•  1 x Battery Pack (Parent Unit) •  1 x Power Adapter (Parent Unit)•  1 x Battery compartment cover •  1 x Quick Start GuideUS and Canada 1-888-331-3383Email: support@motorolastore.comOn the Web: www.motorolastore.com
Overview of Baby Unit1. Night LightLights in Amber color for local.Flashs when in pairing mode.2. Speaker3. Power indicatorLights in Orange when plug the device into power socket.4. Night Light button Press to turn on/o the nightlight.5. PAIR buttonPress and hold for 3s to enter to pairing mode.Press and hold for more than 20s to de-register from Smart Nursery App and reset to factory default.6. Volume buttons (//)Press to decrease/increase speaker volume.7. Antenna8. Power Plug78123456
Overview of Parent Unit1. Audio Level LEDLights in Green, Green and Red when audio detected.2. Power Adapter / Battery LED RED when mains adapter power on.Flashs in RED when battery low.3. Link Indicator On when the parent unit is powered on and linked to the baby unit.4. Power ON/OFF button Press and hold to turn on/o the Parent Unit.5. Talk button/7Press and hold to talk to your baby unit.6. Volume buttons ( //)Press to decrease/increase speaker volume.7. Battery compartment cover8. Power Socket32456781Important guidelines for installing your Baby Monitor•  To use your Video Monitor Baby and Parent Units together, you must be able to establish a radio link between them, and the range will be affected by environmental conditions.•  Any large metal object, like a refrigerator, a mirror, a filing cabinet, metallic doors or reinforced concrete between the Baby and Parent Unit may block the radio signal.•  The signal strength may also be reduced by other solid structures, like walls, or by radio or electrical equipment, such as TVs, computers, cordless or mobile phones, fluorescent lights or dimmer switches.•  Use of other 2.4 GHz products, such as wireless networks (Wi-Fi® routers),Bluetooth® systems, or microwave ovens, may cause interference with this product, so keep the baby monitor away at least 5ft (1.5m) from these types of products, or turn them off if they appear to be causing interference.•  If the signal is weak, try lifting up the Parent Unit Antenna, moving the Parent and/or the Baby Unit to different positions in the rooms.•  Always ensure that you have a good Wi-Fi® connection available.
Table of contents 5ENGLISHTable of contents1. Safety Instructions .........................................................................62. Getting Started ...............................................................................82.1 Power on the Baby Unit ....................................................................82.2 Installing the battery pack for the Parent Unit ........................92.3 Connecting power supply for the Parent Unit ....................... 102.4 Desktop Mount of Parent Unit  .......................................................113. Using the Baby Monitor ...............................................................123.1 Set nightlight ........................................................................................123.2 Adjust Baby Unit volume  ................................................................123.3 Talk Mode  ..............................................................................................123.4 Adjust Parent Baby Unit volume ..................................................124. System Requirements ..................................................................135. Connecting Devices  .................................................................... 145.1 Setup ...................................................................................................... 145.2 What you need ................................................................................... 145.3 User Account and MBP164CONNECT setup on Android™ Devices ...................................................................................................155.4 User Account and MBP164CONNECT setup on iOS® Devices ................................................................................................. 205.5 Reset the Smart Monitoring Companion  .................................256. Disposal of the Device (Environment)  ...................................267. Cleaning .........................................................................................278. Troubleshooting ...........................................................................289. General Information  .....................................................................3110. Technical Specifications  ............................................................37
6Safety Instructions1. Safety InstructionsWARNING:Strangulation Hazard. Children have STRANGLED in cords. Keep this cord out of the reach of children (more than 3ft (1m) away). Never use extension cords with AC Adapters. Only use the AC Adapters provided.
Safety Instructions 7ENGLISHPresence of un-insulated "dangerous voltage" within the product’s enclosure that may be of sufficient magnitude to constitute a risk of electric shock to persons.  WARNING:Presence of important operating and maintenance (servicing) instructions in the literature accompanying the appliance. This digital audio baby monitor is compliant with all relevant standards regarding electromagnetic fields and is, when handled as described in the User’s Guide, safe to use. Therefore, always read the instructions in this User’s Guide carefully before using the device.•  Determine a location for the baby monitor that will provide the best audio reception of your baby in his crib.•  NEVER place the baby monitor within the crib.•  Adult assembly is required. Keep small parts away from children when assembling.•  This product is not a toy. Don’t allow children to play with it.•  This baby monitor is not a substitute for responsible adult supervision.•  Keep this User’s Guide for future reference.•  Do not cover the baby monitor with a towel or blanket.•  Test this monitor and all its functions so that you are familiar with it prior to actual use.•  Do not use the baby monitor near water.•  Do not install the baby monitor near a heat source.CAUTIONIn order to reduce the risk of fire or electrical shock, do not expose the device to water or humidity. Never disassemble the device. Opening the casing is dangerous and will invalidate the warranty.In order to disconnect the apparatus from the mains completely, the unit should be disconnected from the mains socket outlet completely.
8Getting Started2. Getting Started2.1 Power on the Baby UnitThe Baby Unit powers on automatically when it is connected to the power supply.•  Choose a proper location with easy access to a power outlet.•  Plug the Unit into the power outlet in your baby’s room. Ensuring sufficient clearance is given for it to detect sound and no more than 3 feet from the baby crib.•  When the unit is plugged in for the first time the green LED illuminates and the night light switches on.
Getting Started 9ENGLISH2.2 Installing the battery pack for the Parent Unit•  Insert the wire tab of the rechargeable battery pack into the contact slot as shown above and fit the battery pack into the compartment.•  Reattach the battery compartment cover.•  The Charging Indicator comes on.BlackRed
10 Getting Started2.3 Connecting power supply for the Parent UnitIMPORTANT: Installing the rechargeable battery pack and charging it fully before use is recommended. This will allow the unit to operate on battery in the event of a power failure.•  Connect the small plug of the power adapter to the Baby Unit and the other end to the electrical outlet.•  Only use the enclosed adapter (5VDC/600mA).•  Press and hold Power Button to turn on the Parent Unit.NOTEThe battery icon turns RED and the unit emits a beep every 16 seconds to indicate that the battery is low and needs to be recharged. The battery pack takes about 16 hours to charge fully.
Getting Started 11ENGLISH2.4 Desktop Mount of Parent Unit•  Flip the stand from Parent rear to open position for desktop mount.
12 Using the Baby Monitor3. Using the Baby MonitorPlease read these instructions carefully and be aware that this Companion Unit is only intended as an aid. It is not a substitute for responsible, correct parental supervision.3.1 Set nightlightThe nightlight feature is intended to give the room a soft glow so the baby can be observed without disrupting it with bright lights.1. When the nightlight is off, press   to turn it on.2. When the nightlight is on, press   to turn it off. 3.2 Adjust Baby Unit volumeThere are 5 volume levels on the unit, including volume off. Press > to increase or < to decrease the volume of the unit respectively, the sound level will be detected on your iPhone®/iPad® or Android™ devices that paired.3.3 Talk ModePress and hold TALK button 7 on the parent unit to talk to your baby through the baby unit’s loudspeaker.3.4 Adjust Parent Baby Unit volumeThere are 5 volume levels on Parent unit, including volume off. Press > to increase or < to decrease the volume of Parent Unit.
System Requirements 13ENGLISH4. System RequirementsSmartphones / Tablets: Android™ and iOS® only.Minimum requirement: iOS 8.0, Android 5.0 or above.For more information, please visit: https://hubbleconnected.com/ requirements.
14 Connecting Devices5. Connecting DevicesHow does it work?When a user tries to access the Companion Unit, our secure server authenticates the user’s identity and permits access to the Companion Unit. 5.1 SetupPlug the Smart Monitoring Companion into an electrical outlet and the Unit will automatically switch on. The Unit must be within range of the Wi-Fi® router with which you want to connect. Have the router password available for entering during the in-app setup process.5.2 What you need• MBP164CONNECT•  Device with Android™ system 5.0 or above•  or Any iOS® Device with iOS version 8.0 or aboveNote: You can only setup via a compatible smartphone or tablet and not via a PC.MBP164 CONNECTWi-Fi RouterHubble ServiceAccess your MBP164CONNECT locallyReceive notification from any compatible device remotely
AndroidTMConnecting Devices 15ENGLISH5.3 User Account and MBP164CONNECT setup on Android™ Devices5.3.1 Download Hubble for Smart Nursery App.•  Go to Google Play™ Store to search for Hubble for Smart Nursery App.• Download "Hubble for Smart Nursery" App from Google Play™ Store and install it on your Android™ device.5.3.2 Run Smart Nursery App on Android™ Device•  Ensure that your smart device is connected to your Wi-Fi® router.
16 Connecting Devices• Run "Hubble for Smart Nursery" App, SIGN UP by entering your account information, read through the Terms & Conditions, then select "I agree to the Terms of Use". (Pictures A1, A2) Note: If you already have a Smart Nursery App account, please select "Already have an Account?" to go to the next step.A1 A2
AndroidTMConnecting Devices 17ENGLISH5.3.3 Add the MBP164CONNECT to your account•  Tap on Audio Monitors then tap MBP164 to add the device, read through the features of MBP164CONNECT or tap on Skip to setup. (Pictures A3, A4, A5) •  Press and hold the PAIR button at the front of MBP164CONNECT, the nightlight blinks in amber alternately indicating that the device is ready for pairing.A5A3 A4
18 Connecting Devices• Tap Next, the App will automatically search for your device as shown in the picture below. (Pictures A6, A7).• Tap the device SSID ( AudioMonitor-0164XXXXXX ) to connect to the App. (Picture A8)•  Tap Next to search for the Wi-Fi router. (Picture A9)A7A6A9A8
AndroidTMConnecting Devices 19ENGLISH• Select your Wi-Fi® network, enter your password and then tap Search. (Picture A10)•  It will take a few minutes for the device to connect to the Wi-Fi® the device is successfully registered to your Samrt Nusery account. (Picture A11)•  If connection fails, please tap Retry and repeat the steps starting from steps 5.3.3.A11A10
20 Connecting Devices5.4 User Account and MBP164CONNECT setup on iOS® Devices5.4.1 Download Hubble for Smart Nursery App •  Go to App Store to search for "Hubble for Smart Nursery" App.• Download "Hubble for Smart Nursery" App and install it on your iOS® device.5.4.2 Run Smart Nursery App on your iOS® Device•  Ensure that your iOS® device is connected to your Wi-Fi® Router. • Run the "Hubble for Smart Nursery" App, enter your account information, read through the Terms and Conditions, and then select "I agree to the Terms of Use". (Pictures i1, i2)Note: If you already have a Smart Nursery App account, please select "Already have an Account?" to go to the next step.i2i1
Connecting Devices 21iOS® ENGLISH5.4.3 Add the MBP164CONNECT to your account •  Tap on Audio Monitors the tap MBP164 to add the device, read through the features of MBP164CONNECT or tap on Skip to setup. (Pictures i3, i4, i5) •  The following setup instructions will appear on the screen. (Pictures i6, i7)i5i3 i4i7I6
22 Connecting Devices•  Press and hold the PAIR button at the front of MBP164CONNECT, the nightlight blinks in amber color alternately indicating that the device is ready for pairing. The unit also bleeped three times and the Power LED switched off then on again.• Go to Settings > Wi-Fi menu on your iOS® device. (Picture i8).•  Select your device SSID (AudioMonitor-0164XXXXXX) from the list of networks. (Picture i9).i8 i9
Connecting Devices 23iOS® ENGLISH•  Press Home Key to return back, tape the Smart Nursery app to resume setup, the SSID will be detected on your iOS device. (Picture 10)• Tape NEXT• Select your Wi-Fi® network and tap Search. (Picture i11)i10 i11
24 Connecting Devices•  Enter your Wi-Fi® password and tap OK. (Picture i12) •  It will take a few minutes for the device to connect to the Wi-Fi® network, the device is successfully registered to your Samrt Nusery account. (Picture i13)•  If connection fails, please tap Retry and repeat the steps starting from 5.4.3)i12 i13
Connecting Devices 25ENGLISH5.5 Reset the Smart Monitoring CompanionNote: If your Companion Unit is moved from one router (e.g. home) to another (e.g. office) or you have setup issues, then the Unit must be reset.• Press and hold PAIR button   for more than 20s to enter to deregister mode and perform factory default. You will hear a series of bleeps as you hold the button. After 20 seconds the unit will re-initialise. When it is ready the night light will flash ready for pairing.•  Register your device to Smart Nursery App by following the steps in section 5.3.3 for Android™ devices or in section 5.4.3 for iOS® devices.
26 Disposal of the Device (Environment)6. Disposal of the Device (Environment) At the end of the product life cycle, you should not dispose of this product with normal household waste. Take this product to a collection point for the recycling of electrical and electronic equipment. The symbol on the product, user's guide and/or box indicates this.Some of the product materials can be re-used if you take them to a recycling point. By reusing some parts or raw materials from used products you make an important contribution to the protection of the environment.Please contact your local authorities in case you need more information on the collection points in your area.
Cleaning 27ENGLISH7. Cleaning Clean your Smart Monitoring Companion with a slightly damp cloth or with an antistatic cloth. Never use cleaning agents or abrasive solvents.Cleaning and care•  Do not clean any part of the Smart Monitoring Companion with thinners or other solvents and chemicals - this may cause permanent damage to the product which is not covered by the warranty.•  Keep your Smart Monitoring Companion away from hot, humid areas or strong sunlight, and do not let it get wet.•  Every effort has been made to ensure high standards of reliability of your Smart Monitoring Companion. However, if something does go wrong, please do not try to repair it yourself - contact Customer Service for assistance.IMPORTANTAlways switch off and disconnect the power adapter before cleaning your Smart Monitoring Companion.
28 Troubleshooting8. TroubleshootingProblem CategoryProblem Description / ErrorSolutionAccount I am unable to login even after registration.Please check your user name and password.Account I receive an error message saying: "E-mail ID is not registered".Please ensure that you have registered with us. Tap Sign in to create an account.Account What do I do if I forget my password?Click on the "Forgot Password" link on https://app.hubbleconnected.com/ #lostpassword OR on your Android™ or iOS application. An e-mail will be sent to your registered e-mail address.Account I am unable to receive a new password although I have used the "Forgot Password" option.1. The e-mail might have been sent to your Junk Mail Folder. Please check your Junk Mail Folder.2. There might be a delay in getting your e-mail. Please wait a few minutes and refresh your email account.Setting Up While I am adding a new Device to my account, I am not able to find any Device to add.If you are trying to add a Device which has previously been added into your account or another account, you will first have to reset the Device. Refer to Section 5.5.
Troubleshooting 29ENGLISHSetting Up During setup on devices for Android™ and iOS, I am not able to find my Device during the last step and the setup fails.Please reset the Device to setup mode and try again. Press and hold the PAIR button on the front of the Device untill you hear a beep. Wait for a minute for the Device to restart. When the Night Light is flashing, this indicates that it is in setup mode. Now restart the setup from your smartphone again.Connectivity IssuesI get a message: We are having problems accessing your Device. This could be due to the lack of an internet connection. Please wait and try again later.1. Please try again in a few minutes. This could be because of any issue with your internet connection.2. If the problem remains, please restart your Device to check if this fixes the problem.3. Please restart your Wireless Router.Connectivity IssuesEven though I am accessing my Device from the same Wi-Fi network, I still find my Device is shown as remote. I can only access it for 5 minutes at a time.Please check your wireless router settings. For example, for Buffalo brand routers there is an option called Wireless Isolation. Please disable this option.General Which platforms are supported for accessing my Device?Minimum requirement:Android™ 5.0iPhone /iPad iOS version 8.0General I do not hear any sound when I am accessing the DeviceYou can tap on the speaker icon in the Audio Monitoring to hear audio.
30 TroubleshootingGeneral How do I download the App for Android™ and iOS devices?Android™:- Open the Google Play on your Android™ device.- Select Search- Type in "Hubble Connect for Smart Nursery"-  The results will show the Hubble App-  Select to install itiOS Device:- Open the App StoreSM- Select Search- Type in "Hubble Connect for Smart Nursery"-  The results will show the Hubble App-  Select to install it
General Information 31ENGLISH9. General InformationIf your product is not working properly...1. Read this User's Guide or the Quick Start Guide.2. Contact Customer Service atIf you think you need a battery replacement, please contact customer service.Consumer Products and Accessories Limited Warranty ("Warranty")Thank you for purchasing this Motorola branded product manufactured under license by Binatone Electronics International LTD ("BINATONE")What Does this Warranty Cover? Subject to the exclusions contained below, BINATONE warrants that this Motorola branded product ("Product") or certified accessory ("Accessory") sold for use with this product is manufactured to be free from defects in materials and workmanship under normal consumer usage for the period outlined below. This Warranty is your exclusive warranty and is not transferable.THIS WARRANTY GIVES YOU SPECIFIC LEGAL RIGHTS, AND YOU MAY HAVE OTHER RIGHTS THAT VARY BY STATE, PROVINCE OR COUNTRY. FOR CONSUMERS WHO ARE COVERED BY CONSUMER PROTECTION LAWS OR REGULATIONS IN THEIR COUNTRY OF PURCHASE OR, IF DIFFERENT, THEIR COUNTRY OF RESIDENCE, THE BENEFITS CONFERRED BY THIS LIMITED WARRANTY ARE IN ADDITION TO ALL RIGHTS AND REMEDIES CONVEYED BY SUCH CONSUMER PROTECTION LAWS AND REGULATIONS. FOR A FULL UNDERSTANDING OF YOUR RIGHTS YOU SHOULD CONSULT THE LAWS OF YOUR COUNTRY, PROVINCE OR STATE.US and Canada 1-888-331-3383Email: support@motorolastore.com
32 General InformationWho is covered?This Warranty extends only to the first consumer purchaser, and is not transferable.What will BINATONE do?BINATONE or its authorized distributor at its option and within a commercially reasonable time, will at no charge repair or replace any Products or Accessories that do not conform to this Warranty. We may use functionally equivalent reconditioned/ refurbished/ pre-owned or new Products, Accessories or parts.What Other Limitations Are There?ANY IMPLIED WARRANTIES, INCLUDING WITHOUT LIMITATION THE IMPLIED WARRANTIES OF MERCHANTABILITY AND FITNESS FOR A PARTICULAR PURPOSE, SHALL BE LIMITED TO THE DURATION OF THIS LIMITED WARRANTY, OTHERWISE THE REPAIR OR REPLACEMENT PROVIDED UNDER THIS EXPRESS LIMITED WARRANTY IS THE EXCLUSIVE REMEDY OF THE CONSUMER, AND IS PROVIDED IN LIEU OF ALL OTHER WARRANTIES, EXPRESS OR IMPLIED. IN NO EVENT SHALL MOTOROLA OR BINATONE BE LIABLE, WHETHER IN CONTRACT OR TORT (INCLUDING NEGLIGENCE) FOR DAMAGES IN EXCESS OF THE PURCHASE PRICE OF THE PRODUCT OR ACCESSORY, OR FOR ANY INDIRECT, INCIDENTAL, SPECIAL OR CONSEQUENTIAL DAMAGES OF ANY KIND, OR LOSS OF REVENUE OR PROFITS, LOSS OF BUSINESS, LOSS OF INFORMATION OR OTHER FINANCIAL LOSS ARISING OUT OF OR IN CONNECTION WITH THE ABILITY OR INABILITY TO USE THE PRODUCTS OR ACCESSORIES TO THE FULL EXTENT THESE DAMAGES MAY BE DISCLAIMED BY LAW.Some jurisdictions do not allow the limitation or exclusion of incidental or consequential damages, or limitation on the length of an implied warranty, so the above limitations or exclusions may not apply to you. This Warranty gives you specific legal rights, and you may also have other rights that vary from one jurisdiction to another.
General Information 33ENGLISHExclusionsNormal Wear and Tear. Periodic maintenance, repair and replacement of parts due to normal wear and tear are excluded from coverage. Batteries. Only batteries whose fully charged capacity falls below 80% of their rated capacity and/or batteries that leak are covered by this Warranty.Abuse & Misuse. Defects or damage that result from: (a) improper operation, storage, misuse or abuse, accident or neglect, such as physical damage (cracks, scratches, etc.) to the surface of the product resulting from misuse; (b) contact with liquid, water, rain, extreme humidity or heavy perspiration, sand, dirt or the like, extreme heat, or food; (c) use of the Products or Accessories for commercial purposes or subjecting the Product or Accessory to abnormal usage or conditions; or (d) other acts which are not the fault of MOTOROLA or BINATONE, are excluded from coverage. Use of Non-Motorola branded Products and Accessories. Defects or damage that result from the use of Non-Motorola branded or certified Products or Accessories or other peripheral equipment are excluded from coverage. Unauthorized Service or Modification. Defects or damages resulting from service, testing, adjustment, installation, maintenance, alteration, or modification in any way by someone other than MOTOROLA, BINATONE or its authorized service centers, are excluded from coverage. Products Covered Length of CoverageConsumer Products One (1) year from the date of the products original purchase by the first consumer purchaser of the product.Consumer Accessories Ninety (90) days from the date of the accessories original purchase by the first consumer purchaser of the product.Consumer Products and Accessories that are Repaired or ReplacedThe balance of the original warranty or for ninety (90) days from the date returned to the consumer, whichever is longer.
34 General InformationAltered Products. Products or Accessories with (a) serial numbers or date tags that have been removed, altered or obliterated; (b) broken seals or that show evidence of tampering; (c) mismatched board serial numbers; or (d) nonconforming or non-Motorola branded housings, or parts, are excluded from coverage. Communication Services. Defects, damages, or the failure of Products or Accessories due to any communication service or signal you may subscribe to or use with the Products or Accessories is excluded from coverage.How to Obtain Warranty Service or Other Information?To obtain service or information, please call:You will receive instructions on how to ship the Products or Accessories at your expense and risk, to a BINATONE Authorized Repair center.To obtain service, you must include: (a) the Product or Accessory; (b) the original proof of purchase (receipt) which includes the date, place and seller of the Product; (c) if a Warranty card was included in your box, a completed Warranty card showing the serial number of the Product; (d) a written description of the problem; and, most importantly; (e) your address and telephone number.These terms and conditions constitute the complete warranty agreement between you and BINATONE regarding the Products or Accessories purchased by you, and supersede any prior agreement or representations, including representations made in any literature publications or promotional materials issued by BINATONE or representations made by any agent, employee or staff of BINATONE, that may have been made in connection with the said purchase.US and Canada 1-888-331-3383Email: support@motorolastore.com
General Information 35ENGLISHFCC and IC regulationsFCC Part l5NOTE: This equipment has been tested and found to comply with the limits for a Class B digital device, pursuant to Part 15 of the Federal Communications Commission (FCC) rules. These limits are designed to provide reasonable protection against harmful interference in a residential installation. This equipment generates, uses and can radiate radio frequency energy and, if not installed and used in accordance with the instructions, may cause harmful interference to radio communications. However, there is no guarantee that interference will not occur in a particular installation. If this equipment does cause harmful interference to radio or television reception, which can be determined by turning the equipment off and on, the user is encouraged to try to correct the interference by one or more of the following measures:•  Reorient or relocate the receiving antenna.•  Increase the separation between the equipment and receiver.•  Connect the equipment into an outlet on a circuit different from that to which the receiver is connected.•  Consult the dealer or an experienced radio/TV technician for help.Changes or modifications to this equipment not expressly approved by the party responsible for compliance could void the user’s authority to operate the equipment.This device complies with Part 15 of the FCC rules. Operation is subject to the following two conditions: (1) this device may not cause harmful interference, and (2) this device must accept any interference received, including interference that may cause undesired operation. Privacy of communications may not be ensured when using this device.To ensure safety of users, the FCC has established criteria for the amount of radio frequency energy that can be safely absorbed by a user or bystander according to the intended usage of the product. This product has been tested and found to comply with the FCC criteria. The Baby Unit shall be installed and used such that parts of the user’s body other than the hands are maintained at a distance of approximately 8 inches (20 cm) or more.This Class B digital apparatus complies with Canadian ICES-003.
36 General InformationWARNINGChanges or modifications, to this equipment not expressively approved by the party responsible for compliance could void the user’s authority to operate the equipment.Industry CanadaThis device complies with Industry Canada licence-exempt RSS standard(s): Operation is subject to the following Two conditions:(1) this device may not cause interference, and (2) this device must accept any interference, including interference that may cause undesired operation of the device.The term "IC: " before the certification/registration number only signifies that the Industry Canada technical specifications were met. This product meets the applicable Industry Canada technical specifications.Le présent appareil est conforme aux CNR d’Industrie Canada applicables aux appareils radio exempts de licence. L’exploitation est autorisée aux deux conditions suivantes : (1) l’appareil ne doit pas produire de brouillage, et (2) l’utilisateur de l’appareil doit accepter tout brouillage radioélectrique subi, même si le brouillage est susceptible d’en compromettre le fonctionnement.
Technical Specifications 37ENGLISH10. Technical SpecificationsParent UnitFrequency band 1921.536 - 1928.448 MHzOperating temperature41°F - 113°FMaximum RF Power 20dBmBattery GPI international Ltd VT40AAAHC2BMJZ2.4VDC, 400mAhYiYang Corun Battery Co. Ltd.NiMHAAA400*22.4VDC, 400mAhPower Adapter S003GU0600045Input: 100-240VAC, 50/60Hz, 150mAOutput: 6VDC, 450mACS3E060045FUInput: 100-240VAC, 50/60Hz, 200mAOutput: 6VDC, 450mAWARNINGUse only with provided power supply. Do not use non-rechargeable batteries for the Parent Unit. Risk of explosion if battery is replaced by an incorrect type. Dispose of used batteries according to the instructions
38 Technical SpecificationsBaby UnitFrequency band WiFi 802.11b/g/n (2.4 GHz)1921.536 - 1928.448 MHzOperating temperature41°F - 113°FMaximum RF Power 20dBmPower Voltage  Input: 100-240V AC, 50/60Hz, 150mA
Manufactured, distributed or sold by Binatone Electronics International LTD., official licensee for this product. MOTOROLA and the Stylised M logo are trademarks or registered trademarks of Motorola Trademark Holdings, LLC. and are used under license. Apple logo is trademark of Apple Inc., registered in the U.S. and other countries. App Store is a service mark of Apple Inc. Apple logo is trademark are trademarks of Google Inc. Wi-Fi is a trademark of the Wi-Fi Alliance. All other trademarks are the property of their respective owners. © 2017 Motorola Mobility LLC. All rights reserved.US_EN Version 3.0Printed in China

Navigation menu