Binatone Electronics MBP854HDSPU Digital Baby Monitor (Parent Unit) User Manual I
Binatone Electronics International Ltd. Digital Baby Monitor (Parent Unit) I
Contents
- 1. User Manual I
- 2. User Manual II
User Manual I
Users Guide
Digital Video Baby Monitor With Wi-Fi® Internet Viewing
Models: MBP854CONNECT, MBP854CONNECT-2,
MBP854CONNECT-3, MBP854CONNECT-4
The features described in this Users Guide are subject to modifications without prior notice.

Welcome...
to your new Motorola Digital Video Baby Monitor!
Thank you for purchasing your new Motorola Digital Video Baby Monitor.
Now you can see and hear your baby sleeping in another room or you can
monitor your older children in their playroom.
Please retain your original dated sales receipt for your records.
For warranty service of your Motorola product, you will need to provide a
copy of your dated sales receipt to confirm warranty status. Registration is
not required for warranty coverage.
For product related questions, please call:
This User's Guide provides you with all the information you need to get the
most from your product.
Before you can use the Baby Monitor, we recommend you fully charge the
battery in the Parent Unit, so that it continues to work if you disconnect it
from the power supply to carry it to another location. Please read the
Safety Instructions on page 8 before you install the units.
Got everything?
1 x Parent Unit
1 x Baby Unit (Camera)
1 x Power adapter for the Parent Unit
1 x Power adapter(s) for the Baby Unit
In multi-camera packs, you will find one or more additional camera units
with power adapter units and battery packs.
US and Canada 1-888-331-3383
Email: support@motorolamonitors.com
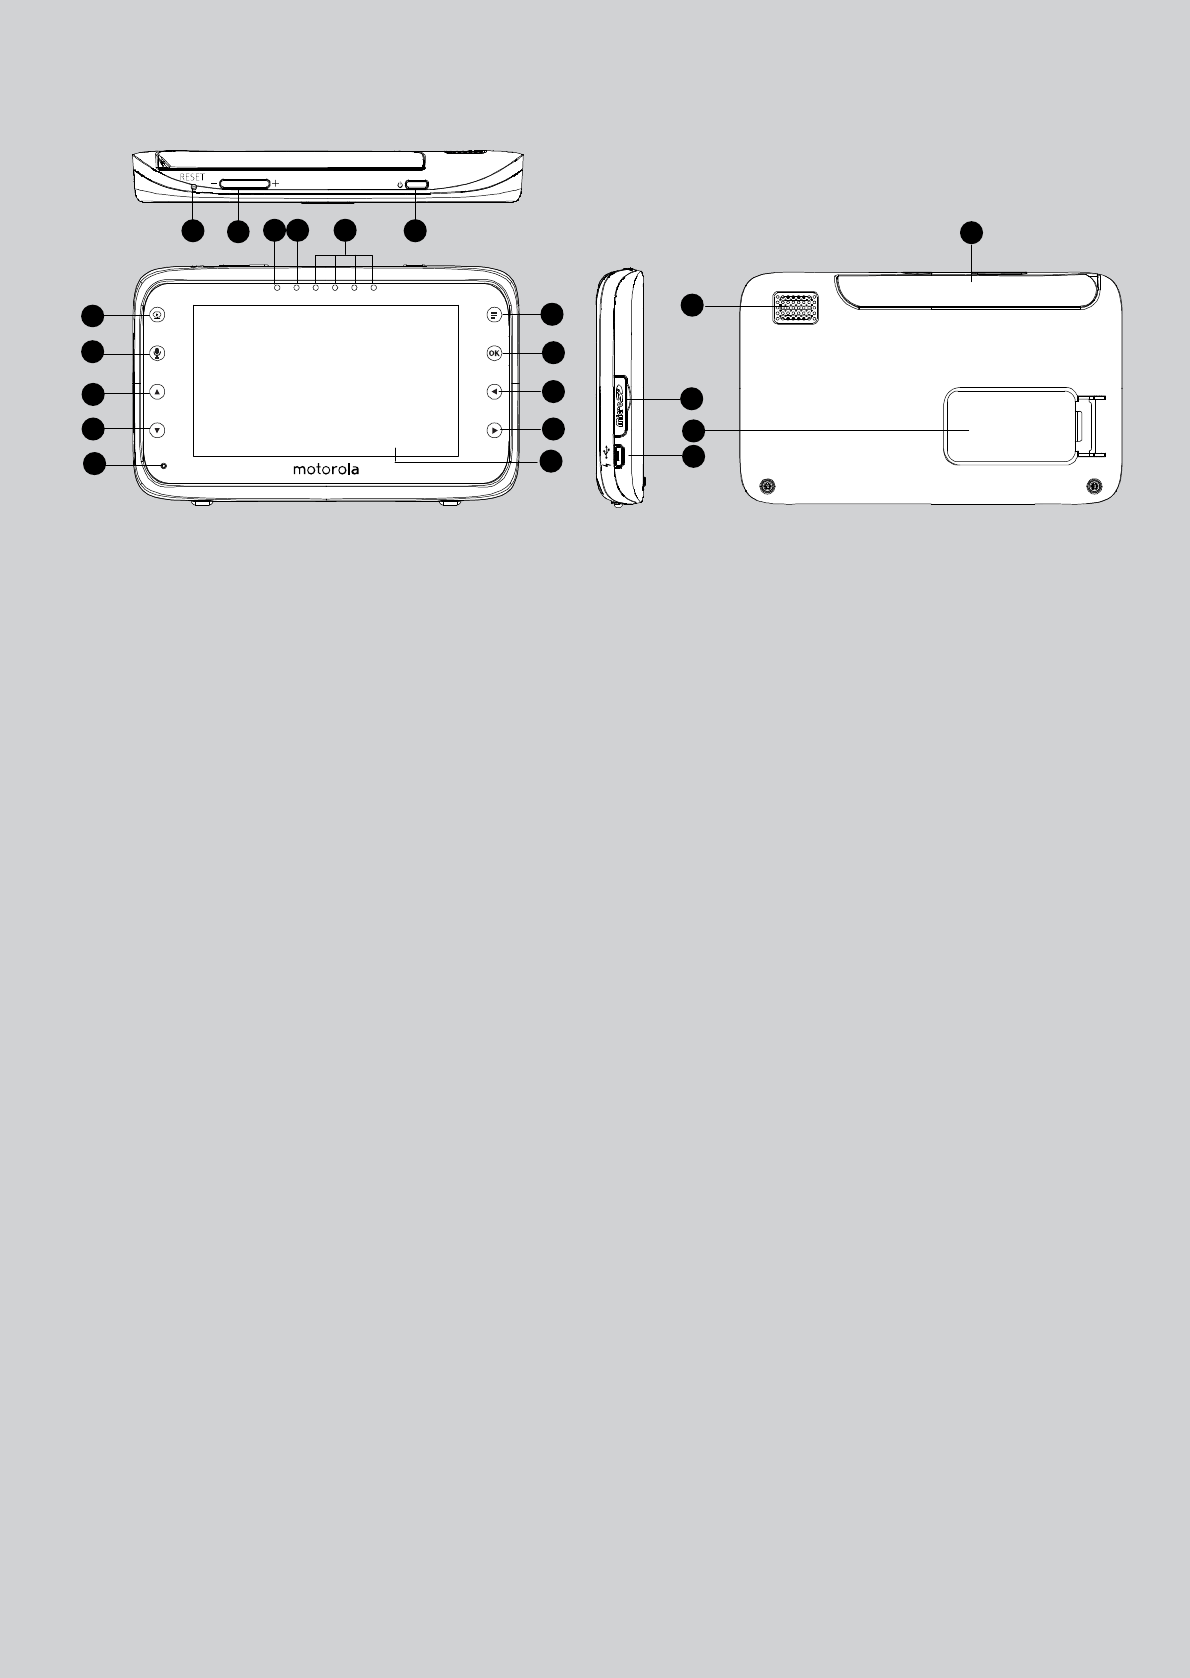
Overview of the Parent Unit
1. Display (LCD screen)
2. Video ON/OFF Key V
Press to turn the LCD display ON/
OFF
3. Talk Key T
Press and hold to speak to your baby
4. Up Key +
Normal Mode: Tilt Up
Menu Mode: Up
5. Down Key -
Normal Mode: Tilt Down
Menu Mode: Down
6. Microphone
7. Menu Key M
Press to open the Menu options
8. OK Key O
9. Left Key <
Normal Mode: Pan Left
Menu Mode: Left
10. Right Key >
Normal Mode: Pan Right
Menu Mode: Right
11. Power Adapter / Battery LED BLUE
when connected to an electrical
outlet.
RED when battery low.
12. Unit ON/OFF LED (Green)
13. Audio Level LED (Green, Orange,
Red)
14. Power Key 0
Press and Hold to turn the unit ON/
OFF
15. Volume Key
Press -/+ to decrease/increase
Volume level on Parent Unit
16. Reset Key
17. SD Card socket
18. Micro USB Socket
19. Stand
20. Speaker
21. Antenna
Raise the antenna for optimal
reception
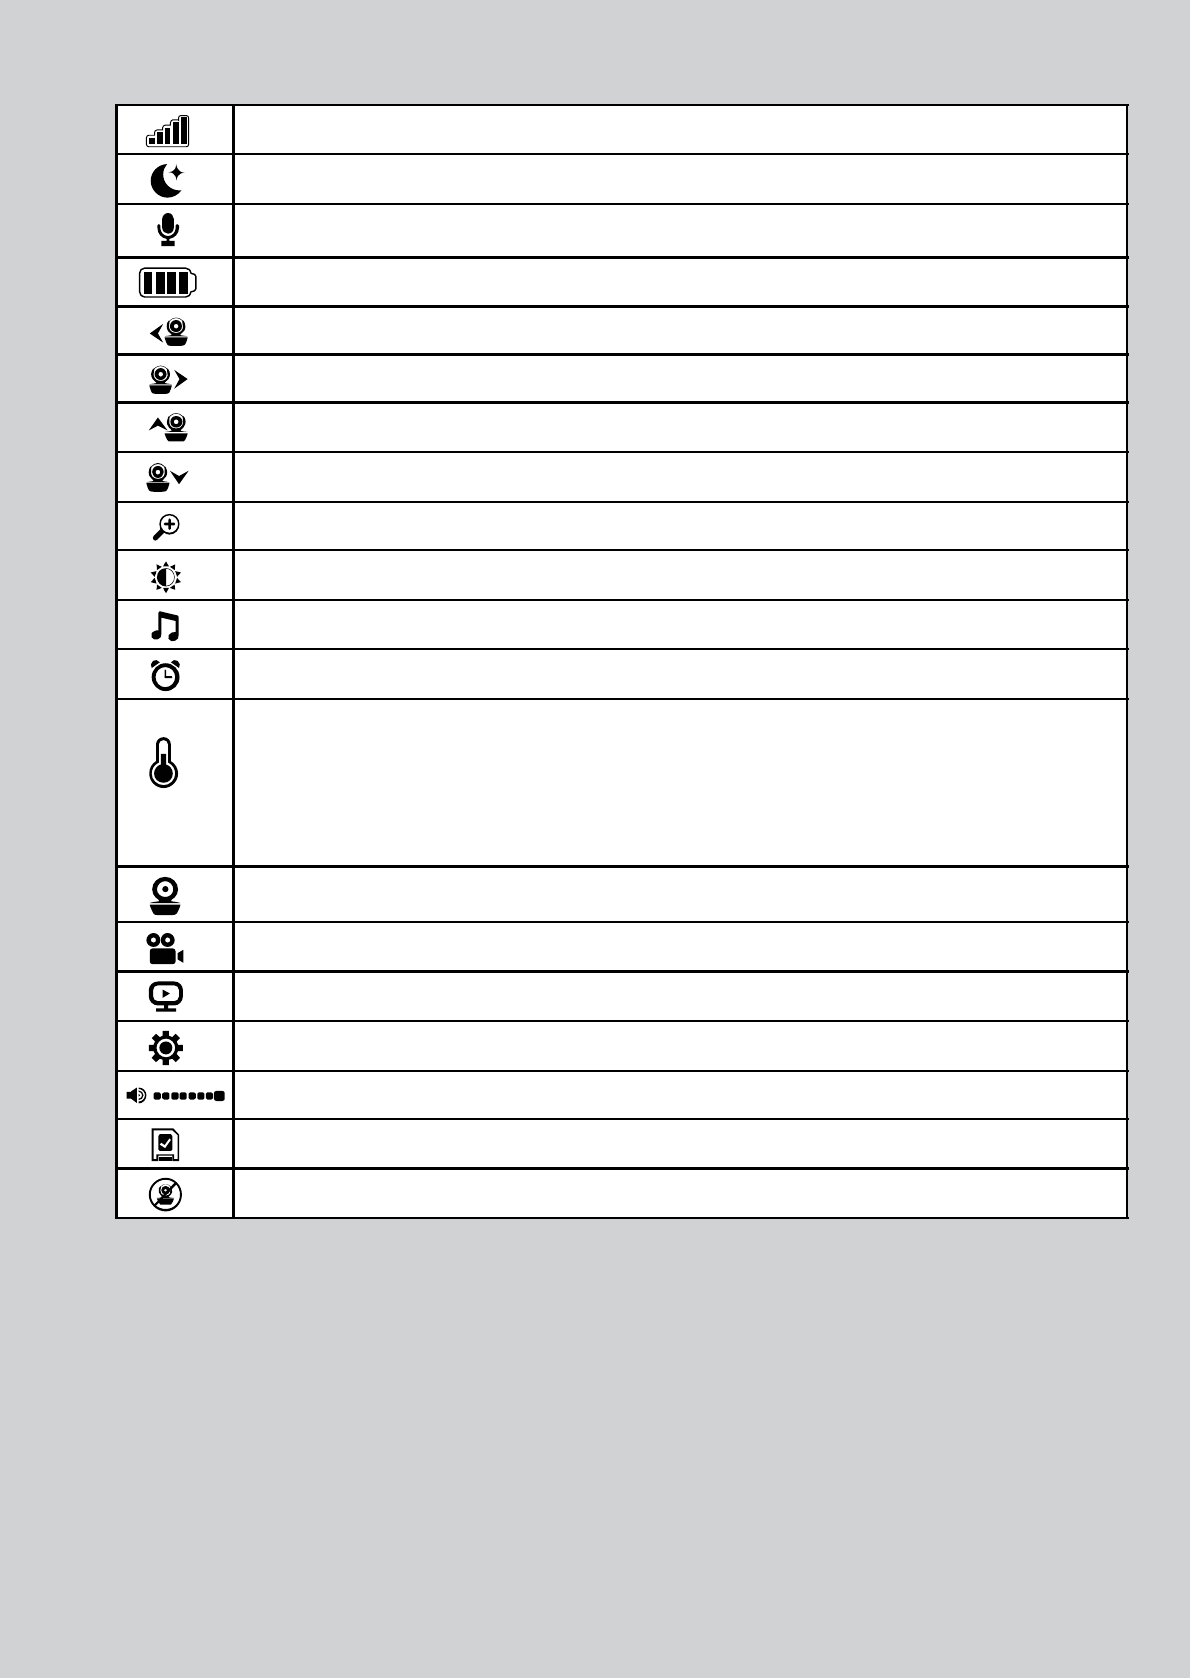
Parent Unit menu icons
Signal Level (4 Levels)
Night Vision Mode (Screen changes to Black/White)
Talk Mode
Battery Level Control (4 Levels)
Pan Left
Pan Right
Tilt Up
Tilt Down
Zoom Level Control (1X, 2X)
Brightness Level Control (8 Levels)
Lullaby Control (5 Song Selections)
Alarm Setting (6h, 4h, 2h, Off)
Temperature Reading (HH ºC / ºF or LL ºC / ºF)
Icon & readings turn RED > 29ºC / 84ºF, and reading display
HH ºC / ºF > 36ºC / 97 ºF
Icon & readings turn RED < 14ºC / 57ºF, and reading display
LL ºC / ºF < 1ºC / 34 ºF
Camera Control (scan, view, add, delete)
Local Recording (Record, Play)
Set Video On Timer (5 min, 30 min, 60 min)
Time Setting (Date, Time format 12/24 Hour and Time)
Volume Level Control (8 Levels)
SD Card detection
No Baby Unit detected
Important guidelines for installing your Baby Monitor
To use your Video Monitor Baby and Parent Units together, you must be able to establish a
radio link between them, and the range will be affected by environmental conditions.
Any large metal object, like a refrigerator, a mirror, a filing cabinet, metallic doors or
reinforced concrete between the Baby and Parent Unit may block the radio signal.
The signal strength may also be reduced by other solid structures, like walls, or by radio
or electrical equipment, such as TVs, computers, cordless or mobile phones,
fluorescent lights or dimmer switches.
Use of other 2.4 GHz products, such as wireless networks (Wi-Fi® routers), Bluetooth®
systems, or microwave ovens, may cause interference with this product, so keep the
Baby Monitor away at least 3ft from these types of products, or turn them off if they
appear to be causing interference.
If the signal is weak, try raising the Parent Unit's Antenna, moving the Parent and/or the
Baby Unit to different positions in the room(s).
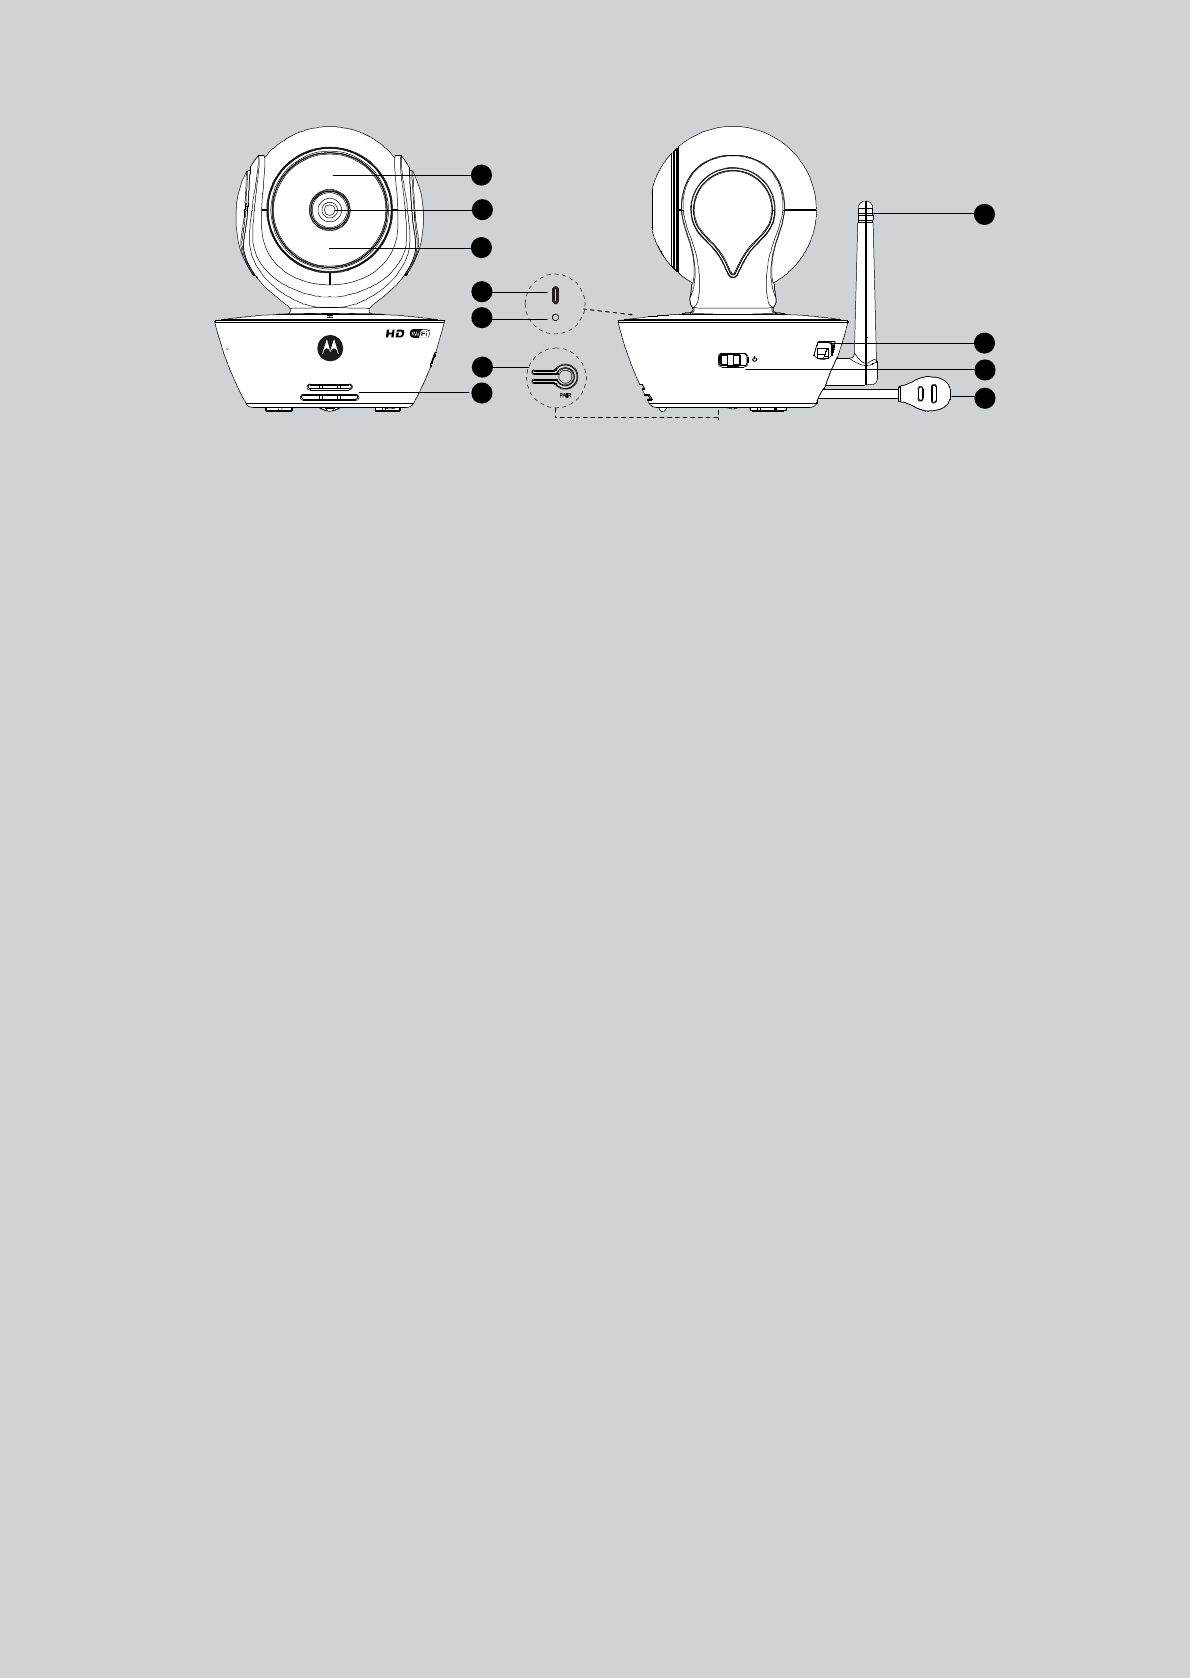
1. Light Sensor (for night mode detection) 7. Speaker
2. Camera Lens 8. Antenna
3. Infrared LEDs (for night vision) 9. Micro USB socket
4. Power / Status indicator 10. ON/OFF Switch
5. Microphone 11. Temperature Sensor
6. PAIR Button
Overview of Your Baby Unit

6Table of contents
Table of contents
1. Safety Instructions..................................................................................... 8
2. Getting Started........................................................................................ 11
2.1 Baby Unit Power Supply............................................................................ 11
2.2 Parent Unit Power Supply ......................................................................... 11
2.3 Registration (Pairing) ................................................................................ 13
3. Using the Baby Monitor........................................................................... 14
3.1 Setting up .................................................................................................. 14
3.2 Pan and Tilt ................................................................................................ 14
3.3 Night Vision Mode .................................................................................... 14
3.4 Talk Mode.................................................................................................. 14
3.5 Video ON/OFF ......................................................................................... 14
3.6 Temperature Display (HH °C / °F or LL °C / °F)...................................... 15
4. Parent Unit Menu Options ...................................................................... 16
4.1 Volume ...................................................................................................... 16
4.2 Brightness.................................................................................................. 16
4.3 Lullaby ....................................................................................................... 16
4.4 Zoom ......................................................................................................... 16
4.5 Alarm ......................................................................................................... 16
4.6 Camera Control ........................................................................................ 17
4.6.1 Add (pair) a camera .................................................................. 17
4.6.2 View a camera ........................................................................... 17
4.6.3 Delete a camera ........................................................................ 18
4.6.4 Scan camera .............................................................................. 18
4.7 Temperature ............................................................................................. 18
4.8 Power Saving mode.................................................................................. 18
4.9 Video ......................................................................................................... 19
4.10 Time Setting .............................................................................................. 19
5. Wi-Fi Internet Viewing ............................................................................20
5.1 Minimum System Requirements .............................................................. 20
5.2 Getting started - Connecting Devices ..................................................... 21
5.3 User Account and Camera Setup on Android Devices....................... 22
5.3.1 Power ON and Connect the Camera ...................................... 22
5.3.2 Download the Hubble App ....................................................... 22
5.3.3 Run the Hubble App on Android device ............................. 23
5.3.4 Add Camera to your account ................................................... 24

Table of contents 7
5.4 User Account and Camera Setup:
Working with iPhone®/iPad®................................................................... 28
5.4.1 Power ON and Connect the Camera ...................................... 28
5.4.2 Download the Hubble App .......................................................28
5.4.3 Run the Hubble App on your iPhone®/iPad® ......................... 29
5.4.4 Add the Camera to your account ............................................. 30
5.5 Camera Functions:
Working with devices for Android.......................................................35
5.5.1 Connecting the Camera to Power ...........................................35
5.5.2 Add more cameras .................................................................... 35
5.5.3 Remove a Camera ....................................................................36
5.5.4 Change your Account Information ..........................................37
5.5.5 Camera settings ........................................................................ 38
5.5.6 General Settings ........................................................................ 39
5.5.7 Features of the Hubble App ..................................................... 40
5.6 Camera Functions:
Working with devices for iPhone®/iPad®............................................... 44
5.6.1 Add more cameras .................................................................... 44
5.6.2 Remove a Camera ....................................................................45
5.6.3 Change your Account Information ..........................................46
5.6.4 Camera settings ........................................................................ 47
5.6.5 General settings ........................................................................ 48
5.6.6 Hubble App Settings .................................................................49
5.6.7 Features of the Hubble App ..................................................... 50
5.7 Camera Functions:
Working with PC/Notebook..................................................................... 54
5.8 Procedure for Resetting the Camera .......................................................54
6. Disposal of The Device (environment) ...................................................55
7. Cleaning .................................................................................................. 56
8. Help.......................................................................................................... 57
9. General Information ................................................................................ 65
8Safety Instructions
1. Safety Instructions
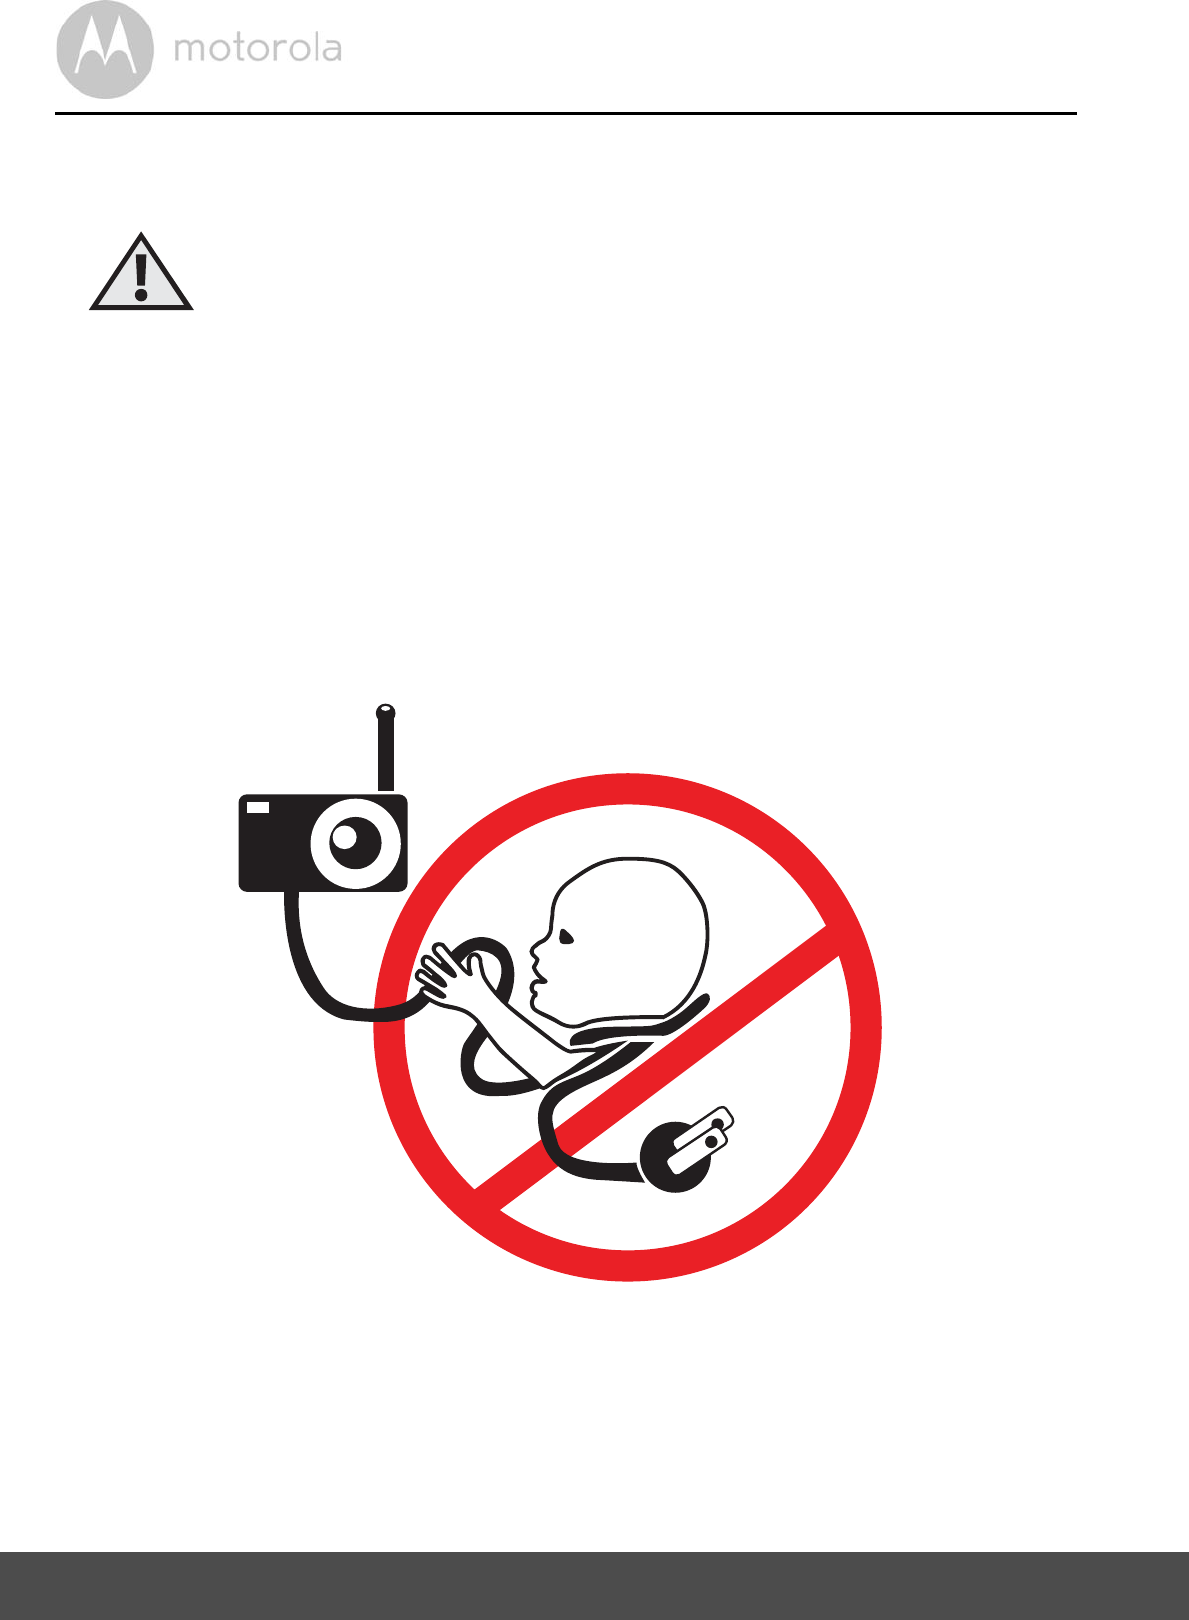
WARNING:
Strangulation Hazard: Children have
STRANGLED in cords. Keep this cord
out of the reach of children (more than
3ft (1m) away). Never use extension
cords with AC Adapters. Only use the AC
Adapters provided.
Safety Instructions 9
WARNING
This digital video Baby Monitor is compliant with all relevant standards
regarding electromagnetic fields and is, when handled as described in the
User's Guide, safe to use. Therefore, always read the instructions in this User's
Guide carefully before using the device.
Adult assembly is required. Keep small parts away from children when
assembling.
This product is not a toy. Do not allow children to play with it.
This Baby Monitor is not a substitute for responsible adult supervision.
Keep this Users Guide for future reference.
Do not place the Baby Unit or cords in the crib or within reach of the baby
(the unit and cords should be more than 3 feet away)
Keep the cords out of reach of children.
Do not cover the Baby Monitor with a towel or blanket.
Never use extension cords with power adapters. Only use the power
adapters provided.
Test this monitor and all its functions so that you are familiar with it prior to
actual use.
Do not use the Baby Monitor near water.
Baby Unit SET UP & USE:
Choose a location for the Baby Unit that will provide the best view of
your baby in their crib.
Place the Baby Unit on a flat surface, such as a dresser, desk, or shelf or
mount the Unit to a wall securely using the keyhole slots on the
underside of the stand.
NEVER place the Baby Unit or cords inside your child's crib.
Do not place the Baby Unit or cords in the crib or within reach of the
baby (the unit and cords should be more than 3 feet away).

10 Safety Instructions
Do not place the Baby Monitor near a heat source.
Only use the chargers and power adapters provided. Do not use other
chargers or power adapters as this may damage the device and battery
pack.
Do not touch the plug contacts with sharp or metal objects.
CAUTION
Risk of explosion if battery is replaced by an unapproved battery type.
Dispose of used batteries according to their instructions.
The Unit shall be setup and used so that parts of the user's body other than the
hands are maintained at a distance of approximately 8 inches (20 cm) or more.
Getting Started 11
2. Getting Started
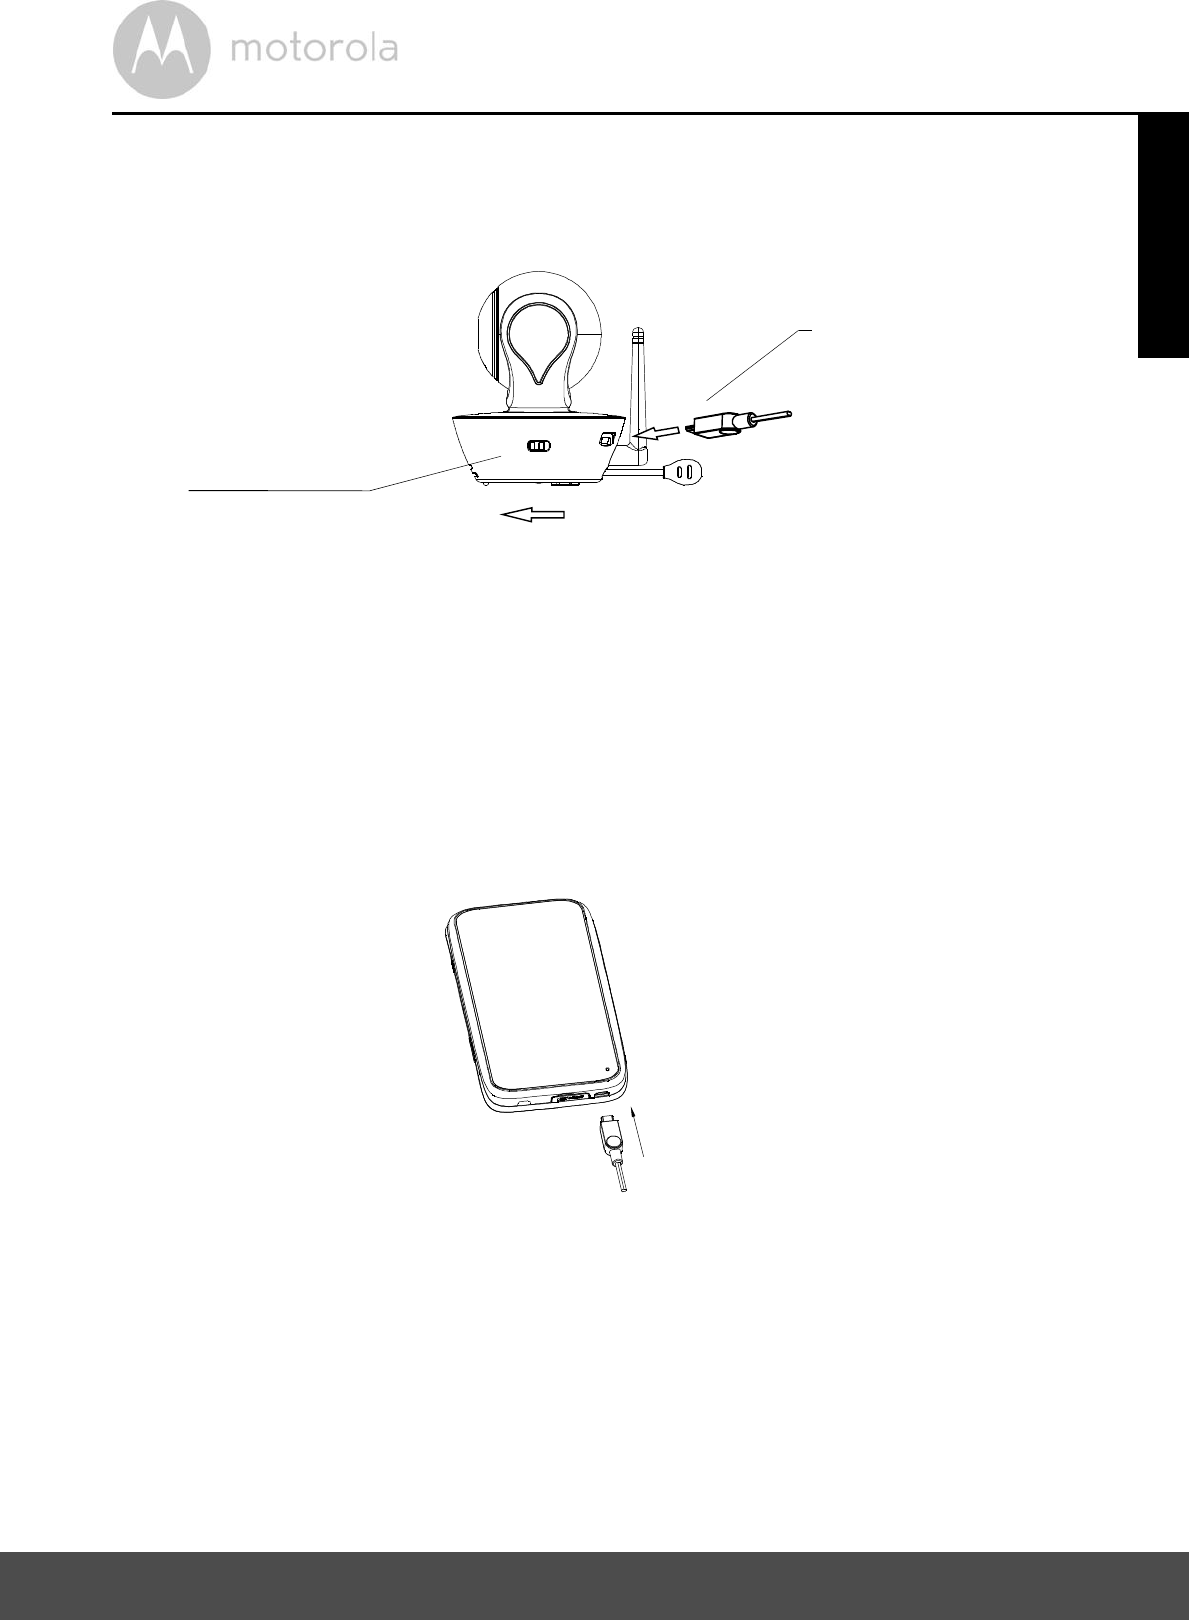
2.1 Baby Unit Power Supply
1. Connect the small plug of the power adapter to the Baby Unit (camera) and
the other end to a suitable electrical outlet.
NOTE
Only use the enclosed power adapter (5V DC / 1500mA).
2. Slide the ON/OFF switch to the ON position. The power LED will light up
in blue.
3. Slide the ON/OFF switch to the OFF position to turn the Baby Unit off.
2.2 Parent Unit Power Supply
IMPORTANT
The Parent Unit is assembled with a built-in rechargeable battery pack (Lithium-
ion battery 1880mAh), please charge it for 16 hours before use.
1. Connect the micro USB plug of the power adapter to the Parent Unit and
the other end to a suitable electrical outlet. Only use the enclosed power
adapter (5V DC / 1500mA) with the micro USB plug.
Switch to turn ON
the camera
Power adapter plug
12 Getting Started
2. Press and hold the 0 POWER ON/OFF button for 1 second to turn ON the
Parent Unit.
3. Once the Baby and Parent Units are switched on, the display on the Parent
Unit will show the video captured by the Baby Unit.
4. If there is no connection or you are out of range, the video display will turn
5. off and the unit will beep every 5 seconds. Move the Parent Unit closer to
6. the Baby Unit until the link is re-established.
7. Press and hold the 0 POWER ON/OFF button, until the progress bar
finishes scrolling, to turn OFF the Parent Unit.
NOTE
The battery icon turns RED to indicate that the battery is low, and the
parent unit will beep every 15 seconds. The battery needs to be recharged; it
will take12 hours to charge fully.
When charging
1. Whilst the power is OFF, and the adapter is plugged in, an adapter logo will
appear on-screen and a flashing battery logo will display for 15 seconds. The
Blue LED at the top left corner will light up; indicating that the adapter is
plugged in.
2. Whilst the power is ON, and the adapter is plugged in, the battery icon at
the top right corner of the screen will show that the battery is charging. The
Blue LED at the top left corner will light up to indicate that the adapter is
plugged in.
Getting Started 13
2.3 Registration (Pairing)
The Baby Monitor is pre-registered to your Parent Unit. You do not need to
register it again unless the Baby Unit loses its link with the Parent Unit.
To re-register your Baby Unit, or register a new Baby Unit, follow the procedures
below:
1. Press the Mbutton of the Parent Unit and the menu bar will pop up.
2. Press the < LEFT button or > RIGHT button until is highlighted, and
the
del/ add/ view/ scan
menu will pop up.
3. Press the + UP button or - DOWN button to select
add
, and press the
O button to confirm.
4. Camera will pop up, press the + UP button or - DOWN
button to select the desired Camera and press the Obutton to start
searching for a camera unit. The green audio level LED will flash rapidly
while searching.
5. Press the Obutton to confirm.
6. Press and hold the PAIR button underneath the Baby Unit until the Parent
Unit finds the camera, beeps and the video from the camera appears.
NOTE
If a particular Baby Unit was registered previously, registering this current
Baby Unit again will overwrite the old registration.
+

14 Using the Baby Monitor
3. Using the Baby Monitor
3.1 Setting up
Place the Baby Unit in a convenient location (e.g. on a table) and point the
camera lens towards the area you want to monitor.
Adjust the angle of the Baby Unit's head by rotating the camera up, down, left
and right until you are satisfied with the image shown on the Parent Unit.
NOTE
Do not place the Baby Unit within the baby's reach! If there is interference with
the picture or sound, try moving the units to different locations, and ensure they
are not close to other electrical equipment.
3.2 Pan and Tilt
The camera can be remotely controlled from the Parent Unit.
1. Press the + UP button or - DOWN button to tilt up or down.
2. Press the < LEFT button or > RIGHT button to pan left or right.
3.3 Night Vision Mode
The Baby Unit has 8 high-intensity infrared LEDs for picking up clear images in
the dark. When the built-in photo sensor on the top of the unit detects a low level
of ambient light, the LEDs will automatically activate and the screen on the
Parent Unit will display in black and white. The icon will be displayed at the
top of the screen.
3.4 Talk Mode
Press and hold the TTALK button on the Parent Unit to talk to your baby through
the Baby Units loudspeaker. The Ticon will be displayed at the top of the LCD
screen.
3.5 Video ON/OFF
Press V VIDEO ON/OFF key to turn the LCD display on or off, whilst still
leaving the audio monitor on.

Using the Baby Monitor 15
3.6 Temperature Display (HH °C / °F or LL °C / °F)
The temperature reading from the temperature sensor at the back of the Baby
Unit will be displayed at the top of the LCD screen. The readings will turn RED if
the temperature goes above 29°C / 84°F or below 14°C / 57°F. The reading will
change to HH °C / °F if the temperature goes above 36°C / 97°F. The reading
will change to LL °C / °F if the temperature goes below 1°C / 34°F.
16 Parent Unit Menu Options
4. Parent Unit Menu Options
4.1 Volume
1. Press the Volume button - or + to adjust the volume level, the icon will
pop up and you can select the desired volume level from level 0~8. (The
default volume level setting is level 4.)
4.2 Brightness
1. Press the M button and the menu bar will pop up.
2. Press the < LEFT button or > RIGHT button until is highlighted.
3. Press the + UP button or - DOWN button to select the desired brightness
level from level 1 ~ 8. (The default brightness level setting is level 5.)
4.3 Lullaby
1. Press the M button and the menu bar will pop up.
2. Press the < LEFT button or > RIGHT button until is highlighted.
3. Press the + UP button or - DOWN button to select the desired song from
the 5 lullabies available, or the cycle option to play all 5 songs in turn. If an
individual song is selected it will only play once. (The default setting is
lullaby OFF.)
4. Press O on the selected lullabies to select the desired song sound level.
4.4 Zoom
1. Press the M button and the menu bar will pop up.
2. Press the < LEFT button or > RIGHT button until is highlighted.
3. Press the + UP button or - DOWN button to select the
1X
or
2X
Zoom.
(The default setting is 1X.)
4.5 Alarm
1. Press the M button and the menu bar will pop up.
2. Press the < LEFT button or > RIGHT button until is highlighted.
3. Press the + UP button or -DOWN button to select the alarm time (
6h
,
4h
,
2h
). (The default setting is Alarm OFF.)
4. If an alarm time is selected, the Parent Unit will beep for about 45 seconds
after every 6, 4 or 2 hour period.
Parent Unit Menu Options 17
4.6 Camera Control
4.6.1 Add (pair) a camera
1. Press the M button and the menu bar will pop up.
2. Press the < LEFT button or > RIGHT button until is highlighted, and
the
del/ add/ view/ scan
menu will pop up.
3. Press the + UP button or - DOWN button to select
add
, and press the
O button to confirm.
4. Camera will pop up, press the + UP button or - DOWN
button to select the desired Camera, and press the O button to start
searching for a camera unit. The green audio level LED will flash rapidly
while searching.
5. Press and hold the PAIR button on the underside of the Baby Unit until the
Parent Unit finds the camera, beeps and the picture from the camera appears.
NOTE
A camera can only be registered to one Parent Unit at any one time.
4.6.2 View a camera
1. Press the M button and the menu bar will pop up.
2. Press the < LEFT button or > RIGHT button until is highlighted and
the
del/ add/ view/ scan
menu pops up.
3. Press the + UP button or - DOWN button to select
view
, and press the
O button to confirm.
4. Camera will pop up, press the + UP button or - DOWN
button to select the desired camera, and press the O button to view the
picture from that camera.
TIP
Quick Method to View Cameras instead of entering into the menu bar.
Directly press OK repeatedly to select Camera ,
scan
.
18 Parent Unit Menu Options
4.6.3 Delete a camera
1. Press the M button and the menu bar will pop up.
2. Press the < LEFT button or > RIGHT button until is highlighted, and
the
del/ add/ view/ scan
menu will pop up.
3. Press the + UP button or - DOWN button to select
del
, and press the
O button to confirm.
4. Camera will pop up, press the + UP button or - DOWN
button to select the desired Camera, and press the O button to delete
that registration.
Note:
You are not allowed to delete the camera if there is only one registered camera
in the system.
4.6.4 Scan camera
1. Press the M button and the menu bar will pop up.
2. Press the < LEFT button or > RIGHT button until is highlighted, and
the
del/ add/ view/ scan
menu will pop up.
3. Press the + UP button or - DOWN button to select
scan
, and press the
O button to confirm.
4. The screen will then display images from different registered cameras in a
loop of Camera , changing about every 12 seconds.
TIP
Quick Method to View Cameras instead of entering into the menu bar.
Directly press OK repeatedly to select Camera ,
scan
.
4.7 Temperature
1. Press the M button and the menu bar will pop up.
2. Press the < LEFT button or > RIGHT button until is highlighted.
3. Press the + UP button or - DOWN button to select °C or °F.
4.8 Power Saving mode
1. Press the M button and the menu bar will pop up.
2. Press the < LEFT button or > RIGHT button until V is highlighted.
3. Press the + UP button or - DOWN button to select auto video off after
5 mins, 30 mins or 60 mins if not in charging.
Parent Unit Menu Options 19
4.9 Video
You can record a video of your baby with this function. The videos will be stored
on the SD Memory Card, so please ensure the memory card has enough free
memory.
1. Press the M button and the menu bar will pop up.
2. Press the < LEFT button or > RIGHT button until is highlighted.
3. Press the + UP button or - DOWN button to select , and press O
button to start video recording, thence select press and press O
button to stop.
4. Press the + UP button or - DOWN button to select and press O
button to play back the video.
Note:
The video format is AVI which you can view on a computer/smartphone/tablet
4.10 Time Setting
1. Press the < LEFT button or > RIGHT button until is highlighted and
press O Button.
2. Press the < LEFT button or > RIGHT button to move between the settings.
3. Press the + UP button or - DOWN button to set Date, Time format and
Time.

20 Wi-Fi Internet Viewing
5. Wi-Fi Internet Viewing
5.1 Minimum System Requirements
Web Portal
Windows® 7
Mac OS® 10.7
Chrome 24
Internet Explorer® 9
Safari® 6
Java 7
Firefox® 18.0
Adobe® Flash® Player 15.0
Android System
Version 4.2 or above
iPhone®/iPad® iOS
Version 7.0 or above
Wi-Fi requirements:
At least 0.6 Mbps upload bandwidth per camera. Test your Internet speed at:
http://www.speedtest.net/
Wi-Fi Internet Viewing 21
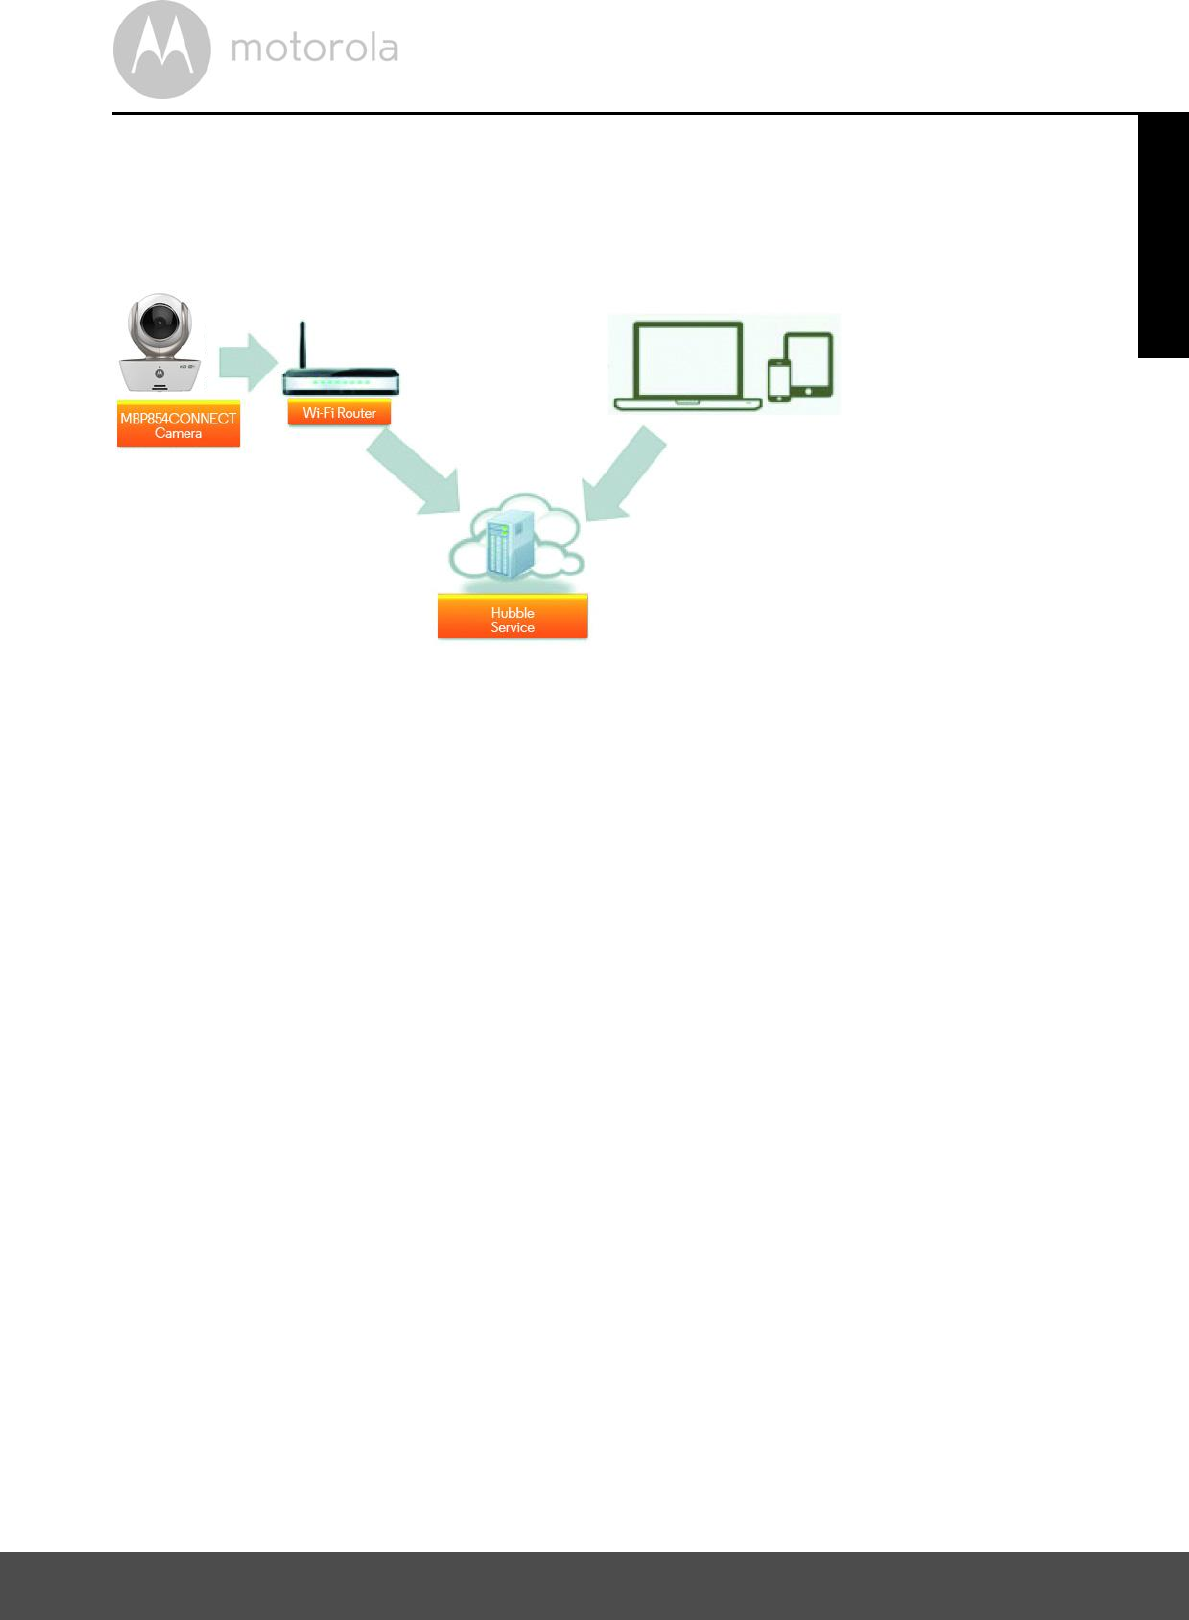
5.2 Getting started - Connecting Devices
How does it work?
When a user tries to access the Camera, our secure server authenticates the
users identity and permits access to the Camera.
Setup
Connect the camera to the power adapter, then plug into a suitable electrical
outlet and make sure the power switch is in the ON position. The Camera must
be within range of the Wi-Fi® router with which you want to connect. Make sure
the password of the router is available for entering during the in-app setup
process.
Status of LED Indication:
- Pair / Setup state: LED is red and blue and flashing slowly
- Unconnected state: LED is red and flashing slowly
- Connected state: LED is blue and always on
- Ready for connection state: LED is blue and flashing slowly
Note: You can only setup via a compatible smartphone or tablet and not via a PC.
View your Camera from any
compatible device remotely

22 Wi-Fi Internet Viewing
5.3 User Account and Camera Setup on Android
Devices
What you need
MBP854CONNECT camera
The power adapter for the Camera
Device with Android system version 4.2 or above
5.3.1 Power ON and Connect the Camera
Connect the power adapter to an electrical outlet and insert the plug into the
micro USB socket on the back of the Camera.
Make sure that the ON/OFF switch is in the ON position.
The Cameras Red LED flashes after the Camera has finished booting. When
you hear two beeps this means the Camera is ready to setup.
5.3.2 Download the Hubble App
Go to the Google Play Store to search Hubble for Motorola Monitors.
Download the Hubble for Motorola Monitors App from the Google Play
Store and install it on your Android device.
Wi-Fi Internet Viewing 23
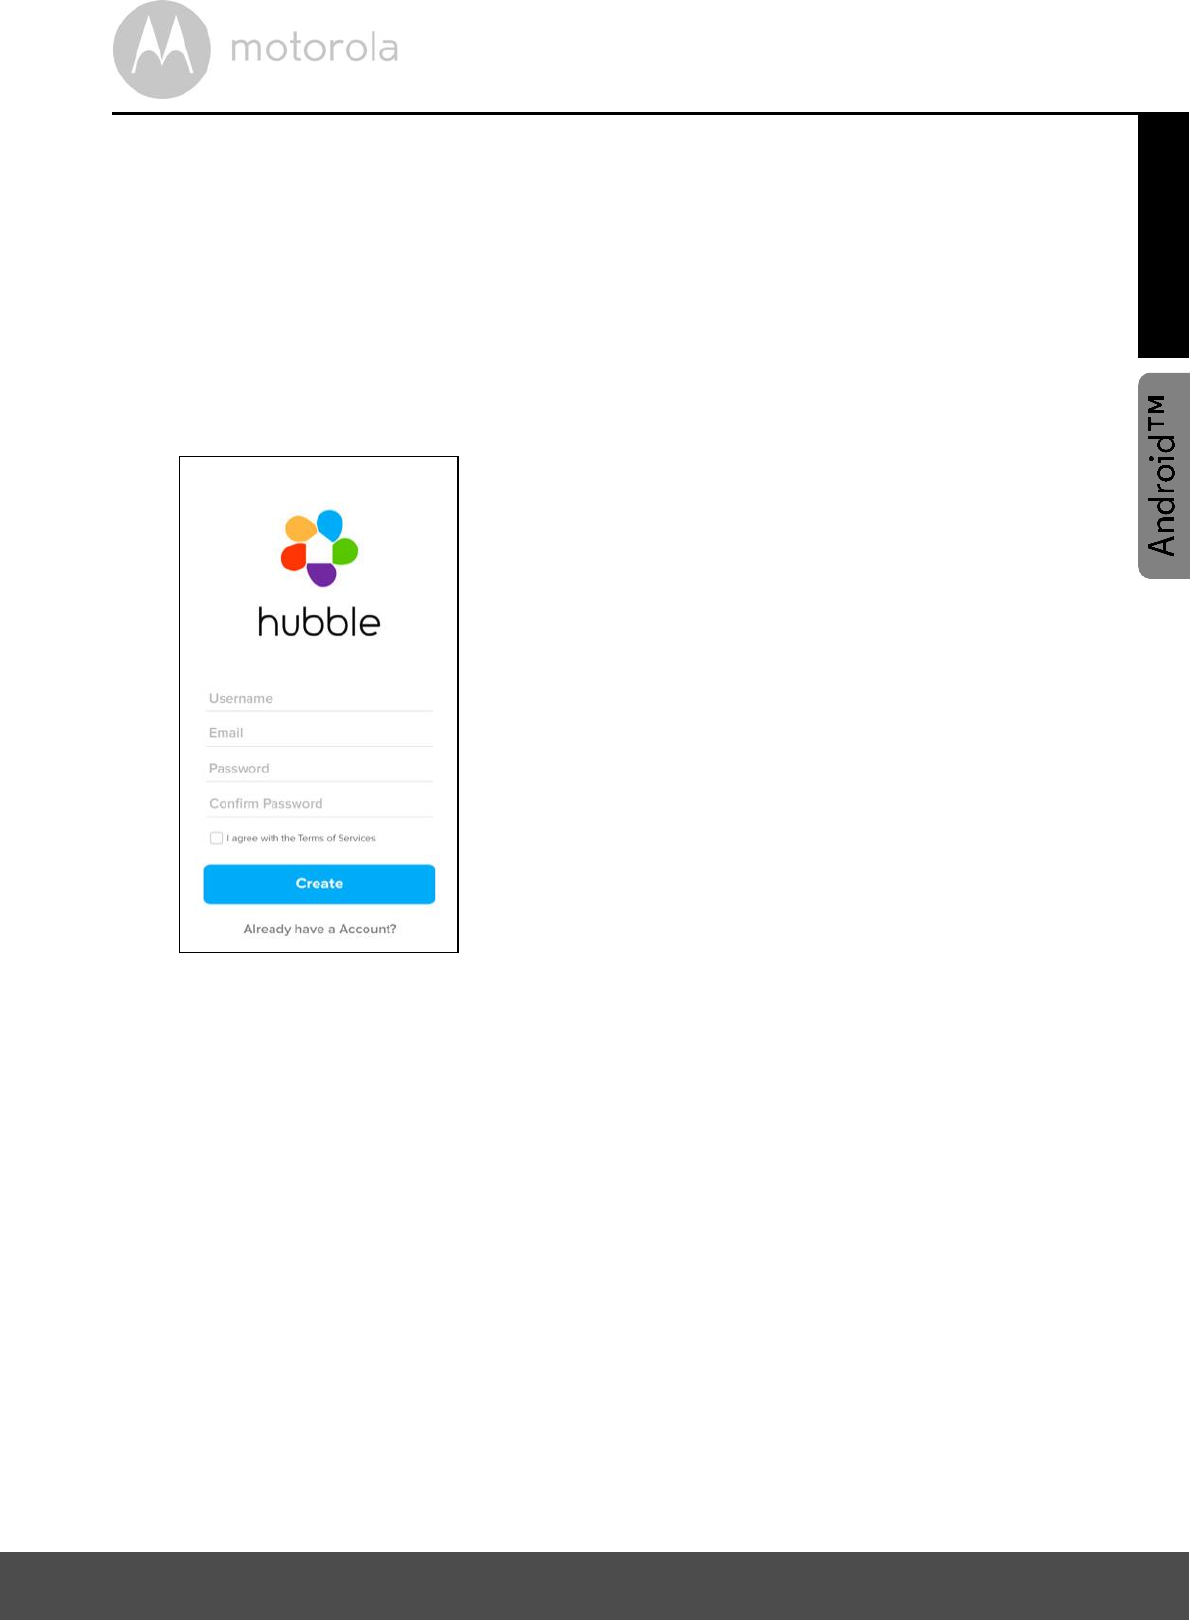
5.3.3 Run the Hubble App on Android device
Ensure your Android device is connected to your Wi-Fi® router.
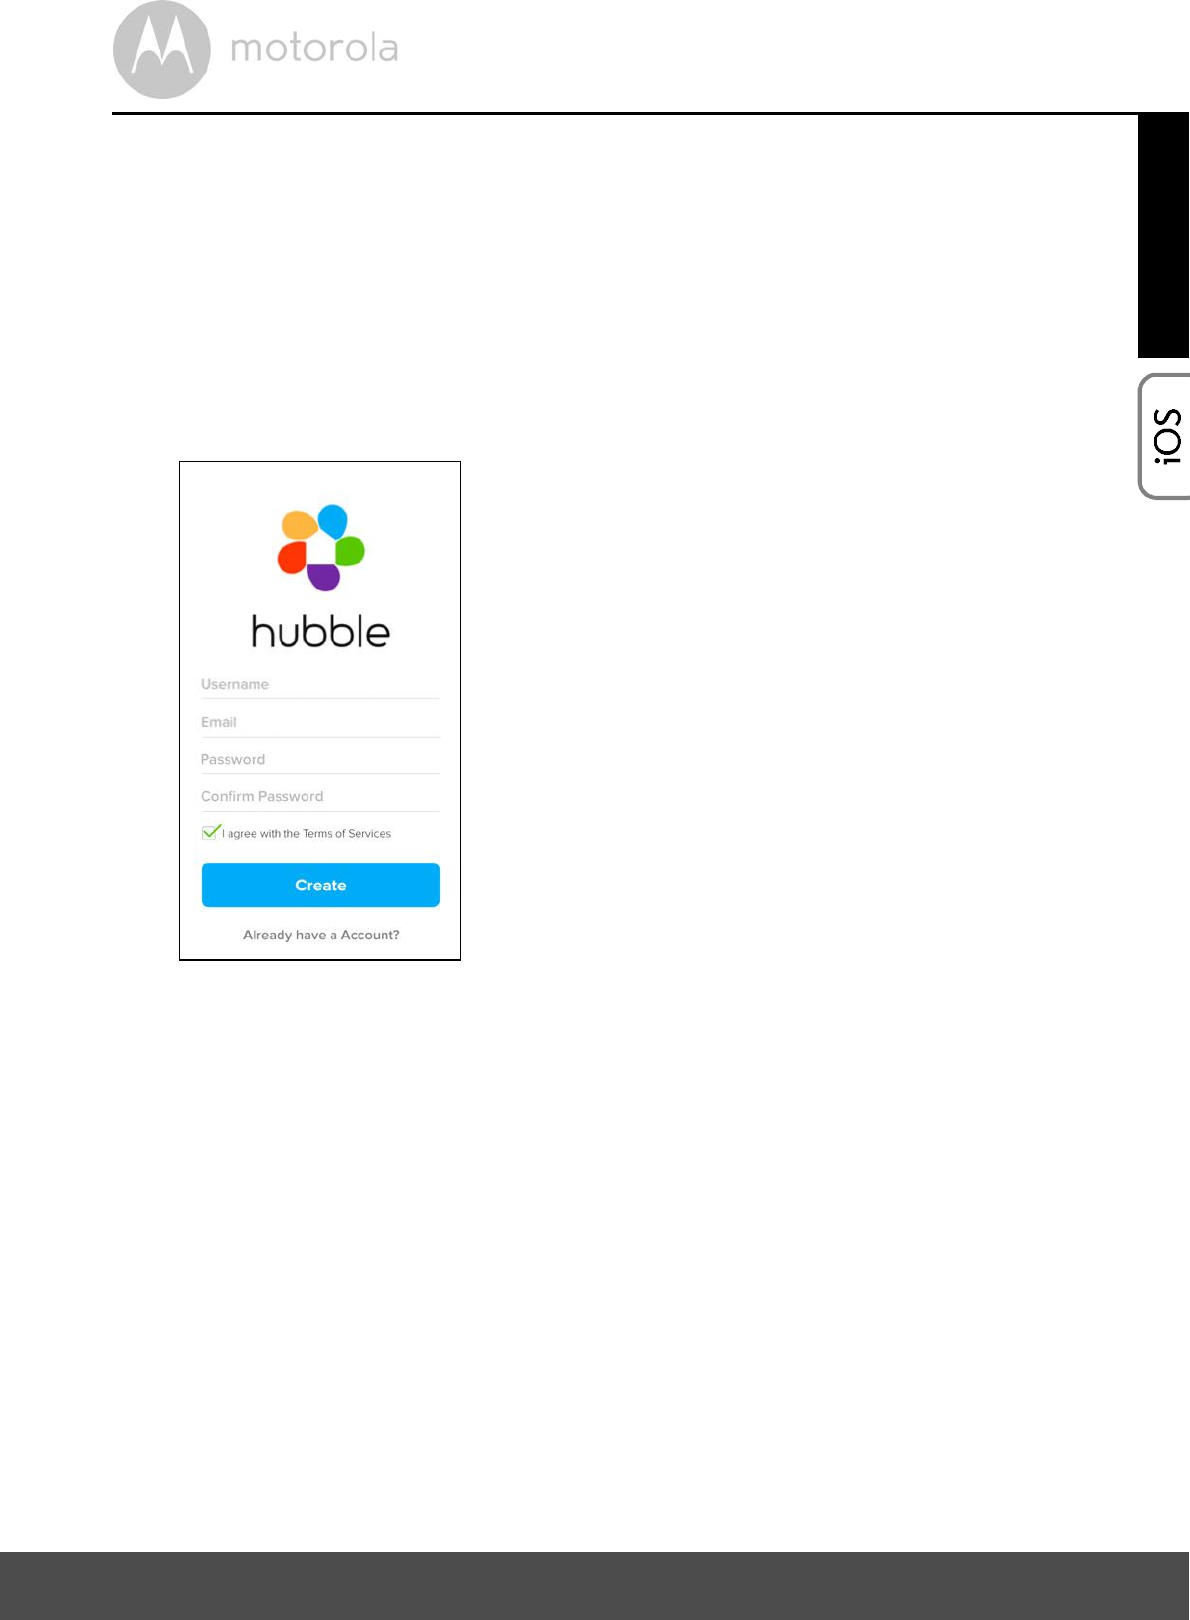
Run the Hubble App and key in your Hubble App account information, read
through the Terms of Service then select I agree to the Terms of Use before
you tap on Create. (Picture A1)
Note: If you have a Hubble account, please select Already have a Account? to
go to the next step.
A1
24 Wi-Fi Internet Viewing
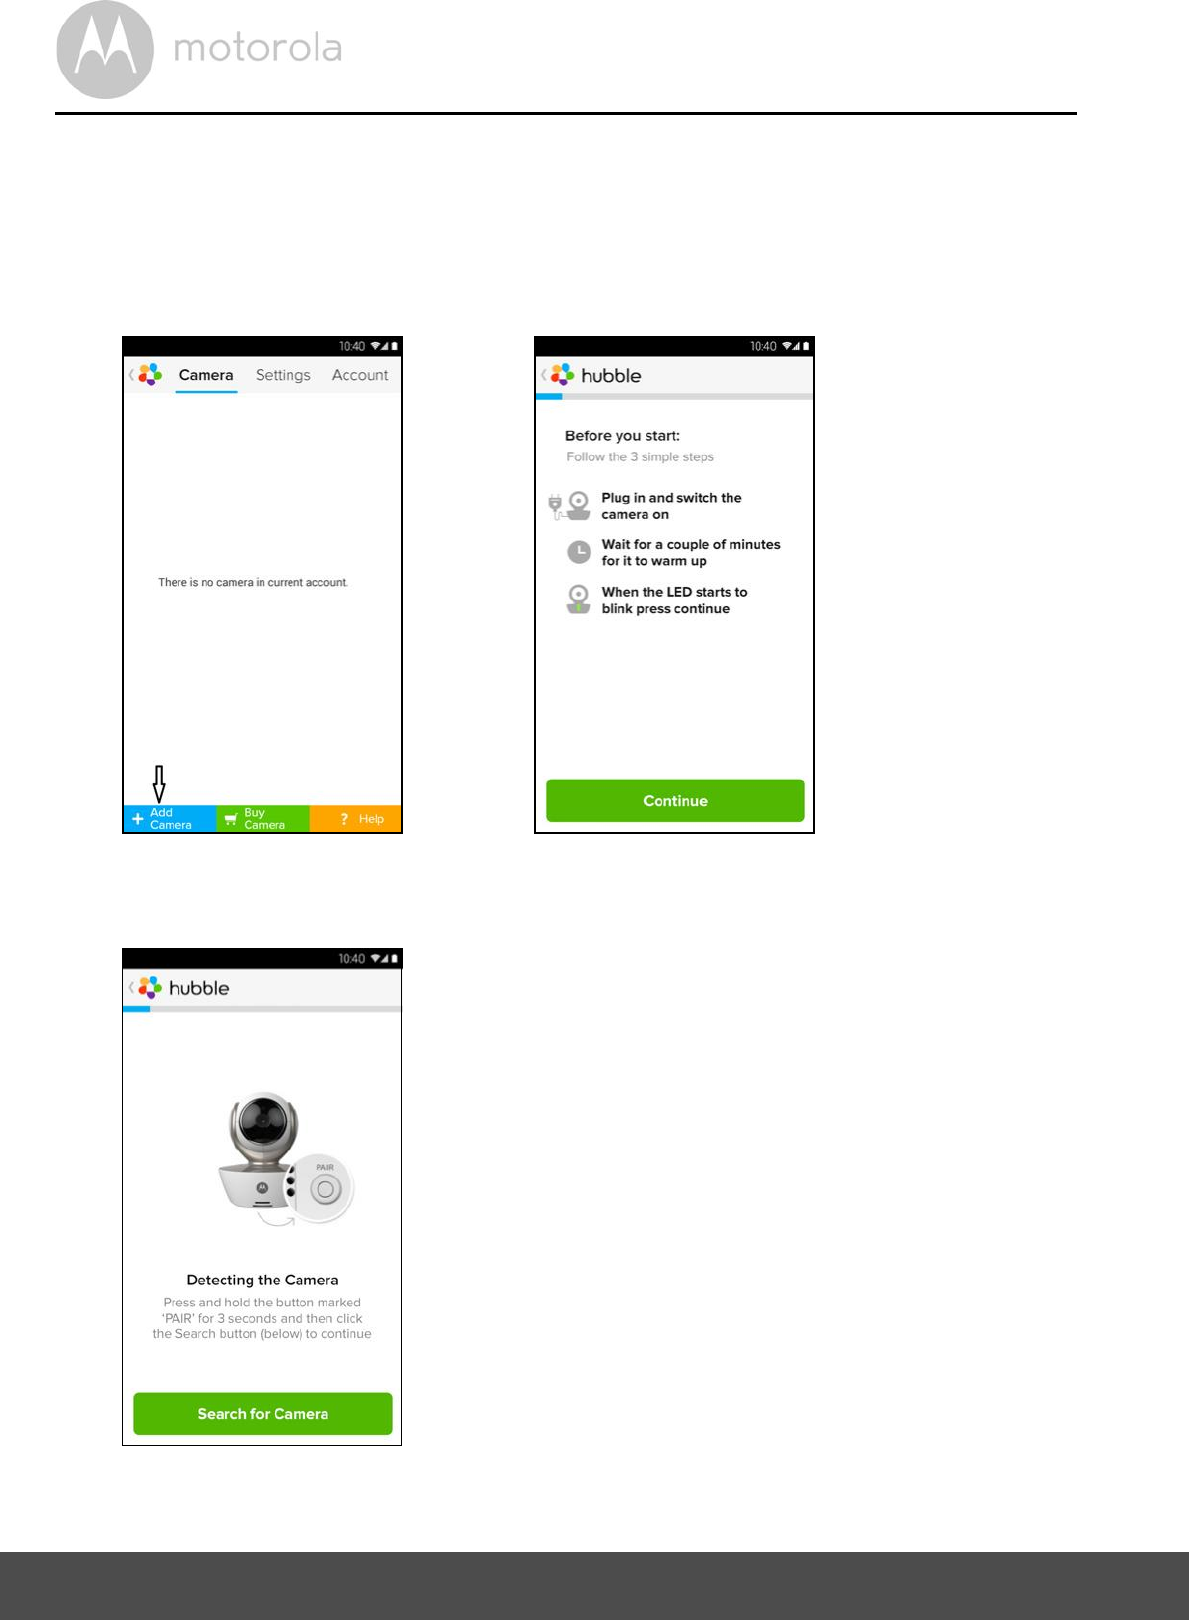
5.3.4 Add Camera to your account
Create a new account and Login.
Tap on Add Camera. (Picture A2)
Tap on Continue. (Picture A3)
The setup instructions will appear on the following screen. (Picture A4)
A2 A3
A4
Wi-Fi Internet Viewing 25
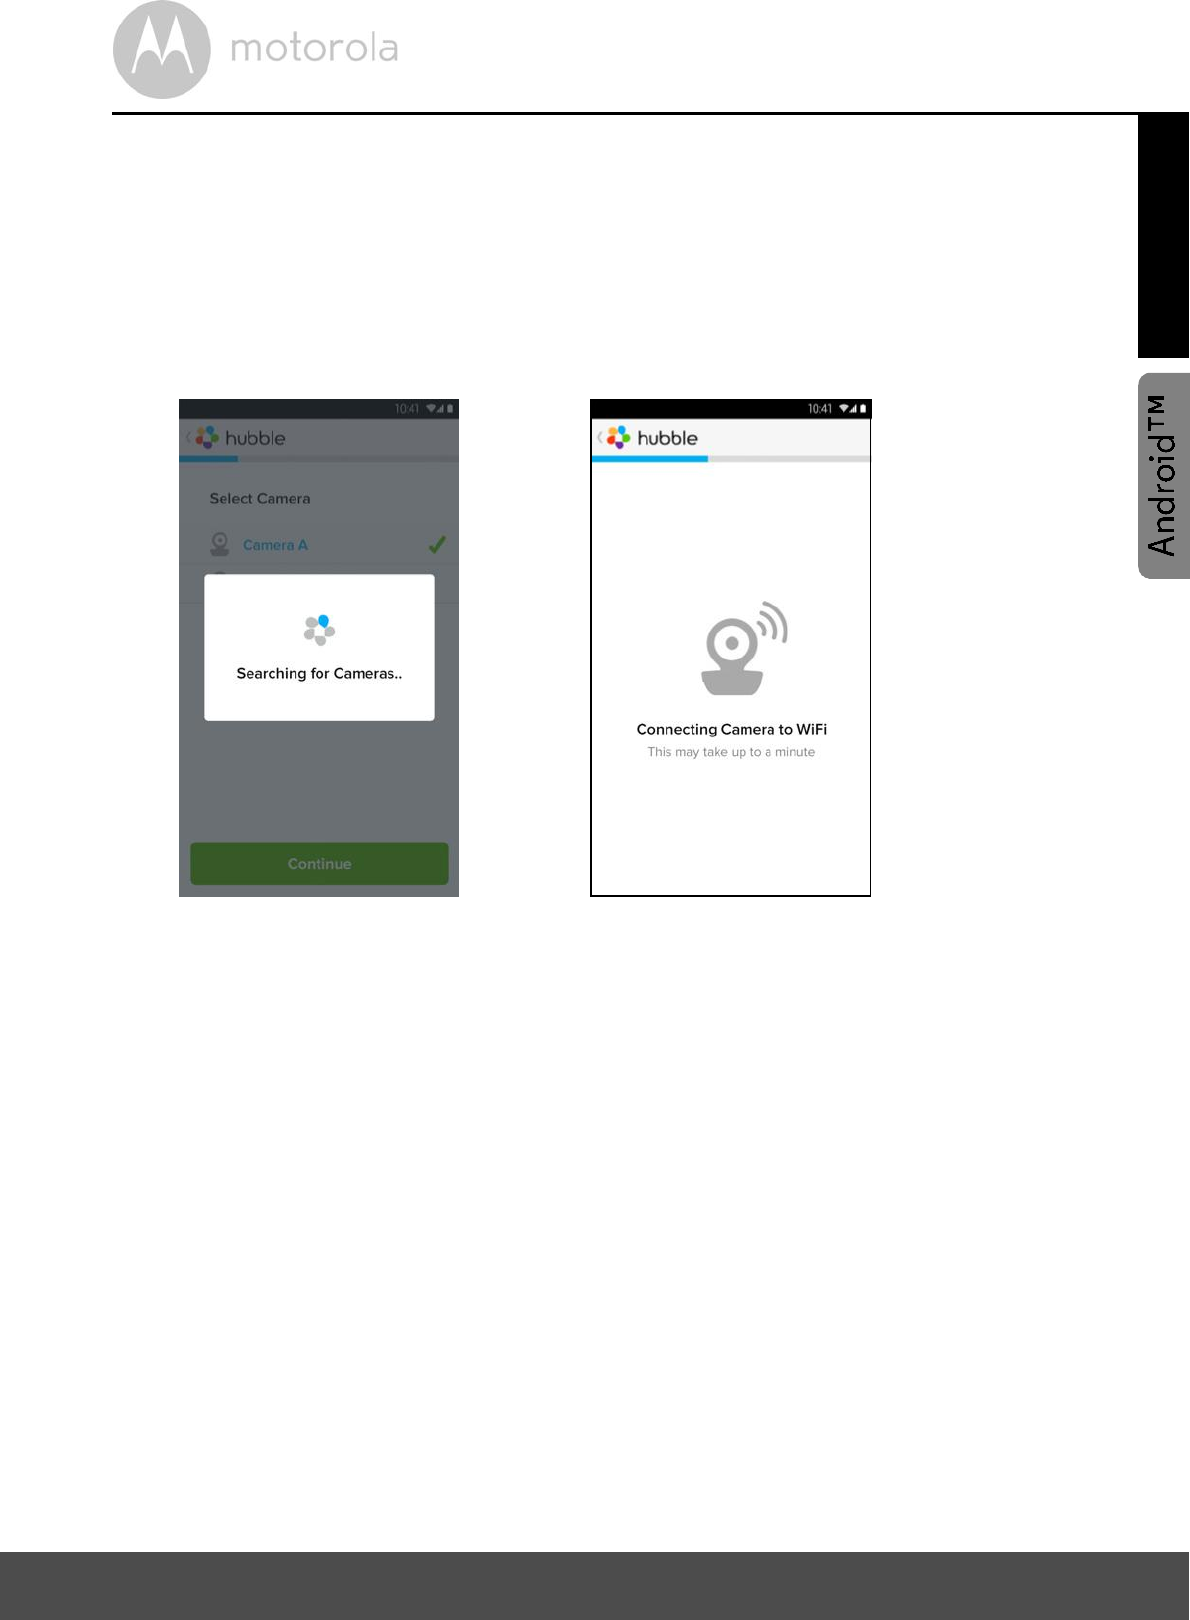
Press and hold the PAIR button for 3 seconds at the side of the Camera, you
will then hear a beep tone and a voice saying "Ready for pairing" from the
Camera Unit. Tap on Search for Camera.
The App will automatically search for and connect to your Camera as shown
in the pictures below (A5 & A6) and the blue/red color LED on the Camera
will flash.
A5 A6
26 Wi-Fi Internet Viewing
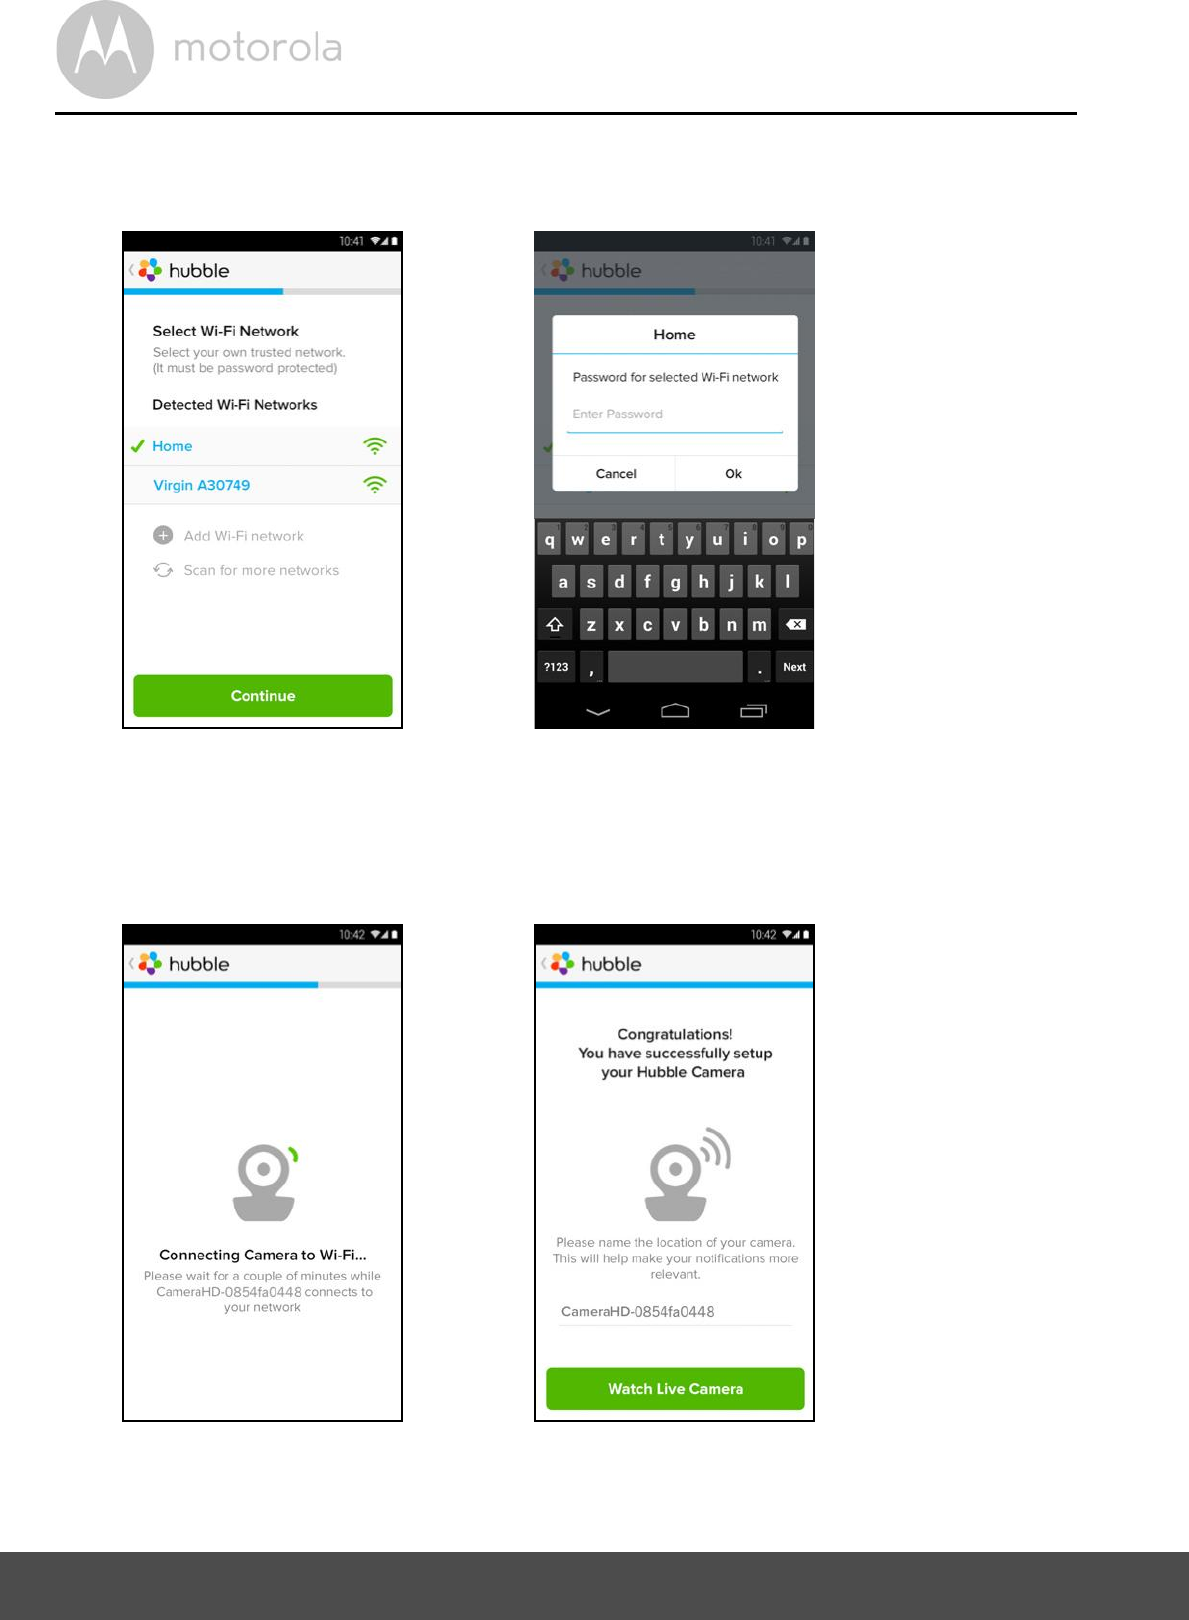
Select your Wi-Fi® Network and tap Continue, enter your password then tap
on Connect. (Picture A7, A8)
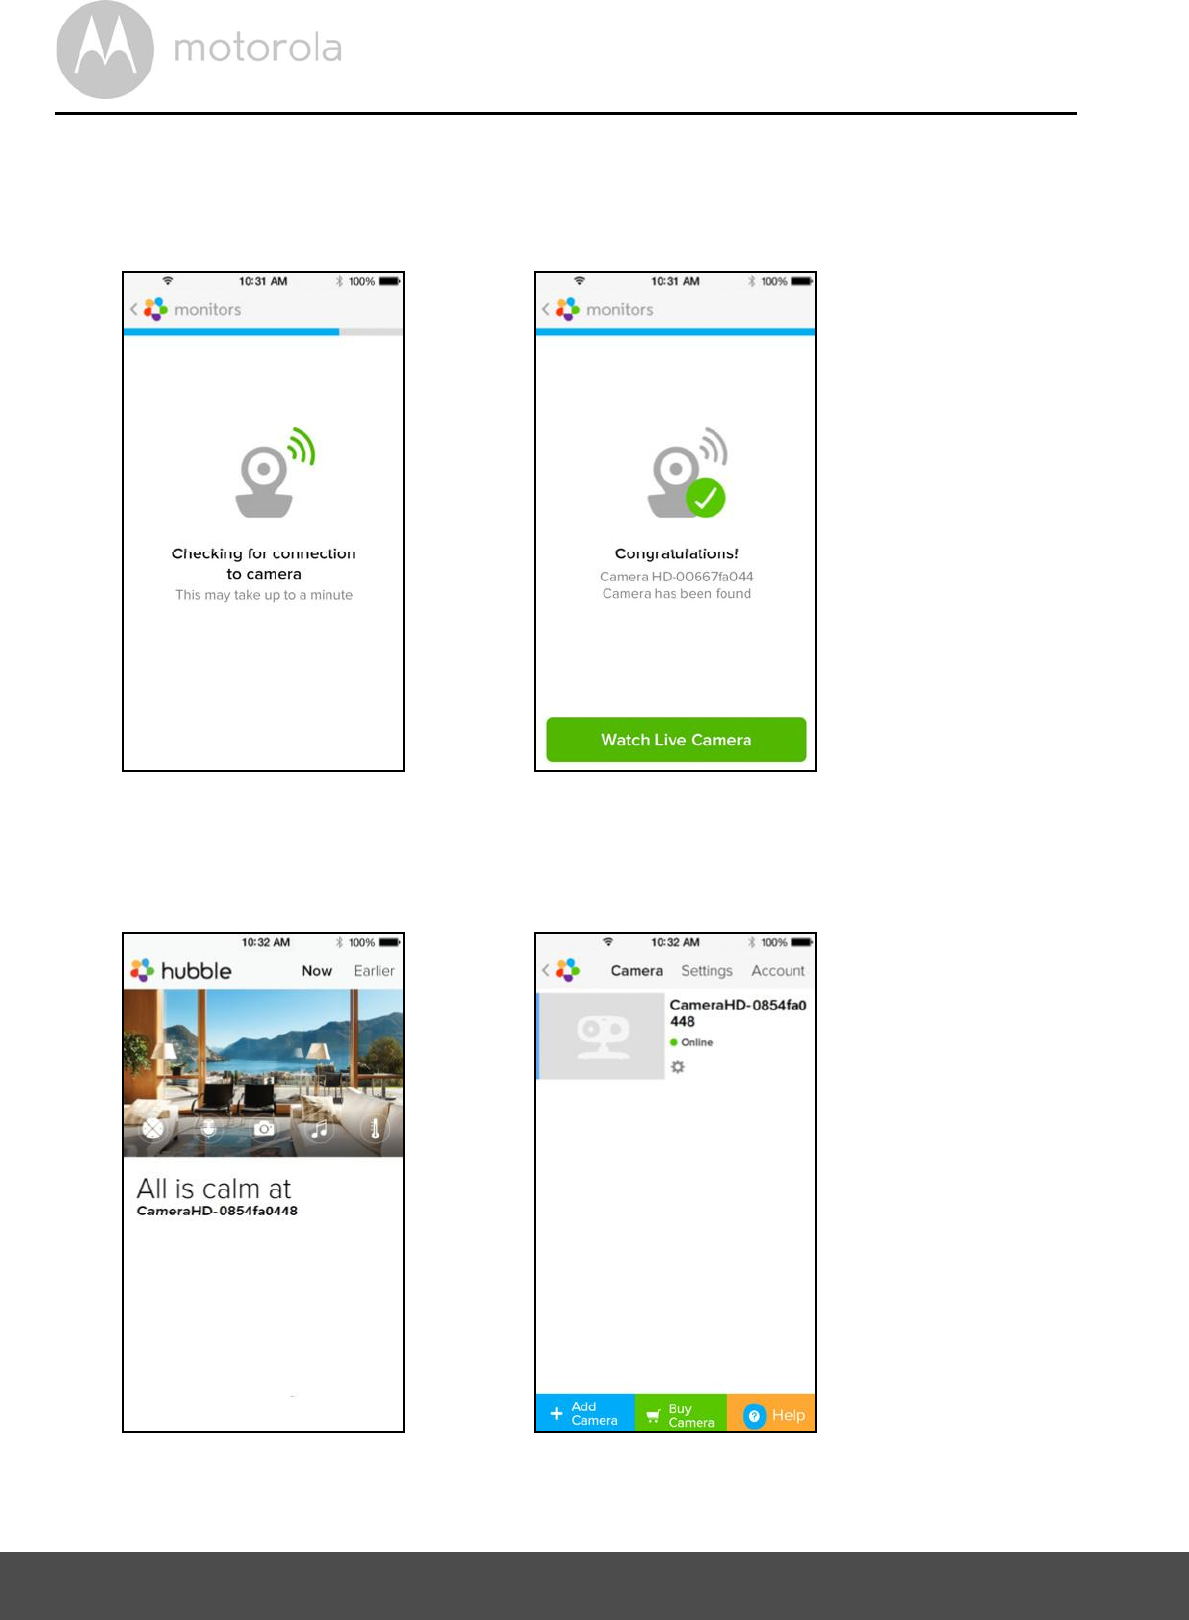
It will take a few minutes for the Camera to connect to the Wi-Fi® network
before showing the connection status (Picture A9, A10). If connection fails,
please tap on the Retry button and repeat the steps starting from 5.3.4.
A7 A8
A9 A10
Wi-Fi Internet Viewing 27
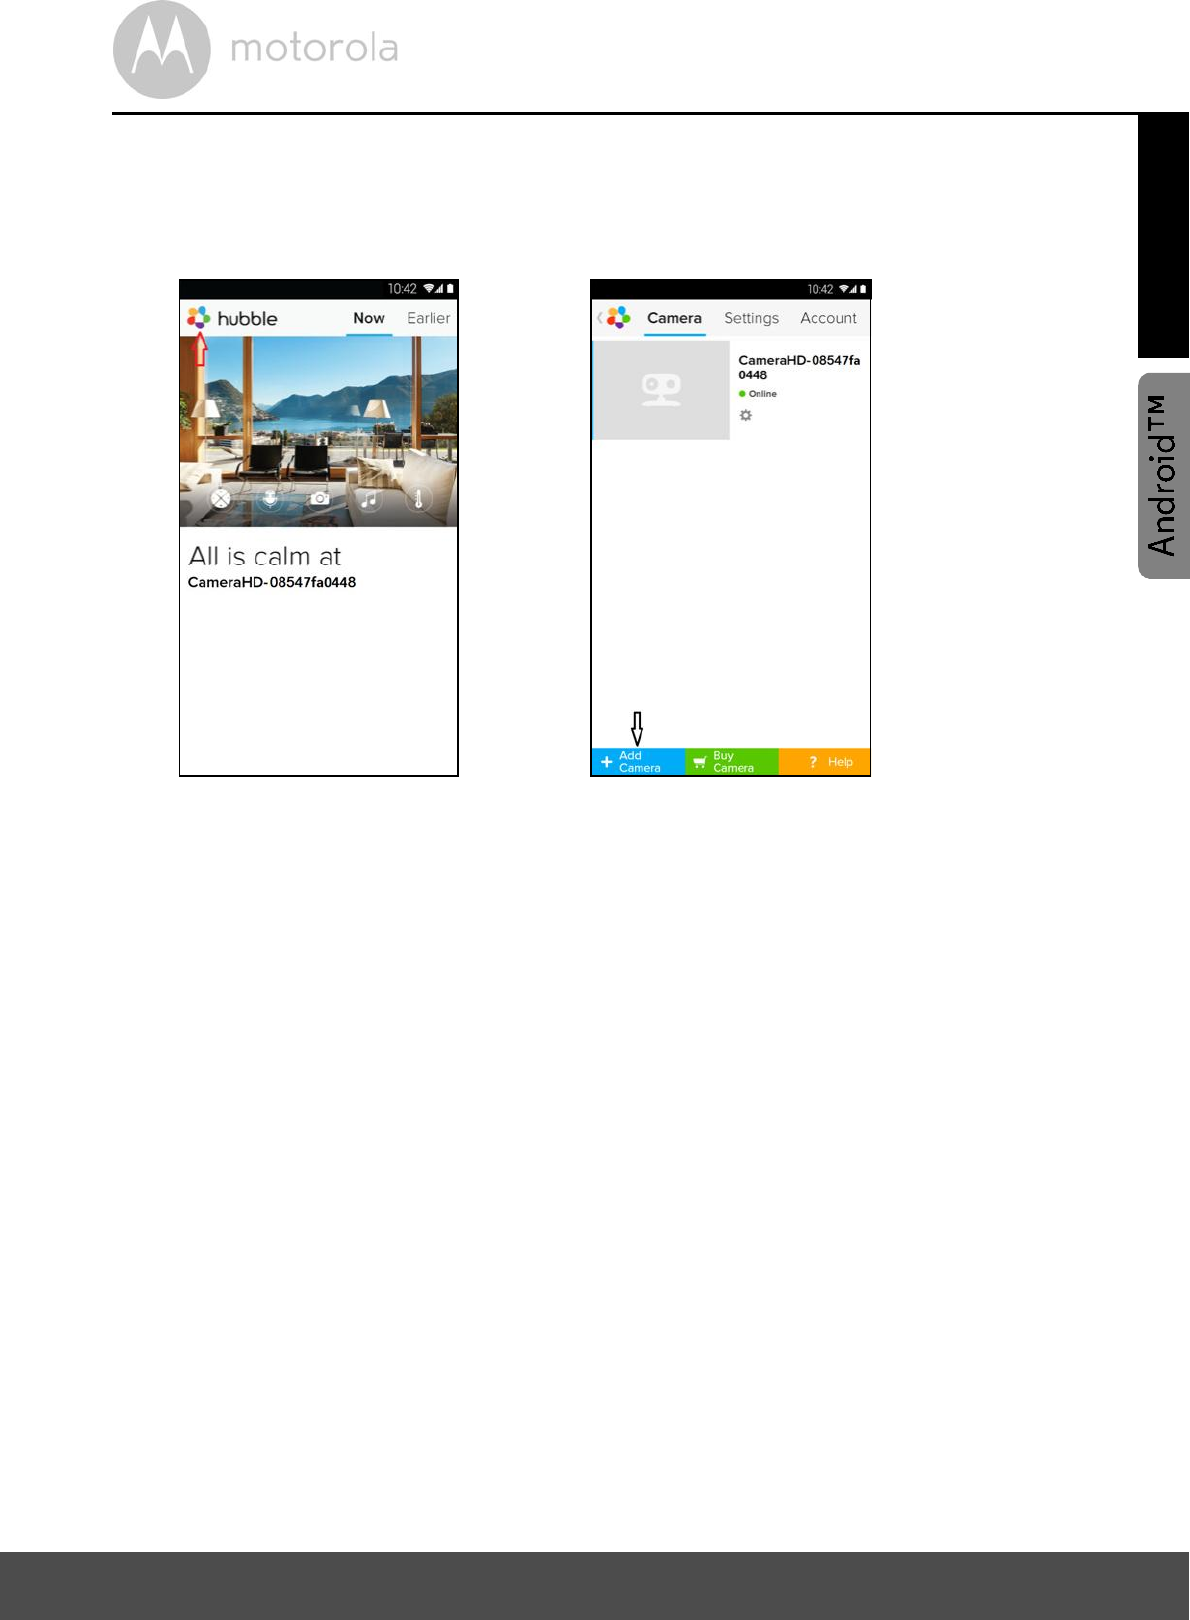
Tap on Watch Live Camera to view the Camera video, the Camera's Blue
LED will flash. (Picture A11)
Tap on the Hubble logo and go back to the Camera list. (Picture A12)
A11 A12

28 Wi-Fi Internet Viewing
5.4 User Account and Camera Setup:
Working with iPhone®/iPad®
What you need
MBP854CONNECT camera
The power adapter for the Camera
iPhone® / iPad® with iOS 7.0 version or up
5.4.1 Power ON and Connect the Camera
Connect the power adapter to an electrical outlet and insert the plug into the
micro USB socket at the back of the Camera.
Make sure that the ON/OFF switch is in the ON position.
The Camera's red LED flashes after the Camera has finished booting. When
you hear two beeps, this means the Camera is ready for setup.
5.4.2 Download the Hubble App
Go to the App Store to search for Hubble for Motorola Monitors.
Download the Hubble for Motorola Monitors App and install it on your
iPhone®/iPad®.
Wi-Fi Internet Viewing 29
5.4.3 Run the Hubble App on your iPhone®/iPad®
Ensure your iPhone®/iPad® is connected to your Wi-Fi® Router.
Run the Hubble App and key in your account information, read through the
Terms of Service then select I agree to the Terms of Service before you tap
on Create. (Picture i1)
Note: If you have a Hubble account, please select Already have a Account? to
go to the next step.
i1
30 Wi-Fi Internet Viewing
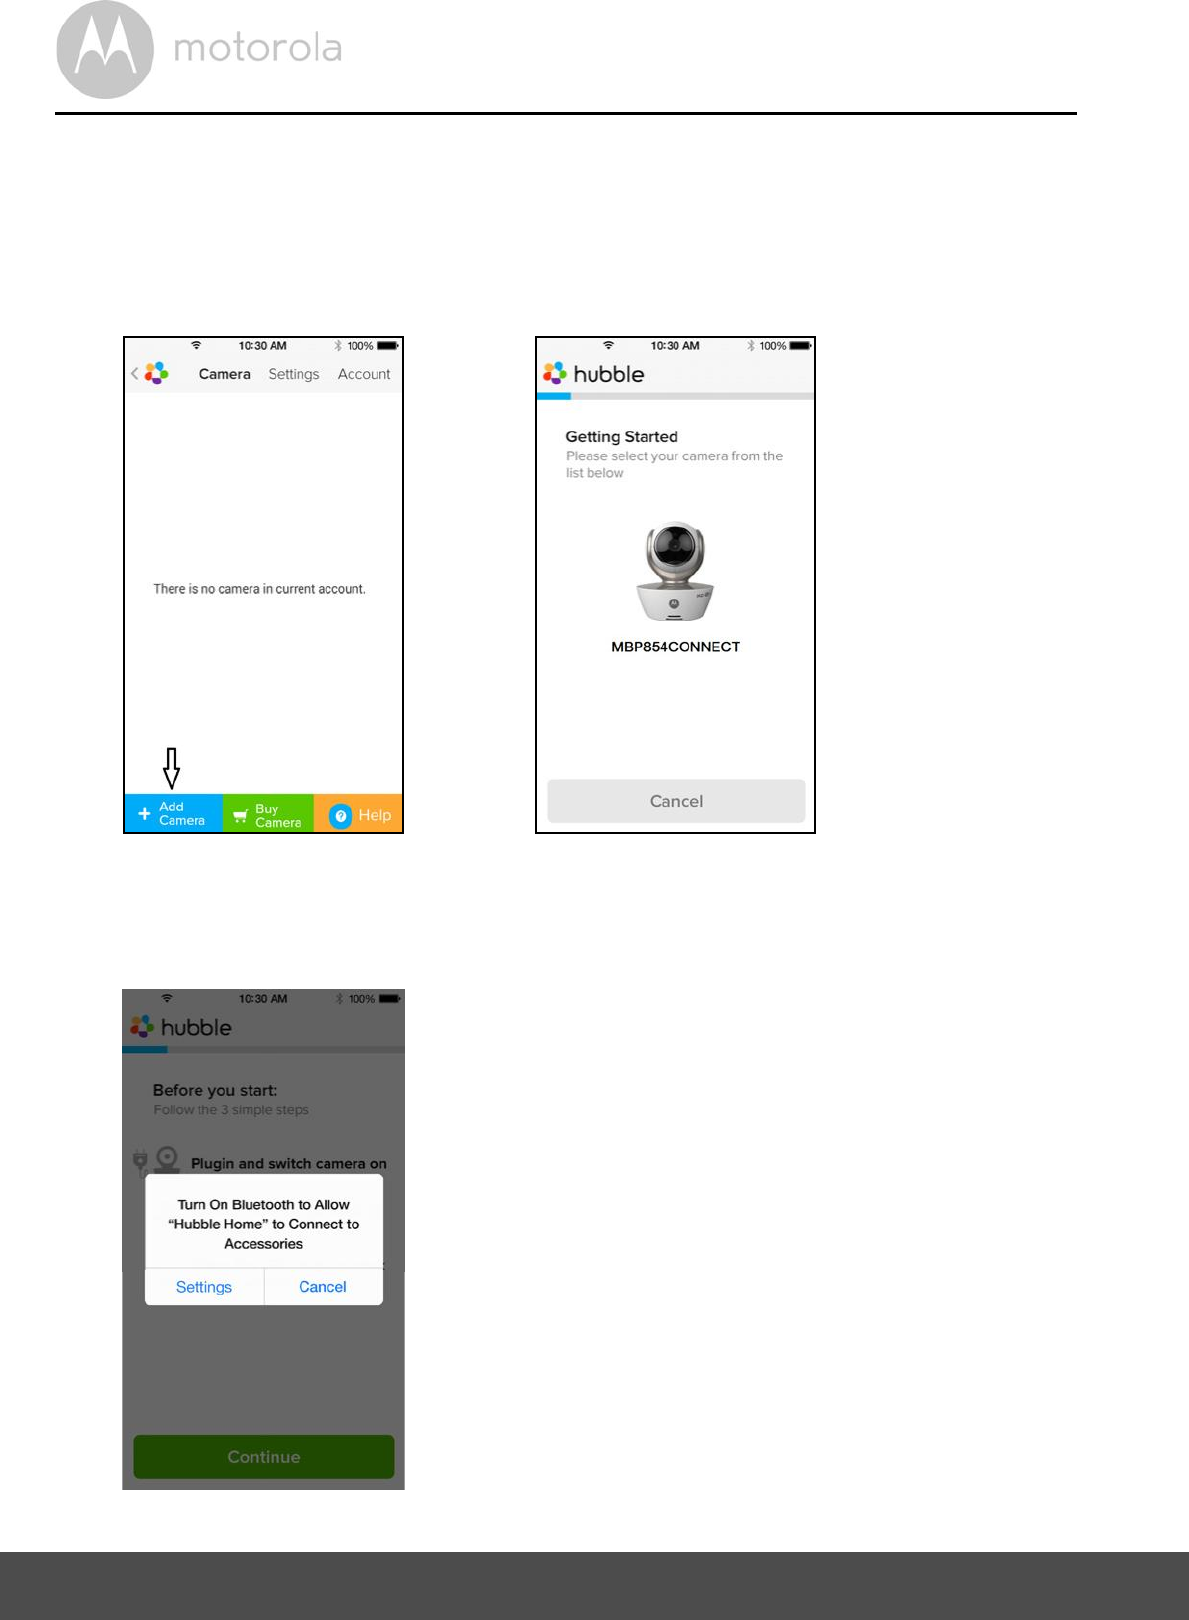
5.4.4 Add the Camera to your account
Create a new account and Login.
Tap on Add Camera. (Picture i2)
Tap on MBP854CONNECT. (Picture i3)
Follow the instruction on screen to turn on the Bluetooth function of your
iPhone/iPad.
i2 i3
FOCUS85 /
SCOUT66 /
MBP854
Blink83 / Scout83 /
MBP36HD
i4
Wi-Fi Internet Viewing 31
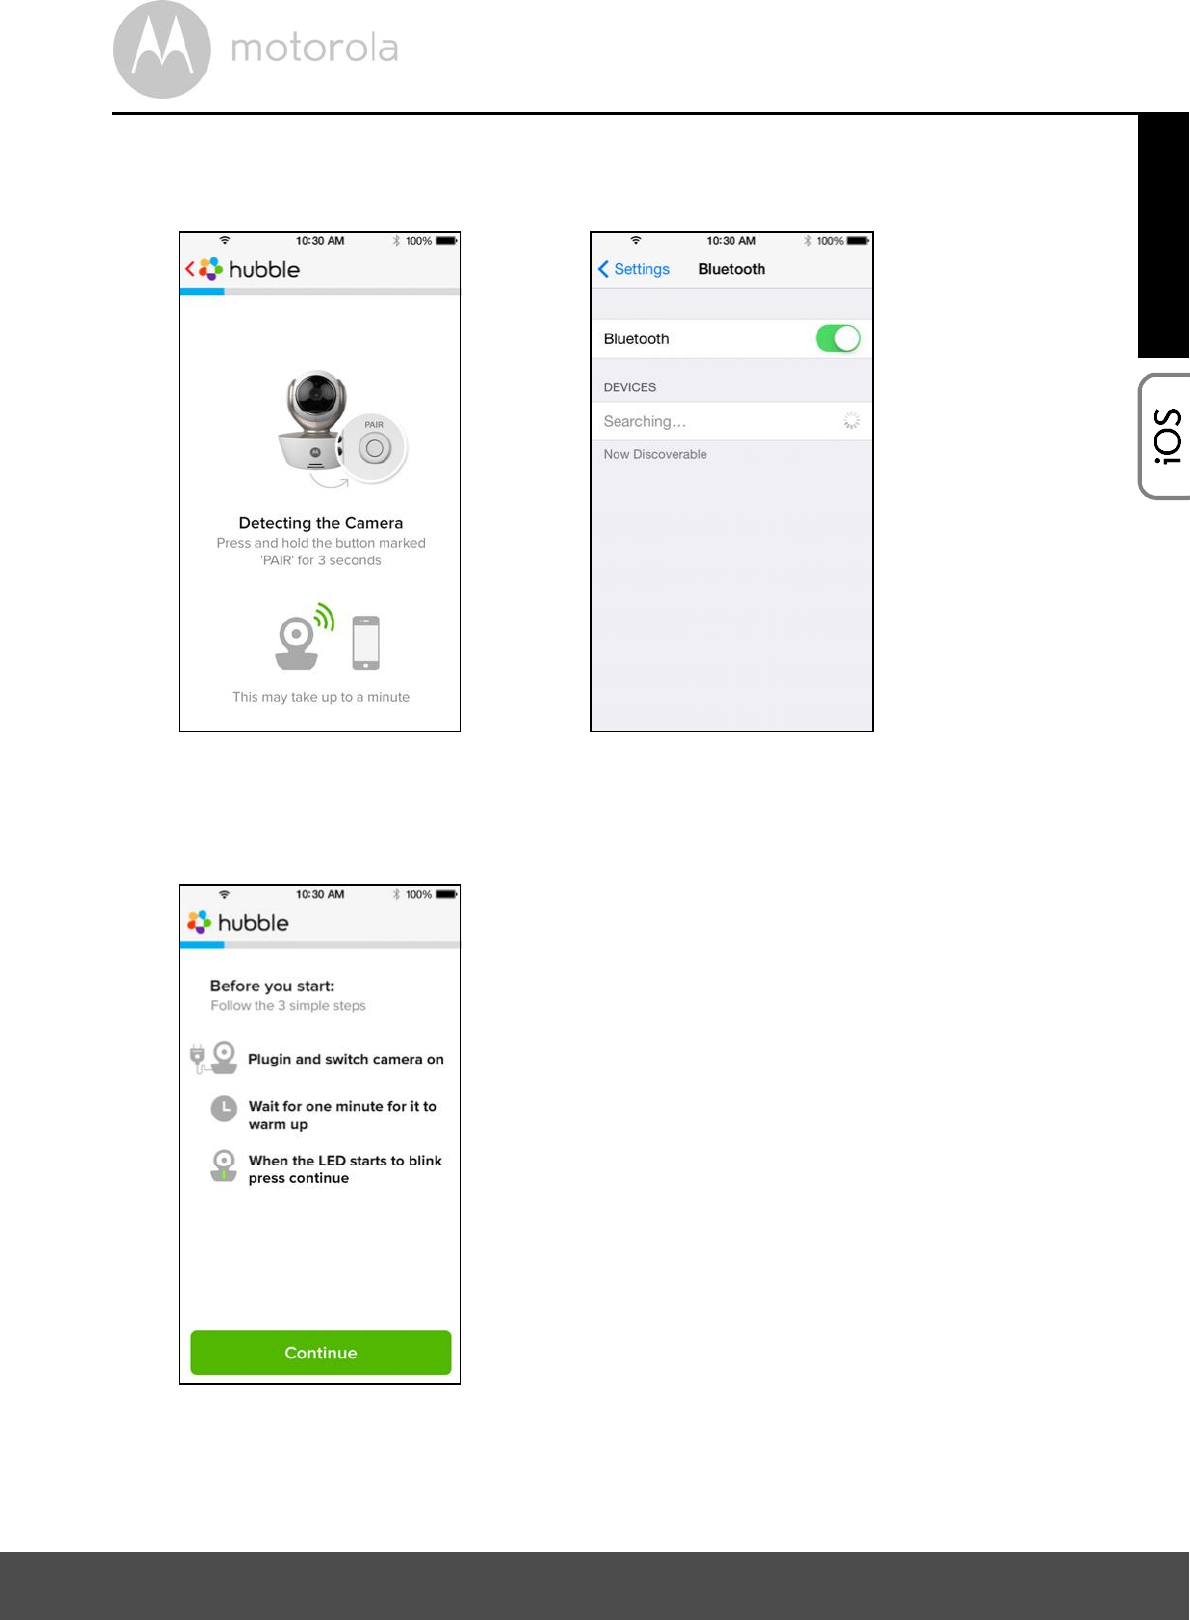
Tap on the Home button, then enter the Settings menu to turn on the
Bluetooth function of your iPhone/iPad.
Press the HOME key to exit the Settings menu and tap on the Hubble for
Motorola Monitors App to enter the start up screen.
i5 i6
i7
32 Wi-Fi Internet Viewing
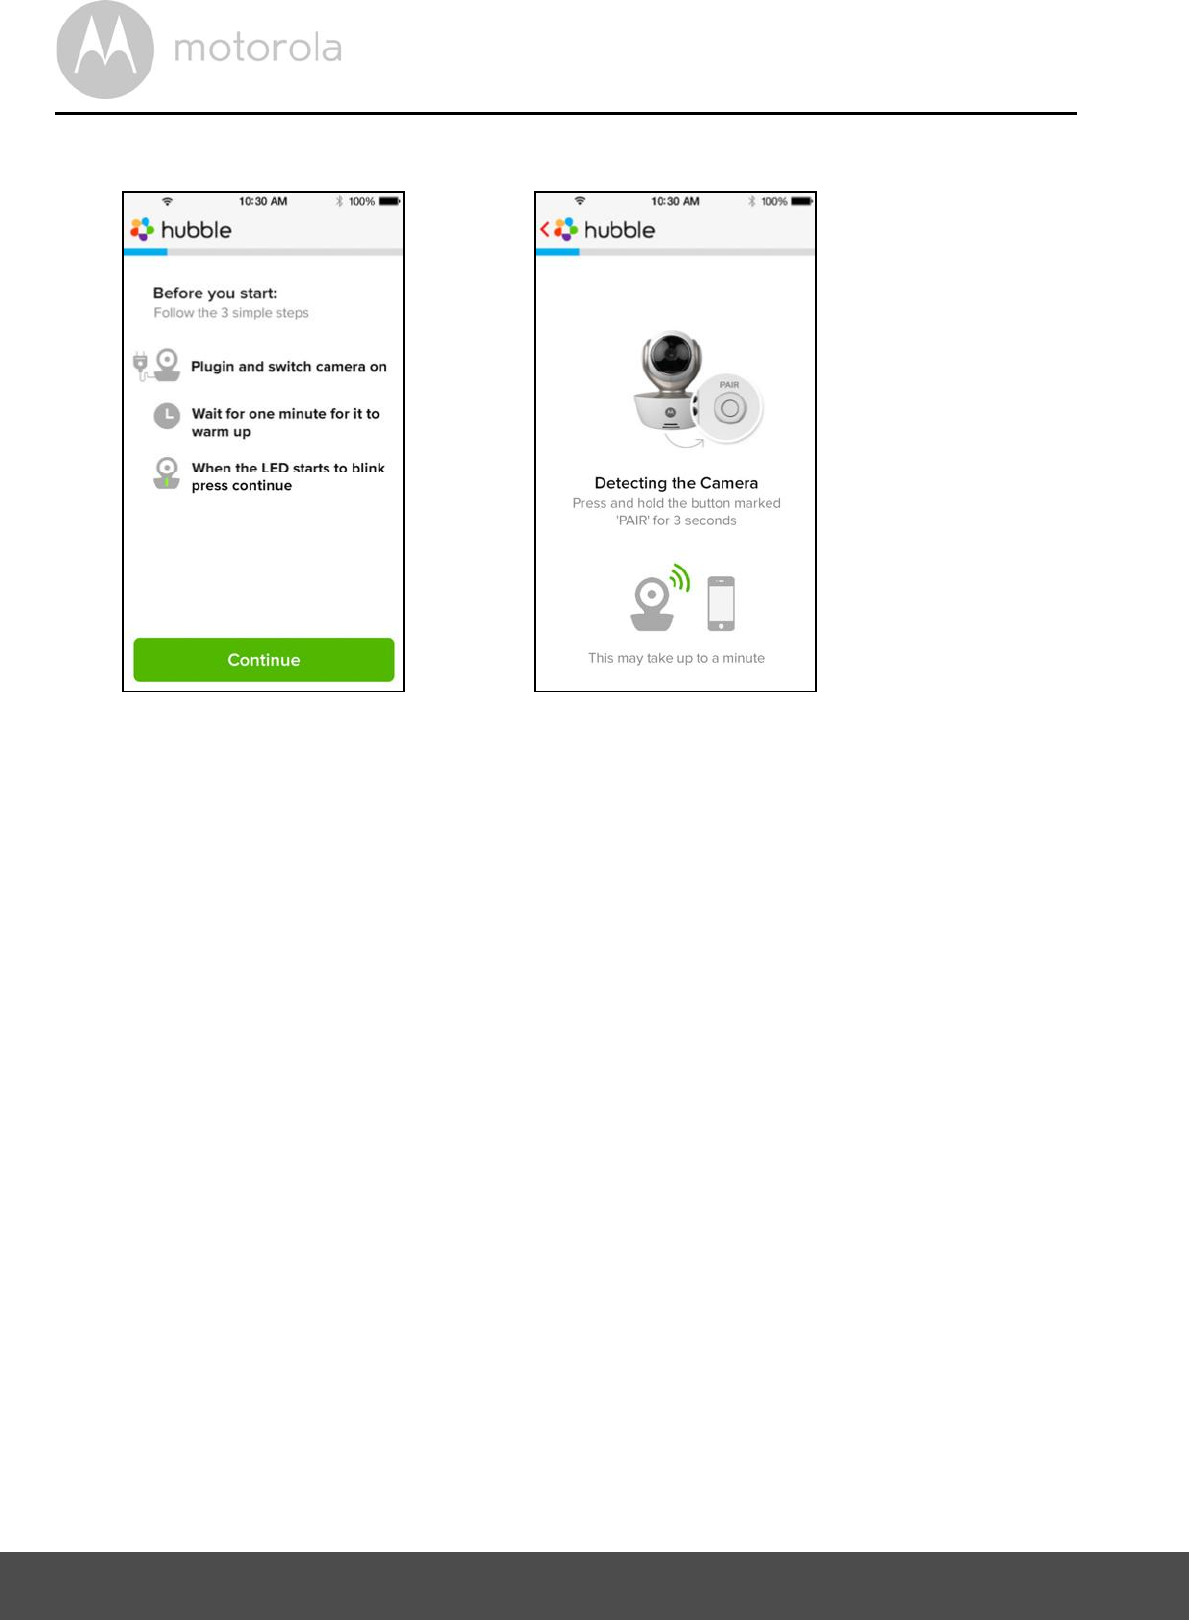
Tap on Continue and follow the instructions below. (Pictures i4-i7)
i4 i5
Wi-Fi Internet Viewing 33
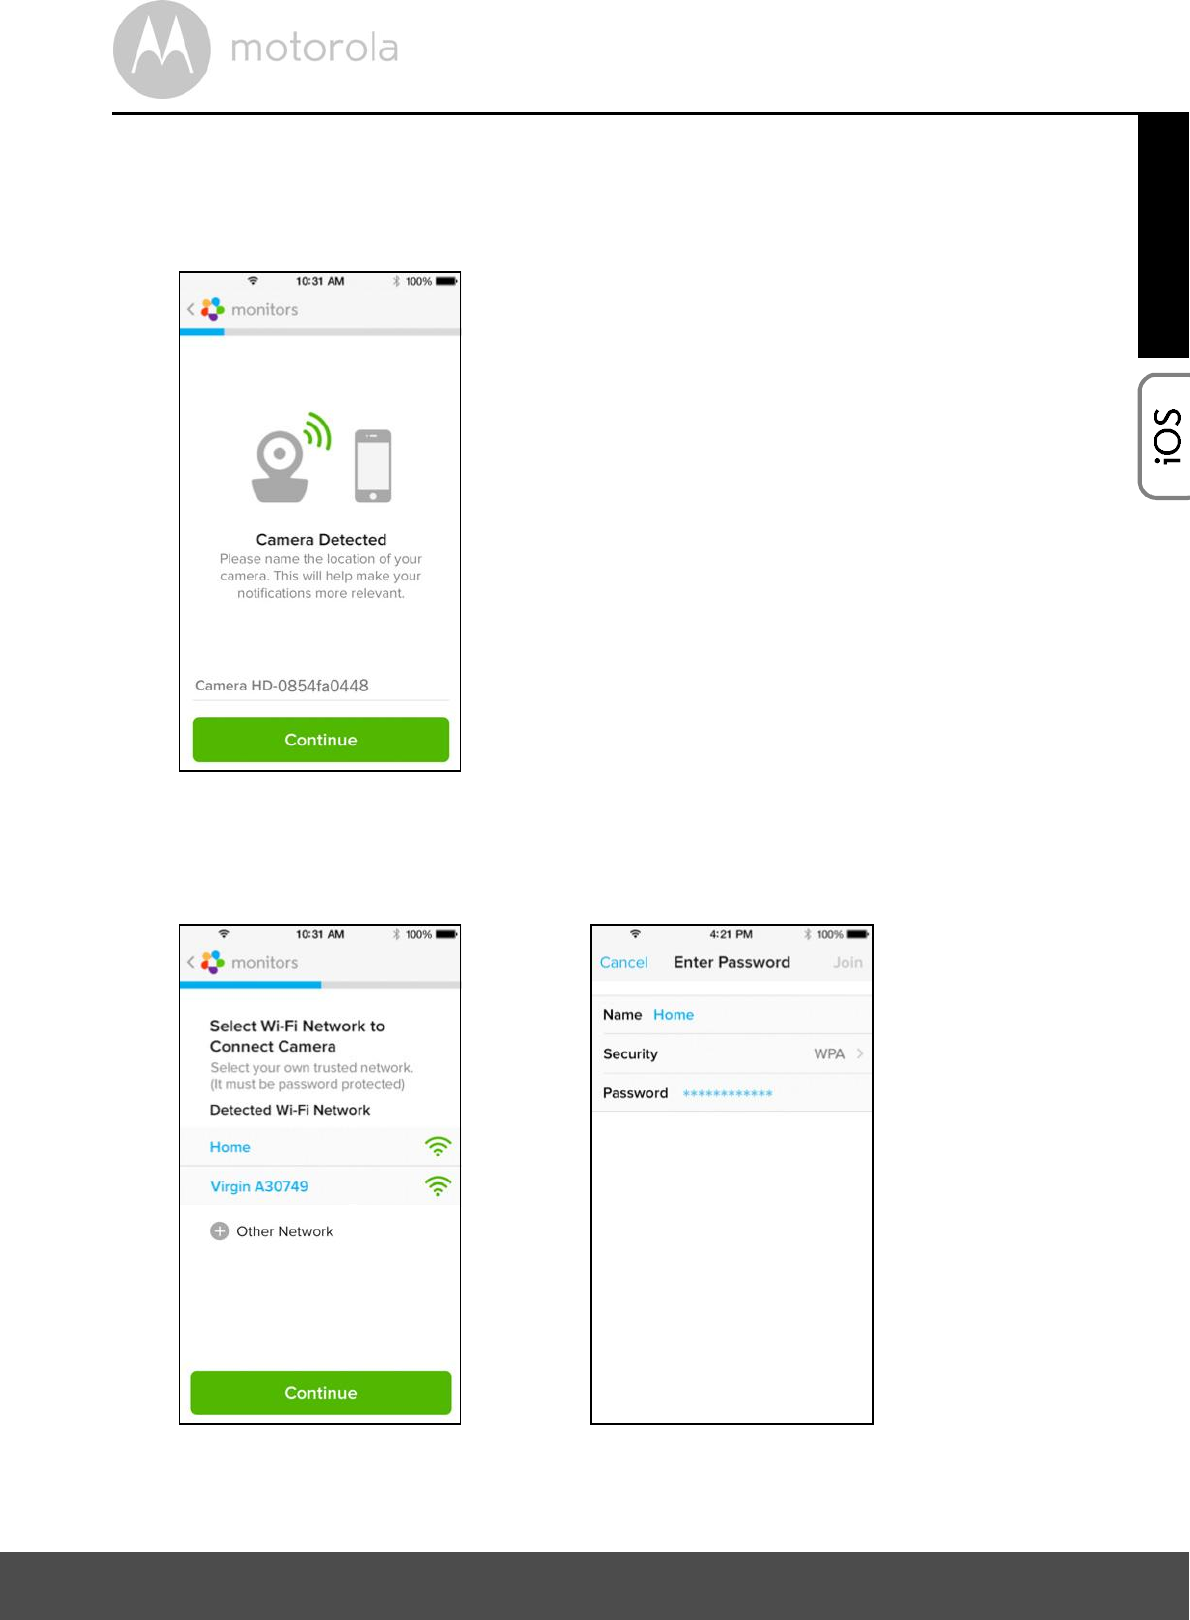
Follow the steps above to locate the camera with identification number
CameraHD-xxxxxxxxxx, then tap on Continue once your iPhone® or iPad®
has connected to the camera. (Picture i8)
Select your Wi-Fi® Network and tap Continue, enter your password and
then tap Next. (Pictures i9, i10)
i8
i9 i10
34 Wi-Fi Internet Viewing
It will take a few minutes for the Camera to connect to the Wi-Fi® network
before showing the connection status (Pictures i11, i12). If connection fails,
please tap on the Retry button and repeat Step 5.4.4 as instructed above.
Tap on Watch Live Camera to view the Camera video. (Picture i13)
Tap on Hubble logo to go back to Camera list. (Picture i14)
i11 i12
i13 i14
Wi-Fi Internet Viewing 35
5.5 Camera Functions:
Working with devices for Android
5.5.1 Connecting the Camera to Power
Insert the small end of the Power Adapter into the Power Adapter Connector
and plug the Power Adapter into a suitable electrical outlet.
Slide the ON/OFF switch to ON, the blue Power LED will light up. (Note: To
switch the device off, slide the ON/OFF switch to OFF.)
Run the Hubble App on your Android device.
The Camera view appears on the screen.
5.5.2 Add more cameras
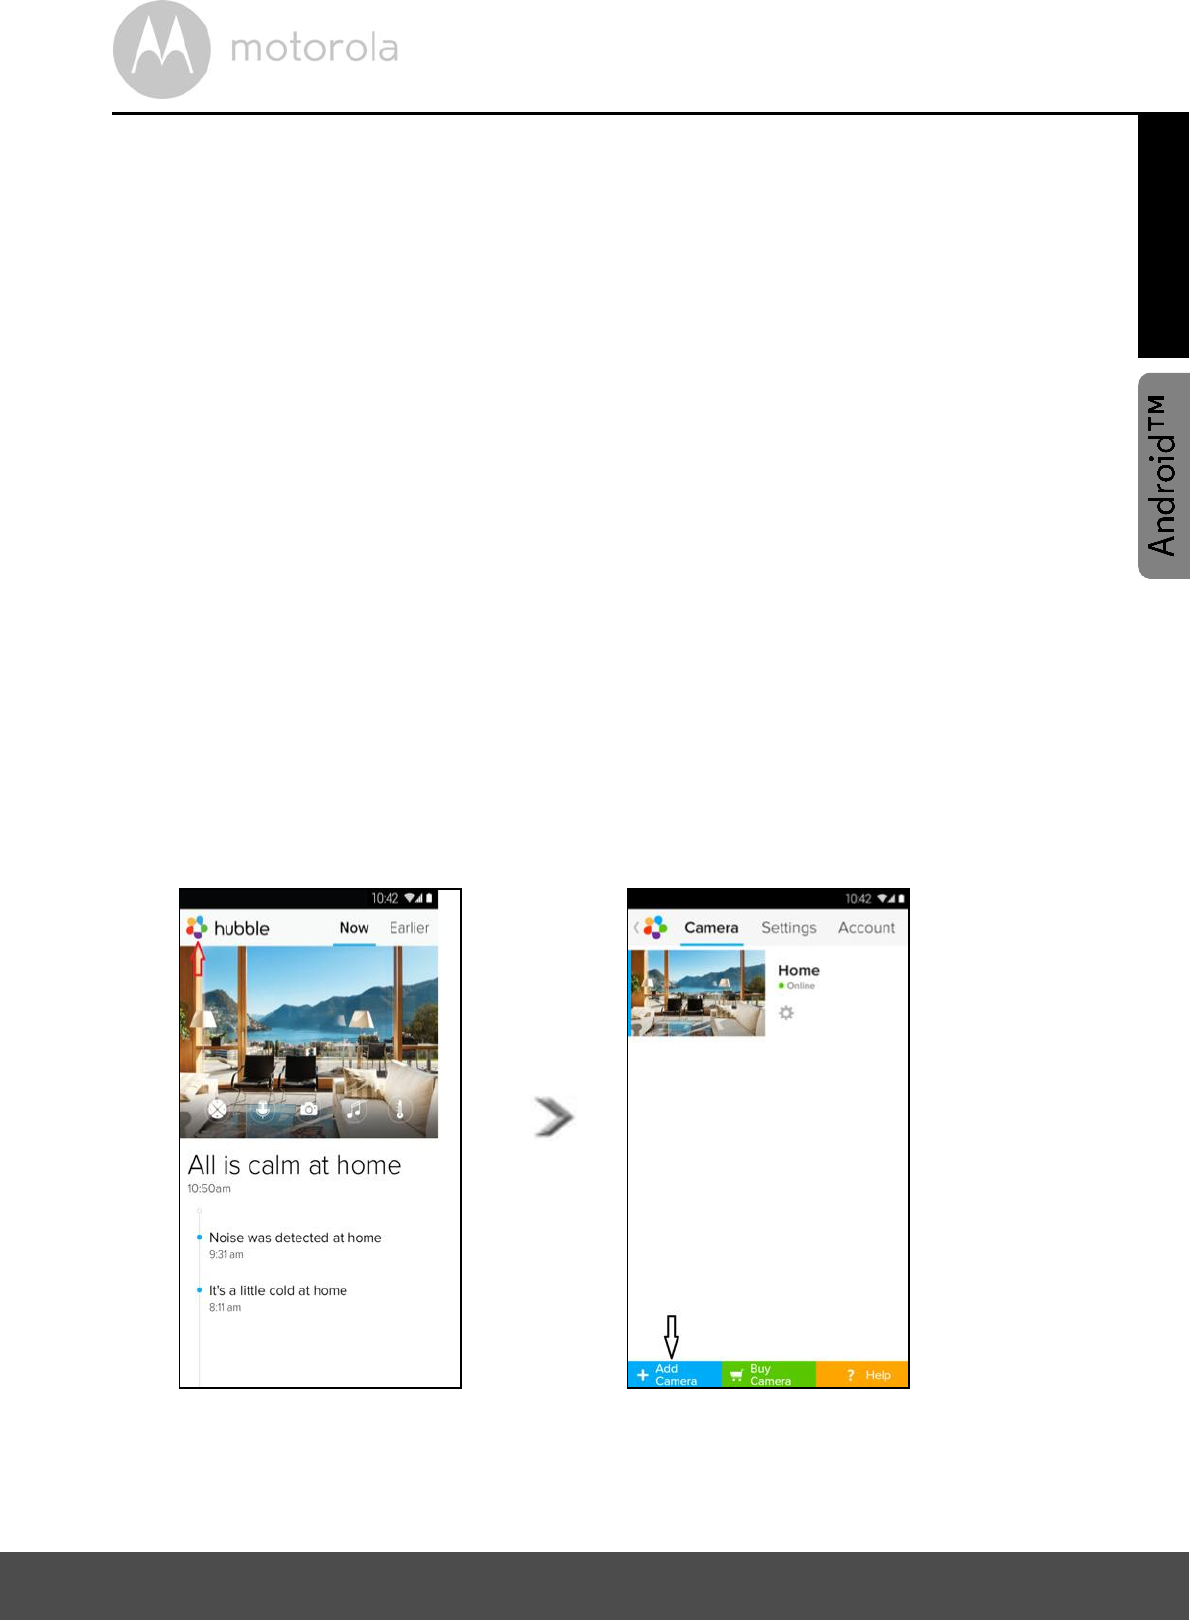
On Camera view, tap on the Hubble logo to go back to the Add Camera
page. (Picture A13)
Tap on Add Camera to add more Cameras by following the steps for Android
device setup Section 5.3.4. (Picture A14)
Once the Camera has been added, the Camera view will be automatically
displayed.
A13 A14
36 Wi-Fi Internet Viewing
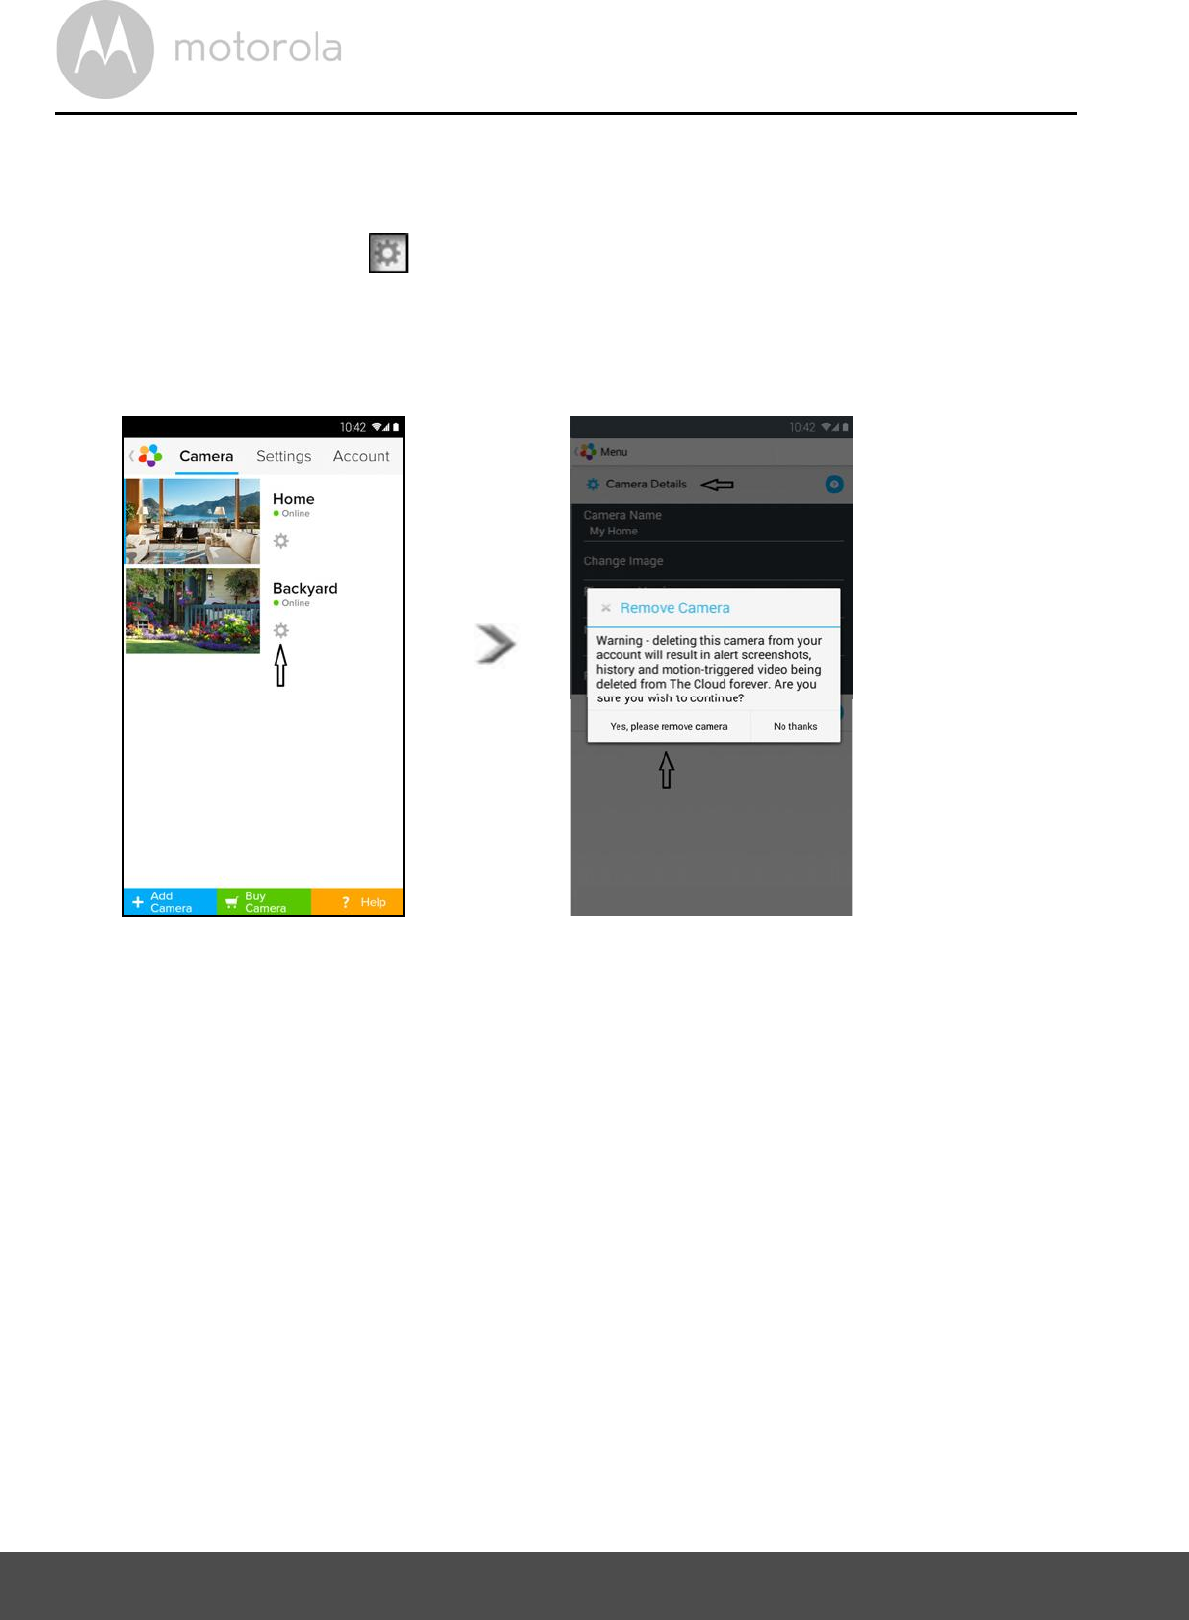
5.5.3 Remove a Camera
You can remove a Camera from your account by following these steps:
Tap the Settings icon on the General page, then tap on Camera Detail.
(Picture A15)
Select Remove Camera and tap on Yes to delete the unit from camera list.
(Picture A16)
A15 A16
Wi-Fi Internet Viewing 37
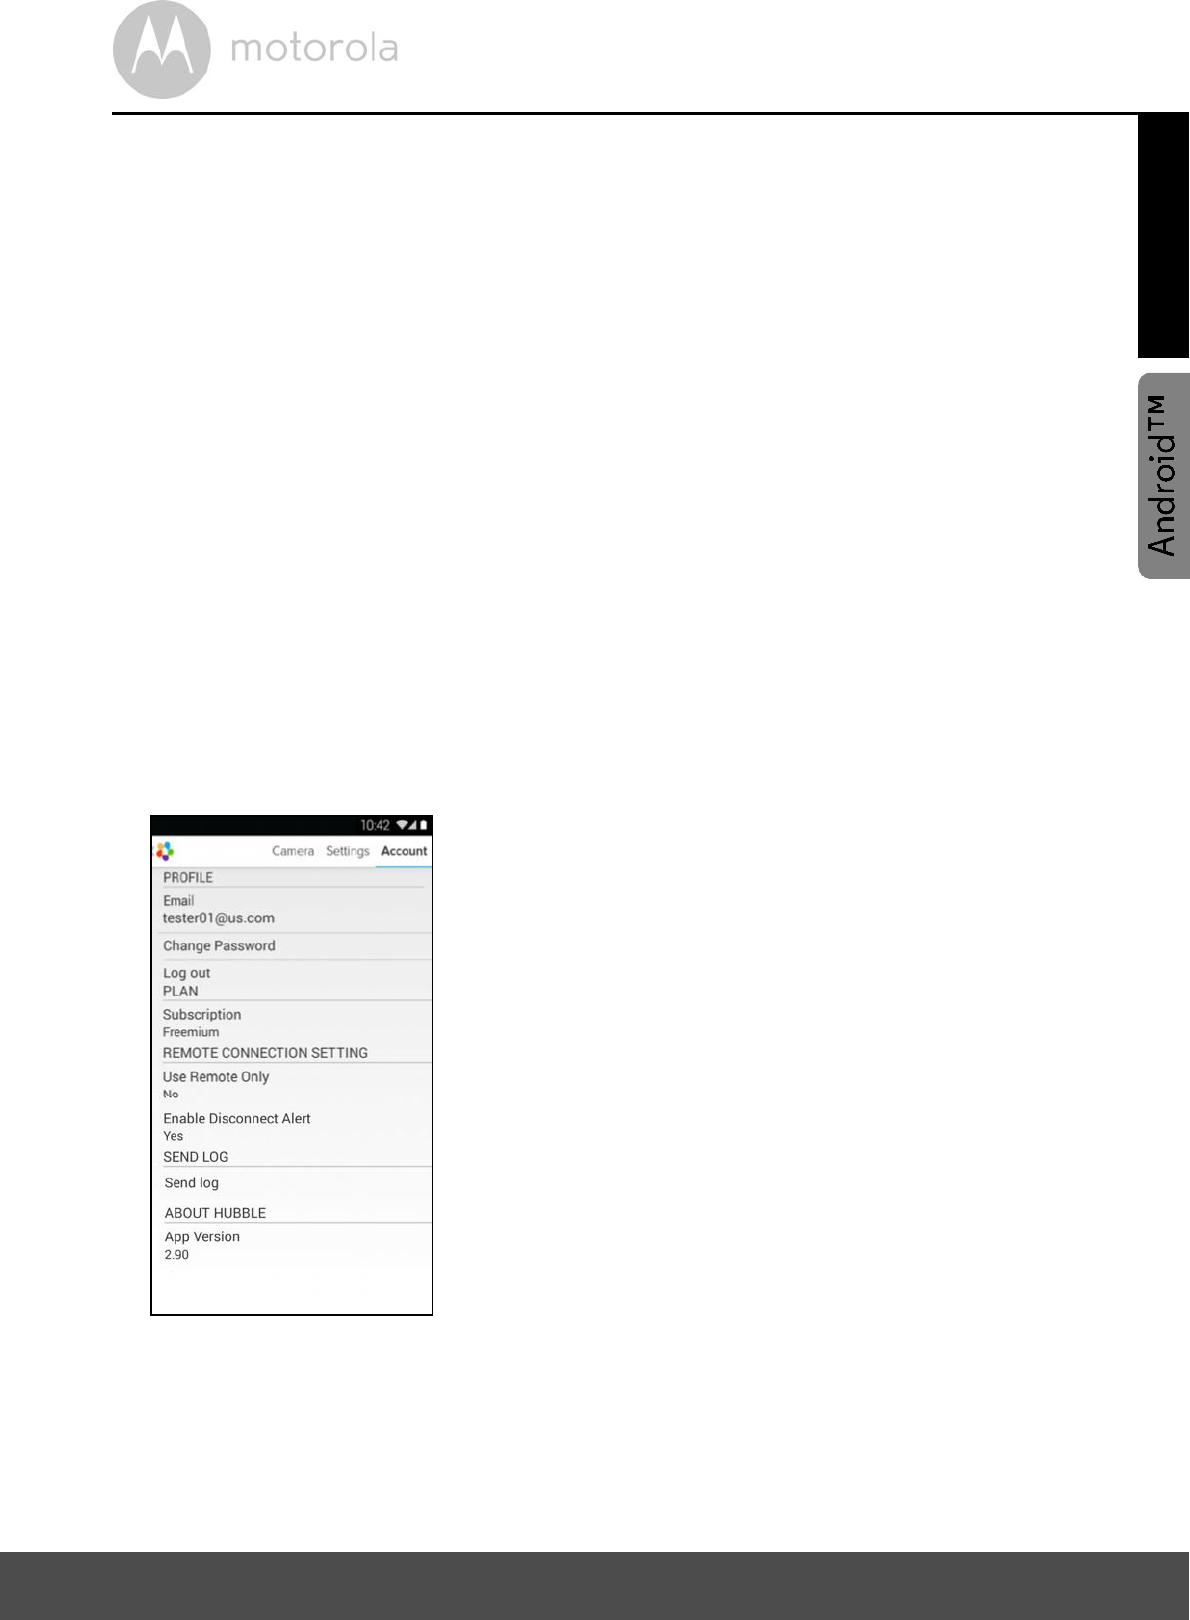
5.5.4 Change your Account Information
You can change the account information using your Android device.
Tap Account on the General page, the Account Settings appears on screen.
(Picture A17)
Tap on Change Password to change your password following the instructions.
Tap on Log Out to leave the account.
Tap on Freemium plan, it will go to the link of Cloud Video Recording
Service, to obtain more information, please visit our website
http://www.hubbleconnected.com.
Tap on Use Remote Only to access Remote Connection Setting , confirm
Use Remote Only by Selecting Yes.
Enable Disconnect Alert , when disconnect it will be "beeps" alert,enable
the disconnect Alert by selecting Yes.
Tap on Send Log to send your Hubble Android App report to our server via
e-mail; this should be sent if requested by a customer service agent.
A17
38 Wi-Fi Internet Viewing
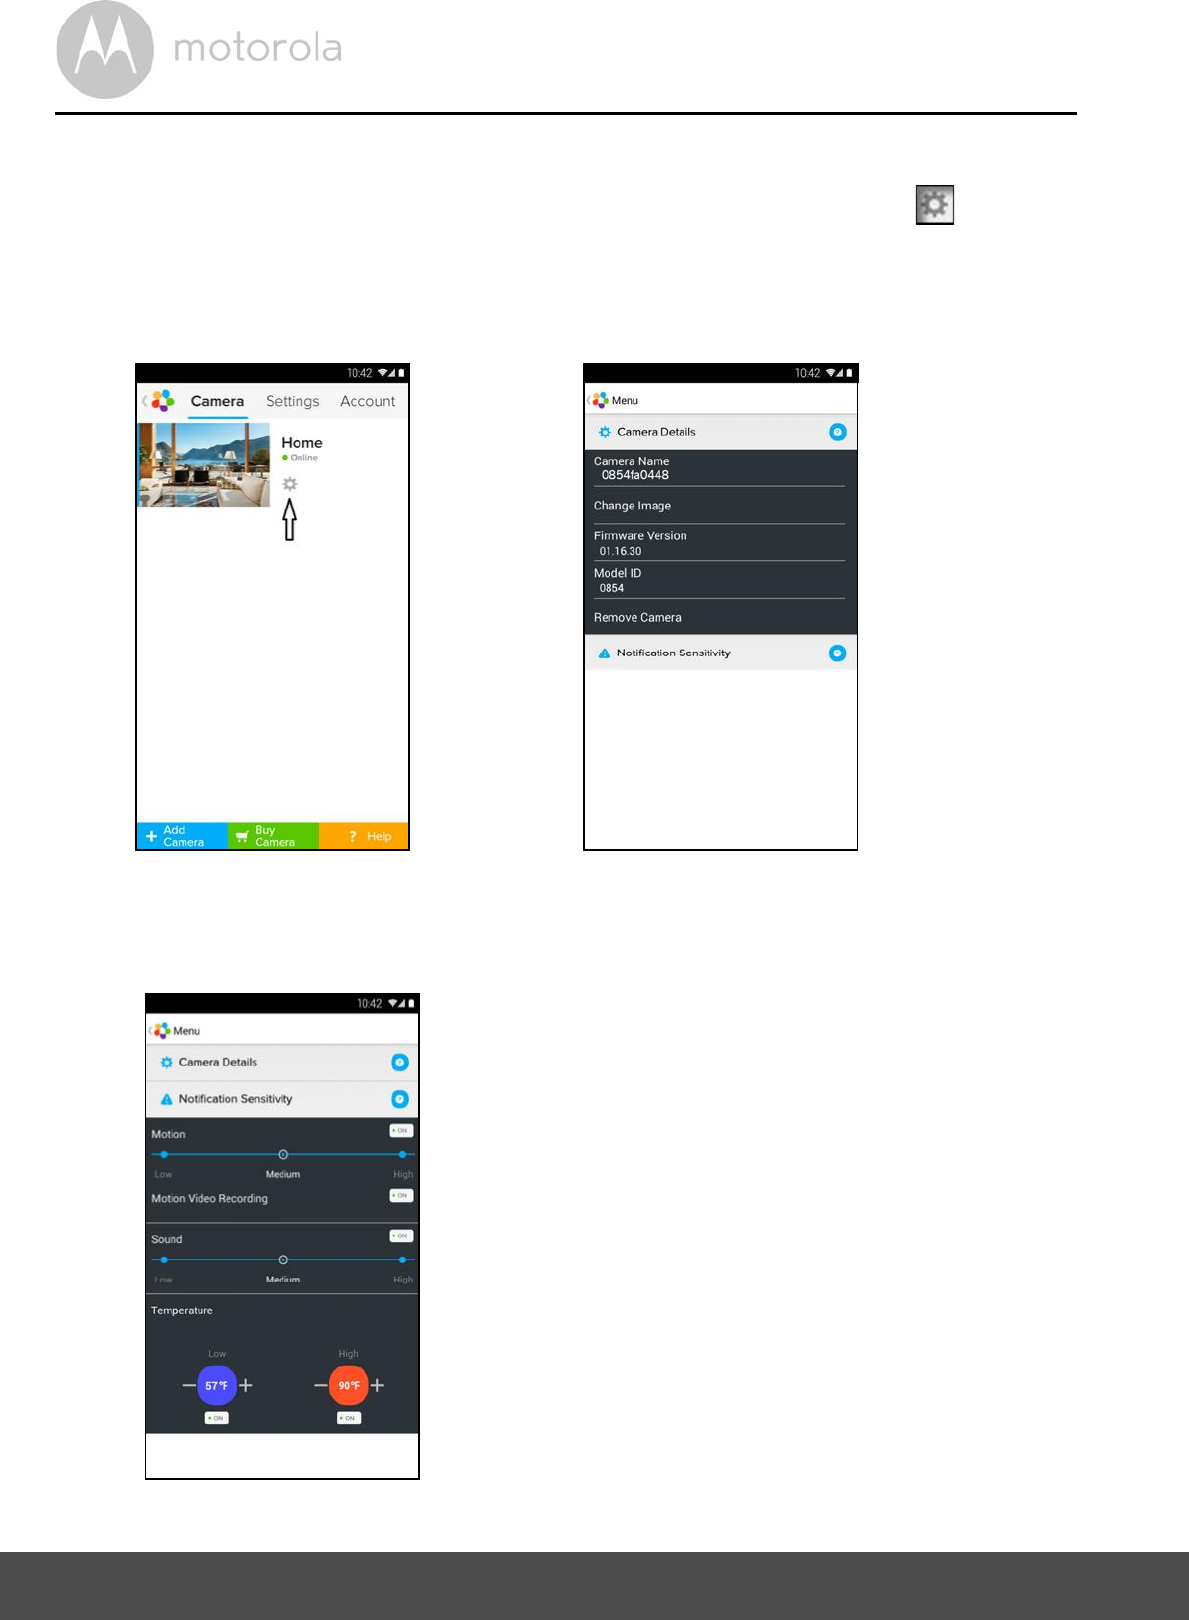
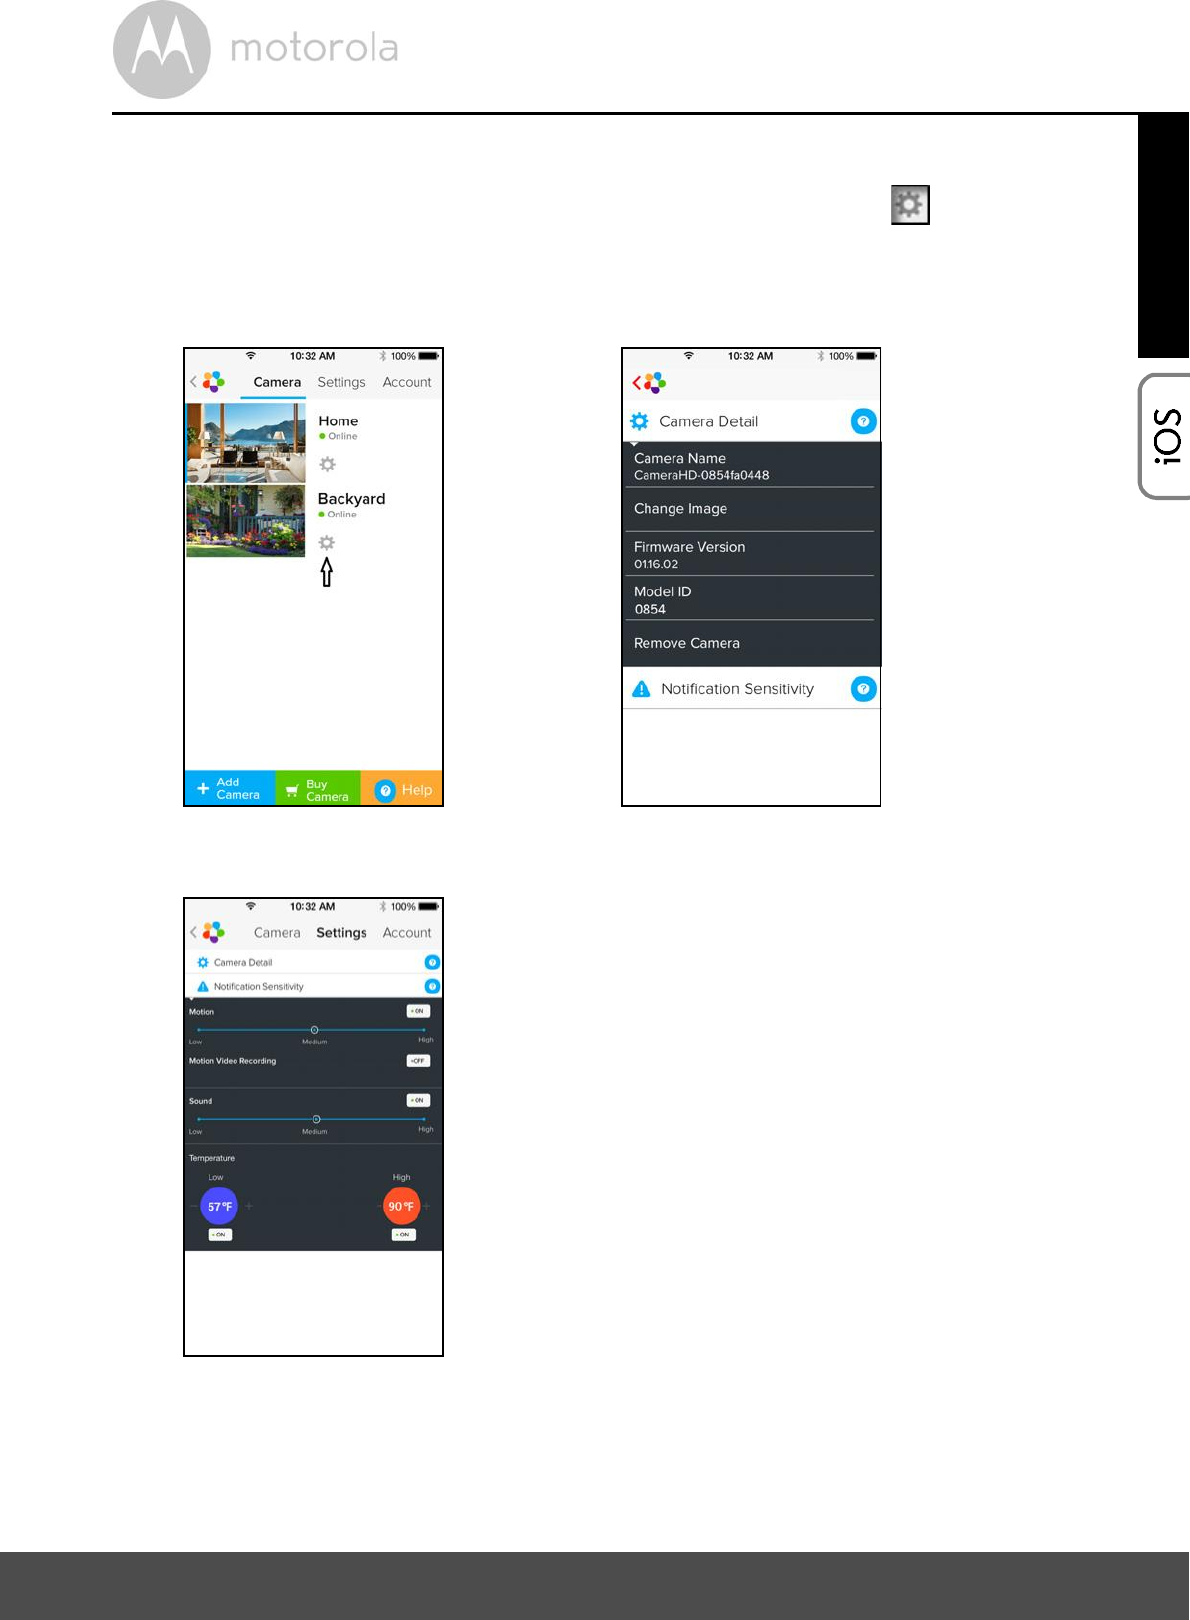
5.5.5 Camera settings
You can change the Camera settings by tapping the Settings icon on the
Camera list screen/page. (Picture A18)
Tap on Camera Details to review Camera Name, Change Image, Firmware
version, Model ID and Remove Camera. (Picture A19)
Tap on Notification Sensitivity to set the sensitivity of sound & motion
detection, and to set an Alert of High/Low temperature. (Picture A20)
A18 A19
A20
Wi-Fi Internet Viewing 39
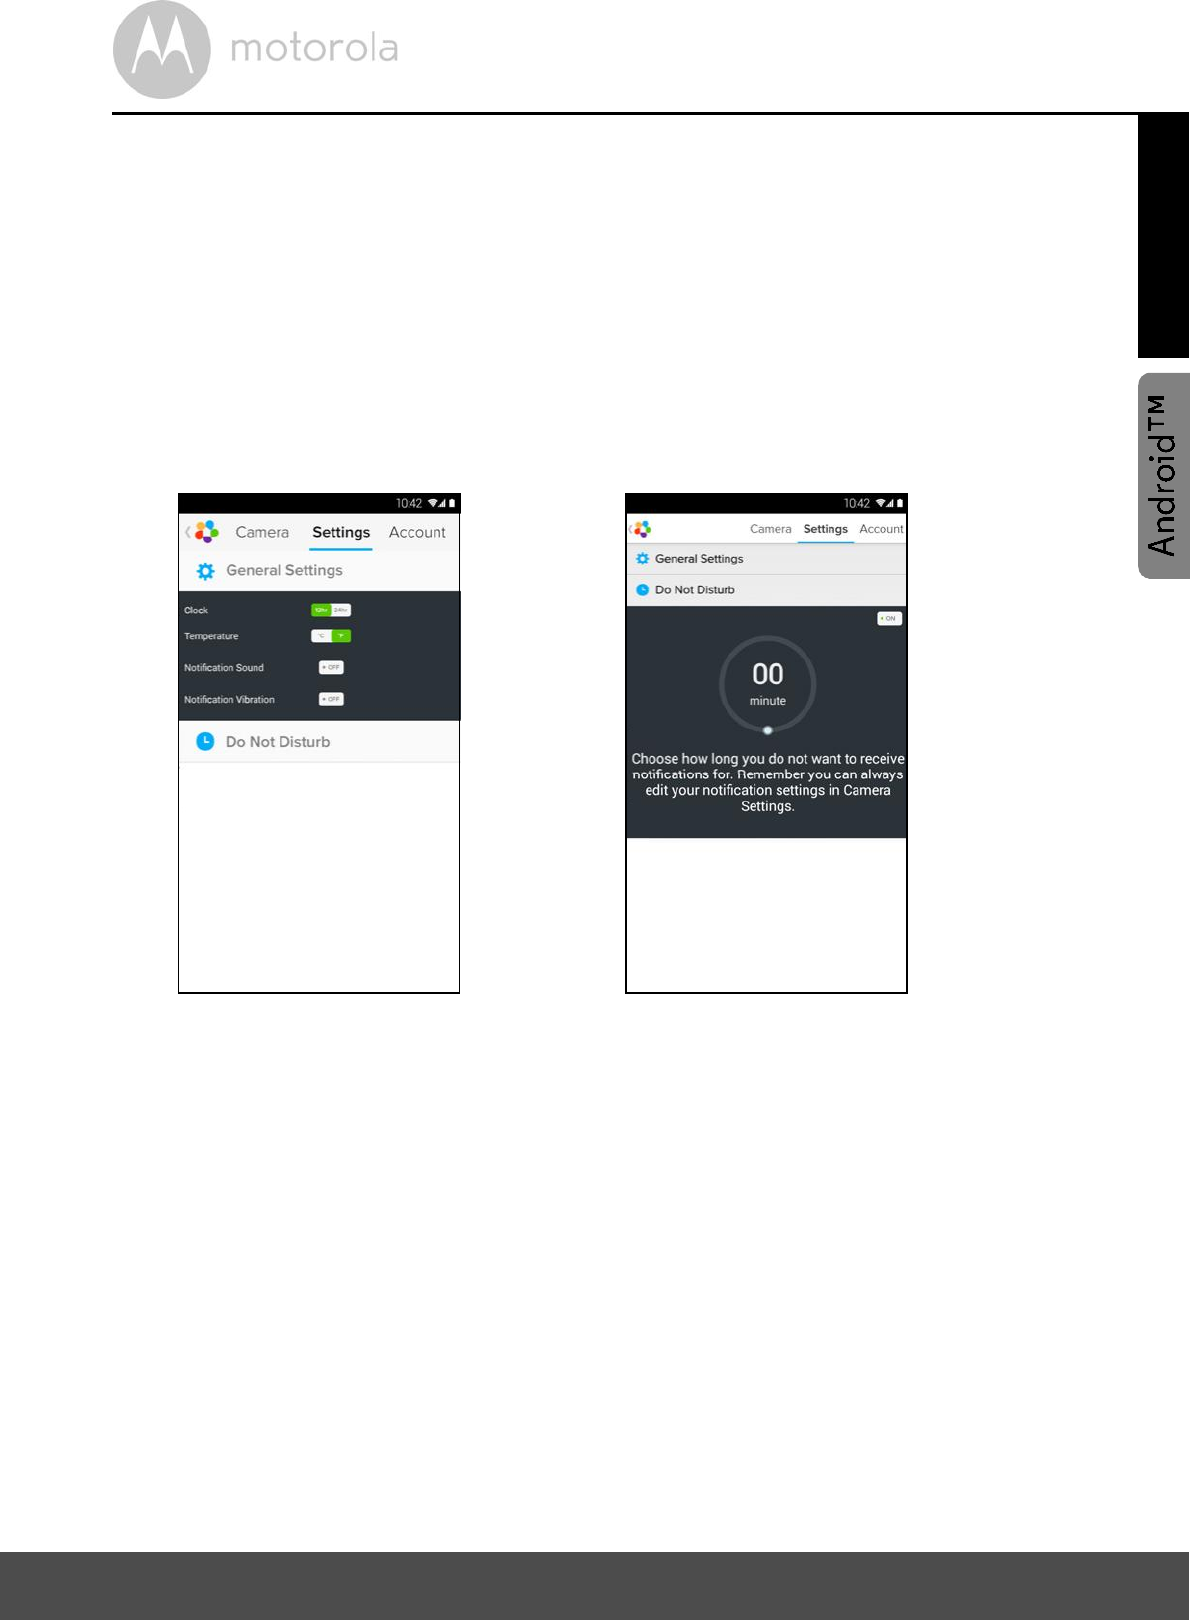
5.5.6 General Settings
Tap Settings on the General page.
Tap on General Settings to shift the format of the Clock (12hr/24hr) & the
Temperature (°C / °F) and activate Notification Sound or Vibration. (Picture
A21)
Tap on Do Not Disturb, set the timer to the desired time and select ON, the
Camera will not send any sound or alert to your Android device for the
duration of your setting. (Picture A22)
A21 A22
40 Wi-Fi Internet Viewing
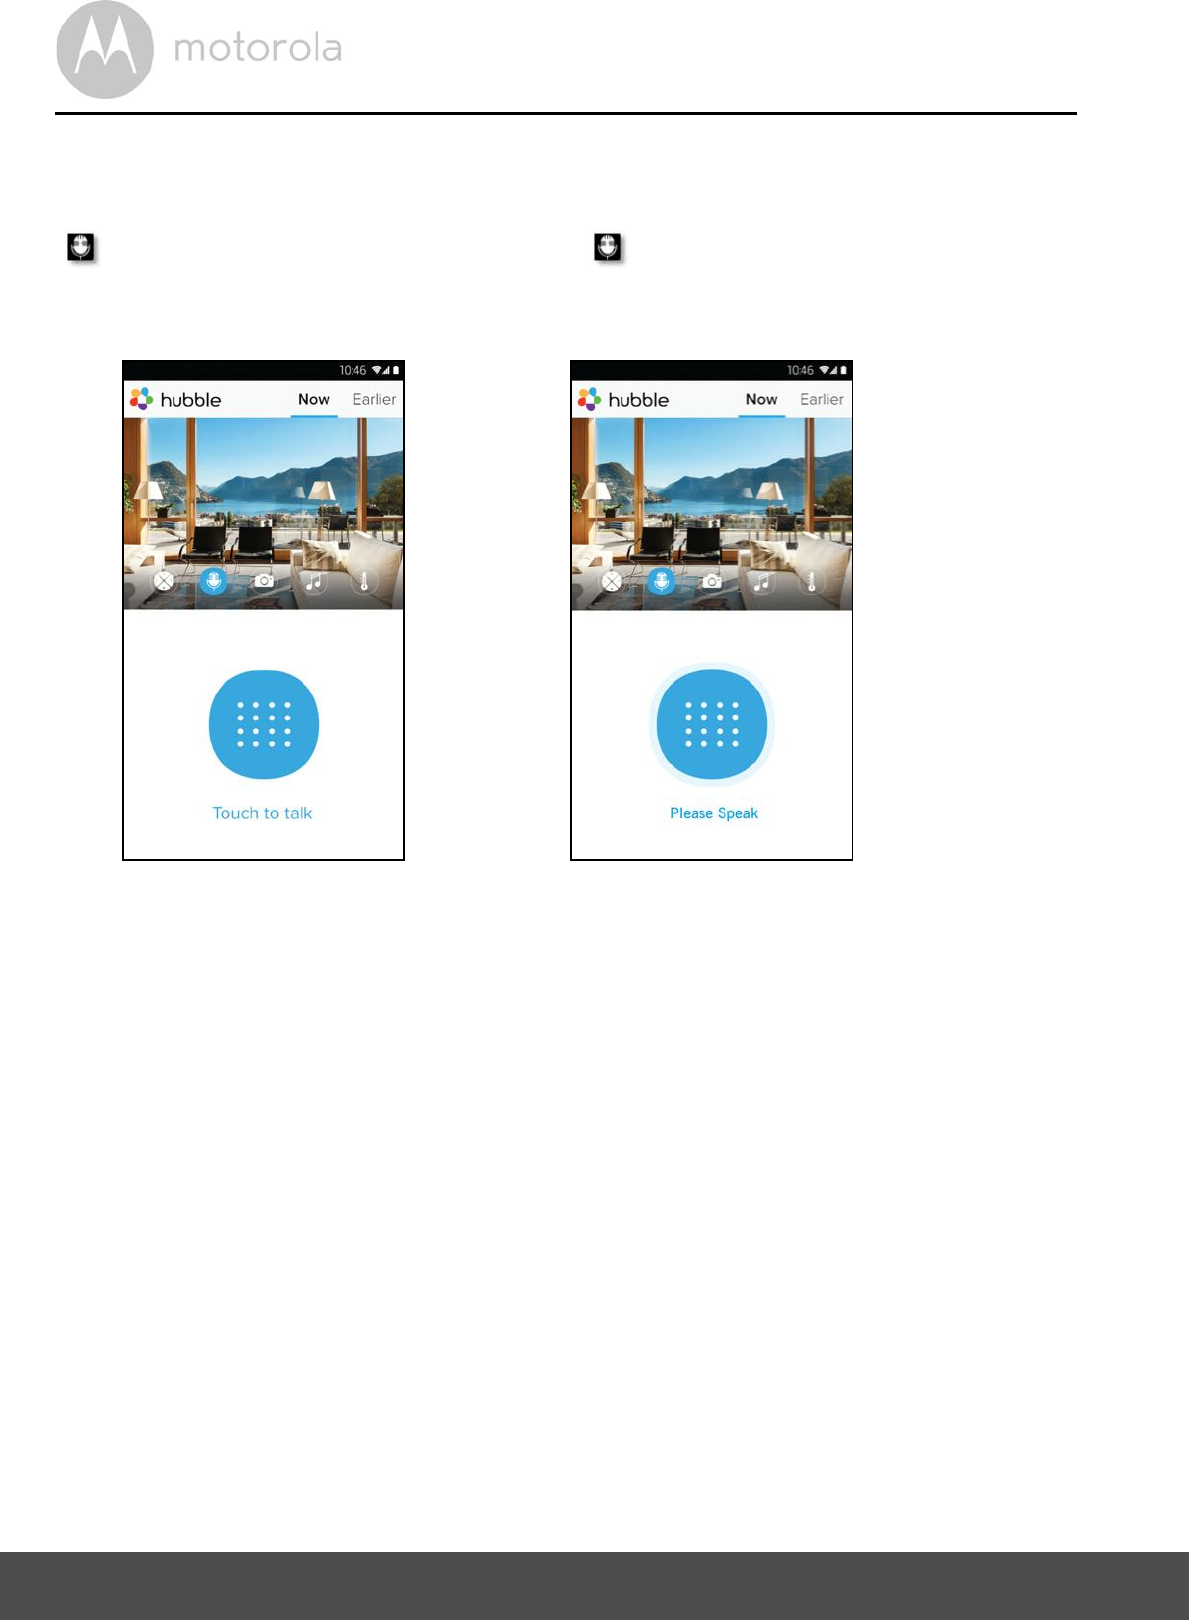
5.5.7 Features of the Hubble App
Tap on the viewing area and the function icons will appear as shown below.
Two Way Communication Tap on to activate the function. Press the
round button once to speak through the Camera. Toggle the button again to
listen to the audio feedback from the Camera. (Pictures A23, A24)
A23 A24
Wi-Fi Internet Viewing 41
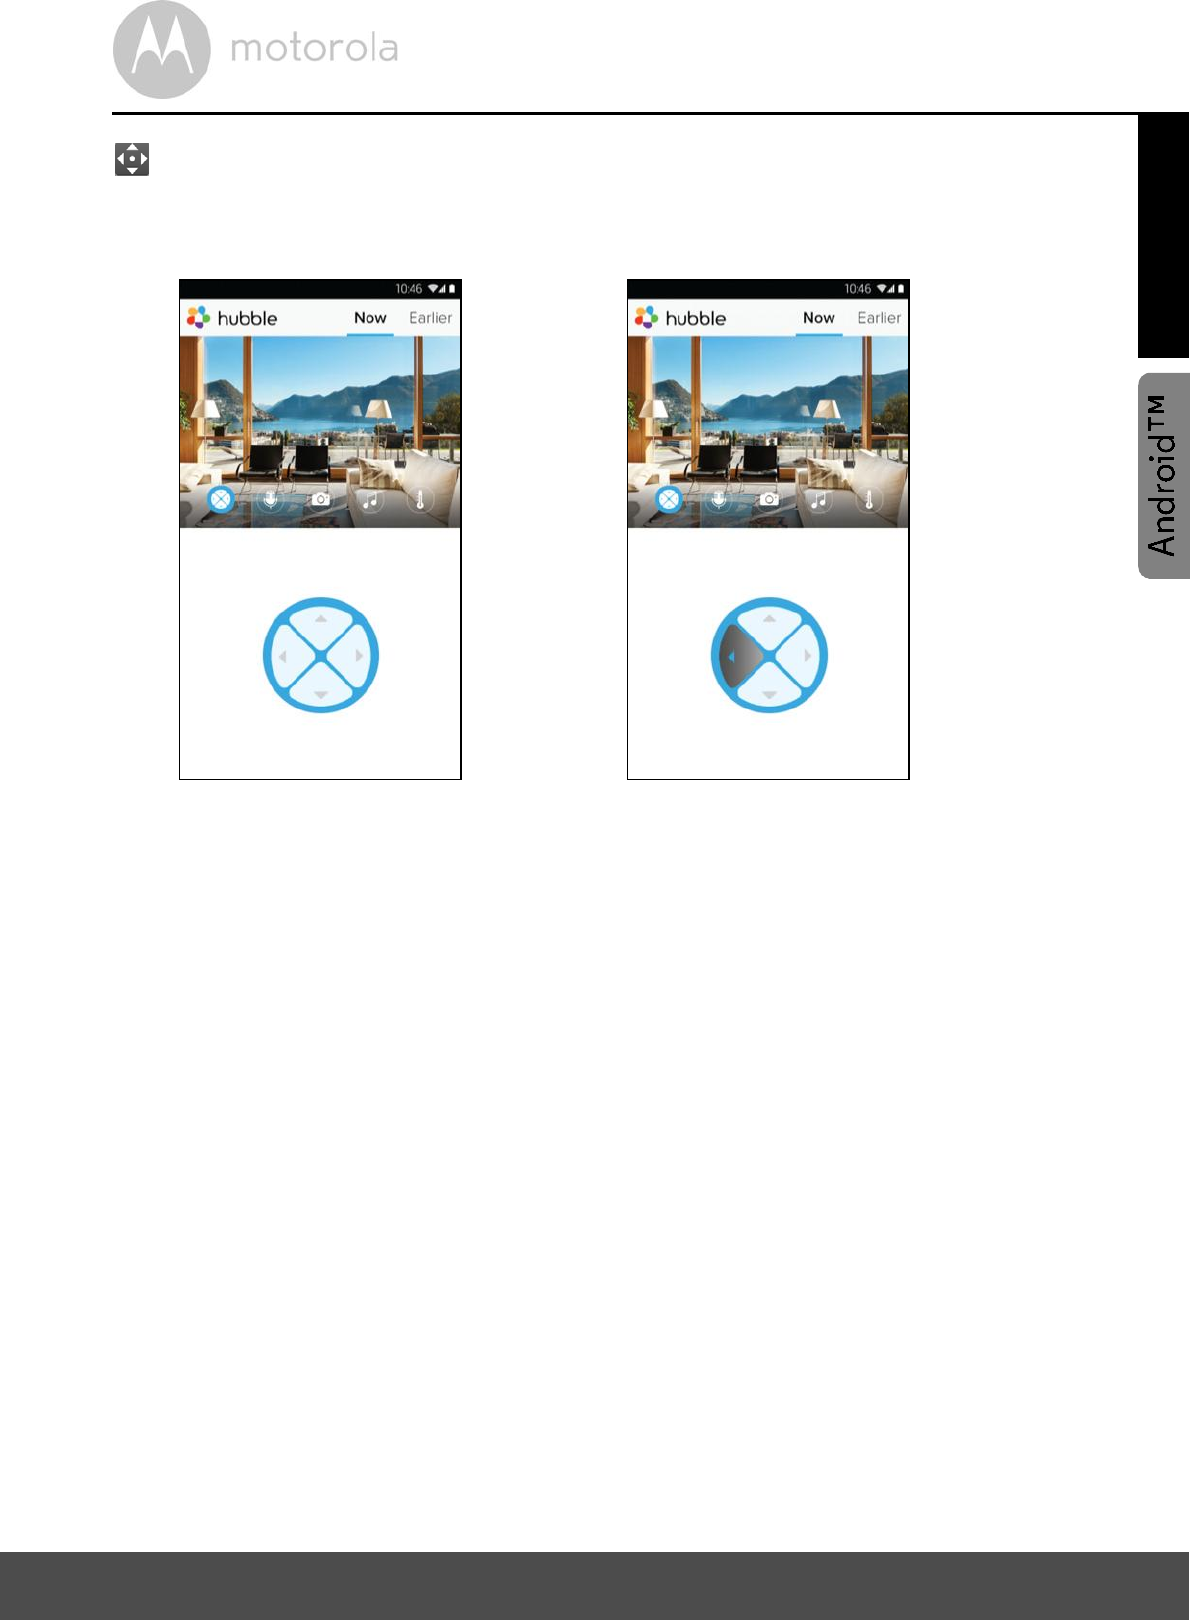
Pan and Tilt Function:
Tap the up and down buttons to tilt, the left and right buttons to pan. (Pictures
A25, A26)
A25 A26
42 Wi-Fi Internet Viewing
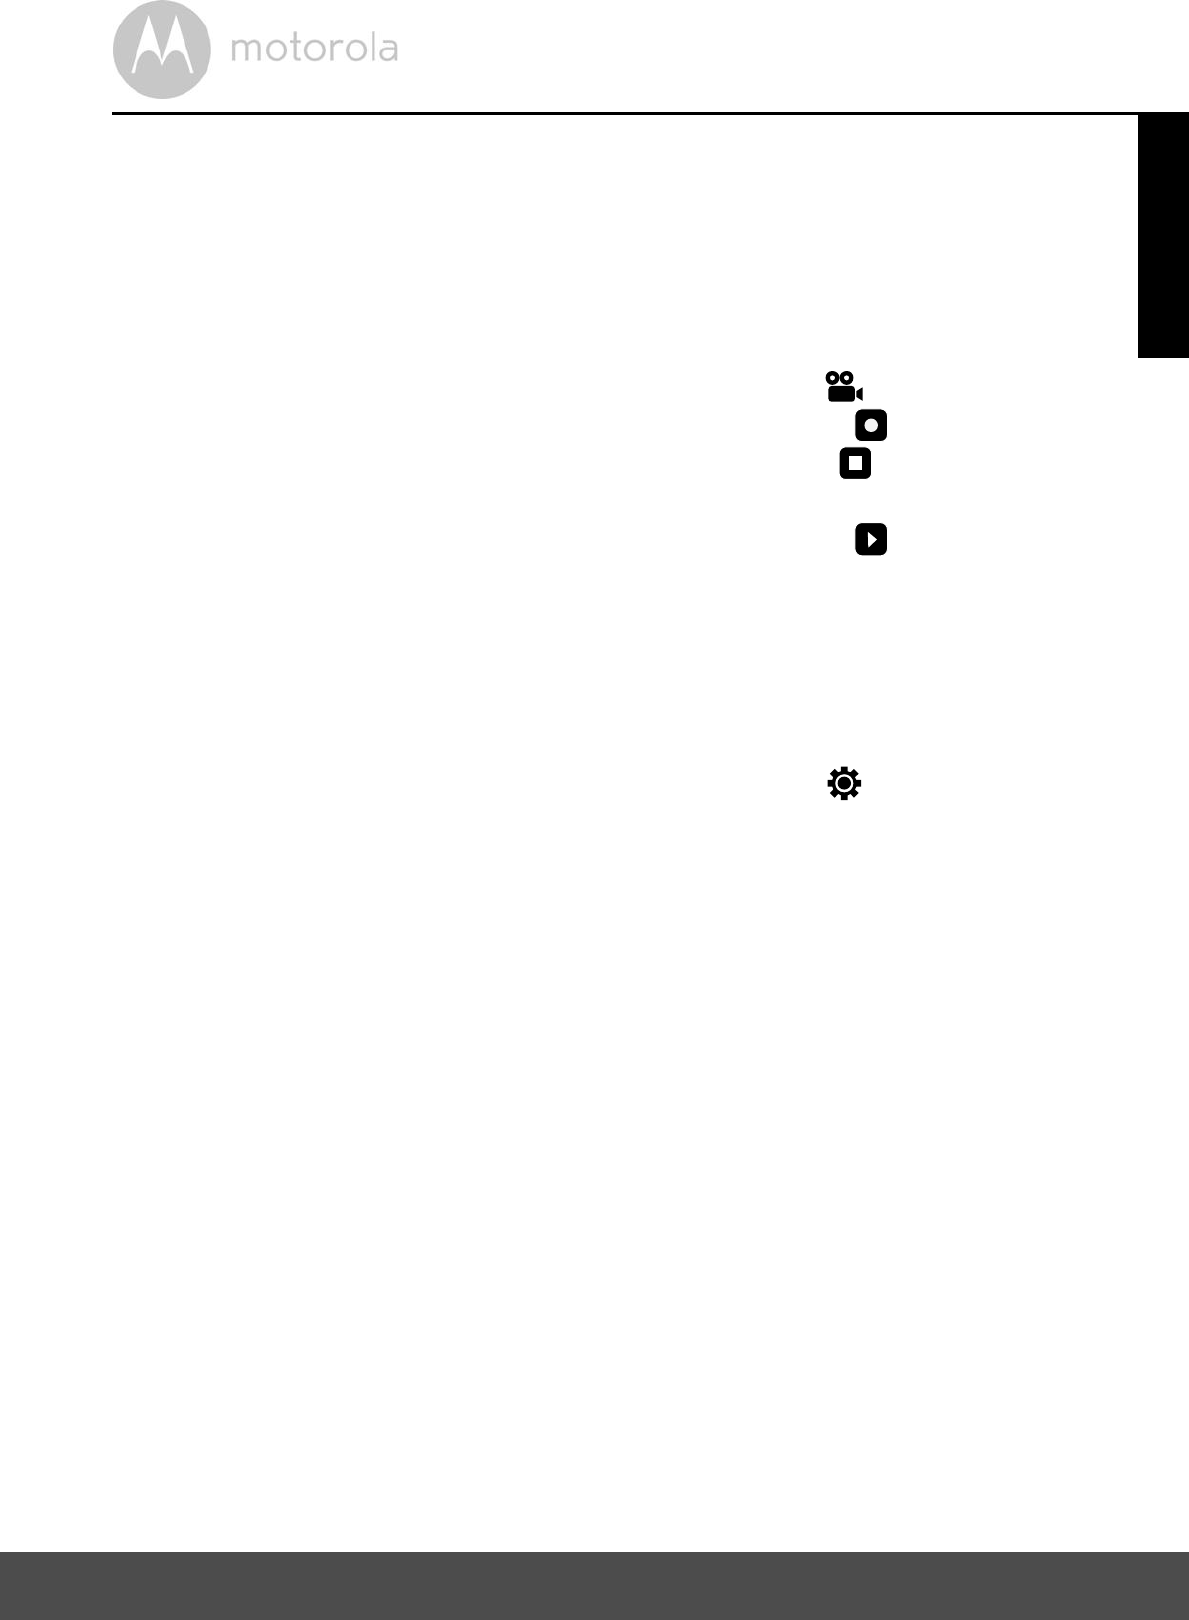
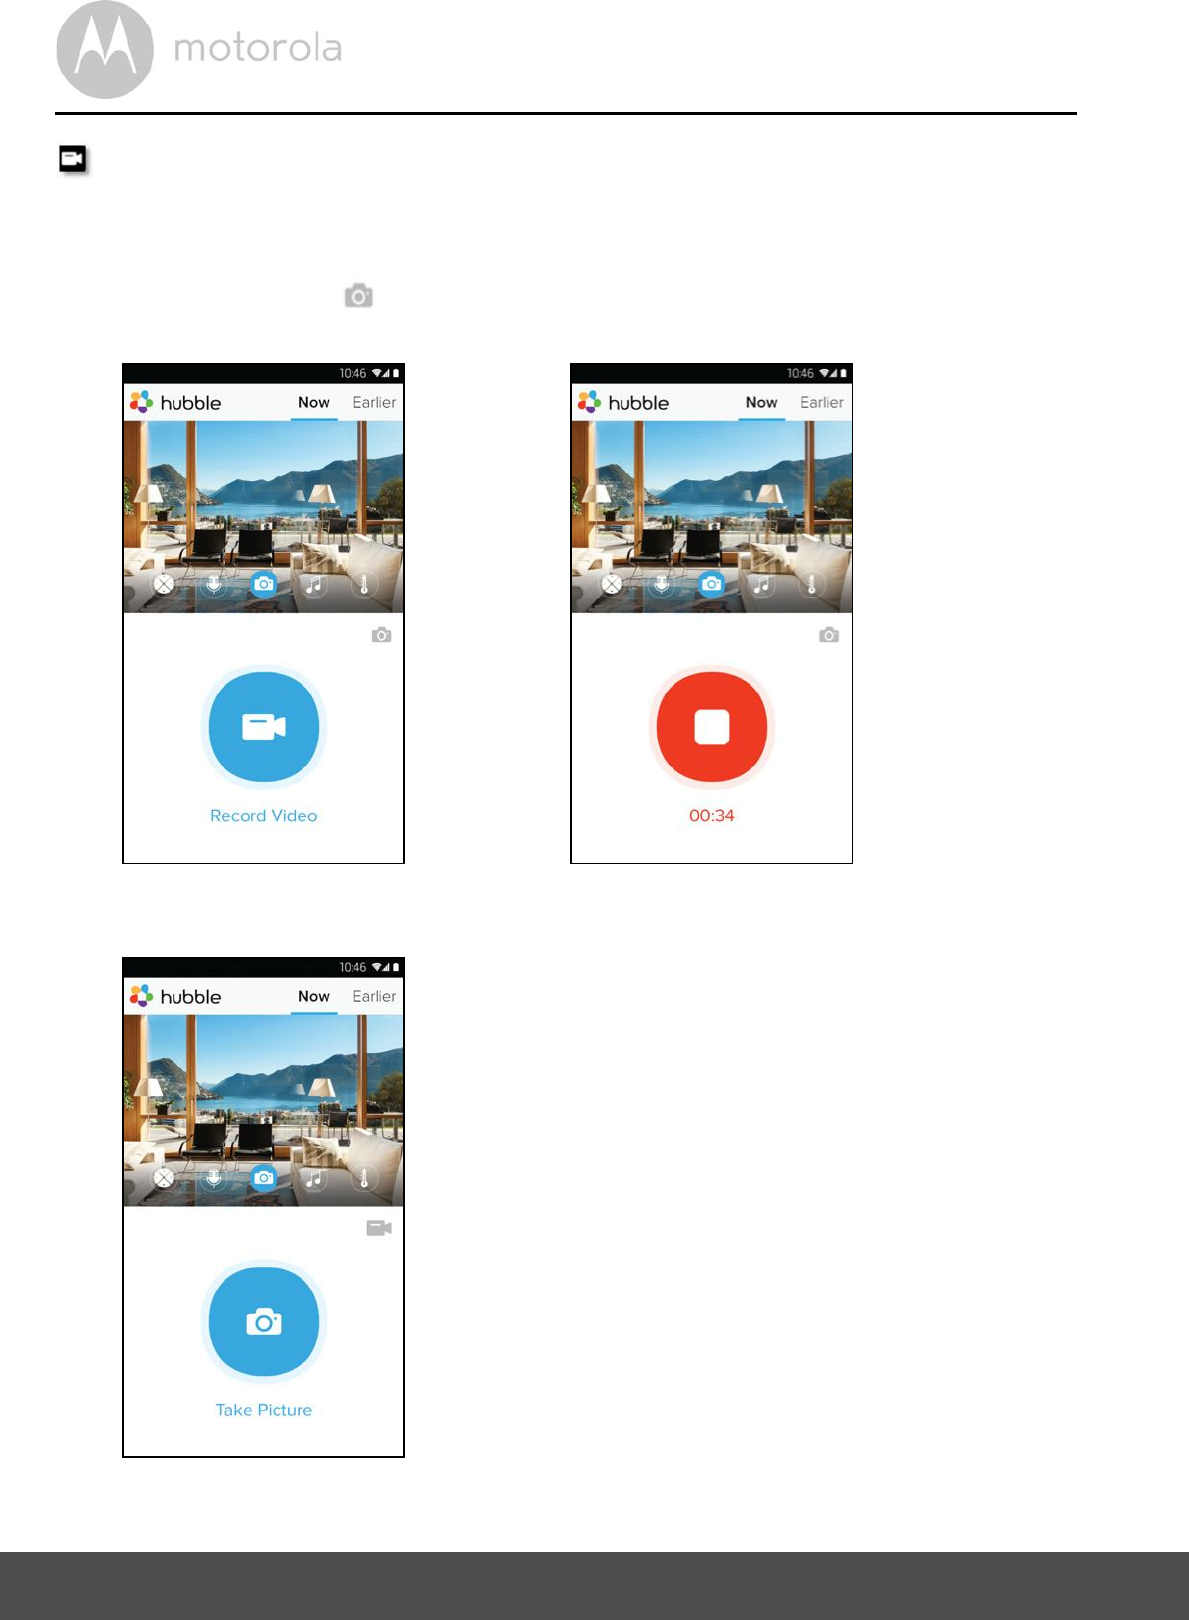
Photo/Video - Take a photo or record a video from your Camera.
Tap the Video icon to activate the Video function and press the red button to
start and release to stop recording. (Pictures A27, A28)
Tap the Camera icon to switch to Camera mode, you can capture photos
from the Camera view. (Picture A29)
A27 A28
A29
Wi-Fi Internet Viewing 43
Note:
Photos and videos will be stored on the internal flash memory of your Android
device, and can be accessed via the Gallery or Media Player. To play videos,
please use the Hubble App or a 3rd party application, such as MX player (found
in the Google Play Store), which is able to play MJPG (Motionjpeg) files.
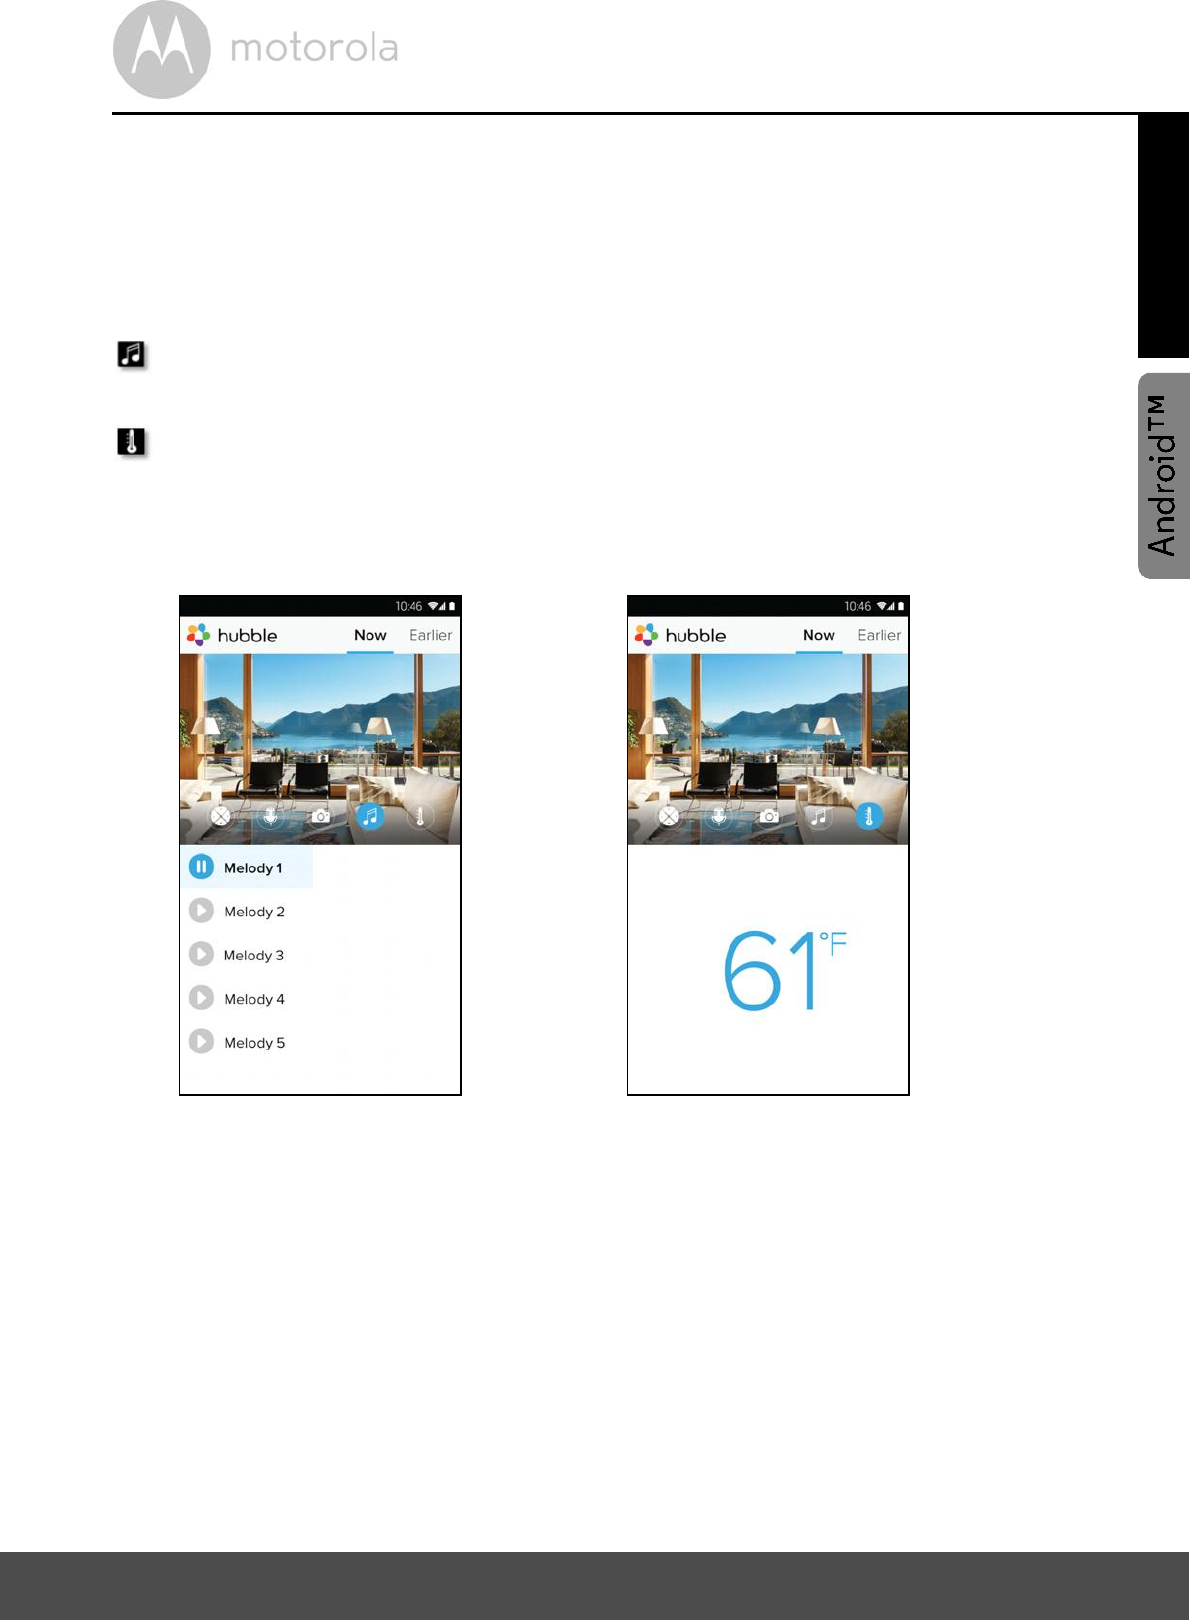
Melody To play one of the pre-set 5 melodies, tap on Melody to show the
Melody menu and select the one you prefer to play on your Camera. (Picture A30)
Temperature Measure The temperature reading from the temperature
sensor at the back of the Camera will display on your Android device screen
(Picture A31). The reading will turn RED if the temperature goes beyond the
High/Low Temperature as set in your Account. (see section 4.2.4)
A30 A31

44 Wi-Fi Internet Viewing
5.6 Camera Functions:
Working with devices for iPhone®/iPad®
Run the Hubble App on your iPhone®/iPad®.
The Camera view appears on the screen.
5.6.1 Add more cameras
In Camera view, tap on the Motorola logo to go to the Add Camera page.
(Picture i15)
Tap on Add Camera to add another Camera (follow steps for iPhone®/iPad®
setup Section 5.4.4.) (Picture i16)
Once the Camera has been added, the Camera view will be automatically
displayed.
i15 i16
Wi-Fi Internet Viewing 45
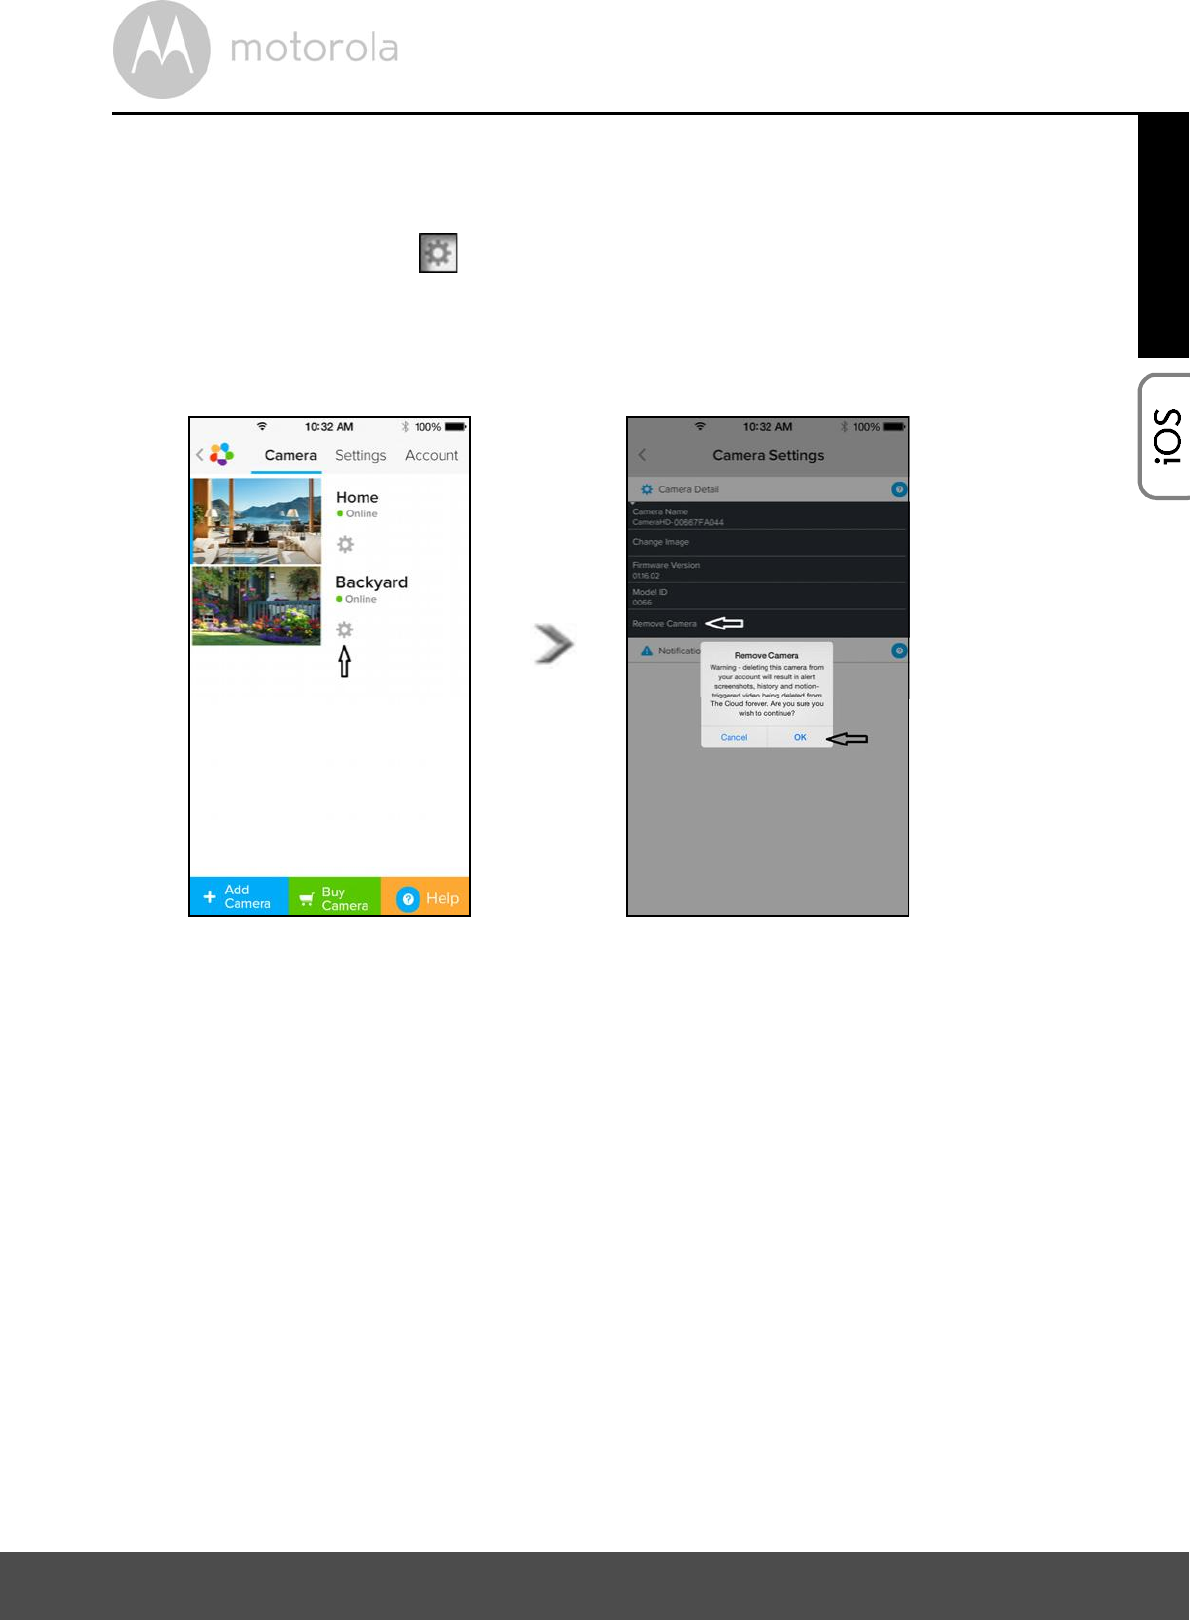
5.6.2 Remove a Camera
You can remove a Camera from your Account by following these steps:
Tap the Settings icon on the General page, then tap on Camera Detail.
(Picture i17)
Select Remove Camera and tap on Yes to delete the unit from camera list.
(Picture i18)
i17 i18
46 Wi-Fi Internet Viewing
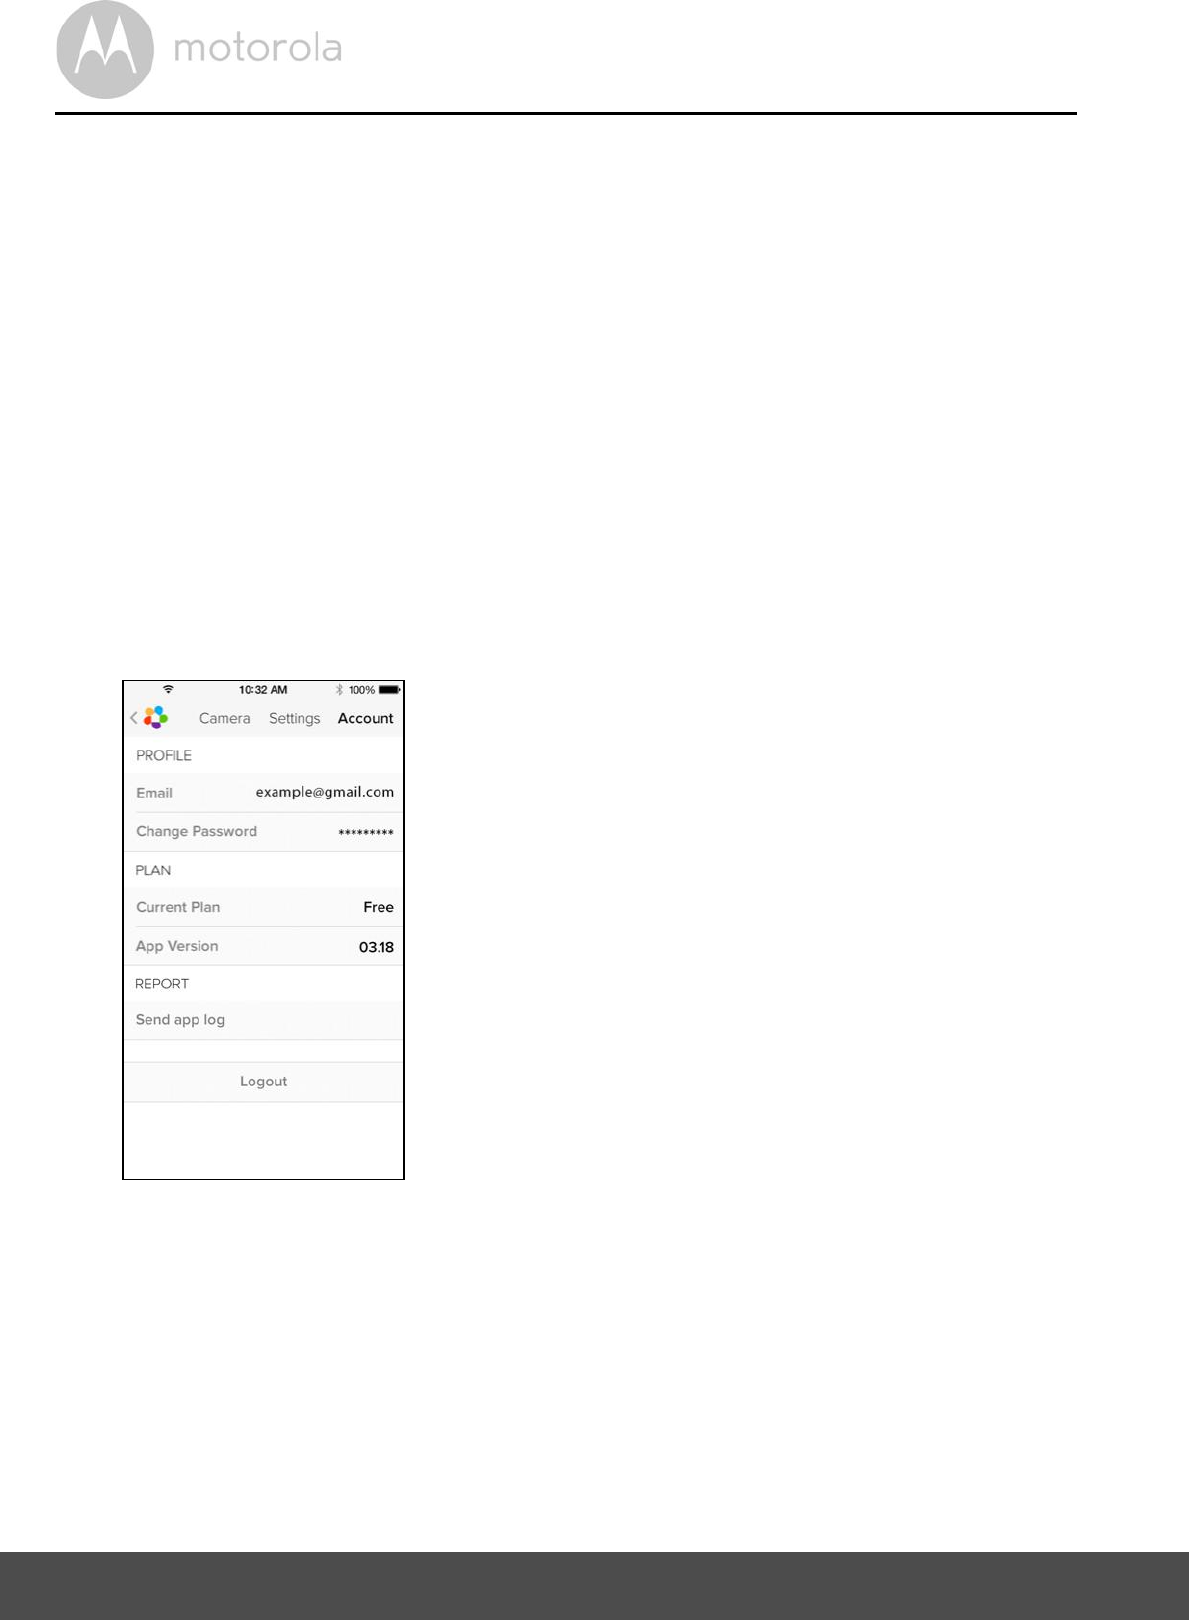
5.6.3 Change your Account Information
You can change the account information using your iPhone®/iPad®.
Tap Account on the General page and the Account settings will appear on
screen. (Picture i19)
Tap on Change Password to change your password by following the
instructions.
Tap on Log Out to leave the account.
Tap on Current plan, it will go to the link of Cloud Video Recording Service,
to obtain more information, please visit our website
https://hubbleconnected.com/plans/.
Tap on Send app log to send your Hubble App report to our server via e-mail;
this should be sent if requested by a customer service agent.
i19
Wi-Fi Internet Viewing 47
5.6.4 Camera settings
You can change the Camera settings to tap the Settings icon on the General
page (Picture i20). You can review the Camera Name and Firmware version
(Picture i21) and are allowed to change the Camera name by tapping on the
existing name and following the instructions.
Tap on Notification Sensitivity to set the sensitivity of sound & motion
detection, and to set an Alert of High/Low temperature. (Picture i22)
i20 i21
i22
48 Wi-Fi Internet Viewing
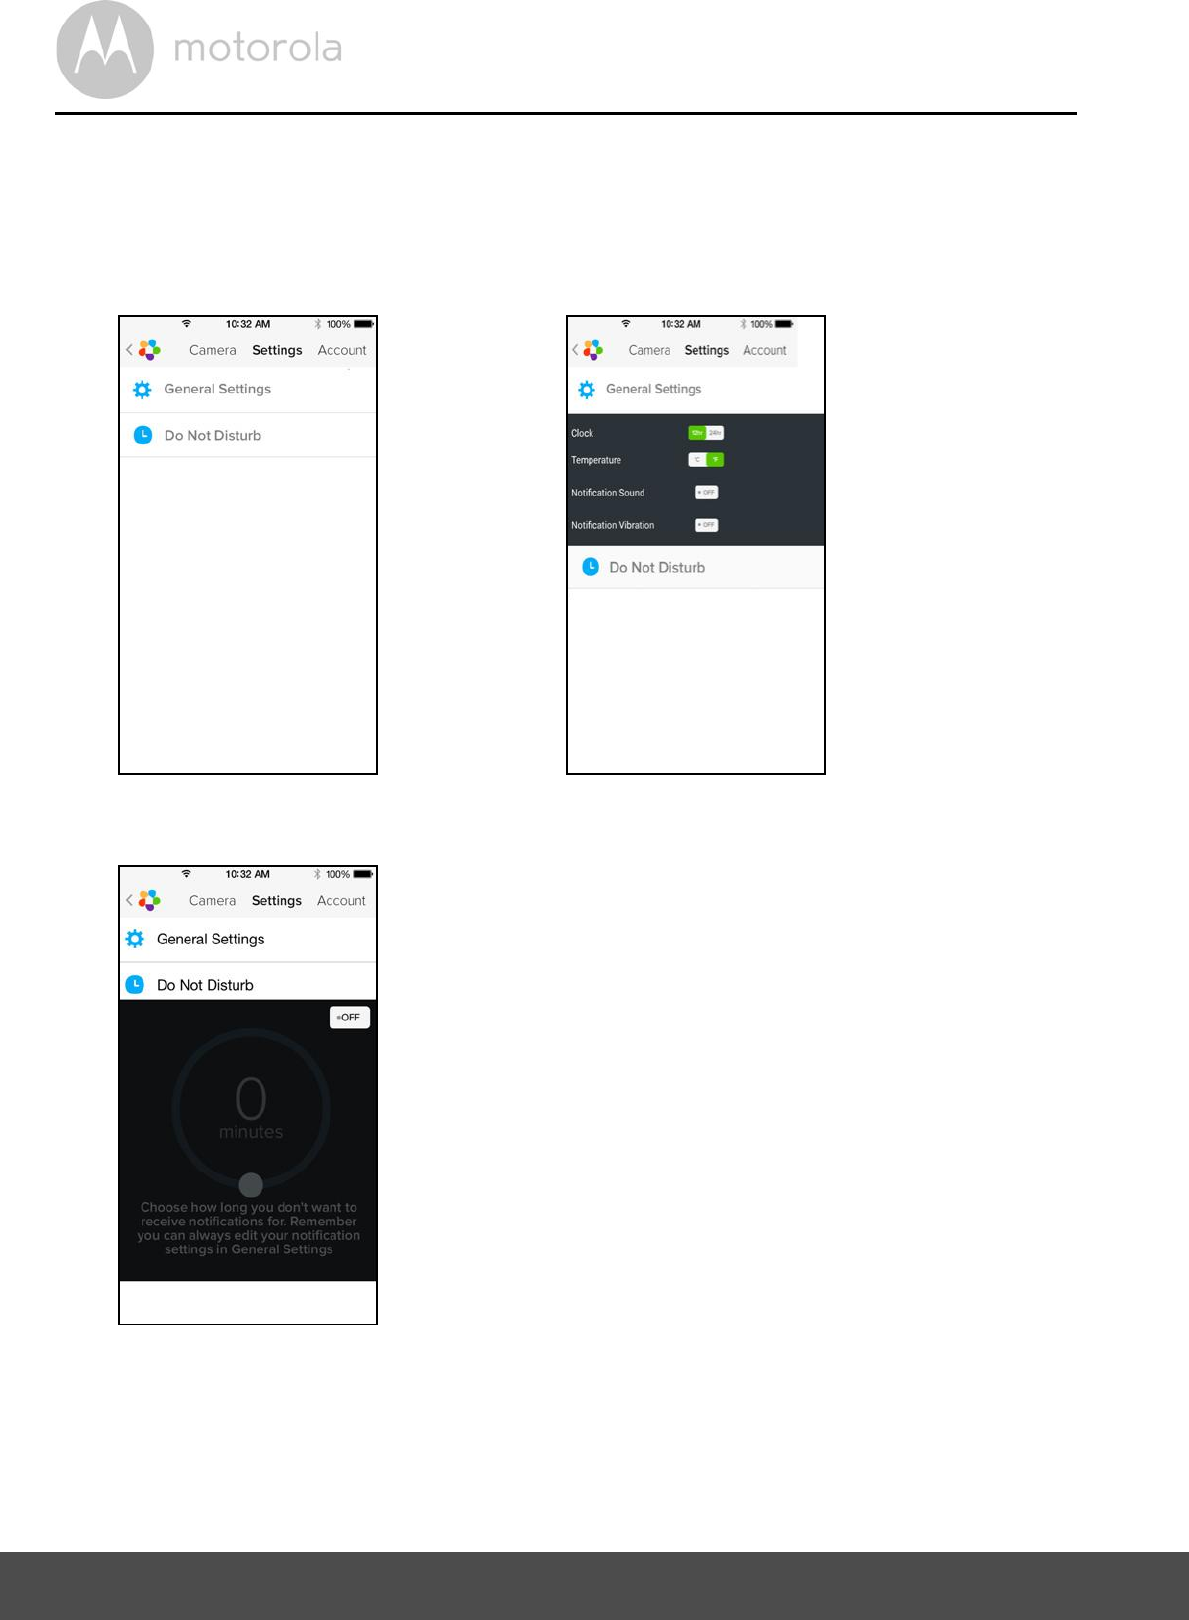
5.6.5 General settings
Tap on Settings on the General page. (Picture i23)
Tap on General Settings to change the format for Clock (12hr/24hr) &
Temperature (°C / °F) and activate Notification Sound or Vibration. (Picture i24)
Tap on Do Not Disturb, set the timer to the desired time and select ON, the
Camera will not send any sound or alert to your iPhone®/iPad® for the
duration of your setting. (Picture i25)
i23 i24
i25
Wi-Fi Internet Viewing 49
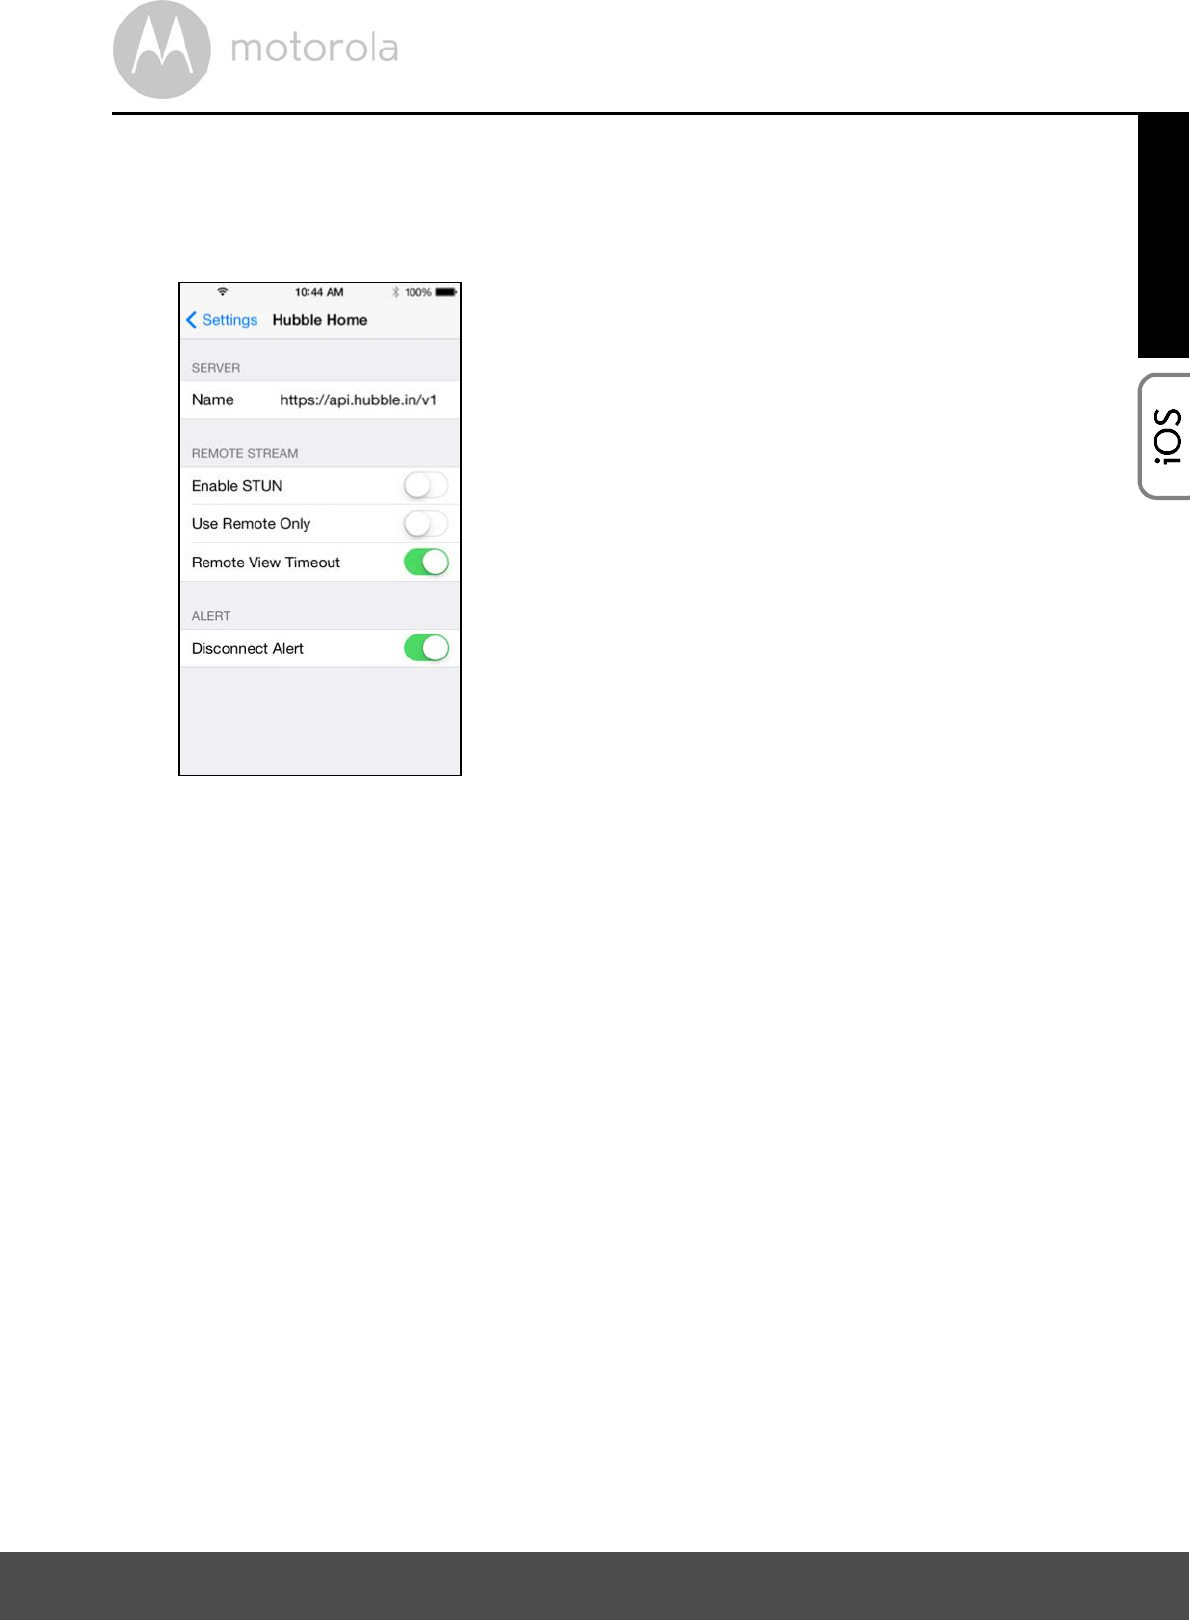
5.6.6 Hubble App Settings
Tap on Settings on your iPhone®/iPad®, and the applications will appear, tap
on the Hubble App and the settings will be shown on screen. (Picture i26)
i26

50 Wi-Fi Internet Viewing
5.6.7 Features of the Hubble App
On Camera view, tap the viewing area and Function Icons will appear as follows.
Two Way Communication Tap on to activate the function. Press the
round button once to speak through the Camera. Toggle the button again to
listen to the audio feedback from the Camera. (Pictures i27, i28)
i27 i28
Wi-Fi Internet Viewing 51
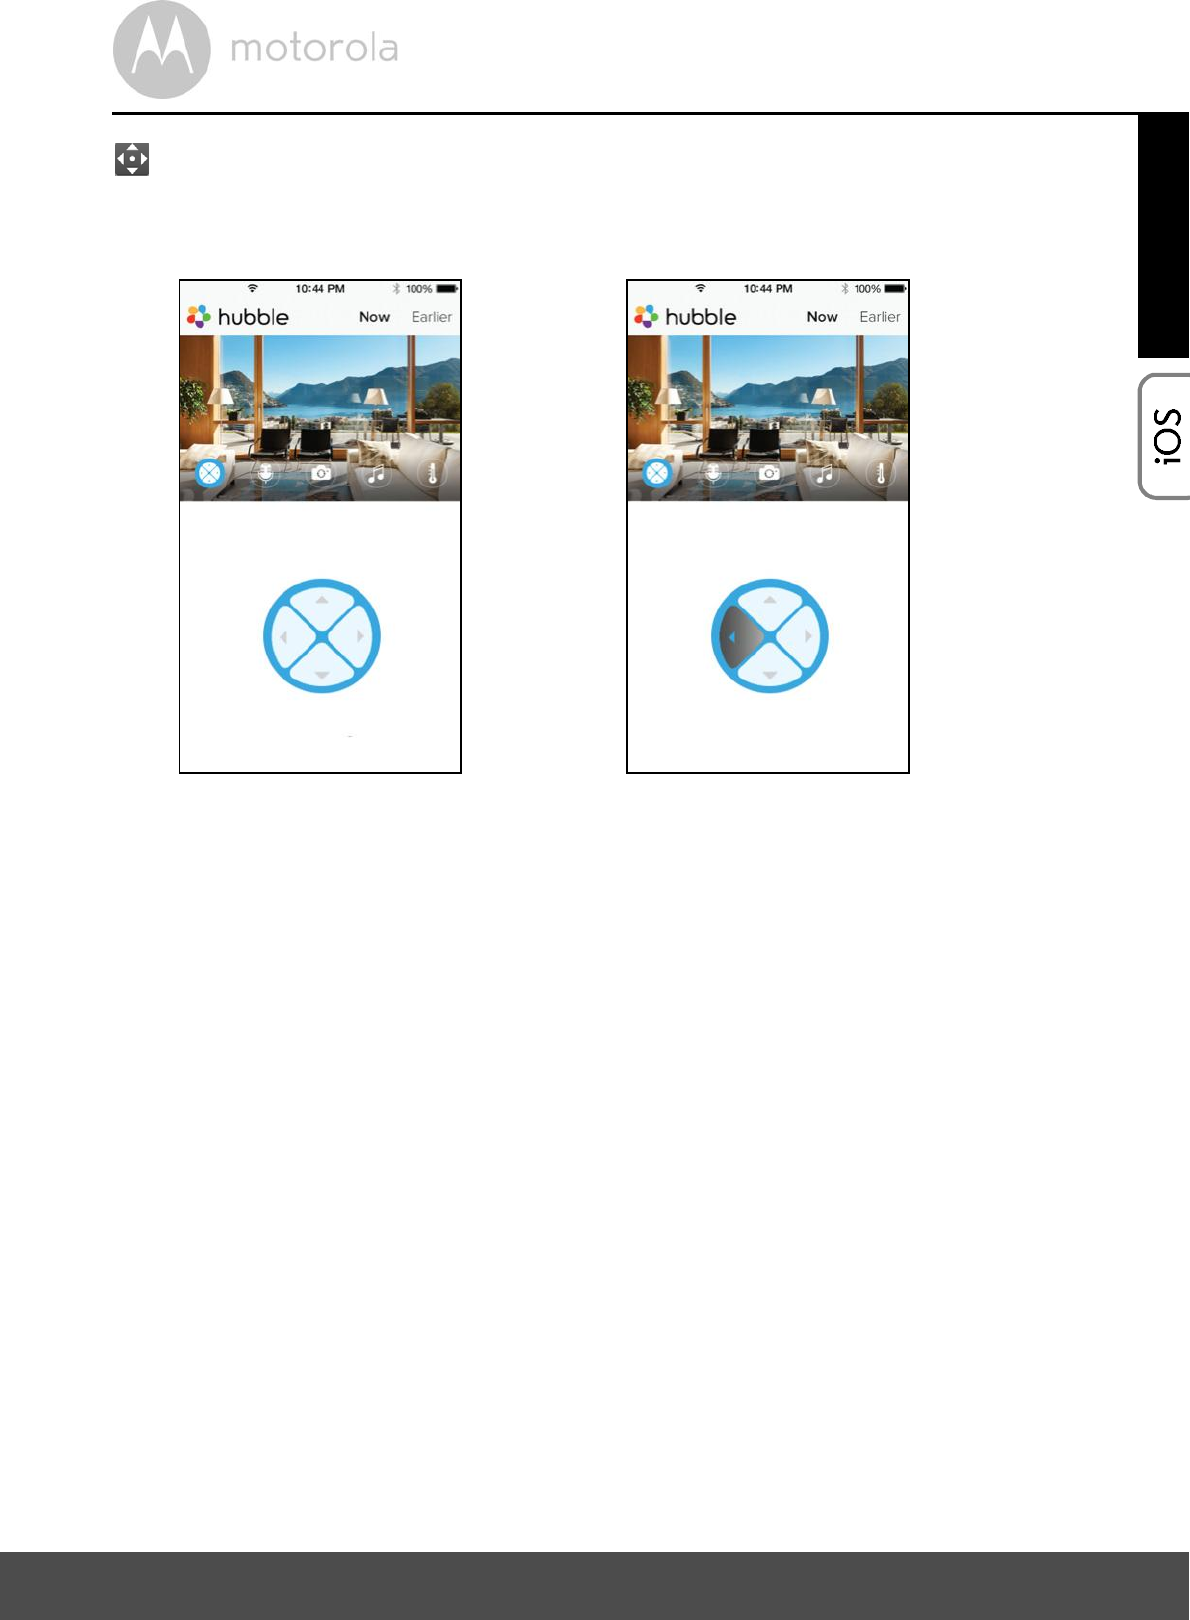
Pan and Tilt Function:
Tap the up and down buttons to tilt, the left and right buttons to pan. (Pictures
i29, i30)
i29 i30
52 Wi-Fi Internet Viewing
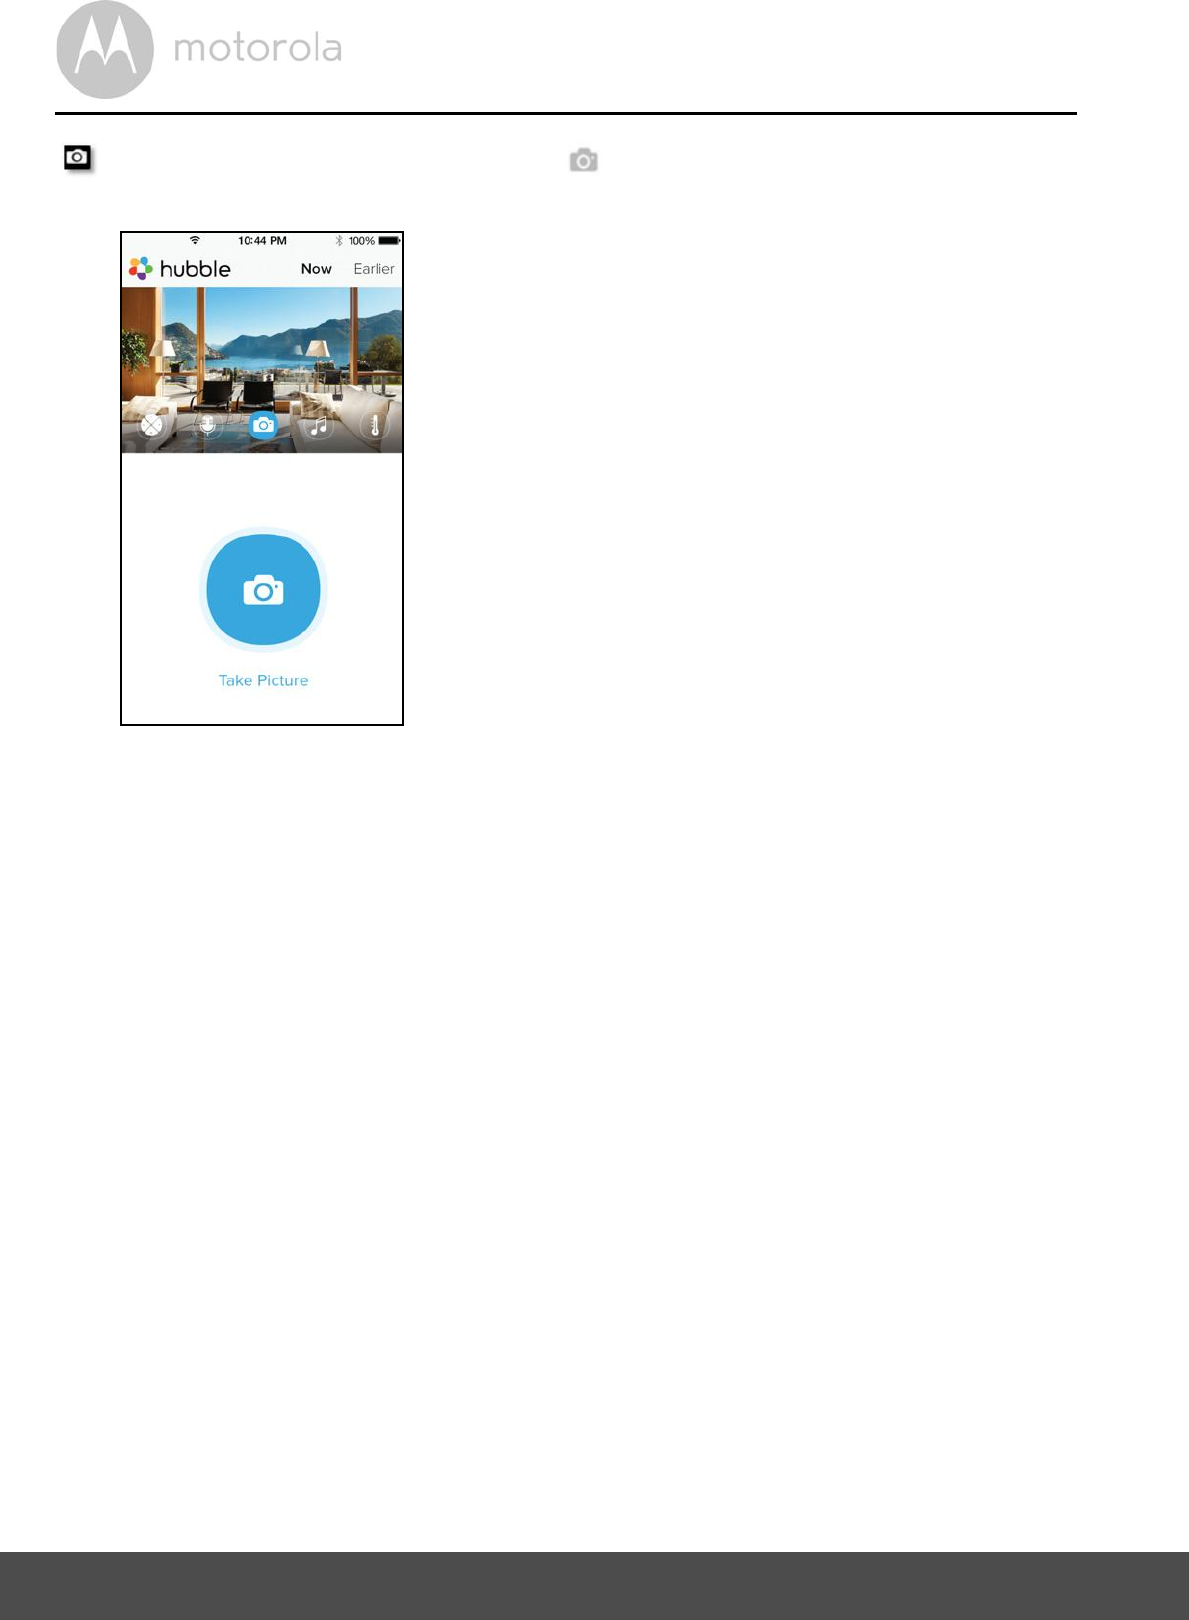
Take Picture - Tap on Camera icon to capture photos from the Camera
view. (Picture i31)
Note:
Photos will be stored on the internal flash memory of your iPhone®/iPad®.
i31
Wi-Fi Internet Viewing 53
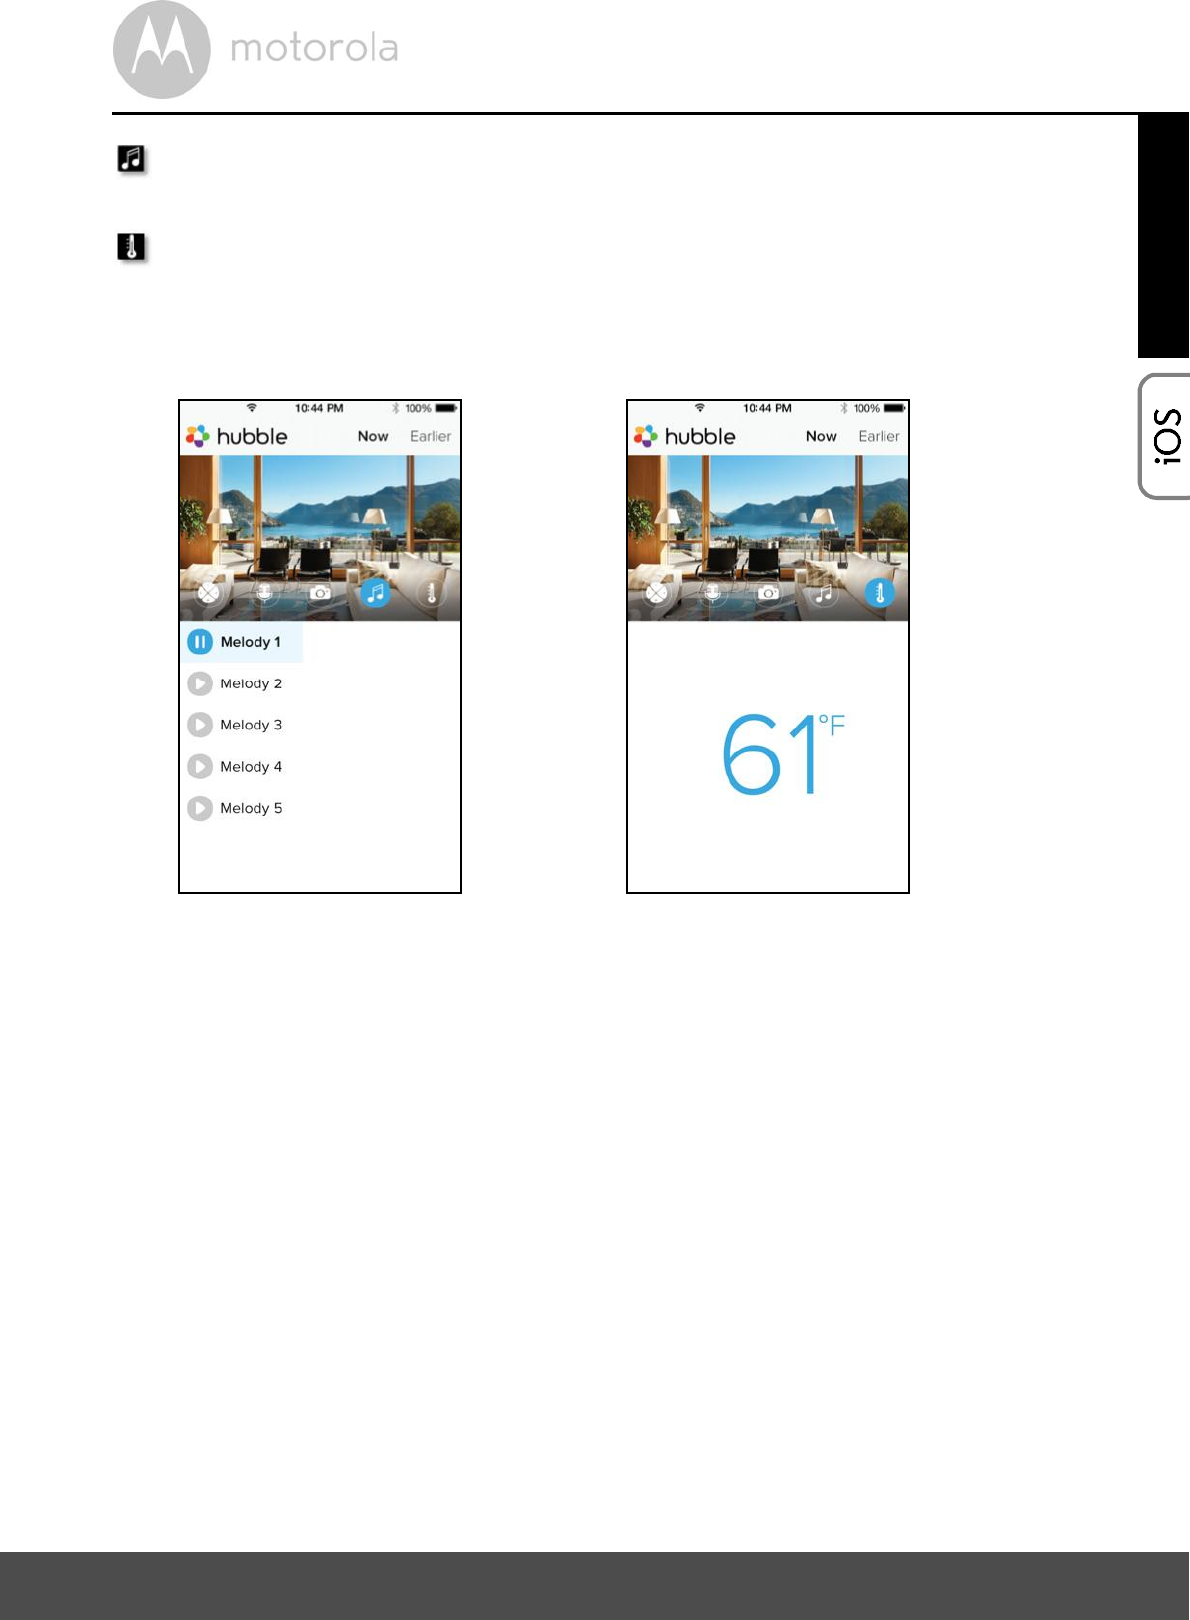
Melody To play one of the pre-set 5 melodies, tap on Melody to show the
Melody menu and select the one you prefer to play on your Camera. (Picture i32)
Temperature Display The temperature reading from the temperature
sensor at the back of the Camera will display on your iPhone®/iPad® screen
(Picture i33). The readings will turn RED if the temperature goes beyond the
High/Low Temperature as set in your Account. (see section 5.6.5)
i32 i33