Bissell 1623 User Manual POWER STEAMER Manuals And Guides 1505108L
User Manual: Bissell 1623 1623 BISSELL POWER STEAMER - Manuals and Guides View the owners manual for your BISSELL POWER STEAMER #1623. Home:Vacuums & Floor Care Parts:Bissell Parts:Bissell POWER STEAMER Manual
Open the PDF directly: View PDF ![]() .
.
Page Count: 16
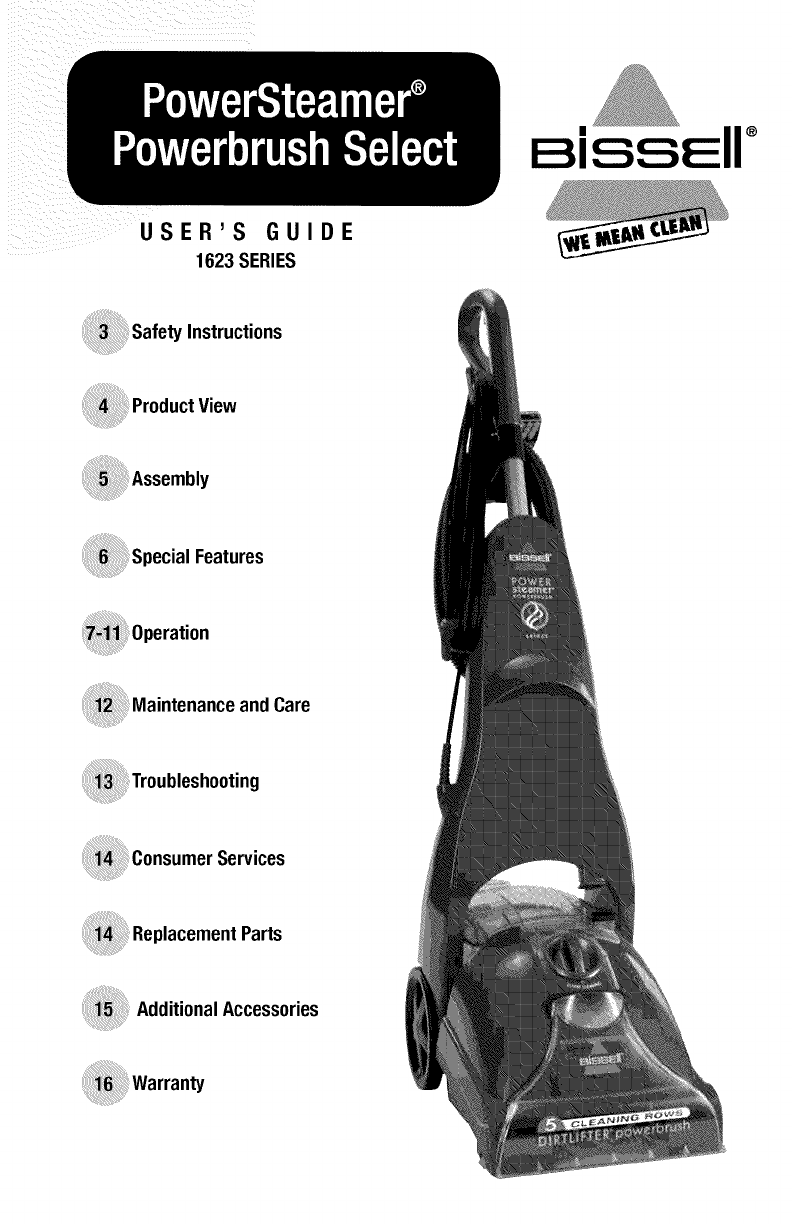
.... USER'S GUIDE
1623 SERIES
_Safety Instructions
_Special Features
;i_Maintenance andCare
AdditionalAccessories
®
for buyinga BISSELLdeepcleaner
We're glad you purchased a BISSELLdeep cleaner. Every_nlng we know about
floor care went into the design and construction of this complete, high-tech
home cleaning system. By purchasing this product you are helping BISSELLwith
our commitment to reducing our impact on the environmen_ _nrougn an expand-
ing range of sustainable design efforts.
Your deep cleaner is well made, and we back it with a limited one-year warranty. We
also stand behind it with a knowledgeable, dedicated Consumer Services depart-
ment, so, should you ever have a problem, you'll receive fast, considerate assistance.
My great-grandfather invented the floor sweeper in 1876. Today, BISSELLis a
global leader in the design, manufacture, and service of high quality homecare
products like your deep cleaner.
Thanks again, from all of us at BISSELL.
Mark J. Bissell
President and Chief Executive Officer
2www,bissell,com 800,237,7691
SAFETYINSTRUCTIONS
Whenus_g anelectricalappliance,basicprecautions
shouldbeobserved, includingthe following:
Readall instructionsbeforeusingyour PowerSteamer®
/k WARNING:Toreducetilerisk
of fire,electricshock,orinjury:
• Do not immerse.
• Useonly on surfaces moistenedby cleaningprocess.
• Alwaysconnectto a properlygroundedoutlet.
• SeeGroundingInstructions.
• Unplugfrom outlet when not in use and before
conducting maintenance or troubleshooting.
• Do not leave machinewhen it is plugged in.
• Donotservicemachinewhenit ispluggedin.
• Do not use with damagedcord or plug.
• If applianceis notworking as it should,has been
dropped,damaged,left outdoors,or droppedinto
water,haveit repairedat an authorizedServiceCenter.
• Use indoorsonly.
• Donotpullor carrybycord,usecordasa handle,close
dooron cord,pullcordaroundsharpcomersoredges,run
applianceovercord,orexposecordto heatedsurfaces.
• Unplugby graspingthe plug, not the cord.
• Donothandleplugorappliancewithwet hands.
• Donotputanyobjectintoapplianceopenings,usewith
blockedopening,orrestrictairflow.
• Do not expose hair,loose clothing, fingers or body
parts to openingsor moving parts.
• Do not pick up hot or burning objects.
• Do not pick up flammable or combustible materials
(lighter fluid, gasoline, kerosene,etc.) or use in the
presence of explosiveliquids or vapor.
• Donotuseapplianceinanenclosedspacefilledwithvapors
givenoffbyoilbasepaint,painthinner,somemothproofing
substances,flammabledust,orolherexplosiveortoxicvapors.
• Donotpickuptoxicmaterial(chlorinebleach,
ammonia,draincleaner,gasoline,etc.).
• Do not modify the 3-prong grounded plug.
• Do not allow to be used as a toy.
• Do not use for any purposeother than described in
this User's Guide.
• Donotoperatetheapplianceunlessthe beltdooris
securelyassembledinthe locationprovided.
• Do not unplug by pulling on the cord.
• Useonlymanufacturer'srecommendedattachments.
• Useonlycleaningproductsformulatedby BISSELLfor
useinthis applianceto preventinternalcomponent
damage.Seethe cleaningfluidsectionof this guide.
• Keepopenings freeof dust, lint, hair,etc.
• Donot pointattachmentnozzleat people or animals
• Keepappliance on a levelsurface.
• Turnoff all controls before unplugging.
• Be extra careful when cleaning stairs.
• Close attention is necessarywhen usedby or
nearchildren.
SAVETHESE
INSTRUCTIONS.
THISMODELISFORHOUSEHOLDUSEONLY.
Commercialuse of this unit voidsthe
manufacturer'swarranty.
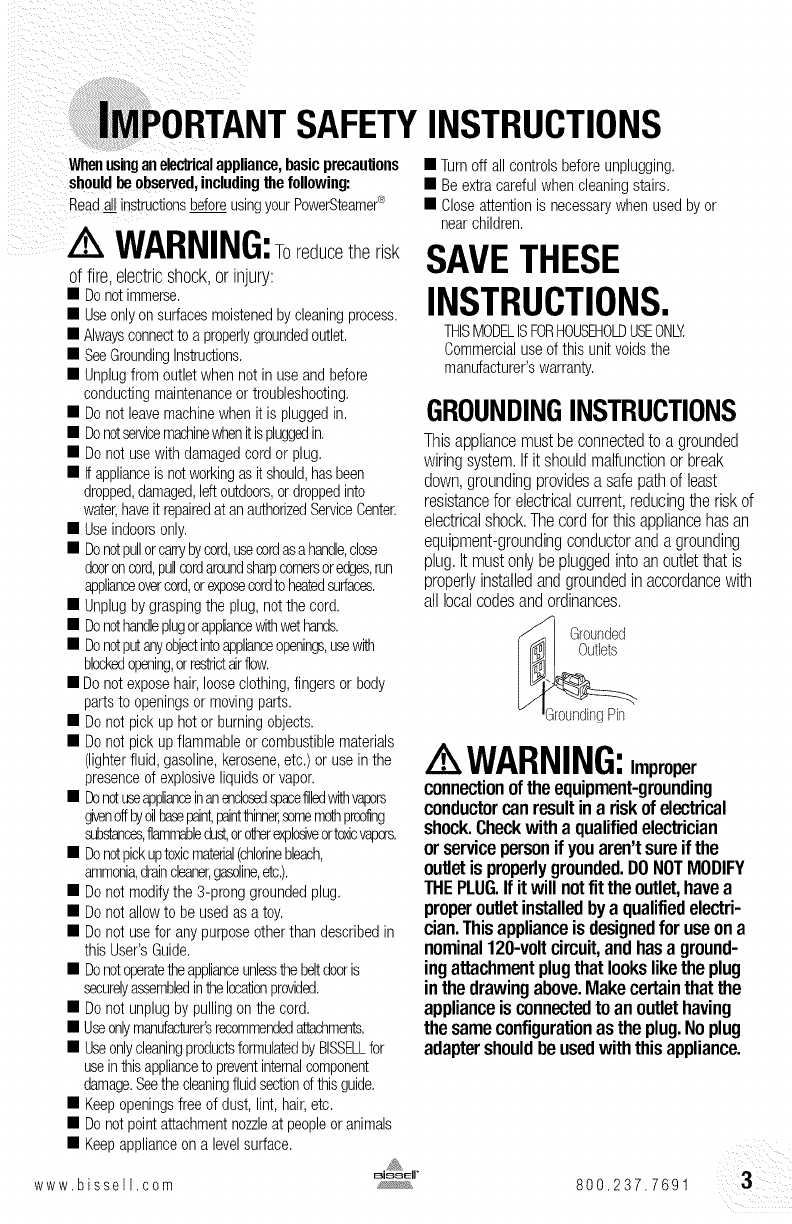
GROUNDINGINSTRUCTIONS
Thisappliancemustbeconnectedto a grounded
wiringsystem.If itshouldmalfunctionor break
down,groundingprovidesa safepathof least
resistancefor electricalcurrent,reducingthe riskof
electricalshock.The cordfor thisappliancehas an
equipment-groundingconductoranda grounding
plug.It mustonly be pluggedinto anoutletthat is
properlyinstalledandgroundedin accordancewith
all localcodesandordinances.
Groanded
/k WARNING:Improper
connectionoftheequipment-grounding
conductorcanresultina riskofelectrical
shock.Checkwitha qualifiedelectrician
orservicepersonif youaren'tsureif the
outletis properlygrounded.DONOTMODIFY
THEPLUG.If itwill notfit theoutlet,havea
properoutletinstalledbya qualifiedelectri-
cian.Thisapplianceisdesignedforuseona
nominal120-voltcircuit,andhasa ground-
ingattachmentplugthatlooksliketheplug
inthedrawingabove.Makecertainthatthe
applianceisconnectedtoan outlethaving
thesameconfigurationastheplug.Noplug
adaptershouldbeusedwiththisappliance.
www. b is se I I c o m #_ 800.237.7691
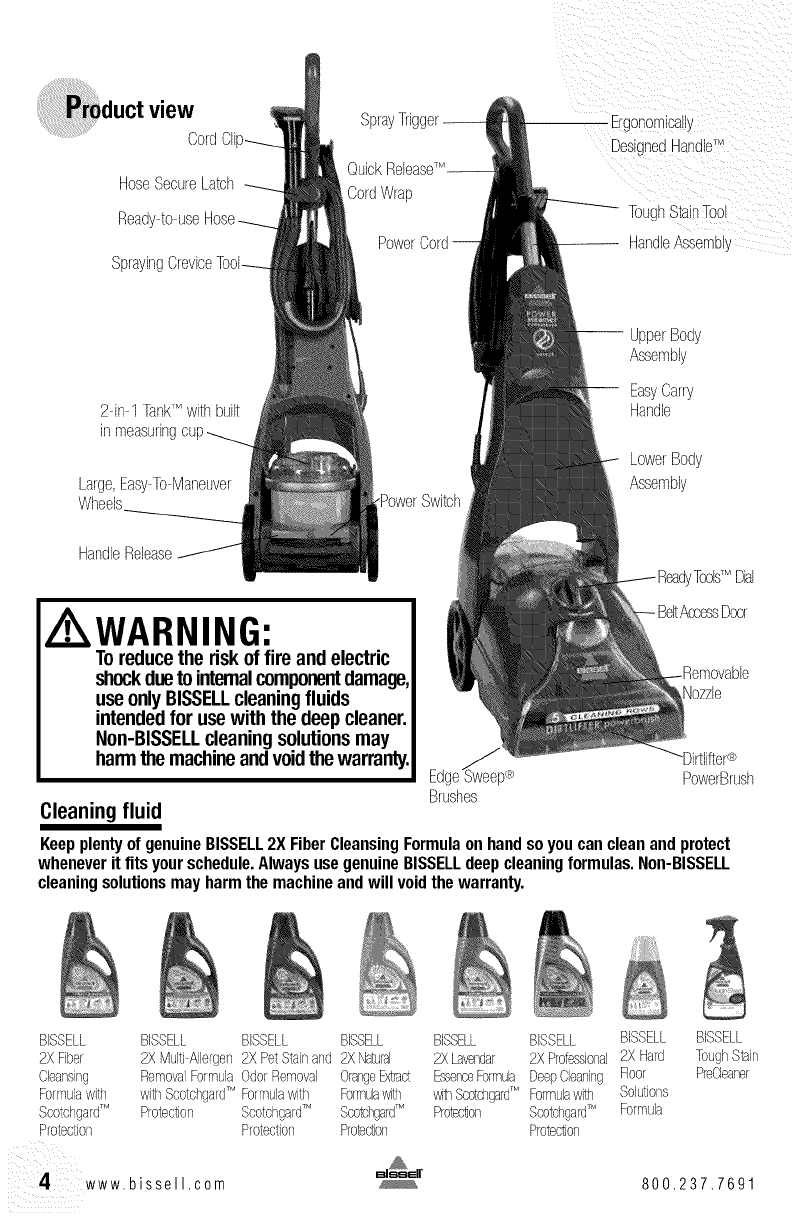
CordCIi
HoseSecureLatch
Readyto use
SprayingCrevice
CordWrap
Power
Ergonomlc_lly
DescsedHandleTM
TougnStainTool
HandleAssembl,_
2 in 1 TankTM withbuilt
inmeasuring
Large,EasyToManeuver
Wheels "PowerSwitch
-- UpperBody
Assembly
EasyCarry
Handle
LowerBody
Assembly
HandleRelease
/TodsTM Dial
[/ WARNING:
Toreducethe riskof fireand electric
shockdueto intemalcomponentdamage,
useonlyBISSELLcleaningfluids
intendedfor usewith the deepcleaner.
Non-BISSELLcleaningsolutionsmay
harmthemachineandvoidthewarranty.
Cleaning fluid
EdgeSw_eep®
Brushes
/ozzb
PowerBrush
Keepplentyof genuineBISSELL2X FiberCleansingFormulaon handsoyoucan cleanand protect
wheneverit fitsyourschedule.AlwaysusegenuineBISSELLdeepcleaningformulas.Non-BISSELL
cleaningsolutionsmayharmthe machineandwill voidthewarranty.
BISSELL BISSELL BISSELL BISSELL
2X Fiber 2XMultiAllergen2X PetStainand 2XNatural
Cleansing RemovalFormulaOdorRemoval OrangeExtract
Formulawith withScotchgardTM Formulawith Formulaw_h
ScotchgardTM Protection SeotchgardTM ScotchgardTM
Protection Protection Protection
4www.bissell.com
BISSELL BISSELL BISSELL
2XLavendar 2X Professional2X Hard
EssenceFormulaDee[}Cleaning Floor
vsthScstdTgardTM Formulawith Solutions
Prot÷sSon ScotchgarU_ Formula
Protection
BISSELL
ToughStain
PreOeaner
800.237.7691
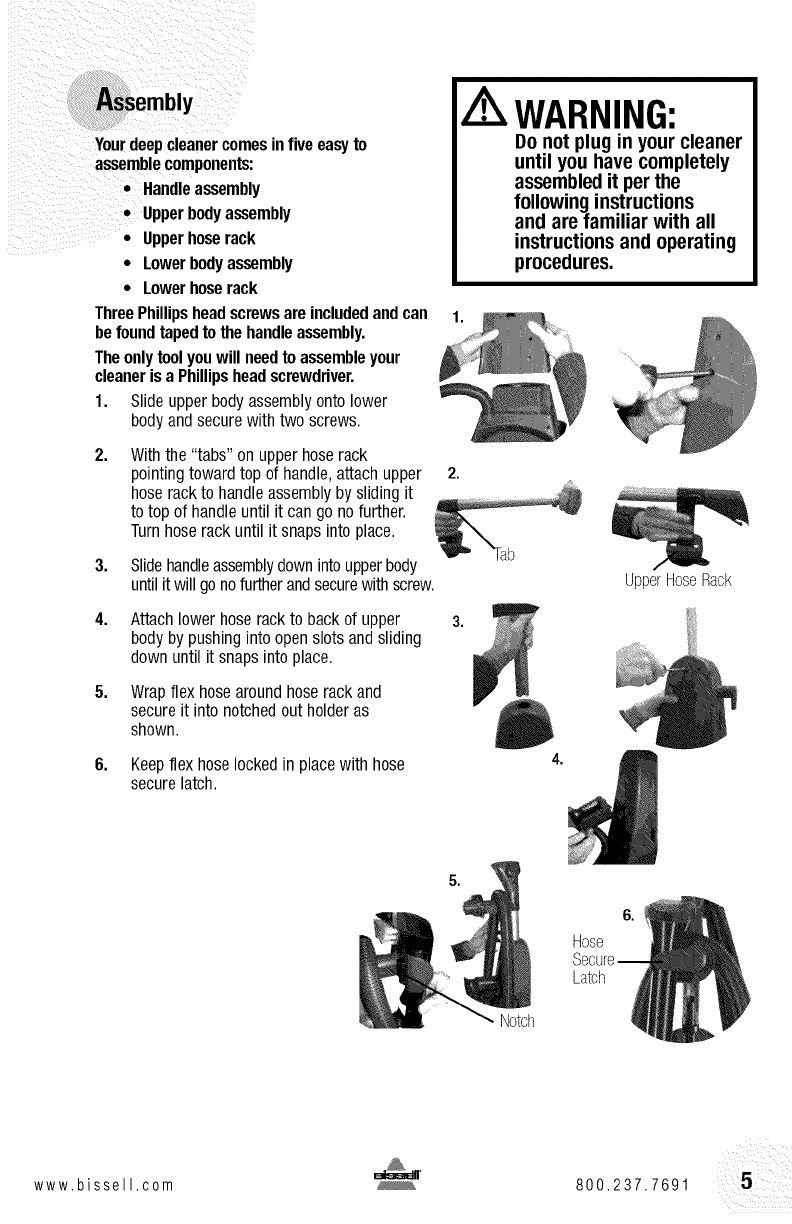
Yourdeepcleanercomesinfive easyto
assemblecomponents:
• Handleassembly
•Upperbodyassembly
•Upperhoserack
• Lower bodyassembly
• Lower hoserack
ThreePhillips headscrewsare includedandcan
befound tapedtothe handleassembly.
Theonlytoolyouwillneedto assembleyour
cleanerisa Phillips headscrewdriver.
1. Slide upper bodyassemblyonto lower
body andsecurewith two screws.
2.
3.
4.
5.
Withthe "tabs" on upper hoserack
pointingtowardtop of handle,attachupper
hose rackto handleassemblyby sliding it
to top of handleuntil it can gono further.
Turnhoserack until it snaps intoplace.
Slidehandleassemblydownintoupperbody
until it willgonofurtherandsecurewithscrew.
Attach lower hoserackto back of upper
body by pushingintoopen slots andsliding
down until it snapsinto place.
Wrapflex hosearoundhoserack and
secureit into notchedout holderas
shown.
6. Keepflex hoselockedin placewith hose
securelatch.
WARNING:
Do not plug in your cleaner
until you have completely
assembledit per the
following instructions
and are familiar with all
instructionsand operating
procedures.
2.
3.
UpperHoseRack
4,
I
5,
6,
Hose
Latch
Notch
www.bissell.com 800.237.7691 5

featuresof yourBISSELLdeepcleaner
YourBISSELLdeepcleaneris a homecleaning
systemthat usesa combinationof hottapwater,
BISSELLadvancedcleaningformula, brush
agitationandsuctionto safelycleancarpets.
DirtLifter®PowerBrush
TheDirtLifterPowerBrushisdesignedto
enhancecleaningperformance.Thebristle
patternsafelyliftsoutthedeepdowndirtwhile
gentlygroomingcarpetfibers. Thefloating
suspensionself-adjuststo all carpetheights.
Whenthe poweris ONandthe machineis in
theuprightposition,yourcarpetis protected
becausethe brushesareliftedupoffthe carpet.
ReadyToolsTM Dial
TheReadyToolsfeatureallowsyouto choose
betweenFLOORCLEANINGorcleaningwith
TOOLSsimplybyturningthedial.TheTOOLS
settingallowsfor abovefloor cleaningof
upholstery,stairs,creasesalongbaseboards,and
otherhardto reachareas.Simplychoosethetool
that isappropriatefor thejob,attachto flex hose
andyouare readyto go.
Measuringcup
Yourdeepcleaneris equippedwith a measuring
cupfor addingtheproperamountofformula to
the2-in-1 tank. Forconveniencethemeasuring
cupis builtintothelid ofthe2-in-1 tank.
2-in-1 watertank
Our2-in-1 watertank systemisdesignedwitha
heavydutybladderinsidefor cleanwater.Asyou
clean,thecleanwaterinthebladderwillempty
andmixwiththecleaningformula. Dirtywater
pulledoutofyourcarpetwillcollectaroundthe
outsideof thebladdersocleananddirtywater
arealwayskeptseparate.Thisallowstheuserto
maximizetank space,yet onlycarryonetank to
andfrom thesinkfor emptyingandfilling.
WARNING:
Toreducethedskoffire,useonly
BISSELLadvanceddeepcleaning
formulaforfullsizemachinesinyour
deepcleaner.Useofcleaning
formulasthatcontainlemonor
pineoilmaydamagethisappliance
andvoidthewarrauty.Chemical
spotcleanersorsolvent-basedsoil
removersshouldnotbeused.These
productsmayreactwiththeplastic
materialsusedinyourdeepcleaner
causingcracidngorpitling.
Oup
CarryHandle
ATTENTION:
SomeBerbercarpetshavea tendencyto fuzzwith wear.
Repeatedstrokesinthe sameareawith an ordinary
vacuumor deepcleanermay aggravatethiscondition.
6www,bissell,com 800,237.7691
Operation
Before you clean
1,
2.
3.
4.
5,
Planactivities to give your carpettime to dry.
Movefurniture to anotherareaif cleaning
anentire room(optional).
Vacuumarea with a dry vacuumcleaner
beforedeep cleaning.
Planyourcleaningrouteto leavean exitpath.It
is bestto begincleaninginthecornerfarthest
fromyourexit.
Pretreating (optional)
Pretreatingisrecommendedtoimprovecleaning
effec'dvenessforheavilysoiledcarpetinhighb'affic
areassuchasentrywaysandhallway&
Toprekeat:
A. Usingthe BISSELLToughStain
Pre-cleaner,generouslyspray evenly
oversoiled area,do notoverwet.
B. Wait3-5 minutesbeforedeepcleaning.
C. CleanasnormalusingyourBISSELLdeep
cleaner,followingthe instructionsbelow.
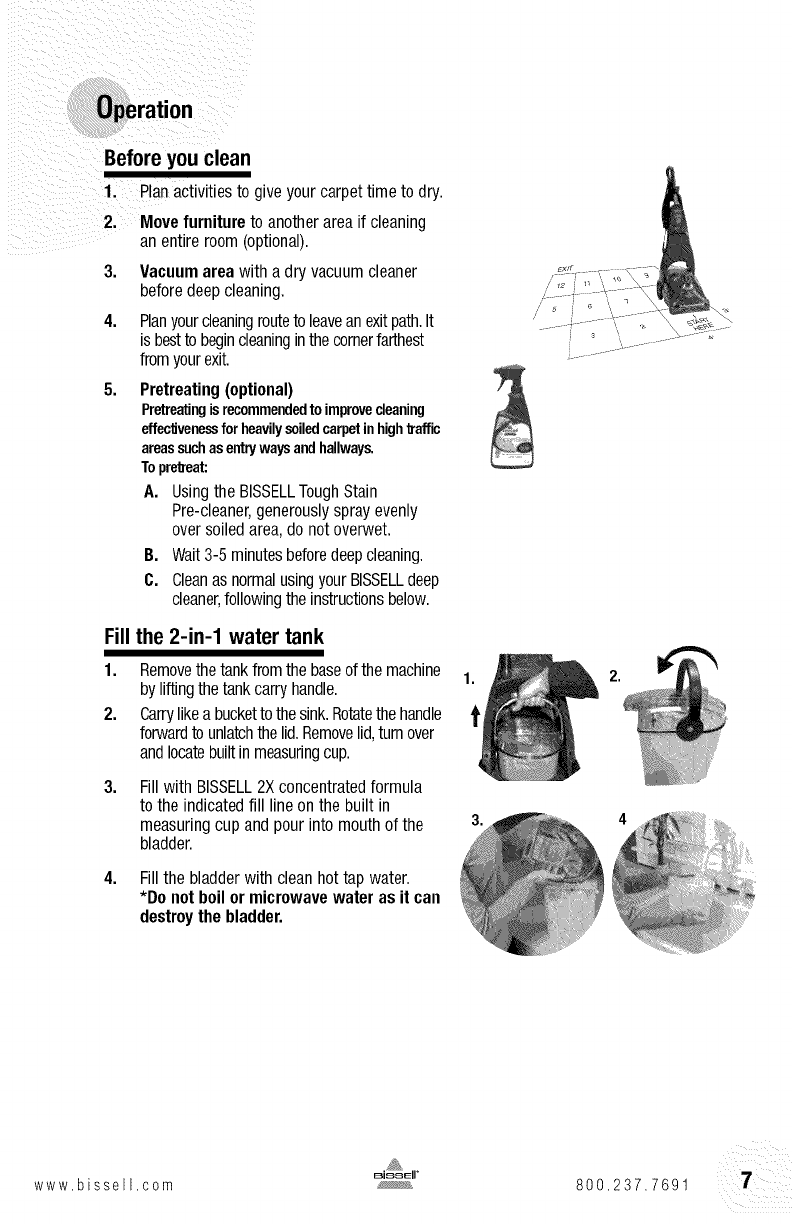
Fill the 2-in-1 water tank
1. Removethetank fromthe baseof the machine 1.
byliftingthe tankcarryhandle.
2. Carrylikea bucketto thesink.Rotatethehandle ]'
forwardto unlatchthelid.Removelid,turn over
andlocatebuiltin measuringcup.
3, Fillwith BISSELL2Xconcentratedformula
to the indicatedfill line on the built in
measuringcup and pourinto mouthof the
bladder.
4. Fillthe bladderwith cleanhot tap water.
*Do not boilor microwavewater asit can
destroythe bladder.
2,
www.bissell,com 800.237.7691 7
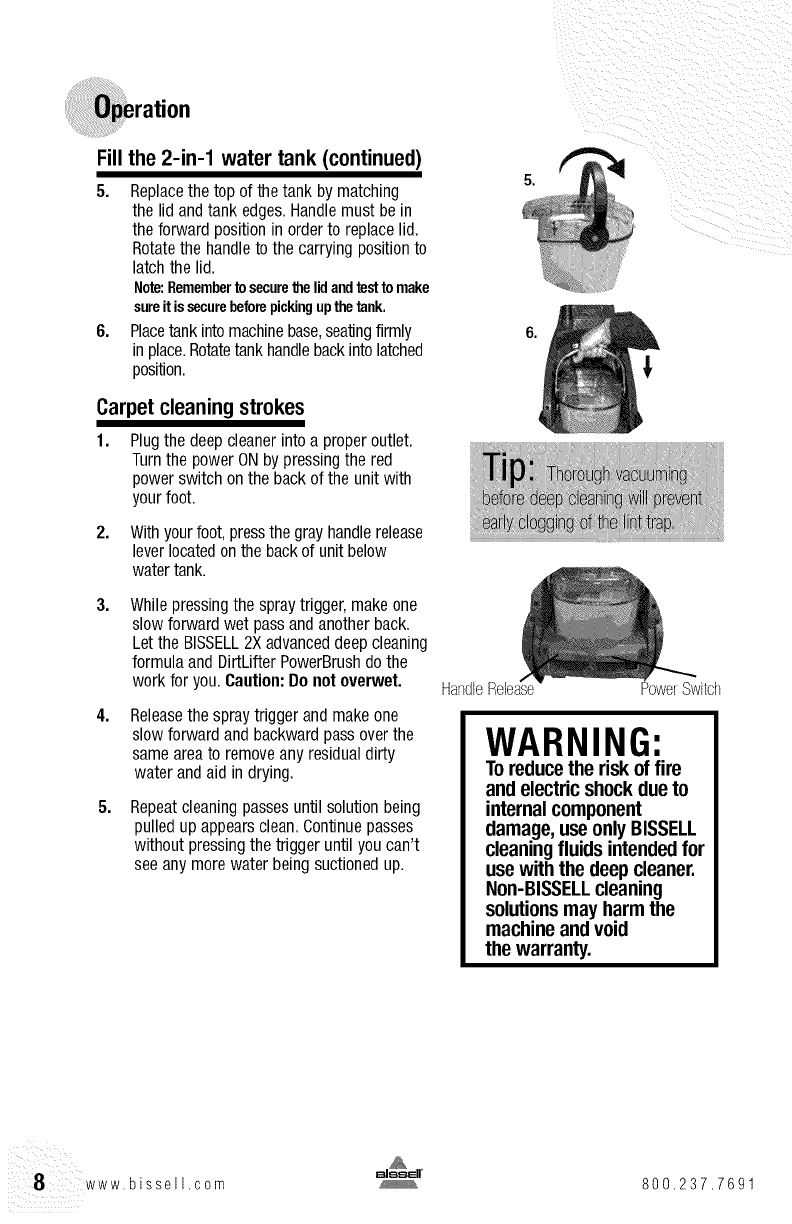
Fill
5.
6,
the2-in-1 water tank (continued)
Replacethe top of the tank by matching
the lid andtank edges.Handlemust be in
theforward positionin orderto replacelid,
Rotatethe handleto the carrying positionto
latchthe lid.
Note:Remembertosecurethelidandtesttomake
sureitissecurebeforepickingupthetank.
Placetankintomachinebase,sea'dngfirmly
in place.Rotatetankhandlebackinto latched
position,
Carpetcleaningstrokes
1,
2,
Plugthe deepcleanerinto a properoutlet.
Turnthe powerONby pressingthe red
powerswitch onthe backof the unitwith
yourfoot.
Withyourfoot,pressthe grayhandlerelease
leverlocatedonthe backof unit below
watertank,
3,
4,
5,
Whilepressingthe spraytrigger,make one
slowforward wet passand anotherback.
Letthe BISSELL2Xadvanceddeep cleaning
formula and DirtLifterPowerBrushdothe
workfor you.Caution:Do not overwet.
Releasethe spraytrigger and makeone
slowforward andbackward passover the
sameareato removeany residualdirty
water and aid in drying,
Repeatcleaning passesuntil solution being
pulled upappearsclean.Continuepasses
without pressingthe trigger until you can't
seeany more water being suctionedup.
Handb
5, _;_ /,_
6,
Rebase
WARNING:
Toreducethe riskof fire
and electricshockdueto
internalcomponent
damage,useonly BISSELL
cleaningfluidsintendedfor
use with the deepcleaner.
Non-BISSELLcleaning
solutionsmay harmthe
machineandvoid
the warranty.
8www,bissell,com 800.237.7691

Operation
Emptythe 2-in-1 water tank/clean removablenozzle
1. TurnpowerswitchOFERemovet_e2-in-1water 1.
tankfromthebaseusingthetankcarryhandle.
Carrythetanklikea buckettoa u'dlitysinkor
outsidewhereyouwilldisposeoflhecolleddon t
water.Removethetopoflhetankbyrotalingthe
handleforwardfounlatchlidandlirdnglidoff tank.
2. Emptycollectionwater from bottomof tank.
LintScreen
3. Aftereach use,removeand rinsethe lint 3.
screenlocatedon the tank lid.
4,
5,
Ifnozzleneedsfo bedeaned:removebygrasping
handleatlhefopandpullingforward.Clean
removablenozzlebyrinsingunderrunningwater.
Whenfinished,replacenozzlebyslightly
raisingfrontof machineto lineup slotson the
basewiththe hookson nozzle.Attachat base
firstandthenclick nozzleinto place.
NOTE:If nozzleis notattachedproperlyloss
ofsuctionwill occur.
6. Tocontinuecarpetcleaning,refer backto
pages7 through8, beginningwith "Fill the
2-in-1 water tank" on page7.
If cleaningiscomplete,referto the"Maintenance
andcare"sectionon page12.
ReadyToolsTM cleaningwithattachments
Yourdeepcleanercomesequippedwith a hose
andat leastoneattachmentfor cleaningstairs,
upholstery,and more.
Important!If usingthemachineto clean
upholstery,checkupholsterytags.
1. Checkmanufacturer'stag beforecleaning.
"W" or "WS" onthe tag meansyoucan use
your PowerSteamer.If the tag iscoded with
"X" or "S" (with a diagonalstrikethrough),
or says"Dry CleanOnly,"do not proceed.Do
not useonvelvet or silk. If manufacturer's
tag is missingor not coded,checkwith your
furniture dealer.
2. Checkforcolorfas_essin aninconspicuous
place.
3. If possible,check upholsterystuffing.
Coloredstuffing may bleedthroughfabric
whenwet.
Manufacturer'stag
4. Planactivities to give upholsterytime to dry.
www.bissell.com _ 800.237.7691
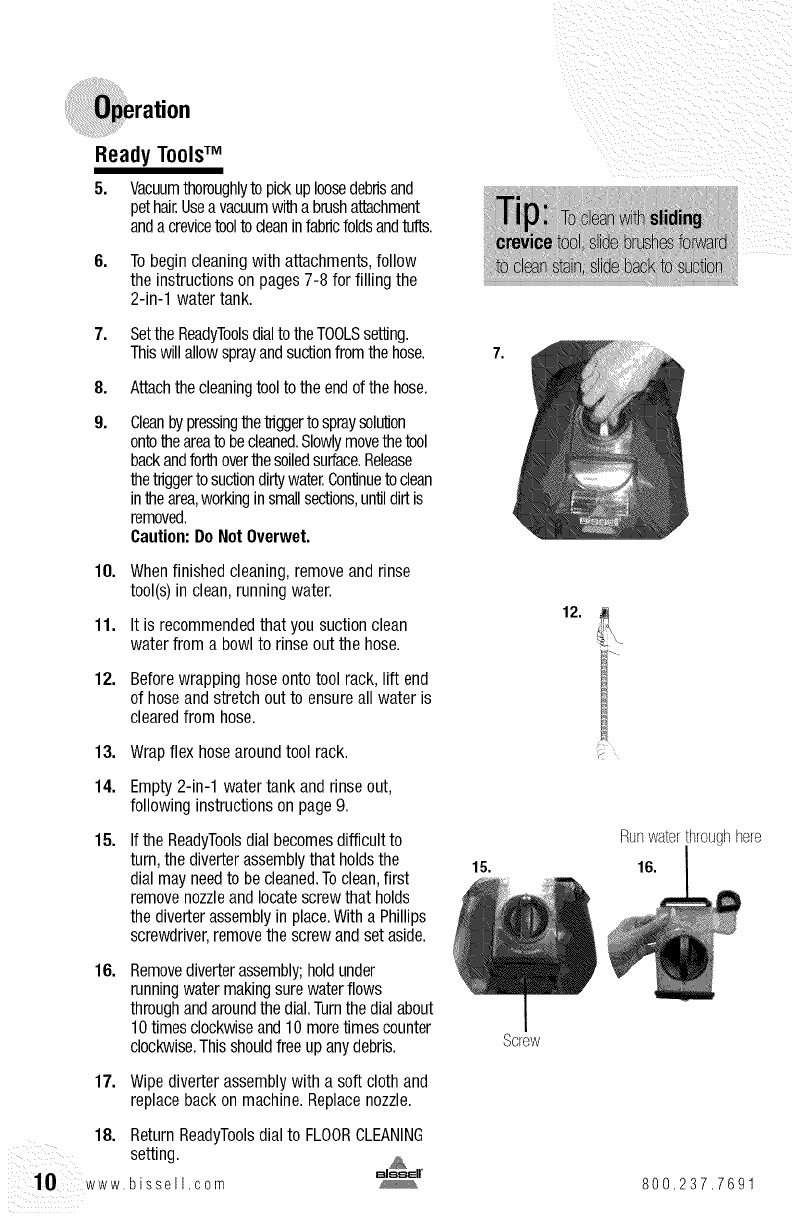
ReadyToolsTM
5. Vacuumthoroughlyto pickup loosedebrisand
pethair.Usea vacuumwilha brushattachment
anda crevicetooltodeaninfabricfoldsandtufts.
6. Tobegincleaning with attachments,follow
the instructionson pages7-8 for filling the
2-in-1 water tank.
7. SettheReadyToolsdialto theTOOLSseBng.
Thiswillallowsprayandsuctionfromthe hose.
8,
9.
10.
11.
12.
13.
14.
15.
16.
17.
18.
Attachthecleaningtoolto the endof thehose.
Cleanbypressingthe_ggerto spraysolu'don
ontomeareato be cleaned.Slowlymovethetool
backandforlhovermesoiledsurface.Release
thetriggerto su_on dirtywater.Con'dnuetoclean
inmearea,workingin smallsections,un'dldirtis
removed.
CauUon:Do Not Overwet.
10 www
Whenfinishedcleaning,removeand rinse
tool(s)in clean,runningwater.
It isrecommendedthat you suctionclean
water from a bowlto rinseout the hose.
Beforewrappinghoseonto tool rack, lift end
of hoseandstretch outto ensureall water is
clearedfrom hose.
Wrapflex hosearoundtool rack.
Empty2-in-1 water tank andrinse out,
followinginstructionson page 9.
If the ReadyToolsdial becomesdifficult to
turn,thediverterassemblythat holdsthe
dial mayneedto becleaned.Toclean,first
removenozzleand locatescrewthat holds
thediverterassemblyin place.Witha Phillips
screwdriver,removethe screwandset aside.
Removediverterassembly;holdunder
runningwater makingsurewaterflows
throughandaroundthe dial.Turnthe dialabout
10timesclockwiseand 10moretimescounter
clockwise.Thisshouldfreeup any debris.
Wipediverterassemblywith a soft clothand
replaceback on machine.Replacenozzle.
ReturnReadyToolsdial to FLOORCLEANING
setting.
.bissell.com
15.
Screw
12.
Runwaterlhroughhere
I
16.
800,237.7691

Operation
HardFloorCleaning
Yourdeepcleanermayhavecomewith a hard
floortoolandHardFloorSolutionsFormula.The
hardfloortool provideseffectivecleaningfor
linoleum,vinyl,andtilefloors.
Caution:Donotuseonunsealedhardwoodfloors.
1. Thoroughlyvacuum or sweepfloor to pick
up anydebris.
NOTE:Priorto fillingwith formulaand
water,besureallcarpetcleaningformulais
thoroughlyrinsedfromtank.
2. Fill BISSELL2X HardFloorSolutionsFormula
to the indicatedfill line in the built in
measuringcupand pour into mouthof
bladder.
3. Fill the bladderwithcleanhottap waterand
set aside.
4.
5.
Attachthe hardfloor toolto the bottom of
the machineby hookingit intothe nozzle
and swingingit downuntil it clicks into
place.
Be sure the ReadyToolsdial is set to
FLOORCLEANING.
6.
7.
8.
Pluginto an outlet and turn the power ON.
Planyour cleaningrouteto leavean exit
path. Besure to allow adequatetime for
floors to dry.
Whilepressingthe spray trigger,make one
slow forward wet passand anotherback.
Caution: DoNot Overwet.
9.
10.
Repeatthe motionwithout pressingthe
trigger usingthe hardfloor toolto squeegee
and suction upthe dirty water.
Whenfinished, removethe hardfloor tool,
rinseand let dry before storing.Referto
the Maintenancesection onpage 12 for
machinecleanup and storageinstructions.
A WARNING: I
Toreduce the risk of fire and electric
shock- when cleaninga hardfloor,
the BISSELLhard floor tool
203-5641 must be usedand it must
only beused with BISSELLHardFloor
Solutionsor BISSELL2X HardFloor
Solutionscleaning fluid intendedfor
usewith this appliance.
www.bissell,com 800,237.7691 ¸11¸¸¸¸/
intenanceandcare
Machinecare
Forbestresults,a few simplestepscan assure
yourmachineiswell maintainedafteryour
cleaningis complete.
1. Turnpower switch OFF.Unplugthe machine
andwrap the powercord.
2.
3.
4.
5.
Afteremptyingthe2-in-1watertank rinseit
wi1_runninghottapwater,takingcareto dean
undemea1_andaroundtheheavydutybladder.
Cleanoutredlintscreen.Removablenozzlemay
berinsedifnecessary.Referto page9.
Replacethe 2-in-1watertank onthe machine.
Anyloosehairor debriscan be pulledfrom
the brushroll andthrown away.
Tocleanattachments,removefromhoseand
rinsein clean,runningwater.Drybeforestoring.
Cleanthehosebysuc'doningcleanwaterfroma
bowl.Beforewrappingbackonmachine,liftend
of hoseandstretchoutto ensureallwateris
clearedfromhose.Referto page10,
illustra'dons11and12.
6. Wipethe machine'sexteriorwith a soft cloth.
7. After carpet is dry, vacuumagain to remove
hair andfuzz.
Machinestorage
Puttheunit awayin a closetor basementfor
thenextuse.Storecleanerin a protected,dry
area.Sincethis productuseswater,it mustnot
bestoredwherethere isa dangeroffreezing.
Freezingwilldamageinternalcomponentsand
voidthewarranty.
12 www.bissell.com 800.237.7691
ReducedSprayORNoSpray
Possible cause
1. Bladdermaybe empty
2. 2-in-1 tank maynotbe seatedproperly.
3. Pumpmayhavelostprime.
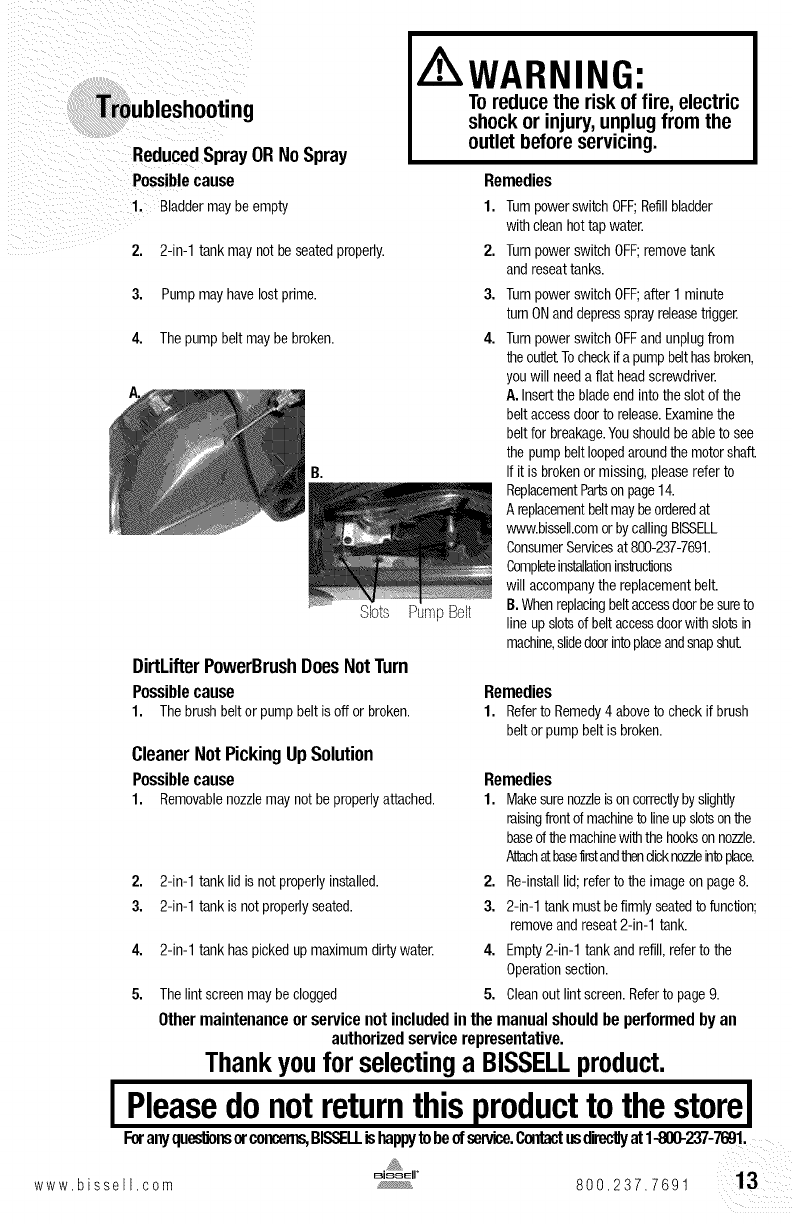
4. Thepumpbelt maybebroken.
Slots PumpBelt
DirtLifterPowerBrushDoesNotTurn
Possible cause
1. Thebrushbeltor pumpbeltis off or broken.
CleanerNotPicking UpSolution
Possible cause
1. Removablenozzlemay notbe properlyattached.
2,
3.
4.
5.
NING:
Toreducethe risk of fire, electric
shockor injury,unplugfrom the
outlet beforeservicing.
Remedies
1. Tumpowerswitch OFF;Refillbladder
with cleanhottap water.
2. Turnpowerswitch OFF;removetank
and reseattanks.
3. Turnpowerswitch OFF;after 1 minute
turnONanddepresssprayreleasetrigger
4. Turnpowerswitch OFFand unplugfrom
the outletTocheckif a pumpbelthasbroken,
youwill needa flat headscrewdriver.
A.Insertthe bladeendintothe slotof the
beltaccessdoorto release.Examinethe
beltfor breakage.Youshouldbe ableto see
the pumpbeltloopedaroundthe motorshaft
If it is brokenor missing,pleasereferto
ReplacementPartsonpage14.
A replacementbeltmaybeorderedat
www.bissell.comorbycallingBISSELL
ConsumerServicesat 800-237-7691.
Completeinstallationinstuc_ons
will accompanythe replacementbelt.
B.Whenreplacingbeltaccessdoorbe sureto
line up slotsdbeltaccessdoorwithslotsin
machine,slidedoorintoplaceandsnapshut.
Remedies
1. Referto Remedy4 aboveto checkif brush
beltorpump beltis broken.
2-in-1 tank lidisnot properlyinstalled.
2-in-1 tank isnot properlyseated.
2-in-1 tank haspickedup maximumdirtywater.
Remedies
1. Makesurenozzleis on correctlybyslightly
raisingfrontdmachinetoline upslotsonthe
basedthemachinewiththehookson nozzle.
Attachatbasefirstandthendicknozzleinbplace.
2. Re-installlid; referto the image on page8.
3. 2-in-1 tank mustbe firmlyseatedto function;
removeand reseat2-in-1 tank.
4. Empty2-in-1 tankand refill,referto the
Operationsection.
Thelint screenmaybe clogged 5. Cleanout lint screen.Referto page9.
Other maintenance or service not included in the manual should be performed by an
authorized service representative.
Thankyoufor selecting a BISSELLproduct.
IPleasedonotreturnthisproducttothestoreI
www.bissell.com
Foranyqueslbnsorconcems,BISSELLishappytobeofsenlice.Contactusdirectlyat1-800-237-769! .
#_ 800.237.7691 13

ConsumerServices
For information about repairs or replacement parts, or questions about your warramy, call:
BISSELLConsumerServices
1-800-237-7691
Monday - Friday 8 a.m. 10 p.m. EST
Saturday 9 a.m. 8 p.m. EST
Orwrits:
BISSELLHOMECARE,iNC
POBox3606
GrandRapidsMI 49501
A_N: ConsumerServices
Or visitthe BISSELLwebsite- www,bissell,com or www,2Xbissell,com
WhencontactingBISSELL,havemodelnumberof unit available.
Pleaserecordyour ModelNumber:
Pleaserecordyour PurchaseDate:
NOTE:Pleasekeepyouroriginalsalesreceipt.It providesproofofdateofpurchaseintheevent
ofa warrantyclaim.SeeWarrantyonpage16for details.
PleaseregisteryournewBISSELLproductat
www.bissell.com/productregistration
dacementparts
Item Part No.
1 203-0104
2 203-0102
3 203-0124
4 215-0628
5 015-0621
6 203-0105
Part Name
TankAssemblyComplete
TankBase
RemovableNozzle
ReplacementPumpBelt(with instructions)
ReplacementBrushBelt(with instructions)
LintScreen
©
14 www,bissell,com 800.237.7691
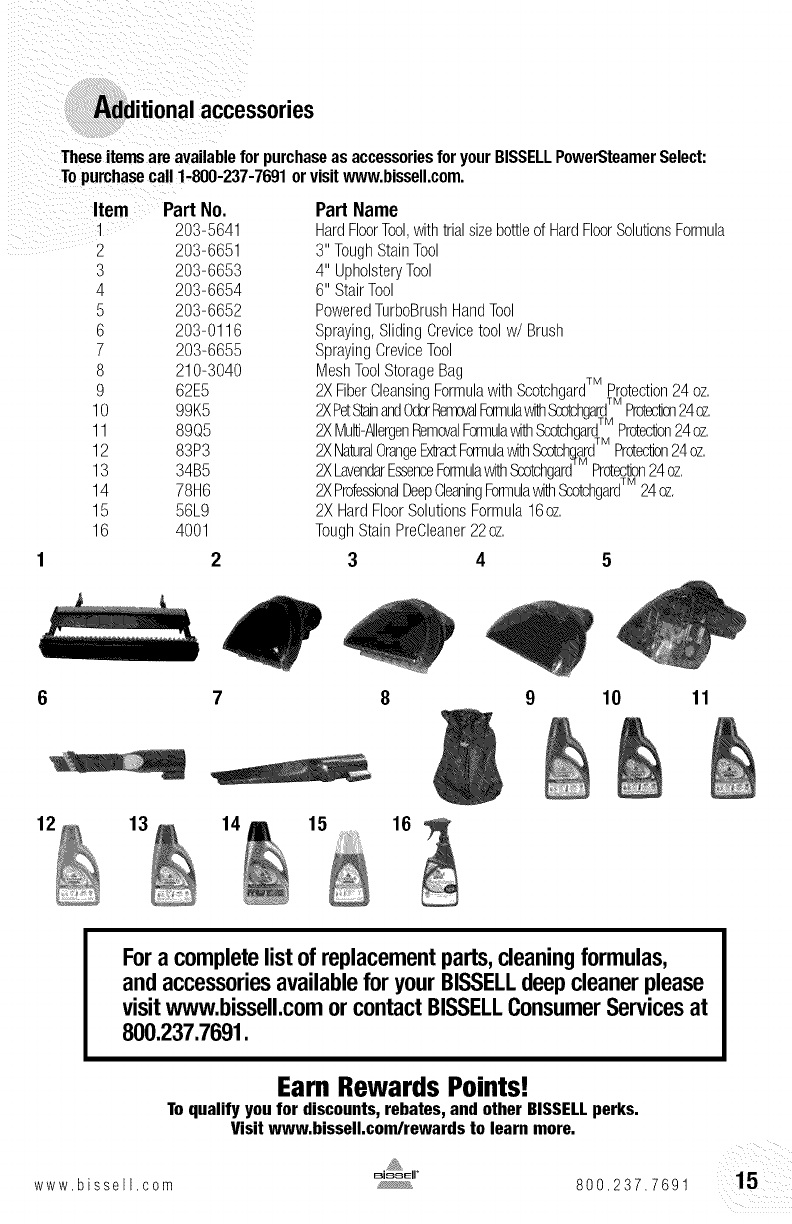
Additional accessories
Theseitemsareavailablefor purchaseas accessoriesforyourBISSELLPowerSteamerSelect:
Topurchasecall1-800-237-7691orvisitwww.bissell.com.
Item Part No.
" 203-5641
2 203-6651
3 203-6653
4 203-6654
5 203-6652
6 203-0116
7 203-6655
8 210-3040
9 62E5
10 99K5
11 89Q5
12 83P3
13 34B5
14 78H6
15 56L9
16 4001
2
Part Name
HardFloorTool,withtrialsizebottleof HardFloorSohtionsFormula
3" ToughStainTool
4" UpholsteryTool
6" StairTool
PoweredTurboBrushHandTool
Spraying,SlidingCrevicetoolw/Brush
SprayingCreviceTool
MeshToolStorageBag
2XFiberCleansingFormulawithScotchgardTM Protection24oz.
2XPetSbainandOdorRerr_valFormulawith Sog_hgardTM ProtedJc_124oz.
, , TM ,
2XMullJ-AllergenRemovalFormulawthScotchgardProtedJon24oz.
, TM ,
2XNaturalOrangeExiractFormulawthScotchqardProtedJon24oz.
, _TM ,
2XLavendarEssenceFormulasathScotchgardProtedJon24oz.
2XProfessionalDeepCleaningFormulawithScotchgardTM 24oz.
2XHardFloorSolutionsFormula16oz.
ToughStainPreCleaner22oz.
3 4 5
6 10 11
13 14 15 16
Fora completelistofreplacementparts,cleaningformulas,
andaccessoriesavailablefor yourBISSELLdeepcleanerplease
visitwww.bissell.comorcontactBISSELLConsumerServicesat
800.237.7691.
Earn Rewards Points!
To qualify you for discounts, rebates, and other BISSELLperks,
Visitwww, bissell,com/rewards to learn more,
www.bissell.com 800.237.7691 15
rranty - BISSELLPowerSteamer
Thiswarranty givesyou specific legal rights,and you may also haveother rights wnlcn mayvary from state to
state. If you needadditional instruction regarding this warranty or nave auest_onsregardingwhat _tmay cover
please contact BISSELLConsumerServices by E-mail, telephone, or regularmal as describedbelow
LimitedOneYearWarranty
Subjectto the *EXCEPTIONSAND EXCLUSIONSidentified below,upon receipt of the product BISSELL
Homecare,Inc.will repair or replace(with new or remanufacturedcomponents or products),at BISSELL'soption,
free of chargefrom the date of purchase by the original purchaser,for one year anydefective or
malfunctioning part.
See information belowon "If your BISSELLproductshould require service".
Thiswarrantyappliesto productusedfor personal,and not commercialor rentalservice.Thiswarrantydoesnotapply
to fansor routinemaintenancecomponentssuch asfilters, belts,or brushes.Damageormalfunctioncausedby negli-
gence,abuse,neglect,unauthorizedrepair,or anyother usenot in accordancewith the User'sGuideis not covered.
If yourBISSELLproductshouldrequireservice:
Contact BISSELLConsumer Services to locate a BISSELLAuthorized Service Center in your area.
If you need information about repairs or replacement parts, or if you have questions about your warranty,
contact BISSELLConsumer Services.
Website or E-mail:
www.bissell.com
Orvisit: www.2Xbissell.com
Or call:
BISSELLConsumerServices
1-800-237-7691
Monday - Friday8 a.rn. - 10 p.m. ET
Saturday9 a.rn.- 8 p.m. ET
Orwrite:
BISSELLHomecare Inc.
POBox 3606
Grand Rapids M149501
ATTN:ConsumerServices
BISSELLHOMECARE,INC.IS NOTLIABLEFORINCIDENTALORCONSEQUENTIALDAMAGESOFANYNATURE
ASSOCIATEDWITHTHEUSEOFTHISPRODUCT.BISSELUSLIABILITYWILLNOTEXCEEDTHEPURCHASEPRICEOFTHE
PRODUCT.
Somestatesdo not allow the exclusionor limitation of incidentalor consequentialdamages,sothe above
limitationor exclusionmay not applyto you.
*EXCEPTIONSANDEXCLUSIONSFROMTHETERMSOFTHELIMITEDWARRANTY
THISWARRANTYISEXCLUSIVEANDIN LIEUOFANYOTHERWARRANTIESEITHER
ORALORWRITrEN.ANYIMPLIEDWARRANTIESWHICHMAYARISEBYOPERATION
OFLAW,INCLUDINGTHEIMPLIEDWARRANTIESOFMERCHANTABILITYAND
FITNESSFOBA PARTICULARPURPOSE,ARELIMITEDTOTHEONEYEARDURATION
FROMTHEDATEOFPURCHASEASDESCRIBEDABOVE.
Somestatesdo not allow limitationson how longan impliedwarrantylasts,sothe
abovelimitationmaynot applyto you.
16 www.bissell.com
@2010 BISSELLHomecare,he
Grand Rapids,Michigan
All rights reserved.Printedin China
Part Number 120-4202
Rev 02/10
Visitour website at: www.bissell.com
Scotehgardis a trademarkof 3M
800.237.7691
