Bissell 1699 User Manual PROHEAT CLEARVIEW Manuals And Guides L0505039
BISSELL Carpet Cleaner Manual L0505039 BISSELL Carpet Cleaner Owner's Manual, BISSELL Carpet Cleaner installation guides
User Manual: Bissell 1699 1699 BISSELL PROHEAT CLEARVIEW - Manuals and Guides View the owners manual for your BISSELL PROHEAT CLEARVIEW #1699. Home:Vacuums & Floor Care Parts:Bissell Parts:Bissell PROHEAT CLEARVIEW Manual
Open the PDF directly: View PDF ![]() .
.
Page Count: 24

22
23
24
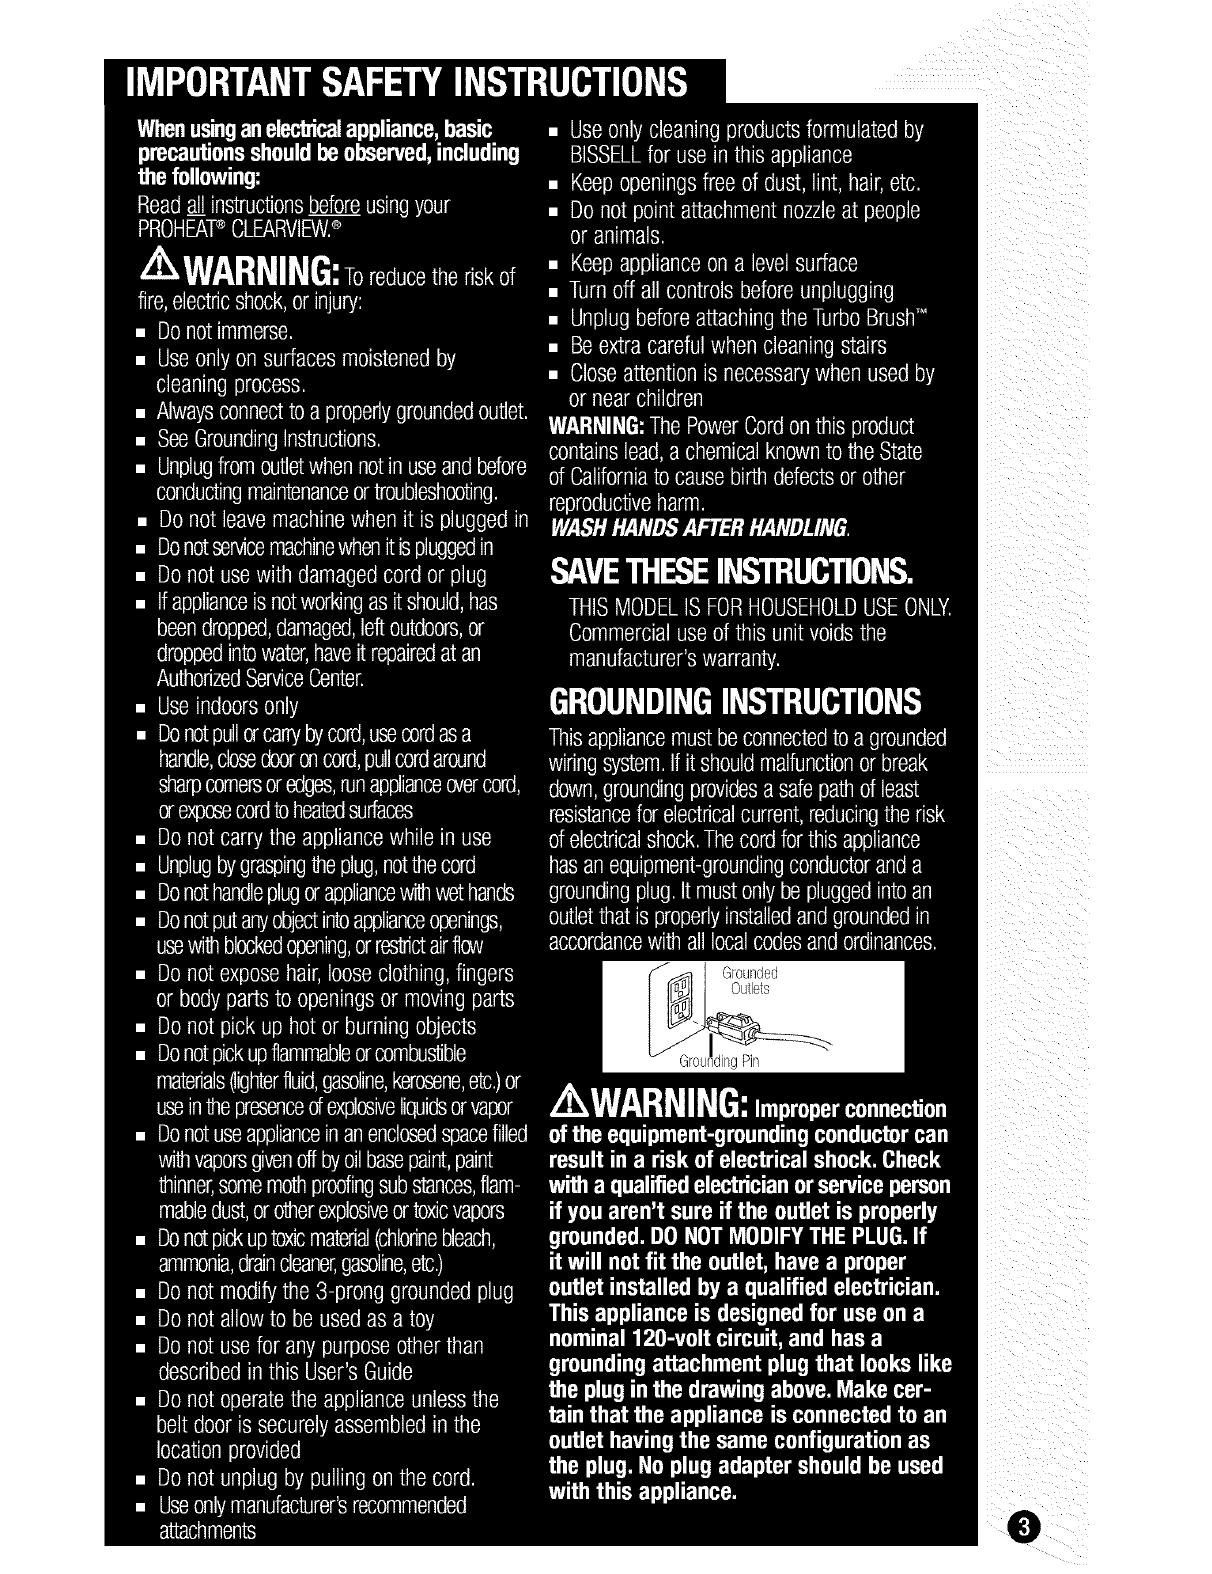
3
4
5
6-17
18-20
21-22
1699 SERIES- 120V
8905 SERIES- 120V
We're gladyou purchaseda BISSELLProHeatClearViewheated
formula deepcleaner.Everythingwe know aboutfloor carewent intothe
designand constructionof this complete,high-techhomecleaningsystem.
YourProHeatClearViewis well made,and we backit with a limited
one-yearwarranty.We alsostand behindit with a knowledgeable,
dedicatedConsumerServicesdepartment,so, shouldyoueverhavea
problem,you'll receivefast. considerateassistance.
My great-grandfather_nventedthe floorsweeperin 1876. Today,
BISSELLis a global leaderin the design,manufacture,andserviceof high
qualityhomecareproductslike yourProHeatClearview.
Thanksagain,from all of us at BISSELL.
!
Mark J. Bissell
Presidentand Chief ExecutiveOfficer
0
ID
Keep plenty of genuine BISSELLAdvanced
CleaningFormulas on hand so youcan clean
whenever it fits your schedule.Always use
genuine BISSELLdeep cleaning formulas.
Non-BISSELLcleaning solutionsmay harm
the machine and void the warranty.
TurboBrusk
Storage ",
SeEectModels
SmartTemDT_
Readyugn_'
SmartMix6
Switch
SmartTerrffM
Switcp
Tank-in-
TankT_\
FlexHoseJ
FlowIndicator
CFilterInside
Lower
_anaEe
JeDer
Power
Switch
ToolCaddy
CreviceTool
Storage _ PowerCord
QuickRelease
4" Upholstery
ToolStorage
Stain
BrushStorage
HexNuts
0
Accessories
_AIIitems maynot beincludedwith your model.
Moretoolsareavailable.To orderreplacementpartsor
tools pleaserefer to page23.
Dirtl
PowerBrush
ReadjTools_
Dial
BeltAccessDoor
FloorNozzleWindo_e
0
TurboBrush_
'Available on selec_
moqels onl_
4" Upholstery
Tool ToughStainBrush PreTreatWand
Available on select (Available on select
models only.)
BareFloorAttachment SprayingCreviceTool
Available on select models only.) (Available on select models only.)
16oz BISSELL16 oz, BISSELL 16 oz, 16 oz,
Multi-Allergen FiberCleansing Floor ToughStain
Formuld_With FormulaTM with Cleansing PreCleane¢M
ScotchgardT' ScotchgardT_ Formuld_
Protection Protectsn
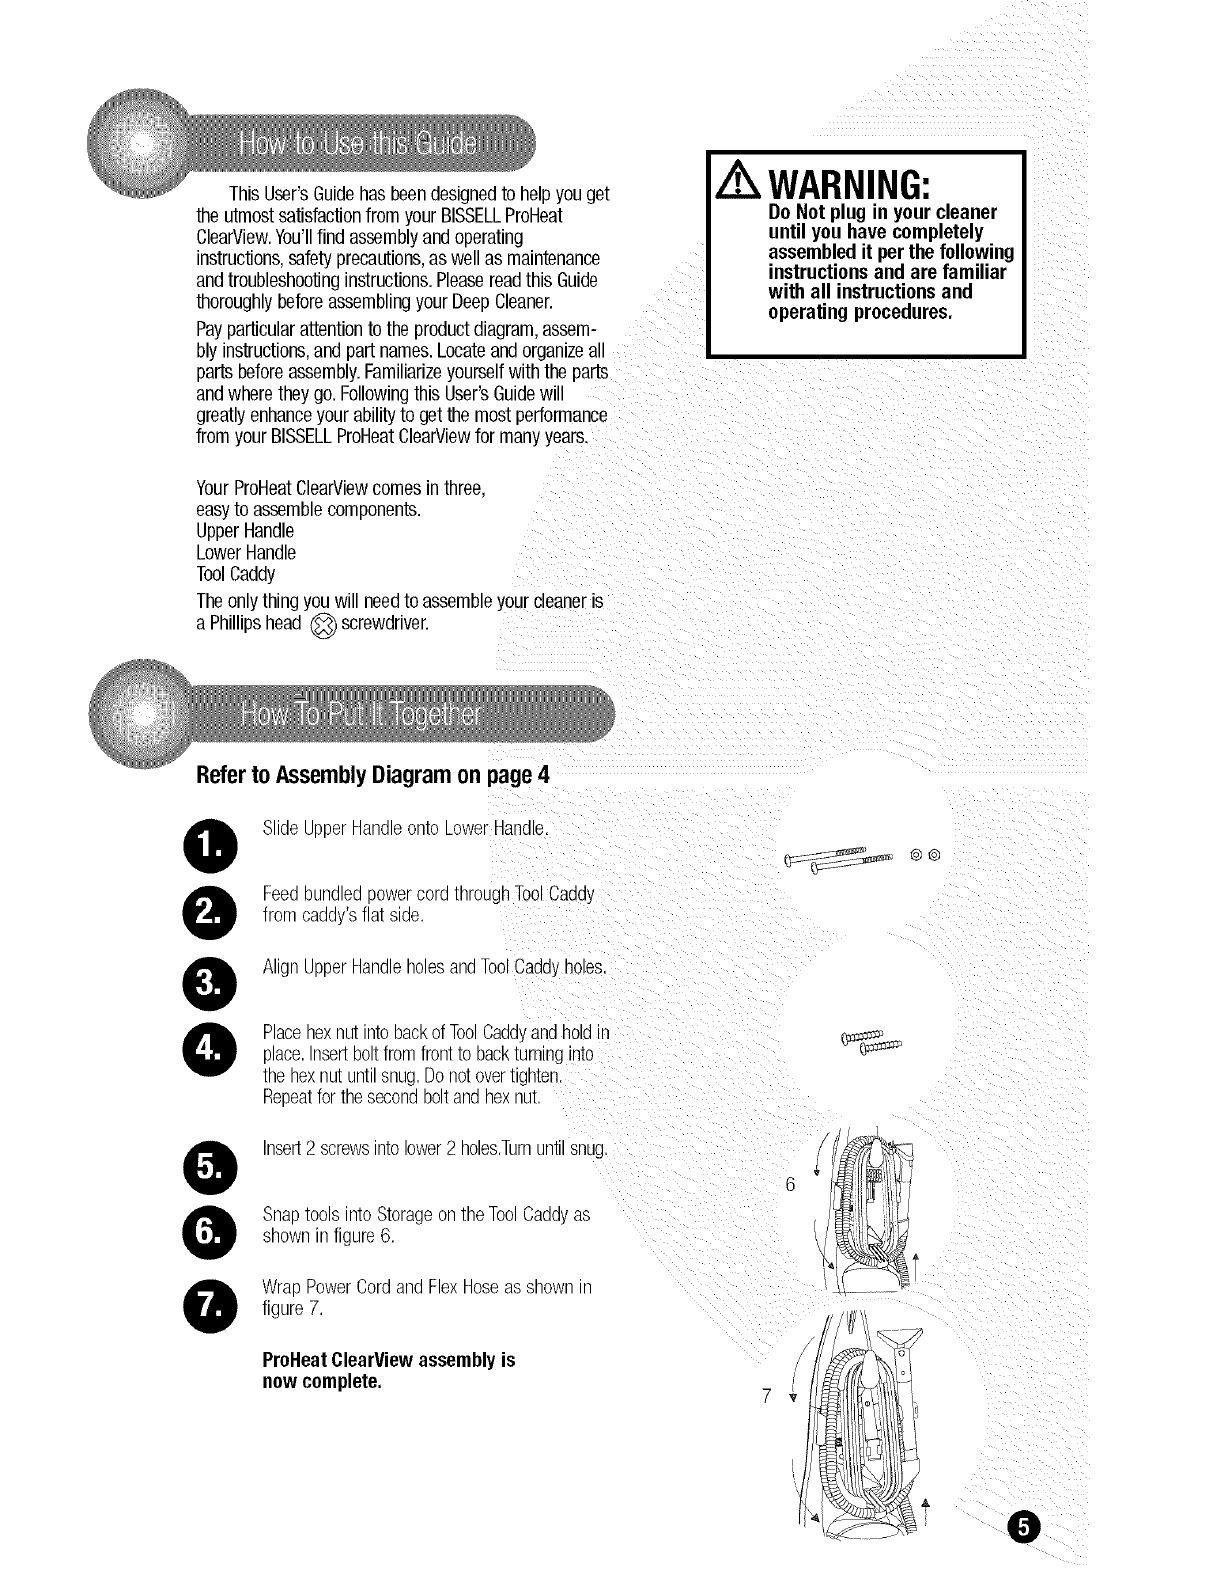
ThisUser'sGuidehasbeendesignedto helpyou get
the utmostsatisfactionfrom yourBISSELLProHeat
ClearView.You'llfind assemblyandoperating
instructions,safetyprecautions,as well as maintenance
andtroubleshootinginstructions.Pleasereadthis Guide
thoroughlybeforeassemblingyour DeepCleaner.
Payparticularattentionto the productdiagram,assem-
bly instructions,and part names.Locateandorganizeall
partsbeforeassembly.Familiarizeyourselfwiththe parts
andwheretheygo. FollowingthisUser'sGuidewil
greatlyenhanceyourabilityto get the most performance
from yourBISSELLProHeatClearViewfor manyyears.
YourProHeatClearViewcomesinthree,
easyto assemblecomponents.
UpperHandle
LowerHandle
ToolCaddy
Theonlythingyou will needto assembleyourcleaneris
a Phillipshead(_ screwdriver.
WARNING:
Do Not plug in your cleaner
until you have completely
assembledit per the following
instructionsand are familiar
with all instructionsand
operating procedures.
Referto AssemblyDiagramon page4
0
0
0
0
SlideUpperHandleonto LowerHandle.
FeedbundledpowercoramroughToolCaddy
from caddy'sflat side.
AlignUpperHandleholesandToolCaddyno_es.
Placehexnut qtobackof ToolCaddyandholdin
place.Insertboltfromfrontto backturning nto
the hexnutuntilsnug.Donotovertmqten.
Repeatfor thesecondboltandnexnut,
0
0
0
Insert2 screwsintolower2 holes.Turnuntosnug.
Snaptoolsinto Storageonthe ToolCaddvas
showninfigure 6,
WrapPowerCordandFlexrlose as snown,n
figure7,
ProHeatClearViewassemblyis
now complete.
v
6

ix i i ii
ix i
_r
The BISSELL SmartClean ®System
The ProHeatClearViewis a home cleaning systemthat
automatically mixes hot tap water with the BISSELL
advancedcleaningformulaand heats the solution as
it is appliedto the carpet. The combinationof heated
cleaning solution,powered brush and suction providea
safe g,effective methodof cleaning.
0
Temperaturecontrol automatically heatsthe cleaning
solutionas it is being appliedto the carpet I*l to safely
optimize cleaningeffectiveness.
OL ]-hePowerSwitchcontrolspowerto the machine;both
| switchesmJstbe ONfor SmartTempto work
]-heSmartTempSwllsh is foundon tne backof the handle
nextto the PowerSwitch.Youmaycnooseno_to usethe
SmartTempfeatureif youare cleaningdelicatewoo or
onenta rugs.
*SmartTempheats the cleaningsolutionfor carpet
and barefloor applicationonly.It doesnot heat
solutionsprayedthroughthe accessorytools,
0The SmartTempReadyLight indicateswhenthe heater
s ON.Thenearershouldbeturnedontwo minutesbefore
cleaning,to becomeful y warmedupand readyto clean.
The SmartTempReadyLightis foundon the front of the
nandlewhereItlseasyto see wnneyou c_ean
temperature25° andwill
allowit to exceed180°.
Providescustomcontrolfor eachcleaningjob.
_ft the SmartMixconcentrateDomeup ano )ut of the
maDnlnebase.
Turnthe bottleoverso tnat tne valvesad s _an upward
I position.Unscrewtne valvecad ana' tne Dometo the
--harkwith BISSELLDeedCleaning:ormula.
Replace_ne/ave cad turning unt snug
SmartTempReads
PowerSwitch
SmartTemp
SmartMix
bottle
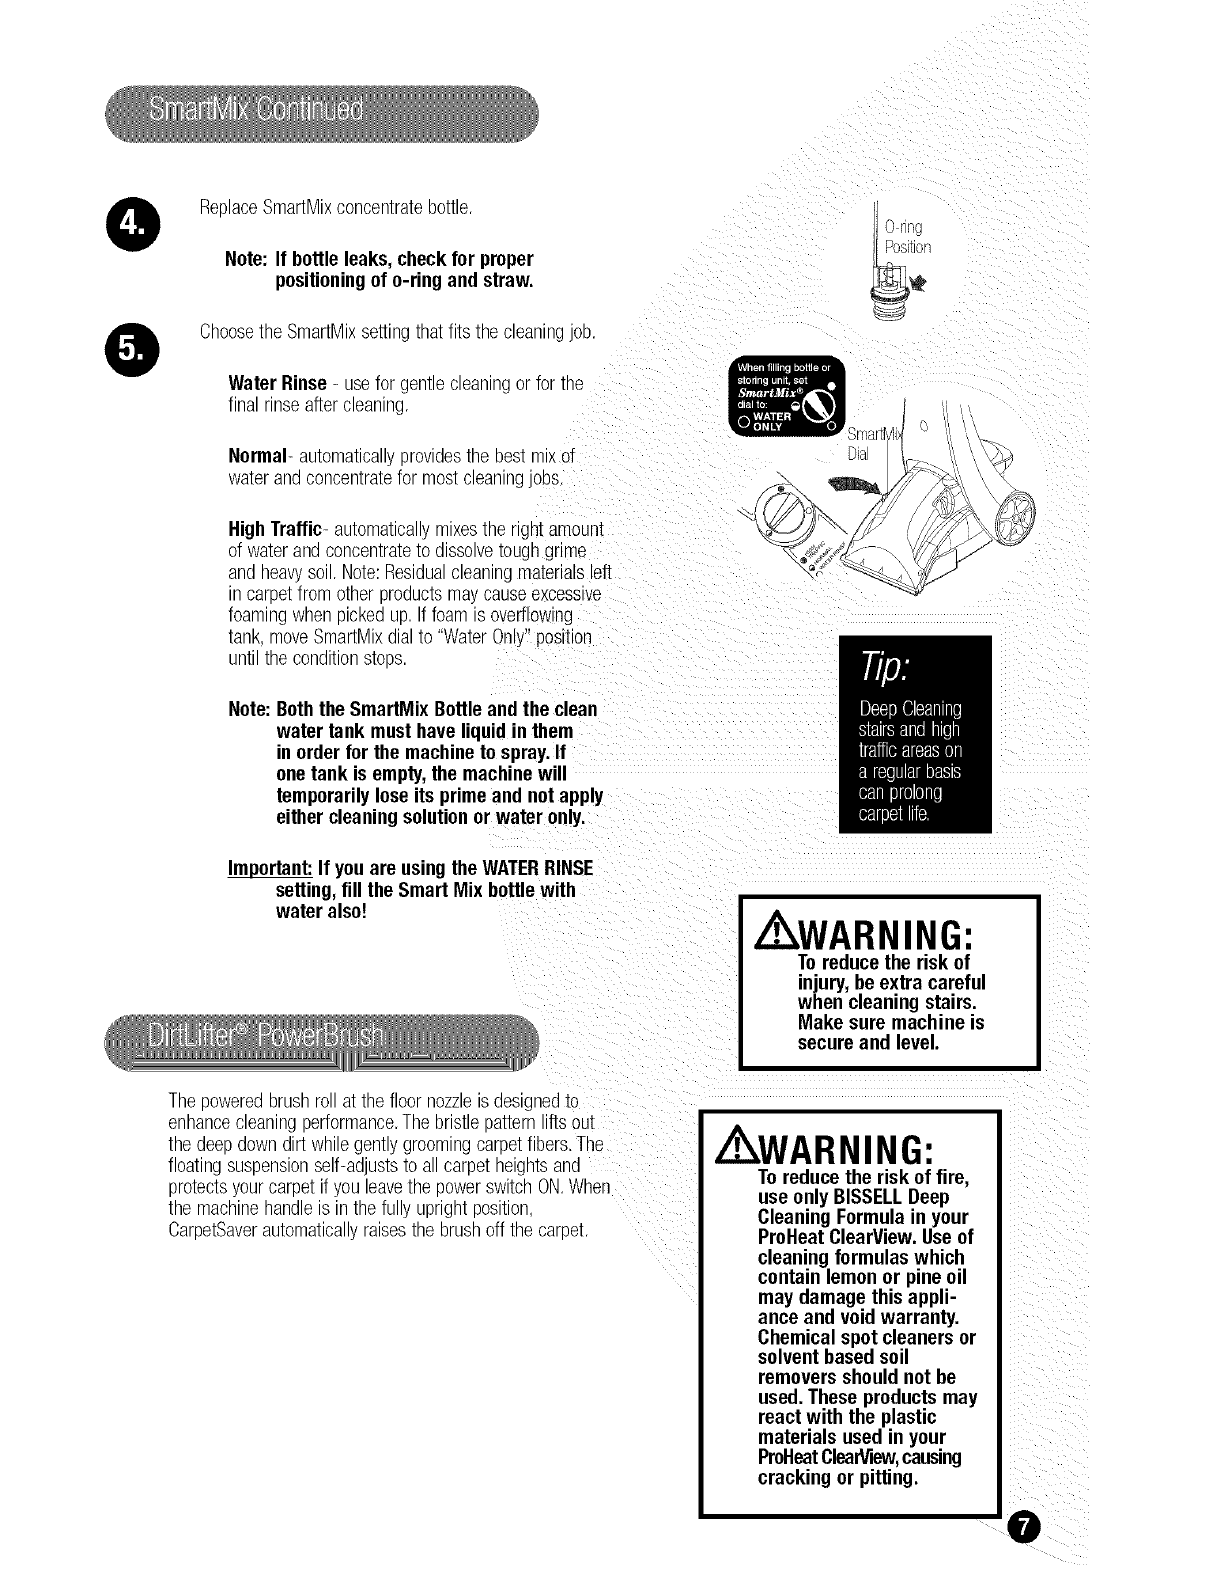
0ReplaceSmartMixconcentratebottle.
Note: If bottle leaks,check for proper
positioningof o-ring and straw.
Choosethe SmartMixsettingthat fits _necleanlrj job
Water Rinse- usefor gem_ec_ean_ngorfor the
final rinseaftercleaning.
Normal- automaticallyprovidesthe pestmixof
waterandconcentratefor mostcleaning 9us.
HighTraffic- automaticallymixestne right amount
of waterand concentratezoa_sso_vezougngrime
andheavysoil.Note:Residualcleaningmaterialsleft
in carpetfrom other productsmaycauseexcessive
foamingwhenpickedup. Iffoam is overflowing
tank, moveSmartMixdialto "WaterOnly"position
until the conditionstops.
Note: Boththe SmartMix Bottleand the clean
water tank must have liquid inthem
in orderfor the machineto spray.If
onetank is empty,the machinewill
temporarilylose its primeand not apply
either cleaningsolutionor water only.
_ortant: If youare usingthe WATERRINSE
setting,fill the Smart Mix bottlewith
water also!
Thepoweredbrushroll at the floor nozzleis aesignedto
enhancecleaningperformance.Thebristlepattern fts out
the deepdown dirt while gentlygrooming_'aroetfibers.The
floatingsuspensionself-adjuststo all carpelnelgmsand
protectsyourcarpetif youleavethe powerswitchON When
the machinehandleis in the fully uprightposition
CarpetSaverautomaticallyraisesthe brush _ffthe caroe[
0 Tng
Positon
/ WARNING:
To reduce the risk of
injury,be extra careful
when cleaning stairs.
Make sure machine is
secure and level.
/ WARNING:
To reduce the risk of fire,
use only BISSELLDeep
CleaningFormula in your
ProHeatClearView. Useof
cleaning formulas which
contain lemon or pine oil
may damage this appli-
ance and void warranty.
Chemical spot cleaners or
solvent basedsoil
removers shouldnot be
used.These products may
react with the plastic
materials used in your
ProHeatClearView,causing
cracking or pitting.
6
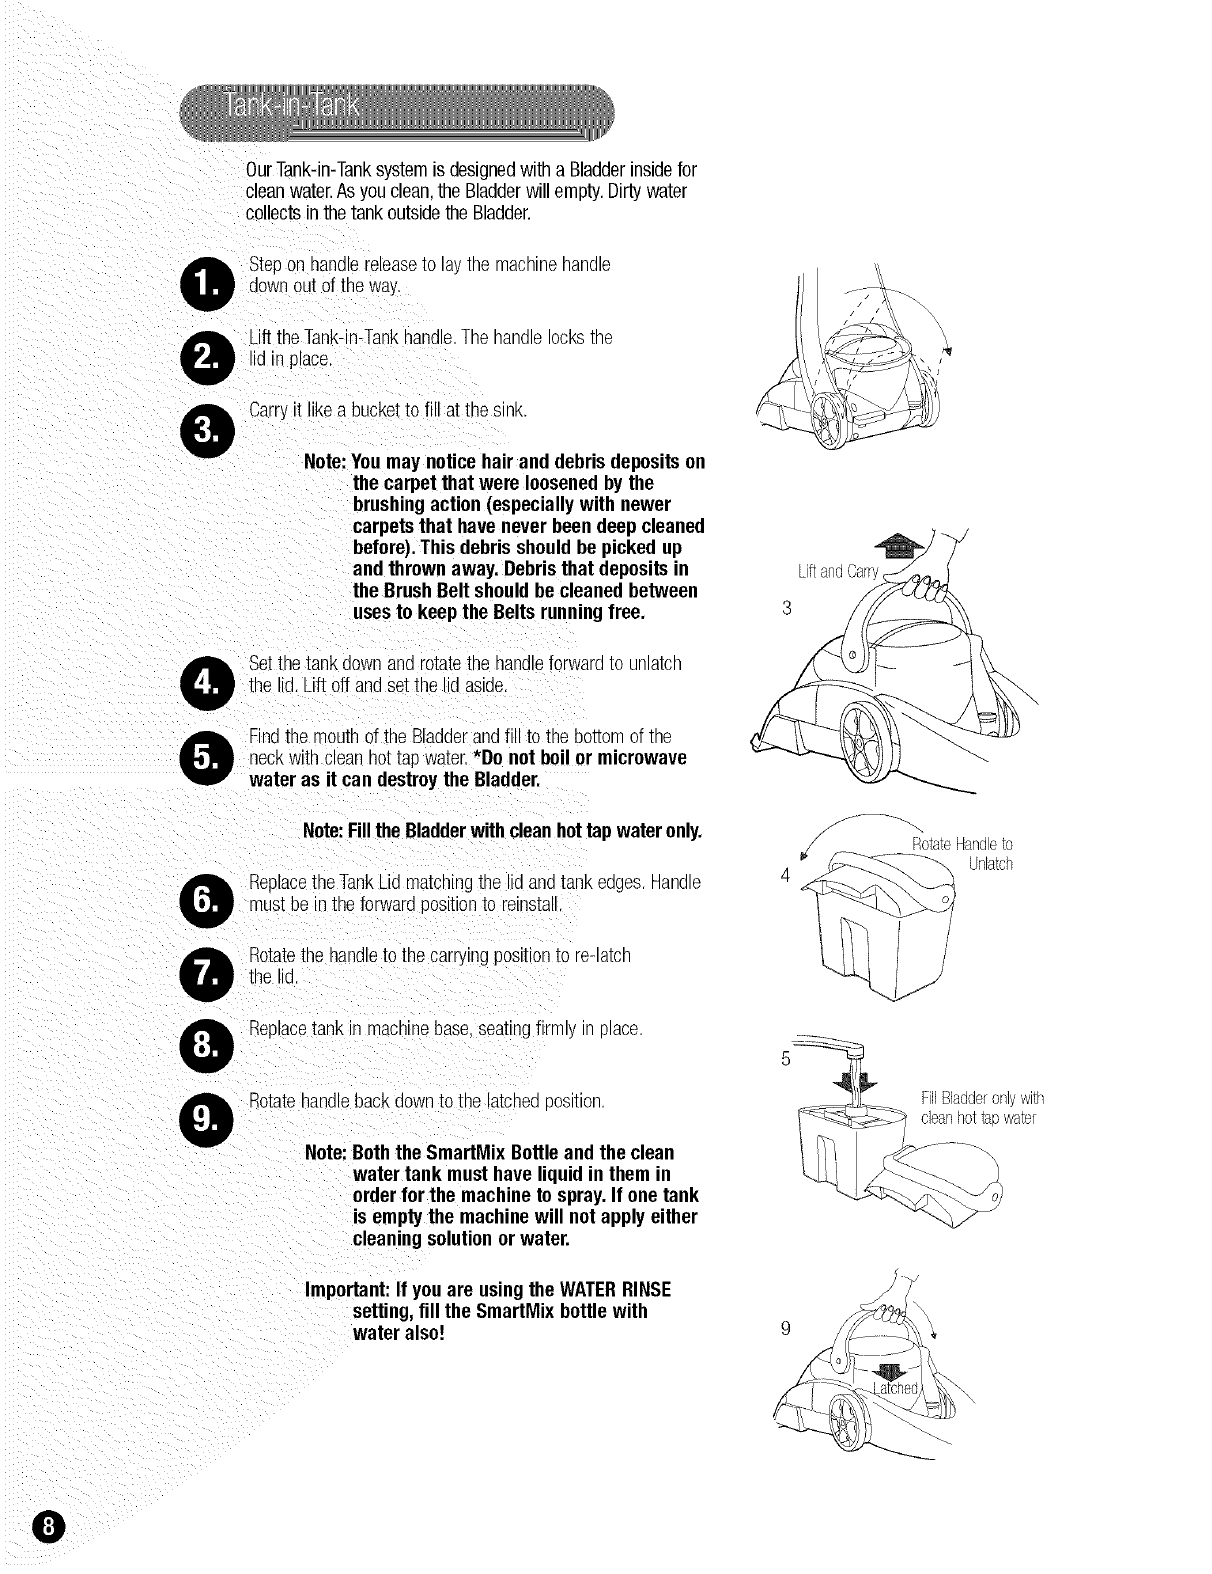
OurTank-in-Tanksystemis designedwitha Bladderinsidefor
cleanwater.As youclean,the Bladderwill empty.Dirtywater
collectsinthe tankoutsidethe Bladder.
0
0
0
Stepon handlereleaseto la__nemacnmenanule
downout of the way,
_iftthe Tank-in-TankhandleThe nanulelOCKS_ne
id in place.
Carry t likea bucketto fill at the SINK,
Note: Youmay notice hair and debrisdepositson
the carpetthat were loosenedby the
brushingaction (especiallywith newer
carpetsthat have never beendeepcleaned
before).This debrisshouldbe picked up
and thrownaway. Debristhat depositsin
the BrushBelt shouldbe cleaned between
usesto keepthe Belts runningfree.
Setthe tank downand rotatethe handleforwardto unlatch
the id. Liftoff andset the d aside.
Findthe mouthof the Bladderandfill to the bottomof the
neckwith cleannot tap water.*Do not boilor microwave
water as it can destroythe Bladder.
Note:Fillthe Bladderwithcleanhottap wateronly.
Replacethe TankLid matcnmg[he lid andtankedges.Handle
must be inthe forwardpositionto reinstall.
Rotatethe handleto the carryingpos_t_onto re-_atcn
the lid.
Replacetank in macnmebase,seatingfirmly _ place,
Rotatei_andlebackdownto the latchedoosmon
Note: Boththe SmartMix Bottleand the clean
water tank must have liquid in them in
orderfor the machine to spray.If one tank
is emptythe machinewill not apply either
cleaningsolutionor water.
Important: If you are usingthe WATERRINSE
setting,fill the SmartMix bottle with
water also!
LiftandCarry
3
4 _ Unlatch
5
FillBhdderonlywith
cleanhottapwater
0

0
0
0
0
0
0
0
0
0
Removethe Tank-in-Tank- followsteps1 ana 2
on page8.
CarrytheTank-in-Tank,like a bucket,to tne SInKfvnere/ou
will disposeof the dirty water.
RemoveTankLid by rotatinghandleforwardto untatcnuaana
lifting lidoff tank.
Pourout dirty water.
Aftereachuse,removeand rinsethe nt screenlocatedon
theTankLid.
A. RemoveTankAssemblyfrom unit.
B. RemoveTankLid.
O. Removeany debriscaughtin Lint Screen.
D. ReinsertLint ScreenonTankLid.Thescreenwill click
into place
E. ReplaceTankLid.
I=. ReinsertTankAssemblyinto unit.
Refillwith cleantap wateras above,steps 5 through9 on
page8, and refillthe SmartMixbottlewith BISSELLDeep
CleaningFormulaas necessary.
Whenthe cleaningjob is complete,rinseout the
Tank-in-Tankby rinsingcteanwaterDe[weenthe Bladderand
tank.
ReturnTank-in-Tankto the machinefollowingsteps6 through
9 (onpage8).
Referto the Maintenancesection,page18 for the
final cleanup.
5C LintScreen 5D
0
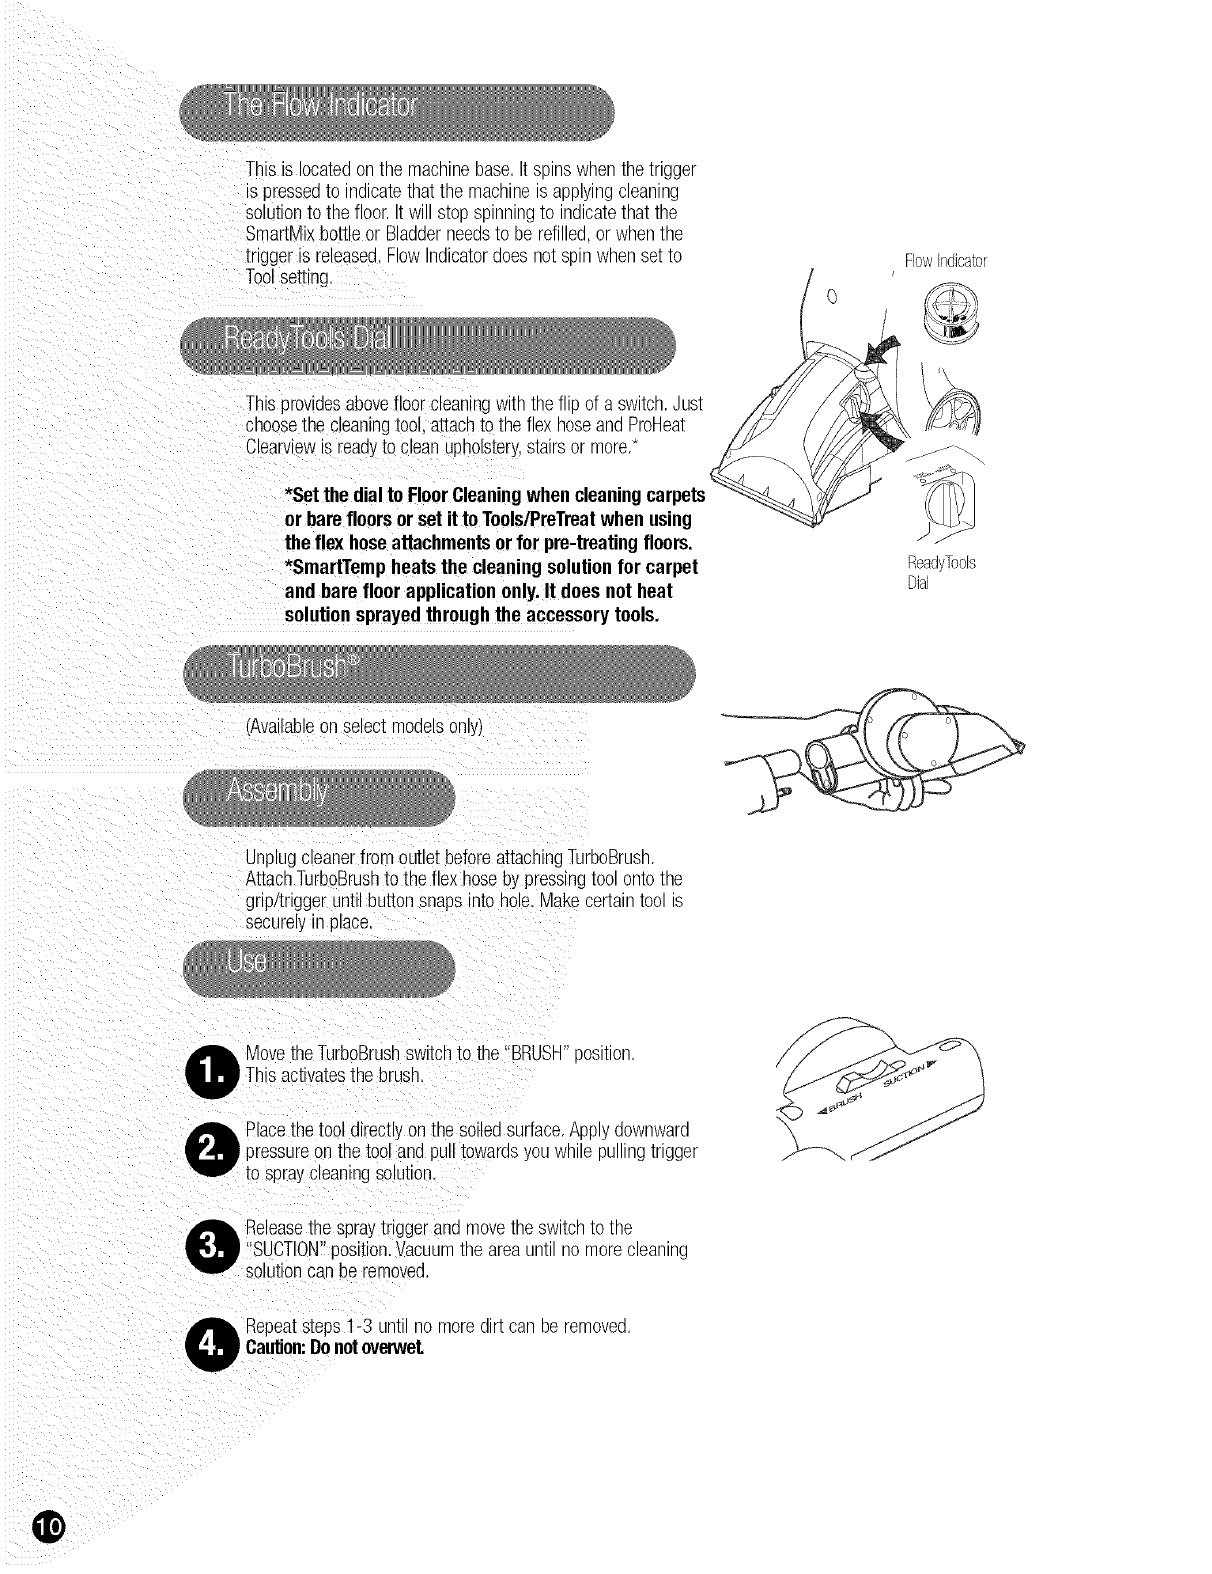
This IS iocaTea)n tne macnlnebase.ITsolnswnentne trigger
s presseutc nalcatetnatme macnmes applyingcleaning
solutionto the floor.It wi step spinningto nalcatemat the
SmartMixbottleor Bladderneedsto be refilled orwhenthe
trigger is releaseaFlow nalcatoracesnot soln whensetto
Toolsetting. FlowIndicator
Thisprovidesabovefloor cleaningwlm tne' Eof a switch.Just
cnoosethe cleaningtool.attachto the flexnoseandProHeat
Clearview_sreadyto c_eanupnostery,stairsor more*
*Set the dial to FloorCleaningwhen cleaning
or barefloors or setit to Tools/PreTreatwhenusing
the flex hoseattachmentsor for pre-treatingfloors.
*SmartTempheats the cleaningsolutionfor carpet
and bare floor applicationonly.It doesnot heat
solutionsprayedthroughthe accessorytools.
(Availableonselect modelsony)
Unplugcleanerfromoutlet beforeattachingTurboBrush
AttachTurboBrushto the flex hoseby pressingtoo ontothe
gri!!trigger until buttonsnaps nto hole.Makecer[amtoo__s
securelyIn place.
ReadyTools
Dial
.ovetheTurboBrushswitchto the "BRUSH"9osltlon
Thisactivatesthe brush.
Placethe tool directlyonthe soiledsurface.Applydownward
pressureonthe tool and pulltowardsyouwnHepullingtrigger
to sprayc_eanmgsolution.
Releasethe spraytnggeran(] movetne swltcnto the
"SUCTION"position.Vacuumtne areaunt nc morecleaning
solutioncan be removed.
Repeatsteps1-3 um nc more(]lrtcan Deremove(]
Ca_on: Donetwe'wet.
@
Disconnectthe TurboBrushfromthe flex noseDypusnlngdownonthe buttonlockandpullings[ralgn_)fl
Onceremovedfromthe FlexHose,theTurboBrushcan
becleaned.
A Movetheswitchto the"SUCTION"oosMor
B Rinseunderrunningwater.
C Checkspraynozzlefor dirt.Ifnecessary,cleanNitha soft
bristlebrush.
DReplaceTurboBrushinthespecialstorageiocatononthe
handlefront.(onselectmodelsonl_
0
0
0
0
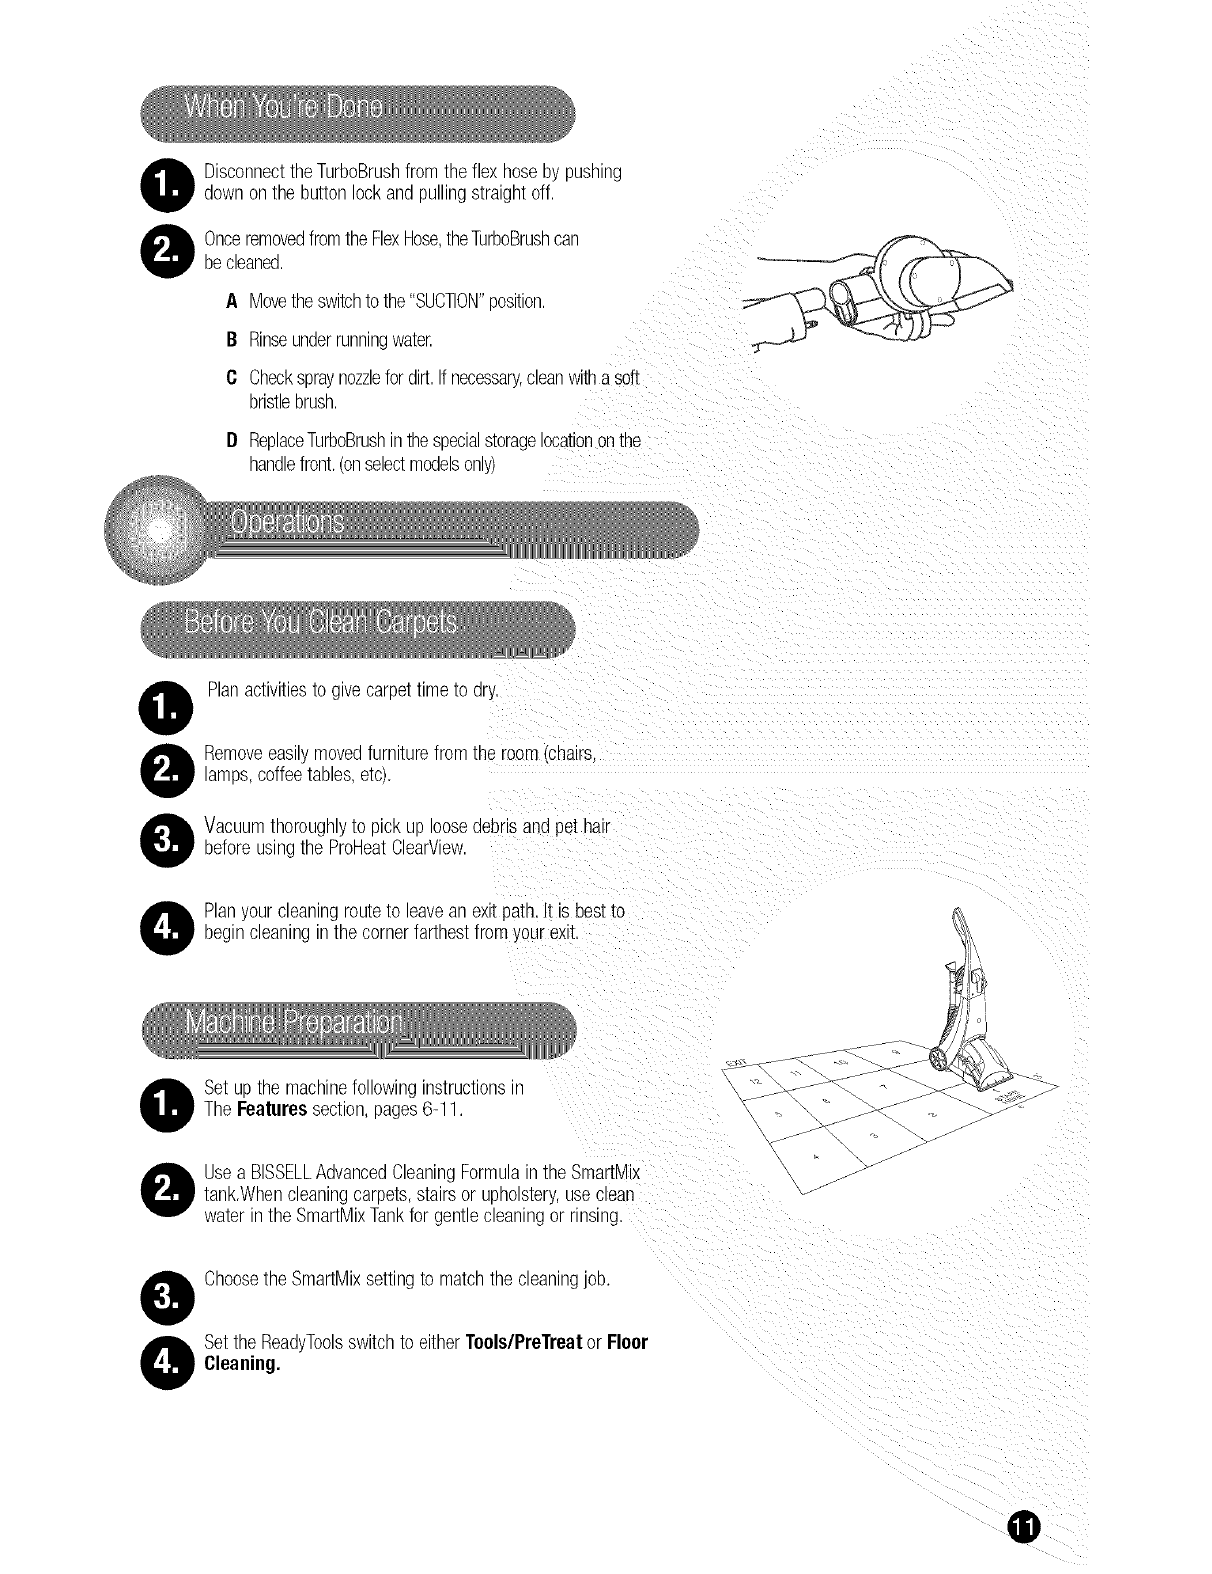
Planactivitiesto give carpettimeto ary.
Removeeasilymovedfurniturefrom the room,cnalrs.
lamps,coffeetables,etc).
Vacuumthoroughlyto pick up oosedebrisandpet ha
beforeusingthe ProHeatClearView.
Planyour cleaningrouteto leavean exitpath.'t is bestto
begincleaninginthe cornerfarthestfrom_our exit.
Set upthe machinefollowing nstructlons
The Featuressection,pages6-11.
Usea BISSELLAdvancedCleaningFormulantne SmartMix
tank.Whencleaningcarpets,stairsor upnols[ery,use clean
waterinthe SmartMixTankfor gentlecleaning )r rinsing.
0
0
Choosethe SmartMixsettingto match_ne_'leanlngjob.
Setthe ReadyToolsswitchto eitherTeels/PreTreat or Fleer
Cleaning.
®
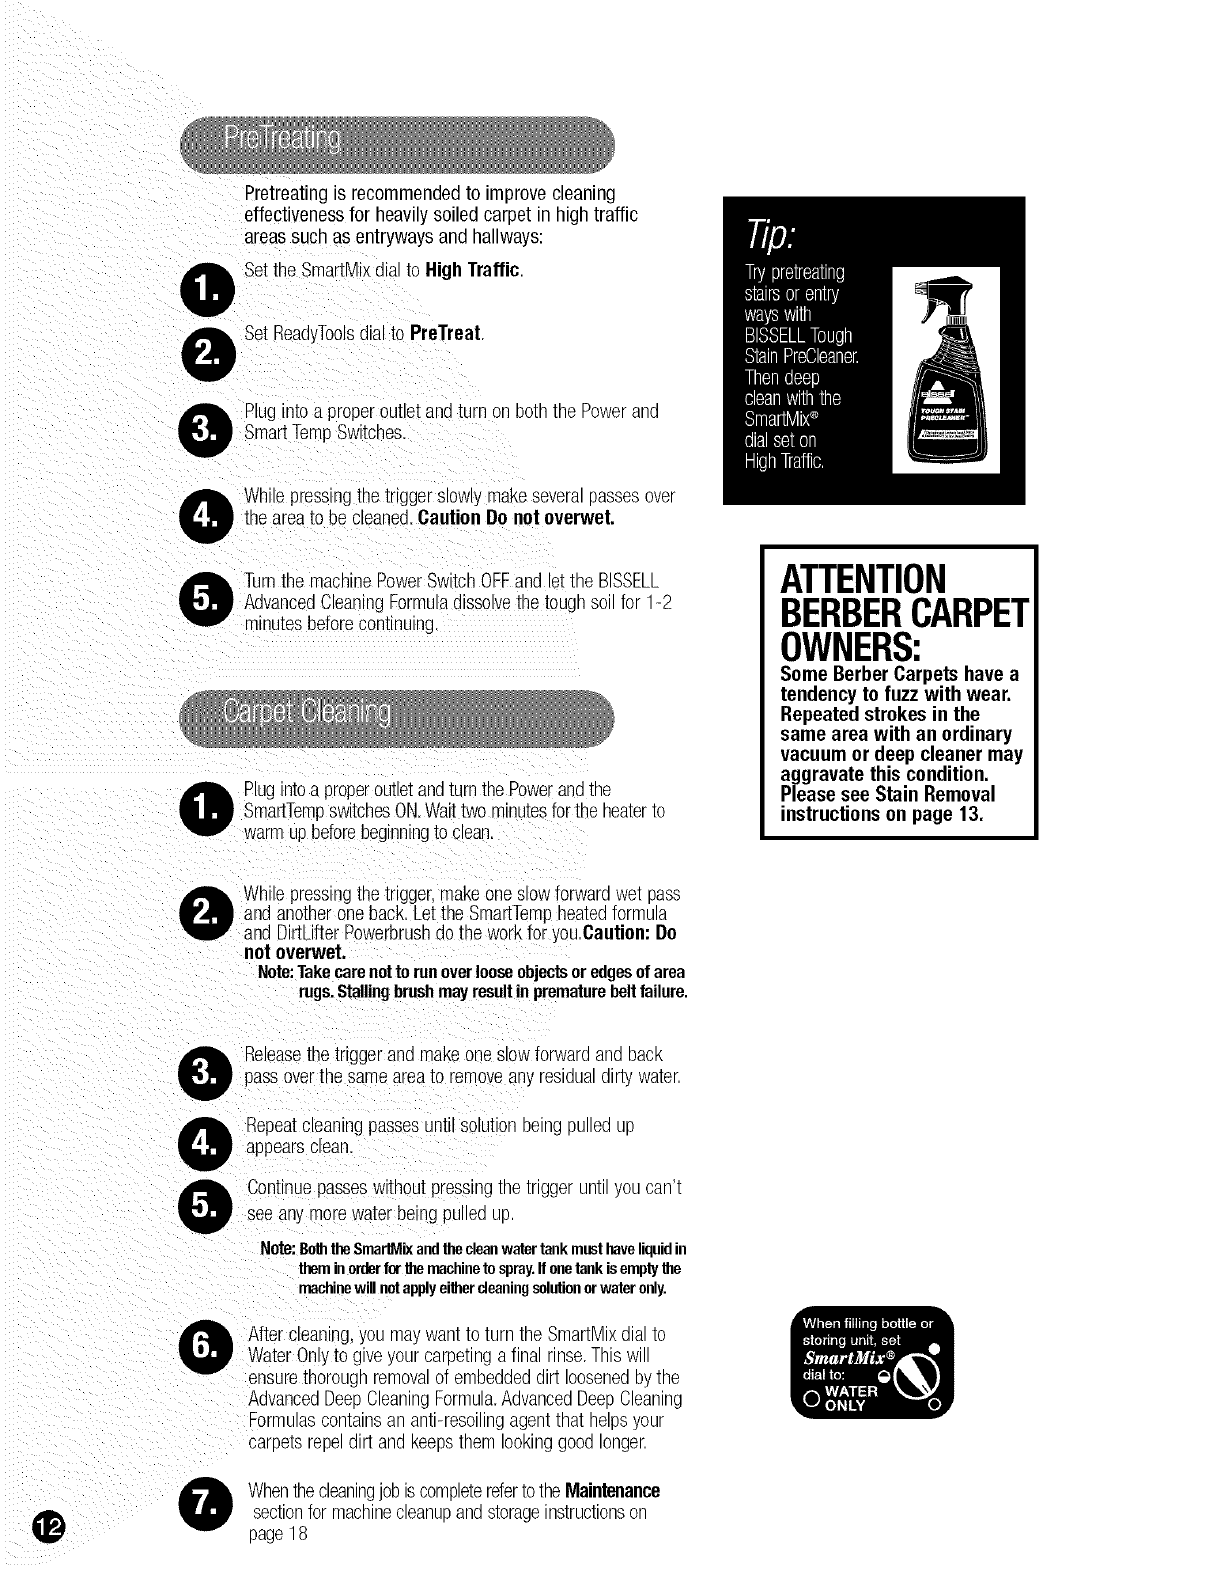
Pretreatingis recommendedto improvecleaning
effectivenessfor heavilysoiled carpet in hightraffic
areassuch as entryways and hallways:
Setthe SmartMixdia to HighTraffic
Set ReadyToolsdialto PreTreat
roperoutletandturn onboth the Powerand
Switches.
Whilepressingthe triggerslowly makeseveraoassesover
the areato be cleaned,CautionDonot overwet.
Turnthe macnmePowerSwitchOFFand lettne BISSELL
ling Formuladissolvethe tougnsoil for 1-2
minutesbeforecontinuing
)oroutletandturnthe Powerandthe
SmartTempswitchesON.Waittwominutesfor the neaterto
jtnn_ngto ctean.
ATTENTION
BERBERCARPET
OWNERS:
Some BerberCarpets have a
tendency to fuzz with wear.
Repeated strokes in the
same area with an ordinary
vacuumor deep cleaner may
aggravate this condition.
Please see Stain Removal
instructionson page 13.
Whilepressingthe trigger,makeoneslowforwardwet pass
andanotheroneback. Letthe SmartTempheatedformula
andDirtLifterPowe"brushdothe workfor you.Caution: Do
notoverwet.
Note:Takecarenottorunoverlouseobjectsoredgesofarea
rugs.Stallingbmobmayresultinprematurebeltfailure.
®
Releasethe triggerand makeor_esicNforwardand back
hoveanyrestauadirty water.
O epeatcleaningpassesuntil solutionDetngDutteaup
appearsctean.
Continuepasseswithoutpressingtne trigger untt youcan't
see anymorewaterbeingpulledup.
Note:BoththeSmartMixandthecleanwatertankmusthaveliquidin
theminorderforthemachinetospray.Ifonetankisemptythe
machinewillnotapplyeithercleaningsolutionorwateronly.
Aftercleaning,you may Nantto turn the SmartMixdial toWaterOny to gve your carpetinga final rinse.Thiswill
ensurethorougnremova _f embeddeddtrttoosenedBythe
AdvancedDeepCleaningFormula.AdvancedDeepCleaning
Formulascontainsan antt-resotttnj agenttnat nelpsyour
carpetsreDetdtrt andKeeDstnemlOOKinggOOdlonger.
Whenthecteantrj joetscomeletereferto theMaintenancesectionfor macnlnecleanupandstoragenstructlonson
page18
De Net Belay! Failureto attendto anaccidentsoonafterit occurs
maycauseit to setand becomepermanent.
Beforetreatinganystain,followthesepre-treatmentsteps:
Blot up liquidswithan absorbentclothor oaDertowels
Whitematerialsarerecommendedbecausecer[amayes
maybleedandmakethe stainworse.
O Gentlyscrapeupsemi-solidswith a spoonor spatula.Do
not usea knifeor other utensilwithsharpeages
becauseit coulddamagethe carpetor upnolstery
If the areahasdried, removethe remainingsemi-solids
and residuewitha sweeperorvacuum.
Besureto pre-testanyspotremovalSOlUtionsor cnemlcals
onan inconspicuousareafirst.Thisis extremeb
important;differentdyesandmaterialscouldbedamaged
or discoloredbya cleaningsolution.If sucha cnanae
shouldoccur,trya differentsolutionorcalla orofessional.If
cleaningon BerberCarpetgentlyrunyour macnmeover
a hiddenarea.If no fuzzingoccurs,continuecleanng,n
soiledarea.
Useone
0of the followingmethodsto Precleanthe stain:
UsingBISSELLToughStainPrecleanerT°,generousiy
spraythe areawiththe formula.Gently_7orkthe solution
with a cleanclothor towelinto the areausing ight
strokesfromthe edgesof the stainto the center.When
yourcloth reachesthe centerof the stain,gentlypinchit
in an upwardmotion.Makesureto turn andchangeyour
clothfrequentlyanddo not rubthe stain, roumayrepeat
this processseveraltimes.
or
Useyour BISSELLdeepcleaneras a Precleaner.With
oneof thetools attachedto hose,setthe ReadyTools
dialto Pretreatandthe SmartMix dialto tne rllgnTraffic
setting.Spraythe areawith solutionandallowtne Deep
Cleaningformulato penetratefor 3-5 minutes.
Oncethe Precleaningis complete,usetne attacneatool
to gentlyscrubthe stainwith backandforth strokes.
Allowto dry.Somedifficultstainsmayrequirea seconc
treatment.
®
0
0
0
0
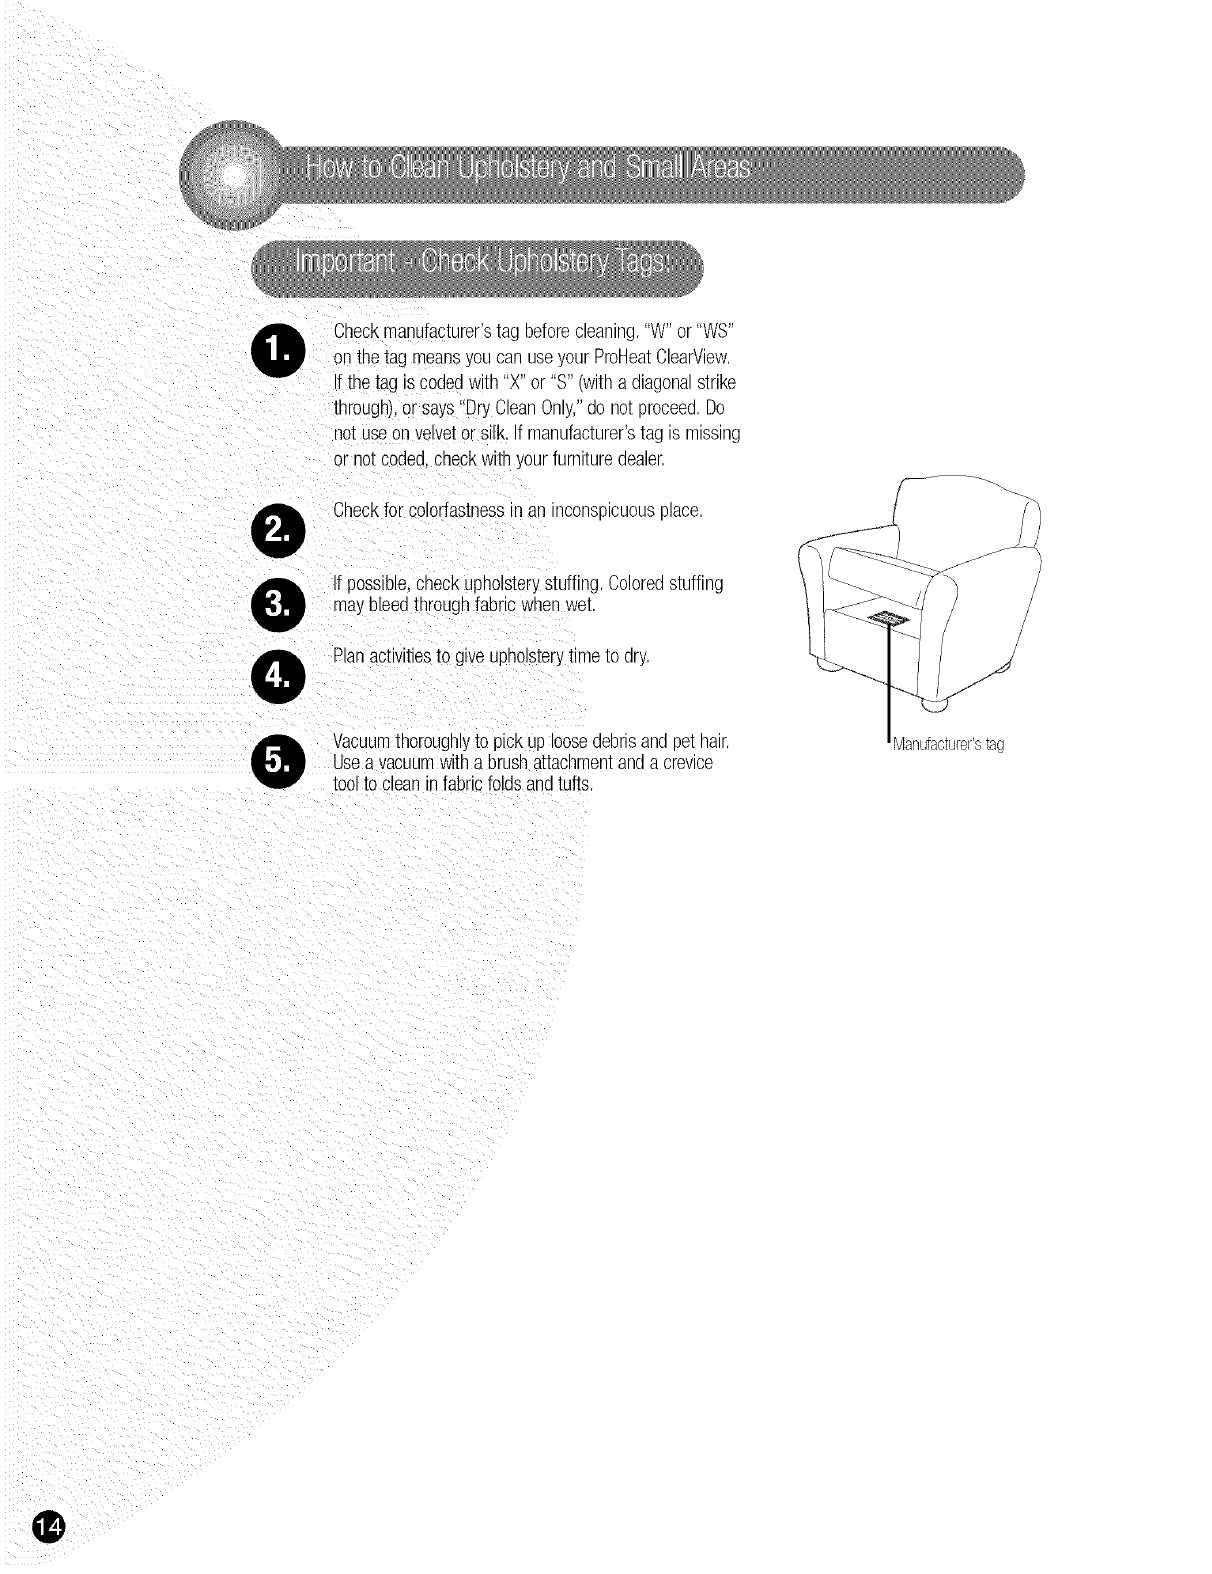
Checkmanufacturer'stag beforecleaning."W"or "WS"
onthe tag means7oucan Jse/our ProHeatClearView.
f the tag s codedwith'Y or "S" wire adiagonalstrike
througn),or says"DryCleanOnly,ao not proceed.Do
'lot useonvelvetor silk. If manufacturer'stag is missing
or notcoded,checkwith yourfurnituredealer.
Checkfor colorfastnessin aninconspicuousplace.
Ifpossible,checkupholsterystuffing Coloredstuffing
maybleedthroughfabricwner we1
PlanactMt_esto g_veupholsteryt_meto dry.
Vacuumthoroughlyto pick Jp ooseaeDnsandpet hair.
Usea vacuumwithabrushattachmentanda crevice
toolto cleaninfabricfoldsandtJfts.
®
Set upthe machinefollowing as[ructlons_ TneFeatures
section,pages6-11.
0
UseBISSFLLAdvanced3leaningFormulas nSmartMixtank.
Set the ReadyToolsdial to Tools or PreTreat.
* SmartTempheatsthe cleaningsolutionfor carpet
and bare floor application only,It doesnot heat
solutionsprayedthroughthe accessorytools,
Set SmartMixDialto Normal.
0
0
0
Choosethe 4" SmallAreaTool the ToughStain Brusn or the
SprayingCreviceTooland connectto the FlexHose.
Plugintoa properoutletandturn PowerSwitchON.
Whilepressingthe trigger,slov+_ymovethe sprayingtoo
backandforthoverthe soledsurface.Releasethe trlgg_
suctionsoiledwater.
Continueto cleanSOlleaarea.workingin smallsectons.
until no moredirt canDeremovec
Caution: Do not overwet.
Whenthe cleaningjob s completereferto the
Maintenance sectionfor macnmec_eanupandstorage
instructionsonpage18
@
ii i
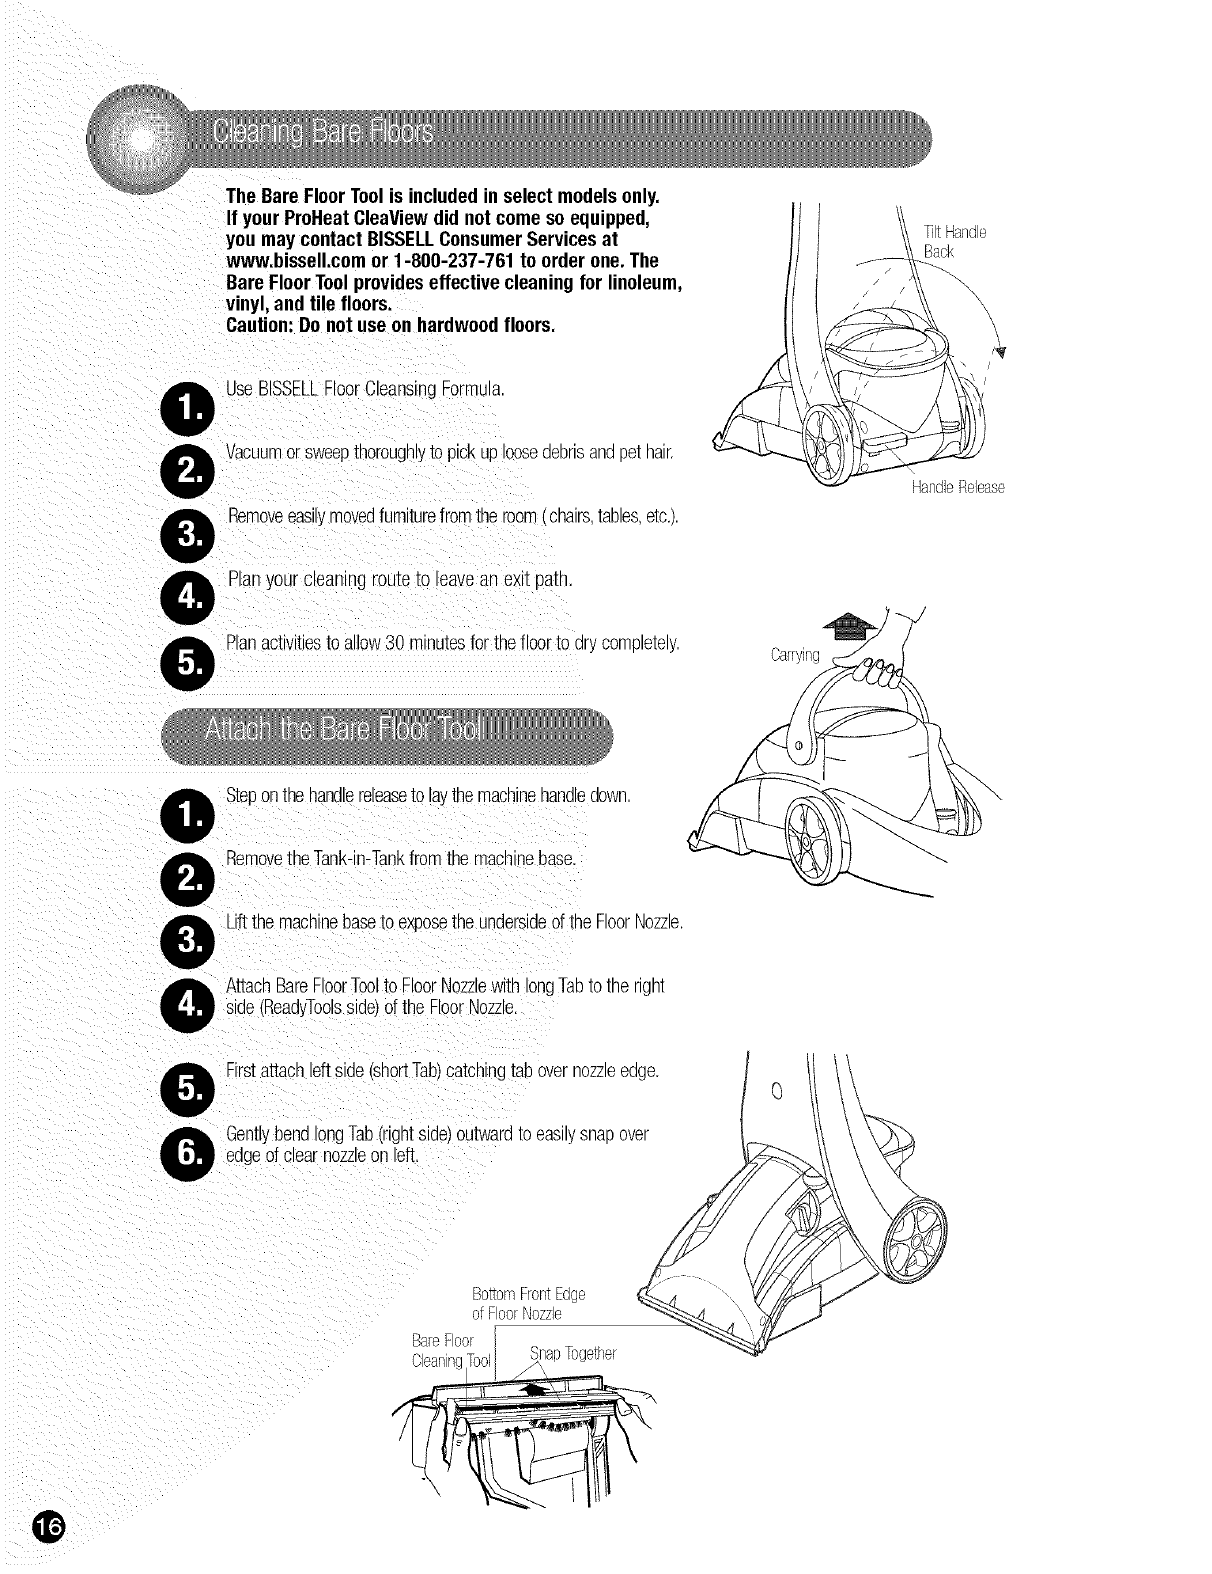
The Bare FloorToolis includedin select modelsonly.
If your ProHeat CleaViewdid not come so equipped,
you may contactBISSELLConsumerServicesat
www.bissell.comor 1-800-237-761 to order one.The
BareFloorToolprovideseffective cleaningfor linoleum,
vinyl, andtile floors.
Caution:Do notuse on hardwoodfloors.
0
0
0
0
0
UseBISSEL_FloorCleansingFormula.
Vacuumorsweepthoroughlyto pickuptoosedebrisan(]pet hair
:_emoveeas,_movedfumiturefromthe room,cnatrs,taDtes,etc.).
Planyour cleaningroute_o eavean exit oa_n.
Planaclvitiesto allow30 minutesforthe floorto drycomptetety.
IO Steponthehandlereleaseto raythe machinehandledown
RemovetheTank-in-Tankfromthe macnneoase.
OLiftthe machinebaseto exposethe undersidedthe FloorNozzle.
AttachBareFloorToolto FloorNozzlewtthlongTabtothe right
sde(ReadyToos s de)of the FoorNozze.
0Firstattachlefts de,snortTab)catchingtabovernozzteedge.
GentlybendlongTab(rightside)outwardto easly snapover
ofc earnozzteo-1left.
Carrying
TiltHandle
Back
HandleRelease
Botto FrontEdge
)f FoorNozzle
Ba_eFoc
}leannc napTogeTne
@
®
%]JWP
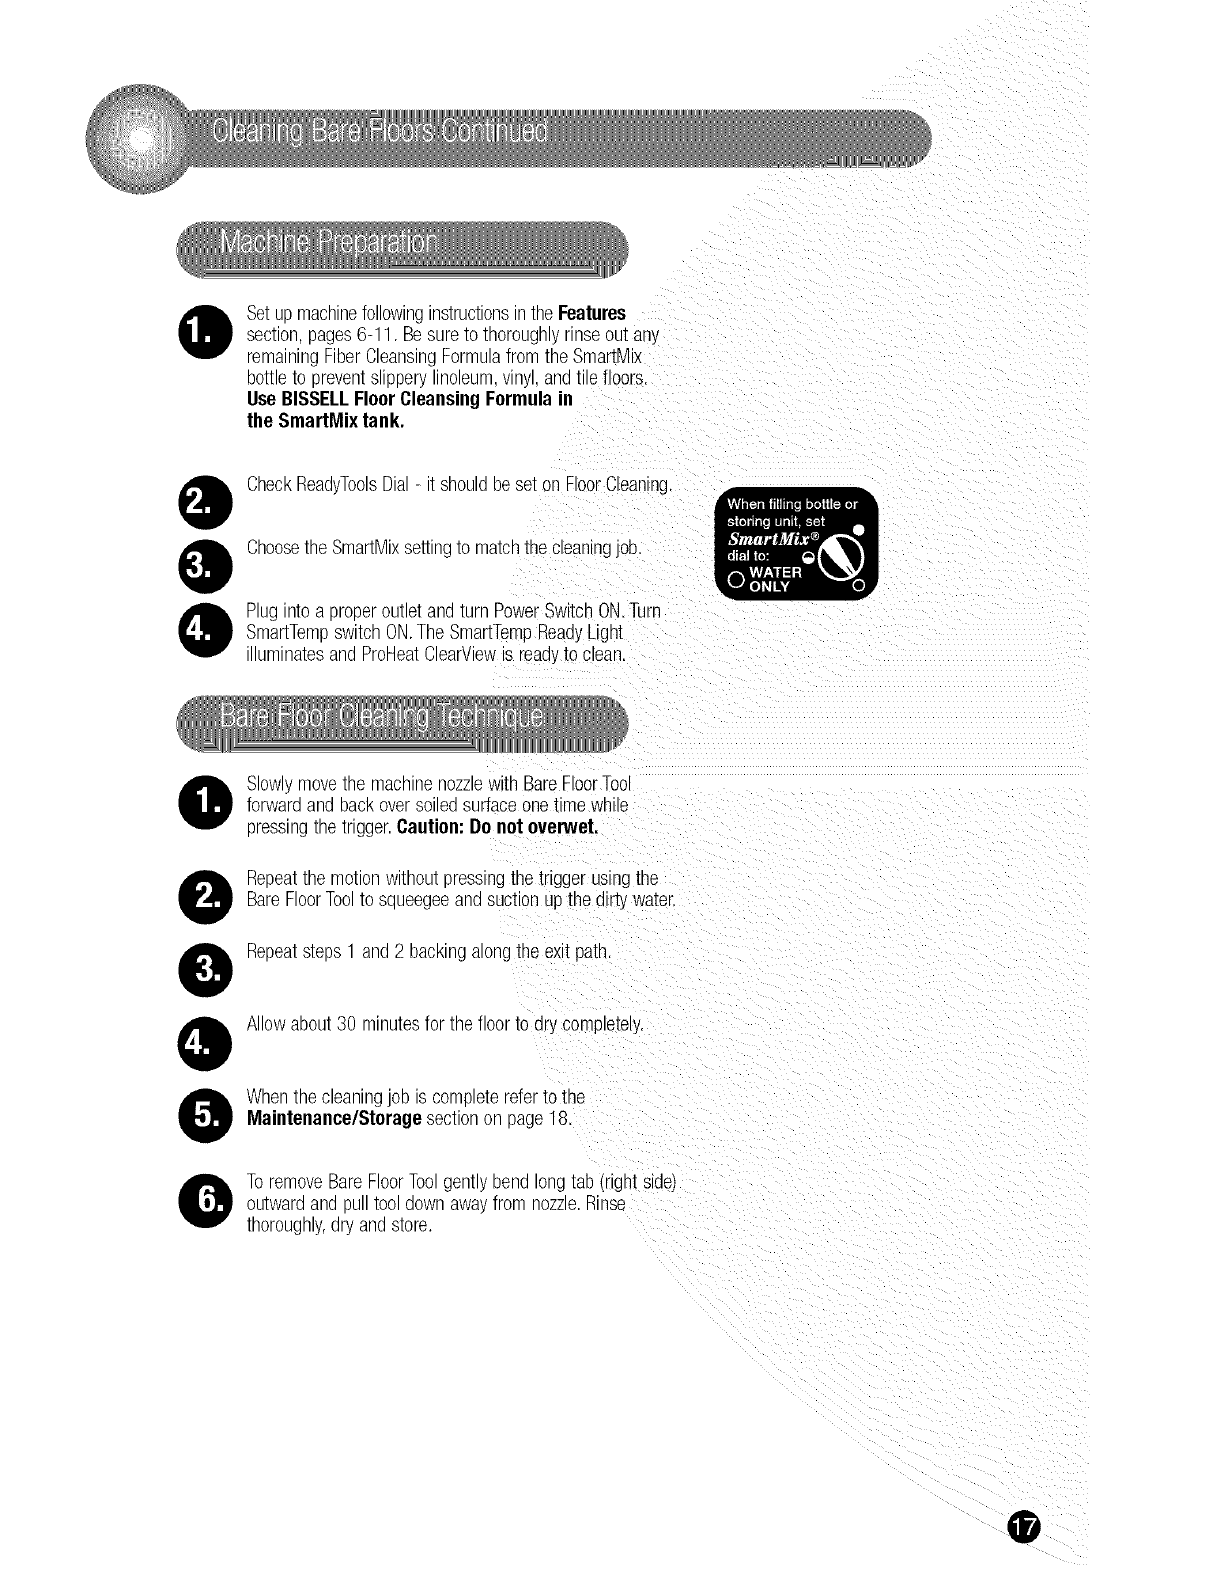
Setupmachinefollowingns_rucuonsintne Features
section,pages6-11. Besureto thorougnlyrinse _utan!
remainingFiberCleansingFormulafrom tne SmartMix
bottleto preventslippery noleum wr.,., anqtile floors
Use BISSELLFloorCleansingFormulain
the SmartMix tank.
0
0
0
CheckReadyToolsDial- it snoulqbeset on FloorCleanng,
Choosethe SmartMixsettingto matchthe cleaningjob.
Pluginto a properoutletanuturn PowerSwitchON.Turn
SmartTemp3witchON.TheSmartTempReadyLight
illuminatesand ProHeatClearViewis read,,to clean.
Slowlymovethe machinenozzlewith BareFloorTool
forwardand backoversoiled _urtaceonet me wnlle
pressingthe trigger.Caution:Donot overwet.
0
0
0
Repeatthe motionwithout pressingthe trigger usingthe
BareFloorToolto squeegeeandsuctionupthe dirtywater.
Repeatsteps1 and2 backingalongthe exitpath.
Allowabout30 minutesfor the floor to dry completely.
Ohenthe cleaningjob is comple[ereferto the
Maintenance/Storagesectionon page18.
Oo removeBareFloorToolgentlyDenulongtab (right side)
outwardandpulltool down awa_from nozzleRinse
thoroughly,dry andstore.
®
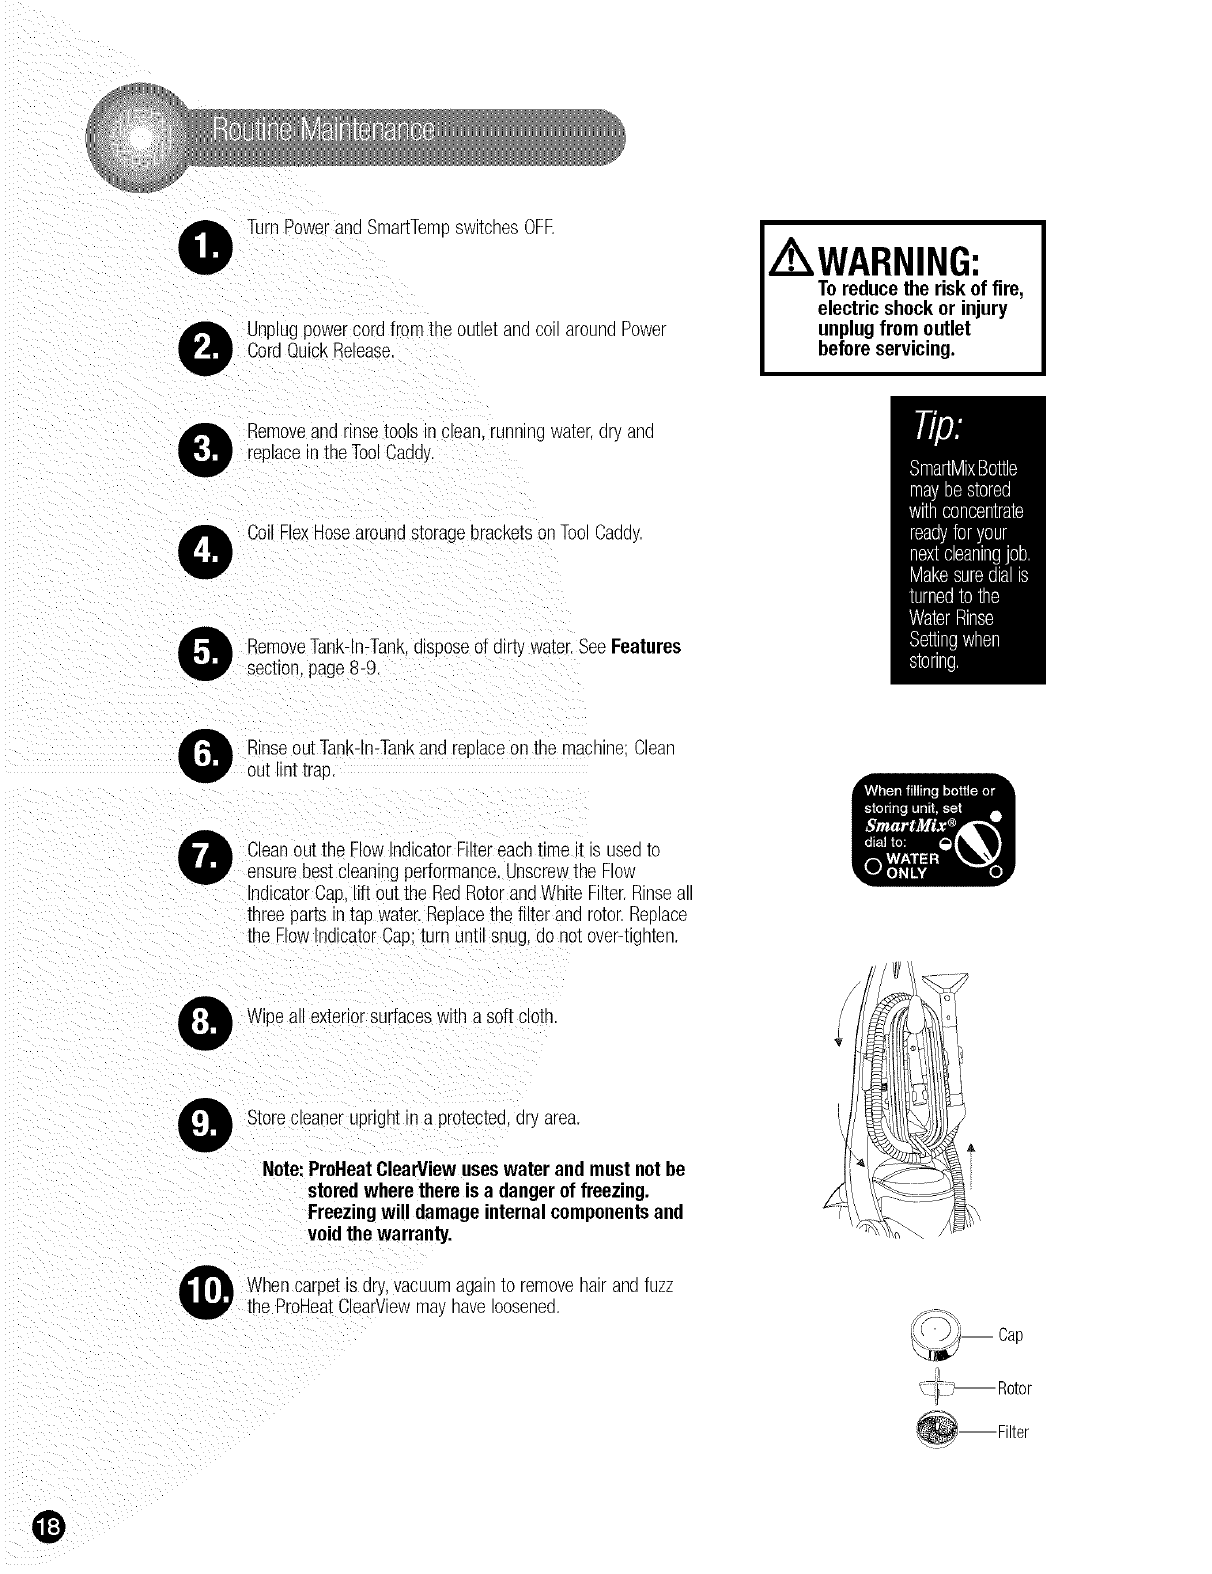
TurnPowerandSmartTerr:switchesOFF.
Unplugpowercordfrom the outte[anacottarounaPower
t CordOuiskRelease.
WARNING:
To reducethe risk of tim,
electric shockor injury
unplugfrom outlet
beforeservicing.
O Removeandrmsetools tnctean,runningwater dry and
! reptaceinthe ToolCaddy.
Coil FlexHosearoundstoragebracketsonToo Caddy.
lank-In-Tank,disposeof dirt_ water.SeeFeatures
_age8-9.
Rinseo[ )laceonthe machine;Clean
Cleanout the Flow ndicatorFiltereacht "hetttsuseato
bestcleaningperformance._nscrewthe Flos
ndicatorCap. fl outthe RedRotorandWhiteFilter Rinseall
three partsintap wateJReplacethe filter and rotor.Replace
tile FlowIndicatorCap;turn until snug,donot over-tighten.
Wipea,,exteriorsurfaceswttn a soft cloth
0Storecleaneruprght ina protected,dry area
Note: ProHeatClearViewuseswater andmust notbe
storedwhere thereis a dangerof freezing.
Freezingwill damageinternalcomponentsand
voidthe warranty.
Whencarpetis dry.vacuumagainto removehairandfuzz
he ProHeatClearViewmaynavetoosenec
@

OTurnthe machineoff andunplugfrom_neNailoutlel --- 2
Otep on the releasepedaland reclinethe hande downonto
floor (seeillustration).
RemoveTank-In-TankandSmartMixtanks.Setthem aside
(seeillustration).
RemoveBeltAccessDoorlocatednearthe FloorCleanng
Toolsswitchby insertinga flat headscrewdriverintothe
slotnearestto the handleand gentlypryingthe accessdoor
off (seeillustration).
O urnthe machineonto itsside so the belt accessarea_s
facing upward(seeillustration).
Onthe bottomof the machine,searthe belt accessarea
is a redretainerplatethat holdsthe blackbrusharm and
brushin place.Usinga PhillipsheadscreNdriverremovethe
screwthat holdsthe redretainerplatein place.Set red
retainerplateandPhillipsheadscrewaside(seeillustration).
Removethe blackbrusharm[natholdsthe brushm place.
Setthe blackbrusharm aside (see ustratlon),
O Removethe "toothed"brushbelt fromme Drusntnen from
the redpump pulle_Setthe "toothed"brushbelt andbrush
aside.
6
Locateand removebrokenpumppelt
@
1
0
O
0
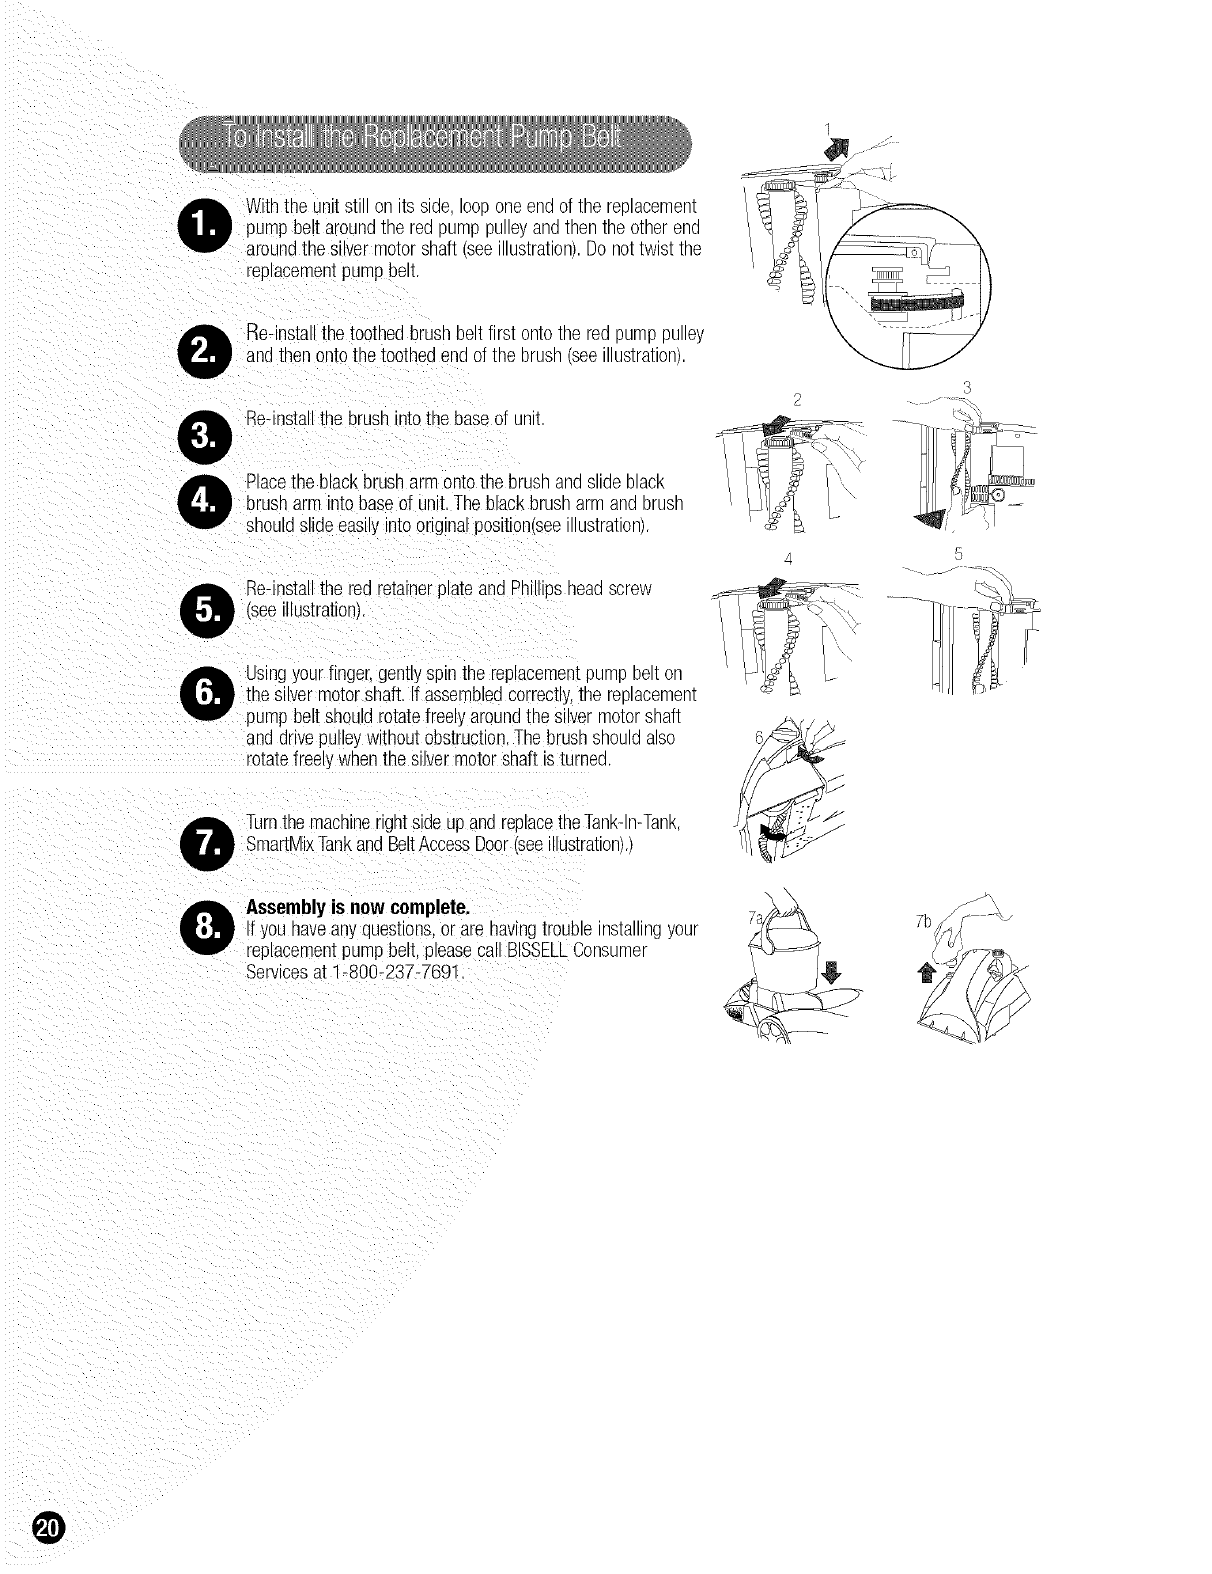
Withthe unit stl )n is slae.lOOPoneena )f the replacement
pumpbelt arounatne reaDUBD pUlleyanatnentne otnerend
aroundthe silvermotorshaft see Jstralon Do nottwist the
replacementpumpbelt
Re-instal thetoothedbrushbeltfirst ontotne reapump pulley
andthen cqtothe toothecendof the Drusnsee Hustra_on).
Reqnstallthe brushintothe baseof unit
Placethe blackbrusharm ontotne brushanasllae black
brusharm into baseof unt. The blackbrush armand brush
snouldslideeasilyinto originalpostlon(see ustralon).
Re-installthe redretainerplate andPnll@sneaascrew
(see lustrationj
Usingyourfinger,gentlyspinthe replacementDumDbelt on
the sWermotorsnalt. If assembledcorrectly,the replacement
pumpbelt shoud rotatefreelyaroundthe snvermeiershaft
anddrivepulleywithoutobstruction.The brusnsnoulaalso
rotatefree y whenthe silvermotorshaft is turned.
3
Turnthe macnlnerightsideupandreplacethe Tank-In-Tank,
SmartMixTankandBeltAccessDoor see ustration).)
Assemblyis now complete.
Ifyou naveanyc Jesttons.or are havingtroubleinstallingyour
replacementpumpbelt,pleasecall BSSELLConsumer
Servicesat 1-800-237-7691.
@

Z WARNING:
To reducethe risk of
fire, electric shock or
injury unplugfrom outlet
before servicing.
SmartTemp Ready Light does not illuminate.
PossibleCauses Remea_es
The SmartTemoswitchis no_ Turnon theSmartTempswitch.
turned ON.
The machinePowerSwitchis not
turned ON.
Reduced spray or no spray
PossibleCauses
Bladdermayoe empty.
Bothswitchesmustbe ONto
activatethe SmartTerra ReadyLight.
Remeales
Refilltankwith hot tap water.
SmartMixbottle maybe empty. Fillwith BISSELLDeepCleaning
Formulafor cleaningor waterif rinsing.
Thefilter maybe clogged. Cleanout FlowIndicatorFilter,page18.
Tanksmay notbe seatedproperly. TurnpowerOFF:remove& reseattanks.
Pumpmayhavelost_rJme. TurnpowerOFF:after1 minuteturn ON
anddepresstrigger.
ThePumpBeltmaybe broken. Turnthe machineOFFand unplugfrom
the outlet Tocheck if a Punp Belt has
broken,youwill needaflat head
screwdriver.Insertthe bladeendintc
the lowerslot of the BeltAccessdoor
to releasethe lowersnap.If necessary,
insertthe bladeendintothe upperslot
to releasethe uppersnap. Examinethe
belt for breakage.Youshouldbe able
to seethe PumpBeltloopedaround
the motorshaft, if it is brokenor
me_e missing,pleasereferto Replacement
Parts on page23 beforecalling
ConsumerServices.Corn9lete
installationinstructionswill
accorrpanythe replacementbelt.
Screwdriver
BladeHere
DirtLifter PowerBrush does not turn.
PossibleCauses
The BrushBelt or PumpBelt
maybe broken.
Remedies
........................... from
the outlet.Tocheck if a PurepBelt has
broken,youwill needaflat head
screwdriver.Insertthe bladeendinto
the lowerslot of the BeltAccessdoor
to releasethe lowersnap.If necessary,
insertthe bladeendintothe uaperslot
to releasethe uppersnap. Examinethe
belt for breakage.If brokenreferto
pages19-20.
0
Cleaner not picking up solution.
PossibleCauses
ReadyToolsdialmay beat the
wrongsetting forthe cleaningjob.
Remedies
Set ReadyToolsdialto eitherToolsor
PreTreator FloorCleaning.
NozzleWindowmaynot be
properlyattached.
Tank-in-Tanklid s not
properlyinstalled.
Pressdownfirmly on the blackoval
gasketat the top windowto makesure
the twotabs on the backof the Nozzle
Windoware snappedintothe mating
slotsin the main housing.
Re-installlid;referto theFeatures
section.
Tank-in-Tankis not propertyseated. Tank-In-Tankmust befirmly seatedto
function;removeandreseatTank-in-Tank.
Poortoolposition
/Handheldattachmentsonly). Adjustangle;applymoredownward
pressure.
Tank-in-Tankhaspickedup
maximumdirtywater. EmptyTank-in-Tank,referto
theFeaturessection.
@
Forinformationaboutrepairsor replacementparts,or questionsabout
your warranty,call:
BISSELLConsumer Services
1-800-237-7691
Monday- Friday
Saturday
Or write:
BISSELLHOMECAREN3
POBox 3606
SrandRaoids MI 49501
ATN: ConsumerServices
8 a.m. -- 10 p.m. EST
9 a.m. m 8 p.m. EST
Orvisit_neBISSELL_ eoszte www.bissell.com
WhencontactingBISSEL.navemoaelnumberof unit available,
Pleaserecordfour Model _lumber:
Pleaserecordyour PurchaseDate:
NOTE:Pleasekeepyouroriginalsalesreceipt.It providesproofof dateof
purchaseintheeventof awarrantyclaim.See"AboutYourWarranty"
onpage24 for details.
Pleasedo not returnthis Droauo[[o [ne store
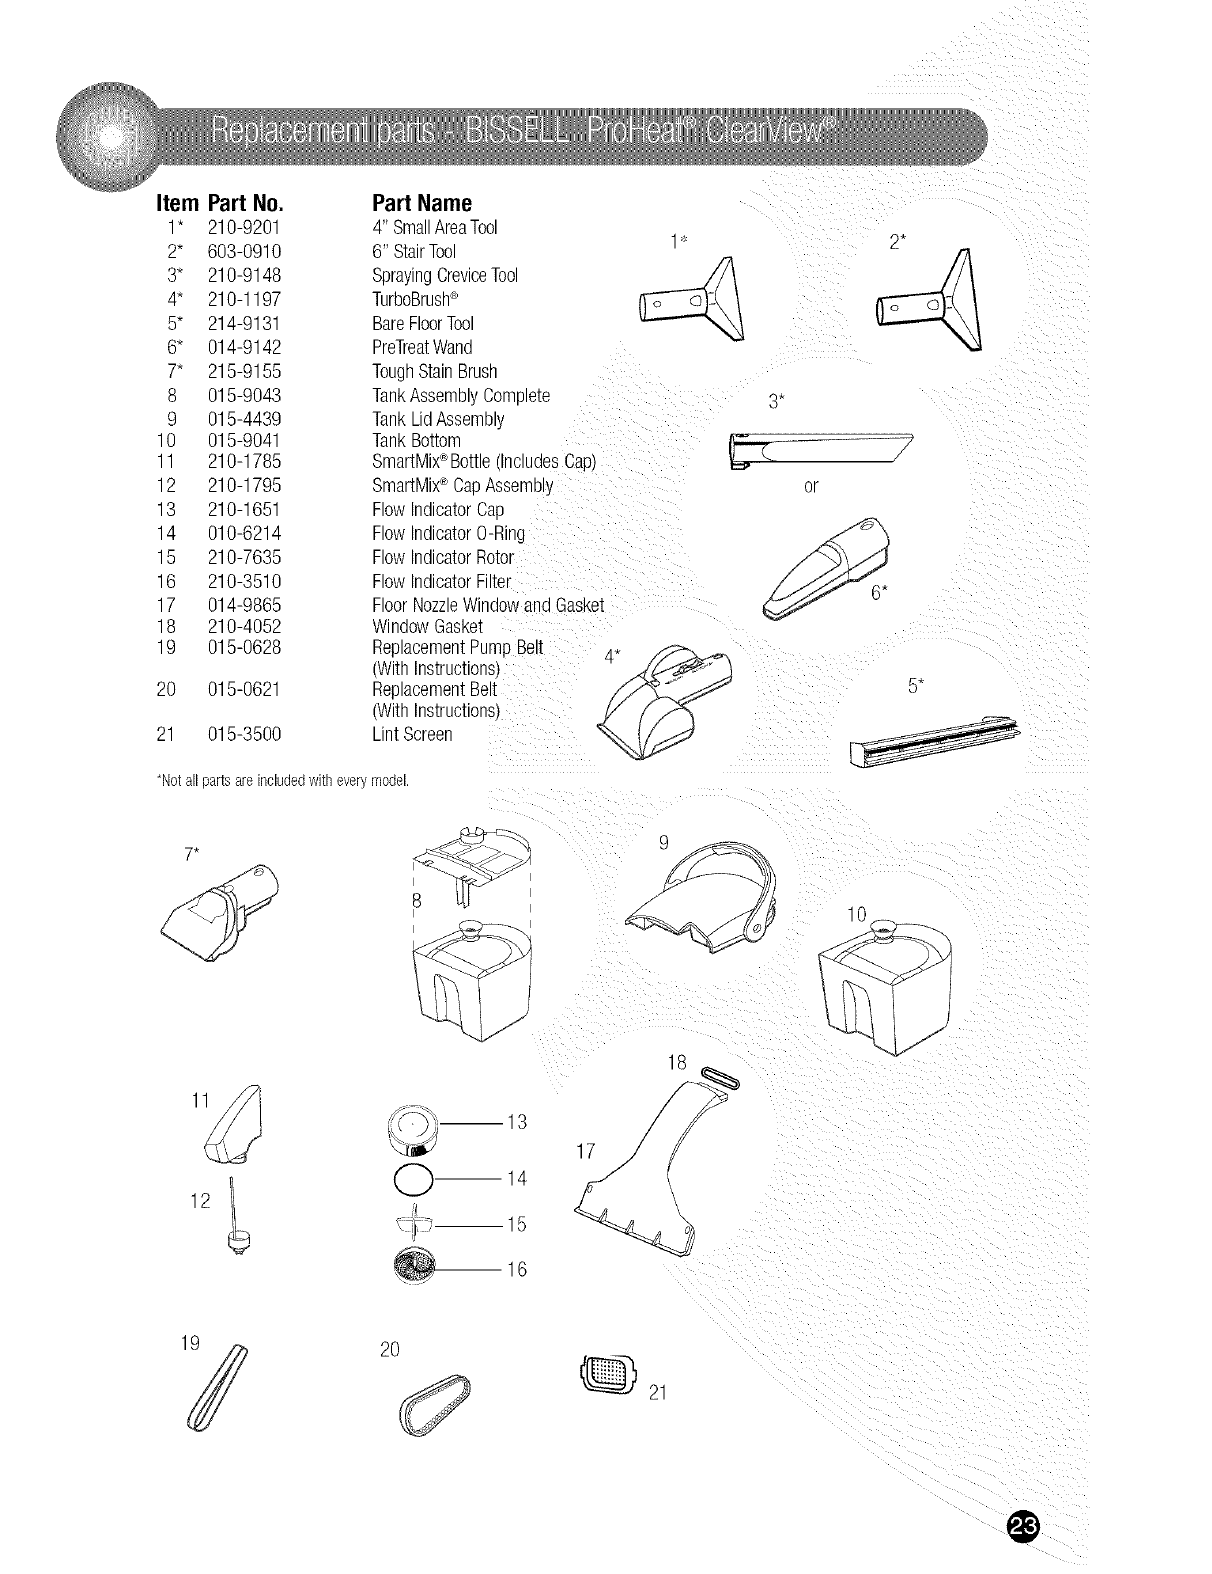
Item Part No.
1" 210-9201
2* 603-0910
3* 210-9148
4* 210-1197
5* 214-9131
6* 014-9142
7* 215-9155
8 015-9043
9 015-4439
10 015-9041
11 210-1785
12 210-1795
13 210-1651
14 010-6214
15 210-7635
16 210-3510
17 014-9865
18 210-4052
19 015-0628
20 015-0621
21 015-3500
Part Name
4" SmallAreaTool
6" StairTool
SprayingCreviceTool
TurboBrush®
BareFloorTool
PreTreatWand
ToughStainBrush
TankAssemblyComplete
TankLidAssemby
TankBottom
SmartMix®Bottle ncluoesCap!
SmartMix®CapAssembly
FlowIndicatorCaD
FlowIndicatorO-Ring
FlowIndicatorRotor
FlowIndicatorFilte_
FloorNozzleWindowancGasket
WindowGasket
ReplacementPumpBelt zl*
(WithInstructions
ReplacementBelt
(WithInstructions',
LintScreen
*Notall partsare includedwith everymodel.
3*
_r
6*
7*
I
B
I
I
11
12 ©
13
1A
--15
16
19 2O
0
Thiswarramy gives you suecific ega rlgms ann you may also have other rights which mayvary
from state to state. If you nee(] a(](]Eiona ns_ruc_onregardingthis warranty or have questions
regardingwhat it may cover oleasecomac_BISSELLConsumer Services by E-mail, telephone,or
regular mail as descr 9eu uelow.
LIITted OneYearWarranty
Subjec_to the *EXCEPTIONSAND EXCLUSIONSidentifiedbelow,uponreceiptof the productBISSELL
domecareInc.will reuairor reulacewen newor remanufacturedcomponentsor products),at BISSELUs
option,free of chargefromthe dateof surcnaseDythe original
uurcnaser,for oneyearanydefectiveor malfunctioningpart.
See information below on "if your BISSELLoroauc_should requireservice".
Thiswarrantyappliesto productusedfor oersonalannnot commercialorrentalservice.Thiswarranty
doesno_aDDlyto routinemaintenancecomponentssucnas filters,belts,orbrushes.Damageor
malfunctioncausedby negligence,abuse,qeglect,unau_norlzearepair,orany otheruse not inaccordance
withthe User'sGuideis no_covered.
If your BISSELL product should require service:
ContactBISSELLConsumerServicesto locate a BISSELLAuthorizedService Centerinyour area.
Ifyou needinformation about repairs or replacement parts, or if you have questions about your
warranty, contact
BISSELLConsumerServices.
WebsiteorE-mail:
www.bissell.com
Usethe CustomerServices tab.
OrCall:
BISSELLConsumerServices
1-800-237-7691
Monday- Friday8 a.m. - 10 p.m.EST
Saturday9 a.m. - 8 p.m.EST
Orwrite:
BISSELLHomecareInc.
POBox3606
GrandRapidsM149501
ATTN:ConsumerServices
BISSELLHOMECARE]NC,IS NOTLIABLEFORNCIDENTALORCONSEQUENTIALDAMAGESOFANYNATUREASSOCIATED
WITHTHEUSEOFTHISPRODUCT.BISSELL'SLIABILITYWILLNOTEXCEEDTHEPURCHASEPRICEOFTHEPRODUCT.
Somes_atesconoralnwthe excusionor limitationof inclaenralorconsequentialdamages,satheabovelimitationarexclusianmaynot
aPPly_DyOU
@
"EXCEPTONSANDEXCLUSIONSFROMTHETERMSOFTHELIMITEDWARRANT
THISWARRANTYISEXCLUSIVEANDINLIEUOFANYOTHERWARRANTIESEITHERORALORWRITTEN.
ANYIMPLIEDWARRANTIESWHICHMAYARISEBYOPERATIONOFLAW,INCLUDINGTHEIMPLIED
WARRANTIES0E MERCHANTABILITYANDFITNESSFORA PARTICULARPURPOSE,ARELIMITEDTO
THEONEYEARDURATIONFROMTHEDATEOFPURCHASEASDESCRIBEDABOVE
Somes[a[esao not allow ilml[arlonsan nowlongaRimplleawarramy _sts.sa the abovelimitationmaynat applyta you.
@2003 BISSELLHOMECARE,Inc.
GrandRapids,Michigan
All rights reserved.Printedin USA.
PartNumber310-5904
Rev07/03
Visitourwebsiteat:
www.bissell.cam
Scotchgardis a trademark of 3M
