Bissell 16N5 User Manual VACUUM Manuals And Guides L1002427
BISSELL Vacuum, Upright Manual L1002427 BISSELL Vacuum, Upright Owner's Manual, BISSELL Vacuum, Upright installation guides
User Manual: Bissell 16N5 16N5 BISSELL VACUUM - Manuals and Guides View the owners manual for your BISSELL VACUUM #16N5. Home:Vacuums & Floor Care Parts:Bissell Parts:Bissell VACUUM Manual
Open the PDF directly: View PDF ![]() .
.
Page Count: 20
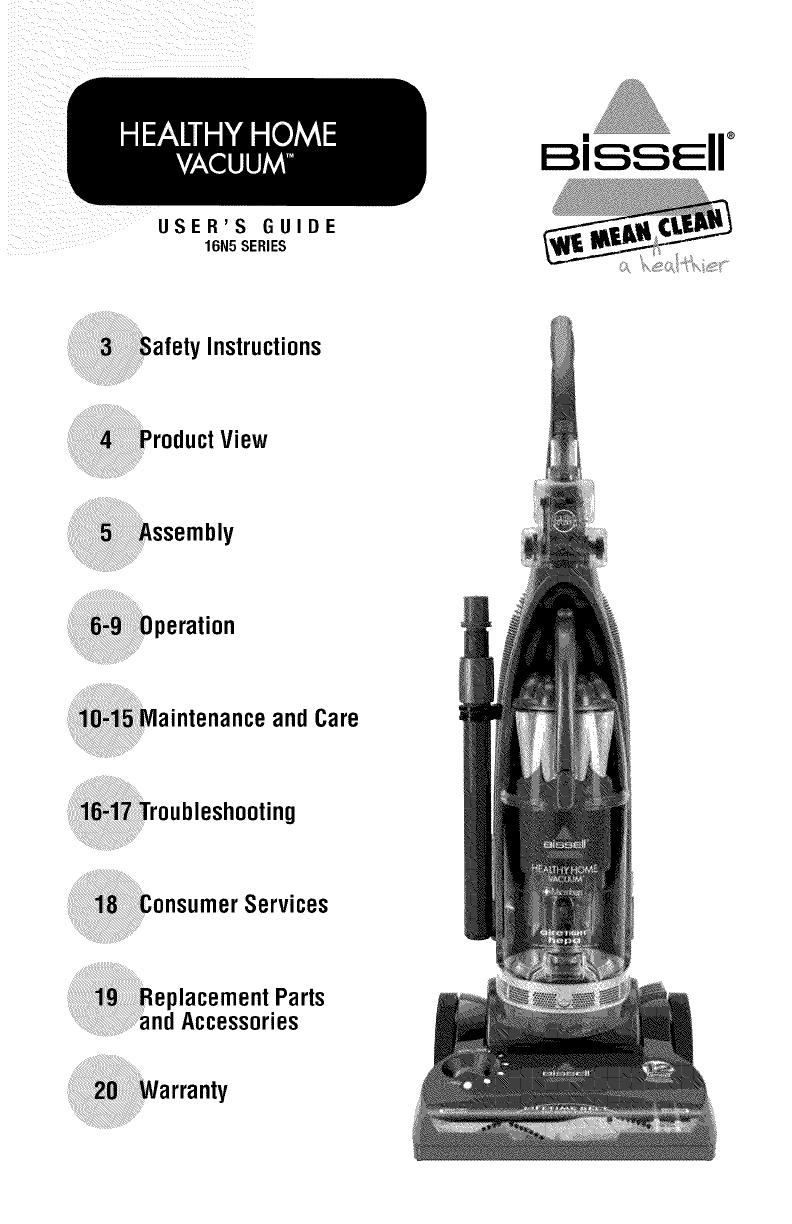
ii ®
USER'S GUIDE
16N5 SERIES
Instructions
_roduct View
)peration
andCare
Services
for buyinga BISSELLHealthy HomeVacuumTM
We're glad you purchased a BISSELLvacuum. Everything we know about floor
care went into the design and construction of this complete, nlgh-tech home
cleaning system. By purchasing this product you are helping BISSELLwith our
commitment to reducing our impact on the environment _nrougn an expanding
range of sustainable design efforts.
Your vacuum is well made, and we back it with a limited five year warranty.
We also stand behind it with a knowledgeable, dedicated Consumer Services
department, so, should you ever have a problem, you'll receive fast, considerate
assistance.
My great-grandfather invented the floor sweeper in 1876. Today, BISSELLis a
global leader in the design, manufacture, and service of high quality homecare
products like your carpet cleaner.
Thanks again, from all of us at BISSELL.
Mark J. Bissell
President and Chief Executive Officer
i2¸¸¸¸¸¸¸wwwbi sell00m 800.237.7691
TANTSAFETYINSTRUCTIONS
Whenusing an electrical appliance, basic
precautions should be observed, including
the following:
READ ALLINSTRUCTIONS
BEFOREUSINGYOUR
UPRIGHTVACUUM.
Alwaysconnectto a polarizedoutlet (one slot is wider
than the other).Unplugfrom outlet when not in useand
before conducting maintenance.
WARNING:Toreduce
the risk of fire, electric shock,
or injury:
• Donot modify the polarizedplug to fit a
non-polarizedoutlet or extension cord.
• Donot leavevacuum cleaner unattendedwhen it
is plugged in.
• Unplugfrom outlet when not in use and
before servicing.
• Donot use outdoorsor on wet surfaces.
• Donot allowchildren to operatevacuum
cleaneror use as a toy.
• Close attention is necessarywhen used by or
nearchildren.
• Do not usefor anypurposeotherthan describedin
this User'sGuide.
• Useonly manufacturer'srecommended
attachments.
• Donotusewithdamagedcordorplug.
• If appliance is not working as it should, has been
dropped,damaged, left outdoors,or dropped
into water,have it repaired at an authorized
servicecenter.
• Donot pullor carry by cord,usecord as a handle,
close a door on cord, or pull cord around sharp
edgesor corners. Donot runapplianceover cord.
Keepcord away from heatedsurfaces.
• Donot unplug by pulling on cord.To unplug, grasp
the plug,not the cord.
• Do not handlevacuum cleaneror plugwith
wet hands.
• Do not put anyobjectintoopenings.Do not usewith
anyopeningblocked;keep openingsfree of dust,
lint, hair,and anythingthat mayreduceair flow.
• Keephair,looseclothing,fingers,and all partsof
bodyawayfrom openingsand movingparts.
www.bissell.com
• Turnoff all controls before plugging or unplugging
vacuum cleaner.
• Use extra care when cleaning stairs.
• Unplugbefore attachingthe TurboBrush.
• Do not pick up flammable materials(lighter fluid,
gasoline, kerosene,etc.) or use in the presence of
explosiveliquids or vapors.
• Do not pick up toxic material (chlorine bleach,
ammonia, drain cleaner, etc.).
• Donot usevacuumcleaner in an enclosedspace
filledwith vaporsgiven off by oil basepaint,paint
thinner,some moth proofingsubstances,flammable
dust,or otherexplosiveor toxicvapors.
• Do not pick up hardor sharp objectssuch as
glass, nails,screws, coins, etc.
• Do not pickup anythingthat is burningor smoking,
suchas cigarettes,matches,or hotashes.
• Do not usewithoutfilters in place.
• Use only on dry, indoorsurfaces.
• Keepappliance on a level surface.
• Donot carrythe vacuumcleanerwhile it is running.
• Brush may unexpectedlyrestart. Unplugfrom
outlet when cleaning or servicing.
SAVETHESE
INSTRUCTIONSFOR
FUTUREUSE
THISAPPLIANCEHAS
A POLARIZEDPLUG.
Toreducethe risk of electricshock,this appliancehas a
polarizedplug(onebladeiswiderthanthe other).Thisplug
wiii fit ina polarizedoutletonlyone way.If the plug does
not fit fullyinthe outlet,reversethe plug.if it still doesnot
fit, contacta qualifiedelectricianto installa properoutlet.
Do not changethe plugin anyway.
Thismodelis for householduseonly.
800.237.7691
view
TurboBrush®
Height
Adjustment
Dial
FingertipPower
_gertipBrush
On/Off
Long
Hose
QuickRebaseTM
CordWrap
Brush
BrushWindow
Quick
CreviceTool
Telescoping
Wand
WandBase
FurnitureProtection
Guard Brush HandleRelease
Pedal
4www.bissell.com
FootHose
800.237.7691
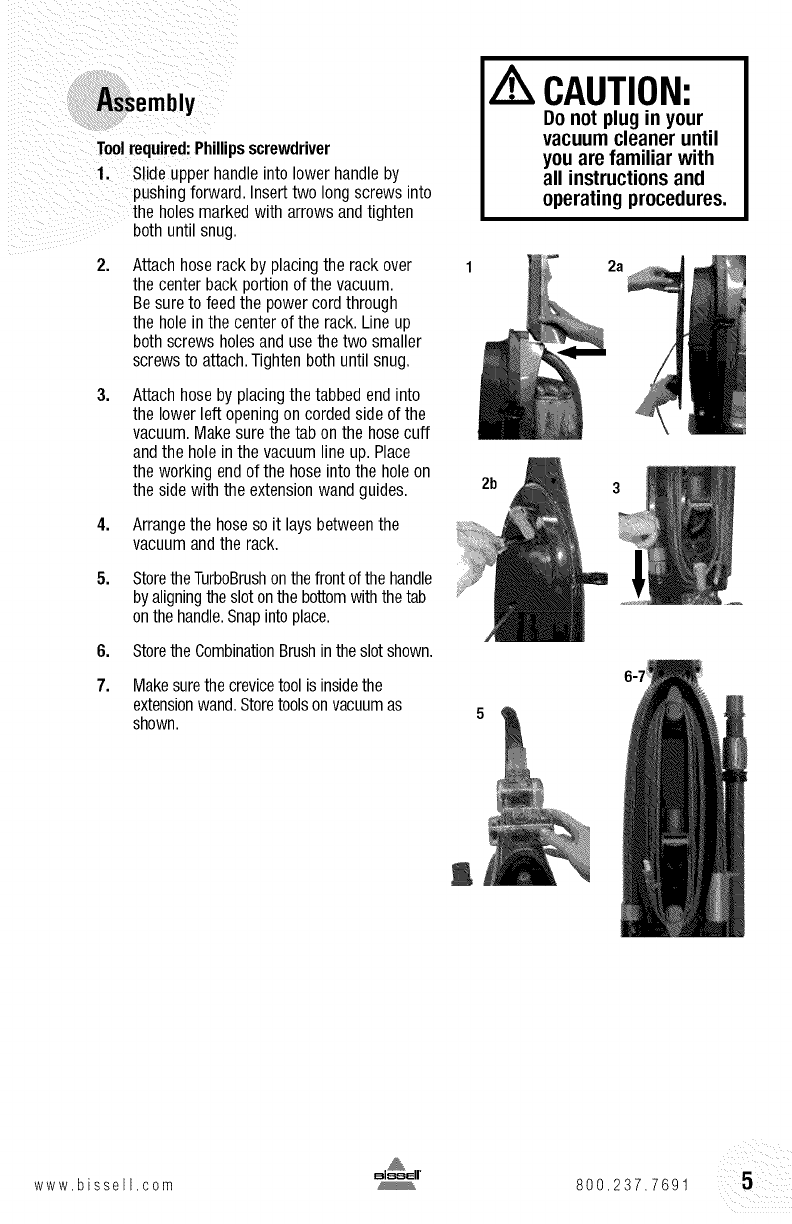
Toolrequired:Phillipsscrewdriver
1, Slideupper handleinto lower handleby
pushingforward.Inserttwo long screwsinto
the holesmarked with arrows and tighten
bothuntil snug.
2,
3,
4,
Attach hoserack by placingthe rack over
the centerback portionof the vacuum.
Be sure to feed the powercordthrough
the hole inthe centerofthe rack.Line up
both screwsholesand use the two smaller
screws to attach.Tighten both until snug.
Attach hoseby placingthe tabbed endinto
the lower left openingon cordedsideof the
vacuum.Makesure the tab onthe hosecuff
andthe holein the vacuumline up. Place
the working end ofthe hose intothe holeon
the side with the extensionwandguides.
Arrangethe hoseso it laysbetweenthe
vacuumandthe rack.
5, StoretheTurboBrushon thefront of thehandle
by aligningthe sloton thebottomwiththetab
onthehandle.Snapintoplace.
6. Storethe CombinationBrushinthe slotshown.
7. Makesurethecrevicetool isinsidethe
extensionwand.Storetoolsonvacuumas
shown.
CAUTION:
Do not plug in your
vacuum cleaner until
you are familiar with
all instructionsand
operatingprocedures.
2a
2b
www.bissell,com 800,237.7691
Transportingyourcleaner
Usethe handleonthefronttocarrythe cleaner
orplacethe cleanerintheuprightpositionand
tip backto rollonthe rearwheels.
Releasingthe powercord
Theupperand lowercordwrapsrotateto allow
forquickand easyremovalof thepowercord.
Fingertip power switch
Thepowerbuttonis locatedat thetop ofthe
vacuumhandle.
Toturn cleaneron, press_) buttononce.
Toturn cleanerOFF,press(_) buttonagain.
Note:Therotatingbrushwill notturnon
unlessthe unitis in the reclinedposition
andthe brushswitchis on.
Handle positions
Useyourfootto pullthehandlereleasepedal
backto reclinethe vacuumcleaner.
Heightadjustment
Therearesevenheightsettingsavailablefor
variousfloorsurfaces.Turnthedialonthefootof
thecleanerto thedesiredsetting.
Lowestsetting- Forlowpile carpetorbare
floors.Topickupdebrisit maybenecessaryto
moveuponesetting.
Mediumsettings - Formediumpilecarpet.
Highsetting- Forhighpileandmostshagcarpet.
Note:Foroptimalcarpetcleaning
performance,adjustto thelowestpractical
setting.If yourcleanerisdifficultto push,
adjustto thenexthighersetting.
If thedialis difficultto turn,tilt thecleaner
backslightlyto take theweightoffthefootwhile
turning.
6www.bissell.com
ATTENTION:
SomeBerbercarpetshavea
tendencyto fuzzwith wear.
Repeatedstrokesinthe same
area may aggravatethis
condition.Considersettingyour
cleanerona higherthan normal
setting for thistypeof carpet.
800.237.7691
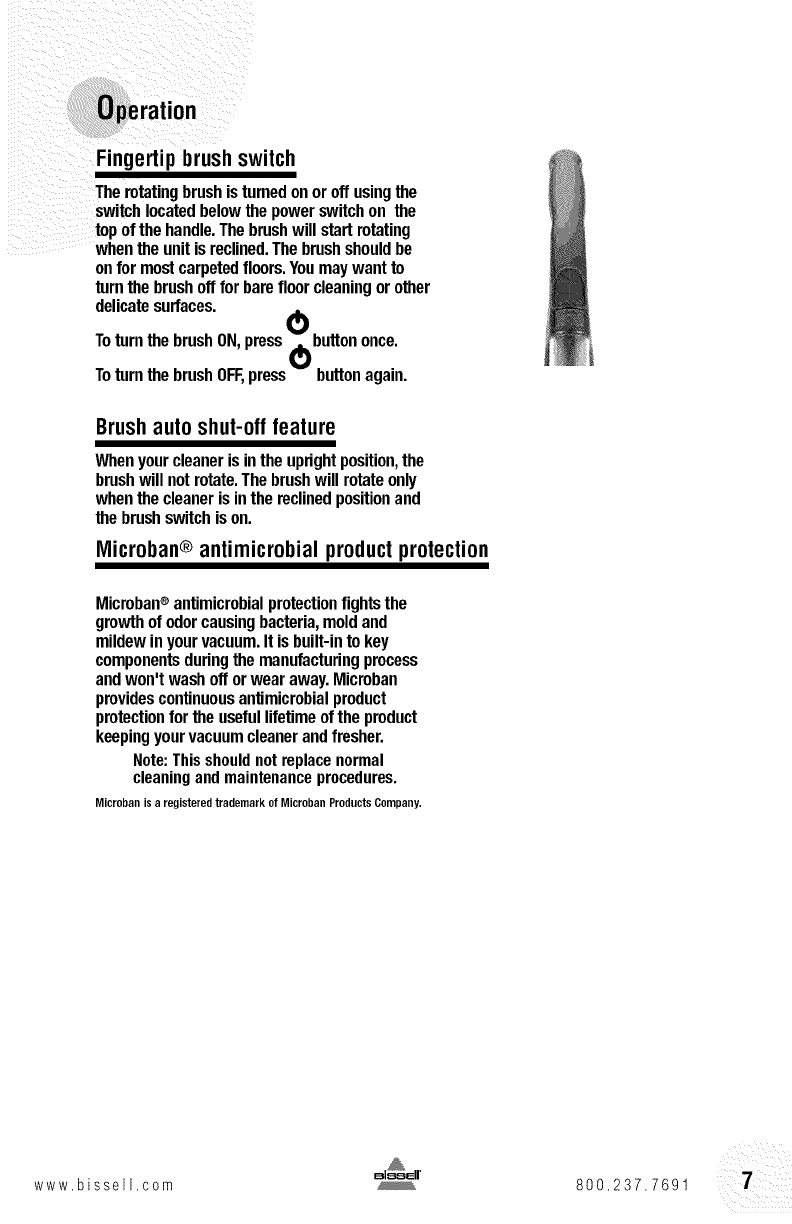
Fingertip brush switch
Therotatingbrushisturnedon oroffusingthe
switchlocatedbelowthepowerswitchon the
topof thehandle.Thebrushwill startrotaUng
whentheunit is reclined.Thebrushshouldbe
onfor mostcarpetedfloors.Youmaywant to
turnthe brushofffor barefloor cleaningor other
delicatesurfaces.
ToturnthebrushON,press_buttononce.
ToturnthebrushOFF,press_) buttonagain.
Brushautoshut-offfeature
Whenyourcleanerisinthe uprightposition,the
brushwill notrotate.Thebrushwillrotateonly
whenthecleaneris inthereclinedpositionand
thebrushswitchis on.
Microban®antimicrobialproduct protection
Microban®antimicrobialprotectionfightsthe
growthof odorcausingbacteria,moldand
mildewinyourvacuum.It is built-into key
componentsduringthemanufacturingprocess
andwon't washoff orwearaway.Microban
providescontinuousantimicrobialproduct
protecUonfor theusefullifetimeofthe product
keepingyourvacuumcleanerandfresher.
Note:Thisshouldnot replacenormal
cleaningandmaintenanceprocedures.
Microban is a registered trademark of Microban Products Company.
www.bissell,com 800.237.7691
Using the tools
1 Make sure the cleaner is in the upright
position.
2. Removethe hosewand fromthe wand
base.This automaticallydiverts the
suctionto the hose.Unwrapthe hosefrom
the cleaner.
3. Usethe hoseandwand aloneor attach
anyof thetools to the endof the hose
wand.
TurboBrush
Userotatingbrushactionfor smallareassuch
asstairsandupholstery.
Note:Pressgentlywhenusingthe
TurboBrushto gainmaximumcleaning.
Toomuchpressurecouldcausethebrush
tostoprotating.
ATTENTION:
Always place the vacuum
cleaner on the floor in its fully
upright position when using
tools.Placing the vacuum in
this position automatically
stopsthe rotating brush.
t
Combination brush
Uselongersoftbristlesfordusting.
Removelong bristleportionanduseshorterstiff
bristleswhen agitationis neededto removedebris.
Crevice tool
Useintightnarrowspaces
Telescopingextensionwand
Usewith desiredattachmentfora longermac& To
extendthewand, twist the collarto "Unlock" and
pushawayfromyou. Twistthe collarto "Lock"
to lock intoplace. Toretract,twist to unlock,pull
towardyouandtwist to relock.
Allavailableitemsmaynotbeincludedwithyour
model. Othertoolsare available;to order,please
referto page19.
i ¸8¸¸¸¸¸¸wwwbisselloom
,,qt,,,,,,D-
/ CAUTION:
Toavoid personal injury
and to prevent the cleaner
from falling when cleaning
stairs, always place it at
the bottomof the stairs.
800.237.7691
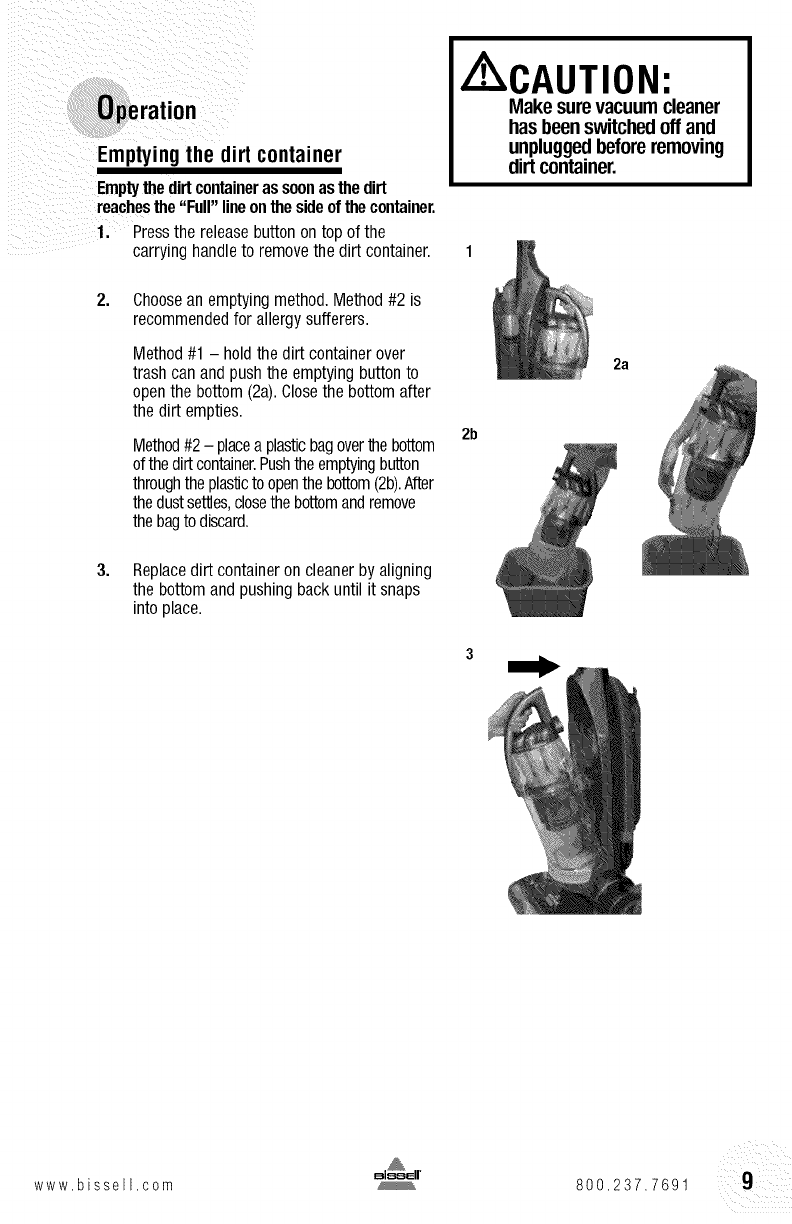
Emptyingthe dirt container
Emptythedirtcontainerassoonasthedirt
reachesthe"Full" lineonthe sideof thecontainer.
1. Pressthe releasebutton on top of the
carrying handleto removethe dirt container.
2, Choosean emptyingmethod.Method#2 is
recommendedfor allergysufferers.
Method#1 - holdthe dirt containerover
trashcan andpush the emptyingbuttonto
openthe bottom (2a).Closethe bottomafter
the dirt empties.
Method#2 - placea plasticbagovermebottom
of thedirtcontainer.Pushthe emptyingbutton
throughtheplas'dcto openthe bottom(2b).After
thedustsettles,closethe bottomandremove
thebagto discard.
3. Replacedirt container oncleanerby aligning
the bottom and pushingback until it snaps
into place.
/ CAUTION:
Make surevacuumcleaner
hasbeenswitchedoff and
unpluggedbeforeremoving
dirtcontainer.
2a
2b
www.bissell,com 800.237.7691
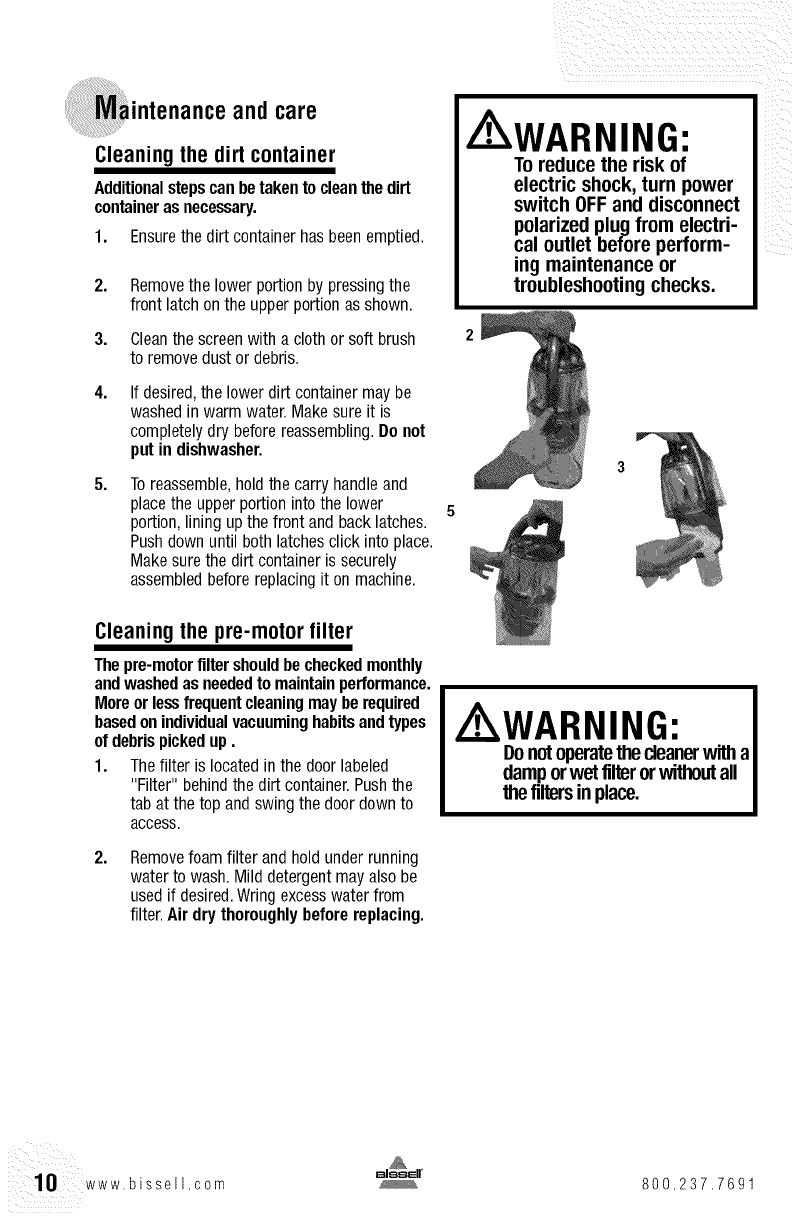
iintenance andcare
Cleaningthe dirt container
Additionalstepscanbetakento cleanthedirt
containerasnecessary.
1. Ensurethe dirt containerhas beenemptied.
2.
3.
4.
5.
Removethe lower portionby pressingthe
front latchon the upperportion as shown.
Cleanthe screenwith a cloth or soft brush
to removedustor debris.
If desired,the lower dirt container maybe
washedin warm water.Make sure it is
completelydry beforereassembling.Do not
put in dishwasher.
Toreassemble,holdthe carryhandleand
placethe upper portionintothe lower
portion,lining up the front and backlatches.
Pushdownuntil both latchesclick intoplace.
Makesure the dirt containeris securely
assembledbefore replacingit on machine.
Cleaningthe pre-motorfilter
Thepre-motorfilter shouldbe checkedmonthly
andwashedas neededto maintainperformance.
Moreor lessfrequent cleaningmaybe required
basedonindividualvacuuminghabitsandtypes
of debrispickedup.
1. Thefilter is located inthe doorlabeled
"Filter" behindthe dirt container.Pushthe
tab at the top and swing the doordownto
access.
2. Removefoam filter andhold under running
water to wash. Mild detergent mayalso be
usedif desired.Wringexcesswater from
filter.Air dry thoroughlybeforereplacing.
_/ iii _ !_iI i _i _
Z WARNING:
To reduce the risk of
electric shock, turn power
switch OFFand disconnect
polarizedplugfrom electri-
cal outlet before perform-
ing maintenance or
troubleshootingchecks.
/ WARNING:
Donotoperatethecleanerwitha
damporwetfilter orwithoutall
thefilters inplace.
i¸ 10 www,bissell,com 800.237.7691
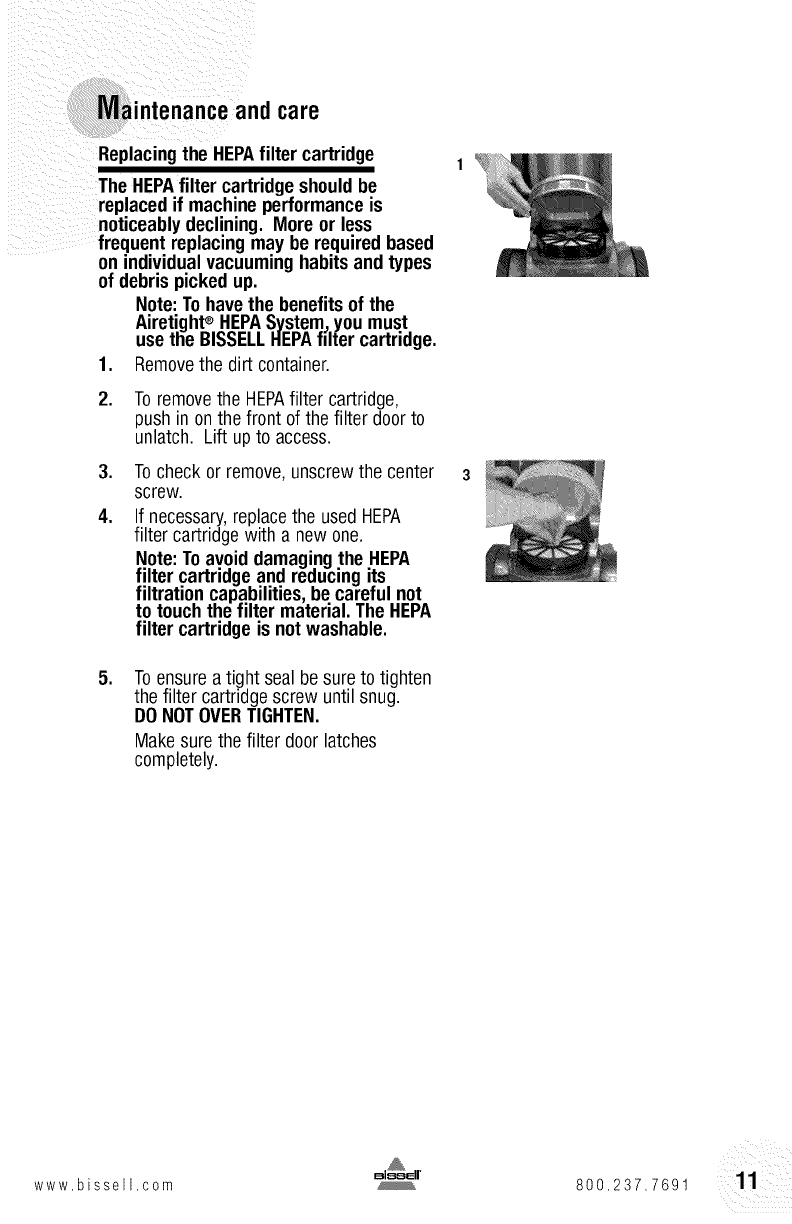
Maintenance andcare
Replacingthe HEPAfilter cartridge
The HEPAfilter cartridgeshouldbe
replacedif machineperformance is
noticeablydeclining. More or less
frequent replacingmaybe requiredbased
on individualvacuuminghabitsandtypes
of debrispicked up.
Note: Tohavethe benefitsof the
Airetight®HEPASystem_youmust
usethe BISSELLHEPAfilter cartridge.
1. Removethe dirt container.
.
,
4.
Toremovethe HEPAfilter cartridge,
push in onthe front of the filter doorto
unlatch. Lift upto access.
Tocheck or remove,unscrewthe center
screw.
If necessary,replacethe used HEPA
filter cartridgewith a new one.
Note: Toavoiddamagingthe HEPA
filter cartridgeandreducingits
filtration capabilities,be careful not
to touchthe filter material.TheHEPA
filter cartridgeis notwashable.
,Toensureatightseal besure to tighten
the filter cartridgescrew until snug.
DONOTOVERTIGHTEN.
Makesurethe filter door latches
completely.
www.bissell=com 800,237.7691
iintenance andcare
Clearingclogs
Low suctionor poor pickup maybe dueto
a clogin the vacuumcleaner.If you notice
a changeinthe soundof the motorora
reductionin the spinningactionin the dirt
container,checkfor a clog.
Ifthereis nosuctionor if suctionis reduced
atthehose,followthesestepsto checkfor
andcleartheclog:
.
2.
3.
.
.
6.
Turnpowerswitch off.
Unplugcleanerfrom electricaloutlet.
Checkthe pre-motorfilter andcleanas
necessary(seecleaningyour pre-motor
filter on page10).
Checkthe HEPAfilter cartridgeand
replaceif necessary(seereplacingthe
HEPAfilter cartridgeon page11).
Checkto see if dirt containeris full.
Emptyif needed.
Removelower portion of dirt container.
Cleanthe screenandcheck center
tubesfor dirt accumulation.
.
8.
Whiledirt containeris removed,check
dirt inletfor clogs.
Removethehosefromthecleanerby
pushingonthetab.Straightenthe hose
andcheckfor a clog.
Checkdiverterareaat backof machine
for diverterpositionandclogs.Whenthe
hosewand is removedfromthe base,
the divertershouldbeupto the right.If a
clogis visiblenearthe diverter,the plas-
tic covermaybe removedto clearthe
clogby removingthe 3 screwsasshown
(9b).
_ii ii iI i_i _ii i
i i i i
[A WARNING:
Toreducethe risk of
electric shock,turn power
switch off and discon-
nect polarized plugfrom
electricaloutlet before
performingmaintenanceor
troubleshootingchecks.
Inlet
9a
9b
12 www.bissell.com 800,237.7691
Maintenance andcare
Clearingclogscontinued
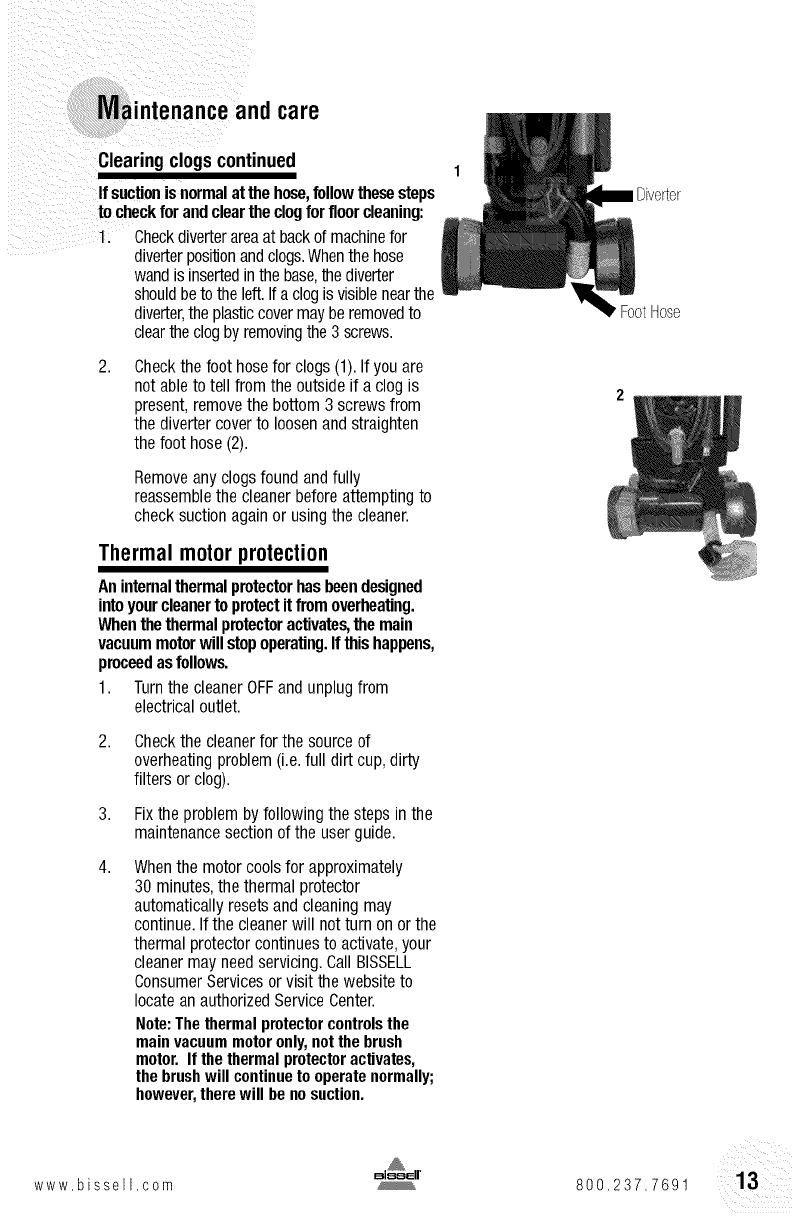
If suctionis normalat the hose,followthesesteps
to checkfor andcleartheclogfor floorcleaning:
1. Checkdiverterareaat backof machinefor
diverterposi'donandclogs.Whenthehose
wandisinsertedin the base,mediverter
shouldbe totheleft.If a clogisvisiblenearthe
diverter,theplasticcovermayberemovedto
cleartheclog byremovingthe3 screws.
2, Checkthefoot hosefor clogs (1).If you are
not abletotell from the outsideif a clog is
present,removethe bottom 3 screwsfrom
the divertercoverto loosenandstraighten
the foot hose(2).
Removeany clogs foundand fully
reassemblethe cleanerbefore attemptingto
checksuctionagain or usingthe cleaner.
Thermal motorprotection
An internalthermalprotectorhasbeendesigned
intoyourcleanertoprotectitfromoverheating.
Whenthethermalprotectoractivates,themain
vacuummotorwillstopoperating.Ifthishappens,
proceedasfollows.
1. Turnthe cleanerOFFand unplugfrom
electricaloutlet.
2,
3,
4.
Checkthe cleanerfor the sourceof
overheatingproblem (i.e.full dirt cup,dirty
filters or clog).
Fixthe problemby followingthe steps in the
maintenancesectionof the user guide.
Whenthe motor coolsfor approximately
30 minutes,the thermal protector
automaticallyresetsand cleaningmay
continue.If the cleanerwill not turn onor the
thermal protectorcontinuesto activate,your
cleanermayneed servicing.Call BISSELL
ConsumerServicesor visitthe websiteto
locatean authorizedServiceCenter.
Note:Thethermalprotectorcontrolsthe
mainvacuummotoronly,notthebrush
motor.If thethermalprotectoractivates,
the brushwillcontinueto operatenormally;
however,therewill beno suction.
Diverter
FootHose
www.bissell.com 800.237.7691
iintenanceandcare
Brushreset
If somethingbecomeslodgedinthefootandthe
brushshutsoff,turnthe cleaneroffandunplug
fromtheoutlet.Removetheobstruction.The
brushwillautomaticallyresetwhenthe cleaner
is pluggedinandturnedbackon.
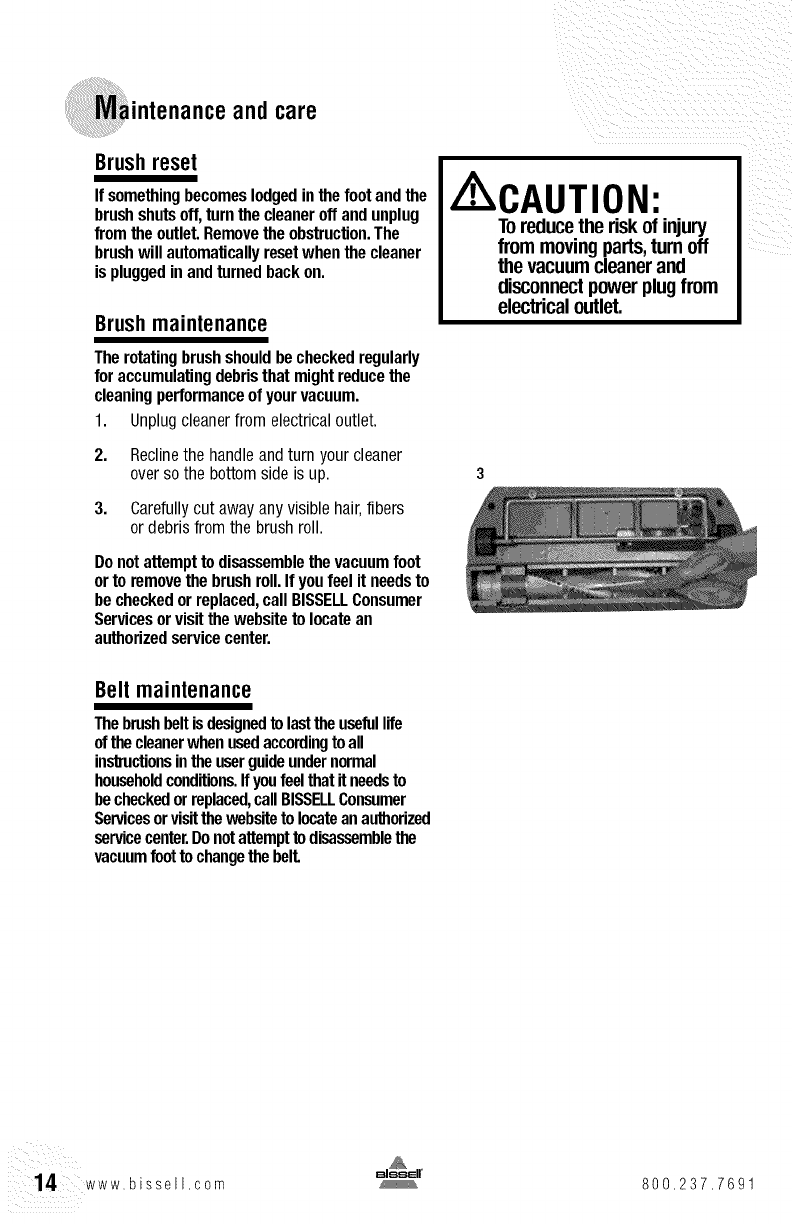
Brushmaintenance
Therotatingbrushshouldbecheckedregularly
for accumulatingdebristhat mightreducethe
cleaningperformanceofyourvacuum.
1. Unplugcleanerfrom electricaloutlet.
2. Reclinethe handleandturn your cleaner
overso the bottomside is up.
3. Carefullycut away any visible hair,fibers
or debrisfrom the brushroll.
Donotattemptto disassemblethevacuumfoot
orto removethe brushroll.If youfeel it needsto
becheckedor replaced,callBISSELLConsumer
Servicesorvisitthewebsiteto locatean
authorizedservicecenter.
/KCAUTION:
Toreducethe riskof injury
from movingparts,turn off
the vacuumcleanerand
disconnectpowerplugfrom
electricaloutlet.
Belt maintenance
Thebrushbeltisdesignedto lasttheusefullife
of thecleanerwhenusedaccordingto all
instructionsintheuserguideundernormal
householdconditions.Ifyoufeelthatitneedsto
becheckedorreplaced,callBISSELLConsumer
Servicesorvisitthewebsiteto locateanaulhorized
servicecenter.Donotattempttodisassemblethe
vacuumfootto changethebelt.
14 www,bissell,com 800.237.7691
Maintenance and care
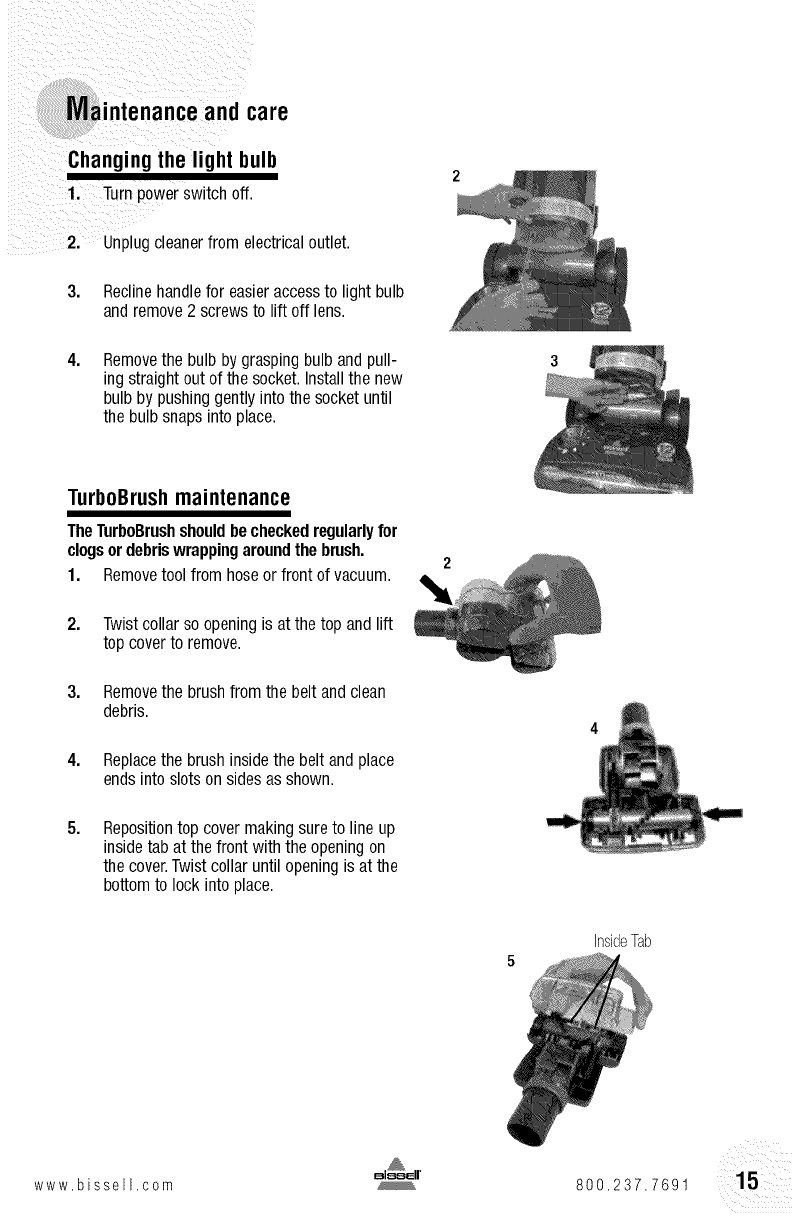
Changingthe light bulb
1. Turn powerswitch off.
2. Unplugcleanerfrom electricaloutlet.
3. Reclinehandlefor easieraccessto light bulb
and remove2 screwsto lift off lens.
4, Removethe bulb by grasping bulband pull-
ing straightout of the socket.Installthe new
bulbby pushinggently intothe socketuntil
the bulb snapsinto place.
TurboBrushmaintenance
TheTurboBrushshouldbecheckedregularlyfor
clogsordebriswrappingaroundthebrush.
1. Removetool from hoseor front of vacuum.
2, Twist collarso openingis at the top and lift
top coverto remove.
3. Removethe brushfrom the belt and clean
debris.
4. Replacethe brushinside the belt and place
endsinto slots on sidesas shown.
5, Repositiontop cover making sureto line up
insidetab at the front with the openingon
the cover.Twist collar until openingis at the
bottomto lock into place.
insideTab
5
www.bissell,com 800.237.7691
iubleshooting
Vacuumcleanerwon'tturnon
Possible causes
1. Powercordnot pluggedin
2. Blownfuse/trippedbreaker
3. Thermalprotectoractivated
4. Handlenotfully attached
iiiiiiiiiiiiiii
/ WARNING:
Toreducethe risk of electric shock,
turn power OFFanddisconnect
polarized plug from electricaloutlet
before performing maintenanceor
troubleshooting.
Remedies
1. Checkelectricalplug
2. Check/replacefuseor resetbreaker
3. Allowcleanerto coolfor 30 minutes,see
pg. 13
4. Removehandleand reinstall
Brushnotrotating
Possible causes
1. Brushswitchturned to "Off"
2. Vacuumisin uprightposition
3. Brushisjammed
4. Brushneedsto be reset
5, Handlenotfully attached
Remedies
1. Makesure brushswitchis in "On"position
2. Reclinevacuumto operatebrush
3. Removeobstructionordebris(pg.14),
unplugcleanerto resetbrush(pg.14)
4. Unplugcleanerto resetbrush(pg. 14)
5. Removehandleand reinstall
Vacuumcleanerwon'tpick upor lowsuction
Possiblecauses
1. Incorrectheightsetting
2. Hosewand notproperlypositioned
3. Dirt containernot installedproperly
4. Dirt containerfull
5. Clogin cleaner
6. Filtersaredirty
7. Hosenot properlyattached
8. Fiberdoorand orgasketmissing
or not installedproperly
16 www.bissell.com
Remedies
1. Turndial to lower setting
2. Makesure hosewand isfully seatedin
baseand diverteris seatedto the left
3. Checkassemblydupperandlowerportions,
correctlypositionandsnapintoplace
4. Emptydirt container
5. Followinstructionson pg. 12-13 for
clearingclogs
6. Checkand cleanfoamfilter,checkand
replaceHEPAfilter cartridgeif needed
7, Makesure hosecollaris twistedto
lock position
8. Checkfilter doorand gasketto verify.
800,237.7691
Vacuumcleaneris difficultto push
Possible causes
1. Incorrectheightsetting
Remedies
1. Turndialto highersetting
Visibledustescapingfrom cleaner
Possible causes
1. Filterdoorand orgasketmissing
or not installedproperly
2. Foamfiltermissingor notinstalledproperly
3. HEPAfiltercartridgemissingor not installedproperly
Remedies
1. Checkfilterdoorandgasket
2, Checkfoamfilterfor correctinstallation
3. CheckHEPAfiltercartridgefor
correctinstallation
4. Dirtcontainernot installedproperly 4.
5. Dirtcontainernot assembledproperly 5.
6. Hosenot installedproperly 6.
Makesuredirt containeris correctly
positionedandsnappedintoplace
Checkscreen,upperand lowerportionsof
the dirt containerfor properassembly
Makesurehosewand isfully seatedin
base,andthat the hoseisassembled
correctlyto me unit.Seepage5.
Alsomakesurefoot hoseisproperly
attachedto diverterarea
7. Holeor crack in hose 7. Checkhosefor holesor cracksandreplace
if needed
Other maintenance or service not included in the manual should be performed by an
authorized service representative.
Thankyoufor selecting a BISSELLproduct.
Pleasedonotreturnthisproducttothestore.]
ForanyqueslJonsorconcerns,BISSELLis happyto beofservice.
Contactusdirectlyat 1-800-237-7691.
www bissell corn 800.237.7691

ConsumerServices
For information about repairs or replacement parts, or questions about your warranty, call:
BISSELLConsumerServices
1-800-237-7691
Monday - Friday 8 a.m. 10 p.m. EST
Saturday 9 a.m. 8 p.m. EST
Orwrits:
BISSELLHOMECARE,iNC
POBox3606
GrandRapidsMI49501
ATrN:ConsumerServices
Or visitthe BISSELLwebsite- www,bissell,com
WhencontactingBISSELL,havemodelnumberof cleaneravailable.
Pleaserecordyour ModelNumber:
Pleaserecordyour PurchaseDate:
NOTE:Pleasekeepyouroriginalsalesreceipt.It providesproofof dateof purchaseintheevent
ofa warrantyclaim.SeeWarrantyonpage20for details.
Pleaseregisteryournew BISSELLproductat
www,bissell.com/productregistration
18 www,bissell,com 800,237,7691

Replacement partsandaccessories
Youmaypurchasepartsfromyourretailer,bycallingBISSELLConsumerServicesorby
visitingour website.Belowis a listof commonreplacementparts*.Whilenotall ofthese
partsmayhavecomewithyourspecificmodel,theyareavailablefor purchaseifdesired.
Pleasenote,allattachmentsmaynotstoreonboardyourvacuum.
Item Part No. Part Name
1 48G7 HEPAFilterCartridge
2 63M7 FoamFilter
3 203-1362 TurboBrush
4 203-1364 TelescopingWand
5 203-1365 CombinationBrush
6 203-1363 CreviceTool
7 203-1382 ContourTool
8 203-1485 Hose
9 203-1469 LightBulb
*Not all parts are included with every model. Other tools may be available.
Contact BISSELLConsumer Services or visit our website for more detail.
Earn Rewards Points!
Toqualify you for discounts,rebates, and other BISSELLperks,
Visit www,bissell,com/rewards to learn more,
www.bissell.com 800.237.7691
_i ii_iI
-BISSELL Healthy Home VacuumTM
Thiswarranty givesyou specific legal rights,and you may also haveother rights which may varyfrom stateto
state. If you needadditional instruction regarding this warranty or havequestionsregardingwhat it may cover,
please contact BISSELLConsumerServicesby E-mail, telephone,or regular mail as described below.
LimitedFiveYearWarranty
Subjectto the *EXCEPTIONSAND EXCLUSIONSidentified below,upon receipt of the product BISSELL
Homecare,Inc.will repair or replace (with new or remanufacturedcomponentsor products),at BISSELL'soption,
free of chargefrom the date of purchase by the original purchaser,for five yearson any defective or
malfunctioning part.
See information belowon "If your BISSELLproductshould require service".
Thiswarrantyappliesto productusedfor personal,and not commercialor rentalservice.Thiswarrantydoesnotapply
to fansor routinemaintenancecomponentssuch asfilters,or brushes.Damageormalfunctioncausedby negligence,
abuse,neglect,unauthorizedrepair,or anyotherusenot in accordancewith the User'sGuideisnot covered.
If your BISSELLproductshould require service:
ContactBISSELLConsumerServicesto locatea BISSELLAuthorizedServiceCenterinyourarea.
If youneedinformationaboutrepairsor replacementparts,or if youhavequestionsaboutyourwarranty,
contactBISSELLConsumerServices.
Websiteor E-mail:
www.bissell.com
Usethe "CustomerService"tab.
OrCall:
BISSELLConsumerServices
1-800-237-7691
Monday- Friday8 a.m.- 10p.m.ET
Saturday9 a.m.- 8 p.m.ET
Orwrite:
BISSELLHomecare,Inc.
P0Box3606
GrandRapidsM149501
ATTN:ConsumerServices
BlSSELLHOMECARE,INC.IS NOTLIABLEFORINCIDENTALORCONSEOUENTIALDAMAGESOFANYNATURE
ASSOCIATEDWITHTHEUSEOFTHISPRODUCT.BlSSELL'SLIABILITYWILLNOTEXCEEDTHEPURCHASEPRICE
OFTHEPRODUCT.
Some statesdo not allow the exclusionor limitationof incidentalor consequentialdamages,sothe above
limitationor exclusionmay not applyto you.
*EXCEPTIONSANDEXCLUSIONSFROMTHETERMSOFTHELIMITEDWARRANTY
THISWARRANTYIS EXCLUSIVEANDIN LIEUOFANYOTHERWARRANTIES
EITHERORALORWRITTEN.ANY IMPLIEDWARRANTIESWHICHMAYARISEBY Bi
OPERATIONOFLAW,INCLUDINGTHE IMPLIEDWARRANTIESOF MERCHANTABILITY
ANDFITNESSFORA PARTICULARPURPOSE,ARELIMITEDTO THEFIVEYEAR Ell
DURATIONFROMTHEDATEOF PURCHASEAS DESCRIBEDABOVE.
Somestatesdo not allow limitationson howlong an impliedwarranty lasts, so
the abovelimitation may not apply to you.
20 www.bissell.com
@2009 BISSELLHomecare, lee
Grand Rapids,Michigan
AI] fights reserved.Printedin China
Part Number 110-41 O0
Rev 5/09
Visitour websJteat:
www.bLsseH.com
800.237.7691
