Blaupunkt Europe PHL835 CAR DVD PLAYER User Manual CE69M5325A 127075004976 EN
Blaupunkt Europe GmbH CAR DVD PLAYER CE69M5325A 127075004976 EN
UserManual.wiki
>
Blaupunkt Europe
>
PHL835 User Manual
User Manual
Navigation menu
Upload a User Manual
Namespaces
Wiki Guide
HTML
PDF
Info
Views
User Manual
Discussion / Help
Navigation
![25DEUTSCHENGLISHControls – Remote controlC SRC buttonCall up main menu D / EJECT buttonEject a CD/DVDE AUDIO / MUSIC buttonSelect playback language (if available on DVD)Call up folder overview of audio les F DISP buttonShow information on the display G ZOOM buttonZoom in on image area H BAND buttonSelect waveband/memory bank I buttonAnswer a call J GOTO buttonDirectly select title, chapter, movie or playtimeK RPT A-B buttonDe ne range for repeat function L RPT buttonRepeat function M SETUP buttonCall up settings menu N buttonStart and interrupt playbackCon rm settings O / / / buttonNavigate in menus and change settingsTuning into stations manually ( / )Starting station seek tuning ( / ) P buttonSlow-motion playback Q Number buttons 0 - 9 R / MIX buttonRandom track play S / SCN buttonScan function T MUTE buttonMute audio source U buttonQuit playback V VOL + / – buttonAdjusting the volume W PIC buttonScreen settings X / buttonSelect title, chapter, movieFast searching Y buttonEnding/rejecting a phone call Z CLEAR buttonDelete last character of an entry [ TITLE buttonCall up title and chapter list \ MENU buttonCall up DVD menu ] ANGLE / VIDEO buttonSelect camera viewing angle (if available on DVD) Call up folder overview of movies a SUBTITLE / PHOTO buttonSelect subtitle language (if available on DVD)Call up folder overview of images b buttonSwitching device on/o c EQ buttonCall up equaliser menu 20222426282932333123252730211934353637394042443847454341484602_Philadelphia835_gb.indd 2502_Philadelphia835_gb.indd 2520.12.12 13:5620.12.12 13:56](https://usermanual.wiki/Blaupunkt-Europe/PHL835/User-Guide-1884342-Page-3.png)
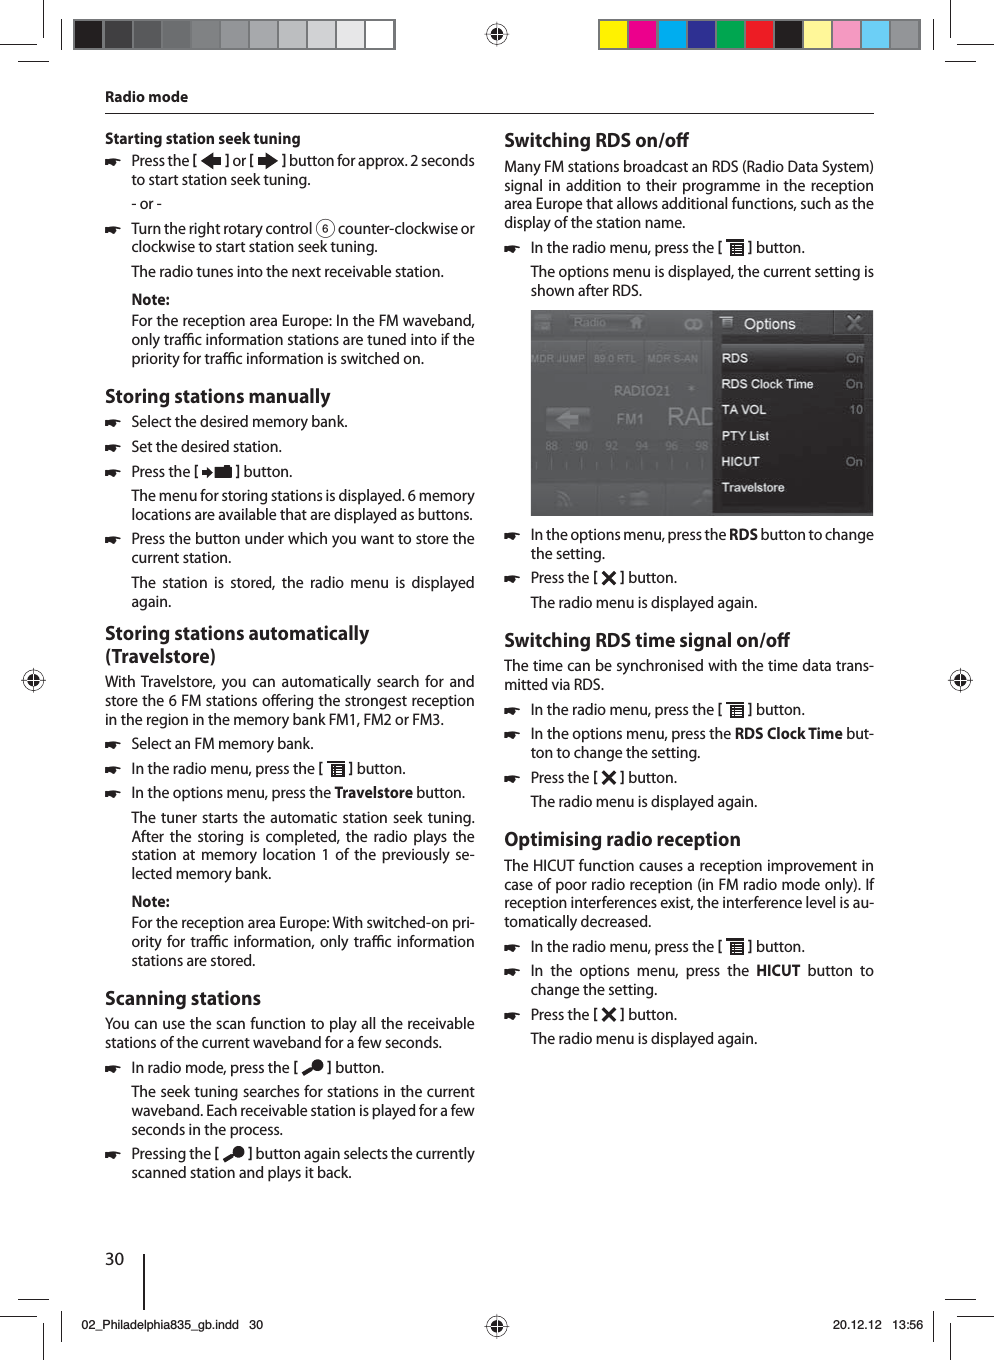
![36USB data carrierThis device features two USB ports: • USB1 is located under the cover at the front of the device. • USB2 is implemented as a USB port on a cable at the rear of the device. You can connect the cable to a USB port integrated in the vehicle when you install the device. Connecting the USB data carrier 쏅Pull the cover plate 9 at the left side to the front until is disengages and fold it to the right. 쏅Insert the USB data carrier in the USB socket <.The device automatically switches to USB mode. The data are read, the playback starts with the rst media le recognized by the device.Removing the USB data carrier 쏅Turn o the car sound system. 쏅Disconnect the USB data carrier.SDHC cardsThis device features an SDHC card slot under the cover at the front of the device.Inserting the SDHC card 쏅Pull the cover plate 9 at the left side to the front until is disengages and fold it to the right. 쏅Insert the SDHC card with its labelled side to the left ( attened corner to the top) and its contacts rst into the card slot; until it clicks into place.The device automatically switches to SDHC mode. The data are read, the playback starts with the rst media le recognized by the device.Removing the SDHC card 쏅If necessary, open the cover 9. 쏅Push on the SDHC card until it disengages. 쏅Pull the SDHC card out of the card slot ;.iPod/iPhone via USBYou can connect numerous iPod® and iPhone® models to the car sound system via the USB ports and control the audio playback from the car sound system.Note:A list of compatible iPod® and iPhone® models is lo-cated at the end of these instructions. Blaupunkt can-not guarantee the awless function of other iPod® and iPhone® models. Use a suitable adapter cable to connect your iPod® or iPhone® with the USB port of the car sound system. 쏅Insert the USB plug of th e adapter cable into the USB socket < under the cover plate 9.The device automatically switches to USB mode. The data are read, the playback starts with the rst media le on the iPod®/iPhone® recognized by the device.DVD movie playbackThe Philadelphia 835 can play video DVDs and VCDs. Af-ter inserting the DVD, the playback starts automatically. The DVD menu is displayed. You can navigate in the DVD menu by touching the corre-sponding buttons in the DVD menu on the touchscreen. After starting the movie via the menu of the DVD, the movie is displayed. The playback menu for DVDs is hid-den. 쏅Brie y touch the touchscreen once to display the playback menu again.The playback menu is shown.[ ] Display the second page of the menu.[ ] End playback, call up DVD menu.[ ] Select previous chapter.[ ] Interrupt playback and continue playback.[ ] Select next chapter.[ ] Fast searching reverse.[ ] Fast searching forward.Note:You can also select a chapter by turning the right ro-tary/pushbutton 6 and interrupt or continue play-back by pressing it. 쏅Touch to display the second page of the play-back menu.The second page of the playback menu is displayed.DVD/CD/USB/SDHC/iPod media playback02_Philadelphia835_gb.indd 3602_Philadelphia835_gb.indd 3620.12.12 13:5620.12.12 13:56](https://usermanual.wiki/Blaupunkt-Europe/PHL835/User-Guide-1884342-Page-14.png)
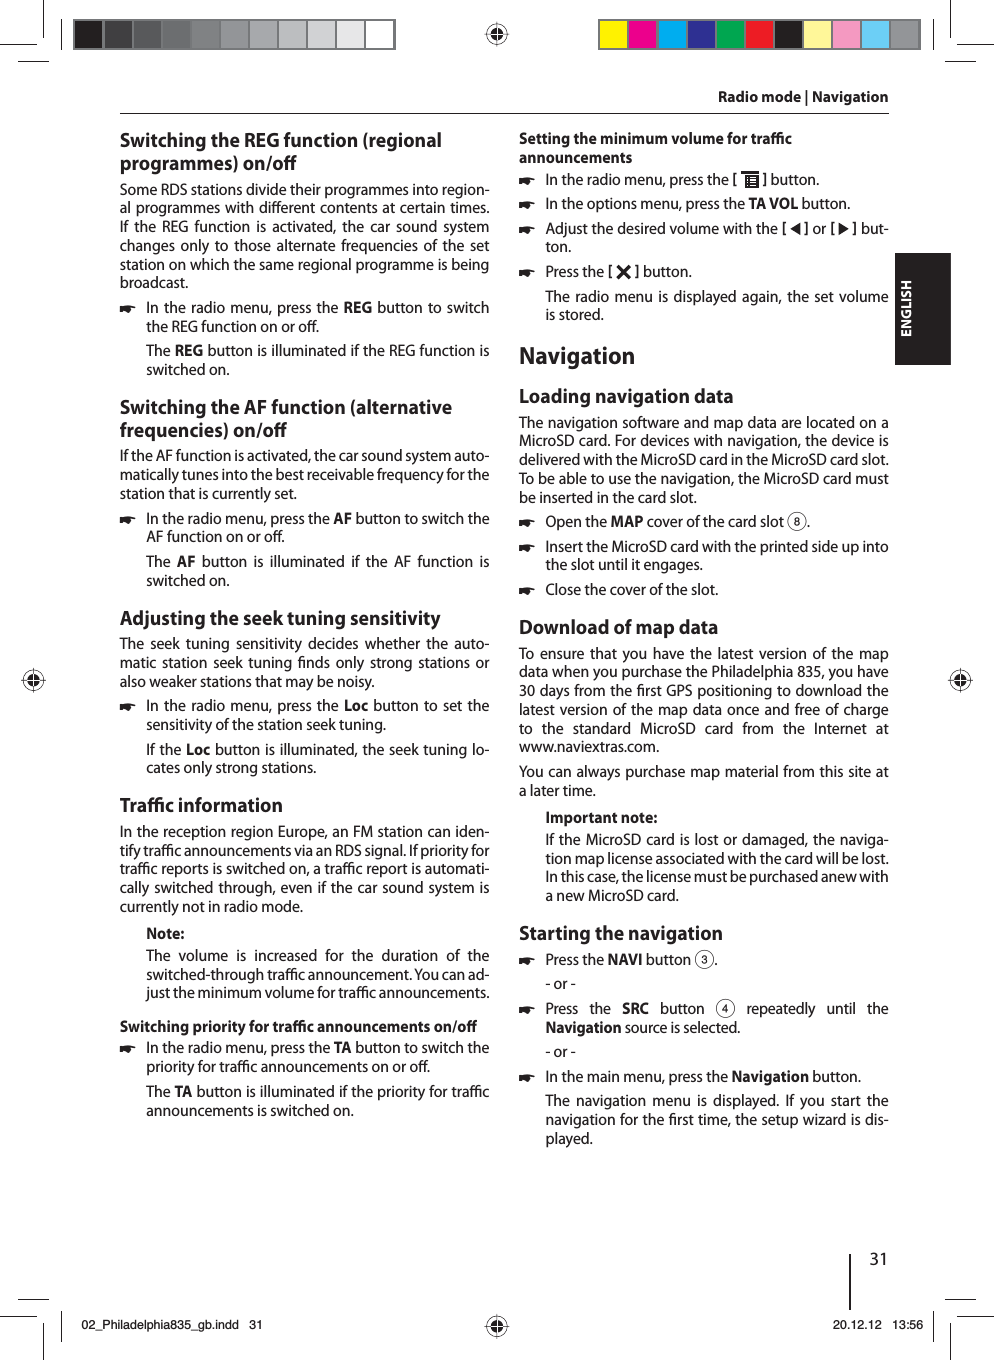
![37DEUTSCHENGLISH[ ] Display rst page.[ ] Select playback language (only if supported by the DVD).[ ] Show subtitles (only if supported by the DVD).[ ] Switch repeat function for chapter or area A-B on/o .[ ] De ne range for repeat function.[ ] Switch camera viewing angle (Angle) (only if supported by the DVD).[ ] Call up keypad for direct selection of titles, chapters or playing time.Audio playback of DVD/CD, USB, SDHC or iPod/iPhoneThe principles of the audio playback (MP3/WMA) from data carriers or iPod®/iPhone® are identical for all sources. 쏅Selected the desired source via the main menu or with the SRCbutton 4.If the playback starts with image or video les, 쏅press the button to change to the audio play-back.The folders of the data carrier containing audio les are displayed. [ ] Change to next higher folder level.[ ] Move selection mark. [ ] Move selection mark. [ ] Open selected folder or start titles. - or -Double-click on the name of the folder/title. The folder is opened/the title is started.[ ] Continue playback only iPod®/iPhone®.[ ] Display keypad to directly enter the number of the desired title.[ ] Display equalizer.Note:You can also move the selection mark by turning the right rotary/pushbutton 6 and open the se-lected folder or start the track by brie y pressing it. To change to the next higher folder level, press the right rotary/pushbutton 6 for approx. 2 seconds. After starting a title, the playback menu is displayed.[ ] Display folder view.[ ] Short press: Title selection. Long press: Fast searching.[ ] Interrupt playback (pause).[ ] Short press: Title selection. Long press: Fast searching.Note:You can also select a track by turning the right rotary/pushbutton 6 and interrupt or continue playback by pressing it. Audio playback from DVD/CD, USB or SDHC:[ ] Start and end REPEAT function.The REPEAT mode changes each time the button is pressed.Display REPEAT modeRepeat current trackRepeat current folderRepeat all tracks of data carrier[ ] Start MIX random track play and end it again.If the MIX function is activated, the button is displayed as highlighted.The MIX mode depends on the selected REPEAT function.REPEAT mode displayMIX modeNo random track play Mixing tracks of the current folderMixing tracks of the data carrierDVD/CD/USB/SDHC/iPod media playback02_Philadelphia835_gb.indd 3702_Philadelphia835_gb.indd 3720.12.12 13:5620.12.12 13:56](https://usermanual.wiki/Blaupunkt-Europe/PHL835/User-Guide-1884342-Page-15.png)
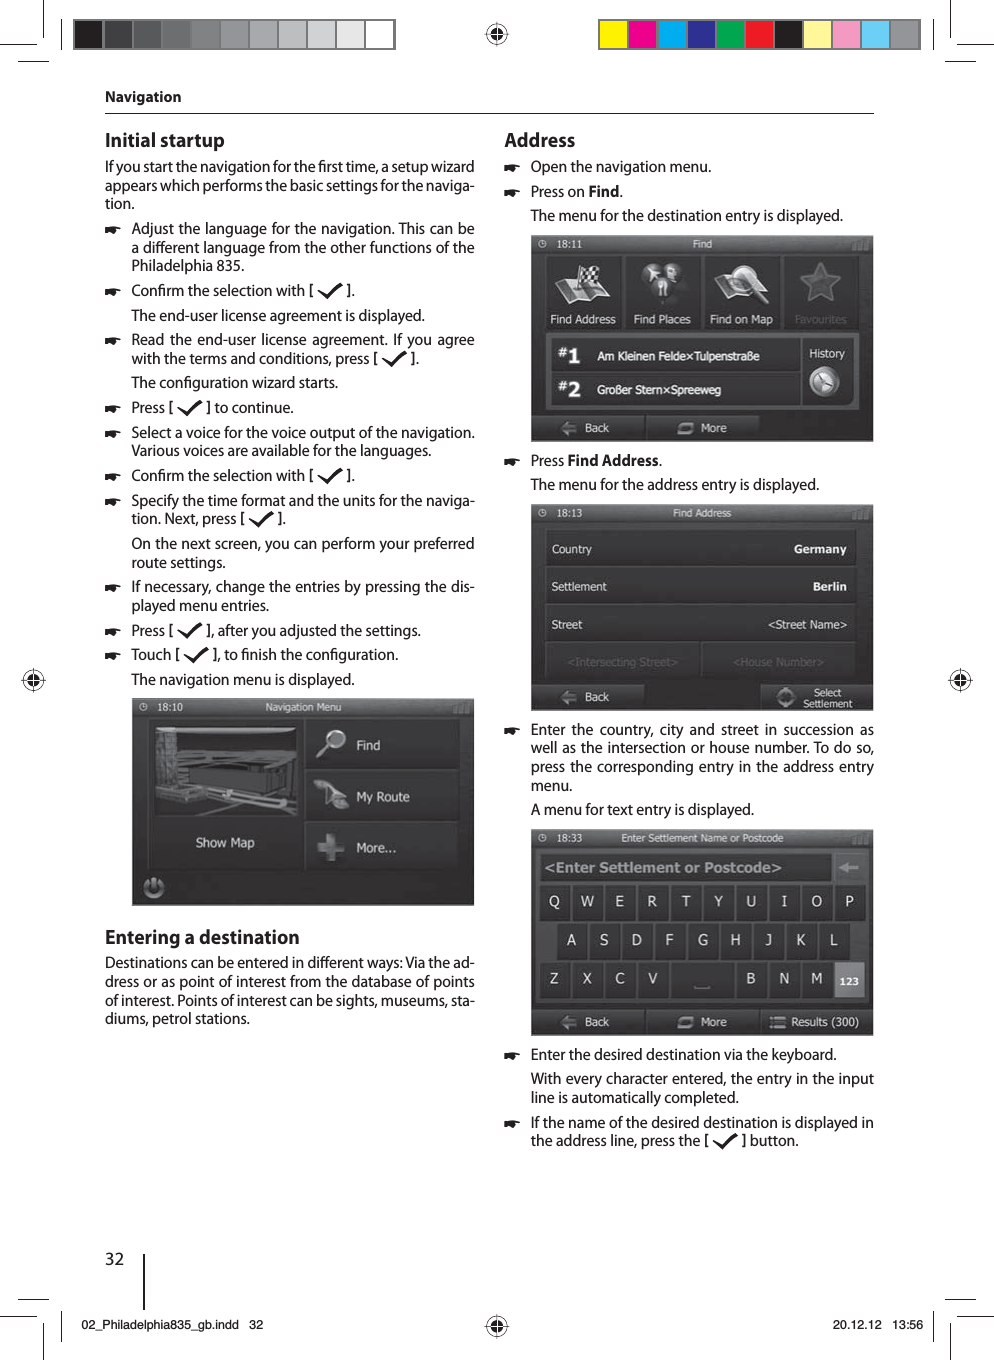
![38Audio playback from iPod®/iPhone®:[ ] Start and end REPEAT function.The REPEAT mode changes each time the button is pressed.Display REPEAT modeRepeat current trackRepeat current selection[ ] Start MIX random track play and end it again.The MIX mode changes each time the button is pressed.Display MIX modeMixing tracks of the current selectionMixing tracks of the current albumNote:The random track play of tracks depends on the iPod®/iPhone® model used. Video playback from DVD/CD, USB or SDHC 쏅Selected the desired source via the main menu or with the SRCbutton 4.If the playback starts with audio or image les, 쏅press the button to change to the video play-back.The folders of the data carrier containing movie les are displayed. Note:Folders and titles are selected and started as de-scribed under audio playback.If you selected a movie, the playback is started. During the movie playback, the playback menu is hidden. 쏅Brie y touch the touchscreen once to display the playback menu again.The playback menu is shown.[ ] Display the second page of the menu.[ ] End playback, change to folder view.[ ] Select previous movie.[ ] Interrupt playback and continue playback.[ ] Select next movie.[ ] Fast searching reverse.[ ] Fast searching forward.Note:You can also select a lm by turning the right rotary/pushbutton 6 and interrupt or continue playback by pressing it. Second page of playback menu.[ ] Display rst page.[ ] End playback, change to folder view.[ ] Select playback language (only if supported by the movie).[ ] Show subtitles (only if supported by the movie).[ ] Switch repeat function for movie or folder on/o .[ ] Switch random playback on/o .[ ] Call up keypad for direct selection of movie or playing time.DVD/CD/USB/SDHC/iPod media playback02_Philadelphia835_gb.indd 3802_Philadelphia835_gb.indd 3820.12.12 13:5620.12.12 13:56](https://usermanual.wiki/Blaupunkt-Europe/PHL835/User-Guide-1884342-Page-16.png)
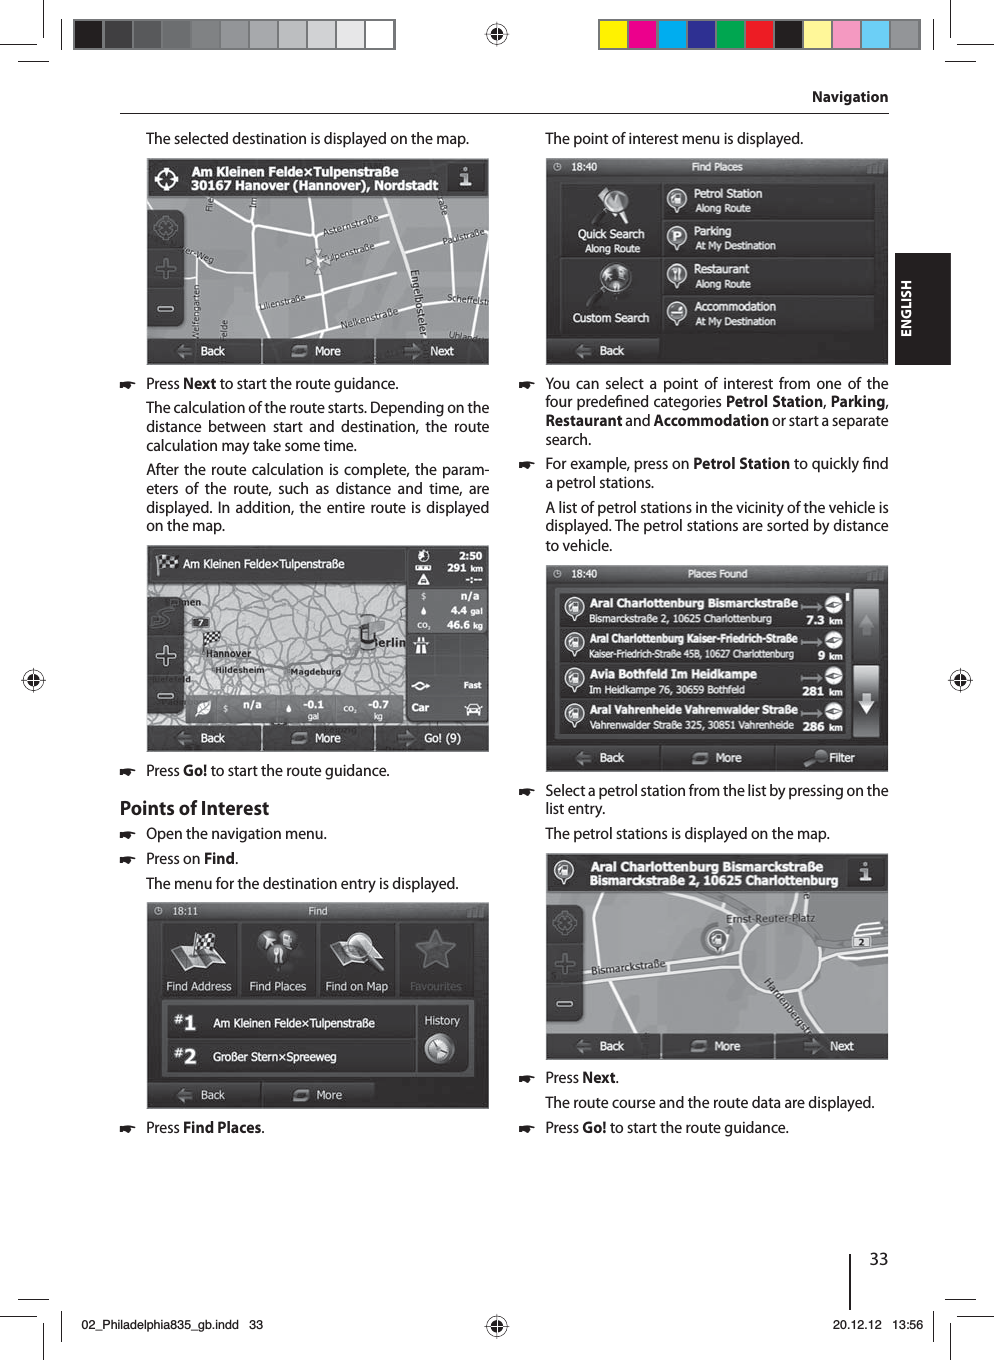
![39DEUTSCHENGLISHNote:You can play back video les stored on an iPod®/iPhone® with this device. For this purpose, the iPod®/iPhone® must be connected with the device using a special cable (USB - AV) that is commercially available.Image playback from DVD/CD, USB or SDHC 쏅Selected the desired source via the main menu or with the SRCbutton 4.If the playback starts with audio or movie les, 쏅press the button to change to the image play-back.The folders of the data carrier containing images are displayed. Note:Folders and images are selected and started as de-scribed under audio playback.Bluetooth modeThe Bluetooth® function allows registering cell phones and media playback devices with the Philadelphia 835. When you register a cell phone with the Philadelphia 835, you can make phone calls with the built-in hands-free function. You can access the lists of dialled numbers and the phone book of the registered cell phone. If the connected Bluetooth® device supports the func-tions A2DP and AVRCP, you can play the music via the Philadelphia 835 unit and control the playback. During a call, the music playback is interrupted and continued again after the call. If a cell phone is registered via Bluetooth® and a call is re-ceived during the playback of another source, the source playback is interrupted and the call menu is displayed.Starting Bluetooth mode 쏅Press the PHONE button 2.- or - 쏅Press the SRC button 4 repeatedly until the Bluetooth source is selected.- or - 쏅In the main menu, press the Bluetooth button.The Bluetooth® menu is displayed. It contains the list of known Bluetooth® devices. Other audio sources are switched o .[ ] Change to next higher level.[ ] Move selection mark. [ ] Move selection mark. [ ] Disconnect connection to marked device.[ ] Delete marked device from the list.[ ] Display options menu. 쏅Double-click on the name of the Bluetooth® device with which you want to establish a connection.When the device is in range, the connection is estab-lished and the menu for the device is displayed.DVD/CD/USB/SDHC/iPod media playback | Bluetooth mode02_Philadelphia835_gb.indd 3902_Philadelphia835_gb.indd 3920.12.12 13:5620.12.12 13:56](https://usermanual.wiki/Blaupunkt-Europe/PHL835/User-Guide-1884342-Page-17.png)
![40Note:You can also move the selection mark by turning the right rotary/pushbutton 6 and establish a connec-tion with the selected device by brie y pressing it. To change to the next higher level, press the right rotary/pushbutton 6 for approx. 2 seconds. Registering Bluetooth devicesIf you want to register a device with the Philadelphia 835 for the rst time, proceed as follows: 쏅Ensure that Bluetooth® is activated at the Philadelphia 835 and at your Bluetooth® device. 쏅In the options menu of the Bluetooth® mode, enter a pairing code (see Bluetooth® settings). 쏅Search for new devices/connections on your Blue-tooth® device. 쏅The Philadelphia 835 appears as "Philadelphia" in the list of Bluetooth® devices. 쏅Establish the connection; you may have to enter the pairing code that was previously de ned on the Philadelphia 835.The connection is being established and the menu for the registered device is displayed.Note:If a telephone is connected with the Philadelphia 835 unit, the Bluetooth® icon is displayed at the top right edge of the display in all audio/video sources.Telephone mode - BluetoothIf you registered a phone with the Philadelphia 835 via Bluetooth®, the following menu appears.[ ] Change to next higher level.[ ] Move selection mark. [ ] Move selection mark. [ ] Disconnect connection with current device.[ ] Display keypad to directly enter a phone number[ ] Display options menu. 쏅Select a contact/number via the call lists or the phone book and double the entry twice (double-click). The connection is being established.Note:You can also move the selection mark by turning the right rotary/pushbutton 6 and con rm the se-lected entry by brie y pressing it. To change to the next higher level, press the right rotary/pushbutton 6 for approx. 2 seconds.If a call is coming in, the call menu is displayed.[ ] Answer a call.[ ] Reject a call.If a second call arrives during a phone call, you have the following options: 쏅Press the button to pause the active call and to answer the incoming call. 쏅Press the button to switch back and forth be-tween the two calls. Note:This function must be activated on your phone.Audio playback - BluetoothIf an audio streaming device is connected with the Philadelphia 835 unit via Bluetooth®, you can play back the music via the Philadelphia 835 unit and control the playback. 쏅In the Bluetooth® menu, press the button to change to the audio playback.[ ] Short press: Title selection. Long press: Fast searching.[ ] Interrupt playback and continue playback.[ ] Short press: Title selection. Long press: Fast searching.Bluetooth mode02_Philadelphia835_gb.indd 4002_Philadelphia835_gb.indd 4020.12.12 13:5620.12.12 13:56](https://usermanual.wiki/Blaupunkt-Europe/PHL835/User-Guide-1884342-Page-18.png)
![41DEUTSCHENGLISH[ ] Disconnect connection with current device.[ ] Display options menu.Note:You can also select a track by turning the right rotary/pushbutton 6 and interrupt or continue playback by pressing it. Bluetooth settingsIn the options menu for Bluetooth®, you can make the basic settings for the Bluetooth® mode. 쏅In the Bluetooth® menu, press the button. The options menu is displayed.Bluetooth – Bluetooth® can be switched on or o .Auto connect – If "Auto Connect" is activated, the device automatically connects with known Blue-tooth® devices as soon as they are in range.Auto answer – If "Auto Answer" is activated, incom-ing phone calls are automatically answered.Pairing code – Many Bluetooth® devices request the pairing code before establishing the connection. You can de ne it here.Phone book sync – To be able to access the phone book of a connected telephone, you must rst syn-chronise it via this menu entry.Auto sync – If "Auto sync" is activated, the synchro-nisation of the phone book is performed automati-cally as soon as the telephone is connected with the device.Bluetooth mode | Rear Seat Entertainment Rear Seat Entertainment (RSE)The Philadelphia 835 features outputs to connect two external monitors and audio outputs for the rear area of the vehicle.Since a di erent programme can be displayed on the ex-ternal monitors than on the device, it is possible to view images and movies on an external monitor while driving. The audio playback for the RSE is established via the sockets Rear Out R and Rear Out L. These sockets should be connected with suitable jack sockets so that the pas-sengers in the front can listen to their audio programme via headphones.Starting RSE via external monitors: 쏅Select the desired source via the main menu and start the lm playback, e.g. from a DVD. The lm is displayed on the monitor of the Philadelphia 835 unit. 쏅Call up the main menu. 쏅Press the button.The RSE main menu is displayed. 쏅Select the same source in the RSE main menu as pre-viously done in the main menu. The lm is now also displayed on the external moni-tors. 쏅Press the button to change back to the main menu.Note:If you select di erent source for the built-in monitor, the lm playback continues to be displayed on the external monitors. 쏅To deactivate the RSE, change to the RSE main menu and press the Rear o button. 02_Philadelphia835_gb.indd 4102_Philadelphia835_gb.indd 4120.12.12 13:5620.12.12 13:56](https://usermanual.wiki/Blaupunkt-Europe/PHL835/User-Guide-1884342-Page-19.png)
![42External audio/video sources | Sound settings External audio/video sourcesThis device features two external AV inputs for audio and video playback: • AV-IN 1 is located under the cover at the front of the device. • AV-IN 2 is implemented as a cinch socket on a cable at the rear of the device. You can specify the instal-lation location of the port during the installation of the device. Danger! Increased risk of injury from connector.In case of an accident, the protruding connec-tor in the front AV-IN socket may cause injuries. The use of straight plugs or adapters leads to an increased risk of injury. 쏅Start the AV-IN mode AV-IN 1 or AV-IN 2 via the main menu or with the SRCbutton 4.The display shows the audio or video playback of the selected AV source. Sound settingsVolume distribution (fader/balance)You can adjust the volume distribution in the vehicle for all sources. 쏅In the current source or in the main menu, press the button.The equalizer menu is displayed. 쏅Press the button.The menu for fader and balance is displayed. 쏅Adjust fader and balance with / or / . 쏅Next press on Equalizer . The setting is stored, the menu of the current source or the main menu is displayed again.EqualizerYou can adjust the equalizer for all sources. 쏅In the current source or in the main menu, press the button.The equalizer menu is displayed. 쏅Select a preset equalizer with or .- or - 쏅Use or to adjust the level for Bass, Mid and Treble as well as the frequency of the LPF, MPF and HPF lters according to your needs. 쏅Next press on Equalizer . The setting is stored, the menu of the current source or the main menu is displayed again.Note:With the [ ] button, you can restore the default val-ues of the selected equalizer presettings. 02_Philadelphia835_gb.indd 4202_Philadelphia835_gb.indd 4220.12.12 13:5620.12.12 13:56](https://usermanual.wiki/Blaupunkt-Europe/PHL835/User-Guide-1884342-Page-20.png)