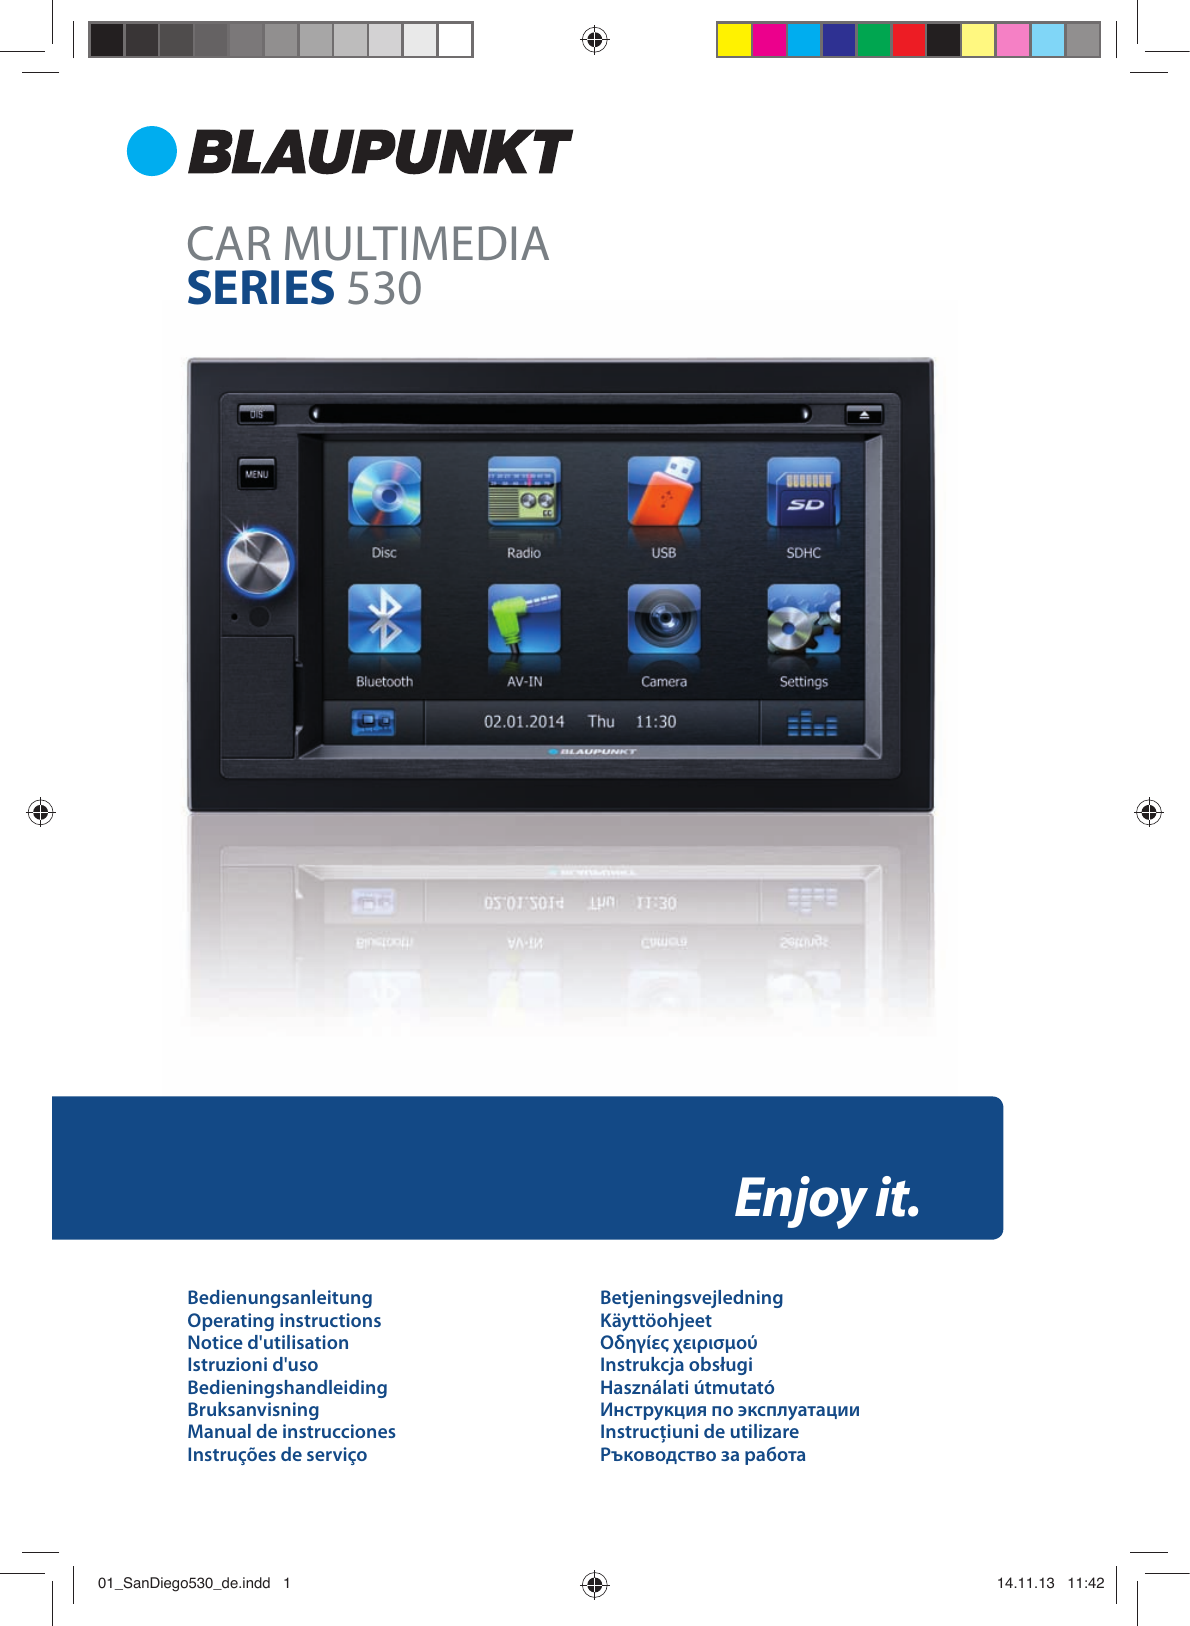
Blaupunkt Europe SANDIEGO530 Car DVD Player User Manual
Blaupunkt Europe GmbH Car DVD Player
UserManual.wiki
>
Blaupunkt Europe
>
SANDIEGO530 User Manual
>
Part 1
Contents
1.
Part 1
2.
Part 2
Part 1
Navigation menu
Upload a User Manual
Namespaces
Wiki Guide
HTML
PDF
Info
Views
User Manual
Discussion / Help
Navigation
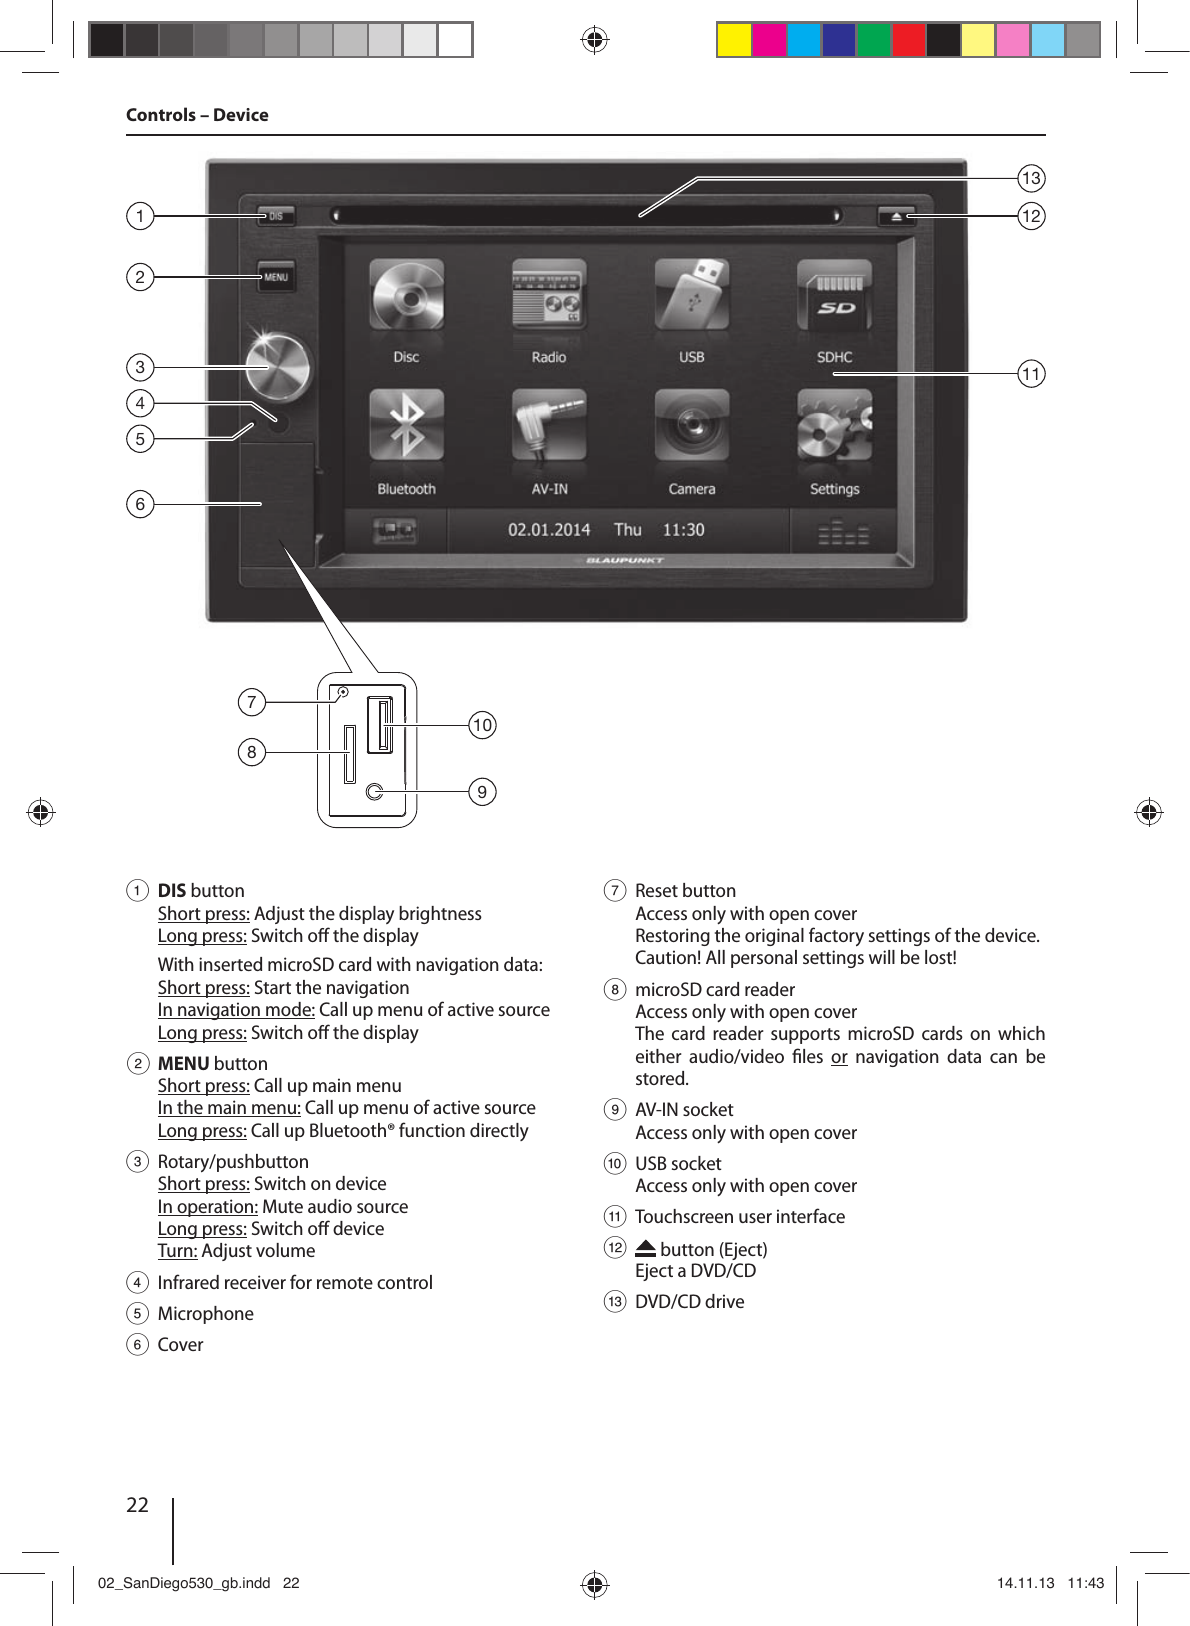
![26Scope of deliveryThe scope of delivery includes: • Car sound system • Remote control (incl. battery) • TMC tuner (only for devices with Europe navigation) •microSD card with navigation data in the microSD card slot (only for devices with navigation) • GPS antenna • External Bluetooth microphone • Getting started • Support frame • Small parts set • Installation material • Connecting cablePlacing the device in operationCaution!Transport securing screwsEnsure that the transport securing screws are removed before the startup of the device.Switching on/o Switching on/o with the rotary/pushbutton !For switch-on, press the rotary/pushbutton 3. !For switch-o , hold the rotary/pushbutton 3 pressed for more than 2 seconds.Switching on/o via vehicle ignitionIf the car sound system is connected with the vehicle ignition and it was switched o with the rotary/pushbut-ton 3, it is switched on or o with the ignition.VolumeAdjusting the volumeYou can adjust the volume in steps from 0 (o ) to 50 (maximum). !Turn the rotary/pushbutton 3 to change the vol-ume.Muting the car sound system (Mute) !Brie y press the rotary/pushbutton 3 to mute the device or to reactivate the previous volume.Main menuIn the main menu, you press the buttons on the touch-screen to call up the di erent sources and operating modes. !Press the MENU button 2.- Or - !In the current source, press the [ ] button.The main menu is displayed. As long as you do not select a new audio source, the last active audio source is played back.Note:The gures used in these instructions are intended to facilitate the explanations and details may deviate from your device.Setting the reception areaThis car sound system is designed for operation in di er-ent regions with di erent frequency ranges and station technologies. The factory default of the reception area is "Europe (FM/AM)". If you operate the car sound system outside of Europe, e.g. in the US or Asia, you may rst have to set a suitable reception area in the menu: !In the main menu, press the [ Settings ] button.The Settings menu is displayed. !In the bottom area of the Settings menu, press the [ General ] button.The current setting is displayed behind "Radio region". !Tap twice (double-click) on the [ Radio region ] but-ton to display the list of available reception areas. !Select the desired reception area by double-clicking.The list is hidden, the selected reception area is set. !Press the [ ] button. The main menu is displayed again. Scope of delivery | Startup02_SanDiego530_gb.indd 2602_SanDiego530_gb.indd 26 14.11.13 11:4314.11.13 11:43](https://usermanual.wiki/Blaupunkt-Europe/SANDIEGO530.Part-1/User-Guide-2136400-Page-6.png)
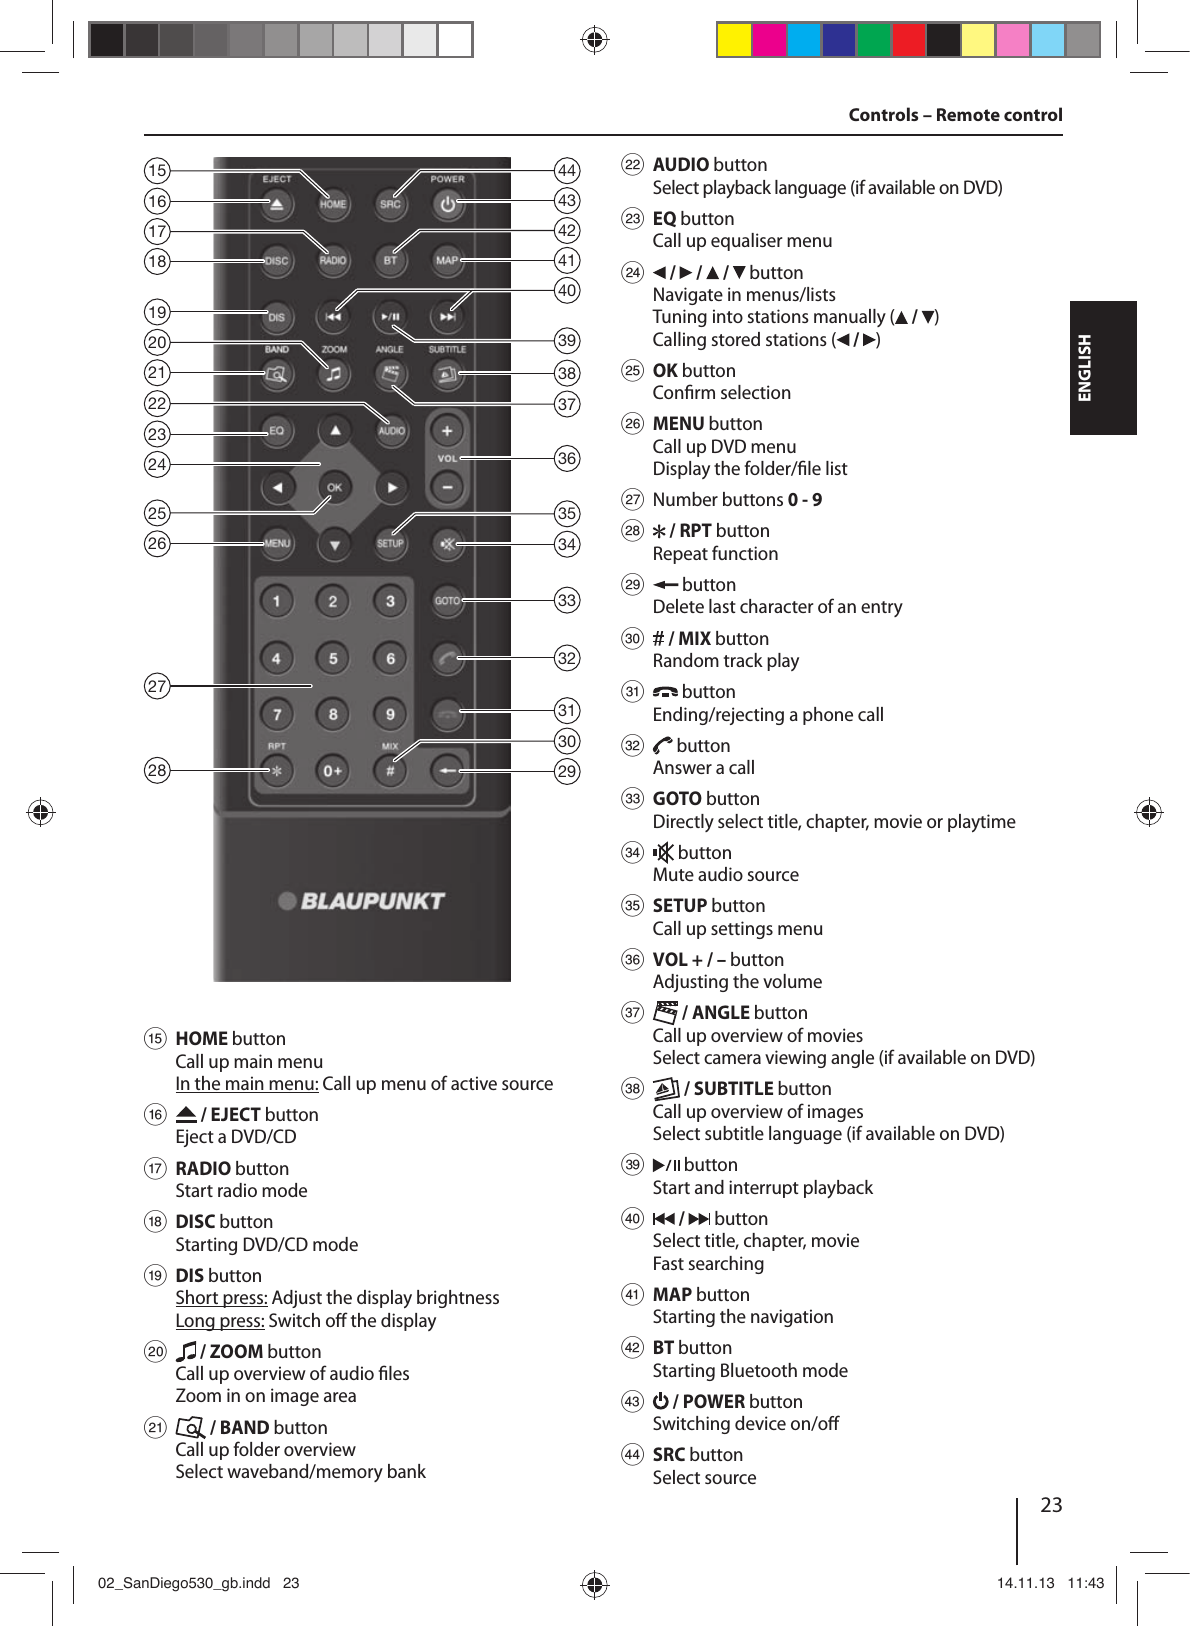
![27DEUTSCHENGLISHRadio modeStart radio mode !In the main menu, press the [ Radio ] button.The radio playback menu is displayed. Select memory bankDi erent memory banks and wavebands are available. Up to 6 stations can be stored in each memory bank. !Press the [ ] button repeatedly until the desired memory bank is displayed.FM1 ! FM2 ! FM3 ! AM1 ! AM2 ! FM1Tuning into a stationTuning into stations manually !Brie y press the [ ] or [ ] button once or sev-eral times to change the frequency in increments.Enter broadcast frequency directlyIf the frequency of the desired stations is known, it can be entered directly via the touchscreen. !Press the [ ] button to display additional operat-ing options. !Press the [ ] button.A numeric keypad is displayed for the frequency input. !Enter the frequency of the desired station with the numeric keypad. !Press the [ OK ] button.The radio playback menu is displayed, the station of the frequency entered is played back. Starting station seek tuning !Press the [ ] or [ ] button for approx. 2 sec-onds to start station seek tuning.The radio tunes into the next receivable station.Note:For the reception area Europe: In the FM waveband, only tra c information stations are tuned into if the priority for tra c information is switched on. Storing stations manually !Select the desired memory bank with the [ ] but-ton. !Set the desired station. !Press one of the memory buttons [ P1 ] - [ P6 ] for approx. 2 seconds to store the current station at the button.The station is stored.Storing stations automatically (Travelstore)With Travelstore, you can automatically search for and store the 6 FM stations o ering the strongest reception in the region in the current memory bank. Any previously stored stations in this memory bank are deleted in the process. !Select a memory bank. !Press the [ ] button to display additional operat-ing options. !Press the [ TS ] button.The tuner starts the automatic station seek tuning. After the storing is completed, the radio plays the station at memory location 1 of the previously se-lected memory bank.Note:For the reception area Europe: With switched-on pri-ority for tra c information, only tra c information stations are stored.Scanning stationsYou can use the scan function to play all the receivable stations of the current waveband for a few seconds. !Press the [ ] button.The seek tuning searches for stations in the current waveband. Each receivable station is played for a few seconds in the process. !Pressing the [ ] button again selects the currently scanned station and plays it back.Switching RDS on/o Many FM stations broadcast an RDS (Radio Data System) signal in addition to their programme in the reception area Europe that allows additional functions, such as the display of the station name. !Press the [ ] button to display additional operat-ing options. !Press the [ RDS ] button to switch the RDS function on or o .If the RDS function is switched on, RDS is displayed in white. !Press the [ ] button to hide the additional oper-ating options, or wait until they are automatically hidden.Radio mode02_SanDiego530_gb.indd 2702_SanDiego530_gb.indd 27 14.11.13 11:4314.11.13 11:43](https://usermanual.wiki/Blaupunkt-Europe/SANDIEGO530.Part-1/User-Guide-2136400-Page-7.png)
![28Switching the REG function (regional programmes) on/o Some RDS stations divide their programmes into region-al programmes with di erent contents at certain times. If the REG function is activated, the car sound system changes only to those alternate frequencies of the set station on which the same regional programme is being broadcast. !Press the [ REG ] button to switch the REG function on or o .If the REG function is switched on, REG is displayed in white.Switching the AF (alternative frequencies) function on/o If the AF function is activated, the car sound system auto-matically tunes into the best receivable frequency for the station that is currently set. !Press the [ AF ] button to switch the AF function on or o .If the AF function is switched on, AF is displayed in white.Adjusting the seek tuning sensitivityThe seek tuning sensitivity decides whether the auto-matic station seek tuning nds only strong stations or also weaker stations that may be noisy. !Press the [ LO ] or [ DX ] button to adjust the sensitiv-ity of station seek tuning.If LO is displayed, only stations with a strong signal are found during seek tuning.If DX is displayed, stations with a strong and weak signal are found during seek tuning.Selecting the programme type and starting seek tuningYou can select a programme type with the PTY function to purposefully search for stations, for example, that broadcast rock music or sport events. !Press the [ ] button to display additional operat-ing options. !Press the [ PTY ] button to display the programme types. !Scroll through the list with [ ] / [ ] and tap on the desired programme type to select it. !Press the [ PTY ] button to start PTY seek tuning.If a station broadcasts a programme with the select-ed programme type, this station is played back.Switching priority for tra c announcements on/o In the reception region Europe, an FM station can iden-tify tra c announcements via an RDS signal. If priority for tra c reports is switched on, a tra c report is automati-cally switched through, even if the car sound system is currently not in radio mode. !Press the [ TA ] button to switch the priority for tra c announcements on or o .If the priority for tra c announcements is switched on, TA is displayed in white.Navigation (only for devices with navigation)Loading navigation dataThe navigation software and map data are located on a microSD card. For devices with navigation, the device is delivered with the microSD card in the microSD card slot. To be able to use the navigation, the microSD card must be inserted in the card slot.Important note:The card reader supports microSD cards on which either audio/video les or navigation data can be stored. The microSD card for the navigation may not contain any other les besides the navigation data. !Open the cover 6 underneath the rotary/pushbut-ton. !Insert the microSD card with its labelled side to the left ( attened corner to the top) and its contacts rst into the card slot8 until it clicks into place.Download of map dataTo ensure that you have the latest version of the map data when you purchase the device, you have 30 days from the rst GPS positioning to download the latest version of the map data once and free of charge to the standard microSD card from the Internet at www.naviextras.com.You can always purchase map material from this site at a later time. Important note:If the microSD card is lost or damaged, the naviga-tion map license associated with the card will be lost. In this case, the license must be purchased anew with a new microSD card.Radio mode | Navigation02_SanDiego530_gb.indd 2802_SanDiego530_gb.indd 28 14.11.13 11:4314.11.13 11:43](https://usermanual.wiki/Blaupunkt-Europe/SANDIEGO530.Part-1/User-Guide-2136400-Page-8.png)
![29DEUTSCHENGLISHStarting the navigation !In the main menu, press [ Navigation ] to start the navigation mode.The navigation menu is displayed. If you start the navigation for the rst time, the setup wizard is dis-played. Initial startupIf you start the navigation for the rst time, a setup wizard appears which performs the basic settings for the naviga-tion. !Adjust the language for the navigation. This can be a di erent language from the other functions of the device. !Con rm the selection with [ ].The end-user license agreement is displayed. !Read the end-user license agreement. If you agree with the terms and conditions, press [ ].The con guration wizard starts. !Press [ ] to continue. !Select a voice for the voice output of the navigation. Various voices are available for the languages. !Con rm the selection with [ ]. !Specify the time format and the units for the naviga-tion. Next, press [ ].On the next screen, you can perform your preferred route settings. !If necessary, change the entries by pressing the dis-played menu entries. !Press [ ], after you adjusted the settings. !Touch [ ], to nish the con guration.The navigation menu is displayed.Entering a destinationDestinations can be entered in di erent ways: Via the ad-dress or as point of interest from the database of points of interest. Points of interest can be sights, museums, sta-diums, petrol stations. Address !Open the navigation menu. !Press on [ Find ].The menu for the destination entry is displayed. !Press [ Find Address ].The menu for the address entry is displayed. !Enter the country, city and street in succession as well as the intersection or house number. To do so, press the corresponding entry in the address entry menu. A menu for text entry is displayed. !Enter the desired destination via the keyboard.With every character entered, the entry in the input line is automatically completed. Navigation02_SanDiego530_gb.indd 2902_SanDiego530_gb.indd 29 14.11.13 11:4314.11.13 11:43](https://usermanual.wiki/Blaupunkt-Europe/SANDIEGO530.Part-1/User-Guide-2136400-Page-9.png)
![30 !If the name of the desired destination is displayed in the address line, press the [ ] button. The selected destination is displayed on the map. !Press [ Next ] to start the route guidance.The calculation of the route starts. Depending on the distance between start and destination, the route calculation may take some time. After the route calculation is complete, the param-eters of the route, such as distance and time, are displayed. In addition, the entire route is displayed on the map. !Press [ Go! ] to start the route guidance.Points of Interest !Open the navigation menu. !Press on [ Find ].The menu for the destination entry is displayed. !Press [ Find Places ].The point of interest menu is displayed. !You can select a point of interest from one of the four prede ned categories Petrol Station, Parking, Restaurant and Accommodation or start a separate search. !For example, press on [ Petrol Station ] to quickly nd a petrol stations. A list of petrol stations in the vicinity of the vehicle is displayed. The petrol stations are sorted by distance to vehicle. !Select a petrol station from the list by pressing on the list entry. The petrol stations is displayed on the map. !Press [ Next ]. The route course and the route data are displayed. !Press [ Go! ] to start the route guidance.Navigation02_SanDiego530_gb.indd 3002_SanDiego530_gb.indd 30 14.11.13 11:4314.11.13 11:43](https://usermanual.wiki/Blaupunkt-Europe/SANDIEGO530.Part-1/User-Guide-2136400-Page-10.png)