Blaupunkt Europe SANDIEGO530 Car DVD Player User Manual
Blaupunkt Europe GmbH Car DVD Player
UserManual.wiki
>
Blaupunkt Europe
>
SANDIEGO530 User Manual
>
Part 2
Contents
1.
Part 1
2.
Part 2
Part 2
Navigation menu
Upload a User Manual
Namespaces
Wiki Guide
HTML
PDF
Info
Views
User Manual
Discussion / Help
Navigation
![31DEUTSCHENGLISHSetting route optionsIn the route options, the vehicle type, type of route (quick, short, dynamic) and additional parameters are de ned which are required by the device to calculate the route according to your requirements.You de ne the route options during the initial con gura-tion of the navigation, but you can change them for any route guidance.Adjusting route options before the route guidance !Call up the navigation menu. !Press [ More… ]. !Press [ Settings ].The settings menu for the navigation is displayed. !Press on the [ ] button to display the second page. !Press [ Route Settings ]. The route settings are displayed. !Change the settings, if necessary. !Press [ Back ] repeatedly until the navigation menu is displayed again.Changing route options during route guidance !During a route guidance, press the [ More ] button. !Press [ Route Settings ]. The route settings are displayed. !Change the settings, if necessary. !Press [ Back ]. The route guidance is displayed again.Map SettingsWith the map settings, you can adjust the view mode (2D or 3D), the viewing angle of the map, the colours and the display of buildings and points of orientation on the map. In addition, you can specify for categories of points of interest whether they should be displayed on the map, e.g. car dealerships, cafés, restaurants. !Call up the navigation menu. !Press [ More… ]. !Press [ Settings ].The settings menu for the navigation is displayed. !Press on the [ ] button to display the second page. !Press [ Map Settings ]. Navigation02_SanDiego530_gb.indd 3102_SanDiego530_gb.indd 31 14.11.13 11:4314.11.13 11:43](https://usermanual.wiki/Blaupunkt-Europe/SANDIEGO530.Part-2/User-Guide-2136401-Page-1.png)
![32Navigation | DVD/CD/USB/microSDHC media playbackThe map settings are displayed. !Change the settings, if necessary. !Press [ Back ] repeatedly until the navigation menu is displayed again.Note:You can also change the map settings during the route guidance: !During a route guidance, press the [ More ] button. !Press [ Map Settings ]. The map settings are displayed. !Change the settings, if necessary. !Press [ Back ]. The route guidance is displayed again.DVD/CD/USB/microSDHC media playbackBasic informationThe car sound system can be used to play audio DVDs/CDs (CDDA) and DVD/CD-R/RWs with audio or MP3 les as well as MP3 or WMA les on USB data carriers and microSDHC cards. In addition, you can view movies and images from DVDs/VCDs/CDs, USB data carriers and microSDHC cards on the display or a connected monitor.For safety reasons, the playback of movies and images on the integrated monitor is allowed only while the vehicle is standing and the hand brake is applied. The "BRAKE" cable must be connected with the hand brake connec-tion of the vehicle (see Connection diagram at the end of these instructions). The movie playback on an external monitor is also possible while driving. Notes: • To ensure proper functioning, use only CDs with the Compact-Disc logo and DVDs with the DVD logo. •Blaupunkt cannot guarantee the awless func-tion of copy-protected DVDs/CDs and all DVD/CD blanks, USB data carriers and microSD cards avail-able on the market.Note the following information when preparing an MP3/WMA data carrier: • Naming of tracks and directories: –Max. 32 characters without the le extension ". mp 3 " o r ". w ma " (t he u se of mo r e c h ar a c t er s re-duces the number of tracks and folders that the car sound system can recognise) • DVD/CD formats: DVD/CD-R/RW, Ø: 12 cm • DVD/CD data formats: ISO 9669 Level 1 and 2, Joliet • CD burn speed: Max. 16x (recommended) • USB format/ le system: mass storage device / FAT/FAT16/FAT32 • microSD card le system: FAT/FAT16/FAT32 • File extension of audio les: – .MP3 for MP3 les – .WMA for WMA les •WMA les only without Digital Rights Management (DRM) and created with Windows Media® Player ver-sion 8 or later • MP3 ID3 tags: Version 1 and 2 • Bit rate for creating audio les: – MP3: 32 to 320 kbps – WMA: 32 to 192 kbps • Maximum number of les and directories: – USB medium: Up to 10,000 entries – microSD cards: Up to 10,000 les.DVD/CD modeInserting a DVD/CDRisk of severe damage to the DVD/CD drive! Noncircular contoured DVDs/CDs and DVDs/CDs with a diameter of 8 cm (mini DVDs/CDs) must not be used.We accept no responsibility for any damage to the drive that may occur as a result of the use of unsuitable DVDs/CDs. !Insert the DVD/CD with its printed side up into the DVD/CD tray = until you feel a slight resistance.The drive automatically draws in the DVD/CD and checks its data. Afterwards, the playback starts in DVD/CD or MP3 mode. Note:You must not hinder or assist the drive as it automati-cally draws in the DVD/CD.Ejecting a DVD/CD !Press the button < to eject an inserted DVD/CD.Note:You must not hinder or assist the drive as it ejects the DVD/CD.02_SanDiego530_gb.indd 3202_SanDiego530_gb.indd 32 14.11.13 11:4314.11.13 11:43](https://usermanual.wiki/Blaupunkt-Europe/SANDIEGO530.Part-2/User-Guide-2136401-Page-2.png)
![33DEUTSCHENGLISHUSB data carrierThis device features a USB port under the cover at the front of the device.Connecting a USB data carrier !Open the cover 6 underneath the rotary/pushbut-ton. !Insert the USB data carrier in the USB socket :.The device automatically switches to USB mode. The data are read, the playback starts with the rst media le recognized by the device.Removing the USB data carrier !Turn o the car sound system. !Disconnect the USB data carrier.microSDHC cardsThis device features an microSDHC card slot under the cover at the front of the device.Inserting the microSDHC card !Open the cover 6 underneath the rotary/pushbut-ton. !Insert the microSDHC card with its labelled side to the left ( attened corner to the top) and its contacts rst into the card slot8 until it clicks into place.The device automatically switches to microSDHC mode. The data are read, the playback starts with the rst media le recognized by the device.Removing the microSDHC card !If necessary, open the cover 6. !Push on the microSDHC card until it disengages. !Pull the microSDHC card out of the card slot 8.DVD movie playbackThe car sound system can play video DVDs and VCDs. Af-ter inserting the DVD, the playback starts automatically. The DVD menu is displayed. You can navigate in the DVD menu by touching the corre-sponding buttons in the DVD menu on the touchscreen. After starting the movie via the menu of the DVD, the movie is displayed. The playback menu for DVDs is hid-den. !Brie y touch the touchscreen once to display the playback menu again.The playback menu is shown.[ ] Pause playback, call up DVD menu.[ ] Select previous chapter.[ / ] Interrupt playback and continue playback.[ ] Select next chapter.[ ] Call up keypad for direct selection of titles, chapters or playing time.[ ] Show additional operating options. !Tap on [ ] to display additional operating op-tions of the playback menu.[ ] Hide additional operating options.[ ] Display equalizer.[ ] De ne range for repeat function.[ ] Select playback language (only if supported by the DVD).[ ] Show subtitles (only if supported by the DVD).[ ] Switch repeat function for title, chapter or area A-B on/o .[ ] Adjust image.DVD/CD/USB/microSDHC media playback02_SanDiego530_gb.indd 3302_SanDiego530_gb.indd 33 14.11.13 11:4314.11.13 11:43](https://usermanual.wiki/Blaupunkt-Europe/SANDIEGO530.Part-2/User-Guide-2136401-Page-3.png)
![34Audio playback from DVD/CD, USB or microSDHCThe principles of audio playback (MP3/WMA) from data carriers are identical for all sources. !Select the desired source via the main menu.The device changes to the desired source and the playback starts.If the playback does not start with the audio playback, !press the [ ] button to change to the folder/file list. !Press the [ ] button to display all the folders and files of the data carrier.- Or - !Press the [ ] button to display all the audio les of the data carrier.[ ] Scroll through the list page by page. [ ] Scroll through the list page by page.[ ] Change to next higher folder level.[ ] Open selected folder or start titles. - Or -Brie y tap twice (double-click) on the name of the folder/track. The folder is opened/the track is started.[ ] Exit the folder/ le list. After starting a title, the playback menu is displayed.[ ] Display the folder/ le list.[ ] Short press: Title selection. Long press: Fast searching.[ / ] Interrupt playback and continue playback.[ ] Short press: Title selection. Long press: Fast searching.[ ] Show additional operating options. !Tap on [ ] to display additional operating op-tions of the playback menu.[ ] Hide additional operating options.[ ] Display keypad to directly enter the number of the desired title.[ ] Start and end REPEAT function.The REPEAT mode changes each time the [ ] button is pressed.Display REPEAT modeRepeat current trackRepeat current folderRepeat all tracks of data carrier[ ] Start MIX random track play and end it again.If the MIX function is switched on, the symbol is displayed in white.The MIX mode depends on the selected REPEAT function.REPEAT mode displayMIX modeNo random track play Mixing tracks of the current folderMixing tracks of the data carrier[ ] Display equalizer.DVD/CD/USB/microSDHC media playback02_SanDiego530_gb.indd 3402_SanDiego530_gb.indd 34 14.11.13 11:4314.11.13 11:43](https://usermanual.wiki/Blaupunkt-Europe/SANDIEGO530.Part-2/User-Guide-2136401-Page-4.png)
![35DEUTSCHENGLISHVideo playback from DVD/CD, USB or microSDHC !Select the desired source via the main menu.The device changes to the desired source and the playback starts.If the playback does not start with the video playback, !press the [ ] button to change to the folder/file list. !Press the [ ] button to display all the folders and files of the data carrier.- Or - !Press the [ ] button to display all the video les of the data carrier.Note:Folders and videos are selected and started as de-scribed under audio playback.If you selected a movie, the playback is started. During the movie playback, the playback menu is hidden. !Brie y touch the touchscreen once to display the playback menu again.The playback menu is shown.[ ] Display the folder/ le list.[ ] Select previous movie.[ / ] Interrupt playback and continue playback.[ ] Select next movie.[ ] Call up keypad for direct selection of movie or playing time.[ ] Show additional operating options. !Tap on [ ] to display additional operating op-tions of the playback menu.[ ] Hide additional operating options.[ ] Display equalizer.[ ] Switch repeat function for movie or folder on/o .[ ] Adjust image.Image playback from DVD/CD, USB or audioSDHC !Select the desired source via the main menu.The device changes to the desired source and the playback starts.If the playback does not start with the image playback, !press the [ ] button to change to the folder/file list. !Press the [ ] button to display all the folders and files of the data carrier.- Or - !Press the [ ] button to display all the images of the data carrier.Note:Folders and images are selected and started as de-scribed under audio playback.DVD/CD/USB/microSDHC media playback02_SanDiego530_gb.indd 3502_SanDiego530_gb.indd 35 14.11.13 11:4314.11.13 11:43](https://usermanual.wiki/Blaupunkt-Europe/SANDIEGO530.Part-2/User-Guide-2136401-Page-5.png)
![36Bluetooth modeThe Bluetooth® function allows registering cell phones and media playback devices with the car sound system. When you register a cell phone with the car sound sys-tem, you can make phone calls with the built-in hands-free function. You can access the lists of dialled numbers and the phone book of the registered cell phone.If the connected Bluetooth® device supports the func-tions A2DP and AVRCP, you can play the music via the car sound system and control the playback. During a call, the music playback is interrupted and continued again after the call. If a cell phone is registered via Bluetooth® and a call is re-ceived during the playback of another source, the source playback is interrupted and the call menu is displayed.Starting Bluetooth mode !In the main menu, press on [ Bluetooth ].- Or - !Press the MENU button 2 for approx. 2 seconds. The Bluetooth® menu is displayed. It contains the list of known Bluetooth® devices. Other audio sources are switched o .[ ] Add new Bluetooth® device.[ ] Display options menu. !Press the [ Connect ] button of the Bluetooth® de-vice with which you want to establish a connection.When the device is in range, the connection is estab-lished and the menu for the device is displayed. !Press the [ Delete ] button if you want to delete the Bluetooth® device from the list.Registering Bluetooth devicesIf you want to register a device with the car sound system for the rst time, proceed as follows: !Ensure that Bluetooth® is activated at the car sound system and at your Bluetooth® device. !In the options menu of the Bluetooth® mode, enter a pairing code (see Bluetooth® settings). !Search for new devices/connections on your Blue-tooth® device. !The car sound system appears as "BP 530" in the list of Bluetooth® devices. !Establish the connection; you may have to enter the pairing code that was previously entered on the car sound system.The connection is being established and the menu for the registered device is displayed.Note:If a telephone is connected with the car sound sys-tem, the Bluetooth® icon is displayed at the top right edge of the display in all audio/video sources.Telephone mode - BluetoothIf you connected a phone with the car sound system via Bluetooth®, the following menu appears.[ ] Display the phone menu.[ ] Display the playback menu. [ ] Disconnect connection with current device.[ ] Call up the phone book.[ ] Call up caller lists. [ ] Display options menu. !Enter a phone number with the keypad and press the [ ] button. - Or - !Select a contact/number via the caller lists or phone book and press the [ Dial ] button in the pop-up window.The connection is being established.Bluetooth mode02_SanDiego530_gb.indd 3602_SanDiego530_gb.indd 36 14.11.13 11:4314.11.13 11:43](https://usermanual.wiki/Blaupunkt-Europe/SANDIEGO530.Part-2/User-Guide-2136401-Page-6.png)
![37DEUTSCHENGLISHIf a call is coming in, the call menu is displayed.[ ] Reject a call.[ ] Answer a call.Audio playback - BluetoothIf an audio streaming device is connected with the car sound system via Bluetooth®, you can play back the mu-sic via the car sound system and control the playback. !Press the [ ] button to change to the audio play-back.[ ] Display the phone menu.[ ] Display the playback menu. [ ] Disconnect connection with current device.[ ] Short press: Title selection. Long press: Fast searching.[ ] Interrupt playback and continue playback.[ ] Short press: Title selection. Long press: Fast searching.[ ] Display equalizer.Bluetooth settingsIn the options menu for Bluetooth®, you can make the basic settings for the Bluetooth® mode. !Press the [ ] button. The options menu is displayed.Bluetooth – Bluetooth® can be switched on or o .Auto connect – If "Auto Connect" is activated, the device automatically connects with known Blue-tooth® devices as soon as they are in range.Auto answer – If "Auto Answer" is activated, incom-ing phone calls are automatically answered.Microphone – Select the microphone to be used for the hands-free system via Bluetooth®.Pairing code – Many Bluetooth® devices request the pairing code before establishing the connection. You can de ne it here.Phone book sync – To be able to access the phone book of a connected telephone, you must rst syn-chronise it via this menu entry. !Press [ ] to exit the options menu. Bluetooth mode02_SanDiego530_gb.indd 3702_SanDiego530_gb.indd 37 14.11.13 11:4314.11.13 11:43](https://usermanual.wiki/Blaupunkt-Europe/SANDIEGO530.Part-2/User-Guide-2136401-Page-7.png)
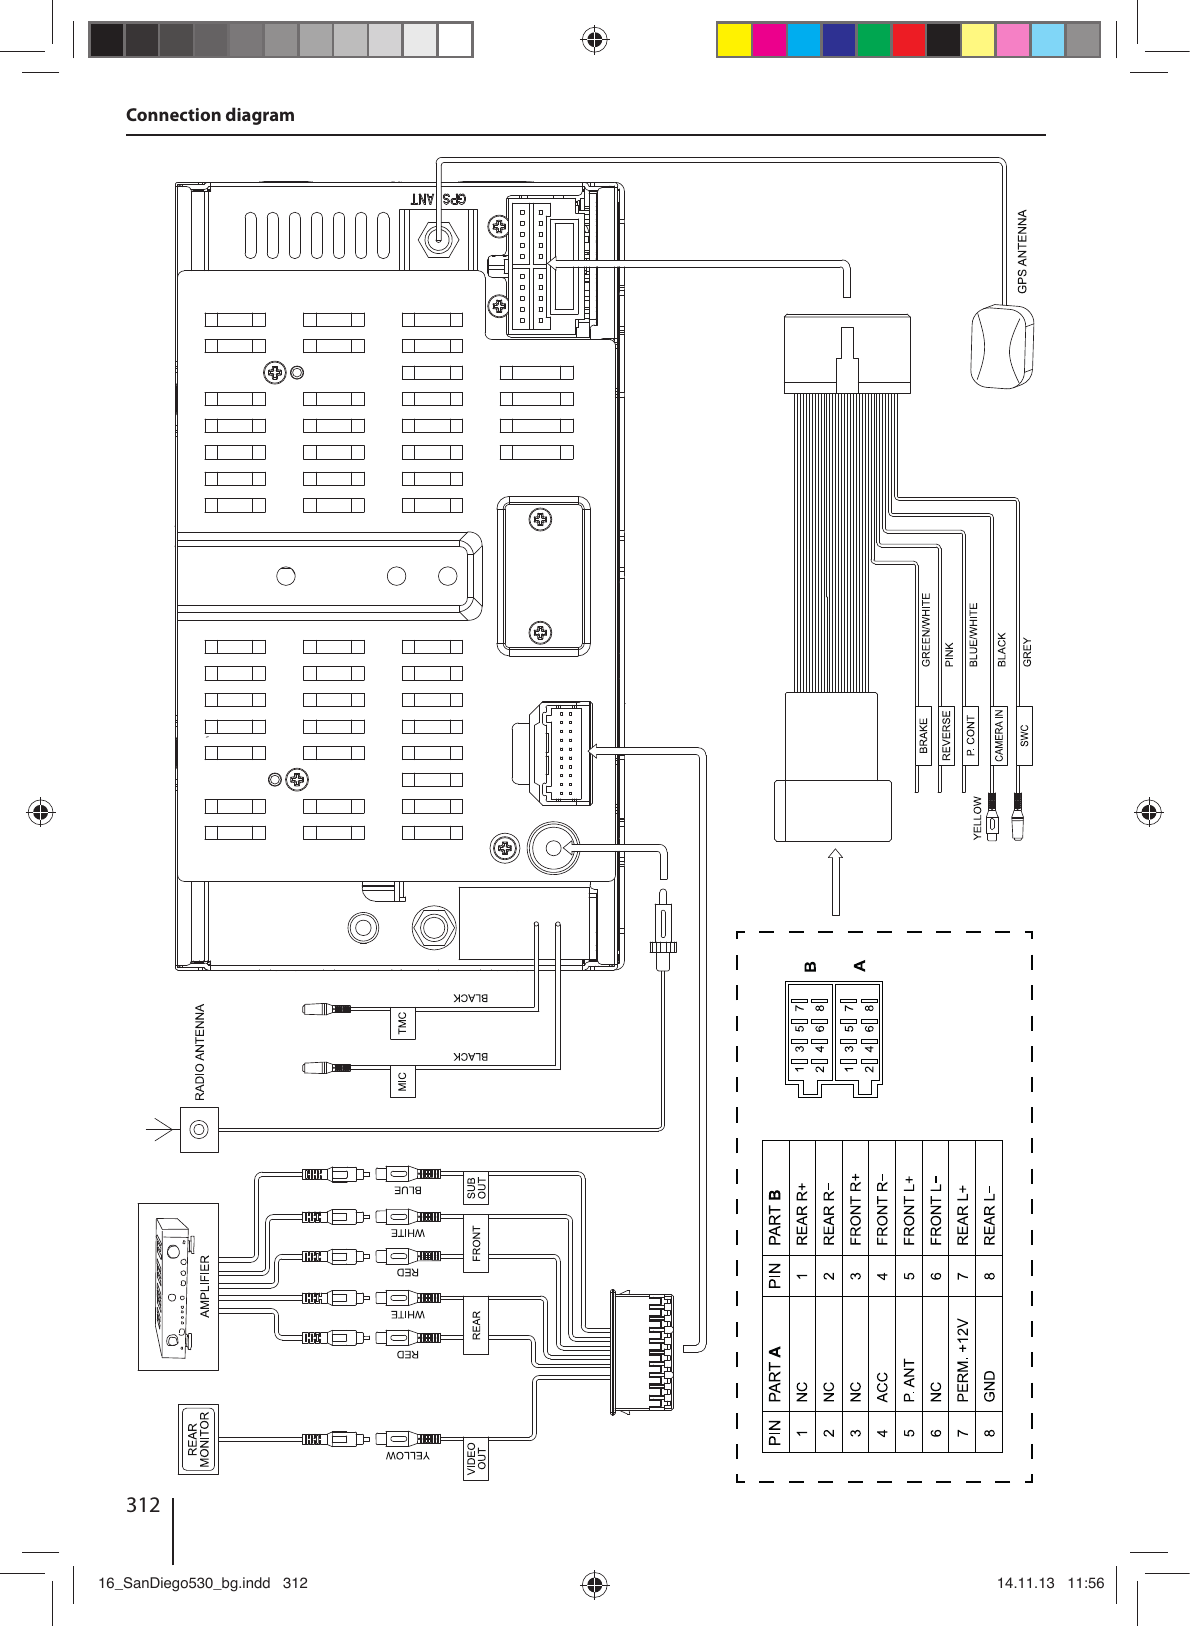
![38External audio/video sourcesAV-IN socketThis device features an external AV input for audio and video playback. The AV-IN socket is located under the cover at the front of the device. Danger! Increased risk of injury from connector.In case of an accident, the protruding connec-tor in the AV-IN socket may cause injuries. The use of straight plugs or adapters leads to an increased risk of injury. !Start the AV-IN mode with the button [ AV-IN ]. The display shows the audio or video playback of the AV source. Video inputThis device features a video input at the rear of the device for connecting a camera that is available as an option. If a camera is connected, you can display the camera image. !In the main menu, press the [ Camera ] button.External audio/video sources | External monitor | Sound settings External monitorThis device features an output for connecting an external monitor for the rear area of the vehicle (see Connection diagram at the end of these instructions). !Select the desired source via the main menu and start the lm playback, e.g. from a DVD. The lm is displayed on the monitor of the device. !Call up the main menu. !Press the [ ] button.The lm is also displayed on the external monitor. Sound settingsVolume distribution (fader/balance)You can adjust the volume distribution in the vehicle for all sources. !In the main menu or on the control bar of the current audio source, press the [ ] button.The equalizer menu is displayed. !Press the [ ] button.The menu for fader and balance is displayed. !Adjust fader and balance with [ ] / [ ] or [ ] / [ ]. !Next, press [ ]. The setting is stored, the current source is displayed again.02_SanDiego530_gb.indd 3802_SanDiego530_gb.indd 38 14.11.13 11:4314.11.13 11:43](https://usermanual.wiki/Blaupunkt-Europe/SANDIEGO530.Part-2/User-Guide-2136401-Page-8.png)
![39DEUTSCHENGLISHSound settings | Basic settings EqualizerYou can adjust the equalizer for all sources. !In the main menu or on the control bar of the current audio source, press the [ ] button.The equalizer menu is displayed. !Select a preset equalizer via the buttons.- Or - !Press the [ User ] button to adjust the level of the available frequency bands according to your prefer-ences. Note:With the [ Reset ] button, you can reset the custom-ised setting again. - Or - !Press the [ Flat ] button for a linear sound playback. !Press the [ Loudness ] button to switch increasing the bass at low volume on or o . !Next, press [ ]. The setting is stored, the current source is displayed again.Basic settingsIn the settings menu, you can adjust the basic settings for the di erent functions of the device to your require-ments. !In the main menu, press the [ Settings ] button.The settings menu is displayed, the General sub-menu is activated. !Call up the submenus with the buttons in the lower area of the settings menu.GeneralThe following settings are possible:Radio region – Select the reception region for the radio reception.Blackout – If this value is set, the display of the radio is completely switched o after 10 or 20 sec. without use.Dimmer mode – Adjust the display brightnessBeep – Switch con rmation beep on/o TFT calibration – The touchscreen can be calibrated here.SWC – The buttons of a connected steering wheel con-trol can be con gured here.Software version – Display of the current software ver-sion.Load factory settings – Resets all personalised settings. VideoThe following settings are possible:Set password – De ne a password if you want to use the parental controls. Rating level – The rating of DVDs can be de ned here. If set to "Adult", all movies can be played back. If a pass-word was con gured, the rating level can be changed only with the password02_SanDiego530_gb.indd 3902_SanDiego530_gb.indd 39 14.11.13 11:4314.11.13 11:43](https://usermanual.wiki/Blaupunkt-Europe/SANDIEGO530.Part-2/User-Guide-2136401-Page-9.png)