Blaupunkt Technology Americas SANPEDRO Car Multimedia Player User Manual
Blaupunkt Technology Americas S.A. Car Multimedia Player
UserManual.wiki
>
Blaupunkt Technology Americas
>
SANPEDRO User Manual
User Manual
Navigation menu
Upload a User Manual
Namespaces
Wiki Guide
HTML
PDF
Info
Views
User Manual
Discussion / Help
Navigation
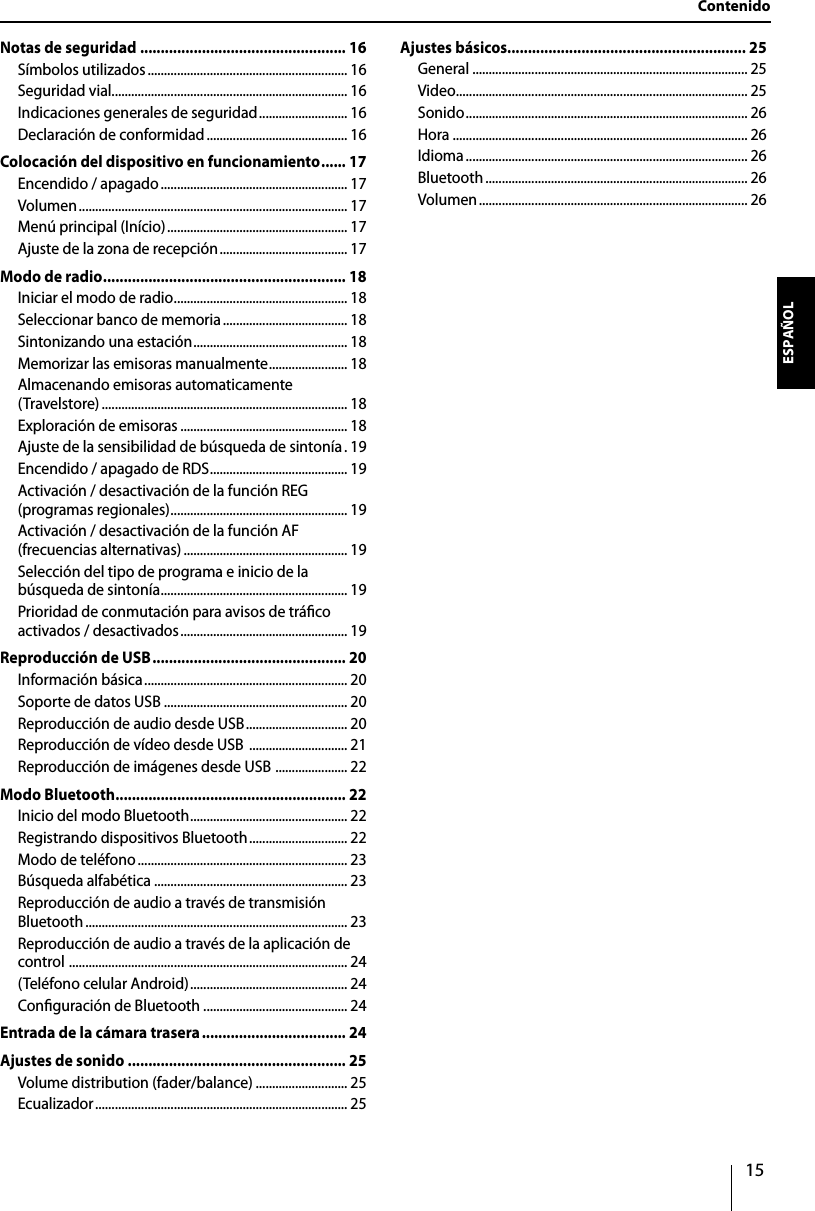
![21234856 79Controls – Device1 [ ] Button Switching on the device In operation: Long press: Switches o device2 [ ] Button Mute the Volume3 HOME key Short press: Return to home page at any point Long press: Display analog clock4 DISPLAY button Short press: Adjust the display brightness (4steps) Long press: Switch o the display5/6 [ + ] / [ - ] Button Adjust volume7 Next page8 Touchscreen user interface9 Microphone](https://usermanual.wiki/Blaupunkt-Technology-Americas/SANPEDRO/User-Guide-3760604-Page-2.png)
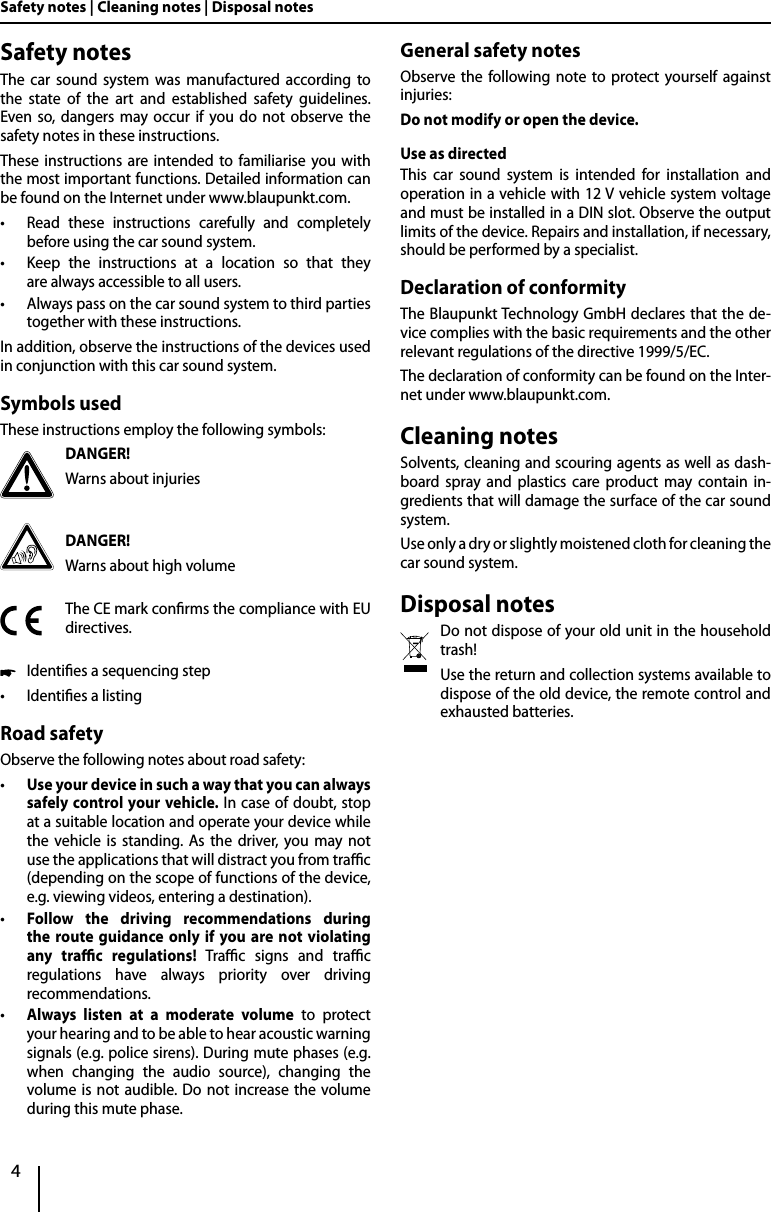
![5DEUTSCHENGLISHPlacing the device in operationSwitching on/oSwitching on/o with the button For switch-on, press the [ ] button. For switch-o, hold the [ ] button pressed for more than 2 seconds.VolumeAdjusting the volumeYou can adjust the volume in steps from 0 (o) to 50 (maximum). Press [ + ]/[ - ] to change the volume.Muting the car sound system (Mute) Briey press the [ ] to mute the device or to reactivate the previous volume.Main menu(Home)In the main menu, you press the buttons on the touch-screen to call up the dierent sources and operating modes. Press the [ ] button.- Or - In the current source, press the button.The main menu is displayed. As long as you do not select a new audio source, the last active audio source is played back.Note:The gures used in these instructions are intended to facilitate the explanations and details may deviate from your device.Setting the reception areaThis car sound system is designed for operation in dierent regions with dierent frequency ranges and station technologies. The factory default of the reception area is "South America (FM/AM)". You can set a dierent reception area. In the main menu, press the Settings button.The Settings menu is displayed. In the upper area of the Settings menu, press the General button.The current setting is displayed behind "Radio region". Tap twice (double-click) on the Radio region button to display the list of available reception areas. Select the desired reception area by double-clicking.The list is hidden, the selected reception area is set. Press the button. The main menu is displayed again. Radio modeStart radio modeIn the main menu, press the Radio button.The radio playback menu is displayed. Select memory bankDierent memory banks and wavebands are available. Up to 6 stations can be stored in each memory bank. Press the button repeatedly until the desired memory bank is displayed.FM1 FM2 FM3 AM1 AM2 FM1Startup | Radio mode](https://usermanual.wiki/Blaupunkt-Technology-Americas/SANPEDRO/User-Guide-3760604-Page-5.png)
![6Tuning into a stationTuning into stations manually Briey press the or button once or several times to change the frequency in increments.Enter broadcast frequency directlyIf the frequency of the desired stations is known, it can be entered directly via the touchscreen. Press the button to display additional operating options. Press the button.A numeric keypad is displayed for the frequency input. Enter the frequency of the desired station with the numeric keypad. Press the OK button.The radio playback menu is displayed, the station of the frequency entered is played back. Starting station seek tuning Press the or button for approx. 2 sec-onds to start station seek tuning.The radio tunes into the next receivable station.Note:For the reception area Europe: In the FM waveband, only trac information stations are tuned into if the priority for trac information is switched on. Storing stations manually Select the desired memory bank with the but-ton. Set the desired station. Press one of the memory buttons P1 - P6 for approx. 2 seconds to store the current station at the button.The station is stored.Storing stations automatically (Travelstore)With Travelstore, you can automatically search for and store the 6 FM stations oering the strongest reception in the region in the current memory bank. Any previously stored stations in this memory bank are deleted in the process. Select a memory band. Press the [ ] button to display additional opera-tiong options. Press the [ TS ] button.The tuner starts the automatic station seek tuning.After the storing is completed, the radio plays the station at memory location 1 of the previously se-lected memory band.Note:For the Erurope reception area: If trac information is switched-on, only trac informations are stored.Scanning stationsYou can use the scan function to play all the receivable stations of the current waveband for a few seconds. Press the button.The seek tuning searches for stations in the current waveband. Each receivable station is played for a few seconds in the process. Pressing the [ ] button again selects the currently scanned station and plays it back.Adjusting the seek tuning sensitivityThe seek tuning sensitivity decides whether the auto-matic station seek tuning nds only strong stations or also weaker stations that may be noisy. Press the DX / LO button to adjust the sensitivity of station seek tuning.If Local is displayed, only stations with a strong signal are found during seek tuning.If Distance is displayed, stations with a strong and weak signal are found during seek tuning.Switching RDS on/oMany FM stations broadcast an RDS (Radio Data System) signal in addition to their programme in the reception area Europe that allows additional functions, such as the display of the station name. Press the button to display additional operating options. Press the RDS button to switch the RDS function on or o. If RDS function is switched on, RDS is displayed in white. Press the [ ] button to hide the additional operation options, or wait until they are automatically hidden.Switching the REG (regional programmes) function on/oSome RDS stations divide their programmes into region-al programmes with dierent content at certain times. Press the REG button to switch the REG function on or o. If the REG function is switched on, REG is illuminated.Switching the AF (alternative frequencies) function on/oIf the AF function is activated, the car sound system auto-matically tunes into the best receivable frequency for the station that is currently set.Radio mode](https://usermanual.wiki/Blaupunkt-Technology-Americas/SANPEDRO/User-Guide-3760604-Page-6.png)
![8USB playbackREPEAT modeRepeat current trackRepeat current folderRepeat all tracks of data carrier[ ] Start MIX random track play and end it again.If the MIX function is switched on, the symbol is displayed in white.The MIX mode depends on the selected REPEAT function.[ ] Display equalizer.Video playback from USB Select the desired source via the main menu.The device changes to the desired source and the playback starts.If the playback does not start with the video playback, press the button to change to the folder/file list. Press the button to display all the folders and files of the data carrier.- Or - Press the button to display all the video les of the data carrier.Note:Folders and videos are selected and started as de-scribed under audio playback.If you selected a movie, the playback is started. During the movie playback, the playback menu is hidden. Briey touch the touchscreen once to display the playback menu again.The playback menu is shown.Briey tap twice (double-click) on the name of the folder/track. The folder is opened/the track is started.After starting a title, the playback menu is displayed.[ ] Short press: Title selection. Long press: Fast searching.[ / ] Interrupt playback and continue playback.[ ] Short press: Title selection. Long press: Fast searching.[ ] Display the folder/le list.[ ] Show additional operating options. Tap on to display additional operating op-tions of the playback menu.[ ] Hide additional operating options.[ ] Display keypad to directly enter the number of the desired title.Audio playback from USB:[ ] Start and end REPEAT function.The REPEAT mode changes each time the button is pressed.](https://usermanual.wiki/Blaupunkt-Technology-Americas/SANPEDRO/User-Guide-3760604-Page-8.png)
![9DEUTSCHENGLISHUSB playback | Bluetooth mode[ ] Select previous movie.[ / ] Interrupt playback and continue playback.[ ] Select next movie.[ ] Call up keypad for direct selection of movie or playing time.[ ] Display the folder/le list.[ ] Show additional operating options. Tap on to display additional operating op-tions of the playback menu.[ ] Hide additional operating options.[ ] Display equalizer.[ ] Switch repeat function for movie or folder on/o.[ ] Adjust image.[ ] Select playback language (only if supported by the movie).[ ] Show subtitles (only if supported by the movie).Image playback from USB Select the desired source via the main menu.The device changes to the desired source and the playback starts.If the playback does not start with the image playback, press the button to change to the folder/file list. Press the button to display all the folders and files of the data carrier.- Or - Press the button to display all the images of the data carrier.Note:Folders and images are selected and started as de-scribed under audio playback.Bluetooth modeThe Bluetooth® function allows registering cell phones and media playback devices with the car sound system. When you register a cell phone with the car sound sys-tem, you can make phone calls with the built-in hands-free function. You can access the lists of dialled numbers and the phone book of the registered cell phone.If the connected Bluetooth® device supports the func-tions A2DP and AVRCP, you can play the music via the car sound system and control the playback. During a call, the music playback is interrupted and continued again after the call. If a cell phone is registered via Bluetooth® and a call is re-ceived during the playback of another source, the source playback is interrupted and the call menu is displayed.Starting Bluetooth mode In the main menu, press on Bluetooth .The Bluetooth® menu is displayed. It contains the list of known Bluetooth® devices. Other audio sources are switched o.[ ] Add new Bluetooth® device.[ ] Display options menu.](https://usermanual.wiki/Blaupunkt-Technology-Americas/SANPEDRO/User-Guide-3760604-Page-9.png)
![10Bluetooth mode Press the Connect button of the Bluetooth® device with which you want to establish a connection.When the device is in range, the connection is estab-lished and the menu for the device is displayed. Press the Delete button if you want to delete the Bluetooth® device from the list.Registering Bluetooth devicesIf you want to register a device with the car sound system for the rst time, proceed as follows: Ensure that Bluetooth® is activated at the car sound system and at your Bluetooth® device. In the options menu of the Bluetooth® mode, enter a pairing code (see Bluetooth® settings). Search for new devices/connections on your Blue-tooth® device. The car sound system appears as "SP 800" in the list of Bluetooth® devices. Establish the connection; you may have to enter the pairing code that was previously entered on the car sound system.The connection is being established and the menu for the registered device is displayed.Note:If a telephone is connected with the car sound sys-tem, the Bluetooth® icon is displayed at the top right edge of the display in all audio/video sources.Telephone modeIf you connected a phone with the car sound system via Bluetooth®, the following menu appears.[ ] Display the phone menu.[ ] Display the playback menu for Bluetooth® streaming. [ ] Display the playback menu for app control. [ ] Disconnect connection with current device.[ ] Call up the phone book.[ ] Call up caller lists. [ ] Display options menu.[ ] Activate the voice control. Enter a phone number with the keypad and press the button. - Or - Select a contact/number via the caller lists or phone book and press the Dial button in the pop-up win-dow.The connection is being established.If a call is coming in, the call menu is displayed.[ ](Hang up): Reject a call.[ ](Answer): Answer a call.Alphabetic search Press [ ] on the left bottom of the screen to access Phonebook. If you want to search a contact, press [ ] and enter the characters via the keypad.Audio playback via Bluetooth streamingIf an audio streaming device is connected with the car sound system via Bluetooth®, you can play back the mu-sic via the car sound system and control the playback. Press the button to change to the audio play-back.[ ] Display the phone menu.[ ] Display the playback menu for Bluetooth® streaming. [ ] Display the playback menu for app control. [ ] Disconnect connection with current device.[ ] Short press: Title selection. Long press: Fast searching.](https://usermanual.wiki/Blaupunkt-Technology-Americas/SANPEDRO/User-Guide-3760604-Page-10.png)
![11DEUTSCHENGLISHBluetooth mode | Rear Camera input[ / ] Interrupt playback and continue playback.[ ] Short press: Title selection. Long press: Fast searching.[ ] Display equalizer.Audio playback via app control (Android cell phone)With the "Blaupunkt Android Player Multimedia Series" app, music les stored on an Android cell phone can be divided into certain categories with the help of ID3 tag information. This allows you to quickly and conveniently select and play back music tracks across dierent catego-ries. For this purpose, the app must be installed on the Android cell phone. The "Blaupunkt Android Player Mul-timedia Series" app can be downloaded on the Internet from www.blaupunkt.com. Note:The audio playback via "Blaupunkt Android Player Multimedia Series" app is available only for Android cell phones with operating system Android 2.3 and higher. In addition, the cell phone must support the Bluetooth® proles SPP (Serial Port Prole) and A2DP (Advanced Audio Distribution Prole). Press the button to change to the audio playback.[ ] Display the phone menu.[ ] Display the playback menu for Bluetooth® streaming. [ ] Display the playback menu for app control. [ ] Display category lists.[ ] Short press: Title selection. Long press: Fast searching.[ / ] Interrupt playback and continue playback.[ ] Short press: Title selection. Long press: Fast searching.[ ] Switch repeat function on/o.[ ] Switch random playback on/o.Bluetooth settingsIn the options menu for Bluetooth®, you can make the basic settings for the Bluetooth® mode. Press the button. The options menu is displayed.Bluetooth – Bluetooth® can be switched on or o.Auto connect – If "Auto Connect" is activated, the device automatically connects with known Blue-tooth® devices as soon as they are in range.Auto answer – If "Auto Answer" is activated, incoming phone calls are automatically answered.Pairing code – Many Bluetooth® devices request the pairing code before establishing the connection. You can dene it here.Phone book sync – To be able to access the phone book of a connected telephone, you must rst synchronise it via this menu entry. Press [ ] to exit the options menu.](https://usermanual.wiki/Blaupunkt-Technology-Americas/SANPEDRO/User-Guide-3760604-Page-11.png)
![12 Sound settings | Basic settingsRear Camera inputThis device features a video input at the rear of the device for connecting a camera that is available as an option. If a rear camera is connected, the image is displayed on the screen, when the rear gear is engaged.Sound settingsVolume distribution (fader/balance)You can adjust the volume distribution in the vehicle for all sources. In the main menu or on the control bar of the current audio source, press the button.The equalizer menu is displayed. Press the button.The menu for fader and balance is displayed. Adjust fader and balance with / or / . Next, press . The setting is stored, the current source is displayed again.EqualizerYou can adjust the equalizer for all sources. In the main menu or on the control bar of the current audio source, press the button.The equalizer menu is displayed. Select a preset equalizer via the buttons.- Or - Press the User button to adjust the level of the available frequency bands according to your preferences. Note:With the [ Reset ] button, you can reset the customised setting again. - Or - Press the Flat button for a linear sound playback. Press the Loudness button to switch increasing the bass at low volume on or o. Next, press . The setting is stored, the current source is displayed again.Basic settingsIn the settings menu, you can adjust the basic settings for the dierent functions of the device to your requirements. In the main menu, press the [ Settings ] button. The settings menu is displayed, the General submenu is activated. Call up the submenus with the buttons in the lower area of the settings menu.GeneralThe following settings are possible:Radio region – Select the reception region for the radio reception.FM HICUT - Trun on the function to enhance the signal of FM.Blackout – If this value is set, the display of the radio is completely switched o after 10 or 20 sec. without use.Dimmer mode – Adjust the display brightnessBeep – Switch conrmation beep on/oTFT calibration – The touchscreen can be calibrated here.Software version - Show the version of softwareLoad factory settings - Resets all personalised settings.Rear view camera - normal/mirror](https://usermanual.wiki/Blaupunkt-Technology-Americas/SANPEDRO/User-Guide-3760604-Page-12.png)
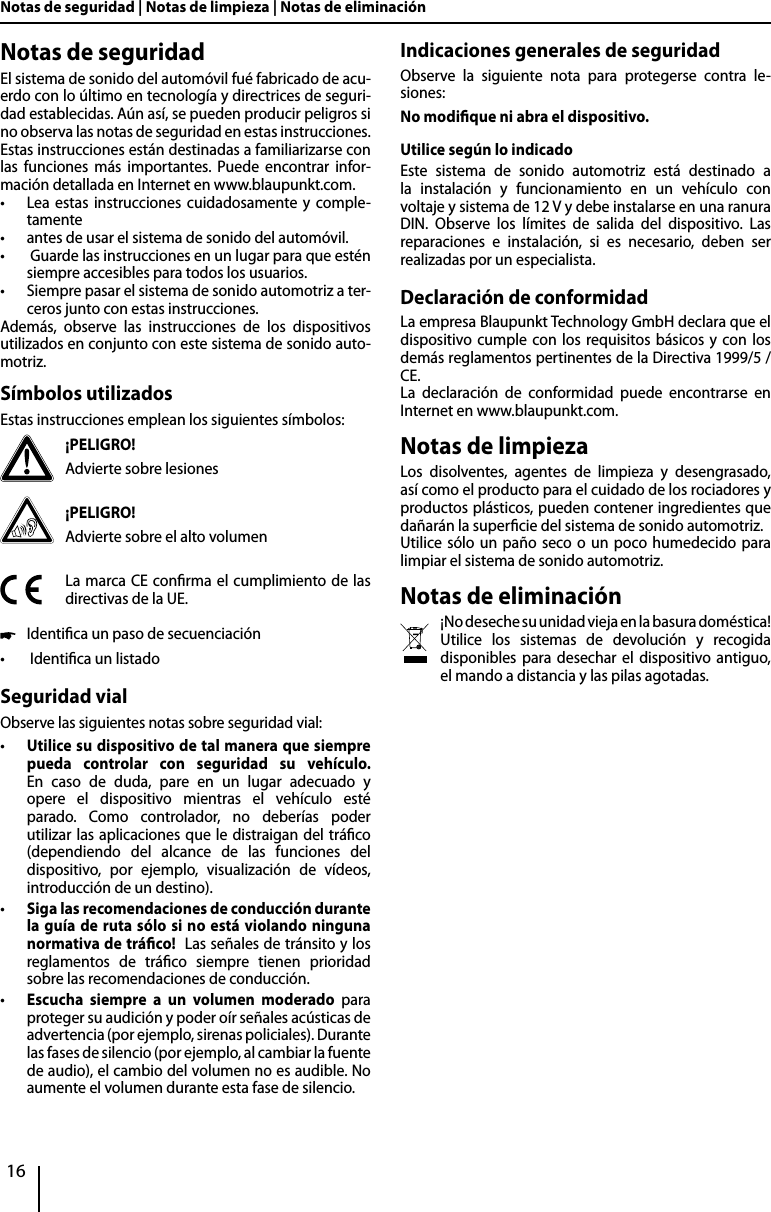
![14Controles – dispositivo1. [ ] Botón Enciende el equipo En funcionamiento: Pulsación larga: Apaga el equipo 2. [ ] Botón Silencia la fuente de audio3 Tecla INICIO Pulsación breve: Vuelve a la página principal (no importa en que pantalla esté) Pulsación larga: Exhibe reloj análogo en pantalla4 Tecla BRILLO Pulsación breve: Ajusta el brillo de la pantalla (4 pasos) Pulsación larga: Apaga la pantalla (sin cortar el audio, vuelve a encender cuando se toca en pantalla o se ejecuta una función)5/6 [ + ] / [ - ] Botón Ajusta volumen7 Página siguiente8 Pantalla táctil – interfaz de usuario9 Micrófono1234856 79](https://usermanual.wiki/Blaupunkt-Technology-Americas/SANPEDRO/User-Guide-3760604-Page-14.png)
![17DEUTSCHESPAÑOLColocación del dispositivo en funcionamientoEncendido / apagadoPrendiendo/apagando Pulse el botón [ ] para prender la unidad. Cuando prendida, pulse y mantenga el botón [ ] para apagar la unidad.VolumenAjuste del volumenPuede ajustar el volumen en pasos de 0 (apagado) a 50 (máximo). Pulse la [ + ]/[ - ] para cambiar el volumen.Silenciamiento del sistema de sonido del coche (Mudo) Pulse brevemente la [ ] para silenciar el dispositivo o para retornar al volumen anterior.Menú principal (Início)En el menú principal, pulse los botones de la pantalla táctil para acceder a las diferentes fuentes y modos de funcionamiento. Pulse la tecla [ ] .- O - En la fuente actual, pulse el botón .Se muestra el menú principal. Siempre y cuando no seleccione una fuente de audio nueva, se reproduce la última fuente de audio activa.Nota:Las guras utilizadas en estas instrucciones están destinadas a facilitar las explicaciones y los detalles pueden diferir de su dispositivo.Ajuste de la zona de recepciónEste sistema de sonido automotriz está diseñado para funcionar en diferentes regiones con diferentes rangos de frecuencias y tecnologías de sintonía. La conguración de zona predeterminada de fábrica es "South America". Se puede congurar un área de recepción diferente si le gusta.. En el menu principal, pulse el botón [ Ajustes ].Se muestra el menú Conguración.Si el ícono [ Ajustes ] no aparece en el menu, de-splaze la pantalla hacia la derecha para mostrar más iconos. En el área superior del menú Conguración, pulse el botón [ General ].El ajuste actual aparece bajo "Radio region". Pulse dos veces (doble clic) en el botón [ Radio region ] para mostrar la lista de áreas de recepción disponibles. Seleccione el área de recepción deseada haciendo doble clic. Pulse el botón . El menú principal se muestra nuevamente. Inicio](https://usermanual.wiki/Blaupunkt-Technology-Americas/SANPEDRO/User-Guide-3760604-Page-17.png)
![18Modo de radioIniciar el modo de radioEn el menú principal, pulse el botón [ Radio ].Aparece el menú de reproducción de la radio. Seleccionar banco de memoriaDiferentes bancos de memoria y bandas de frecuencia están disponibles. Hasta 6 estaciones se pueden almace-nar en cada banco de memoria. Pulse el botón repetidamente hasta que se muestre el banco de memoria deseado.FM1 FM2 FM3 AM1 AM2 FM1Sintonizando una estaciónSintonización manual de emisoras Presione brevemente el botón o una o varias veces para cambiar la frecuencia en incremen-tos.Ingrese la frecuencia directamenteSi se conoce la frecuencia de las estaciones deseadas, se puede ingresar directamente a través de la pantalla táctil. Pulse el botón para mostrar opciones de oper-ación adicionales. Pulse el botón .Aparece un teclado numérico para la entrada de fre-cuencia. Introduzca la frecuencia de la emisora deseada con el teclado numérico. Pulse el botón OK .Aparece el menú de reproducción de la radio, se re-produce la emisora de la frecuencia introducida.Iniciando búsqueda de sintonía Pulse el botón o por aprox. 2 segundos para iniciar la búsqueda de sintonía. La radio sintoniza la próxima estación que se puede recibir.Nota:Para la zona de recepción Europa: En la banda de ondas FM sólo se sintonizan las estaciones de infor-mación de tráco si se activa la prioridad de la infor-mación de tráco. Memorizar las emisoras manualmente Seleccione el banco de memoria deseado con el botón . Ajuste la emisora deseada. Pulse uno de los botones de memoria P1 - P6 por aprox. 2 segundos para almacenar la emisora ac-tual en el botón. La estación está almacenada.Almacenando emisoras automaticamente (Travelstore)Con Travelstore, puede buscar y almacenar automática-mente las 6 estaciones FM que ofrecen la recepción más fuerte en la región en el banco de memoria actual. Cualquier estación previamente almacenada en este banco de memoria se borra en el proceso. Seleccione una banda de memoria. Pulse el botón [ ] para mostrar opciones de oper-ación adicionales. Pulse el botón [ TS ].El sintonizador inicia la sintonización automática de búsqueda de emisoras. Una vez completado el almacenamiento, la radio reproduce la estación en la posición de memoria 1 de la banda de memoria previamente seleccionada.Nota:Para la zona de recepción de Europa: Si la infor-mación de tráco está activada, sólo se almacenan las informaciones de tráco.Exploración de emisorasPuede utilizar la función de exploración para reproducir todas las emisoras que se pueden recibir de la banda ac-tual durante unos segundos. Pulse el botón .La sintonización de búsqueda busca estaciones en la banda de ondas actual. Cada estación de recepción se reproduce durante unos segundos en el proceso. Pulsando el botón [ ] selecciona nuevamente la estación actualmente explorada y la reproduce.Modo de radio](https://usermanual.wiki/Blaupunkt-Technology-Americas/SANPEDRO/User-Guide-3760604-Page-18.png)
![19DEUTSCHESPAÑOLAjuste de la sensibilidad de búsqueda de sintoníaLa sensibilidad de sintonía de búsqueda determina si la sintonización automática de búsqueda de emisora encuentra sólo estaciones fuertes o también estaciones más débiles que pueden ser ruidosas. Pulse el botón DX / LO para ajustar la sensibilidad de la sintonización de búsqueda de estación. Si Local aparece, sólo se encuentran estaciones con una señal fuerte durante la sintonización por búsqueda. Si Distance aparece, las estaciones con una señal fuerte y débil se encuentran durante la sintonización de búsqueda.Encendido / apagado de RDSMuchas emisoras FM emiten una señal RDS (Radio Data System) además de su programa en la zona de recepción Europa que permite funciones adicionales, como la visu-alización del nombre de la estación. Pulse el botón para mostrar opciones de oper-ación adicionales. Pulse el botón RDS para activar o desactivar la fun-ción RDS. Si la función RDS está activada, RDS se muestra en blanco. Pulse el botón [ ] para ocultar las opciones de op-eración adicionales, o esperar hasta que se oculten automáticamente.Activación / desactivación de la función REG (programas regionales)Algunas estaciones RDS dividen sus programas en pro-gramas regionales con contenido diferente en ciertos momentos. Pulse el botón [ REG ] para activar o desactivar la fun-ción REG. Si se activa la función REG, REG está iluminado.Activación / desactivación de la función AF (frecuencias alternativas)Si la función AF está activada, el sistema de sonido au-tomotriz automáticamente se sintoniza en la mejor fre-cuencia de recepción para la emisora que está actual-mente congurada. Pulse el botón [ AF ] para activar o desactivar la fun-ción AF. El botón AF está iluminado si la función AF está acti-vada.Modo de radioSelección del tipo de programa e inicio de la búsqueda de sintoníaPuede seleccionar un tipo de programa con la función PTY para propositivamente buscar estaciones, por ejem-plo, que transmiten música rock o eventos deportivos. (No disponible en algunas regiones) Pulse el botón para mostrar opciones de oper-ación adicionales. Pulse el botón PTY para mostrar los tipos de pro-grama. Mueva hacia arriba / abajo para desplazarse por la lista y toque en el tipo de programa deseado para seleccionarlo. Pulse el botón PTY para empezar la búsqueda de sintonía PTY. Si una estación transmite un programa que se ha se-leccionado anteriormente, esa estación es reprodu-cida.Prioridad de conmutación para avisos de tráco activados / desactivadosEn la región de sintonía Europa, una estación FM puede identicar anuncios de tráco a través de una señal RDS. Si la prioridad de avisos de tráco está activa, un aviso de tráco es automáticamente exhibido, mismo si el Sis-tema de sonido automotriz no está en el modo de radio. Pulse el botón TA para activar o desactivar la prior-idad de conmutación para avisos de tráco. El botón TA se ilumina si la prioridad de conmutación para avisos de tráco está activada.](https://usermanual.wiki/Blaupunkt-Technology-Americas/SANPEDRO/User-Guide-3760604-Page-19.png)
![20Reproducción de USBInformación básicaEl sistema de sonido automotriz se puede utilizar para MP3 o WMA en portadores de datos USB . Además, puede ver películas e imágenes de USB en la pantalla o en un monitor conectado.Por razones de seguridad, la reproducción de películas e imágenes en el monitor integrado sólo se permite mien-tras el vehículo está parado y se aplica el freno de mano. El cable "BRAKE" debe conectarse con la conexión del fre-no de mano del vehículo (ver Esquema de conexiones al nal de estas instrucciones). La reproducción de películas en un monitor externo también es posible mientras se conduce.Notas: Blaupunkt no puede garantizar la total compatibilidad con los dispositivos USB disponibles en el mercado.Tenga en cuenta la información siguiente al preparar un soporte de datos MP3 / WMA: •Designación de títulos y directorios: Max. 32 carac-teres sin la extensión de archivo ".mp3" o ".wma" (el uso de más caracteres reduce el número de pistas y carpetas que el sistema de sonido del coche puede reconocer) •Formato USB / sistema de archivos: dispositivo de almacenamiento masivo / FAT / FAT16 / FAT32 •Extensión de archivos de audio: - .MP3 para archivos MP3- . WMA para archivos WMA •WMA sólo sin Digital Rights Management (DRM) y creados con Windows Media® Player versión 8 o pos-terior •MP3 ID3 tags: Versión 1 y 2 • Taza de bits para crear archivos de audio: - MP3: 32 a 320 kbps- WMA: 32 a 192 kbps •Número máximo de archivos y directorios: - Medio USB: Hasta 10.000 entradasSoporte de datos USB Puerto USB en la parte posterior del dispositivo.Conexión de un soporte de datos USB Inserte el soporte de datos USB en el puerto USB. El dispositivo cambia automáticamente al modo USB. Los datos se leen, la reproducción comienza con el primer archivo multimedia reconocido por el dispositivo.Extracción del portador de datos USB Apagar el sistema de sonido automotriz. Desconecte el soporte de datos USB.Reproducción de USBReproducción de audio desde USBLos principios de la reproducción de audio (MP3 / WMA) de los portadores de datos son idénticos para todas las fuentes. Seleccione la fuente deseada a través del menú prin-cipal. El dispositivo cambia a la fuente deseada y se inicia la reproducción.Si la reproducción no se inicia con la reproducción de audio, pulse el botón para cambiar a la carpeta / lista de archivos. Pulse el botón Para mostrar todas las carpetas y archivos del soporte de datos.- O - Pulse el botón para mostrar todos los archivos de audio del portador de datos.Toque brevemente dos veces (haga doble clic) en el nombre de la carpeta / pista. Se abre la carpeta / se inicia la pista..Después de iniciar un título, se muestra el menú de re-producción.[ ] Presione brevemente: Selección de título. Pulsación larga: Búsqueda rápida.[ / ] Interrumpir la reproducción y continuar la reproducción.[ ] Presione brevemente: Selección de título. Pulsación larga: Búsqueda rápida.[ ] Mostrar la lista de carpetas / archivos.[ ] Mostrar opciones operativas adicionales.](https://usermanual.wiki/Blaupunkt-Technology-Americas/SANPEDRO/User-Guide-3760604-Page-20.png)
![21DEUTSCHESPAÑOLReproducción de USB Toque en para mostrar opciones de operación adicionales del menú de reproducción.[ ] Ocultar opciones operativas adicionales.[ ] Mostrar el teclado para ingresar directamente el número del título deseado.Audio playback from USB [ ] Inicio y n de la función REPEAT.El modo REPEAT cambia cada vez que el botón es tocado.Modo de repeticiónRepetir pista actualRepetir carpeta actualRepetir todas las pistas del soporte de datos[ ] Comenzar MIX la reproducción aleatoria de la pista y nalizar nuevamente.Si la función MIX está activada, el símbolo se muestra en blanco.El modo MIX depende de la función REPEAT seleccionada.[ ] Mostrar ecualizador.Reproducción de vídeo desde USB Seleccione la fuente deseada a través del menú prin-cipal.El dispositivo cambia a la fuente deseada y se inicia la reproducción.Si la reproducción no se inicia con la reproducción de vídeo, pulse el botón para cambiar a la carpeta / lista de archivos. Pulse el botón para mostrar todas las carpetas y archivos del soporte de datos.- O - Pulse el botón para mostrar todos los archivos de vídeo del soporte de datos.Nota:Las carpetas y los vídeos se seleccionan y se inician como se describe en la reproducción de audio.Si seleccionó una película, se iniciará la reproducción. Durante la reproducción de la película, el menú de repro-ducción se oculta. Toque brevemente la pantalla táctil una vez para volver a mostrar el menú de reproducción.Se muestra el menú de reproducción.[ ] Seleccionar película anterior.[ / ] Interrumpir la reproducción y continuar la reproducción.[ ] Seleccionar película siguiente.[ ] Llamar al teclado para seleccionar directa-mente la película o el tiempo de reproduc-ción.[ ] Mostrar la lista de carpetas / archivos.[ ] Mostrar opciones operativas adicionales. Tocar en para mostrar opciones de operación adicionales del menú de reproducción.](https://usermanual.wiki/Blaupunkt-Technology-Americas/SANPEDRO/User-Guide-3760604-Page-21.png)
![22Reproducción de USB | Modo Bluetooth[ ] Ocultar opciones operativas adicionales.[ ] Mostrar ecualizador.[ ] Activar / desactivar la función de repetición de la película o carpeta.[ ] Ajustar imagen.[ ] Seleccione el idioma de reproducción (sólo si está soportado por la película).[ ] Mostrar subtítulos (sólo si está soportado por la película).Reproducción de imágenes desde USB Seleccione la fuente deseada a través del menú principal.El dispositivo cambia a la fuente deseada y se inicia la reproducción.If the playback does not start with the image playback, pulse el botón para cambiar a la carpeta / lista de archivos.. Pulse el botón para mostrar todas las carpetas y archivos del soporte de datos.- O - Pulse el botón [ ] para visualizar todas las imágenes del portador de datos. Nota:Las carpetas e imágenes se seleccionan y se inician como se describe en la reproducción de audio.Modo BluetoothLa función Bluetooth® permite registrar teléfonos celu-lares y dispositivos de reproducción de medios con el sistema de sonido automotriz. Cuando registra un teléfono celular con el sistema de so-nido automotriz, se puede realizar llamadas telefónicas con la función manos libres incorporada. Puede acceder a las listas de números marcados y al catalogo telefónico del teléfono celular registrado.Si el dispositivo Bluetooth® conectado soporta las fun-ciones A2DP y AVRCP, puede reproducir la música a través del sistema de sonido del coche y controlar la reproducción. Durante una llamada, la reproducción de música se interrumpe y continúa. Si un teléfono celular se registra a través de Bluetooth® y se recibe una llamada durante la reproducción de otra fuente, se interrumpe la reproducción de la fuente y se muestra el menú de llamada.Inicio del modo Bluetooth En el menú principal, presione el botón Bluetooth .Aparecerá el menú Bluetooth®. Contiene la lista de dispositivos Bluetooth® conocidos. Otras fuentes de audio están desactivadas.[ ] Agregar nuevo dispositivo Bluetooth®.[ ] Menú de opciones de visualización. Pulse el botón [ Connect ] del dispositivo Bluetooth® con el que desea establecer una conexión. Cuando el dispositivo está en rango, se establece la conexión y se muestra el menú del dispositivo. Pulse el botón [ Delete ] si desea eliminar el disposi-tivo Bluetooth® de la lista.Registrando dispositivos BluetoothSi desea registrar un dispositivo con el sistema de soni-do automotriz por primera vez, proceda de la siguiente manera: Asegúrese de que Bluetooth® esté activado en el sis-tema de sonido automotriz y en su dispositivo Blue-tooth®.](https://usermanual.wiki/Blaupunkt-Technology-Americas/SANPEDRO/User-Guide-3760604-Page-22.png)
![23DEUTSCHESPAÑOLModo Bluetooth En el menú de opciones del modo Bluetooth®, introduzca un código de emparejamiento (consulte Ajustes Bluetooth®). Buscar nuevos dispositivos / conexiones en el dis-positivo Bluetooth®. El sistema de sonido automotriz aparece como "SP 800" en la lista de dispositivos Bluetooth®. Establecer la conexión; puede que tenga que in-gresar el código de emparejamiento que se introdujo previamente en el sistema de sonido del automóvil.Se está estableciendo la conexión y se muestra el menú del dispositivo registrado.Nota:Si un teléfono está conectado con el sistema de so-nido del coche, el icono Bluetooth® se muestra en el extremo superior derecho de la pantalla en todas las fuentes de audio / vídeo.Modo de teléfonoSi ha conectado un teléfono con el sistema de sonido del coche a través de Bluetooth®, aparecerá el siguiente menú.[ ] Mostrar el menú del teléfono.[ ] Visualización del menú de reproducción para el streaming de Bluetooth®. [ ] Mostrar el menú de reproducción para la aplicación de control. [ ] Desconectar la conexión con el dispositivo actual.[ ] Exhibe a la guía telefónica.[ ] Exhibe las listas de llamadas. [ ] Menú de opciones de visualización.[ ] Activar el control de voz. Introduzca un número de teléfono con el teclado y pulse el botón . - O - Seleccione un contacto / número a través de las lis-tas de llamadas o de la guía telefónica y presione el botón [ Dial ] en la ventana emergente.La conexión se está estableciendo.Si se recibe una llamada, se muestra el menú de llamada.[ ](Cuelgue): rechazar una llamada.[ ](Contesta): Contestar una llamada.Búsqueda alfabéticaPulse [ ] en la parte inferior izquierda de la pantalla para acceder a la Agenda telefónica. Si desea buscar un contacto, pulse [ ] e introduzca los caracteres a través del teclado.Reproducción de audio a través de transmisión BluetoothSi un dispositivo de transmisión de audio está conectado con el sistema de sonido del coche a través de Blue-tooth®, puede reproducir la música a través del sistema de sonido del coche y controlar la reproducción. Pulse el botón para cambiar a la reproducción de audio.[ ] Mostrar el menú del teléfono.[ ] Visualización del menú de reproducción para el streaming de Bluetooth®. [ ] Mostrar el menú de reproducción para la aplicación de control. [ ] Disconnect connection with current device.[ ] Presione brevemente: Selección de título. Pulsación larga: Búsqueda rápida.[ / ] Interrumpir la reproducción y continuar la reproducción.[ ] Presione brevemente: Selección de título. Pulsación larga: Búsqueda rápida.[ ] Mostrar ecualizador.](https://usermanual.wiki/Blaupunkt-Technology-Americas/SANPEDRO/User-Guide-3760604-Page-23.png)
![24Modo Bluetooth | Entrada de la cámara traseraReproducción de audio a través de la aplicación de control (Teléfono celular Android)Con la aplicación "Blaupunkt Android Player Multimedia Series", los archivos de música almacenados en un telé-fono celular Android se pueden dividir en ciertas catego-rías con la ayuda de la información de la etiqueta ID3. Esto le permite seleccionar y reproducir de forma rápida y cómoda pistas de música en diferentes categorías. Para este propósito, la aplicación debe estar instalada en el teléfono celular Android. La aplicación "Blaupunkt An-droid Player Multimedia Series" se puede descargar en Internet desde www.blaupunkt.com o en su tienda de aplicaciones preferida. Nota:La reproducción de audio a través de la aplicación "Blaupunkt Android Player Multimedia Series" está disponible sólo para teléfonos celulares Android con el sistema operativo Android 2.3 y superior. Además, el teléfono celular debe admitir los perles Blue-tooth® SPP (perl de puerto serie) y A2DP (Advanced Audio Distribution Prole). Pulse el botón para cambiar a la reproducción de audio-back.[ ] Mostrar el menú del teléfono.[ ] Visualización del menú de reproducción para el streaming de Bluetooth®. [ ] Mostrar el menú de reproducción para la aplicación de control. [ ] Mostrar listas de categorías.[ ] Presione brevemente: Selección de título. Pulsación larga: Búsqueda rápida.[ / ] Interrumpir la reproducción y continuar la reproducción.[ ] Presione brevemente: Selección de título. Pulsación larga: Búsqueda rápida.[ ] Activar o desactivar la función de repetición.[ ] Activar / desactivar reproducción aleatoria.Conguración de BluetoothEn el menú de opciones de Bluetooth®, puede realizar los ajustes básicos para el modo Bluetooth®. Pulse el botón . Se muestra el menú de opciones.Bluetooth – Bluetooth® se puede encender o apagar.Auto connect – Si "Auto Connect" está activado, el dispositivo se conecta automáticamente con dispos-itivos Bluetooth® conocidos tan pronto estén dentro del alcance.Auto answer – Si se activa "Respuesta automática", las llamadas entrantes se responden automáticamente.Pairing code – Muchos dispositivos Bluetooth® solicitan el código de emparejamiento antes de establecer la conexión. Puedes denirlo aquí.Phone book sync – Para poder acceder a la guía telefónica de un teléfono conectado, primero debe sincronizarlo mediante esta entrada de menú. Pulse [ ] para salir del menú de opciones. Entrada de la cámara traseraEste dispositivo cuenta con una entrada de vídeo en la parte posterior del dispositivo para conectar una cámara que está disponible como opción. Si se conecta una cámara trasera, la imagen se visualiza en la pantalla, cuando se engancha la marcha trasera.](https://usermanual.wiki/Blaupunkt-Technology-Americas/SANPEDRO/User-Guide-3760604-Page-24.png)
![25DEUTSCHESPAÑOLAjustes de sonidoVolume distribution (fader/balance)Puede ajustar la distribución de volumen en el vehículo para todas las fuentes. En el menú principal o en la barra de control de la fuente de audio actual, pulse el botón .Aparece el menú del ecualizador. Pulse el botón .Se visualiza el menú de fader y balance. Ajuste el fader y el balance con / o / . A continuación, presione . El ajuste se almacena, la fuente actual se muestra nuevamente.EcualizadorPuede ajustar el ecualizador para todas las fuentes. En el menú principal o en la barra de control de la fuente de audio actual, pulse el botón .Aparece el menú del ecualizador. Seleccione un ecualizador preestablecido mediante los botones.- O - Pulse el botón User para ajustar el nivel de las bandas de frecuencia disponibles según sus preferencias. Nota:Con el botón [ Reset ], puede restablecer el ajuste personalizado de nuevo. - O - Pulse el botón Flat para una reproducción de sonido lineal. Pulse el botón Loudness para activar o desactivar el bajo a bajo volumen. A continuación, presione . El ajuste se almacena, la fuente actual se muestra nuevamente.Ajustes básicosEn el menú de conguración, puede ajustar los ajustes básicos para las diferentes funciones del dispositivo según sus necesidades. En el menú principal, presione el botón [ Settings ].Se muestra el menú de conguración, se activa el submenú General. Llamar a los submenús con los botones en el área inferior del menú de conguración.GeneralLos siguientes ajustes son posibles:Radio region – Seleccione la región de recepción para la recepción de radio.FM HICUT - Active la función para mejorar la señal de FM.Blackout – Si se ajusta este valor, la pantalla de la radio se apaga completamente después de 10 ó 20 seg. sin uso.Dimmer mode – Ajuste el brillo de la pantallaBeep – Activar / desactivar el pitido de conrmación de las funciones.TFT calibration – La pantalla táctil se puede calibrar aquí.Software version - Mostrar la versión del softwareLoad factory settings - Restablece todos los ajustes personalizados. VideoLos siguientes ajustes son posibles:Aspect ratio - Ajuste la relación de aspecto Ajustes de sonido | Ajustes básicos](https://usermanual.wiki/Blaupunkt-Technology-Americas/SANPEDRO/User-Guide-3760604-Page-25.png)