Blaupunkt 7648011310 Car Radio 3T Hamburg MP68 User Manual 01BA HamburgMP68us gb indd
Blaupunkt GmbH Car Radio 3T Hamburg MP68 01BA HamburgMP68us gb indd
Contents
- 1. Manual1
- 2. Manual2
- 3. Manual3
Manual2
36
AUX mode
AUX mode
You can connect different external audio
sources to the device via the rear AUX in-
put:
C‘n‘C devices from the Blaupunkt acces-
sories programme (e.g. an iPod®/USB
interface).
CD changer
Other external audio sources, such as
portable CD players, MiniDisc players,
MP3 players or a non-C‘n‘C Blaupunkt
interface.
The C‘n‘C interface from Blaupunkt (C‘n‘C =
Command and Control) allows an even more
convenient control of devices and data car-
riers that are connected to the car sound
system via a C‘n‘C Blaupunkt interface.
This device is factory set for the connec-
tion of C‘n‘C Blaupunkt accessory devices.
If you want to connect a non-C‘n‘C device,
such as a CD changer or another external
audio source, please perform the settings
described in the following sections.
Note
Please note that the current software of
this device may not yet offer any C‘n‘C
support. In this case, the menu items
"CDC ON" and "C‘N‘C EDIT" are not avail-
able in the "Syst" system menu.
Your device can be rendered C‘n‘C-capa-
ble by means of a software update. Infor-
mation about the availability of this soft-
ware and the download can be found
under www.blaupunkt.com. To install
new software, please read the section
•
•
•
"Updating the device software" in the
chapter "Additional settings".
Adjusting the rear AUX input
mode
Note
This setting is omitted if the current soft-
ware of this device does not yet offer any
C‘n‘C support.
You can select between these modes for the
rear AUX input:
C‘n‘C mode for C‘n‘C Blaupunkt inter-
faces.
Non-C'n'C mode for non-C‘n‘C Blaupunkt
interfaces, CD changers and other ex-
ternal audio sources.
The C‘n‘C mode is activated by default.
To switch between C‘n‘C mode and non-
C‘n‘C mode,
press the MENU button 6.
Press the rocker switch : to open
the "Syst" system menu.
Press the rocker switch or : until
the "CDC ON" menu item is selected.
Press the OK button 2 to call up the
menu item.
Switch between the settings with the
rocker switch or :.
"CDC ON" : Non-C‘n‘C mode.
"CDC ON" : C‘n‘C mode.
As soon as you change the setting, the de-
vice briefl y switches off and back on again
with the selected setting (Reset).
•
•
u
u
u
u
u
•
•
01BA_HamburgMP68us_gb.indd 3601BA_HamburgMP68us_gb.indd 36 14.03.2008 10:49:01 Uhr14.03.2008 10:49:01 Uhr
37
AUX mode
FRANÇAIS ENGLISHESPAÑOL
PORTUGUÊS
中文
한국어
한국어
Connecting other external audio
sources
If no C‘n‘C Blaupunkt accessory device and
no CD changer is connected to the device,
you can connect other external audio sources
via the rear AUX input, such as portable CD
players, MiniDisc players or MP3 players.
Note:
An adapter cable is needed to connect
an external audio source via the rear AUX
input. You can obtain this cable (Blau-
punkt no.: 7 607 897 093) from your
Blaupunkt dealer.
If you want to connect such an external au-
dio source, proceed as follows:
Note
The first step is omitted if the current
software of this device does not yet offer
any C‘n‘C support.
Check whether the non-C‘n‘C mode
is set for the rear AUX input. For fur-
ther details, please read the section
"Adjusting the rear AUX input mode" in
this chapter.
Connect the external audio source to
the rear AUX input while the device is
switched off.
In the menu of the device, switch on the
external audio source. For further de-
tails, please read the following section,
"Switching the external audio source
on/off and selecting it".
If necessary, make additional settings
for the external audio source. For fur-
ther details, please read the additional
sections in this chapter.
1.
2.
3.
4.
Switching the external audio source on/
off and selecting it
If you connected an external audio source
to the rear AUX input, you must activate the
AUX input in the menu. This allows you to se-
lect the external audio source with the SRC
button 8.
Press the MENU button 6.
Press the rocker switch : to open
the "Syst" system menu.
Press the rocker switch or : until
the "AUX" menu item is selected.
Press the OK button 2 to call up the
menu item.
Switch between the settings with the
rocker switch or :.
"AUX" : AUX input on.
"AUX" : AUX input off.
Press the OK button 2 to select a dif-
ferent function, or press the DIS•ESC
button ; to exit the menu.
Naming external audio sources (AUX
EDIT )
For the rear AUX input, you can enter a sepa-
rate name that is shown on the display if you
select the connected audio source.
Press the MENU button 6.
Press the rocker switch : to open
the "Syst" system menu.
Press the rocker switch or : until
the "AUXEDIT" menu item is selected.
Press the OK button 2 to call up the
menu item.
u
u
u
u
u
•
•
u
u
u
u
u
01BA_HamburgMP68us_gb.indd 3701BA_HamburgMP68us_gb.indd 37 14.03.2008 10:49:02 Uhr14.03.2008 10:49:02 Uhr
38
AUX mode
The current name is displayed. The posi-
tion digit fl ashes and can be changed. You
can now enter your own name with up to
12 characters:
Enter the name by pressing the corre-
sponding buttons of the keys 9. Select
the desired letter, if necessary by press-
ing a button several times.
After entering one letter, the device auto-
matically switches to the next one. To cor-
rect any entry errors, select the correspond-
ing digit by pressing the rocker switch
or : again.
Enter the desired character by pressing
the corresponding button of the alpha-
numeric keys 9 once or several times.
Press the rocker switch or : to
change to a different position.
After entering the complete name,
press the OK button 2 to store the
name entered.
Notes:
To quit the text input without chang-
ing the welcome text, press the
DIS•ESC button ;.
If the text entry is interrupted, e.g. by
a phone call, any of the changes per-
formed so far are not stored.
Mixing an external audio source with
another audio source (MIX AUX )
You can play an external audio source simul-
taneously with any other audio source of the
radio (radio, CD, USB or Bluetooth stream-
ing).
u
u
u
u
•
•
This function allows you, e.g. to connect a
mobile Blaupunkt navigation device as ex-
ternal audio source and to play the navi-
gation announcements via the radio loud-
speakers while listening to one of the other
audio sources. Note that the other audio
source is not muted in this case if a naviga-
tion announcement is broadcast.
Note:
The volume of the external audio source
and the volume of the audio source of
the radio are adjusted separately:
Adjust the volume for the radio,
CD,USB or Bluetooth streaming play-
back with the volume control 4.
Use an output on the connected de-
vice whose volume you can adjust
(e.g. the headphones output), and
adjust the volume of the external au-
dio source with the corresponding
controller of the device.
The simultaneous playback must be acti-
vated in the menu. If "MIX AUX" is switched
on, the audio source connected via the rear
AUX input is played back together with the
currently selected audio source (e.g. radio
or CD). If "MIX AUX" is switched off, only
the selected audio source is played in each
case.
To switch "MIX AUX" on/off,
press the MENU button 6.
Press the rocker switch : to open
the "Syst" system menu.
Press the rocker switch or : until
the "MIX AUX" menu item is selected.
•
•
u
u
u
01BA_HamburgMP68us_gb.indd 3801BA_HamburgMP68us_gb.indd 38 14.03.2008 10:49:03 Uhr14.03.2008 10:49:03 Uhr
39
AUX mode
FRANÇAIS ENGLISHESPAÑOL
PORTUGUÊS
中文
한국어
한국어
Press the OK button 2 to call up the
menu item.
Switch between the settings with the
rocker switch or :.
"MIX AUX" : On.
"MIX AUX" : Off.
Press the OK button 2 to select a dif-
ferent function, or press the DIS•ESC
button ; to exit the menu.
Managing several C‘n‘C devices
Note
This setting is omitted if the current soft-
ware of this device does not yet offer any
C‘n‘C support.
When using suitable adapter cables, you
can connect up to 3 C‘n‘C Blaupunkt inter-
faces to the device. For the device to distin-
guish the different interfaces, you can as-
sign them individual device numbers.
Press the MENU button 6.
Press the rocker switch : to open
the "Syst" system menu.
Press the rocker switch or : until
the "C‘N‘C EDIT" menu item is selected.
Press the OK button 2 to call up the
menu item.
The menu displays the 3 C‘n‘C devices "DE-
VICE 1" to "DEVICE 3".
Select a device with the rocker switch
or :.
Press the OK button 2.
u
u
•
•
u
u
u
u
u
u
u
You can now enter the four-digit PIN number
of the device:
Enter the number sequence by press-
ing the corresponding buttons of the
keys 9.
Note:
The PIN of a C‘n‘C device consists of
4 hexadecimal digits. Every digit can
take on 16 different values from 0 to 9
and A to F. To enter the values from A to
F for a digit, press the "2" or "3" button
of the keys as often as required.
After entering one digit, the device auto-
matically switches to the next one. To cor-
rect any entry errors, select the correspond-
ing digit by pressing the rocker switch
or : again.
After entering the complete PIN number,
press the OK button 2.
u
u
01BA_HamburgMP68us_gb.indd 3901BA_HamburgMP68us_gb.indd 39 14.03.2008 10:49:03 Uhr14.03.2008 10:49:03 Uhr

40
Bluetooth phone call
Bluetooth phone call
The integrated Bluetooth module in your de-
vice allows the hands-free use of a phone via
a Bluetooth connection. The cell phone can
remain in the bag or the glove compartment
– you have both hands free for steering.
Besides cell phones, you can also connect
Bluetooth-ready MP3 players with the de-
vice and play back audio contents via Blue-
tooth streaming. For further details, please
read the chapter "Bluetooth streaming
mode".
Bluetooth preparation
Prerequisites for Bluetooth phone calls are
a Bluetooth cell phone and the installation
of the supplied microphone (see the instal-
lation instructions).
Note:
Use only the supplied Blaupunkt micro-
phone. Conventional microphones are
not suitable for a connection to this de-
vice.
The cell phones that are compatible with
the car sound system can be found under
www.blaupunkt.com or at your Blaupunkt
specialised dealer.
The Bluetooth technology is a wireless con-
nection with a short range. That is, the cell
phone must be close to the car sound sys-
tem (in the vehicle).
How is a Bluetooth connection
established?
First, the cell phone and the car sound sys-
tem have to "become acquainted" with each
other, i.e. they must be registered. When
you register the devices, a Bluetooth con-
nection is subsequently established. This
connection remains in effect as long as the
cell phone is within range. If the connection
is interrupted, e.g. because you moved the
cell phone outside the range, the connec-
tion is automatically re-established as soon
as you are back within range.
If you want to connect another registered
cell phone with the car sound system, you
can do so manually (please read the section
"Managing registered Bluetooth devices" in
this chapter). If the device is switched off
and on again, it automatically attempts to
establish a connection with the master tel-
ephone (see the section "Determining the
master telephone"). If the master telephone
is not within range or switched off, the de-
vice attempts to establish a connection with
another registered cell phone, and in the
order in which the telephones were con-
nected last.
Opening the Bluetooth menu
The Bluetooth menu contains all the re-
quired settings and functions.
To open the Bluetooth menu,
press the MENU button 6.
Press the rocker switch : to open
the "Syst" system menu.
u
u
01BA_HamburgMP68us_gb.indd 4001BA_HamburgMP68us_gb.indd 40 14.03.2008 10:49:04 Uhr14.03.2008 10:49:04 Uhr
41
Bluetooth phone call
FRANÇAIS ENGLISHESPAÑOL
PORTUGUÊS
中文
한국어
한국어
Press the rocker switch or : until
the "BT" menu item is selected.
Press the OK button 2 to call up the
menu item.
The Bluetooth menu opens.
Note:
If a Bluetooth process is currently taking
place (e.g. registering a device or down-
loading a phone book), you cannot open
the Bluetooth menu. A corresponding
message appears on the display. To re-
turn to the current audio source, press
the DIS•ESC button ;.
Registering the cell phone
The device can be registered with up to
5 Bluetooth cell phones or other devices
such as MP3 players. If you register a sixth
one, the Bluetooth device registered fi rst
is unregistered.
To register a cell phone,
open the Bluetooth menu.
The "PAIR" menu item is selected.
Press the OK button 2 to call up the
menu item.
The Device menu opens. The "PHONE" (cell
phone) menu item is selected.
Press the OK button 2.
The display shows the PIN number for the
Bluetooth connection. The Bluetooth cell
phone can now be registered.
If requested, enter the PIN displayed in
your cell phone.
u
u
u
u
u
u
The car sound system independently es-
tablishes a Bluetooth connection to the cell
phone that was registered last and is availa-
ble. If the connection has been established,
"DEVICE CONNECTED" is briefl y shown on
the display, and the symbol for the Blue-
tooth signal strength appears. If no connec-
tion could be established, then "CONNEC-
TION FAILED" is displayed.
Note:
The time required for the connection is
dependent upon the cell phone and can
differ from cell phone to cell phone.
Determining the master
telephone
If you register several telephones with the
device, you can determine a master tele-
phone. The master telephone has a high-
er priority than the other registered tele-
phones:
If the device is switched on, it fi rst at-
tempts to establish a connection with
the master telephone. Only if the master
telephone is not available, does the de-
vice attempt to establish a connection
with the telephone registered last.
If you register a sixth Bluetooth device,
the one registered fi rst is unregistered.
During the process, the master tele-
phone always remains registered, even
if it is the fi rst registered Bluetooth de-
vice in the list. Instead, the next Blue-
tooth device in the list is unregistered.
•
•
01BA_HamburgMP68us_gb.indd 4101BA_HamburgMP68us_gb.indd 41 14.03.2008 10:49:04 Uhr14.03.2008 10:49:04 Uhr
42
Bluetooth phone call
Open the Bluetooth menu.
Press the rocker switch or : until
the "MASTER" menu item is selected.
Press the OK button 2 to call up the
menu item.
A list of the registered cell phones is dis-
played.
Press the rocker switch or : to
select a telephone.
Press the OK button 2.
The selected telephone is defi ned as master
telephone and identifi ed by an "M".
To delete the master telephone,
select the master telephone in the list
with the rocker switch or :.
Press the OK button 2.
The "DELETE" option is selected in the
submenu.
Press the OK button 2.
Note:
After the deletion, no telephone is de-
fi ned as master telephone. However, the
former master telephone remains regis-
tered.
Managing registered Bluetooth
devices
In the Bluetooth menu, you can manage the
registered Bluetooth devices (cell phones
and devices such as MP3 player).
The "DEL ALL " function allows you to unreg-
ister all registered Bluetooth devices.
u
u
u
u
u
u
u
u
The registered devices are displayed on the
device list (DEV LIST). You can do the fol-
lowing:
Disconnect the connection to the cur-
rently connected Bluetooth device (DIS-
CON)
Establish a connection to one of the reg-
istered Bluetooth devices (CONNECT)
Unregister a Bluetooth device ( DELETE)
Unregister all registered Bluetooth
devices
Open the Bluetooth menu.
Press the rocker switch or : until
the "DEL ALL" menu item is selected.
Press the OK button 2 to call up the
menu item.
The "YES" menu item is selected.
Press the OK button 2 to unregister all
registered Bluetooth devices.
OR:
Use the rocker switch or : to
select the menu item "NO" or "EXIT".
Press the OK button 2 to leave all
registered Bluetooth devices as is and
return to the Bluetooth menu.
Managing registered Bluetooth devices
in the device list
To mange the registered Bluetooth devices
in the device list,
open the Bluetooth menu.
Press the rocker switch or : until
the "DEV LIST" menu item is selected.
•
•
•
u
u
u
u
u
u
u
u
01BA_HamburgMP68us_gb.indd 4201BA_HamburgMP68us_gb.indd 42 14.03.2008 10:49:05 Uhr14.03.2008 10:49:05 Uhr

43
Bluetooth phone call
FRANÇAIS ENGLISHESPAÑOL
PORTUGUÊS
中文
한국어
한국어
Press the OK button 2 to call up the
menu item.
Use the rocker switch or : to se-
lect whether cell phones (PHONE) or
devices such as MP3 players (NOMAD-
IC) should be managed.
Press the OK button 2.
Select the desired Bluetooth device
with the rocker switch or :.
Press the OK button 2.
Select one of the following functions
with the rocker switch or ::
"CONNECT": The selected Bluetooth
device is connected.
"DISCON": The connection to the
selected Bluetooth device is discon-
nected.
"DELETE": The selected Bluetooth
device is unregistered.
Note:
The "DISCON" function is only available
to the currently connected Bluetooth de-
vice, the "CONNECT" function only for
the other registered Bluetooth devices.
Answering/rejecting a phone call
If you are receiving a call, the display shows
"INCOMING CALL" and the phone number
of the caller or his entry in the phone book.
The active audio source is muted and the
ring tone is sent to the loudspeakers.
In case of an incoming call, you must answer
or reject the call. At this time, it is not possi-
u
u
u
u
u
u
•
•
•
ble to perform another operation using the
car sound system.
To reject the call,
press the button <.
The display shows "CALL ENDED".
To answer the call,
press the button =.
The display shows "IN-CALL".
Your caller's voice is broadcast via the loud-
speakers.
During the phone call, you can change the
volume by means of the volume control 4.
Note:
No navigation announcements are
switched during the Bluetooth phone
call.
Making a phone call (DIAL NEW )
There are several ways of making a phone
call via the car sound system:
Entering a phone number
Selecting a phone number stored in
the phone book of the device (see the
section "Storing and calling a phone
number in the phone book of the
device")
Selecting a phone number stored in the
phone book of the connected cell phone
(see the section "The phone book of the
cell phone")
Selecting a phone number from the his-
tory (see the section "Calling a phone
number from history")
u
u
•
•
•
•
01BA_HamburgMP68us_gb.indd 4301BA_HamburgMP68us_gb.indd 43 14.03.2008 10:49:05 Uhr14.03.2008 10:49:05 Uhr
44
Bluetooth phone call
To enter a phone number and make a call,
open the Bluetooth menu.
Press the rocker switch or : until
the "DIAL NEW" menu item is selected.
Press the OK button 2 to call up the
menu item.
Now you can enter a phone number:
Enter the number sequence by press-
ing the corresponding buttons of the
keys 9.
After entering one digit, the device auto-
matically switches to the next one. To cor-
rect any entry errors, select the correspond-
ing digit by pressing the rocker switch
or : again.
After entering the complete phone number,
press the button = to make the
call.
The display shows "CALLING" and the di-
aled phone number or its entry in the phone
book.
Ending a call
To end a call,
press the button <.
The display shows "CALL ENDED".
You can also end the phone call by switching
off the device.
u
u
u
u
u
u
Redirecting an ongoing phone
call to the cell phone
By default, the voice of the person calling
you is played back via the loudspeakers of
the vehicle during a phone call. You can also
redirect a phone call to your cell phone:
Briefl y press the button =.
The loudspeakers in the vehicle are muted
and the voice of your caller is redirected to
your cell phone. Pressing the button
again outputs the voice again via the loud-
speakers in the vehicle.
OR
Press the On/Off button 3 for longer
than 2 seconds.
The car sound system is switched off and
your caller is redirected to your cell phone.
Storing and calling a phone
number in the phone book of the
device
The device features its own phone book in
which you can store 10 entries. Every en-
try consists of a name and a phone number.
The numbers stored in the phone book of
the device are available independent of the
currently connected cell phone.
Storing phone numbers
To store an entry in the phone book of the
device,
open the Bluetooth menu.
Press the rocker switch or : until
the "RAD PBK" menu item is selected.
u
u
u
u
01BA_HamburgMP68us_gb.indd 4401BA_HamburgMP68us_gb.indd 44 14.03.2008 10:49:06 Uhr14.03.2008 10:49:06 Uhr

45
Bluetooth phone call
FRANÇAIS ENGLISHESPAÑOL
PORTUGUÊS
中文
한국어
한국어
Press the OK button 2 to call up the
menu item.
The "ADD NEW" menu item is selected.
Press the OK button 2.
You can now enter your the name of the
entry with up to 20 characters:
Enter the name by pressing the corre-
sponding buttons of the keys 9. Select
the desired letter, if necessary by press-
ing a button several times.
After entering one letter, the device auto-
matically switches to the next one. To cor-
rect any entry errors, select the correspond-
ing digit by pressing the rocker switch or
: again.
After entering the complete name,
press the OK button 2.
Now you can enter the phone number:
Enter the number sequence by press-
ing the corresponding buttons of the
keys 9.
After entering the complete phone number,
press the OK button 2.
The new entry is stored.
Calling a phone number
To call a number stored in the phone book
of the device,
open the Bluetooth menu.
Press the rocker switch or : until
the "RAD PBK" menu item is selected.
Press the OK button 2 to call up the
menu item.
u
u
u
u
u
u
u
u
u
Press the rocker switch or : until
the "VIEW PBK" menu item is selected.
Press the OK button 2.
The entries of the phone book of the device
are displayed.
Select the desired entry with the rocker
switch or :.
Press the button = to make the
call.
The display shows "CALLING" and the
selected entry in the phone book.
Editing an entry
To edit an existing entry in the phone book
of the device,
open the Bluetooth menu.
Press the rocker switch or : until
the "RAD PBK" menu item is selected.
Press the OK button 2 to call up the
menu item.
Press the rocker switch or : until
the "EDIT PBK" menu item is selected.
Press the OK button 2.
The entries of the phone book of the device
are displayed.
Select the desired entry with the rocker
switch or :.
Press the OK button 2.
You can now edit the name of the entry:
If necessary, press the rocker switch
or : to select a position.
Enter the desired character by pressing
the corresponding button of the keys 9
once or several times.
u
u
u
u
u
u
u
u
u
u
u
u
u
01BA_HamburgMP68us_gb.indd 4501BA_HamburgMP68us_gb.indd 45 14.03.2008 10:49:06 Uhr14.03.2008 10:49:06 Uhr

46
Bluetooth phone call
After editing the complete name,
press the OK button 2.
Now you can edit the phone number:
If necessary, press the rocker switch
or : to select a position.
Enter the desired digit by pressing the
corresponding button of the keys 9.
After editing the complete phone number,
press the OK button 2.
The modifi ed entry is stored.
Deleting entries
To delete an existing entry in the phone
book of the device,
open the Bluetooth menu.
Press the rocker switch or : until
the "RAD PBK" menu item is selected.
Press the OK button 2 to call up the
menu item.
Press the rocker switch or : until
the "DELETE" menu item is selected.
Press the OK button 2.
The entries of the phone book of the device
are displayed.
Select the desired entry with the rocker
switch or :.
Press the OK button 2.
The selected entry is deleted.
Note:
To delete all the entries of the phone
book, select the menu item "DEL ALL" in-
stead of "DELETE" and press the OK but-
ton 2.
u
u
u
u
u
u
u
u
u
u
u
The phone book of the cell phone
You can upload the phone book of the con-
nected cell phone to the device and then se-
lect and call entries from the phone book via
the device.
Note:
Downloading the phone book means that
the entries are copied from the cell phone
to the device. The phone book of the cell
phone is not deleted in the process.
The device stores phone book entries of
up to 3 cell phones with up to 500 entries
each. Each entry may contain up to 4 dif-
ferent phone numbers, e.g. for private and
offi ce numbers of a person.
Downloading a phone book
To download the phone book,
open the Bluetooth menu.
Press the rocker switch or : until
the "PBK DNL" menu item is selected.
Press the OK button 2 to call up the
menu item.
The download of the phone book from the
cell phone to the device starts. The display
shows "PHONEBOOK DOWNLOADING". After
the download is complete, it shows "DOWN-
LOAD COMPLETE"; if the download was not
successful, it shows "DOWNLOAD FAILED".
Note:
If the device is currently in the Bluetooth
streaming mode when the phone book is
being downloaded, the audio transfer is
interrupted for the duration of the phone
book download.
u
u
u
01BA_HamburgMP68us_gb.indd 4601BA_HamburgMP68us_gb.indd 46 14.03.2008 10:49:07 Uhr14.03.2008 10:49:07 Uhr
47
Bluetooth phone call
FRANÇAIS ENGLISHESPAÑOL
PORTUGUÊS
中文
한국어
한국어
Calling an entry in the phone book
Note:
Only the phone book of the currently
connected cell phone is available (if this
phone book has already been download-
ed to the device).
To call an entry in the phone book of the cell
phone,
open the Bluetooth menu.
Press the rocker switch or : until
the "DEV PBK" menu item is selected.
Press the OK button 2 to call up the
menu item.
The entries of the phone book are dis-
played.
Select the desired entry with the rocker
switch or :.
Note:
To reach the desired entry faster, press
the button of the alphanumeric keys 9
with the corresponding starting letter.
In each case, the fi rst available number for
the currently selected entry is displayed. If
additional numbers are available under the
entry, e.g. an offi ce or cell phone number,
it is indicated by means of corresponding
symbols on the display.
To call the fi rst number of the entry,
press the button =.
To call a different number of the entry,
press the OK button 2.
All numbers stored under this entry are dis-
played.
u
u
u
u
u
u
Select the desired number with the
rocker switch or :.
Press the button =.
The call is being made. "CALLING" and the
name of the entry are shown on the display.
Calling a phone number from the
history
The history of the cell phone is automat-
ically downloaded after establishing the
Bluetooth connection. The following phone
numbers are stored in the history of the cell
phone:
Numbers dialed
The numbers of received calls
The numbers of missed calls
To call one of these numbers,
open the Bluetooth menu.
Press the rocker switch or : until
the "CALL LOG" menu item is selected.
Press the OK button 2 to call up the
menu item.
Press the rocker switch or : to
select one of the following menu items.
RECEIVED: Received calls
MISSED: Missed calls
DIALED: Numbers dialed
Press the OK button 2 to call up the
menu item.
The entries of the corresponding list are
displayed. The date and time are displayed
for the selected entry, if available.
u
u
•
•
•
u
u
u
u
•
•
•
u
01BA_HamburgMP68us_gb.indd 4701BA_HamburgMP68us_gb.indd 47 14.03.2008 10:49:08 Uhr14.03.2008 10:49:08 Uhr

48
Bluetooth phone call
Select the desired entry with the rocker
switch or :.
Press the button = to make the
call.
Speed dial
The speed dial function allows direct access
to the phone book of the device, the phone
book downloaded from the cell phone, the
lists of the history and the voice-dialing
function.
To use the speed dial,
press the button = during regular
operation.
A menu with the following menu items is
displayed:
DEV PBK: Phone book uploaded from
the cell phone
RAD PBK: Phone book of the device
RECEIVED: Received calls
MISSED: Missed calls
DIALED: Numbers dialed
VR DIAL: Voice dialing
To dial a number from one of the phone
books or one of the lists of the history,
select the desired menu item with the
rocker switch or :.
Press the OK button 2.
Select the desired entry or the number
with the rocker switch or :.
Press the button = to make the
call.
u
u
u
•
•
•
•
•
•
u
u
u
u
To use voice dialing,
use the rocker switch or : to
select the "VR DIAL" menu item.
Press the OK button 2.
The voice recognition is activated. "SPEAK
NOW" appears on the display.
Note:
The duration for which the voice recogni-
tion activated depends on the connect-
ed cell phone.
Say the name for the desired phone
number.
The call is being made.
Notes:
To cancel voice recognition and re-
turn to the last audio source, press
the button <.
To use voice dialing, this function
must be supported by your cell phone
and activated in the cell phone.
Changing the PIN (PIN NUM )
If you want to register a cell phone with
the car sound system, you must enter PIN
"1234". This PIN can also be changed:
Open the Bluetooth menu.
Press the rocker switch or : until
the "PIN NUM" menu item is selected.
Press the OK button 2 to call up the
menu item.
u
u
u
•
•
u
u
u
01BA_HamburgMP68us_gb.indd 4801BA_HamburgMP68us_gb.indd 48 14.03.2008 10:49:08 Uhr14.03.2008 10:49:08 Uhr

49
Bluetooth phone call
FRANÇAIS ENGLISHESPAÑOL
PORTUGUÊS
中文
한국어
한국어
Now you can enter the new PIN:
Enter the number sequence by press-
ing the corresponding buttons of the
keys 9.
After entering one digit, the device auto-
matically switches to the next one. To cor-
rect any entry errors, select the correspond-
ing digit by pressing the rocker switch
or : again.
After entering the complete new PIN
number,
press the OK button 2.
The new entry is stored.
Changing the Bluetooth name of
the device (RAD NAME)
The Bluetooth name of the device under
which it is displayed by other Bluetooth de-
vices is set to "BLAUPUNKT BT" at the facto-
ry. To change this name,
open the Bluetooth menu.
Press the rocker switch or : until
the "RAD NAME" menu item is selected.
Press the OK button 2 to call up the
menu item.
You can now enter a new Bluetooth name:
Enter the name by pressing the corre-
sponding buttons of the keys 9. Select
the desired letter, if necessary by press-
ing a button several times.
After entering one letter, the device auto-
matically switches to the next one. To cor-
u
u
u
u
u
u
rect any entry errors, select the correspond-
ing digit by pressing the rocker switch or
: again.
After entering the complete name,
press the OK button 2.
The new Bluetooth name is stored.
u
01BA_HamburgMP68us_gb.indd 4901BA_HamburgMP68us_gb.indd 49 14.03.2008 10:49:09 Uhr14.03.2008 10:49:09 Uhr

50
Sound settings
Sound settings
The following sound settings can be changed
in the Audio menu:
Adjusting bass, treble and volume dis-
tribution
Selecting the sound presetting
Changing equalizer settings
Switching off the equalizer
Note:
The settings for bass (BASS), middle
(MIDDLE) and treble (TREBLE) are each
stored for the current audio source.
Opening the Audio menu
To call up the Audio menu,
press the AUDIO button 7.
OR:
Press the MENU button 6.
Press the rocker switch : until the
Audio menu is displayed.
Adjusting bass, treble and
volume distribution
To perform settings,
press the rocker switch or : in
the Audio menu to select one of these
menu items.
"BASS ": Bass level between -7 and +7
"TREBLE ": Treble between -7 and +7
"BALANCE ": Volume distribution left/
right between -9 and +9
•
•
•
•
u
u
u
u
•
•
•
"FADER ": Volume distribution front/
rear between -9 and +9
"X-BASS ": Increasing the bass at low
volume from 0 (off) to 3
The currently active setting is represented
by a bar display.
Press the OK button 2 to call up the
menu item.
To change the setting, press the rocker
switch or :.
Press the OK button 2 to select a dif-
ferent function, or press the DIS•ESC
button ; to exit the menu.
Selecting a sound presetting
(PRESETS )
You can select sound presets for Pop, Rock
and Classical . A sound preset allows adjust-
ing a suitable combination of bass and tre-
ble for the type of music.
In the Audio menu, press the rocker
switch or : repeatedly until the
"EN AUDIO" menu item is selected.
Press the OK button 2 to call up the
menu item.
The Enhanced Audio menu opens.
In the Enhanced Audio menu, press the
rocker switch or : repeatedly un-
til the "PRESETS" menu item is selected.
Press the OK button 2 to call up the
menu item.
•
•
u
u
u
u
u
u
u
01BA_HamburgMP68us_gb.indd 5001BA_HamburgMP68us_gb.indd 50 14.03.2008 10:49:10 Uhr14.03.2008 10:49:10 Uhr
51
Sound settings
FRANÇAIS ENGLISHESPAÑOL
PORTUGUÊS
中文
한국어
한국어
Select one of the following sound pre-
sets with the rocker switch or ::
"POP"
"ROCK"
"CLASSIC"
Switch the selected sound preset off
with the rocker switch : or on with
the rocker switch :.
Press the OK button 2 to select a dif-
ferent function, or press the DIS•ESC
button ; to exit the menu.
Notes:
Only one sound preset can be
switched on at any time. To activate
no sound preset, switch off the cur-
rently switched-on sound preset.
To obtain a perfect sound, the preset-
tings can be supplemented further
by the equalizer settings according to
personal preferences. If you change
the level setting for bass, treble or
middle, the selected sound preset is
switched off in the menu; but the oth-
er level settings of the sound preset
are retained.
Equalizer settings
Your device features a digital 3-band equal-
izer. It allows you to adjust the sound to your
vehicle and your personal preferences and
eliminate problems, such as droning or poor
voice comprehension.
u
•
•
•
u
u
•
•
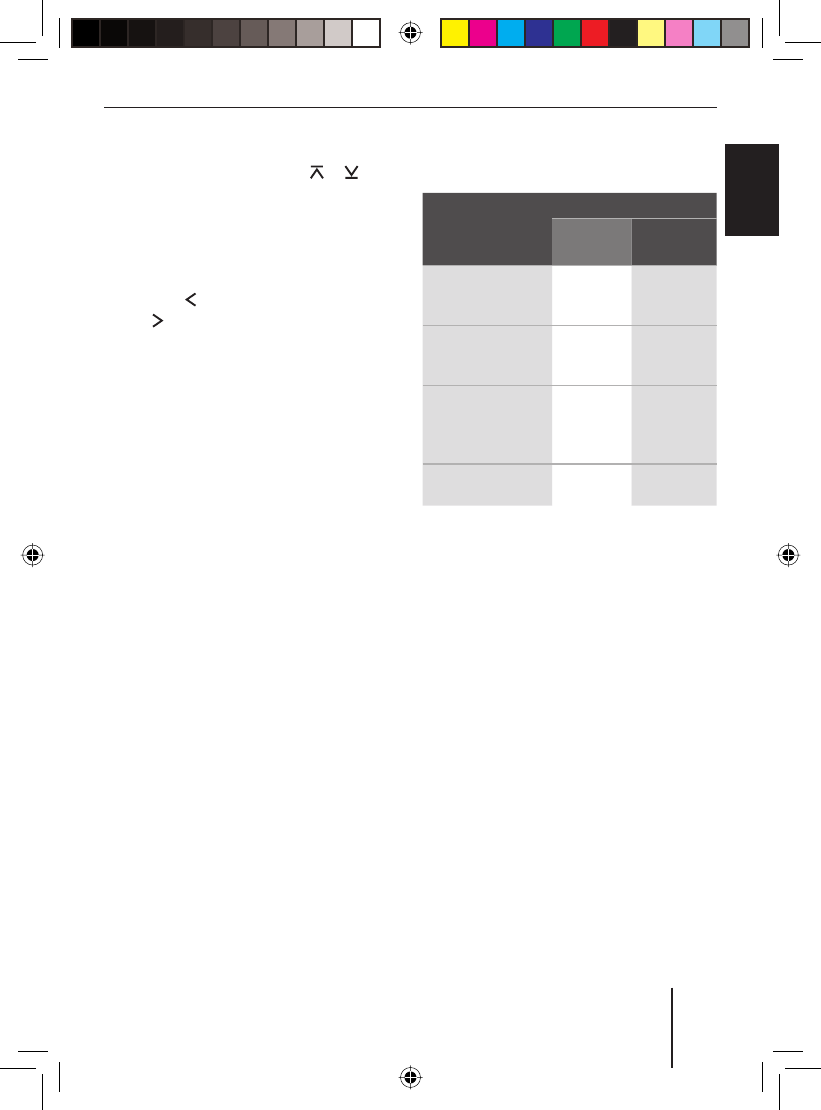
Which equalizer setting is the correct
one?
Sound
impression
Measure
Frequen-
cy (Hz)
Level
Unclean bass,
droning, unpleasant
pressure
100–200 approx. –4
Very transparent,
aggressive sound,
no stereo effect
1000–
2500
approx.
–4 to –6
Muffl ed sound,
low transparency,
instruments do
not excel
10000–
12500
approx.
+4 to +6
Insuffi cient bass 60–80 approx.
+4 to +6
Tip:
Insert a CD which you know very well if
you want to adjust the equalizer. First,
set the bass, treble, balance, and fad-
er to zero. For equalizer settings, first
change the settings of the mid-frequen-
cies, followed by those for treble and
fi nally bass.
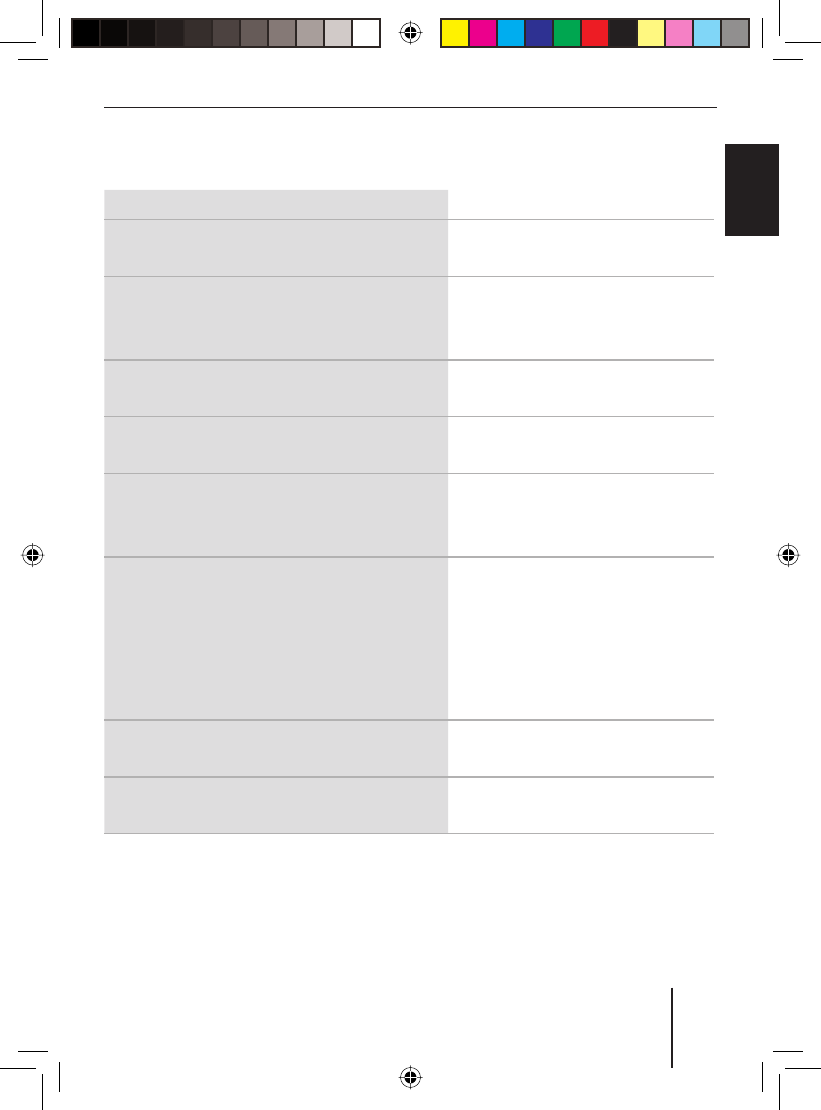
The following table shows the expanded
setting options for bass (EBASS), treble
(ETREBLE), middle (EMIDDLE) and X-Bass
(EXBASS) that can be performed in the
Enhanced Audio menu.
Note:
The table does not contain all the set-
tings that are possible in the Enhanced
Audio menu.
01BA_HamburgMP68us_gb.indd 5101BA_HamburgMP68us_gb.indd 51 14.03.2008 10:49:10 Uhr14.03.2008 10:49:10 Uhr

52
Sound settings
Changing equalizer settings (EBASS,
ETREBLE, EMIDDLE, EXBASS)
In the Enhanced Audio menu, you can
change these settings :
"GAIN " (level )
"FREQ " (frequency)
"QUAL " (quality factor )
To adjust the equalizer,
in the Audio menu, press the rocker
switch or : repeatedly until the
"EN AUDIO" menu item is selected.
Press the OK button 2 to call up the
menu item.
The Enhanced Audio menu appears.
Press the rocker switch or : in
the Enhanced Audio menu to select one
of these menu items.
"EBASS ": Bass
"ETREBLE": Treble
"EMIDDLE": Middle
"EXBASS ": Increasing bass at low
volume
•
•
•
u
u
u
•
•
•
•
Press the OK button 2 to call up the
menu item.
Press the rocker switch or : to
switch between the available menu
items (see the table above):
"GAIN"
"FREQ"
"QUAL"
Press the rocker switch or : to
change the setting.
After you performed the settings for all
menu items,
press the OK button 2 to select a dif-
ferent function, or press the DIS•ESC
button ; to exit the menu.
u
u
•
•
•
u
u
AUDIO (Audio menu)
EN AUDIO (Enhanced Audio menu)
EBASS ETREBLE EMIDDLE EXBASS
Level (GAIN) – – -7 to +7 0 to 3
Frequency
(FREQ)
60 Hz, 80 Hz, 100
Hz, 200 Hz
10 kHz, 12.5 kHz,
15 kHz, 17.5 kHz
500 Hz, 1,000 Hz,
1,500 Hz, 2,500 Hz
30 Hz, 60 Hz
100 Hz
Quality fac-
tor (QUAL)
1.0, 1.25, 1.5, 2.0 – 0.5, 0.75, 1.0,
1.25
–
01BA_HamburgMP68us_gb.indd 5201BA_HamburgMP68us_gb.indd 52 14.03.2008 10:49:11 Uhr14.03.2008 10:49:11 Uhr

53
User settings
FRANÇAIS ENGLISHESPAÑOL
PORTUGUÊS
中文
한국어
한국어
User settings
In the System menu, you can adjust these
presettings to your preferences:
Welcome text
Clock settings
Volume settings
Display settings
Scan time
Opening the System menu
Press the MENU button 6.
Press the rocker switch : to open
the "Syst" system menu.
Changing the welcome text
(ON MSG )
When you switch on the device, an anima-
tion appears. It contains the factory set wel-
come text "THE ADVANTAGE IN YOUR CAR".
To change this text,
in the System menu, press the rocker
switch or : repeatedly until the
"ON MSG" menu item is selected.
Press the OK button 2 to call up the
menu item.
The current welcome text is displayed. The
position digit fl ashes and can be changed.
You can now enter your own welcome text
with up to 35 characters:
Enter the text by pressing the corre-
sponding buttons of the keys 9. Select
the desired letter, if necessary by press-
ing a button several times.
•
•
•
•
•
u
u
u
u
u
After entering one letter, the device auto-
matically switches to the next one. To cor-
rect any entry errors, select the correspond-
ing digit by pressing the rocker switch or
: again.
After entering the complete welcome text,
press the OK button 2 to store the
welcome text entered.
Notes:
To quit the text input without chang-
ing the welcome text, press the
DIS•ESC button ;.
If the text entry is interrupted, e.g. by
a phone call, any of the changes per-
formed so far are not stored.
Changing time settings
The following settings can be changed in the
System menu:
Switching time display on/off
(OFF CLK)
Selecting 12h/24h time display
(CLK MODE)
Setting the time (CLK SET)
Switching time display on/off (OFF CLK)
The time can be displayed while the de-
vice is switched off, if the vehicle ignition
is switched on. To switch this time display
on/off,
in the System menu, press the rocker
switch or : repeatedly until the
"OFF CLK" menu item is selected.
Press the OK button 2 to call up the
menu item.
u
•
•
•
•
•
u
u
01BA_HamburgMP68us_gb.indd 5301BA_HamburgMP68us_gb.indd 53 14.03.2008 10:49:11 Uhr14.03.2008 10:49:11 Uhr

54
User settings
Switch between the settings with the
rocker switch or :.
"OFF CLK" : Time display is on.
"OFF CLK" : Time display is off.
Press the OK button 2 to select a dif-
ferent function, or press the DIS•ESC
button ; to exit the menu.
Selecting 12h/24h time display
(CLK MODE )
The time can be displayed using the 12-hour
or 24-hour format.
In the System menu, press the rocker
switch or : repeatedly until the
"CLK MODE" menu item is selected.
Press the OK button 2 to call up the
menu item.
Use the rocker switch or : to se-
lect the setting "12 HR AM", "12 HR PM"
or "24 HR MODE".
Press the rocker switch : to switch
on the selected setting.
Press the OK button 2 to select a dif-
ferent function, or press the DIS/ESC
button ; to exit the menu.
Setting the time (CLK SET)
In the System menu, press the rocker
switch or : repeatedly until the
"CLK SET" menu item is selected.
Press the OK button 2 to call up the
menu item.
The time is displayed.
Select the hours or minutes with the
rocker switch or :.
u
•
•
u
u
u
u
u
u
u
u
u
Enter the desired digit by pressing the
corresponding button of the keys 9.
After entering the complete time,
press the OK button 2 to store the
time entered.
Note:
To fi nish the entry without changing the
time, press the DIS•ESC button ;.
Changing volume presettings
The following presettings can be changed in
the System menu:
Power-on volume (ON VOL)
Volume presettings of telephone/nav-
igation announcement (TEL VOL) and
volume reduction (MUTE VOL)
Signal tone (BEEP ON)
Speed-dependent volume increase
(AUTO SND)
Adjusting power-on volume (ON VOL /
LAST VOL )
To adjust the power-on volume,
in the System menu, press the rocker
switch or : repeatedly until the
"ON VOL" menu item is selected.
Press the OK button 2 to call up the
menu item.
The current power-on volume is displayed.
Set the power-on volume with the rock-
er switch or :.
Press the OK button 2 to select a dif-
ferent function, or press the DIS•ESC
button ; to exit the menu.
u
u
•
•
•
•
u
u
u
u
01BA_HamburgMP68us_gb.indd 5401BA_HamburgMP68us_gb.indd 54 14.03.2008 10:49:12 Uhr14.03.2008 10:49:12 Uhr
55
User settings
FRANÇAIS ENGLISHESPAÑOL
PORTUGUÊS
中文
한국어
한국어
Alternately, you can select the "LAST VOL"
setting. This sets the volume at power-on to
the volume at the last switch-off:
In the System menu, press the rocker
switch or : repeatedly until the
"LAST VOL" menu item is selected.
Press the OK button 2 to call up the
menu item.
Switch between the settings with the
rocker switch or :.
"LAST VOL" : On.
"LAST VOL" : Off.
Press the OK button 2 to select a dif-
ferent function, or press the DIS•ESC
button ; to exit the menu.
Note:
If "LAST VOL" is selected, the device is
switched on with the volume adjusted
under "ON VOL".
Changing volume presettings for TEL
and MUTE
If the device switches a phone call or navi-
gation announcement, it is always done with
the volume preset here.
In addition, you can assign a lower volume
up to the value 0 (mute) to the volume re-
duction (MUTE).
In the System menu, press the rock-
er switch or : repeatedly until of
these menu items is displayed:
"MUTE VOL ": Presetting the volume
of the volume reduction
u
u
u
•
•
u
u
•
"TEL VOL ": Presetting the volume of
the phone call/navigation announce-
ment
Press the OK button 2 to call up the
menu item.
The currently set volume is displayed.
Set the volume with the rocker switch
or :.
Press the OK button 2 to select a dif-
ferent function, or press the DIS•ESC
button ; to exit the menu.
Notes:
The volume preset by you will not be
used,
if the volume currently listened to is
lower than the set mute level. The de-
vice continues playing with the vol-
ume listened to.
if the volume currently listened to is
higher than the set TEL volume. In
this case, phone calls/navigation an-
nouncements are reproduced with
the volume listened to.
Activating/deactivating the signal tone
(BEEP ON)
You can deactivate the signal tone that
sounds as a confi rmation in the menus or
when storing the stations on the station but-
tons.
In the System menu, press the rocker
switch or : repeatedly until the
"BEEP ON" menu item is selected.
Press the OK button 2 to call up the
menu item.
•
u
u
u
•
•
u
u
01BA_HamburgMP68us_gb.indd 5501BA_HamburgMP68us_gb.indd 55 14.03.2008 10:49:13 Uhr14.03.2008 10:49:13 Uhr

56
User settings
Switch between the settings with the
rocker switch or :.
"BEEP ON " : Signal tone on.
"BEEP ON" : Signal tone off.
Press the OK button 2 to select a dif-
ferent function, or press the DIS•ESC
button ; to exit the menu.
Setting the speed-dependent volume
increase (AUTO SND )
When you are driving faster, the device can
automatically increase the volume to com-
pensate for the driving noise. The volume is
increased depending upon the speed. In or-
der for this to work, the speedometer signal
must be connected as described in the in-
stallation instructions.
The optimum setting for this volume in-
crease depends on how noise levels devel-
op in your particular vehicle. Try the setting
that is perfect for your vehicle. You can se-
lect a value between OFF (no increase) and
5 (maximum increase).
In the System menu, press the rocker
switch or : repeatedly until the
"AUTO SND" menu item is selected.
Press the OK button 2 to call up the
menu item.
The current setting is displayed.
Select the desired setting with the rock-
er switch or :.
Press the OK button 2 to select a dif-
ferent function, or press the DIS•ESC
button ; to exit the menu.
u
•
•
u
u
u
u
u
Changing display settings
The following display settings can be
changed in the System menu:
Day/night brightness (D-DAY / D-
NIGHT)
Adjusting the display viewing angle
(ANGLE)
Adjusting the display color (DISP COL,
COL SCAN, CON SCAN)
Adjusting the display viewing angle
(ANGLE )
The angle at which the driver looks at the
display is dependent upon, among other
things, the installation position of the de-
vice, the seating position, and the physical
size of the driver. You can optimise the dis-
play contrast for your viewing angle:
In the System menu, press the rocker
switch or : repeatedly until the
"ANGLE" menu item is selected.
Press the OK button 2 to call up the
menu item.
The current setting is displayed.
Use the rocker switch or : to
select the desired setting between –6
and +6.
Press the OK button 2 to select a dif-
ferent function, or press the DIS•ESC
button ; to exit the menu.
•
•
•
u
u
u
u
01BA_HamburgMP68us_gb.indd 5601BA_HamburgMP68us_gb.indd 56 14.03.2008 10:49:14 Uhr14.03.2008 10:49:14 Uhr

57
User settings
FRANÇAIS ENGLISHESPAÑOL
PORTUGUÊS
中文
한국어
한국어
Changing the day/night brightness
(D-DAY/D-NIGHT )
The device automatically switching to night
mode if you turn on the light of your vehicle.
For this purpose, the device must be con-
nected with your vehicle via a correspond-
ing connection as described in the installa-
tion instructions.
You can adjust the display brightness sepa-
rately for day and night.
In the System menu, press the rocker
switch or : repeatedly until the
menu item "D-DAY" (day brightness) or
"D-NIGHT" (night brightness) is
selected.
Press the OK button 2 to call up the
menu item.
The current setting is displayed.
Use the rocker switch or : to
select the desired setting between 1
and 16.
Press the OK button 2 to select a dif-
ferent function, or press the DIS•ESC
button ; to exit the menu.
Mixing the color for the display
illumination (DISP COL )
To customise the display illumination to suit
your tastes you can mix a colour yourself us-
ing the three primary colours red, green and
blue (RGB).
In the System menu, press the rocker
switch or : repeatedly until the
"DISP COL" menu item is selected.
Press the OK button 2 to call up the
menu item.
u
u
u
u
u
u
The current settings for "GREEN", "RED" and
"BLUE" are displayed.
Select a colour with the rocker switch
or :.
Adjust the value for the selected col-
our with the rocker switch or : be-
tween 0 and 16.
After you adjusted all colours as desired,
press the OK button 2 to select a dif-
ferent function, or press the DIS•ESC
button ; to exit the menu.
Selecting the colour of the display
illumination from the colour scan
(COL SCAN )
During the colour seek, the colour of the dis-
play illumination changes continuously, and
you can select the current colour.
In the System menu, press the rocker
switch or : repeatedly until the
"COL SCAN" menu item is selected.
Press the OK button 2 to call up the
menu item.
The colour seek is started. "AUTO COLOR-
SCAN" appears on the display.
Press the OK button 2 to select the
current colour, or press the DIS•ESC
button ; to cancel the colour seek
without selecting a new colour.
u
u
u
u
u
u
01BA_HamburgMP68us_gb.indd 5701BA_HamburgMP68us_gb.indd 57 14.03.2008 10:49:14 Uhr14.03.2008 10:49:14 Uhr
58
User settings
Switching the continuous colour change
for the display illumination on/off
(CON SCAN )
You can select a constant colour change as
the colour of the display illumination. If the
colour change is activated, the display col-
our changes constantly. The colour change
is switched on or off in the system menu.
In the System menu, press the rocker
switch or : repeatedly until the
"CON SCAN" menu item is selected.
Press the OK button 2 to call up the
menu item.
Switch between the settings with the
rocker switch or :.
"CONTINUOUS COLSCAN" :
Colour change is on.
"CONTINUOUS COLSCAN" :
Colour change is off.
Press the OK button 2 to select a dif-
ferent function, or press the DIS•ESC
button ; to exit the menu.
u
u
u
•
•
u
Changing the scan time
(SCANTIME )
The scan time of the SCAN function can be
adjusted in the System menu for all audio
sources between 5 and 30 seconds.
In the System menu, press the rocker
switch or : repeatedly until the
"SCANTIME" menu item is selected.
Press the OK button 2 to call up the
menu item.
The current setting is displayed.
Use the rocker switch or : to
select the desired setting in 5-second
increments between 5 and 30.
Press the OK button 2 to select a dif-
ferent function, or press the DIS•ESC
button ; to exit the menu.
u
u
u
u
01BA_HamburgMP68us_gb.indd 5801BA_HamburgMP68us_gb.indd 58 14.03.2008 10:49:15 Uhr14.03.2008 10:49:15 Uhr

59
Additional settings
FRANÇAIS ENGLISHESPAÑOL
PORTUGUÊS
中文
한국어
한국어
Additional settings
You can perform additional settings:
Confi guring the preamplifi er output for
the subwoofer
Activating/deactivating demo mode
Displaying the version number of device
components
Updating the device software
Confi guring the preamplifi er
output for the subwoofer
(SUBOUT )
If you want to use an additional subwoofer
via an external amplifi er, it can be adjusted
to the other loudspeakers. You can adjust
the level of the Subout preamplifi er output
for a selected cut-off frequency .
You adjust the following settings in the
Enhanced Audio menu for this purpose:
"GAIN " (level )
"FREQ " (cut-off frequency)
Press the AUDIO button 7.
Press the rocker switch or :
repeatedly until the "EN AUDIO" menu
item is selected.
Press the OK button 2 to call up the
menu item.
The Enhanced Audio menu appears.
In the Enhanced Audio menu, press the
rocker switch or : repeatedly un-
til the "SUBOUT" menu item is selected.
Press the OK button 2 to call up the
menu item.
•
•
•
•
•
•
u
u
u
u
u
Press the rocker switch or : to
change between these menu items:
"GAIN" (from 0 to +7)
"FREQ" (80 Hz, 120 Hz or 160 Hz)
Press the rocker switch or : to
change the setting.
After you performed the settings for all
menu items,
press the OK button 2 to select a dif-
ferent function, or press the DIS•ESC
button ; to exit the menu.
Activating/deactivating demo
mode
The Demo mode uses animations to show
you which functions the device offers.
To switch the demo mode on or off,
switch off the device.
Simultaneously press the MENU but-
ton 6 and the 0 button of the alpha-
numeric keys 9 while switching on the
device.
The device switches on with activated or
deactivated demo mode. By pressing any
button, the demo mode is interrupted and
you can operate the device.
Displaying version numbers
You can display the version numbers of the
different device components.
Switch off the device.
Simultaneously press the MENU but-
ton 6 and the # button of the alphanu-
u
•
•
u
u
u
u
u
u
01BA_HamburgMP68us_gb.indd 5901BA_HamburgMP68us_gb.indd 59 14.03.2008 10:49:16 Uhr14.03.2008 10:49:16 Uhr

60
Additional settings
meric keys 9 while switching on the
device.
The version display with information about
the software appears.
Press the rocker switch or : to
change between device components.
To exit the version display,
use the rocker switch or : to
select the "EXIT" menu item.
Press the OK button 2.
The display of the audio source previously
listened to is displayed.
Updating the device software
You can update the software of this device
without removing it. New software versions
can be found on the Internet under www.
blaupunkt.com. The software is transferred
to the device with a USB data carrier.
Note:
Please observe the information obtained
at www.blaupunkt.com for handling the
downloaded file and for installing the
software on your device.
To start the installation,
connect the USB data carrier with the
new software to the device.
Press the MENU button 6.
Press the rocker switch : to open
the "Syst" system menu.
u
u
u
u
u
u
In the System menu, press the rocker
switch or : repeatedly until the
"SW DNL" menu item is selected.
Press the OK button 2 to start install-
ing the new software.
u
u
01BA_HamburgMP68us_gb.indd 6001BA_HamburgMP68us_gb.indd 60 14.03.2008 10:49:16 Uhr14.03.2008 10:49:16 Uhr
61
Technical data
FRANÇAIS ENGLISHESPAÑOL
PORTUGUÊS
中文
한국어
한국어
Technical data
Weight approx. 1.4 kg
Voltage supply
Operating voltage: 10.5–14.4 V
Current consumption
In operation:
10 seconds after switch-off:
max. 10 A
< 3.5 mA
Amplifi er output power acc. to DIN 45324:
max. power:
4 x 25 W sine
4 x 50 W at 14.4 V
Preamplifi er output (Preamp Out)
4 channels: 3 V
Input sensitivity
AUX-IN:
Tel./Navi input:
2 V / 6 kΩ
10 V / 1 kΩ
Tuner
Frequency ranges USA FM:
AM:
Frequency ranges Thailand and Europe FM:
AM:
FM frequency response:
87.7 – 107.9 MHz
530 – 1 710 kHz
87,5 – 108 MHz
531 – 1 602 kHz
35–16,000 Hz
CD player
Frequency response: 20–20,000 Hz
USB port
Current load max. 800 mA
Subject to technical changes!
01BA_HamburgMP68us_gb.indd 6101BA_HamburgMP68us_gb.indd 61 14.03.2008 10:49:17 Uhr14.03.2008 10:49:17 Uhr

62
Service and Warranty
Service
In some countries Blaupunkt offers a specif-
ic repair service including a pick-up service.
If you want to use this service, you may re-
quest a pick-up service for your device via
the Internet.
Refer to www.blaupunkt.com to check if this
service is available in your country.
Warranty
We provide a manufacturer's warranty
for products bought within the European
Union. For devices purchased outside
the European Union, the warranty terms
issued by our respective responsible
domestic agency are valid.
FCC Information
This device complies with Part 15 of the
FCC Results. Operation is subject to the fol-
lowing two conditions:
This Device may not cause harmful inter-
face, and
This device must accept any interference
received, including interference that may
cause undesired operation.
Note: This equipment has been tested and
found to comply with the limits for CLASS
B digital device, pursuant to Part 15 of FCC
Rules. These limits are designed to provide
reasonable protection against harmful inter-
ference when the equipment is operated in
a commercial environment. This equipment
1.
2.
generates, uses and can radiate radio fre-
quency energy and, if not installed and used
in accordance with the instructions, may
cause harmful interference to radio commu-
nications. However, there is no guarantee
that interference will not occur in a particu-
lar installation. If this equipment does cause
harmful interference to radio or television
reception, which can be determined by
turning the equipment off and on, the user
is encouraged to try correct the interference
by one or more of the following measures:
Reorient or relocate the receiving an-
tenna.
Increase the separation between the
equipment and receiver.
Connect the equipment into an outlet on
a circuit different from that to which re-
ceiver is connected.
Consult the dealer or experienced radio/
TV technician for help.
WARNING
Changes or modifi cations not expressly ap-
proved by the manufacturer could void the
user‘s authority to operate the equipment.
CAUTION
Exposure to Radio Freqency Radiation.
Antenna schall be mounted in such a man-
ner to minimize the potential for human con-
tact during normal operation. The antenna
should not be contacted during operation to
avoid the possibility of exceeding the FCC
radio frequency exposure limit. The mini-
mum separation distance of 20 cm from the
antenna to the body of user required.
1.
2.
3.
4.
01BA_HamburgMP68us_gb.indd 6201BA_HamburgMP68us_gb.indd 62 14.03.2008 10:49:17 Uhr14.03.2008 10:49:17 Uhr

63
Glossary
FRANÇAIS ENGLISHESPAÑOL
PORTUGUÊS
中文
한국어
한국어
Glossary
Bluetooth
Bluetooth is a wireless radio communica-
tion for short distances. This technology
allows for transmitting voice and data be-
tween devices, e.g. car sound system and
cell phone.
Quality factor – QUALITY
It determines the fi lter quality of the equal-
izer, i.e. the edge steepness and fi lter band-
width, dependent upon the characteristic
frequency.
ID3 tags
ID3 tags contain additional information for
MP3 fi les (e.g. artist, title, album, genre,
year).
Mass storage device
Format for storage media that can perma-
nently store large amounts of data, such as
USB removable storage devices (USB stick
or USB hard disk).
MP3, WMA
MP3 and WMA are audio data formats that
allow for high compression with little loss in
quality.
Playlist
Playback list for MP3 or WMA fi les In
playlists, you determine the order in which
certain titles should be played. They are
created with an MP3 manager, such as
WinAmp or Windows Media Player.
Root folder
Main folder of a data carrier. The root folder
contains all other folders.
Shape CDs
A shape CD is a CD whose form deviates
from the usual circular shape. It can be cor-
nered or contoured. The non-circular form
does not allow the device to correctly center
and read the CD in the drive. This results in
damage to the CD drive.
Subwoofer , Subout
Separate low-bass loudspeaker. The device
has a Subout preamplifi er output. You can
connect either an active subwoofer or a sep-
arate power amplifi er with subwoofer.
TRAVEL STORE
Automatic searching and storing of the
10 strongest radio stations received of the
region.
Tuner
Receiving unit of the radio.
USB – Universal Serial Bus
USB is an interface for connecting external
removable storage devices to the device.
X-BASS
X-BASS allows for boosting the bass at low
volume levels. This renders the sound rich-
er even at a low volume.
01BA_HamburgMP68us_gb.indd 6301BA_HamburgMP68us_gb.indd 63 14.03.2008 10:49:17 Uhr14.03.2008 10:49:17 Uhr

64
Index
Index
A
AM, AMT 20
ANGLE 56
Audio menu 50
AUTO SND 56
AUX 36
Switching AUX input on 37
AUX EDIT 37
B
BALANCE 50
BANDSCAN 22
BASS 50
BEEP ON 56
Bluetooth 40, 63
Bluetooth name 49
Changing the PIN 48
Connection 34, 41
Making a phone call 43, 44
Preparation 40
Streaming 34
Browse mode 27
C
C'N'C 39
C'n'C 36
C‘n‘C mode 36
CD (audio, CD-R, CD-RW) 18, 63
CD changer 32, 33
CD mode
Inserting/removing a CD 18
Playing an MP3/WMA CD 25
Start 23, 25
Changing the scan time 58
Changing the switch-off time 15
Cleaning 7
CLK MODE, 12HR and 24HR 54
Clock, time display 53, 54
COL SCAN 57
Connection, Bluetooth 34, 40, 41
Control panel 12
Controls 10
CONTSCAN 58
Cut-off frequency 59
D
D-DAY, D-NIGHT
(brightness for day and night) 57
DEL ALL 42
DELETE 42
Demo mode 59
Device card 12
Device software 60
DIAL NEW (dialing a phone number) 43
DISP COL 57
Display
Settings 56
Disposal 7
Note:
Keywords in capital letters refer to menu
items.
01BA_HamburgMP68us_gb.indd 6401BA_HamburgMP68us_gb.indd 64 14.03.2008 10:49:18 Uhr14.03.2008 10:49:18 Uhr

65
Index
FRANÇAIS ENGLISHESPAÑOL
PORTUGUÊS
中文
한국어
한국어
E
EBASS, EMIDDLE, ETREBLE 52
Equalizer 52
EXBASS 52
External audio source: See AUX
F
Factory settings: See Resetting (NORMSET)
FADER 50
FM, FMT 20
FREQ 52, 59
G
GAIN 52, 59
H
History (Bluetooth) 47
I
ID3 tags 63
Installation, self-installation 7
L
LAST VOL 54
Level 52, 59
M
Master telephone (Bluetooth) 41
Memory bank 20
MENU button 11
MIX AUX 38
MP3 16, 17, 25
MUTE: See Muting
MUTE VOL 55
Muting 13
N
NORMSET 15
O
OFFTIMER 15
ON MSG 53
ON VOL 54
P
PAIR: See Registering (Bluetooth)
Phone book of the cell phone 46
Phone book of the device 44
PIN NUM 48
Playlist 28, 63
PRESETS 50
Q
QUAL 52
Quality factor 52
R
Registering (Bluetooth) 34, 41
Resetting (NORMSET) 15
Resetting the device (NORMSET) 15
Root directory 63
01BA_HamburgMP68us_gb.indd 6501BA_HamburgMP68us_gb.indd 65 14.03.2008 10:49:18 Uhr14.03.2008 10:49:18 Uhr

66
Index
S
Safety 6, 7
SCANTIME 58
Seek tuning sensitivity 22
SENS 22
Setting the region 19
Signal tone 55
Sound presettings 50
Sound settings 50
Speed dial (Bluetooth) 48
Station
Scanning 22
Storing 21
Tuning, calling 20
SUBOUT 59
Subwoofer 59, 63
Switch-off 13
Switch-on 13
T
TEL VOL 55
TRAVEL STORE 63
Travel Store 21
TREBLE 50
Tuner 19, 63
Seek tuning sensitivity 22
Selecting a region 19
Selecting a waveband 20
Tuning into a station, storing 20
U
USB medium 63
Connecting 16
Requirements 16
Selecting 17, 25
V
Version numbers 59
Volume 11, 13
Changing presettings 54
Increase, speed-dependent 56
W
Waveband 20
Welcome text 53
WMA 16, 25
X
X-BASS 50, 63
01BA_HamburgMP68us_gb.indd 6601BA_HamburgMP68us_gb.indd 66 14.03.2008 10:49:19 Uhr14.03.2008 10:49:19 Uhr
67
Factory settings
FRANÇAIS ENGLISHESPAÑOL
PORTUGUÊS
中文
한국어
한국어
Factory settings
ON VOL 15
MUTE VOL 0
TEL VOL 17
SENS SENS HI6
OFF CLOCK OFF
CLOCKSET 12:00
CLK MODE 12 HR MODE
BEEP ON ON
D-DAY
D-NIGHT
16
15
ANGLE 0
AUTO SOUND 3
SCAN TIME 10
MIX AUX OFF
DEMO MODE OFF
PIN-NUM 1234
CD-TEXT ON
01BA_HamburgMP68us_gb.indd 6701BA_HamburgMP68us_gb.indd 67 14.03.2008 10:49:19 Uhr14.03.2008 10:49:19 Uhr