Blue Ox RT-WAR RodenTerminator Wireless Transmitter and RodenTerminator Wireless Alert Receiver User Manual instruction manual side 2
BlueOX Industrial Co., Limited RodenTerminator Wireless Transmitter and RodenTerminator Wireless Alert Receiver instruction manual side 2
Blue Ox >
User Manual
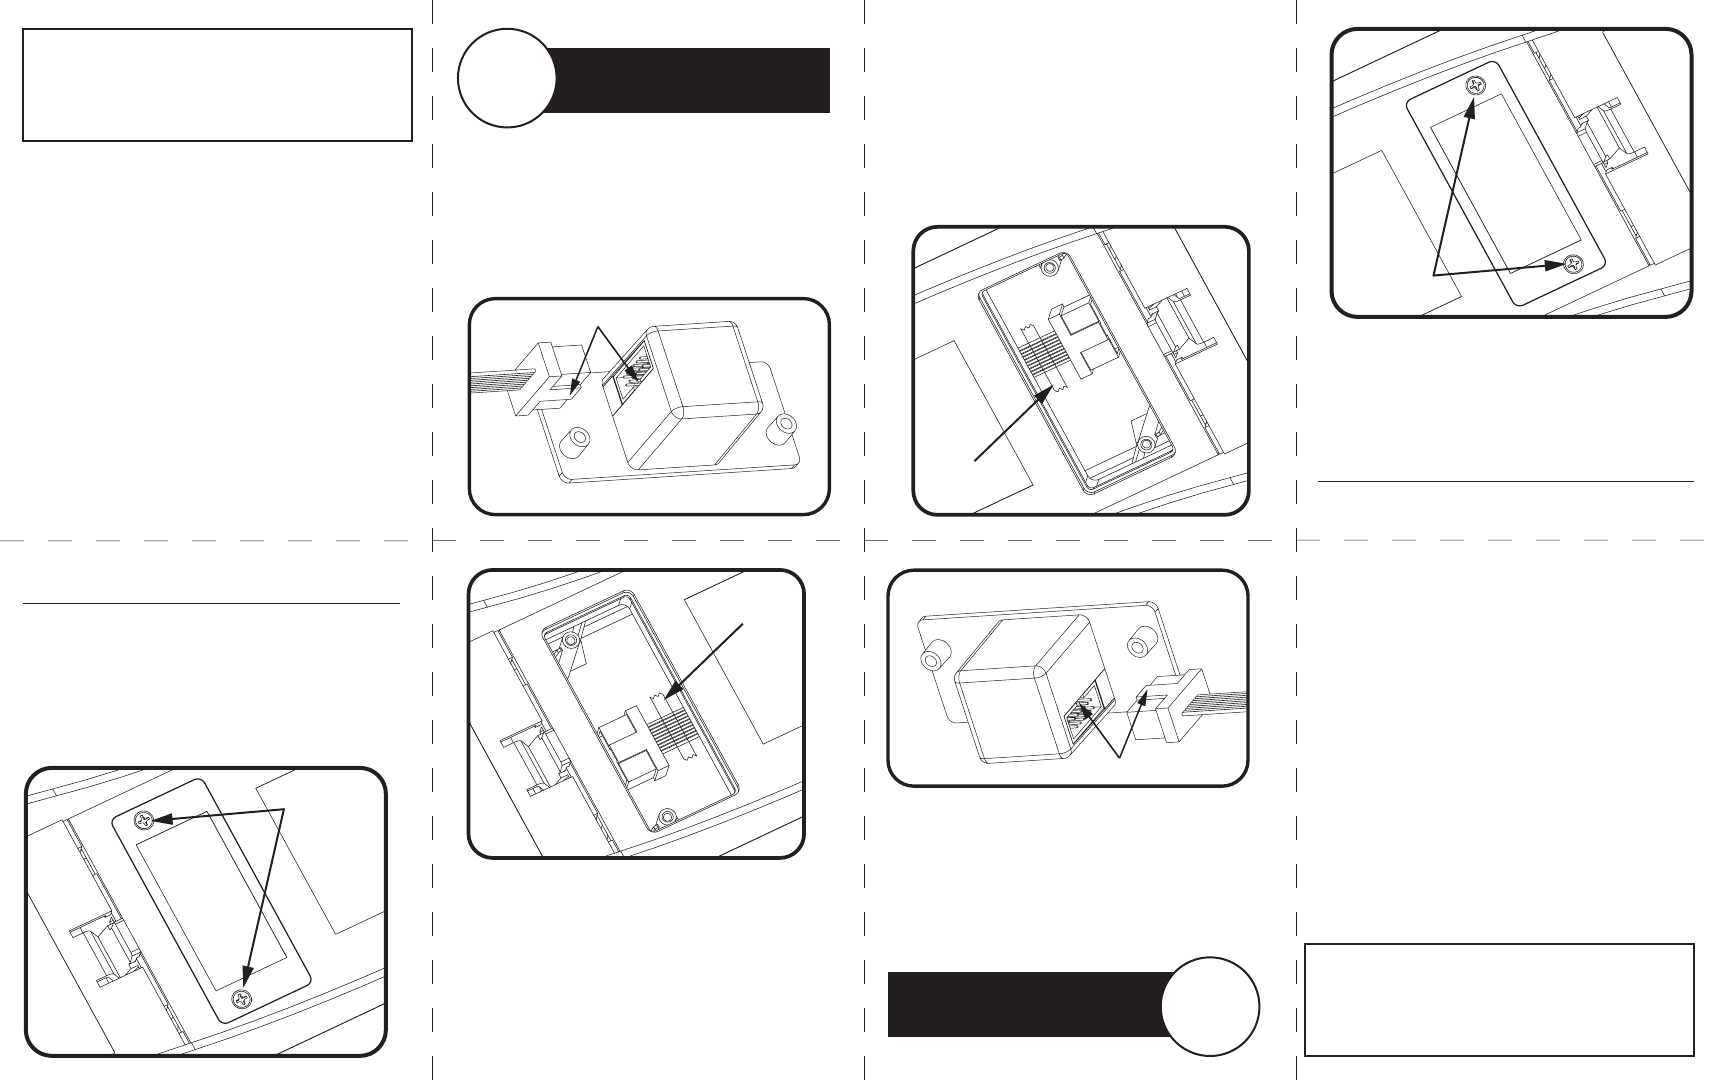
3) Find the ribbon cable inside the lid. If there is
a piece of tape holding the cable in place
remove it to free the cable.
4) Gently pull the cable out of the lid far enough
to make the connection in the next step.
Remove tape
5) Insert the cable connector into the W.A.R.
transmitter. It will only insert if the tab and notch
are aligned.
6) Gently tuck the cable back into the lid and put
the W.A.R transmitter in place with the screw
holes aligned. Install the included screws.
Look for the tab and notch
Adjust the transmitter switch to
the same setting as the receiver.
1 or
2 or 3
1) Remove all of the batteries from your Rodent
Terminator before you start.
2) Use a phillips screwdriver to remove the two
screws holding the cover plate in place.
Remove these
2 screws
Instrucciones (Español) 7) Plug the included AC adapter into the W.A.R.
receiver and then plug into a wall outlet. You’re
done. Time to wage W.A.R !
Bait and set your Rodent Terminator just like you
normally do according to its instrucions.
When the lid gets closed, the lights on both the
transmitter and receiver will ash rapidly green and
red. This lets you know that the transmitter and
receiver successfully paired and are communicating.
Now, both the trap and the W.A.R. receiver will
display the same information about battery
condition, trap readiness and kill alert.
You can now place your trap anywhere up to100 feet
away from the W.A.R. receiver and know what’s
happening with your trap at all times.
Note: Concrete walls or large obstructions can reduce
the range of the W.A.R unit. Pick a place as close to your
Rodent Terminator as possible for best results. Also,
pick a frequency not being used by another Rodent
Terminator or other device to avoid interference.
3) Find the ribbon cable inside the lid. If there is
a piece of tape holding the cable in place
remove it to free the cable.
4) Gently pull the cable out of the lid far enough
to make the connection in the next step.
Remove tape
5) Insert the cable connector into the W.A.R.
transmitter. It will only insert if the tab and notch
are aligned.
6) Gently tuck the cable back into the lid and put
the W.A.R transmitter in place with the screw
holes aligned. Install the included screws.
Look for the tab and notch
Adjust the transmitter switch to
the same setting as the receiver.
1 or
2 or 3
1) Remove all of the batteries from your Rodent
Terminator before you start.
2) Use a phillips screwdriver to remove the two
screws holding the cover plate in place.
Remove these
2 screws
Instructions (Francés) 7) Plug the included AC adapter into the W.A.R.
receiver and then plug into a wall outlet. You’re
done. Time to wage W.A.R !
Bait and set your Rodent Terminator just like you
normally do according to its instrucions.
When the lid gets closed, the lights on both the
transmitter and receiver will ash rapidly green and
red. This lets you know that the transmitter and
receiver successfully paired and are communicating.
Now, both the trap and the W.A.R. receiver will
display the same information about battery
condition, trap readiness and kill alert.
You can now place your trap anywhere up to100 feet
away from the W.A.R. receiver and know what’s
happening with your trap at all times.
Note: Concrete walls or large obstructions can reduce
the range of the W.A.R unit. Pick a place as close to your
Rodent Terminator as possible for best results. Also,
pick a frequency not being used by another Rodent
Terminator or other device to avoid interference.

Changes or modifications not expressly approved by the party responsible for
compliance could void the user's authority to operate the equipment。
Note: This equipment has been tested and found to comply with the limits for a
Class B digital device, pursuant to part 15 of the FCC Rules. These limits are
designed to provide reasonable protection against harmful interference in a
residential installation. This equipment generates, uses and can radiate radio
frequency energy and, if not installed and used in accordance with the instructions,
may cause harmful interference to radio communications. However, there is no
guarantee that interference will not occur in a particular installation. If this
equipment does cause harmful interference to radio or television reception, which
can be determined by turning the equipment off and on, the user is encouraged to
try to correct the interference by one or more of the following measures:
—Reorient or relocate the receiving antenna.
—Increase the separation between the equipment and receiver.
—Connect the equipment into an outlet on a circuit different from that to which
the receiver is connected.
—Consult the dealer or an experienced radio/TV technician for help.
FCC ID: 2AAY6-RT-WAR
This device complies with Part 15 of the FCC Rules. Operation is
subject to the following two conditions: (1) this device may not cause
harmful interference, and (2) this device must accept any interference
received, including interference that may cause undesired operation.