Bosch Security Systems DCNMMMD2 DCN multimedia Multimedia Device User Manual
Bosch Security Systems BV DCN multimedia Multimedia Device
Users Manual
DCN multimedia
Conference System
en User manual

Table of contents
1Safety 4
1.1 Statements for FCC and Industry Canada 4
2About this manual 5
2.1 Intended audience 5
2.2 Copyright and disclaimer 5
2.3 Document history 5
3System introduction 6
4Multimedia Device 7
4.1 Microphone operation 9
4.2 Touch-screen operation 11
4.2.1 Home screen 11
4.2.2 Meeting overview screen 12
4.2.3 Meeting screen 12
4.2.4 Discussion screen 14
4.2.5 Discussion settings screen 15
4.2.6 Voting screens 16
4.3 Identification/authentication 21
5Troubleshooting 22
DCN multimedia Table of Contents | en 3
Bosch Security Systems B.V. User manual 2016.03 | V1.5_01 |
Safety
You should regularly check the equipment for wear and damage. Pay particular attention to
the following:
–LCD screen: Check for cracks.
–Cables: If the outer insulation is damaged, the cable must be replaced.
–Connectors: Check for signs of stretching and damage.
If you think the equipment is damaged or presents a potential hazard, you should label the
equipment and put it to one side, so that no‑one else can use it. Then contact your local
technician for further advice.
Statements for FCC and Industry Canada
This device complies with Part 15 of the FCC Rules. Operation is subject to the following two
conditions:
1. This device may not cause harmful interference, and
2. This device must accept any interference received, including interference that may cause
undesired operation.
!
Caution!
Changes or modifications not expressly approved by Bosch Security Systems B.V. could void
the user's authority to operate the equipment.
FCC Statement
This equipment has been tested and found to comply with the limits for a Class B digital
device, pursuant to part 15 of the FCC Rules. These limits are designed to provide reasonable
protection against harmful interference in a residential installation. This equipment generates,
uses and can radiate radio frequency energy and, if not installed and used in accordance with
the instructions, may cause harmful interference to radio communications. However, there is
no guarantee that interference will not occur in a particular installation. If this equipment does
cause harmful interference to radio or television reception, which can be determined by
turning the equipment off and on, the user is encouraged to try to correct the interference by
one or more of the following measures:
– Reorient or relocate the receiving antenna.
– Increase the separation between the equipment and receiver.
– Connect the equipment into an outlet on a circuit different from that to which the
receiver is connected.
– Consult the dealer or an experienced radio/TV technician for help.
RSS-Gen & RSS-247 statement
This device complies with Industry Canada license-exempt RSS standard(s).
Operation is subject to the following two conditions:
1. This device may not cause interference, and
2. This device must accept any interference, including interference that may cause
undesired operation of the device.
1
1.1
4en | Safety DCN multimedia
2016.03 | V1.5_01 | User manual Bosch Security Systems B.V.

About this manual
The purpose of this manual is to provide information required for operating the DCN
Multimedia Device.
This manual is available as a digital document in the Adobe Portable Document Format (PDF).
Refer to the product related information at: www.boschsecurity.com.
Intended audience
This manual is intended for:
– users of a DCN Multimedia Device.
– a secretary or clerk, whose task it is to manage a meeting using a DCN Multimedia Device.
Copyright and disclaimer
All rights reserved. No part of this document may be reproduced or transmitted in any form by
any means, electronic, mechanical, photocopying, recording, or otherwise, without the prior
written permission of the publisher. For information on getting permission for reprints and
excerpts, contact Bosch Security Systems B.V..
The content and illustrations are subject to change without prior notice.
Document history
Release date Documentation version Reason
2013.08 V1.0 1st edition.
2014.07 V1.1 Sections updated: 2.3, 4.1,
4.2.1.
Sections added: 4.2.6.
2014.10 V1.2 Section updated: 4.2.1.
2015.01 V1.3 Sections updated: 4.2.1, 4.2.5,
4.2.6.
2015.04 V1.4 Sections updated: 2.1, 4,
4.2.6.
2016.01 V1.5 New section: 4.3.
Sections updated: 2.3, 4, 4.1,
4.2.3, 4.2.4, 4.2.5, 4.2.6.
2016.03 V1.5_01 New section: 1.2
2
2.1
2.2
2.3
DCN multimedia About this manual | en 5
Bosch Security Systems B.V. User manual 2016.03 | V1.5_01 |

System introduction
The DCN multimedia system is an IP based conference system which runs on an OMNEO
compatible Ethernet network. It is used for distributing and processing audio, video and data
signals.
3
6en | System introduction DCN multimedia
2016.03 | V1.5_01 | User manual Bosch Security Systems B.V.
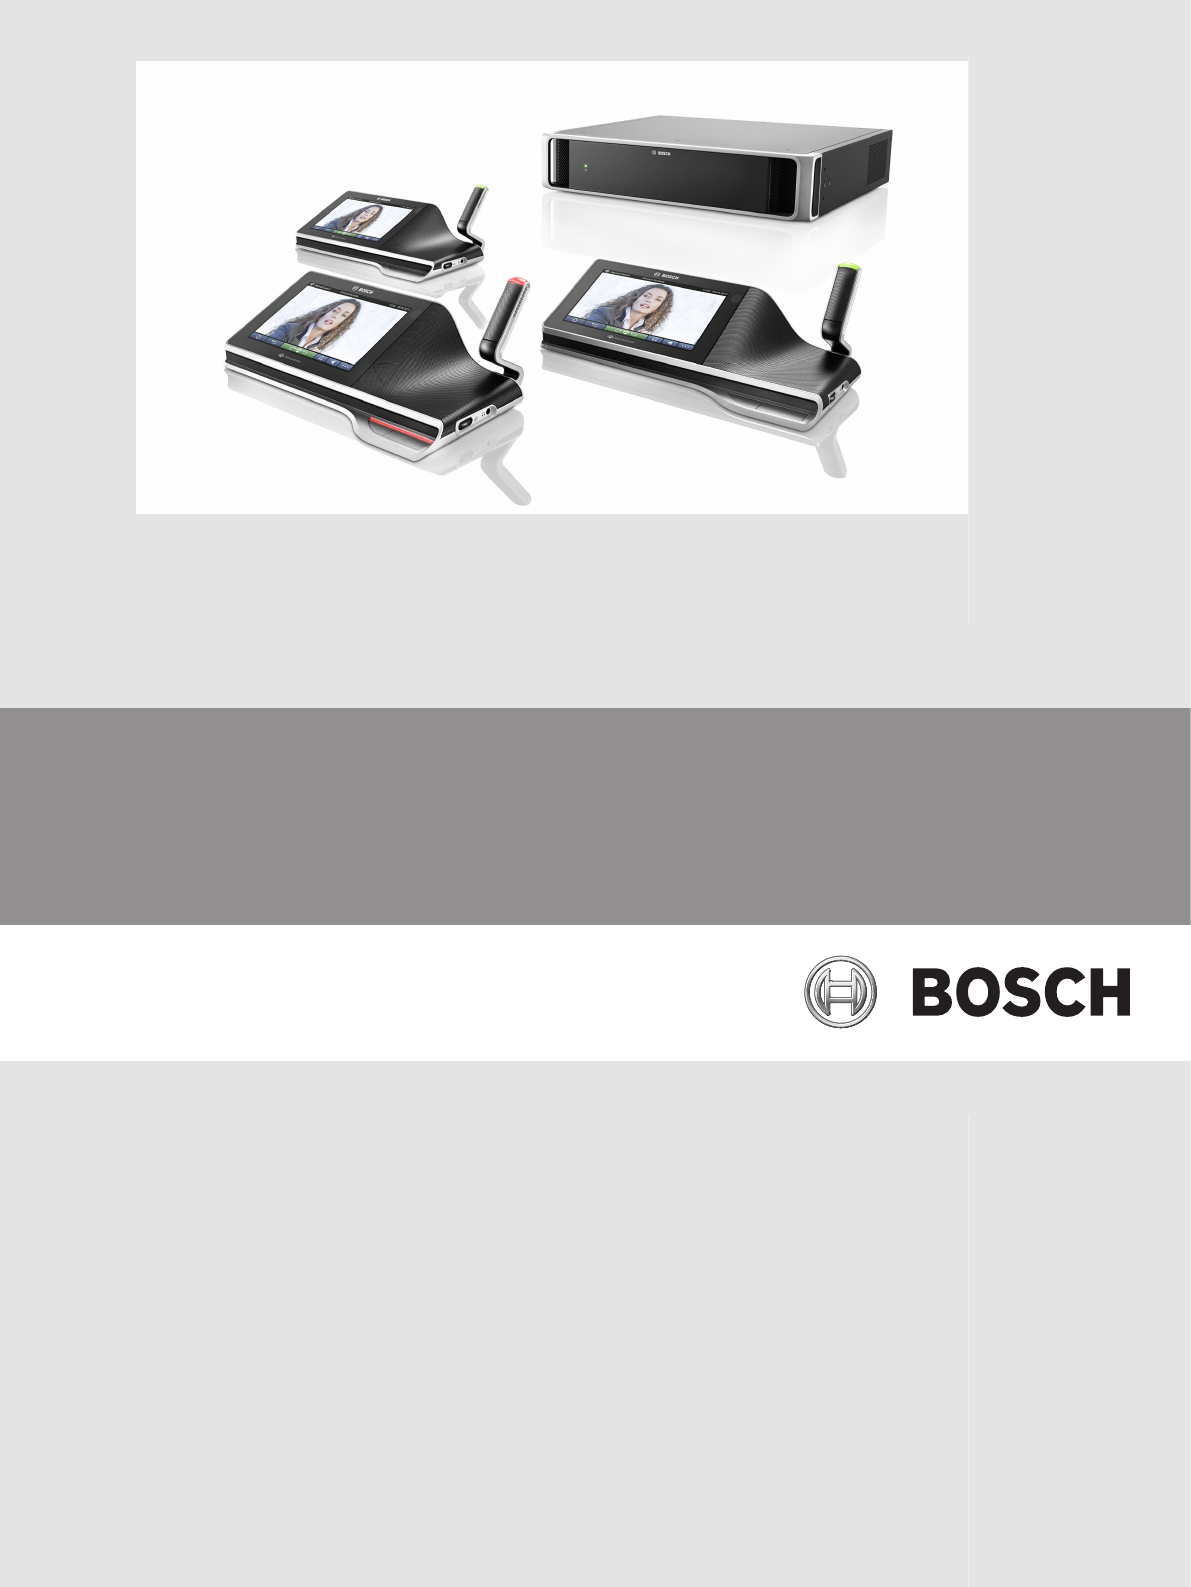
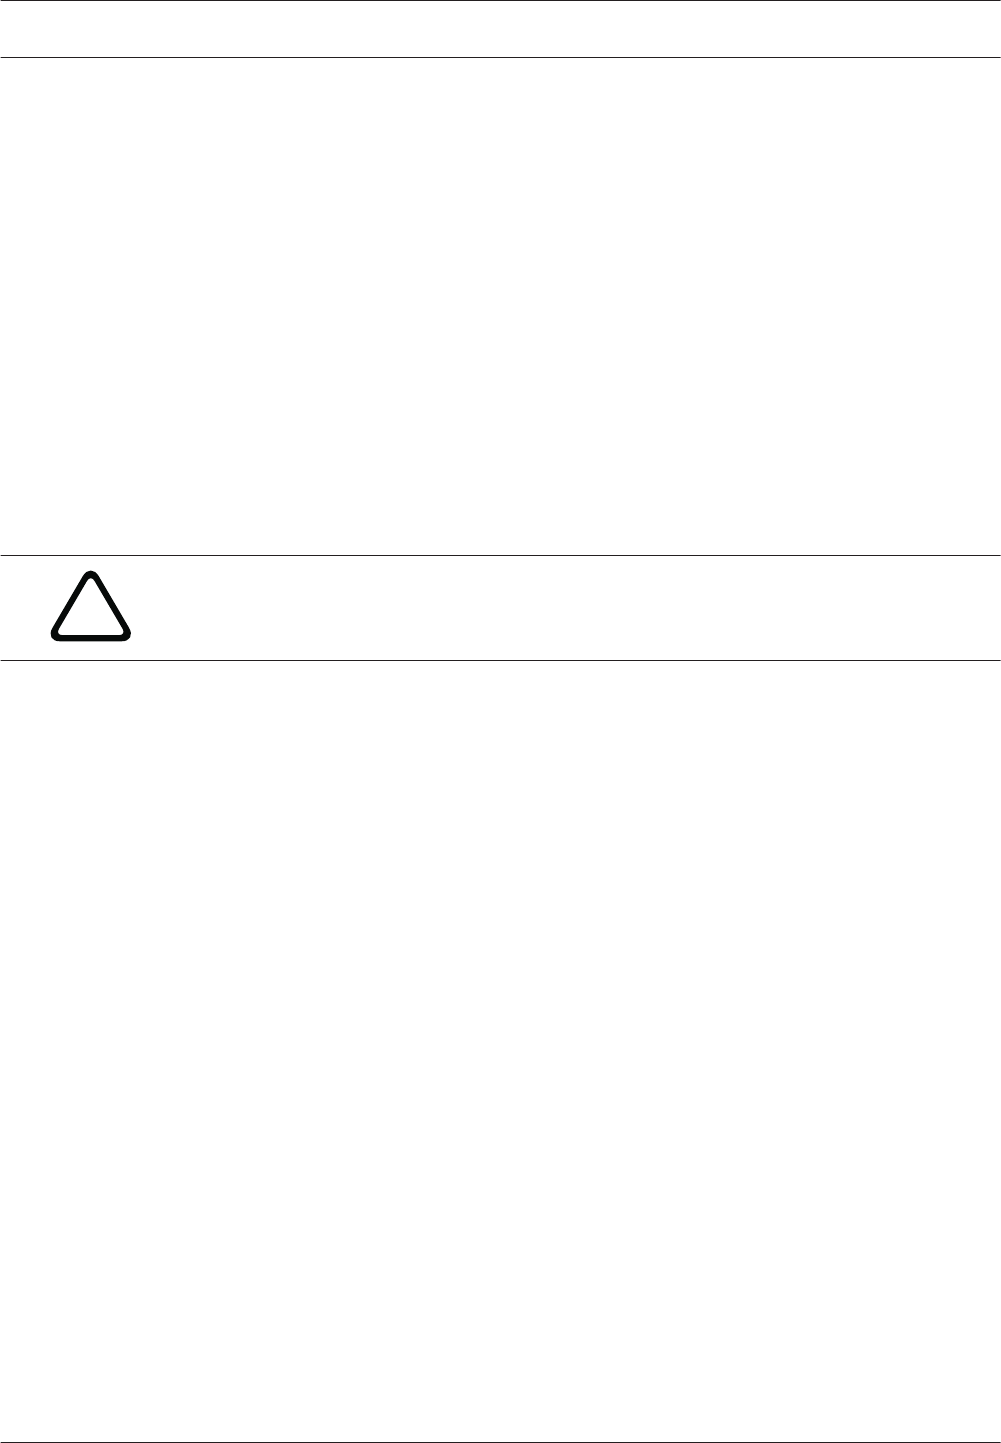
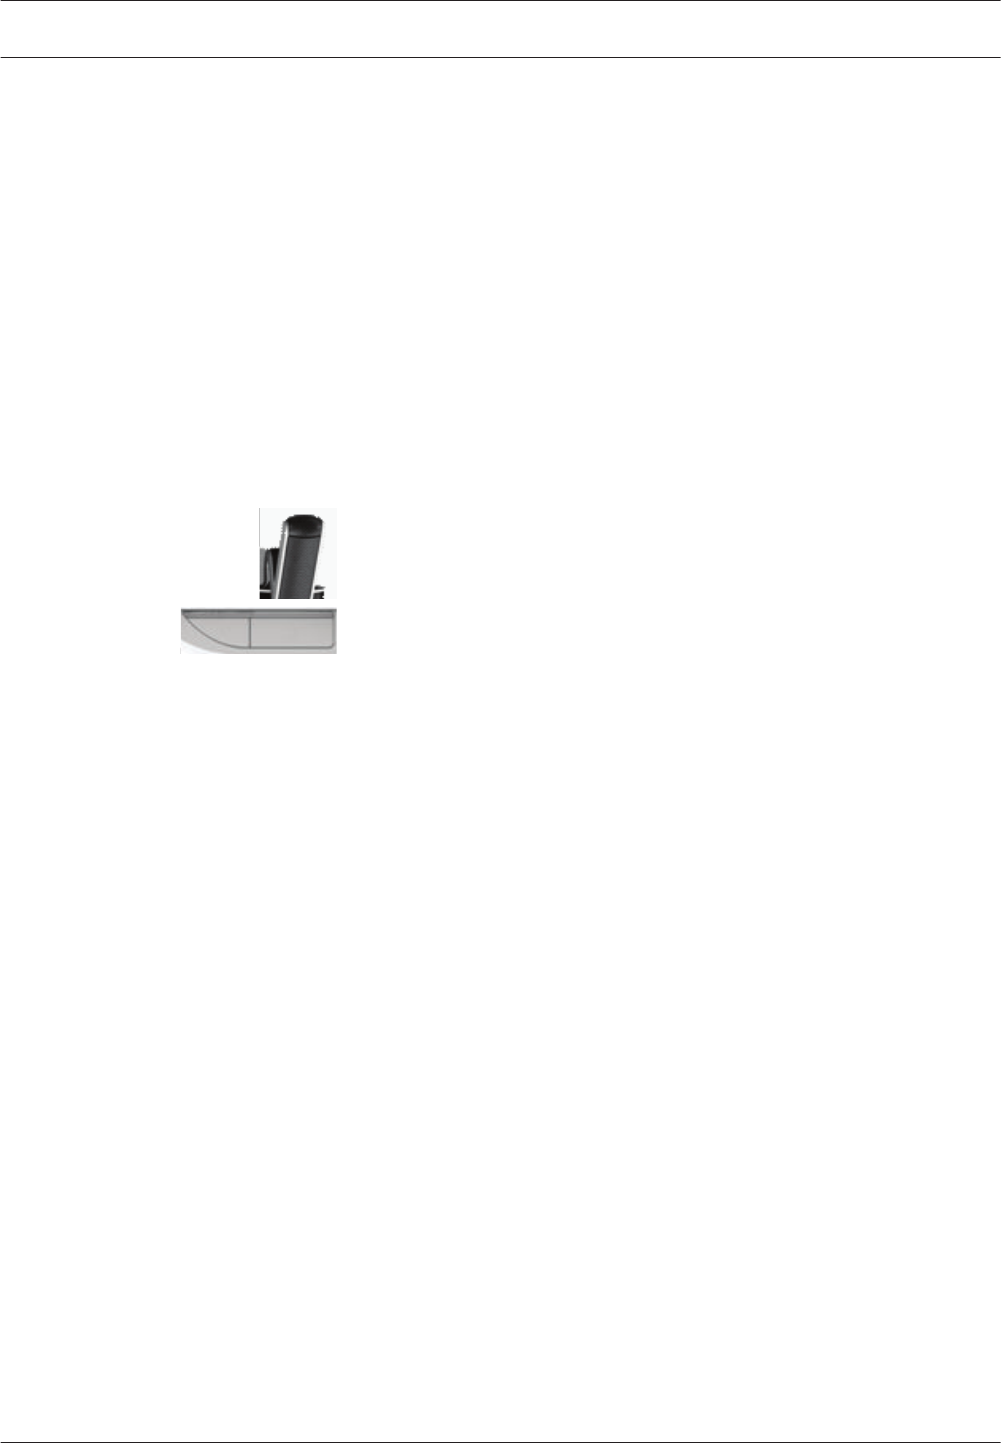
Multimedia Device
The Multimedia Device has a touch screen (9), which provides the user interface for the
meeting. Use the touch screen to: browse through information about the topic being
discussed, consult meeting subject lists and agendas, and look up details about the speaker.
If cameras are integrated into the system, you can also see who is speaking.
328710
1 5 69 4
Listening
12‑way loudspeakers.
2Headphone volume.
3Headphone connection.
Speaking
Microphone operation, page 9
4Microphone on air led strip.
5Microphone LED (bi‑color).
6Microphones.
7Priority / Microphone mute / Power on button (3 functions in one button).
8Microphone button.
Touch‑screen
Touch-screen operation, page 11
9Touch‑screen.
4
DCN multimedia Multimedia Device | en 7
Bosch Security Systems B.V. User manual 2016.03 | V1.5_01 |

Microphone operation
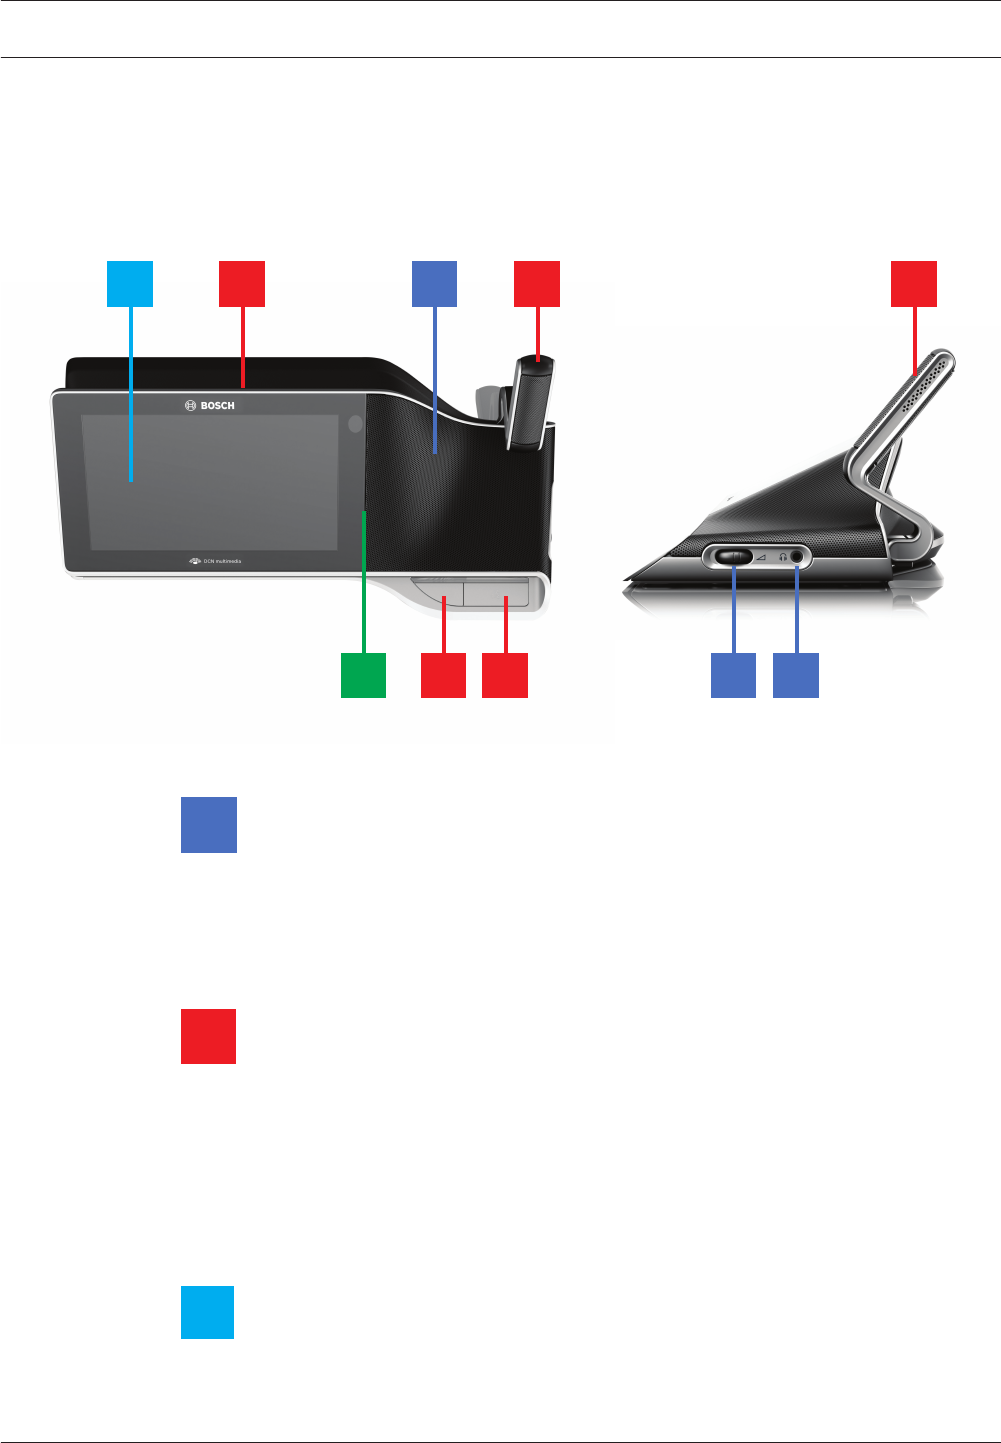
Button options:
–Off: Microphone mute button for participant.
–White: Priority button for chairperson.
–Red: Power on button.
Open mode:
– When the white light in the microphone button is on:
– You can always enable the microphone.
– You will not be queued in the waiting list.
– Push the microphone button to enable the microphone of your Multimedia Device:
– If the red light above the microphone button comes on, the microphone is activated
and you can speak.
– If the green (flashing) light above the microphone button comes on, your
request‑to‑speak is accepted and you are placed in the waiting list:
- Green on: In the waiting list.
- Green flashing: First in the waiting list.
- You cannot speak until the red light above the microphone button comes on.
– When the green light above the microphone button is on, you can push the microphone
button to cancel the request‑to‑speak. The green light above the microphone button goes
off. The system operator also has the possibility to cancel the request‑to‑speak.
When the red light above the microphone button is on, you can push the microphone button
to disable the microphone. The red light above the microphone button goes off. The system
operator also has the possibility to disable the microphone.
4.1
DCN multimedia Multimedia Device | en 9
Bosch Security Systems B.V. User manual 2016.03 | V1.5_01 |
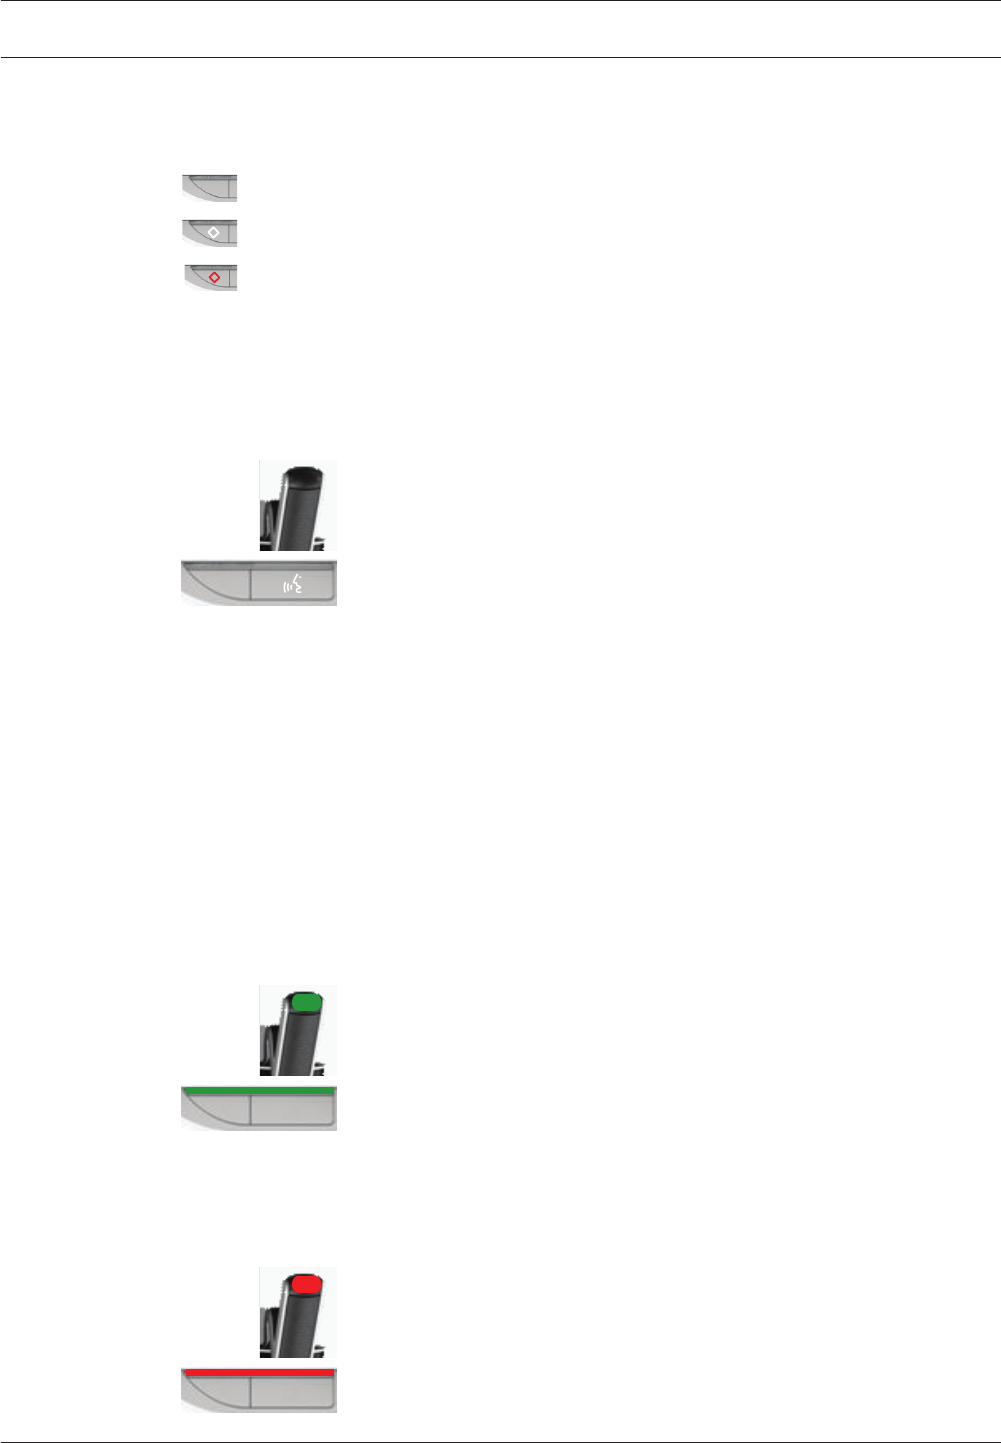
Override mode:
When your Multimedia Device is in Override mode you do not have to wait to speak (there is
no green light indication):
– Push the microphone button to enable the microphone. The red light above the
microphone button comes on.
– Push the microphone button for a second time to disable the microphone. The red light
above the microphone button goes off.
– When you are the longest speaking participant, another participant can override your
microphone by pressing their microphone button. You will then have to push the
microphone button to re-enable the microphone.
Push-To-Talk (PTT) mode:
When your Multimedia Device is in Push-To-Talk mode, the microphone is enabled when you
push and hold in the microphone button.
Voice mode:
When your Multimedia Device is in Voice mode, the microphone is enabled when you speak.
– the microphone button on the discussion device is colored red.
– the microphone button can be pressed and held in to temporarily mute the microphone.
If you have VIP rights, you have to press the microphone button to speak, which will mute all
other participant microphones.
10 en | Multimedia Device DCN multimedia
2016.03 | V1.5_01 | User manual Bosch Security Systems B.V.
Touch-screen operation
The touch‑screen of the DCNM‑MMD Multimedia Device is used to participate in a meeting,
and/or manage meetings within the DCN multimedia system.
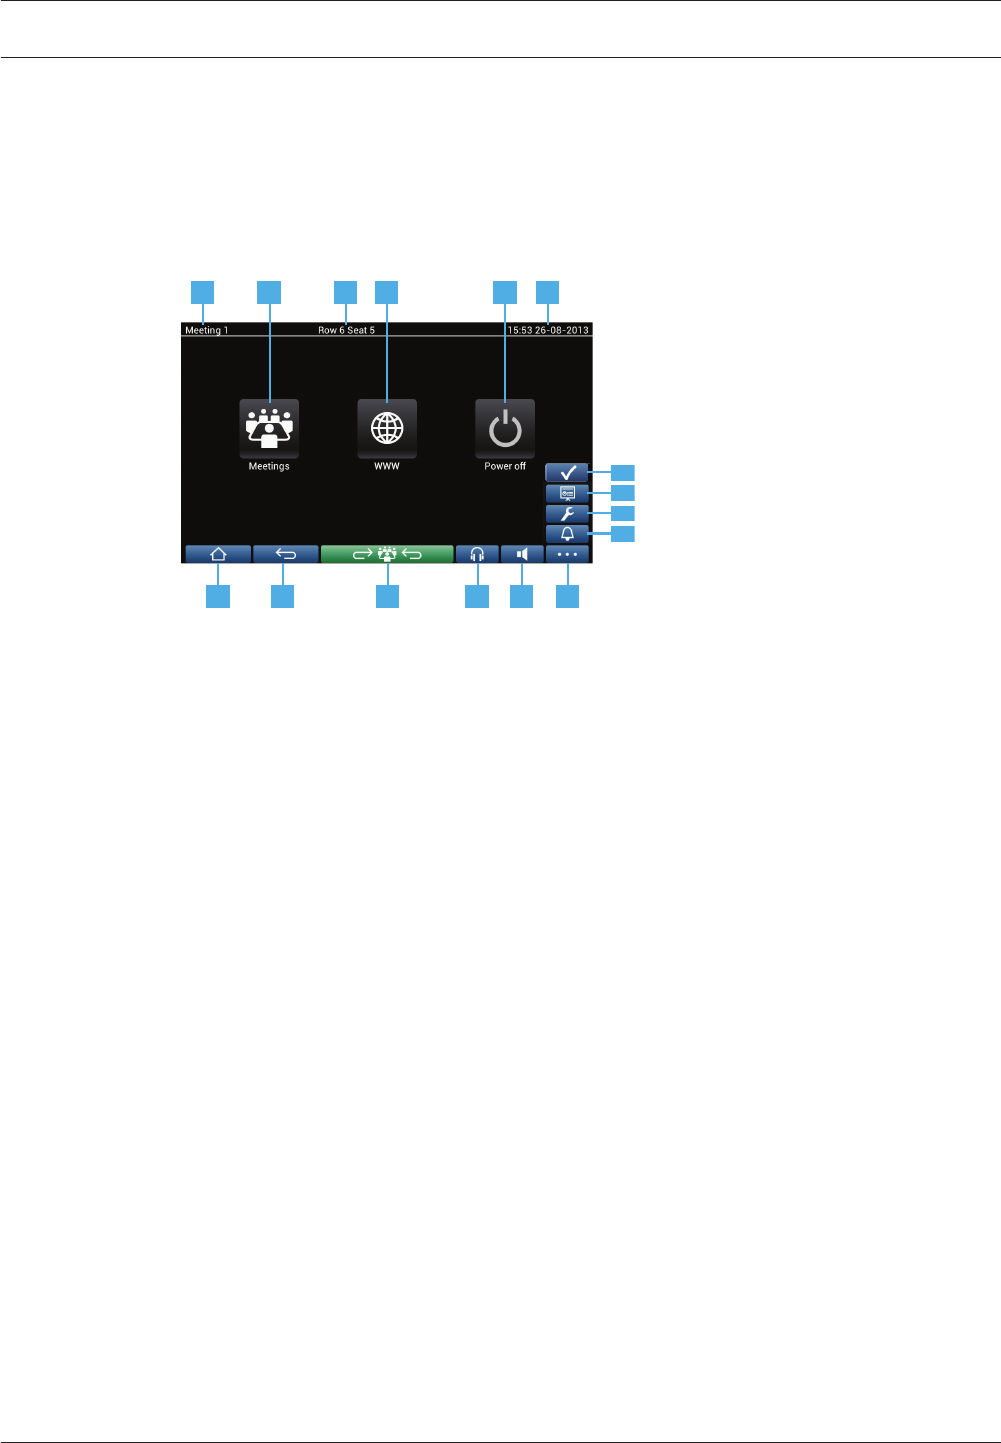
Home screen
Depending on the authorizations, some items might not be present.
1 2 4 53 6
7 8 9 10 11 12
12.3
12.4
12.2
12.1
1Name of the active meeting or agenda topic.
2 Meetings overview button: See Meeting overview screen, page 12.
3Seat name or participant name is shown here.
4 WWW button: Opens a web browser.
5 Power off button: Switches off the system.
6Time & date.
7Home button: Returns you to the home screen.
8Back button: Navigates one step back in the navigation history.
9Back to active button: Brings you to the active part of the meeting.
10 Headphone button: Opens the headphone volume control and the available
interpreted languages. The control disappears automatically after 3 seconds when
not used.
11 Master volume control button: Opens the volume control. The control disappears
automatically after 3 seconds when not used.
12 Menu button: Opens a menu for additional functionality:
12.1 Summon button: Activates a chime to summon the participants.
12.2 Configure button: Opens the discussion settings screen. See Discussion settings
screen, page 15.
12.3 Presentation button: Activates the presentation mode.
12.4 Voting button: Activates the voting function. See Voting screens, page 16.
4.2
4.2.1
DCN multimedia Multimedia Device | en 11
Bosch Security Systems B.V. User manual 2016.03 | V1.5_01 |
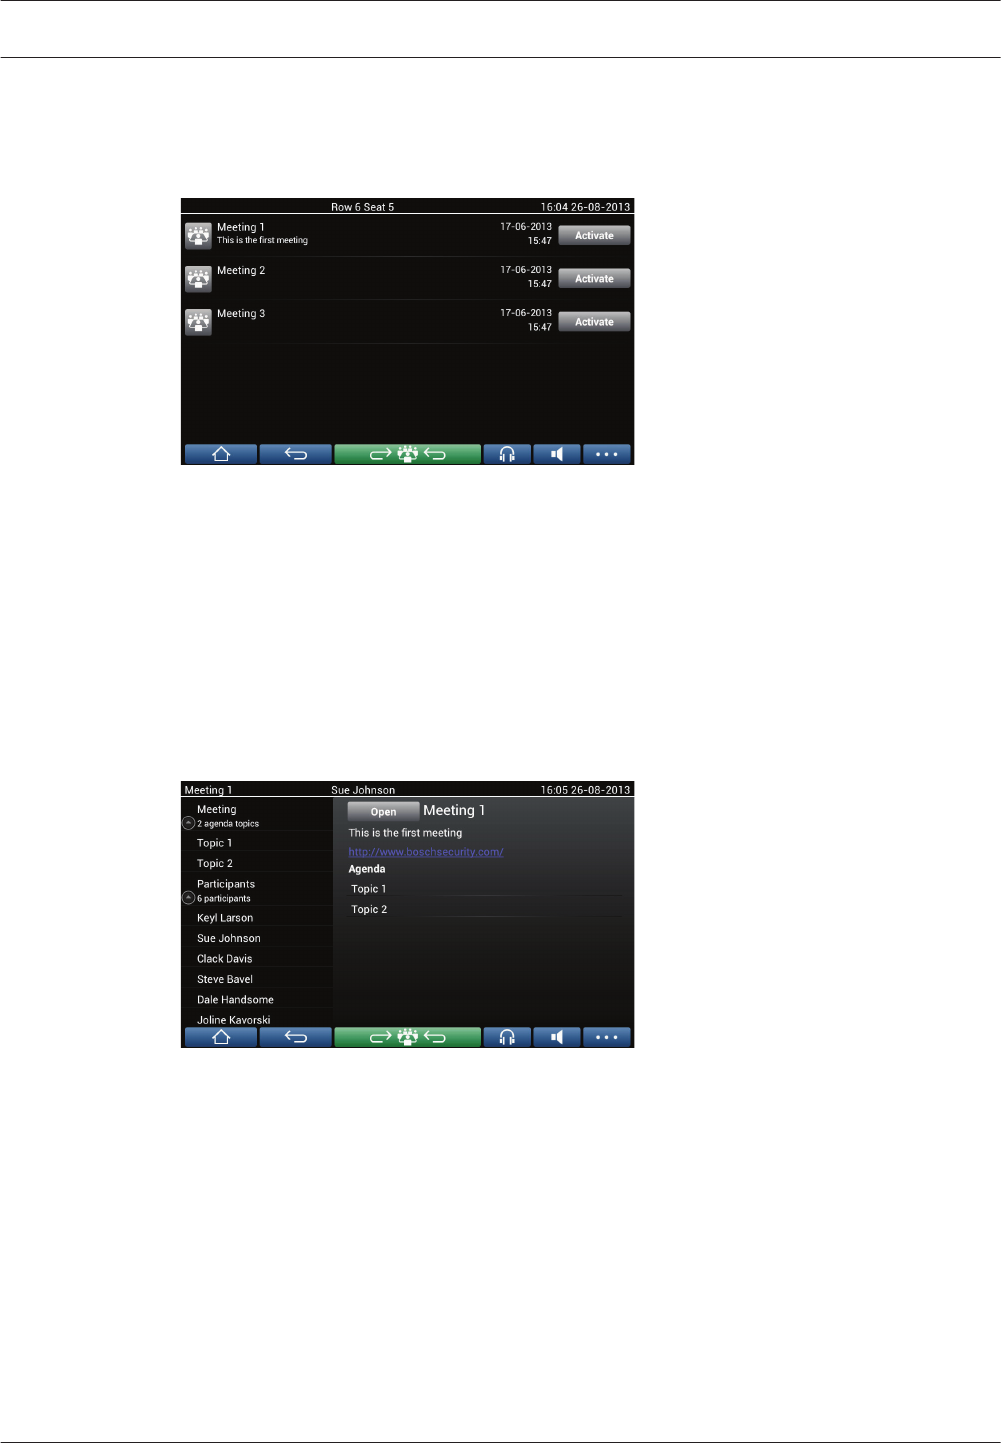
Meeting overview screen
To view the meeting overview screen, press the Meetings button on the home screen (Home
screen, page 11).
The meeting overview screen shows all prepared meetings. Depending on the authorizations, a
meeting can be activated by pressing the Activate button:
– Activating a meeting forces all devices to go to the meeting screen. See Meeting screen,
page 12.
– Pressing anywhere in the line of the meeting opens the selected meeting screen and
allows you to see the content of the meeting. See Meeting screen, page 12.
Meeting screen
The meeting screen shows all the details of the meeting, including the agenda topics and the
participants. Any prepared voting rounds can also be viewed in this screen.
Depending on the authorizations, a meeting can be opened:
– Select an agenda topic, and then press the Open button to open the discussion screen.
See Discussion screen, page 14.
– Press the “hyperlink” to open the embedded browser, showing additional information.
4.2.2
4.2.3
12 en | Multimedia Device DCN multimedia
2016.03 | V1.5_01 | User manual Bosch Security Systems B.V.
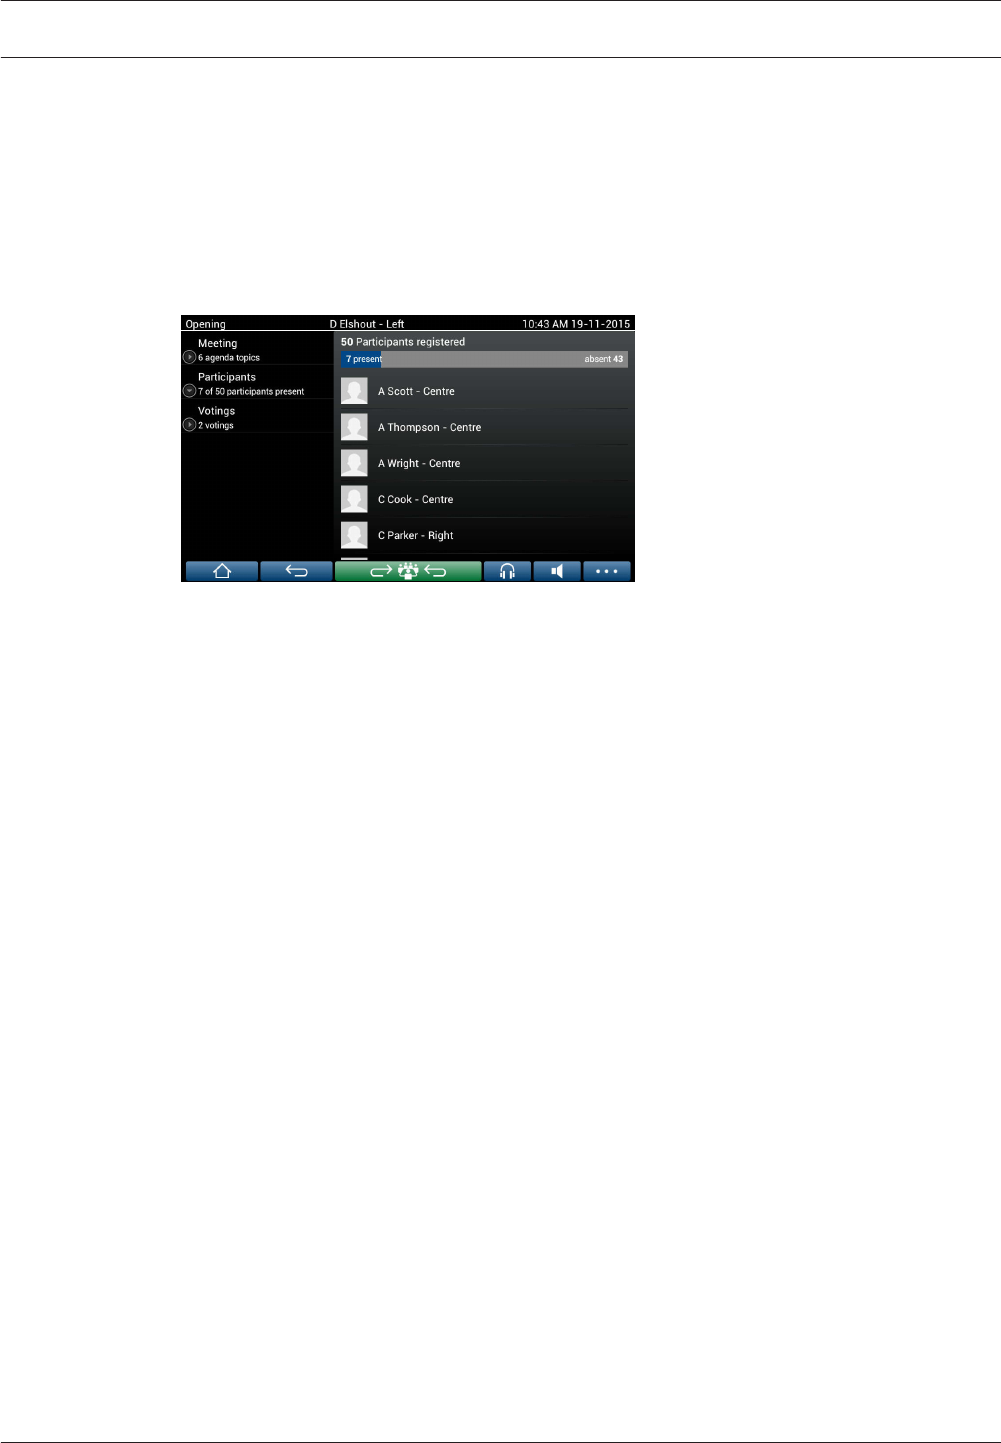
Attendance registration is displayed at the top of the meeting screen when:
– the licenses DCNM‑LMPM, DCNM‑LPD, and DCNM‑LSID are activated.
– an identification/authentication method is configured for the meeting (see Identification/
authentication, page 21).
The following information is available:
– Total number of participants registered for the meeting.
– Number of participants present.
– Number of participants absent.
Attendance registration can be used by the chairperson or clerk to determine if sufficient
participants are present to start a meeting. The login/logout activity of participants is used to
generate the present/absent notifications.
DCN multimedia Multimedia Device | en 13
Bosch Security Systems B.V. User manual 2016.03 | V1.5_01 |
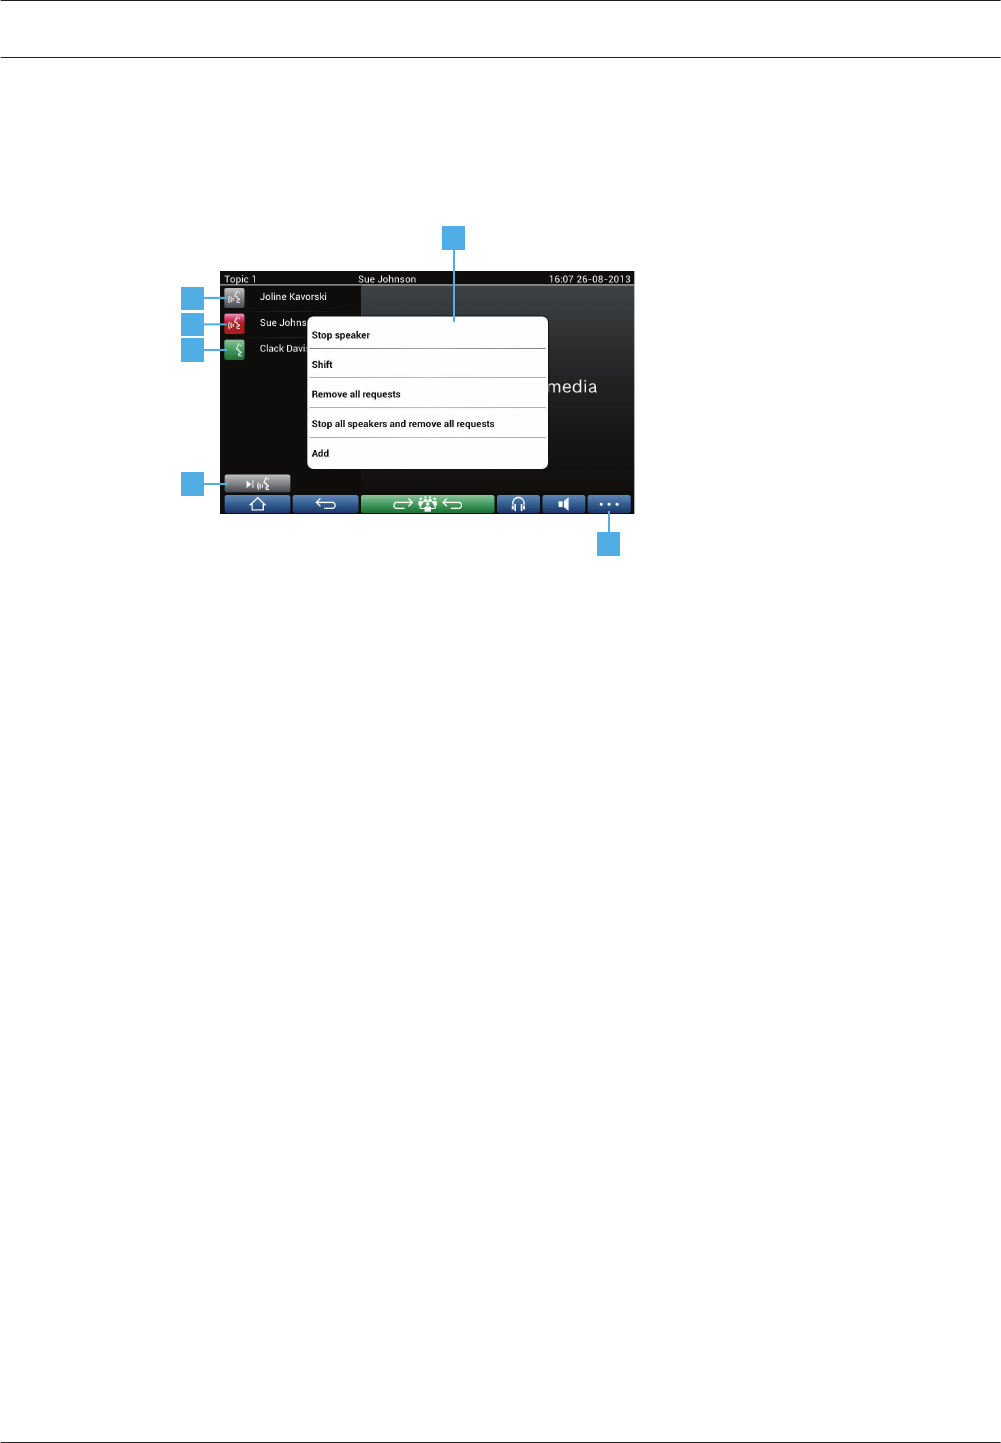
Discussion screen
The discussion can be managed here, depending on authorizations.
The list on the left shows the discussion list. This list contains speaking and waiting
participants.
5
1
2
3
4
6
1Grey icon: The participants microphone is muted.
2Red icon: The participant is speaking.
3Green icon: The participant is waiting‑to‑speak.
4Shift button: Shifts participants from “waiting” to “speaking”. If the speaker list is
full, the longest speaking participant is removed from the speaker list.
5Context menu. Manages the discussion. Press the screen on the discussion list to
open the context menu:
–Stop speaker: Stops the selected participant from speaking. Depending on the
number of open microphones and microphone mode setting, the first waiting
participant can immediately be shifted to the speaker list.
–Shift: Shifts the selected participant from “waiting” to “speaking”.
–Remove all requests: Removes all waiting participants from the list.
–Stop all speakers and remove all requests: Stops participants from speaking,
and removes all waiting participants from the list.
–Add: Opens a menu to add a participant to the list, as a “speaker” or as a
“waiting” participant. To add the participant: Select the required participant,
and then select Grant the floor or Add to waiting list. Depending on the
number of open microphones and microphone mode setting, a participant
added to the waiting list can immediately be shifted to the speaker list.
To close the context menu, press anywhere outside the discussion list and the
context menu.
6Menu button. Depending on your meeting authorizations, you can manage the
discussion settings by:
– pressing the menu button to display a pop-up list, and then
– pressing the configure button to open the discussion settings screen. See
Discussion settings screen, page 15.
For an overview of the Home screen buttons, see Home screen, page 11.
4.2.4
14 en | Multimedia Device DCN multimedia
2016.03 | V1.5_01 | User manual Bosch Security Systems B.V.
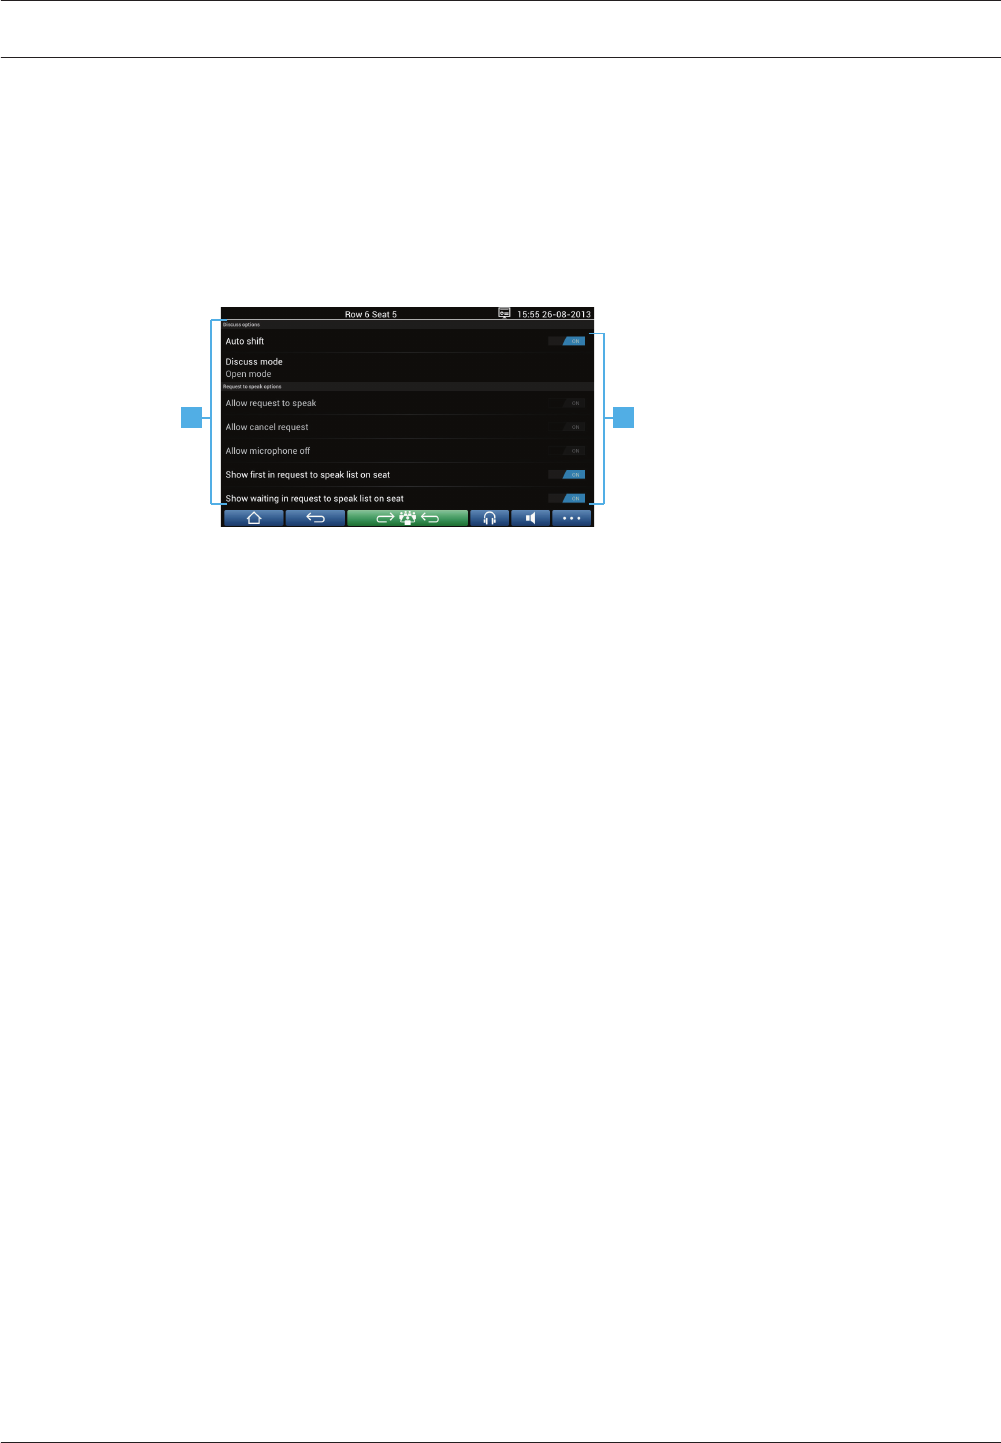
Discussion settings screen
The discussion and request‑to‑speak options can be managed here, depending on
authorizations.
To display this screen:
– press the menu button to display a pop-up list, and then
– press the configure button
2
1
1Swipe the screen from bottom to top to display the following options:
–Discuss options
–Request to speak options
–Microphone options
–Priority options
–Speaker viewing options
2ON / OFF: Slide button. Swipe the slide button to switch the option ON or OFF
(depends on authorizations and functionality).
If the option does not have a slide button, press the option, and a pop-up menu will
appear. Use this menu to enter the required settings.
4.2.5
DCN multimedia Multimedia Device | en 15
Bosch Security Systems B.V. User manual 2016.03 | V1.5_01 |

Voting screens
Background information (secretary or clerk)
Different types of voting are available:
– Basic voting
– Prepared voting
– Prepared voting with attendance registration
The system will use one of these voting methods depending on the installed licenses and
system configuration.
Basic voting will be used when:
– DCNM‑LSVT device voting licenses are activated.
– the voting function has been assigned to licensed seats in the Meeting application. For
more information, refer to the section: Meeting application > Configure > Seats and
Devices in the ‘Software Manual’.
Note: Basic voting screens do not have a subject and description displayed on the multimedia
device; the voting results are not stored.
Prepared voting will be used when:
– all requirements of basic voting are met.
– the licenses DCNM‑LMPM, DCNM‑LPD, as well as the DCNM‑LVPM system voting license,
are activated.
– one or voting rounds have been prepared in the meeting application.
For more information, refer to the section Meeting application > prepare > Voting round
details in the ‘Software Manual’.
– a meeting is activated and open.
Note: Prepared voting screens have a subject and description displayed on the multimedia
device; the voting results are stored. If you want to display individual results, the DCNM-LPD
license is required.
Prepared voting with attendance registration will be used when:
– all requirements of prepared voting are met.
– the DCNM‑LSID identification at seat license is activated.
– an identification method is configured for the meeting (see Identification/authentication,
page 21).
4.2.6
16 en | Multimedia Device DCN multimedia
2016.03 | V1.5_01 | User manual Bosch Security Systems B.V.
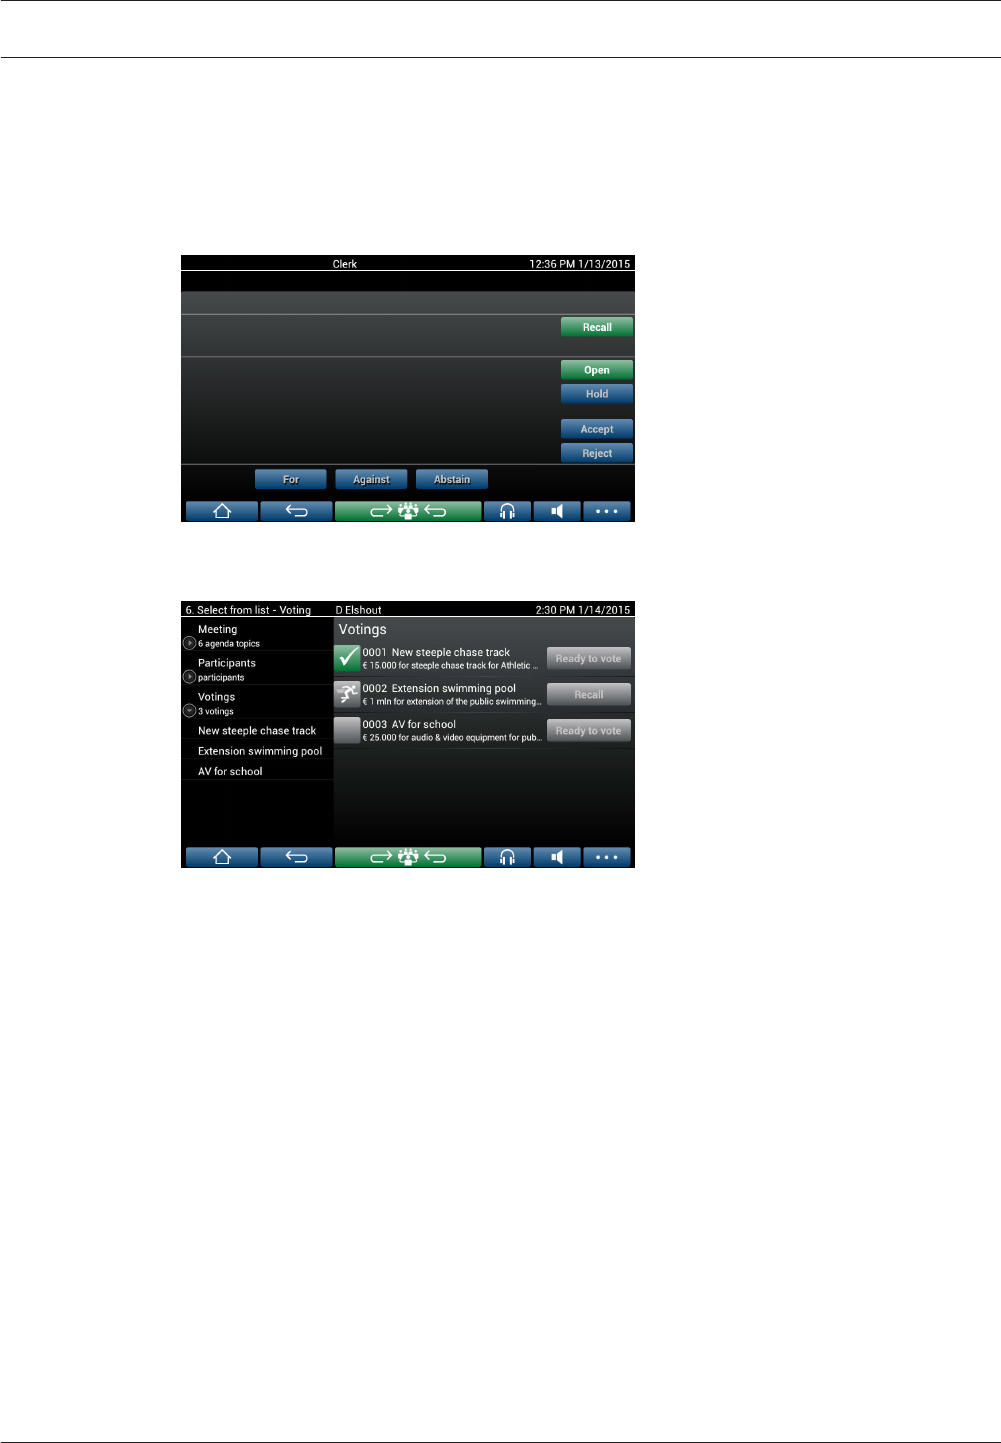
Manage voting (secretary or clerk)
To go to the voting screens, select the voting icon (tick mark) in the menu button (…) at the
bottom right-hand corner of the screen. For more information, refer to Home screen, page 11,
item 12.4.
Depending on the system setup, as described in background information, either the initial
‘Basic’ voting screen will appear:
Or, the initial ‘Prepared’ voting screen (when the agenda is open):
If prepared voting is being used, select the Ready to vote button to display the desired voting
round. The icon to the left of the voting description indicates the status of the voting round.
The following icons are used:
– Running man: voting round is active.
– Green tick: voting round is accepted.
– Red cross: voting round is rejected.
– Yellow dash: voting round is aborted.
DCN multimedia Multimedia Device | en 17
Bosch Security Systems B.V. User manual 2016.03 | V1.5_01 |
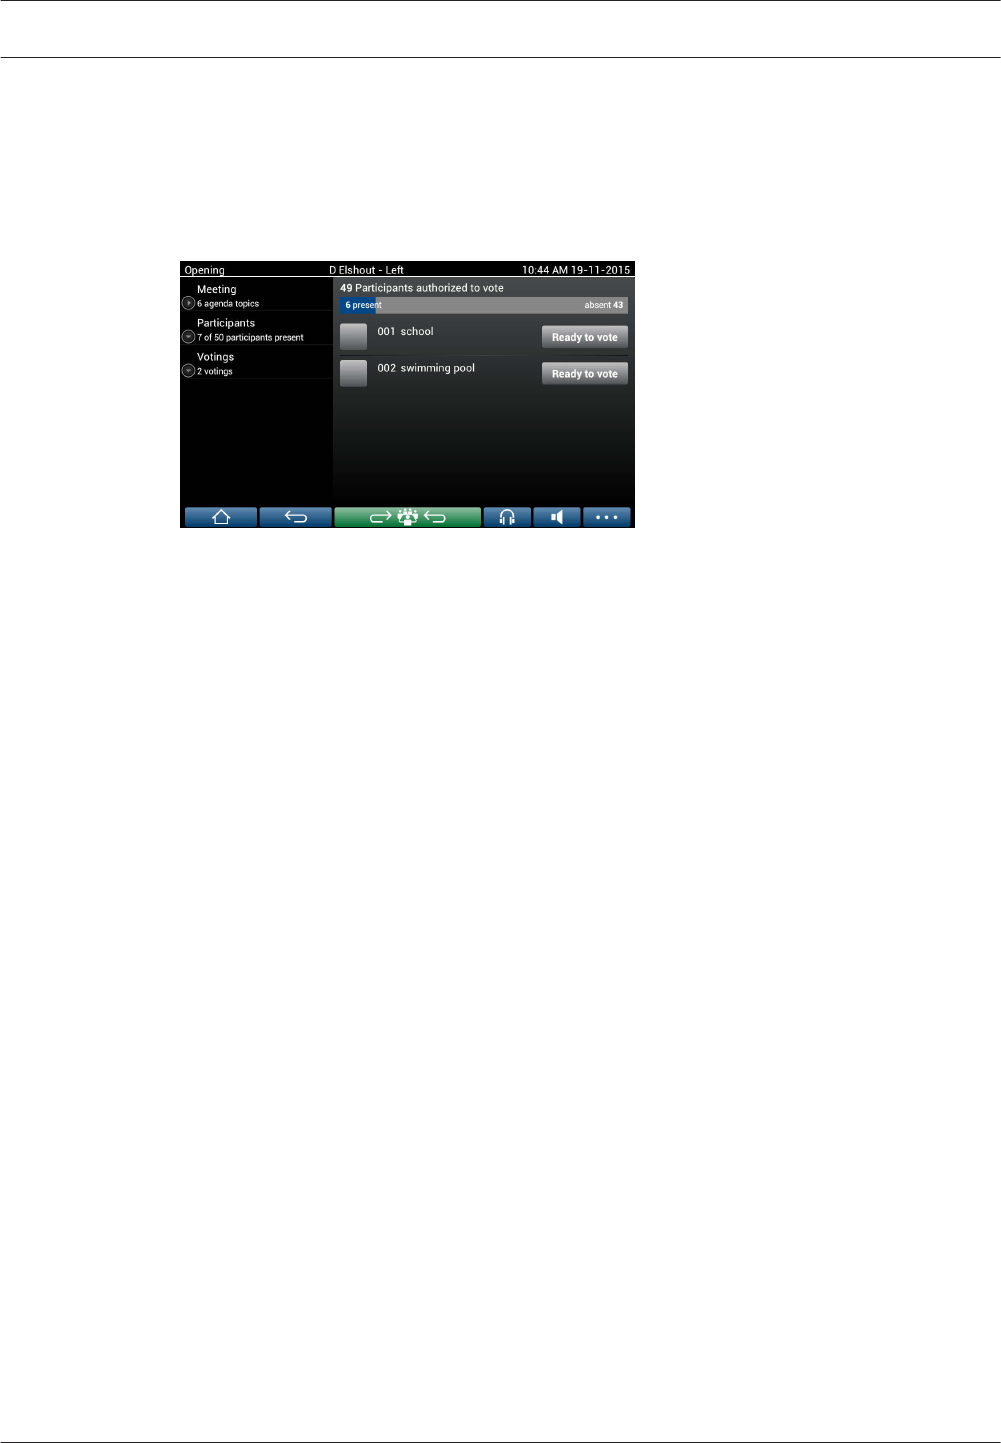
Attendance registration:
When attendance registration is used, the following information is displayed at the top of the
voting screen:
– Total number of participants authorized to vote.
– Number of participants authorized to vote present.
– Number of participants authorized to vote absent.
Attendance registration is used by the chairperson or clerk to determine if sufficient
participants are present to start a voting round. The login/logout activity of participants is
used to generate the present/absent notifications.
18 en | Multimedia Device DCN multimedia
2016.03 | V1.5_01 | User manual Bosch Security Systems B.V.
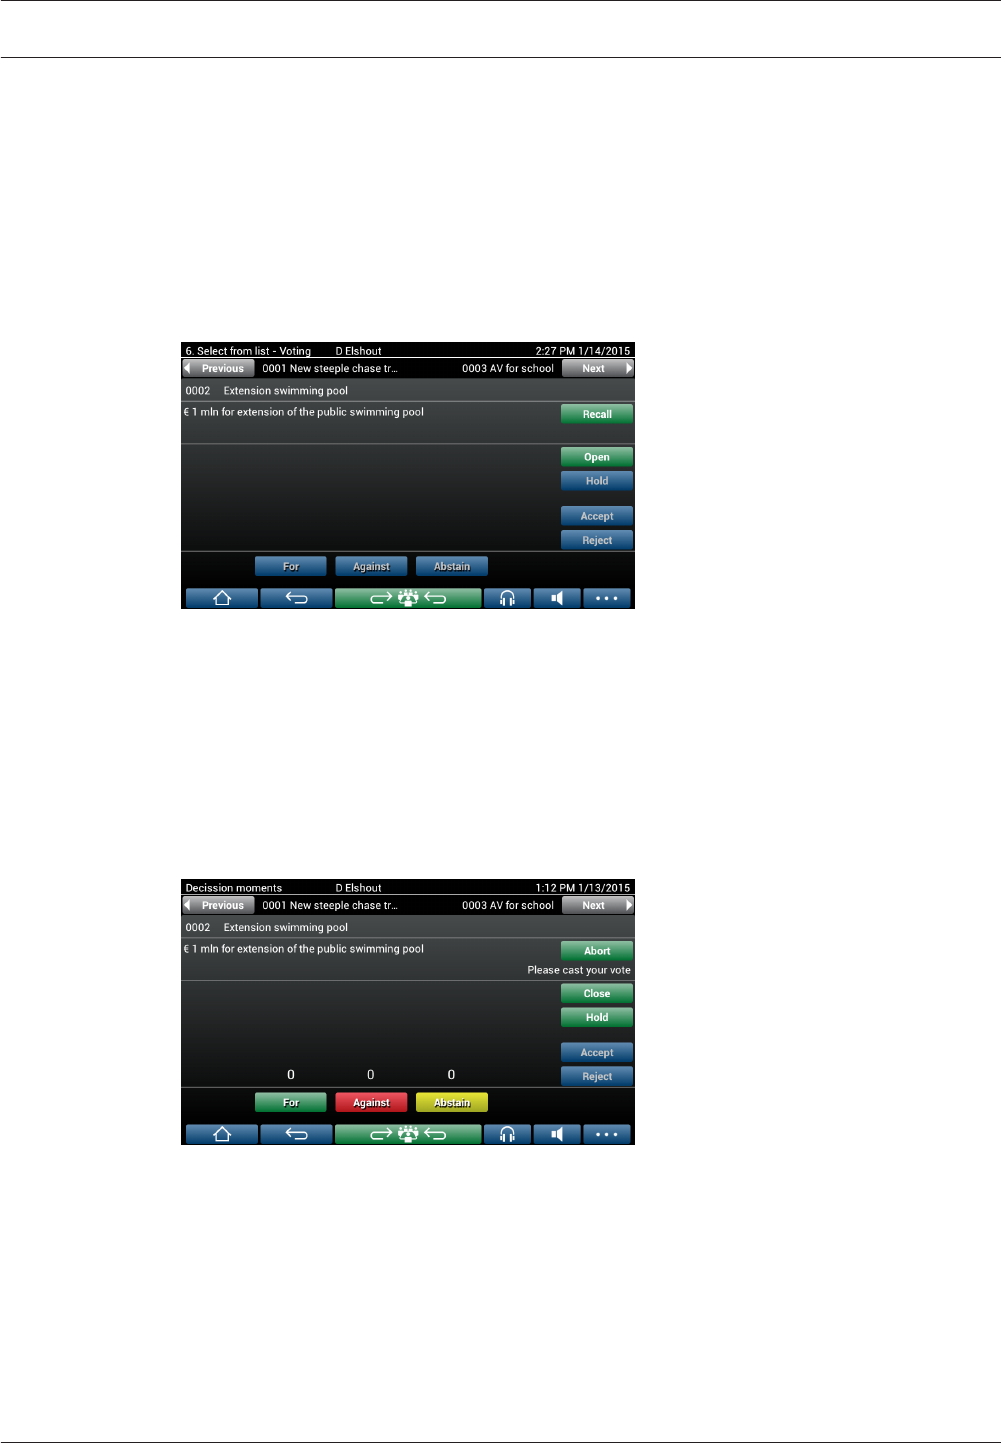
Voting buttons:
The basic and prepared voting screens are similar.
The prepared voting screens have additional functionality; the subject and description of the
voting round and Previous and Next navigation buttons are displayed at the top of the page,
as shown in the following screenshots.
–Previous button: Selects the previous voting round. When the first voting round in the list
is selected, this button is hidden.
–Next button: Selects the next voting round. When the last voting round in the list is
selected, this button is hidden.
The colored buttons on the right-hand side of the screen are not visible for participants. They
are only used by the secretary or clerk to control a voting round:
–Recall button: Recalls the selected voting round. For example, use this button if you
selected the incorrect voting round by mistake. Once voting is opened, this button
changes to the abort button, as shown in the following screenshot.
–Open button: Opens the selected voting round. Once voting is opened, this button
changes to the Close button.
–Hold button: Puts the current voting round on hold. The participants voting buttons are
temporarily disabled and votes cannot be changed or cast. This button changes to the
Resume button when it is pressed.
–Resume button: Allows voting to be resumed. Votes can be cast or changed.
–Close button: Closes the voting round.
–Abort button: Aborts the current voting round once voting is opened. Voting results are
not saved.
DCN multimedia Multimedia Device | en 19
Bosch Security Systems B.V. User manual 2016.03 | V1.5_01 |
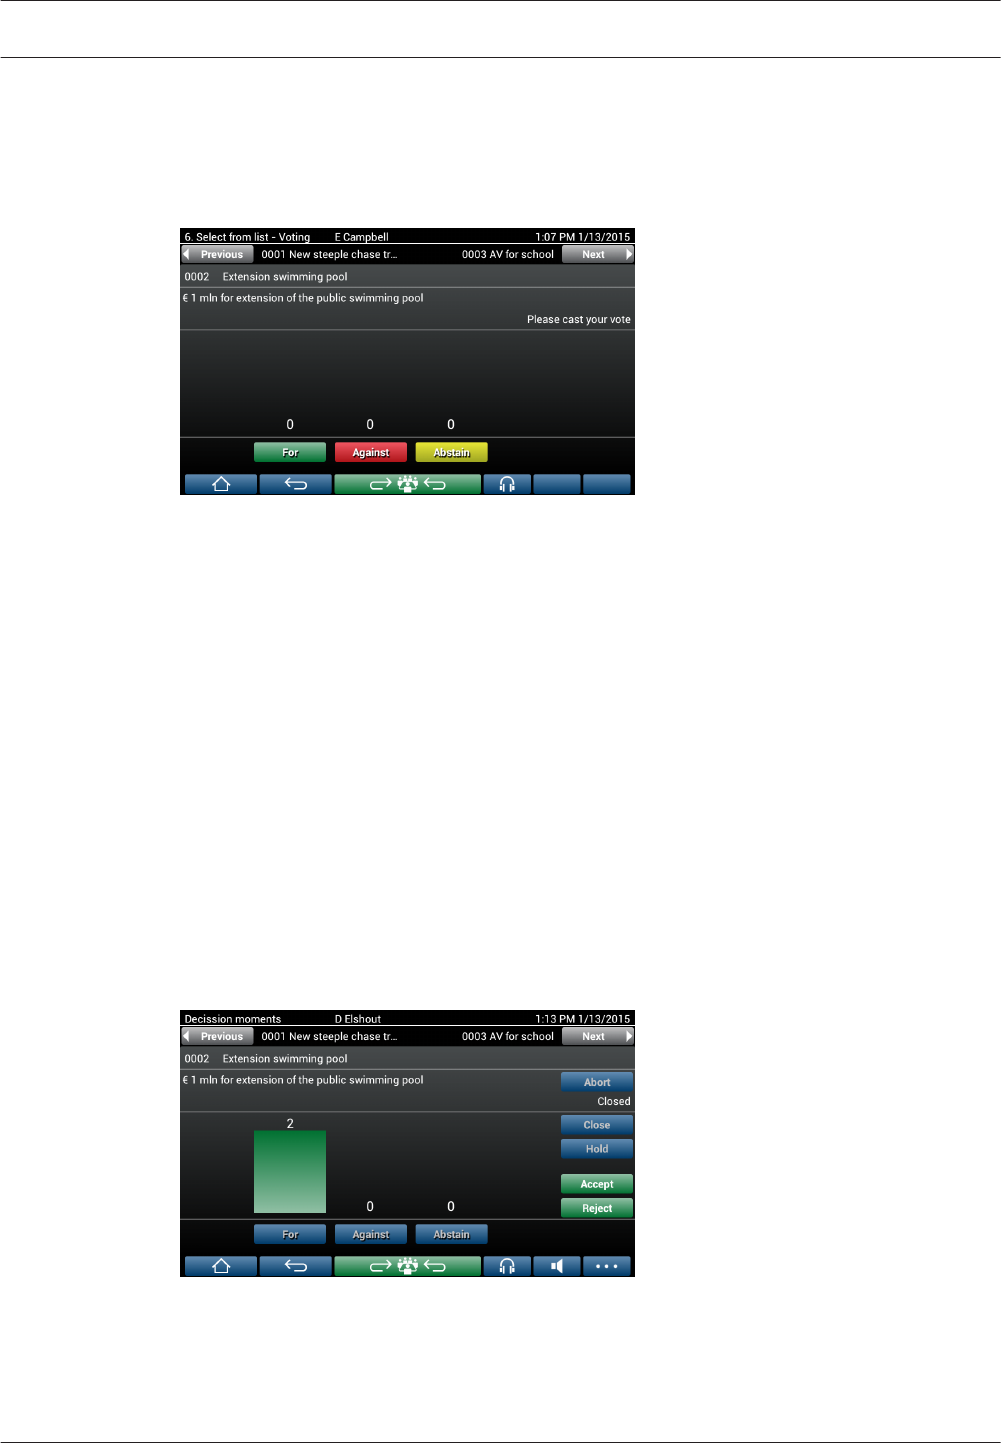
Cast vote (participants)
The votes are cast by touching the voting buttons at the bottom of the screen. Basic voting
has voting buttons for For, Against and Abstain.
If prepared voting is used, different sets of voting buttons are available depending on the
answer set selected during voting preparation.
When voting is opened, the vote buttons are all colored, for example: For (Green), Against
(Red), Abstain (Yellow).
After a vote is cast, these buttons change color:
– Open voting: Only the selected button is colored after the vote is cast.
– Secret voting or prevent influence when voting: All buttons are gray after the vote is cast.
Other participants cannot see your voting choice.
– If timed voting is being used, the time available for voting is displayed at the top right-
hand side of the display.
Manage voting result (secretary or clerk)
The voting choice is displayed above the vote button as a bar graph.
Different options are available for displaying the cast votes (for more information, refer to the
section Meeting application > Prepare > Voting round details in the “Software Manual”):
– Only the cast vote of the participant is displayed on the multimedia device – prevents
participants being influenced by the voting choice of other participants.
– The cast vote, as well as a live update of the total number of votes for each voting choice,
is displayed on the multimedia device, as shown in the following figure:
Use the Accept and Reject buttons to finalize the voting round:
–Accept button: To confirm that the motion is accepted.
–Reject button: To confirm that the motion is rejected. The voting round can be held at
another time.
20 en | Multimedia Device DCN multimedia
2016.03 | V1.5_01 | User manual Bosch Security Systems B.V.

Identification/authentication
Depending on the installed licenses and system settings, you may be asked to identify and
authenticate yourself before joining a meeting.
This can be done in several ways, depending on the system settings:
– Enter your user name (and your password, if required).
– Select your user name from a list (and enter your password, if required).
– Log in with your NFC tag (and enter your password, if required) – DCNM‑MMD2 only.
– By use of an external system.
Log in instructions are displayed on screen.
If attendance registration is used, the login/logout activity of participants is used to generate
the present/absent notifications in the meeting and voting screens.
4.3
DCN multimedia Multimedia Device | en 21
Bosch Security Systems B.V. User manual 2016.03 | V1.5_01 |
Troubleshooting
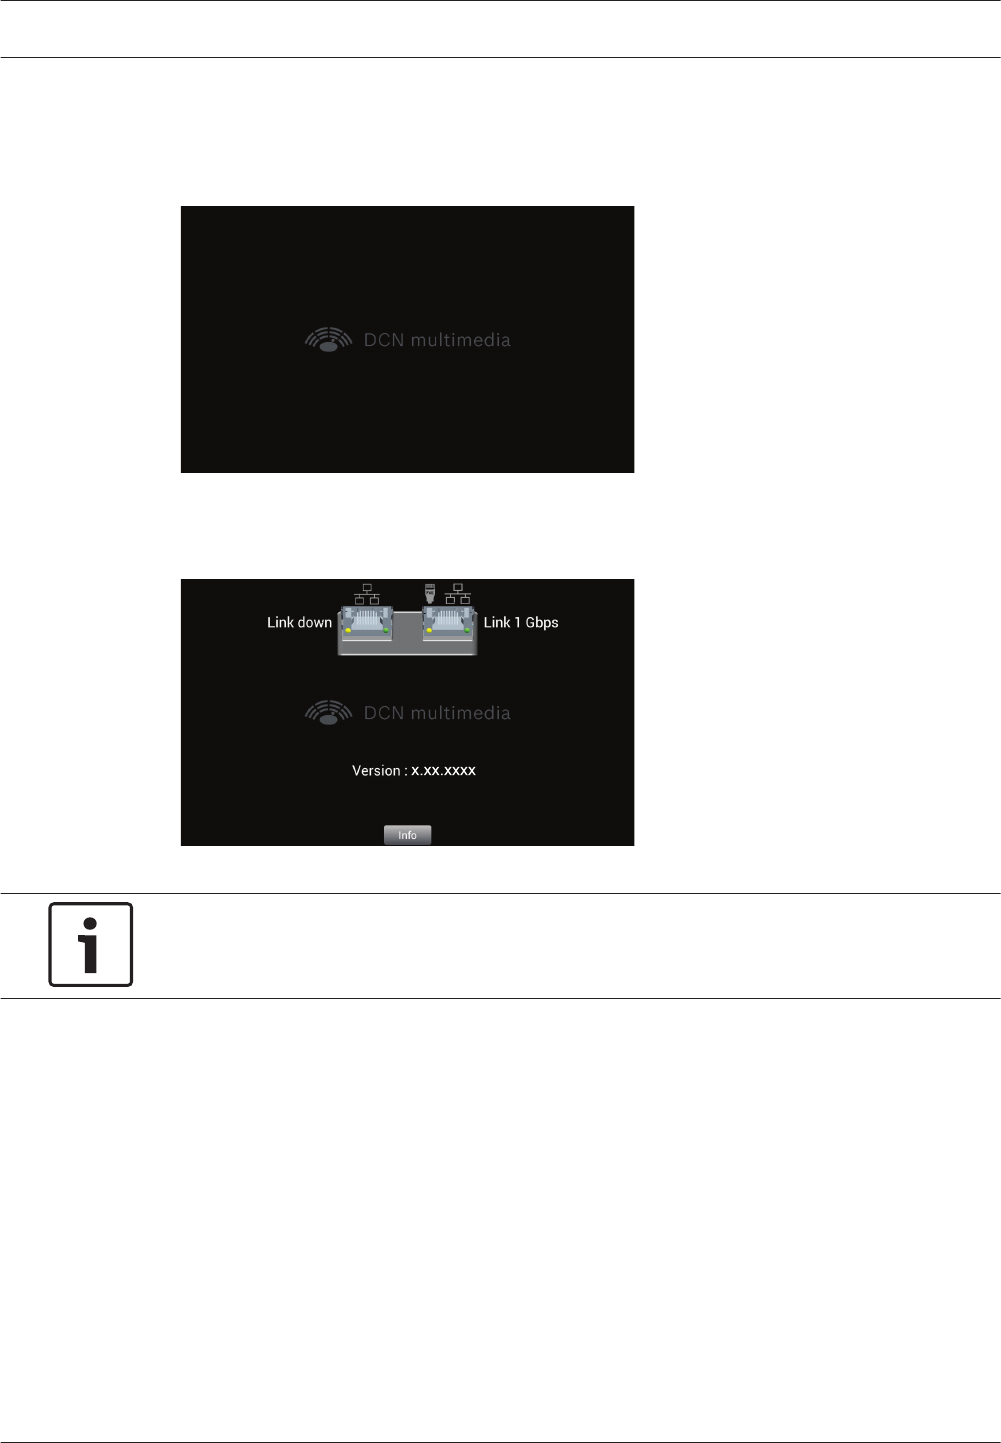
When your DCNM-MMD device has been not configured correctly, the following screen is
shown:
When the DCNM‑MMD cannot find the system in the network, the following screen is shown.
Refer to Installation Test in the “Hardware Installation Manual”.
Notice!
For general troubleshooting, please contact your local system technician.
5
22 en | Troubleshooting DCN multimedia
2016.03 | V1.5_01 | User manual Bosch Security Systems B.V.

Bosch Security Systems B.V.
Torenallee 49
5617 BA Eindhoven
Netherlands
www.boschsecurity.com
© Bosch Security Systems B.V., 2016