Broadcom BRCM1022-H 802.11ag/Draft 802.11n Wireless LAN PCI-E MiniCard User Manual 1

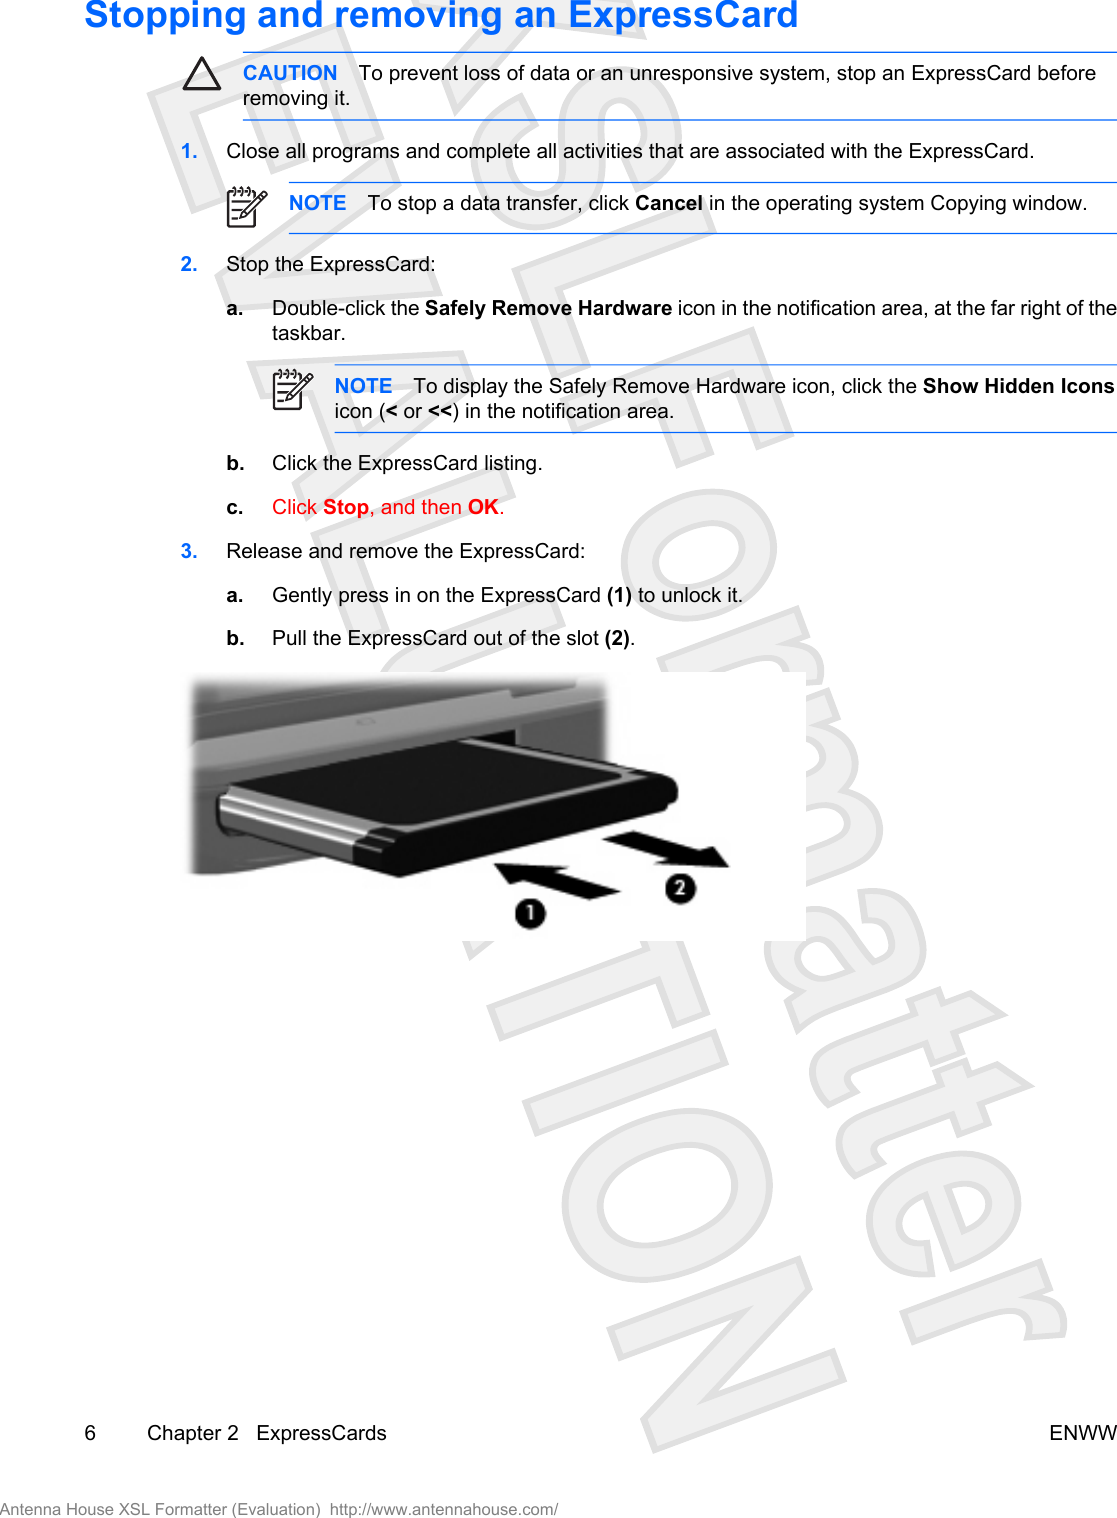
Broadcom Corporation 802.11ag/Draft 802.11n Wireless LAN PCI-E MiniCard 1

User Manual 1

DrivesUser GuideAntenna House XSL Formatter (Evaluation)  http://www.antennahouse.com/
© Copyright 2007 Hewlett-PackardDevelopment Company, L.P.The information contained herein is subjectto change without notice. The onlywarranties for HP products and services areset forth in the express warranty statementsaccompanying such products and services.Nothing herein should be construed asconstituting an additional warranty. HP shallnot be liable for technical or editorial errorsor omissions contained herein.First Edition: January 2007Document Part Number: 431172-001Antenna House XSL Formatter (Evaluation)  http://www.antennahouse.com/
Table of contents1  Identifying installed drives2  Handling drives3  Optical drivesInserting an optical disc ........................................................................................................................ 5Removing an optical disc when running on battery or external power ................................................. 6Removing an optical disc when no computer power is available ......................................................... 74  Improving hard drive performanceUsing Disk Defragmenter ..................................................................................................................... 8Using Disk Cleanup .............................................................................................................................. 85  Replacing the hard driveIndex ................................................................................................................................................................... 12ENWW iiiAntenna House XSL Formatter (Evaluation)  http://www.antennahouse.com/
iv ENWWAntenna House XSL Formatter (Evaluation)  http://www.antennahouse.com/
1 Identifying installed drivesTo view the drives installed on the computer, select Start > My Computer.ENWW 1Antenna House XSL Formatter (Evaluation)  http://www.antennahouse.com/
2 Handling drivesDrives are fragile computer components that must be handled with care. Refer to the following cautionsbefore handling drives. Additional cautions are included with the procedures to which they apply.CAUTION To reduce the risk of damage to the computer, damage to a drive, or loss ofinformation, observe these precautions:Before you move a computer or external hard drive from one location to another, initiate Sleep,and allow the screen to clear.Before handling a drive, discharge static electricity by touching the unpainted metal surface ofthe drive.Do not touch the connector pins on a removable drive or on the computer.Handle a drive carefully; do not drop a drive or place items on it.Before removing or inserting a drive, shut down the computer. If you are unsure whether thecomputer is off, in the Sleep state, or in hibernation, turn the computer on, and then shut it downthrough the operating system.Do not use excessive force when inserting a drive into a drive bay.Do not type on the keyboard or move the computer while the optical drive is writing to a disc. Thewrite process is sensitive to vibration.When the battery is the only source of power, be sure that the battery is sufficiently chargedbefore writing to a medium.Avoid exposing a drive to temperature or humidity extremes.Avoid exposing a drive to liquids. Do not spray the drive with cleaning products.Remove the medium from a drive before removing the drive from the drive bay, or traveling with,shipping, or storing a drive.If a drive must be mailed, place the drive in a bubble-pack mailer or other suitable protectivepackaging and label the package “FRAGILE.”Avoid exposing a drive to magnetic fields. Security devices with magnetic fields include airportwalk-through devices and security wands. The airport security devices that check carry-onluggage, such as conveyor belts, use x-rays instead of magnetism and will not damage a drive.2 Chapter 2   Handling drives ENWWAntenna House XSL Formatter (Evaluation)  http://www.antennahouse.com/Vista textVista text
3 Optical drivesAn optical drive, such as a DVD-ROM drive, supports optical discs (CDs and DVDs). These discs storeor transport information and play music and movies. DVDs have a higher storage capacity than CDs.Optical drives can read from and select models can write to optical media as described in the followingtable.Optical drivetypeRead CD andDVD-ROMmediaWrite to CD-RW mediaWrite to DVD±RW/R mediaWrite to DVD+RW DL mediaWrite label toLightScribeCD or DVD±RW/RWrite to DVD-RAM mediaDVD-ROMDriveYes No No No No NoDVD±RW/Rand CD-RWCombo DriveYes Yes Yes No No NoDVD±RW/Rand CD-RWCombo Drivewith Double-Layer supportYes Yes Yes Yes No YesLightScribeDVD±RW/Rand CD-RWCombo Drivewith Double-Layer supportYes Yes Yes Yes Yes YesNOTE Some of the optical drives listed may not be supported by your computer. The listed drivesare not necessarily all of the supported optical drives. CAUTION To prevent possible audio and video degradation, loss of information, or loss of audioor video playback functionality, do not initiate Sleep or hibernation while reading or writing to aCD or DVD.ENWW 3Antenna House XSL Formatter (Evaluation)  http://www.antennahouse.com/Vista textIs this correct for Sputnik?
If Sleep or hibernation is accidentally initiated during playback of a disc, you may experience thefollowing behaviors:●Your playback may be interrupted.●You may see the following warning: “Putting the computer into hibernation or standby may stopthe playback. Do you want to continue?” Click No.●You may need to restart the CD or DVD to resume audio and video playback.4 Chapter 3   Optical drives ENWWAntenna House XSL Formatter (Evaluation)  http://www.antennahouse.com/This warning text may change for VistaVista text
Inserting an optical disc1. Turn on the computer.2. Press the release button (1) on the drive bezel to release the media tray.3. Pull out the tray (2).4. Hold the disc by the edges to avoid touching the flat surfaces and position the disc label-side upover the tray spindle.NOTE If the tray is not fully accessible, tilt the disc carefully to position it over the spindle.5. Gently press the disc (3) down onto the tray spindle until the disc snaps into place.6. Close the media tray.NOTE After you insert a disc, a short pause is normal. If you have not selected a media player,an AutoPlay dialog box opens. It prompts you to select how you want to use the media content.ENWW Inserting an optical disc 5Antenna House XSL Formatter (Evaluation)  http://www.antennahouse.com/
Removing an optical disc when running on battery orexternal power1. Press the release button (1) on the drive bezel to release the media tray, and then gently pull outthe tray (2) until it stops.2. Remove the disc (3) from the tray by gently pressing down on the spindle while lifting the outeredges of the disc. Hold the disc by the edges and avoid touching the flat surfaces.NOTE If the tray is not fully accessible, tilt the disc carefully as you remove it.3. Close the media tray and place the disc in a protective case.6 Chapter 3   Optical drives ENWWAntenna House XSL Formatter (Evaluation)  http://www.antennahouse.com/
Removing an optical disc when no computer power isavailable1. Insert the end of a paper clip (1) into the release access in the front bezel of the drive.2. Press in gently on the paper clip until the tray is released, and then pull out the tray (2) until it stops.3. Remove the disc (3) from the tray by gently pressing down on the spindle while lifting the outeredges of the disc. Hold the disc by the edges and avoid touching the flat surfaces.NOTE If the tray is not fully accessible, tilt the disc carefully as you remove it.4. Close the media tray and place the disc in a protective case.ENWW Removing an optical disc when no computer power is available 7Antenna House XSL Formatter (Evaluation)  http://www.antennahouse.com/
4 Improving hard drive performanceUsing Disk DefragmenterAs you use the computer, files on the hard drive become fragmented. Disk Defragmenter consolidatesthe fragmented files and folders on the hard drive so that it can run more efficiently.To run Disk Defragmenter:1. Select Start > All Programs > Accessories > System Tools > Disk Defragmenter.2. Click a volume for the hard drive you want to defragment, usually listed as (C:), and then clickDefragment.For additional information, access the Disk Defragmenter online Help.Using Disk CleanupDisk Cleanup searches the hard drive for unnecessary files that you can safely delete to free up diskspace and help the computer to run more efficiently.To run Disk Cleanup:1. Select Start > All Programs > Accessories > System Tools > Disk Cleanup.2. Follow the on-screen instructions.8 Chapter 4   Improving hard drive performance ENWWAntenna House XSL Formatter (Evaluation)  http://www.antennahouse.com/These two sections may change for Vista
5 Replacing the hard driveCAUTION To prevent information loss or an unresponsive system:Shut down the computer before removing the hard drive from the hard drive bay. Do not removethe hard drive while the computer is on, in the Sleep state, or in hibernation.If you are not sure whether the computer is off or in hibernation, turn the computer on by pressingthe power button. Then shut down the computer through the operating system.NOTE You computer may look slightly different from the illustrations in this chapter.To remove the hard drive:1. Save your work.2. Shut down the computer and close the display.3. Disconnect all external devices connected to the computer.4. Unplug the power cord from the AC outlet.5. Turn the computer upside down on a flat surface.6. Remove the battery from the computer.7. With the hard drive bay toward you, loosen the 2 hard drive cover screws (1).8. Lift the hard drive cover away from the computer (2).ENWW 9Antenna House XSL Formatter (Evaluation)  http://www.antennahouse.com/
9. Remove the 2 hard drive screws (1)10. Pull the hard drive tab up (2), and then lift the hard drive away from the computer.To install a hard drive:1. Insert the hard drive into the hard drive bay.2. Gently press the hard drive down until it snaps into place (1).3. Replace the 2 hard drive screws (2).4. Align the tabs (1) on the hard drive cover with the notches on the computer.5. Close the cover (2).10 Chapter 5   Replacing the hard drive ENWWAntenna House XSL Formatter (Evaluation)  http://www.antennahouse.com/
6. Tighten the hard drive cover screws (3).ENWW 11Antenna House XSL Formatter (Evaluation)  http://www.antennahouse.com/
IndexAairport security devices 2CCDinserting 5removing, with power 6removing, without power 7CD drive 3DDisk Cleanup 8Disk Cleanup software 8Disk Defragmenter 8Disk Defragmenter software 8disk performance 8drivescaring for 2hard 9,  10optical 3See also hard drive, optical driveDVDinserting 5removing, with power 6removing, without power 7DVD drive 3Hhard disk driveinstalling 10removing 9replacing 9hard driveinstalling 10removing 9replacing 9MmaintenanceDisk Cleanup 8Disk Defragmenter 8Ooptical discinserting 5removing, with power 6removing, without power 7optical drive 3SsoftwareDisk Cleanup 8Disk Defragmenter 812 Index ENWWAntenna House XSL Formatter (Evaluation)  http://www.antennahouse.com/
Antenna House XSL Formatter (Evaluation)  http://www.antennahouse.com/
External Media CardsUser GuideAntenna House XSL Formatter (Evaluation)  http://www.antennahouse.com/
© Copyright 2007 Hewlett-PackardDevelopment Company, L.P.SD Logo is a trademark of its proprietor.The information contained herein is subjectto change without notice. The onlywarranties for HP products and services areset forth in the express warranty statementsaccompanying such products and services.Nothing herein should be construed asconstituting an additional warranty. HP shallnot be liable for technical or editorial errorsor omissions contained herein.First Edition: January 2007Document Part Number: 431176-001Antenna House XSL Formatter (Evaluation)  http://www.antennahouse.com/
Table of contents1  Digital Media Slot cardsInserting a digital card .......................................................................................................................... 2Stopping and removing a digital card ................................................................................................... 32  ExpressCardsConfiguring an ExpressCard ................................................................................................................ 4Inserting an ExpressCard ..................................................................................................................... 5Stopping and removing an ExpressCard .............................................................................................. 6Index ..................................................................................................................................................................... 7ENWW iiiAntenna House XSL Formatter (Evaluation)  http://www.antennahouse.com/
iv ENWWAntenna House XSL Formatter (Evaluation)  http://www.antennahouse.com/
1 Digital Media Slot cardsOptional digital cards provide secure data storage and convenient data sharing. These cards are oftenused with digital media–equipped cameras and PDAs as well as with other computers.The Digital Media Slot supports the following digital card formats:●Memory Stick (MS)●Memory Stick Pro (MSP)●MultiMediaCard (MMC)●Secure Digital Input/Output (SD I/O)●Secure Digital (SD) Memory Card●xD-Picture Card (XD)●xD-Picture Card (XD) Type MCAUTION To avoid damaging the digital card or the computer, do not insert any type of adapterinto the Digital Media Slot.ENWW 1Antenna House XSL Formatter (Evaluation)  http://www.antennahouse.com/
Inserting a digital cardCAUTION To prevent damage to the digital card connectors, use minimal force to insert a digitalcard.1. Hold the digital card label-side up, with the connectors facing the computer.2. Gently slide the card into the Digital Media Slot until the card is seated.You will hear a sound when the device has been detected.NOTE The first time you insert a digital card, the "Installing device driver software"message is displayed in the notification area, at the far right of the taskbar.2 Chapter 1   Digital Media Slot cards ENWWAntenna House XSL Formatter (Evaluation)  http://www.antennahouse.com/Vista wording
Stopping and removing a digital cardCAUTION To prevent loss of data or an unresponsive system, stop a digital card beforeremoving it.1. Close all files and applications that are associated with the digital card.NOTE To stop a data transfer, click Cancel in the operating system Copying window.2. Stop the digital card:a. Double-click the Safely Remove Hardware icon in the notification area, at the far right of thetaskbar.NOTE To display the Safely Remove Hardware icon, click the Show Hidden Iconsicon (< or <<) in the notification area.b. Click the digital card listing.c. Click Stop, and then OK.3. Press in on the digital card (1), and then remove the card from the slot (2).ENWW Stopping and removing a digital card 3Antenna House XSL Formatter (Evaluation)  http://www.antennahouse.com/
2 ExpressCardsAn ExpressCard is a next-generation, high-performance PC Card that is inserted into the ExpressCardslot.Like standard PC Cards, ExpressCards are designed to conform to the standard specifications of thePersonal Computer Memory Card International Association (PCMCIA).Configuring an ExpressCardInstall only the software required for your device. If you are instructed by the ExpressCard manufacturerto install device drivers:●Install only the device drivers for your operating system.●Do not install other software, such as card services, socket services, or enablers, supplied by theExpressCard manufacturer.4 Chapter 2   ExpressCards ENWWAntenna House XSL Formatter (Evaluation)  http://www.antennahouse.com/
Inserting an ExpressCardCAUTION To prevent damage to the computer and external media cards, do not insert anExpressCard into a PC Card slot or a PC Card into an ExpressCard slot.CAUTION To prevent damage to the connectors:Use minimal force when inserting an ExpressCard.Do not move or transport the computer when an ExpressCard is in use.The ExpressCard slot may contain a protective insert. The insert must be removed before you can insertan ExpressCard.To release and remove the protective insert:1. Press in on the insert (1) to unlock it.2. Pull the insert out of the slot (2).To insert an ExpressCard:1. Hold the card label-side up, with the connectors facing the computer.2. Gently slide the card into the ExpressCard slot until the card is seated.You will hear a sound when the device has been detected.NOTE The first time you insert an ExpressCard, the “Installing device driver software”message is displayed in the notification area, at the far right of the taskbar.NOTE An inserted ExpressCard uses power even when idle. To conserve power, stop orremove an ExpressCard when it is not in use.ENWW Inserting an ExpressCard 5Antenna House XSL Formatter (Evaluation)  http://www.antennahouse.com/Vista wording
Stopping and removing an ExpressCardCAUTION To prevent loss of data or an unresponsive system, stop an ExpressCard beforeremoving it.1. Close all programs and complete all activities that are associated with the ExpressCard.NOTE To stop a data transfer, click Cancel in the operating system Copying window.2. Stop the ExpressCard:a. Double-click the Safely Remove Hardware icon in the notification area, at the far right of thetaskbar.NOTE To display the Safely Remove Hardware icon, click the Show Hidden Iconsicon (< or <<) in the notification area.b. Click the ExpressCard listing.c. Click Stop, and then OK.3. Release and remove the ExpressCard:a. Gently press in on the ExpressCard (1) to unlock it.b. Pull the ExpressCard out of the slot (2).6 Chapter 2   ExpressCards ENWWAntenna House XSL Formatter (Evaluation)  http://www.antennahouse.com/
IndexCconfiguring ExpressCards 4Ddigital carddefined 1inserting 2removing 3stopping 3EExpressCardconfiguring 4defined 4inserting 5removing 6removing insert 5stopping 6ENWW Index 7Antenna House XSL Formatter (Evaluation)  http://www.antennahouse.com/
Antenna House XSL Formatter (Evaluation)  http://www.antennahouse.com/
External DevicesUser GuideAntenna House XSL Formatter (Evaluation)  http://www.antennahouse.com/
© Copyright 2007 Hewlett-PackardDevelopment Company, L.P.The information contained herein is subjectto change without notice. The onlywarranties for HP products and services areset forth in the express warranty statementsaccompanying such products and services.Nothing herein should be construed asconstituting an additional warranty. HP shallnot be liable for technical or editorial errorsor omissions contained herein.First Edition: January 2007Document Part Number: 431173-001Antenna House XSL Formatter (Evaluation)  http://www.antennahouse.com/
Table of contents1  Using a USB deviceConnecting a USB device .................................................................................................................... 2Stopping a USB device ........................................................................................................................ 22  Using the expansion portIndex ..................................................................................................................................................................... 4ENWW iiiAntenna House XSL Formatter (Evaluation)  http://www.antennahouse.com/
iv ENWWAntenna House XSL Formatter (Evaluation)  http://www.antennahouse.com/
1 Using a USB deviceUniversal Serial Bus (USB) is a hardware interface that connects an optional external device, such asa USB keyboard, mouse, drive, printer, scanner, or hub, to the computer or to an optional expansionproduct or docking device.Some USB devices may require additional support software, which is usually included with the device.For more information about device-specific software, refer to the manufacturer's instructions.The computer has 3 USB ports, which support USB 1.0, USB 1.1, and USB 2.0 devices To add moreUSB ports, attach an optional hub, expansion product, or docking device.ENWW 1Antenna House XSL Formatter (Evaluation)  http://www.antennahouse.com/
Connecting a USB deviceCAUTION To prevent damage to a USB connector, use minimal force to connect a USB device.To connect a USB device to the computer, connect the USB cable for the device to the USB port. Theoperating system will issue a sound to indicate that a device has been detected.NOTE The first time you connect a USB device, the "Installing device driver software" messageis displayed in the notification area, at the far right of the taskbar.Stopping a USB deviceCAUTION To prevent loss of information or an unresponsive system, stop the USB devicebefore removing it.CAUTION To prevent damage to a USB connector, do not pull on the cable to disconnect theUSB device.To stop a USB device:1. Double-click the Safely Remove Hardware icon in the notification area, at the far right of thetaskbar.NOTE To display the Safely Remove Hardware icon, click the Show Hidden Icons icon(< or <<) in the notification area.2. Click the name of the device in the list.NOTE If the USB device is not listed, you do not have to stop the device before you removeit.3. Click Stop, and then click OK.2 Chapter 1   Using a USB device ENWWAntenna House XSL Formatter (Evaluation)  http://www.antennahouse.com/Vista message
2 Using the expansion portThe expansion port connects the computer to an optional expansion product. An optional expansionproduct provides additional ports and connectors that can be used with the computer.ENWW 3Antenna House XSL Formatter (Evaluation)  http://www.antennahouse.com/
IndexCcablesUSB 2Eexpansion port 3Hhubs 1Pportsexpansion 3USB 1UUSB cable, connecting 2USB devicesconnecting 2description 1stopping 2USB hubs 1USB ports, identifying 14 Index ENWWAntenna House XSL Formatter (Evaluation)  http://www.antennahouse.com/
Antenna House XSL Formatter (Evaluation)  http://www.antennahouse.com/
Memory ModulesUser GuideAntenna House XSL Formatter (Evaluation)  http://www.antennahouse.com/
© Copyright 2007 Hewlett-PackardDevelopment Company, L.P.The information contained herein is subjectto change without notice. The onlywarranties for HP products and services areset forth in the express warranty statementsaccompanying such products and services.Nothing herein should be construed asconstituting an additional warranty. HP shallnot be liable for technical or editorial errorsor omissions contained herein.First Edition: January 2007Document Part Number: 431177-001Antenna House XSL Formatter (Evaluation)  http://www.antennahouse.com/
Table of contentsAdding or replacing a memory moduleIndex ..................................................................................................................................................................... 5ENWW iiiAntenna House XSL Formatter (Evaluation)  http://www.antennahouse.com/
iv ENWWAntenna House XSL Formatter (Evaluation)  http://www.antennahouse.com/
Adding or replacing a memory moduleThe computer has one memory module compartment, which is located on the bottom of the computer.The memory capacity of the computer can be upgraded by adding a memory module to the vacantexpansion memory module slot or by upgrading the existing memory module in the primary memorymodule slot.WARNING! To reduce the risk of electric shock and damage to the equipment, unplug thepower cord and remove all batteries before installing a memory module.CAUTION Electrostatic discharge (ESD) can damage electronic components. Beforebeginning any procedure, ensure that you are discharged of static electricity by touching agrounded metal object.To add or replace a memory module:1. Save your work.2. Shut down the computer and close the display.If you are not sure whether the computer is off or in the Sleep state, turn the computer on by pressingthe power button. Then shut down the computer through the operating system.3. Disconnect all external devices connected to the computer.4. Unplug the power cord from the AC outlet.5. Turn the computer upside down on a flat surface.6. Remove the battery from the computer.7. Loosen the 2 memory module compartment screws (1).ENWW 1Antenna House XSL Formatter (Evaluation)  http://www.antennahouse.com/Vista version. If we ship with XP, this will say "in Standby"
8. Lift the memory module compartment cover (2) away from the computer.9. If you are replacing a memory module, remove the existing memory module:a. Pull away the retention clips (1) on each side of the memory module.The memory module tilts up.CAUTION To prevent damage to the memory module, hold the memory module bythe edges only. Do not touch the components on the memory module.b. Grasp the edge of the memory module (2), and gently pull the module out of the memorymodule slot.To protect a memory module after removal, place it in an electrostatic-safe container.2 Adding or replacing a memory module ENWWAntenna House XSL Formatter (Evaluation)  http://www.antennahouse.com/
10. Insert a new memory module:a. Align the notched edge (1) of the memory module with the tab in the memory module slot.CAUTION To prevent damage to the memory module, hold the memory module bythe edges only. Do not touch the components on the memory module.b. With the memory module at a 45-degree angle from the surface of the memory modulecompartment, press the module (2) into the memory module slot until it is seated.c. Gently press the memory module (3) down, applying pressure to both the left and right edgesof the memory module, until the retention clips snap into place.CAUTION To prevent damage to the memory module, be sure that you do not bendthe memory module.11. Align the tabs (1) on the memory module compartment cover with the notches on the computer.12. Close the cover (2).13. Tighten the 2 memory module compartment screws (3).ENWW 3Antenna House XSL Formatter (Evaluation)  http://www.antennahouse.com/
14. Replace the battery.15. Reconnect external power and external devices.16. Turn on the computer.4 Adding or replacing a memory module ENWWAntenna House XSL Formatter (Evaluation)  http://www.antennahouse.com/
IndexMmemoryadding memory modules 1replacing memory modules 1upgrading memory modules 1memory moduleadding 1inserting 3removing 2replacing 1upgrading 1memory module compartmentcoverremoving 2replacing 3ENWW Index 5Antenna House XSL Formatter (Evaluation)  http://www.antennahouse.com/
Antenna House XSL Formatter (Evaluation)  http://www.antennahouse.com/
MultimediaUser GuideAntenna House XSL Formatter (Evaluation)  http://www.antennahouse.com/
© Copyright 2007 Hewlett-PackardDevelopment Company, L.P.Microsoft and Windows are U.S. registeredtrademarks of Microsoft Corporation.The information contained herein is subjectto change without notice. The onlywarranties for HP products and services areset forth in the express warranty statementsaccompanying such products and services.Nothing herein should be construed asconstituting an additional warranty. HP shallnot be liable for technical or editorial errorsor omissions contained herein.First Edition: January 2007Document Part Number: 431178-001Antenna House XSL Formatter (Evaluation)  http://www.antennahouse.com/
Table of contents1  Using multimedia hardwareUsing the audio features ...................................................................................................................... 1Using the audio-in (microphone) jack .................................................................................. 2Using the audio-out (headphone) jack ................................................................................. 2Using S/PDIF digital audio (select models only) .................................................................. 2Adjusting the volume ........................................................................................................... 3Using the QuickPlay buttons ................................................................................................................ 4Media button ........................................................................................................................ 4DVD button .......................................................................................................................... 5Using the video features ....................................................................................................................... 6Using the external monitor port ............................................................................................ 6Using the S-Video-out jack .................................................................................................. 7Using the camera  ................................................................................................................................ 8Capturing and streaming video ............................................................................................ 9Capturing video ................................................................................................... 9Streaming video with an instant message program ............................................ 9Taking still photographs with the integrated camera ......................................................... 10Adjusting camera properties .............................................................................................. 10Using an optical drive  ........................................................................................................................ 12Identifying the installed optical drive .................................................................................. 12Inserting an optical disc ..................................................................................................... 12Removing an optical disc when running on battery or external power .............................. 13Removing an optical disc when no computer power is available ....................................... 14Using the media activity functions ...................................................................................................... 15Using the media activity hotkeys ....................................................................................... 15Using the media activity buttons ........................................................................................ 16Previous/rewind button ...................................................................................... 16Play/pause button ............................................................................................. 16Next/fast forward button .................................................................................... 17Stop button ........................................................................................................ 172  Working with multimedia softwareOpening preinstalled multimedia software ......................................................................................... 19Installing multimedia software from a disc .......................................................................................... 19Using multimedia software ................................................................................................................. 19Preventing playback disruptions ......................................................................................................... 20Changing DVD region settings ........................................................................................................... 21Observing the copyright warning ........................................................................................................ 21ENWW iiiAntenna House XSL Formatter (Evaluation)  http://www.antennahouse.com/
Index ................................................................................................................................................................... 22iv ENWWAntenna House XSL Formatter (Evaluation)  http://www.antennahouse.com/
1 Using multimedia hardwareUsing the audio featuresThe following illustration and table describe the audio features of the computer.Component Description(1) Internal microphones (2) Record sound.NOTE A microphone icon next to the microphoneopening indicates that the computer has an internalmicrophone.(2) Speakers (2) Produce sound.(3) Audio-in (microphone) jack Connects an optional computer headset microphone, stereo arraymicrophone, or monaural microphone.(4) Audio-out (headphone) jack Connects optional powered stereo speakers, headphones, earbuds, a headset, or television audio. (5) Audio-out (headphone) S/PDIF jack Provides enhanced audio performance, including surround soundand other high-end audio output.ENWW Using the audio features 1Antenna House XSL Formatter (Evaluation)  http://www.antennahouse.com/
Using the audio-in (microphone) jackThe computer is equipped with a stereo (dual-channel) microphone jack that supports an optional stereoarray or monaural microphone. Using sound recording software with external microphones allows forstereo recordings.When connecting a microphone to the microphone jack, use a microphone with a 3.5-mm plug.Using the audio-out (headphone) jackWARNING! To reduce the risk of personal injury, adjust the volume before putting onheadphones, earbuds, or a headset.CAUTION To prevent possible damage to an external device, do not plug a single soundchannel (monaural) connector into the headphone jack.In addition to connecting headphones, the headphone jack is used to connect the audio input functionof an audio/video device such as a television or VCR. When connecting a device to the headphone jack, use only a 3.5-mm stereo plug.When a device is connected to the headphone jack, the speakers are disabled.Using S/PDIF digital audio (select models only)S/PDIF (Sony/Phillips Digital Interface) or digital audio provides enhanced audio performance, includingsurround sound and other high-end audio output.For digital audio connections, connect the S/PDIF digital audio plug to the digital audio connector onyour audio/video equipment.NOTE In order to use S/PDIF with the headphone jack, you will need an optional mini TOS linkcable and/or adapter.2 Chapter 1   Using multimedia hardware ENWWAntenna House XSL Formatter (Evaluation)  http://www.antennahouse.com/
Adjusting the volumeYou can adjust the volume using the following controls:●Computer volume buttons:●To decrease volume, press the volume down button (1).●To mute or restore volume, press the mute button (2).●To increase volume, press the volume up button (3).●Microsoft® Windows® volume control:a. Click the Volume icon in the notification area, at the far right of the taskbar.b. Increase or decrease the volume by moving the slider up or down. Select the Mute check boxto mute the volume.– or –a. Double-click the Volume icon in the notification area.b. In the Master Volume column, increase or decrease the volume by moving the Volume sliderup or down. You can also adjust the balance or mute the volume.If the Volume icon is not displayed in the notification area, follow these steps to add it:a. Select Start > Control Panel > Sounds, Speech, and Audio Devices > Sounds and AudioDevices.b. Click the Volume tab.c. Select the Place volume icon in the taskbar check box.d. Click Apply.●Program volume control:Volume can also be adjusted within some programs.ENWW Using the audio features 3Antenna House XSL Formatter (Evaluation)  http://www.antennahouse.com/May change with Vista
Using the QuickPlay buttonsMedia button and DVD button functions vary, depending on the software installed on your computer.The media button (1) and the DVD button (2) allow you to listen to music, play DVDs, and watch movieswith the touch of a button.Media buttonComputer power state Media button functionOn or off Opens a music program or the Media menu so that you canselect a multimedia program.NOTE Press the power button to exit theprogram.Standby Exits standby.4 Chapter 1   Using multimedia hardware ENWWAntenna House XSL Formatter (Evaluation)  http://www.antennahouse.com/Will change to "Sleep" with Vista
DVD buttonComputer power state DVD button functionOn Opens the default DVD program so that you can play a DVDin the optical drive.NOTE Press the power button to exit theprogram.Off Opens QuickPlay so that you can play a DVD in the opticaldrive.NOTE Press the power button to exit QuickPlay.Standby Exits standby.ENWW Using the QuickPlay buttons 5Antenna House XSL Formatter (Evaluation)  http://www.antennahouse.com/Will change to "Sleep" with Vista
Using the video featuresUsing the external monitor portThe external monitor port connects an external display device, such as a television, an external monitor,or a projector, to the computer.To connect a display device, connect the device cable to the external monitor port.NOTE If a properly connected external display device does not display an image, press fn+f4to transfer the image to the device.6 Chapter 1   Using multimedia hardware ENWWAntenna House XSL Formatter (Evaluation)  http://www.antennahouse.com/
Using the S-Video-out jackThe 7-pin S-Video-out jack connects the computer to an optional S-Video device such as a television,VCR, camcorder, overhead projector, or video capture card.To transmit video signals through the S-Video-out jack, you need an S-Video cable, available from mostelectronics retailers. If you are combining audio and video functions, such as playing a DVD movie onyour computer and displaying it on your television, you also need a standard audio cable, available frommost electronics retailers, to connect to the headphone jack.The computer can support one S-Video device connected to the S-Video-out jack, while simultaneouslysupporting an image on the computer display or on any other supported external display.NOTE The S-Video connection provides a higher quality image than a composite-videoconnection.To connect a video device to the S-Video-out jack:1. Plug one end of the S-Video cable into the S-Video-out jack on the computer.NOTE If the S-Video-out jack on the computer is not accessible because the computer isdocked in an optional docking device, connect the S-Video cable to the S-Video-out jack onthe docking device.2. Plug the other end of the cable into the video device, as instructed in the user guide included withthe device.3. Press the fn+f4 keys to switch the image between display devices connected to the computer.ENWW Using the video features 7Antenna House XSL Formatter (Evaluation)  http://www.antennahouse.com/
Using the camera Select computer models include an integrated camera, located on the top of the display. The cameracan be used with a variety of software for the following functions:●Capturing video.●Streaming video with instant message software.●Taking still photos.The camera light (1) turns on when video software accesses the camera (2).For optimum performance, observe the following guidelines while using the integrated camera:●Be sure that you have the latest version of an instant message program before attempting a videoconversation.●Your integrated camera may not work properly across some network firewalls. If you are havingtrouble viewing or sending video to someone on another LAN or outside your network firewall,contact your network administrator for assistance.●Whenever possible, place bright light sources behind the camera and out of the picture area.8 Chapter 1   Using multimedia hardware ENWWAntenna House XSL Formatter (Evaluation)  http://www.antennahouse.com/
Capturing and streaming videoTo illustrate how each camera feature works, the following examples use specific software, not availableon all computers. Select Start > All Programs to locate the video software installed on your computer,and refer to the individual program's online Help for further information.Capturing videoYou can capture video for playback at a later time. The following example uses MovieMaker software:1. Select Start > Programs > Windows MovieMaker.2. Click Capture from Video Device. The Video Capture Wizard opens.3. Click the listing for the integrated camera from the list of available devices.4. Check the microphone and camera settings, and adjust if necessary.5. Click Next.6. Select the file name and path where you want to save the video file, and then click Next.7. Select the video settings, and then click Next.8. Click Start Capture. When you finish recording, click Stop Capture.9. Click Finish to save the video file and close the wizard.Streaming video with an instant message programYou can send real-time video through an instant message program. The following example usesWindows Messenger:1. Open Windows Messenger by double-clicking the icon in the notification area, at the far right of thetaskbar.2. Sign in to Windows Messenger.3. Select Actions > Voice/Video > Start a Video Conversation.4. Click the name of the person you want to connect with, and then click OK. An instant messagewindow is displayed, and the camera image is displayed next to the message area.5. If the Audio and Video Tuning Wizard opens, follow the instructions to adjust your camera andmicrophone settings.ENWW Using the camera 9Antenna House XSL Formatter (Evaluation)  http://www.antennahouse.com/
Taking still photographs with the integrated camera1. Select Start > Control Panel > Scanners and Cameras.2. Double-click the listing for the integrated camera, and then click Next.3. Click Take Picture.4. Follow the directions on the Picture wizard to select any of the following options:●Publish the pictures to a Web site.●Order prints of the pictures.●Save the pictures on your computer.Adjusting camera propertiesYou can adjust the following camera properties:●Brightness—Controls the amount of light that is incorporated into the image. A higher brightnesssetting creates a brighter image; a lower brightness setting creates a darker image.●Contrast—Controls the difference between lighter and darker areas on the image. A higher contrastsetting intensifies the image; a lower contrast setting maintains more of the original information’sdynamic range but leads to a flatter image.●Hue—Controls the aspect of color that distinguishes it from another color (what makes a color red,green, or blue). Hue is distinct from saturation, which measures the intensity of the hue.●Saturation—Controls the strength of color in the final image. A higher saturation setting creates abolder image; a lower saturation setting creates a more subtle image.●Sharpness—Controls the definition of edges in an image. A higher sharpness setting creates amore defined image; a lower sharpness setting creates a softer image.●Gamma—Controls the contrast affecting the mid-level grays or midtones of an image. Adjustingthe gamma of an image allows you to change brightness values of the middle range of gray toneswithout dramatically altering the shadows and highlights. A lower Gamma setting makes greys lookblack, and makes dark colors even darker.●White Balance—Controls the color temperature of the dominant light sources. This enables whiteobjects in the image to appear truly white. The white balance settings in the Properties dialog boxare displayed as WB (Red) and WB (Blue). A higher white balance setting increases theconcentration of the color (red or blue); a lower white balance setting decreases the concentrationof the selected color.●Exposure—Controls the relative amount of light that enters the camera sensor. A higher exposuresetting allows more light; a lower exposure setting allows less light.●Gain—Controls the intensity range, thus altering the color contrast of the image. A higher gainsetting stretches the intensity range; a lower gain setting shrinks the intensity.●Light Source—Controls the settings to adjust the camera exposure for the ambient light.●Flip—Reverses the captured image vertically.●Mirror—Reverses the captured image horizontally.10 Chapter 1   Using multimedia hardware ENWWAntenna House XSL Formatter (Evaluation)  http://www.antennahouse.com/
●Privacy—Turns off the capture function.●Low Light—Lowers the frame rate automatically in a poor lighting environment to maintain thebrightness of the captured image.The Properties dialog box is accessible from various programs that use the integrated camera, usuallyfrom a configuration, settings, or properties menu.ENWW Using the camera 11Antenna House XSL Formatter (Evaluation)  http://www.antennahouse.com/
Using an optical driveDepending on the type of optical drive and software installed in your computer, the optical drive plays,copies, and creates CDs or DVDs.Identifying the installed optical driveSelect Start > My Computer.The type of optical drive installed in the computer is displayed under Devices with RemovableStorage.Inserting an optical disc1. Turn on the computer.2. Press the release button (1) on the drive bezel to release the media tray.3. Pull out the tray (2).4. Hold the disc by the edges to avoid touching the flat surfaces and position the disc label-side upover the tray spindle.NOTE If the tray is not fully accessible, tilt the disc carefully to position it over the spindle.5. Gently press the disc (3) down onto the tray spindle until the disc snaps into place.6. Close the media tray.NOTE After you insert a disc, a short pause is normal. If you have not selected a media player,an AutoPlay dialog box opens. It prompts you to select how you want to use the media content.12 Chapter 1   Using multimedia hardware ENWWAntenna House XSL Formatter (Evaluation)  http://www.antennahouse.com/
Removing an optical disc when running on battery or externalpower1. Press the release button (1) on the drive bezel to release the media tray, and then gently pull outthe tray (2) until it stops.2. Remove the disc (3) from the tray by gently pressing down on the spindle while lifting the outeredges of the disc. Hold the disc by the edges and avoid touching the flat surfaces.NOTE If the tray is not fully accessible, tilt the disc carefully as you remove it.3. Close the media tray and place the disc in a protective case.ENWW Using an optical drive 13Antenna House XSL Formatter (Evaluation)  http://www.antennahouse.com/
Removing an optical disc when no computer power is available1. Insert the end of a paper clip (1) into the release access in the front bezel of the drive.2. Press in gently on the paper clip until the tray is released, and then pull out the tray (2) until it stops.3. Remove the disc (3) from the tray by gently pressing down on the spindle while lifting the outeredges of the disc. Hold the disc by the edges and avoid touching the flat surfaces.NOTE If the tray is not fully accessible, tilt the disc carefully as you remove it.4. Close the media tray and place the disc in a protective case.14 Chapter 1   Using multimedia hardware ENWWAntenna House XSL Formatter (Evaluation)  http://www.antennahouse.com/
Using the media activity functionsThe media activity hotkeys and the media activity buttons (select models only) control the play of anaudio CD or a DVD that is inserted into the optical drive.Using the media activity hotkeysA media activity hotkey is a combination of the fn key (1) and a function key.NOTE To control the play of a video disc, use the media activity controls in your video discplayer program.●To play, pause, or resume an audio CD or a DVD, press fn+f9 (2).●To stop an audio CD or a DVD that is playing, press fn+f10 (3).●To play the previous track of an audio CD or the previous chapter of a DVD that is playing,press fn+f11 (4).●To play the next track of an audio CD or the next chapter of a DVD that is playing, press fn+f12(5).ENWW Using the media activity functions 15Antenna House XSL Formatter (Evaluation)  http://www.antennahouse.com/
Using the media activity buttonsThe following illustration and tables describe the functions of the media activity buttons when a disc isinserted in the optical drive.●Previous/rewind button (1)●Play/pause button (2)●Next/fast forward button (3)●Stop button (4)Previous/rewind buttonDisc status Button FunctionPlaying Previous/rewind button Plays a previous track.Playing fn + previous/rewind button Rewinds the playback.Play/pause buttonDisc status Button FunctionNot playing Play/pause button Plays the disc.Playing Play/pause button Pauses the playback.16 Chapter 1   Using multimedia hardware ENWWAntenna House XSL Formatter (Evaluation)  http://www.antennahouse.com/
Next/fast forward buttonDisc status Button FunctionPlaying Next/fast forward button Plays the next track or chapter.Playing fn + next/fast forward button Fast forwards the playback.Stop buttonDisc status Button FunctionPlaying Stop button Stops the playback.ENWW Using the media activity functions 17Antenna House XSL Formatter (Evaluation)  http://www.antennahouse.com/
2 Working with multimedia softwareThe computer includes preinstalled multimedia software. Some computer models also include additionalmultimedia software on an optical disc.Depending on the hardware and software included with the computer, the following multimedia tasksmay be supported:●Playing digital media, including audio and video CDs, audio and video DVDs, and Internet radio●Creating or copying data CDs●Creating, editing, and burning audio CDs●Creating, editing, and burning a video or movie to a DVD or video CDCAUTION To prevent loss of information or damage to a disc:Before writing to a disc, connect the computer to a reliable external power source. Do not writeto a disc while the computer is running on battery power.Before writing to a disc, close all open programs except the disc software you are using.Do not copy directly from a source disc to a destination disc or from a network drive to adestination disc. Instead, copy from a source disc or network drive to your hard drive, and thencopy from your hard drive to the destination disc.Do not use the computer keyboard or move the computer while the computer is writing to a disc.The write process is sensitive to vibration.NOTE For information about using software included with the computer, refer to the softwaremanufacturer's instructions that may be provided on disc, as online Help files, or on the softwaremanufacturer's Web site.18 Chapter 2   Working with multimedia software ENWWAntenna House XSL Formatter (Evaluation)  http://www.antennahouse.com/
Opening preinstalled multimedia software1. Select Start > All Programs.2. Double-click the program that you want to open.Installing multimedia software from a disc1. Insert the disc into your optical drive.2. When the installation wizard opens, follow the on-screen instructions.3. Restart the computer if prompted to do so.Using multimedia software1. Select Start > All Programs, and then open the multimedia program you want to use. For example,if you want to use Windows Media Player to play an audio CD, click Windows Media Player.NOTE Some programs may be located in subfolders.2. Insert the media disc, such as an audio CD, into the optical drive.3. Follow the instructions on the screen.– or –1. Insert the media disc, such as an audio CD, into the optical drive.An AutoPlay dialog box opens.2. Click a multimedia task from the list of tasks.NOTE The AutoPlay dialog box allows you to select a multimedia program for the mediadisc. After you select a program from the list, click the Always do the selected action box.3. Click OK.ENWW Opening preinstalled multimedia software 19Antenna House XSL Formatter (Evaluation)  http://www.antennahouse.com/
Preventing playback disruptionsTo reduce the possibility of playback disruption:●Save your work and close all open programs before playing a CD or a DVD.●Do not connect or disconnect hardware while playing a disc.Do not initiate standby or hibernation while playing a disc. Otherwise, you may see the warning message“Putting the computer into hibernation or standby might stop the playback. Do you want to continue?”If this message is displayed, click No. After you click No:●Playback may resume.– or –●Playback may stop and the screen may clear. To return to playing the CD or DVD, press the powerbutton and then restart the disc.20 Chapter 2   Working with multimedia software ENWWAntenna House XSL Formatter (Evaluation)  http://www.antennahouse.com/
Changing DVD region settingsMost DVDs that contain copyrighted files also contain region codes. The region codes help protectcopyrights internationally.You can play a DVD containing a region code only if the region code on the DVD matches the regionsetting on your DVD drive.CAUTION The region settings on your DVD drive can be changed only 5 times.The region setting you select the fifth time becomes the permanent region setting on the DVDdrive.The number of allowable region changes remaining on the drive is displayed in the Changesremaining box on the DVD Region tab. The number in the field includes the fifth and permanentchange.To change settings through the operating system:1. Select Start > My Computer.2. Right-click in the window and select Properties > Hardware tab > Device Manager.3. Click DVD/CD-ROM drives, right-click the DVD drive for which you want to change region settings,and then click Properties.4. Make the desired changes on the DVD Region tab.5. Click OK.Observing the copyright warningIt is a criminal offense, under applicable copyright laws, to make unauthorized copies of copyright-protected material, including computer programs, films, broadcasts, and sound recordings. Do not usethis computer for such purposes.ENWW Changing DVD region settings 21Antenna House XSL Formatter (Evaluation)  http://www.antennahouse.com/
IndexAaudio features 1audio-in (microphone) jack 1,  2audio-out (headphone) jack 1,  2BbuttonsDVD 4Media 4next/fast forward 16play/pause 16previous/rewind 16stop 16volume mute 3Ccameracapturing video 9identifying 8properties 10taking still photographs 10CDinserting 12playing 20protecting 18removing, with power 13removing, without power 14writing to 18copyright warning 21DDVDchanging region setting 21inserting 12playing 20protecting 18removing, with power 13removing, without power 14writing to 18DVD button 4DVD region settings 21Eearbuds 1external monitor port 6Hheadphones 1Jjackaudio-in (microphone) 1audio-out (headphone) 1jacksaudio-in (microphone) 2audio-out (headphone) 2S-Video-out 7Mmedia activity buttons 16media activity hotkeys 15Media button 4microphones, supported 2monitor, connecting 6multimedia softwaredescribed 18using 19mute button 3Ooptical discinserting 12removing, with power 13removing, without power 14writing to 18optical driveplaying 20protecting 18Pportsexternal monitor 6programsmultimedia 18using 19projector, connecting 6protecting playback 20QQuickPlay 4QuickPlay buttons 4Rregion codes, DVD 21SS-Video-out jack 7S/PDIF digital audio 2softwaremultimedia 18using 19speakers 1TTV 2VVCR 2volume mute button 3volume, adjusting 322 Index ENWWAntenna House XSL Formatter (Evaluation)  http://www.antennahouse.com/
Antenna House XSL Formatter (Evaluation)  http://www.antennahouse.com/
Notebook TourUser GuideAntenna House XSL Formatter (Evaluation)  http://www.antennahouse.com/
© Copyright 2007 Hewlett-PackardDevelopment Company, L.P.Microsoft and Windows are U.S. registeredtrademarks of Microsoft Corporation.Bluetooth is a trademark owned by itsproprietor and used by Hewlett-PackardCompany under license. SD Logo is atrademark of its proprietor.The information contained herein is subjectto change without notice. The onlywarranties for HP products and services areset forth in the express warranty statementsaccompanying such products and services.Nothing herein should be construed asconstituting an additional warranty. HP shallnot be liable for technical or editorial errorsor omissions contained herein.First Edition: January 2007Document Part Number: 431179-001Antenna House XSL Formatter (Evaluation)  http://www.antennahouse.com/
Table of contents1  Identifying Hardware2  Top componentsTouchPad ............................................................................................................................................. 2Keys ..................................................................................................................................................... 3Hotkey quick reference ......................................................................................................................... 43  DisplayDisplay components ............................................................................................................................. 5Quick Launch buttons ........................................................................................................................... 6Media buttons ....................................................................................................................................... 7Display lights ........................................................................................................................................ 8Wireless antennae (select models only) ............................................................................................... 9WWAN antenna  ................................................................................................................................. 104  Front components5  Rear components6  Right-side components7  Left-side components8  Bottom components9  Additional hardware components10  LabelsIndex ................................................................................................................................................................... 20ENWW iiiAntenna House XSL Formatter (Evaluation)  http://www.antennahouse.com/
iv ENWWAntenna House XSL Formatter (Evaluation)  http://www.antennahouse.com/
1 Identifying HardwareTo see a list of hardware installed in the computer:1. Select Start > Computer > Properties.2. In the left pane, click Hardware and Device Settings.3. In the Windows Security dialog box, click Allow.4. Select Hardware tab > Device Manager.You can also add hardware or modify device configurations using Device Manager.ENWW 1Antenna House XSL Formatter (Evaluation)  http://www.antennahouse.com/
2 Top componentsTouchPadComponent Description(1) TouchPad light Blue: TouchPad is enabled.Amber: TouchPad is disabled.(2) TouchPad* Moves the pointer and selects or activates items on the screen.(3) Left TouchPad button* Functions like the left button on an external mouse.(4) Right TouchPad button* Functions like the right button on an external mouse.(5) TouchPad scroll zone* Scrolls up or down.(6) TouchPad on/off button Enables/disables the TouchPad.*This table describes factory settings. To view and change pointing device preferences, select Start > Control Panel >Hardware and Sound > Mouse. In the Windows Security dialog box, click Allow.2 Chapter 2   Top components ENWWAntenna House XSL Formatter (Evaluation)  http://www.antennahouse.com/
KeysComponent Description(1) esc key Displays system information when pressed in combination withthe fn key.(2) fn key Executes frequently used system functions when pressed incombination with a function key or the esc key.(3) Windows logo key Displays the Microsoft Windows Start menu.(4) Windows applications key Displays a shortcut menu for items beneath the pointer.(5) Embedded numeric keypad keys Can be used like the keys on an external numeric keypad.(6) Function keys Execute frequently used system functions when pressed incombination with the fn key.ENWW Keys 3Antenna House XSL Formatter (Evaluation)  http://www.antennahouse.com/
Hotkey quick referenceTo perform this function PressDisplay information. fn+escClear system information. fn+esc or press enterOpen the Help and Support Center. fn+f1Open the Print Options window. fn+f2Open a Web browser. fn+f3Alternate between computer display and external display. fn+f4Initiate the Sleep state. fn+f5Initiate QuickLock. fn+f6Decrease screen brightness. fn+f7Increase screen brightness. fn+f8Play, pause, or resume an audio CD or a DVD. fn+f9Stop an audio CD or a DVD. fn+f10Play the previous track or section on an audio CD or a DVD. fn+f11Play the next track on an audio CD or a DVD. fn+124 Chapter 2   Top components ENWWAntenna House XSL Formatter (Evaluation)  http://www.antennahouse.com/
3DisplayDisplay componentsComponent Description(1) Rotating hinge Swivels the display and converts the computer from notebookmode into tablet PC mode or vice versa.(2) Internal display switch Turns off the display if the display is closed while the computer isturned on.(3) Fingerprint reader Allows a fingerprint logon to Windows, instead of a password logon.(4) Integrated camera (select models only) Records video and captures still photographs.(5) Display release latch Opens the computer.ENWW Display components 5Antenna House XSL Formatter (Evaluation)  http://www.antennahouse.com/
Quick Launch buttonsComponent Description(1) Rotate button Switches the image between landscape and portrait orientation.(2) Mobility Center button Press to open Mobility Center.(3) Media button When the computer is●On, the media button opens the music program or Mediamenu, allowing you to select a multimedia program.●Off, the media button opens the music program or the Mediamenu, allowing you to select a multimedia program.●In the Sleep state, the media button resumes from Sleep intoWindows.(4) DVD button When the computer is●On, the DVD button opens the default DVD program to starta DVD in the optical drive.●Off, the DVD button opens QuickPlay to start a DVD in theoptical drive. If the QuickPlay software is not installed, thecomputer starts in Windows.●In Hibernation, opens QuickPlay to start a DVD in the opticaldrive. If the QuickPlay software is not installed, the computerresumes from Hibernation.NOTE Refer to the QuickPlay online Help for details onusing QuickPlay.6 Chapter 3   Display ENWWAntenna House XSL Formatter (Evaluation)  http://www.antennahouse.com/
Media buttonsComponent Description(1) Previous/rewind button When a disc is playing in the optical drive:●Press to play the previous track or chapter.●Press fn+ this button to rewind.(2) Play/pause button When a disc is in the optical drive and is●Not playing, press to play the disc.●Playing, press to pause the disc.(3) Next/fast forward button When a disc is playing in the optical drive:●Press once to play the next track or chapter.●Press fn+ this button to fast forward.(4) Stop button When a disc is playing in the optical drive, press to stop the currentdisc activity.ENWW Media buttons 7Antenna House XSL Formatter (Evaluation)  http://www.antennahouse.com/
Display lightsComponent Description(1) Power light* ●On: The computer is on.●Blinking: The computer is in the Sleep state.●Off: The computer is off or in Hibernation.(2) Battery light ●On: A battery is charging.●Blinking: A battery that is the only available power source hasreached a low-battery condition. When the battery reachesa critical low-battery condition, the battery light begins blinkingrapidly.●Off: If the computer is plugged into an external power source,the light is turned off when all batteries in the computer arefully charged. If the computer is not plugged into an externalpower source, the light stays off until the battery reaches alow-battery condition.(3) Drive light Blinking: The hard drive or optical drive is being accessed.(4) Rotate button light On: The image is in landscape mode. [PLEASE VERIFY](5) 
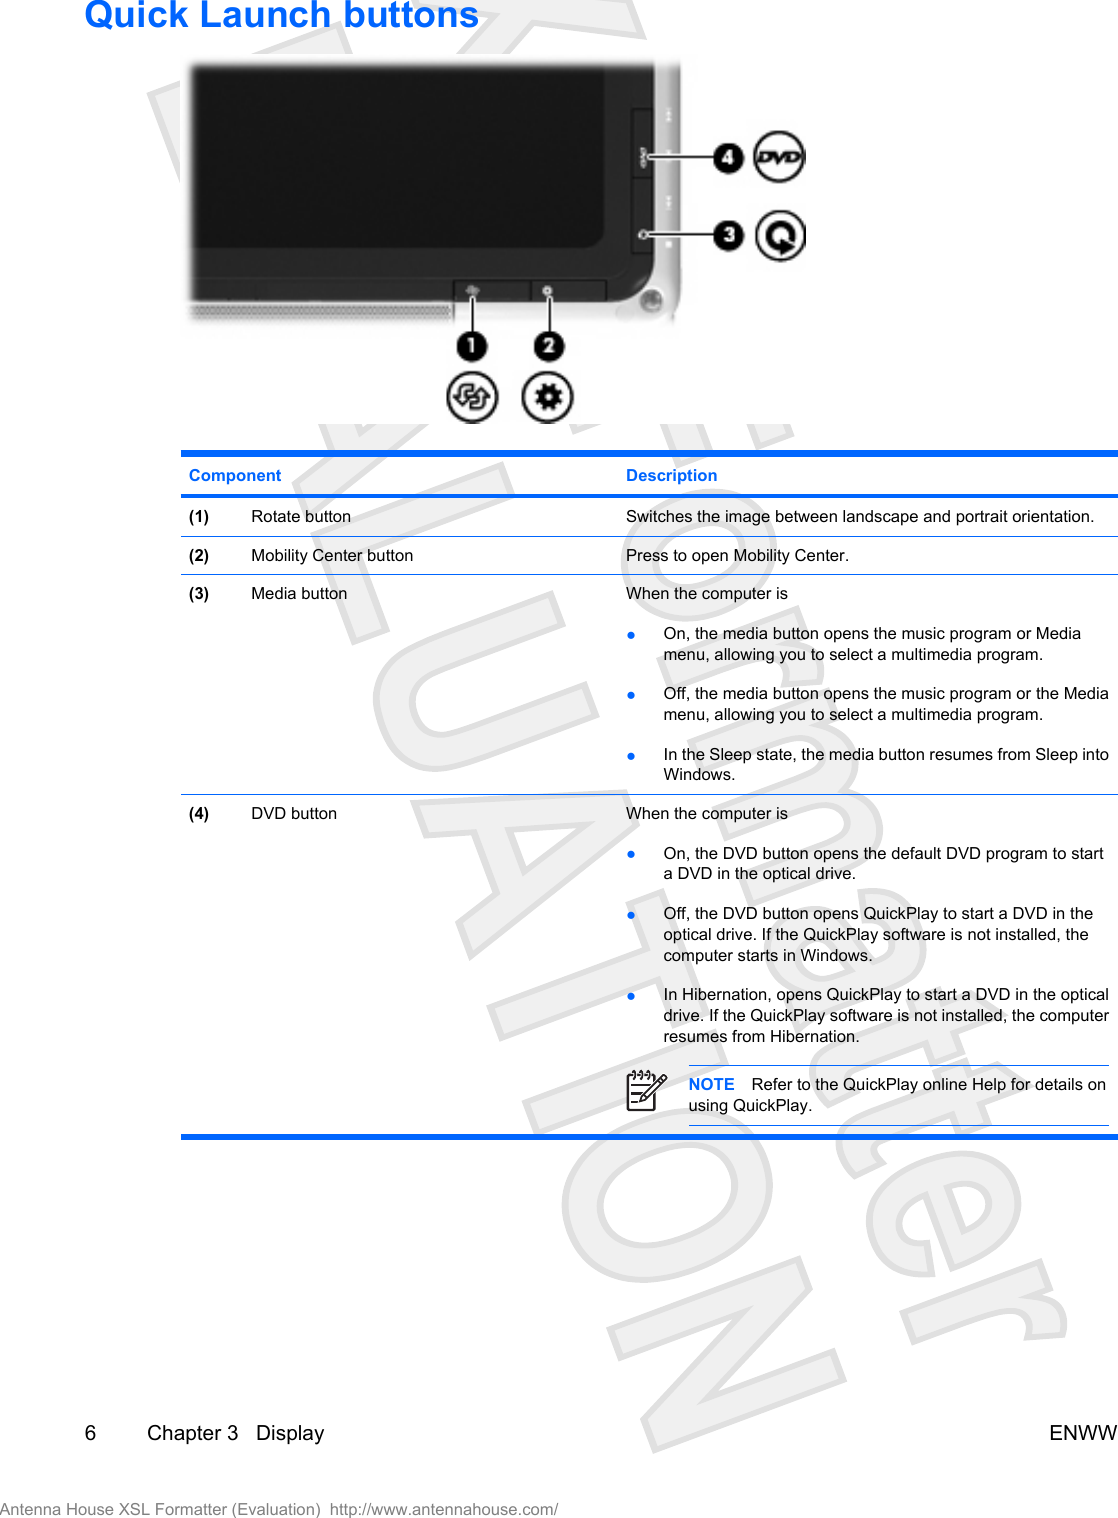
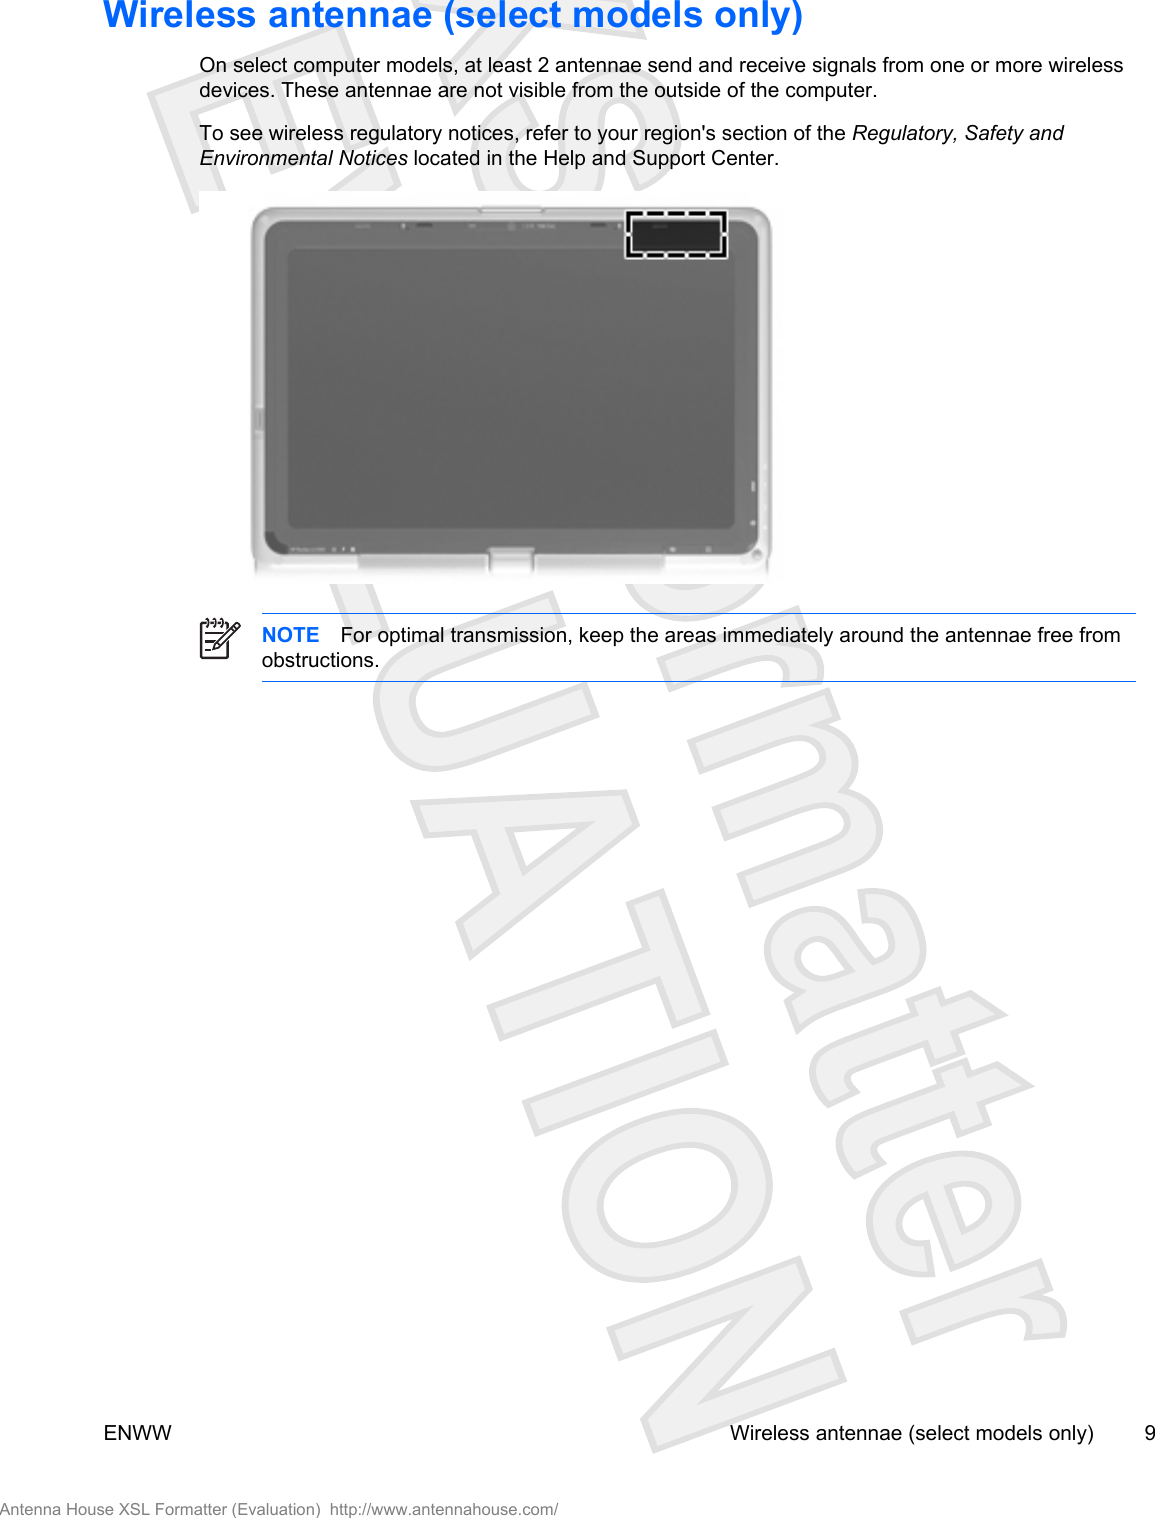
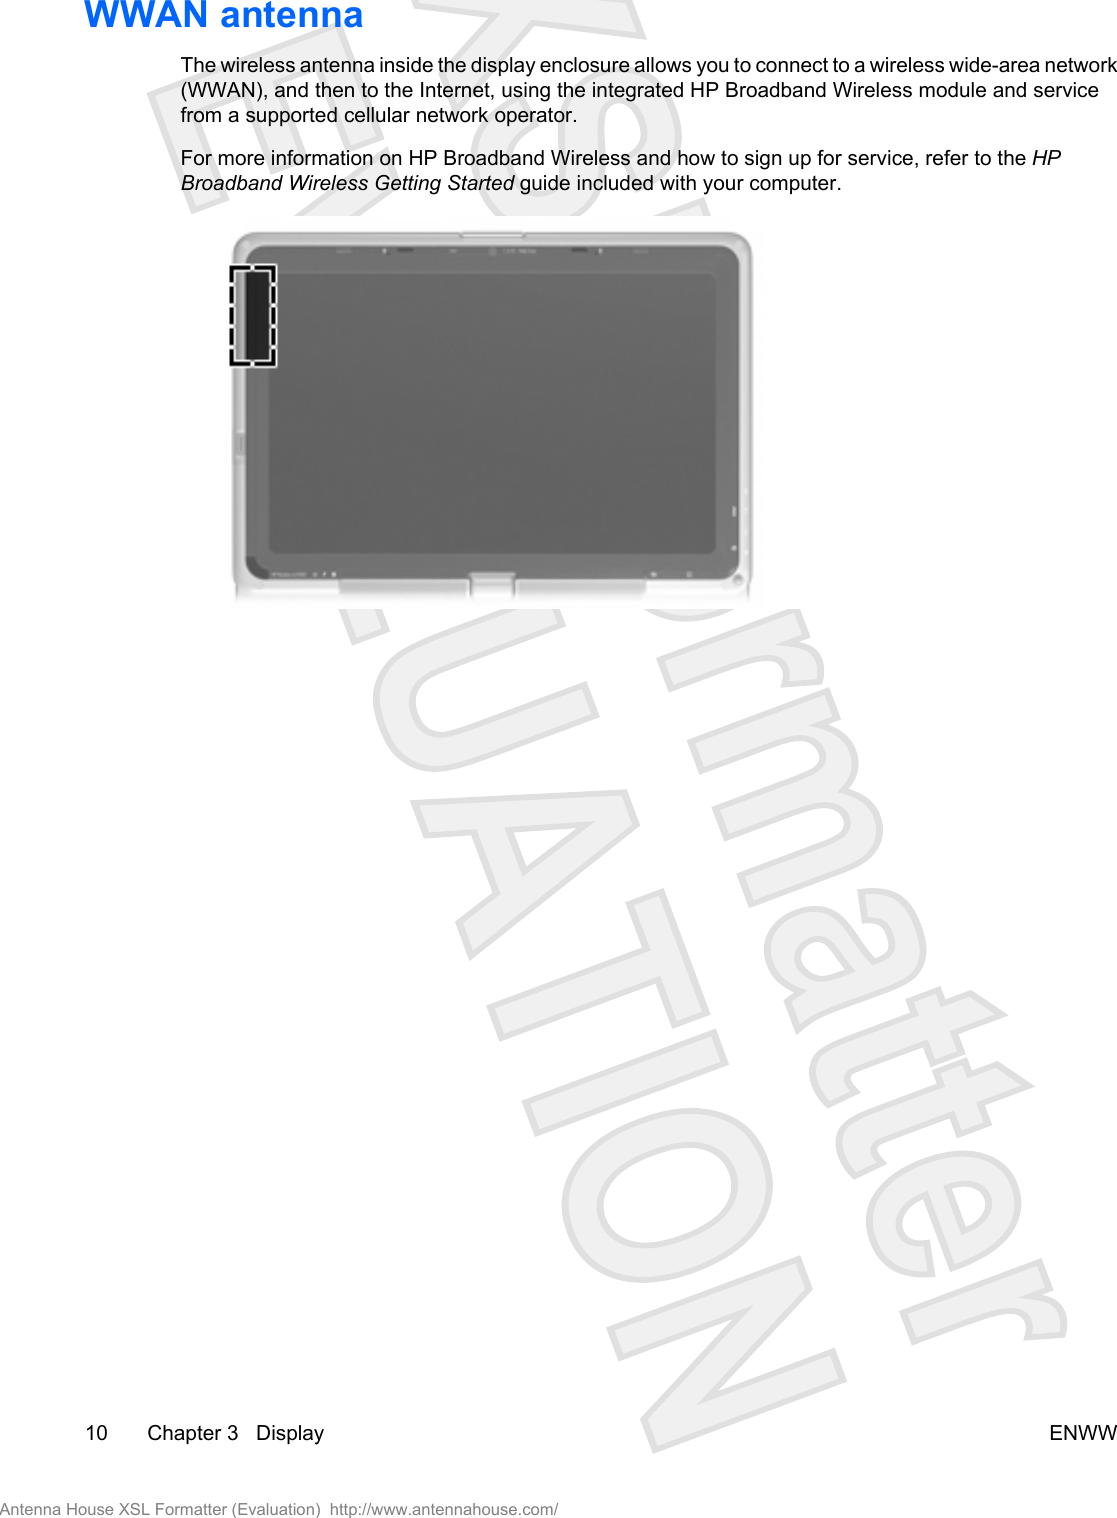
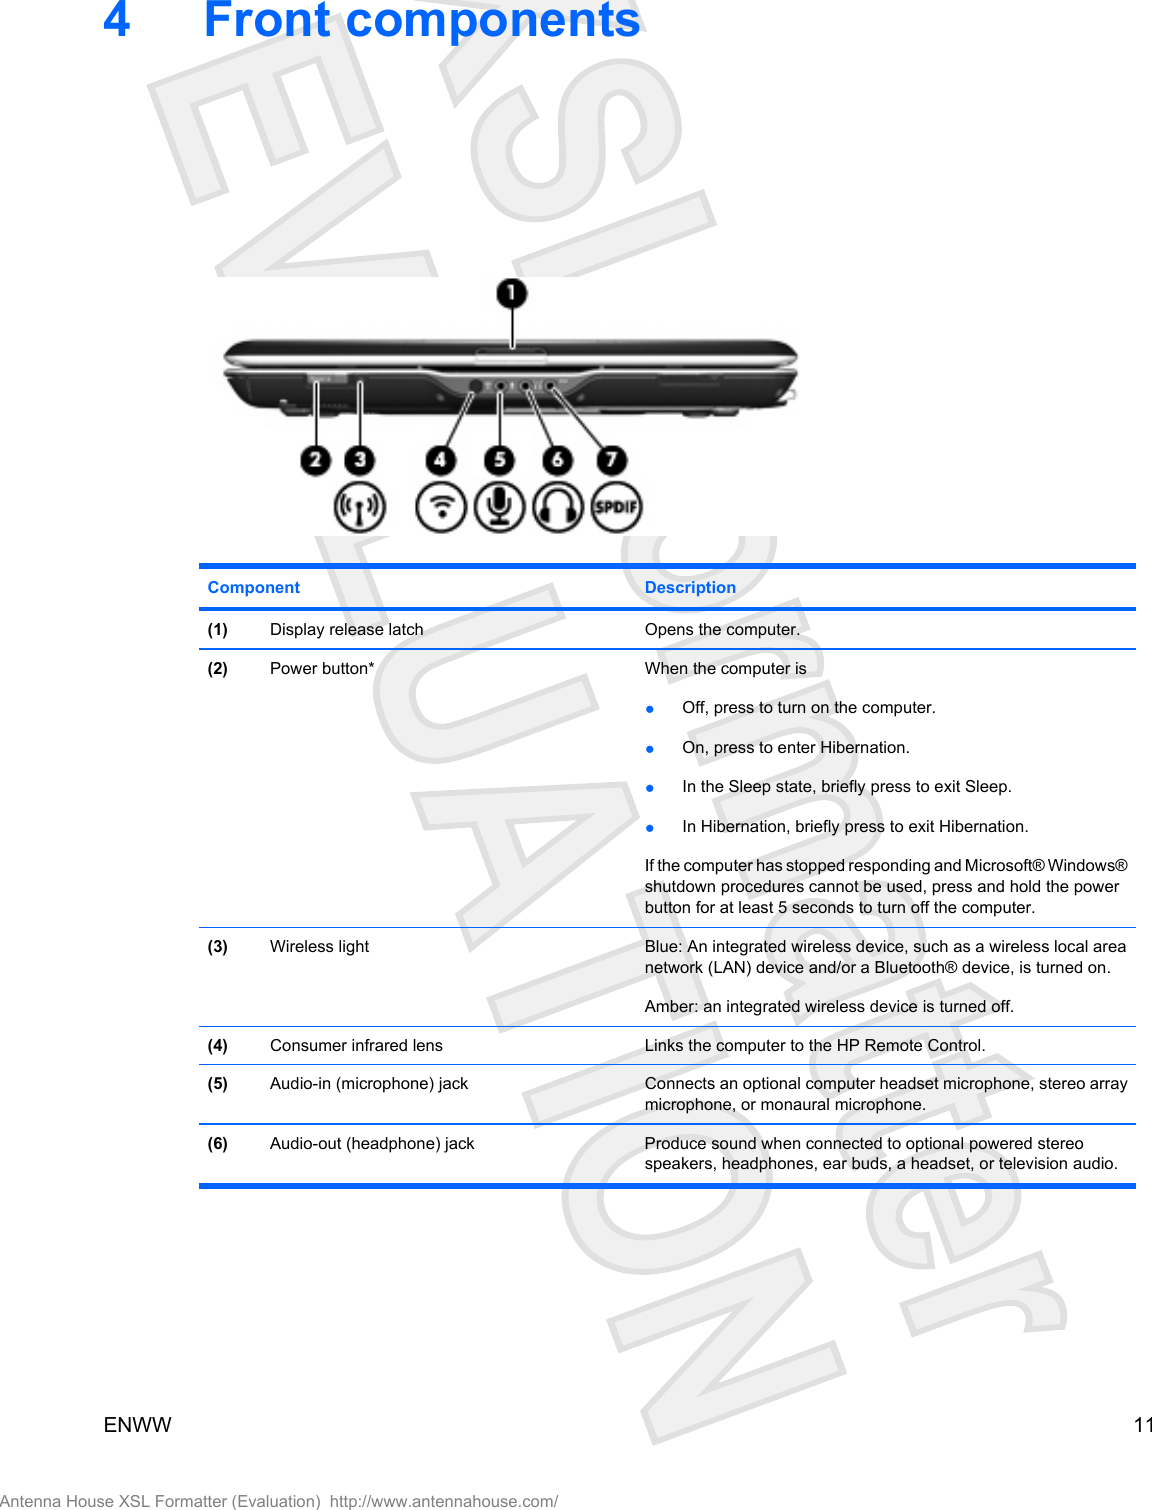
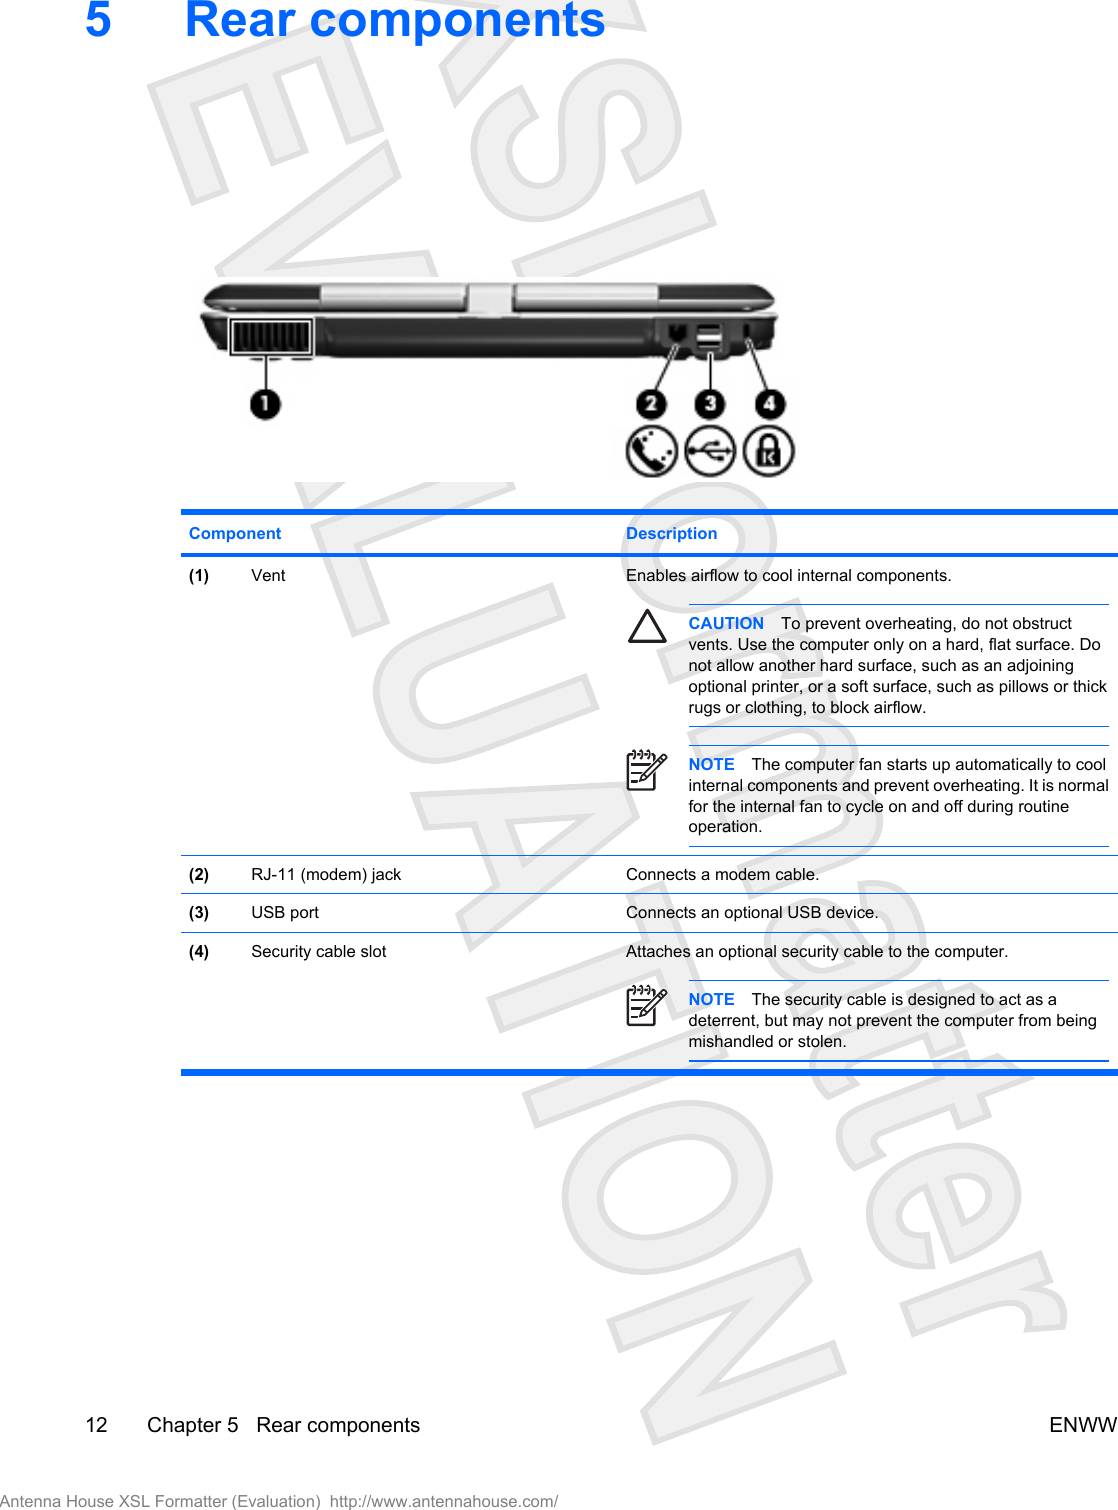
Mobility Center button light On: Mobility Center is open. [PLEASE VERIFY](6) Media button light On: QuickPlay media mode is open. [PLEASE VERIFY](7) DVD button light On: QuickPlay DVD mode is open. [PLEASE VERIFY]8 Chapter 3   Display ENWWAntenna House XSL Formatter (Evaluation)  http://www.antennahouse.com/
Wireless antennae (select models only)On select computer models, at least 2 antennae send and receive signals from one or more wirelessdevices. These antennae are not visible from the outside of the computer.To see wireless regulatory notices, refer to your region's section of the Regulatory, Safety andEnvironmental Notices located in the Help and Support Center.NOTE For optimal transmission, keep the areas immediately around the antennae free fromobstructions.ENWW Wireless antennae (select models only) 9Antenna House XSL Formatter (Evaluation)  http://www.antennahouse.com/
WWAN antenna The wireless antenna inside the display enclosure allows you to connect to a wireless wide-area network(WWAN), and then to the Internet, using the integrated HP Broadband Wireless module and servicefrom a supported cellular network operator.For more information on HP Broadband Wireless and how to sign up for service, refer to the HPBroadband Wireless Getting Started guide included with your computer.10 Chapter 3   Display ENWWAntenna House XSL Formatter (Evaluation)  http://www.antennahouse.com/
4 Front componentsComponent Description(1) Display release latch Opens the computer.(2) Power button* When the computer is●Off, press to turn on the computer.●On, press to enter Hibernation.●In the Sleep state, briefly press to exit Sleep.●In Hibernation, briefly press to exit Hibernation.If the computer has stopped responding and Microsoft® Windows®shutdown procedures cannot be used, press and hold the powerbutton for at least 5 seconds to turn off the computer.(3) Wireless light Blue: An integrated wireless device, such as a wireless local areanetwork (LAN) device and/or a Bluetooth® device, is turned on.Amber: an integrated wireless device is turned off.(4) Consumer infrared lens Links the computer to the HP Remote Control.(5) Audio-in (microphone) jack Connects an optional computer headset microphone, stereo arraymicrophone, or monaural microphone.(6) Audio-out (headphone) jack Produce sound when connected to optional powered stereospeakers, headphones, ear buds, a headset, or television audio.ENWW 11Antenna House XSL Formatter (Evaluation)  http://www.antennahouse.com/
5 Rear componentsComponent Description(1) Vent Enables airflow to cool internal components.CAUTION To prevent overheating, do not obstructvents. Use the computer only on a hard, flat surface. Donot allow another hard surface, such as an adjoiningoptional printer, or a soft surface, such as pillows or thickrugs or clothing, to block airflow.NOTE The computer fan starts up automatically to coolinternal components and prevent overheating. It is normalfor the internal fan to cycle on and off during routineoperation.(2) RJ-11 (modem) jack Connects a modem cable.(3) USB port Connects an optional USB device.(4) Security cable slot Attaches an optional security cable to the computer.NOTE The security cable is designed to act as adeterrent, but may not prevent the computer from beingmishandled or stolen.12 Chapter 5   Rear components ENWWAntenna House XSL Formatter (Evaluation)  http://www.antennahouse.com/
6 Right-side componentsComponent Description(1) Previous/rewind button When a disc is playing in the optical drive:●Press to play the previous track or chapter.●Press fn+ this button to rewind.(2) Play/pause button When a disc is in the optical drive and is●Not playing, press to play the disc.●Playing, press to pause the disc.(3) Next/fast forward button When a disc is playing in the optical drive:●Press once to play the next track or chapter.●Press fn+ this button to fast forward.(4) Stop button When a disc is playing in the optical drive, press to stop the currentdisc activity.(5) Pen holder Secures the pen to the computer.(6) USB port Connects an optional USB device.(7) Pen tether Connects the pen tether(8) RJ-45 (network) jack Connects a network cable.(9) Expansion port 3 Connects the computer to an optional expansion product.ENWW 13Antenna House XSL Formatter (Evaluation)  http://www.antennahouse.com/
Component DescriptionNOTE The computer has only one expansion port. Theterm expansion port 3 describes the type of expansionport.(10) External monitor port Connects an external VGA monitor or projector.(11) S-Video-out jack Connects an optional S-Video device such as a television, VCR,camcorder, overhead projector, or video capture card.(12) Vent Enables airflow to cool internal components.CAUTION To prevent overheating, do not obstructvents. Use the computer only on a hard, flat surface. Donot allow another hard surface, such as an adjoiningoptional printer, or a soft surface, such as pillows or thickrugs or clothing, to block airflow.NOTE The computer fan starts up automatically to coolinternal components and prevent overheating. It is normalfor the internal fan to cycle on and off during routineoperation.14 Chapter 6   Right-side components ENWWAntenna House XSL Formatter (Evaluation)  http://www.antennahouse.com/
7 Left-side componentsComponent Description(1) Power connector Connects an AC adapter.(2) ExpressCard slot Supports optional ExpressCard/54 cards.(3) Digital Media Slot Supports the following optional digital card formats: Secure Digital(SD) Memory Card, MultiMediaCard (MMC), Secure Digital Input/Output (SD I/O), Memory Stick (MS), Memory Stick Pro (MSP), xD-Picture Card (XD), xD-Picture Card (XD) Type M.(4) Digital Media Slot light On: A digital card is being accessed.(5) Optical drive Reads an optical disc.(6) Optical drive release button Releases the optical drive tray.ENWW 15Antenna House XSL Formatter (Evaluation)  http://www.antennahouse.com/
8 Bottom componentsComponent Description(1) Vents (3) Enable airflow to cool internal components.CAUTION To prevent overheating, do not obstructvents. Use the computer only on a hard, flat surface. Donot allow another hard surface, such as an adjoiningoptional printer, or a soft surface, such as pillows or thickrugs or clothing, to block airflow.NOTE The computer fan starts up automatically to coolinternal components and prevent overheating. It is normalfor the internal fan to cycle on and off during routineoperation.(2) Hard drive bay Holds the hard drive.(3) Optical drive release latch Releases the optical drive from the drive bay.(4) Memory module compartment Contains the memory module slots.(5) Mini Card compartment Holds a wireless LAN device (select models only).16 Chapter 8   Bottom components ENWWAntenna House XSL Formatter (Evaluation)  http://www.antennahouse.com/
Component DescriptionNOTE To prevent an unresponsive system and thedisplay of a warning message, replace with only a MiniCard device authorized for use in the computer by thegovernmental agency that regulates wireless devices inyour country. If you replace the device and then receive awarning message, remove the device to restore computerfunctionality. Then contact Customer Care through theHelp and Support Center.(6) Battery release latch Releases the battery from the battery bay.(7) Battery bay Holds the battery.ENWW 17Antenna House XSL Formatter (Evaluation)  http://www.antennahouse.com/
9 Additional hardware componentsComponent Description(1) Power cord* Connects an AC adapter to an AC outlet.(2) AC adapter Converts AC power to DC power.(3) Battery* Powers the computer when the computer is not plugged intoexternal power.(4) Modem cable*  Connects the internal modem to an RJ-11 telephone jack or to acountry-specific modem adapter.(5) Country-specific modem cable adapter (selectmodels only)Adapts the modem cable to a non-RJ-11 telephone jack.*Modem cables, batteries, and power cords vary in appearance by region and country.18 Chapter 9   Additional hardware components ENWWAntenna House XSL Formatter (Evaluation)  http://www.antennahouse.com/
10 LabelsThe labels affixed to the computer provide information you may need when you troubleshoot systemproblems or travel internationally with the computer.●Service tag—Provides the product brand and series name, serial number (s/n), and productnumber (p/n) of your computer. Have this information available when you contact Customer Care.The service tag label is affixed to the bottom of the computer.●Microsoft Certificate of Authenticity—Contains the Microsoft® Windows® Product Key. You mayneed the Product Key to update or troubleshoot the operating system. This certificate is affixed tothe bottom of the computer.●Regulatory label—Provides regulatory information about the computer. The regulatory label isaffixed inside the hard drive bay.●Modem approval label—Provides regulatory information about the modem and lists the agencyapproval markings required by some of the countries in which the modem has been approved foruse. You may need this information when traveling internationally. The modem approval label isaffixed inside the hard drive bay.●Wireless certification label(s) (select models only)—Provide information about optional wirelessdevices and the approval markings of some of the countries in which the devices have beenapproved for use. An optional device may be a wireless local area network (WLAN) device or anoptional Bluetooth® device. If your computer model includes one or more wireless devices, one ormore certification labels are included with your computer. You may need this information whentraveling internationally. Wireless certification labels are affixed inside the memory modulecompartment.ENWW 19Antenna House XSL Formatter (Evaluation)  http://www.antennahouse.com/
IndexAAC adapter, identifying 18antennae 9applications key, Windows 3audio-in (microphone) jack,identifying 11audio-out (headphone) jack,identifying 11Bbattery bay 17,  19battery light, identifying 8battery release latch,identifying 17battery, identifying 18baysbattery 17,  19hard drive 16Bluetooth label 19buttonsDVD 6media 6next/fast forward 7,  13play/pause 7,  13power 11previous/rewind 7,  13stop 7,  13TouchPad 2TouchPad on/off 2Ccable, RJ-11 (modem) 18Certificate of Authenticity label 19compartmentsmemory module 16Mini Card 16componentsadditional hardware 18bottom 16display 5front 11left-side 15rear 12right-side 13top 2connector, power 15cord, power 18DDigital Media Slot light,identifying 15Digital Media Slot, identifying 15display release latch 5,  11display switch, identifying 5drive light, identifying 8driveshard 16DVD button, identifying 6Eesc key, identifying 3expansion port, identifying 13ExpressCard slot, identifying 15external monitor port,identifying 14Ffingerprint reader 5fn key, identifying 3function keys, identifying 3Hhard drive bay, identifying 16headphone (audio-out) jack 11hotkeys, quick reference 4Iinfrared lens, identifying 11integrated camera light,identifying 5internal display switch,identifying 5Jjacksaudio-in (microphone) 11audio-out (headphone) 11RJ-11 (modem) 12RJ-45 (network 13S-Video-out 14Kkeypad keys, identifying 3keysesc 3fn 3function 3keypad 3Windows applications 3Windows logo 3LlabelsBluetooth 19Microsoft Certificate ofAuthenticity 19modem approval 19regulatory 19service tag 19wireless certification 19WLAN 19latch, battery release 17latchesdisplay release 5,  11lightsbattery 8Digital Media Slot 15drive 8integrated camera 5power 820 Index ENWWAntenna House XSL Formatter (Evaluation)  http://www.antennahouse.com/
TouchPad 2wireless 11Mmedia activity buttons,identifying 7,  13media button, identifying 6memory module compartment,identifying 16microphone (audio-in) jack 11Microsoft Certificate of Authenticitylabel 19Mini Card compartment,identifying 16modem approval label 19modem cable adapter,identifying 18monitor port, external 14Nnext/fast forward button,identifying 7,  13Ooperating systemMicrosoft Certificate ofAuthenticity label 19Product Key 19Pplay/pause button, identifying 7, 13portsexpansion 13external monitor 14USB 13power button, identifying 11power connector, identifying 15power cord, identifying 18power light, identifying 8Previous/rewind button,identifying 7,  13Product Key 19product name and number,computer 19Rreader, fingerprint 5regulatory informationmodem approval label 19regulatory label 19wireless certification labels 19release latch, battery 17RJ-11 (modem) cable,identifying 18RJ-11 (modem) jack,identifying 12RJ-45 (network) jack,identifying 13SS-Video-out jack, identifying 14scrolling regions, TouchPad 2security cable slot, identifying 12serial number, computer 19service tag 19slotsDigital Media 15ExpressCard 15memory module 16security cable 12stop button, identifying 7,  13TTouchPadbuttons 2identifying 2scrolling regions 2TouchPad light, identifying 2TouchPad on/off button 2traveling with the computermodem approval label 19wireless certification labels 19UUSB ports, identifying 13Vvents, identifying 12,  14,  16WWindows applications key,identifying 3Windows logo key, identifying 3wireless antennae 9wireless certification label 19wireless light, identifying 11WLAN device 19WLAN label 19WWAN device 10ENWW Index 21Antenna House XSL Formatter (Evaluation)  http://www.antennahouse.com/
Antenna House XSL Formatter (Evaluation)  http://www.antennahouse.com/

Navigation menu