Broadcom BRCM1079 BROADCOM BCM943142YH 802.11B/G/N WLAN User Manual USERS MANUAL 1 OF 2
Broadcom Corporation BROADCOM BCM943142YH 802.11B/G/N WLAN USERS MANUAL 1 OF 2
Broadcom >
Contents
USERS MANUAL 1 OF 2
Setup Instructions
Quick Setup Quick Tour
* Select models only.
Limited Warranty
You can nd the expressly provided HP Limited Warranty applicable to your product located with the user guides on your computer and/or on the CD or
DVD provided in the box. In some countries or regions, HP may provide a printed HP Limited Warranty in the box. For some countries or regions where the
warranty is not provided in printed format, you may request a printed copy from http://www.hp.com/go/orderdocuments or write to:
North America:
Hewlett-Packard, MS POD, 11311 Chinden Blvd.
Boise, ID 83714, U SA
Europe, Middle East, Africa:
Hewlett-Packard, POD, Via G. Di Vittorio, 9
20063 Cernusco s/Naviglio (MI), Italy
Asia Pacic:
Hewlett-Packard, POD, P.O. Box 200
Alexandra Post Oice, Singapore 911507
When you request a printed copy of your warranty, please include your product number, warranty period (found on your service label), name, and postal
address.
IMPORTANT: Do NOT return your HP product to the addresses above. For U.S. support, go to http://www.hp.com/go/contactHP. For worldwide support, go to
http://welcome.hp.com/country/us/en/wwcontact_us.html.
* Select models only.
Leap Motion*
Leap Motion allows you to control custom apps with your hands and ngers
in the air. When you rst turn Leap Motion on, follow the setup instructions
to experience the interactive tutorial and create an account for Airspace,
the Leap Motion app store. Airspace is where you will launch your Leap
Motion apps, and discover new apps designed specically for 3D interaction
using the accuracy of Leap Motion technology.
Press fn and then the spacebar to turn the Leap Motion sensor on or o.
Access Airspace using either of the following methods:
• From the Start screen, select the Leap Motion Airspace app.
• From the Windows desktop, select the Leap Motion Airspace icon.
For more information about Leap Motion, go to http://www.leapmotion.com.
Enjoy your own personal help desk*
Get immediate answers to your computer questions with HP SmartFriend
Services. For more information, go to http://www.hpremoteservices.com.
Share les and media between devices*
Exchange photos, les, data, music, and videos between your mobile devices.
Using sMedio 360 software and (on select models) NFC hardware, you can
wirelessly stream and transfer media between your Windows computer and
Android smartphone.
1. To explore all of the sMedio features, go to the Windows desktop and
click the sMedio TrueSync icon in the taskbar or on the desktop.
2. On the Sign-in/Create Account screen, click Learn More.
Or go to http://www.smedio.co.jp/en/sMedio360_hp/.
Find more information
Windows
models
To learn about Windows, select the Getting Started with
Windows 8 app on the Start screen.
To access the user guides, select the HP Support Assistant
app on the Start screen, select My computer, and then
select User guides.
Linux
models
Double-click the HP Documents icon on the desktop.
NOTE: A User Guides disc is included with some models.
w
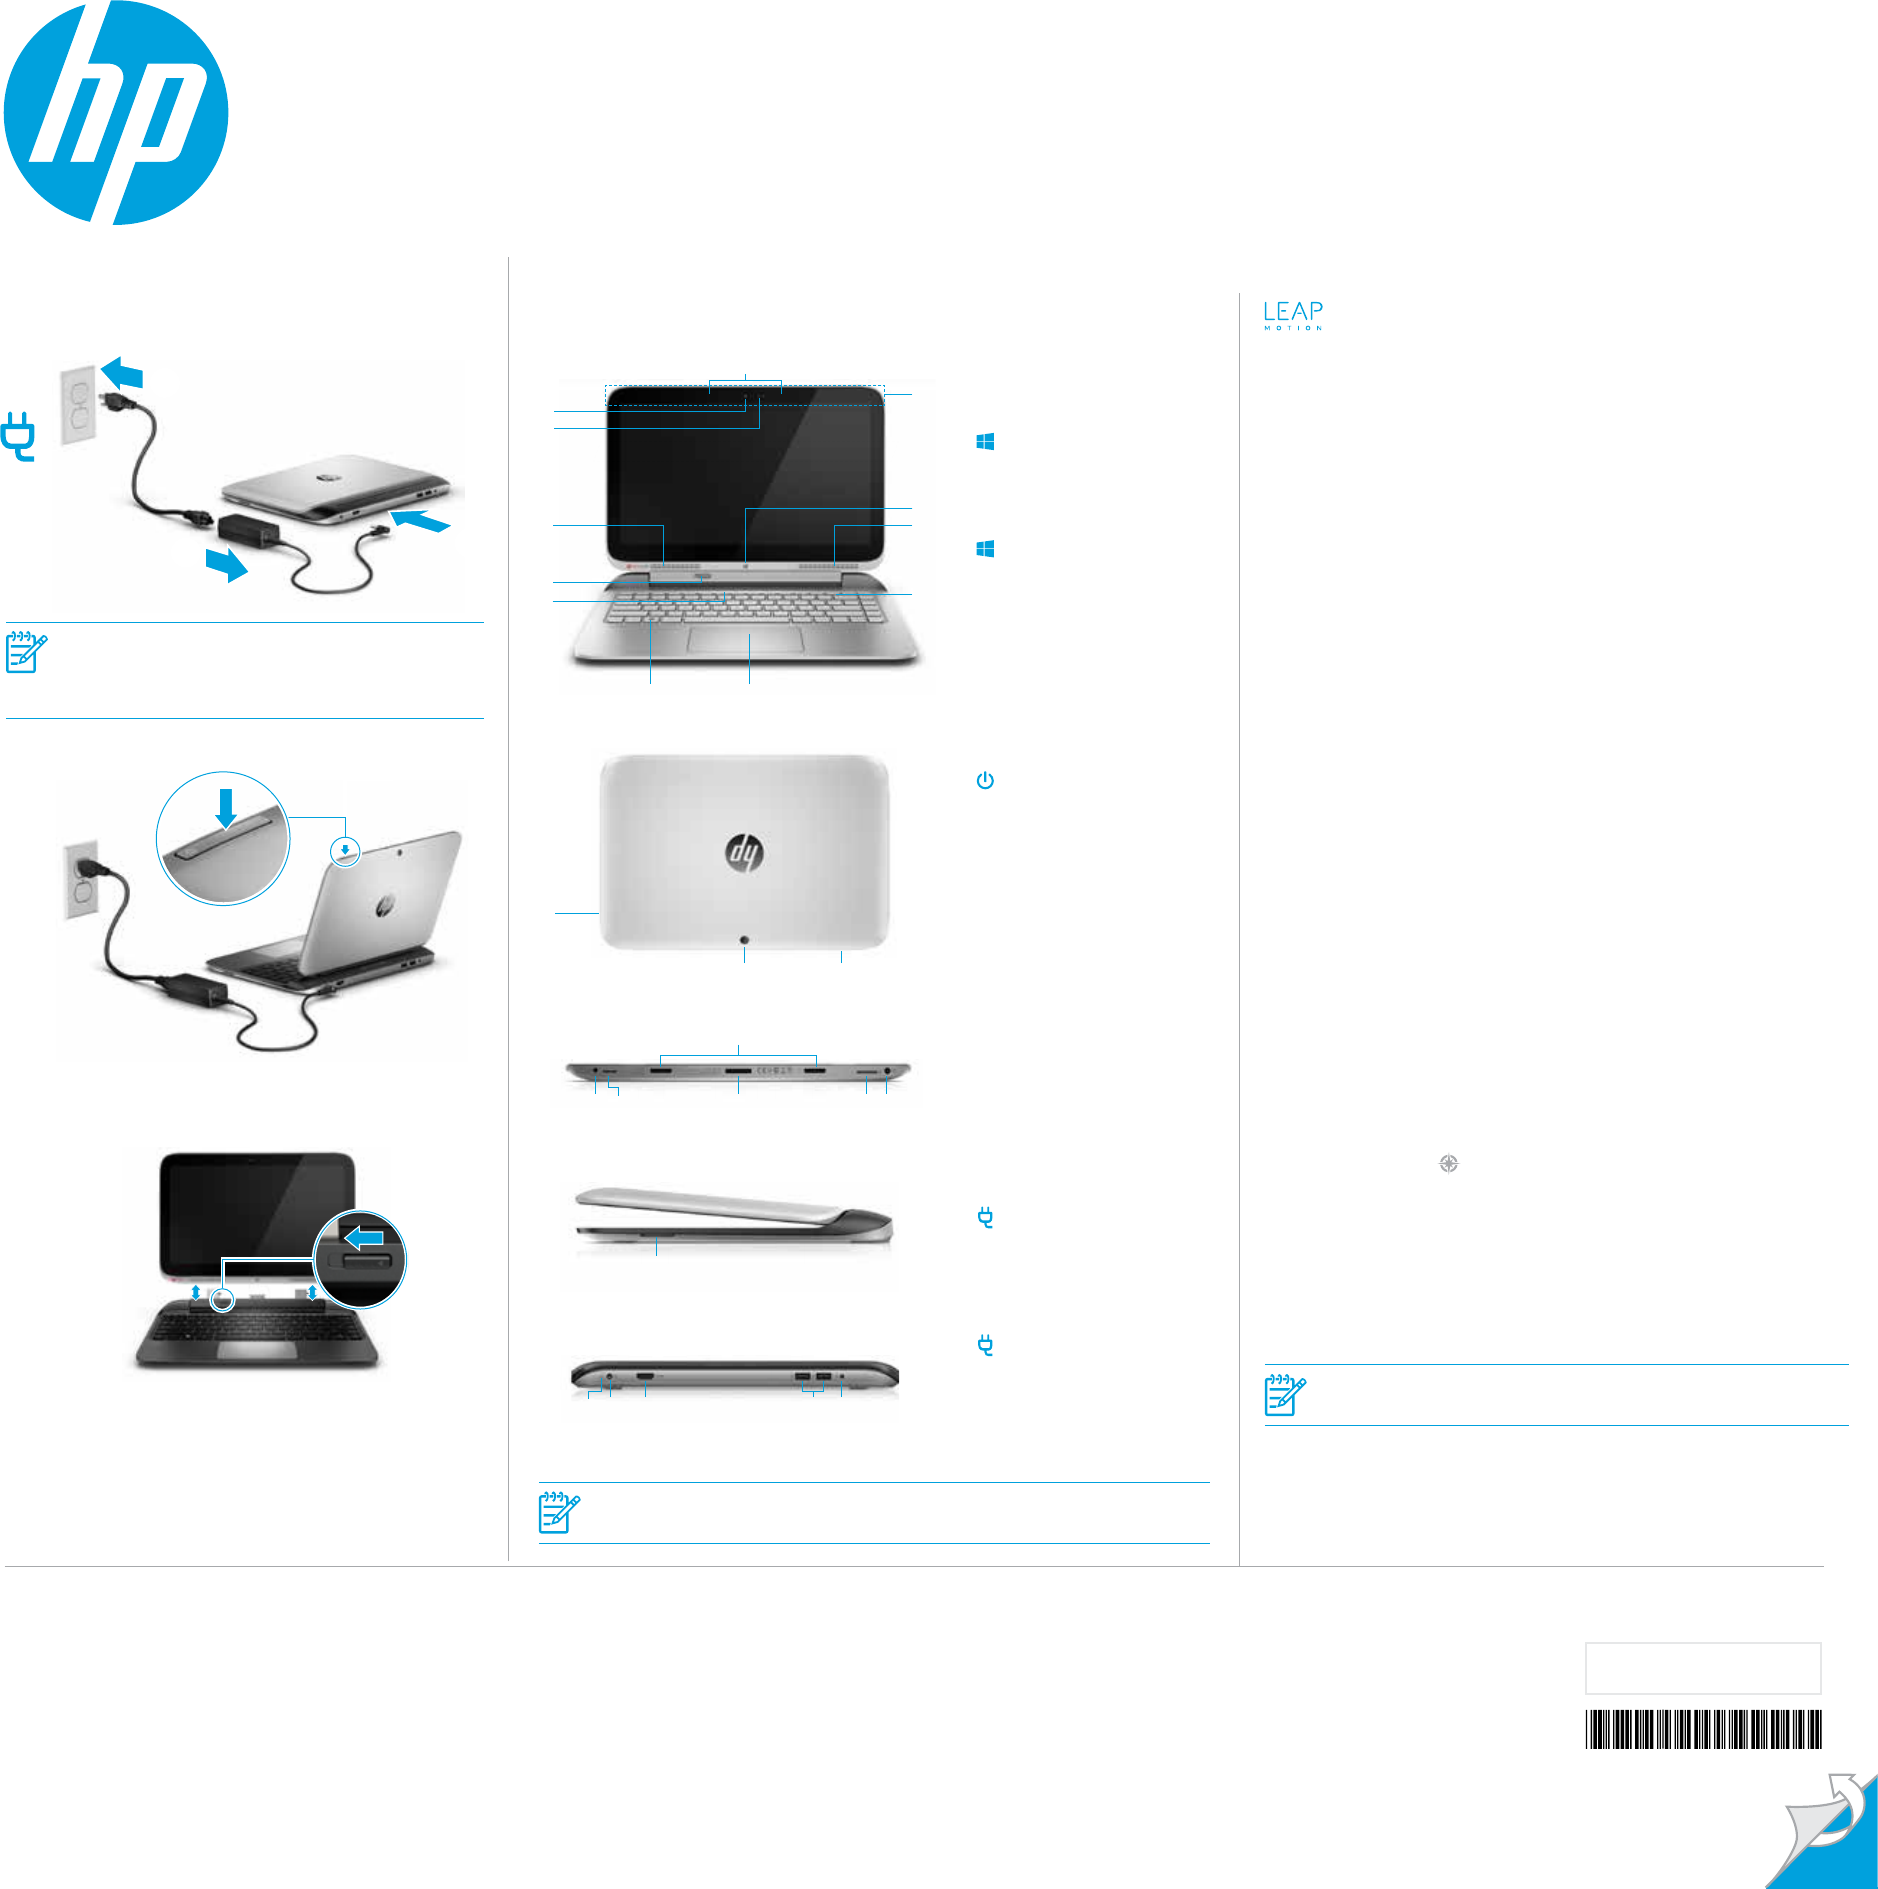
Undocking the Tablet
1
3
2
1
2
NOTE: Your computer has a factory-sealed battery.
Before you press the power button to turn on the computer for
the rst time, make sure that the AC adapter is connected to
the computer.
3
9
4
5
67
8
r
e
1Internal microphones (2)
2Wireless antennas (4)
3Windows® button
(displays the Start screen)
4Speakers (2)
5Wireless key
6TouchPad
7Windows key
(displays the Start screen)
8Mute key/Mute light
9Release latch
-Webcam
qWebcam light
t
wPower button
eWebcam (rear)*
rVolume up/down button
tAudio-out (headphone)/
Audio-in (microphone)
combo jack
yMicro memory card reader
uAlignment post connectors
(2)
iDocking port
oMicro SIM slot*
pPower connector
aMemory card reader
u
yo
a
p
sd
i
f g h
NOTE: Computer color, features, and accessories may vary.
Your computer is protected by a free subscription to McAfee LiveSafe™
service for a limited time from the rst time you use the computer. You
will have the option to purchase McAfee LiveSafe service upon expiration
of the subscription. McAfee LiveSafe service helps protect your identity,
your data, and your devices with a single subscription.*
* Select models only.
The notebook you have can become the tablet you want.
4
sAC adapter/battery light
dPower connector
fHDMI port
gUSB ports (2)
hAudio-out (headphone)/
Audio-in (microphone)
combo jack
2
-
q
1
763383-001
Replace this box with PI statement
as per spec.
Locate system information
Depending on your computer model, a service label is either aixed to the bottom of the computer or is located inside the battery bay
or beneath the service door.
In Windows, briey press the fn+esc key combination to display the System Information screen, which provides the product name and
serial number of your computer, as well as information about the memory, processor, BIOS, and keyboard.
Software terms
By installing, copying, downloading, or otherwise using any software product preinstalled on this computer, you agree to be bound by
the terms of the HP End User License Agreement (EULA). If you do not accept these license terms, your sole remedy is to return the
entire unused product (hardware and software) within 14 days for a full refund subject to the refund policy of your seller.
For any further information or to request a full refund of the price of the computer, please contact your seller.
WARNING: To reduce the risk of electric shock or damage to the equipment:
• Plug the power cord into an AC outlet that is easily accessible at all times.
• Disconnect power from the computer by unplugging the power cord from the AC outlet.
• If provided with a 3-pin attachment plug on the power cord, plug the cord into a grounded (earthed)
3-pin outlet. Do not disable the power cord grounding pin, for example, by attaching a 2-pin adapter.
The grounding pin is an important safety feature.
For more safety and regulatory information, and for battery disposal information, refer to the
Regulatory, Safety and Environmental Notices provided with your user guides. To locate the user guides
for your computer, see the “Find more information” section of this poster.
WARNING: To reduce the risk of serious injury, read the Safety & Comfort Guide provided with your user
guides. It describes proper workstation setup, and proper posture, health, and work habits for
computer users. The Safety & Comfort Guide also provides important electrical and mechanical safety
information. The Safety & Comfort Guide is also available on the Web at http://www.hp.com/ergo.
WARNING: To reduce the possibility of heat-related injuries or of overheating the computer, do not place
the computer directly on your lap or obstruct the computer air vents. Use the computer only on a hard,
at surface. Do not allow another hard surface, such as an adjoining optional printer, or a soft surface,
such as pillows or rugs or clothing, to block airow. Also, do not allow the AC adapter to contact the skin
or a soft surface, such as pillows or rugs or clothing, during operation. The computer and the AC
adapter comply with the user-accessible surface temperature limits dened by the International
Standard for Safety of Information Technology Equipment (IEC 60950).
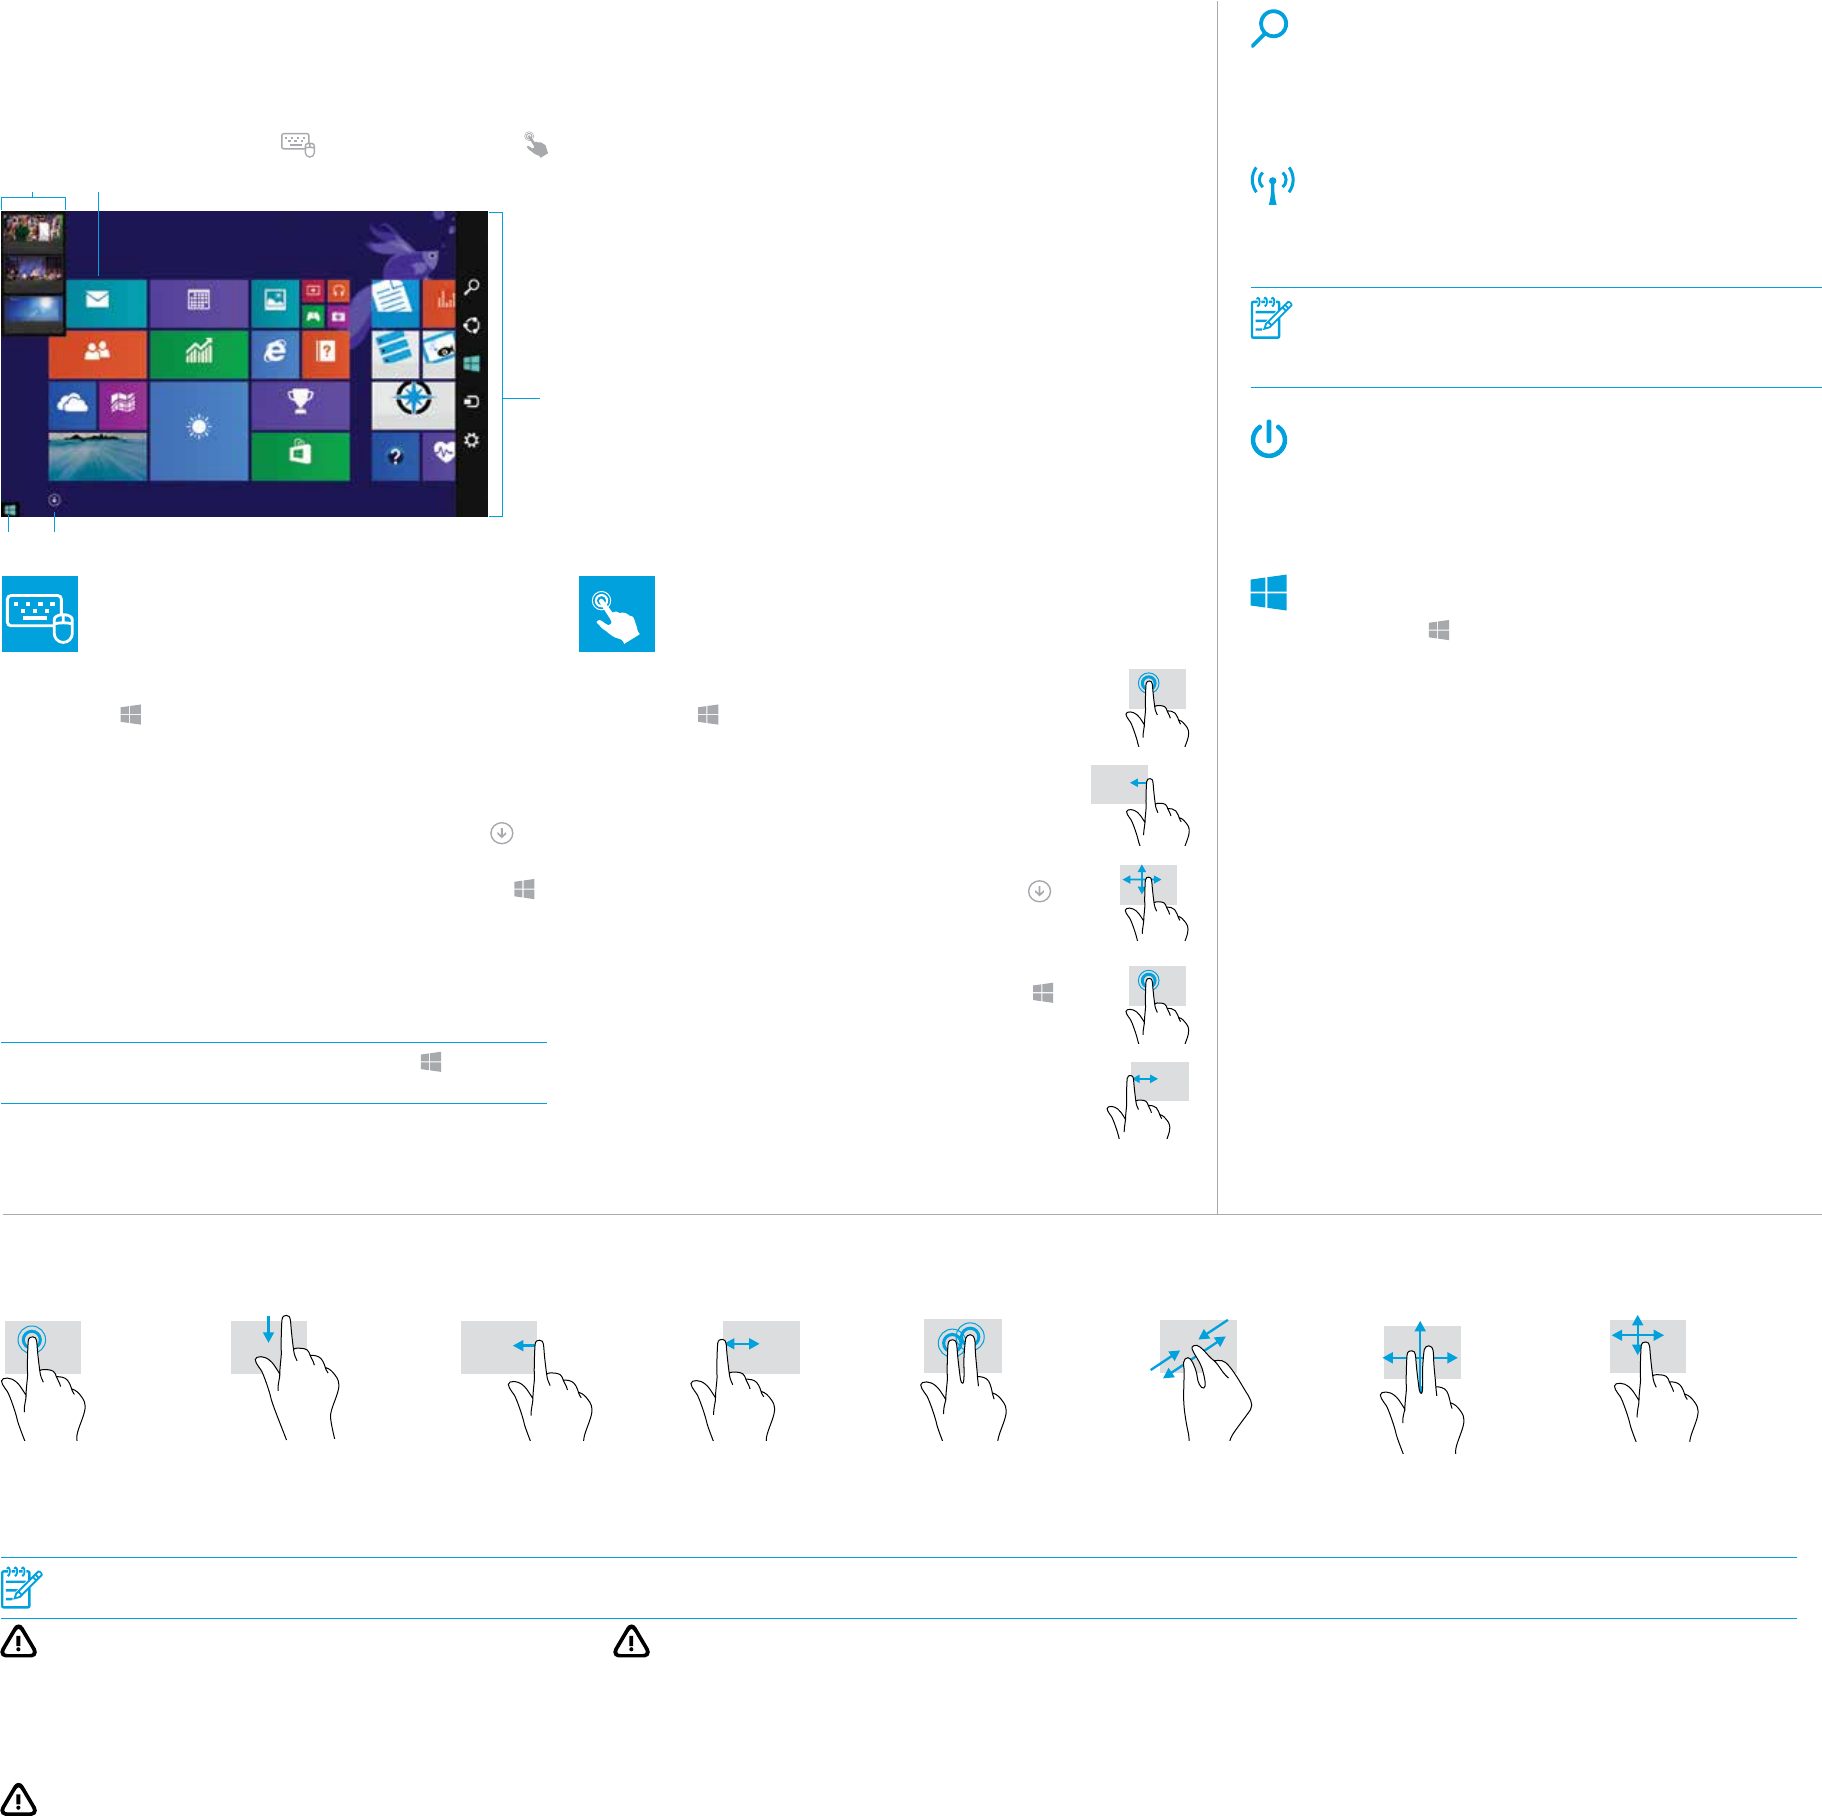
Touch gestures for TouchPad or touch screen
Use touch gestures with the TouchPad and, on select computer models, with a touch screen.
Tap/Double-tap
to select
Top-edge swipe to
display app command
options
Right-edge swipe
to display the charms
Left-edge swipe to switch
between open apps
Two-nger click
(same as right-clicking
with a mouse)
Two-nger pinch zoom Two-nger scroll
(TouchPad only)
One-nger slide
(touch screen only)
NOTE: Some computers, apps, and les do not support all touch gestures.
© Copyright 2014 Hewlett-Packard Development Company, L.P.
McAfee LiveSafe is a trademark of McAfee, Inc. in the United States and other countries. Windows is a U.S.
registered trademark of the Microsoft group of companies.
Not all features are available in all editions of Windows 8. This computer may require upgraded and/or
separately purchased hardware, drivers, and/or software to take full advantage of Windows 8 functionality.
See http://www.microsoft.com for details.
The information contained herein is subject to change without notice. The only warranties for HP products and
services are set forth in the express warranty statements accompanying such products and services. Nothing
herein should be construed as constituting an additional warranty. HP shall not be liable for technical or
editorial errors or omissions contained herein.
First Edition: May 2014
Using a keyboard and mouse
1Open an app
Click a Start screen app. To quickly return to the Start screen, press the
Windows key on your keyboard.
2Display the charms (Search, Share, Start, Devices, and Settings)
Point to the upper-right or lower-right corner of the Start screen.
3Find a list of all the apps on your computer
Point to the lower-left area of the Start screen, and then click the arrow .
4Display the Start menu
Point to the lower-left corner of the Start screen to display the Start button ,
and then right-click the Start button.
5Switch between open apps
Point to the upper-left corner of the Start screen to reveal a list of open apps,
and then click an open app.
TIP: To quickly return to the Start screen, press the Windows key on your
keyboard.
Using touch gestures
1Open an app
Tap a Start screen app. To quickly return to the Start screen, press the
Windows key on your keyboard.
2Display the charms (Search, Share, Start, Devices,
and Settings)
Swipe from the right edge of the TouchPad or touch screen.
3Find a list of all the apps on your computer
Swipe to the left on the TouchPad or touch screen until the arrow
appears, and then tap the arrow in the lower-left corner of the Start
screen.
4Display the Start menu
Tap the Desktop app, and then press and release the Start button in
the lower-left corner.
5Switch between open apps
Swipe in and out from the left edge of the TouchPad or touch screen to
reveal a list of open apps, and then tap an open app.
Product description
This product is a lightweight notebook computer and features a thin-panel display, TouchPad,
processor, keyboard, RAM, integrated battery pack, hard drive or solid state drive, and an external
AC adapter. The printed Setup Instructions identify the hardware components of your computer.
Depending on your computer model, the AC adapter has a rating of 100-240 V ac, 50-60 Hz, 2.3 A, 3.3
A, or 4.6 A. To access the latest user guide, go to http://www.hp.com/support, and select your country.
Select Drivers & Downloads, and then follow the on-screen instructions.
Search for an app, setting, or le
1. From the Start screen, begin typing the name of an app, setting, or le.
2. Select the app, setting, or le from the list that is displayed on the
screen.
Go wireless
From the Start screen, type wireless, and then select Connect
to a network.
NOTE: To set up a WLAN and connect to the Internet, you need a broadband
modem (either DSL or cable) (purchased separately), high-speed Internet service
purchased from an Internet service provider, and a wireless router (purchased
separately).
Shut down your computer
To shut down your computer, swipe from the right edge of the TouchPad or
touch screen to display the charms, select Settings, select the Power icon,
and then select Shut down.
Return to the Start screen
Press the Windows key on your keyboard to return to the Start screen.
Documentation feedback
HP is committed to providing documentation that meets your needs.
To help us improve the documentation, please send any suggestions,
comments, or errors to doc.feedback@hp.com. Include the document title
and part number when submitting your feedback.
Regulatory Model Number
The Regulatory Model Numbers (RMN) are TPN-C118 and TPN-C119. The
RMNs are located on the bottom of the unit near the battery compartment.
Navigating the Windows Start Screen
The Windows Start screen provides a central location where you can access your information and email, browse the Web, stream videos, view photos, and
access your social media websites.
Depending on your computer model, you can use a keyboard and mouse, the TouchPad, or a touch screen to navigate the Start screen. In the instructions
below, the keyboard and mouse icon and the touch gesture icon are used to indicate the corresponding instructions.
15
3
2
4