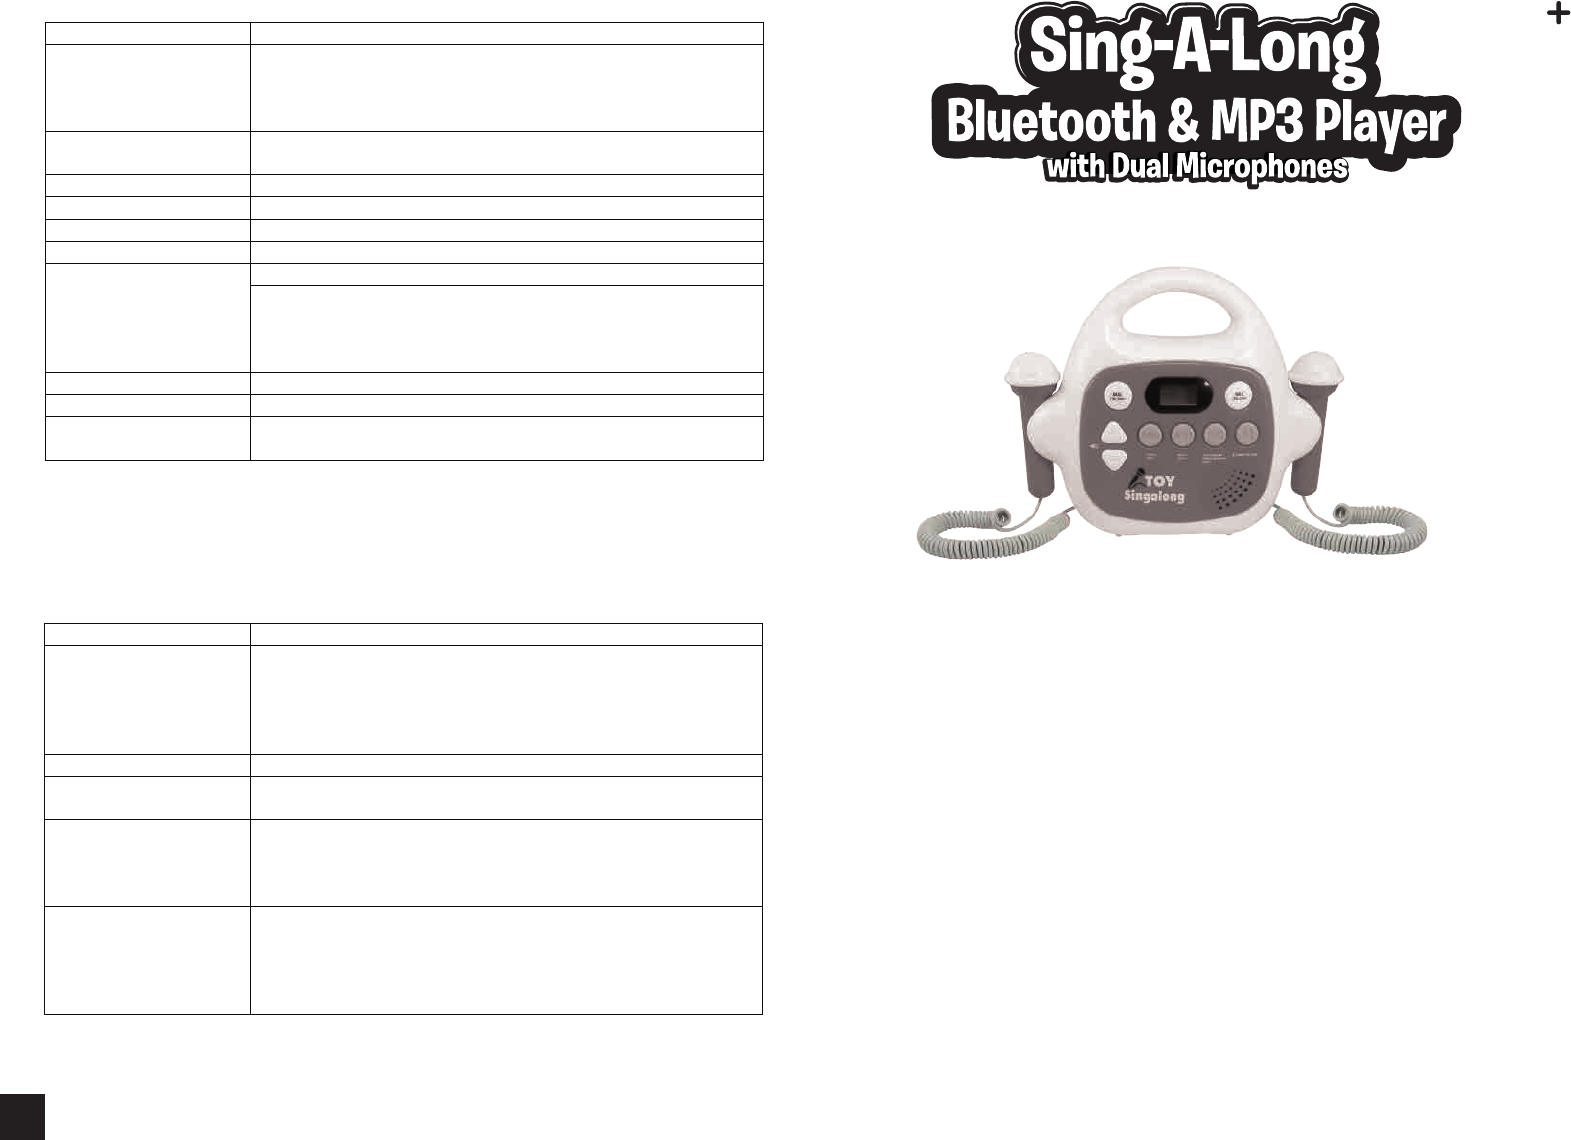
Bulk Un 0509 SING-A-LONG Bluetooth & MP3 Player with Dual Microphones User Manual 0509
Bulk Unlimited Corp.. SING-A-LONG Bluetooth & MP3 Player with Dual Microphones 0509
Bulk Un >
0509_User Manual

G、Trouble Shooting
The product is controlled by MCU, if there is any function trouble (such as the buttons are invalid,
abnormal function and LCD screen holds still), please turn off the power, wait for about one minute and
turn on the power again. If the player resumes working at the moment, it can be used again normally.
Note: When battery power is weak, some USB flash drives inserted into the player may not work
properly. Please replace with new battery or connect to external (DC.5V) power supply in time.
SYMPTOM
CHECK AND ACTION
NO POWER
1. Check if the adapter has been properly connected to the player and the indoor
power socket.
2. Check whether the battery is installed correctly.
3. Replace the battery which is exhausted.
4. Make sure the power switch has been switched to "ON"
No sound of the speaker
1
、
Check if the volume is rotated to the minimum, and adjust volume higher
Bad reception of FM radio 1. Adjust position of the player
2. Turn off nearby electrical equipment.
No sound of Line In input
5. Check if the Line Cable is damaged or connected correctly
6. Check if the external equipment works normally.
7. Check if the product has entered Line In run mode.
8. Check if the volume is rotated to the minimum, and adjust volume higher
Can not play music in USB
flash drive
1. Check if USB flash drive has been inserted into the player correctly
2. Check if there are any music files of MP3/WMA format in USB flash drive; for no
MP3/WMA file inside USB flash drive, it will indicate “no FILE” on LCD screen
3. Check if the music files in USB flash drive are damaged.
4. Check is USB flash drive is damaged.
Bluetooth specification Bluetooth v2.1+EDR
Supportive Bluetooth protocol AVCTP1.0,AVRCP1.0
GAVDP1.2,AVDTP1.0
A2DP1.2,Hands-Free profile1.5
Headset profile v1.1
Supportive music file format
MP3/WMA
USB Port Support USB 2.0
Supportive USB flash capacity 128MB ~ 32G
FM reception frequency range 87.5 ~ 108MHz
FM stored channels 20
Power supply
Battery
:
4 x 1.5V ”AA” batteries
Adapter Type
:
Switching Adapter
Input Voltage:AC 100-240V 50/60Hz
Output voltage、Current:DC 5V、 800mA
DC 5V output plug:micro-USB
Speaker output power >500mW
Display screen LCD
Operating environmental
temperature
-5 to 40 °C
F、Technical Information
IMPORTANT MESSAGES:
Thank you for buying this Bluetooth Dual Microphones Karaoke, Please take a
moment to read these instructions of how to operate this product safely and properly.
Please keep this packaging since it contains important information.
7
3
Item no. 0509
Battery Operated Or Micro-USB Power Supported
FCC Statement
This equipment has been tested and found to comply with the limits for a Class B digital device, pursuant to part 15 of the FCC rules.
These limits are designed to provide reasonable protection against harmful interference in a residential installation. This equipment
generates, uses, and can radiate radio frequency energy and, if not installed and used in accordance with the instructions,
may cause harmful interference to radio communications. However, there is no guarantee that interference will not occur in a
particular installation.
If this equipment does cause harmful interference to radio or television reception, which can be determined by turning the equipment
off and on, the user is encouraged to try to correct the
interference by one or more of the following measures:
• Reorient or relocate the receiving antenna.
• Increase the separation between the equipment and receiver.
• Connect the equipment into an outlet on a circuit different from that to which the receiver is connected.
• Consult the dealer or an experienced radio/TV technician for help.
To assure continued compliance, any changes or modifications not expressly approved by the party responsible for compliance
could void the user’s authority to operate this equipment.
Radiation Exposure Statement
This equipment complies with FCC radiation exposure limits set forth for an uncontrolled environment and it also complies with Part
15 of FCC RF Rules.
CAUTION:
To comply with the limits of the Class B digital device, pursuant to Part 15 of the FCC Rules, this device is comply with Class B limits.
All peripherals must be shielded and grounded. Operation with non-certified peripherals or non-shielded cables may results in
interference to radio or reception.
MODIFICATION:
Any changes or modifications not expressly approved by the grantee of this device could void the user’s authority to operate the
device.

A. Important Notes
1. Do not repair, alter or disassemble the unit arbitrarily.
2. Do not drop it in water or drop water on it.
3. Do not put the unit outdoors, in the washroom, bathroom or other places that may get it wet.
4. Do not put the unit on the unstable shelf, sloping surface or other places that may cause the falls of
the unit.
5. Do not insert small objects into the unit.
6. Please follow the instruction of airlines when use it in an aircraft.
7. Do not hit or strike the unit by hard objects.
8. Do not use and keep the unit in the dusty, oily, smoky and humid places.
9. Do not touch and plug DC Adapter by wet hands in case of electric shock.
10. Do not use chemicals (like alcohol, benzene thinner) to clean the unit.
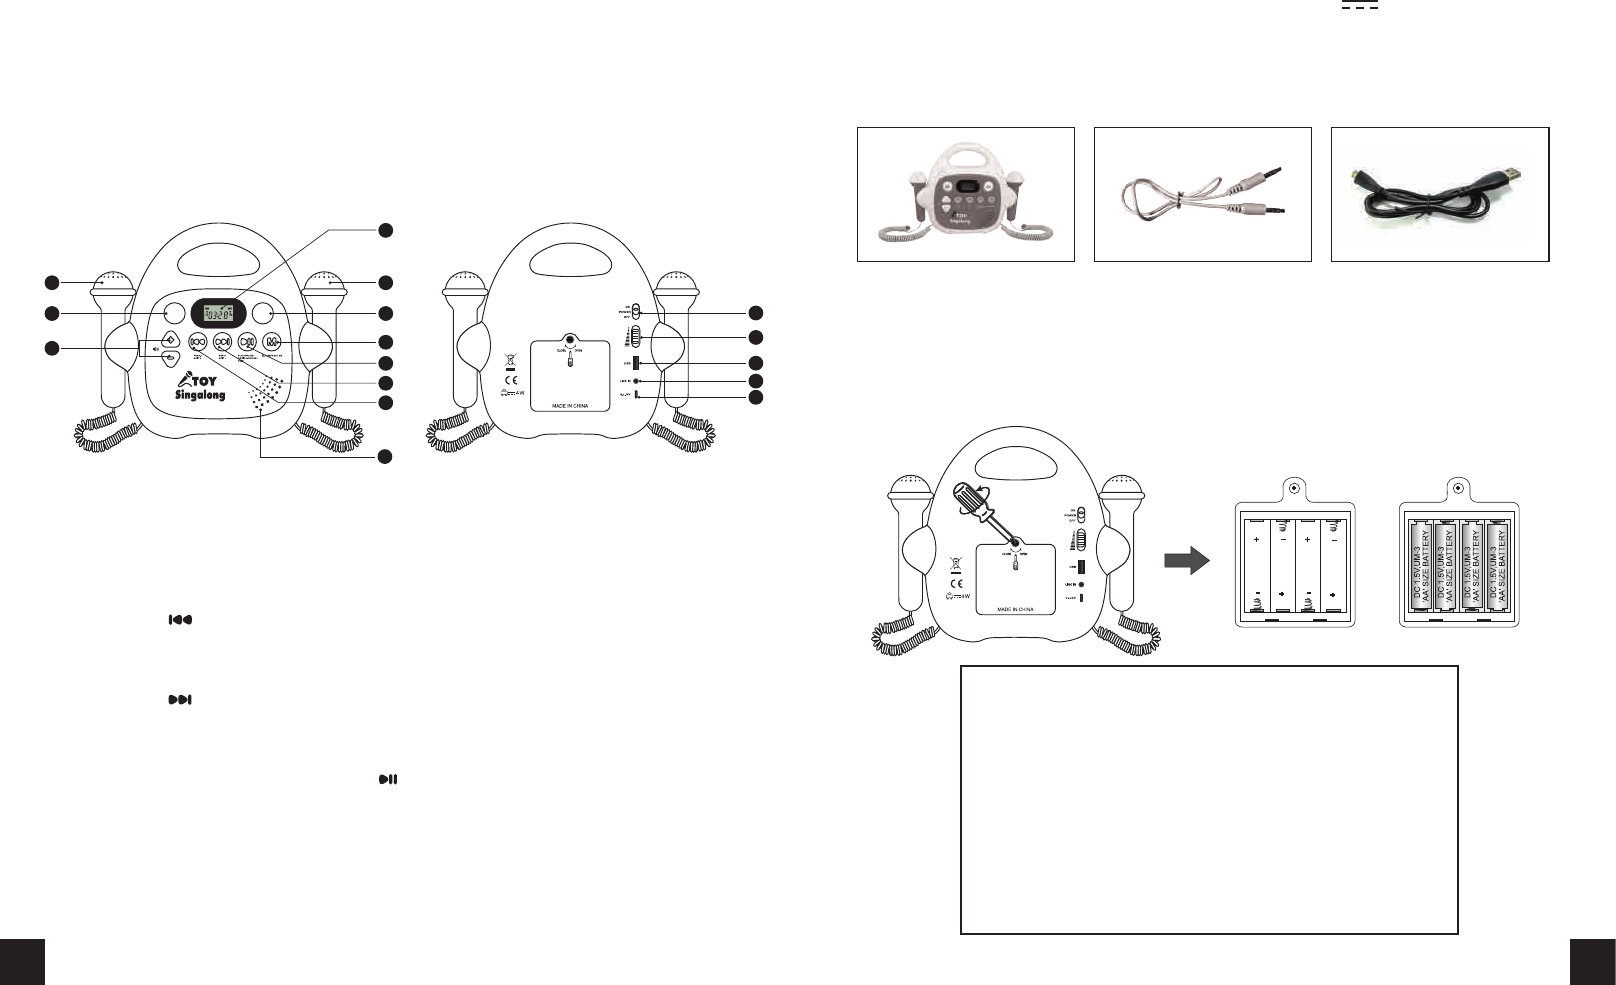
B. Appearance and Function Introduction
C、Unpacking
1、Main Unit 2、Line-in connecting cable 3、Micro-USB cable(Optional)
D、Power Supply
1、Battery installation
* Unscrew and remove the battery cover of the unit.
* Insert 4 x “ AA” alkaline batteries with the correct polarity.
* Replace the battery cover and tighten screws
Important safety instructions
*Replacement of batteries must be done by an adult.
*Batteries are to be inserted with the correct polarity.
*Only batteries of the same or equivalent type as recommended are to be used.
*Do not use rechargeable batteries.
*Do not mix alkaline standard (carbon-zinc) or rechargeable (nickel-cadmium)
batteries.
*Do not mix old and new batteries.
*Exhausted batteries are to be removed from the toy.
*Non-rechargeable batteries are not to be recharged.
*The supply terminals are not to be short-circuited.
*Rechargeable batteries are to be removed from the toy before being charged
*Rechargeable batteries are only to be charged under adult supervision
1、Microphone (Left)
2、Microphone (Right)
3、MIC ON/OFF Button :Press to turn on or turn off the left microphone
4、MIC ON/OFF Button : Press to turn on or turn off the right microphone
5、Volume Up/Down (+/-):Digital Volume Control
6、PREV/SKIP- ( ):
a) In USB or Bluetooth mode, press to choose previous music
b) In FM mode, press to choose previous channel
7、NEXT/SKIP+( ):
a) In USB or Bluetooth mode, press this button to choose next music
b) In FM mode, press this button to choose next channel
8、PLAY/PAUSE/RADIO SCAN/M+/Bluetooth( ):
a).In USB or Bluetooth mode, press to play or pause the music
b).In FM mode, press more than 3 seconds to enter FM auto-scan and save channels automatically;
during auto-scan process, press to stop scan, and press again to choose the saved channel
c).In bluetooth mode, long press to erase paired information.
9、Mode Switch
Main Unit (the player) Line-in cable
MIC. VOL.
Press each time to select mode in circular sequence: Bluetooth → USB → FM → Line-in function; The
Default mode is Bluetooth
10、LCD Display
11、Power Switch : Turn on or turn off power supply
12、MIC VOL : Rotate to adjust microphone volume
13、USB Port:For inserting external USB flash drive
14、Line-in:External audio signal (audio source of other devices) input
15、DC 5V Input :External power input via micro-USB cable (d.c. 5V 800mA)
16、Built-in Speaker
1 2
MIC
ON/OFF
MIC
ON/OFF
1
5
2
9
8
7
6
16
10
4
3
MIC. VOL.
11
12
13
14
15
Micro-USB cable(Optional)

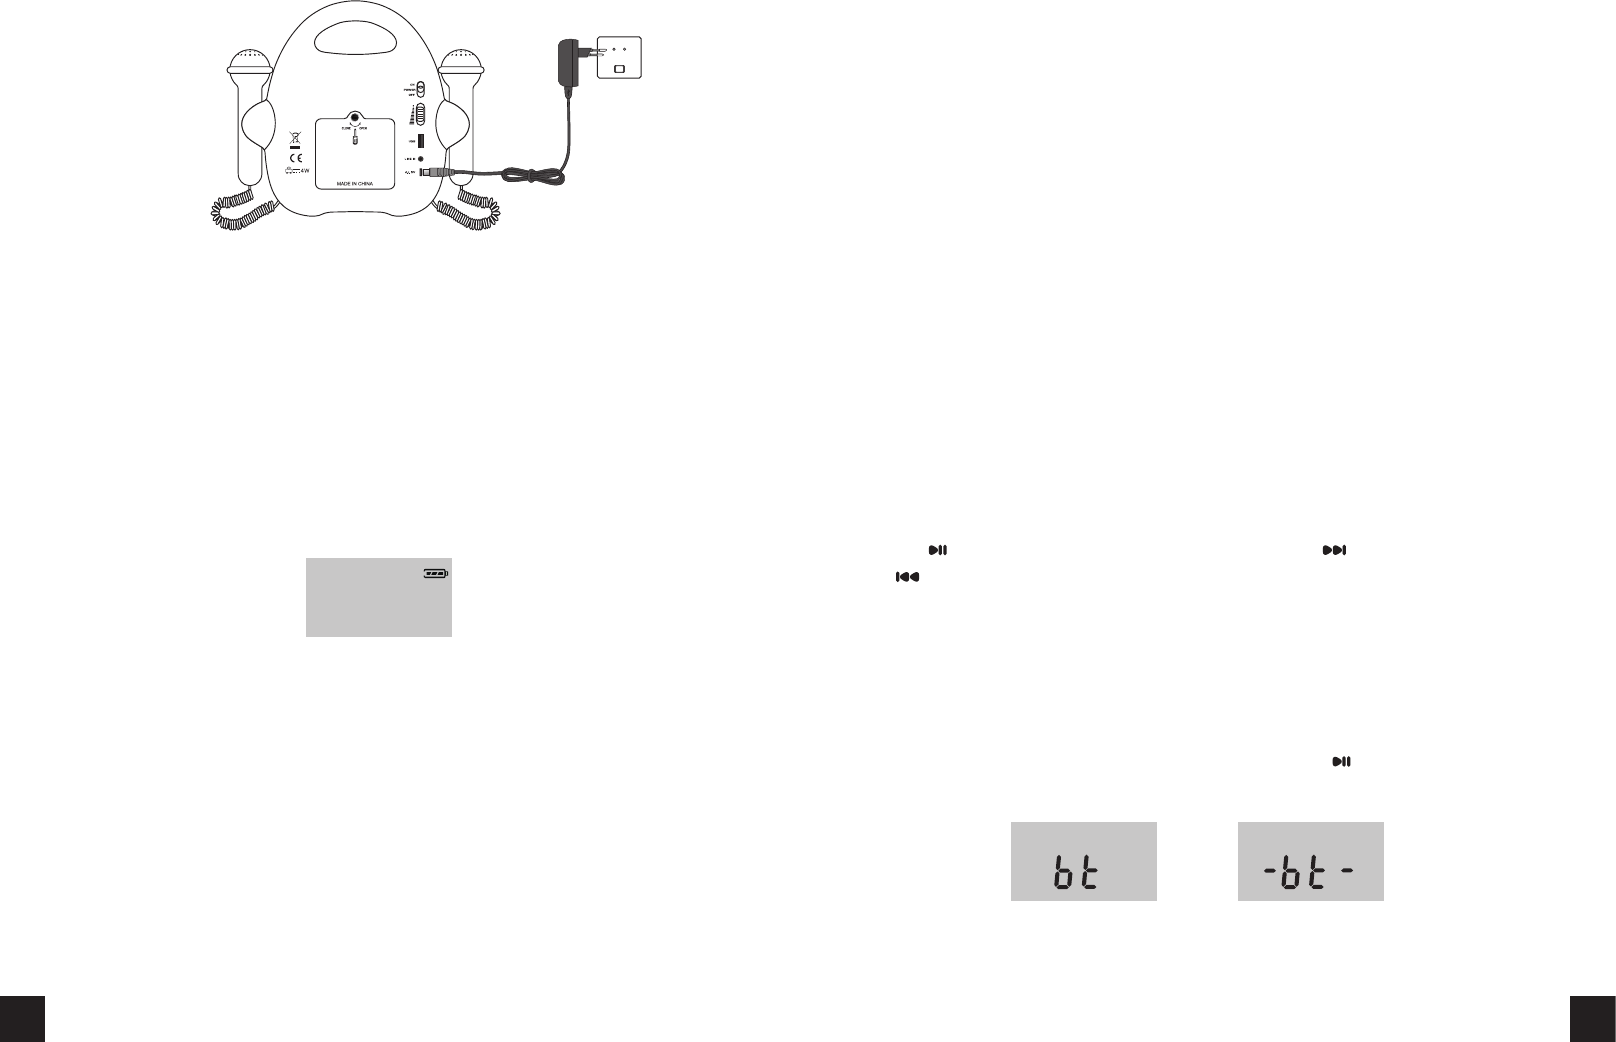
2、Use of Adapter (adapter is not included)
1. Ensure that the local voltage corresponds to the adapter voltage.
2. Plug DC 5V output of micro-USB cable to the player, and another terminal connects to indoor power
socket.
3、 Specification of Adapter
1). Adapter type: Power Switch
2). Input Voltage: AC 100-240V 50/60Hz
3). 0utput Voltage: DC 5V; Output Current: ≥800mA
4). Output DC plug: select the micro-USB plug that matches DC Input of the player
4、 Battery symbol indicates on LCD Display when using batteries as power supply
MIC. VOL.
Notes:
*if the product is not used for a long time (30 days or more), please press the power switch to “OFF”, and
take out batteries in case the leakage of batteries damage the products.
*When batteries are exhausted, the product will stop working automatically. Please take out the batteries in
time in case the leakage of batteries damage the products.
*The product can be powered by the USB cable connected to computer.
Battery symbol will disappear when using DC 5V input as power supply, if the DC 5V input is
discontinued, it will switch back to power supply of batteries
CAUTION:
When using optional AC adapter, it must comply with the specifications of CEE publication 15. Charging
unit to be used with toy should be regularly examined for potential hazard as damage to the cable or
cord, plug, enclosure of other parts and that, in the event of such damage, the toy must not be used.
Transformers used with the toy are to be regularly examined for damage to the cord, plug, enclosure
and other parts, and that, in the event of such damage, the toy must not be used with this transformer
until the damage has been repaired.
1). Warning! Not suitable for children under 36 months. Electric shock hazard.
2). The toy shall only be used with a transformer for toys.
3). The transformer is not a toy;
4).Toys liable to be cleaned with liquid are to be disconnected from the transformer before cleaning.
5).The toy is not to be connected to more than the recommended number of power supplies.
E、Basic Function
Power on
a、Install batteries correctly or connect the player with DC 5V adapter
b、Slide the power switch to “ON”
c、The player is designed with power-saving feature. In Bluetooth, USB or Line-in mode, if no operation
within 30 minutes after stopped music, the indicated word “OFF” will show on LCD display and flash
slowly for 3 seconds then shut down the power of player automatically. After that, press any button will
not activate the player. and have to slide power switch from OFF to ON again to turn on the player.
[ Note: no power-saving feature in FM mode ]
1、Bluetooth Function
a、After power on, the player goes to Bluetooth mode automatically
b、When hearing “beep-beep” from the player, the Bluetooth is waiting pairing, and the word“bt”
indicates on LCD and flash (as showing in picture E-1-a)
c、 Enter the Bluetooth interface of mobile phone or other device, choose “search for device” or
“Search for audio ”
d、 When Pairing code “SC-56M” shows on searching list on display of mobile phone or other
device, please select the “SC-56M” for pairing
e、 If password is needed, please input “0000” and then press “ok”.
f、 When pairing is successful, you will hear a “beep” from the player, and the word “bt” stops flash
and stays on LCD of player.
g、 Press to play music, and press again to pause music. Press to choose next music or
press to choose the previous music
h、The effective distance between the player and Bluetooth device is around 10 meters; When
Bluetooth device moves out of 10 meters, the Bluetooth connection will be discontinued and can be
restored if Bluetooth device moves back within 10 meters (under Auto-connect status, the words
“-bt-” shows on LCD and flash, as showing in picture E-1-b)
i、When turn off the player and turn on again, the player will automatically search and connect to the
last Bluetooth device which was successfully connected, and LCD display as showing in picture E-1-b
j、To erase current Bluetooth pairing information, press and hold button, then the word “bt”
indicates on LCD and flash (as showing in picture E-1-a)
(E-1-a) (E-1-b)
3 4

2、MP3 (USB) Function
a、 After power on, insert USB flash drive to USB port of the player, and press Mode Switch to select
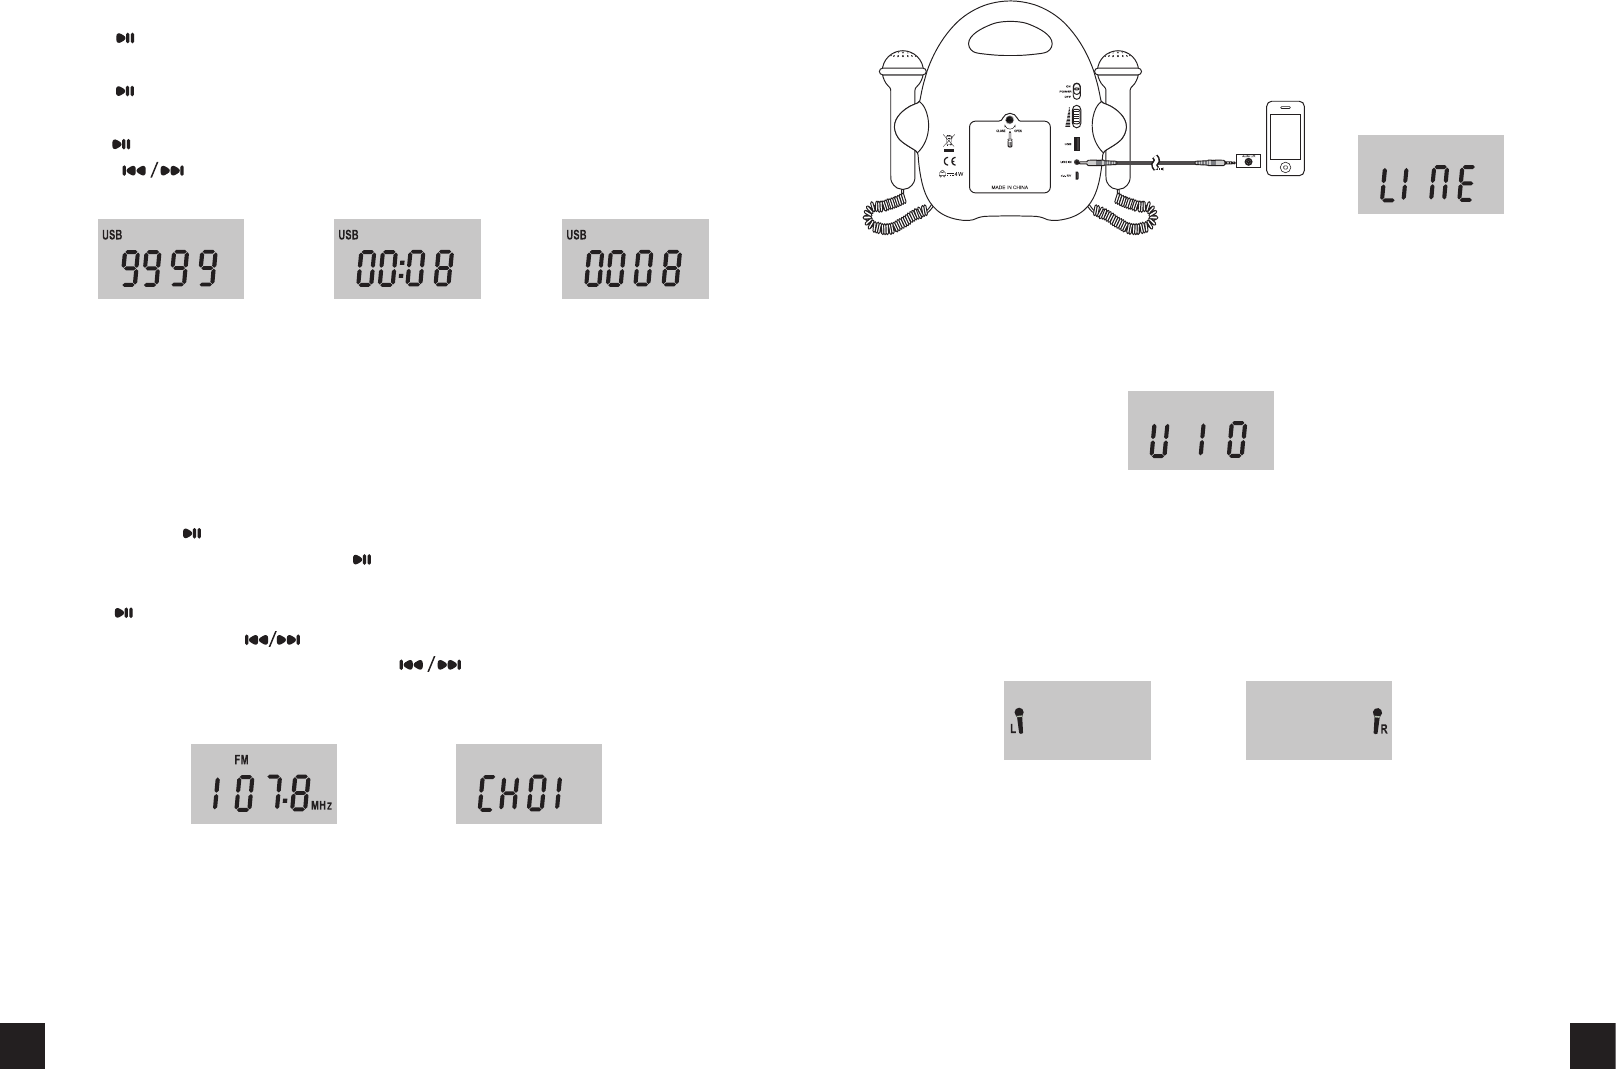
USB function, the word “USB” firstly indicates on the LCD player and then the total number of songs
included in USB flash drive will indicate on the LCD player as showing in picture E-2-a.
b、Press to play the music and the playing time of running music indicates on LCD display, as
showing in picture E-2-b.
c、Press to pause music, and the playing time as showing in picture E-2-b and the playing tracks
as showing in picture E-2-c will alternatively indicates on the LCD player.
d、Press again to be back to play music .
e、 Press to choose previous / next music, the playing tracks indicates on LCD display, as
showing in picture E-2-c.
(E-2-b)(E-2-a)
f、When no USB flash drive is inserted in USB mode, the words “no” and “USB” will indicate on
LCD alternately
g、When USB flash driver is inserted but no music file is detected, the words “no” and “FILE” will
indicate on LCD alternately
4、Line in (External Audio Input)
a、Connect Line in cable to the Line-out or headphone jack of external device, and another terminal to
the player’s Line-in jack, as showing in picture E-4-a
b、Make sure external device (such as MP3 player) is power on and works normally.
c、When power on, press Mode Switch to select Line-in Mode, the words “LInE” will indicate on LCD
display, as showing in picture E-4-b;
d、When no Line-in cable is connected in Line-in mode, the words “no” and “LInE” will indicate on
LCD alternately
(E-3-a)
3、FM Radio
a、After power on, press Mode Switch to select FM Mode, LCD display as showing in picture E-3-a
b、Press and hold about 3 seconds, the player will automatically search in 87.5-108MHz and save
max. 20 FM channels. To stop search, press again, then the player will go back to the first saved FM
channel.
c、Press repeatedly to choose next FM channel that has been saved, as showing in picture E-3-b
d、Manual Searching: Press repeatedly to search FM channel backwards / forwards (frequency
will skip 0.1 MHz per each press.); Press and hold to search backwards / forwards until valid
FM channel and play radio.
(E-3-b)
(E-4-b)
(E-4-a)
MIC. VOL.
5、Volume Up/ Down
Press volume "+" / "-“to increase or decrease output volume of speaker. Volume up to 10 levels, as
showing in picture E-5.
6、Use of Microphone
a、Take down the microphone and press "MIC ON/OFF" button, the microphone symbol
(pic. E-6-a) will appear on LCD when using the left microphone, and the microphone symbol
(pic. E-6-b) will appear on LCD when using the right microphone.
( E-5 )
(E-6-b)(E-6-a)
b、Aim your mouth toward microphone about 1 ~ 2 cm distance, and adjust MIC VOL to proper
volume to sing along with the music.
c、After use,press "MIC ON/OFF" button, the microphone symbol will disappear in the LCD screen
accordingly, then put microphone back to its position of the player and adjust MIC VOL to minimum.
5 6
(E-2-c)