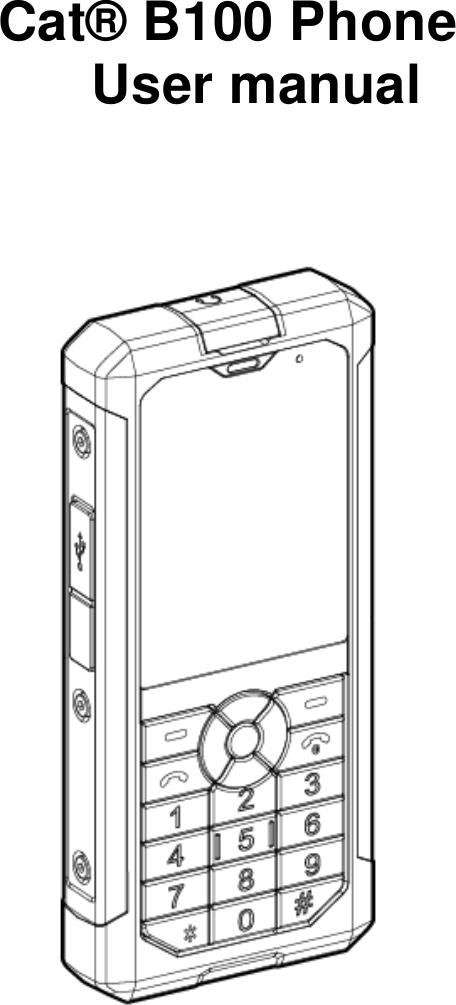
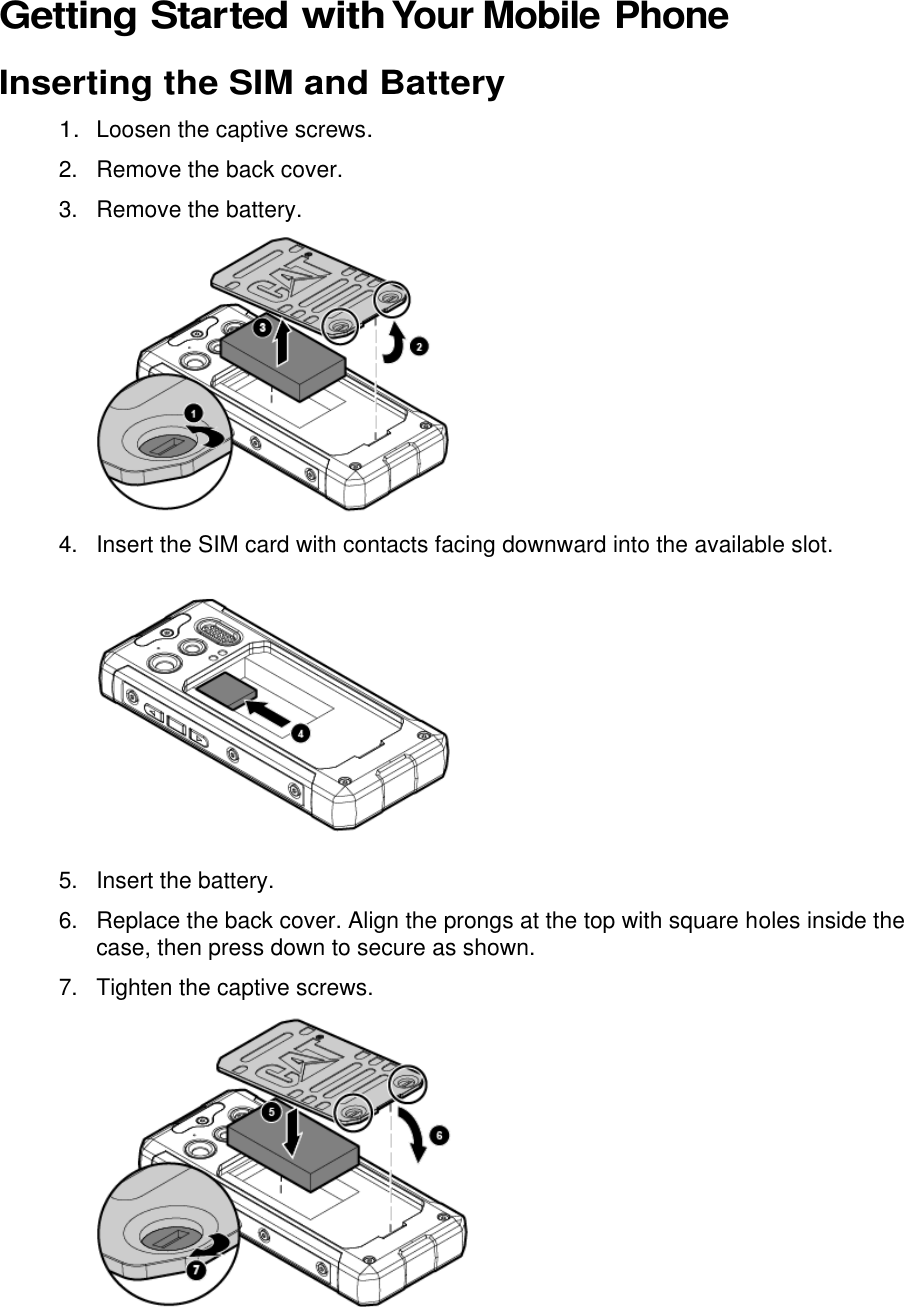
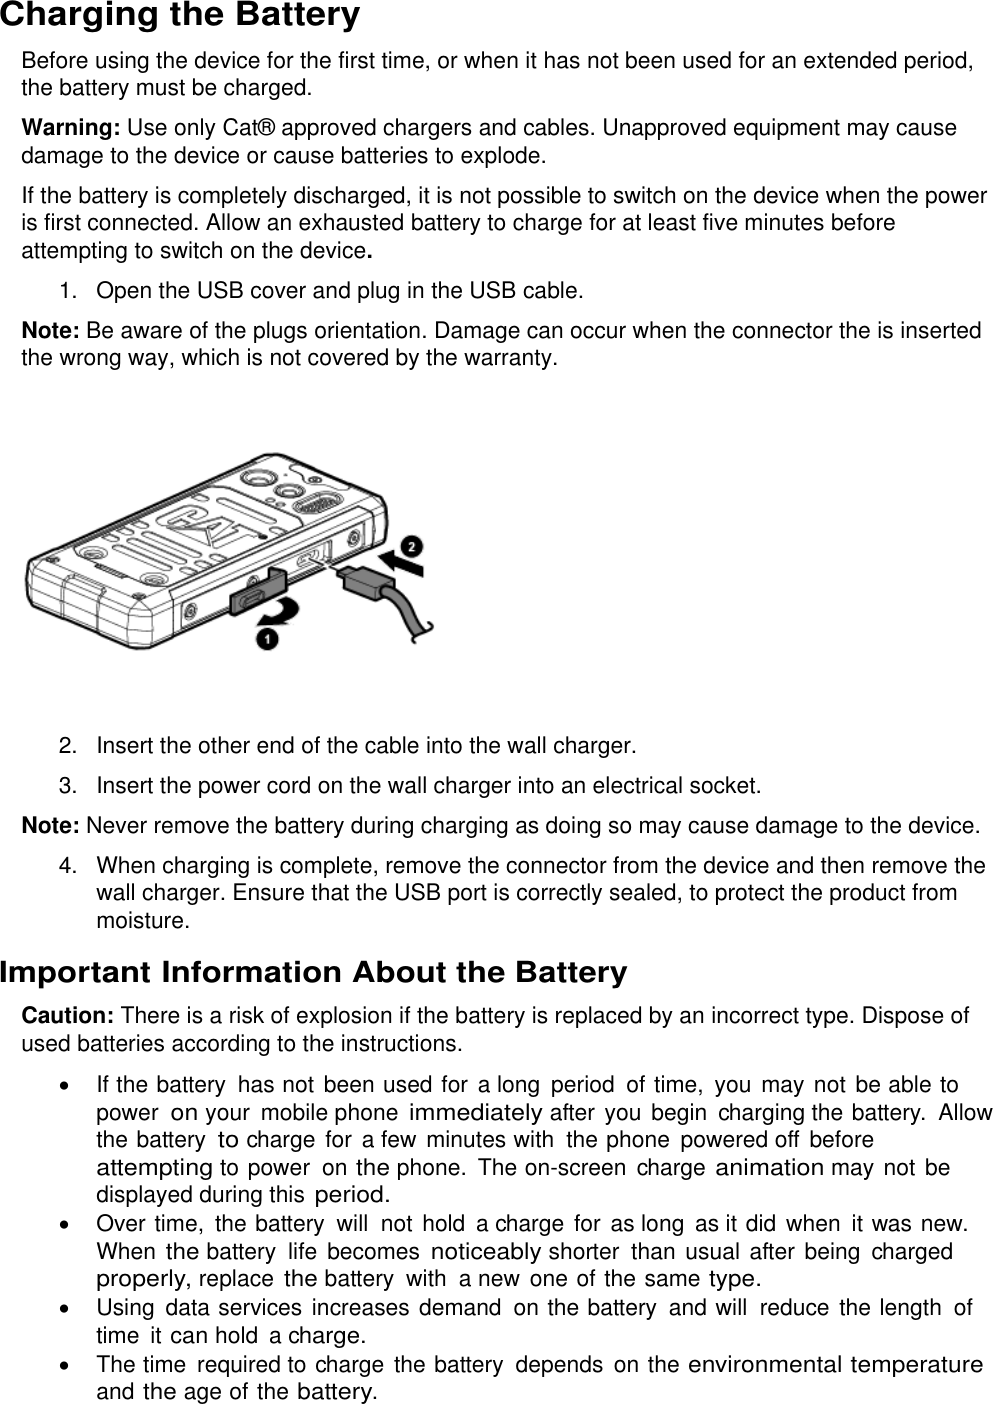
Bullitt Group B100 Rugged Mobile Phone User Manual

Bullitt Group Rugged Mobile Phone

User manual

   Cat® B100 Phone User manual
Please Read  Before Proceeding Safety Precautions  Please read the safety precautions carefully to ensure the correct use of your mobile phone.  Despite the nature of this rugged device, avoid hitting, throwing, dropping, crushing, bending, and puncturing your mobile phone. Avoid using your mobile phone in a damp environment, such as the bathroom. Prevent your mobile phone from being intentionally soaked or washed in liquid. Do not switch on your mobile phone when it is prohibited to use phones or when the phone may cause interference or danger. Do not use your mobile phone while driving. Follow any rules or regulations in hospitals and health care facilities. Switch off your mobile phone near medical equipment. Switch off your mobile phone in aircraft. The phone may cause interference to control equipment of the aircraft. Switch off your mobile phone near high-precision electronic devices. The phone may affect the performance of these devices. Do not attempt to disassemble your mobile phone or its accessories. Only qualified personnel are allowed to service or repair the phone. Do not place your mobile phone or its accessories in containers with a strong electromagnetic field. Do not place magnetic storage media near your mobile phone. Radiation from the phone may erase the information stored on them. Do not put your mobile phone in a high-temperature place or use it in a place with flammable gas such as a gas station. Keep your mobile phone and its accessories away from young children. Do not allow children to use your mobile phone without guidance. Use only approved batteries and chargers to avoid the risk of explosions. Observe any laws or regulations on the use of wireless devices. Respect others’ privacy and legal rights when using your wireless device. Do not use the mobile phone in airplanes, hospitals, gas stations, or professional garages. For medical implant patients (heart, insulin, etc.), keep the mobile phone 15cm away from the implant and, while calling, keep the phone on the opposite side of the implant. Strictly follow the relevant instructions of this manual while using the USB cable. Otherwise, your mobile phone or PC may be damaged.
Legal Notice  www.cat.com / www.caterpillar.com  © 2014 Caterpillar. All Rights Reserved. CAT, CATERPILLAR, BUILT FOR IT, their  respective logos, “Caterpillar Yellow”, the “Power Edge” trade dress as well  as corporate and product identity used herein,  are trademarks of Caterpillar and may  not be used without permission. No part  of this document may be reproduced or transmitted in any form  or by any means without prior written consent  of Caterpillar, Inc. The product described  in this manual  may include copyrighted software  and possible  licensors.  Customers  shall not in any manner  reproduce, distribute, modify, decompile, disassemble, decrypt,  extract,  reverse engineer,  lease, assign, or sublicense  the said software  or hardware, unless such restrictions are prohibited by applicable laws  or such actions  are approved by respective copyright holders under licenses. Notice  Some features  of the product and its accessories described  herein  rely on the software installed, capacities  and settings  of the local network, and may  not be activated or may be limited by local  network operators or network service providers. Thus, the descriptions herein  may not exactly  match  the product or its accessories  you purchase. The manufacturer reserves the right to change or modify any information or specifications contained in this manual without prior notice or obligation. The manufacturer is not responsible for the legitimacy and quality of any products that you upload or download through this  mobile phone, including but not limited to the text, pictures,  music,  movies,  and non-built-in software with copyright protection. Any consequences  arising  from  the installation or usage of the preceding products on this mobile phone  shall  be your responsibility. Warnings This device is certified to Ingress Protection rating of IP67 for dust and water immersion. It meets Military Standard MilSpec 810G for temperature extremes, salt mist, thermal shock, vibration and drop test up to 1.8M onto concrete. To ensure the device will meet this level of protection, the port covers (USB and Headphone) must be securely in place, and the rear cover properly fitted and locked. The device is designed to get wet, but it is not designed to be submerged for prolonged periods. Water damage that occurs as a result of these covers not being fitted securely will not be covered by the warranty. This device is durable in design, but it is not indestructible. It is drop tested to 1.8 meters so it will be protected against accidental drops during normal use. Deliberate abuse of the device may cause damage and invalidate the warranty.
Warranty Information  Terms and Conditions of warranty are available at www.catphones.com. Two-Year Limited Warranty Summary: Cat Phone warrants that at the time of original purchase, the hardware product and accessories are free of defects in design, material, and workmanship. The warranty shall last for twenty-four (24) months from the date of original purchase for mobile devices, and twelve (12) months for accessories (whether included in the mobile device sales package or sold separately). The contents of this manual are provided “as is.” Except as required by applicable laws, no warranties of any kind, either express or implied, including but not limited to, the implied warranties of merchantability and fitness for a particular purpose, are made in relation to the accuracy, reliability or contents of this manual. To the maximum extent permitted by applicable law, in no case shall the manufacturer be liable for any special, incidental, indirect, or consequential damages, or lost profits, business, revenue, data, goodwill or anticipated savings. Import and  Export Regulations  Customers  shall  comply with  all applicable export  or import laws  and regulations and will obtain all necessary governmental permits and licenses in order  to export, re-export, or import the product mentioned in this  manual including the software and technical  data therein.
Contents Welcome to the Cat B100 Phone ................................................................................................................... 7 Features ...................................................................................................................................................... 7 Getting to Know Your Mobile Phone ........................................................................................................ 8 Key Functions ............................................................................................................................................. 9 Getting Started with Your Mobile  Phone ................................................................................................... 10 Inserting the SIM and Battery .................................................................................................................... 10 Charging the Battery ................................................................................................................................. 11 Powering On or Off Your Mobile  Phone ................................................................................................. 12 Protecting Your Mobile  Phone ............................................................................................................... 12 Using the Flight Mode ............................................................................................................................ 12 Accessing Applications ........................................................................................................................ 13 Making and Receiving Calls ...................................................................................................................... 13 Sending Messages ............................................................................................................................... 13 Getting to Know the  Main Screen ......................................................................................................... 13 Phone .......................................................................................................................................................... 15 Making a Call ......................................................................................................................................... 15 Answering or Rejecting a Call ................................................................................................................... 15 Other Operations During a Call ................................................................................................................ 15 Using the Call Center ................................................................................................................................ 16 Phonebook/Names ....................................................................................................................................... 18 Adding a New Contact .............................................................................................................................. 18 Viewing and Editing a Contact .................................................................................................................. 18 Deleting a Contact ..................................................................................................................................... 18 Phonebook Settings .................................................................................................................................. 18 Messaging .................................................................................................................................................... 19 Creating and Sending a Text Message (SMS) .................................................................................... 19 Creating and Sending a Multimedia Message (MMS) ....................................................................... 19 Opening and Viewing a Multimedia Message ..................................................................................... 19 Replying to a Message .......................................................................................................................... 19 Customizing the Message Settings ...................................................................................................... 19 Email ............................................................................................................................................................. 20 Creating an Initial Email Account .............................................................................................................. 20 Viewing an  Email Message ................................................................................................................... 20 Creating and Sending an  Email Message ........................................................................................... 20 Replying to an  Email Message ............................................................................................................... 20 Deleting an  Email Account ................................................................................................................... 20 Changing Email Account Settings ....................................................................................................... 21 Getting Connected .................................................................................................................................... 21 Browser .................................................................................................................................................... 21
Bluetooth ................................................................................................................................................... 22 Multimedia .................................................................................................................................................. 23 Taking Photos and Recording Videos .................................................................................................... 23 Enjoying Music ........................................................................................................................................... 24 Listening to FM Radio ........................................................................................................................... 25 Fun and Games ............................................................................................................................................ 25 Using Maps .................................................................................................................................................. 26 Enabling Location ...................................................................................................................................... 26 Opening Maps ........................................................................................................................................... 26 Searching for Places of Interest ............................................................................................................ 26 Getting Directions .................................................................................................................................. 26 Using Other Applications ............................................................................................................................ 27 Using the  Calendar .................................................................................................................................. 27 Setting the Alarm ..................................................................................................................................... 27 Using the Calculator .............................................................................................................................. 27 Using the  File Manager ......................................................................................................................... 28 Managing Your Mobile  Phone ................................................................................................................... 29 Setting the  Date and Time ..................................................................................................................... 29 Setting the  Display ................................................................................................................................. 29 Setting Phone Ringtone ........................................................................................................................... 29 Setting Phone Services .......................................................................................................................... 30 Ways to  Free  Up Your Mobile Phone Memory .................................................................................... 30 Resetting Your Mobile  Phone ................................................................................................................... 30 Specifications  ............................................................................................................................................ 31 Appendix ....................................................................................................................................................... 33 Warnings and Precautions ...................................................................................................................... 33 Accessories ............................................................................................................................................. 34 Cleaning and Maintenance .................................................................................................................... 35 Emergency Call ....................................................................................................................................... 36 FCC Statement ...................................................................................................................................... 36 RF Exposure Information (SAR) ................................................................................................................ 36 Prevention of Hearing  Loss .................................................................................................................... 37 Declaration of Conformity .................................................................................................................... 38 CE SAR  Compliance ............................................................................................................................... 40 Disposal and Recycling Information .................................................................................................... 41
 Welcome to the Cat B100 Phone The B100 is waterproof, dustproof, and rugged enough to withstand a drop of 1.8M onto a hard surface. It is equipped with a noise canceling microphone and a loud high-quality speaker. As well as being a rugged mobile phone, with it you will be able to enjoy web browsing, messaging, music and more with its high-capacity battery and expandable memory up to 32GB. Features   MIL SPEC 810G: 1.8M (6ft) Drop onto cement; Operating temperature: -25 C (-13 F) to 55 C (131 F)   IP 67: Waterproof up to 1M (3ft) for 30 minutes; Dust resistant   Micro SD card support up to 32GB   Bluetooth V2.0 +EDR/A2DP (FTP, OPP, DUN, SPP, A2DP, AVRCP)   FM radio   3 MP camera, contains video camera   Dual noise canceling microphones   Predictive text   GPS   Browser   Flashlight   HAC certified (AWS model only)   TTY capable   High audio quality loud speaker   Can be used with drop-in charger*   Memory management via USB   * Drop-in charger sold separately
 Getting to Know Your Mobile Phone             1.  Earpiece Earpiece 15. Rear Camera 2.  Headset Jack 16. Flash 3.  Display 17. Speaker 4.  Messaging/Menu Scroll Left 18. Rear Cover 5. Media Player/Menu Scroll Up 19. Rear Cover Latch 6.  User Profiles/Select 20. Volume Down 7.  Alarm/Menu Scroll Down 21. Flashlight  8.  Camera/Menu Scroll Right 22. Volume Up 9.  Names/Right Select  10. End Call/Power  11. Number Pad  12. Send/Answer  13. Menu/Left Select  14. USB Port
 Key Functions End Call/Power key  Press to turn on your mobile phone or end a call. Send/Answer key Press to make or answer a call. Menu/Left Select key  Press to access menu options. Names/Right Select key  Press to add or search contacts or go back to the previous screen. User Profiles/Select key Press to access user profile volume settings or to select applications and options. Side Flashlight key Press and hold until the flashlight is on or off.
 Getting Started with Your Mobile Phone Inserting the SIM and Battery 1. Loosen the captive screws. 2.  Remove the back cover. 3.  Remove the battery.  4.  Insert the SIM card with contacts facing downward into the available slot.  5.  Insert the battery. 6.  Replace the back cover. Align the prongs at the top with square holes inside the case, then press down to secure as shown. 7.  Tighten the captive screws.
 Charging the Battery Before using the device for the first time, or when it has not been used for an extended period, the battery must be charged.  Warning: Use only Cat® approved chargers and cables. Unapproved equipment may cause damage to the device or cause batteries to explode.  If the battery is completely discharged, it is not possible to switch on the device when the power is first connected. Allow an exhausted battery to charge for at least five minutes before attempting to switch on the device. 1.  Open the USB cover and plug in the USB cable. Note: Be aware of the plugs orientation. Damage can occur when the connector the is inserted the wrong way, which is not covered by the warranty.  2.  Insert the other end of the cable into the wall charger. 3.  Insert the power cord on the wall charger into an electrical socket. Note: Never remove the battery during charging as doing so may cause damage to the device. 4.  When charging is complete, remove the connector from the device and then remove the wall charger. Ensure that the USB port is correctly sealed, to protect the product from moisture. Important Information About the Battery  Caution: There is a risk of explosion if the battery is replaced by an incorrect type. Dispose of used batteries according to the instructions.  If the battery  has not been used for a long  period  of time,  you may not be able to power on your  mobile phone immediately after you  begin  charging the battery.  Allow the battery to charge for a few  minutes with  the phone  powered off before attempting to power  on the phone. The on-screen  charge animation may not be displayed during this period.   Over time,  the battery  will  not hold  a charge for as long  as it did  when  it was new. When the battery  life becomes noticeably shorter than usual after being  charged properly, replace the battery  with  a new one of the same type.   Using  data services increases demand  on the battery and will  reduce the length  of time  it can hold a charge.  The time  required to charge the battery depends on the environmental temperature and the age of the battery.
  When the battery  power  level is low,  the phone  plays  an alert and displays  a message.  Powering On or Off Your Mobile Phone   To power on the phone, press and hold the End Call/Power key   for 2-3 seconds.   To power off the phone, press and hold the End Call/Power key. Note: If personal identification number (PIN) protection is enabled on your SIM card, you must enter your PIN before using the mobile phone.  When the battery  power  is almost  exhausted,  your  phone  will  power  off automatically. Protecting Your Mobile  Phone Enabling Your SIM Card  PIN 1.  Press Menu > Settings > Security settings > SIM security. 2.  Select PIN lock > Turn on. 3.  Set a pin for your SIM card. 4.  You will need this PIN to access your SIM card in the future. Note: You can dial emergency numbers any time from your mobile phone. Locking the  Phone Your phone will have an automatic keypad lock that, by default, will set when the phone has been idle for 30 seconds. To unlock the keypad, press Unlock > *. To keep your  data more  secure, lock the phone. When the phone is locked, you  can still receive messages and calls. 1.  Press Menu > Settings > Security settings > Phone security. 2.  Press On and enter your phone password.  The factory default password is 1122. This password can be changed under Security settings. If you change your password keep note of the new password created. 3. The phone lock is now active. When restarting the phone you will be prompted to enter your password before accessing the phones features.   Using the Flight Mode Some locations might require you to turn off your phone’s wireless connections. Respect warnings and instructions to power off mobile devices in restricted areas. Rather than powering off your phone, you can set it to Flight mode. 1.  Press Menu > Settings > Phone settings > Flight mode. 2.  Select Flight mode and press OK. 3.  Press Yes to switch modes.  4.  Press Back to return to the main screen.
 Accessing Applications 1.  To access the applications, press Menu. 2.  Use the Menu scroll buttons to highlight the applicable application and press OK or Select. 3.  Select the features listed for each application. Making and Receiving Calls 1.  To make a phone call, dial the number or press Names from the main screen:   Dial: Enter the number and press Send/Answer    .   Names: Press Names, scroll to select a contact name, and press Send/Answer. 2.  To receive a call, press Send/Answer. Sending Messages To send messages via text (SMS) or multimedia (MMS), press Menu > Messaging. Getting to Know the  Main Screen After you sign in, or when you power on the phone, the main screen appears. The main screen is your starting point to access the features on your phone. It displays the date and time and allows you to access applications, user volume profiles, and contact names. You can customize the main screen with different wallpaper and choose the items to display. Display Layout Notifications and Status Information The main screen displays the time, battery status, notification messages, and analog or digital clock. The screen provides access to the Menu, User Profiles, and Names. Status Icons  Connected to GPRS mobile network  No SIM card installed  Connected to a 2G network  Battery is drained  Connected to a 3G network  Battery is full  Roaming  Battery is half full  Mobile network signal strength  Battery is charging  Searching for a network signal  Bluetooth is on  No Signal  Connected to Bluetooth device  Airplane Mode
 Notification  Icons  New Text or email message  Second incoming call  Alarm is set  Call on hold  Incoming call  Location enabled  Missed call    Currently on call    Wallpapers You can select system or user-defined wallpapers. When changing the wallpaper, the screen image does not affect all pages, only the idle screen. 1.  To change the wallpaper, press Menu > Settings. 2.  Select Phone settings > Display > Wallpaper.  3.  Select System or User defined.   System: Scroll and view the images. Select an image to set as the wallpaper, and press OK.   User defined: The file manager displays the available space. Select Open and scroll through the list of items to use as wallpaper, such as photos that you downloaded. Select a photo to set as the wallpaper, and press OK. 4.  Press Back until the main screen appears. Using the  USB  Mass  Storage To transfer music and pictures from your PC onto your mobile phone’s microSD card, set the microSD card as USB mass storage. 1.  Connect your mobile phone to your PC with the USB cable. 2.  Select the Mass storage option on your device storage. 3.  Mass storage folders for Phone and MicroSD card will pop up on your PC screen. You can now transfer files from your PC to your phone’s microSD card. Note: While the USB mass storage function is enabled, some functions might not be available. There is a Phone Suite PC application available for download via the www.catphones.com website. The link is available under the B100 model support page. It can be used for editing contacts, messaging, file management and calendar entries
 Phone There are several ways to place a phone  call. You can dial a number, or select a number in your contacts  list or from a text message. When you are on a call, you  can either  answer incoming calls or send them to your voicemail box. You can also set up conference  calls with  two additional people if the option is supported by your network. Making a Call To make a call, dial a number or select a number from Names or Dialed calls. Note: Be careful not to block the microphone with your fingers. The microphone is located between the 0 and # key on the front and by the camera lens on the back of the phone. Making a Call with the  Dialer 1. From the main screen, use the keypad to dial the number. 2.  Press Send/Answer. 3. When the call is complete, press End Call/Power to hang up. Making a Call  from Names 1. From the main screen, press Names. 2.  From the Phonebook, select the appropriate contact to call and press Send/Answer. 3. When the call is complete, press End Call/Power to hang up. Making a Call  from Dialed calls 1. From the main screen, press Send/Answer. The Dialed calls tab appears. 2.  You can scroll to the left or right to view All calls, Missed calls, or Received calls tabs. 3. From the appropriate tab, select the number to call and press Send/Answer. 4. When the call is complete, press End Call/Power to hang up. Answering or Rejecting a Call To answer a phone call, press Send/Answer key. The screen displays the caller ID. To reject a phone call, press Reject. Other Operations During a Call Making a Conference Call If you receive a new call while  you are already  on a call, you  can connect  the second call to the call you  are on. This feature is known  as conference  calling.  You can also set up a conference  call with multiple callers. Note: Contact your network operator to learn whether it supports conference calls and how many participants you can add. 1.  To initiate a conference call, dial the number of the first person to be on the call.
 2. While on the call enter the phone number of the person you want to join the conversation or find them using Options > Phonebook and press send. The first call is automatically placed on hold. 3.  Once you have connected to the person you have added, press Options > Conference. 4. To add more people, repeat steps 2 and 3. 5.  To split the conference back to separate conversations, press Options > Split. 6. To end the conference call and disconnect everyone, press End call. Switching Between Calls If you receive a new call while  you are already  on a call, you  can switch  between  the two calls. 1. While  you  are on two  calls, press the Send key. 2. The current  call is placed on hold and you  are connected  to the other call. 3.  To switch back to your original call, press Options > Swap. Recording a Call While in a call, press Options > Sound recorder. The tool will automatically start recording your call. Press Stop to end the recording. Saved recordings can be found under Menu > Multimedia > Sound recorder. Using the Call Center The Call center contains the history of calls that you have dialed, received, or missed. You can use the history to quickly find a recently called number or add an incoming number to your contact list. The Call center also contains advanced call settings. Viewing Call History 1.  Press Menu > Call center > Call history. The Dialed calls tab appears. 2.  Scroll to the left or right to view the All calls, Missed calls, or Received calls tabs. 3.  Press Options > Advanced. 4.  Advanced options allow you to view call timers, call cost, text message counter, and GPRS counter. Changing Call Settings 1.  Press Menu > Call center > Call settings > Advanced settings. A list of settings appears. Change any settings as needed. Settings include: blacklist, auto redial, call time display and reminder, auto quick end, reject by SMS, connect notice, and answer mode. Adding a Contact from the Call Center 1. From the main screen, press Send/Answer. This is a shortcut to access the Dialed calls tab.
 2.  If necessary, scroll to the left or right to view the All calls, Missed calls, or Received calls tabs. 3.  From the appropriate tab, select the number to add to contacts and press Options > Save to Phonebook. Clearing the Call Log   1. From the main screen, press Send/Answer. The Dialed calls tab appears. 2.  If necessary, scroll to the left or right to view the All calls, Missed calls, or Received calls tabs. 3.  Press Options > Delete or Delete all and press Yes to confirm.
 Phonebook/Names The Phonebook application enables you to save and manage information such as phone numbers and addresses of your  contacts.  After  you  save the contact information on your mobile phone, it provides  easy access to people  with  whom you want to communicate. Adding a New Contact 1.  Press Menu > Phonebook > Add new contact >Center Select key to save. Alternatively, press Names > Add new contact > Center Select key to save. 2.  Enter the applicable information. You must press the keys for the letters. For example, press the 2 key once for a, twice for b, and three times for c. 3.  Press Options > Save.  4. To add more detail to the contact, press Options > Add detail. 5.  Add any details, including mobile, home, office, and fax numbers; additional email address; company name and job title; caller video; birthday; URL; address; and notes. Viewing and Editing a Contact 1.  Press Names and select the applicable contact. 2.  Press Options > View. 3.  To edit the contact details, press Options > Edit. 4.  Make any changes. Then press Select > Save and press Yes to confirm. Deleting a Contact 1.  Press Names and select the contact to delete. 2.  Press Options > Delete and press Yes to confirm. Phonebook Settings To edit your phonebook settings, go to Menu > Phonebook > Options > Phonebook Settings. Here you can edit your storage preferences and speed dial selections as well as view your phone number, memory status. You can also delete all contacts from this menu.
 Messaging The Messaging application allows  you to exchange  text messages (SMS) and multimedia messages (MMS)  with  anyone  using  an SMS or MMS-capable phone.  With the Email application, you can read and send emails. Creating and Sending a Text Message (SMS) 1. From the main screen, press Menu > Messaging > Write message. 2.  Enter the message you would like to send. You must press the keys for the letters. For example, press the 2 key once for a, twice for b, and three times for c. 3.  When you have finished entering the message, press Options > Send to and select Enter recipient to input the number of your contact. You can also choose Add from phonebook to select the recipient from your contact list. If you wish to add multiple recipients, scroll back up to Enter recipient or Add from phonebook. 4.  When your selected recipients have been entered, press the center Select button to send. Alternatively, you can find your recipient in the phonebook, press Options > Send message. Creating and Sending a Multimedia Message (MMS) Multimedia Message format can include images, videos, audio, or business cards with your own or a contacts information. 1. While typing an SMS, press Options > Switch to MMS. 2.  Enter the applicable information. You must press the keys for the letters. For example, press the 2 key once for a, twice for b, and three times for c. 3.  Select which recipient you would like to send the message to from your phonebook. Opening and Viewing a Multimedia Message When a message is received, from the main screen press Menu > Messaging > Inbox and select the message you would like to view. Replying to a Message 1.  While viewing a message, press Options > Reply. 2.  Enter the applicable information. You must press the keys for the letters. For example, press the 2 key once for a, twice for b, and three times for c. 3.  When you have finished entering the message, press the center Select button to send it. Customizing the Message Settings 1.  From the main screen, press Menu > Messaging > Message settings. 2.  In this screen you will be able to edit settings for Text, multimedia, and service
 messages. Email  Menu > Messaging > Email  Your mobile phone supports POP3, IMAP used by most email services. Creating an Initial Email Account Before using the Email application for the first time, you must configure your email account. You will need to know the email address you want the phone to use (emailuser@gmail.com) and the password associated with that account. 1. Menu > Messaging > Email.  2.  Select a service and follow the prompts. Viewing an Email Message 1. Menu > Messaging > Email >Inbox. 2.  Press Options > Retrieve Email. 3.  Select the email message to view. Creating and Sending an Email Message 1. Menu > Messaging > Email > Options> Write Email. 2. To enter the recipient’s email address, select To > Edit > Enter recipient or Add from Phonebook. When the recipient has been found, press Back to return to your email draft 3.  Enter the message subject (Optional). 4.  To write your message, you must press the keys for the letters. For example, press the 2 key once for a, twice for b, and three times for c. 5.  When you have the message you would like to send ready, press Options > Send. Replying to an Email Message 1.  While viewing an email, press Options > Reply. 2.  Enter the message you would like to send. 3.  Press Options > Send. Deleting an Email Account 1. Options > Email accounts. 2.  Select the account you would like to remove and press Options > Delete > Yes.  3.  A notification will appear telling you the account has been deleted.
 Changing Email Account Settings You can change a number of settings for an account, including how often you check for emails, how you are notified of a new mail, and details about the servers the account uses to send and receive mails. Note: Your account’s incoming and outgoing settings depend on the kind of email service for your account: POP3, IMAP, or Exchange. You can enter the necessary details manually, although you will typically need to contact your email service provider to determine the right settings for the account. Getting Connected GPRS/3G Your mobile phone will be automatically configured to use your wireless service provider’s GPRS/3G service (if available) when you turn on the phone for the first time. Checking the Network Connection Your mobile phone will automatically read the access point of the SIM card. For this reason, do not change the parameters of the access point; otherwise, you might not be able to access network sources. Browser Your mobile phone comes with a browser to access the Internet. Opening a Web Page 1.  Press Menu > Browser. A message states “Using data may incur additional charges.” Select Yes to continue or No to cancel. Charges are dependent on your ISP. 2. To open a web page, press Edit, enter the web page address in the URL field, and press Go. As you enter the address, matching web page addresses appear on the screen. If you see the address you want, select it and go directly to that web page. Setting a Home Page 1. While in the browser, select Menu. 2.  Under the dropdown menu that appears, select Settings > Advanced > Homepage. 3.  Enter the domain you would like to set as your homepage. 4.  Press Done > Save.  Managing Bookmarks You can store as many  bookmarks as needed on your  mobile phone. Adding a Bookmark 1. While in the browser, select Menu
 2.  Under the dropdown menu that appears, select Bookmarks > Add. 3.  Type a title you would like to recognize the webpage by. 4.  Enter the address and press Add. Opening a Bookmark 1. While in the browser, select Menu. 2.  Under the dropdown menu that appears, select Bookmarks. 3.  Find the bookmark you would like to view and press Open. Customizing the Browser Settings 1. While in the browser, select Menu. 2.  Under the dropdown menu, select Settings. 3.  From here, various changes can be made, such as what zoom setting you would like to be at. 4.  More options can be found under Advanced.  Managing a Web Page To navigate a web page, use the directional arrows to move your cursor. When hovering over the area you would like to zoom in on or the link you would like to click, press the center Select button. Use the keypad to type out any web addresses or search terms. The Menu button lets you access the address bar, bookmarks, settings, and various other navigation tools. Bluetooth Your mobile phone includes Bluetooth connectivity, which allows you to create a wireless connection with other Bluetooth devices so that you can share files with others, talk hands-free with a Bluetooth headset, or even transfer photos on your phone to your PC. If you are using Bluetooth, remember to stay within 10 meters (33 feet) of your Bluetooth devices. Be aware that obstacles like walls or other electronic equipment may interfere with your Bluetooth connection. Turning On Bluetooth  1.  Press Menu > Settings > Connectivity > Bluetooth. 2.  Press Select to set the Bluetooth power to On. The Bluetooth icon appears at the top of the screen. 3. To set the visibility to On and make your phone visible to other Bluetooth devices, press Select. The Bluetooth options allow you to search for other Bluetooth devices, customize your phone Bluetooth name, and use advanced features.  Pairing and Connecting a Bluetooth Device Your mobile Bluetooth lets you do the following:   Hands Free Profile (HFP): allows you to use a hands-free Bluetooth device.
   Headset Profile (HSP): allows you to use a mono Bluetooth headset.   Object Push Profile (OPP): allows you to transfer files through Bluetooth.   Advanced Audio Distribution Profile (A2DP): allows you to use a stereo Bluetooth headset.   A/V Remote Control Profile (AVRCP): allows you to control what plays through the Bluetooth headset remotely. Before you use Bluetooth, you need to pair your mobile phone with another Bluetooth device as follows: 1.  Ensure that the Bluetooth function on your mobile phone is enabled. 2.  Go to Menu > Settings > Connectivity > Search audio device. Your mobile phone will then scan for Bluetooth devices in range. 3.  Select the device you  want to pair with  your  mobile phone. 4.  Enter the pairing password to complete the connection. Note: After pairing is complete, connecting to that Bluetooth device again does not require the password. Sending Files  via Bluetooth With Bluetooth, you can share pictures, videos, or music files with your family and friends. To send files via Bluetooth: 1.  Press Menu > File Manager > Options > Open. 2.  Select a folder (for example, Photos), and press Options > Open. 3.  Select a photo to send, and press Options > Send > Via Bluetooth. 4.  Select a paired device. Disconnecting or Unpairing a Bluetooth Device 1.  Press Menu > Settings > Connectivity > Bluetooth > My device. 2.  Scroll to active connection. 3.  Select Option > Disconnect. Multimedia In addition to being a communication device and personal  assistant,  your  mobile phone also provides you with  a multitude of entertainment possibilities. You can take photos, create videos  and audio  clips, and download and listen  to music. Taking Photos and Recording Videos The camera is a combination of camera and camcorder that you can use to shoot and share pictures and videos. Taking a Photo 1.  Press Menu > Camera. 2.  Compose  your  photo within the photo  capture screen.
 3. Press the center Select key to take your photo. 4. Press the return arrow right soft key to close the camera. 5. End/Power down key will exit the camera application. Viewing Your Photos 1.  Press Menu > Multimedia > Image viewer. Your photos appear as thumbnails. 2.  Select a photo and press Options to choose various tasks, including view, send, and delete photos. Shooting a Video 1.  Press Menu > Camera. 2.  Press down on the directional pad to change to video recorder.  3.  Ready your video within the capture screen. 4.  Press the center Select key to begin the recording. 5. To end the recording, press the stop button. 6.  The video will be automatically saved in your media files. Viewing Your Videos 1.  To view your video immediately after recording, select the menu button on the left of the screen.  2.  Scroll down to select play. 3.  Alternatively, go to Menu > File Manager > Videos. Enjoying Music You can transfer music files from your PC to your microSD card so you can listen to music on your mobile phone. Copying Music to  the  Micro SD Card 1.  Insert your microSD card. 2.  Connect the phone to your computer with a USB cable. 3. On your computer, navigate to the USB drive and open it. 4.  Create a folder in the root directory of the microSD card (for example, Music). 5.  Copy the music from your computer to the folder you created. 6.  After copying the music, eject the drive as required by your computer operating system to safely remove the mobile phone. 7.  Disconnect the mobile phone from the computer. Playing Music 1.  Go to Menu > Multimedia > Media player > My playlists. 2.  Select the song you would like to play and press the center Select key.
 Tip: When you are listening to music, press Back to use another application. Your music continues to play. To return to the music controls,  Adding Music to  a Playlist 1.  Go to Menu > Multimedia > Media Player > My Playlists. 2.  Press Options, choose New. 3.  Enter preferred name for the new playlist, press Options > Done. 4.  Press Add, choose your storage device and follow the directory path to locate your audio files. 5.  Press OK to add music to the playlist.  Listening to FM Radio FM Radio allows you to listen to FM radio stations on your mobile phone. Since FM Radio uses the provided wired stereo headset as the antenna, connect the headset first to the audio jack of your phone before opening the application. Playing the FM Radio 1.  Be sure that headphones are plugged into the audio jack. 2.  Press Menu > Multimedia > FM radio. 3.  The FM Radio automatically scans for available FM channels, saves them as presets, and plays the first FM channel found. 4.  To control the volume, press the Volume Up and Volume Down keys on the side of the phone. 5. To tune the radio, press the Left and Right scroll keys. 6. To turn the radio off and on, press the Up and Down scroll keys. Recording the FM Radio 1.  To record the radio, press Options > Record. The radio begins recording. 2.  Press Pause, Continue, or Stop. 3.  Once the recording is stopped you will be prompted to save by pressing the center Select key. 4.  Recorded sessions can be found under Menu > Multimedia > Sound Recorder. Fun and Games Options:   Java   Google Maps   Java settings
 Using Maps Maps lets you find your current location, view real-time traffic conditions (depending on availability in your  location), and get detailed directions to various destinations on a satellite, traffic, or other kind  of map. Enabling Location Before you open Maps to  find your location or search for places of interest, you must enable the “location source” receiver.  Go to Menu > Settings > GPS Settings > Turn Receiver on > Yes for confirmation. Opening Maps Maps must be downloaded from the browser before you can access the application. 1.  Go to Fun & Games > Google Maps. 2.  You will be redirected to the browser and prompted to download the application. 3.  Confirm Yes. 4.  After Maps has been downloaded, it can be accessed in Fun & Games. Searching for Places of Interest 1. While viewing a map, press Menu > Search Map. 2.  Enter the place you  want to search, then press the center Select button and confirm your selection.  Note: You can also select one option from the suggestions list. 3.  Your search results  will  then be displayed. Press the center Select button to display information about your results. Getting Directions 1. While viewing a map, without a destination chosen, press Menu > Get Directions. 2.  Enter the starting point in the first text box, and then enter your destination in the second text box.  3.  Choose the tab for car, public transit, or walking directions. 4.  Select Show directions. 5.  A list will appear with the instructions for how to reach your destination. Note: To view a step on the map, highlight the desired step and select it with the center Select key. 6.  When you finish viewing or following the directions, press Back to return to the map. 7. Clear Map to reset the map.
 Using Other Applications Using the  Calendar Use the calendar to create and manage  events,  meetings, and appointments. Creating a Calendar Event 1.  Press Menu > Organizer > Calendar. 2.  Use the scroll keys to select a date. 3. Press Options > Add event. 4. Enter the event details, such as type of event (such as a reminder or meeting), start and end times, subject, frequency, location, and any details. 5. Press OK and then Yes to confirm. Setting the Alarm You can set a new alarm  or modify an existing alarm. 1.  Press Menu > Organizer > Alarm. 2.  Use the scroll keys to select a time and press Edit. 3. Use the left/right scroll keys to set the alarm On. 4. Enter the alarm time in 4-digit format. To toggle between AM and PM, press the Select key while the time is highlighted. 5. Use the scroll keys to set the alarm details, such as frequency, alarm tone, snooze minutes, and alert type. 6. Press Done and then Yes to save. The time appears in the list of alarm times. An alarm icon appears at the top of the screen. Using the Calculator Use the calculator to solve  simple arithmetic problems or use its advanced operators to solve more  complex equations. 1.  Press Menu > Organizer > Calculator. 2.  Use the scroll keys to add, subtract, multiply, or divide. For example:  Use the keypad to enter “100”.   Scroll to select the multiply sign (X).  Enter “5”.   Press OK. The answer “= 500” appears.
 Using the  File Manager File Manager allows you to organize, edit, and delete files and folders. Creating a Folder 1.  Press Menu > File Manager. The phone displays the total space and the free space. 2.  Press Options > Open. The phone displays a list of folders, such as My Music and Photos. 3. Press Options > New folder. 4. Use the keypad to enter the name of the new folder and press Select. The new folder appears in the folder list. Moving or Copying Files 1.  Press Menu > File Manager. 2.  Press Options > Open. 3.  From the folder list, open the source folder that contains a file you want to copy. 4. Press Options > Copy > Select.  “Copy to” appears at the top of the screen. 5. Press Options > Open > [destination folder] >Select. The file is copied to the destination folder. 6.  Open the destination folder to ensure that the file copied. Deleting Files 1.  Press Menu > File Manager. 2.  Press Options > Open. The phone displays a list of folders, such as My Music and Photos. 3.  Open the source folder that contains the file you want to delete. 4. Press Options > Delete. 5. Press Yes to confirm. The file is deleted from the folder.
 Managing Your Mobile Phone Use Menu > Settings to configure your phone. Settings include options for phone, GPS, security, connectivity, sound effects, and restoring factory settings. Setting the  Date and Time When you first start the phone, you are asked if you want the time and date to update automatically using the time provided by the network. Note: When the time provided by the network is automatically used, you cannot set the date, time, and time zone. 1.  Press Menu > Settings > Phone settings > Time and date > Set time/date. 2.  Enter the time in HH:MM (hour:minutes) format. Press Select to toggle between AM and PM. 3. Enter the date in DD.MM.YYYY (day.month.year) format. 4. Use the scroll keys to toggle daylight savings off and on. 5. Press OK. The Time and date menu also allows you to enter your home city, change the time and date format, and update with your time zone. If you want the phone to auto-update the time, press Phone settings > Auto update time and use the scroll keys to toggle off and on. Setting the  Display Adjusting the  Screen Brightness and Display Time 1.  Press Menu > Settings > Phone settings > Misc. settings > LCD backlight. 2.  Use the scroll keys to adjust the brightness lighter or darker. 3.  Use the scroll keys to adjust the time in seconds before the screen turns off when it is idle. 4. Press OK. Setting Phone Ringtone To adjust phone volume and ringtone, press Menu > User Profiles. Alternatively, press the Select key from the main screen. The User profiles menu allows you to adjust or customize general phone settings, create and activate your own style of settings, and adjust the volume for silent, meeting, or outdoor use. Turning On Silent Mode 1.  From the main screen, press Select. 2.  Under User profiles, press Silent > Options > Activate.  The phone remains in Silent mode until you select and activate another setting.
 Customizing the Ringtone Types and Volume Under User profiles, you can customize settings such as the alert type (ring/vibrate), ring type, incoming call ringtone, ringtone volume, message volume, keytone volume, and power on and off tones. As you scroll down through the settings, use the left/right scroll keys to increase/decrease the volume for each setting. For example, under User profiles > General > Options > Customize, select Ringtone volume and press the left/right scroll keys to decrease/increase the volume. Press Options to Change or Save. Setting Phone Services 1.  Press Menu > Services. Setting up the Default Network 1. On the Settings  screen, select Network Settings. 2.  Here you can change your Network Selection and Service selection, view your Network information, and change GPRS Connection settings. Note: Check the availability of service and plan rates of data connections with  your network service provider. Ways to Free Up Your Mobile Phone Memory   Move files and email attachments to the microSD card.  In the Browser, clear all temporary Internet files and Browser history information.   Uninstall the downloaded programs that you no longer use (i.e. Google Maps).   Reset your mobile phone. Resetting Your Mobile Phone Restoring Factory Data If you reset your phone to the settings that were configured at the factory, all of your personal data from internal phone storage, including information about your Google Account, any other accounts, your system and application settings, and any downloaded applications will be erased. Resetting the phone does not erase any system software updates that you downloaded or any files on your microSD card, such as music or photos. 1.  Press Menu > Settings > Restore factory settings. 2. You will be asked to “Input phone password”. The factory default password is 1122. If you have changed the default password, enter your chosen password. 3.  Press OK. A message will read, “Restore settings and restart the phone?” Press Yes to continue or No to cancel. .
 Specifications   Item Specifications* Operating System Proprietary Processor MTK 6276W Memory 128MB/64MB Micro SD card support up to 32G Network 2G GSM/GPRS/EDGE 3G WCDMA (Max data rate: 384 kbps) Band *** GSM/GPRS/EDGE Quad-Band 850/900/1800/1900 MHz EU version: WCDMA Dual-Band 900/2100MHz (Europe/Africa) US Version: WCDMA Tri-Band 850/AWS (1700/2100)/1900 (USA, Canada, Latin America) Please check with your reseller to verify which version you have purchased. Display 2.2” QVGA 240 X 320 TFT Camera 3 MP Video player and Capture Connectivity Bluetooth V2.0 +EDR/A2DP 3.5mm headset jack Micro USB2.0 Battery 1150mAh (removable) Talk time up to 10 hours Standby up to 23 days Others Bluetooth, GPS Extras FM radio
             * Design and specifications are subject to change without prior notice. Loud hands-free speakerphone Dimensions 123 x 56 x 17.5mm Weight 136 g MIL SPEC 810G and IP67 Certified Impact resistant up to 1.8M Waterproof up to 1m for 30 mins (battery door must be correctly fitted and all ports must be sealed securely) Operational between -25°C (-13 F) to 55°C (131 F) Resistant to dust
 Appendix Warnings and Precautions This section  contains important information pertaining to the operating instructions of your device.  It also contains information about  how to use the device safely. Read this information carefully before  using  your device. Waterproof  Casing USB and Headphone Port covers must be securely in place, and the rear cover properly fitted and locked to ensure the device will meet this level of protection. Electronic Device Power off your  device if using  the device is prohibited. Do not use the device when  using the device causes danger  or interference with  electronic devices. Medical Device Follow  rules and regulations set forth by hospitals and health  care facilities.  Do not use your device when  using  the device is prohibited. Pacemaker manufacturers recommend that a minimum distance  of 15 cm be maintained between  a device and a pacemaker to prevent potential interference with  the pacemaker.  If you are using  a pacemaker,  use the device on the opposite side of the pacemaker and do not carry the device in your  front pocket.  Potentially  Explosive Atmosphere Power off your  device in any area with  a potentially explosive atmosphere, and comply with all signs and instructions. Areas that may have potentially explosive atmospheres include the areas where you would normally be advised to turn off your vehicle engine. Triggering of sparks in such areas could cause an explosion or a fire, resulting in bodily injuries or even deaths. Do not power on your device at refueling points such as service stations. Comply with restrictions on the use of radio equipment in fuel depots, storage, and distribution areas, and chemical plants. In addition, adhere to restrictions in areas where blasting operations are in progress. Before using the device, watch out for areas that have potentially explosive atmospheres that are often, but not always, clearly marked. Such locations include areas below the deck on boats, chemical  transfer  or storage  facilities, and areas where  the air contains chemicals  or particles  such as grain,  dust, or metal  powders.  Ask the manufacturers of vehicles using liquefied petroleum gas (such as propane or butane) whether this device can be safely used in their vicinity. Traffic Security Observe local  laws and regulations while  using  the device.  In addition, if using  the device while driving a vehicle,  comply with  the following guidelines: Concentrate on driving. Your first responsibility is to drive safely. Do not talk on the device while driving. Use hands-free accessories.
 When you  have to make or answer  a call, park the vehicle  at the road side before  using your device. RF signals may affect electronic systems of motor vehicles. For more information, consult the vehicle manufacturer. In a motor vehicle, do not place the device over the air bag or in the air bag deployment area. Otherwise, the device may hurt you owing to the strong force when the air bag inflates. Do not use your device while flying in an aircraft. Power off your device before boarding an aircraft. Using wireless devices in an aircraft may cause danger to the operation of the aircraft and disrupt the wireless telephone network. It may also be considered illegal. Operating Environment Do not use or charge the device in dusty, damp, and dirty places or places with magnetic fields. Otherwise, it may result  in a malfunction of the circuit. The device complies with the RF specifications when the device is used near your ear or at a distance  of 1.5 cm from  your  body.  Ensure that the device accessories such as a device case and a device holster  are not  composed of metal components. Keep your  device 1.5 cm away from  your  body to meet  the requirement earlier mentioned. On a stormy day with  thunder, do not use your  device when  it is being  charged,  to prevent any danger  caused by lightning. When you  are on a call, do not touch  the antenna.  Touching the antenna  affects the call quality and results  in increase  in power consumption. As a result,  the talk time  and the standby time are reduced. While  using  the device, observe  the local  laws and regulations, and respect others’ privacy and legal rights. Keep the ambient temperature between  0°C and 40°C while  the device is being  charged. Keep the ambient temperature between –10°C to 55°C for  using  the device powered by a battery. Safety of Children Comply  with  all precautions with  regard  to children’s safety.  Letting  a child  play  with your device or its accessories,  which  may include parts that can be detached  from  the device, may be dangerous, as it may present  a choking  hazard. Ensure that  small  children are kept away from  the device and accessories. Accessories Choose only  batteries,  chargers,  and accessories approved for  use with  this model  by the device manufacturer. The use of any other  type  of battery,  charger,  or accessory may invalidate any warranty for the device, may be in violation of local rules or laws,  and may be dangerous. Please contact  your  dealer for information about the availability of approved batteries, chargers, and accessories  in your area. Battery and Charger Unplug the charger  from  the electrical  plug  and the device when  not in use. The battery  can be charged  and discharged hundreds of times  before  it eventually wears out. When the standby time and the talk time are shorter than the normal time, replace the
 battery. Use the AC power supply defined in the specifications of the charger. An improper power voltage may cause a fire or a malfunction of the charger. Do not connect  two  poles of the battery  with conductors, such as metal  materials, keys, or jewelries.  Otherwise, the battery  may be short-circuited and may  cause injuries  and burns on your body. If battery electrolyte leaks out, ensure that the electrolyte does not touch  your  skin and eyes. When the electrolyte touches  your  skin or splashes  into  your  eyes, wash your  eyes with clean water immediately and consult  a doctor. If there is a case of battery deformation, color  change, or abnormal heating  while  you charge or store the battery, remove the battery immediately and stop using it. Otherwise, it may lead to battery leakage, overheating, explosion, or fire. If the power cable is damaged (for example, the cord is exposed or broken), or the plug loosens, stop using the cable at once. Otherwise, it may lead to an electric shock, a short circuit of the charger, or a fire. Do not dispose of batteries in fire as they may explode. Batteries may also explode if damaged. Do not modify or remanufacture, attempt to insert foreign objects into the battery, immerse or expose to water or other liquids, expose to fire, explosion or other hazard. Avoid dropping the device or battery. If the device or battery is dropped, especially on a hard surface, and the user suspects damage, take it to a qualified service center for inspection. Improper battery use may result in a fire, explosion or other hazard. Promptly dispose  of used batteries  in accordance  with  local regulations. The device should  only be connected  to products that bear the USB-IF logo  or have completed the USB-IF compliance program. CAUTION – RISK  OF EXPLOSION IF BATTERY IS  REPLACED BY AN INCORRECT TYPE. DISPOSE OF USED BATTERIES ACCORDING TO  THE INSTRUCTIONS.  Cleaning and Maintenance The battery and charger  are not water-resistant. Keep them  dry.  Protect the device,  battery, and charger  from  water or vapor.  Do not touch  the charger  with  wet hands. Otherwise, it may lead to a short  circuit,  a malfunction of the device, and an electric  shock to the user. Do not place your  device,  battery,  and charger  in places where  they can get damaged because of collision. Otherwise, it may lead to battery leakage, device malfunction, overheating, fire, or explosion. Do not place magnetic storage media such as magnetic cards and floppy disks near the device. Radiation  from  the device may erase the information stored  on them. Do not leave your  device, battery,  and charger  in a place with  an extreme  high or low temperature. Otherwise, they may not function properly and may lead to a fire or an explosion. When the temperature is lower  than 0°C, performance of the battery is affected. Do not place sharp metal  objects  such as pins  near the earpiece. The earpiece may  attract these objects  and hurt  you  when  you  are using  the device. Before you clean or maintain the device,  power  off  the device and disconnect it from the
 charger. Do not use any chemical  detergent, powder, or other  chemical  agents (such as alcohol and benzene) to clean the device and the charger.  Otherwise, parts of the device may be damaged or a fire can be caused. You can clean the device and the charger with a piece of damp and soft antistatic cloth. Do not dismantle the device or accessories. Otherwise, the warranty on the device and accessories  is invalid and the manufacturer is not liable to pay for the damage. If the device screen is broken by colliding with  hard  objects,  do not touch  or try to remove the broken part. In this case, stop using  the device immediately, and then contact  an authorized service  center in time. Emergency Call You can use your  device for  emergency calls in the service  area. The connection, however, cannot  be guaranteed in all conditions. You should  not rely  solely  on the device for essential communications.  FCC Statement This mobile phone  complies with  part 15 of the FCC Rules. Operation is subject  to the following two conditions: (1) This device may not cause harmful interference, and (2) this device must accept any interference received, including interference that may cause undesired operation. This mobile phone  has been tested and found to comply with  the limits for  a Class B digital device,  pursuant to Part 15 of the FCC Rules. These limits are designed  to provide reasonable protection against harmful interference in a residential installation. This equipment generates, uses and can radiate  radio  frequency energy  and, if not installed and used in accordance with the instructions, may cause harmful interference to radio communications. However,  there is no guarantee  that interference will  not occur in a particular installation. If this equipment does cause harmful interference to radio  or television reception, which  can be determined by turning the equipment off and on, the user is encouraged to try to correct  the interference by one or more  of the following measures:   Reorient  or relocate  the receiving antenna.   Increase the separation between  the equipment and receiver.   Connect the equipment into  an outlet  on a circuit different from that to which  the receiver is connected.   Consult  the dealer or an experienced radio/TV  technician for help. FCC Caution: Changes or modifications not expressly approved by the party responsible for compliance could void the user‘s authority to operate the equipment. The antenna(s) used for this transmitter must not be co-located or operating in conjunction with any other antenna or transmitter. RF Exposure Information (SAR) This device meets the government’s requirements for exposure  to radio waves. This device is designed  and manufactured not to exceed the emission limits for exposure to
 radio  frequency (RF) energy  set by the Federal Communications Commission of the U.S. Government. For body  worn operation, this device has been tested  and meets  the FCC RF exposure guidelines for use with  an accessory that contains  no metal  and positions the handset  a minimum of 1 cm from the body.  Use of other  accessories  may not ensure compliance with FCC RF exposure guidelines. The highest  reported SAR values under  the FCC regulatory for the phone  are list below: Head SAR: 0.74 W/kg Body SAR: 0.93 W/kg The highest  reported SAR values under  the CE regulatory for the phone  are list below: Head SAR: 0.90 W/kg Body SAR: 0.79 W/kg  To reduce the level  of exposure  to radiation, please do the following: (i) use the mobile phone in good  reception conditions, (ii) use a hand  free kit, (iii)  for  pregnant  women,  please hold  the mobile phone  far from stomach, (iv) use a mobile phone far from  genital parts.  For the device which  tests in accordance  to EN60950-1:2006, it is mandatory to perform audio tests for EN50332. This device has been tested  to comply with  the Sound  Pressure Level requirement laid down in the applicable  EN 50332-1and/or  EN 50332-2 standards.  Permanent  hearing  loss may occur if earphones  or headphones  are used at high  volume for prolonged periods  of time. Cat phone User Guide Hearing Aid Compatibility (HAC) The Cat® B100 (US version) is hearing-aid compatible under the FCC requirements for hearing-aid compatibility (HAC). B100 HAC Rating: M3/ T3 The FCC hearing aid compatibility rules require that certain phones be tested and rated under the American National Standard Institute (ANSI) C63.19 hearing aid compatibility standards. The ANSI standard for hearing-aid compatibility contains two types of ratings:   M: For reduced radio-frequency interference to enable acoustic coupling with hearing aids that don’t operate in telecoil mode.  T: For inductive coupling with hearing aids operating in telecoil mode. These ratings are given on a scale from one to four, where four is the most compatible. A phone is considered hearing-aid compatible under the FCC requirements if it is rated M3 or M4 for acoustic coupling and T3 or T4 for inductive coupling. Hearing-aid compatibility ratings aren't a guarantee that a particular hearing aid works well with a particular phone. Some hearing aids may work well with phones that do not meet the FCC requirements for Hearing Aid Compatibility. To ensure that a particular hearing aid works well with a particular phone, use them together before purchasing. The SAR limit set by the FCC is 1.6W/kg. 0.9510.5621.130.871.5cm
 Prevention of Hearing  Loss Warning statement requirement under  EN 60950-1:A12. To prevent  possible  hearing  damage,  do not listen  at high  volume levels  for long periods. Using a headset at high volume can damage your hearing. To reduce the risk of damage to hearing, lower the headset volume to a safe and comfortable level.    Note:  For France, headphones/earphones for this device are compliant with  the sound pressure  level requirement laid down  in the applicable EN 50332-1: 2000 and/or EN50332-2: 2003 standard  as required by French Article  L.5232-1. Afin d’éviter des dommages auditifs éventuels, ne pas écouter à un niveau sonore élevé pendant une longue durée. L’écoute d’un baladeur musical à forte puissance peut endommager l’oreille de l’utilisateur et entraîner des troubles auditifs (surdité temporaire ou definitive, bourdonnements d’oreille, acouphénes, hyperacousie). Il est donc vivement recommandé de ne pas utilizer le baladeur à plein volume ni plus d’une heure par jour à volume moyen.  Background noise, as well as continued exposure to high volume levels, can make sounds seem quieter than they actually are. Turn on the audio and check the volume before inserting anything in your ear. For more information about hearing loss, consult the HAC User guide for Hearing Aid compatibility. Declaration of Conformity Complies  with  the essential requirements of Article  3 of the R&TTE 1999/5/EC Directive,  if used for its intended use and that the following standards  have been applied: 1.  Health (Article 3.1(a) of the  R&TTE Directive) Applied Standard(s):   EN 50360:2001/A1:2012   EN 62209-1:2006   EN 62209-2:2010   EN 62311:2008   EN 62479:2010 2. Safety (Article 3.1(a) of the  R&TTE Directive) Applied Standard(s):   EN 60950-1:2006/A11:2009+A1:2010+A12:2011   EN 50332-1:2000   EN 50332-2:2003 3.  Electromagnetic compatibility (Article 3.1 (b) of the  R&TTE Directive)
 Applied Standard(s):   EN 301 489-1 V1.9.2/-3 V1.4.1/-7 V1.3.1/-17 V2.2.1/-24 V1.51. 4. Radio frequency spectrum usage (Article 3.2 of the R&TTE Directive) Applied Standard(s):   EN 301 511 V9.0.2   EN 301 908-1 V5.2.1/ -2 V5.2.1   EN 300 328 V1.7.1   EN 300 440-1 V1.6.1/ -2 V1.4.1 5. EMC Directive  (2004/108 /EC) Applied Standard(s):   EN 61000-3-2:2006/A1:2009/A2:2009   EN 61000-3-3:2008   EN55022:2010/ AC:2011 Class B   EN55024: 2010
 CE Mark & NB Identification Number CETECOM Countries List where the device will be sold to Austria AT Malta MT Belgium BE Netherlands NL Cyprus CY Poland PL Czech Republic CZ Portugal PT Denmark DK Slovakia SK Estonia EE Slovenia SI Finland FI Spain ES France FR Sweden SE Germany DE United Kingdom GB Greece GR Iceland IS Hungary HU Leichtenstein LI Ireland IE Norway NO Italy IT Switzerland CH Latvia LV Bulgaria BG Lithuania LT Romania RO Luxembourg LU Turkey TR
 CE SAR  Compliance This device meets the EU requirements (1999/519/EC) on the limitation of exposure of the general public to electromagnetic fields by way of health protection. The limits are part of extensive recommendations for the protection of the general public. These recommendations have been developed and checked by independent scientific organizations through regular and thorough evaluations of scientific studies. The unit of measurement for the European Council’s recommended limit for mobile devices is the “Specific Absorption Rate” (SAR), and the SAR limit is 2.0 W/ kg averaged over 10 gram of tissue. It meets the requirements of the International Commission on Non-Ionizing Radiation Protection (ICNIRP). For body  worn operation, this device has been tested  and meets  the ICNIRP exposure guidelines and the European  Standard  EN 62311 and EN 62209-2, for  use with dedicated accessories.  Use of other  accessories  which  contain  metals  may not ensure compliance with ICNIRP exposure guidelines. SAR is measured  with  the device at a separation of 1.5 cm to the body,  while transmitting at the highest certified output power level in all frequency bands of the mobile device. The distance  of 1.5cm should be kept between body and device. Disposal and Recycling Information This symbol on the device (and any included batteries)  indicates  that they should  not be disposed  of as normal household garbage.  Do not dispose  of your  device or batteries  as unsorted municipal waste. The device (and any batteries) should be handed over to a certified collection point  for  recycling or proper  disposal  at the end of their life. For more  detailed information about  the recycling of the device or batteries,  contact  your local city office, the household waste disposal service, or the retail store where you  purchased this device. The disposal  of this device is subject  to the Waste from  Electrical  and Electronic Equipment (WEEE) directive of the European  Union.  The reason for  separating WEEE and batteries from other  waste is to minimize the potential environmental impacts  on human health of any hazardous  substances  that may be present. Reduction of Hazardous Substances This device is compliant with  the EU Registration, Evaluation, Authorization and Restriction of Chemicals (REACH) Regulation (Regulation  No 1907/2006/EC of the European  Parliament and of the Council)  and the EU Restriction  of Hazardous Substances  (RoHS) Directive (Directive 2002/95/EC of the European  Parliament and of the Council).  For more information about the REACH compliance of the device, visit the Website www.catphones.com/certification. You are recommended to visit  the Website regularly for up-to-date information. EU Regulatory Conformance Hereby,  the manufacturer declares that this  device is in compliance with  the essential requirements and other  relevant provisions of Directive  1999/5/EC. For the Declaration of Conformity, visit the Web site www.catphones.com0682 Note: Observe the national local regulations in the location where the device is to be used. This
 device may be restricted for use in some or all member states of the European Union (EU). Note: This device may be operated in all member states of the EU. France: Outdoor use limited to 10 mW e.i.r.p. within the band 2454-2483.5 MHz. Italy: For private use, a general authorization is required if WAS/RLAN’s are used outside own premises. For public  use, a general authorization is required.  Luxembourg: General authorization required for  network and service supply. Norway:  This subsection does not apply for  the geographical area within a radius  of 20 km from the centre of Ny-Ålesund. V100R001B03_01 Industry Canada Statement This device complies with Industry Canada license-exempt RSS standard(s). Operation is subject to the following two conditions: 1.  This device may not cause interference. 2.  This device must accept any interference, including interference that may cause undesired operation of the device. Le present appareil est conforme aux CNR d’Industrie Canada applicables aux appareeils radio exempts de license. L’exploitation est autoriséaux deux conditions suivantes: 1. L’appariel ne doit pas prduire de brouillage. 2. L’utilisateur de l’appareil doit accepter tout brouillage radioélectrique subi, meme si le brouillage est susceptible d’en compromettre le fonctionnement. This class B digital apparatus complies with Canadian ICES-003. Cet appareil numérique de la classe B est conforme à la norme NMB-003 du Canada. Radiation Exposure Statement: The product comply with the Canada portable RF exposure limit set forth for an uncontrolled environment and are safe for intended operation as described in this manual. The further RF exposure reduction can be achieved if the product can be kept as far as possible from the user body or set the device to lower output power if such function is available. Déclaration d’exposition aux radiations: Le produit est conforme aux limites d’exposition pour les appareils portables RF pour les Etats-Unis et le Canada établies pour un environnement non contrôlé. Le produit est sûr pour un fonctionnement tel que décrit dans ce manuel. La reduction aux expositions RF peut étre augmentée si l’appareil peut être conserve aussi loin que possible du corps de l’utilisateur ou que le dispositive est réglé sur la puissance de sortie la plus faible si une telle function est disponible.

Navigation menu