Bumpboxx V3 PA RECORDED SYSTEM User Manual user manual
Bumpboxx llc PA RECORDED SYSTEM user manual
Bumpboxx >
user_manual
USER GUIDE
OPERATION MANUAL
1

OPERATION MANUAL
2
1. The bumpboxx TM Freestyle uses an all-
inclusive performance audio receiver. This
receiver features multiple media capabilities
to play all of your music and has bumpboxx’s
TM proprietary built-in amplifier, all designed
for our woofers & horns for a complete all-
around crisp sound and deep bass kick.
2. Your bumpboxx TM Freestyle features a
heavy duty rechargeable battery that can play
at maximum volume for up to 8-10 hours! At
normal listening volume, your bumpboxx TM
Freestyle will play up to 12 hours between
charges. NO DDD batteries to buy!
3. Music Media Choices:
• Bluetooth enabled, connects any Bluetooth
enabled electronic device
•Auxiliary Port, connects to any device with a
3.5mm auxiliary cable (Not Supplied)
• USB & SD ports for any pre-recorded music
you may already have. Think demo tapes,
mixes, etc...
• Microphone Inputs. Comes with wireless
microphone and TRS input jack for your
wired microphone
FEATURES
•Bluetooth connects:Short press "mode"button to
switch Bluetooth.On your smartphone, scan and
select "Bumpbox" to match.

OPERATION MANUAL
3
3. Music Media Choices (Continued):
• Guitar capable with TRS input jack & sepa
rate volume control
• 1 “Line In” and 2 “Line Out” jacks. This
unique bumpboxx TM feature allows you to
“daisy chain” multiple bumpboxx TM
Freestyle units together and play the same
media through all of them at once.
• Charging port plugs directly into the side
panel for charging the internal battery.
4. Wireless Remote
Additional features include: EQ: Bass, Treble,
Volume, Microphone Volume, Guitar Volume.
Perfect & portable for any event. Note the EQ
button works in USB mode only!
FEATURES
OPERATION MANUAL
4
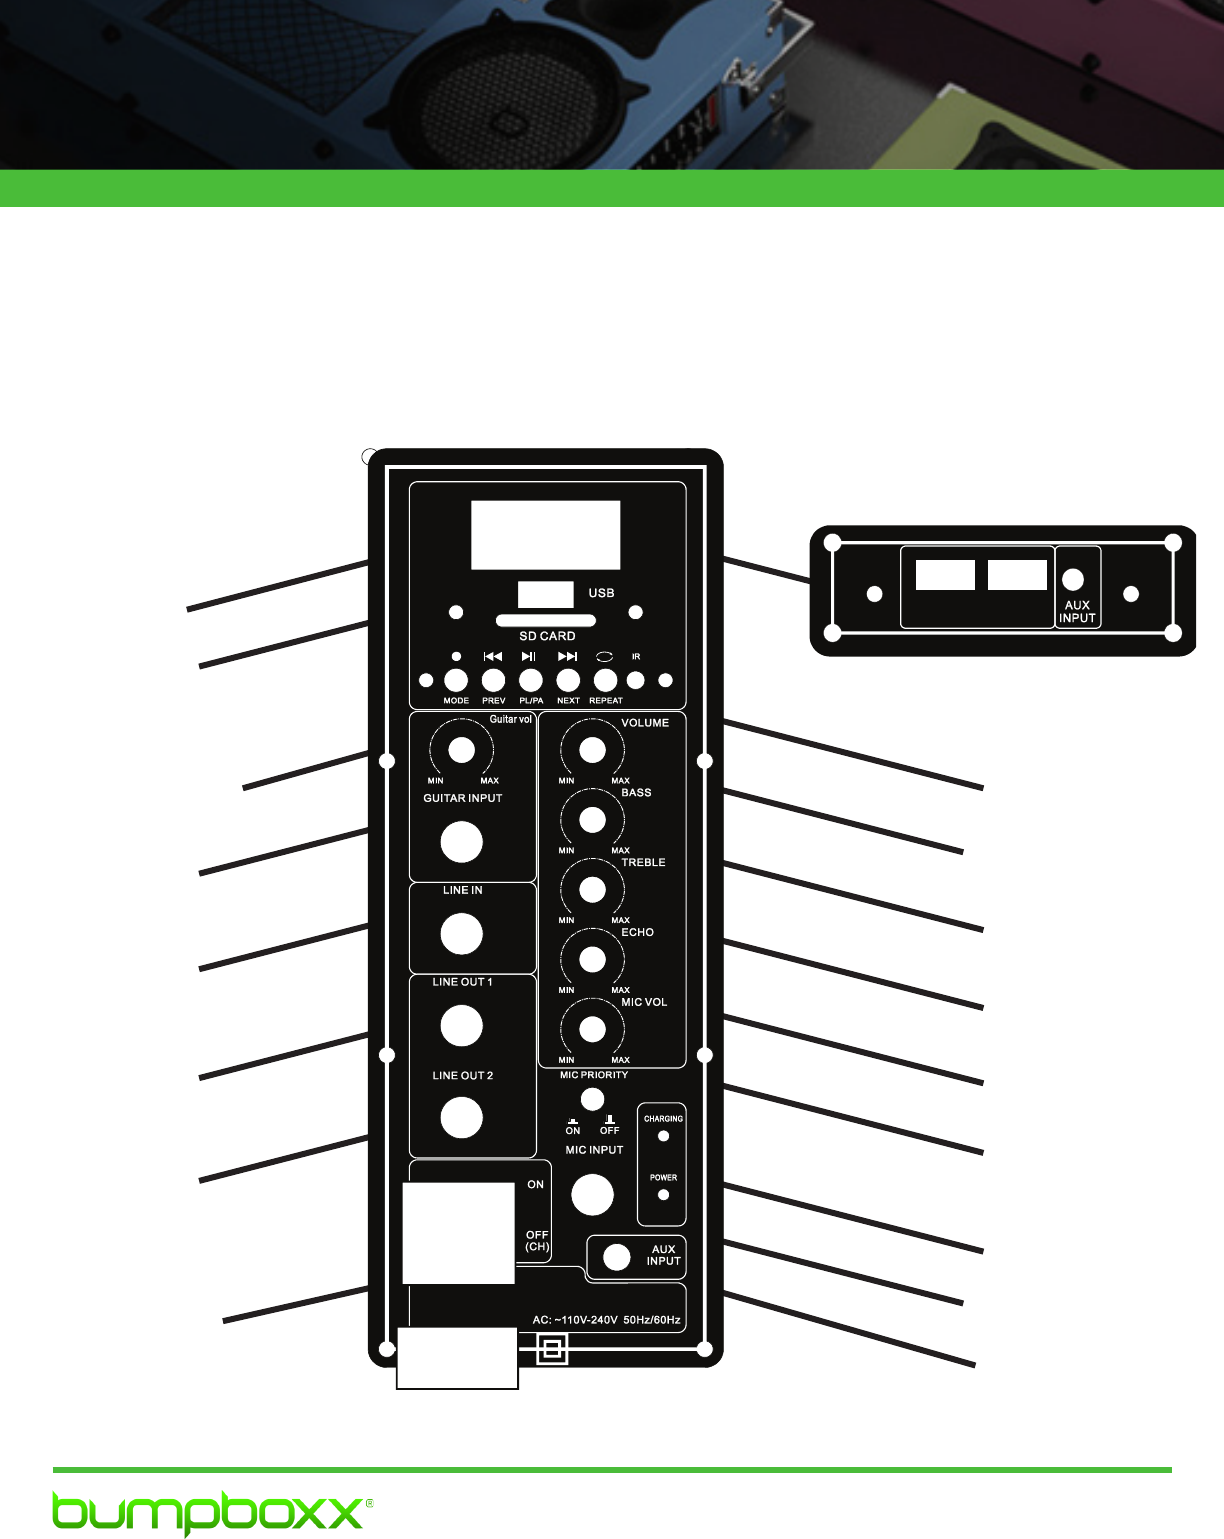
PANEL
PLUGIN
LED DISPLAY
FLASH DRIVE
PLAYER READER
MENU FUNCTIONS
GUITAR VOLUME
GUITAR INPUT
LINE IN
LINE OUT 1
LINE OUT 2
POWER ON/OFF
MAX. VOUME
EQ: BASS
EQ: TREBLE
EQ: ECHO
MIC. VOL.
MIC. PRIORITY
POWER ON/OFF
MIC. WIRED AUX
AUX. INPUT
AC ADAPTER
SD/MMC CARD
DC 5V 1.2A OU TPUT
US B 1 US B 2

OPERATION MANUAL
5
1. POWER BUTTON
2. PLAY/PAUSE BUTTON: Press the arrow keys to
enter the desired track then press the play button. If
you input the desired track and you are out of range
it will continue to play the current track.
3. EQ BUTTON: The sound equalizer change mode.
MODES: Natural, Rock, Pop, Classic, Soul, Jazz, DBB
& DRS WOW.
4. STOP BUTTON: Will stop the current track playing.
5. MUTE BUTTON: Mute the current sound with this
button.
6. PREVIOUS BUTTON: Will play the previous track
in the play list.
7. NEXT BUTTON: Will skip to the next track in the
play list.
8. VOLUME DECREASE BUTTON: decrease current
volume.
9. VOLUME INCREASE BUTTON: increase current
volume.
10. REPEAT BUTTON:
• Press once for one-time repeat all
• Press twice for random play
• Press three times for repeat all
• Press four times for repeat all
11. USB/SD/MMC CARD FUNCTION
12. ARROW BUTTONS: left & right to switch
between or go backwards between specific tracks
13. PLAY & PAUSE BUTTON will record the USB
thumb stick only
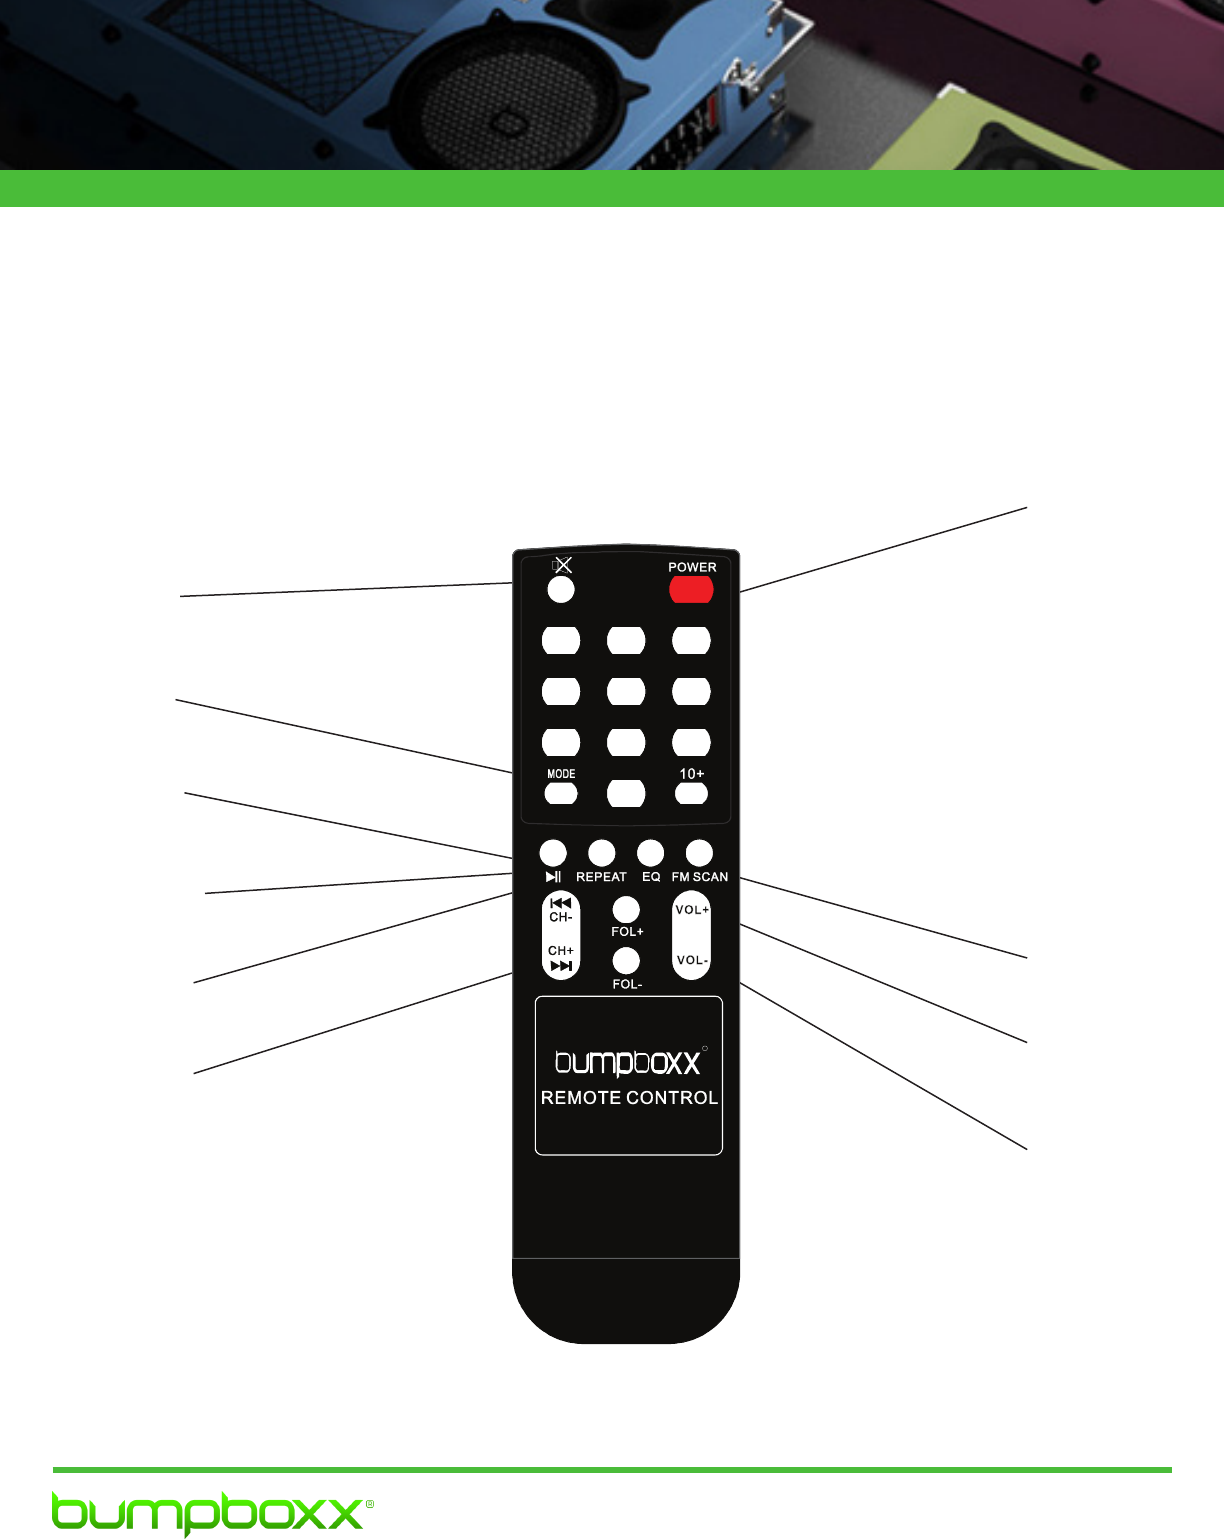
REMOTE CONTROL FUNCTIONS
OPERATION MANUAL 6
POWER BUTTON
MODE BUTTON
MUTE BUTTON
SCAN MUSIC
EQUALIZER
SOUND
REPEAT MUSIC
VOLUME
DECREASE
VOLUME
INCREASE
BACK BUTTON
PLAY/PAUSE
BUTTON
12
456
7 9
0
R
REMOTE CONTROL FUNCTIONS
3
8

OPERATION MANUAL
7
OPERATION INSTRUCTIONS
1. POWER BUTTON
2. PLAY/PAUSE BUTTON: Press the arrow keys to
enter the desired track then press the play button. If
you input the desired track and you are out of range
it will continue to play the current track.
3. EQ BUTTON: The sound equalizer change mode.
MODES: Natural, Rock, Pop, Classic, Soul, Jazz, DBB
& DRS WOW.
4. STOP BUTTON: Will stop the current track playing.
5. MUTE BUTTON: Mute the current sound with this
button.
6. PREVIOUS BUTTON: Will play the previous track
in the play list.
7. NEXT BUTTON: Will skip to the next track in the
play list.
8. VOLUME DECREASE BUTTON: decrease current
volume.
9. VOLUME INCREASE BUTTON: increase current
volume.
10. REPEAT BUTTON:
• Press once for one-time repeat all
• Press twice for random play
• Press three times for repeat all
• Press four times for repeat all
11. USB/SD/MMC CARD FUNCTION
12. ARROW BUTTONS: left & right to switch
between or go backwards between specific tracks
NOTE: For best longevity of battery it is advised to
tip off charge after every use.

OPERATION MANUAL
8
TROUBLE-SHOOTING
NO SOUND OR SOUND KEEPS CUTTING IN AND OUT?
Please make sure your bumpboxx is fully charged.
Another reason for sound cutting out is you are out of
Bluetooth range.
I CANNOT PAIR MY BLUETOOTH TO MY BUMPBOXX
Please try turning the Bluetooth off & then on in your phone
settings. Then press the Menu Button on the bumpboxx
until the bluetooth “BLUE” pairing is set, you will hear a
chime and then another when you pair to your Bluetooth
Device.
MY LED SOUND MOTION DISPLAY ISN’T WORKING
Please move your bumpboxx device out of direct sunlight.
The LED display isn’t as visible with UV rays from the
sunlight.
MY REMOTE CONTROL ISN’T WORKING
Please make sure you have fresh batteries installed or make
sure you are aiming directly at the side panel. We use an IR
remote so you will need to point at the side panel.
THE BLUE LIGHT WILL BLINK WHILE CHARGING. When your
bumpboxx is fully charged it will be solid blue.
MY VOLUME IS VERY LOW EVEN THOUGH VOLUME IS MAX
Try pressing and holding the >> button until it reads 30 in
the display box. This is the volume override.
FCCWarningStatement
Changesormodificationsnotexpresslyapprovedbythepartyresponsibleforcompliancecouldvoidthe
user’sauthoritytooperatetheequipment.Thisequipmenthasbeentestedandfoundtocomplywiththe
limitsforaClassBdigitaldevice,pursuanttoPart15oftheFCCRules.Theselimitsaredesignedto
providereasonableprotectionagainstharmfulinterferenceinaresidentialinstallation.Thisequipment
generatesusesandcanradiateradiofrequencyenergyand,ifnotinstalledandusedinaccordancewith
theinstructions,maycauseharmfulinterferencetoradiocommunications.However,thereisno
guaranteethatinterferencewillnotoccurinaparticularinstallation.Ifthisequipmentdoescause
harmfulinterferencetoradioortelevisionreception,whichcanbedeterminedbyturningtheequipment
offandon,theuserisencouragedtotrytocorrecttheinterferencebyoneormoreofthefollowing
measures:
‐‐ Reorientorrelocatethereceivingantenna.
‐‐ Increasetheseparationbetweentheequipmentandreceiver.
‐‐
Connecttheequipmentintoanoutletonacircuitdifferentfromthattowhichthereceiverisconnected.
‐‐ Consultthedealeroranexperiencedradio/TVtechnicianforhelp.
This device complies with part 15 of the FCC Rules. Operation is subject to the following
two conditions: (1) This device may not cause harmful interference, and
(2) this device must accept any interference received, including interference that may
cause undesired operation.