CALTTA TECHNOLOGIES Z9U Digital Portable Radio, UHF DMR User Manual
CALTTA TECHNOLOGIES CO., LTD. Digital Portable Radio, UHF DMR
User Manual
Quick Start Guide
Digital Handheld Terminal
LEGAL INFORMATION
Copyright© CALTTA TECHNOLOGIES CO.,LTD.
1
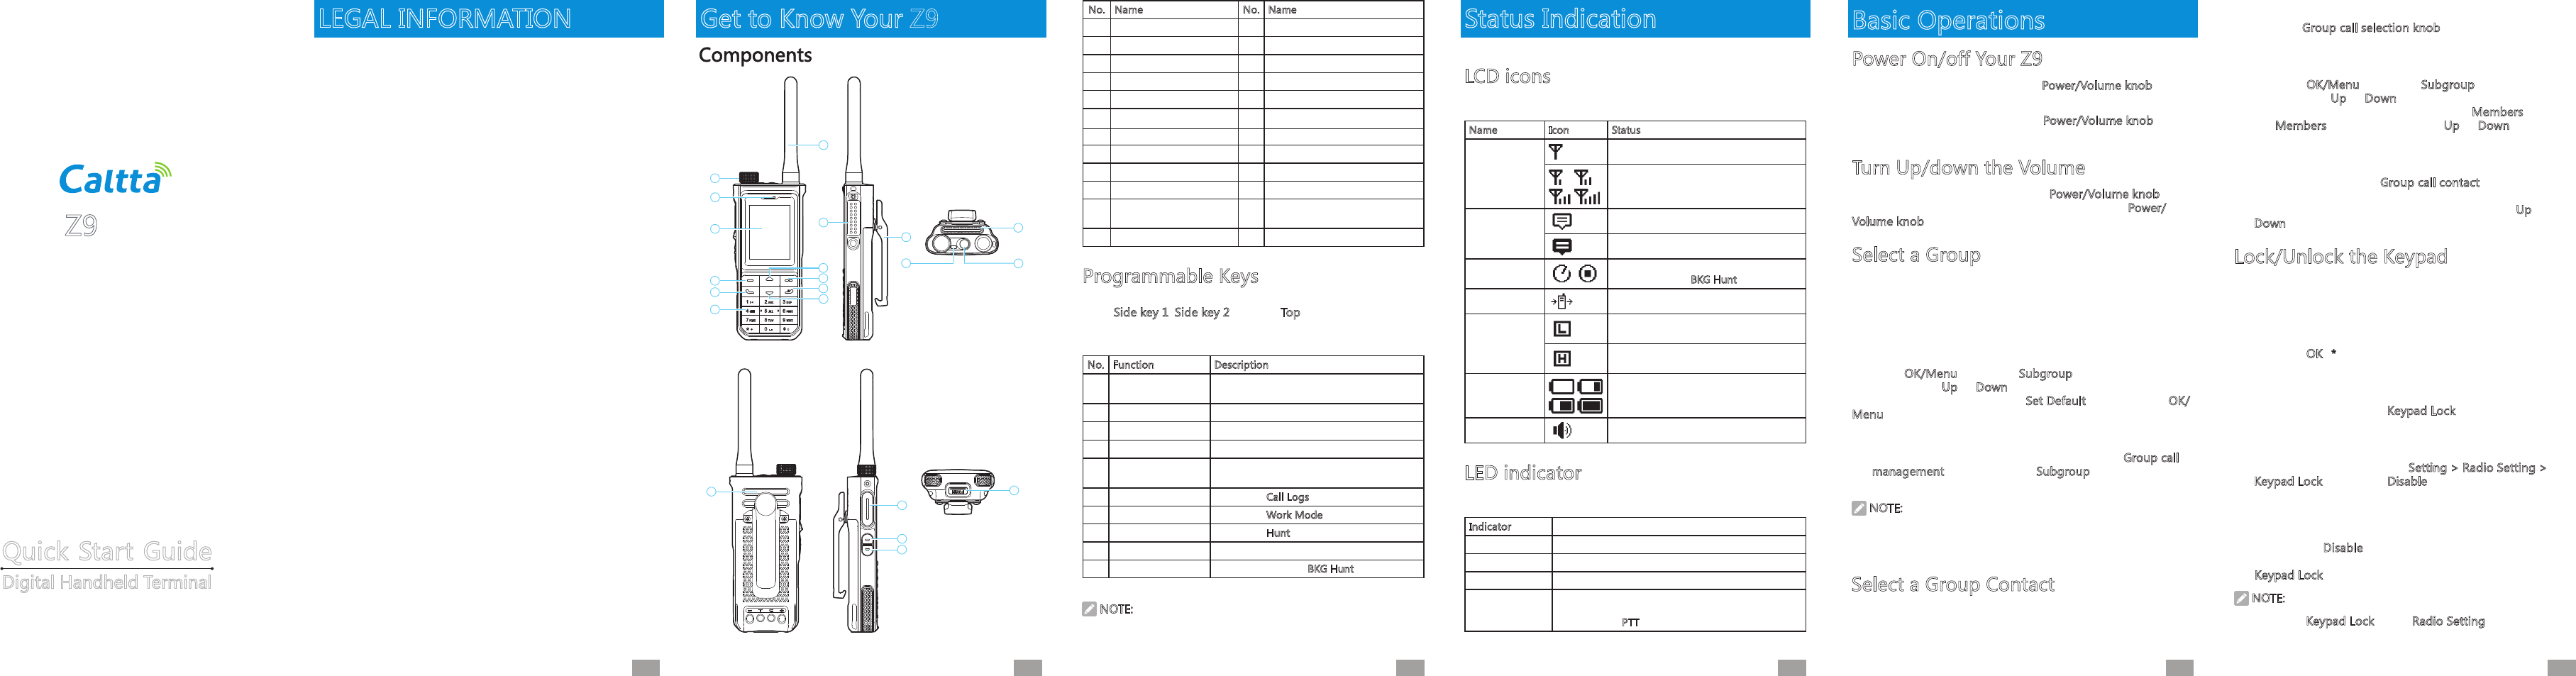
Get to Know Your Z9 No. Name No. Name
1Group call /Volume knob 13 Down key
2 Microphone 14 BATT CLIP
3 LCD 15 LED indicator
4 OK/Menu key 16 PTT key
5 Call/Answer key 17 Side key 1
6 Digit keypad 18 Side key 2
7 Back Speaker 19 Top Speaker
8 Antenna 20 Top key
9 Accessory interface 21 Push button
10 Up key
11 Back/Group call
management key
12 Power/Hook key
Programmable Keys
To facilitate operations, your Z9 U(1) provides three programmable
keys (Side key 1, Side key 2, and the Top key), and each
programmable key can be assigned with one of the following
functions by the product distributor through programming.
No. Function Description
1 Call release Releases an ongoing call or stops
establishing a call.
2 Keypad lock Locks or unlocks the keypad immediately.
3 Power level Adjusts the transmit power level quickly.
4 Private call contact Opens the private call contact list directly.
5 Group call contact Opens the contact list of a contact group
directly.
6 Call logs Opens the Call Logs menu directly.
7 Work mode Opens the Work Mode menu directly.
8 Hunt Opens the Hunt menu directly.
9 Manual Hunt Restarts scanning and registration
10 BKG Hunt Enables or disables BKG Hunt.
NOTE:
The functions of a programmable key may vary with the
operation (press or press and hold). For details, contact the
local distributor.
Status Indication
LCD icons
The following icons may be displayed on the LCD.
Name Icon Status
Signal strength
No signal
The more the signal bars are, the
stronger the signals are.
Message
SMS message unread
The message box is full.
Hunt Your Z9 is in Hunt status. This icon is
not displayed in BKG Hunt.
Roaming Your Z9 is in roaming status.
Transmit
power
The current channel transmits signals in
low power.
The current channel transmits signals in
high power.
Battery level
The longer the battery progress bar is,
the higher the battery level is.
Speaker The speaker is on.
LED indicator
The LED indicator indicates the operating status of the Z9 U(1).
Indicator Z9 U(1)
Lit green Your Z9 U(1) is receiving voice signals.
Lit red Your Z9 U(1) is transmitting voice signals.
Flashing orange Your Z9 U(1) is in Hunt status.
Lit orange
After a call is established, there is no voice
transmitted or received in the service channel. You
can press the PTT key to initiate a call.
2 3 4
No part of this publication may be quoted, reproduced,
translated or used in any form or by any means, electronic or
mechanical, including photocopying and microfilm, without
the prior written permission of CALTTA TECHNOLOGIES CO.,LTD.
Violators Will Be Prosecuted.
Z9 U(1)
CALTTA TECHNOLOGIES CO.,LTD. reserves the right to make
modifications on typographical errors or update specifications
in this guide without prior notice.
The figures in this manual are for reference only. For the
product structure and specifications of the battery and charger,
refer to the actual product. The accessories provided with the
produc may vary with product models an functions.
7
14
8
9
20
19
15
10
11
12
13
21
1
2
16
3
17
18
4
5
6
7
14
8
9
20
19
15
10
11
12
13
21
1
2
16
3
17
18
4
5
6
Basic Operations
Power On/off Your Z9
To power on your Z9 U(1), turn the Power/Volume knob
clockwise until a click is heard.
To power off your Z9 U(1), turn the
counterclockwise until a click is heard.
Turn Up/down the Volume
After powering on your Z9, turn the
clockwise can turn up the volume, and turning the Power/
Volume knob counterclockwise can turn down the volume.
Select a Group
You can add contacts in one group to manage the contacts
efficiently. Your Z9 U(1) supports up to 32 groups. One group
contains up to 32 contacts.
You can select a group through one of the following ways:
• Menu
Press the OK/Menu key, select Subgroup from the displayed
menu, press the Up or Down key to select a group as required.
After entering the group, select Set Default, and press the OK/
Menu key.
• Shortcut key
When the home screen is displayed, press the Group call
management key to open the Subgroup menu, and then
repeat the above operations.
NOTE:
By default, your Z9 U(1) has one group list in which you can add
32 group contacts.
Select a Group Contact
After your Z9 U(1) is powered on and registered, you can select
a group contact through one of the following three ways:
• Group call selection knob
Turn the Group call selection knob to select the group
contact.
• Menu
Press the OK/Menu key, select Subgroup from the menu,
and press the Up or Down key to select a group as
required. After entering a group, select Members to enter
the Members menu, and press the Up or Down key to
select a group call contact.
• Shortcut key
If the distributor sets a Group call contact shortcut key,
you can press this key to enter the group call list menu
corresponding to the group, and then press the Up or
Down key to select a group call contact.
Lock/Unlock the Keypad
If the keypad is unnecessary temporarily, you can lock the
keypad to prevent misoperations. You can lock or unlock the
keypad through one of the following ways:
• Key combination
Press the OK+* key combination. The keypad can be locked
or unlocked.
• Programmable key
If your distributor sets a Keypad Lock shortcut key, you can
press the shortcut key to lock or unlock the keypad.
• Menu
Enter the main menu, select Setting > Radio Setting >
Keypad Lock, and select Disable or a time option.
After you select a time option, if you perform no
operation within the specified period, the keypad is locked
automatically.
If you select Disable, the keypad will not be locked
automatically. You can press the key combination or the
Keypad Lock shortcut key to lock or unlock the keypad.
NOTE:
If there is no Keypad Lock in the Radio Setting menu, you can
ask your distributor to set the automatic keypad lock function.
5 6
Power/Volume knob
Power/Volume knob
U(1)
U(1)
Call
To ensure that the called party can hear you the best, keep the
microphone 2.5 cm to 5 cm away from your mouth.
Private Call
Initiate a private call
You can initiate a private call through one of the following
ways. Your Z9 U(1) plays a prompt tone before the called party
answers the call.
• Initiate the call through Contacts or Call Logs
1. Press the OK/Menu key to enter the home menu.
2. Select Contacts > Private Contact, or select Call Logs to
display Outgoing calls, Incoming calls, or Missed calls.
3. Press the Up or Down key to select the contact that you
want to call.
4. Press the PTT key to initiate the private call.
• Dial the number that you want to call
1. When the home screen is displayed, enter the private
number that you want to call.
2. Press the Call/Answer key, PPT key, or the # key to initiate
the call.
• Initiate a call in Missed calls
In the Missed calls menu, select a missed call, and press
the Call key or PTT key to initiate the call.
NOTE:
If your Z9 U(1) is not registered or fails in registration, no call
can be initiated.
Answer a private call
After receiving a private call, your Z9 U(1) plays a prompt tone.
If you press the Call/Answer key or PTT key within the
preconfigured duration, the call is answered. Your Z9 U(1) emits
an announcement. If the call is not answered, the icon is
displayed on the LCD to notify you that you missed a call.
End a private call
To end a private call, press the Hook key.
NOTE:
A private call can be ended by the calling or called party.
Group Call
Initiate a group call
You can initiate a group call through one of the following ways:
• Initiate a group call to a preset group contact
When the home screen is displayed, press the PTT key to
initiate a group call to the group contact preset for the
Group call selection knob.
• Through the address book in groups
1. On the home screen, press the OK/Menu key and select
Subgroup, or press the Group call management key to
enter the Subgroup menu.
2. Select Members, and press the Up or Down key to select
the contact that you want to call.
3. Press the Call/Answer key or PTT key to initiate the group
call.
• Dial the number that you want to call
1. On the home screen, enter the group call number that you
want to call.
2. Press the Call/Answer key, PTT key, or # key to initiate the
group call.
Answer a group call
The Z9 U(1) answers a group call automatically. When a group
call is answered, your Z9 emits an announcement.
Answer a call in delay
After a group call is established, a member who did not answer
the call immediately can join in the group call during the call.
End a group call
Press the Hook key to end the group call.
NOTE:
Only the calling party can end a group call.
789
4F, R&D building1, ZTE Industrial Park,
Liuxian Road, Xili, Nanshan District, Shenzhen,
Guangdong Province, 518055, P.R.China
10 11 12
Compliance with RF Exposure Standards
Your CALTTA TECHNOLOGIES CO.,LTD. 2-way radio is designed
and t ested to comply with a number of national and
internationall standards and guidelines (listed below) for
human exposure to radio frequency electromagnetic energy.
This radio complies with the IEEE and ICNIRP exposure limits for
occupational/controlled RF exposure environment at operating
duty factors of up to 50 % transmitting and is authorized by the
FCC for occupational use only. In terms of measuring RF energy
for compliance with the FCC exposure guidelines, your radio
radiates measurable RF energy only while it is transmitting
(during talking), not when it is receiving (listening) or in standby
mode. Note: The approved batteries supplied with this radio are
rated for a 5-5-90 duty factor (5% talk-5% listen 90% standby),
even though this radio complies with the FCC occupational RF
exposure limits and may operate at duty factors of up to 50 %
talk.
Your CALTTA TECHNOLOGIES CO.,LTD. 2-way radio complies
with the following RF energy exposure standards and
guidelines:
• United States Federal Communications Commission, Code of
Federal Regulations; 47 CFR §§ 1.1307, 1.1310, 2.1091 and
2.1093.
• American National Standards Institute (ANSI) / Institute of
Electrical and Electronic Engineers (IEEE) C95. 1-1992.
• Institute of Electrical and Electronic Engineers (IEEE)
C95.1-1999 Edition.
Operating Instructions:
• Transmit no more than the rated duty factor of 50% of the
time. To transmit (talk), push the Push-To-Talk (PTT) button.
To receive calls, release the PTT button. Transmitting 50% of
the time, or less, is important because this radio generates
measurable RF energy exposure only when transmitting (in
terms of measuring for standards compliance).
• Hold the radio in a vertical position in front of face with the
microphone (and the other parts of the radio, including the
antenna) at least one inch (2.5 cm) away from the nose. Keeping
the radio at the proper distance is important because RF
exposures decrease with distance from the antenna. Antenna
should be kept away from eyes.
• When worn on the body, always place the radio in a CALTTA
TECHNOLOGIES CO.,LTD. approved clip, holder, holster, case, or
body harness for this product. Using approved body-worn
accessories is important because the use of CALTTA
TECHNOLOGIES CO.,LTD. or other manufacturer’s non-approved
accessories may result in exposure levels, which exceed the
FCC’s occupational/controlled environment RF exposure limits.
• If you are not using a body-worn accessory and are not using
the radio in the intended use position in front of the face, then
ensure the antenna and the radio are kept at least 2.5 cm
(one inch) from the body when transmitting. Keeping the radio
at the proper distance is important because RF exposures
decrease with increasing distance from the antenna.
• Use only CALTTA TECHNOLOGIES CO.,LTD. approved
supplied or replacement antennas, batteries, and accessories.
Use of non-manufacturer-name approved antennas, batteries,
and accessories may exceed the FCC RF exposure guidelines.
FCC Statement
This equipment has been tested and found to comply with the
limits for a Class B digital device,pursuant to part 15 of FCC
Rules. These limits are designed to provide reasonable protection
against harmful interference in a residential installation. This
equipment generates and can radiate radio frequency energy
and, if not installed and used in accordance with the instructions
, may cause harmful interference to radio communications.
However, there is no guarantee that interference will not occur
in a particular installation. lf this equipment does cause harmful
interference to radio or television reception, which can be
determined by turning the equipment off and on, the user is
encouraged to try to correct.
The interference by one or more of the following measures:
• Reorient or relocate the receiving antenna. lncrease the
separation between the equipment and receiver.
• Connect the equipment into an outlet on a circuit different
from that to which the receiver is connected.
• Consult the dealer or an experienced radio/TV technician
for help.
Operation is subject to the following two conditions: 1. This
device may not cause harmful interference, and 2. This device
must accept any interference received, including interference
that may cause undesired operation.
Note: Any Changes or modifications to this unit not expressly
approved by the party responsible for compliance could void
the user’s anthority to operate the equipment.
GPS:
Press the OK/Menu key, select Accessories from
the menu,and press the Up or Down key to select
Positioning.
BT:
Press the OK/Menu key, select Accessories from
the menu,and press the Up or Down key to select
Bluetooth.