CANON Cameras, All Manual L0605047
User Manual: CANON CANON Cameras, All Manual CANON Cameras, All Owner's Manual, CANON Cameras, All installation guides
Open the PDF directly: View PDF ![]() .
.
Page Count: 147 [warning: Documents this large are best viewed by clicking the View PDF Link!]
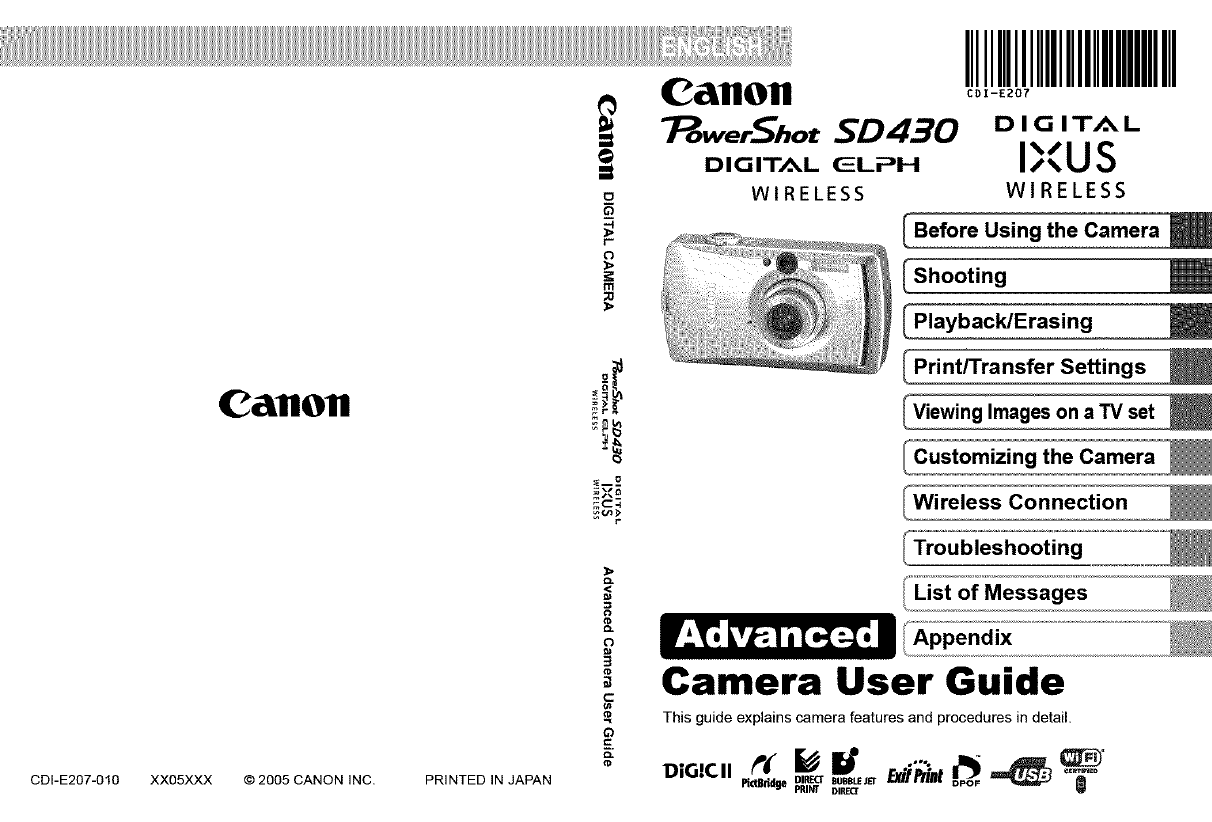
CDI-E207-010XX05XXX
C&flOfl
© 2005 CANON INC. PRINTED IN JAPAN
_o
r
o
m
-v o
o
c
_=.
CallOfl
7_ower--_hotSD 430
I IIIIIIIIMIIIIII
CDI-E207
D ICl IT/_L
DIGITAL C_LPH l;,'US
WIRELESS WIRELESS
Before Using the Camera
Shooting
Playback/Erasing
Print/Transfer Settings
Viewing Images on aTV set
C_g the Camera
Wireless Connection
Troubleshooting
List of Messages
Appendix
Camera User Guide
This guide explains camera features and procedures in detail.
oleo, _ 0,_E_llt _.',_.t""_ -_ _-'=
N_Bri_e su.s_JEr _"°
PRINT DIREO
I_ F;1ITII_JF_t!l"t'_l
*Connecting wirelessly between the camera and a computer is
only possible with the Windows XP SP2 operating system.
IConventions Used in this Guide
Icons appearing below titles indicate the modes in which the
_rocedure can be used.
Mode Switch
See Functions Available in Each Shooting Mode (p. 144).
In this guide, the Basic Camera User Guide is referred to as the
Basic Guide, and the Advanced Camera User Guide is referred to
as the Advanced Guide.
This mark denotes issues that may affect the camera's operation.
I_ his mark denotes additional topics that complement the basic
operating pracedures.
You can use SD* memory cards and MultiMediaCards with this camera.
These cards are collectively ca_ledmemory cards in this guide.
*SD stands for Secure Digital, a copyrght protection system.
Use of genuine Canon accessories is recommended.
This product is desigr_ed to achieve excellent performance when
used with genuine Canon accessories. Canon shalI not be liable
for any damage to this product and/or accidents such as fire, etc.,
caused by the malfunction of non-genuine Canon accessories
(e.g., a leakage and/or explosion of a battery pack). Please note
that this warranty does not apply to repairs arising out of the
malfunction of non-genuine Canon accessories, although you
may request such repairs on a chargeable basis.
lTable of Contents
Items marked with a'_ are lists or charts that summarize camera
functions or procedures.
Please Read ....................................... 5
Operation Restrictions ............................... 6
Safety Precautions .................................. 9
Preventing Malfunctions ............................. 14
Using the LCD Monitor .............................. 19
LCD Monitor Brightness ............................. 21
Information Displayed on the LCD Monitor .............. 22
Using the Viewfinder ............................... 25
Indicators ........................................ 26
Power Saving Function ............................. 27
Formatting Memory Cards ........................... 28
Setting the Wodd Clock ............................. 29
Menus and Settings ................................ 31
Menu List ........................................ 33
Resetting Settings to Their Default Values ............... 37
Changing the Recording Pixels and Compression (Still Images) 38
Changing Recording Pixels and Frame Rates (Movies) ....... 40
Magnified Close-Up Shooting (Digital Macro) ............ 41
Using the Digital Zoom ............................... 42
Continuous Shooting ............................ 43
Postcard Date Imprint Mode .......................... 44
Using the Self-Timer ............................. 45
'_ Movie Shooting ................................. 47
Shooting Panoramic Images (Stitch Assist) ................ 49
Switching between Focusing Modes ................... 51
ShootingHard-to-FocusSubjects(FocusLock,AFLock)...52
LockingtheExposureSetting(AELock)................. 53
LockingtheFIashExposureSetting(FELock)............ 54
SwitchingbetweenMeteringModes.................... 55
AdjustingtheExposureCompensation.................. 56
ShootinginLongShutterMode......................... 57
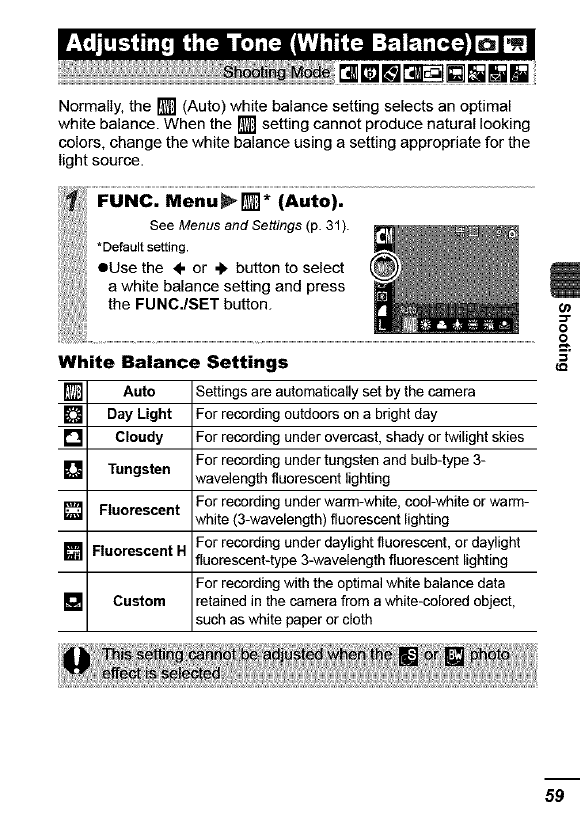
AdjustingtheTone(WhiteBalance)..................... 59
ChangingthePhotoEffect............................ 62
ShootinginaMy Colors Mode ......................... 63
IS0 Adjusting the ISO Speed .......................... 69
Setting the Auto Rotate Function ........................ 70
Creating an Image Destination (Folder) ................. 71
Resetting the File Number ............................ 72
Q. Magnifying Images ............................... 74
"-" Viewing Images in Sets of Nine (Index Playback) ......... 75
Jumping tc3Images ............................... 76
Viewing Movies .................................... 77
Editing Movies ..................................... 78
Rotating Images in the Display ........................ 80
Playback with Transition Effects ........................ 81
Attaching Sound Memos to Images .................... 81
Automated Playback (Slide Shows) .................... 83
Protecting Images .................................. 87
Erasing All Images ................................. 87
Setting the DPOF Print Settings ....................... 88
Setting the DPOF Transfer Settings .................... 91
Changing My Camera Settings ......................... 94
Registering My Camera Settings ........................ 95
ConnectingtoaPrinter.............................. 98
Deletingtargetdevices............................. 104
Camera......................................... 105
Whenthepoweristurnedon........................ 105
LCDmonitor..................................... 106
Shooting........................................ 107
ShootingMovies.................................. 111
Playback........................................ 112
Battery/BatteryCharger............................ 113
TVmonitoroutput................................. 113
Wirelessconnectiontoaprinter...................... 114
BatteryHandling.................................. 119
HandlingtheMemoryCard......................... 121
UsinganACAdapterKit(SoldSeparately)............. 123
UsinganExternallyMountedFlash(SoldSeparately)..... 124
CameraCareandMaintenance...................... 126
Specifications.................................... 127
IHandling Precautions
Test Shots
Before you try to photograph important subjects, we highly
recommend that you shoot several trial images to confirm that the
camera is operating and being operated correctly.
P_ease note that Canon Inc., its subsidiaries and affiIiates, and its
dJstributors are not liable for any consequential damages arising
from any malfunction of a camera or accessory, including memory
cards, that results in the failure of an image to be recorded or to be
recorded in a way that is machine readable.
Warning Against Copyright Infringement
Please note that Canon digital cameras are intended for personal
use and should never be used in a manner that infringes upon or
contravenes international or domestic copyright laws and
regulafions. Please be advised that in certain cases the copying of
images from performances, exhibitions, or commercial properties
by means of a camera or other device may contravene copyright or
other legal rights even if the image was shot for personal use.
Warranty Limitations
This camera's warranty is only effective in the country of sale. If a
problem arises while the camera is in use abroad, please convey it
back to the country of sale before proceeding with a warranty claim
to a Canon Customer Support Help Desk.
For Canon Customer Support contacts, please see the Canon
Umited Warranty supplied with your camera,
Video Format
Please set the camera's video signal format to the one used in your
region before using it with a TV monitor (p. 93).
Language Setting
Please see the Basic Guide (p. 4) to change the language setting.
[o]I_'?_tt_ I_"_'1t'_tt_
OThe wireless function used in this equipment has been approved
for domestic use. For use of this function in other countries,
please inquire through Canon's Customer Service Center.
OFrance: Using the wireless function outdoors is prohibited.
OltaIy: If used outside of own premises, general authorization is
required.
OLatvia: If used outside of own premises, general authorization is
required.
oThis device may experience signal interference caused by other
devices emitting radio waves (microwave ovens, BIuetooth
appliances, cordless telephones, etc.). Keep the device away
from such devices or do not use the devices at the same time.
FCC WARNING
Changes or modifications not expressly approved by the party
responsible for compliance could void the user's authority to
operate the equipment.
This transmitter must not be co-located or operated in conjunction
with any other antenna or transmitter.
This equipment complies with FCC radiation exposure limits set
forth for uncontrolled equipment and meets the FCC radio
frequency (RF) Exposure Guidelines in Supplement C to OET65.
This equipment has very low levels of RF energy that it is deemed
to comply without testing of specific absorption ratio (SAR).
This device complies with part 15 of the FCC Rules.
Operation is subject to the following two conditions: (1) this device
may not cause harmful interference, and (2) this device must
accept any interference received, including interference that may
__ cause undesired operation.
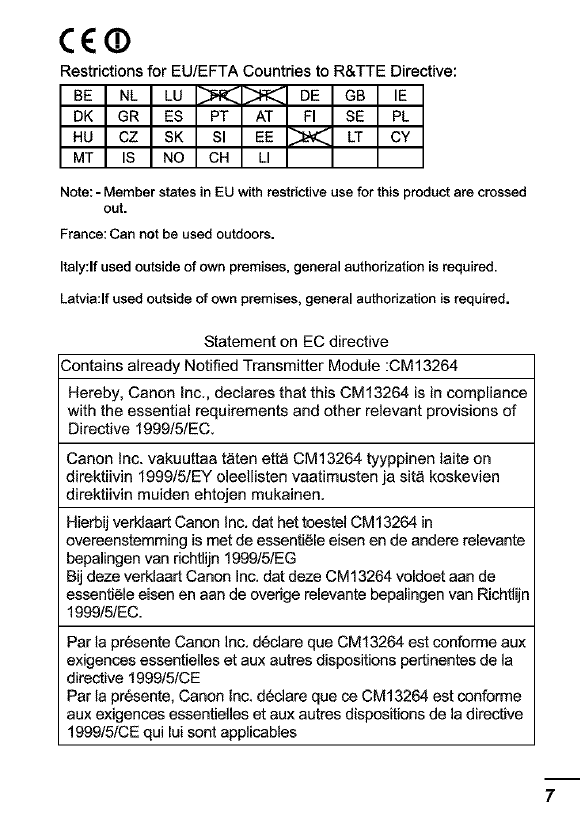
Restrictions for EU/EFTA Countries to R&TTE Directive:
BE NL LU _.]_ DE GB IE
DK GR ES PT AT FI SE PL
HU CZ SK SI EE _ LT CY
MT IS NO CH LI
Note: - Member states in EU with restrictive use for this product are crossed
out.
France: Can not be used outdoors.
Italy:If used outside of own premises, general authorization is required.
Latvia:If used outside of own premises, general authorization is required.
Statement on EC directive
Contains already Notified Transmitter Module :CM13264
Hereby, Canon Inc,, declares that this CM13264 is in compliance
with the essential requirements and other relevant provisions of
Directive 1999/5/EC.
Canon Inc. vakuuttaa t&ten ett_ CM13264 tyyppinen laite on
direktiivin 1999/5/EY oleellisten vaatimusten ja sit_ koskevien
direktiivin muiden ehtojen mukainen,
Hierbij verklaart Canon Inc, dat het toestel CM 13264 in
overeenstemming is met de essentiele eisen en de andere relevante
bepalingen van dchtlijn 1999/5/EG
Bij deze verklaart Canon Inc. dat deze CM13264 voldoet aan de
essentiele eisen en aan de overige relevante bepalingen van Richtlijn
1999/5/EC.
Par ta pr6sente Canon Inc, d6clare que CM13264 est conforme aux
exigences essentielles et au× autres dispositions pertinentes de la
directive 1999/5/CE
Par la pr6sente, Canon lnc, declare que ce CM13264 est conforme
aux exigences essentieles et au× autres dispositions de la directive
1999/5/CE qui lui sont applicables
H_rmedintygarCanontnc.attdermaCM13254star1
6verensst_mmelsereeddev_sentligaegenskapskravoch6vriga
relevantabest&immelsersoreframg_ravdirektiv1999/5/EG.
UndertegnedeCanonlnc.erklaererhewed,atf_lgendeudstyr
CM13254overholderdevaesentligekravog_vrigerelevantekrav
direktiv1999/5/EF
Hiermiterkl&rtCanonInc.,dasssichdieser/diese/diesesCM13264
in0bereinstimmungmitdengrundlegendenAnforderungenundden
anderenrelevantenVorschriftenderRichtlinie1999/5/EGbefindet".
(BMWi)
Hiermiterkl&rtCanonInc,die0bereinstimmungdesGer_tes
CM13264mitdengrundlegendenAnforderungenunddenanderen
relevantenFesflegungenderRichtlinie1999/5/EG.(Wien)
METHNFIAPOY[ACanonInc.AH^ONEIOTICM13264
[YMMOPCDNETAIFIPO£TI_OY_IDAEI£AIqAITH[EI£KAITI[
AOIFtE[[XETIKE[AmATA_--EI[TH[OAHFIA[1999/5/EK
ConlapresenteCanonInc,dichiarachequestoCM13264
conformeairequisitiessenziatiedallealtredisposizionipertinenti
stabilitedaHadirettiva1999/5/CE.
PermediodelapresenteCanonInc,declaraqueelCM13264
cumpleconlosrequisitosesencialesycualesquieraotras
disposicionesaplicablesoexigiblesdelaDirectiva1999/5/CE
CanonInc,declaraqueesteCM13264est&conformecornos
requisitos essenciais e outras disposig6es da Directiva 1999/5/CE.
Spole_nost Canon Inc, timto prohla_uje, 2e CM 13264 splfiuje
z_kladni po2adavky a dal,_i pfislu_n6 ustanoveni Direktivy 1999/5/EC.
Sellega kinnitab Canon Inc,, et see CM13264 vastab direktiivi
1999/5/EC p6hilistele n6udmistele ja muudele asjakohastele
m_rustele.
Ar _e, Canon Inc., apstiprina, ka CM13264 atbilst DirektTvas
1999/5/EK galvenaj_m pras_m un citiem t_s nosacTjumiem.
_iuo, Canon Inc., parei_kia, kad {_isCM13264 atitinka pagrindinius
Direktyvos 1999/5/EB reikatavimus ir kitas svarbias nuostatas.
Alulirott,CanonInc.,kijetenti,hogyajelenCM13264megfelelaz
1999/5/ECir&nyelvbenmeghat&rozottalapvet6k6vetelm6nyeknek
6segy6bvonatkoz6el6ir&soknak.
Hawnhekk, Canon Inc., tiddikjara li CM13264 josserva IJhtigUiet
essenzjali u dispo±izzjonijiet relevanti ohra tad-Direttiva 1995/5/KE.
Canon inc. niniejszym o_wiadcza, 2e CM13264 spe_nia zasadnicze
wymogi oraz inne istotne postanowienia dyrektywy 1999/5/EC.
S tern Canon tnc. izjavlja, da je ta CM13264 v skiadu zosnovnimi
zahtevami in ostalimi ustreznimi predpisi Direktive 1999/5/EC.
Spolodnost' Canon tnc. t_mto vyhlasuje, 2e CM 13264 sp[fia z&kladn6
po2Jadavky a d'al_,ie prJslu_n6 ustanovenia Direktivy 1999/5/EC.
C HaCTORLL_14__OKyMeHTCanon Inc. p,e_ap_pa, ,_e CM13264 eB
c_,rflacl4e cOCHOBHidTe H3FICKBaH_4_ 14C'bOTBeTHI4Te nOCTaHOBYleHI4_
Ha_peKT_Ba 1999/5/EC.
Prin prezenta, Canon inc. declar_ c_ aceet CM13264 este conform
cu cerinl;ele principale gi cu cetelalte prevederi relevante ale
Directivei 1999/5/EC.
I_bu beige ile Canon Inc., bu CM13264'in 1995/5/EC YSnetmeli_i
esas gereksinimledne ve dialer ._artlanna uygun oldu_unu beyan eder.
MADE IN JAPAN
@Nl18
•Before using the camera, please ensure that you read the safety
precautions described below and in the "Safety Precautions"
section of the Basic Guide. Always ensure that the camera is
operated correctly.
eThe safety precautions noted on the following pages are intended
to instruct you in the safe and correct operation of the camera and
its accessories to prevent injuries or damage to yourself, other
persons and equipment. Be sure you fully understand them before
reading the rest of the manual.
OEquipment refers to the camera, battery charger, wireless print
adapter or separately sold compact power adapter.
OBattery refers to the battery pack.
• Do not aim the camera directly into the sun or at other
intense light sources that could damage your eyesight.
•Store this equipment out of the reach of children and
infants.
• Wrist strap: Placement of the strap around the child's neck could
result in asphyxiation.
• Memory card: Dangerous if accidentally swallowed. If this
occurs, contact a doctor immediately.
• Do not attempt to disassemble or alter any part of the
equipment that is not expressly described in this guide.
• To avoid the risk of high-voltage electrical shock, do not
touch the flash portion of the camera if it has been damaged.
• Stop operating the equipment immediately if it emits smoke
or noxious fumes.
•Do not allow the equipment to come into contact with, or
become immersed in, water or other liquids. If the exterior
comes into contact with liquids or salt air, wipe it dry with a
soft, absorbent cloth.
Continued use of the equipment may result in fire or electrical
shock. Immediately turn the camera power off and remove the
camera battery or unplug the power cord from the power outlet.
Please consult your camera distributor or the closest Canon
Customer Support Help Desk.
lO
• Do not use substances containing alcohol, benzine,
thinners or other flammable substances to clean or
maintain the equipment.
•Do not cut, damage, alter or place heavy items on the power
cord.
•Use only recommended power accessories.
•Remove the power cord on aregular periodic basis and
wipe away the dust and dirt that collects on the plug, the
exterior of the power outlet and the surrounding area.
•Do not handle the power cord if your hands are wet.
Continued use of the equipment may result in fire or electrical
shock.
•Do not place the battery near a heat source or expose it to
direct flame or heat.
•The battery should not be immersed in water or sea water.
•Do not attempt to disassemble, alter or apply heat to the
battery.
•Avoid dropping or subjecting the battery to severe impacts
that could damage the casing.
•Use only recommended battery and accessories,
Use of battery not expressly recommended for this equipment
may cause explosions or leaks, resulting in fire, injury and
damage to the surroundings, tn the event that a battery leaks and
the eyes, mouth, skin or clothing contact these substances,
immediately flush with water and seek medical assistance.
•Disconnect the battery charger and compact power adapter
from the camera or the wireless print adapter and the power
outlet after recharging or when they are not in use to avoid
fire and other hazards.
•Do not place anything, such as tablecloths, carpets,
bedding or cushions, on top of the battery charger while it
is charging.
Continued use over a long period may cause the units to overheat
and distort, resulting in fire.
11

• Use only the specified battery charger to charge the battery.
•The battery charger and compact power adapter are
designed for exclusive use with your camera, Do not use it
with other products or batteries.
There is a risk of overheating and distortion which could result in
fire or electrical shock.
•Before you discard a battery, cover the terminals with tape
or other insulators to prevent direct contact with other
objects.
Contact with the metallic components of other materials in waste
containers may lead to fire or explosions.
•Do not trigger the flash in close proximity to human or
animal eyes, Exposure to the intense light produced by the
flash may damage eyesight,
In particular, remain at least one meter (39 inches) away from
infants when using the flash.
•Keep objects that are sensitive to magnetic fields (such as
credit cards) away from the speaker of the camera.
Such items may lose data or stop working.
•If you wish to use a wireless connection inside an aircraft or
hospital, always follow the instructions of the airline or
hospital staff.
The camera emits electromagnetic waves which may affect
instruments, medical devices and other sensitive equipment.
m [.,_ETr[tB31'_,
12

• Do not store the equipment in humid or dusty areas.
•Do not allow metal objects (such as pins or keys) or dirt to
contact the charger terminals or plug.
Such conditions could lead to fire, electrical shock or other
damage.
•Avoid using, placing or storing the equipment in places
subject to strong sunlight or high temperatures, such as the
dashboard or trunk (boot) of a car.
•Ensure that the battery charger or the compact power
adapter are plugged into a power outlet of the specified
rating, not over the specified rating. Do not use if the power
cord or plug are damaged, or if not fully plugged into the
outlet.
•Do not use in locations with poor ventilation.
The above-mentioned can cause leakage, overheating or
explosion, resulting in fire, burns or other injuries. High
temperatures may also cause deformation of the casing.
• When not using the camera for extended periods of time,
remove the battery from the camera or battery charger and
store the equipment in a safe place.
The battery can run down.
• If the AC adapter kit or battery charger is connected to, for
example, an electronic transformer for travel abroad,
trouble with the camera may result, so please do not use
such a device.
•Do not operate the flash with dirt, dust or other items stuck
to the surface of the flash.
•Be careful not to cover the flash with your fingers or
clothing when shooting.
The flash may be damaged and emit smoke or noise. The
resulting heat build-up could damage the flash.
•Do not touch the surface of the flash after taking several
pictures in rapid succession.
Doing so could result in burns.
13
I_,_:IIT_j LvAh'l It't_'l_
• Never place the camera in close proximity to electric motors
or other equipment generating strong electromagnetic
fields.
Exposure to strong magnetic fields may cause malfunctions or
corrupt image data.
•When moving the equipment rapidly between hot and cold
temperatures, you can avoid condensation by placing the
equipment in an airtight, resealable plastic bag and letting it
adjust to temperature changes slowly before removing it
from the bag.
Moving the equipment rapidly between hot and cold temperatures
may cause condensation (water droplets) to form on its external
and internal surfaces.
•Stop using the camera immediately.
Continued use may damage the equipment. Remove the memory
card and battery or compact power adapter from the camera and
wait until the moisture evaporates completely before resuming
use.
14
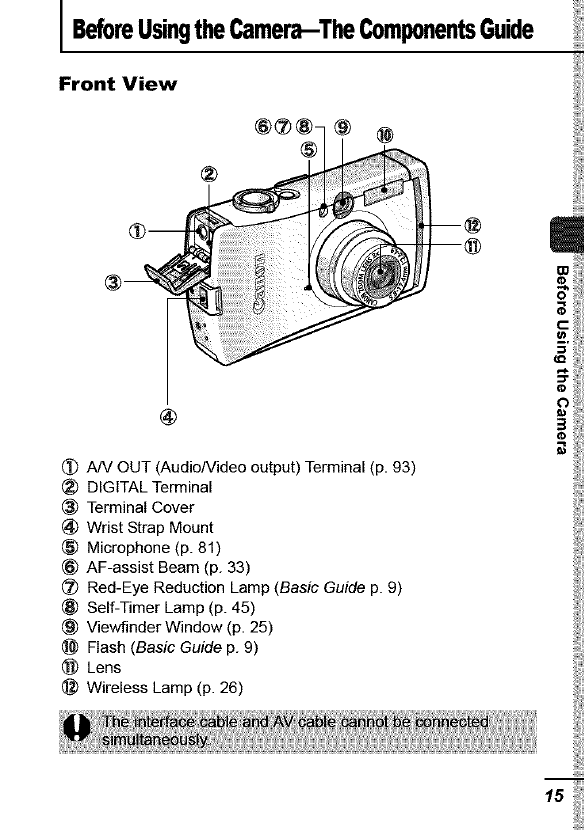
I BeforeUsingtheCamera-The ComponentsGuide
Front View
®®®-
®
(!) AN OUT (Audio/Video output) Terminal (p. 93)
(_) DIGITAL Terminal
® Terminal Cover
_) Wrist Strap Mount
® Microphone (p. 81)
® AF-assist Beam (p. 33)
(_ Red-Eye Reduction Lamp (Basic Guide p. 9)
® Self-Timer Lamp (p. 45)
® Viewfinder Window (p. 25)
Flash (Basic Guide p. 9)
Lens
(_ Wireless Lamp (p. 26)
o
15
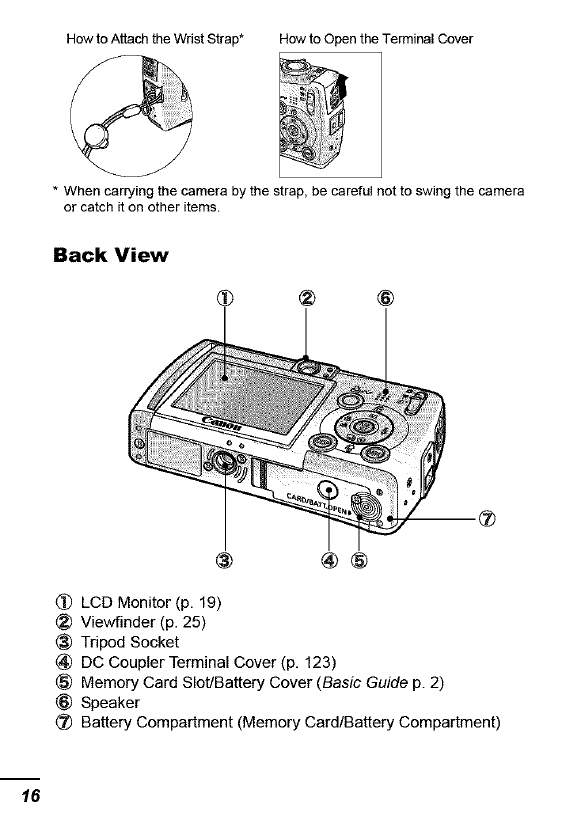
How to Attach theWrist Strap* How to Open the TerminalCover
* When carrying the camera by the strap, be carelul net to swing the camera
or catch it on other items.
Back View
(_) LCD Monitor (p. 19)
(_ Viewfinder (p. 25)
® Tripod Socket
(_) DC Coupler Terminal Cover (p. 123)
® Memory Card Slot/Battery Cover (Basic Guide p. 2)
® Speaker
(_ Battery Compartment (Memory Card/Battery Compartment)
16

Operation Panel
®
® @
(_) Indicators (p. 26)
® Power Button (Basic Guide p. 5)
® Power Lamp
('4_ Zoom Lever (p. 74, Basic Guide p. 8)
Shooting: [] (Wide Angle)/E(ll3 (Telephoto)
Playback: _ (Index)/ O. (Magnify)
® Shutter Button (Basic Guide p. 5)
® Mode Switch (Basic Guide pp. 5, 6)
_,,,_ (Print/Share) Button (Basic Guide p. 14)
® DISP. (Display) Button (p. 19)
® FUNC./SET (Function/Set) Button (p. 31)
_) MENU Button (p. 32)
(_) _ (Macro)/JA (Infinity)/ ÷ Button (Basic Guide p. 10)
@ ISO (ISO Speed)/._do (Jump)/ ,1_ Button (pp. 69, 76)
_- (Flash)/ '_ Button (Basic Guide p. 9)
(_ /_ (Single Image Erase)/O-Ij (Continuous)/_.) (Self-timer)/
Button (pp. 43, 45, Basic Guide p. 11)
m
o
t-
O
#a
3
17
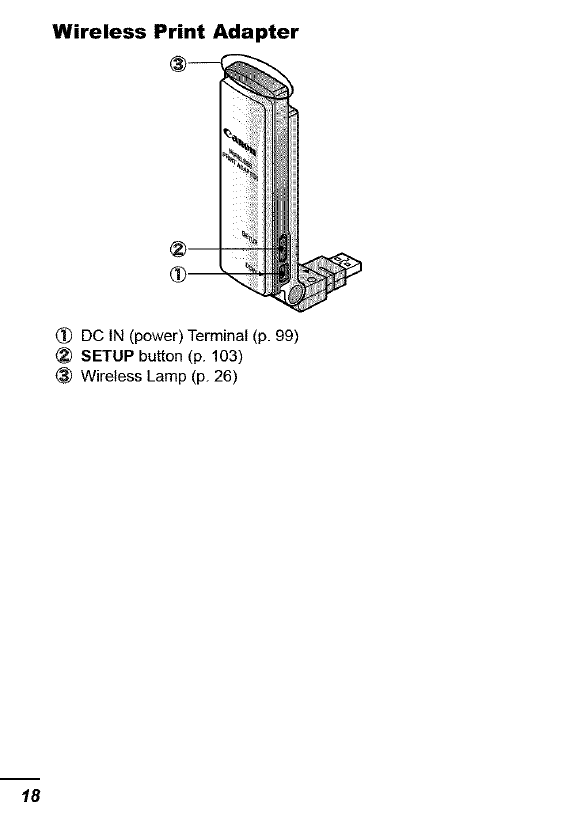
Wireless Print Adapter
(!) DC IN (power) Terminal (p. 99)
(_ SETUP button (p. 103)
_) Wireless Lamp (p. 26)
18
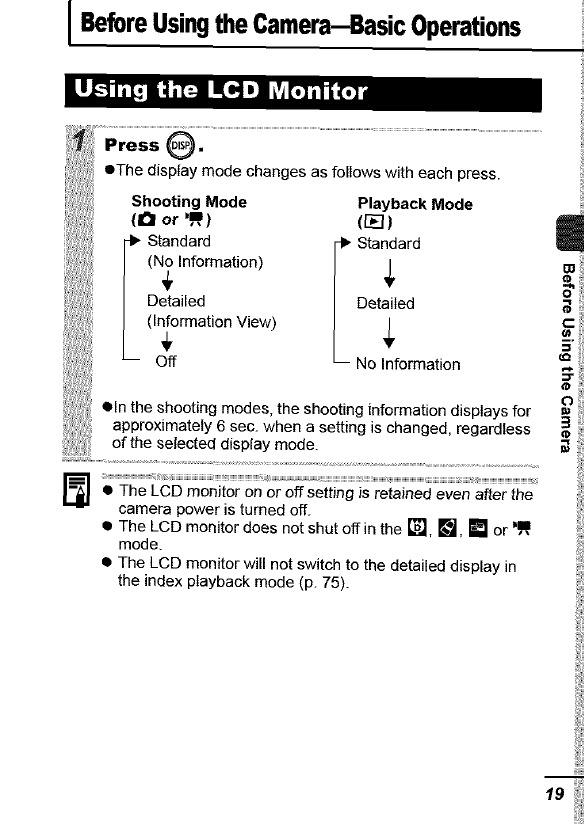
IBeforeUsingtheCamera-BasicOperations
Press 0"
eThe display mode changes as follows with each press.
Shooting Mode Playback Mode
(0 or ',_) (r_)
i Standard _ Sta ard
(_t:iii: rmati°n) _t_ _
Detailed
(Information View)
C_ff _-- No !formation
•In the shooting modes, the shooting information displays for
approximately 6 sec. when a setting is changed, regardless
of the selected display mode.
, ii i iii ii _ ii _:
•The LCD monitor on or offsetting is retained even after the
camera power is turned off.
• The LCD monitor does not shut off in the L_] I_, [] or bll
mode,
• The LCD monitor will not switch to the detailed display in
the index playback mode (p. 75).
o !i
t-
=o
19
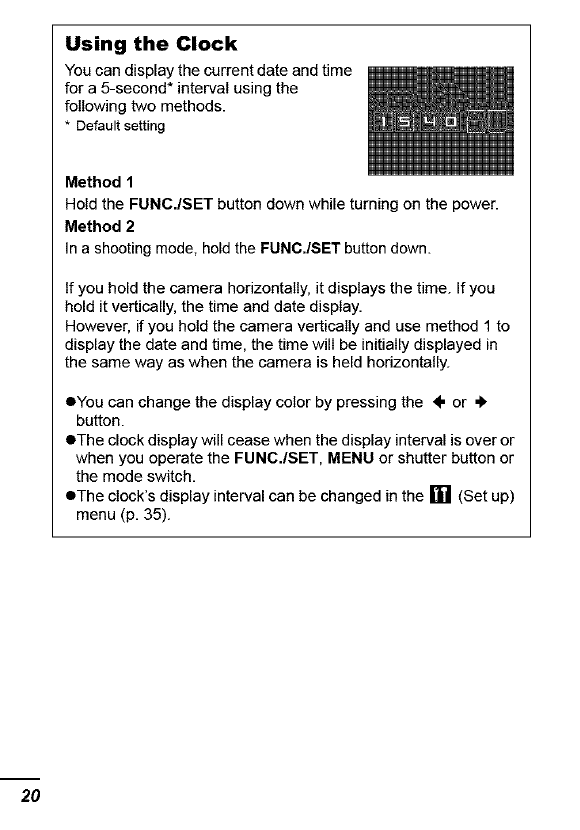
Using the Clock
You can display the current date and time
for a 5-second* interval using the
following two methods.
* Default setting
Method 1
Hold the FUNC./SET button down while turning on the power.
Method 2
In a shooting mode, hold the FUNC./SET button down.
If you hold the camera horizontally, it displays the time. If you
hold it vertically, the time and date display.
However, if you hold the camera vertically and use method 1 to
display the date and time, the time will be initially displayed in
the same way as when the camera is held horizontally.
•You can change the display color by pressing the _. or .l,
button.
eThe clock display will cease when the display interval is over or
when you operate the FUNC./SET, MENU or shutter button or
the mode switch.
eThe clock's display interval can be changed in the [] (Set up)
menu (p. 35).
2O
LCD Monitor Brightness Settings
The brightness of the LCD monitor can be changed in the following
two ways.
OChanging Settings Using the Set up Menu (p. 35)
OChanging Settings Using the DISP. Button (Quick-bright LCD
Function)
You can set the LCD monitor to the brightest setting regardless of
the option selected in the Set up menu by pressing the DISP.
button for more than one second*.
- To restore the previous brightness setting, press the DISP.
button for more than one second again.
- The next time you turn on the camera, the LCD monitor will be at
the brightness setting selected in the Set up menu.
*You cannot change the brightness of the LCD monitorwith this function if
you have already set it to its highest setting in the Set up menu.
Night Display
When shooting in dark conditions, the camera automatically
brightens the LCD monitor to suit the brightness of the subject*,
making it easier to frame the subject.
* Noisewill appear, and the movementsof the subjectwill appearirregular on
the LCD monitor. The recorded imagewill not be affected. The brightnessof
the image displayed in the monitor,and the brightness ofthe actual image
recorded will be different.
m
o
t-
¢)
3
21

Shooting Information (Shooting mode)
]* Spot Frame 'l_l_ []1 _
[] *AF Frame(p. 51)
•Low Battery(p. 119)
Grid Lines*(p. 33)
filliflWireless Connection
Movies(See.):RemainingElapsedTime
I:E]ral_D[]m
E_mwDmmw
[]* []* I_i*W*
ShootingMode (pp. 41, 47,
49, 63, Basic Guidepp. 7, 8)
W.W
ExposureCompensation(p.56)
li...mi
Long ShutterMode (p.57)
ODO_mn
White Balance(p.59)
mmmE[]
PhotoEffect (p. 62)
mmmmmmmll_ll
ISOSpeed (p.69)
mwmmM
Shooting Method (pp.43, 45)
Ea_]
Macro!Infinity(Basic Guide p.10)
_WBIOHrU
Flash(BasioGuide p. 9)
mBB
A_o Rotate(p. 70)
•(Red)*
MovieRecording (p.47)
E:II* AE Lock (p.53)
.71)
_'1[] [] MeteringMode(p. 55)
tan[:]
,?.ompression(p. 39)
r_Mrd
--tameRate(Movie)(p.40)
_ww_l_mmm
Recording Pixels (pp. 38, 40)
[] (Red)* CameraShake Warning(p. 106)
_he shutterspeed will also display when
Lhe[] displays.)
-- My Colors(p.63) ExposureShiftBar (Movie)(p.49)
22 * Appears even if the LCD monitor is set to Standard display.
Iftheindicatorblinksorangeandthecamerashakeicon[]
displays,itindicatesthereisinsufficientilluminationanda
slowshutterspeedwillbeselected.RaisetheISOspeed
(p.69)orselectasettingotherthan[] (flashoff),orattach
thecameratoatripodorotherdevice.
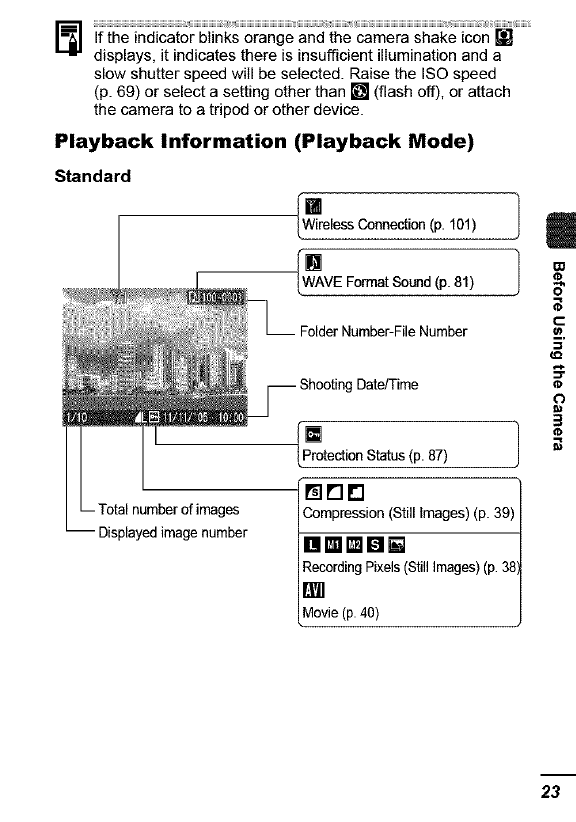
Playback Information (Playback Mode)
Standard
{wi_relessC°eeec'[i°n(p 101) 1
[]
Protection Status (p. 87)
Compression (Still Images) (p. 39)
RecordingPixels (StillImages)(p. 38
[]
Movie (p.40)
-- Total numberof images
-- Displayedimagenumber
t-
m,
¢)
23
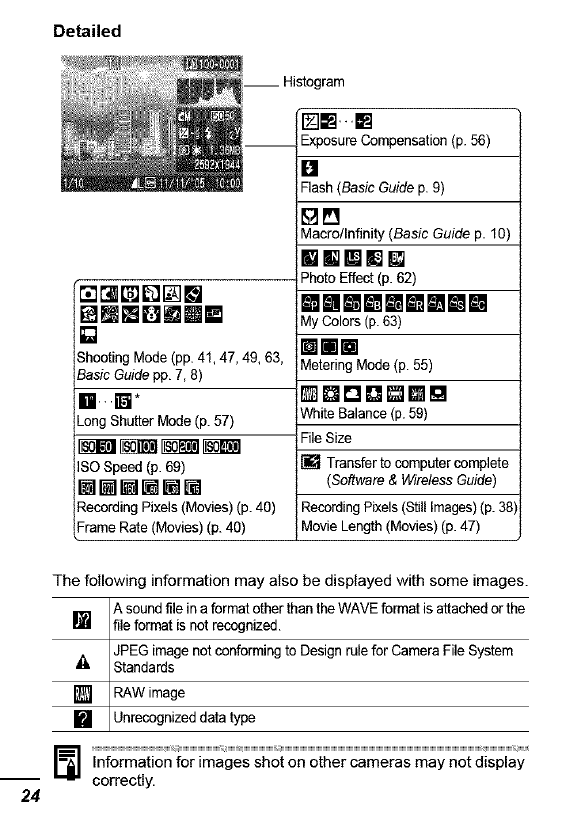
Detailed
E_mmDmmW
[]
ShootingMode(pp. 41, 47, 49, 63,
BasicGuidepp. 7, 8)
gi.m*
_ongShutterMode (p. 57)
ISOSpeed (p.69)
mmlitilmmM
RecordingPixels(Movies) (p.40)
FrameRate (Movies) (p.40)
[]W. W
__ ExposureCompensation(p. 56)
[]
Flash(Basic Guide p. 9)
B_3
Macro/Infinity (Basic Guide p. 10)
mmmE[]
PhotoEffect (p. 62)
wmmmmmmmm
MyColors (p.63)
mmm
MeteringMode(p. 55)
_DDO_mD
White Balance(p.59)
File Size
[] Transfer to computercomplete
(Software& WirelessGuide)
RecordingPixels(StillImages)(p.38)
Movie Length (Movies)(p. 47)
The following information may also be displayed with some images.
A soundfile in a format other than the WAVEformat is attachedor the
[] file format is not recognized.
JPEG image not conformingto Design rulefor Camera File System
-_ Standards
[] RAWimage
[] Unrecognizeddata type
_] ............................................................_H_jIHHHHHHHHHHHHHHHHH_j_HHHH_mHHHHHHHHHHHHH_jIHHHHHHHHHHHHHHHHHHHHHHHHHHHHHHHHHHHHHHHHHHHHHHHHHHHHHHHHHHHHHHHHHHHHHHHHHHHHHHHHHHHHHH_HHHHHHHHHHH_j_j
Information for images shot on other cameras may not display
-- correctly.
24
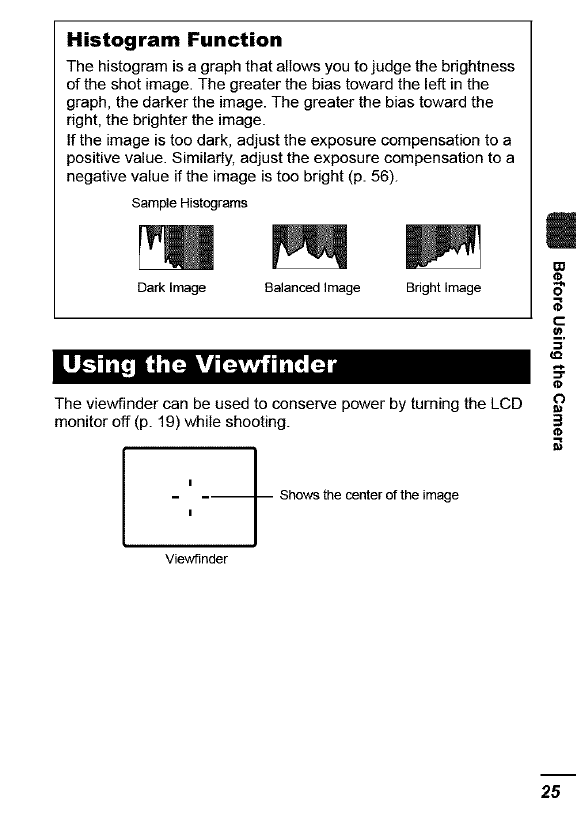
Histogram Function
The histogram is a graph that allows you to judge the brightness
of the shot image. The greater the bias toward the left in the
graph, the darker the image. The greater the bias toward the
right, the brighter the image.
If the image is too dark, adjust the exposure compensation to a
positive value. Similarly, adjust the exposure compensation to a
negative value if the image is too bright (p. 56).
Sample Histograms
Dark Image Balanced Image Bright Image
The viewfinder can be used to conserve power by turning the LCD
monitor off (p. 19) while shooting.
I
I
-- Shows the center of the image
o
3
Viewfinder
25
The indicators of the camera and the wireless print adapter light or
blink in the following situations.
26
Camera
eUpper Indicator
Green:
Blinking Green:
Ready to shoot
Image recording/reading/erasing/transferring
(when connected to a computer)
Orange: Ready to shoot (flash on)
Blinking Orange: Ready to shoot (camera shake warning)
eLower Indicator
Yellow: Macro mode/infinity mode/AF lock mode
Blinking Yellow: Focusing difficulty (camera beeps once)
eWireless Lamp
Blue: Standing by for printing or transfer*
Blinking Blue (slowly): Wireless connection active/Currently
registering target device
Blinking Blue (rapidly): Data transfer underway
* When the wireless connection is extremely weak, the wireless lamp
blinks, as does the T icon on the LCD monitor. (p. 95).
Wireless Print Adapter
Blue: Wireless connection active
Blinking Blue (slowly): Wireless connection on standby
Blinking Blue (rapidly): Data transfer underway
Blinking Blue and Orange: Currently registering target device
Orange: Registration failed.
Blinking Orange: Error*
*An irregularity occurred in the wireless print adapter. Disconnect the
wireless print adapter from the printer,then reconnect it. When using the
compact power adapter, pull out the power cord, disconnect the wireless
pdnt adapter from the printer, reconnect it, then reinserLthe power cord. if
the lamp blinks orange frequently, bring the camera to a Canon Customer
Support Help Desk.
t t 't'l'T il
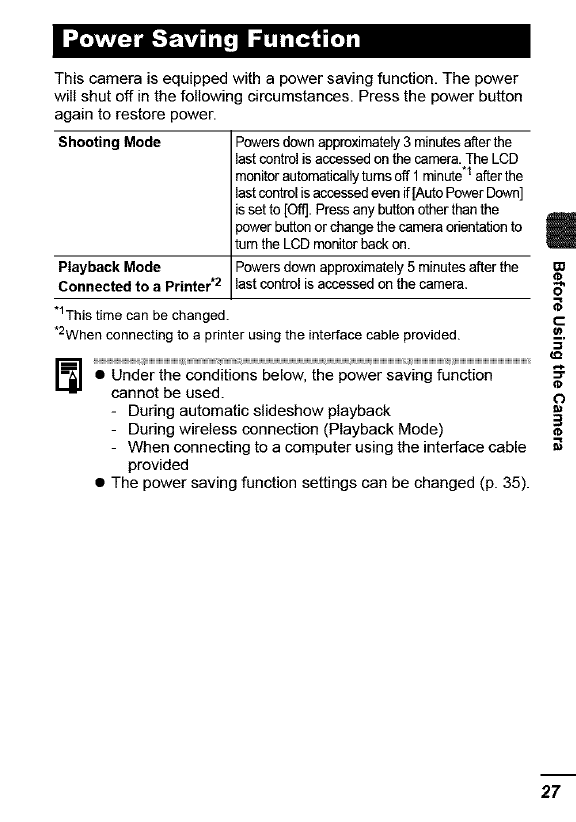
This camera is equipped with a power saving function. The power
will shut off in the following circumstances. Press the power button
again to restore power.
Shooting Mode Powersdownapproximately3 minutesafterthe
last control isaccessedon the camera.The LCD
monitorautomaticallyturns off 1 minute.1after the
last controlis accessedevenif [Auto PowerDown]
is setto [Off]. Pressany buttonotherthan the
powerbuttonor changethe cameraorientationto
turnthe LCD monitorback on.
Playback Mode Powersdown approximately5 minutesafterthe
Connected to a Printer .2 last controlisaccessedon the camera.
*1Thistime can be changed.
*2Whenconnecting to a printer using the interface cable provided.
• Under the conditions below, the power saving function
cannot be used.
- During automatic slideshow playback
- During wireless connection (Playback Mode)
- When connecting to a computer using the interface cable
provided
• The power saving function settings can be changed (p. 35).
&
o
t-
O
27
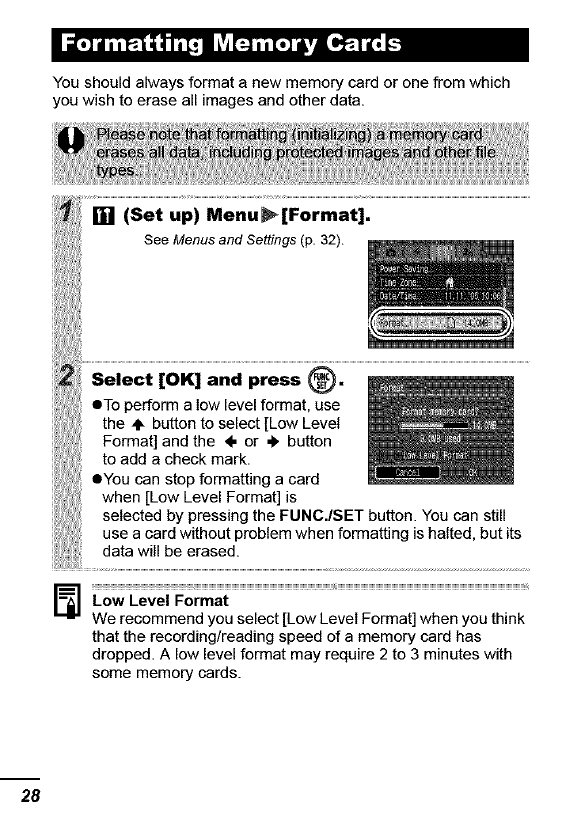
You should always format a new memory card or one from which
you wish to erase all images and other data.
28
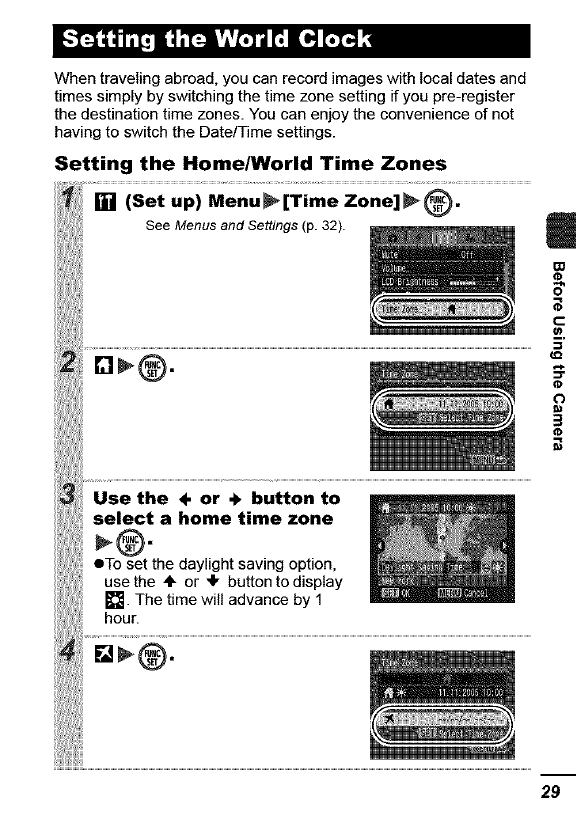
When traveling abroad, you can record images with local dates and
times simply by switching the time zone setting if you pre-register
the destination time zones. You can enjoy the convenience of not
having to switch the Date/Time settings.
Setting the Home/World Time Zones
[] (Set up) Menu _[Time Zone] _ @.
See Menus and Settings (p.32).
Use the ÷or ÷ button to
select a home time zone
eTo set the daylight saving option,
use the ÷ or _1, button to display
[]. The time will advance by 1
hour.
m,
€,o
o
29
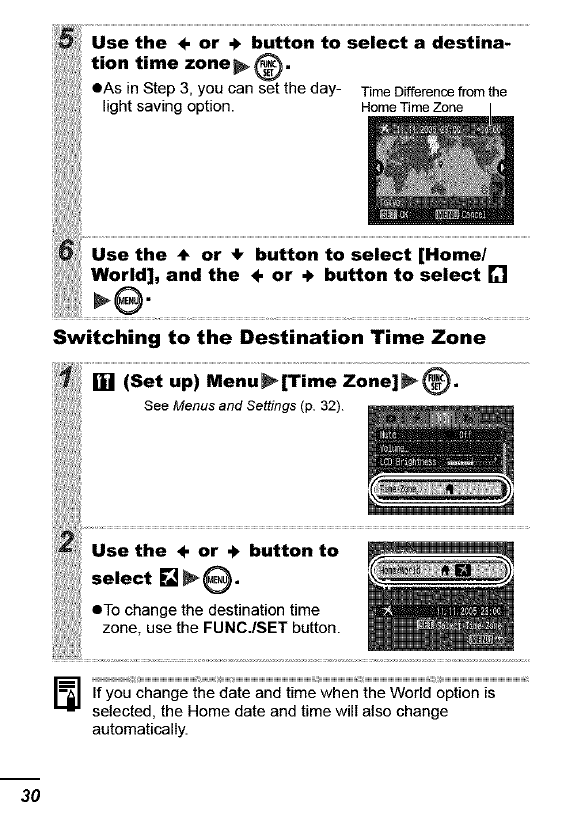
Use the ÷ or +button to select a destina-
tion time zone_ @.
eAs in Step 3, you can set the day- Time D_erencefrom the
light saving option. HomeTime Zone I
Use the *or button to select [Home/
World], and the ÷ or + button to select []
Switching to the Destination Time Zone
ii_ W (Set uP) Menu_[Time Zone]_@.
Use the ÷or + button to
select [] _0.
eTo change the destination time
zone, use the FUNC./SET button.
If you change the date and time when the World option is
selected, the Home date and time will also change
automatically.
3O
Menus are used to set the shooting and playback settings as well
as such camera settings as the date/time, electronic beep and
wireless connection. The following menus are available.
eFUNC. Menu
eRec., Play, Wireless, Set up and My Camera Menus
FUNC. Menu
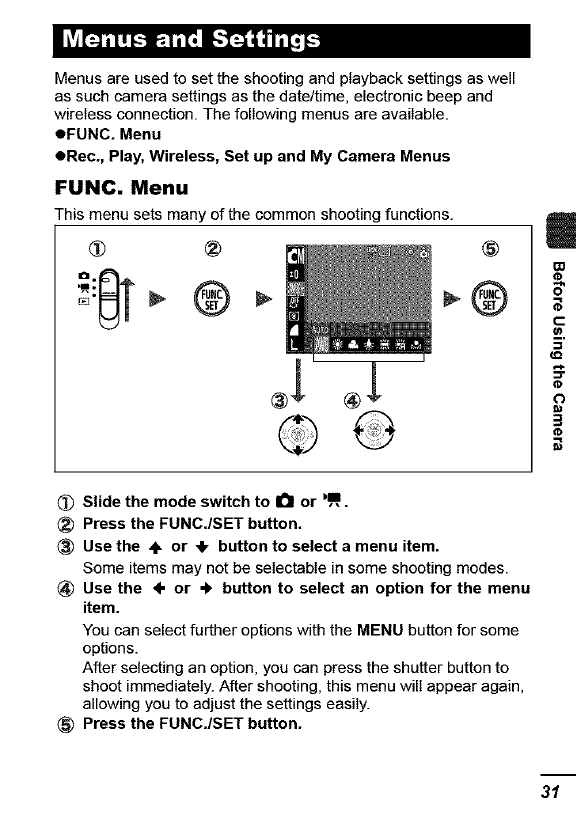
This menu sets many of the common shooting functions.
@
®
<_) Slide the mode switch to 0or ,m.
(_) Press the FUNCJSET button.
®Use the @ or 4, button to select a menu item.
Some items may not be seIectabIe in some shooting modes.
_) Use the 4" or ,_ button to select an option for the menu
item.
You can select further options with the MENU button for some
options.
After selecting an option, you can press the shutter button to
shoot immediately. After shooting, this menu will appear again,
allowing you to adjust the settings easily.
® Press the FUNCJSET button.
31

Rec., Play, Wireless, Set up and My Camera
Menus
Convenient settings for shooting or playback can be set with these
menus.
[] -- [] (Wireless)Menu
[] (Play) (Set up)Menu
(My Camera)Menu
® ®
@ @
(_) Youcanswitch
betweenmenus with
the*or*button k k
when this part is ® (_
selected. ('_<_"_')
•This example shows the Rec. menu.
• In playback mode, the Play menu displays.
(_ Press the MENU button.
®Use the *or 4, button to switch between menus.
You can also use the zoom lever to switch between menus.
® Use the ÷ or _1, button to select menu items.
Some items may not be setectable in some shooting modes.
{_ Use the ÷ or * button to select an option.
• Menu items followed by an ellipsis (...) can only be set after
pressing the FUNC./SET button to display the next menu.
Press the FUNC./SET button again to confirm the setting.
• When selecting items from the [] (Wireless) menu, the
method of operation depends on the menu item. Please
confirm precise instructions on the appropriate operational
procedure page.
®Press the MENU button.
32
IL'AI_fll!lImI_"_:
FUNC. Menu The [cons shown below are the default settings.
Menu Item Page Menu Item
Basic
[] p.5 []
[]
[]
[]
Shooting Mode
Movie Mode
Exposure Compensation
Long Shutter Mode
White Balance
Photo Effect
p. 47 []
p. 56 []
p. 57 []
p. 59 []
p. 62 []
My Colors
MeteringMode
Compression
FrameRate (Movie)
RecordingPixels(StillImage)
RecordingPixels(Movie)
Page
p.63
p. 55
p. 39
p. 40
p. 38
p. 40
Rec= Menu * Defaultsetting
Menu Item Options Page/Topic
AiAF On*lOft p. 51
Self-timer [] 10 seconds*/[] 2
seconds/[] CustomTimer
(Delay: 0-10", 15, 20, 30 p.45
sec.) (Shots: 1-3"-10)
AF-assist Beam On*lOft
DigitalZoom On/Off*
(On in standardmovie p. 42
mode.)
Review Off/2"-10 seconds/Hold
SaveOriginal On/Off*
Grid Lines On/Off*
Date Stamp Off*/Date/Date & Time
Long Shu_er On/OfP
BasicGuide p. 6
p. 65
You candisplaygrid lines
(splitsscreenintonine
areas) to makeit easier to
judge the horizontaland
verticalalignmentof a
photographicsubjectand to
makecompositioneasier.
Thelineswill not be
recordedin the images.
p. 44
p. 57
&
o
t-
O
3
33
StitchAssist m Left to right*/ p. 49
[] Rightto left
Play Menu
Menu Item Page
[] Protect p. 87
[] Rotate p. 80
[] SoundMemo p. 81
[] EraseAll p. 87
[] SlideShow p. 83
[] PrintOrder p. 88
[] Transfer Order p. 91
[] Transition p.81
Wireless Menu
Menu Item Options
ConneddDiscennec_
Reg. TargetDevice
DeleteRegistration
Auto Transfer On*lOft
Set up Menu
Menu Item Options
Mute On/Offf
*Default setting
Page/Topic
p. 100, Software & Wireless Guide
p. 102, Software & Wireless Guide
p. 104, Software & Wireless Guide
Software & Wireless Guide
* Default setting
Page/Topic
Set to [On] to silence the start-up,
operation, self-timer and shutter
sounds all at once. However, warnings
still sound even when the mute is set
to On. (Basic Guide p. 5)
34
,lume Off/1/2"/3/4/5 Adjuststhe volumeof the start-up
sound,operationsound,self-timer
sound, shuttersoundand playback
sound.The volumecannot be
adjusted if [Mute] isset to [On].
Start-upVoL Adjuststhe volumeof the start-up
sound whenthe cameraisturned on.
OperationVoL Adjuststhe volumeof the operation
sound that playswhen any button
otherthan the shutterbutton is
Dressed.
SelftimerVol. Adjuststhe volumeof the self-timer
sound played2 sec. before the shutter
isreleased.
ShutterVolume Adjusts the volumeof the sound
playedwhen the shutterreleases.The
shutter sound does not play when a
movieis recording.
PlaybackVol. Adjuststhe volumeof movie sounds
and soundmemos.
:DBrightness -7-0*-+7 Usethe ÷ or 4* buttonto adjust the
brightness.Ifyou pressthe 4" or 4,
button,the display returns to the Set
up menu.You can checkthe
brightnesson the LCD monitorwhile
you are adjustingthe setting.
wer Saving p. 27
Auto Power On*/Off Sets whether or not the camera
Down automatically powersdown after a set
Deriedof time elapses withoutthe
camera beingoperated.
Display Off 1g sec.120sec./ Sets the lengthof timebefore the LCD
30 sec./1 min.*/
2 min./3min.
Home*/Worldne Zone
Lterl-ime
_ck Display 0-5"-10 sec./20
sec./30sec./1
min./2min./3
min.
monitorturns off when no camera
operation isperformed.
p. 29
Basic Guide p.4
p. 20
@@
o
t-
@l
D}
35
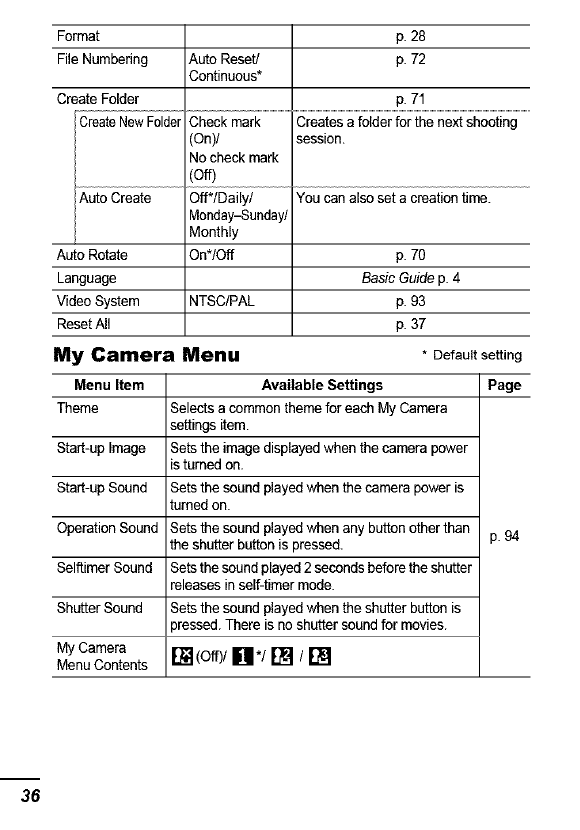
Format p. 28
File Numbering Auto Reset/ p. 72
Continuous*
Create Folder p. 71
................................cieaies a folder foi [fie next shooiing...........
session.
ark
Youcan also set a creationtime.
day/
Auto Rotate On*lOft p. 70
Language Basic Guide p. 4
Video System NTSC/PAL p. 93
ResetAll p. 37
My Camera Menu * Defaultsetting
Menu Item Available Settings Page
Theme Selectsa commonthemefor each MyCamera
settingsitem.
Start-up Image Sets theimagedisplayedwhen the camerapower
isturnedon.
Start-up Sound Sets thesoundplayedwhenthecamera poweris
turnedon.
OperationSound Setsthesound played when anybuttonotherthan p.94
theshutterbuttonis pressed.
SelftimerSound Setsthesoundplayed2secondsbeforetheshutter
releasesin self-timer mode.
Shutter Sound Setsthesound playedwhen the shutter buttonis
_ressed.There is noshuttersoundfor movies.
My Camera
MenuContents [] (Off)/[]*/[] /[]
36

[] (Set up) Menu _[Reset All].
See Menus and Settings (p.32).
Select [OK] and press _.
•Settings cannot be reset when the camera is connected to a _c°
computer or to a printer. _,
•The following cannot be reset.
- Shooting mode t--
- Item chosen from the [] (Wireless) menu =,,
- The [Time Zone], [Date/Time], [Language] and [Video
System] options in the [] (Set up) menu (pp. 35, 36)
- White balance data recorded with the custom white 0
balance function (p. 60) ._
- Colors specified in the [Color Accent] (p. 66) or [Color
Swap] (p. 67) modes of My Colors.
- Newly added My Camera settings (p. 95)
37
lShooting
Approximate Values for Recording Pixels
Recording Pixels Purpose
[] (Large) 2592 × 1944
pixels
[] (Medium 1) 2048 × 1536
pixels
[] (Medium 2) 1600 × 1200
pixels
[] (Small) 640 ×480
pixels
[] [] 1600×1200
Postcard Date pixels
Imprint Mode)
High Print larger than A4-size prints* 210
_, × 297 mm (83 × 11.7in.)
Print largerthan Letter-size prints*
216 × 279 mm (8.5 × 11 in.)
Print up to A4-size prints*210 ×297
mm (8.3 × 11.7 in.)
Print up to Letter-size prints* 216 ×
279 mm (8.5 × 11 in.)
Print postcard-size prints 148 × 100
mm (6 × 4 in.)
Print L-size prints 119 × 89 mm (4.7
× 3.5 in.)
_' Send images as e-mail attachments
Low Shoot more images
When printing to postcards (p. 44).
* Paper sizes vary according to region.
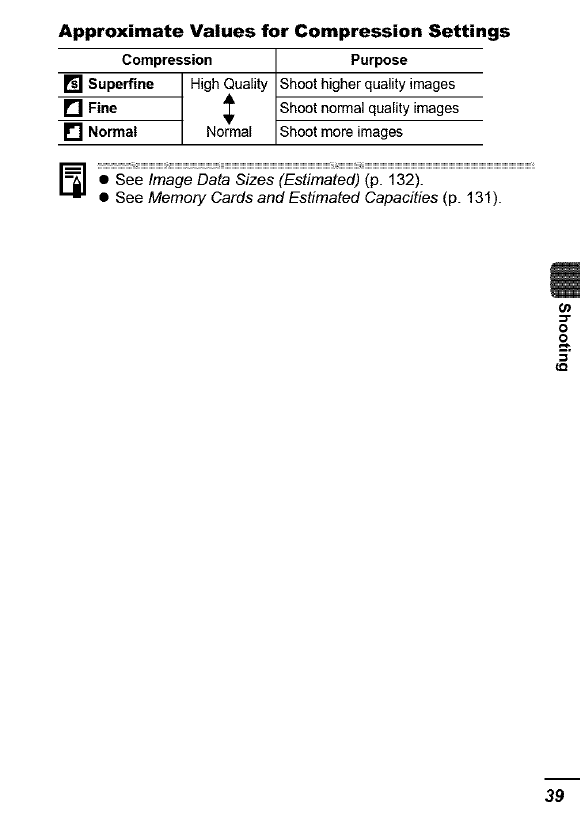
Approximate Values for Compression Settings
Compression Purpose
[] Superfine High Quality Shoot higher quality images
[] Fine _ Shoot normal quality images
[] Normal Normal Shoot more images
,i r
•See Image Data Sizes (Estimated) (p. 132).
• See Memory Cards and Estimated Capacities (p. 131 ).
o
o
39
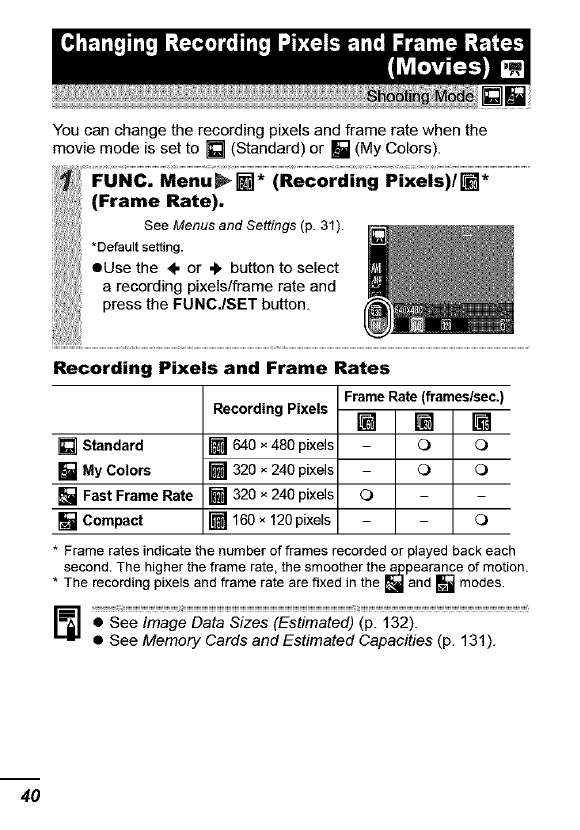
You can change the recording pixels and frame rate when the
movie mode is set to [] (Standard) or [] (My Colors).
:(Frame Rate).
SeeMenusandSe.,ngs31 .
*Default setting.
eUse the ÷or ,_ button to select
a recording pixels/frame rate and
press the FUNC./SET button.
Recording Pixels and Frame Rates
[] Standard
[] My Colors
[] Fast Frame Rate
[] Compact
FrameRate(frames/sec.)
Recording Pixels [] [] []
[] 640 ×480 pixels - 0 0
[] 320 ×240 pixels - 0 0
[] 320 ×240 pixels 0
[] 160 × 120 pixels - O
* Frame rates indicate the number of frames recorded or played back each
second. The higher the frame rate, the smoother the appearance of motion.
* The recording pixels and frame rate are fixed in the [] and [] modes.
Image (Estimated) (p. 132).
See Data Sizes
• See Memory Cards and Estimated Capacities (p. 131 ).
40
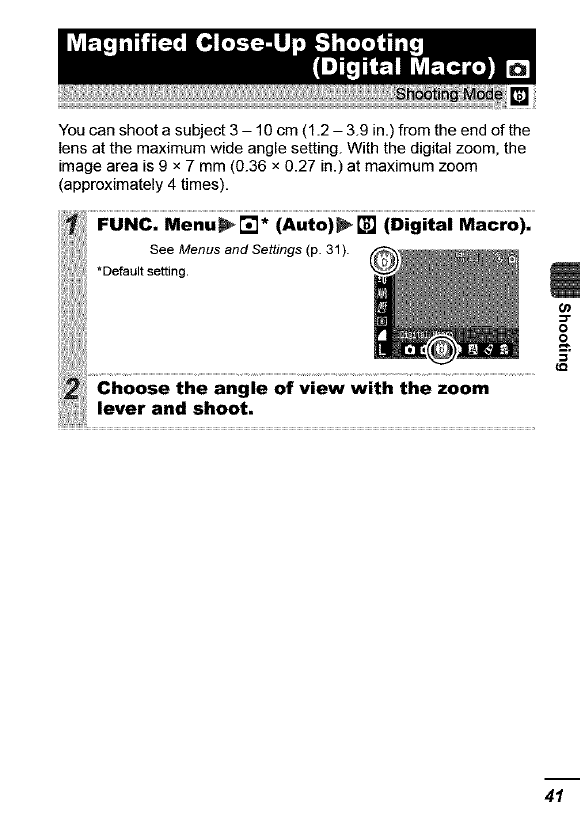
You can shoot a subject 3 - 10 cm (1.2 - 3.9 in.) from the end of the
lens at the maximum wide angle setting. With the digital zoom, the
image area is 9 x 7 mm (0.36 x 0.27 in.) at maximum zoom
(approximately 4 times).
See enu an Se ingsp31
i_ii,_,i'iiiii,__oo_o,tso_ioo.
,li'iiiii!ii_liii
h h n I fv, ww,
......_ lever and shoot, .....................................................................................................................................................................................................................................................
_Q
41
You can shoot zoomed images using the combined digital and
optical zooms.
eStills: zoom up to approximately 12 times
eMovies (Standard): zoom up to approximately 12 times
.....................................................
li See ensan Se ngp32
_Press the zoom iever toward E40and shoot.
eThe combined digital and optical zoom setting will display
on the LCD monitor.
eWhen you press the zoom lever toward E(b3,the zoom stops
when the lens reaches the maximum optical telephoto set-
ting (when shooting still images).
Press the zoom lever toward E@3again to activate the digital
zoom and further zoom the image digitally.
ePress the zoom lever toward [] to zoom out.
Images become coarser the more they are digitally zoomed.
42
[][][][][]mmBmm
In this mode, the camera shoots continuously while the shutter
button is held down.
If you use the recommended memory card*, you can shoot
continuously (smooth continuous shooting) at a set shooting
interval until the memory card is full (p. 131 ).
*Recommended Memory Card
Super high speed SDC-512 MSH memory card (sold separately)
immediately after a low level format (p. 28).
•This reflects standardshooting criteriaestablished by Canon. Actual results
mayvary according to the subject and shooting conditions.
• Even if continuous shooting suddenly stops, the memory card may not be
full.
Press the _to display [].
Shoot.
eThe camera wilI continue to record successive images while
the shutter button is fully pressed. Recording will cease
when the shutter button is released.
To Cancel Continuous Shooting
Press the D__button twice to display i.
•The interval between shots lengthens when the built-in
memory of the camera fills.
• If the flash is used, the interval between shots lengthens
because the flash must charge.
O_
=r
o
o
43

You can shoot images with the optimal settings for postcards by
composing them inside the print area (width-to-height ratio of
approximately 3:2) shown on the LCD monitor.
Embedding the Date in the Image Data
You can embed the date in image data when [] (Postcard
Date Imprint Mode) is selected.
[Date & Time].
• LCD Monitor Display
I1_]: [Date]/[Date & Time]
44
You can set a 10 sec. ([_) or 2 sec. ([J) delay, or a custom delay
time and the number of shots ([I Custom Timer), for shooting after
the shutter button is pressed.
Press the _button to display [I, [] or [].
(n
Shoot. _"
eWhen the shutter button is pressed fully, the self-timer will o
activate and the self-timer lamp will blink. When using red-
eye reduction, the self-timer lamp will blink and then stay lit
for the last 2 seconds.
To Cancel the Self-Timer
Press the _) button to display [].
You can change the self-timer sound (p. 36).
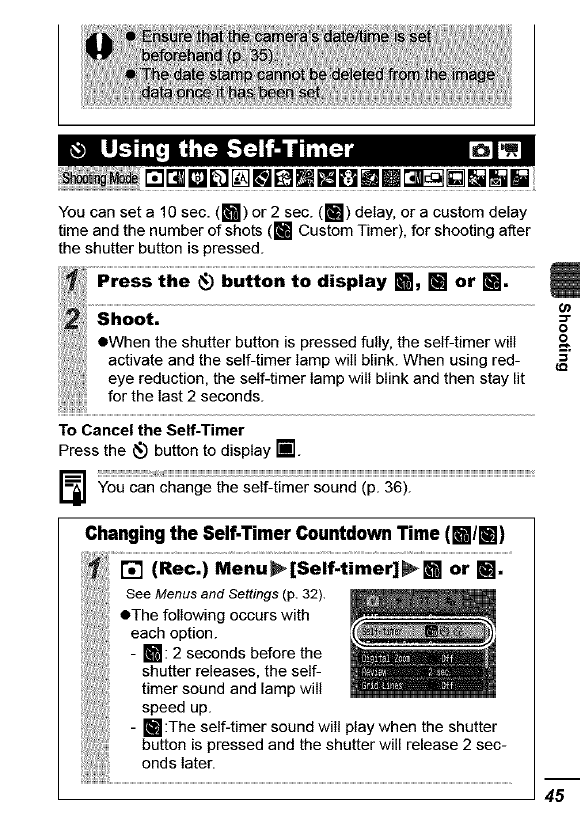
Changingthe Self-Timer CountdownTime ([]/[])
[] (Rec.) Menu_[Self-timer]_[] or [].
See Menus and Settings (p. 32).
eThe following occurs with
each option.
- []: 2 seconds before the
shutter releases, the self-
timer sound and lamp will
speed up.
- [] :The self-timer sound will play when the shutter
button is pressed and the shutter will release 2 sec-
onds later.

Changing the Delay Time and Number of Shots ([J).
You can change the delay time (0-10, 15, 20, 30 sac.) and
number of shots (1-10). These settings, however, cannot be
set for the Stitch Assist mode, movie mode or My Colors
modes.
eThe se f-t mer sound w _ W
: behave as follows. _ l
- The self-timer sound will _
start 2 seconds before the _k_
specified delay for shoot- _
Ing is over. _
-If multiple shots have
been specified for the [Shots] option, the sound will
play for the first shot only.
If the [Shots] option is set to 2 or more shots, the
following occurs.
- The exposure and white balance are locked at the
settings selected for the first shot.
- If the flash is used, the interval between shots
lengthens because the flash must charge.
- The interval between shots lengthens when the built-
in memory of the camera fills.
- Shooting will automatically cease if the memory card
becomes full.
46
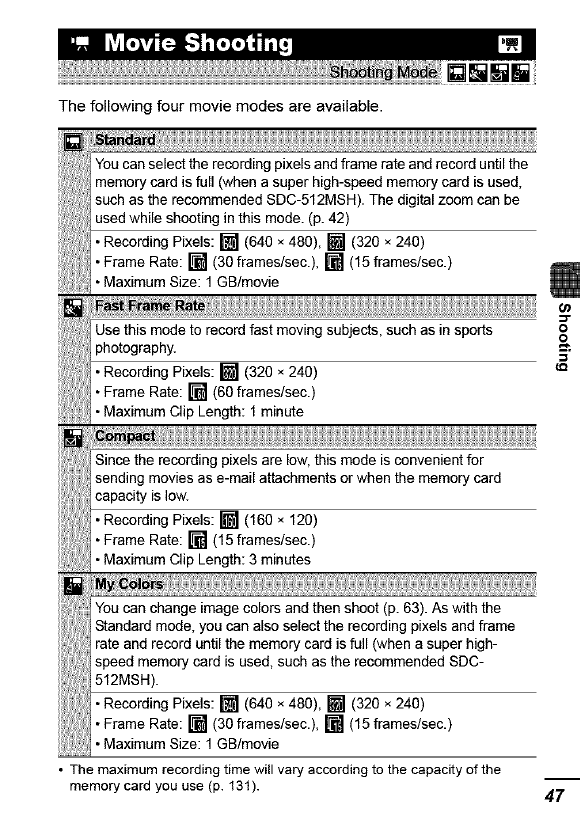
The following four movie modes are available.
You can select the recording pixels and frame rate and record until the
memory card is full (when a super high-speed memory card is used,
such as the recommended SDC-512MSH). The digital zoom can be
used while shooting in this mode. (p. 42)
• Recording Pixels: [] (640 × 480), [] (320 × 240)
• Frame Rate: [] (30 frames/sec.), [] (15 frames/sec.)
• Maximum Size: 1 GB/movie
Use this mode to record fast moving subjects, such as in sports
!I1 hoto0ra h
• Recording Pixels: [] (320 × 240)
• Frame Rate: [] (60 frames/sec.)
• Maximum Clip Length: 1 minute
Since the recording pixels are low, this mode is convenient for
sending movies as e-mail attachments or when the memory card
capacity is low.
• Recording Pixels: [] (160 × 120)
• Frame Rate: [] (15 frames/sec.)
• Maximum Clip Length: 3 minutes
You can change image colors and then shoot (p. 63). As with the
Standard mode, you can also select the recording pixels and frame
rate and record until the memory card is full (when a super high-
speed memory card is used, such as the recommended SDC-
512MSH).
• Recording Pixels: [] (640 × 480), [] (320 x 240)
• Frame Rate: [] (30 frames/sec.), [] (15 frames/sec.)
• Maximum Size: 1 GB/movie
• The maximum recording time will vary according to the capacity of the
memory card you use (p. 13!).
o
47
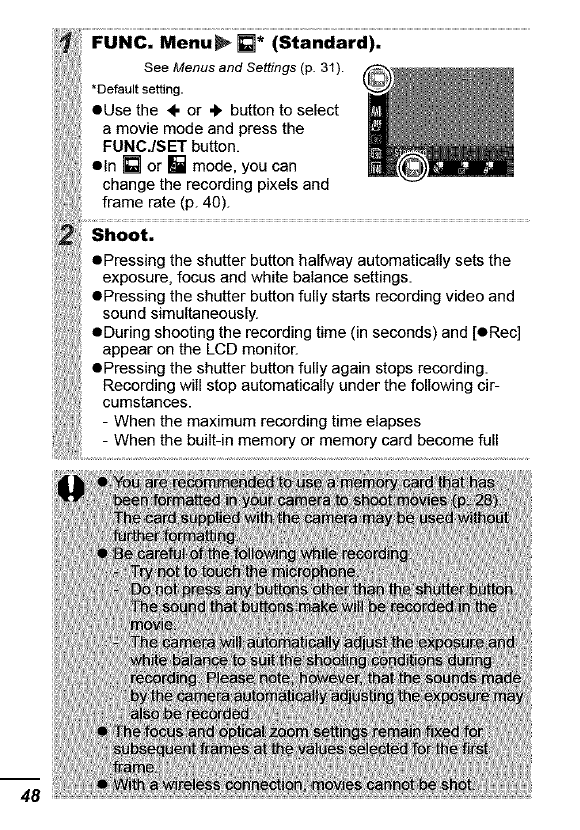
•Before recording, you can set the AE lock (p. 53) and
exposure shift.
1. Press the IS0 button.
The exposure will lock (AE lock) and the exposure shift
bar will appear on the LCD monitor.
2. Use the ÷ or ,_ button to adjust the exposure.
Press the IS0 button again to release the setting. Also,
the setting will be canceled if you press the MENU button
or change the white balance, photo effect or shooting
mode settings.
•QuickTime 3.0 or later is required to play back movies
(Data type: AVt/Compression method: Motion JPEG) on a
computer. QuickTime (for Windows) is included on the
Canon Digital Camera Solution Disk. On the Macintosh
platform, this program is standard with Mac OS X or later.
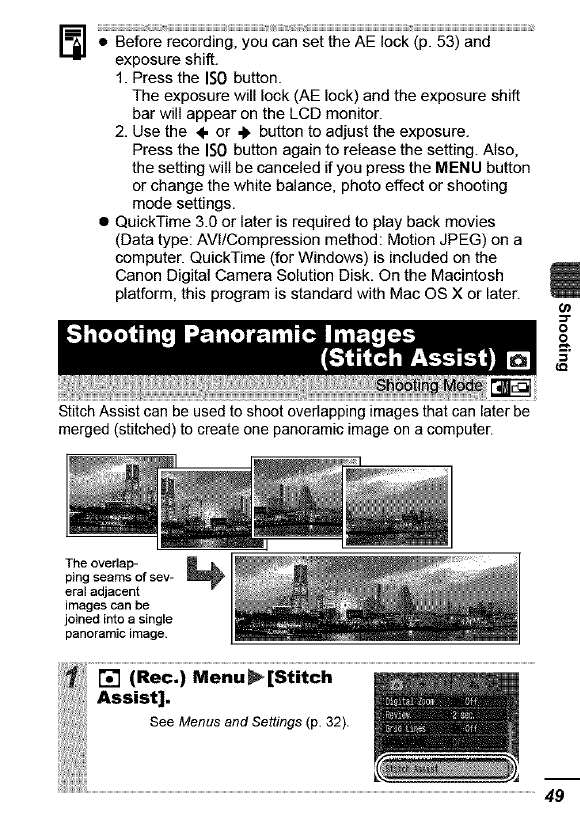
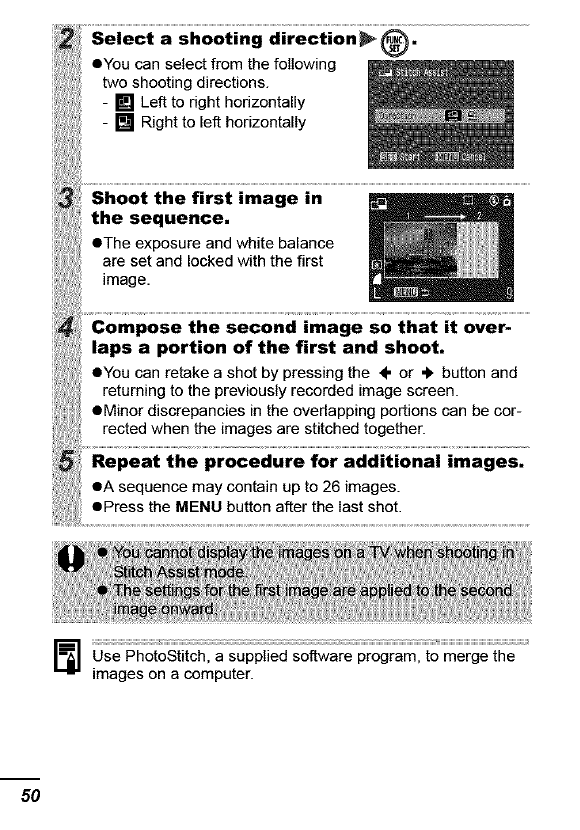
Stitch Assist can be used to shoot overlapping images that can later be
merged (stitched) to create one panoramic image on a computer.
The ovedap-
ping seams of sev-
eral adjacent
images can be
joined into a single
panoramic image.
[] (Rec.) Menu_[Stitch
Assist].
See Menus and Settings (p. 32).
49
Use PhotoStitch, a supplied software program, to merge the
images on a computer.
5O
mDF ImWDm
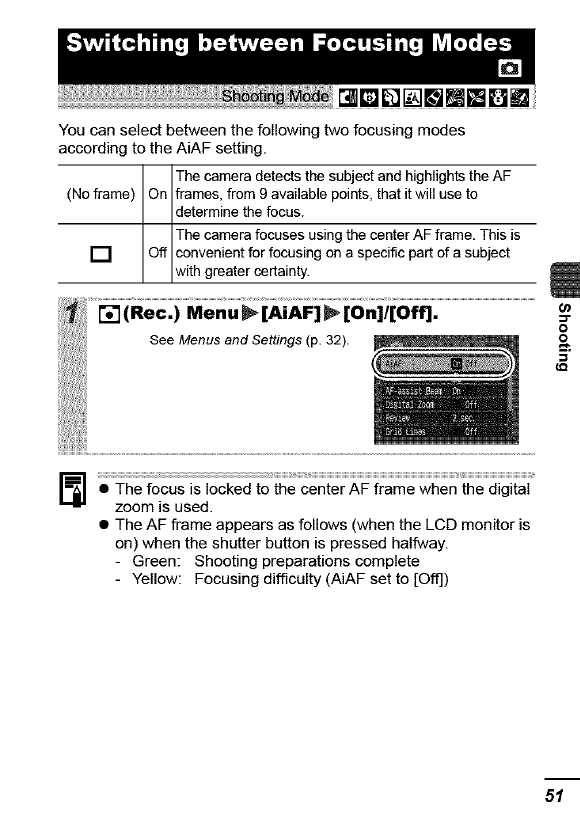
You can select between the following two focusing modes
according to the AiAF setting.
I IThe camera detects the subject and highlights the AF
(No frame) On frames, from 9 available points, that it will use to
determine the focus.
I IThe camera focuses using the center AF frame. This is
[] Off convenient for focusing on a specific part of a subject
with greater certainty.
[] (Rec.) Menu _[AiAF] _[On]/[Off],
See Menus and Settings (p. 32).
_r
o
o
• The focus is locked to the center AF frame when the digital
zoom is used.
• The AF frame appears as follows (when the LCD monitor is
on) when the shutter button is pressed halfway.
- Green: Shooting preparations complete
- Yellow: Focusing difficulty (AiAF set to [Off])
51
52
It may be difficult to focus on the following types of subjects.
eSubjects with extremely low contrast to the surroundings
eScenes with a mixture of near and far subjects.
eSubjects with extremely bright objects at the center of the composition
eSubjects that are moving quickly
eSubjects through glass: Try to shoot as close to the glass as
possible to reduce the chances of light reflecting back off the
glass.
Shooting with the Focus Lock
The focus lock can be used in any shooting mode.
e, .........................................
same focal distance as the main subject is
centered in the viewfinder or in the AF
frame displayed on the LCD monitor.
to composeth; shotaS
....... esire an pre the shu tte button y. .......................
Shooting with the AF Lock
The AF lock can be used in the r_, [_] [] or [] mode.
iu;, o"t"eLeom"iior.............................................................................................
_i, Ai ame th_ e_ he.........................................
same focal distance as the main subject is
centered in the AF frame.
the _/,A button.
cameraio composethe Shotas
des! red a nd shoot, .............................................................................................................................................................................................................................
To Release the AF Lock
Press the _/_1, button.
•When shooting with the focus lock or AF lock using the LCD
monitor, setting [AiAF] to [Off] (p. 33) makes shooting easier
since the camera focuses using the center AF frame only.
• The AF lock is convenient because you can let go of the
shutter button to compose the image. Moreover, the AF
lock is still effective after the picture is taken, allowing you
to capture a second image with the same focus.
3_ra[]_qea[][]
You can set the exposure and focus separately. This is effective
when the contrast is too strong between the subject and
background or when a subject is backlit.
_Turn on the LcD monitor. ........................................................................................................................................................................
you wish to lock the exposure setting.
_i _Press the shutter button haifway and press ...........
the ISO button,
•The[] iconw,Idisptay.
_eO_aimthecamerato composetheshotas
,e ,e,..,pre t hut utton 1,........................
To Release the AE Lock
Press the ISO button.
53
• AE lock can also be set and released in ,I mode (p. 49).
• You can use the FE lock when using the flash.
You can lock the flash exposure so that the exposure settings are
correctly set regardless of the composition of your subject.
ni,ias.......
on).
you wish to lock the flash exposure setting.
the IS0 button.
•The flash will pre-fire and [] will display.
!51, Re:aim the camera to compose the sho* as
i: desire ass t he shutter button y, .......................
To Release the FE Lock
Press the IS0 button.
54
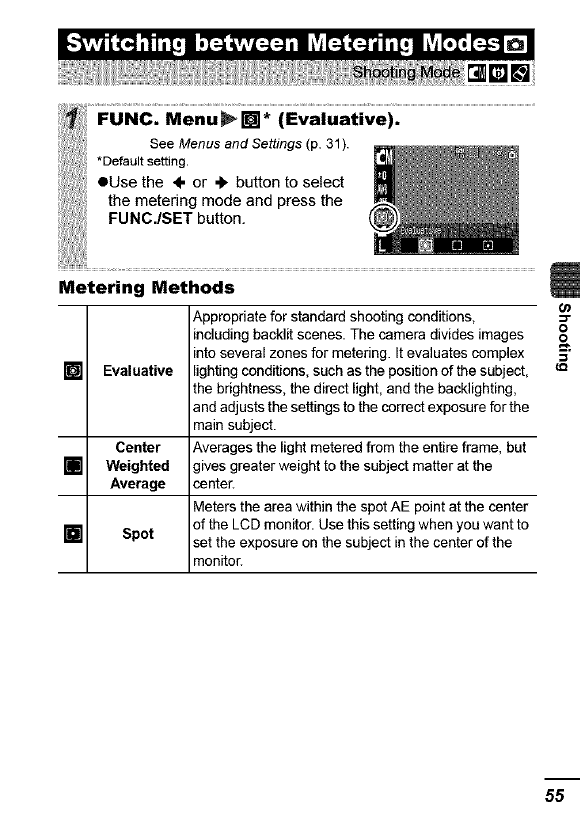
FUNC. Menu _ []* (Evaluative).
See Menus and Settings (p. 31).
*Default setting.
eUse the ÷ or 4' button to select
the metering mode and press the
FUNC./SET button.
Metering Methods
Appropriate for standard shooting conditions,
including backlit scenes. The camera divides images
into several zones for metering. It evaluates complex
[] Evaluative lighting conditions, such as the position of the subject,
the brightness, the direct light, and the backlighting,
and adjuststhe settings to the correct exposure for the
main subject.
Center Averages the light metered from the entire frame, but
[] Weighted gives greater weight to the subject matter at the
Average center.
Meters the area within the spot AE pointat the center
of the LCD monitor. Use thissetting when youwant to
[] Spot set the exposure on the subject inthe center of the
monitor.
Of)
g
5"
55
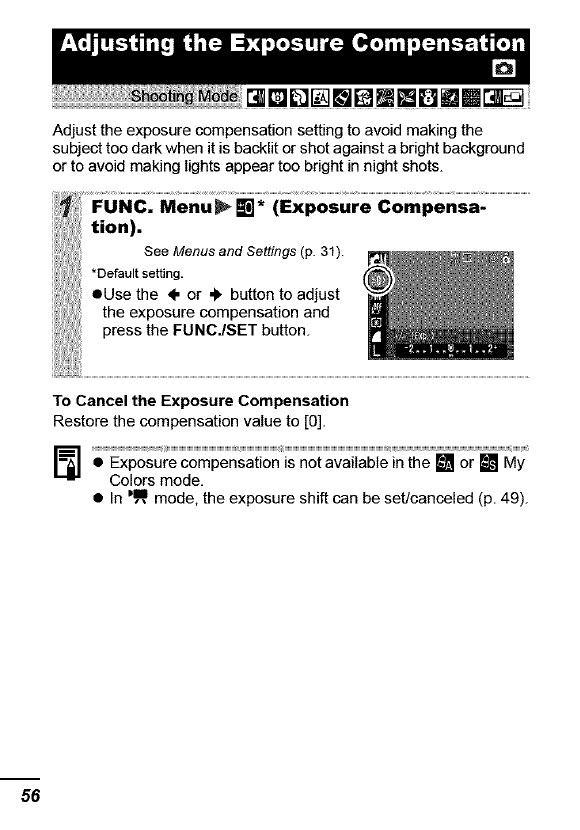
Adjust the exposure compensation setting to avoid making the
subject too dark when it is backlit or shot against a bright background
or to avoid making lights appear too bright in night shots.
To Cancel the Exposure Compensation
Restore the compensation value to [0].
•Exposure compensation is not available in the [] or [] My
Colors mode.
• In '_ mode, the exposure shift can be set/canceled (p. 49).
56
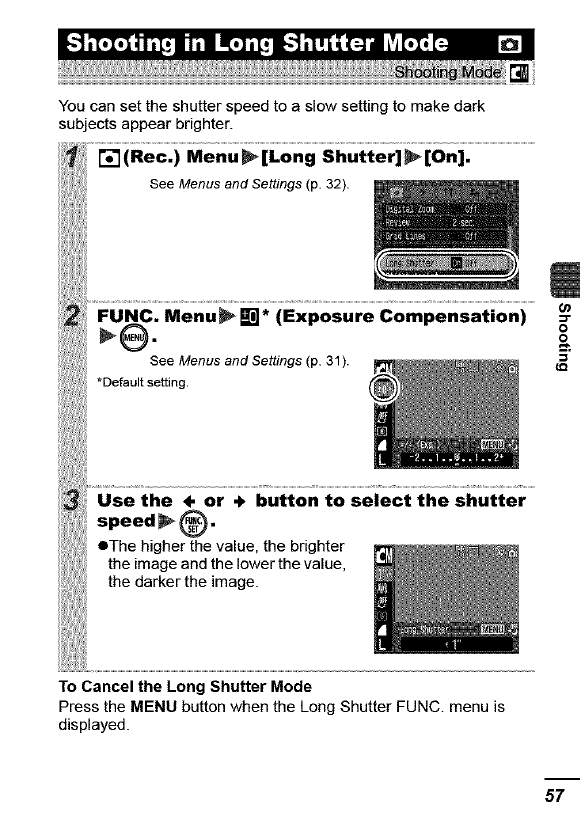
You can set the shutter speed to a slow setting to make dark
subjects appear brighter.
See MenusandSettings(p.32)._.
_ "_'See Menus and Settln[M_4_"s 31
so ,o0
:: speed_ _c.
eThe higher the value the brighter
:" the image and the lower the value,
the darker the image.
To Cancel the Long Shutter Mode
Press the MENU button when the Long Shutter FUNC. menu is
displayed.
o
o
57
• Use the LCD monitor to confirm that the image was
recorded at the desired brightness.
• Please note that camera shake becomes a factor at low
shutter speeds. Secure the camera to a tripod before
shooting.
• Use of the flash may result in an over-exposed image. If
this occurs, shoot with the flash set to [_-].
• The following are unavailable:
Exposure Compensation
Metering
AE Lock
FE Lock
ISO speed: Auto
Flash: Auto, Auto with Red-Eye Reduction
58
Normally, the [] (Auto) white balance setting selects an optimal
white balance. When the [] setting cannot produce natural looking
colors, change the white balance using a setting appropriate for the
light source.
White Balance Settings
[] Auto Settings are automatically set by the camera
[] Day Light For recording outdoors on a bright day
[] Cloudy For recording under overcast, shady or twilight skies
For recording under tungsten and bulb-type 3-
[] Tungsten wavelength fluorescent lighting
For recording under warm-white, cool-white or warm-
[] Fluorescent white (3-wavelength) fluorescent lighting
[] Fluorescent H For recording under daylight fluorescent, or daylight
fluorescent-type 3-wavelength fluorescent lighting
For recording with the optimal white balance data
[] Custom retained in the camera from a white-colored object,
such as white paper or cloth
59
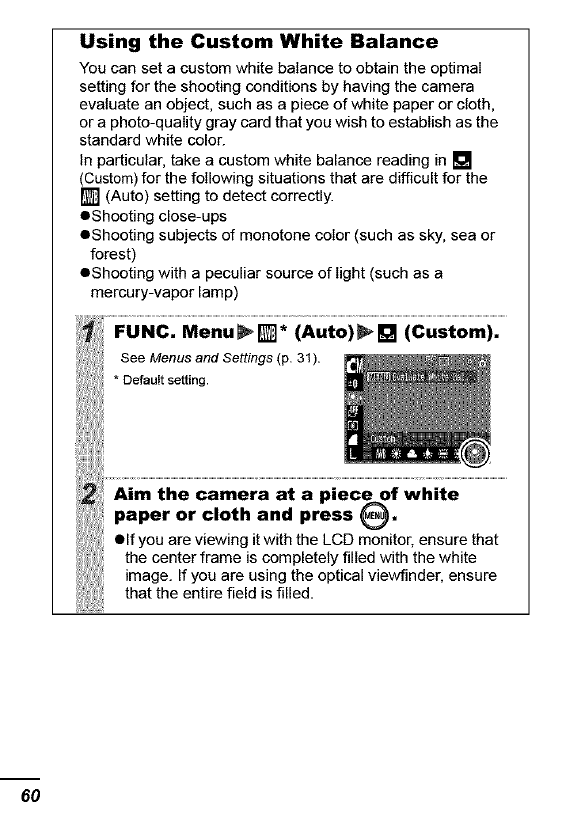
Using the Custom White Balance
You can set a custom white balance to obtain the optimal
setting for the shooting conditions by having the camera
evaluate an object, such as a piece of white paper or cloth,
or a photo-quality gray card that you wish to establish as the
standard white color.
In particular, take a custom white balance reading in []
(Custom) for the following situations that are difficult for the
[] (Auto) setting to detect correctly.
eShooting close-ups
eShooting subjects of monotone color (such as sky, sea or
forest)
eShooting with a peculiar source of light (such as a
mercury-vapor lamp)
See Menusand Settings (p. 31). _
oo,ou,,,o,,,no
Aim the camera at a piec_f white
paper or cloth and press _.
elf you are viewing it with the LCD monitor ensure that
the center frame is completely filled with the white
image. If you are using the optical viewfinder, ensure
that the entire field is filled.
6O
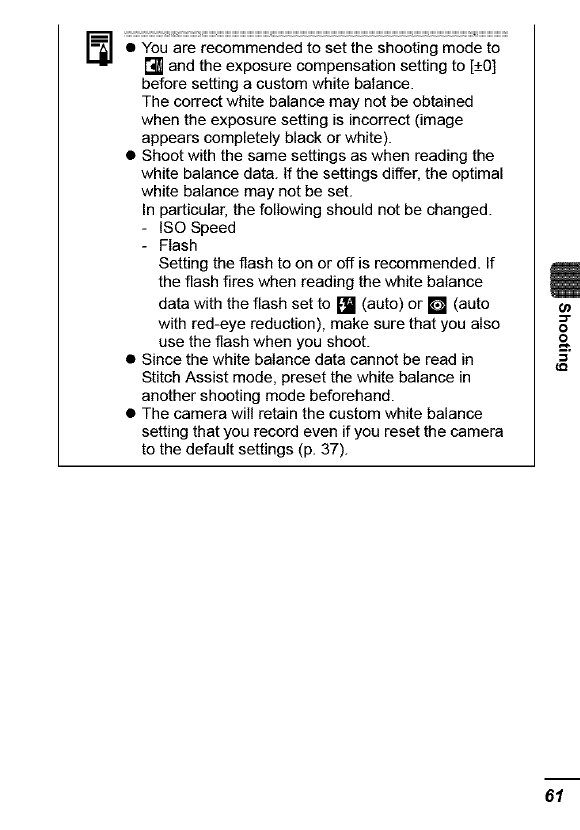
• You are recommended to set the shooting mode to
[] and the exposure compensation setting to [+0]
before setting a custom white balance.
The correct white balance may not be obtained
when the exposure setting is incorrect (image
appears completely black or white).
Shoot with the same settings as when reading the
white balance data. If the settings differ, the optimal
white balance may not be set.
In particular, the following should not be changed.
- ISO Speed
- Flash
Setting the flash to on or off is recommended. If
the flash fires when reading the white balance
data with the flash set to [] (auto) or [] (auto
with red-eye reduction), make sure that you also
use the flash when you shoot.
Since the white balance data cannot be read in
Stitch Assist mode, preset the white balance in
another shooting mode beforehand.
The camera will retain the custom white balance
setting that you record even if you reset the camera
to the default settings (p. 37).
61
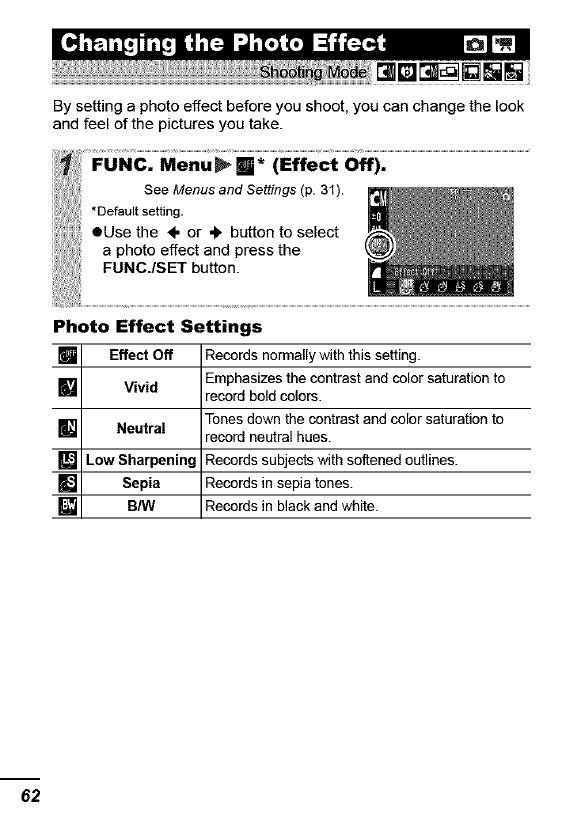
By setting a photo effect before you shoot, you can change the look
and feel of the pictures you take.
Photo Effect Settings
[] Effect Off Records normally with this setting.
Emphasizes the contrast and color saturation to
[] Vivid record bold colors.
Tones down the contrast and color saturation to
[] Neutral record neutral hues.
_L_4jLow Sharpening Records subjects with softened outlines.
Sepia Records in sepia tones.
[] B/W Records in black and white.
62
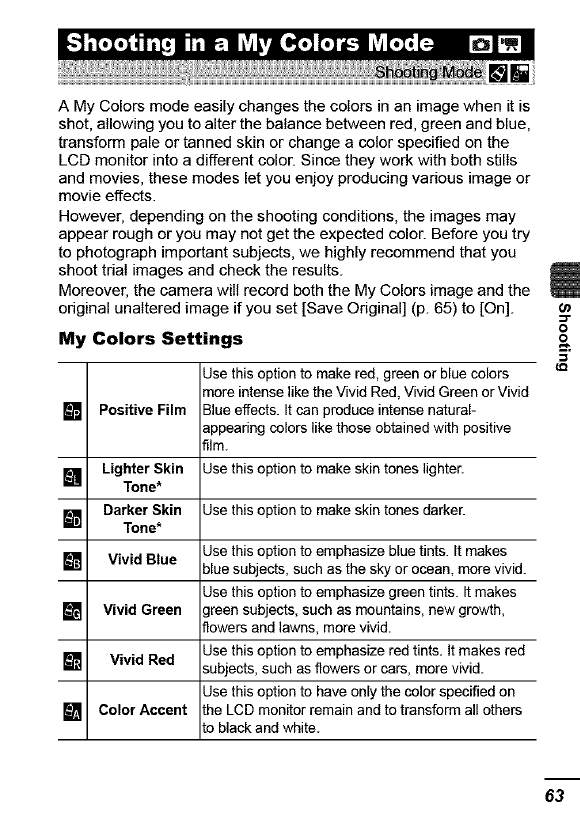
A My Colors mode easily changes the colors in an image when it is
shot, allowing you to alter the balance between red, green and blue,
transform pale or tanned skin or change a color specified on the
LCD monitor into a different color. Since they work with both stills
and movies, these modes let you enjoy producing various image or
movie effects.
However, depending on the shooting conditions, the images may
appear rough or you may not get the expected color. Before you try
to photograph important subjects, we highly recommend that you
shoot trial images and check the results.
Moreover, the camera will record both the My Colors image and the
original unaltered image if you set [Save Original] (p. 65) to [On].
My Colors Settings
Use this option to make red, green or blue colors
more intense like the Vivid Red, Vivid Green or Vivid
[] Positive Film Blue effects. It can produce intense natural-
appearing colors like those obtained with positive
film.
[] Lighter Skin Use this option to make skin tones lighter.
Tone*
[] Darker Skin Use this option to make skin tones darker.
Tone*
Use this option to emphasize blue tints. It makes
[] Vivid Blue blue subjects, such as the sky or ocean, more vivid.
Use this option to emphasize green tints. It makes
[] Vivid Green green subjects, such as mountains, new growth,
flowers and lawns, more vivid.
Use this option to emphasize red tints. It makes red
[] Vivid Red subjects, such as flowers or cars, more vivid.
Use this option to have only the color specified on
[] Color Accent the LCD monitor remain and to transform all others
to black and white.
_r
o
63
64
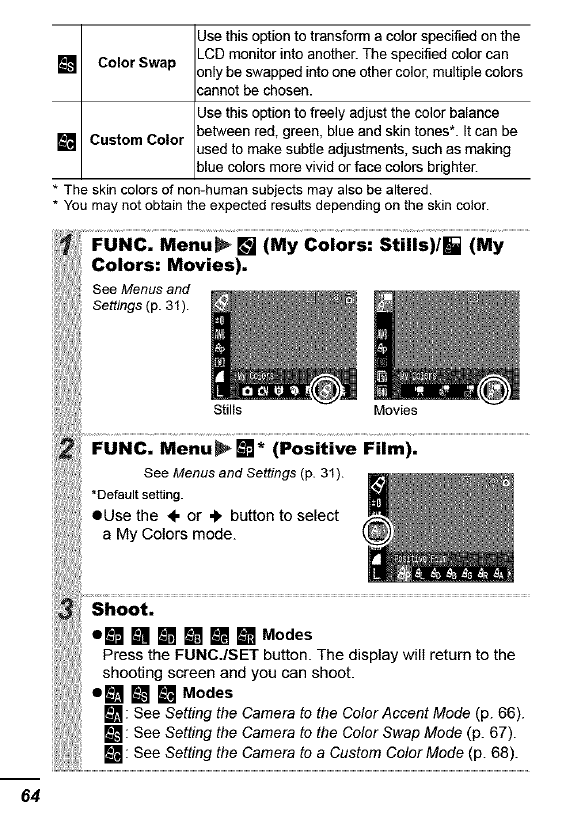
Usethis option to transform a color specified on the
[] Color Swap LCDmonitor into another. The specified color can
3nly be swapped intoone othercolor, multiple colors
cannotbe chosen.
Usethis option to freely adjust the color balance
between red, green, blue and skin tones*. It can be
[] Custom Color usedto make subtle adjustments, such as making
bluecolors more vivid or face colors brighter.
* The skin colors of non-human subjects may also be altered.
* You may not obtain the expected results depending on the skin color.
Colors: Movies).
SeeMenus ........
-g.
eUse the ÷ or 4, button to select
a My Colors mode.
e[] [] [] [] [] [] Modes
i Press the FUNCJSET button. The display will return to the
shooting screen and you can shoot.
e[] [] [] Modes
[]: See Setting the Camera to the Coler Accent Mede (p. 66).
[]: See Setting the Camera to the Color Swap Mode (p. 67).
SeeSe!tin s(o d ..........
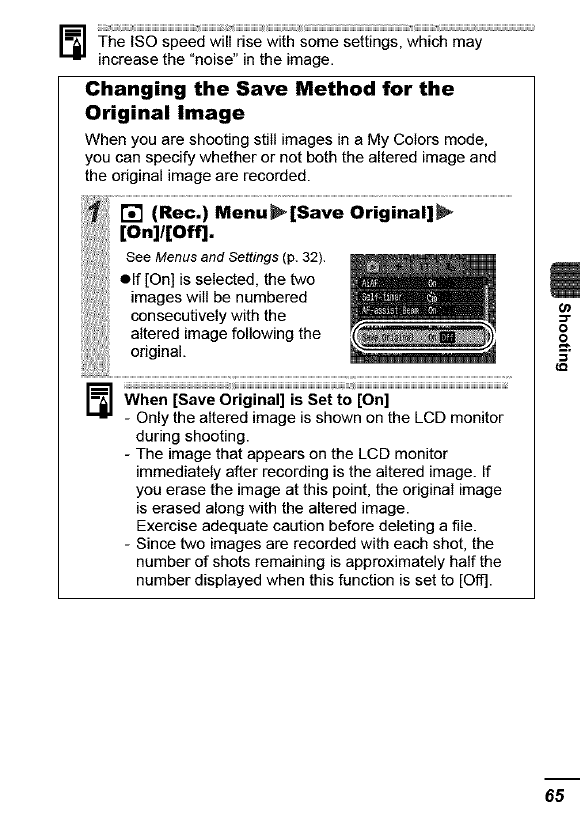
The ISO speed will rise with some settings, which may
increase the "noise" in the image.
Changing the Save Method for the
Original Image
When you are shooting still images in a My Colors mode,
you can specify whether or not both the altered image and
the original image are recorded.
[On]/[Off].
sooMonusSe.,ngs
•f [On] s se ected, the two
images will be numbered
consecutively with the
altered image following the
original.
When [Save Original] is Set to [On]
- Only the altered image is shown on the LCD monitor
during shooting.
- The image that appears on the LCD monitor
immediately after recording is the altered image. If
you erase the image at this point, the original image
is erased along with the altered image.
Exercise adequate caution before deleting a file.
- Since two images are recorded with each shot, the
number of shots remaining is approximately half the
number displayed when this function is set to [Off].
65
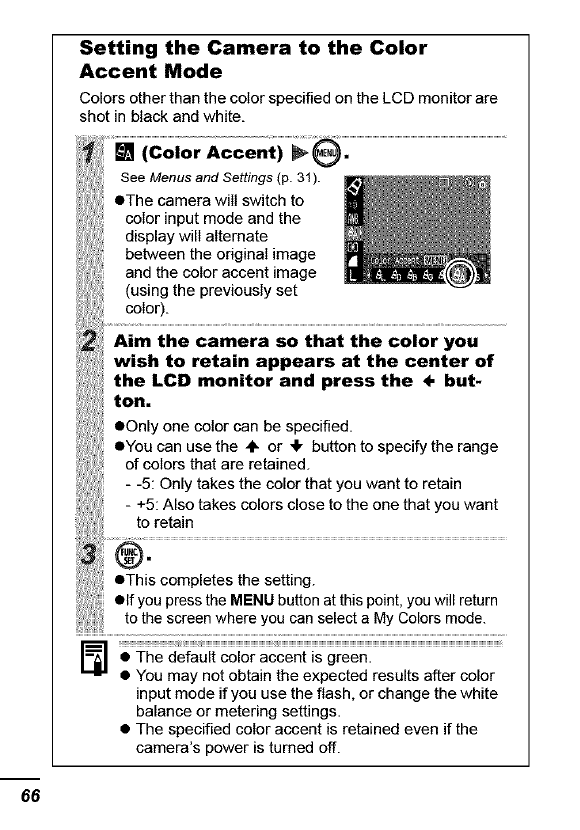
Setting the Camera to the Color
Accent Mode
Colors other than the color specified on the LCD monitor are
shot in black and white.
SeeMonusa._sot,ng__p3!_
eThe camera will switch to
color input mode and the
i display will alternate
between the original image
and the color accent image __._
(using the previously set
co_or).
_Aim th;cam;rasothatth;coloryou
wish to retain appears at the center of
the LCD monitor and press the ÷but-
ton.
eOnly one color can be specified.
eYou can use the 4" or 4, button to specify the range
of colors that are retained.
- -5: Only takes the color that you want to retain
- +5: Also takes colors close to the one that you want
to retain
m0 .....................................................................
elf you press the MENU button at this point you will return
,: !othe ................
:::::::::::::::::::::::::::::::::::::::::::::::_I_IHIHHH_IHHHHHHHHHHHHHHHHHHHHHHHHHHHHH_IHHHHHHHHHHHHHHHHHHHHHHHHHHHHHHHHHHHHHHHHHHHHHHHHHHHHHHHHHHHHHHHHHHHHHHHHHHHHHHHHHHHHHHHHHHHHHHH_
•The default color accent is green.
• You may not obtain the expected results after color
input mode if you use the flash, or change the white
balance or metering settings.
• The specified color accent is retained even if the
camera's power is turned oft.
66
Setting the Camera to the Color Swap Mode
This mode allows you to transform a color specified on the
LCD monitor into another.
Desired
See Menus and Settings (p. 31).
eThe camera will switch to
color input mode and the dis-
play will alternate between
the original image and the
color swap image (using the __,'m
previously set color).
Aim the camera So that the original
color appears at the center of the LCD
monitor and press the <- button.
eOnly one color can be specified.
eYou can use the 4, or 4, button to specify the range
: of colors that are swapped.
:: : • -5: Only takes the color that you want to swap
•+5: Also takes colors close to the one that you want
to swap
_Aim the camera so that the desired
color appears at the center of the LCD
monitor and press the +button•
eOnly one color can be specified.
Original Color
(Before Swapping) (After Swapping)
Setting the Camera to a Custom Color Mode
This mode allows you to adjust the color balancefor red,
reen, blue and skin tones.
Raise the ISO speed when you wish to reduce the effects of camera
shake, turn the flash off when shooting in a dark area, or use a fast
shutter speed.
•Cycle through the _L_/_/_/Ld_/[Auto] with each press of
the ISO button.
• Selecting [Auto] sets the sensitivity to produce the optimal
ima°equa!itY...............................................................................................................................................................................................................................................................................................
o
69
Your camera is equipped with an Intelligent Orientation sensor that
detects the orientation of an image shot with the camera held
vertically and automatically rotates it to the correct orientation when
viewing it on the LCD monitor.
70
• When the camera is held vertically to shoot, the Intelligent
Orientation sensor judges the upper end to be "up" and the
lower end to be "down". tt then regulates the optimal white
balance, exposure and focus for vertical photography. This
function operates regardless of the on/off status of the Auto
Rotate function.
• When the Auto Rotate function is set to [On] in shooting
mode, the orientation of the camera is recorded when the
shot is taken.
• When the Auto Rotate function is set to [On] in playback
mode, images will be rotated to their correct orientation on
the LCD monitor as needed when the camera's orientation
is changed (only applies to images shot when the Auto
Rotate function was set to [On]).
ra[]ln"_ [] []i_ mm[] mml3_q_a[][]
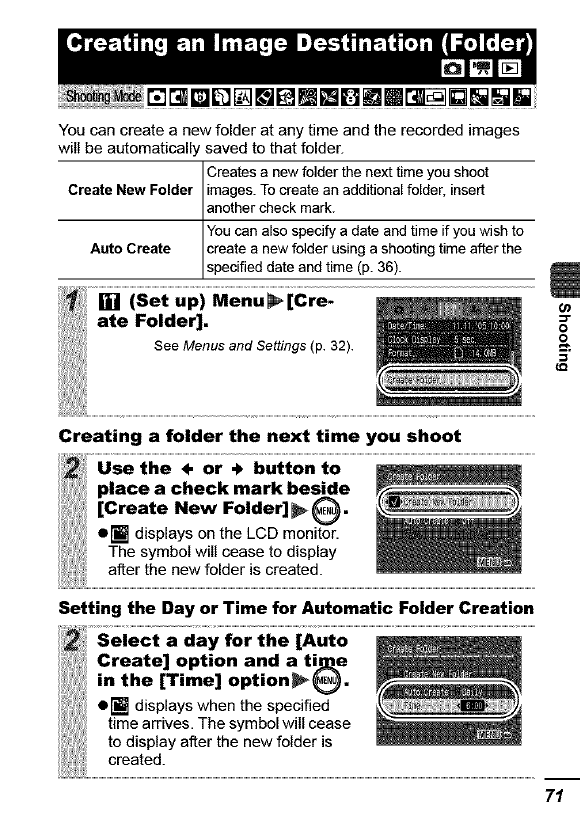
You can create a new folder at any time and the recorded images
will be automatically saved to that folder.
Creates a new folder the next time you shoot
Create New Folder images. Tocreate an additional folder, insert
another check mark.
You can also specify a date and time if you wish to
Auto Create create a new folder using a shooting time after the
spec fed date and t me (p. 36).
;e-
ate Folder].
Soe onusondso , gs<p32>
Creating a folder the next time you shoot
place a check mark besi .de
[Create New Folder] _ .
a[] displays on the LCD monitor.
The symbol will cease to display
after the new folder is created.
Setting the Day or Time for Automatic Folder Creation
Create] option and a tij]&e
!in the [Time] option_.
e[] displays when the specified
time arrives. The symbol will cease
to display after the new folder is
created.
71
Upto2000imagescanbesavedintoonefolder.Anewfolder
willautomaticallybecreatedwhenyourecordmorethanthat
numberevenifyouarenotcreatingnewfolders.
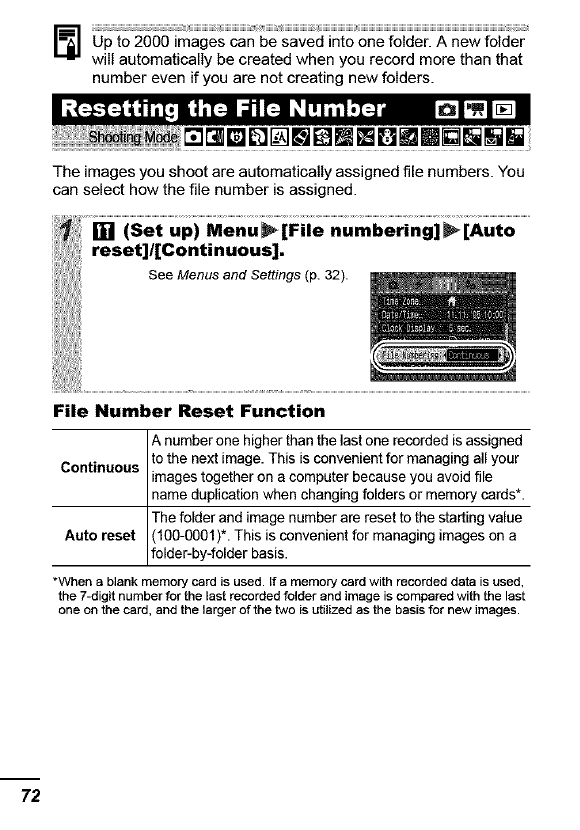
Theimagesyoushootareautomaticallyassignedfilenumbers.You
canselecthowthefilenumberisassigned.
File Number Reset Function
A number one higher than the last one recorded isassigned
to the next image. This isconvenient for managing all your
Continuous l images together on a computer because you avoid file
name duplication when changing folders or memory cards*.
IThe folder and image number are reset to the starting value
Auto reset (100-0001)*. This is convenient for managing images on a
fo der-by-fo der bass.
*When a blank memory card is used. If a memory card with recorded data is used,
the 74:ligit number for the last recorded folder and image is compared with the last
one on the card, and the larger of the two is utilized as the basis for new images.
72

File and Folder Numbers
Recorded images are assigned consecutive file numbers starting
with 0001 and ranging up to 9999, while folders are assigned
numbers starting with 100 and ranging up to 999. Up to 2,000
images can be saved into a single folder.
New Folder Created
Memory Card 1
Memory Card 1
Continuous
Auto Reset
MemoryCardExchangedforAnother
Memory Card 1 Memory Card 2
Memory Card 1 Memory Card 2
•Images may be saved to a new folder when there is insufficient
free space even if the total number of images in a folder is less
than 2,000 because the following types of image are always
saved together into the same folder.
- Images from continuous shooting
- Self-timer images (custom)
- Stitch Assist mode images
- My Colors images ([Save Original] set to [On])
Olmages cannot be played back when the folder numbers are
duplicated or image numbers are duplicated within folders.
OPIease refer to the Software & WtYeless Guide for information
regarding folder structures or image types.
_r
o
o
73
Playback/Erasing
Please also see the Basic Guide (p. 11).
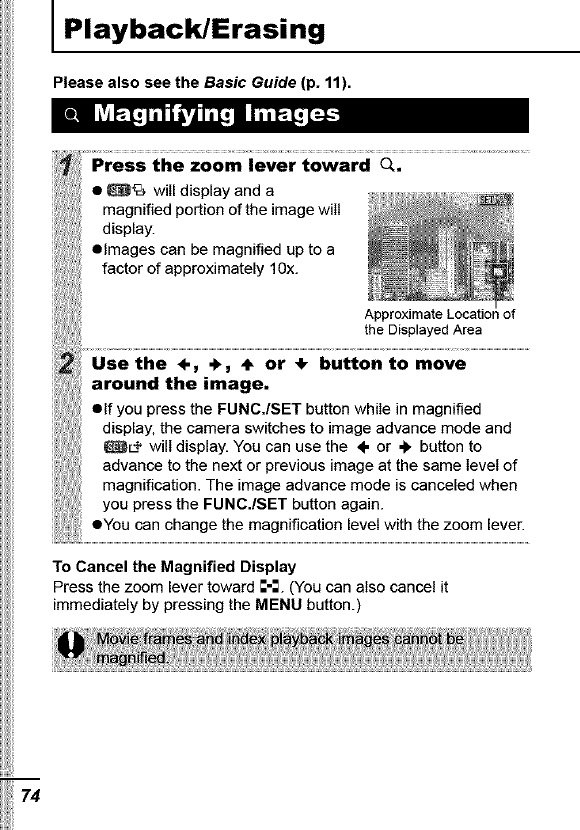
iii [Pre, thezoomie e;to d .....................................................................................................
•_" will display and a .....
magnified portion of the image will
display.
[ii -Images can be magnified up to a
factor of approximately 10x.
I'
pp " .
the Displayed Area
around the image,
•If you press the FUNC./SET button while in magnified
display, the camera switches to image advance mode and
)' @c÷ will display. You can use the ÷ or ,_ button to
advance to the next or previous image at the same level of
magnification. The image advance mode is canceled when
you press the FUNC.ISET button again.
,,-Yo ca gth magn!!ica! e w hez O0 e!....
To Cancel the Magnified Display
Press the zoom lever toward =-:. (You can also cancel it
immediately by pressing the MENU button.)
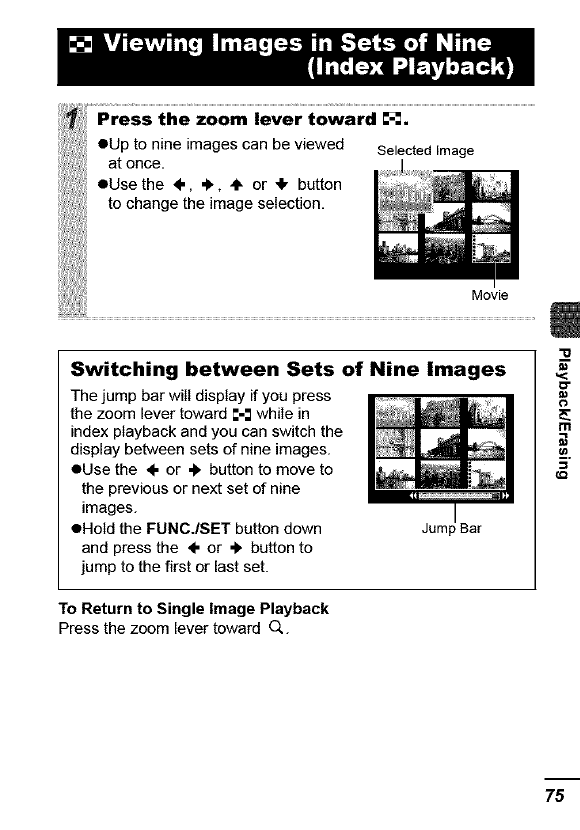
thezoom iever toward _,
n, e, aoe oanv,ewe e,ec ed, a e
1!
at once.
OUse the ÷, ,_, "1_ or 41, button
to change the image selection.
Movie
Switching between Sets of Nine Images
The jump bar will display if you press
the zoom lever toward =-: while in
index playback and you can switch the
display between sets of nine images.
OUse the ÷ or ,_ button to move to
the previous or next set of nine
images.
oHold the FUNC./SET button down Jurn Bar
and press the ÷ or ,_ button to
jump to the first or last set.
To Return to Single Image Playback
Press the zoom lever toward 0,.
"10
==
75
When you have many images recorded onto a memory card, it is
handy to use the five search keys below to jump over images to find
the object of your search.
[] IJump 10 Images Jumps over 10 images at a time.
[] IJump 100 Images Jumps over 100 images at a time.
[] IJump Shot Date Jumpsto the first imageof each shooting date.
[] Jump to Movie Jumpsto amovie.
[] Jump to Folder Dspaysthefrst mage neachfoder.
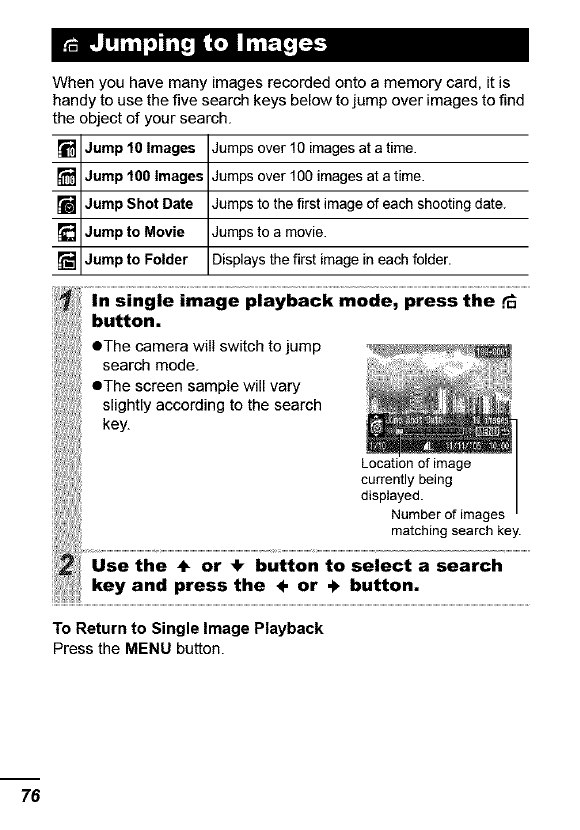
button. ,_
The camera will switch to jump _
search mode
emhe screen sample will vary
slightly according to the search
key. Locat,onof=a_e I
currently being I
displ_yedber of images I
:,_ matching search key.
asearc.......................
.......,,.., .,esst.e, or÷b.tto..
To Return to Single Image Playback
Press the MENU button.
76
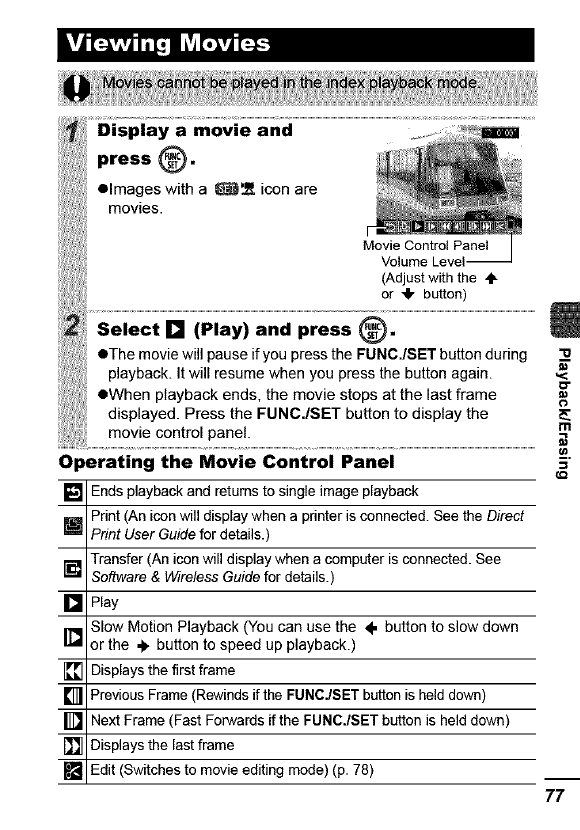
kv j ILvA
Operating the Movie Control Panel
[] Ends playback and returns to single image playback
Print (An icon will display when a printer is connected. See the Direct
[] Print User Guide for details.)
Transfer (An icon will display when a computer is connected. See
[] Software& Wireless Guide for details.)
[] Play
Slow Motion Playback (You can use the ÷ button to slow down
[] or the ,). button to speed up playback.)
[] Displays the first frame
[] Previous Frame(Rewinds if the FUNC./SET button is held down)
[] Next Frame (Fast Forwards if the FUNC,/SET button is held down)
[] Displays the last frame
[] Edit (Switches to movie editing mode) (p. 78)
,<
o"
I"11
_.Q
77
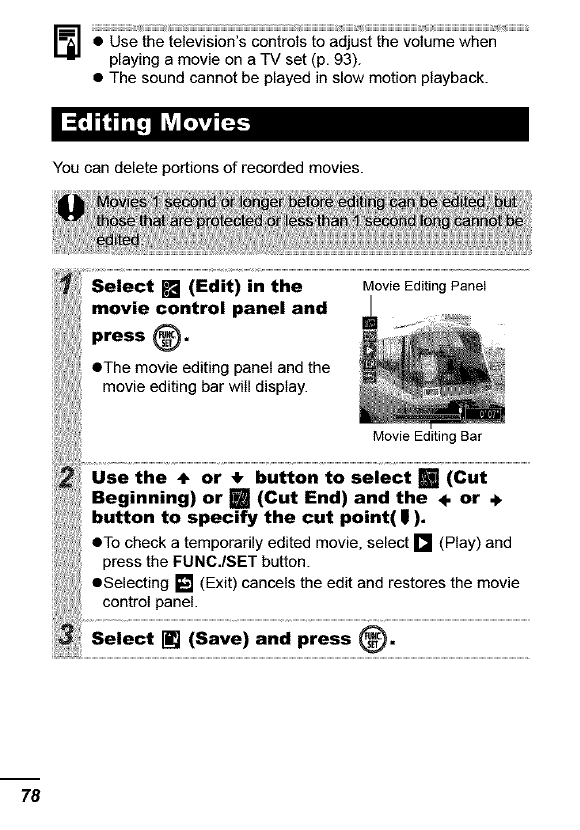
• Use the television's controls to adjust the volume when
playing a movie on a TV set (p. 93).
• The sound cannot be played in slow motion playback.
You can delete portions of recorded movies.
i_ Seiect m (Sdiiiinth e .....................................................M,ovie Editing Panel
movie control panel and ._ ,_,_
pre,s@.
•The movie editing panel and the
movie editing bar wilI disptay.
Movie Editing Bar
Beginning) or [] (Cut End) and the ÷ or
button to specify the cut point( I),
•To check a temporarily edited movie select [] (Play) and
press the FUNC./SET button.
• Selecting [] (Exit) cancels the edit and restores the movie
control panel.
_Se'ec,_ iSa-e)a"dP;ess@:
78
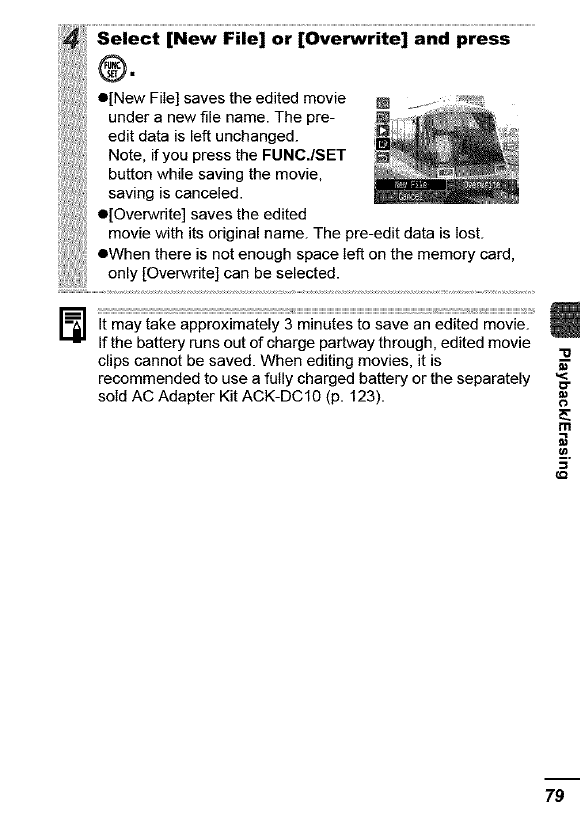
• [New File] saves the edited movie _ .........
under a new file name. The pre-
edit data Is left unchanged. ___i_ °
Note, if you press the FUNC.ISET
button while saving the movie,
saving is canceled.
e[Overwrite] saves the edited
movie with its original name. The pre-edit data is lost.
eWhen there is not enough space left on the memory card,
only [Overwrite] can be selected.
It may take approximately 3 minutes to save an edited movie.
If the battery runs out of charge partway through, edited movie
clips cannot be saved. When editing movies, it is
recommended to use a fully charged battery or the separately
sold AC Adapter Kit ACK-DC1O (p. 123).
-e
m
79
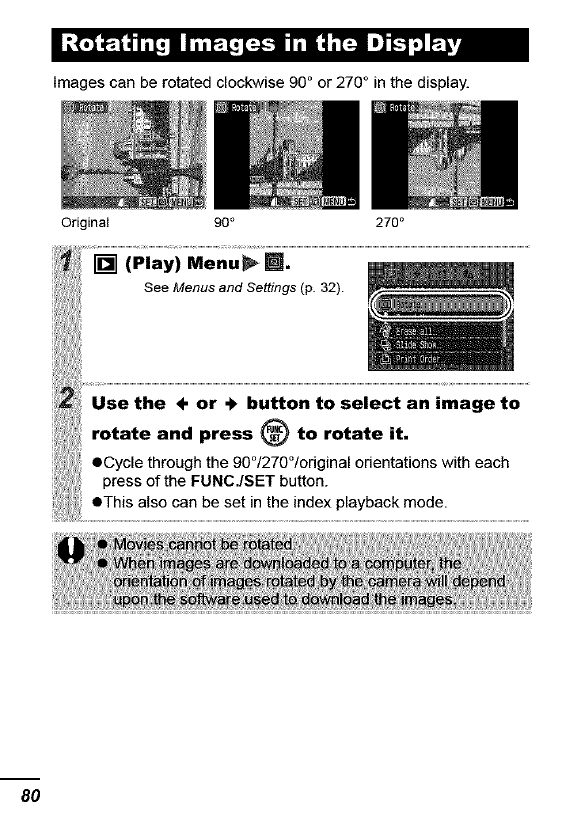
Images can be rotated clockwise 90 ° or 270 ° in the display.
Original 90 ° 270 °
8O

You can select the transition effect displayed when switching
between images.
Usual display
[] I The displayed image darkens and the next image gradually brightens
until it is displayed.
IPress the ÷ button to have the previous image display from the left
• .i I and the ._ button to have the next image display from the right.
1
The transition effect will not display when an image is
switched while the camera is reading an image from the ---.
memory card.
In playback mode (including single image playback and index
playback), you can attach sound memos (up to 60 seconds) to an
image. The sound data is saved in the WAVE format.
[] (Play) Menu_[_J.
See Menus and Settings (p. 32).
81
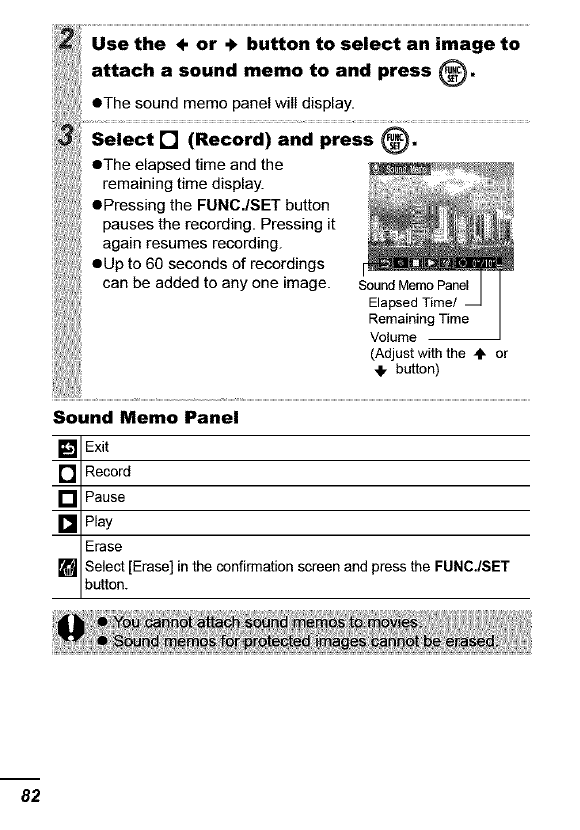
usethe ÷ or Ubutton to select an image to ........
iiiiiiii_!i_iattac,aso..dmemotoa.d,,ess®.
•The sound memo panel will display.
N:Se'ect0("eco;"ian"";ess_:
eThe e apsed t me and the
remaining time display.
ePressing the FUNC./SET button _t
pauses the recording. Pressing it _
again resumes recording. _
eUp to 60 seconds of recordings _
can be added to any one image. SE_andDsMedm_iPa_e_|
p
Rve_ami_ing Time__ J
(Adjust with the _1_or
41, button)
Sound Memo Panel
Exit
Record
NI,_Pause
Play
Erase
[] Select [Erase] in the confirmation screen and press the FUNC./SET
button.
82
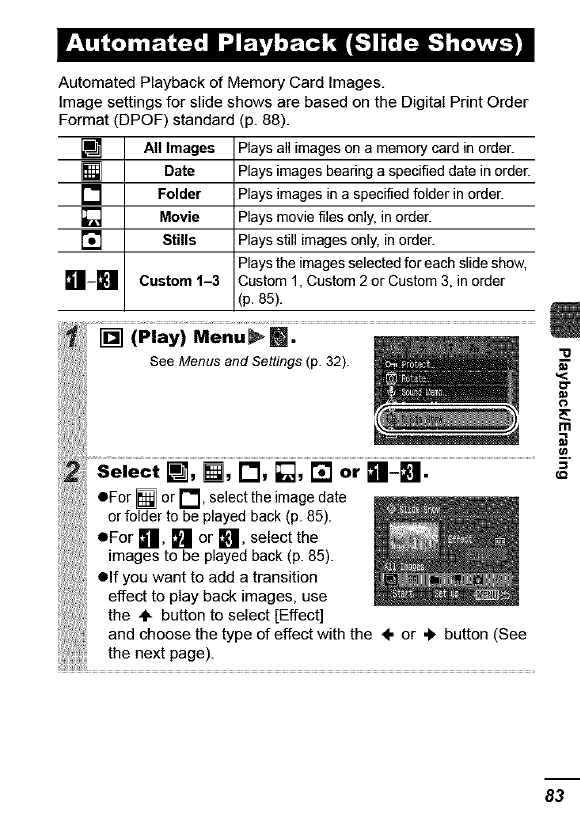
Automated Playback of Memory Card Images.
Image settings for slide shows are based on the Digital Print Order
Format (DPOF) standard (p. 88).
[] All Images Plays all images on a memory card in order.
Date Plays images beadng a specified date in order.
[] Folder Plays images in a specified folder in order.
[] Movie Plays movie files only, in order.
[] Stills Plays still images only, in order.
Playsthe images selected for each slide show,
_1-_]_ Custom 1-3 Custom 1, Custom 2 or Custom 3, in order
(p. 85).
83
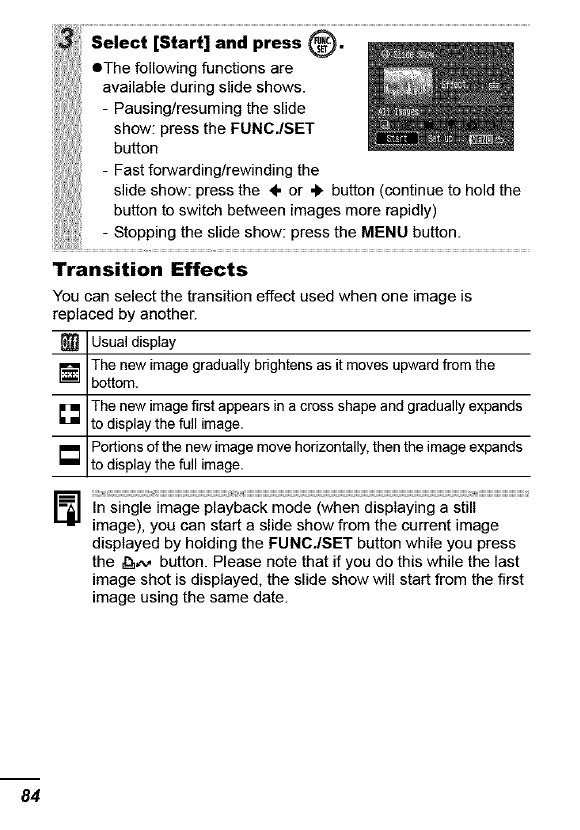
Se'ect[SCar*]'nd®:
eThe following functions are
;, available during slide shows. _
il - Pausing/resuming the slide _
bhutloW:npress the FUNO'/SET __
- Fast forwarding/rewinding the
slide show: press the ÷or +button (continue to hold the
button to switch between images more rapidly)
0thet p!es ............................................................
Transition Effects
You can select the transition effect used when one image is
replaced by another.
[] Usual display
I_ The new image gradually brightens as it moves upward from the
bottom.
The new image first appears in a cross shape and gradually expands
mLB to display the full image.
Portions of the new image move horizontally, then the image expands
to display the full image.
In single image playback mode (when displaying a still
image), you can start a slide show from the current image
displayed by holding the FUNC./SET button while you press
the _,_, button. Please note that if you do this while the last
image shot is displayed, the slide show will start from the first
image using the same date.
84
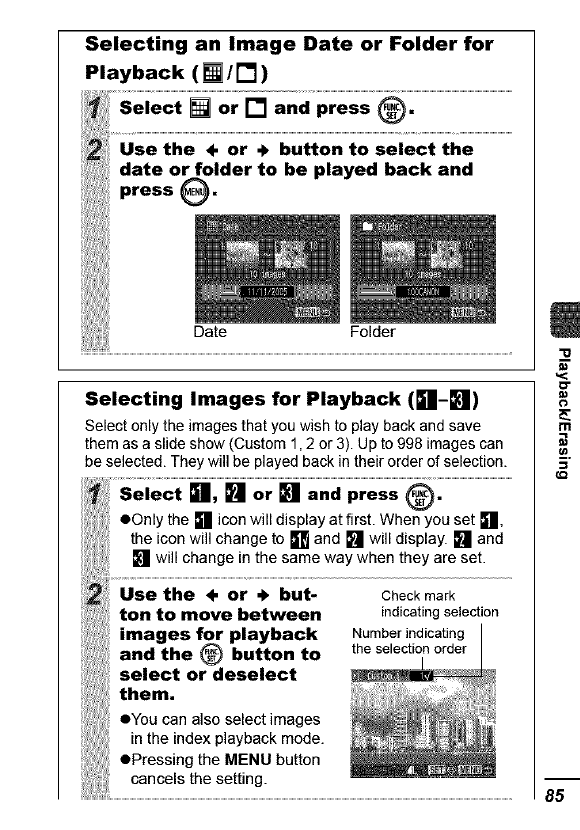
Selecting Images for Playback (511-_])
Select only the images that you wish to play back and save
them as a slide show (Custom 1,2 or 3). Up to 998 images can
be selected. They will be played back in their order of selection.
Select _!, [] or [] and press @.
eOnly the [] icon will display at first. When you set [],
the icon will change to [] and [] will display. [] and
[] will change in the same way when they are set.
Use the 4. or + but-
ton to move between
images for playback
and the _button to
select or deselect
them,
eYou can also select images
in the index playback mode.
ePressing the MENU button
cancels the setting.
Check mark
indicating selection
Number indicating
the selection order
,.<

Selecting All Images
1. After selecting &l-_l in step 1 (p. 85), use the ÷ button
to select [Mark all] and press the FUNC./SET button.
2. Use the ÷ button to select [Mark all], press the
FUNC./SET button.
3. Use the "l, button to select [OK] and press the
FUNCJSET button.
To desetect all images, select [Reset].
Adjusting the Play Time and Repeat Settings
ePlay Time
Sets the duration that each image displays. Choose between
3-10 seconds, 15 seconds and 30 seconds. Displaying time
can vary slightly depending on the image.
eRepeat
Sets whether the slide show stops when atl the slides have
been displayed or continues until stopped.
_:: Select [Set u"] an" press _. ........................................................
[Repeat] and then
the desired option.
-Pressing the MENU button
,; cancels the setting.
86
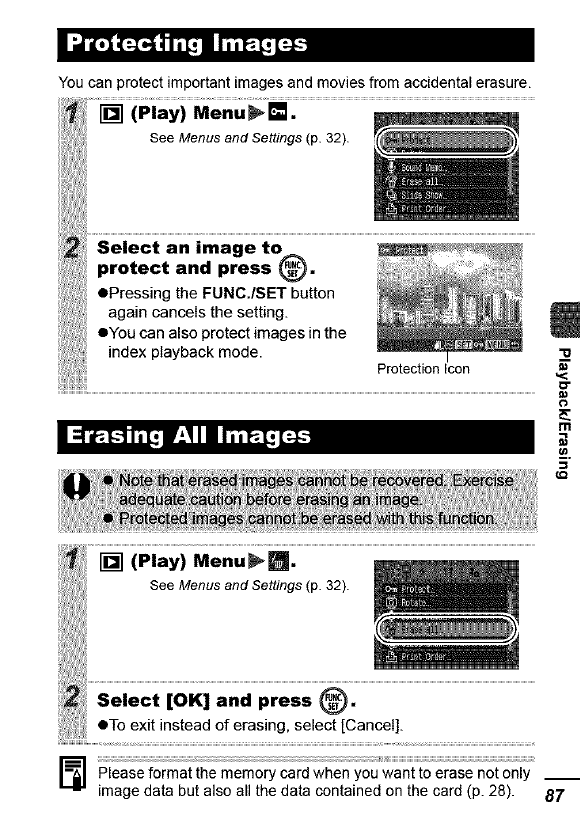
I _l__.._J LI_]_[_'t
You can protect important images and movies from accidental erasure.
SeeMenusandSettings(p. 32). r&_
L_.o,o.,.,o
protect and press @.
ePressing the FUNC./SET button
again cancels the setting.
eYou can also protect images in the
index ptayback mode.
Protection Icon
I=F'I_L"_'_j !'_,III II'TT_j[=_-_
g
See Menus and Settings (p. 32).
......!!. : o,
Please format the memory card when you want to erase not only
image data but also all the data contained on the card (p. 28). 87

lPrint Settings/Transfer Settings
[.'I_:[IT_j[!,'F'-Jl,]2o); 2;r_: [.-l_:[;r_
You can select images on a memory card for printing and specify
the number of print copies in advance using the camera. This is
extremely convenient for printing on a direct print compatible
printer, or for sending the images to a photo developing service that
supports DPOR
The _icon may display for a memory card with print I
settings set by a different DPOF-compliant camera. These I
settings will be overwritten by those set by your camera,
Single Images
_Select [order] and press _i .......................................................................................................................................
eSelecting [Reset] cancels all print
settings for the images.
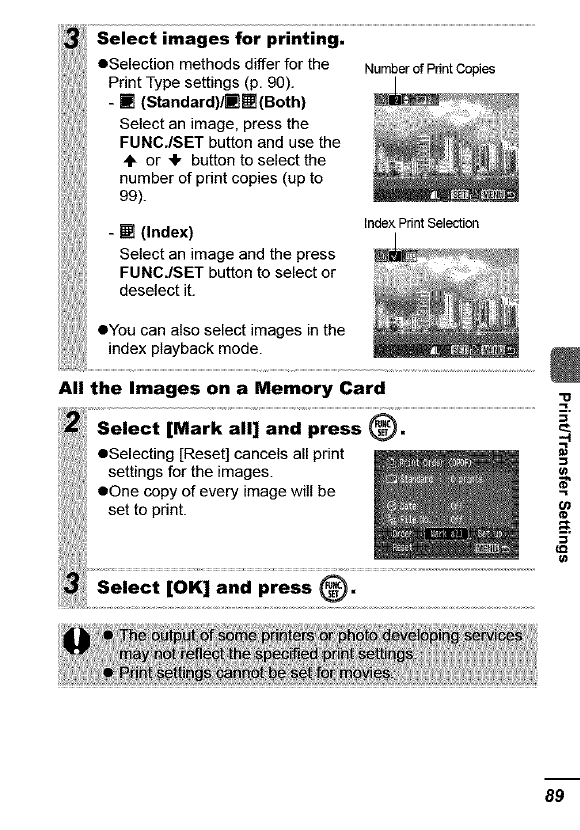
All the Images on a Memory Card
89
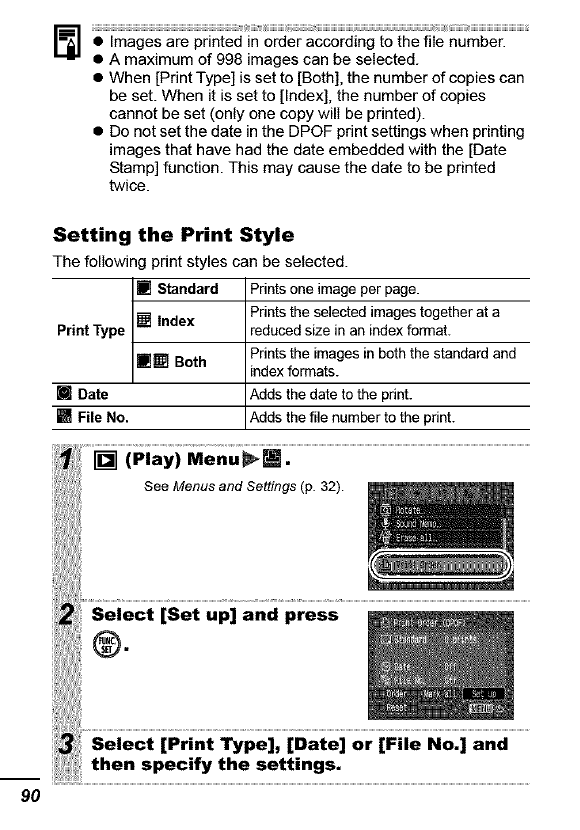
............................................................................................................................_i_iiiii_iiiiiiiiiiiiiiiiiiiiiii iiiiiiiiiiiiiiiiiiiiiiiiiiiiii ii_ _
•Images are printed in order according to the file number.
• A maximum of 998 images can be selected.
• When [Print Type] is set to [Both], the number of copies can
be set. When it is set to [Index], the number of copies
cannot be set (only one copy will be printed).
• Do not set the date in the DPOF print settings when printing
images that have had the date embedded with the [Date
Stamp] function. This may cause the date to be printed
twice.
9O
Setting the Print Style
The following print styles can be selected.
_ Standard Prints one image per page.
Index Prints the selected images together at a
Print Type reduced size in an index format.
ira[] Both Prints the images in both the standard andindex formats.
[] Date Adds the date to the print.
[] File No, Adds the file number to the print.
_y:e ...................
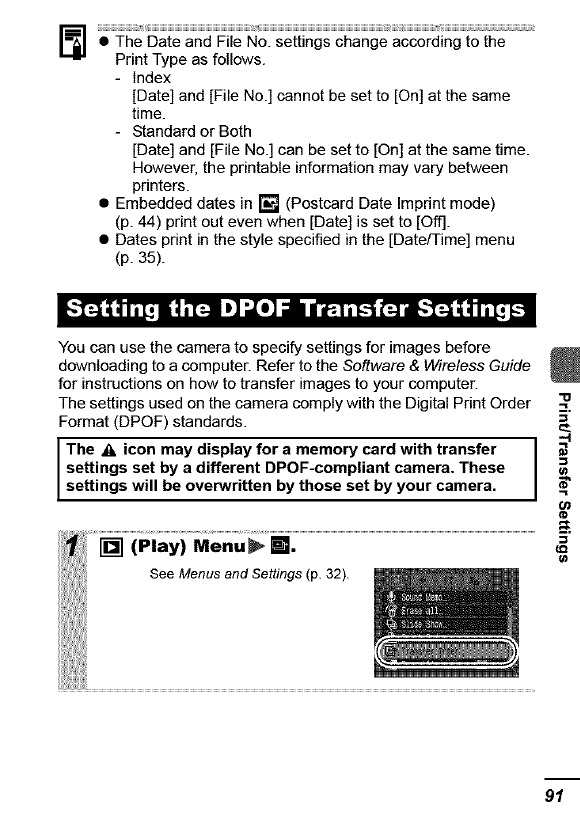
• TheDateandFileNo.settingschangeaccordingtothe
PrintTypeasfollows.
- Index
[Date]and[FileNo.]cannotbesetto[On]atthesame
time.
- StandardorBoth
[Date]and[FileNo.]canbesetto[On]atthesametime.
However,theprintableinformationmayvarybetween
printers.
• Embeddeddatesin[] (PostcardDateImprintmode)
(p.44)printoutevenwhen [Date] is set to [Off].
• Dates print in the style specified in the [Date/Time] menu
(p. 35).
You can use the camera to specify settings for images before
downloading to a computer. Refer to the Software & Wireless Guide
for instructions on how to transfer images to your computer.
The settings used on the camera comply with the Digital Print Order
Format (DPOF) standards.
The _, icon may display for a memory card with transfer
settings set by a different DPOF-compliant camera. These
settings will be overwritten by those set by your camera.
O9
' i ii i'ili i'iseeMenu
91
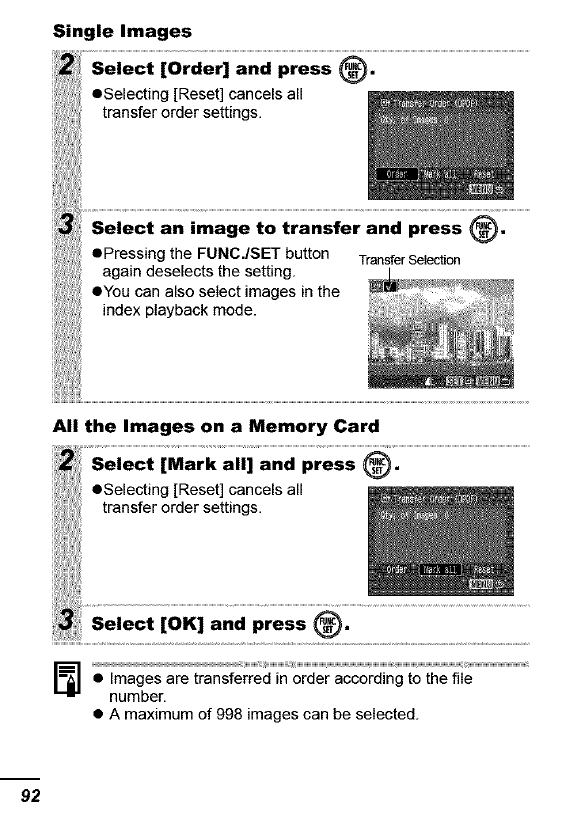
Single Images
_Se'ect[O;der]and";ess_.
eSelecting [Reset] cancels all
::: transfer order settings.
Select an image to transfer and press _,
ePressing the FUNC./SET button TransferSelection
again deselects the setting.
eYou can also select images in the
index playback mode.
All the Images on a Memory Card
[Mark alli and Press _:
eSelecting [Reset] cancels all
transfer order settings.
......._,e'ec' an"";ess®:
•Images are transferred in order according to the file
number.
• A maximum of 998 images can be selected.
92
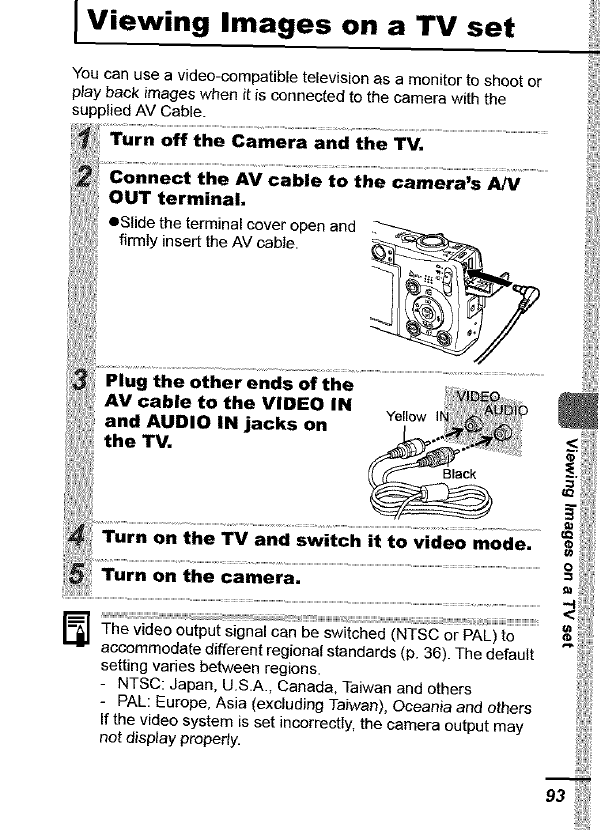
I Viewing Images on a TV set
You can use a video-compatible television as a monitor to shoot or
play back images when it is connected to the camera with the
supplied AV Cable.
III r#
The video output signal can be switched (NTSC or PAL) to
accommodate different regionat standards (p. 36). The default
setting varies between regions.
- NTSC: Japan, US.A. Canada, Taiwan and others
- PAL: Europe, Asia (excluding Taiwan), Oceania and others
If the video system is set incorrectly, the camera output may
not display properly.
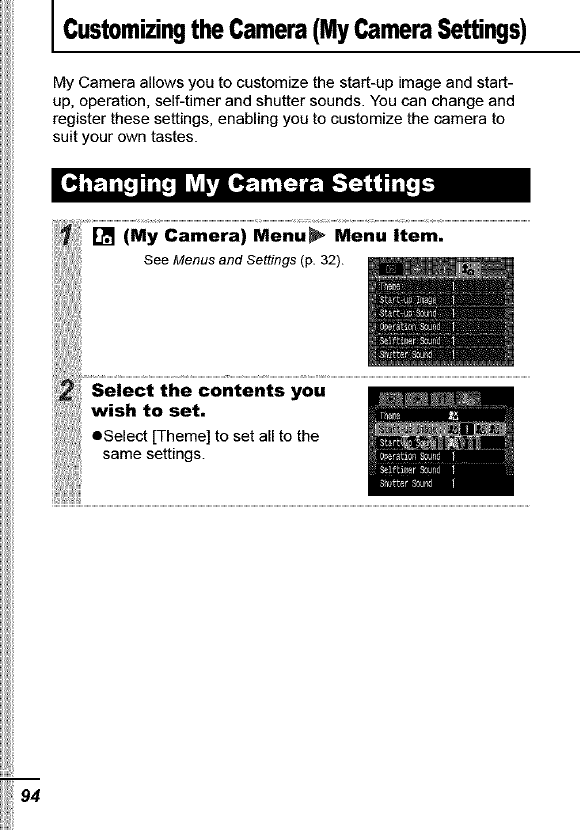
lCustomizingtheCamera(MyCameraSettings)
My Camera allows you to customize the start-up image and start-
up, operation, self-timer and shutter sounds. You can change and
register these settings, enabling you to customize the camera to
suit your own tastes.
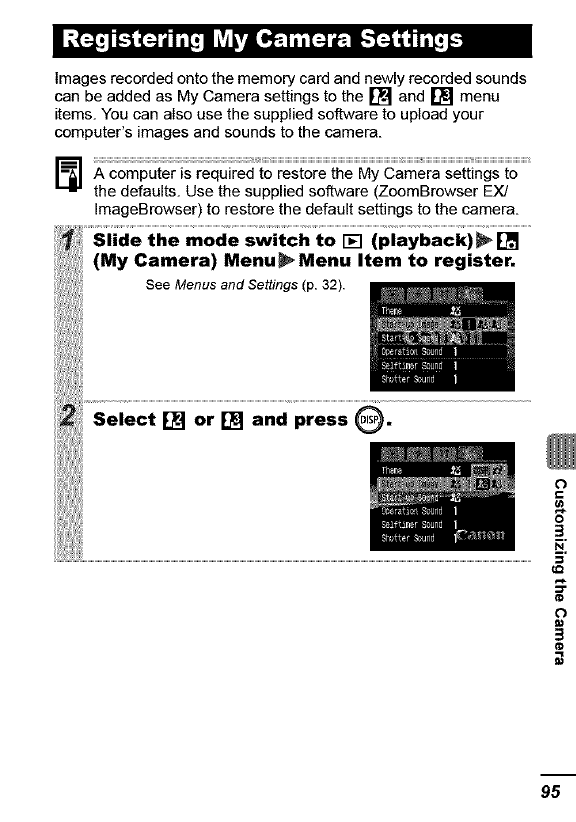
Imagesrecordedontothememorycardandnewlyrecordedsounds
canbeaddedasMyCamerasettingstothe[] and[] menu
items.Youcanalsousethesuppliedsoftwaretouploadyour
computer'simagesandsoundstothecamera.
AcomputerisrequiredtorestoretheMyCamerasettingsto
thedefaults.Usethesuppliedsoft:ware(ZoomBrowserEX/
ImageBrowser)torestorethedefaultsettingstothecamera.
3
95
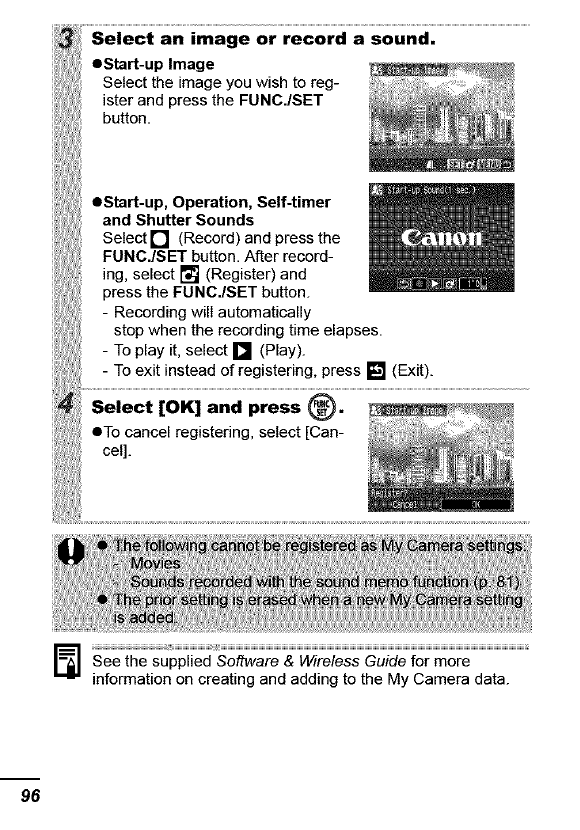
96
See the supplied Sofiware & Wireless Guide for more
information on creating and adding to the My Camera data.
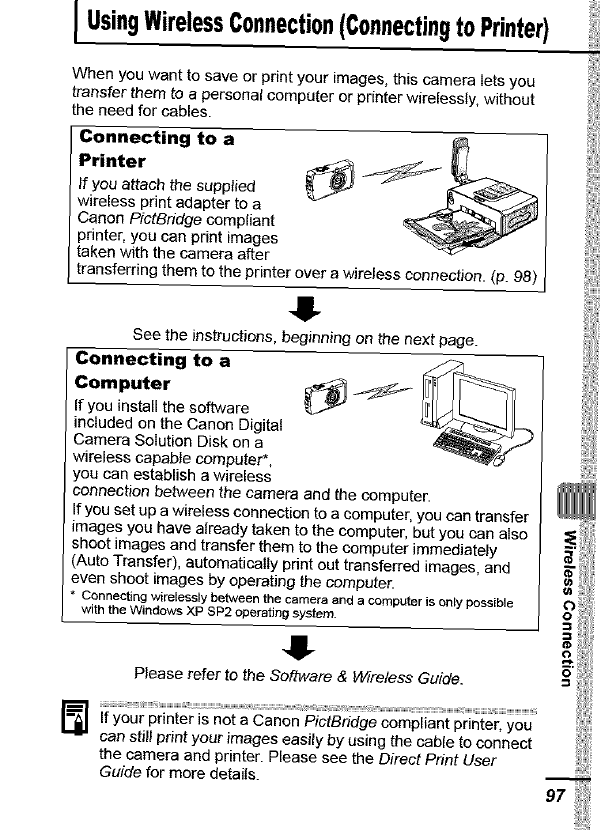
IUsingWirelessConnection(Connectingto Printer)
When you want to save or print your images, this camera lets you
transfer them to apersonat computer or printer wirelessty, without
the need for cables.
Connecting to a
Printer
If you attach the supplied
wireless print adapter to a
Canon PictBridge compliant
printer, you can print images
taken with the camera after
transferring them to the printer over a wireless connection. (p. 98)
&
See the instructions, beginning on the next page.
Connecting to a
Computer
If you install the software
included on the Canon Digitat
Camera SoIution Disk on a
wireless capable computer*,
you can establish a wireless
connection L_tween the camera and the computer.
If you set up a wireless connection to a computer, you can transfer
_mages you have already taken to the computer, but you can also
shoot images and transfer them to the computer immediately
(Auto Transfer), automatically print out transferred images, and
even shoot images by operating the computer.
* Connecting wirelessly betweenthe cameraand a computer is only possible
withtheWindowsXP SP2operating system.
&
Please refer to the Software & Wireless Guide.
$ II III II III tll
If your printer is not a Canon PictBridge compliant printer, you
can still print your images easily by using the cable to connect
the camera and printer. Please see the Direct Print User
Guide for more details.
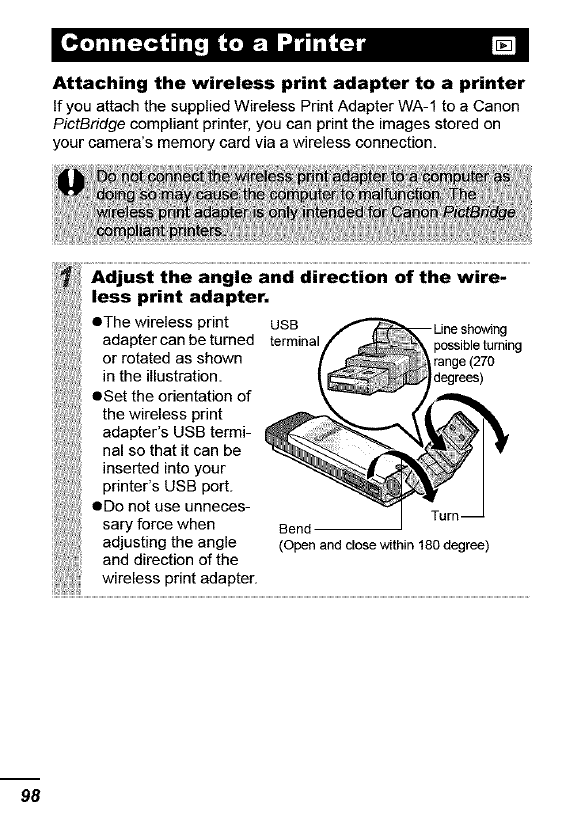
Attaching the wireless print adapter to a printer
If you attach the supplied Wireless Print Adapter WA-1 to a Canon
PictBridge compliant printer, you can print the images stored on
your camera's memory card via a wireless connection.
Adjust the angle and direction of the wire-
less print adapter,
eThe wireless print USB
adapter can be turned terminal possibletumieg
or rotated as shown range(270
in the illustration, degrees)
eSet the orientation of
the wireless print
adapter's USB termi-
nal so that it can be
inserted into your
printer's USB port.
eDo not use unneces-
sary force when Bend
adjusting the angle (Openand closewithin 180degree)
and direction of the
wireless print adapter.
98
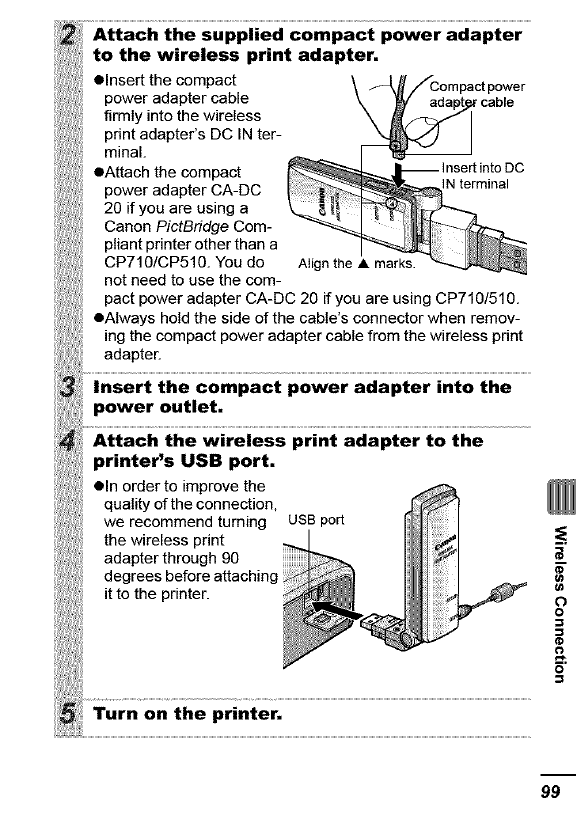
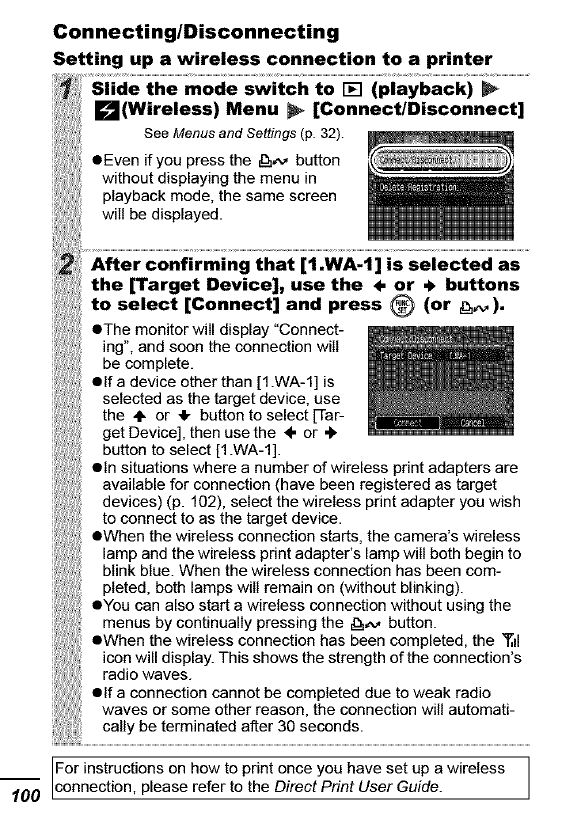
Connecting/Disconnecting
Setting up a wireless connection to a printer
LeZJ(Wireless) Menu _ [Connect!Disconnect]
See Menus and Settings (p. 32).
eEven if you press the _,_, button
without displaying the menu in
playback mode, the same screen
will be displayed.
the [Target Device], use the 4. or _buttons
to select [Connect] and press Q(or _).
eThe monitor will display "Connect- ,........
ing", and soon the connection will
be complete.
elf a device other than [1.WA-1] is
selected as the target device, use
the 41"or 4, button to select [Tar-
get Device], then use the ÷ or ,_
button to select [1 .WA-1].
etn situations where a number of wireless print adapters are
available for connection (have been registered as target
devices) (p. 102), select the wireless print adapter you wish
to connect to as the target device.
eWhen the w re ess connect on starts, the camera's w re ess
lamp and the wireless print adapter's lamp will both begin to
blink blue. When the wireless connection has been com-
pleted, both lamps will remain on (without blinking).
eYou can also start a wireless connection without using the
menus by continually pressing the _,,M button.
eWhen the wireless connection has been completed, the T,
icon will display. This shows the strength of the connection's
radio waves.
elf a connection cannot be completed due to weak radio
' waves or some other reason, the connection will automati-
cally be terminated af[er 30 seconds.
For instructions on how to print once you have set up a wireless ]
"-_ [connection, please refer to the Direct Print User Guide. J
Ending the wireless connection
LmJ(Wireless) Menu _[Connect!Disconnect]
See Menus and Settings (p. 32)........ t on:...............................
nect], then press _.
•If _,,I displays during wireless connection, it means that the
connection is very good. The fewer the antennas displayed,
the worse the wireless connection is. When T and the
wireless lamp both blink, it indicates an extremely bad
connection. In such a case, shorten the distance between
the camera and the wireless adapter.
OPIease be aware of the points below when using a wireless
connection between the camera and a printer. Failure to
follow these instructions may terminate the connection.
- Do not use a wireless connection Rear to a microwave
oven or any other appliance which emits electromagnetic
waves.
- Do not put the camera and the printer far apart.
- Do not place objects in between the camera and printer.
• If a number of wireless print adapters are available for
connection, select [Target Device] and press the DISP.
button to confirm which wireless print adapter you can
connect to. The lamp on the available adapter will blink in
the following sequence: blue, blue, orange.
• If you slide the mode switch while using a wireless
connection to a printer, the wireless connection will be
terminated.
• If you end the wireless connection while printing, printing
will be interrupted.
t_
o
o
lOl
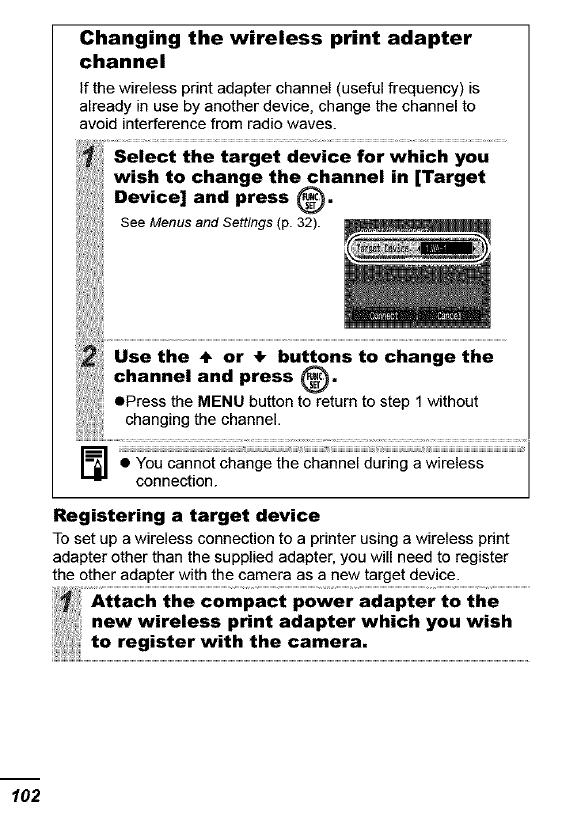
Changing the wireless print adapter
channel
If the wireless print adapter channel (useful frequency) is
already in use by another device, change the channel to
avoid interference from radio waves.
wish to change the channel in [Target
Device] and press @.
mUse the + or ÷buttons toc a get e
channel and press _,
ePress the MENU button to return to step 1 without
thechanne,.......................................................................................................................................
• You cannot change the channel during a wireless
connection.
Registering a target device
To set up a wireless connection to a printer using a wireless print
adapter other than the supplied adapter, you will need to register
the other adapter with the camera as a new target device.
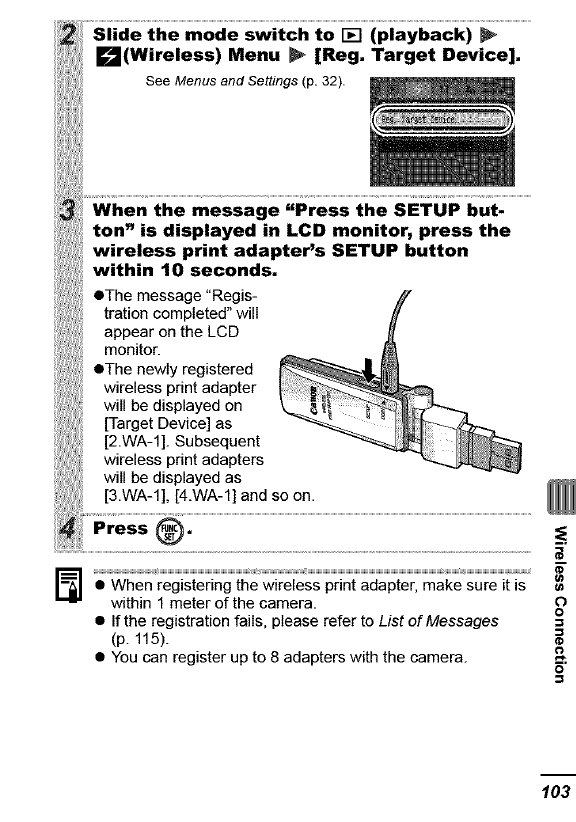
LeJJ(Wireless) Menu _[Reg. Target Device].
ton _is displayed in LCD monitor, press the
wireless print adapter's SETUP button
within t0 seconds.
•The message "Regis- _#"
tration completed" will
appear on the LCD ._
monitor.
:•Theoew,yre0,stered
wireless print adapter
will be displayed on
[Target Device] as
[2.WA-1]. Subsequent
wireless print adapters
:: will be displayed as
:::: [3.WA-1], [4.WA-1] and so on.
_iHHHHHHHHHHHHHHHHHHHHHHHHHHHHHHHHHHHHHH_HiIHHHHHHHHHHHHHHHHHHHHHHHHHHHHHHHHHHHHHHHHHHHHHHHHHHHHHHHHH_HHHHH_HHHHHHHHHHHHHHHHHH
• When registering the wireless print adapter, make sure it is
within 1 meter of the camera.
• If the registration fails, please refer to List of Messages
(p. 115).
• You can register up to 8 adapters with the camera.
¢)
o
o
103
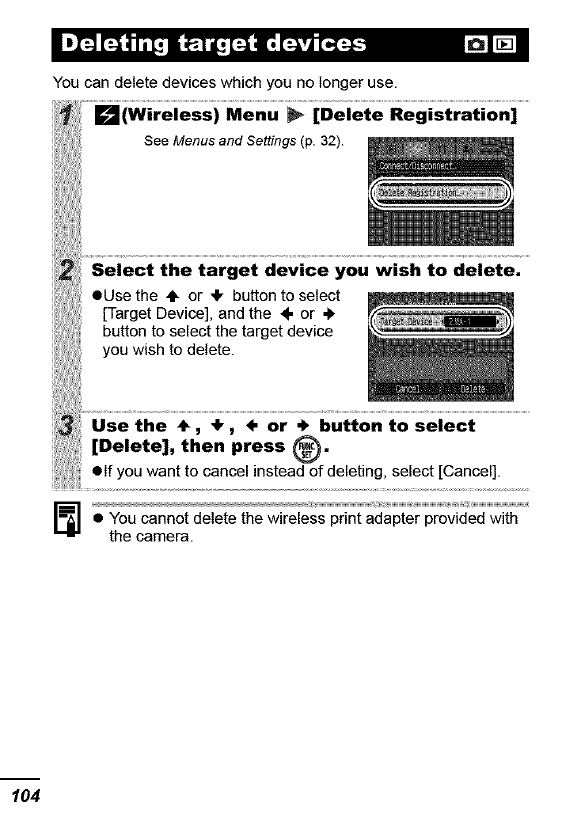
You can delete devices which you no longer use.
LmJ(Wireless) Menu _[Delete Registration]
See Menus and Settings (p. 32).
Select the target device you wish to delete.
eUse the ,IF or ,Ik button to select
[Target Device], and the ÷ or ,_
button to select the target device
you wish to delete.
i Troubleshooting
Power is not turned on. ePress the power button (Basic
Guide p. 5).
Memory card slot/battery OConfirm that the memory card slot/
cover is open. battery cover is securely closed
(Basic Guide p. 2).
Insufficient battery Olnsert a fully charged battery into the
voltage ("Change the camera (Basic Guide p. 2).
battery pack" message OUse the AC Adapter Kit ACK-DC10
displays). (sold separately) (p. 123).
camera and battery cotton swab before charging or
terminals, using the battery (p. 119).
The camera's horizontal/ eThe camera's or entat on
vertical orientation was mechanism is operating. There is no
changed, malfunction.
The SD memory card's eWhen recording to, erasing from or
write protect tab is set to formatting the SD memory card,
"Write protect", slide the tab upward (p. 121).
The built-in rechargeabte ORecharge the built-in battery
lithium battery charge is immediately (Basic Guide p. 4).
low. !
TheimageontheLCD
monitorwiIldarkenin
strongsunlightorbright
light.
•Thisdoesnotconstitutea
malfunctionandhasnoeffecton
imagesthathavebeenshot.
Displayflickerswhen eThisisnotacameramalfunction
shotunderfluorescent(flickeringrecordedinmovies,but
lighting, notinstillimages).
Subjectistoobright. 'oThisisanormaloccurrencein
devicescontainingCCDsanddoes
notconstituteamalfunction.This
baroflightwillnotberecordedwhen
shootingstillphotos,butitwillbe
recordedwhenshootingmovies.
Aslowshutterspeedhas
likelybeenselected
becauseofinsufficient
lighting.
•RaisethetSOspeed(p.69)orset
theflashtoanysettingotherthan
otis(flashoff),orsecurethecamera
omething,suchasatripod
(BasicGuide p. 9).
This displays when using eThese settings will be overwritten by
a memory card that has those set by your camera (p. 88).
print settings, transfer
settings or slide show
image selections set by
other DPOF-compliant
cameras.
CameraautomaticallyeThereisnoeffectontherecorded
lightenedtheimage image.
displayedontheLCD
monitortomakeiteasier
toseewhenshootingin
adarkarea(p.21).
[.1
Mode switch is set to [] eSet the mode switch to a (Rec.) or
(playback). Bmm(Movie) (Basic Guide p. 6).
Flash is charging, eWhen charging is complete, the
indicator will light orange and you
are free to start shooting (p. 26).
Memory card is full. etnsert a new memory card (Basic
Guide p. 2).
elf required, download the images to
a computer and erase them from the
memory card to make space.
Memory card is not eFormat the memory card (p. 28).
formatted correctly, elf reformatting does not work, the
memory card logic circuits may be
damaged. Consult the nearest
Canon Customer Support Help
Desk.
SD memory card is write oSlide the write protect tab of the SD
protected, memory card upward (p. 121).
Usually the recorded eConfirm the actual image size with
image contains more of the LCD monitor. Use the LCD
the scene than is seen in monitor when taking close-up shots
the viewfinder. (p. 19).
-I
g
o
_o
107
AF-assist Beam is set to etn dark places where it is difficult for
[Off]. the camera to focus, the AF-assist
Beam will emit to assist focusing. As
the AF-assist Beam will not function
when turned off, set it [On] to activate it
(p. 33). Take care not to obstruct the
AF-assist Beam with your hand when
used.
The camera moves when eSetting the self-timer to [] (2
the shutter button is seconds) delays the shutter release
pressed, for 2 seconds and allows the camera
to stop shaking, thus preventing a
blurred image (p. 45).
Even better results can be obtained
by placing the camera on a stable
surface or by using a tripod to shoot.
Subject is out of focal eShoot with the subject at the correct
range, shooting distance (p. 127).
The subject is hard to eUse the focus lock or AF lock to shoot
focus on. (p. 52).
Insufficient light for eSet the flash to [] (flash on) (Basic
shooting. Guide p. 9).
Subject is dark in eSet the exposure compensation to a
contrast to the positive (+) setting (p. 56).
background, eUse AE lock or use the spot
metering function (pp. 53, 55).
Subject is too far away eShoot within correct shooting
for flash to reach, distance of the subject when using
the built-in flash (p. 128).
eRaise the tSO speed and then shoot
(p. 69).
Subjectistooclose, eShootwithincorrectshooting
makingtheflashtoo distanceofthesubjectwhenusing
strong, thebuilt-inflash(p.128).
Subjectisbrightin eSettheexposurecompensationtoa
contrasttothe negative(-)setting(p.56).
background, eUseAElockorusethespot
meteringfunction(pp.53,55).
ToomuchlightisshiningeChangetheshootngange
directlyintothecamera,
orisbeingreflectedoff
thesubject.
Flashissettoon. eSettheflashto[] (flashoff)(Basic
Guide p. 9).
ISO speed is too high. • Higher ISO speeds increase image
noise. To take clean images, use as
low an ISO speed as possible (p. 69).
eta _'], [], [] and [] modes, the
tSO speed increases and noise can
appear.
Light from the flash has eThis is a phenomenon that occurs
reflected off dust with digital cameras and does not
particles or insects in the constitute a malfunction.
air. This is particularly
noticeable when
shooting using the wide
angle.
,,,,N
C
o"
o
_o.
109
eyes can make them
appear red when the
flash is used in dark
areas.
Light reflecting backfrom eUse the [] (auto with red-eye
reduction) mode (Basic Guide p. 9).
For this mode to be effective, the
subject must be looking right at the
red-eye reduction lamp. Try asking
them to look directly at the lamp.
eEven better results can be obtained
by increasing the lighting in indoor
settings or approaching closer to the
subject. The shutter will not activate
for approximately 1 second after the
red-eye reduction lamp fires in order
to improve the effect.
The memory card's
performance has
dropped.
aTe enhance the continuous shooting
performance, you are recommended
to format the memory card in the
camera after you save all its images
to your computer (p. 28).
Memory card was
formatted in another
device.
• Use a memory card formatted in
your camera (p. 28).
Memory card slot/battery eFirst close the memory card slot/
cover was opened with battery cover and then turn the
power on. power off (Basic Guide p. 2).
Thefollowingtypesof
memorycardsareused.
- Slowrecordingcards.
- Cardsformattedona
differentcameraora
computer.
- Cardswhich have had
images recorded and
erased repeatedly.
If free space in the
camera's built-in memory
becomes too scarce, the
"!" symbol will display on
the LCD monitor in red
and the camera will
automatically cease
filming shortly thereafter.
eAIthough the recording time may not
display properly during shooting, the
movie will be recorded correctly on
the memory card. Recording time
will display properly if you format the
memory card in this camera
(excluding slow recording memory
cards) (p. 28).
•Try the following procedures.
- Reformat the memory card before
filming (p. 28).
- Lower the recording pixels or
frame rate (p. 40).
- Use a high-speed memory card
(SDC-512MSH, etc.).
Zoom lever was pressed OOperate the zoom before shooting
while shooting in movie in movie mode (Basic Guide p. 8).
mode. Note the digital zoom is available
while shooting, but only in Standard
movie mode (p. 42). C
_r
t/I
_r
o
_o
111
You attempted to play
back images shot with
another camera or
images edited with a
computer.
• Computer images that cannot be
played back will play back if they are
added to the camera using the
supplied software program
ZoomBrowser EX or ImageBrowser.
See ZoomBrowser EX/
ImageBrowser Software User Guide
(PDF).
File name was changed eSet the file name or location on the
with a computer or file file format/structure of the camera
location was changed. (Refer to the Software & Wireless
Guide for details).
Some movies shot with another camera cannot be edited.
Movies recorded with high recording pixets and frame rates may
momentarily stop playing if played on slow reading memory
cards.
You may experience frame dropping and audio breakup when
playing back a movie on a computer with insufficient system
resources.
Movies recorded at the eTo check the images at the original
[] (Fast Frame Rate) frame rate, you are recommended
setting and with the video to play the movie back on the
signal set to the PAL camera's LCD monitor or on a
format, may play back computer.
with a frame rate lower
than the recorded one
when output to a TV or
video. You can play every
frame by using the stow
motion playback.
Batterylifeexceededif
batterylosesitscharge
quicklyatnormal
temperature(23°C/73
°F).
OReptacethebatterywithanewone
(BasicGuide p. 2).
Battery life exceeded. OReptace the battery with a new one
(Basic Guide p. 2).
k 6Vl FT_"I'TT[;L';T_t';Tr'[__'l'r'B
Incorrect video system OSet the video system to the
setting. , appropriate setting, NTSC or PAL,
for your TV (p. 36).
Shooting in Stitch Assist OThe output will not appear on a TV
mode. in Stitch Assist mode. Cancel the
Stitch Assist mode (Basic Guide
p. 6).
-I
C
o
_o.
113
You have not attached eAttach the wireless print adapter to
the wireless print adapter ', the printer (p. 98).
to the printer.
Your printer is not a eWhen using a wireless connection
Canon PictBridge between the camera and printer,
compliant printer, ensure you are using a Canon
PictBridge compliant printer (p. 98).
You have not attached elf you are using a Canon PictBridge
the compact power compliant printer (other than a
adapter to the wireless CP710/CP510), please attach the
print adapter. CA-DC20/CA-DC20E compact
power adapter.
The wireless connection ',eDo not use near a microwave oven
has become weak. or any other device that emits radio
waves.
',eDo not put the camera and the
printer far apart.
eDo not place anything between the
camera and the printer.
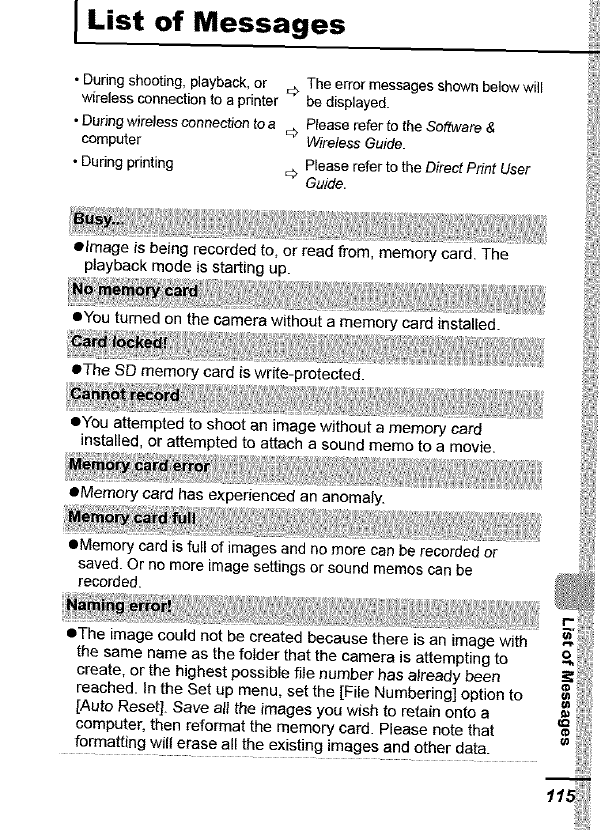
lust of Messages
•During shooting, playback, or The error messages shown below will
wirelessconnectionto a printer_ be displayed.
•Duringwirelessconnection toa _ Ptease refer to the Soffwat'e &
computer Wireless Guide.
•During printing _> Please refer to the Direct Print User
Guide.
•Image is being recorded to, or read from, memory card. The
playback mode isstarting up.
•You turned on the camera without a memory card installed.
•The SD memory card is write-protected.
•You attempted to shoot an image without a memory card
installed, or attempted to attach a sound memo to a movie.
eMemory card has experienced an anomaly.
•Memory card is full of images and no more can be recorded or
saved. Or no more image settings or sound memos can be
recorded.
•The image could not be created because there is an image with
the same name as the folder that the camera is attempting to
create, or the highest possible file number has already been
reached. In the Set up menu, set the [File Numbering] option to
[Auto Reset]. Save all the images you wish to retain onto a
computer, then reformat the memory card. Please note that
formatting will erase all the existing images and other data.
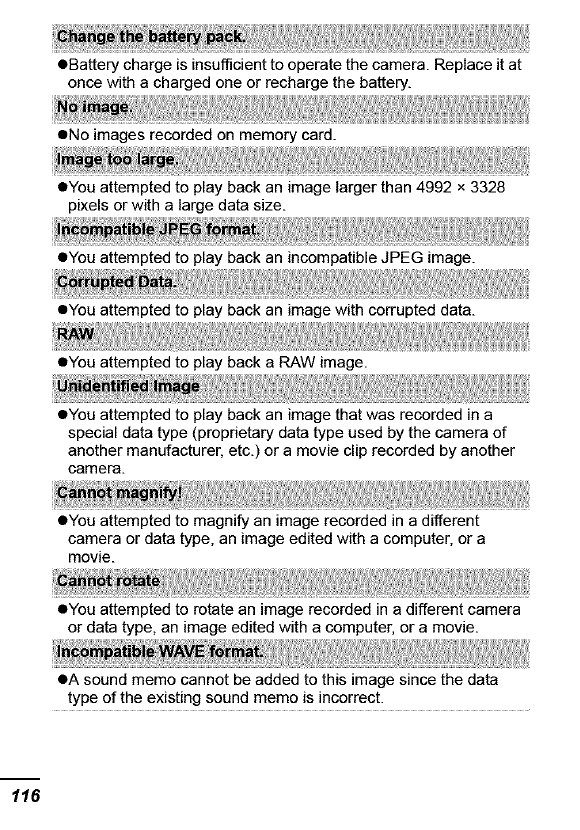
•Batterychargeisinsufficienttooperatethecamera.Replaceitat
oncewithachargedoneorrechargethebattery.
•Noimagesrecordedonmemorycard.
•Youattemptedtoplaybackanimagelargerthan4992x3328
pixelsorwithalargedatasize.
•YouattemptedtoplaybackanincompatibleJPEGimage.
•Youattemptedtoplaybackanimagewithcorrupteddata.
•YouattemptedtoplaybackaRAWimage.
•Youattemptedtoplaybackanimagethatwasrecordedina
specialdatatype(proprietarydatatypeusedbythecameraof
anothermanufacturer,etc.)oramoviecliprecordedbyanother
camera.
•Youattemptedtomagnifyanimagerecordedinadifferent
cameraordatatype,animageeditedwithacomputer,ora
movie.
•Youattemptedtorotateanimagerecordedinadifferentcamera
ordatatype,animageeditedwithacomputer,oramovie.
eAsoundmemocannotbeaddedtothisimagesincethedata
typeoftheexistingsoundmemoisincorrect.
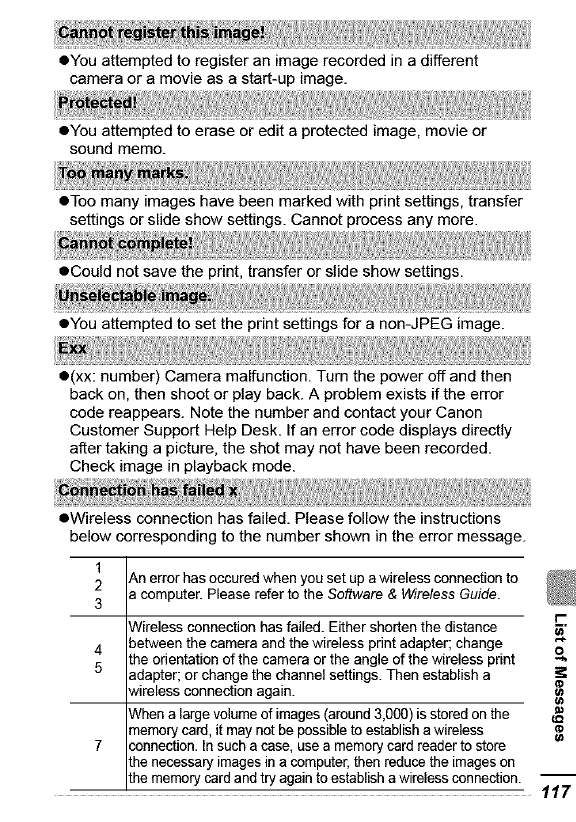
oYouattemptedtoregisteranimagerecordedinadifferent
cameraoramovieasastart-upimage.
oYouattemptedtoeraseoreditaprotectedimage,movieor
soundmemo.
oToomanyimageshavebeenmarkedwithprintsettings,transfer
settingsorslideshowsettings.Cannotprocessanymore.
oCouldnotsavetheprint,transferorslideshowsettings.
oYouattemptedtosettheprintsettingsforanon-JPEGimage.
o(xx:number)Cameramalfunction.Turnthepoweroffandthen
backon,thenshootorplayback.Aproblemexistsiftheerror
codereappears.NotethenumberandcontactyourCanon
CustomerSupportHelpDesk.Ifanerrorcodedisplaysdirectly
aftertakingapicture,theshotmaynothavebeenrecorded.
Checkimageinplaybackmode.
OWirelessconnectionhasfailed.Pleasefollowtheinstructions
belowcorrespondingtothenumbershownintheerrormessage.
1
2 Anerrorhasocouredwhen you set up a wireless connection to
3 a computer. Please refer to the Software & Wireless Guide. t-
Wireless connection has failed. Either shorten the distance
4 between the camera and the wireless print adapter; change
the orientation of the camera or the angle of the wireless print o
5 adapter; or change the channel settings. Then establish a r_
wireless connection again.
When a large volume of images (around3,0go) is storedon the
memory card,it may not be possible to establisha wireless r_
7 connection. In such a case, use a memorycard reader to store
the necessary images in a computer,then reducethe imageson
the memory card and try again to establish a wireless connection. 117

OWireless connection has disconnected. Either shorten the
distance between the camera and the wireless print adapter;
change the orientation of the camera or the angle of the wireless
print adapter; or change the channel settings. Then establish a
wireless connection again.
o8 target devices are already registered, tf you wish to register
additional devices, use [Delete Registration] to delete target
devices you no longer use.
ORegistration has failed. Either shorten the distance between the
camera and the wireless print adapter, or change the orientation
of the camera or the angle of the wireless print adapter. Then
carry out registration again. Also, if "Press the SETUP button"
appears on the LCD monitor at the time of registration, press the
camera's SETUP button within 10 seconds.
ORegistration of the same wireless print adapter has already been
completed.
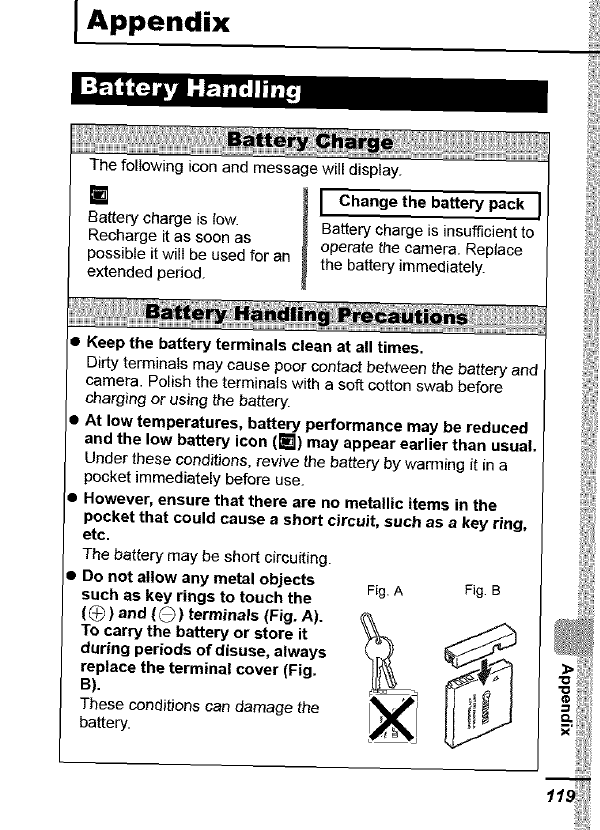
I Appendix
The folIowing icon and message will display.
[] I Change the battery pack I
Battery charge is low. Battery charge is insufficient to
Recharge it as soon as operate the camera. Replace
possible it will be used for an the battery immediately.
extended period.
• Keep the battery terminals clean at all times.
Dirty terminals may cause poor contact between the battery and
camera. Polish the terminals with a soft cotton swab before
charging or using the battery.
• At low temperatures, battery performance may be reduced
and the low battery icon (_1) may appear earlier than usual.
Under these conditions, revive the battery by warming it in a
pocket immediately before use.
• However, ensure that there are no metallic items in the
pocket that could cause ashort circuit, such as a key ring,
etc.
The battery may be short circuiting.
•Do not allow any metal objects
such as key rings to touch the
{_)and (O) terminals (Fig. A).
To carry the battery or store it
during periods of disuse, always
replace the terminal cover (Fig.
B).
These conditions can damage the
battery.
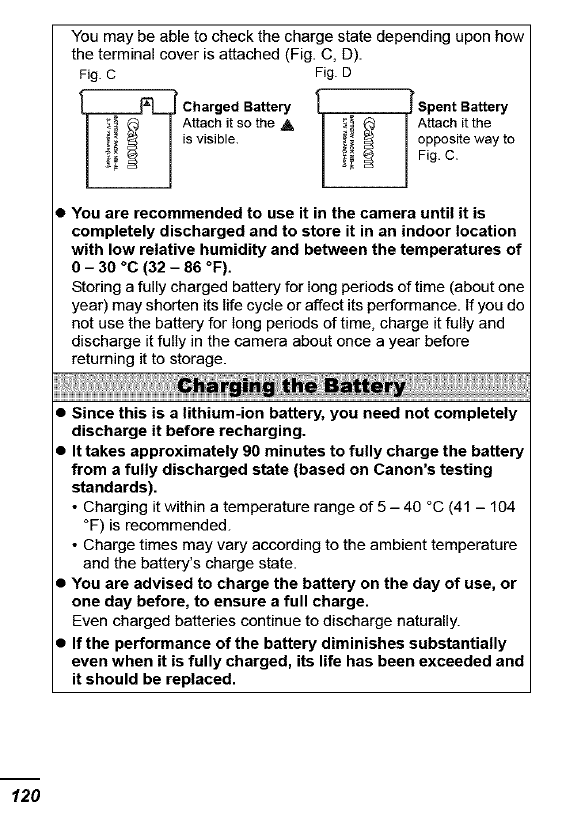
Youmaybeabletocheckthechargestatedependinguponhow
theterminalcoverisattached(Fig.C,D).
Fig. C Fig. D
_Charged Battery I= _ Spent Battery
Attach it so the ,_, | __
,_ Attach it the
_is visible. __ opposite way tol_ Fig. C.
• You are recommended to use it in the camera until it is
completely discharged and to store it in an indoor location
with low relative humidity and between the temperatures of
0 - 30 °C (32 - 86 °F).
Storing a fully charged battery for long periods of time (about one
year) may shorten its life cycle or affect its performance. If you do
not use the battery for long periods of time, charge it fully and
discharge it fully in the camera about once a year before
returning it to storage.
th_
•Since this is a lithium-ion battery, you need not completely
discharge it before recharging.
•It takes approximately 90 minutes to fully charge the battery
from a fully discharged state (based on Canon's testing
standards).
• Charging it within a temperature range of 5 - 40 °C (41 - 104
°F) is recommended.
• Charge times may vary according to the ambient temperature
and the battery's charge state.
•You are advised to charge the battery on the day of use, or
one day before, to ensure a full charge.
Even charged batteries continue to discharge naturally
• If the performance of the battery diminishes substantially
even when it is fully charged, its life has been exceeded and
it should be replaced.
Up.
Writing/Erasing Possible
__ lide the switch down
(you can protect the
images and other
data on the card).
Writing/Erasing Impossible
• Memory cards are high-precision electronic devices. Do not
bend them, apply force to them, or subject them to shocks
or vibration.
•Do not attempt to disassemble or alter the memory card.
•Do not allow dirt, water or foreign objects to contact the
terminals on the back of the card. Do not touch the
terminals with your hands or metal objects.
•Do not peel away the original label on the memory card or
cover it with another label or sticker.
•When writing on the memory card, do not use a pencil or
ball-point pen. Only use a soft point pen (e.g. felt-tip pen).
•Do not use or store memory cards in the following
locations.
• Locations subject to dust or sand
• Locations subject to high humidity and high temperatures
•Since some or all of the data recorded on the memory card
may be corrupted or erased by electrical noise, static
electricity, or camera or card malfunction, making a backup
copy of important data is recommended.
"o
_D
3"
121
• Please note that formatting (initializing) an memory card
erases all data, including protected images.
•You are recommended to use memory cards that have been
formatted in your camera.
•The card supplied with the camera may be used without further
formatting.
• When the camera is malfunctioning, a corrupted memory card
might be the cause. Reformatting the memory card may solve
the problem.
• When a non-Canon brand memory card is malfunctioning,
reformatting it may solve the problem.
• Memory cards formatted in other cameras, computers, or
peripheral devices may not operate correctly in this camera.
When that happens, reformat the memory card with this
camera.
•If formatting in the camera does not work properly, turn the
camera off and re-insert the memory card. Then turn the
camera back on and format again.
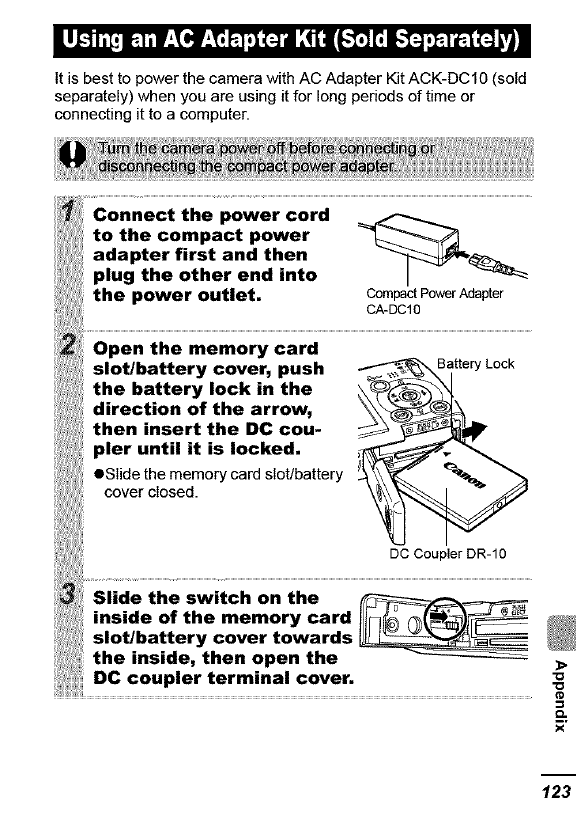
It is best to power the camera with AC Adapter Kit ACK-DC10 (sold
separately) when you are using it for long periods of time or
connecting it to a computer.
Connect the power cord
to the compact power
adapter first and then
plug the other end into
the power outlet. CompactPowerAdapter
CA-DC10
Open the memory card
slot/battery cover, push _ _ Batten Lock
the battery lock in the _-x
direction of the arrow,
then insert the DC cou- _ _"__
pier until it is locked.
eSIide the memory card slot/battery
cover closed.
DC Cou )ler DR-10
the inside, then open the
DC coupler terminal cover, )>
"D
"D
¢D
c_
3"
123
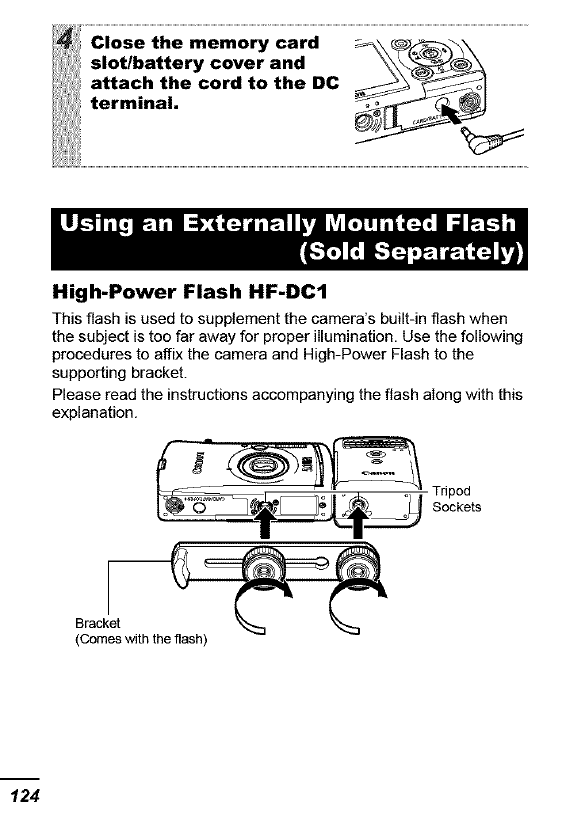
CI0se the memo_ card ................................__\ .........................
slot/battery cover and __
attach the cord to the DC __l
terminal, _1_
High-Power Flash HF-DC1
This flash is used to supplement the camera's built-in flash when
the subject is too far away for proper illumination. Use the following
procedures to affix the camera and High-Power Flash to the
supporting bracket.
Please read the instructions accompanying the flash along with this
explanation.
Tripod
Sockets
Bracket
(Comes with the flash)
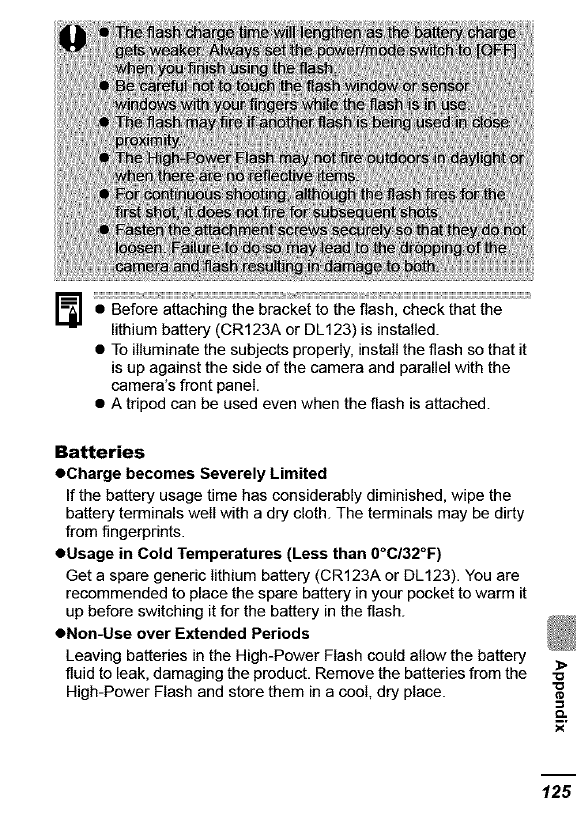
•Before attaching the bracket to the flash, check that the
lithium battery (CR123A or DL123) is installed.
• To illuminate the subjects properly, install the flash so that it
is up against the side of the camera and parallel with the
camera's front panel.
• A tripod can be used even when the flash is attached.
Batteries
• Charge becomes Severely Limited
If the battery usage time has considerably diminished, wipe the
battery terminals well with a dry cloth. The terminals may be dirty
from fingerprints.
OUsage in Cold Temperatures (Less than 0°C/32°F)
Get a spare generic lithium battery (CR123A or DL123). You are
recommended to place the spare battery in your pocket to warm it
up before switching it for the battery in the flash.
• Non-Use over Extended Periods
Leaving batteries in the High-Power Flash could allow the battery
fluid to leak, damaging the product. Remove the batteries from the
High-Power Flash and store them in a cool, dry place.
3"
125
Never use thinners, benzine, synthetic or
cleansers water to
clean the camera. These substances may distort or damage
the equipment.
Camera Body
Gently wipe dirt off the camera body with a soft cloth or eyeglass
lens wiper.
Lens
First use a lens blower brush to remove dust and dirt, then remove
any remaining dirt by wiping the tens lightly with a soft cloth.
Viewfinder and LCD Monitor
Use a lens blower brush to remove dust and dirt. If necessary,
gently wipe with a soft cloth or an eyeglass lens wiper to remove
stubborn dirt.

All data is based on Canon's standard testing methods. Subject to
change without notice.
PowerShot SD430 DIGITAL ELPH
WIRELESS/DIGITAL IXUS WIRELESS
(W): Max. wide angle (T): Max. telephoto
Approx. 5.0 million
Camera Effective
Pixels
Image Sensor 1/2.5-inch CCD (Total number of pixels: Approx.
5.3 million)
Lens 5.8 (W) - 17.4 (T) mm
(35mm film equivalent: 35 (W) - 105 (T) mm)
f/2.8 (W) - f/4.9 (T)
Digital Zoom Approx. 4.0x (Up to approx. 12x in combination
with the optical zoom)
Optical Viewfinder Real-image zoom viewfinder
LCD Monitor 2.0-inch, low-temperature polycrystalline silicon
TFT color LCD, approx. 118,990 pixels (Picture
coverage 109%)
AF System TTL autofocus
Focusing frame: 9-point AiAF/1-point AF (fixed
to center)
Shooting Distance Normal: 39 cm (1.0 ft.) - infinity
(From the front of Macro: 3- 59 cm (W)/30 - 50 cm (T)
the lens) (1.2 in. - 1.6 ft. (W)/1.0 - 1.6 ft. (T))
Infinity: 3 m (9.8 ft.)- infinity
Shutter Mechanical shutter + electronic shutter
Shutter Speeds 15 - 1/1599 sec.
•The shutter speed vades accordingto the shooting
mode.
• Slow shutterspeeds of 1.3 sec. or slower operate
with noise reduction.
Metering System Evaluative, Center-weighted average or Spot
(fixed to center)
Exposure + 2 stops in 1/3-stop increments
Compensation
ISO Speed
White Balance
Auto*, ISO 50/100/200/400 equivalent 3"
* Camera automatically sets the optimal speed.
Auto, pre-set(available settings: Daylight, Cloudy,
Tungsten, Fluorescent or Fluorescent H) or custom 127
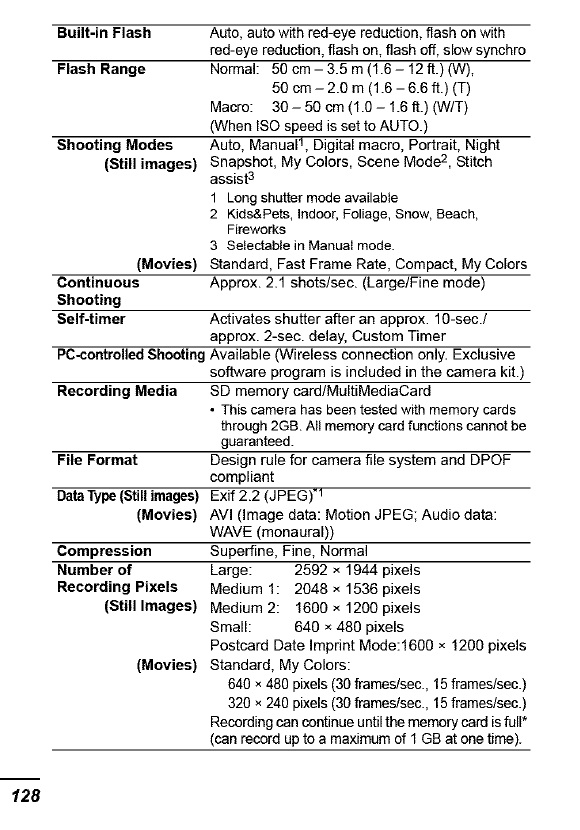
Built-in Flash
Flash Range
Shooting Modes
(Still images)
(Movies)
Continuous
Shooting
Self-timer
Auto, auto with red-eye reduction, flash on with
red-eye reduction, flash on, flash off, slow synchro
Normal: 50 cm - 3.5 m (1.6 - 12 ft.) (W),
50 cm - 2.0 m (1.6 - 6.6 ft.) (T)
Macro: 30 - 50 cm (1.0 - 1.6 ft.) (W/T)
(When ISO speed is set to AUTO.)
Auto, Manual 1, Digital macro, Portrait, Night
Snapshot, My Colors, Scene Mode 2, Stitch
assist 3
1 Long shutter mode available
2 Kids&Pets, Indoor, Foliage, Snow, Beach,
Fireworks
3 Selectable in Manual mode.
Standard, Fast Frame Rate, Compact, My Colors
Approx. 2.1 shots/sec. (Large/Fine mode)
Activates shutter after an approx. 10-sec./
approx. 2-sec. delay, Custom Timer
PC-controlled ShootingAvailable (Wireless connection only. Exclusive
software program is included inthe camera kit.)
Recording Media SD memory card/MultiMediaCard
•This camera has been testedwith memory cards
through 2GB. All memory cardfunctions cannotbe
guaranteed.
File Format Design rule for camera file system and DPOF
compliant
DataType(Still images) Exif 2.2 (JPEG)_1
(Movies) AVI (Image data: Motion JPEG; Audio data:
WAVE (monaural))
Compression Superfine, Fine, Normal
Number of Large: 2592 × 1944 pixels
Recording Pixels Medium 1: 2048 × 1536 pixels
(Stilllmages) Medium 2: 1600 × 1200 pixels
Small: 640 × 480 pixels
Postcard Date Imprint Mode:1600 × 1200 pixels
(Movies) Standard, My Colors:
640 × 480 pixels (30 frames/sec.,15 frames/sec.)
320 × 240 pixels (30 frames/sec.,15 frames/sec.)
Recording cancontinue until the memorycard isfull*
(can record up to a maximum of 1 GB at one time).
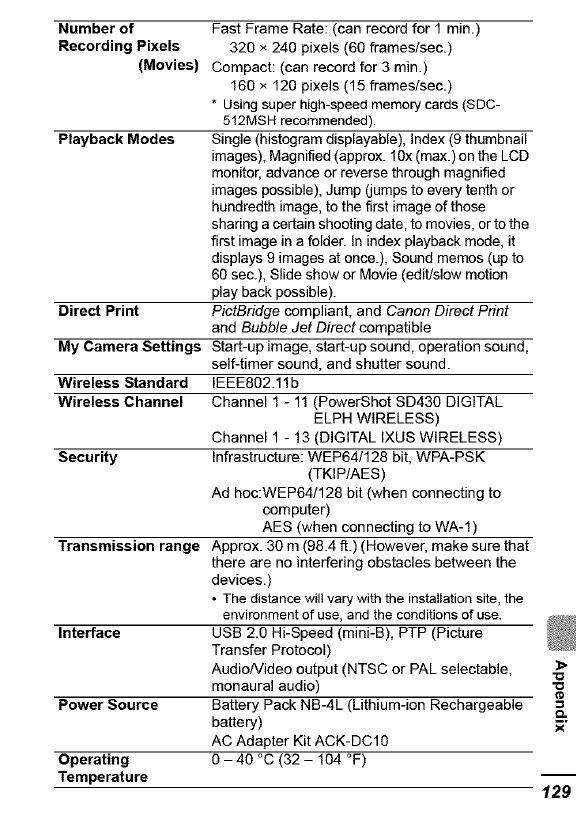
Number of
Recording Pixels
(Movies)
Playback Modes
Direct Print
My Camera Settings
Wireless Standard
Wireless Channel
Security
Transmission range
Interface
Power Source
Operating
Temperature
Fast Frame Rate: (can record for 1 min.)
320 × 240 pixels (60 frames/sec.)
Compact: (can record for 3 min.)
169 × 120 pixels (15 frames/sec.)
* Using super high-speedmemory cards(SDC-
512MSH recommended).
Single (histogram displayable), Index (9 thumbnail
images), Magnified (approx. 10x(max.) on the LCD
monitor, advance or reverse through magnified
images possible), Jump (jumps to every tenth or
hundredth image, to the first image of those
sharing a certain shooting date, to movies, orto the
first image in a folder. In index playback mode, it
displays 9 images at once.), Sound memos (up to
60 sec.), Slide show or Movie (edit/slow motion
play back possible).
PictBridge compliant, and Canon Direct Print
and Bubble Jet Direct compatible
Start-up image, start-up sound, operation sound,
self-timer sound, and shutter sound.
IEEE802.11b
Channel 1 - 11 (PowerShot SD430 DIGITAL
ELPH WIRELESS)
Channel 1 - 13 (DIGITAL IXUS WIRELESS)
Infrastructure: WEP64/128 bit, WPA-PSK
(TKIP/AES)
Ad hoc:WEP64/128 bit (when connecting to
computer)
AES (when connecting to WA-1)
Approx. 39 m (98.4 ft.) (However, make sure that
there are no interfering obstacles between the
devices.)
•The distancewill vary with the installationsite, the
environmentof use, and the conditionsof use.
USB 2.0 Hi-Speed (mini-B), PTP (Picture
Transfer Protocol)
Audio/Video output (NTSC or PAL selectable,
monaural audio)
Battery Pack NB-4L (Lithium-ion Rechargeable
battery)
AC Adapter Kit ACK-DC10
9-49 °C (32- 104 °F)
3"
129
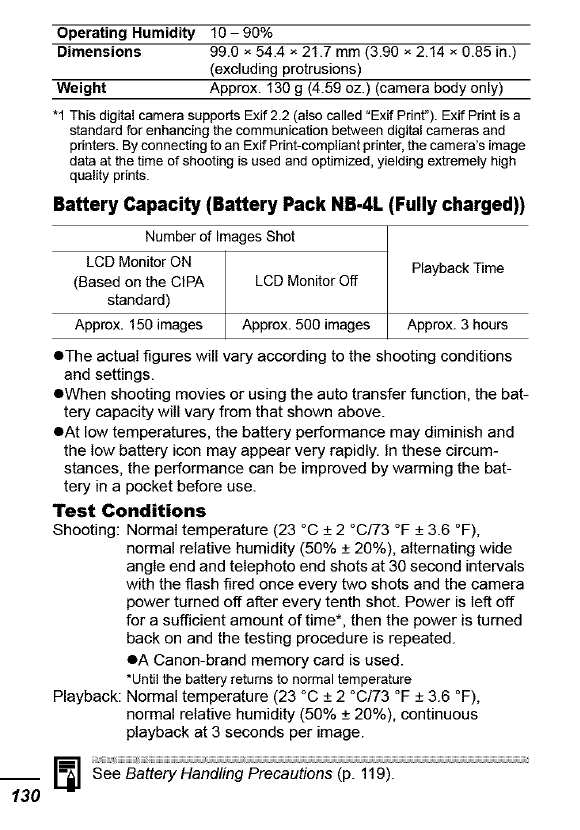
Operating Humidity 10-90%
Dimensions 99.0 × 54.4 × 21.7 mm (3.90 × 2.14 × 0.85 in.)
(excluding protrusions)
Weight Approx. 130 g (4.59 oz.) (camera body only)
"1 This digital camerasupports Exif 2.2 (also called "ExifPrint"). Exif Print is a
standard for enhancingthe communication betweendigital cameras and
printers.Byconnecting to an Exif Print-compliantprinter,the camera'simage
data at the time of shooting is used and optimized, yielding extremely high
quality prints.
Battery Capacity (Battery Pack NB-4L (Fully charged))
Number of Images Shot
LCD Monitor ON
(Based on the CIPA LCD Monitor Off
standard)
Approx. 159 images Approx. 509 images
Playback Time
Approx. 3 hours
•The actual figures will vary according to the shooting conditions
and settings.
eWhen shooting movies or using the auto transfer function, the bat-
tery capacity wilI vary from that shown above.
eAt low temperatures, the battery performance may diminish and
the low battery icon may appear very rapidly, tn these circum-
stances, the performance can be improved by warming the bat-
tery in a pocket before use.
Test Conditions
Shooting: Normal temperature (23 °C + 2 °C/73 °F + 3.6 °F),
normal relative humidity (50% + 20%), alternating wide
angle end and telephoto end shots at 30 second intervals
with the flash fired once every two shots and the camera
power turned off after every tenth shot. Power is Ieft off
for a sufficient amount of time*, then the power is turned
back on and the testing procedure is repeated.
eA Canon-brand memory card is used.
*until the batteryreturns to normaltemperature
Playback: Normal temperature (23 °C + 2 °C/73 °F + 3.6 °F),
normal relative humidity (50% + 20%), continuous
playback at 3 seconds per image.
See Battery Handling Precautions (p. 119).
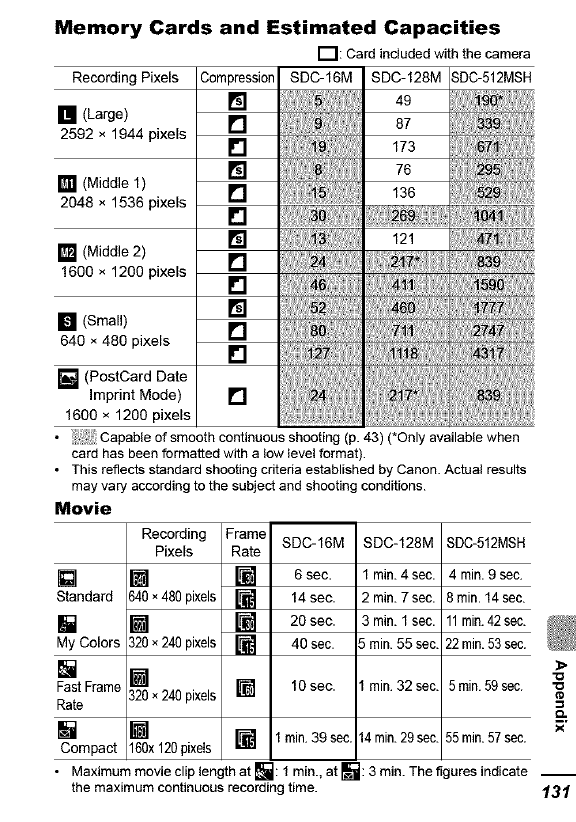
[] (Large)
2592 1944 pixels
[] (a_dle 1)
2048 1536 pixels
[] (M_dle 2)
1600 1200 pixels
[] (Small)
640 480 pixels
[] (PostCard Date
Imprint Mode)
1600 × 1200 pixels
Memory Cards and Estimated Capacities
I'_1: Cardincludedwith the camera
Recording Pixels Compression_SDC-16M I SDC-128M2_SDC-512MSH
I I I
[] I I 173 I
[] I I 76 I
[] I I 136 I
[] I 69 I
[] Ii i2i I
[] 1 21_7I
[] t I J
I I _ ]
[] i J
[] I]
[]
• _: Capableof smooth continuous shooting (p.43) (*Only available when
card has beenformatted with a low level format).
• This reflects standardshooting criteriaestablished by Canon. Actual results
mayvary accordingto the subjectand shooting conditions.
Movie
Recording Frame 8DC-512MSH
Pixels Rate
['_ 4 min.9 sec.
[] []
Standard B40×480pixels [] 8 min. 14 sec.
[] [] 11rain.42sec.
320×240pixels [] 22rain.53 sec.
[]
My Colors
[]
FastFrame
Rate
[]
Compact
[] []
320×240pixels
SDC-16M SDC-128M
6 sec. 1 min. 4 sec.
14 sec. 2 min. 7 sec.
20 sec. 3 min. 1sec.
40 sec. 3 min. 55 seo.
10 sec. min.32 sec.
1 min.39 sec 14rain.29sec.
5min.59sec.
[] I_ 55rain.57sec.
160x120pixels
• Maximummovie clip length at []: l min., at l_: 3 min. Thefiguresindicate __
the maximumcontinuous recordingtime.
3"
131
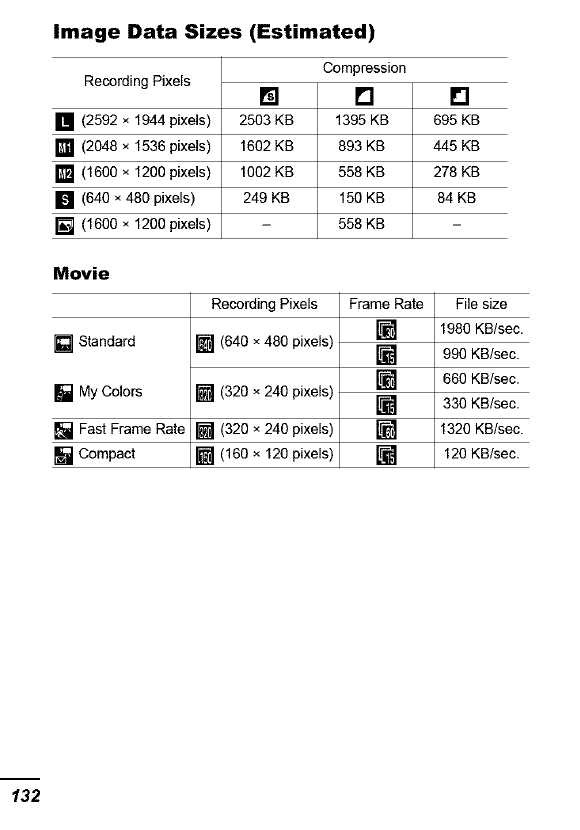
Image Data Sizes (Estimated)
Recording Pixels []
Compression
[] []
[] (2592 × 1944 pixels) 2503 KB 1395 KB 695 KS
[] (2048 × 1536 pixels) 1602 KS 893 KS 445 KS
[] (1600 × 1200 pixels) 1002 KB 558 KB 278 KS
[] (640 × 480 pixels) 249 KS 150 KS 84 KB
[] (1600 × 1200 pixels) - 558 KB
Movie
Standard
[] My Colors
Fast Frame Rate
Compact
Recording Pixels Frame Rate
[] (640 × 480 pixels)
[] (320 × 240 pixels)
[] (320 × 240 pixels)
[] (160 × 120 pixels)
File size
[] 1980 KB/sec.
[] 990 KB/sec.
[] 660 KB/sec.
[] 330 KB/sec.
[] 1320 KB/sec.
[] 120 KB/sec.
Wireless Print Adapter WA-1
Supported Camera PowerShot SD430 DIGITAL ELPH WIRELESS/
DIGITAL IXUS WIRELESS
Supported Printer Canon PictBridge compliant printer*
*Compact power adapter CA-DC20/CA-DC20E is
required (exceptfor SELPHY CP710/CP510).
SELPHY CP710/CP510 can be powered by the
USB bus.
Wireless Standard IEEE802.11b
Wireless Mode Ad hoc Mode
Security AES
Transmission range Approx. 30 m (However, make sure that there
are no interfering obstacles between the
devices.)
Interface USB
Display Blue LED, Orange LED
Power Source DC 5.0 V (when powered by USB bus)
DC 5.0 V (when using CA-DC20/CA-DC20E)
Dimensions 92.5 x 27.0 x 28.8 mm
(3.64 × 1.06 × 1.13 in.) (When folded)
Weight Approx. 40 g (1.4 oz.)
Compact Power Adapter CA-DC20/CA-DC20E
Rated Input 100 - 240 V AC (50/60 Hz)
11 VA (100 V)- 13 VA (240 V) (CA-DC20)
100 mA (CA-DC20E)
Rated Output 5.0 V DC, 0.7 A
Operating O-40 °C (32 - 104 °F)
Temperatures
Dimensions 49.4 x 53.4 × 20.5 mm (1.94 × 2.10 × 0.81 in.)
(CA-DC20)
28.0 x 78.0 × 21.0 mm (1.10 × 3.07 × 0.83 in.)
(CA-DC20E)
Weight Approx. 92 g (3.25 oz.) (CA-DC20)
Approx. 75 g (2.65 oz.) (excluding power cord)
(CA-DC20E)
_>
"o
133
SD Memory Card
Interface Compatible with SD memory card standards
Dimensions 32.0 x 24.0 x 2.1 mm (1.26 × 0.94 x 0.08 in.)
Weight Approx. 2 g (0.07 oz.)
Battery Pack NB-4L
Type Lithium-ion Rechargeable battery
Nominal Voltage 3.7 V DC
Typical Capacity 760 mAh
Operating 0- 40 °C (32- 104 °F)
Temperatures
Dimensions 35.4 x 40.3 x 5.9 mm (1.40 × 1.59 x 0.23 in.)
Weight Approx. 17 g (0.60 oz.)
Battery Charger CB-2LV/CB-2LVE
Rated Input 100 -240 V AC (50/60 Hz)
10 VA (100 V) - 14 VA (240 V) (CB-2LV)
0.1 A (100 V) - 0.06 A (240 V) (CB-2LVE)
Rated Output 4.2 V DC, 0.65 A
Charging Time Approx. 90 minutes
Operating 0- 40 °C (32- 104 °F)
Temperatures
Dimensions 53.0 x 86.0 × 19.5 mm (2.1 x 3.4 x 0.77 in.)
Weight Approx. 60 g (2.1 oz.) (CB-2LV)
Approx. 55 g (1.9 oz.) (CB-2LVE) (excluding
power cable)
Compact Power Adapter CA-DC10
(Included with the separately sold AC Adapter Kit ACK-DC10)
Rated Input 100 - 240 V AC (50/60 Hz)
16 VA (100 V) - 26 VA (240 V)
Rated Output 4.3 V DC, 1.5 A
Operating 0- 40 °C (32- 104 °F)
Temperatures
Dimensions 42.6 × 104.4 × 31.4 mm (1.7 × 4.1 × 1.2 in.)
Weight Approx. 180 g (6.3 oz.)
I INDEX
A
AC Adaptor Kit ACK-OC10 ... 123
AE Lock .................................. 53
AF Frame ......................... 51, 52
AF Lock .................................. 52
AE-assist Beam ...................... 33
AiAF ........................................ 33
Auto P{ay (Slide Shows) .........83
Auto Rotate Function ..............70
AV cable ................................. 93
B
Battery
Battery Capacity ............... 130
Charging .. 119, Basic Guide 1
Handling ........................... 119
Installing .......... Basic Guide 2
6
C}ock Disp)ay .......................... 20
Compression .......................... 39
Continuous Shooting .............. 43
Create Folder ......................... 71
Custom White Ba}ance ........... 60
D
Date/Time
Setting ............. Basic Guide 4
Using the Clock .................. 20
World Clock ........................ 29
Digital Macro .......................... 41
DIGITAL Terminal .................. 15
Digital Zoom ........................... 42
Downloading Images to a Com-
puter ....................................... 16
DPOP Print Order
Print Style ........................... 90
Selecting Images ................ 89
DPOF Transfer Order ............. 91
E
Erasing
All Images ........................... 87
Single Images
................ 17, Basic Guide 11
Exposure ................................ 56
Exposure Shift ....................... 49
F
FE Lock .................................. 54
File Number ........................... 72
Flash .............. 15, Basic Guide 9
Focus .......................................
Focus Lock ............................ 52
Frame Rates .......................... 40
FUNC. Menu .......................... 31
FUNC./SET Button ................. 17
G
Grid Lines .............................. 33
H
HF-DC1 ................................ 124
Histogram .............................. 25
I
}mage Data Sizes (Estimated)
............................................. 132
index Playback ...................... 75
Indicators ............................... 26
Infinity .......... 17, Basic Guide 10
Interface Cable .. Basic Guide 16
ISO Speed ............................. 69
#
Jump (Image Search) ............ 76
L
Language ............. Basic Guide 4
LCD Monitor
Information Displayed ........ 22
Night Display ...................... 21
Playback Information ......... 23
Quick-bright LCD ............... 21
Shooting Information .......... 22
Using the LCD Monitor ...... 19
M
Macro ........... 17, Basic Guide 10
Magnifying ............................. 74
Memory Card
Formatting ........................ 122
Handling ........................... 121
Inserting ........... Basic Guide 2,oo
Memory Cards
Estimated Capacities ....... 131
Formatting .......................... 28
Menu
FUNC. Menu ................ 31, 33
Menu List ........................... 33
Menus and Settings ........... 31
My Camera Menu .............. 36
Play Menu .......................... 34
Rec. Menu ......................... 33
Set up Menu ...................... 34
Wireless Menu ................... 34
MENU Button ......................... 17
Messages ............................ 115
Metering Modes ..................... 55
Mode Switch
...................... 17, Basic Guide4, 5
Movie
Editing ................................ 78
Playback ............................ 77
Shooting ............................. 47
Mute Mode ..... 34, Basic Guide 5
My Camera Menu .................. 36
My Camera Settings .............. 94
My Colors ............................... 63
O
Output .................................... 93
P
Photo Effect ........................... 62
Playback ............ Basic Guide 11
Postcard Date Imprint Mode .. 44
Power Button . 17, Basic Guide 5
Power Saving ................... 27, 35
Print/Share Button
..................... 17, Basic Guide 14
Printing ............... Basic Guide 14
Protect ................................... 87
R
Recording Pixels .............. 38, 46
Red-Eye Reduction
....................... 15, Basic Guide 9
Reset All ................................ 37
Rotate .................................... 80
$
Self-Timer .............................. 45
Set up Menu .......................... 34
Shooting Mode
Auto ................. Basic Guide 7
Digital Macro ...................... 41
Manual ............ Basic Guide 7
Movie ......... 47, Basic Guide 8
Scene Mode .... Basic Guide 7
Beach .......... Basic Guide 8
Fireworks ..... Basic Guide 8
Foliage ........ Basic Guide 7
Indoor .......... Basic Guide 7
Kids&Pets .... Basic Guide 7
Snow ........... Basic Guide 7
Selecting ......... Basic Guide 6
Stitch Assist ........................ 49
Shutter Button ........................ 17
Fully ................. Basic Guide 6
Halfway ........... Basic Guide 5
Shutter Speed ........................ 57
Slide Shows ............................ 83
Repeat Settings .................. 86
Selecting ............................ 85
Transition ........................... 84
Smooth Continuous Shooting .43
Sound Memo .......................... 81
Spot AE Point Frame .............. 55
Spot Frame ............................. 22
T
Telephoto ............ Basic Guide 8
Time Zone ........................ 30, 35
Transition Effects
Playback ............................. 81
Slide Show ......................... 84
P
Video Output System ............. 93
W
White Balance ........................ 59
Wide Angle ............................... 8
Wireless
Connecting to Printer .........98
Connecting/Disconnecting 1O0
Target Device ........... 102, 104
Wireless Print Adapter
........................... 18,26,98, 102
Wrist Strap .............................. 16
Z
Zoom ................... Basic Guide 8

MEMO

MEMO

MEMO

MEMO

MEMO

Trademark Acknowledgments
•Canon, PowerShot, PIXMA and SELPHY are trademarks of Canon Inc
• Macintosh, Mac OS and QuickTime are trademarks of Apple
Computer Inc, registered in the United States and/or other countries
•Microsoft ® and Windows ® are either registered trademarks or
trademarks of Microsoft Corporation in the United States and/or
other countries
• SD is a trademark.
• Wi-Fi ® is a registered trademark of the Wi-Fi Alliance; and Wi-Fi
CERTIFIED TM and WPA TM are trademarks of the Wi-Fi Alliance
• All other product and service names mentioned herein are the
marks of their respective owners
• Other names and products not mentioned above may be registered
trademarks or trademarks of their respective companies
IMPORTANT SAFETY INSTRUCTIONS-SAVE THESE
INSTRUCTIONS.
DANGER-TO REDUCE THE RISK OF FIRE OR ELECTRIC
SHOCK, CAREFULLY FOLLOW THESE INSTRUCTIONS.
For connection to a supply not in the U.S.A., use an attachment
plug adapter of the proper configuration for the power outlet.
142 Copyright© 2005Canon Inc.All dghtsreserved.
FCCNotice
(DigitalCamera,ModelPC1190NVirelessPrintAdapter,ModelWA-1N)
Tested To Cmply
F_ with FCCStar_fard_
FORHOMEORO_ICE USE
This device complies with Part 15 of the FCC Rules. Operation is subject
to the following two conditions;
(1) this device may not cause harmful interference, and
(2) this device must accept any interference received, including
interference that may cause undesired operation.
Note: This equipment has been tested and found to comply with the limits
for Class B digital devices, pursuant to Part 15 of the FCC rules. These
limits are designed to provide reasonable protection against harmful
interference in a residential installation. This equipment generates, uses
and can radiate radio frequency energy and, if not installed and used in
accordance with the instructions, may cause harmful interference to radio
communications. However, there is no guarantee that interference will not
occur in a particular installation. If this equipment does cause harmful
interference to radio or television reception, which can be determined by
fuming the equipment off and on, the user is encouraged to try to correct
the interference by one or more of the following measures:
Reorient or relocate the receiving antenna.
Increase the separation between the equipment and receiver.
Connect the equipment into an outlet on a circuit different from that to
which the receiver is connected.
Consult the dealer or an experienced radio/TV technician for help.
The cable with the ferrite core provided with the digital camera must be
used with this equipment in order to comply with Class B limits in Subpart
B of Part 15 of the FCC rules.
Do not make any changes or modifications to the equipment unless
otherwise specified in the manual. If such changes or modifications
should be made, you could be required to stop operation of the
equipment.
Canon U.S.A. Inc.
One Canon Plaza, Lake Success, NY 11042, U.S.A.
Tel No. (516) 328-5600
Canadian Radio Interference Regulations
This Class B digital apparatus complies with Canadian ICES-O03.
R_glementation canadienne sur les interferences radio
Cet appareil numCrique de la classe Best conforme a ia norme
NMB-003 du Canada.
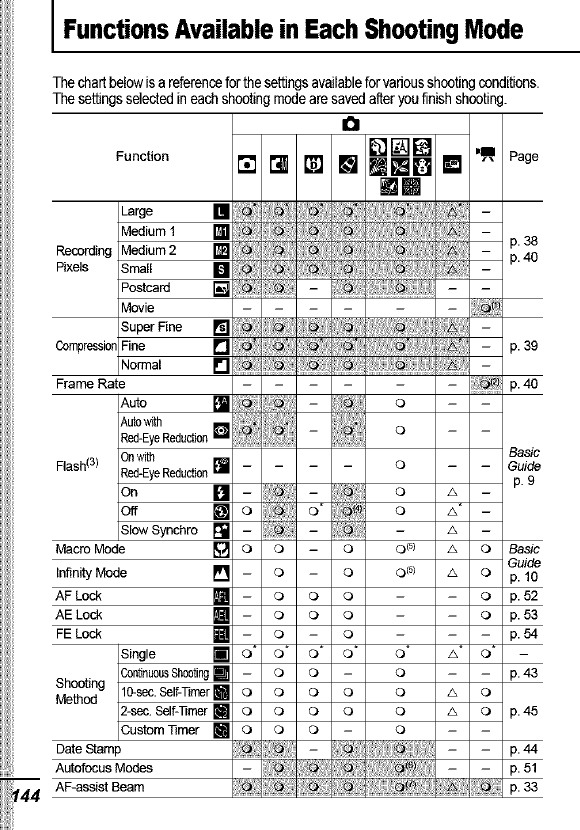
lFunctionsAvailablein EachShootingMode
The chart below is a reference for the settings available for various shooting conditions.
The settings selected in each shooting mode are saved after you finish shooting.
a
[] [] [] ,ll Page
Foncfion [] [] [] [] II_•ta []
m•
Large []
Medium I [] p. 38
Recording Medium 2 [] - p. 40
Pixels Small []
Postcard []
Movie
Super Fine
CompressiorFine
Normal
Frame Rate
Auto
]
[] - p. 39
[] p40
O
[] o
Autswith 0"
Red-EyeReduction[] ............................
Flash(3) Onwith
Red-EyeReduction[]
On [] -
Off [] 0 O*
SlowSynchro[] -
Macro Mode [] O O O
Infinity Made [] -O O
AF Lock [] -ooo
AE Lock [] - O O O
FE Lock [] - O O
Single [] O*' O*' O*' O*
Coo_nuousShooting[] -oo-
Shooting 10-sec.Self-Timer[I o o o o
Method 2-sec.Self-limer [] o o o o
Custom 11mer [] o o o -
Date Stamp
Autofocus Modes
AF-assist Beam
Basic
o-Guide
p. 9
O A -
O A* -
A -
O (s) A 0 Basic
Guide
0(2) A O p. 10
O p. 52
O p. 53
- p. 54
O* A* O* -
O - p. 43
O A O
O A O p. 45
O
- p. 44
- p. 51
p. 33
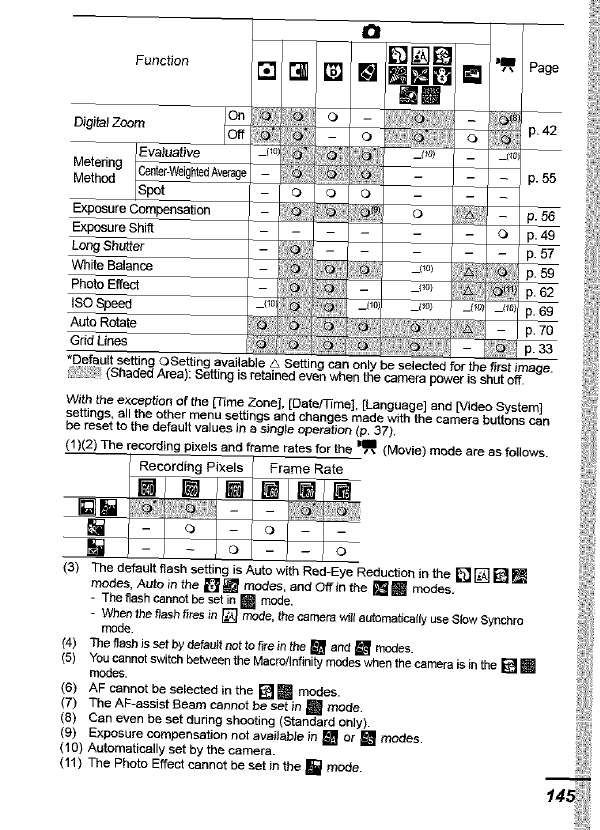
Function
0
_'_ _] _J I _ Page
[] [] [] I_ I_ I
i O - 42
DigJ_Zoom O" :_* - o P,
Evaluative _l,0;
Metedng £enter-WeightedAverage -O: :o: :o: p. 55
Method ...............................................
Spot o o o - I-
Exposure Compensation o p. 56
Exposure Shi_ - I - o p.49
Long Shutter - - p. 57
W_ite Balance - _/_Q/ p. 5g
PhotoEffect -_'°>I:_I p.62
ISO Speed _(10 _ __la; p. 69
Auto Rotate _ - p. 70
Grid Lines _ : JlI -: _ p. 33
*DefauLt setting oSetting available A Setting can only be selected for the first image.
(Shaded Area): Setting is retained even when the camera power is shut off.
With the excelotion of the [77me ZoneJ, [Date/Time], [Language] and [Video System]
settings, all the other menu settings and changes made with the camera buttons can
be reset to the default values in a single operation (p. 37).
(1)(2) The recording pixels and frame rates for the mlII (Movie) mode are as follows.
[]
(3) The default flash setting is Auto with Red-Eye Reduction in the [] [] [] []
modes, Auto in the [] _ modes, and Off in the [] [] modes.
- The flash cannot be set in [] mode.
When the flash fires in [] mode, the camera v4tt automatically use Slow Synchro
mode.
(4) The flash Jsset by default nat to fi_e in the [] and m modes.
_5) Yc_ cannot switch between the Mac_ol_nf_it'y modes when the carne[a is _ the [] []
modes.
(6) AF cannot be selected in the [] [] modes,
(7) The AF-essist Beam cannot be set in [] mode.
(8) Can even be set during shooting (Standard only).
(9) Exposure compensafJon not ava#able in [] or [] modes.
(10) Automatically set by the camera.
(11) The Photo Effect cannot be set in the [] mode.
