User Manual
ITM. / ART. 962793
Model #: 1301-030303-01
ASSEMBLY, INSTALLATION, AND CARE INSTRUCTIONS
FEATURES
Easy to Install.
Fixture engineered to safely use energy-saving Light Emitting Diodes (LED’s).
NOTE: This product is an LED light fixture. It contains its own light source and does not require the purchase of
light bulbs.
WARNING: To reduce the risk of injury read these instructions thoroughly.
WARNING: Before starting installation of this fixture or removal of an existing fixture disconnect the
power by turning off the circuit breaker or by removing fuse at fuse box.
WARNING: Consult a qualified electrician if you have any electrical questions.
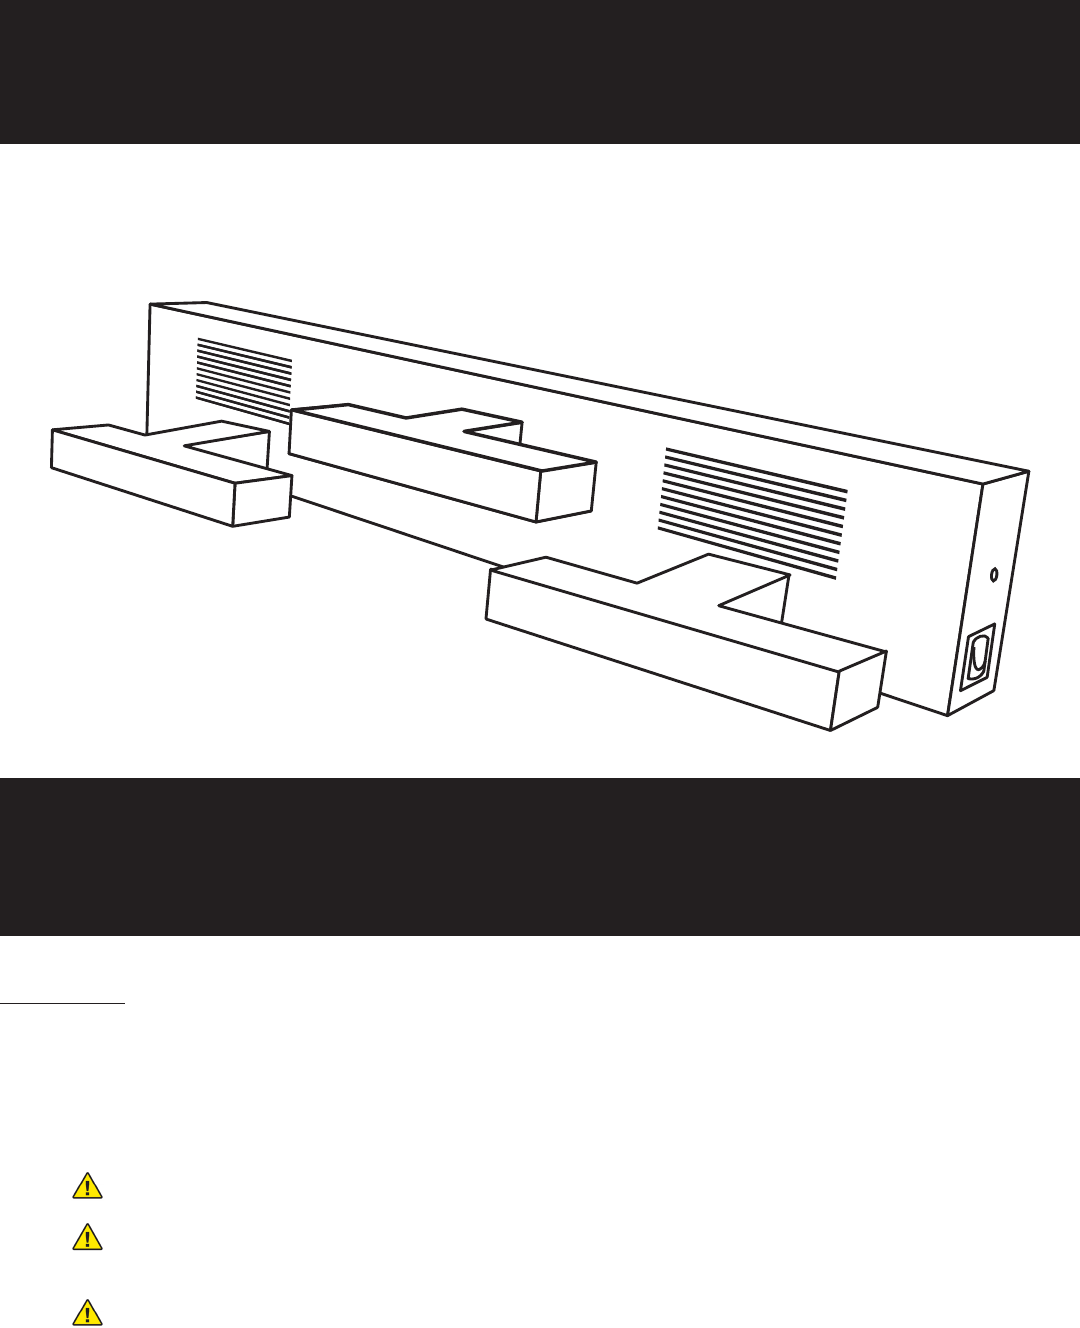
LIGHT & SOUND BATH VANITY LIGHT
CONTEMPORARY SLAT 3L SWITCH/NL/BT BLACK CHROME
IMPORTANT, RETAIN FOR FUTURE REFERENCE
READ CAREFULLY
All of the safety and operating instructions should be read,
adhered to and followed before the unit is operated.
Made in China
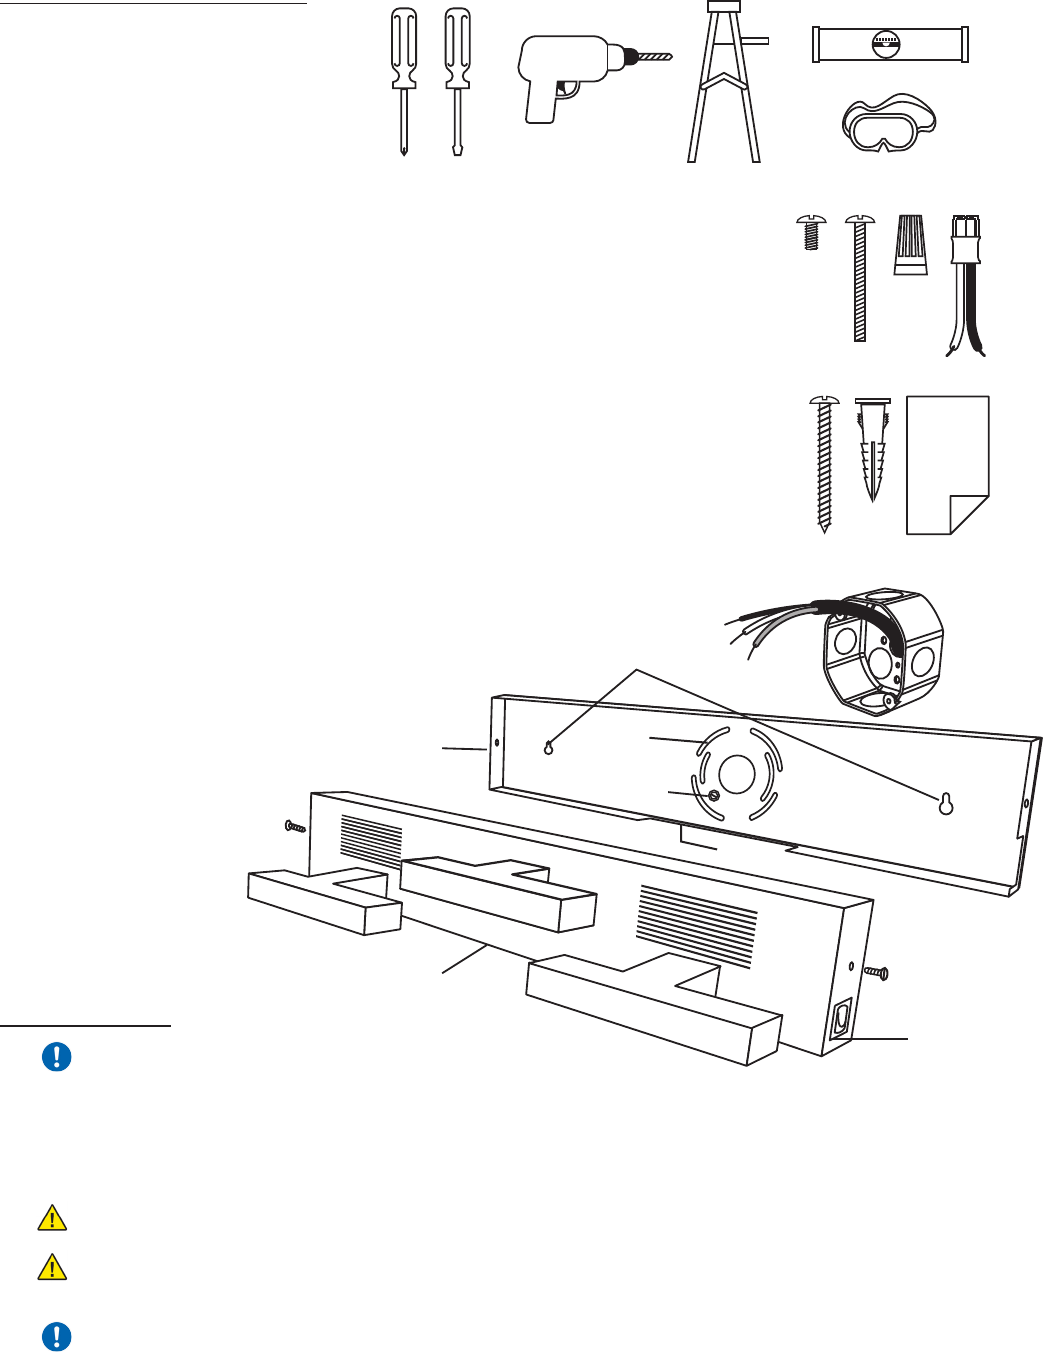
PARTS & SPECIFICATIONS
TOOLS REQUIRED
Phillips Screw Driver
Flat Head Screwdriver
Drill (Option 2 only)
Drill Bit 7mm (9/32”) (Option 2 only)
Ladder
Level
Safety Goggles
HARDWARE INCLUDED
AA 2 – Mounting Plate Screws (Pre-installed)
BB 2 – #8-32 x 1” Electrical Box Mounting Screws (Option 1)
CC 2 – Wire Nuts
DD 2 – Capstone Quick Connector (1 Pre-wired; 1 Loose)
EE 2 - #4 x 1” Self-Tapping Wall Mounting Screws (Option 2)
FF 2 – Plastic Wall Anchors (Option 2)
GG 1 – White Cleaning Cloth
DIAGRAM
A Light Fixture
B Mounting Plate
C Electrical Box Screw Hole (Option 1)
D Wall Mounting Screw Holes (Option 2)
E Ground Screw (Green, Pre-installed)
AA Mounting Plate Screws (Pre-installed)
F ON/OFF Rocker Switch
G Electrical Box (not included)
AA BB
EE
CC
FF
DD
GG
A
D
B
AA
AA
E
F
G
INSTALLATION
IMPORTANT: This fixture has two installation options.
OPTION 1 – ANCHOR TO AN ELECTRICAL BOX
OPTION 2 – ANCHOR TO A WALL
Both OPTION’s require powering the xture using a standard 4” octagonal recessed electrical box (G).
WARNING: Consult a qualified electrician if you have any electrical questions.
WARNING: Before starting installation of this fixture or removal of an existing fixture disconnect the power
by turning off the circuit breaker or by removing fuse at fuse box.
IMPORTANT: Notice the position of cutouts on the Mounting Plate. Cutouts must be positioned correctly
for proper mounting.
Bottom
C
OPTION 1
ANCHORING TO AN ELECTRICAL OUTLET BOX
1. If replacing an existing xture remove.
2. Remove Mounting Plate (B) from Light Fixture (A) by removing pre-installed
Mounting Plate Screws (AA).
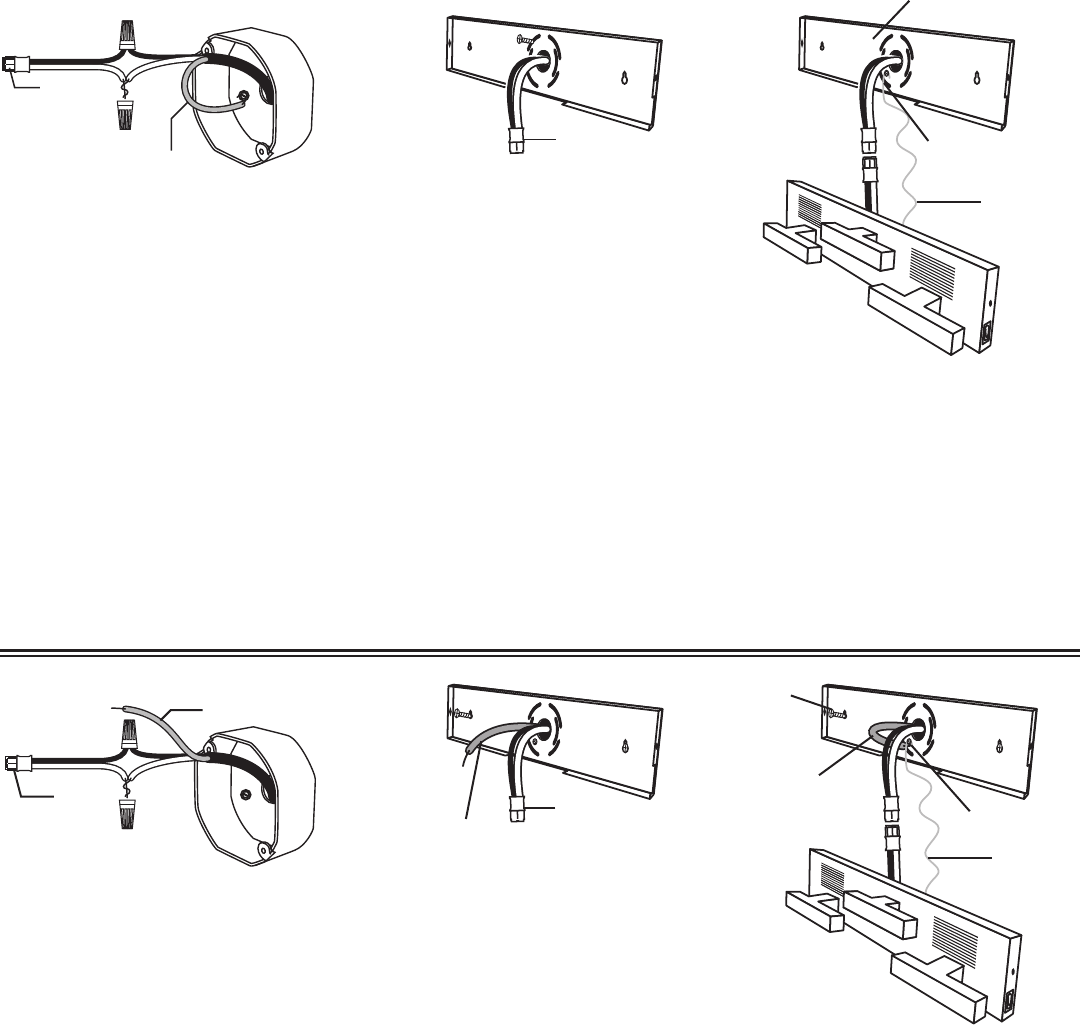
3. Wire Capstone Quick Connector (DD) to Electrical Box (G) using Wire Nuts (CC) (white wire to white
wire / black wire to black wire) and attach Wall Ground Wire to the Electrical Box (Fig 1).
4. Bring Capstone Quick Connector (DD) through center hole in Mounting Plate (B) (Fig 2).
5. Align and anchor Mounting Plate (B) to Electrical Box (G) using Electrical Box Mounting Screws (BB). Make
certain the Mounting Plate bottom is facing downward.
6. Connect Capstone Quick Connector (DD) pre-wired to Light Fixture (A) to Capstone Quick Connector (DD) wired
to Electrical Box (G) and attach Light Fixture Ground Wire to Ground Screw (E) (Fig 3).
7. Place Rocker Switch (F) in ON position to activate Night Light feature.
8. Align Light Fixture (A) in Mounting Plate (B) and secure with Mounting Plate Screws (AA).
OPTION 2 – ANCHOR TO A WALL
1. If replacing an existing xture remove.
2. Remove Mounting Plate (B) from Light Fixture (A) by removing pre-
installed Mounting Plate Screws (AA).
3. Align Mounting Plate (B) on wall centering over Electrical Box (G). Make
certain the Mounting Plate bottom is facing downward.
4. Mark location of Wall Mounting Screw Holes (D) with pencil/pen.
5. Remove Mounting Plate (B) from wall and drill holes using 7mm (9/32”) drill bit
6. Insert Plastic Wall Anchors (FF).
7. Wire Capstone Quick Connector (DD) to Electrical Box (G) using Wire Nuts (CC) (white wire to white wire and
black wire to black wire) (Fig 4).
8. Bring Capstone Quick Connector (DD) and Wall Ground Wire through center hole in Mounting Plate (B) (Fig 5).
9. Anchor Mounting Plate (B) to wall by securing Self-Tapping Wall Mounting Screws (EE) into Plastic Wall
Anchors (FF).
10. Connect Capstone Quick Connector (DD) pre-wired to Light Fixture (A) to Capstone Quick Connector (DD) wired
to Electrical Box (G) and attach Wall Ground Wire and Light Fixture Ground Wire to Ground Screw (E) (Fig 6).
11. Place Rocker Switch (F) in ON position to activate Night Light feature.
12. Align Light Fixture (A) in Mounting Plate (B) and secure with Mounting Plate Screws (AA).
Fig 3
Fixture
Ground
Wire
E
BB
Fig 4 Fig 5 Fig 6
Fixture
Ground
Wire
DD E
EE
DD
Wall
Ground
Wire
G
DD
DD
B
B
B
B
A
A
Fig 2Fig 1
Wall Ground Wire
Wall
Ground
Wire
Wall
Ground
Wire
G
OPERATION
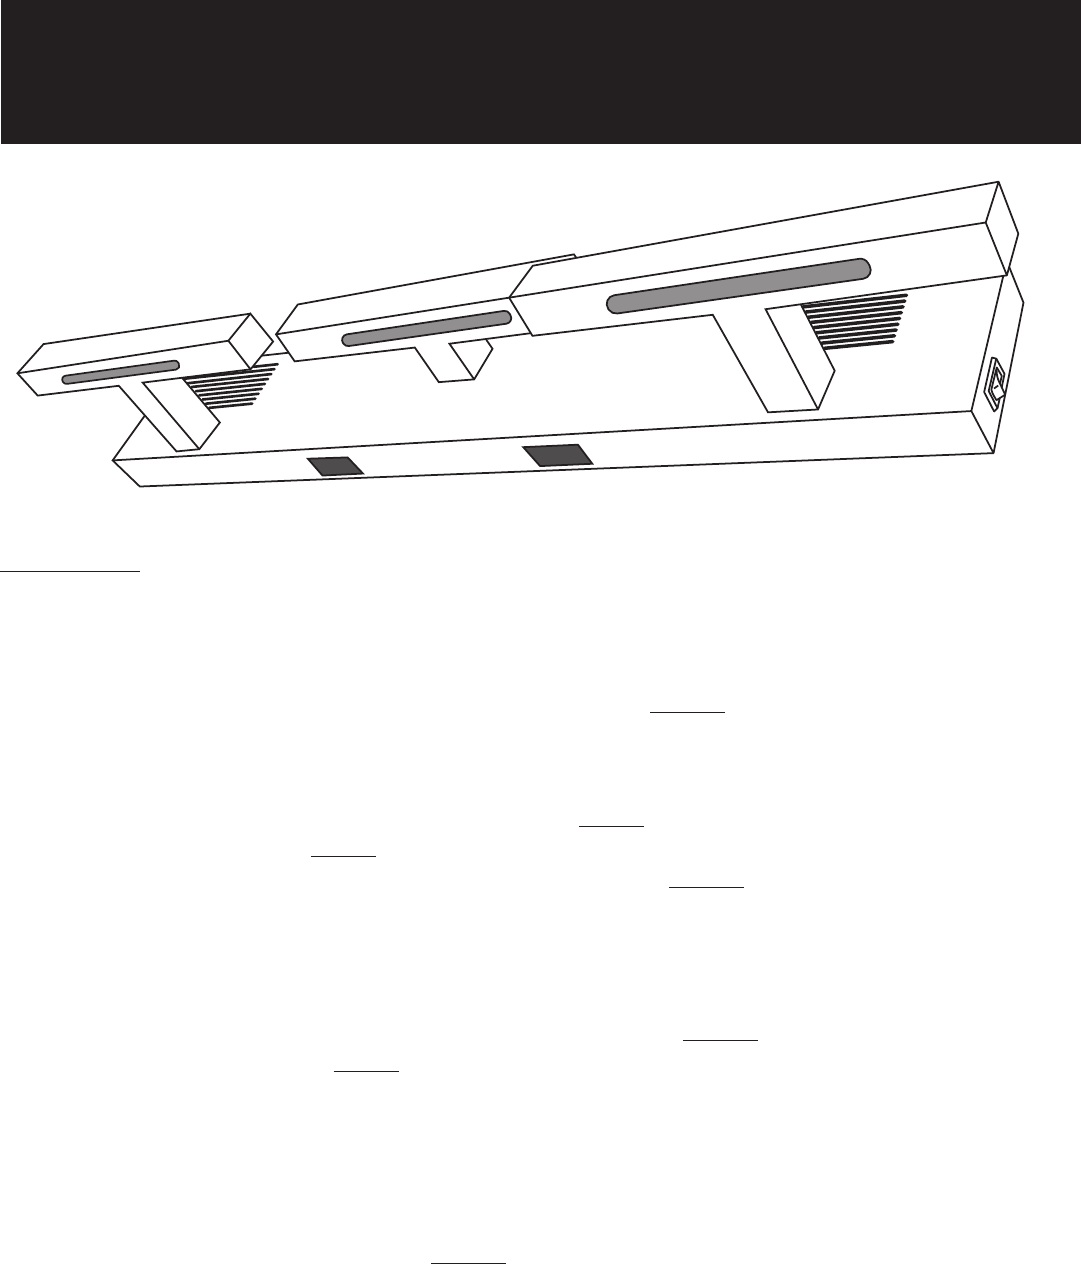
BATH VANITY LIGHT
• Turn Light Fixture ON/OFF using Wall Switch.
• 900 Lumen brightness (300 Lumen per lamp).
• Turning Light Fixture OFF automatically activates the Night Light function when Rocker Switch is in ON position.
NIGHT LIGHT
• The Light Fixture has a built in Motion Sensor, night light feature powered by a rechargeable battery pack.
• To activate the Night Light feature place and leave the Rocker Switch in the ON position.
• Turning the Light Fixture Wall Switch OFF activates the Night Light function.
• Night Light turns on automatically when motion is detected in low light.
• 30 Lumen brightness (10 Lumen per lamp).
• Night Light turns off automatically after 90 seconds if no motion is detected.
• Night Light will not turn on during daylight.
• Turning the Light Fixture Wall Switch ON deactivates the Night Light function.
• To deactivate the Night Light feature place and leave the Rocker Switch in the OFF position.
BLUETOOTH®
• The Light Fixture has 2 Bluetooth® V2.1 enabled speakers.
• Speakers activate when Light Fixture Wall Switch is in ON position and deactivate when Wall Switch is in OFF
position.
• Speakers do not work when Night Light function is activated.
• To pair your device to Bluetooth® speakers refer to your device’s User Guide.
LIGHT & SOUND BATH VANITY LIGHT
CONTEMPORARY SLAT 3L SWITCH/NL/BT BLACK CHROME

REPLACING THE BATTERY PACK
The Night Light is powered by a Li-ion 11.1V 2000mAh
rechargeable Battery Pack. To replace follow these steps.
WARNING: Consult a qualified electrician if you have any electrical questions.
WARNING: Before replacing Battery Pack disconnect the power by turning off the circuit breaker or by
removing fuse at fuse box.
1. Place Rocker Switch (F) in OFF position.
2. Remove Light Fixture (A) from Mounting Plate (B) by removing Mounting Plate Screws (AA) and disconnect
Capstone Quick Connectors (DD) and ground wires (Fig 7).
3. Locate Battery Pack Compartment (H) on back of Light Fixture (A) and open (Fig 8).
4. Replace with Li-ion 11.1V 2000mAh rechargeable battery pack. Reattach the battery pack wires using the snap-
in connector. Match the black and red wires with the xture wires. Place the exposed wire into the connector and
lock into place using the snap clamp (Fig 9).
5. Close Battery Compartment (H).
6. Reconnect Capstone Quick Connectors (DD) and ground wires (Fig 7).
7. Place Rocker Switch (F) in ON position to activate Night Light feature.
8. Align Light Fixture (A) in Mounting Plate (B) and secure with Mounting Plate Screws (AA).
Li-ion 11.1V 2000mAh
Battery Pack
Back side (A)
Fig 7
Fig 8
A
F
H
DD
B
AA
AA
Fig 9

WARNING
1. For cleaning, use a soft dry cloth.
2. For decorative indoor use only.
CARE AND CLEANING
• Clean the Light Fixture with the Cleaning Cloth (GG) included.
• Do not use cleaners with chemicals, solvents or abrasives.
TROUBLESHOOTING
Problem Possible Cause Soluon
The Light Fixture does not light The power is o Ensure the power supply
is on
Faulty wire connecons Check wiring
The circuit breaker is o Ensure the circuit breaker
is in ON posion.
The fuse blows or circuit breaker trips
when the Light Fixture is turned on
Crossed wires or power wire is
grounding out
Check wire connecons
The Night Light does not light in dark
area when there is moon
The Rocker Switch is in OFF
posion
Ensure Rocker Switch is in
ON posion
The Bluetooth speakers do not work The Wall Switch is in OFF posi-
on
Ensure Wall Switch is in
ON posion
The Bluetooth speakers are not
paired to the smartphone
Check smartphone User
Guide

Capstone Industries Inc., warrants to the original retail purchaser, this product to be free of defects in
material and workmanship for a period of up to one year from date of original purchase.
Warranty applies only to the original purchaser of the product.
Warranty is limited to consumer use and does not cover parts damaged due to normal wear, abnormal
conditions, misuse, or accidents, and is limited to repair or replacement only.
This limited warranty does not cover batteries, or any part that may become defective due
to mishandling.
Warranty is effective only upon presentation of dated proof of purchase.
Customers are responsible for all postage costs on returned merchandise.
No shipping or handling charges will be reimbursed.
NOTE:
This equipment has been tested and found to comply with the limits for a Class B Digital Device,
pursuant to Part 15 of the FCC Rules.
These limits are designed to provide reasonable protection against harmful interference in a residential
installation. This equipment generates, uses, and can radiate radio frequency energy and, if not installed
and used in accordance with the instructions, may cause harmful interference to radio communications.
However, there is no guarantee that interference will not occur in a particular installation. If this
equipment does cause harmful interference to radio or television reception, which can be determined
by turning the equipment off and on, the user is encouraged to try to correct the interference by one
or more of the following measures:
- Reorient or relocate the receiving antenna.
- Increase the distance between the equipment and receiver.
- Connect the equipment to an outlet on a circuit different from that to which the receiver is connected.
- Consult the dealer or an experienced radio/TV technician for help.
This equipment complies with Part 15 of the FCC Rules. Operation is subject to the following two
conditions:
1) This device may not cause harmful interference.
2) This device must accept any interference received, including interference that may cause undesired
operation.
Warning: Changes or modications to this unit not expressly approved by the party responsible for
compliance could void the user’s authority to operate the equipment.
One Year Limited Warranty
There are no warranties which extend beyond the description on the face hereof. This warranty gives
you specic legal rights, and you may also have other rights which may vary from state to state.
Limitations on Warranty Disclaimers

Protecting the Environment - Recycle It
Reponsibly recycling these products saves natural resources and protects human health through reuse of reclaimed
resources. Please call your local waste management company for vendors in your immediate area.
For assistance with assembly or installation, parts and customer service,
please do not return to retailer - contact Capstone CUSTOMER SERVICE at:
USA Toll Free: 1-888-570-8889 (English only)
Hours of Operation: Monday - Friday
9AM - 5PM EST
mail: info@capstoneindustries.com
website: www.capstoneindustries.com
10/2015-03