CARRIER Air Conditioner/heat Pump(outside Unit) Manual L1001423
User Manual: CARRIER CARRIER Air conditioner/heat pump(outside unit) Manual CARRIER Air conditioner/heat pump(outside unit) Owner's Manual, CARRIER Air conditioner/heat pump(outside unit) installation guides
Open the PDF directly: View PDF ![]() .
.
Page Count: 24
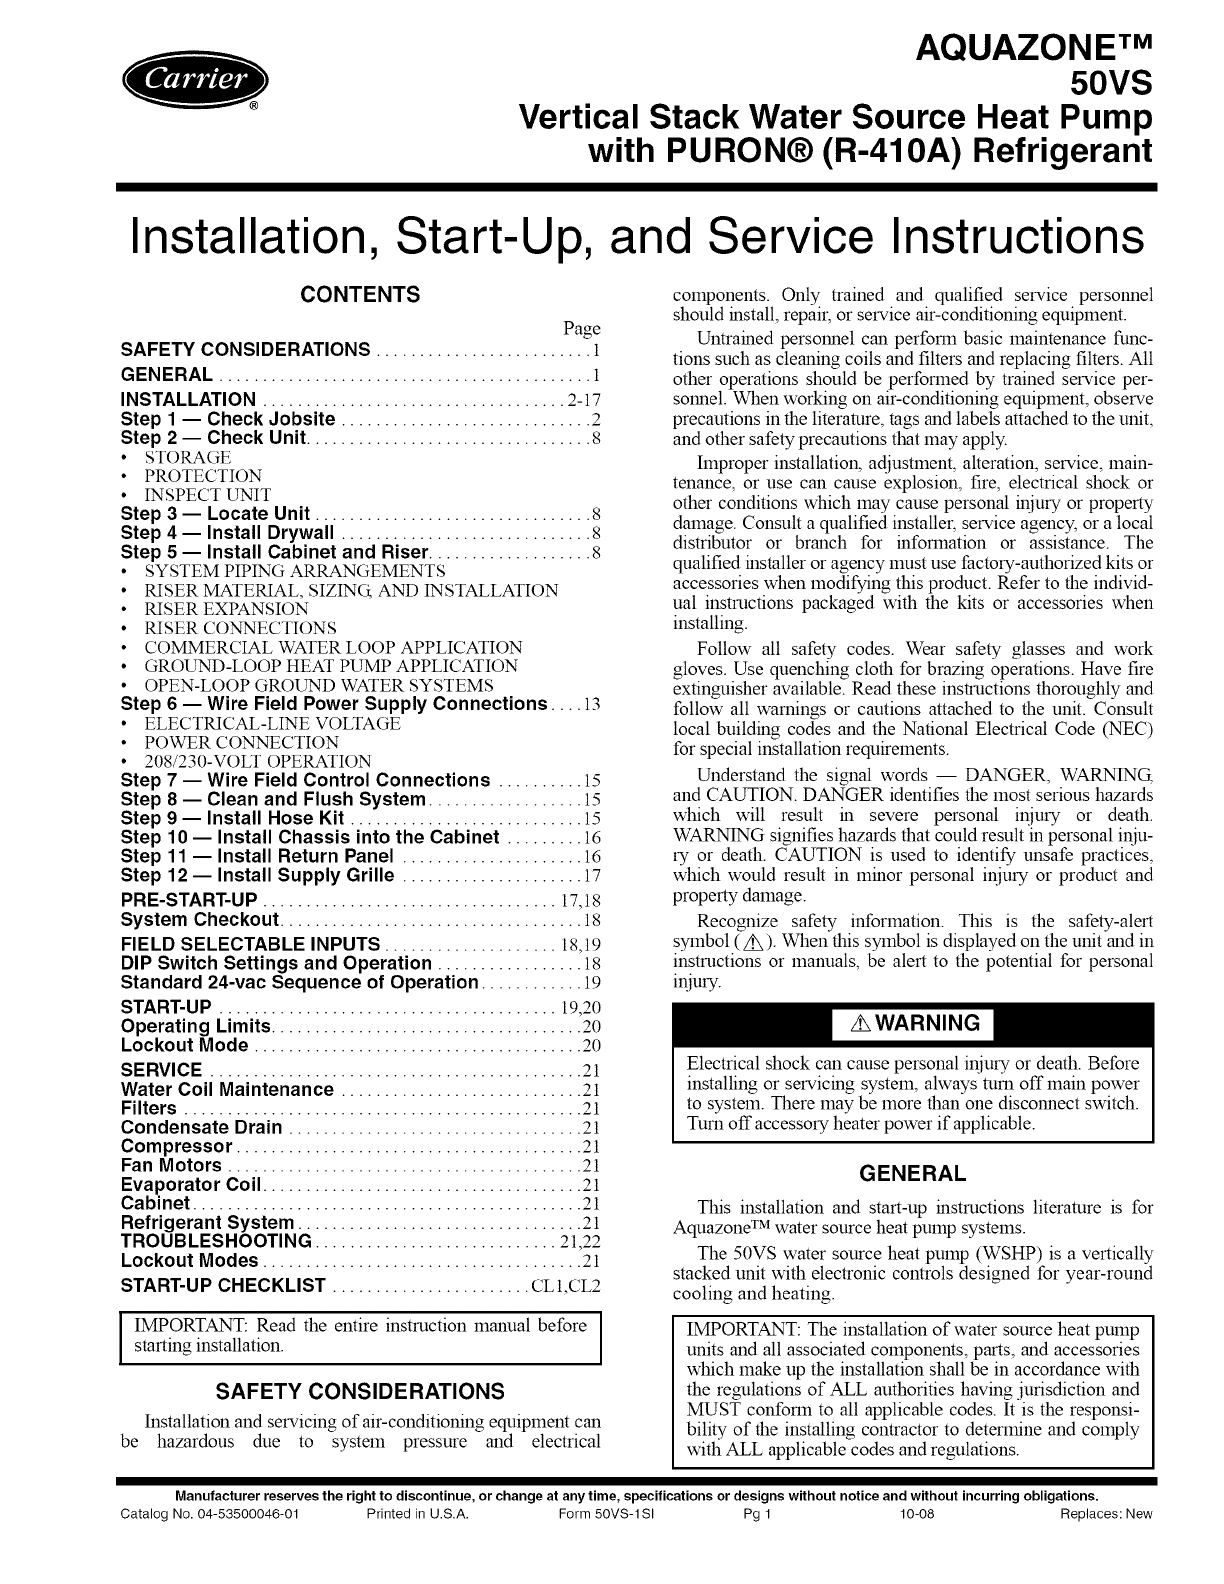
AQUAZONE TM
50VS
Vertical Stack Water Source Heat Pump
with PURON® (R-410A) Refrigerant
Installation, Start-Up, and Service Instructions
CONTENTS
Page
SAFETY CONSIDERATIONS ......................... 1
GENERAL ........................................... 1
INSTALLATION ................................... 2-17
Step 1 -- Check Jobsite ............................. 2
Step 2 -- Check Unit ................................. 8
• STORAGE
• PROTECTION
• INSPECT UNIT
Step 3-- Locate Unit ................................ 8
Step 4 -- Install Drywall ............................. 8
Step 5 -- Install Cabinet and Riser ................... 8
•SYSTEM PIPING ARRANGEMENTS
• RISER MATERIAL, SIZING AND INSTALLATION
• RISER EXPANSION
• RISER CONNECTIONS
• COMMERCIAL WATER LOOP APPLICATION
• GROUND-LOOP HEAT PUMP APPLICATION
• OPEN-LOOP GROUND WATER SYSTEMS
Step 6 -- Wire Field Power Supply Connections .... 13
• ELECTRICAL-LINE VOLTAGE
• POWER CONNECTION
• 208/230-VOLT OPERATION
Step 7-- Wire Field Control Connections .......... 15
Step 8-- Clean and Flush System .................. 15
Step 9 -- Install Hose Kit ........................... 15
Step 10- Install Chassis into the Cabinet ......... 16
Step 11 -- Install Return Panel ..................... 16
Step 12- Install Supply Grille ..................... 17
PRE-START-UP .................................. 17,18
System Checkout ................................... 18
FIELD SELECTABLE INPUTS .................... 18,19
DIP Switch Settings and Operation ................. 18
Standard 24-vac Sequence of Operation ............ 19
START-UP ....................................... 19,20
Operating Limits .................................... 20
Lockout Mode ...................................... 20
SERVICE ........................................... 21
Water Coil Maintenance ............................ 21
Filters .............................................. 21
Condensate Drain .................................. 21
Compressor ........................................ 21
Fan Motors ......................................... 21
Evaporator Coil ..................................... 21
Cabinet ............................................. 21
Refrigerant System ................................. 21
TROUBLESHOOTING ............................ 21,22
Lockout Modes ..................................... 21
START-UP CHECKLIST ....................... CL1,CL2
IMPORTANT: Read the entire instruction manual beforestarting installation.
SAFETY CONSIDERATIONS
Installation and servicing of air-conditioning equipment can
be hazardous due to system pressure and electrical
components. Only trained and qualified service personnel
should install, repair, or service air-conditioning equipment.
Untrained personnel can perform basic maintenance func-
tions such as cleaning coils and filters and replacing filters. All
other operations should be performed by trained service per-
sonnel. When working on air-conditioning equipment, observe
precautions in the literature, tags and labels attached to the unit,
and other safety precautions that may apply.
hnproper installation, adjustment, alteration, service, main-
tenance, or use can cause explosion, fire, electrical shock or
other conditions which may cause personal injury or property
damage. Consult a qualified installer, service agency, or a local
distributor or branch for information or assistance. The
qualified installer or agency must use factory-authorized kits or
accessories when modifying this product. Refer to the individ-
ual instructions packaged with the kits or accessories when
installing.
Follow all safety codes. Wear safety glasses and work
gloves. Use quenching cloth for brazing operations. Have fire
extinguisher available. Read these instructions thoroughly and
follow all warnings or cautions attached to the unit. Consult
local building codes and the National Electrical Code (NEC)
for special installation requirements.
Understand the signal words -- DANGER, WARNING,
and CAUTION. DANGER identifies the most serious hazards
which will result in severe personal injury or death.
WARNING signifies hazards that could result in personal inju-
ry or death. CAUTION is used to identify unsafe practices,
which would result in minor personal injury or product and
property damage.
Recognize safety information. This is the safety-alert
symbol (AX). When this symbol is displayed on the unit and in
instructions or manuals, be alert to the potential for personal
injury.
Electrical shock can cause personal injury or death. Before
installing or servicing system, always turn off main power
to system. There may be more than one disconnect switch.
Turn off accessory heater power if applicable.
GENERAL
This installation and start-up instructions literature is for
Aquazone TM water source heat pump systems.
The 50VS water source heat pump (WSHP) is a vertically
stacked unit with electronic controls designed for year-round
cooling and heating.
IMPORTANT: The installation of water source heat pump
units and all associated components, parts, and accessories
which make up the installation shall be in accordance with
the regulations of ALL authorities having jurisdiction and
MUST conform to all applicable codes. It is the responsi-
bility of the installing contractor to determine and comply
with ALL applicable codes and regulations.
Manufacturer reserves the right to discontinue, or change at any time, specifications or designs without notice and without incurring obligations.
Catalog No. 04-53500046-01 Printed in U.S.A. Form 50VS-1SI Pg 1 10-08 Replaces: New
INSTALLATION
Step 1ECheck Jobsite EInstallation, operation and
maintenance instructions are provided with each unit. Before
unit start-up, read all manuals and become familiar with the
unit and its operation. Thoroughly check out the system before
operation. Complete the inspections and instructions listed
below to prepare a unit for installation. See Table 1 for unit
physical data.
IMPORTANT: This equipment is designed for indoor
installation ONLY. Extreme variations in temperature,
humidity and corrosive water or air will adversely affect
the unit performance, reliability and service life.
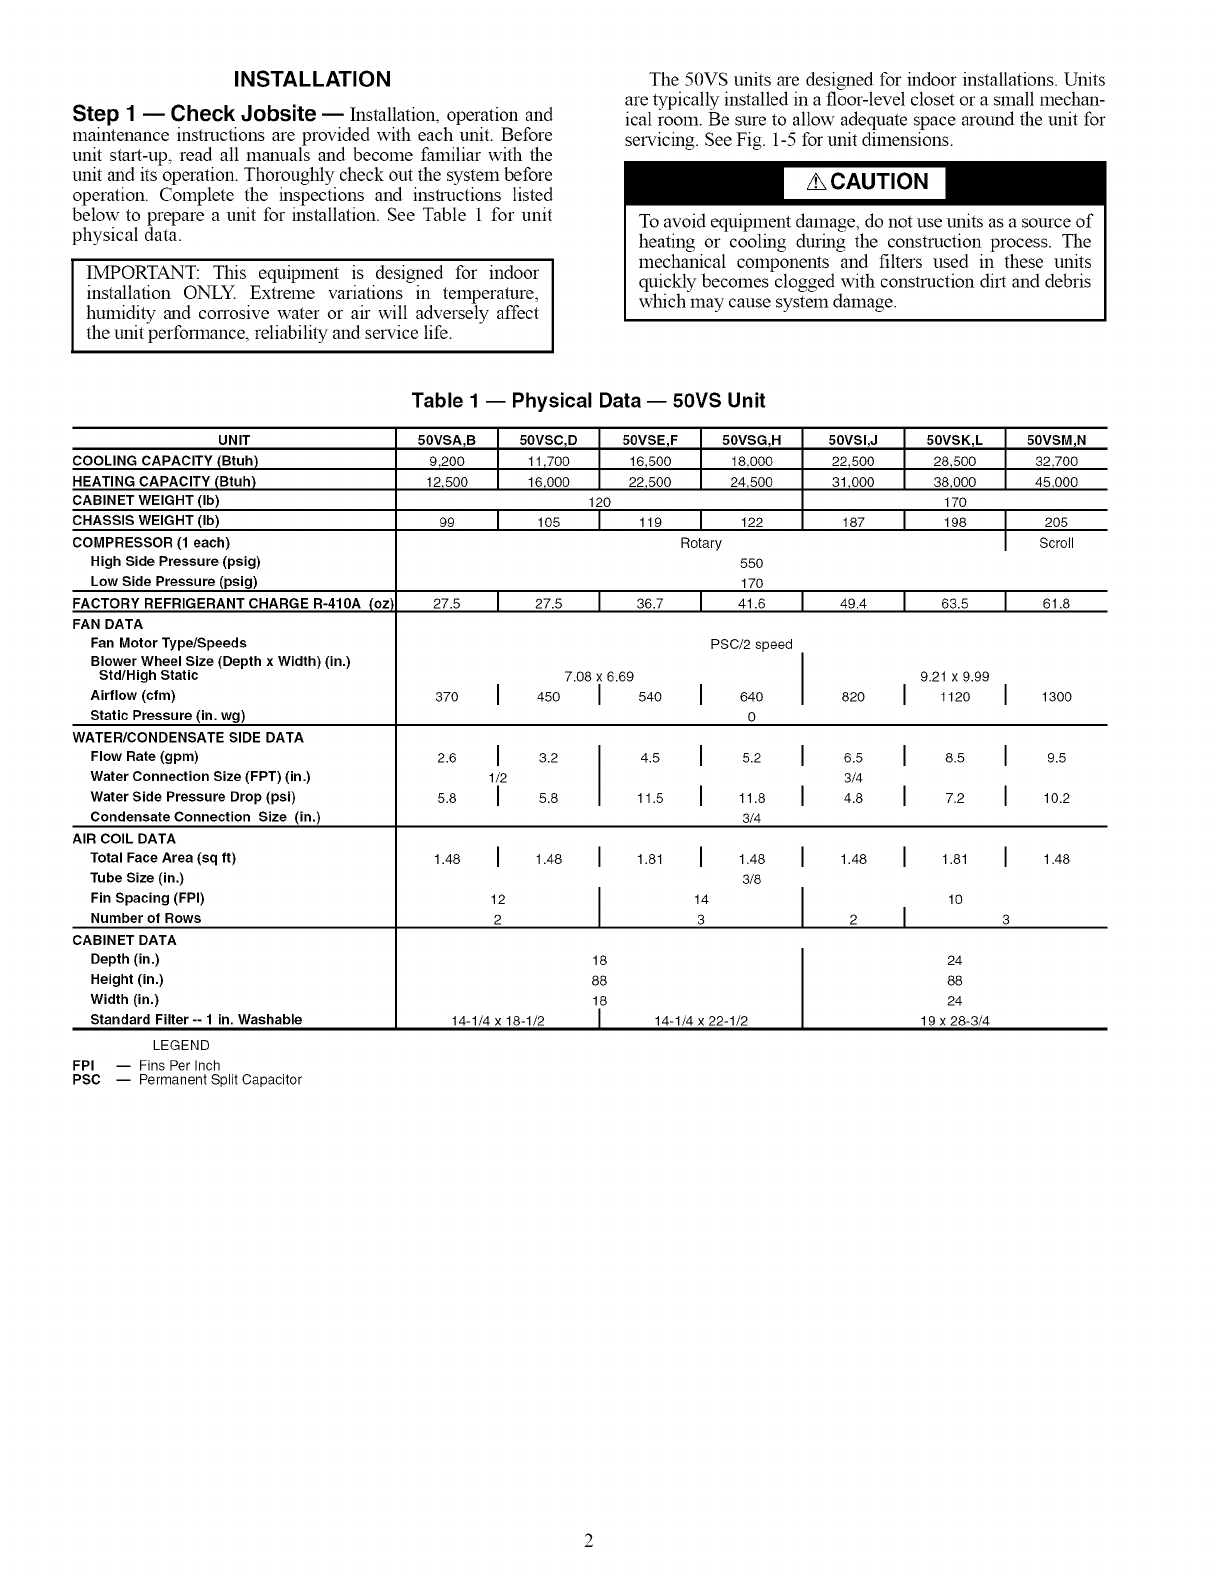
The 50VS units are designed for indoor installations. Units
are typically installed in a floor-level closet or a small mechan-
ical room. Be sure to allow adequate space around the unit for
servicing. See Fig. 1-5 for unit dimensions.
To avoid equipment damage, do not use units as a source of
heating or cooling during the construction process. The
mechanical components and filters used in these units
quickly becomes clogged with construction dirt and debris
which may cause system damage.
Table 1 -- Physical Data -- 50VS Unit
UNIT
COOLING CAPACITY (Btuh)
HEATING CAPACITY (Btuh)
CABINET WEIGHT (Ib)
CHASSIS WEIGHT (Ib)
COMPRESSOR (1 each)
High Side Pressure (psig)
Low Side Pressure (psig)
50VSA,B
9,200
12,500
50VSC,D
11,700
16,000
50VSE,F 50VSG,H
16,500 18,000
22,500 24,500
50VSI,J
22,500
31,000
50VSK,L
28,500
38,000
170
] 198
50VSM,N
32,700
45,000
FACTORY REFRIGERANT CHARGE R-410A (oz)
FAN DATA
Fan Motor Type/Speeds
Blower Wheel Size (Depth x Width) (in.)
Std/High Static
Airflow (cfm)
Static Pressure (in. wg)
WATER/CONDENSATE SIDE DATA
Flow Rate (gpm)
Water Connection Size (FPT) (in.)
Water Side Pressure Drop (psi)
Condensate Connection Size (in.)
120
99 I 105 I 119 I 122 187 205
Rotary Scroll
550
170
27.5 I27.5 I36.7 I41.6 I49.4 I63.5 I61.8
PSC/2 speed
540
4.5
11.5
640
0
5.2
11.8
3/4
820
6.5
3/4
4.8
AIR COIL DATA
Total Face Area (sq ft)
Tube Size (in.)
Fin Spacing (FPI)
Number of Rows
CABINET DATA
Depth (in.)
Height (in.)
Width (in.)
Standard Filter -- 1 in. Washable
LEGEND
FPI -- Fins Per Inch
PSC -- Permanent Split Capacitor
370 ] 450
2.6 ] 3.2
1/2
5.8 ] 5.8
1.48
12
2I
1.81
14
3
1.48
3/8
1.48
14-1/4 x 18-1/2
18
88
18
I14-1/4 x 22-1/2
7.08 6.69 9.21 x 9.99
1120
8.5
7.2
1.81
10
24
88
24
19 x 28-3/4
1.48
1300
9.5
10.2
1.48
2 1/2" _ 2 1/2"
0 0
o 0
WATER COIL
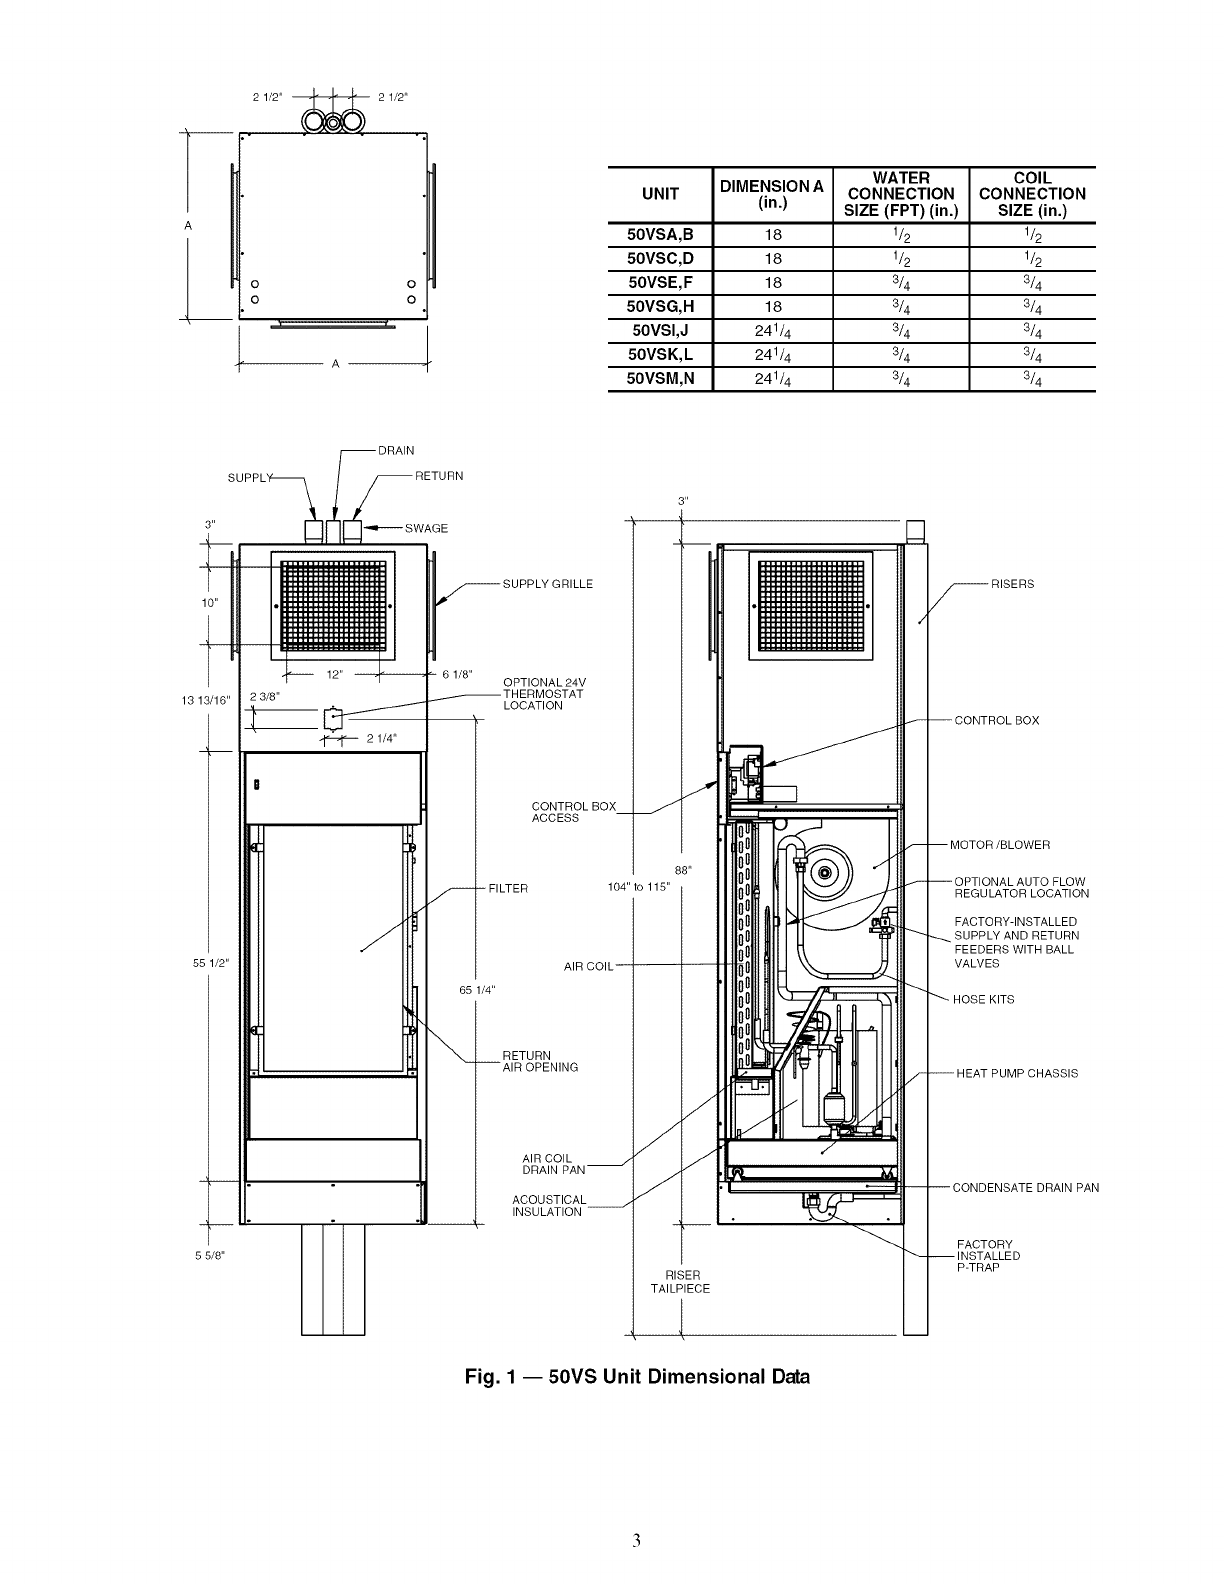
UNIT DIMENSION A CONNECTION CONNECTION
(in.) SIZE (FPT) (in.) SIZE (in.)
50VSA,B 1 8 1/2 1/2
50VSC,D 18 1/2 1/2
50VSE, F 18 3/4 3/4
50VSG,H 18 3/4 3/4
50VSI,J 241/4 3/4 3/4
50VS K, L 241/4 3/4 3/4
50VSM,N 241/4 3/4 3/4
13 13/16"
55 1/2"
-3--
5 5/8"
SWAG E
2 3/8"
21/4"
f
SUPPLY GRILLE
6 1/8" OPTIONAL 24V
THERMOSTAT
LOCATION
CONTROL BOX
ACCESS
' FILTER
65 1/4"
I
RETURN
AIR COIL
DRAIN
ACOUSTICAL
104" to 115"
RISER
TAILPIECE
Fig. 1-- 50VS Unit Dimensional Data
FLOW
REGULATOR LOCATION
FACTORY-INSTALLED
SUPPLY AND RETURN
FEEDERS WITH BALL
VALVES
HOSE KITS
PUMPCHASSIS
PAN
FACTORY
P-TRAP
5/8-in.
C
I
IL
I 2_in.
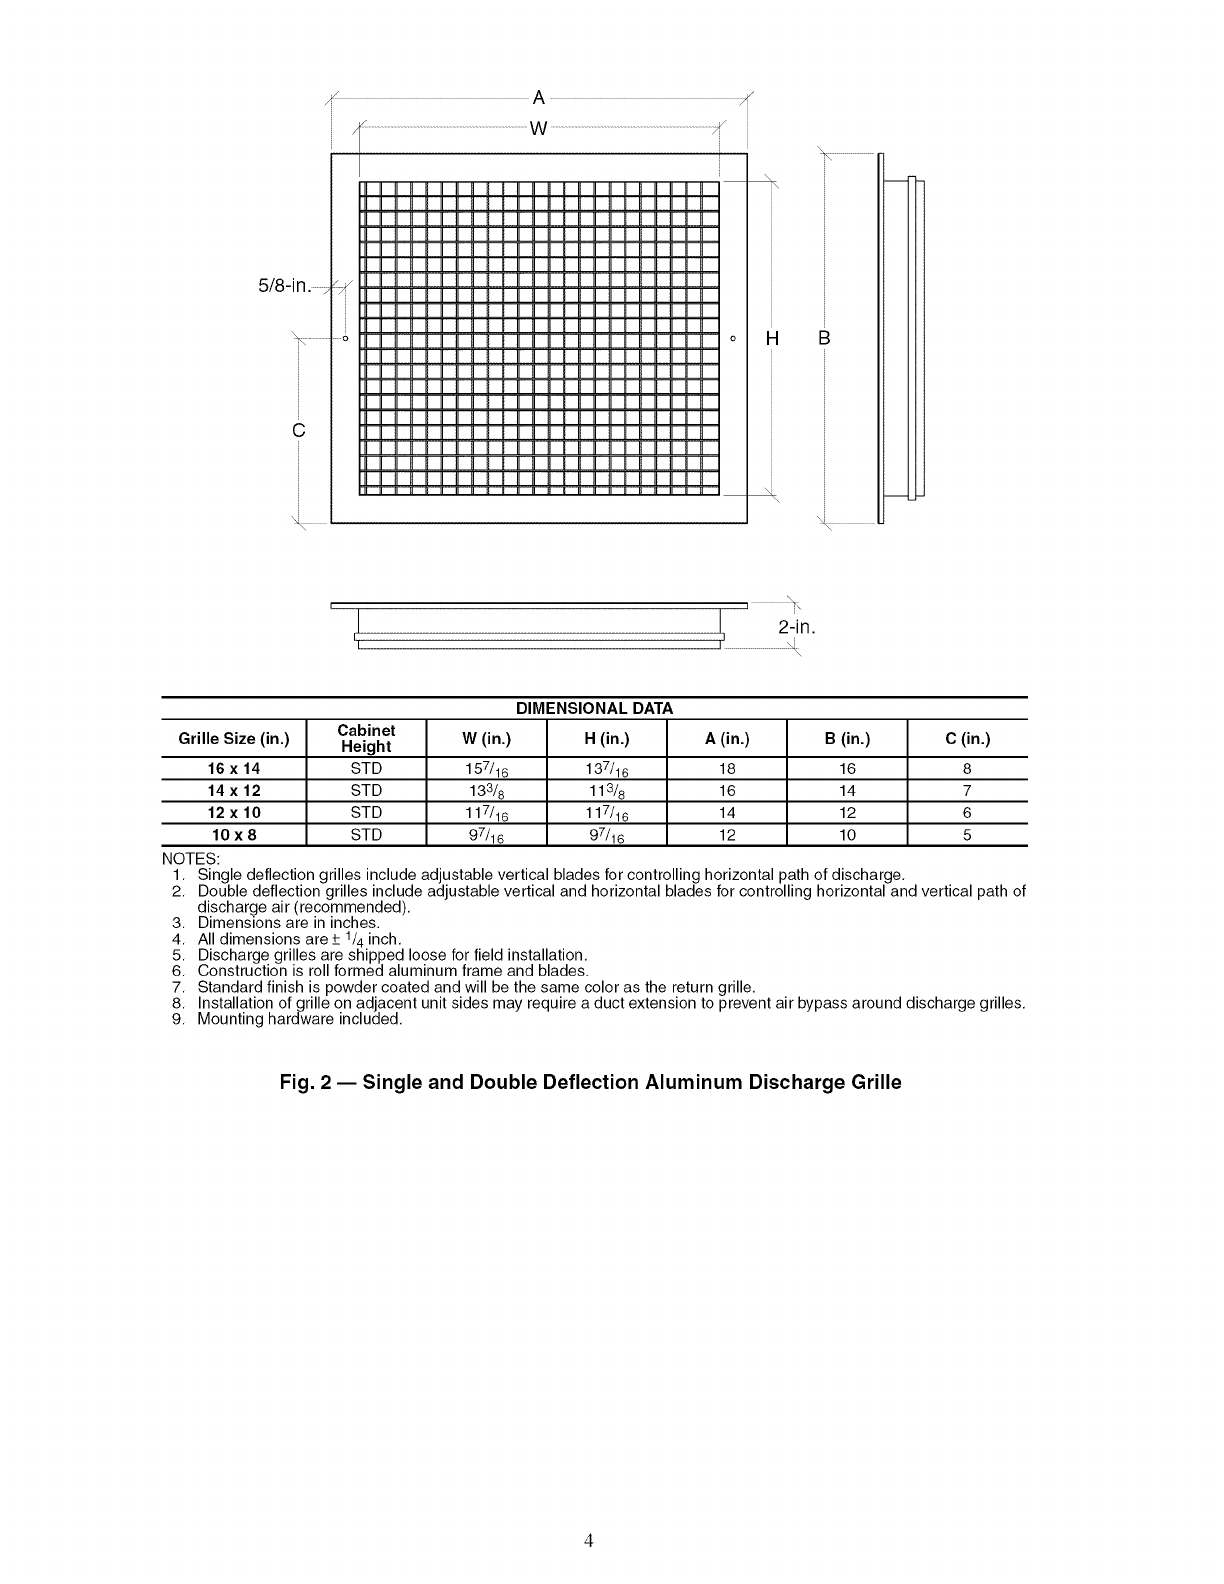
Grille Size (in.)
16 x 14
14 x 12
12 x 10
10x8
NOTES:
1.
2.
DIMENSIONAL DATA
Cabinet W (in.) H (in.) A (in.) B (in.) C (in.)
Height
STD 157/16 137/16 18 16 8
STD 133/8 113/8 16 14 7
STD 117/16 117/16 14 12 6
STD 97/16 97/16 12 10 5
Single deflection grilles include adjustable vertical blades for controlling horizontal path of discharge.
Double deflection grilles include adjustable vertical and horizontal blades for controlling horizontal and vertical path of
discharge air (recommended).
3. Dimensions are in inches.
4. All dimensions are 4- 1/4 inch.
5. Discharge grilles are shipped loose for field installation.
6. Construction is roll formed aluminum frame and blades.
7. Standard finish is powder coated and will be the same color as the return grille.
8. Installation of grille on adjacent unit sides may require a duct extension to prevent air bypass around discharge grilles.
9. Mounting hardware included.
Fig. 2 -- Single and Double Deflection Aluminum Discharge Grille
5/8"
C
1
--O
A
W
o
\
I
' I 1, r
l 3 1/8"
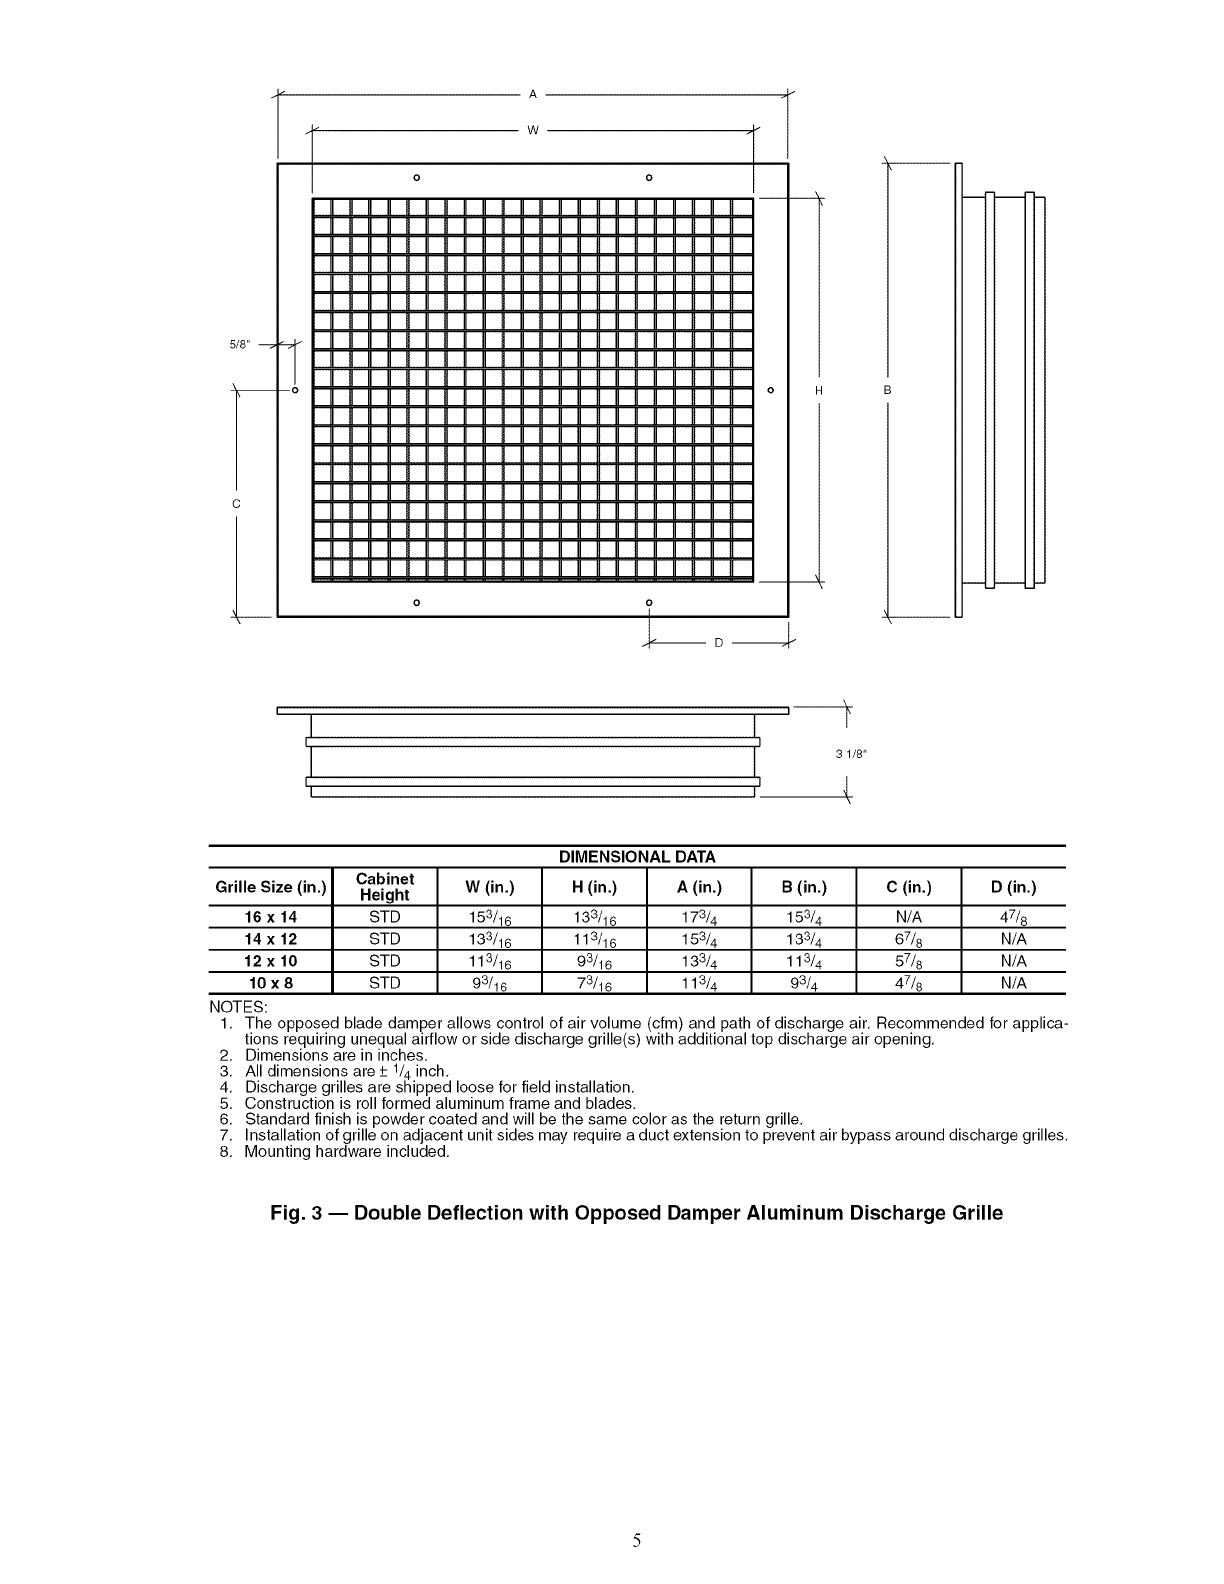
Grille Size (in.)
16 x 14
14 x 12
12 x 10
10x8
NOTES:
DIMENSIONAL DATA
Cabinet W (in.) H (in.) A (in.) B (in.) C (in.) D (in.)
Height
STD 153/16 133/16 173/4 153/4 N/A 47/8
STD 133/16 113/16 153/4 133/4 67/8 N/A
STD 113/16 93/16 133/4 113/4 57/8 N/A
STD 93/16 73/16 113/4 93/4 47/8 N/A
1. The opposed blade damper allows control of air volume (cfm) and path of discharge air. Recommended for applica-
tions requiring unequal airflow or side discharge grille(s) with additional top discharge air opening.
2. Dimensions are in inches.
3. All dimensions are 4- 1/4 inch.
4. Discharge grilles are shipped loose for field installation.
5. Construction is roll formed aluminum frame and blades.
6. Standard finish is powder coated and will be the same color as the return grille.
7. Installation of grille on adjacent unit sides may require a duct extension to prevent air bypass around discharge grilles.
8. Mounting hardware included.
Fig. 3 -- Double Deflection with Opposed Damper Aluminum Discharge Grille
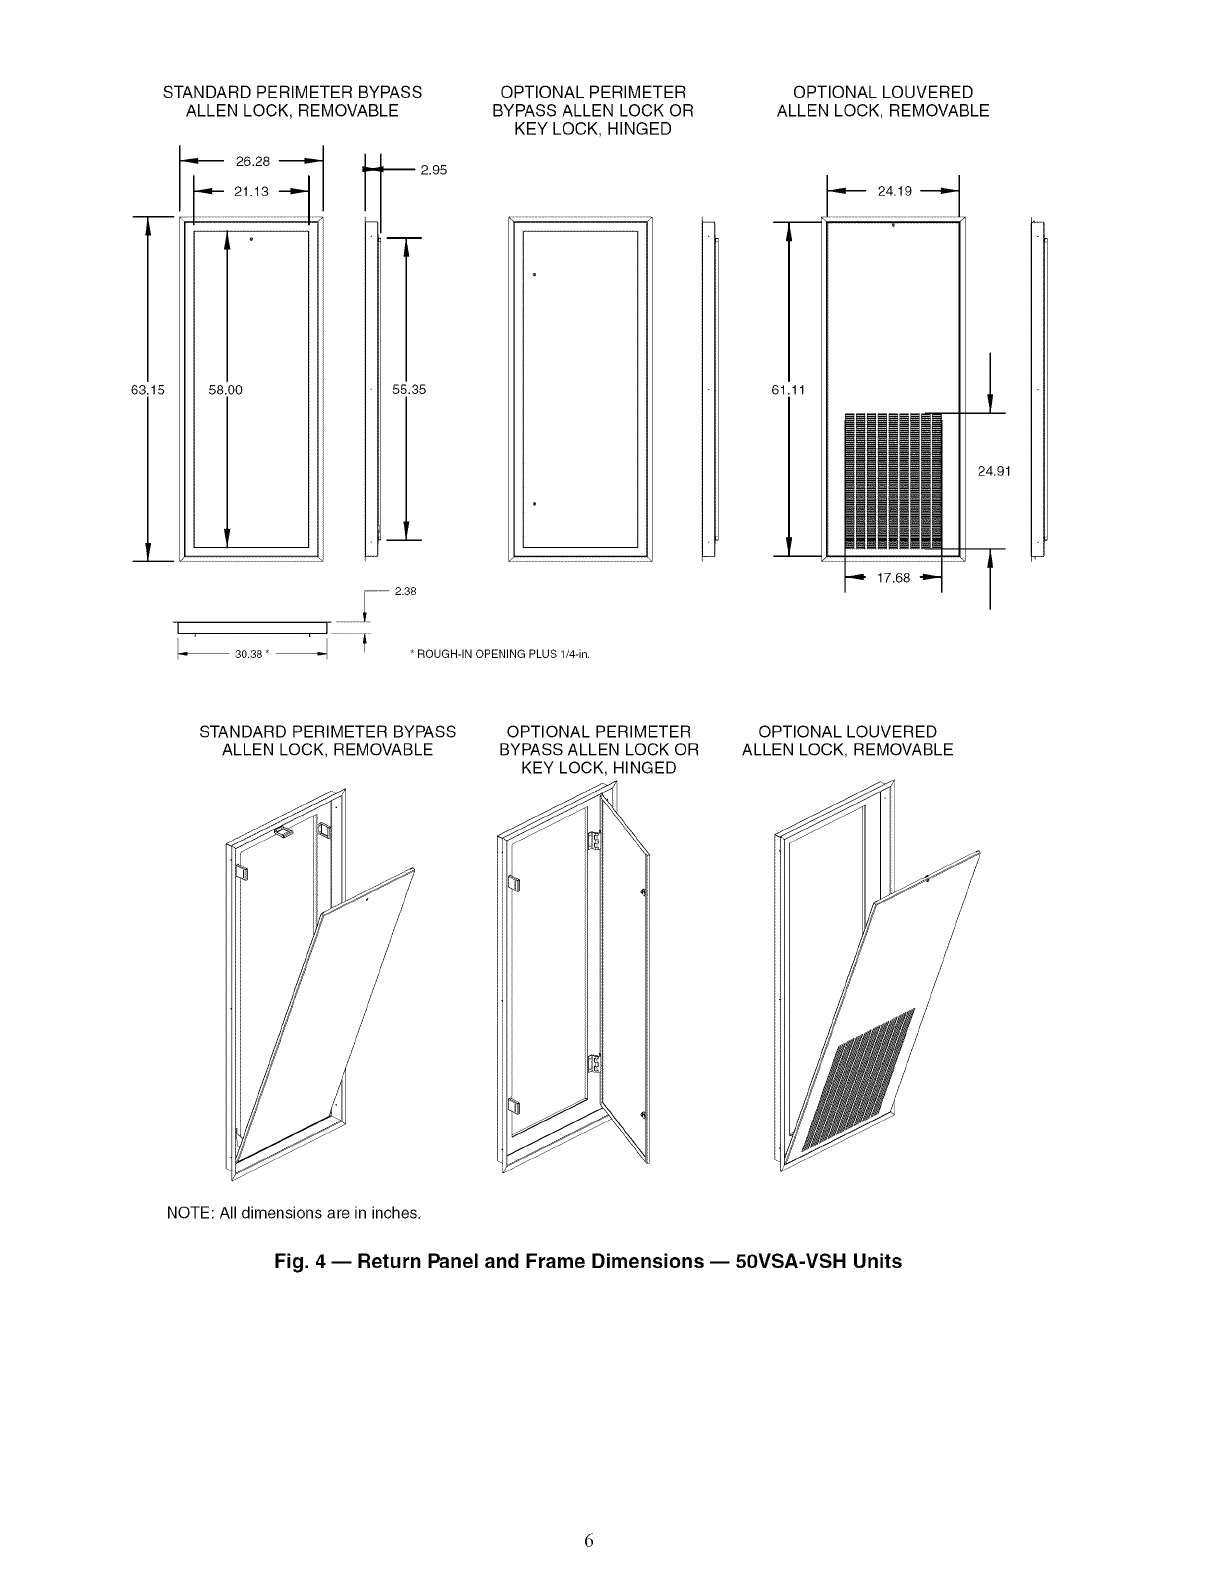
STANDARD PERIMETER BYPASS OPTIONAL LOUVERED
ALLEN LOCK, REMOVABLE ALLEN LOCK, REMOVABLE
26.28
21.13
L
63.15 58.00
r
-- 2.95
mB
55L.35
'r
OPTIONAL PERIMETER
BYPASS ALLEN LOCK OR
KEY LOCK, HINGED
2.38
,].......................................
30.38* ' _ *ROUGH-IN OPENING PLUS 1/4-in.
24.19
i
61 1
17.68
STANDARD PERIMETER BYPASS
ALLEN LOCK, REMOVABLE
OPTIONAL PERIMETER
BYPASS ALLEN LOCK OR
KEY LOCK, HINGED
OPTIONAL LOUVERED
ALLEN LOCK, REMOVABLE
NOTE: All dimensions are in inches.
Fig. 4 -- Return Panel and Frame Dimensions -- 50VSA-VSH Units

STANDARD PERIMETER BYPASS OPTIONAL LOUVERED
ALLEN LOCK, REMOVABLE ALLEN LOCK, REMOVABLE
63.90
32.28
27.13
58.75
2.95
OPTIONAL PERIMETER
BYPASS ALLEN LOCK OR
KEY LOCK, HINGED
,2438.
-- 2.38
* ROUGH-IN OPENING PLUS 1/4-in.
61.86
r
30.19
19.68
|
24.91
m
|
STANDARD PERIMETER BYPASS
ALLEN LOCK, REMOVABLE
OPTIONAL PERIMETER
BYPASS ALLEN LOCK OR
KEY LOCK, HINGED
OPTIONAL LOUVERED
ALLEN LOCK, REMOVABLE
NOTE: All dimensions are in inches,
Fig. 5 -- Return Panel and Frame Dimensions -- 50VSI-VSN Units
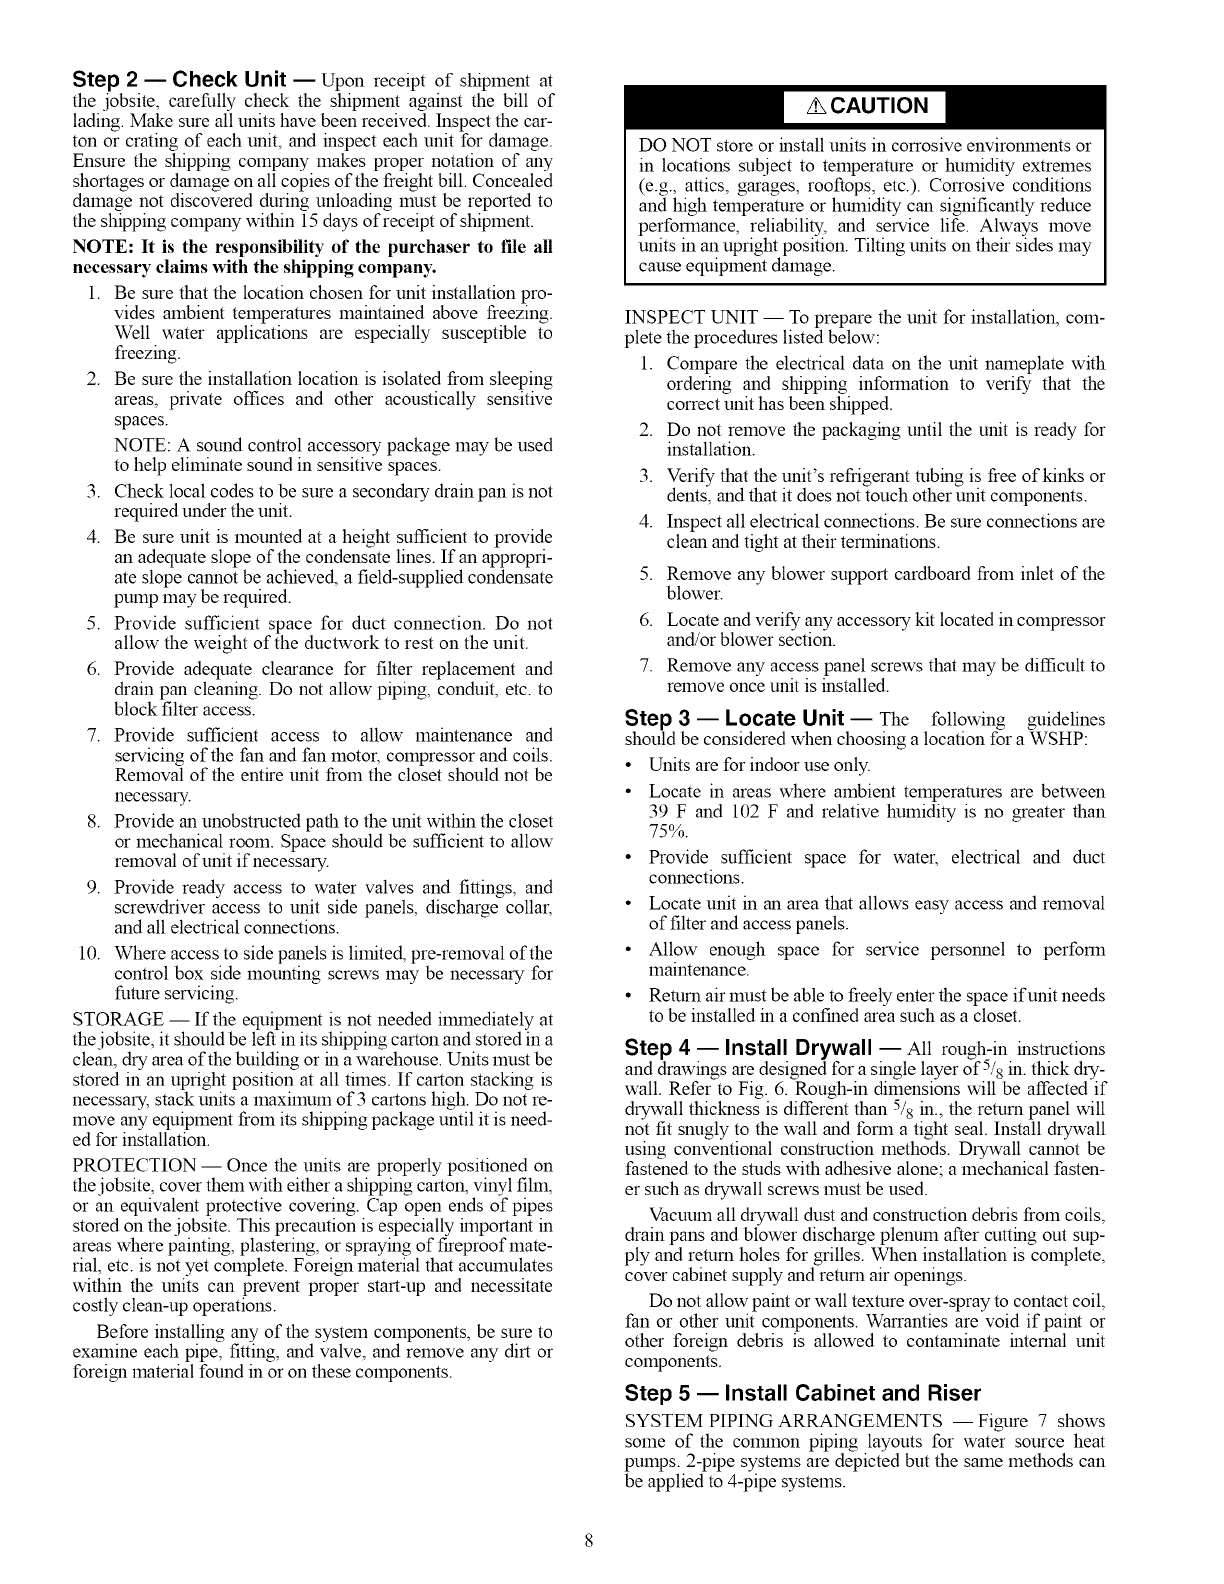
Step 2-- Check Unit -- Upon receipt of shipment at
the jobsite, carefully check the shipment against the bill of
lading. Make sure all units have been received. Inspect the car-
ton or crating of each unit, and inspect each unit for damage.
Ensure the shipping company makes proper notation of any
shortages or damage on all copies of the freight bill. Concealed
damage not discovered during unloading must be reported to
the shipping company within 15 days of receipt of shipment.
NOTE: It is the responsibility of the purchaser to file all
necessary claims with the shipping company.
1. Be sure that the location chosen for unit installation pro-
vides ambient temperatures maintained above freezing.
Well water applications are especially susceptible to
freezing.
2. Be sure the installation location is isolated from sleeping
areas, private offices and other acoustically sensitive
spaces.
NOTE: A sound control accessory package may be used
to help eliminate sound in sensitive spaces.
3. Check local codes to be sure a secondary drain pan is not
required under the unit.
4. Be sure unit is mounted at a height sufficient to provide
an adequate slope of the condensate lines. If an appropri-
ate slope cannot be achieved, a field-supplied condensate
pump may be required.
5. Provide sufficient space for duct connection. Do not
allow the weight of the ductwork to rest on the unit.
6. Provide adequate clearance for filter replacement and
drain pan cleaning. Do not allow piping, conduit, etc. to
block filter access.
7. Provide sufficient access to allow maintenance and
servicing of the fan and fan motor, compressor and coils.
Removal of the entire unit from the closet should not be
necessary.
8. Provide an unobstructed path to the unit within the closet
or mechanical room. Space should be sufficient to allow
removal of unit if necessary.
9. Provide ready access to water valves and fittings, and
screwdriver access to unit side panels, discharge collar,
and all electrical connections.
10. Where access to side panels is limited, pre-removal of the
control box side mounting screws may be necessary for
future servicing.
STORAGE -- If the equipment is not needed ilmnediately at
the jobsite, it should be left in its shipping carton and stored in a
clean, dry area of the building or in a warehouse. Units must be
stored in an upright position at all times. If carton stacking is
necessary, stack units a maximum of 3 cartons high. Do not re-
move any equipment from its shipping package until it is need-
ed for installation.
PROTECTION -- Once the units are properly positioned on
the jobsite, cover them with either a shipping carton, vinyl fihn,
or an equivalent protective covering. Cap open ends of pipes
stored on the jobsite. This precaution is especially flnportant in
areas where painting, plastering, or spraying of fireproof lnate-
rial, etc. is not yet complete. Foreign material that accumulates
within the units can prevent proper start-up and necessitate
costly clean-up operations.
Before installing any of the system components, be sure to
examine each pipe, fitting, and valve, and remove any dirt or
foreign material found in or on these components.
DO NOT store or install units in corrosive enviromnents or
in locations subject to temperature or humidity extremes
(e.g., attics, garages, rooftops, etc.). Corrosive conditions
and high temperature or humidity can significantly reduce
performance, reliability, and service life. Always move
units in an upright position. Tilting units on their sides may
cause equipment damage.
INSPECT UNIT -- To prepare the unit for installation, com-
plete the procedures listed below:
1. Compare the electrical data on the unit nameplate with
ordering and shipping information to verify that the
correct unit has been shipped.
Do not remove the packaging until the unit is ready for
installation.
2.
3.
4.
5.
6.
7.
Verify that the unit's refrigerant robing is free of kinks or
dents, and that it does not touch other unit components.
Inspect all electrical connections. Be sure connections are
clean and tight at their terminations.
Remove any blower support cardboard from inlet of the
blower.
Locate and verify any accessory kit located in compressor
and/or blower section.
Remove any access panel screws that may be difficult to
remove once unit is installed.
Step 3_Locate Unit _ The following guidelines
should be considered when choosing a location for a WSHP:
•Units are for indoor use only.
• Locate in areas where ambient temperatures are between
39 F and 102 F and relative humidity is no greater than
75%.
Provide sufficient space for water, electrical and duct
connections.
Locate unit in an area that allows easy access and removal
of filter and access panels.
Allow enough space for service personnel to perform
maintenance.
Return air must be able to freely enter the space if unit needs
to be installed in a confined area such as a closet.
Step 4_Install Drywall _All rough-in instructions
ar 5
and drawings e designed for a single layer of /s in- thick dry-
wall. Refer to Fig. 6. Rough-in dimensions will be affected if
drywall thickness is different than 5/8 in., the return panel will
not fit snugly to the wall and form a tight seal. Install drywall
using conventional construction methods. Drywall cannot be
fastened to the studs with adhesive alone; a mechanical fasten-
er such as drywall screws must be used.
Vacuum all drywall dust and construction debris from coils,
drain pans and blower discharge plenum after cutting out sup-
ply and return holes for grilles. When installation is complete,
cover cabinet supply and return air openings.
Do not allow paint or wall texture over-spray to contact coil,
fan or other unit components. Warranties are void if paint or
other foreign debris is allowed to contaminate internal unit
components.
Step 5-- Install Cabinet and Riser
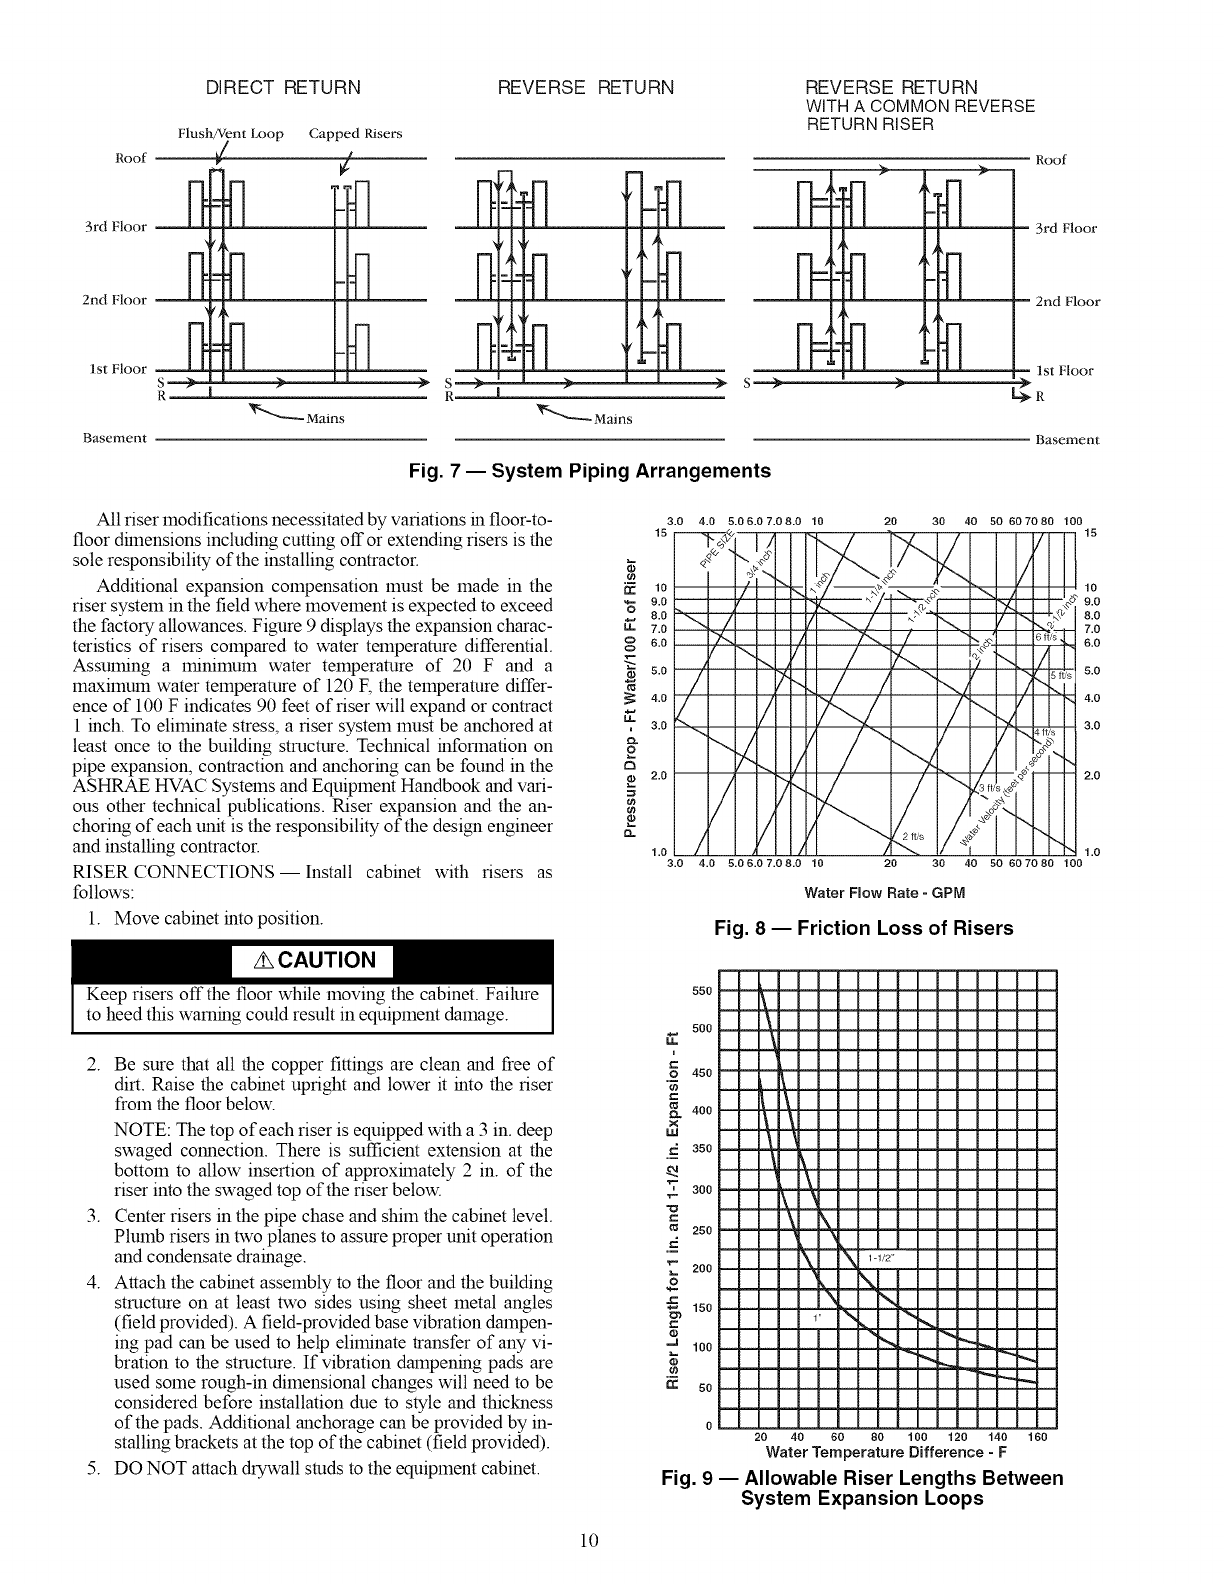
SYSTEM PIPING ARRANGEMENTS -- Figure 7 shows
some of the colmnon piping layouts for water source heat
pumps. 2-pipe systems are depicted but the same methods can
be applied to 4-pipe systems.
The direct return system shows the most common piping ar-
rangement. This is the most cost effective method of piping to
install since the water is supplied and returned to a riser column
at the same place, at the bottom or top of the building. Howev-
er, this type of system requires more effort to individually bal-
ance water flow to the units. The risers are normally capped at
the ends opposite the main supply and return piping and may
require a field-installed flush and vent loop.
The first reverse return system shows a system, which is
commonly used to minimize individual unit water flow balanc-
ing and is often referred to as "self balancing." This riser ar-
rangement has a natural affinity to balance the flow to each unit
in the riser column. However, individual unit balancing may
still be required. This piping system is used on 2-pipe systems
only and has an individual return for each riser column.
The second reverse return system shows a system with a
common reverse return riser installed separately from the
individual unit riser columns. This riser arrangement allows for
more flexibility in individual unit riser sizing but has the same
general characteristics as the "reverse return" system described
above. It may also be a better fit for the particular structural and
architectural requirements of the building. This piping system
may also be used on 4-pipe systems.
Regardless of the system selected, optimum performance
can only be achieved through adjustlnent to the recommended
water flow at each individual unit (see Table 1 for individual
unit water flow requirements).
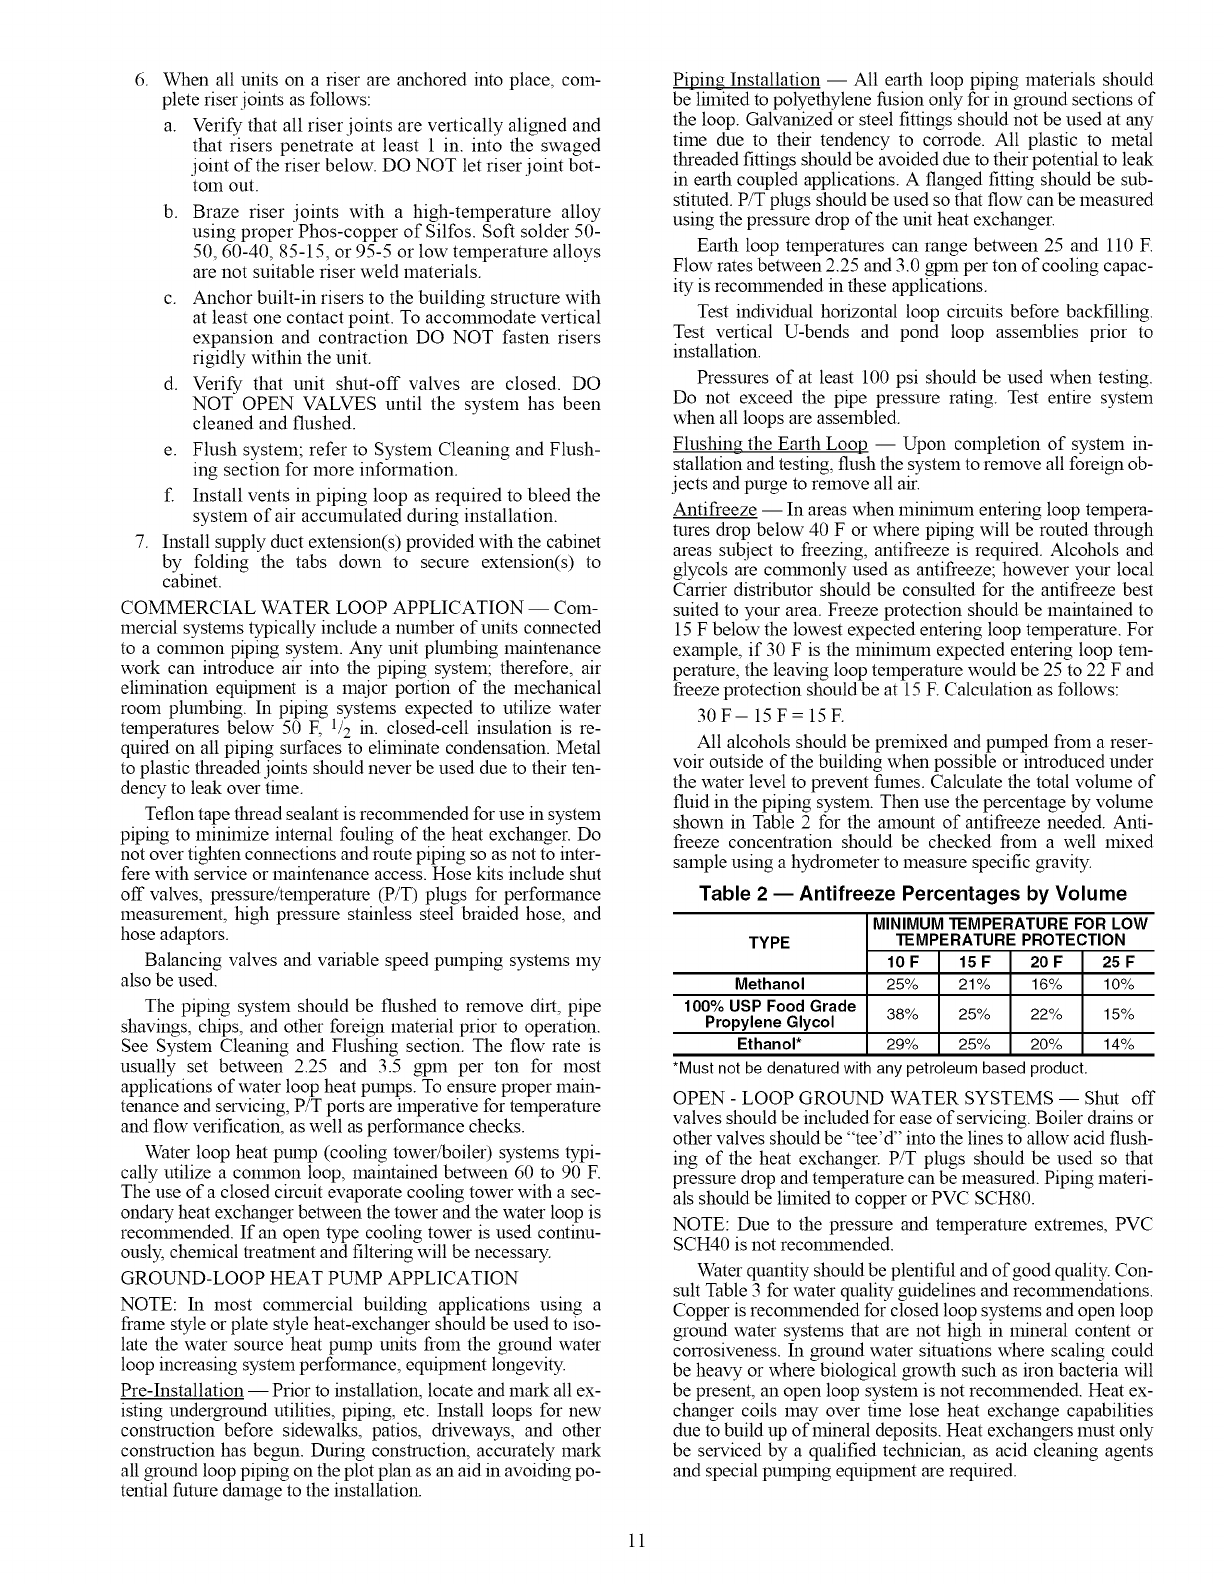
RISER MATERIAL, SIZING, AND INSULATION --
Some of the factors affecting riser application and sizing are
noise, tube erosion and economics. Water source heat pumps
maybe supplied with factory-installed risers; the riser material,
diameter, length and insulation thickness must be determined
for each unit based on its positioning within the building.
Figure 8 displays riser robe diameter sizes as a function of flow
(gpm), friction loss and water velocity. For maxilnum riser
velocity on pressure drop per 100 ft, refer to ASHRAE (Amer-
ican Society of Heating, Refrigeration, and Air Conditioning
Engineers) Fundamentals Handbook for Riser Sizing. Gener-
ally, riser copper type, size, length and insulation thickness are
determined by the location of the water source heat pump unit
in the building. Chilled water and hot water risers are available
in Type-M, Type-L copper, varying diameters from 3/4 to
21/2 in., and with either no insulation, 1/2 or 3/4 in. thick closed
cell foam insulation. Condensate risers are available in Type-M
copper, varying diameters from 3/4 to 11/4 in., and with no
insulation, 1/2 or 3/4 in. thick closed cell foam insulation. All
factory-supplied risers and riser extensions are insulated for the
full length of the riser, eliminating the need for field insulation.
Insulation is not required on loop water piping except where
the piping runs through unheated areas, outside the building or
when the loop water temperature is below the minimum
expected dew point of the pipe ambient conditions. Insulation
is required if loop water temperature drops below the dew
point (insulation is required for the ground loop applications in
most clilnates).
Riser sizing is generally based on the water flow require-
ments of each unit and the units on higher and lower floors that
tie into the same riser column depending on the piping system
chosen. Water piping is often designed at approximately 5 ft/s.
Keeping this in mind, risers can be reduced in size as the water
flow decreases froln floor to floor. For low-rise buildings, riser
sizes can be of a single diameter.
The reduced material handling on site will often offset the
extra costs associated with the larger risers.
RISER EXPANSION- Generally, in medium to high-rise
buildings, allowances must be made for pipe expansion. In ap-
plications supplemented with factory (or field) supplied be-
tween the floor riser extensions, assemble and install exten-
sions before installing cabinet.
NOTE: Riser assemblies are designed to accommodate a
maximum of 11/8 in. expansion and contraction up to a total
movement of 21/4 inches. If the total calculated rise expansion
exceeds 21/4 in., expansion devices must be used (field
provided).
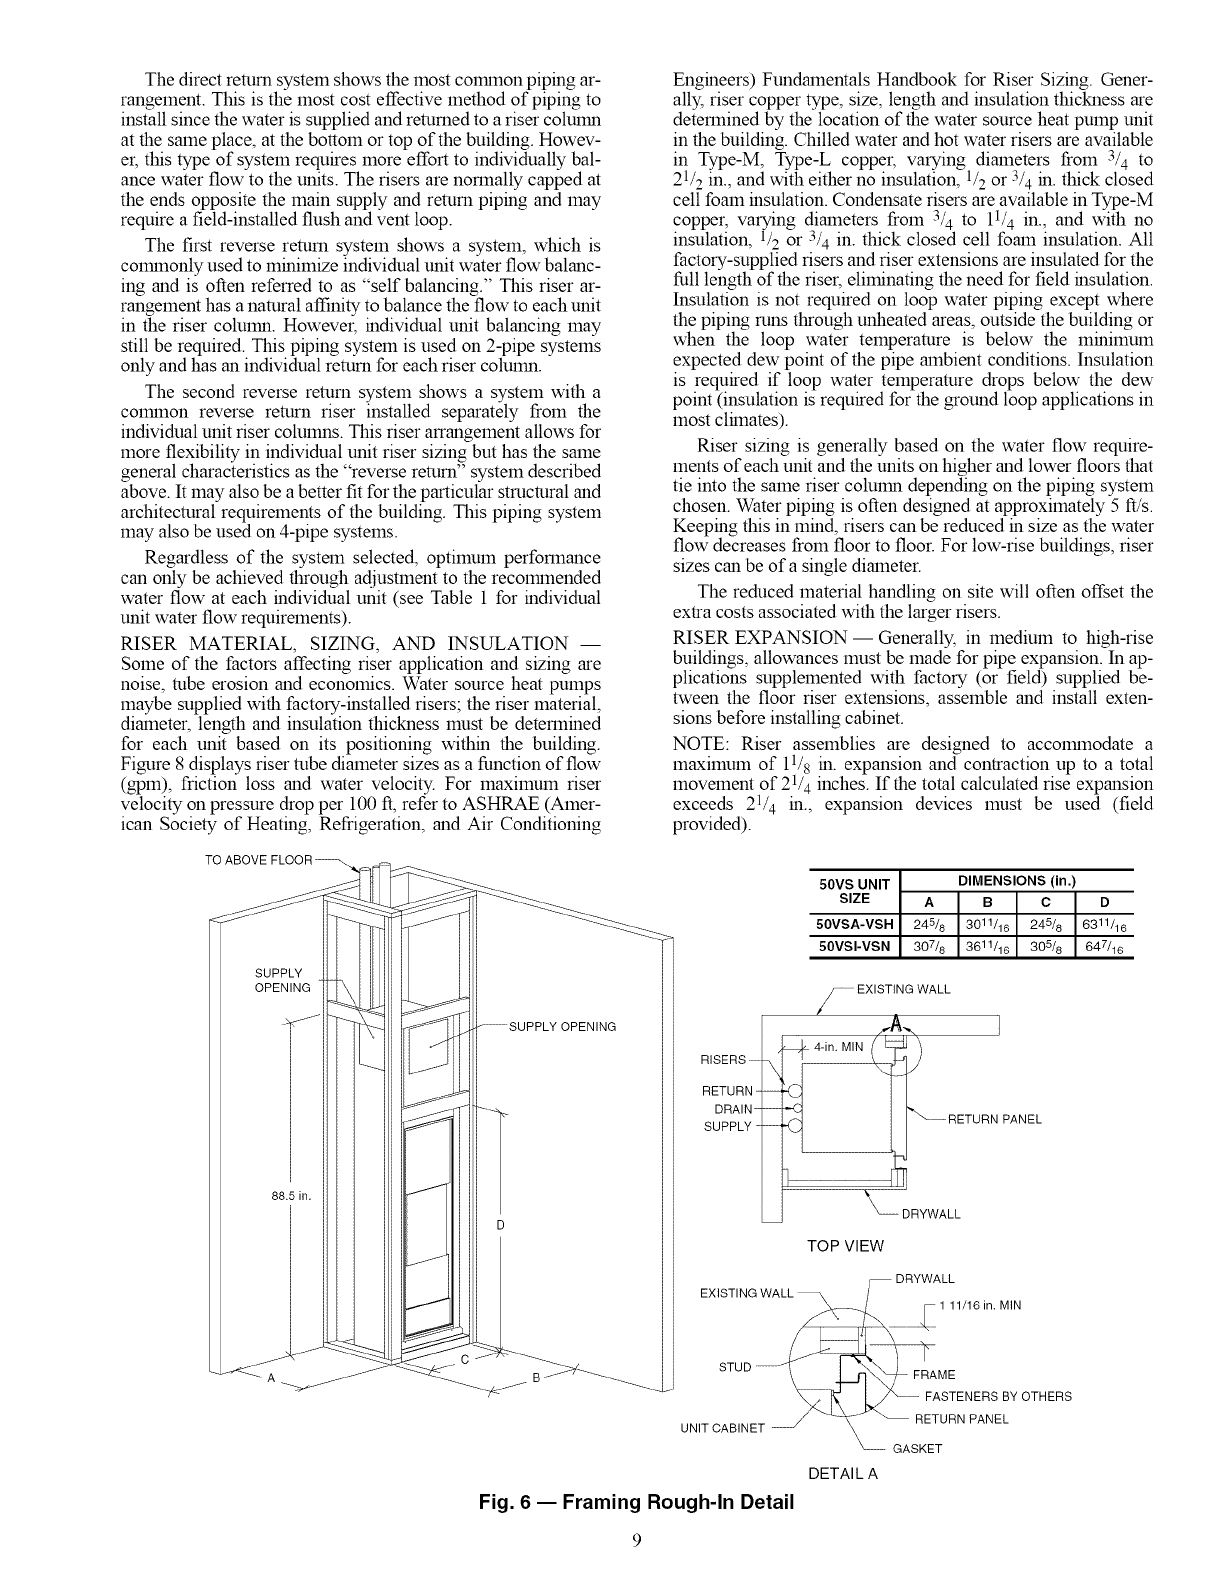
RISERS --
RETURN-
DRAIN-
SUPPLY-
50VS UNIT DIMENSIONS (in.)
SIZE A B CD
50VSA-VSH 245/8 3011/16 245/8 6311/16
50VSI-VSN 307/8 3611/16 305/8 647/18
EXISTING WALL
fA_
__ \RETURN PANEL
\\_ DRYWALL
TOP VIEW
DRYWALL
EXISTING WALL _ /1 11/16in. MIN
STUD _4__.f] _ FRAME
"_[_ j_\ FASTENERS BY OTHERS
UNIT CABINET _ _ _ RETGAsKETURNPANEL
DETAILA
Fig. 6-- Framing Rough-In Detail
Roof
3rd Floor
2nd Floor
I st Floor
Basement
DIRECT RETURN REVERSE RETURN
Flush/Vent Loop Capped Risers
!¢
R--
Mains
R 1
Mains
REVERSE RETURN
WiTH A COMMON REVERSE
RETURN RISER
s===e, . >
k
m
Roof
•4 I
1I -3rd Floor
=1 i
=i i
2rid Floor
=! |
-1 i
• • -- 1st Floor
tgR
Basement
Fig. 7 -- System Piping Arrangements
All riser modifications necessitated by variations in flooPto-
floor dimensions including cutting off or extending risers is the
sole responsibility of the installing contractor.
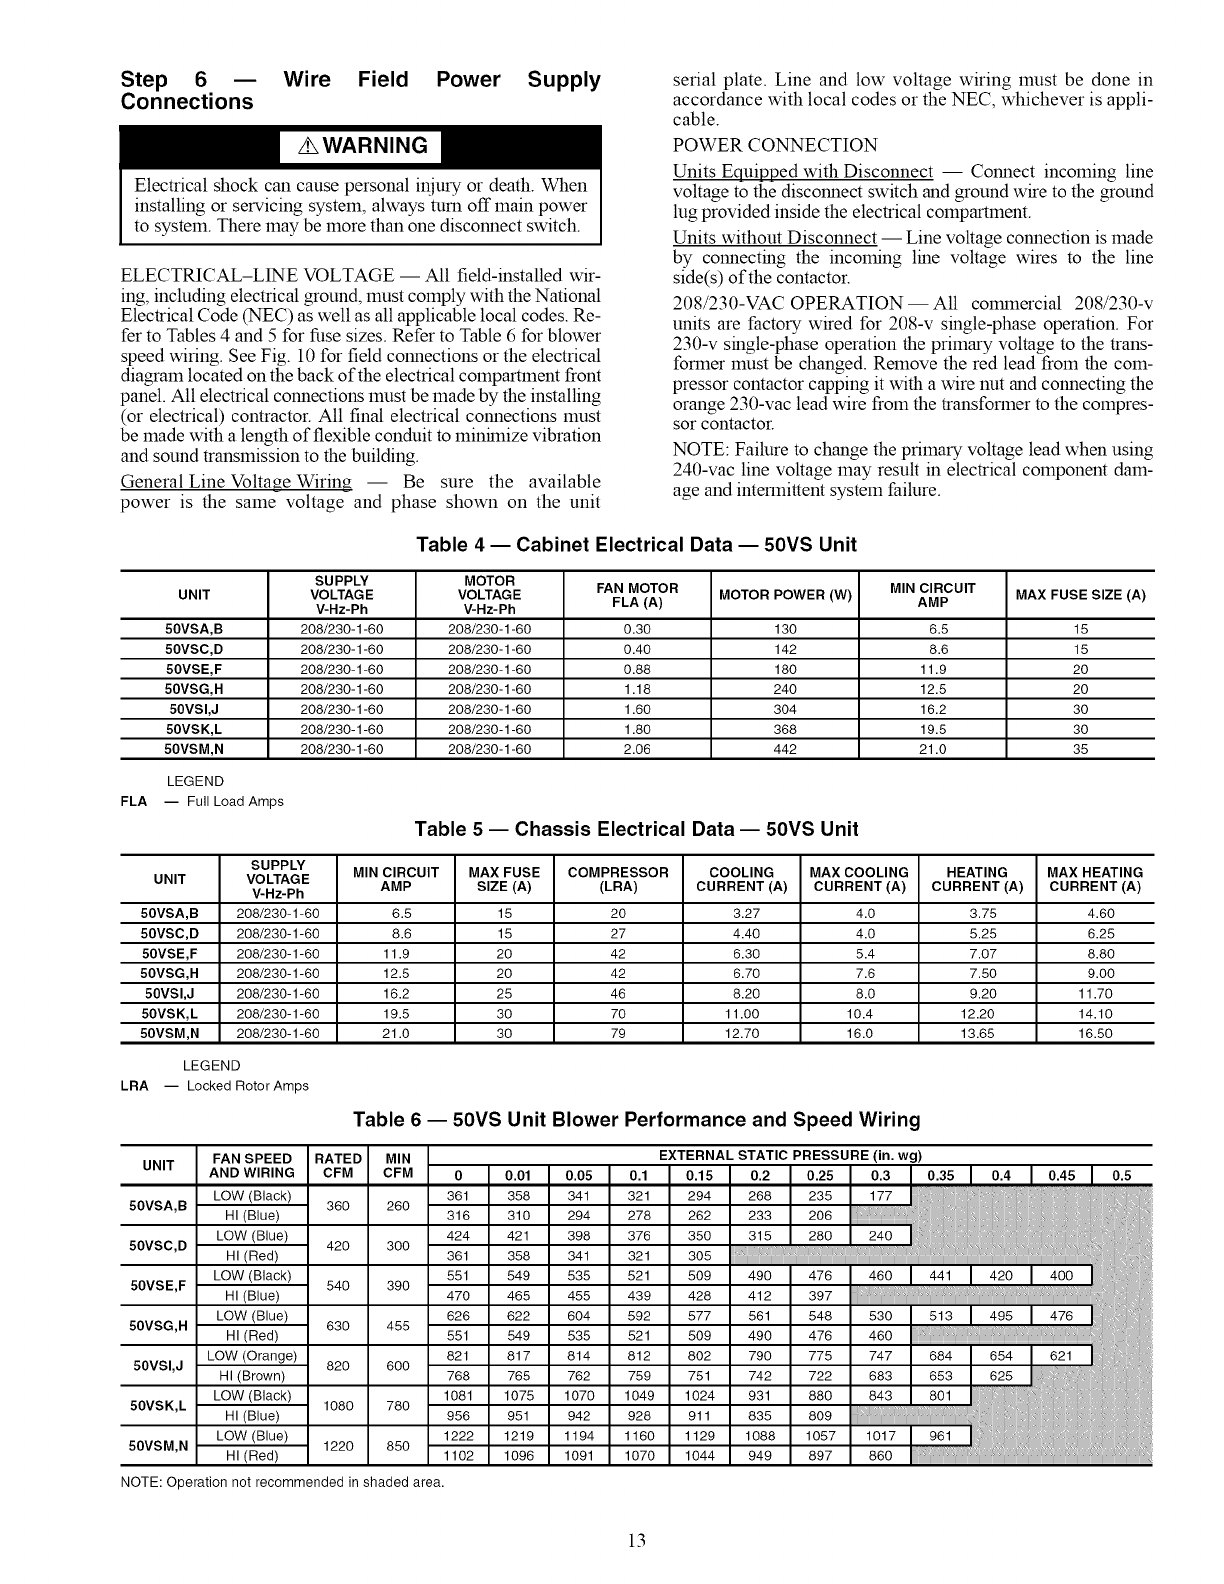
Additional expansion compensation must be made in the
riser system in the field where movement is expected to exceed
the factory allowances. Figure 9 displays the expansion charac-
teristics of risers compared to water temperature differential.
Assuming a lninimum water temperature of 20 F and a
maxilnum water temperature of 120 K the temperature differ-
ence of 100 F indicates 90 feet of riser will expand or contract
1 inch. To eliminate stress, a riser system must be anchored at
least once to the building structure. Technical information on
pipe expansion, contraction and anchoring can be found in the
ASHRAE HVAC Systems and Equipment Handbook and vari-
ous other technical publications. Riser expansion and the an-
choring of each unit is the responsibility of the design engineer
and installing contractor.
RISER CONNECTIONS- Install cabinet with risers as
follows:
1. Move cabinet into position.
_E
"5
ft.
g
T-
ez
£
t_
=
O..
3.0 4.0 5.06.07.08.0 10
1o
9.0
8.0
7.0
6.o
5.0
4.0
3.0
2.0
1.o 3.0
20 30 40 50 607080 100
1 I I /I I',...,_ _ _, 1o
ii "- 8o
1 6"s 6.8
5 ft
d__/ /-.._/ I 17"42,80
...... I/'--J /'f'-4d ,o
["- ! ! [/ ! ,4 / "_- /I lit N4'_s I 3.0
,,,/1.0
40 5todbrbso 10 20 30 40 50507080100
Water Flow Rate - GPM
Fig. 8 -- Friction Loss of Risers
Keep risers off the floor while moving the cabinet. Failure
to heed this warning could result in equipment damage.
2. Be sure that all the copper fittings are clean and flee of
dirt. Raise the cabinet upright and lower it into the riser
from the floor below.
NOTE: The top of each riser is equipped with a 3 in. deep
swaged connection. There is sufficient extension at the
bottom to allow insertion of approxhnately 2 in. of the
riser into the swaged top of the riser below.
3. Center risers in the pipe chase and shim the cabinet level.
Plumb risers in two planes to assure proper unit operation
and condensate drainage.
4. Attach the cabinet assembly to the floor and the building
structure on at least two sides using sheet metal angles
(field provided). A field-provided base vibration dampen-
ing pad can be used to help eliminate transfer of any vi-
bration to the structure. If vibration dampening pads are
used some rough-in dimensional changes will need to be
considered before installation due to style and thickness
of the pads. Additional anchorage can be provided by in-
stalling brackets at the top of the cabinet (field provided).
5. DO NOT attach drywall studs to the equipment cabinet.
m
550
500
i
!-
0450
!-
X_. 400
W
._ 350
'300
T-
280
,..=
200
2=
t--
•_ 150 ---
"a 100
tr 50 --
8020 40 60 100 120 140 160
Water TemperatureDifference - F
Fig. 9 -- Allowable Riser Lengths Between
System Expansion Loops
10
6. When all units on a riser are anchored into place, com-
plete riser joints as follows:
a. Verify that all riser joints are vertically aligned and
that risers penetrate at least 1 in. into the swaged
joint of the riser below. DO NOT let riser joint bot-
tom out.
b. Braze riser joints with a high-temperature alloy
using proper Phos-copper of Silfos. Soft solder 50-
50, 60-40, 85-15, or 95-5 or low temperature alloys
are not suitable riser weld materials.
c. Anchor built-in risers to the building structure with
at least one contact point. To accommodate vertical
expansion and contraction DO NOT fasten risers
rigidly within the unit.
d. Verify that unit shut-off valves are closed. DO
NOT OPEN VALVES until the system has been
cleaned and flushed.
7.
e. Flush system; refer to System Cleaning and Flush-
ing section for more information.
f. Install vents in piping loop as required to bleed the
system of air accumulated during installation.
Install supply duct extension(s) provided with the cabinet
by folding the tabs down to secure extension(s) to
cabinet.
COMMERCIAL WATER LOOP APPLICATION -- Coin-
mercial systems typically include a number of units connected
to a common piping system. Any unit plumbing maintenance
work can introduce air into the piping system; therefore, air
elimination equipment is a major portion of the mechanical
room plumbing. In piping systems expected to utilize water
temperatures below 50 F, 1/2 in. closed-cell insulation is re-
quired on all piping surfaces to eliminate condensation. Metal
to plastic threaded joints should never be used due to their ten-
dency to leak over time.
Teflon tape thread sealant is recommended for use in system
piping to minimize internal fouling of the heat exchanger. Do
not over tighten connections and route piping so as not to inter-
fere with service or maintenance access. Hose kits include shut
off valves, pressure/temperature (P/T) plugs for performance
measurement, high pressure stainless steel braided hose, and
hose adaptors.
Balancing valves and variable speed pumping systems my
also be used.
The piping system should be flushed to remove dirt, pipe
shavings, chips, and other foreign material prior to operation.
See System Cleaning and Flushing section. The flow rate is
usually set between 2.25 and 3.5 gpm per ton for most
applications of water loop heat pumps. To ensure proper main-
tenance and servicing, P/T ports are imperative for temperature
and flow verification, as well as performance checks.
Water loop heat pump (cooling tower/boiler) systems typi-
cally utilize a common loop, maintained between 60 to 90 E
The use of a closed circuit evaporate cooling tower with a sec-
ondary heat exchanger between the tower and the water loop is
recommended. If an open type cooling tower is used continu-
ously, chemical treatment and filtering will be necessary.
GROUND-LOOP HEAT PUMP APPLICATION
NOTE: In most commercial building applications using a
frame style or plate style heat-exchanger should be used to iso-
late the water source heat pump units from the ground water
loop increasing system performance, equipment longevity.
Pre-Installation -- Prior to installation, locate and mark all ex-
isting underground utilities, piping, etc. Install loops for new
construction before sidewalks, patios, driveways, and other
construction has begun. During construction, accurately mark
all ground loop piping on the plot plan as an aid in avoiding po-
tential furore damage to the installation.
Piping Installation -- All earth loop piping materials should
be limited to polyethylene fusion only for in ground sections of
the loop. Galvanized or steel fittings should not be used at any
time due to their tendency to corrode. All plastic to metal
threaded fittings should be avoided due to their potential to leak
in earth coupled applications. A flanged fitting should be sub-
stimted. P/T plugs should be used so that flow can be measured
using the pressure drop of the unit heat exchanger.
Earth loop temperatures can range between 25 and 110 F.
Flow rates between 2.25 and 3.0 gpm per ton of cooling capac-
ity is recommended in these applications.
Test individual horizontal loop circuits before backfilling.
Test vertical U-bends and pond loop assemblies prior to
installation.
Pressures of at least 100 psi should be used when testing.
Do not exceed the pipe pressure rating. Test entire system
when all loops are assembled.
Flushing the Earth Loop -- Upon completion of system in-
stallation and testing, flush the system to remove all foreign ob-
jects and purge to remove all air.
Antifreeze -- In areas when minilnum entering loop tempera-
rares drop below 40 F or where piping will be routed through
areas subject to freezing, antifreeze is required. Alcohols and
glycols are commonly used as antifreeze; however your local
Carrier distributor should be consulted for the antifreeze best
suited to your area. Freeze protection should be maintained to
15 F below the lowest expected entering loop temperature. For
example, if 30 F is the lninilnum expected entering loop tem-
perature, the leaving loop temperature would be 25 to 22 F and
freeze protection should be at 15 F. Calculation as follows:
30F- 15F= 15F.
All alcohols should be premixed and pumped from a reser-
voir outside of the building when possible or introduced under
the water level to prevent fumes. Calculate the total volume of
fluid in the piping system. Then use the percentage by volume
shown in Table 2 for the amount of antifreeze needed. Anti-
freeze concentration should be checked from a well mixed
sample using a hydrometer to measure specific gravity.
Table 2 -- Antifreeze Percentages by Volume
TYPE
Methanol
100% USP Food Grade
Propylene Glycol
Ethanol*
MINIMUM TEMPERATURE FOR LOW
TEMPERATURE PROTECTION
10 F15 F 20 F 25 F
25% 21% 16% 10%
38% 25% 22% 15%
29% 25% 20% 14%
*Must not be denatured with any petroleum based product.
OPEN -LOOP GROUND WATER SYSTEMS -- Shut off
valves should be included for ease of servicing. Boiler drains or
other valves should be "tee'd" into the lines to allow acid flush-
ing of the heat exchanger. P/T plugs should be used so that
pressure drop and temperature can be measured. Piping materi-
als should be limited to copper or PVC SCH80.
NOTE: Due to the pressure and temperature extremes, PVC
SCH40 is not recommended.
Water quantity should be plentiful and of good quality. Con-
sult Table 3 for water quality guidelines and recommendations.
Copper is recommended for closed loop systems and open loop
ground water systems that are not high in mineral content or
corrosiveness. In ground water situations where scaling could
be heavy or where biological growth such as iron bacteria will
be present, an open loop system is not recommended. Heat ex-
changer coils may over time lose heat exchange capabilities
due to build up of mineral deposits. Heat exchangers must only
be serviced by a qualified technician, as acid cleaning agents
and special pumping equipment are required.
11

Inareaswithextremelyhardwater,theownershouldbein-
formedthattheheatexchangermayrequireadditionalsystem
maintenanceandoccasionalacidflushing.
Water Supply and Quality -- Check water supply. Water sup-
ply should be plentiful and of good quality. See Table 3 for wa-
ter quality guidelines.
In all applications, the quality of the water circulated
through the heat exchanger must fall within the ranges listed in
the Water Quality Guidelines table. Consult a local water treat-
ment firm, independent testing facility, or local water authority
for specific recommendations to maintain water quality within
the published limits.
IMPORTANT: Failure to comply with the above required
water quality and quantity limitations and the closed-
system application design requirements may cause damage
to the tube-in-tube heat exchanger. This damage is not the
responsibility of the manufacturer.
Table 3 -- Water Quality Guidelines
I HX I CLOSED ICONDITION MATERIAL* REClRCULATINGt OPEN LOOP AND REClRCULATING WELL**
Scaling Potential -- Primary Measurement
Above the given limits, scaling is likely to occur, Scaling indexes should be calculated using the limits below,
pH/CalciUmHardnessMethod I All I N/A I pH < 7.5 and Ca Hardness, <100 ppm
Index Limits for Probable Scaling Situations (Operation outside these limits is not recommended.)
Scaling indexes should be calculated at 150 F for direct use and HWG applications, and at 90 F for indirect HX use. A monitoring plan should be
implemented.
Ryznar Stability Index All N/A 6.0 - 7.5
If >7.5 minimize steel pipe use.
Langelier Saturation Index -0.5 to +0.5
All N/A If <-0.5 minimize steel pipe use.
Based upon 150 F HWG and direct well, 85 F indirect well HX.
Iron Fouling
Iron Fe2+(Ferrous) <0.2 ppm (Ferrous)
(Bacterial Iron Potential) All N/A If Fe2+ (ferrous) >0.2 ppm with pH 6 - 8, 02<5 ppm check for iron bac-
teria.
Iron Fouling All N/A <0.5 ppm of Oxygen
Above this level deposition will occur.
Corrosion Preventiontt
pH All 6 - 8.5 6 - 8.5
Monitor/treat as needed. Minimize steel pipe below 7 and no open tanks with pH <8.
Hydrogen Sulfide (H2S) <0.5 ppm
All N/A At H2S>0.2 ppm, avoid use of copper and cupronickel piping or HXs.
Rotten egg smell appears at 0.5 ppm level.
Copper alloy (bronze or brass) cast components are okay to <0.5 ppm.
Ammonia Ion as Hydrox- <0.5 ppm
ide,
Chloride, Nitrate and Sul- All N/A
fate
Compounds
Maximum Chloride Levels
Copper
CuproNickel
304 SS
316 SS
Titanium
N/A
N/A
N/A
N/A
N/A
Maximum allowable at maximum water temperature.
50 F (10 C) 75 F (24 C) 100 F (38 C)
<20 ppm NR NR
<150 ppm NR NR
<400 ppm <250 ppm <150 ppm
<1000 ppm <550 ppm <375 ppm
>1000 ppm >550 ppm >375 ppm
Erosion and Clogging
Particulate Size and Ero- <10 ppm of particles and <10 ppm (<1 ppm "sandfree" for reinjection) of particles and a maxi-
a maximum velocity of 6 mum velocity of 6 fps. Filtered for maximum 800 micron size. Any par-
sion All fps. Filtered for maximum ticulate that is not removed can potentially clog components.
800 micron size.
Brackish Use cupronickel heat exchanger when concentrations of calcium or
All N/A sodium chloride are greater than 125 ppm are present. (Seawater is
approximately 25,000 ppm.)
LEGEND ttlf the concentration of these corrosives exceeds the maximum
HWG-- Hot Water Generator
HX -- Heat Exchanger
N/A -- Design Limits Not Applicable Considering Recirculating
Potable Water
NR -- Application Not Recommended
SS -- Stainless Steel
*Heat exchanger materials considered are copper, cupronickel,
304 SS (stainless steel), 316 SS, titanium.
fCIosed recirculating system is identified by a closed pressurized
piping system.
**Recirculating open wells should observe the open recirculating
design considerations.
allowable level, then the potential for serious corrosion problems
exists.
Sulfides in the water quickly oxidize when exposed to air, requir-
ing that no agitation occur as the sample is taken. Unless tested
immediately at the site, the sample will require stabilization with a
few drops of one Molar zinc acetate solution, allowing accurate
sulfide determination up to 24 hours after sampling. A low pH and
high alkalinity cause system problems, even when both values
are within ranges shown. The term pH refers to the acidity, basic-
ity, or neutrality of the water supply. Below 7.0, the water is con-
sidered to be acidic. Above 7.0, water is considered to be basic.
Neutral water contains a pH of 7.0.
To convert ppm to grains per gallon, divide by 17. Hardness in
mg/I is equivalent to ppm.
12
Step 6 -- Wire Field Power Supply
Connections
Electrical shock can cause personal iniury or death. When
installing or servicing system, always turn off main power
to system. There may be more than one disconnect switch.
ELECTRICAL-LINE VOLTAGE -- All field-installed wir-
ing, including electrical ground, must comply with the National
Electrical Code (NEC) as well as all applicable local codes. Re-
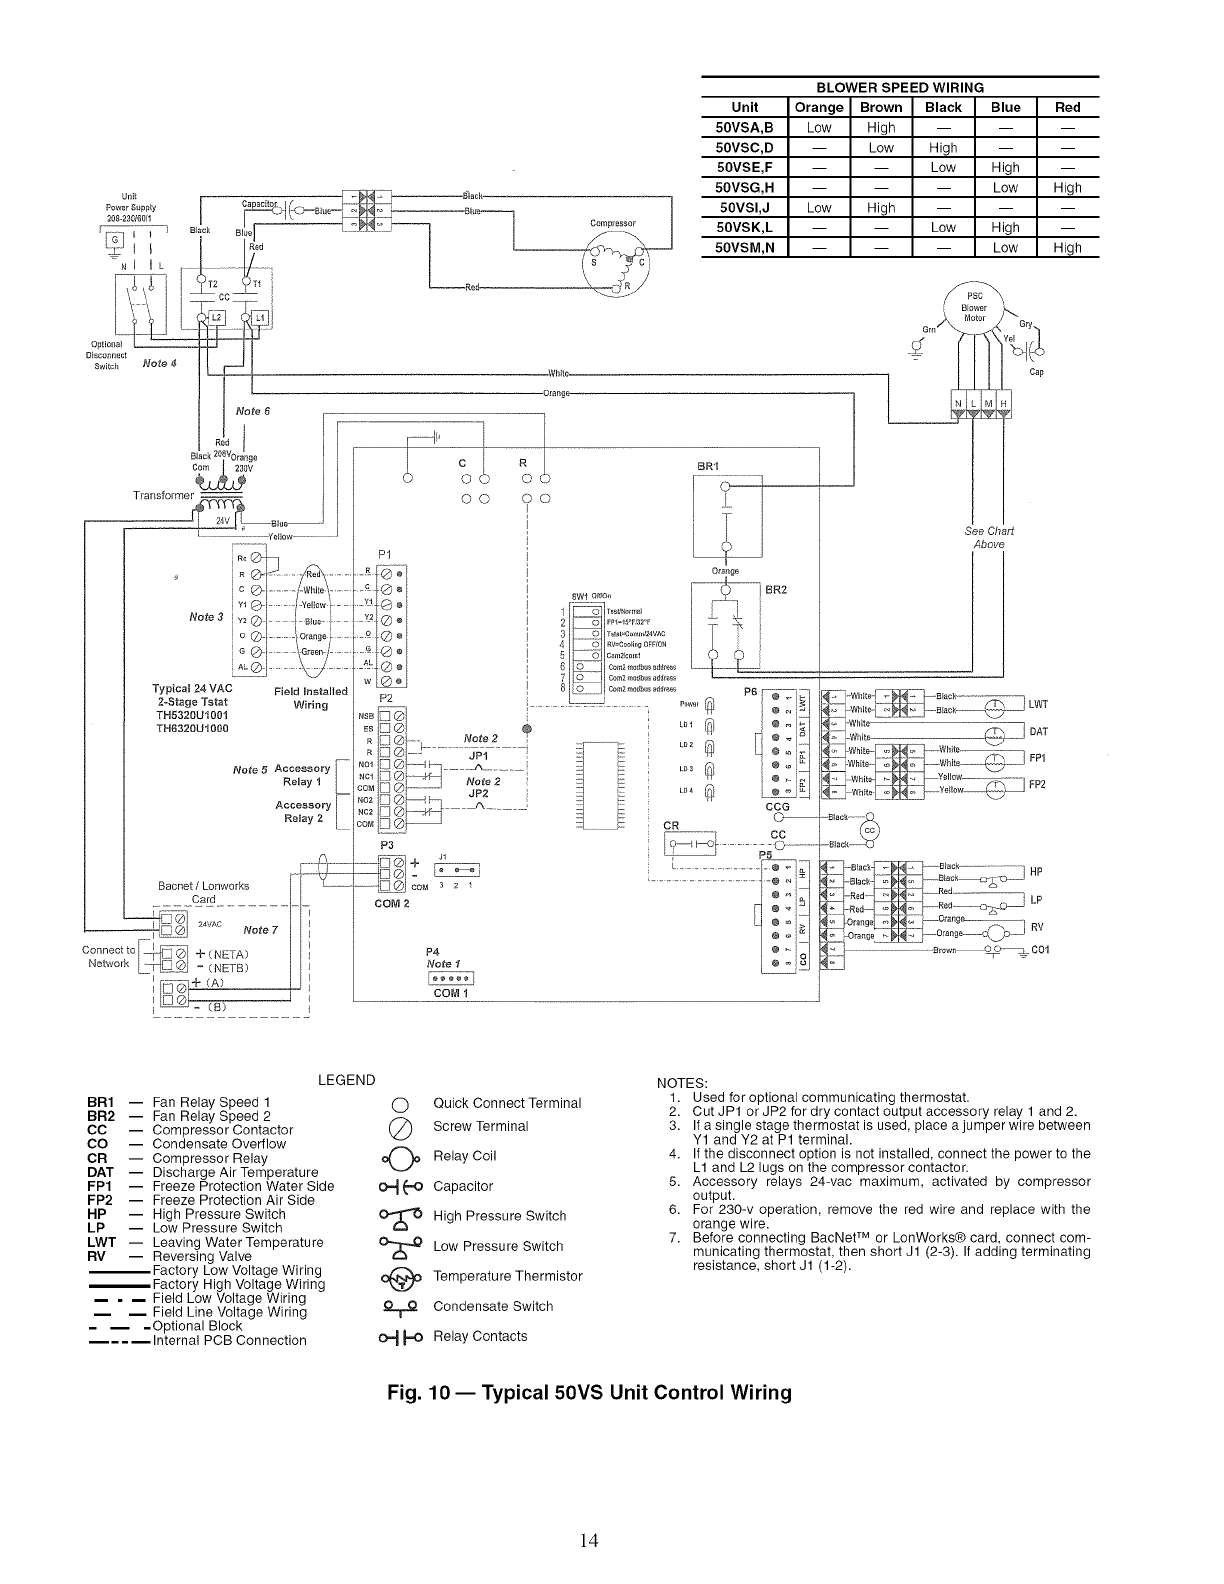
fer to Tables 4 and 5 for fuse sizes. Refer to Table 6 for blower
speed wiring. See Fig. 10 for field connections or the electrical
diagram located on the back of the electrical compartment front
panel. All electrical connections must be made by the installing
(or electrical) contractor. All final electrical connections must
be made with a length of flexible conduit to minhnize vibration
and sound transmission to the building.
General Line Voltage Wiring -- Be sure the available
power is the same voltage and phase shown on the unit
serial plate. Line and low voltage wiring must be done in
accordance with local codes or the NEC, whichever is appli-
cable.
POWER CONNECTION
Units Equipped with Disconnect -- Connect incoming line
voltage to the disconnect switch and ground wire to the ground
lug provided inside the electrical compartment.
Units without Disconnect -- Line voltage connection is made
by connecting the incoming line voltage wires to the line
side(s) of the contactor.
208/230-VAC OPERATION--All colmnercial 208/230-v
units are factory wired for 208-v single-phase operation. For
230-v single-phase operation the primary voltage to the trans-
former must be changed. Remove the red lead from the com-
pressor contactor capping it with a wire nut and connecting the
orange 230-vac lead wire from the transformer to the compres-
sor contactor.
NOTE: Failure to change the primary voltage lead when using
240-vac line voltage may result in electrical component dam-
age and intermittent system failure.
Table 4 -- Cabinet Electrical Data -- 50VS Unit
S UP PLY MOTO R
UNIT VOLTAGE VOLTAGE FAN MOTOR MIN CIRCUIT
AMP
V-Hz-Ph V-Hz-Ph FLA (A) MOTOR POWER (W) MAX FUSE SIZE (A)
50VSA,B 208/230-1-60 208/230-1-60 0.30 130 6.5 15
50VSC,D 208/230-1-60 208/230-1-60 0.40 142 8.6 15
50VSE,F 208/230-1-60 208/230-1-60 0.88 180 11.9 20
50VSG,H 208/230-1-60 208/230-1-60 1.18 240 12.5 20
50VSI,J 208/230-1-60 208/230-1-60 1.60 304 16.2 30
50VSK,L 208/230-1-60 208/230-1-60 1.80 368 19.5 30
50VSM,N 208/230-1-60 208/230-1-60 2.06 442 21.0 35
LEGEND
FLA -- Full Load Amps
Table 5 -- Chassis Electrical Data -- 50VS Unit
SUPPLY
UNIT VOLTAGE MIN CIRCUIT MAX FUSE COMPRESSOR COOLING MAX COOLING HEATING MAX HEATING
AMP SIZE (A) (LRA) CURRENT (A) CURRENT (A) CURRENT (A) CURRENT (A)
V-Hz-Ph
50VSA,B 208/230-1-60 6.5 15 20 3.27 4.0 3.75 4.60
50VSC,D 208/230-1-60 8.6 15 27 4.40 4.0 5.25 6.25
50VSE,F 208/230-1-60 11.9 20 42 6.30 5.4 7.07 8.80
50VSG,H 208/230-1-60 12.5 20 42 6.70 7.6 7.50 9.00
50VSI,J 208/230-1-60 16.2 25 46 8.20 8.0 9.20 11.70
50VSK,L 208/230-1-60 19.5 30 70 11.00 10.4 12.20 14.10
50VSM,N 208/230-1-60 21.0 30 79 12.70 16.0 13.65 16.50
LEGEND
LRA -- Locked Rotor Amps
Table 6 -- 50VS Unit Blower Performance and Speed Wiring
UNIT
50VSA,B
50VSC,D
50VSE,F
50VSG,H
50VSI,J
50VSK,L
50VSM,N
FAN SPEED RATED MIN EXTERNAL STATIC PRESSURE (in. wg)
AND WIRING CFM CFM 0 0.01 0.05 0.1 0.15
LOW (Black) 361 358 341 321 294
HI (Blue) 360 260 316 310 294 278 262
LOW (Blue) 420 300 424 421 398 376 350
HI (Red) 361 358 341 321 305
LOW (Black) 540 390 551 549 535 521 509
HI (Blue) 470 465 455 439 428
LOW (Blue) 626 622 604 592 577
HI (Red) 630 455 551 549 535 521 509
LOW (Orange) 820 600 821 817 814 812 802
HI (Brown) 768 765 762 759 751
LOW (Black) 1080 780 1081 1075 1070 1049 1024
HI (Blue) 956 951 942 928 911
LOW(Blue) 1222 1219 1194 1160 1129
HI (Red) 1220 850 1102 1096 1091 1070 1044
NOTE: Operation not recommended in shaded area.
13
Unit
PowerSupply !
208-230160/1
BI k
NI IL
0plonaI
Note 4
oo
Note 6
I
Transformer --
io-:......... I
(_ ........ /_W[liLe! -
YlC_ ......I-Yell°w I
Note,I_51.......I-=.o-*--
!
jo&t....../o=°g0_--
ioot \°'°°°/--
Typical24 VAC Field Installed
2-Stage Tstat Wiring
TH532OU1001
TH632OU!O00
Pl
.....xq@o_
-A<S°I
-°-t®° I
...._1®° I
w_
-White
©range-
o
oo
P2
ITI£_L_, Noteg÷_--_ i
[ ==,r.-;..........._-= 7 _
="o'=......o i I i
Rela72 ;0,4I__QjA _£
E P3
....... i 4"_
.... l[]®[co= s = <,
0OII 2
SWl ollot
_f_l ...........
2_ FPI=I_°F_S2_F
_ T_ta{=C_mml_4VAC
RV=C00tlI OFFION
_ Com2mldbus all,_
BLOWER SPEED WIRING
BRt
Orange
BR2
Unit Orange Brown Black Blue Red
50VSA,B Low High -- -- --
50VSC,D -- Low High -- --
50VSE,F -- -- Low High --
50VSG,H -- -- -- Low High
50VSI,J Low High -- -- --
50VSK,L -- -- Low High --
50VSM,N -- -- -- Low High
See Chart
Above
P4
Note I
CON 1
P5
Oap
Red = Red--
Orange _ 'Orang_
..... =v
-Brown_ C01
LEGEND
BR1 -- Fan Relay Speed 1
BR2 -- Fan Relay Speed 2
CC -- Compressor Contactor
CO -- Condensate Overflow
CR -- Compressor Relay
DAT -- Discharge Air Temperature
FP1 -- Freeze Protection Water Side
FP2 -- Freeze Protection Air Side
HP -- High Pressure Switch
LP -- Low Pressure Switch
LWT -- Leaving Water Temperature
RV -- Reversing Valve
_,Factory Low Voltage Wiring
_,Factory High Voltage Wiring
. -- Field Low Voltage Wiring
_ Field Line Voltage Wiring
- _ -Optional Block
.... Internal PCB Connection
0 Quick Connect Terminal
Q Screw Terminal
cO o Relay Coil
O_ _ Capacitor
O_ High Pressure Switch
O_ Low Pressure Switch
o0) Temperature Thermistor
Condensate Switch
O_ }=O Relay Contacts
NOTES:
1. Used for optional communicating thermostat.
2. Cut JP1 or JP2 for dry contact output accessory relay 1 and 2.
3. If a single stage thermostat is used, place a jumper wire between
Y1 and Y2 at P1 terminal.
4. If the disconnect option is not installed, connect the power to the
L1 and L2 lugs on the compressor contactor.
5. Accessory relays 24-vac maximum, activated by compressor
output.
6. For 230-v operation, remove the red wire and replace with the
orange wire.
7. Before connecting BacNet TM or LonWorks® card, connect com-
municating thermostat, then short J1 (2-3). If adding terminating
resistance, short J1 (1-2).
Fig. 10 -- Typical 50VS Unit Control Wiring
14

Step 7 EWire Field Control Connections
STANDARD 24-V THERMOSTAT CONNECTIONS --
The thennostat should be wired directly to the microprocessor
board tenninals labeled P1 to the corresponding terminals
(R,C,Y1,Y2,O,G).
Installation of Optional Wall-Mounted Thermostat -- The
unit can be controlled with a remote 24-volt surface mounted
thermostat such as the Honeywell TH5320U1001 or
TH6320U1000 series thermostat. Refer to instructions pro-
vided with remote thermostat for wiring instructions using
2 stages of heating and 2 stages of cooling for a heat pump
system.
Below are typical thermostat connections and color codes.
Rc Power (Red)
R R+Rc joined by factory jumper wire (Red)
Y Compressor Contactor (Stage 1) (Yellow)
Y2 Compressor Contactor (Stage 2) (Blue)
C 24-vac Common (White)
O Reversing Valve (Orange)
G Fan Relay (Green)
NOTE: The terminal block on the microprocessor board is
removable for ease of thermostat wiring installation.
Low-voltage wiring between the unit and the wall thermo-
stat must comply with all applicable electrical codes (i.e., NEC
and local codes), and be completed before the unit is
installed. Use of six-wire, color-coded, low-voltage cable is
recommended.
Table 7 lists recolrunended wire sizes and lengths to install
the thermostat. The total resistance of low voltage wiring must
not exceed 1 otun. Any resistance in excess of 1 otun may
cause the control to malfunction because of high voltage drop.
Table 7 -- Recommended Wire Gage -- Low
Voltage Thermostat
MAXIMUM RUN (UNIT TO
WIRE SIZE (gage) THERMOSTAT) (ft)
22 30
20 50
18 75
16 125
14 200
Step 8 EClean and Flush System _ Cleaning
and flushing the unit is the most important step to ensure
proper start-up and continued efficient operation of the system.
Follow the instructions below to properly clean and flush the
system.
1. Verify that electrical power to the unit is off.
2. Verify that supply and return riser service valves are
closed at each unit.
3. Fill the system with water, leaving the air vents open.
Bleed all air from the system but do not allow the system
to overflow. Check the system for leaks and make any re-
quired repairs.
4. Adjust the water and air level in the expansion tank.
5. With strainers in place, start the pumps. Systematically
check each vent to ensure that all of the air is bled from
the system.
6. Verify that make-up water is available and adjusted to
properly replace any space remaining when all air is
purged. Check the system for leaks and make any addi-
tional repairs if needed.
7. Set the boiler to raise the loop temperature to approxi-
mately 85 E Open the drain at the lowest point in the
system. Verify that make-up water replacement rate
equals rate of bleed. Continue to bleed the system until
the water appears clean or for at least three hours which-
ever is longer.
8. Completely drain the system.
Flush risers as follows:
1. Close shut-off valves at each unit on the riser except the
shut-off valve on the top floor.
2. Flush solution through supply riser.
NOTE: The solution passes through the top floor connec-
tion down the return riser.
3. When the building has more than 10 floors, connect the
supply and return run outs on the top two floors to divide
the water flow and reduce pressure drop at the pump.
4. Repeat flushing procedure for each set of risers in the
building.
5. Refill the system and add in a proportion of trisodium
phosphate approximately one pound per 150 gallons of
water. Reset the boiler to raise the loop temperature to
about 100 E
6. Circulate the solution for between 8 and 24 hours. At the
end of this period, shut offthe circulating pump and drain
the solution. Repeat system cleaning if needed.
7. Open the supply and return riser service valves at each
unit. Refill the system and bleed offall air.
8. Test the system pH with litmus paper. The system water
should have a pH of 6 to 8.5. Add chemicals as appropri-
ate to maintain pH levels.
9. When the cleaning process is complete, remove the short-
circuited hoses. Reconnect the hoses to the proper supply,
and return the connections to each of the units. Refill the
system and bleed off all air.
NOTE: DO NOT use "Stop Leak" or similar chemical
agent in this system. Addition of chemicals of this type to
the loop water will foul the heat exchanger and inhibit
unit operation.
Step 9 _Install Hose Kit
1. Refer to Fig. 11 for an illustration of a typical supply/
return hose kit assembly.
2. Pipe joint compound or Teflon tape is not necessary when
using factory-supplied hose kits.
NOTE: When anti-freeze is used, ensure that it is compat-
ible with Teflon tape and pipe joint compound that may
have been applied to other pipe fittings in the system.
3. Attach the flex hoses. Unpack and examine hose kit. Re-
move all shipping and/or packing material such as rubber
bands, plastic caps, and styrofoam. Hose kit should con-
tain 2 hoses, one balancing valve with shutoff, one shut-
off, and 2 hose adaptors.
4. Locate the valves inside the unit cabinet marked WATER
1N and WATER OUT. Attach the hoses to the water
valve. Always use a back-up wrench when tightening the
hose to the valve.
5. If the valves are removed to attach the hoses, be sure the
O-ring is in the valve before attaching to the union in the
cabinet.
6.
NOTE: The valve union is to be hand tight plus an addi-
tional 1/4 of a turn; always use back-up wrench on the fit-
tings being tightened.
Attach flex hoses. Let the universal ends of the hoses
hang inside the cabinet. See Table 8 for bend allowances.
NOTE: Be sure the valve handles and P/T ports are in a
position that enables them to be opened and closed and
used for system readings. Check the swivel ends of the
hoses. Gaskets must be in the hose for proper seal.
15
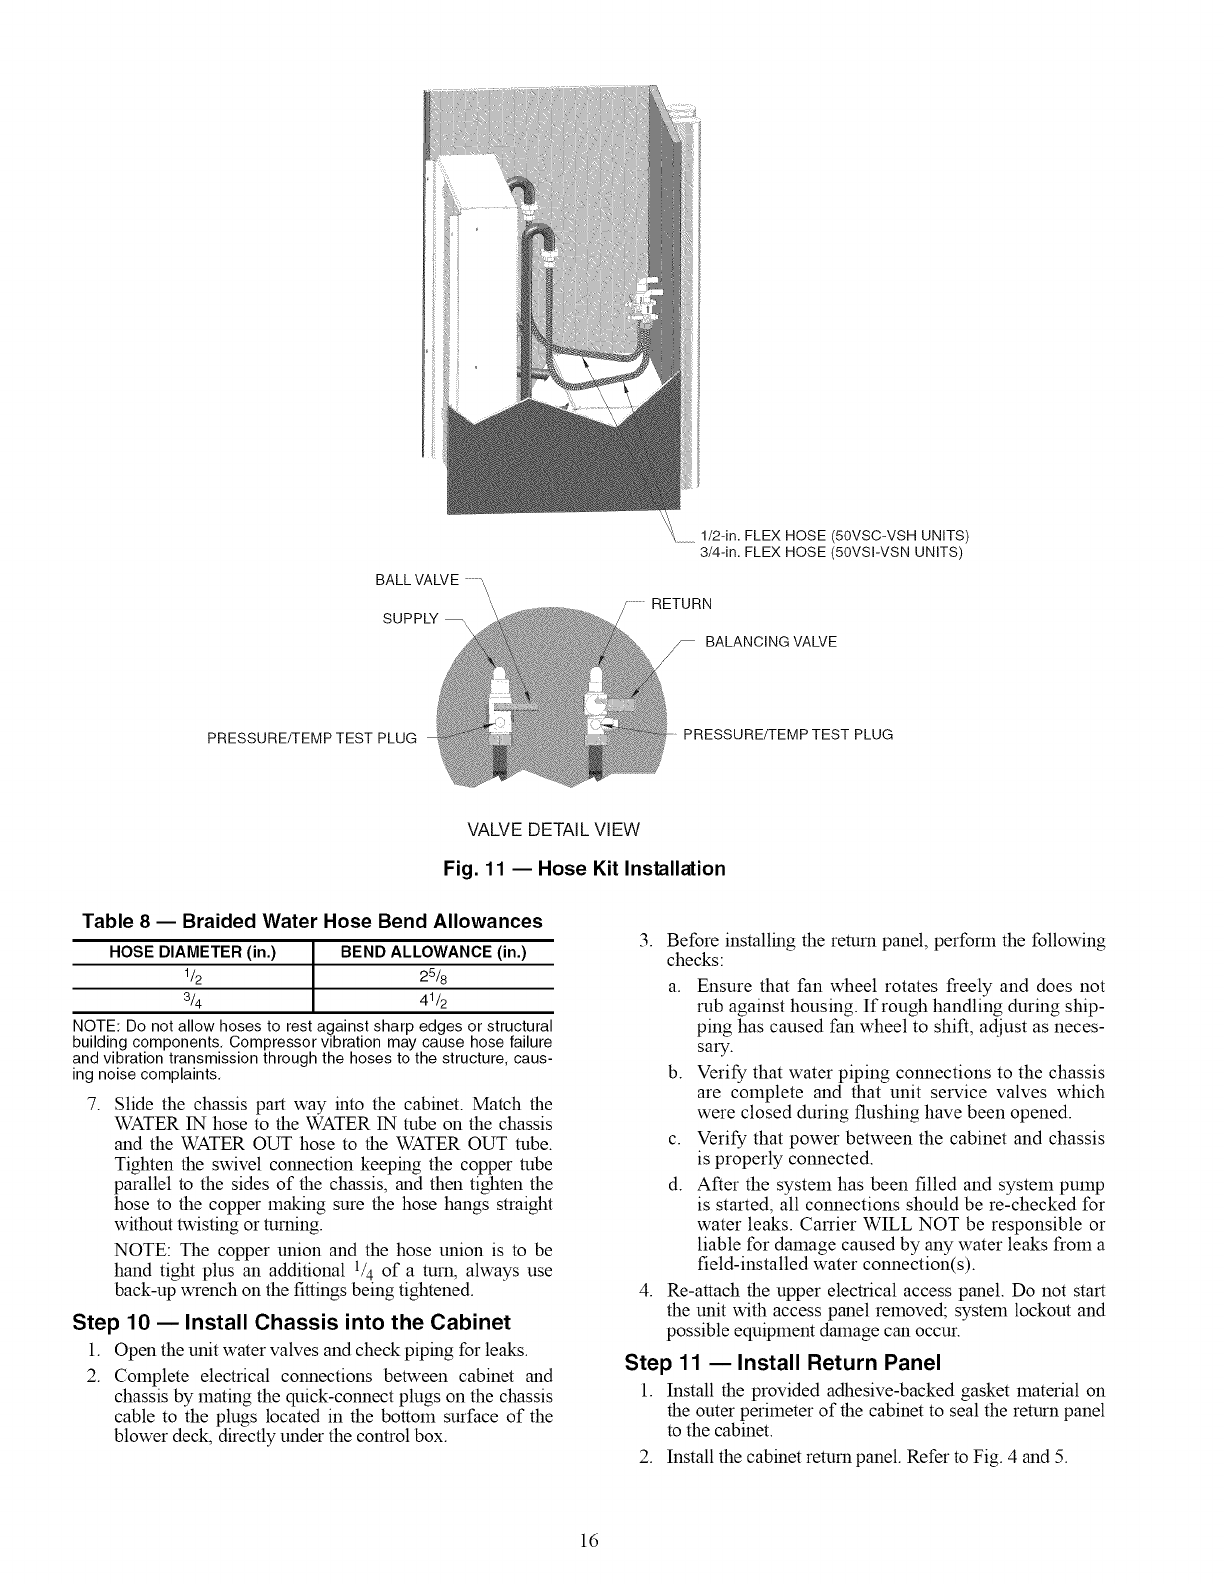
BALL VALVE \\
SUPPLY
1/2-in. FLEX HOSE (50VSC-VSH UNITS)
3/4-in. FLEX HOSE (50VSl-VSN UNITS)
RETURN
/..........BALANCING VALVE
/
PRESSURE/TEMP TEST PLUG PRESSURE/TEMP TEST PLUG
VALVE DETAILVIEW
Fig. 11 -- Hose Kit Installation
Table 8-- Braided Water Hose Bend Allowances
HOSE DIAMETER (in.) BEND ALLOWANCE(in.)
1/2 25/8
3/4 41/2
NOTE: Do not allow hoses to rest against sharp edges or structural
building components. Compressor vibration may cause hose failure
and vibration transmission through the hoses to the structure, caus-
ing noise complaints.
7. Slide the chassis part way into the cabinet. Match the
WATER 1N hose to the WATER 1N tube on the chassis
and the WATER OUT hose to the WATER OUT tube.
Tighten the swivel connection keeping the copper tube
parallel to the sides of the chassis, and then tighten the
hose to the copper making sure the hose hangs straight
without twisting or turning.
NOTE: The copper union and the hose union is to be
hand tight plus an additional 1/4 of a turn, always use
back-up wrench on the fittings being tightened.
Step 10 EInstall Chassis into the Cabinet
1. Open the unit water valves and check piping for leaks.
2. Complete electrical connections between cabinet and
chassis by mating the quick-connect plugs on the chassis
cable to the plugs located in the bottom surface of the
blower deck, directly under the control box.
3. Before installing the return panel, perform the following
checks:
4.
a. Ensure that fan wheel rotates freely and does not
rub against housing. If rough handling during ship-
ping has caused fan wheel to shift, adjust as neces-
sary.
b. Verify that water piping connections to the chassis
are complete and that unit service valves which
were closed during flushing have been opened.
c. Verify that power between the cabinet and chassis
is properly connected.
d. After the system has been filled and system pump
is started, all connections should be re-checked for
water leaks. Carrier WILL NOT be responsible or
liable for damage caused by any water leaks from a
field-installed water connection(s).
Re-attach the upper electrical access panel. Do not start
the unit with access panel removed; system lockout and
possible equipment damage can occur.
Step 11 E Install Return Panel
1. Install the provided adhesive-backed gasket material on
the outer perimeter of the cabinet to seal the return panel
to the cabinet.
2. Install the cabinet return panel. Refer to Fig. 4 and 5.
16
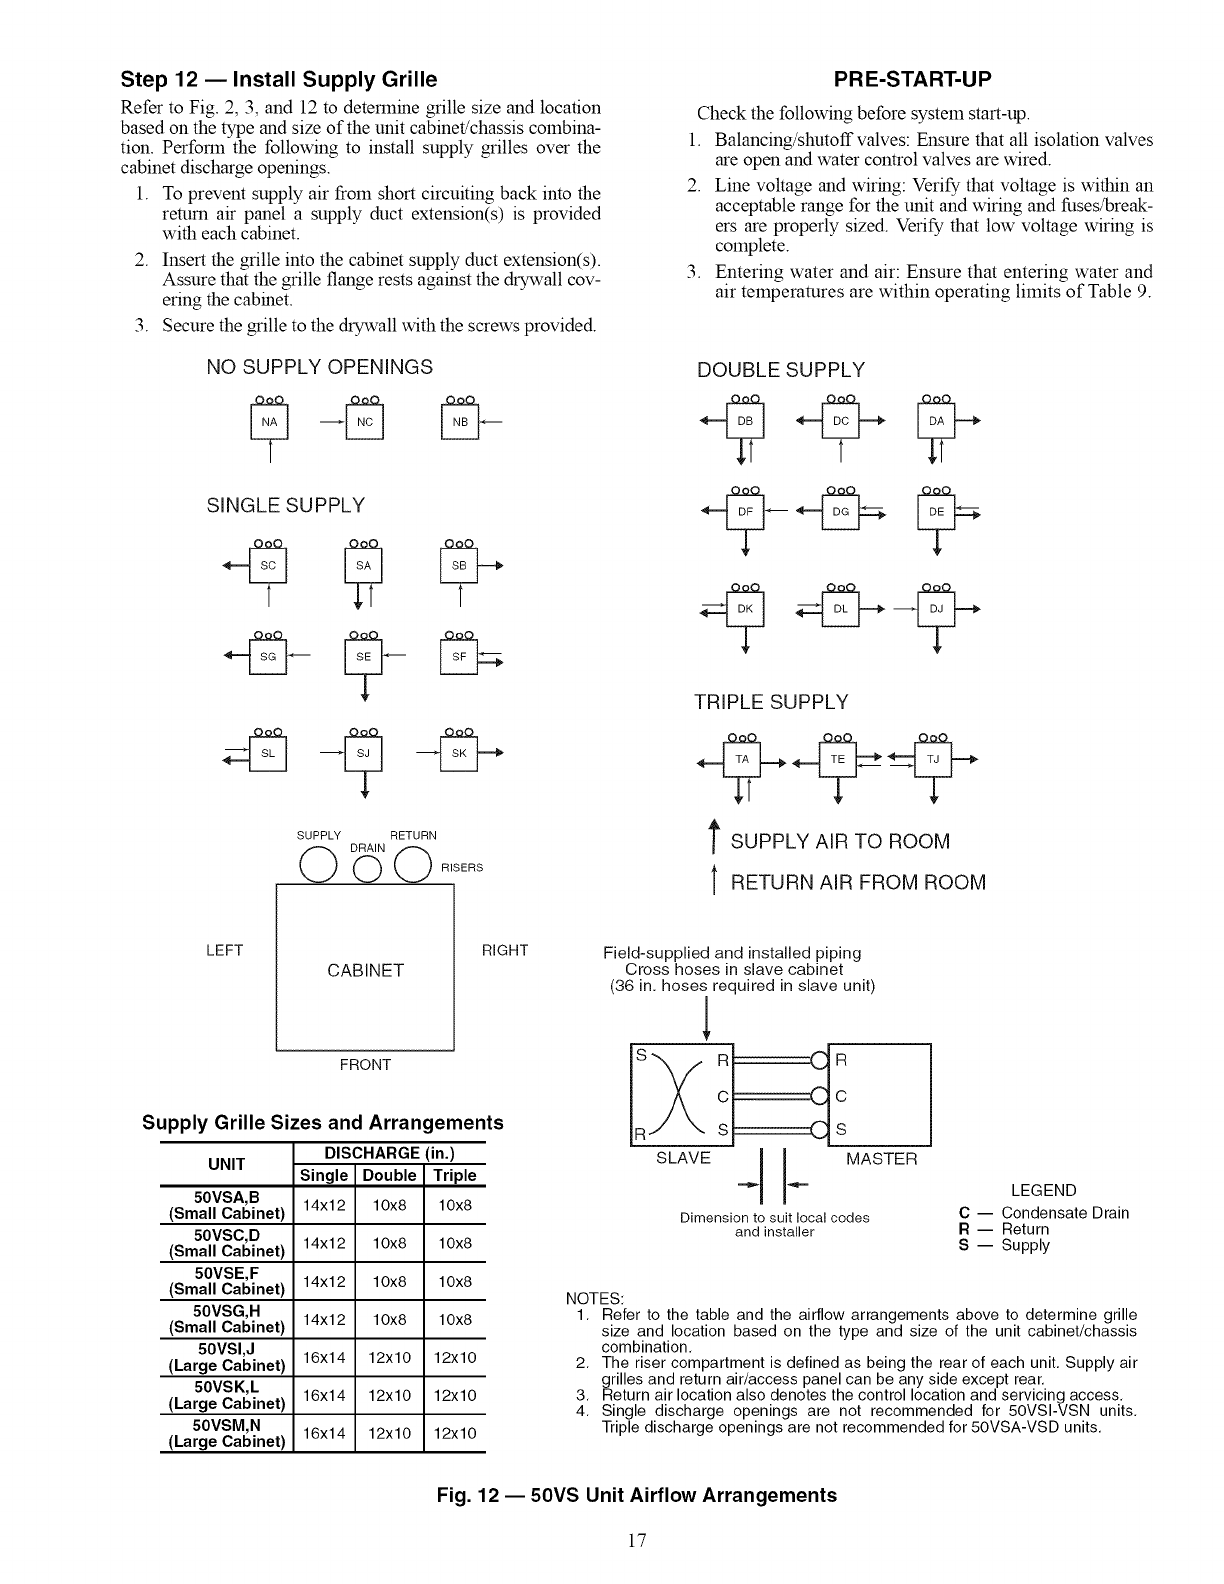
Step 12 EInstall Supply Grille
Refer to Fig. 2, 3, and 12 to determine grille size and location
based on the type and size of the unit cabinet!chassis combina-
tion. Perform the following to install supply grilles over the
cabinet discharge openings.
1. To prevent supply air from short circuiting back into the
return air panel a supply duct extension(s) is provided
with each cabinet.
2. Insert the grille into the cabinet supply duct extension(s).
Assure that the grille flange rests against the drywall cov-
ering the cabinet.
3. Secure the grille to the drywall with the screws provided.
NO SUPPLY OPENINGS
SINGLE SUPPLY
SUPPLY RETURN
O
PRE-START-UP
Check the following before system start-up.
1. Balancing/shutoff valves: Ensure that all isolation valves
are open and water control valves are wired.
2. Line voltage and wiring: Verify that voltage is within an
acceptable range for the unit and wiring and fuses/break-
ers are properly sized. Verify that low voltage wiring is
complete.
3. Entering water and air: Ensure that entering water and
air temperatures are within operating limits of Table 9.
DOUBLE SUPPLY
TRIPLE SUPPLY
474 5>
t SUPPLY AIR TO ROOM
TRETURN AIR FROM ROOM
LEFT
CABINET
RIGHT
FRONT
Supply Grille Sizes and Arrangements
UNIT DISCHARGE (in.)
Single Double Triple
50VSA,B 14xl 2 10x8 10x8
(Small Cabinet)
50VSC,D 14xl 2 10x8 10x8
(Small Cabinet)
50VSE,F 14x12 10x8 10x8
(Small Cabinet)
50VSG,H 14x12 10x8 10x8
(Small Cabinet)
50VSI,J 16x14 12x10 12x10
(Large Cabinet)
50VSK, L 16x14 12x10 12x10
(Large Cabinet)
50VSM,N 16x14 12x10 12x10
(Large Cabinet)
Field-supplied and installed piping
Cross hoses in slave cabinet
(36 in. hoses required in slave unit)
SLAVE "_1 I"_'- MASTER
Dimension to suit local codes
and installer
LEGEND
C -- Condensate Drain
R- Return
S -- Supply
NOTES:
1, Refer to the table and the airflow arrangements above to determine grille
size and location based on the type and size of the unit cabinet/chassis
combination,
2, The riser compartment is defined as being the rear of each unit, Supply air
grilles and return air/access panel can be any side except rear,
3, Return air location also denotes the control location and servicing access,
4, Single discharge openings are not recommended for 50VSI-VSN units,
Triple discharge openings are not recommended for 50VSA-VSD units,
Fig. 12 -- 50VS Unit Airflow Arrangements
17
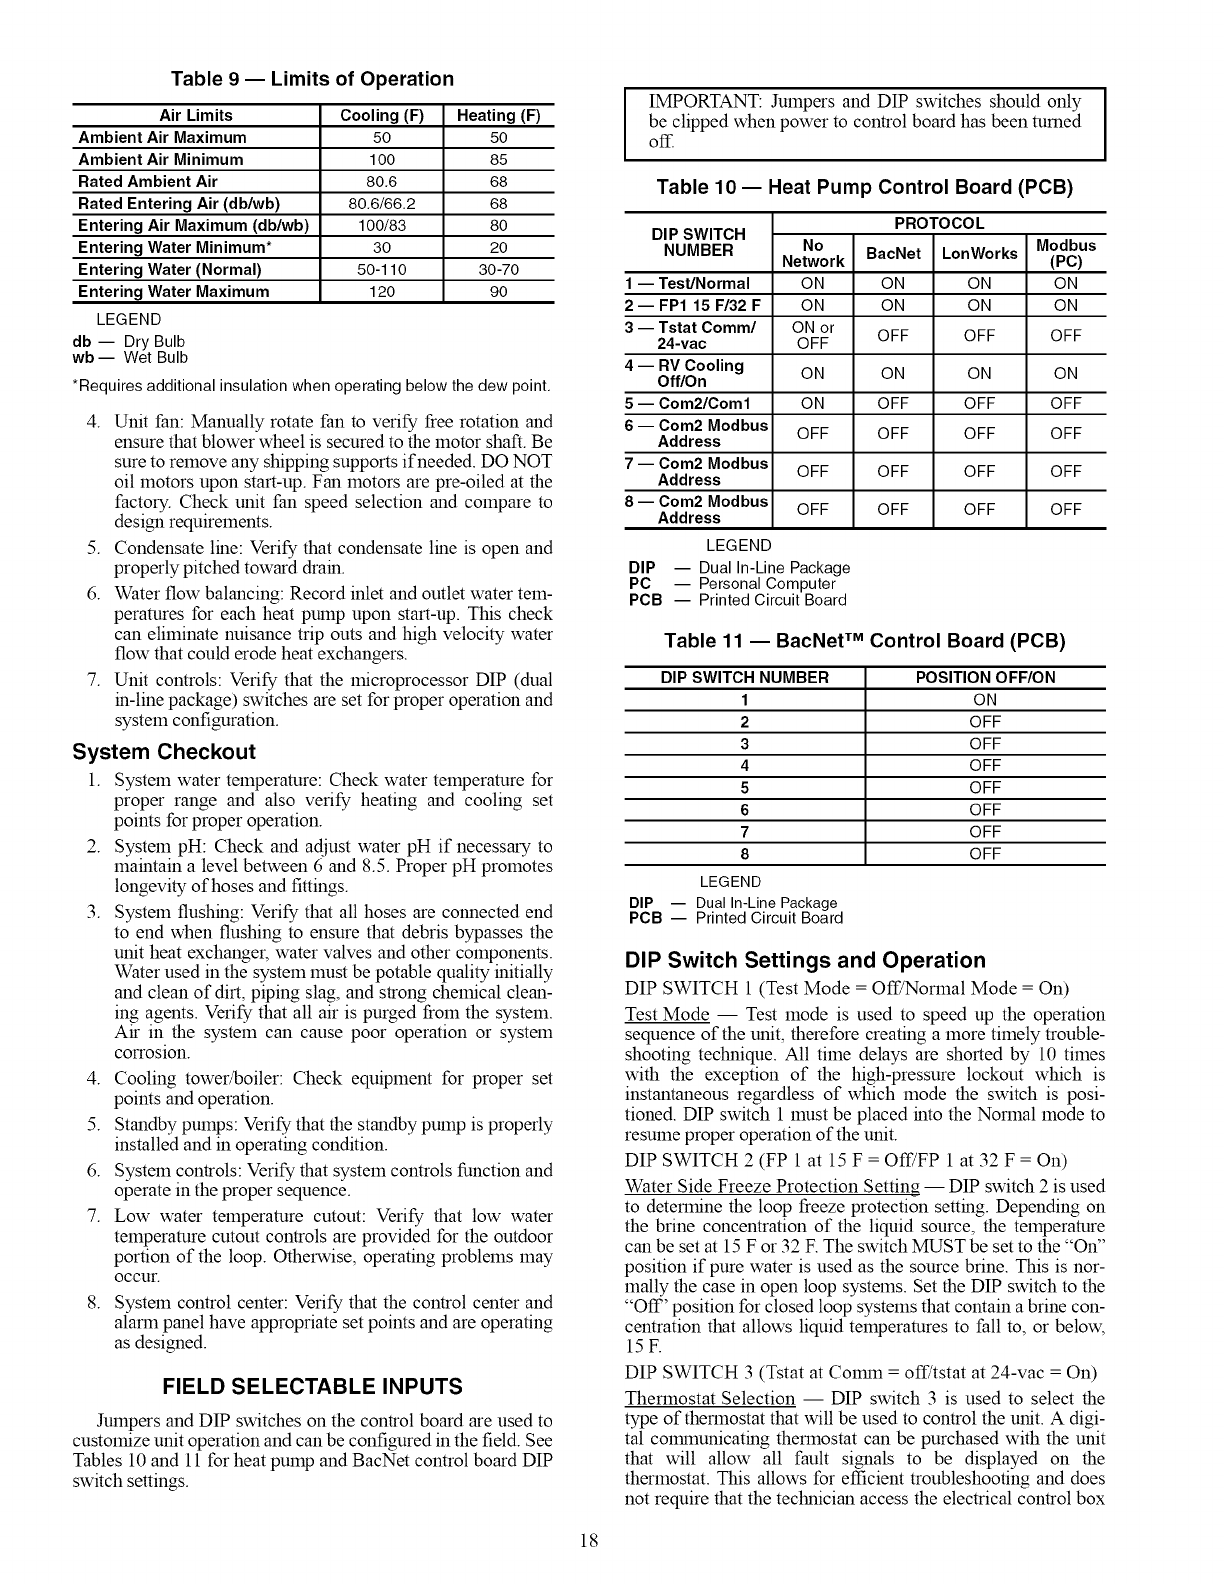
Table 9 -- Limits of Operation
Air Limits
Ambient Air Maximum
Ambient Air Minimum
Rated Ambient Air
Rated Entering Air (db/wb)
Entering Air Maximum (db/wb)
Entering Water Minimum*
Entering Water (Normal)
Entering Water Maximum
LEGEND
db -- Dry Bulb
wb-- Wet Bulb
Cooling (F) Heating (F)
50 50
1O0 85
80,6 68
80,6/66,2 68
100/83 80
30 20
50-110 30-70
120 90
*Requires additional insulation when operating below the dew point,
4. Unit fan: Manually rotate fan to verify flee rotation and
ensure that blower wheel is secured to the motor shaft. Be
sure to remove any shipping supports if needed. DO NOT
oil motors upon start-up. Fan motors are pre-oiled at the
factory. Check unit fan speed selection and compare to
design requirements.
5. Condensate line: Verify that condensate line is open and
properly pitched toward dram.
6. Water flow balancing: Record inlet and outlet water tem-
peratures for each heat pump upon start-up. This check
can eliminate nuisance trip outs and high velocity water
flow that could erode heat exchangers.
7. Unit controls: Verify that the microprocessor DIP (dual
m-line package) switches are set for proper operation and
system configuration.
System Checkout
1. System water temperature: Check water temperature for
proper range and also verify heating and cooling set
points for proper operation.
2. System pH: Check and adjust water pH if necessary to
maintain a level between 6 and 8.5. Proper pH promotes
longevity of hoses and fittings.
3. System flushing: Verify that all hoses are connected end
to end when flushing to ensure that debris bypasses the
unit heat exchanger, water valves and other components.
Water used in the system must be potable quality initially
and clean of dirt, piping slag, and strong chemical clean-
ing agents. Verify that all air is purged from the system.
Air in the system can cause poor operation or system
corrosion.
4. Cooling tower/boiler: Check equipment for proper set
points and operation.
5. Standby pumps: Verify that the standby pump is properly
installed and in operating condition.
6. System controls: Verify that system controls function and
operate in the proper sequence.
7. Low water temperature cutout: Verify that low water
temperature cutout controls are provided for the outdoor
portion of the loop. Otherwise, operating problems may
occur.
8. System control center: Verify that the control center and
alarm panel have appropriate set points and are operating
as designed.
FIELD SELECTABLE INPUTS
Jumpers and DIP switches on the control board are used to
customize unit operation and can be configured in the field. See
Tables 10 and 11 for heat pump and BacNet control board DIP
switch settings.
IMPORTANT: Jumpers and DIP switches should only
be clipped when power to control board has been turned
off.
Table 10- Heat Pump Control Board (PCB)
PROTOCOL
DIP SWITCH
NUMBER No
Network BacNet LonWorks
1 -- Test/Normal ON ON ON
2-- FP1 15 F/32 F ON ON ON
3 -- Tstat Comm/ ON or
24-vae OFF OFF OFF
4-- RV Cooling
Off/On ON ON ON
5 -- Com2/Coml ON OFF OFF
6 -- Corn2 Modbus
Address OFF OFF OFF
7 -- Corn2 Modbus OFF OFF OFF
Address
8-- Corn2 Modbus OFF OFF OFF
Address
LEGEND
Modbus
(PC)
ON
ON
OFF
ON
OFF
OFF
OFF
OFF
DIP -- Dual In-Line Package
PC -- Personal Computer
PCB -- Printed Circuit Board
Table 11 -- BacNet TM Control Board (PCB)
DIP SWITCH NUMBER
1
2
3
4
5
6
7
8
LEGEND
DIP -- Dual In-Line Package
PCB -- Printed Circuit Board
POSITION OFF/ON
ON
OFF
OFF
OFF
OFF
OFF
OFF
OFF
DIP Switch Settings and Operation
DIP SWITCH 1 (Test Mode = Off/Normal Mode = On)
Test Mode -- Test mode is used to speed up the operation
sequence of the unit, therefore creating a more timely trouble-
shooting technique. All time delays are shorted by 10 times
with the exception of the high-pressure lockout which is
instantaneous regardless of which mode the switch is posi-
tioned. DIP switch 1 must be placed into the Normal mode to
resume proper operation of the unit.
DIP SWITCH 2 (FP 1 at 15 F = Off/FP 1 at 32 F = On)
Water Side Freeze Protection Setting -- DIP switch 2 is used
to determine the loop freeze protection setting. Depending on
the brine concentration of the liquid source, the temperature
can be set at 15 F or 32 F. The switch MUST be set to the "On"
position if pure water is used as the source brine. This is nor-
mally the case in open loop systems. Set the DIP switch to the
"OIF' position for closed loop systems that contain a brine con-
centration that allows liquid temperatures to fall to, or below,
15E
DIP SWITCH 3 (Tstat at Cmmn= off/tstat at 24-vac = On)
Thermostat Selection -- DIP switch 3 is used to select the
type of thermostat that will be used to control the unit. A digi-
tal colr_numcatmg thermostat can be purchased with the unit
that will allow all fault signals to be displayed on the
thermostat. This allows for efficient troubleshooting and does
not require that the technician access the electrical control box
18
todeterminetheuniterror.If adigitalcolmnunicatingthermo-
statisusedDIPswitch3mustbesetinthe"Off"position.If a
24-vacthermostatisusedsetDIPswitch3 intothe"On"
position.
DIPSWITCH4(RVatCooling=Off/RVatCooling=On)
Reversing Valve Operation -- DIP switch 4 is used to deter-
mine the reversing valve (RV) position in the Cooling mode
(deenergized/energized). This function is used only when a 24-
vac thermostat is used and is determined by the reversing valve
output of the thermostat in the Cooling mode. If the thermostat
deenergizes the reversing valve in the Cooling mode then set
the DIP switch in the "Off" position. If the thermostat ener-
gizes the reversing valve in the Cooling mode set the DIP
switch in the "On" position.
DIP Switch 5 (Corn2 = Off/BacNet TM or LonWorks(R))
(Coml = On!Colmnunicating Thermostat)
DIP Switch 6 (Corn2 modbus address)
DIP Switch 7 (Corn2 modbus address)
DIP Switch 8 (Corn2 modbus address)
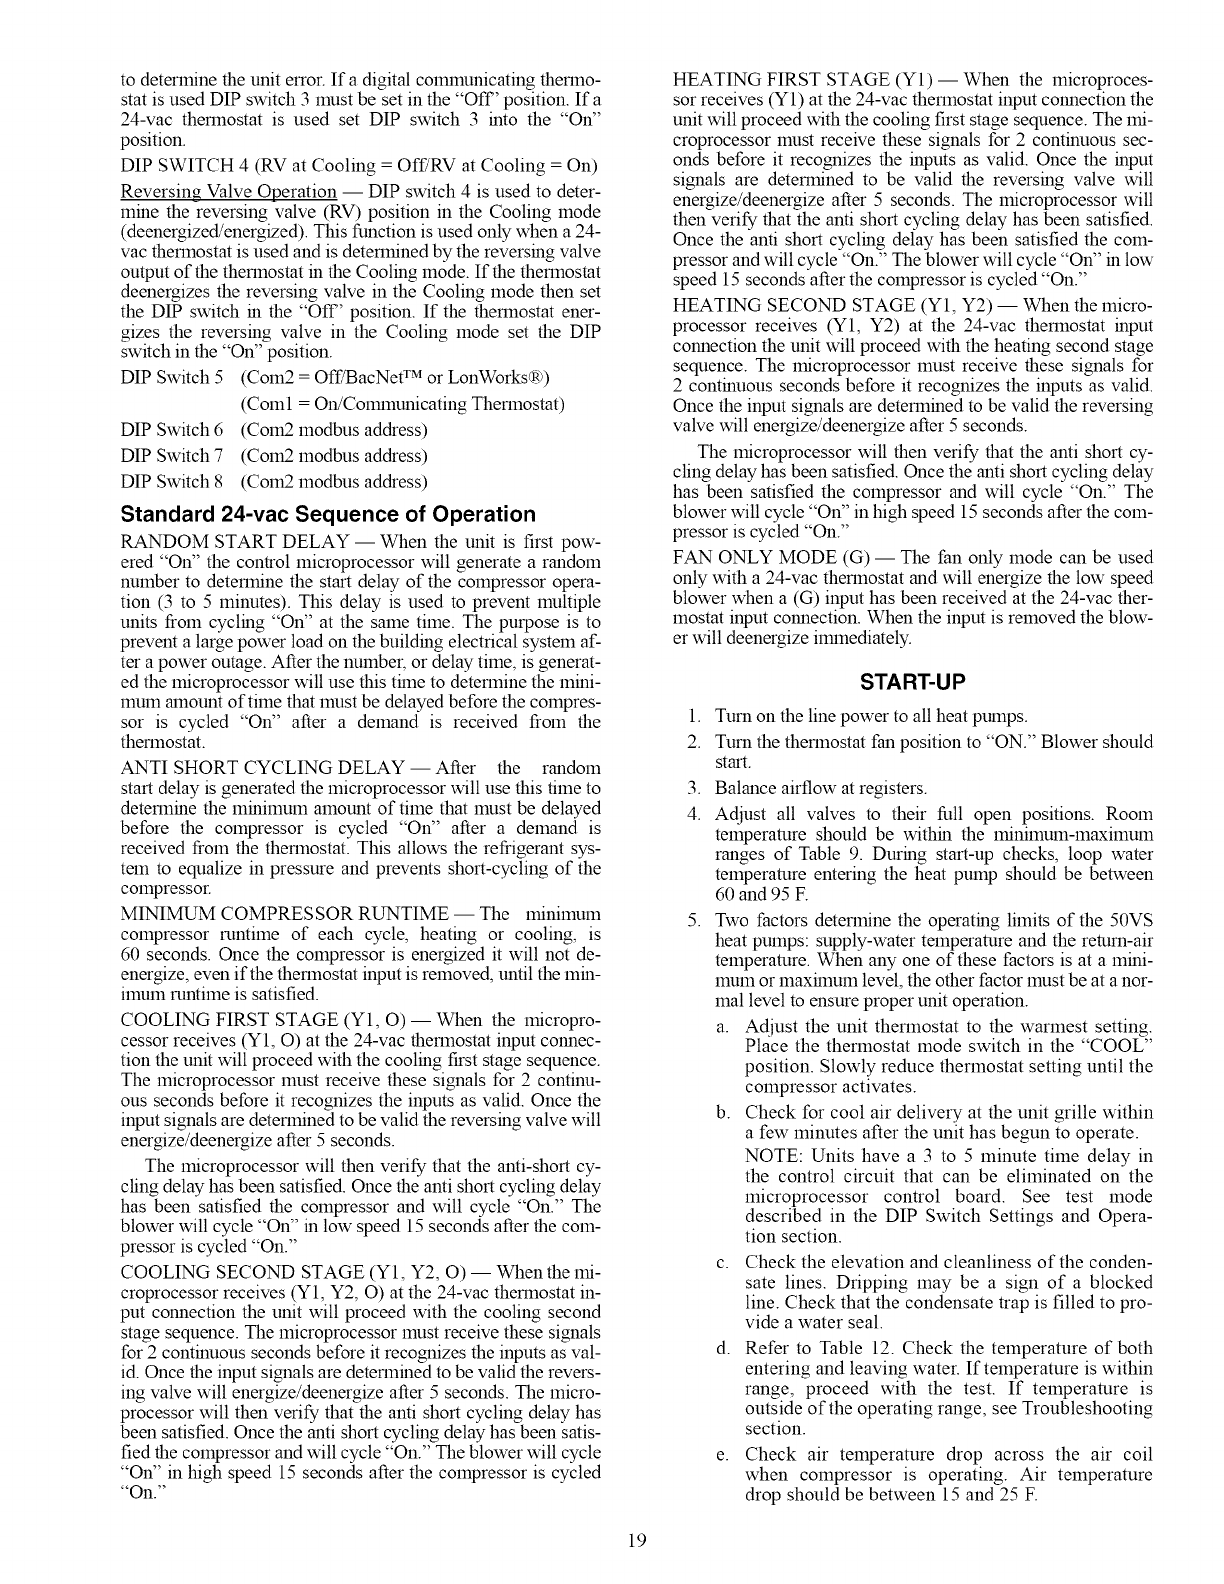
Standard 24-vac Sequence of Operation
RANDOM START DELAY -- When the unit is first pow-
ered "On" the control microprocessor will generate a random
number to determine the start delay of the compressor opera-
tion (3 to 5 minutes). This delay is used to prevent multiple
units from cycling "On" at the same time. The purpose is to
prevent a large power load on the building electrical system af-
ter a power outage. After the number, or delay time, is generat-
ed the microprocessor will use this thne to determine the mini-
mum amount of time that must be delayed before the compres-
sor is cycled "On" after a demand is received from the
thermostat.
ANTI SHORT CYCLING DELAY -- After the random
start delay is generated the microprocessor will use this time to
determine the minimum amount of time that must be delayed
before the compressor is cycled "On" after a demand is
received from the thermostat. This allows the refrigerant sys-
tem to equalize in pressure and prevents short-cycling of the
compressor.
MINIMUM COMPRESSOR RUNTIME -- The minimum
compressor mntime of each cycle, heating or cooling, is
60 seconds. Once the compressor is energized it will not de-
energize, even if the thermostat input is removed, until the min-
imum mntime is satisfied.
COOLING FIRST STAGE (Y1, O) -- When the micropro-
cessor receives (Y1, O) at the 24-vac thermostat input connec-
tion the unit will proceed with the cooling first stage sequence.
The microprocessor must receive these signals for 2 continu-
ous seconds before it recognizes the inputs as valid. Once the
input signals are determined to be valid the reversing valve will
energjze/deenergize after 5 seconds.
The microprocessor will then verify that the anti-short cy-
cling delay has been satisfied. Once the anti short cycling delay
has been satisfied the compressor and will cycle "On." The
blower will cycle "On" in low speed 15 seconds after the com-
pressor is cycled "On."
COOLING SECOND STAGE (Y1, Y2, O)- When the mi-
croprocessor receives (Y1, Y2, O) at the 24-vac thermostat in-
put connection the unit will proceed with the cooling second
stage sequence. The microprocessor must receive these signals
for 2 continuous seconds before it recognizes the inputs as val-
id. Once the input signals are determined to be valid the revers-
ing valve will energize/deenergize after 5 seconds. The micro-
processor will then verify that the anti short cycling delay has
been satisfied. Once the anti short cycling delay has been satis-
fied the compressor and will cycle "On." The blower will cycle
"On" in high speed 15 seconds after the compressor is cycled
"On."
HEATING FIRST STAGE (Y1) -- When the microproces-
sor receives (Y1) at the 24-vac thermostat input connection the
unit will proceed with the cooling first stage sequence. The mi-
croprocessor must receive these signals for 2 continuous sec-
onds before it recognizes the inputs as valid. Once the input
signals are determined to be valid the reversing valve will
energize/deenergize after 5 seconds. The microprocessor will
then verify that the anti short cycling delay has been satisfied.
Once the anti short cycling delay has been satisfied the com-
pressor and will cycle "On." The blower will cycle "On" in low
speed 15 seconds after the compressor is cycled "On."
HEATING SECOND STAGE (Y1, Y2) -- When the micro-
processor receives (Y1, Y2) at the 24-vac thermostat input
connection the unit will proceed with the heating second stage
sequence. The microprocessor must receive these signals for
2 continuous seconds before it recognizes the inputs as valid.
Once the input signals are determined to be valid the reversing
valve will energize/deenergize after 5 seconds.
The microprocessor will then verify that the anti short cy-
cling delay has been satisfied. Once the anti short cycling delay
has been satisfied the compressor and will cycle "On." The
blower will cycle "On" in high speed 15 seconds after the com-
pressor is cycled "On."
FAN ONLY MODE (G) -- The fan only mode can be used
only with a 24-vac thermostat and will energize the low speed
blower when a (G) input has been received at the 24-vac ther-
mostat input connection. When the input is removed the blow-
er will deenergize immediately.
START-UP
1. Turn on the line power to all heat pumps.
2. Turn the thermostat fan position to "ON." Blower should
start.
3.
4.
Balance airflow at registers.
Adjust all valves to their full open positions. Room
temperature should be within the minimum-maximum
ranges of Table 9. During start-up checks, loop water
temperature entering the heat pump should be between
60 and 95 E
Two factors determine the operating limits of the 50VS
heat pumps: supply-water temperature and the return-air
temperature. When any one of these factors is at a mini-
mum or maxhnum level, the other factor must be at a nor-
mal level to ensure proper unit operation.
a. Adjust the unit thermostat to the warmest setting.
Place the thermostat mode switch in the "COOL"
position. Slowly reduce thermostat setting until the
compressor activates.
b. Check for cool air delivery at the unit grille within
a few minutes after the unit has begun to operate.
NOTE: Units have a 3 to 5 minute time delay in
the control circuit that can be eliminated on the
microprocessor control board. See test mode
described in the DIP Switch Settings and Opera-
tion section.
C.
d.
5.
e.
Check the elevation and cleanliness of the conden-
sate lines. Dripping may be a sign of a blocked
line. Check that the condensate trap is filled to pro-
vide a water seal.
Refer to Table 12. Check the temperature of both
entering and leaving water. If temperature is within
range, proceed with the test. If temperature is
outside of the operating range, see Troubleshooting
section.
Check air temperature drop across the air coil
when compressor is operating. Air temperature
drop should be between 15 and 25 E
19
f. Turnthermostatto"OFF"position.A hissingnoise
indicatesproperfunctioningofthereversingvalve.
g. Allow5 minutesbetweentestsfor pressureto
equalizebeforebeginningheatingtest.
h. Adjustthethermostattothelowestsetting.Place
the thermostat mode switch in the "HEAT"
position.
i. Slowly raise the thermostat to a higher temperature
until the compressor activates.
j. Check for warm air delivery within a few minutes
after the unit has begun to operate.
k. Refer to Table 9. Check the temperature of both
entering and leaving water. If temperature is within
range, proceed with the test. If temperature is out-
side of the operating range, check refrigerant
pressures.
1. Check air temperature rise across the air coil when
compressor is operating. Air temperature rise
should be between 20 and 30 F.
in. Check for vibration, noise, and water leaks.
6. If unit fails to operate, perform troubleshooting analysis
(see troubleshooting section). If the check described fails
to reveal the problem and the unit still does not operate,
contact a trained service technician to ensure proper diag-
nosis and repair of the equipment.
7. When testing is complete, set system to maintain desired
comfort level.
NOTE: If performance during any mode appears abnormal
refer to the troubleshooting section of this manual. To obtain
maximum performance, the air coil should be cleaned before
start-up. Use a coil cleaner for use on indoor evaporator refrig-
eration equipment.
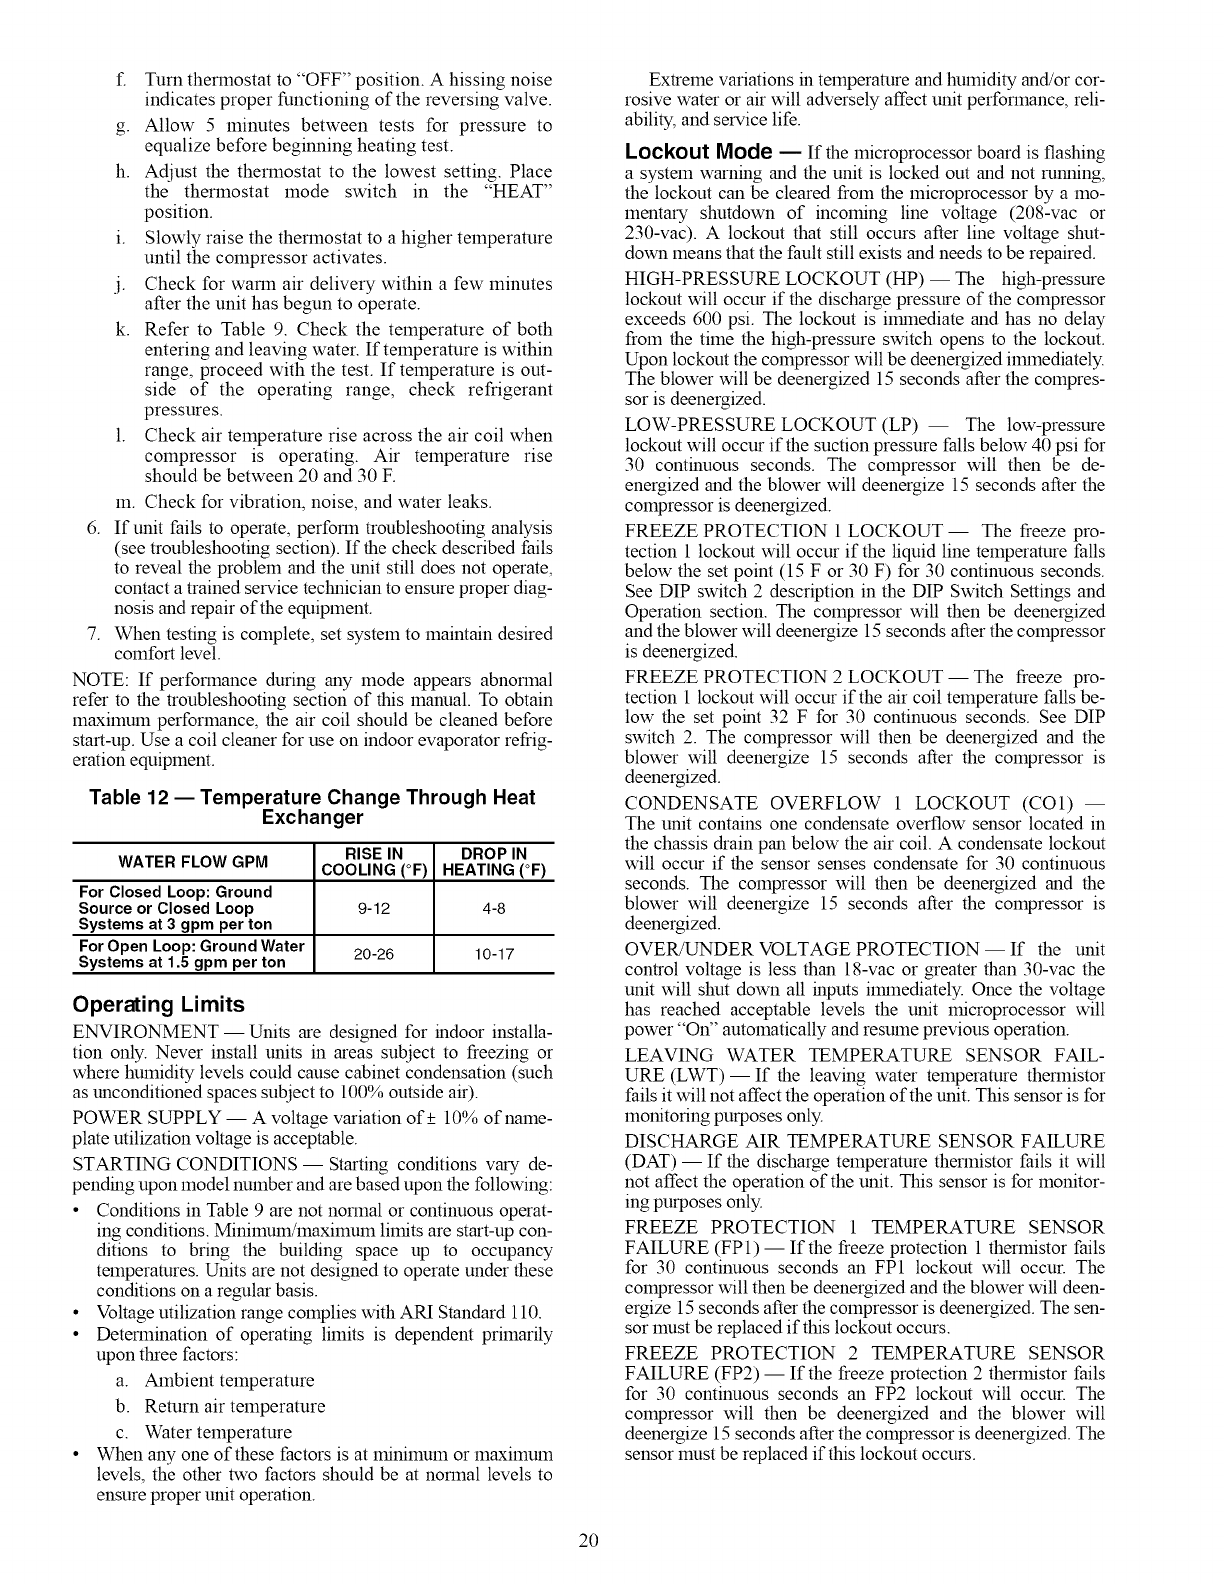
Table 12 -- Temperature Change Through Heat
Exchanger
RISE IN DROP IN
WATER FLOW GPM COOLING (°F) HEATING (°F)
For Closed Loop: Ground
Source or Closed Loop 9-12 4-8
Systems at 3 gpm per ton
For Open Loop: Ground Water 20-26 10-17
Systems at 1.5 gpm per ton
Operating Limits
ENVIRONMENT- Units are designed for indoor installa-
tion only. Never install units in areas subject to freezing or
where humidity levels could cause cabinet condensation (such
as unconditioned spaces subject to 100% outside air).
POWER SUPPLY -- A voltage variation of_+ 10% of name-
plate utilization voltage is acceptable.
STARTING CONDITIONS- Starting conditions vary de-
pending upon model number and are based upon the following:
• Conditions in Table 9 are not normal or continuous operat-
ing conditions. Minimuln/lnaximuln limits are start-up con-
ditions to bring the building space up to occupancy
temperatures. Units are not designed to operate under these
conditions on a regular basis.
• Voltage utilization range complies with ARI Standard 110.
• Determination of operating limits is dependent primarily
upon three factors:
a. Ambient temperature
b. Return air temperature
c. Water temperature
• When any one of these factors is at lninimum or maximum
levels, the other two factors should be at normal levels to
ensure proper unit operation.
Extreme variations in temperature and humidity and/or cor-
rosive water or air will adversely affect unit performance, reli-
ability, and service life.
Lockout Mode EIf the microprocessor board is flashing
a system warning and the unit is locked out and not running,
the lockout can be cleared from the microprocessor by a mo-
mentary shutdown of incoming line voltage (208-vac or
230-vac). A lockout that still occurs after line voltage shut-
down means that the fault still exists and needs to be repaired.
HIGH-PRESSURE LOCKOUT (HP) -- The high-pressure
lockout will occur if the discharge pressure of the compressor
exceeds 600 psi. The lockout is ilrnnediate and has no delay
from the time the high-pressure switch opens to the lockout.
Upon lockout the compressor will be deenergized ilmnediately.
The blower will be deenergized 15 seconds after the compres-
sor is deenergized.
LOW-PRESSURE LOCKOUT (LP) -- The low-pressure
lockout will occur if the suction pressure falls below 40 psi for
30 continuous seconds. The compressor will then be de-
energized and the blower will deenergize 15 seconds after the
compressor is deenergized.
FREEZE PROTECTION 1 LOCKOUT- The freeze pro-
tection 1 lockout will occur if the liquid line temperature falls
below the set point (15 F or 30 F) for 30 continuous seconds.
See DIP switch 2 description in the DIP Switch Settings and
Operation section. The compressor will then be deenergized
and the blower will deenergize 15 seconds after the compressor
is deenergized.
FREEZE PROTECTION 2 LOCKOUT -- The freeze pro-
tection 1 lockout will occur if the air coil temperature falls be-
low the set point 32 F for 30 continuous seconds. See DIP
switch 2. The compressor will then be deenergized and the
blower will deenergize 15 seconds after the compressor is
deenergized.
CONDENSATE OVERFLOW 1 LOCKOUT (CO1) --
The unit contains one condensate overflow sensor located in
the chassis drain pan below the air coil. A condensate lockout
will occur if the sensor senses condensate for 30 continuous
seconds. The compressor will then be deenergized and the
blower will deenergize 15 seconds after the compressor is
deenergized.
OVER/UNDER VOLTAGE PROTECTION -- If the unit
control voltage is less than 18-vac or greater than 30-vac the
unit will shut down all inputs ilrnnediately. Once the voltage
has reached acceptable levels the unit microprocessor will
power "On" automatically and resume previous operation.
LEAVING WATER TEMPERATURE SENSOR FAIL-
URE (LWT)- If the leaving water temperature thermistor
fails it will not affect the operation of the unit. This sensor is for
monitoring purposes only.
DISCHARGE AIR TEMPERATURE SENSOR FAILURE
(DAT)- If the discharge temperature thermistor fails it will
not affect the operation of the unit. This sensor is for monitor-
ing purposes only.
FREEZE PROTECTION 1 TEMPERATURE SENSOR
FAILURE (FP1) --If the freeze protection 1 thermistor fails
for 30 continuous seconds an FP1 lockout will occur. The
compressor will then be deenergized and the blower will deen-
ergize 15 seconds after the compressor is deenergized. The sen-
sor must be replaced if this lockout occurs.
FREEZE PROTECTION 2 TEMPERATURE SENSOR
FAILURE (FP2) -- If the freeze protection 2 thermistor fails
for 30 continuous seconds an FP2 lockout will occur. The
compressor will then be deenergized and the blower will
deenergize 15 seconds after the compressor is deenergized. The
sensor must be replaced if this lockout occurs.
20
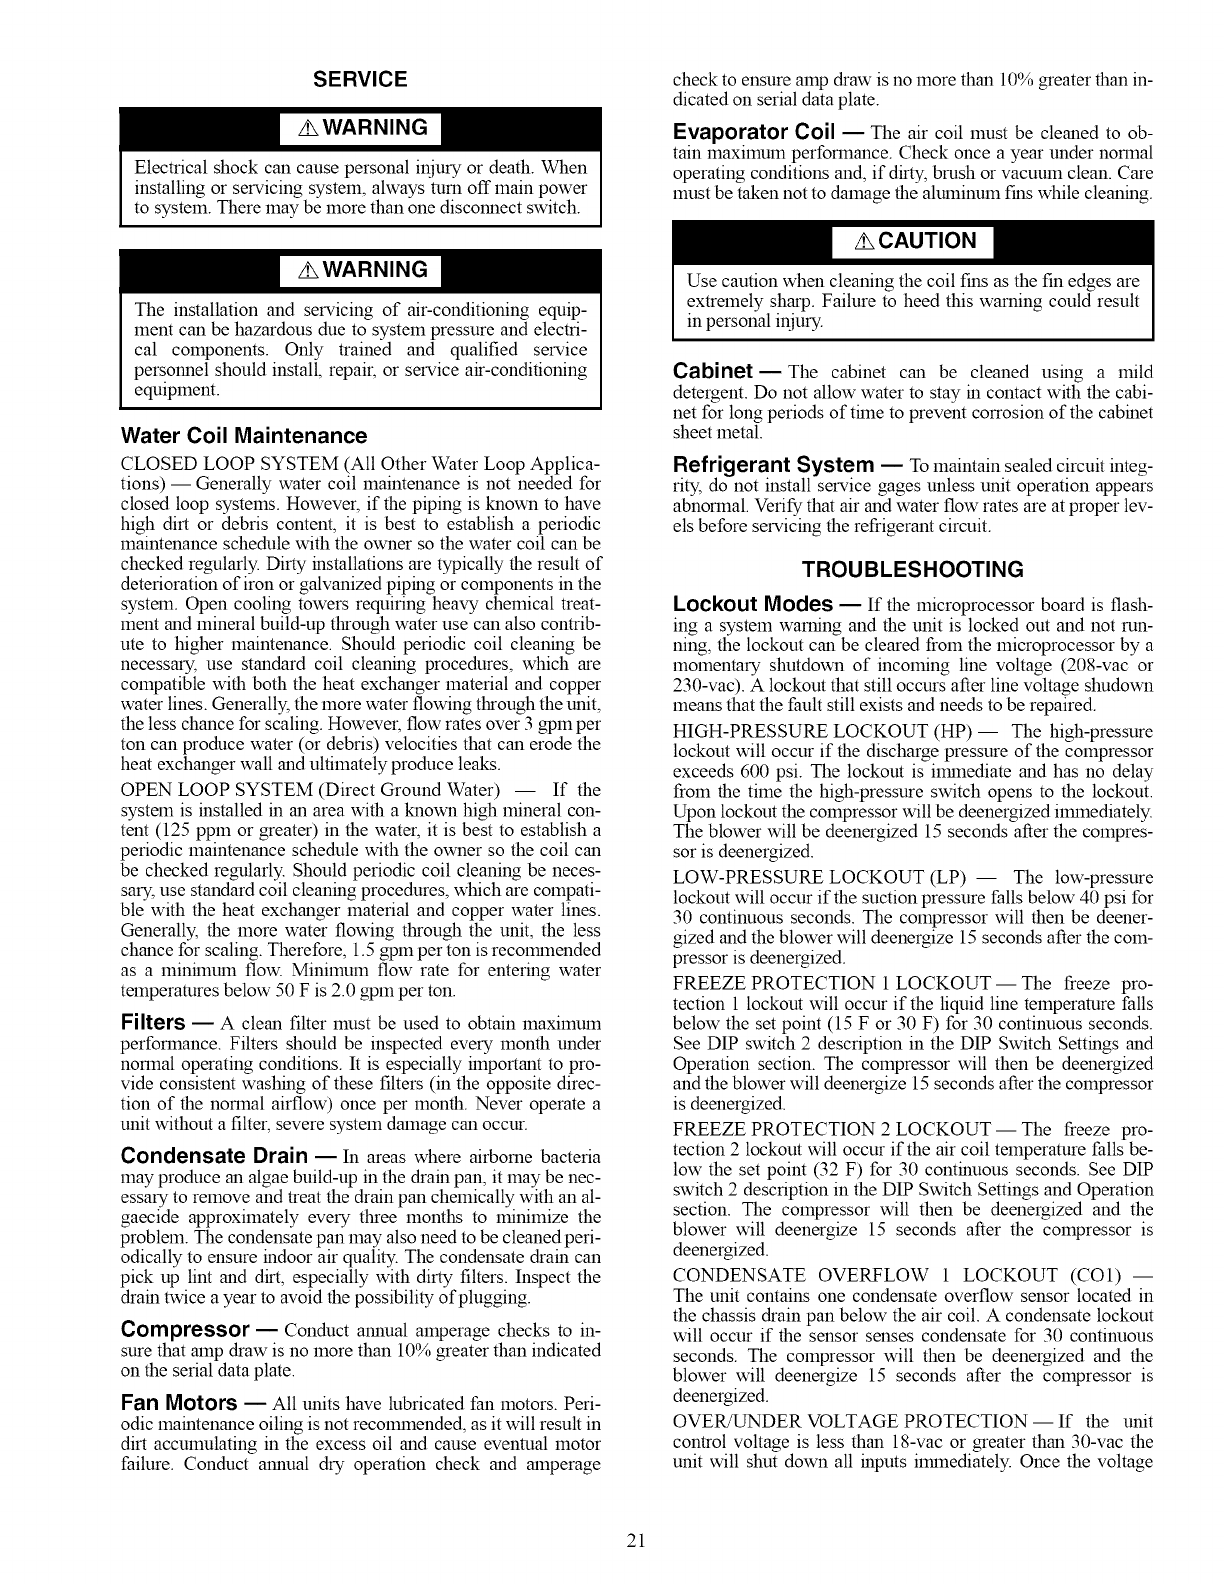
SERVICE
Electrical shock can cause personal iniury or death. When
installing or servicing system, always turn off main power
to system. There may be more than one disconnect switch.
check to ensure amp draw is no more than 10% greater than in-
dicated on serial data plate.
Evaporator Coil -- The air coil must be cleaned to ob-
tain maximum performance. Check once a year under normal
operating conditions and, if dirty, brush or vacuum clean. Care
must be taken not to damage the aluminum fins while cleaning.
The installation and servicing of air-conditioning equip-
ment can be hazardous due to system pressure and electri-
cal components. Only trained and qualified service
personnel should install, repair, or service air-conditioning
equipment.
Water Coil Maintenance
CLOSED LOOP SYSTEM (All Other Water Loop Applica-
tions) -- Generally water coil maintenance is not needed for
closed loop systems. However, if the piping is known to have
high dirt or debris content, it is best to establish a periodic
maintenance schedule with the owner so the water coil can be
checked regularly. Dirty installations are typically the result of
deterioration of iron or galvanized piping or components in the
system. Open cooling towers requiring heavy chemical treat-
ment and mineral build-up through water use can also contrib-
ute to higher maintenance. Should periodic coil cleaning be
necessary, use standard coil cleaning procedures, which are
compatible with both the heat exchanger material and copper
water lines. Generally, the more water flowing through the unit,
the less chance for scaling. However, flow rates over 3 gpm per
ton can produce water (or debris) velocities that can erode the
heat exchanger wall and ultimately produce leaks.
OPEN LOOP SYSTEM (Direct Ground Water) -- If the
system is installed m an area with a known high mineral con-
tent (125 ppm or greater) in the water, it is best to establish a
periodic maintenance schedule with the owner so the coil can
be checked regularly. Should periodic coil cleaning be neces-
sary, use standard coil cleaning procedures, which are compati-
ble with the heat exchanger material and copper water lines.
Generally, the more water flowing through the unit, the less
chance for scaling. Therefore, 1.5 gpm per ton is recolr_nended
as a minhnum flow. Minimum flow rate for entering water
temperatures below 50 F is 2.0 gpm per ton.
Filters -- A clean filter must be used to obtain maximum
performance. Filters should be inspected every month under
normal operating conditions. It is especially flnportant to pro-
vide consistent washing of these filters (in the opposite direc-
tion of the normal airflow) once per month. Never operate a
unit without a filter, severe system damage can occur.
Condensate Drain- In areas where airborne bacteria
may produce an algae build-up in the dram pan, it may be nec-
essary to remove and treat the drain pan chemically with an al-
gaecide approximately every three months to minimize the
problem. The condensate pan may also need to be cleaned peri-
odically to ensure indoor air quality. The condensate dram can
pick up lint and dirt, especially with dirty filters. Inspect the
dram twice a year to avoid the possibility of plugging.
Compressor _Conduct annual amperage checks to in-
sure that amp draw is no more than 10% greater than indicated
on the serial data plate.
Fan Motors _All units have lubricated fan motors. Peri-
odic maintenance oiling is not recolmnended, as it will result in
dirt accumulating in the excess oil and cause eventual motor
failure. Conduct annual dry operation check and amperage
Use caution when cleaning the coil fins as the fin edges are
extremely sharp. Failure to heed this warning could result
in personal iniury.
Cabinet _The cabinet can be cleaned using a mild
detergent. Do not allow water to stay m contact with the cabi-
net for long periods of thne to prevent corrosion of the cabinet
sheet metal.
Refrigerant System -- Tomaintain sealed circuit integ-
rity, do not install service gages unless unit operation appears
abnormal. Verify that air and water flow rates are at proper lev-
els before servicing the refrigerant circuit.
TROUBLESHOOTING
Lockout Modes _If the microprocessor board is flash-
ing a system warning and the unit is locked out and not run-
ning, the lockout can be cleared from the microprocessor by a
momentary shutdown of incoming line voltage (208-vac or
230-vac). A lockout that still occurs after line voltage shudown
means that the fault still exists and needs to be repaired.
HIGH-PRESSURE LOCKOUT (HP) -- The high-pressure
lockout will occur if the discharge pressure of the compressor
exceeds 600 psi. The lockout is ilr_nediate and has no delay
from the time the high-pressure switch opens to the lockout.
Upon lockout the compressor will be deenergized ilmnediately.
The blower will be deenergized 15 seconds after the compres-
sor is deenergized.
LOW-PRESSURE LOCKOUT (LP) -- The low-pressure
lockout will occur if the suction pressure falls below 40 psi for
30 continuous seconds. The compressor will then be deener-
gized and the blower will deenergize 15 seconds after the com-
pressor is deenergized.
FREEZE PROTECTION 1 LOCKOUT -- The freeze pro-
tection 1 lockout will occur if the liquid line temperature falls
below the set point (15 F or 30 F) for 30 continuous seconds.
See DIP switch 2 description in the DIP Switch Settings and
Operation section. The compressor will then be deenergized
and the blower will deenergize 15 seconds after the compressor
is deenergized.
FREEZE PROTECTION 2 LOCKOUT -- The freeze pro-
tection 2 lockout will occur if the air coil temperature falls be-
low the set point (32 F) for 30 continuous seconds. See DIP
switch 2 description in the DIP Switch Settings and Operation
section. The compressor will then be deenergized and the
blower will deenergize 15 seconds after the compressor is
deenergized.
CONDENSATE OVERFLOW 1 LOCKOUT (CO1) --
The unit contains one condensate overflow sensor located in
the chassis drain pan below the air coil. A condensate lockout
will occur if the sensor senses condensate for 30 continuous
seconds. The compressor will then be deenergized and the
blower will deenergize 15 seconds after the compressor is
deenergized.
OVER/UNDER VOLTAGE PROTECTION -- If the unit
control voltage is less than 18-vac or greater than 30-vac the
unit will shut down all inputs ilr_nediately. Once the voltage
21
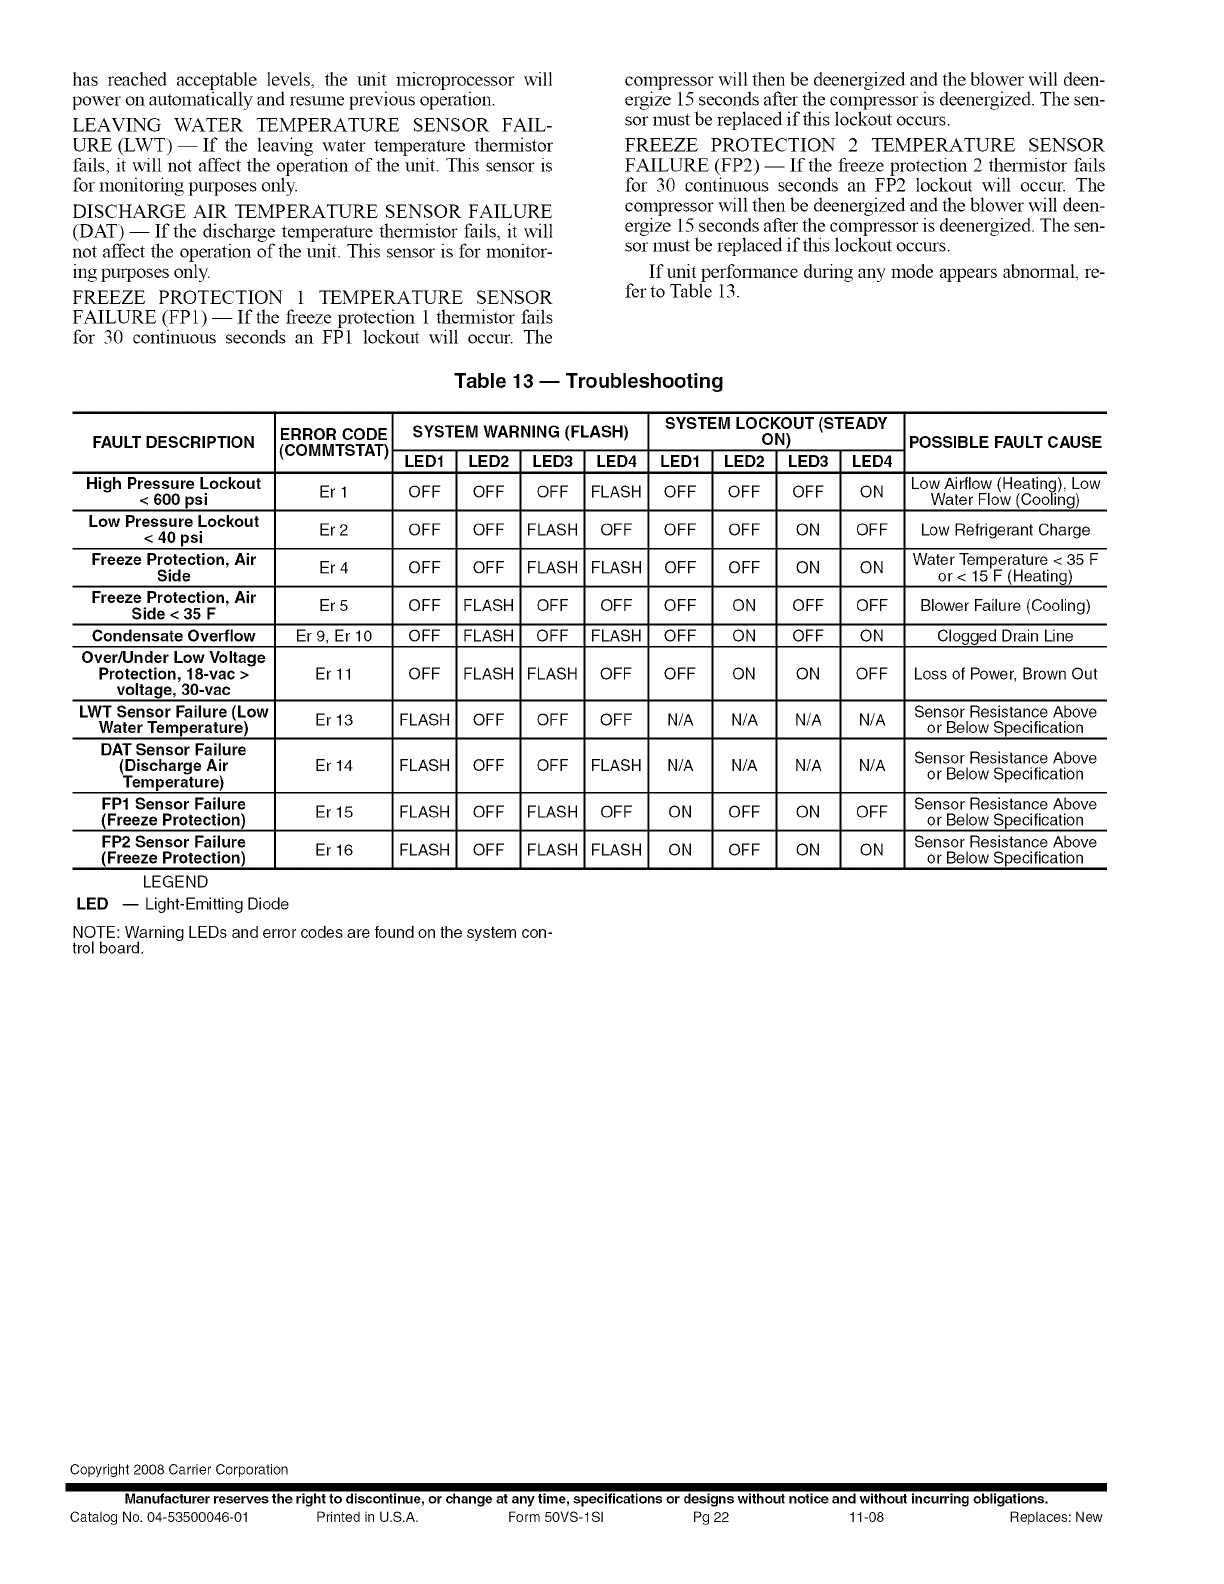
hasreachedacceptablelevels,theunitmicroprocessorwill
poweronautomaticallyandresumepreviousoperation.
LEAVINGWATERTEMPERATURESENSORFAIL-
URE(LWT)-- If theleavingwatertemperaturethermistor
fails,it willnotaffecttheoperationoftheunit.Thissensoris
formonitoringpurposesonly.
DISCHARGEAIRTEMPERATURESENSORFAILURE
(DAT)-- If thedischargetemperaturethermistorfails,it will
notaffecttheoperationoftheunit.Thissensorisformonitor-
ingpurposesonly.
FREEZEPROTECTION1 TEMPERATURESENSOR
FAILURE(FP1)--If thefreezeprotection1thermistorfails
for 30continuoussecondsanFP1lockoutwill occur.The
compressor will then be deenergized and the blower will deen-
ergize 15 seconds after the compressor is deenergized. The sen-
sor must be replaced if this lockout occurs.
FREEZE PROTECTION 2 TEMPERATURE SENSOR
FAILURE (FP2) -- If the freeze protection 2 thermistor fails
for 30 continuous seconds an FP2 lockout will occur. The
compressor will then be deenergized and the blower will deen-
ergize 15 seconds after the compressor is deenergized. The sen-
sor must be replaced if this lockout occurs.
If unit performance during any mode appears abnormal, re-
fer to Table 13.
Table 13 -- Troubleshooting
FAULTDESCRIPTION
High Pressure Lockout
<600 psi
Low Pressure Lockout
< 40 psi
Freeze Protection, Air
Side
Freeze Protection, Air
Side < 35 F
Condensate Overflow
Over/Under Low Voltage
Protection, 18-vac >
voltage, 30-vac
LWT Sensor Failure (Low
Water Temperature)
DAT Sensor Failure
(Discharge Air
Temperature)
FP1 Sensor Failure
(Freeze Protection)
FP2 Sensor Failure
(Freeze Protection)
LEGEND
LED -- Light-Emitting Diode
SYSTEM LOCKOUT (STEADY
ERROR CODE SYSTEM WARNING (FLASH) ON)
(COMMTSTAT) LED1 LED2 LED3 LED4 LED1 LED2 LED3 LED4
Er 1 OFF OFF OFF FLASH OFF OFF OFF ON
POSSIBLE FAULT CAUSE
Low Airflow (Heating), Low
Water Flow (Cooling)
Er 2 OFF OFF FLASH OFF OFF OFF ON OFF Low Refrigerant Charge
Er 4 OFF OFF FLASH FLASH OFF OFF ON ON Water Temperature < 35 F
or < 15 F (Heating)
Er 5 OFF FLASH OFF OFF OFF ON OFF OFF Blower Failure (Cooling)
Er 9, Er 10 OFF FLASH OFF FLASH OFF ON OFF ON Clogged Drain Line
Er 11 OFF FLASH FLASH OFF OFF ON ON OFF Loss of Power, Brown Out
Er 13 FLASH OFF OFF OFF N/A N/A N/A N/A Sensor Resistance Above
or Below Specification
Er 14 FLASH OFF OFF FLASH N/A N/A N/A N/A Sensor Resistance Above
or Below Specification
Er 15 FLASH OFF FLASH OFF ON OFF ON
Er 16 FLASH OFF FLASH FLASH ON OFF ON
OFF Sensor Resistance Above
or Below Specification
ON Sensor Resistance Above
or Below Specification
NOTE: Warning LEDs and error codes are found on the system con-
trol board.
Copyright 2008 Carrier Corporation
Manufacturer reserves the right to discontinue, or change at any time, specifications or designs without notice and without incurring obligations.
Catalog No. 04-53500046-01 Printed in U.S.A. Form 50VS-1Sl Pg 22 11-08 Replaces: New
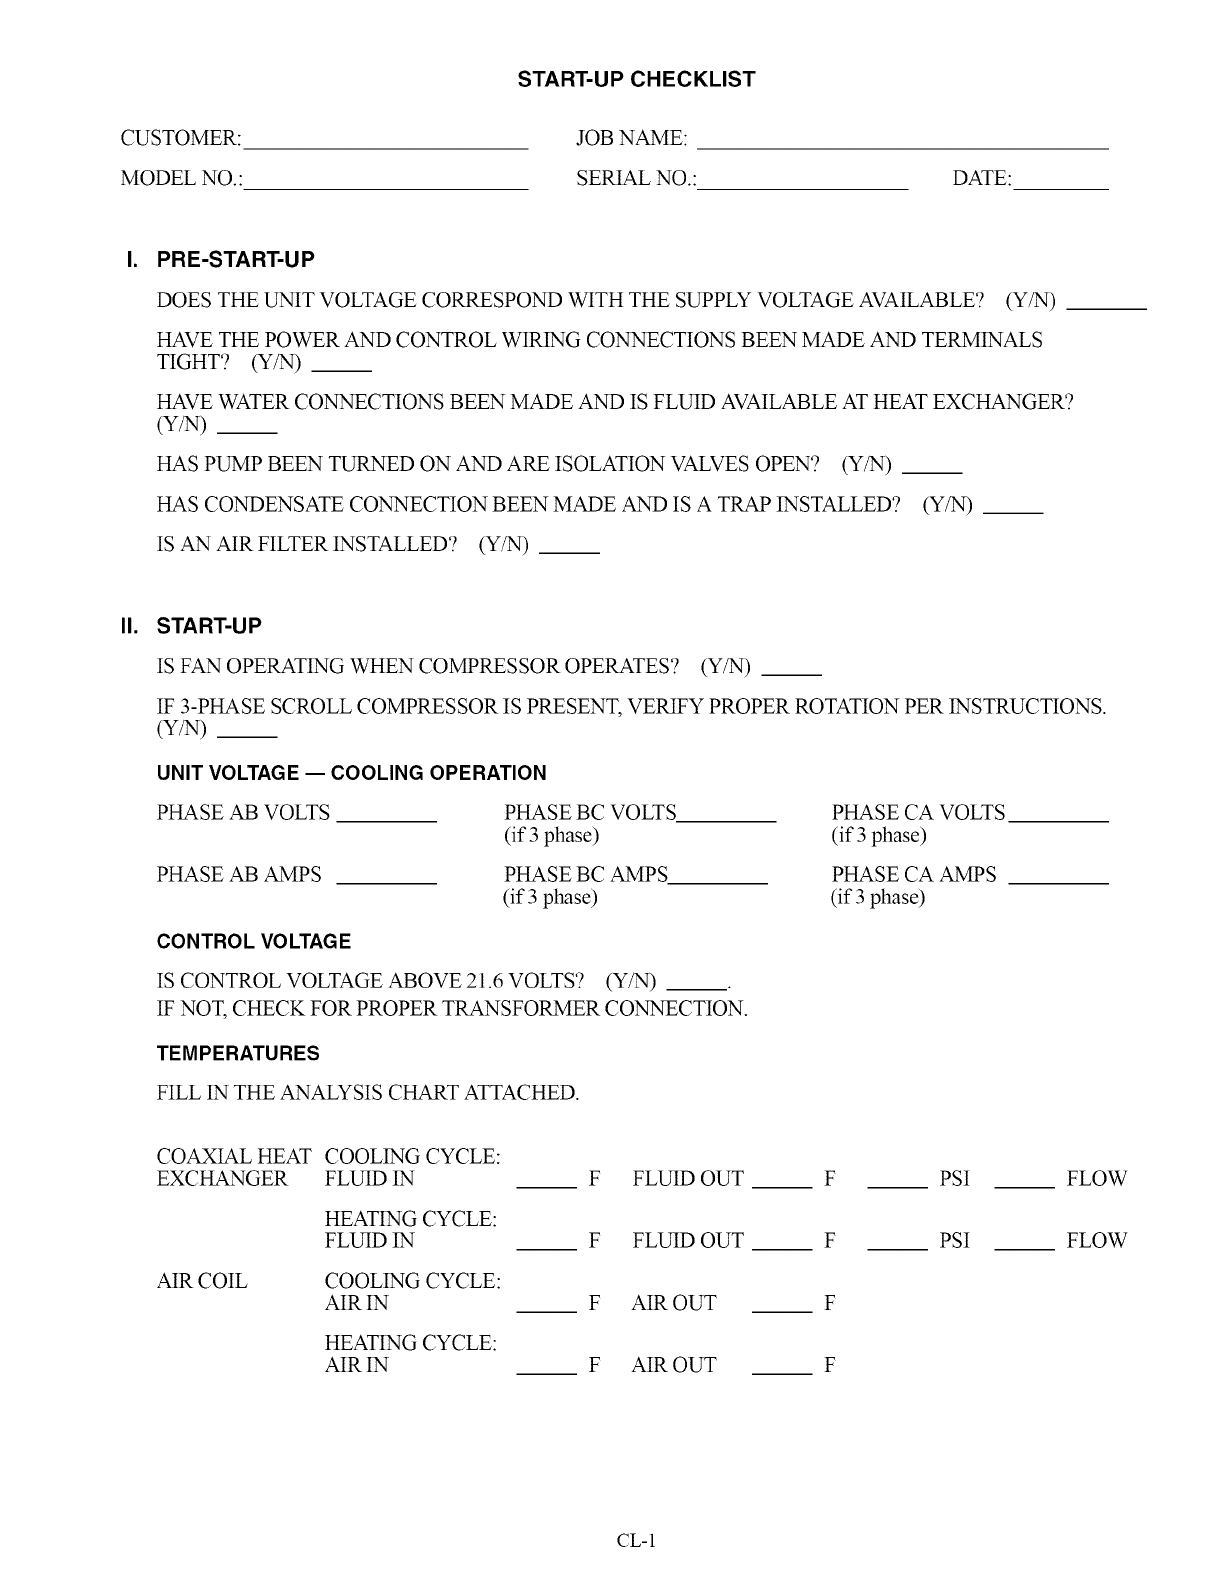
CUSTOMER:
MODEL NO.:
START-UP CHECKLIST
JOB NAME:
SERIAL NO.: DATE:
PRE-START-UP
DOES THE UNiT VOLTAGE CORRESPOND WITH THE SUPPLY VOLTAGE AVAILABLE? (Y/N)
HAVE THE POWER AND CONTROL WIRING CONNECTIONS BEEN MADE AND TERMINALS
TIGHT? (Y/N)_
HAVE WATER CONNECTIONS BEEN MADE AND IS FLUID AVAILABLE AT HEAT EXCHANGER?
(Y/N) __
HAS PUMP BEEN TURNED ON AND ARE ISOLATION VALVES OPEN? (Y/N) __
HAS CONDENSATE CONNECTION BEEN MADE AND IS ATRAP INSTALLED? (Y/N) __
IS AN AIR FILTER INSTALLED? (Y/N) __
II. START-UP
IS FAN OPERATING WHEN COMPRESSOR OPERATES? (Y/N) __
IF 3-PHASE SCROLL COMPRESSOR IS PRESENT, VERIFY PROPER ROTATION PER INSTRUCTIONS.
(Y/N) __
UNIT VOLTAGE -- COOLING OPERATION
PHASE AB VOLTS PHASE BC VOLTS
(if 3 phase)
PHASE AB AMPS PHASE BC AMPS
(if 3 phase)
CONTROL VOLTAGE
IS CONTROL VOLTAGE ABOVE 21.6 VOLTS? (Y!N) __
IF NOT, CHECK FOR PROPER TRANSFORMER CONNECTION.
TEMPERATURES
FILL IN THE ANALYSIS CHART ATTACHED.
PHASE CA VOLTS
(if 3 phase)
PHASE CA MPS
(if 3 phase)
COAXIAL HEAT COOLING CYCLE:
EXCHANGER FLUID IN F FLUID OUT F
HEATING CYCLE:
FLUID IN F FLUID OUT F
AIR COIL COOLING CYCLE:
AIR IN F AIR OUT F
HEATING CYCLE:
AIR IN F AIR OUT F
PSI FLOW
PSI FLOW
CL-1
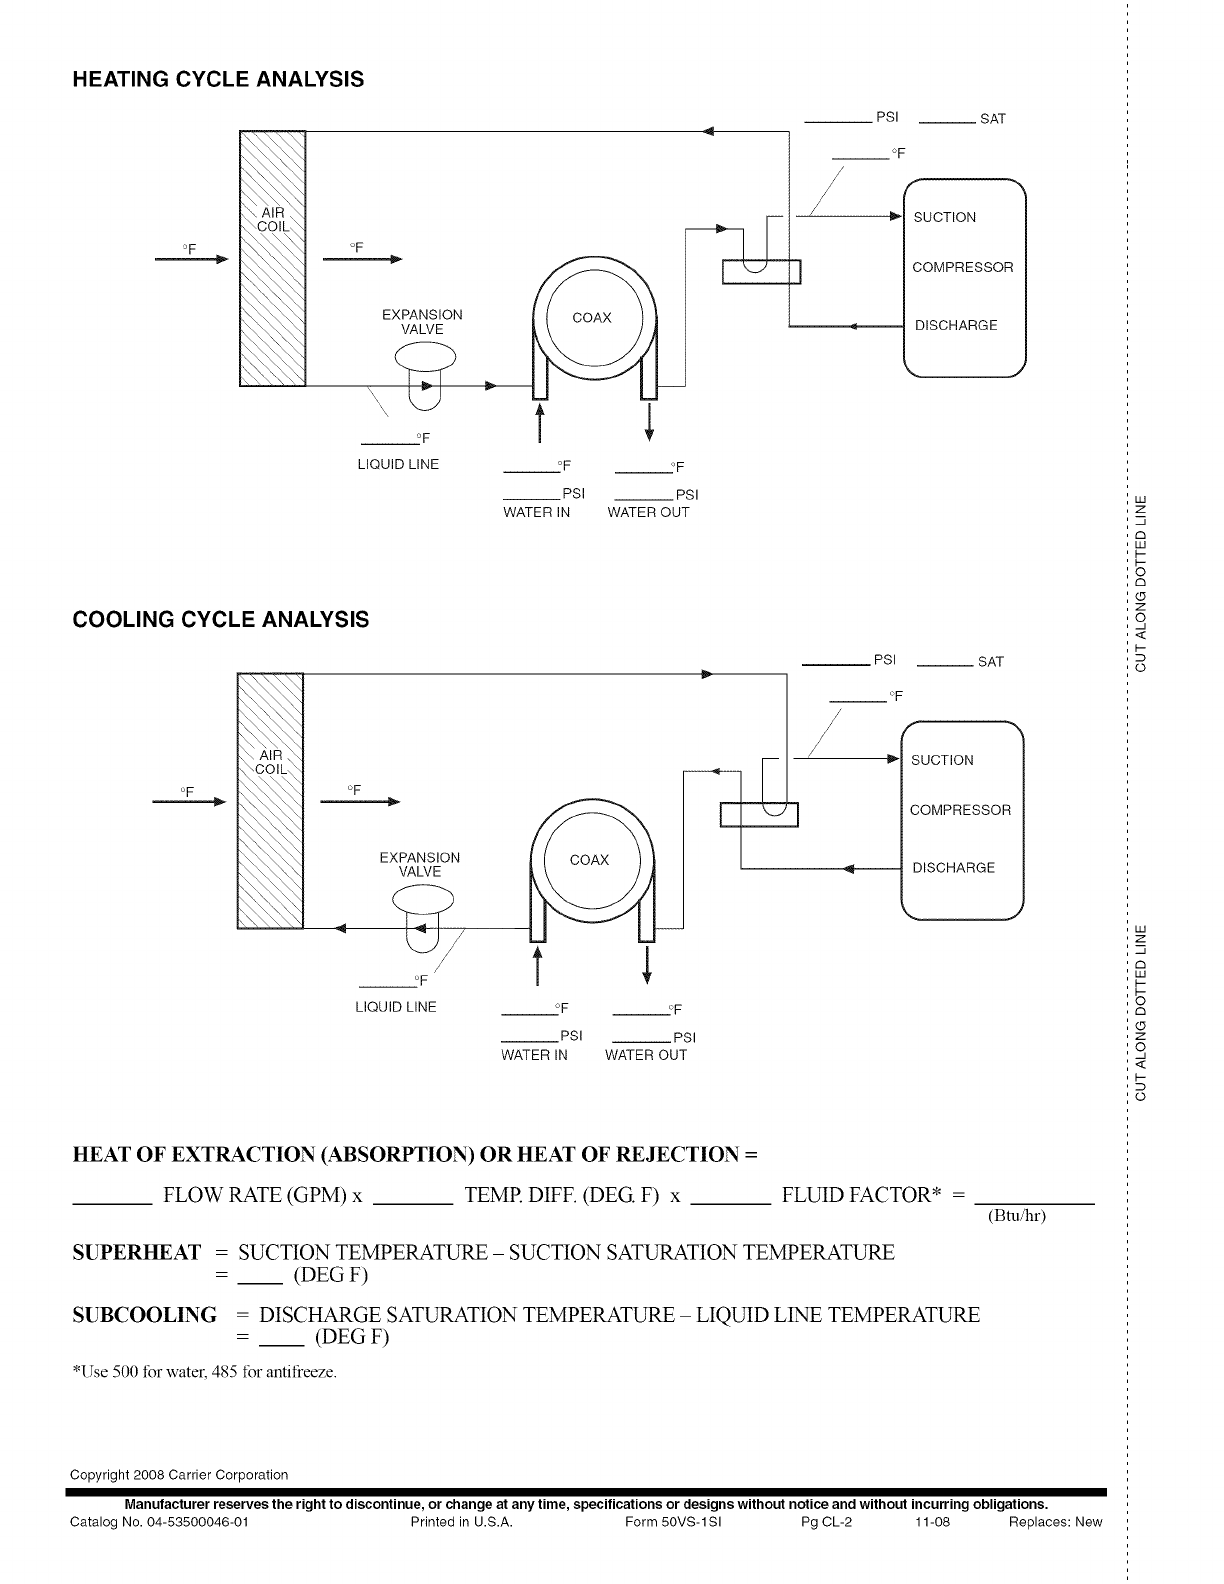
HEATING CYCLE ANALYSIS
oF
_\\\ \\
\\\\\\
,:", AIR ,_
\\COIL\\
\\\\\\
\\\\\\
\\\\_,
\\\\\\
,\\\\\
\\\\\\
\\\\\\
oF
EXPANSION
VALVE
\\LJ
oF
LIQUID LINE
t
°F o F
PSI __PSI
WATER IN WATER OUT
PSI
oF
7
COOLING CYCLE ANALYSIS
oF
\\\\\,
\\ \\\\
x\\\\\
AIR
_COILO
_\\\\\
_\\\\,
,\\\\\
,\\\\,
x\\\\\
_\\\\\
_\\\\\
oF
EXPANSION
VALVE
_'F
LIQUID LINE
t
°F __?F
PSI __PSI
WATER IN WATER OUT
__ PSI
__ SAT
SUCTION
COMPRESSOR
DISCHARGE
__ SAT
oF
SUCTION
COMPRESSOR
DISCHARGE
iii
Z
-7
¢h
iii
i--
i--
o
¢h
(D
Z
o,
<
i--
o
iii
Z
-7
¢h
iii
i.-
6
¢h
(D
Z
o,
<
i--
HEAT OF EXTRACTION (ABSORPTION) OR HEAT OF REJECTION =
FLOW RATE (OPM) x TEMP. DIFF. (DEO. F) x FLUID FACTOR* =
SUPERHEAT = SUCTION TEMPERATURE - SUCTION SATURATION TEMPERATURE
= __ (DEG F)
SUBCOOLING = DISCHARGE SATURATION TEMPERATURE - LIQUID LIN_ TEMPERATURE
= __ (DEG F)
*Use 500 for water, 485 for antifreeze.
(Btu/hr)
Copyright 2008 Carrier Corporation
Manufacturer reserves the right to discontinue, or change at any time, specifications or designs without notice and without incurring obligations.
Catalog No. 04-53500046-01 Printed in U.S.A. Form 50VS-1 SI Pg CL-2 11-08 Replaces: New
