CCL ELECTRONICS 84291702 Transmitter User Manual C8428 M01 R1 WWVB CCL ai
CCL ELECTRONICS LTD Transmitter C8428 M01 R1 WWVB CCL ai
UserManual.wiki
>
CCL ELECTRONICS
>
84291702 User Manual
User Manual
Navigation menu
Upload a User Manual
Namespaces
Wiki Guide
HTML
PDF
Info
Views
User Manual
Discussion / Help
Navigation
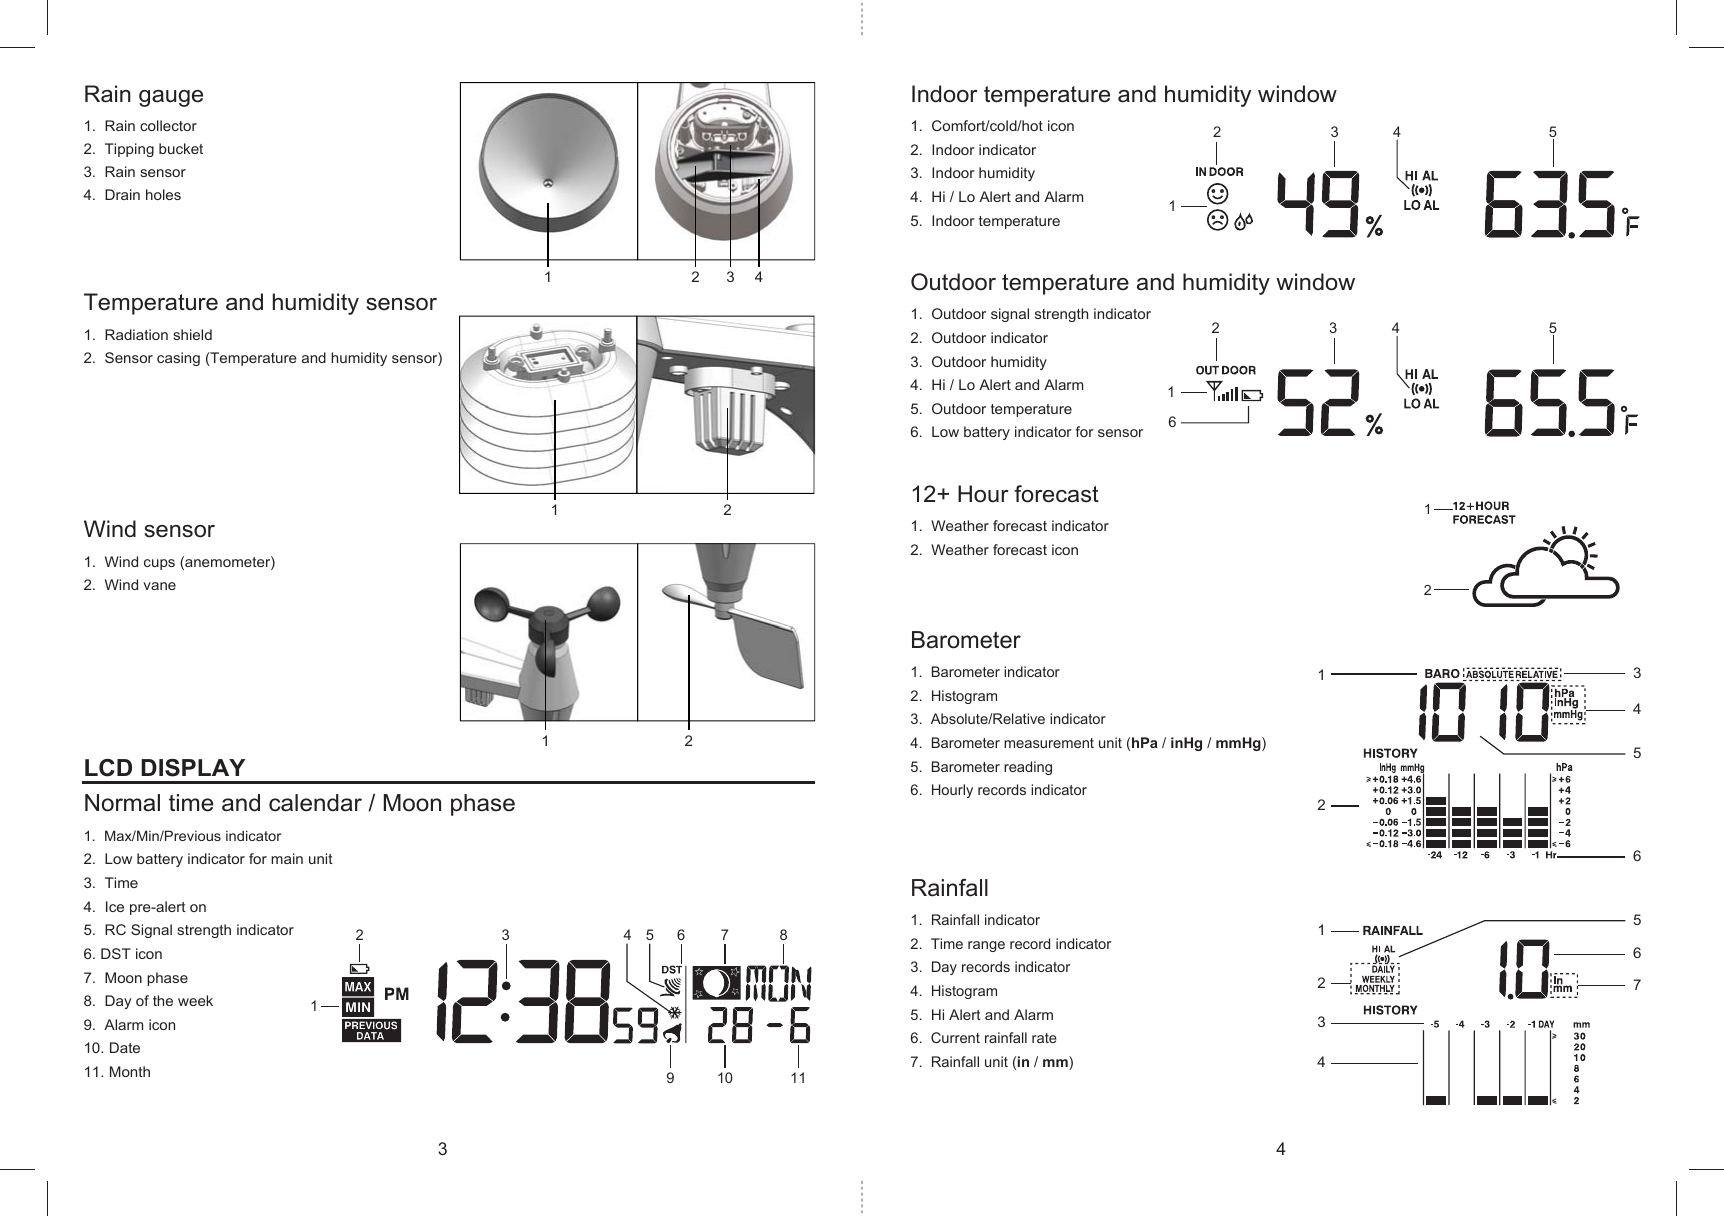
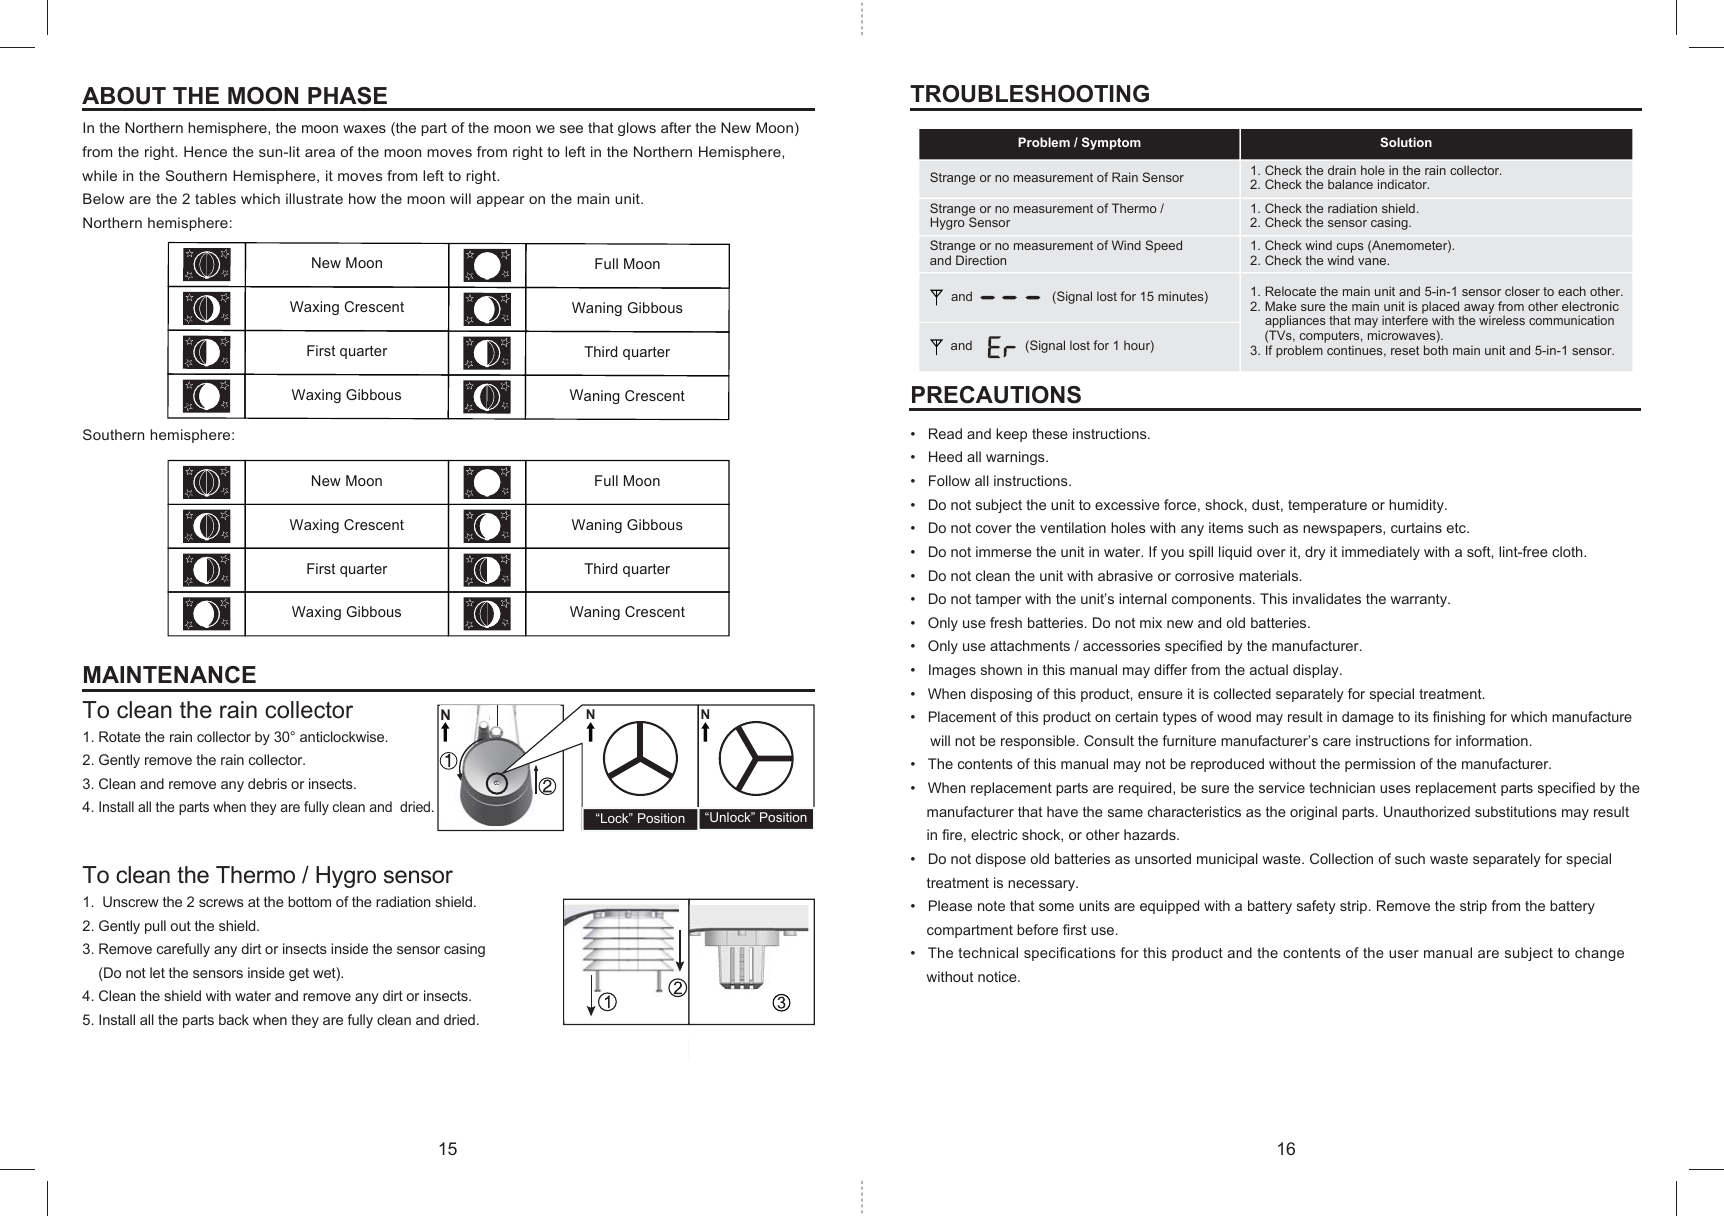
![Alarm off Alarm on Alarm with ice-alertRC on RC offDISPLAY MAIN UNITStand and batteries installationThe unit is designed for desktop or wall mount for easy viewing.1. Remove the battery door of the main unit.2. Insert 3 new AA size batteries according to the “+/-” polarity mark on the battery compartment.3. Replace the battery door.4. Once the batteries are inserted, all the segments of the LCD will be shown briefly before entering the radio-controlled time reception mode. 5. The RC clock will automatically start scanning for the radio-controlled time signal in 8 seconds.Note: 1. If no display appears on the LCD after inserting the batteries, press the RESET button by using a pointed object.2. In some cases, you may not receive the signal immediately due to the atmospheric disturbance.Pairing of wireless 5-in-1 sensor with Display Main UnitAfter insertion of batteries, the Display Main Unit will automatically search and connect the wireless 5-in-1 sensor (antenna blinking).Once the connection is successful, antenna mark and readings for outdoor temperature, humidity, wind speed, wind direction, and rainfall will appear on the display.Changing batteries and manual pairing of sensorWhenever you changed the batteries of the wireless 5-in-1 sensor, pairing must be done manually.1. Change the batteries to new ones.2. Press the [SCAN] button.3. Press the [RESET] button on the sensor.Note:1. Pressing [RESET] button at bottom of wireless 5-in-1 sensor will generate a new code for pairing purpose.2. Always dispose old batteries in an environmental safe manner.Radio-controlled / atomic clock functionWhen the unit receives RC signal, a sync-time symbol “ ” will appear on the LCD, and synchronizes daily.Note:1. The strength of radio-controlled time signal from the transmitter tower may be affected by geographical location or building around.2. Always place the unit away from interfering sources such as TV set, computer, etc.3. Avoid placing the unit on or next to metal plates.4. Closed areas such as airport, basement, tower block, or factory are not recommended.Time settingThe unit automatically set itself accordingly to the Radio Controlled Clock signal it received. To set the clock/calendar manually, first disable the reception by holding the RCC button for 8 seconds.To manually set the clock / Time Zone selection1. Press and hold [CLOCK] button for 2 seconds until “12 or 24Hr” flashes.2. Use [UP]/[DOWN] button to adjust, and press [CLOCK] button to proceed to the next setting.3. Repeat 2 above for setting of TIME ZONE, HOUR, MINUTE, SECOND, YEAR, MONTH, DATE, HOUR OFFSET, LANGUAGE and DST.Note:1. The unit will automatically exit setting mode if no button was pressed in 60 seconds.2. Time zone setting is only for North American version where the unit is set to receive WWVB signal. User can select PST, MST, CST, EST, AST or NST.3. The language options are English (EN), French (FR), German (DE), Spanish (ES), and Italian (IT).4. DST (Daylight Saving Time) feature is set to Auto (factory set). The clock has been programmed to automatically switch when the daylight saving time is in effect. User can set the DST to OFF to disable the feature.Disable / Enable RCC signal reception1. Press and hold [RCC] button 8 seconds to disable the reception.2. Press and hold [RCC] button 8 seconds to enable automatic RCC reception.To turn on/off alarm clock (with ice-alert function) 1. Press the [ALARM] button anytime to show the alarm time. 2. Press [ALARM] button to activate the alarm. 3. Press again to activate alarm with ice-alert function.4. To disable the alarm, press until the alarm icon disappears.To set the alarm time1. Press and hold [ALARM] button for 2 seconds to enter alarm setting mode. HOUR will begin to flash.2. Use [UP]/[DOWN] button to adjust HOUR, and press [ALARM] button to proceed to set MINUTE.3. Repeat 2 above to set MINUTE, then press [ALARM] button to exit.Note: Pressing the [ALARM] button twice when alarm time is being displayed will activate the temperature-adjusted pre-alarm. The alarm will sound 30 minutes earlier if it detects outside temperature is below -3°C.7 8](https://usermanual.wiki/CCL-ELECTRONICS/84291702/User-Guide-3636636-Page-5.png)
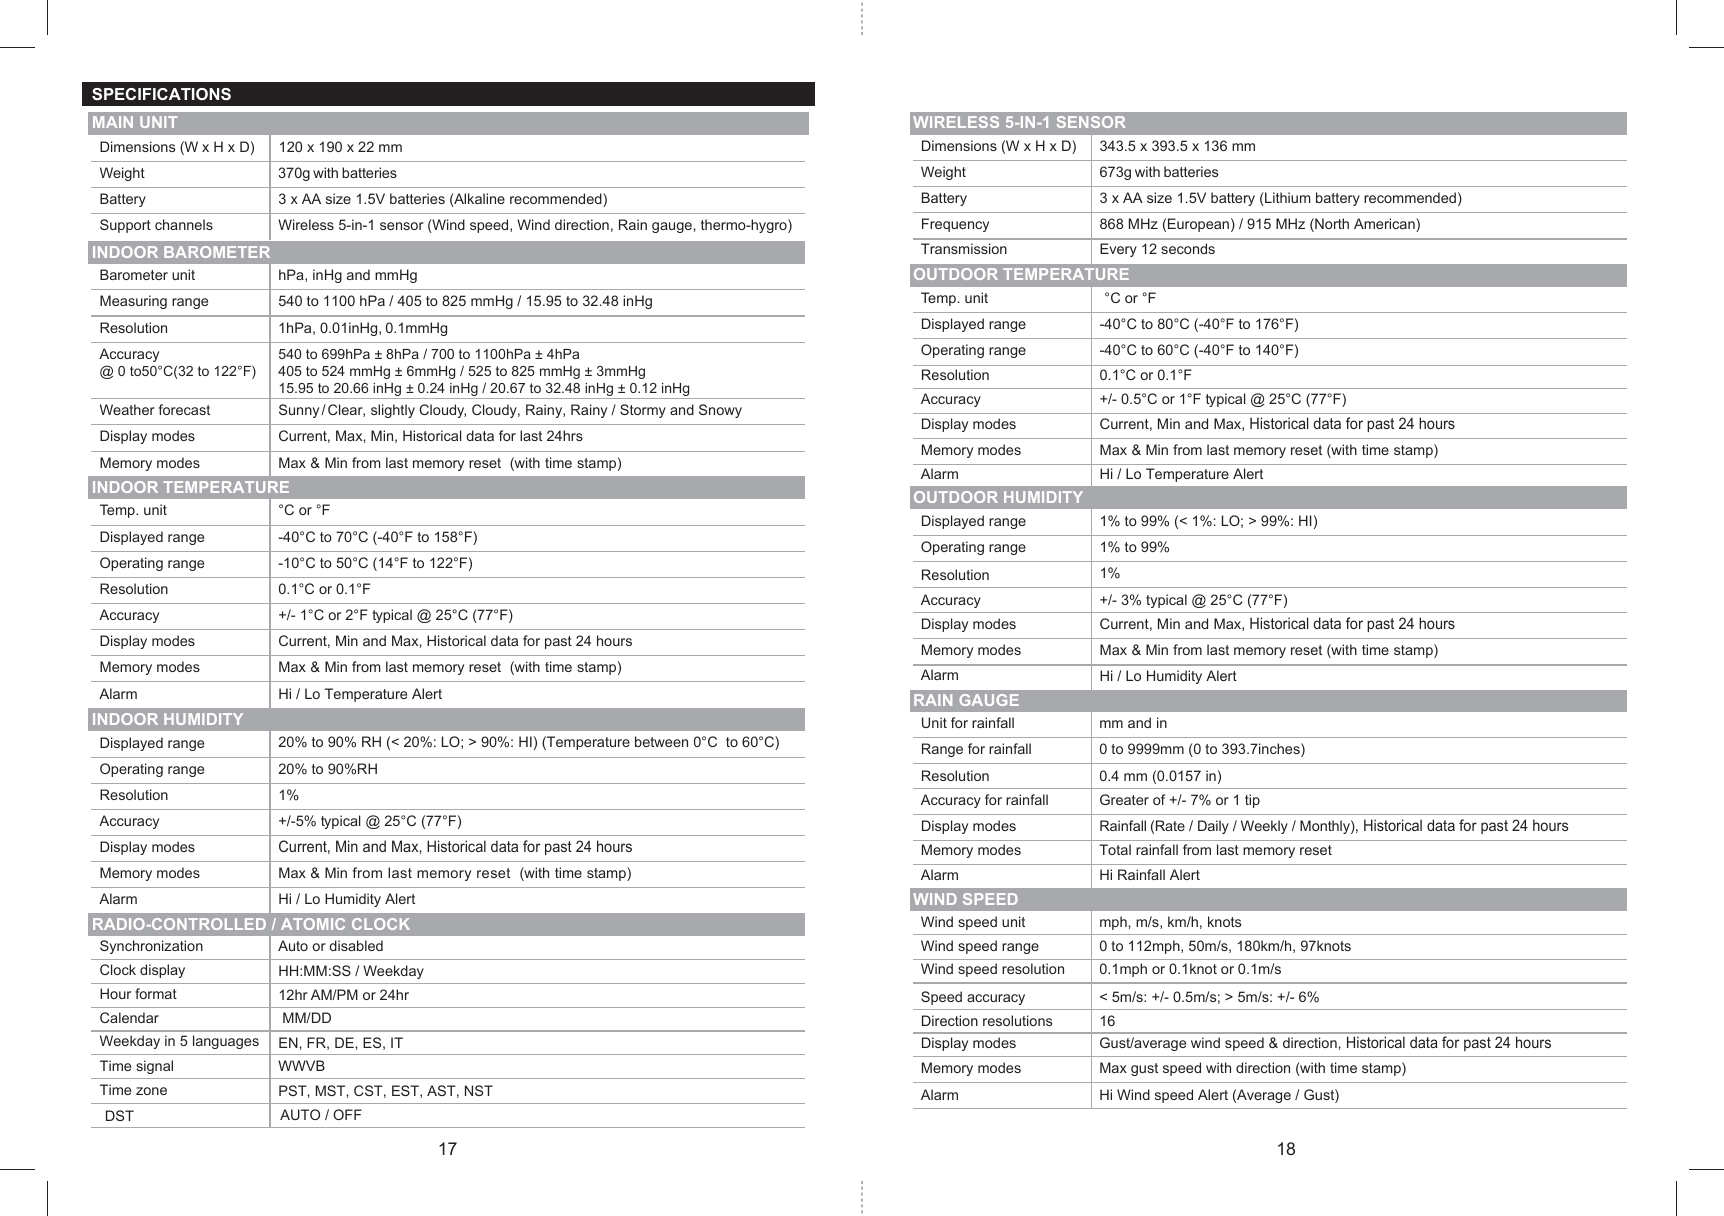
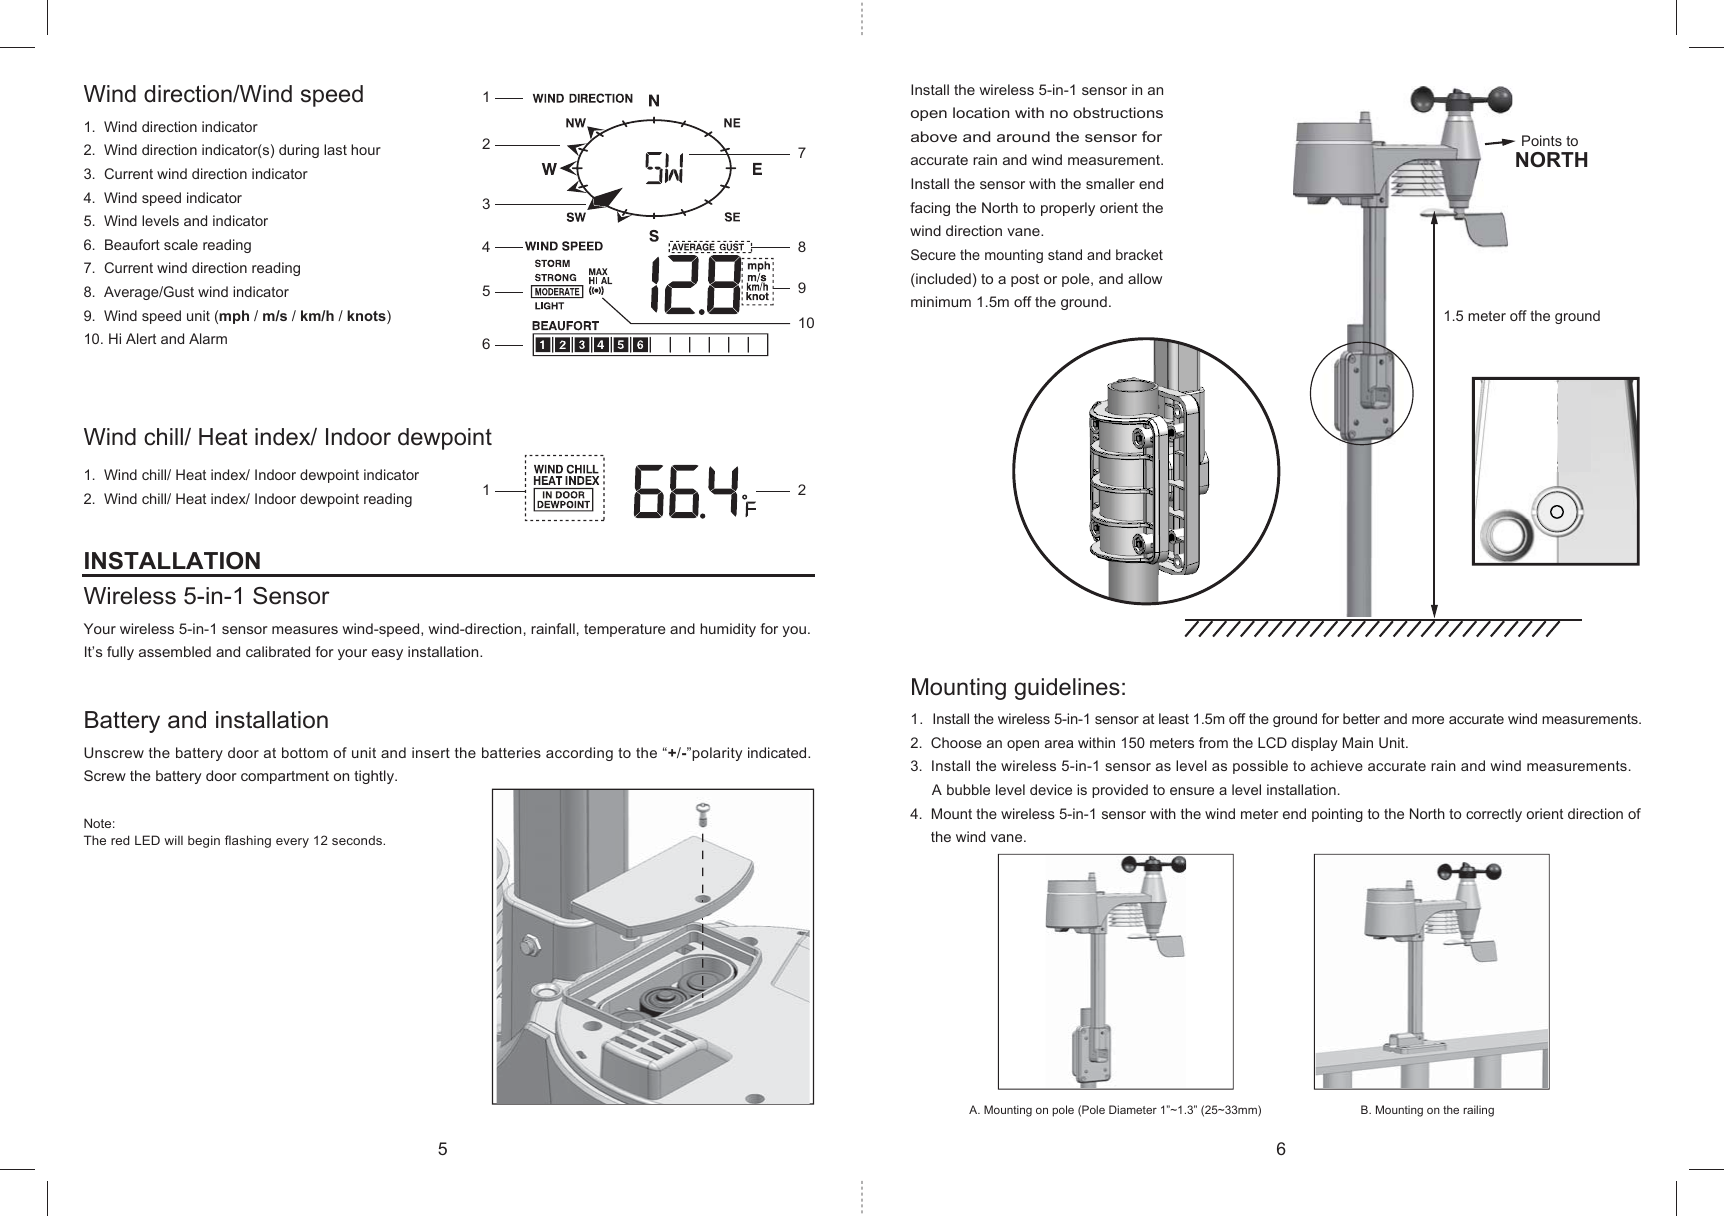
![Wind Direction Indicator MeaningReal-time wind directionWind directions appeared in last 5 minutes (max 6) Sunny / Clear Slightly cloudy Cloudy Rainy Rainy / Stormy SnowyLIGHT MODERATE STRONG STORM2-8 mph3-13 km/h9-25 mph14-41 km/h26-54 mph42-87 km/h≥ 55 mph≥ 88 km/hLevelSpeedRainfall rate Daily rainfall Weekly rainfall Monthly rainfallRAINFALLTo select the rainfall display mode:The device displays how many mm / inches of rain are accumulated in a one hour time period, based on current rainfall rate. Press [RAINFALL] button to toggle between:• RATE Current rainfall rate in past an hour• DAILY The DAILY display indicate the total rainfall from midnight• WEEKLY The WEEKLY display indicate the total rainfall from the current week• MONTHLY The MONTHLY display indicate the total rainfall from the current calendar monthNote: Rain rate is updated every 6 minutes, at every hour on the hour, and at 6, 12, 18, 24, 30, 36, 42, 48, 54 minute past the hour.To select the measurement unit for the rainfall:1. Press and hold [RAINFALL] button 2 seconds to enter unit setting mode.2. Use [UP] / [DOWN] button to toggle between mm (millimeter) and in (inch).3. Press [RAINFALL] button to confirm and exit.WIND SPEED / DIRECTIONTo read the wind direction:To select the wind display mode:Press [WIND] button to toggle between:• AVERAGE The AVERAGE wind speed will display the average of all wind speed numbers recorded in the previous 30 seconds• GUST The GUST wind speed will display the highest wind speed recorded from last reading The wind level provides a quick reference on the wind condition and is indicated by a series of text icons:To select wind speed unit:1. Press and hold [WIND] button for 2 seconds to enter unit setting mode.2. Use the [UP] / [DOWN] button to change the unit between mph (miles per hour) / m/s (meter per second) / km/h (kilometer per hour) / knots.3. Press [WIND] button to confirm and exit.WEATHER FORECAST The device contains sensitive pressure sensor built-in with sophisticated and proven software that predicts weather for the next 12 ~ 24 hours within a 30 to 50km (19-31 miles) radius.Note:1. The accuracy of a general pressure-based weather forecast is about 70% to 75%.2. The weather forecast is meant for the next 12 hours, it may not necessarily reflect the current situation.3. The “Snowy” weather forecast is not based on the atmospheric pressure, but based on the outdoor temperature. When the outdoor temperature is below -3°C (26°F), the “Snowy” weather indicator will be displayed on the LCD.BAROMETRIC / ATMOSPHERIC PRESSUREAtmospheric Pressure is the pressure at any location of the Earth caused by the weight of the column of air above it. One atmospheric pressure refers to the average pressure and gradually decreases as altitude increases.Meteorologists use barometers to measure atmospheric pressure. Since variation in atmospheric pressure greatly affected by weather, it is possible to forecast the weather by measuring the changes in pressure.To select the display mode:Press and hold [BARO] button for 2 seconds to toggle between:• ABSOLUTE the absolute atmospheric pressure of your location• RELATIVE the relative atmospheric pressure based on the sea levelTo set relative atmospheric pressure value:1. Get the atmospheric pressure data of the sea level (it is also the relative atmospheric pressure data of your home area) through the local weather service, internet and other channels.2. Press and hold [BARO] button for 2 seconds until “ABSOLUTE” or “RELATIVE” icon flashes.3. Press [UP]/[DOWN] button to switch to “RELATIVE” mode.4. Press [BARO] button once again until the “RELATIVE” atmospheric pressure digit flashes.5. Press [UP]/[DOWN] button to change its value.6. Press [BARO] button to save and exit the setting mode. Note:1. The default relative atmospheric pressure value is 1013 hPa (29.91 inHg), which refers to the average atmospheric pressure.2. When you change the relative atmospheric pressure value, the weather indicators will change along with it.3. The built-in barometer can notice the environmental absolute atmospheric pressure changes. Based on the data collected, it can predict the weather conditions in the forthcoming 12 hours. Therefore, the weather indicators will change according to the detected absolute atmospheric pressure after you operate the clock for 1 hour.4. The relative atmospheric pressure is based on the sea level, but it will change with the absolute atmospheric pressure changes after operating the clock for 1 hour.To select the measurement unit for the barometer:1. Press the [BARO] button to enter unit setting mode.2. Use the [BARO] button to change the unit between inHg (inches of mercury) / mmHg (millimeter of mercury) (millibars per hectopascal) /hPa.3. Press [BARO] button to confirm.9 10](https://usermanual.wiki/CCL-ELECTRONICS/84291702/User-Guide-3636636-Page-6.png)
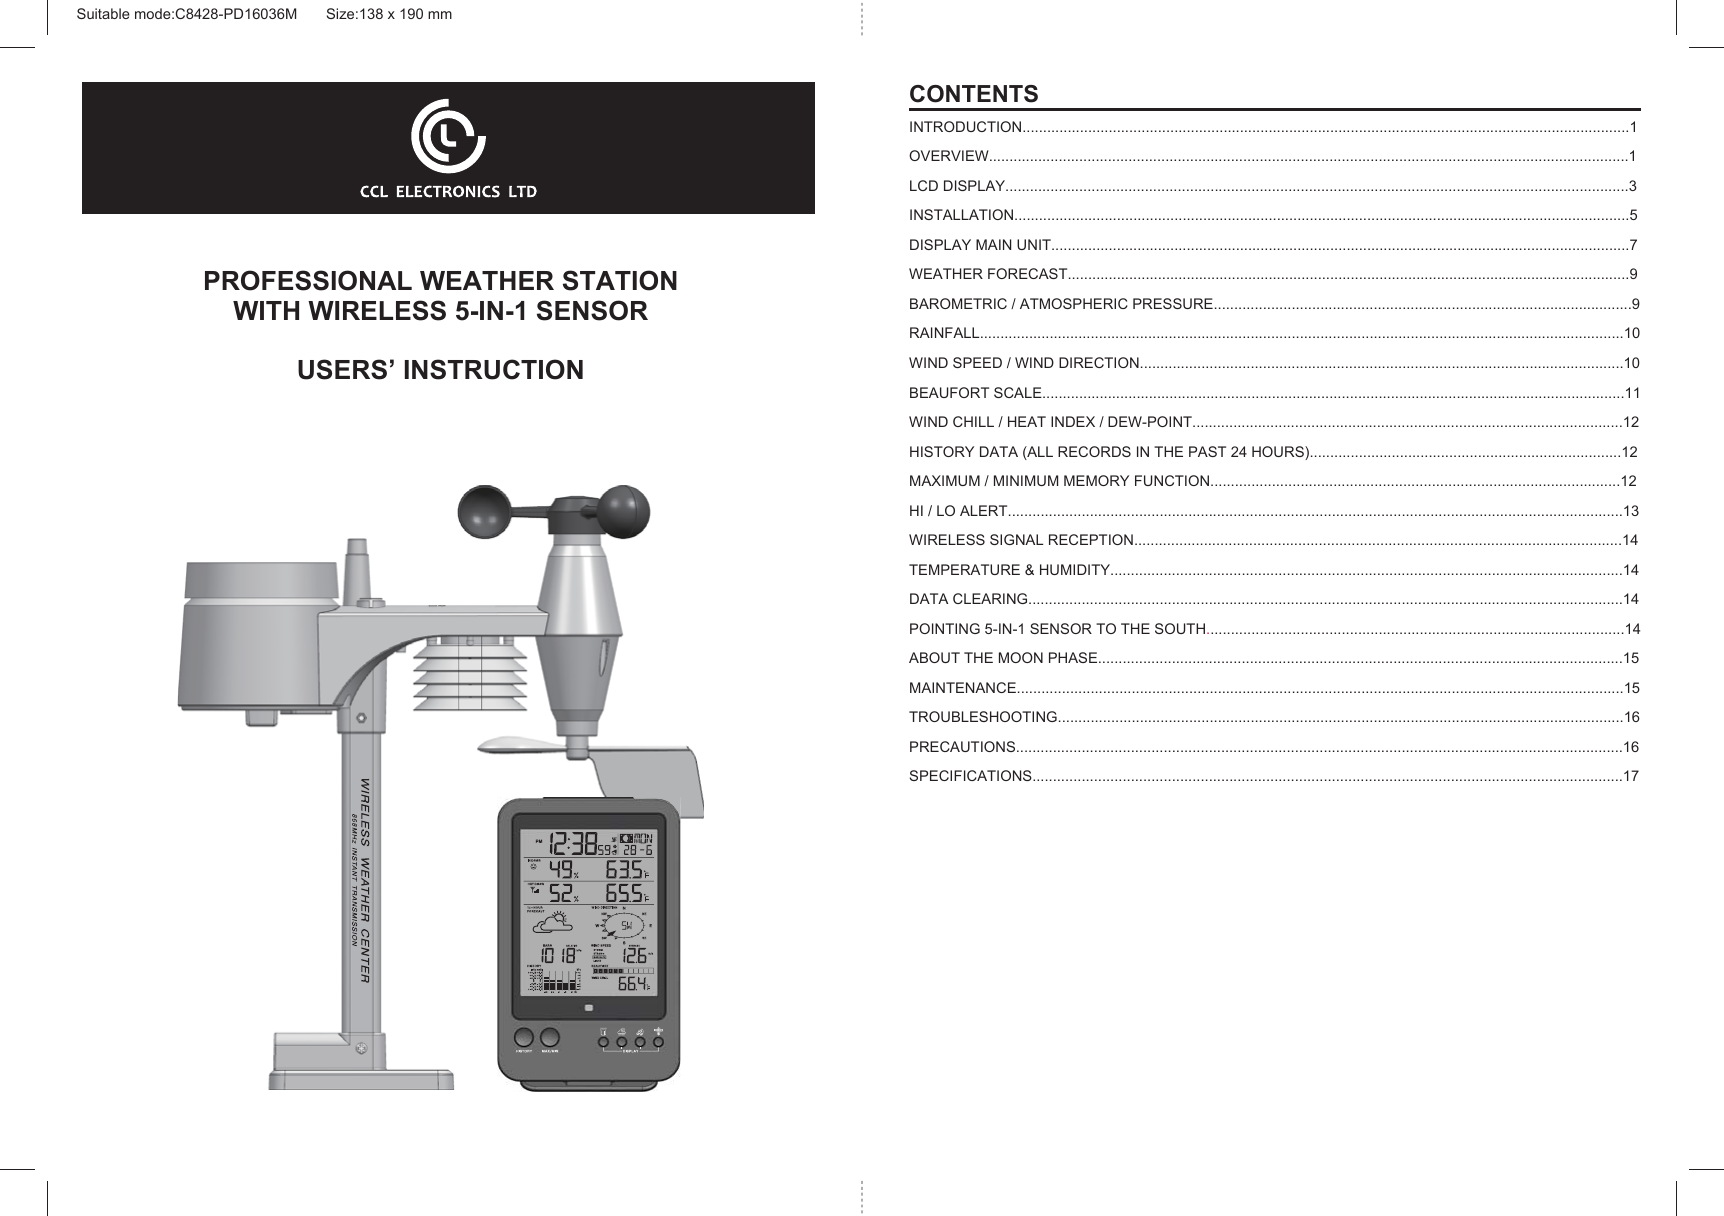
![27°C to 32°C(80°F to 90°F)33°C to 40°C(91°F to 105°F)41°C to 54°C(106°F to 129°F)≥55°C(≥130°F)CautionExtreme CautionDangerExtreme DangerPossibility of heat exhaustionPossibility of heat dehydrationHeat exhaustion likelyStrong risk of dehydration / sun strokeHeat Index range Warning ExplanationBeaufort number< 1 km/h< 1 mph< 1 knots< 0.3 m/s1.1–5.5 km/h1–3 mph1–3 knots0.3–1.5 m/s5.6–11 km/h4–7 mph4–6 knots1.6–3.4 m/s12–19 km/h8–12 mph7–10 knots3.5–5.4 m/s20–28 km/h13–17 mph11–16 knots5.5–7.9 m/s29–38 km/h18–24 mph17–21 knots8.0–10.7 m/s39–49 km/h25–30 mph22–27 knots10.8–13.8 m/s50–61 km/h31–38 mph28–33 knots13.9–17.1 m/s62–74 km/h39–46 mph34–40 knots17.2–20.7 m/s75–88 km/h47–54 mph41–47 knots20.8–24.4 m/s89–102 km/h55–63 mph48–55 knots24.5–28.4 m/s103–117 km/h64–73 mph56–63 knots28.5–32.6 m/s≥ 118 km/h≥ 74 mph≥ 64 knots≥ 32.7m/sWind speedCalmLight airSmoke drift indicates wind direction. Leaves and wind vanes are stationary.Wind felt on exposed skin. Leavesrustle. Wind vanes begin to move.Leaves and small twigs constantly moving, light flags extended.Dust and loose paper raised. Small branches begin to move.Branches of a moderate size move. Small trees in leaf begin to sway.Large branches in motion. Whistling heard in overhead wires. Umbrella use becomes difficult. Empty plastic bins tip over.Whole trees in motion. Effort needed to walk against the wind.Some twigs broken from trees. Cars veer on road. Progress on foot is seriously impeded.Some branches break off trees, and some small trees blow over. Construction/temporary signs and barricades blow over.Trees are broken off or uprooted, structural damage likely.Widespread vegetation and structural damage likely.Severe widespread damage to vegetation and structures. Debris and unsecured objects are hurled about.DescriptionCalm. Smoke rises vertically.Land conditionsLight breezeGentle breezeModerate breezeFresh breezeStrong breezeHigh windGaleStrong galeStormViolent stormHurricane force9WIND CHILL / HEAT INDEX / DEW-POINTTo view Wind Chill:Press the [INDEX] button repeatedly until WINDCHILL displays.Note: The wind chill factor is based on the combined effects of temperature and wind speed. The wind chill displayed is calculated solely from temperature and humidity measured from the 5-in-1 sensor.To view Heat Index:Press the [INDEX] button repeatedly until HEAT INDEX displays.Note: Heat index is only calculated when temperature is 27°C/80°F or above, and based solely from the temperature and humidity measured from the 5-in-1 sensor.To view Dew-Point (Indoor)Press the [INDEX] button repeatedly until DEWPOINT displays.Note: The dew point is the temperature below which the water vapor in air at constant barometric pressure condenses into liquid water at the same rate at which it evaporates. The condensed water is called dew when it forms on a solid surface.The dewpoint temperature is calculated from the indoor temperature and humidity measured at the Main Unit.HISTORY DATA (ALL RECORDS IN THE PAST 24 HOURS )The Display main unit automatically record and display data of past 24 hours on the hour.To check all the history data in the past 24 hours, press the [HISTORY] button. E.g. Current time 7:25 am, Mach 28Press [HISTORY] button repeatedly to view past readings at 7:00am, 6:00am, 5:00am, …, 5:00am (Mar 27), 6:00am (Mar 27), 7:00am (Mar 27)The LCD will display the past indoor and outdoor temperature & humidity, value of air pressure, wind chill, wind speed, rainfall and their time and date.MAXIMUM / MINIMUM MEMORY FUNCTION1. Press [MAX/MIN] button to check the maximum/minimum records. The checking orders will be: Outdoor max temperature Outdoor min temperature Outdoor max humidity Outdoor min humidity Indoor max temperature Indoor min temperature Indoor max humidity Indoor min humidity Outdoor max wind chill Outdoor min wind chill Outdoor max heat index Outdoor min heat index Indoor max dewpoint Indoor min dewpoint Max pressure Min pressure Max average Max gust Max rainfall. 2. Press and hold [MAX/MIN] button for 2 seconds to reset the maximum and minimum records.Note: When maximum or minimum reading is displayed, the corresponding timestamp will be shown. BEAUFORT SCALEBeaufort scale is an international scale of wind velocities from 0 (calm) to 12 (Hurricane force).11 12](https://usermanual.wiki/CCL-ELECTRONICS/84291702/User-Guide-3636636-Page-7.png)
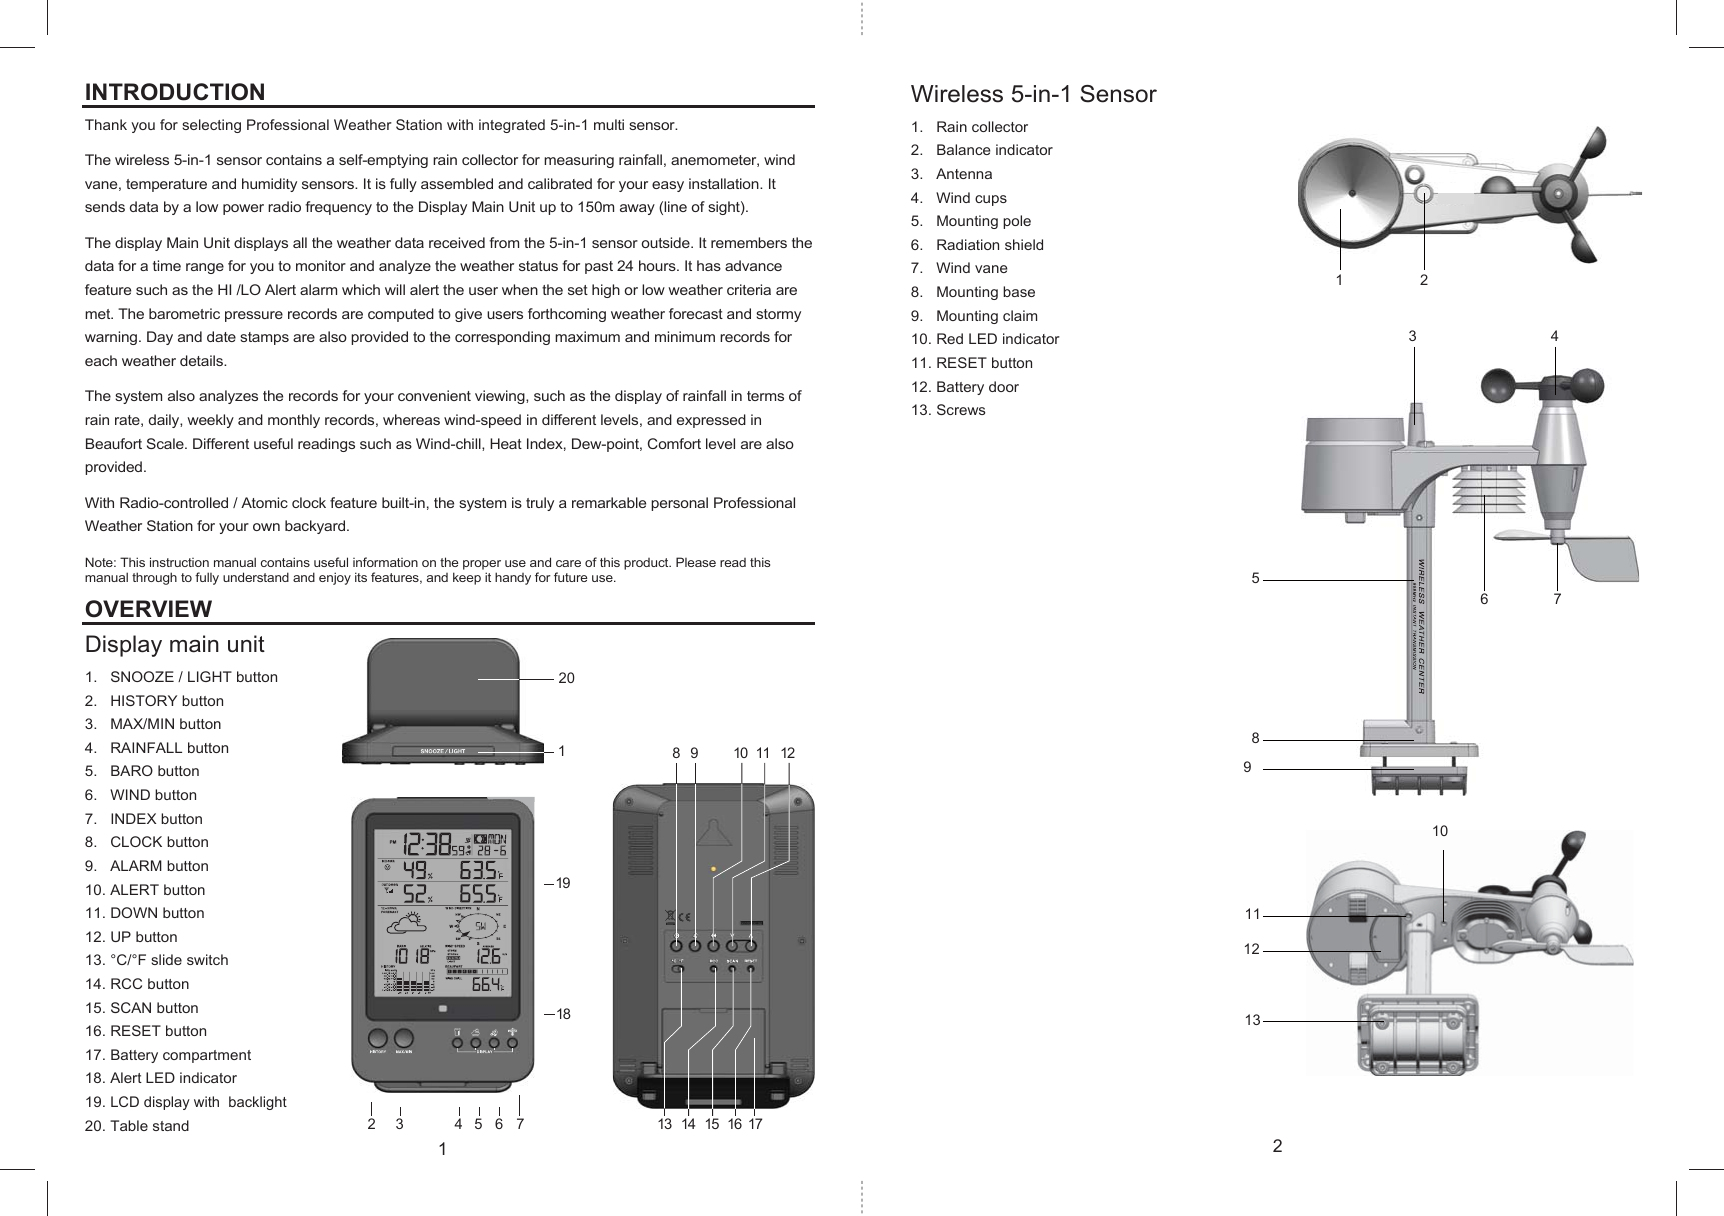
![Indoor temperature HI and LO alertIndoor humidity HI and LO alertOutdoor temperature HI and LO alertRainfallWind speed HI alertHI alert Outdoor humidity HI and LO alertArea Type of Alert availableToo hotComfortableToo coldNorthern hemisphere Southern hemisphereWeak signalStrong signalSignal searching Signal lostNo sensorHI / LO ALERTHI/LO alert are used to alert you of certain weather conditions. Once activated, the alarm will turn on and amber LED starts flashing when a certain criterion is met. The following are areas and type of alert provided:Note: Daily rainfall since midnight.To set the HI / LO alert1. Press the [ALERT] button until the desired area is selected.2. Use [UP] / [DOWN] buttons to adjust the setting.3. Press [ALERT] button to confirm and continue to next setting.To enable/disable the HI / LO alert1. Press [ALERT] button until the desired area is selected.2. Press [ALARM] button to turn the alert on or off.3. Press [ALERT] button to continue to next setting.Note:1. The unit will automatically exit setting mode in 5 seconds if no button is pressed.2. When ALERT alarm is on, the area and type of alarm that triggered the alarm will be flashing and the alarm will sound for 2 minutes.3. To silence the Alert alarm beeping, press the [SNOOZE / LIGHT] / [ALARM] button, or let the beeping alarm automatically turn off after 2 minutes.WIRELESS SIGNAL RECEPTIONThe 5-in-1 sensor is capable of transmitting data wirelessly over an approximate operating of 150m range (line of sight). Occasionally, due to intermittent physical obstructions or other environmental interference, the signal may be weaken or lost.In the case that the sensor signal is lost completely, you will need to relocate the Display main unit or the wireless 5-in-1 sensor.TEMPERATURE & HUMIDITYComfort IndicationThe comfort indication is a pictorial indication based on indoor air temperature and humidity in an attempt to determine comfort level.Note: 1. Comfort indication can vary under the same temperature, depending on the humidity.2. There is no comfort Indication when temperature is below 0°C (32°F) or over 60°C (140°F). DATA CLEARINGDuring installation of the wireless 5-in-1 sensor, the sensors were likely to be triggered, resulting in erroneous rainfall and wind measurements. After the installation, user may clear out all the erroneous data from the Display Main Unit, without needing to reset the clock and re-establish pairing.Simply press and hold the [HISTORY] button for 10 seconds. This will clear out any data recorded before.POINTING 5-IN-1 SENSOR TO THE SOUTHThe outdoor 5-in-1 sensor is calibrated to be pointing to North by default. However, in some cases, users may wish to install the product with the arrow pointing towards the South, especially for people living in the Southern hemisphere (e.g. Australia, New Zealand).1. First install the outdoor 5-in-1 sensor with its arrow pointing to the South. (Please refer to Installation session for mounting details)2. On the Display main unit, press and hold [WIND] button for 8 seconds until the upper part (Northern Hemisphere) of the compass lights up and blinking.3. Use [UP] / [DOWN] to change to lower part (Southern Hemisphere).4. Press [WIND] button to confirm and exit.Note: Changing from hemisphere setting will automatically switch the direction of the moon phase on the display.13 14](https://usermanual.wiki/CCL-ELECTRONICS/84291702/User-Guide-3636636-Page-8.png)