CCT Tech Advanced MD450 2.4GHz FHSS Cordless Phone With Caller ID User Manual 1041b65o

CCT Tech Advanced Products Limited 2.4GHz FHSS Cordless Phone With Caller ID 1041b65o
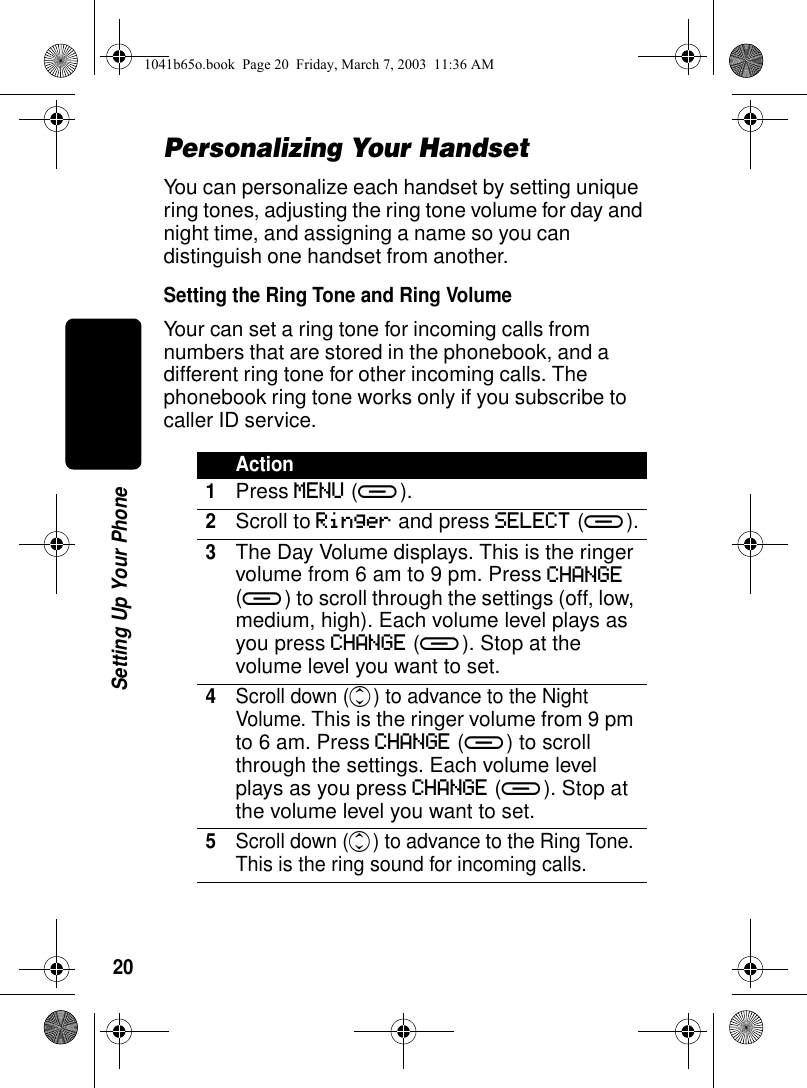
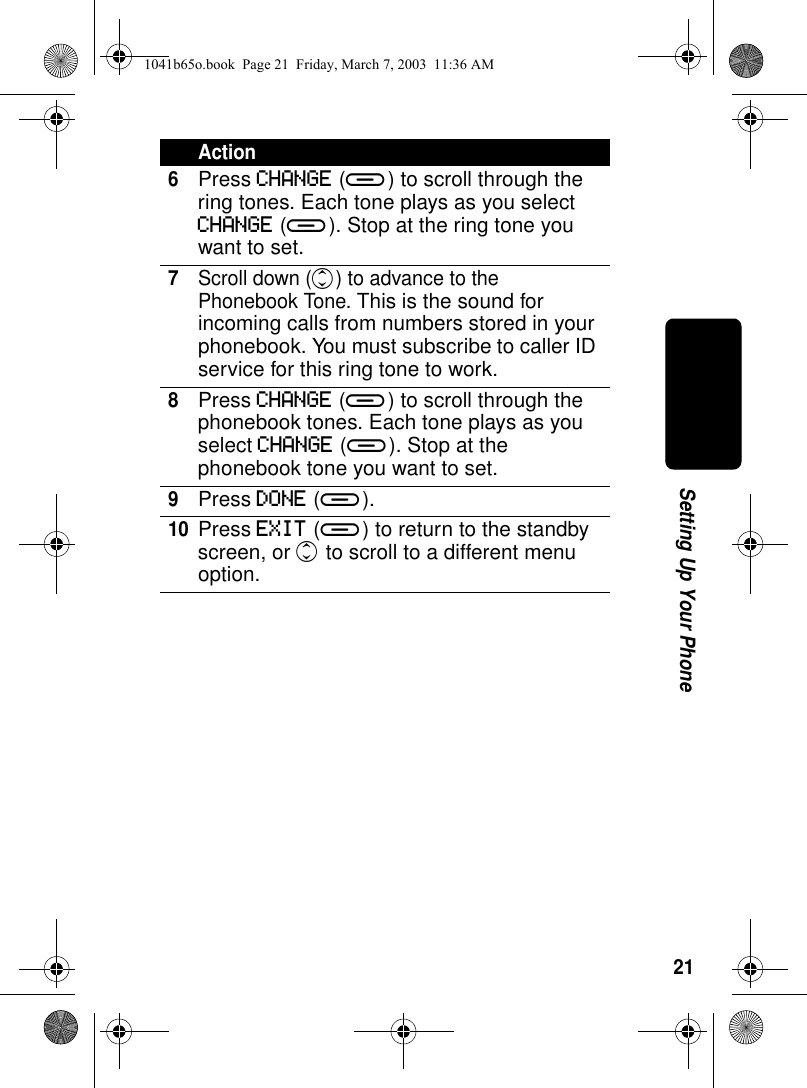
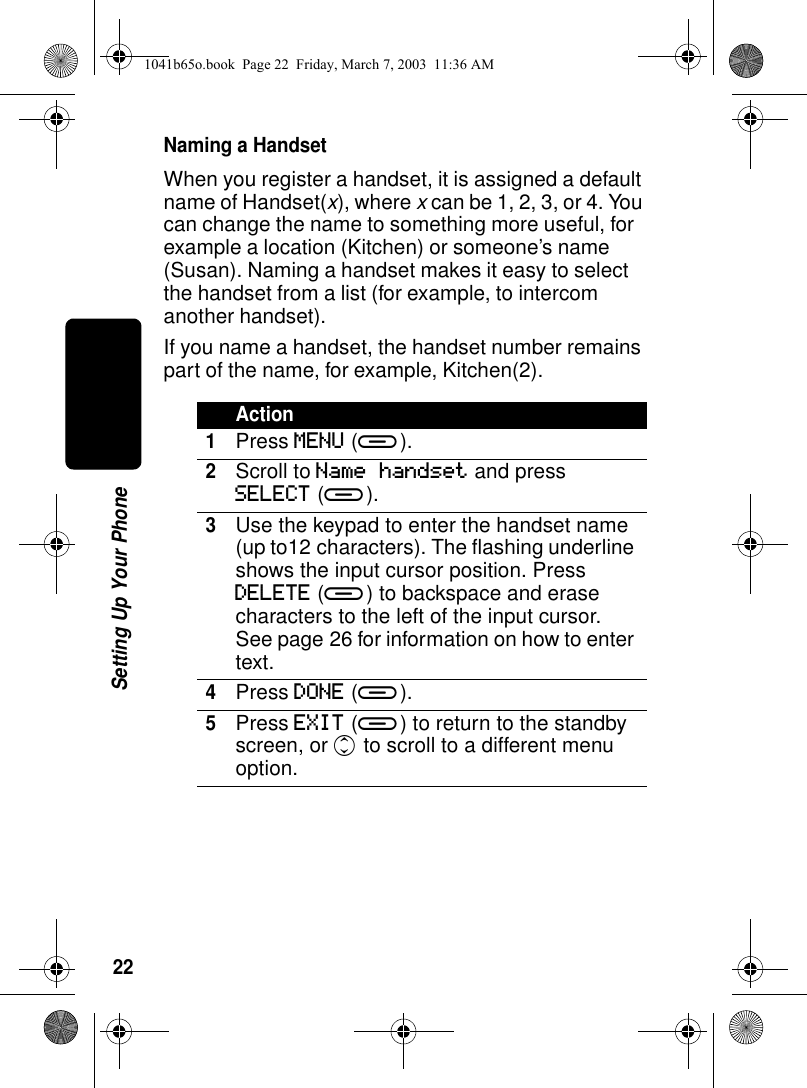
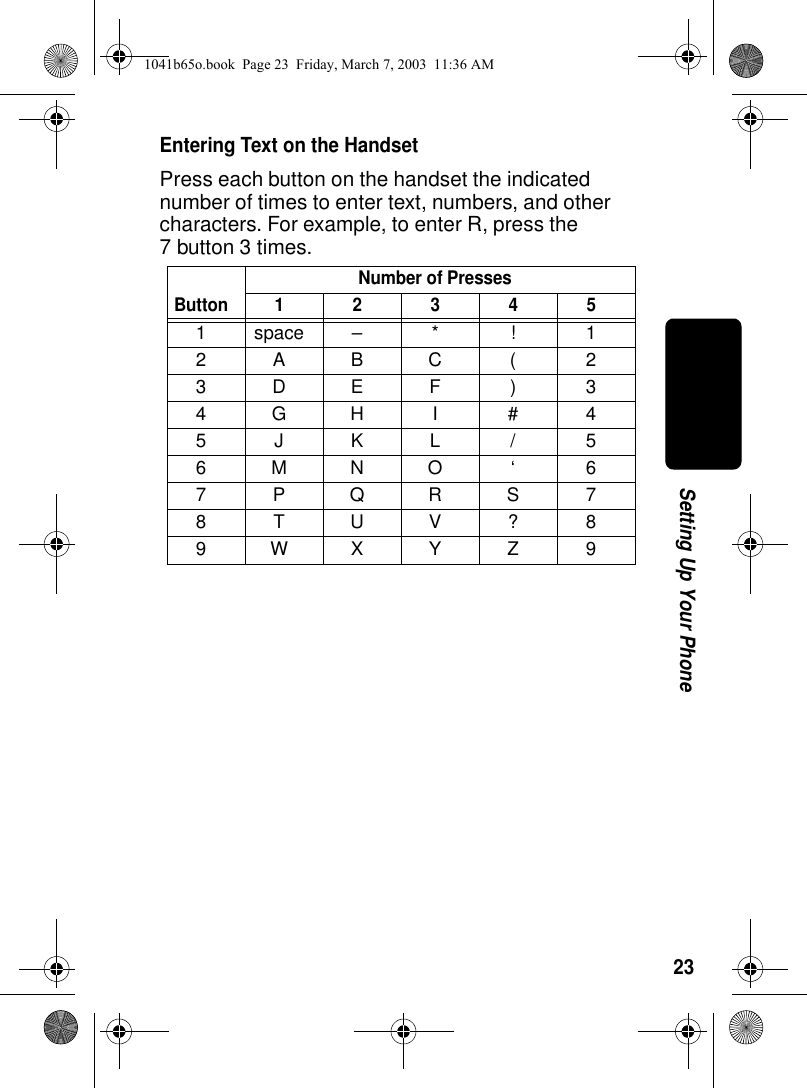
Contents

User Manual 1 of 2

6881041B65-O User's Guide >motorola.comMD450 SeriesDigital 2.4GHzExpandable Cordless Telephone System031068o
 User's Guide >MD450 SeriesDigital 2.4GHzExpandable Cordless Telephone System031068o
1Congratulations on your purchase of a Motorola product! Product registration is an important step. Registering helps us facilitate warranty service and permits us to contact you if your Motorola product requires an update or other service. To register your product online, visit: www.motorola.com/warranty/cordlessPlease retain your original dated sales receipt for your records. For warranty service of your Motorola product, you will need to provide a copy of your dated sales receipt to confirm warranty status. Registration is not required for warranty coverage.For a large-print version of this guide, or for product-related questions, please call:1-800-353-2729 in the USA1-888-390-6456 TTY (Text Telephone)On the Web:www.motorola.com/cordlessMOTOROLA and the Stylized M Logo are registered in the US Patent & Trademark Office. All other product or service names are the property of their respective owners. © Motorola, Inc. 20036881041B65-O1041b65o.book  Page 1  Friday, March 7, 2003  11:36 AM
2Handset ControlsHandset ControlsTurn handset onto make a callEarphone jackRaise volumeRedial Scroll up or down on displayLeft soft key Right soft keyTurn handset off (hang up)Use handset as intercomTalk handsfreeusingspeakerphoneLower volumeMicrophone1041b65o.book  Page 2  Friday, March 7, 2003  11:36 AM
3FCC and Interference InformationThis equipment complies with Parts 15 and 68 of the FCC rules and the requirements adopted by the Administrative Council for Terminal Attachments (ACTA). A plug and jack used to connect this equipment to the premises wiring and telephone network must comply with applicable FCC Part 68 rules and requirements adopted by the ACTA. A compliant telephone cord and modular plug is provided with this product. It is designed to be connected to a compatible modular jack that is also compliant. See installation instructions for details. Notification of the Local Telephone CompanyOn the bottom of this equipment is a label that contains, among other information, a product identifier in the form US:AAAEQ##TXXXX. You must, upon request, provide this information to your telephone company.The digits represented by ## in the product identifier indicate the Ringer Equivalency Number (REN) for this equipment. The REN is useful in determining the number of devices you may connect to your telephone line and still have all of these devices ring when your telephone number is called. In most (but not all) areas, the sum of the RENs of all devices connected to one line should not exceed 5. To be certain of the number of devices you may connect to your line as determined by the REN, contact your local telephone company.Notes:•This equipment may not be used on coin service provided by the telephone company.•Connection to party line service is subject to state tariffs. Contact the state public utility commission, public service commission or corporation commission for information.•If your home has specially wired alarm equipment connected to the telephone line, ensure the installation of this cordless phone does not disable your alarm equipment. If you have questions 1041b65o.book  Page 3  Friday, March 7, 2003  11:36 AM
4about what will disable alarm equipment, consult your telephone company or a qualified installer.•Notice must be given to the telephone company upon permanent disconnection of your telephone from your line.•The FCC requires that you connect your cordless telephone to the nationwide telephone network through a modular telephone jack (USOC RJ11C/RJ11W or RJ14C/RJ14W).Rights of the Telephone CompanyShould your equipment cause trouble on your line which may harm the telephone network, the telephone company shall, where practicable, notify you that temporary discontinuance of service may be required. Where prior notice is not practical and the circumstances warrant such action, the telephone company may temporarily disconnect service immediately. In case of such temporary discontinuance, the telephone company must:1. Promptly notify you of such temporary discontinuance; 2. Afford you the opportunity to correct the situation;3. Inform you of your right to bring a complaint to the Commission pursuant to procedures set forth in Subpart E of Part 68, FCC Rules and Regulations. The telephone company may make changes in its facilities, equipment, operations, or procedures that could affect the operation of the equipment. If this happens, the telephone company will provide advance notice in order for you to make necessary modifications to maintain uninterrupted service. Interference InformationThis device complies with Part 15 of the FCC Rules. Operation is subject to the following two conditions:1. This device may not cause harmful interference.2. This device must accept any interference received, including interference that may cause undesired operation.1041b65o.book  Page 4  Friday, March 7, 2003  11:36 AM
5This equipment has been tested and found to comply with the limits for a Class B digital device, pursuant to Part 15 of the FCC Rules. These limits are designed to provide reasonable protection against harmful interference in a residential installation.This equipment generates, uses, and can radiate radio frequency energy and, if not installed and used in accordance with the instructions, may cause harmful interference to radio communications. However, there is no guarantee that interference will not occur in a particular installation.If this equipment does cause harmful interference to radio or television reception, which can be determined by turning the equipment on and off, the user is encouraged to try to correct the interference with one or more of the following measures:Reorient or relocate the receiving antenna (that is, the antenna for the radio or television that is “receiving” the interference).Reorient or relocate and increase the separation between the telecommunications equipment and the receiving antenna.Connect the telecommunications equipment into an outlet on a circuit different from that to which the receiving antenna is connected. If these measures do not eliminate the interference, please consult your dealer or an experienced radio/television technician for additional suggestions. Also, the Federal Communications Commission has prepared a helpful booklet, “How to Identify and Resolve Radio/TV Interference Problems.” This booklet is available from the U.S. Government Printing Office, Washington, D.C. 20402. Please specify stock number 004-000-00345-4 when ordering copies.The FCC requires this product to be serviced only by Motorola or its authorized service agents. Changes or modifications not expressly approved by Motorola could void not only the user's authority to operate the equipment, but also the limited warranty.Hearing Aid CompatibilityThis telephone system meets the FCC standards for hearing aid compatibility. 1041b65o.book  Page 5  Friday, March 7, 2003  11:36 AM
6Important Safety InstructionsFollow these safety precautions when using your cordless phone to reduce the risk of fire, electric shock, and injury to persons or property: 1. Keep all slits and openings of the phone unblocked. Do not set the phone on a heating register or over a radiator. Ensure that proper ventilation is provided at the installation site. 2. Do not use while wet or while standing in water. 3. Do not use this product near water (for example, near a bath tub, kitchen sink, or swimming pool). 4. Do not allow anything to rest on the power cord. Place the power cord so that it will not be walked on.   5. Never insert objects of any kind into the product slits as that may result in fire or shock. 6. Unplug this product from the wall outlet before cleaning. Do not use liquid cleaners or aerosol cleaners. Use a damp cloth for cleaning. 7. Do not disassemble this product. If service or repair work is required, contact the Motorola address found in the back of this user’s guide. 8. Do not overload wall outlets and extension cords. 9. Avoid using during an electrical storm. Use a surge protector to protect the equipment. 10. Do not use this cordless phone to report a gas leak, especially if you are in the vicinity of the gas line.Caution:  To reduce the risk of fire, use only No. 26 AWG or larger UL Listed or CSA Certified Telecommunication Line Cord.Unplug this cordless phone immediately from an outlet if:•The power cord or plug is damaged or frayed. •Liquid has been spilled into the product. MD450_Safety.fm  Page 6  Monday, March 10, 2003  10:10 AM
7•The product has been exposed to rain or water. Do not retrieve the handset or base until after you have unplugged the power and phone from the wall. Then retrieve the unit by the unplugged cords. •The product has been dropped or the cabinet has been damaged. •The product exhibits a distinct change in performance. Installation Guidelines1. Read and understand all instructions and save them for future reference. 2. Follow all warnings and instructions marked on the product. 3. Do not install this product near a bath tub, sink, or shower. 4. Operate this phone using only the power source that is indicated on the marking label. If you are unsure of the power supply to your home, consult with your dealer or local power company. 5. Do not place this product on an unstable cart, stand, or table. This product may fall, causing serious damage to the product. 6. Adjust only those controls that are covered by the operating instructions. Improper adjustment of other controls may result in damage and will often require extensive work to restore the product to normal operation. 7. Clean this product with a soft, damp cloth. Do not use chemicals or cleaning agents to clean this phone. 8. Use only the power supply that came with this unit. Using other power supplies may damage the unit. 9. Because cordless phones operate on electricity, you should have at least one phone in your home that is not cordless in case the power in your home goes out. 10. To avoid interference to nearby appliances, do not place the base of the cordless phone on or near a TV, microwave oven, or VCR. MD450_Safety.fm  Page 7  Monday, March 10, 2003  10:10 AM
9ContentsGetting Started . . . . . . . . . . . . . . . . . . . . . . . . . . . . . . .11Powering the Base Station  . . . . . . . . . . . . . . . . . . . . .12Setting Up the Charging Bases  . . . . . . . . . . . . . . . . .13Installing Batteries in the Handsets  . . . . . . . . . . . . . .13Charging the Handsets . . . . . . . . . . . . . . . . . . . . . . . .14Phone Line Connection  . . . . . . . . . . . . . . . . . . . . . . .14Wall Mounting the Base Station  . . . . . . . . . . . . . . . . . 15Using the Handset Display  . . . . . . . . . . . . . . . . . . . . . 17Using the Soft Keys   . . . . . . . . . . . . . . . . . . . . . . . .17Using the Navigation Key  . . . . . . . . . . . . . . . . . . . . 18Setting Up Your Phone. . . . . . . . . . . . . . . . . . . . . . . . . 19Registering a Handset  . . . . . . . . . . . . . . . . . . . . . . . .19Personalizing Your Handset  . . . . . . . . . . . . . . . . . . . . 20Setting the Ring Tone and Ring Volume  . . . . . . . . .20Naming a Handset  . . . . . . . . . . . . . . . . . . . . . . . . .22Entering Text on the Handset  . . . . . . . . . . . . . . . . . 23Storing Area Codes for Caller ID  . . . . . . . . . . . . . . . . 24Setting the Date and Time  . . . . . . . . . . . . . . . . . . . . .26Setting the Language  . . . . . . . . . . . . . . . . . . . . . . . . . 27Setting Touch Tone or Pulse Dialing . . . . . . . . . . . . . . 27Using the Handset  . . . . . . . . . . . . . . . . . . . . . . . . . . . .28Making a Call  . . . . . . . . . . . . . . . . . . . . . . . . . . . . . . . 28Adjusting the Volume During a Call  . . . . . . . . . . . . . .28Making a Call Using the Speakerphone . . . . . . . . . . . 29Adjusting the Speakerphone Volume  . . . . . . . . . . . . .29Switching Between the Handset and Speakerphone  .29Muting a Call   . . . . . . . . . . . . . . . . . . . . . . . . . . . . . . . 30Putting a Call on Hold . . . . . . . . . . . . . . . . . . . . . . . . .30Redialing a Number  . . . . . . . . . . . . . . . . . . . . . . . . . .301041b65o.book  Page 9  Friday, March 7, 2003  11:36 AM
10ContentsFinding a Lost or Misplaced Handset   . . . . . . . . . . . . 31Saving a Number in the Phonebook  . . . . . . . . . . . . . 31Calling a Number from the Phonebook  . . . . . . . . . . . 33Editing a Phonebook Entry  . . . . . . . . . . . . . . . . . . . . 33Deleting a Phonebook Entry  . . . . . . . . . . . . . . . . . . . 34Inserting Pauses in a Number  . . . . . . . . . . . . . . . . . . 34Using Caller ID   . . . . . . . . . . . . . . . . . . . . . . . . . . . . . 34Reviewing the List of Caller ID Calls  . . . . . . . . . . . 35Store a Caller ID Number in the Phonebook  . . . . . 36Deleting Caller ID Calls  . . . . . . . . . . . . . . . . . . . . . 37Multihandset Functions. . . . . . . . . . . . . . . . . . . . . . . . 38Conference Calling   . . . . . . . . . . . . . . . . . . . . . . . . . . 39Using the Intercom   . . . . . . . . . . . . . . . . . . . . . . . . . . 40Intercom Setup . . . . . . . . . . . . . . . . . . . . . . . . . . . . 40Handset to Handset Intercom   . . . . . . . . . . . . . . . . 41Transferring a Call from One Handset to Another  . . . 42Unannounced Transfer . . . . . . . . . . . . . . . . . . . . . . 42Announced Transfer . . . . . . . . . . . . . . . . . . . . . . . . 42Using the Handset as a Walkie Talkie  . . . . . . . . . . . . 43Monitoring a Room   . . . . . . . . . . . . . . . . . . . . . . . . . . 44Deregistering a Handset  . . . . . . . . . . . . . . . . . . . . . . 45Warranty . . . . . . . . . . . . . . . . . . . . . . . . . . . . . . . . . . . . . . 1041b65o.book  Page 10  Friday, March 7, 2003  11:36 AM
11Getting StartedGetting StartedTo set up your Motorola digital cordless phone system:1. Install optional backup batteries in the base station and plug into a power outlet (page 12).2. Plug in charging bases for expansion handsets (page 13).3. Install batteries in handsets (page 13).4. Charge handset batteries (page 14).A rechargeable NiCd battery powers each handset. Charge the battery for about 12 hours before initial use.5. Connect the base station to the phone line (page 14).6. Register expansion handsets to the base station (page 19).Handsets that come with your phone system are already registered to the base.7. Set the ring tone, date, time, and other features of your phone (page 20).Place the Base Station:•Away from electrical appliances such as a TV, personal computer, or another cordless phone. •In a high and central location with no obstructions, such as walls.If you hear noise while using the handset near a microwave or another cordless phone’s base unit, move away from the microwave or base unit and closer to your handset’s base station.1041b65o.book  Page 11  Friday, March 7, 2003  11:36 AM
12Getting StartedPowering the Base StationImportant: Before installing or handling batteries, read the Battery Safety Instructions on page 8.The base station uses 4 AAA alkaline batteries for optional backup power (batteries are included with some models). To install the batteries in the base station:1. With the bottom of the base facing you, press the cover latch with a screwdriver to lift and remove the battery cover.2. Insert 4 AAA alkaline batteries into the battery compartment.3. To replace the cover, insert the tabs of the cover into the slots on the base station and press down until the cover clicks into place.4. Plug the power cord into the back of the base station and into an outlet.1041b65o.book  Page 12  Friday, March 7, 2003  11:36 AM
13Getting StartedSetting Up the Charging BasesIf you have expansion handsets, they do not need to be plugged into a phone line. Simply plug the power cord into the back of the charging base and into an outlet wherever you want to place the handset.Installing Batteries in the HandsetsImportant: Before installing or handling batteries, read the Battery Safety Instructions on page 8.1. Remove the battery cover by pressing on the recess and sliding down and off the handset.2. Plug the connector into the receptacle.3. Insert the battery into the compartment. 4. Slide and snap the battery cover back into place.BlackRed1041b65o.book  Page 13  Friday, March 7, 2003  11:36 AM
14Getting StartedCharging the HandsetsPlace the handset in the base station or charging base. The LED is solid red when the handset is charging.For the initial charge, charge the battery for at least 12 hours. Phone Line ConnectionDo not connect the base station to the phone line until the handset is fully charged.charge1041b65o.book  Page 14  Friday, March 7, 2003  11:36 AM
15Getting StartedWall Mounting the Base StationThe base station can be mounted on a wall instead of placed on a flat surface such as a table or desk.1. Remove the twist-tie from the phone cord. Do not unfold the cord.2. Untuck both ends of the cord.3. Hold the folded cord at the center and insert it into the back of the wall mount bracket.4. Plug the phone cord into the phone jack on the wall.5. Hang the wall mount bracket on the phone wall plate. 020930o020929o1041b65o.book  Page 15  Friday, March 7, 2003  11:36 AM
16Getting Started6. Plug the other end of the phone cord into the back of the base station.7. Plug the power cord into a power outlet if it is not already plugged in. 8. Insert the four tabs on the wall mount into the four slots on the back of the base station and push until it snaps into place. 1041b65o.book  Page 16  Friday, March 7, 2003  11:36 AM
17Getting StartedUsing the Handset DisplayWhen the handset is not in use, the display shows the standby screen.Note: Caller ID information is supplied only if you subscribe to caller ID service from your local phone company.When the handset speakerphone is on, V appears on the display.Using the Soft KeysThe 2 soft keys are used to select the functions listed above these keys on the display. The functions change as you move from one screen to the next. In this guide, soft key functions are shown as the function name followed by a, for example, CHANGE (a).904:26 PM  09/26Handset (1)PHONEBK MENU6 CallsTimeRinger offLeft soft key functionBattery meterDate^HandsetnameNumber ofCaller IDrecordsRight soft key functionLeft soft key Right soft keyLeft soft keyfunctionRight soft key function1041b65o.book  Page 17  Friday, March 7, 2003  11:36 AM
18Getting StartedUsing the Navigation Keyc is used to scroll up and down through menu items, a list of settings, caller ID and redial lists, and the phonebook.On the handset display, !points to the currently selected item, and b indicates there are more items above and below the currently selected item.Press c to scroll up or down on the display.Caller ID LogSet RingerLoc Area CodesBACK SELECT"#!1041b65o.book  Page 18  Friday, March 7, 2003  11:36 AM
19Setting Up Your PhoneSetting Up Your PhoneRegistering a HandsetYou can have up to 4 handsets registered to a base station.If you try to register a 5th handset, Unable to Register displays.Handsets that come with your MD450 Series phone system are already registered. You only need to register handsets if you buy expansion handsets to add to your phone system.To register a new expansion handset that has never been registered to a base station before:Action1Press OK (a).2Press and hold PAGE on the base station for at least 6 seconds or until you hear a long beep and see the handset name, for example, Handset(2).3Press OK (a) to return to the standby screen.1041b65o.book  Page 19  Friday, March 7, 2003  11:36 AM
20Setting Up Your PhonePersonalizing Your HandsetYou can personalize each handset by setting unique ring tones, adjusting the ring tone volume for day and night time, and assigning a name so you can distinguish one handset from another.Setting the Ring Tone and Ring VolumeYour can set a ring tone for incoming calls from numbers that are stored in the phonebook, and a different ring tone for other incoming calls. The phonebook ring tone works only if you subscribe to caller ID service.Action1Press MENU (a).2Scroll to Ringer and press SELECT (a).3The Day Volume displays. This is the ringer volume from 6 am to 9 pm. Press CHANGE (a) to scroll through the settings (off, low, medium, high). Each volume level plays as you press CHANGE (a). Stop at the volume level you want to set.4Scroll down (c) to advance to the Night Volume. This is the ringer volume from 9 pm to 6 am. Press CHANGE (a) to scroll through the settings. Each volume level plays as you press CHANGE (a). Stop at the volume level you want to set.5Scroll down (c) to advance to the Ring Tone. This is the ring sound for incoming calls.1041b65o.book  Page 20  Friday, March 7, 2003  11:36 AM
21Setting Up Your Phone6Press CHANGE (a) to scroll through the ring tones. Each tone plays as you select CHANGE (a). Stop at the ring tone you want to set.7Scroll down (c) to advance to the Phonebook Tone. This is the sound for incoming calls from numbers stored in your phonebook. You must subscribe to caller ID service for this ring tone to work.8Press CHANGE (a) to scroll through the phonebook tones. Each tone plays as you select CHANGE (a). Stop at the phonebook tone you want to set.9Press DONE (a).10Press EXIT (a) to return to the standby screen, or c to scroll to a different menu option.Action1041b65o.book  Page 21  Friday, March 7, 2003  11:36 AM
22Setting Up Your PhoneNaming a HandsetWhen you register a handset, it is assigned a default name of Handset(x), where x can be 1, 2, 3, or 4. You can change the name to something more useful, for example a location (Kitchen) or someone’s name (Susan). Naming a handset makes it easy to select the handset from a list (for example, to intercom another handset).If you name a handset, the handset number remains part of the name, for example, Kitchen(2).Action1Press MENU (a).2Scroll to Name handset and press SELECT (a).3Use the keypad to enter the handset name (up to12 characters). The flashing underline shows the input cursor position. Press DELETE (a) to backspace and erase characters to the left of the input cursor. See page 26 for information on how to enter text.4Press DONE (a).5Press EXIT (a) to return to the standby screen, or c to scroll to a different menu option.1041b65o.book  Page 22  Friday, March 7, 2003  11:36 AM
23Setting Up Your PhoneEntering Text on the HandsetPress each button on the handset the indicated number of times to enter text, numbers, and other characters. For example, to enter R, press the 7 button 3 times.ButtonNumber of Presses123451space– * ! 12ABC( 23DEF ) 34GH I #45JKL/56MNO ‘ 67PQRS78TUV?89WXYZ 91041b65o.book  Page 23  Friday, March 7, 2003  11:36 AM
24Setting Up Your PhoneStoring Area Codes for Caller IDNote: This section applies only if you subscribe to caller ID service from your local phone company.You can store up to 5 area codes to make it easy to dial numbers from your list of caller ID calls. Each area code can be:•7-digit formatYou do not have to dial the area code to call numbers in this area code.•10-digit formatYou have to dial the 3-digit area code + 7-digit phone number to call numbers in this area code.•11-digit formatYou have to dial the 1 + 3-digit area code + 7-digit phone number to call numbers in this area code.For example, if you store 954 in 10-digit format, when you receive a call from that area code, the phone number is stored in your call list with all 10 digits. The number will then be in the correct format for you to dial directly from the call list without any reformatting.1041b65o.book  Page 24  Friday, March 7, 2003  11:36 AM
25Setting Up Your PhoneAction1Press MENU (a).2Scroll to Loc area code and press SELECT (a).3Enter the first area code.4Press FORMAT (a) to scroll through the formats. Stop at the format you want to set for the area code, then scroll down (c) to move to the next area code.5Repeat steps 3 and 4 to store up to 4 more area codes. When you are finished, press DONE (a).6Press EXIT (a) to return to the standby screen, or c to scroll to a different menu option.1041b65o.book  Page 25  Friday, March 7, 2003  11:36 AM
26Setting Up Your PhoneSetting the Date and TimeAction1Press MENU (a).2Scroll to Date/Time and pressSELECT (a).3Enter the time (2 digits are required for the hour and 2 digits for the minutes, so use a leading 0 for 1-digit values). 4Press AM/PM (a) to switch between am and pm.Note: This applies only if using a 12-hour clock.5Scroll down (c) to move the next field.6Press CHANGE (a) to change the time format (12- or 24-hour clock). Scroll down (c) to move to the next field.7Press CHANGE (a) to select date format (MM/DD or DD/MM).8Scroll down (c) to move the next field.9Enter the current date.10Press DONE (a).11Press EXIT (a) to return to the standby screen, or c to scroll to a different menu option.1041b65o.book  Page 26  Friday, March 7, 2003  11:36 AM

Navigation menu