User manual
Wi-Fi Display
User’s Manual
Contents
1. Package Contents
------------------------------------------------------------------------------3
2. Before you start
------------------------------------------------------------------------------4
3. Quick Start
------------------------------------------------------------------------------7
4. Using MirrorOp Sender for win-OS
------------------------------------------------------------------------------9
5. Using MirrorOp Sender for MAC-OS (Optional for User)
----------------------------------------------------------------------------19
6. Web Management
----------------------------------------------------------------------------27
7. Using DLNA Function via Wi-Fi Display
----------------------------------------------------------------------------33
8. System requirements
----------------------------------------------------------------------------38
Wi-Fi Display User’s Manual
- 3 -
1.
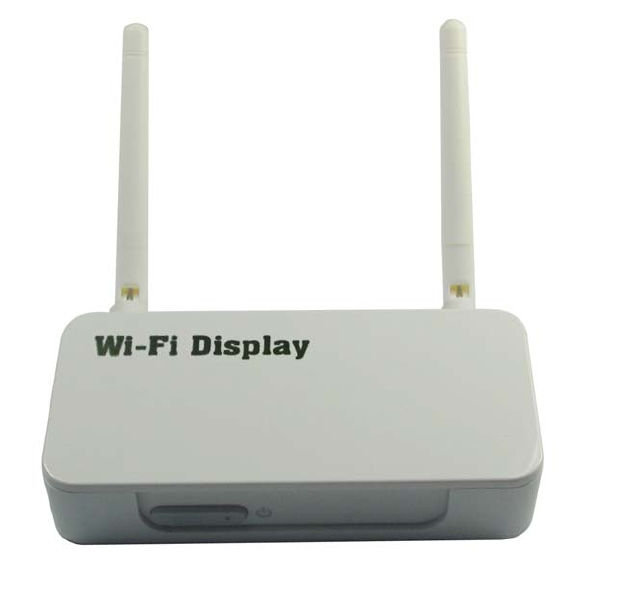
Package Contents:
Please check the following items are included in your Wi-Fi Display
package:
Main Unit X1
Antennas X2
5V/2A Power Adapter X1
Installation CD X1
User’s Manual (In the CD) X1

Wi-Fi Display User’s Manual
- 4 -
2.
Before you start
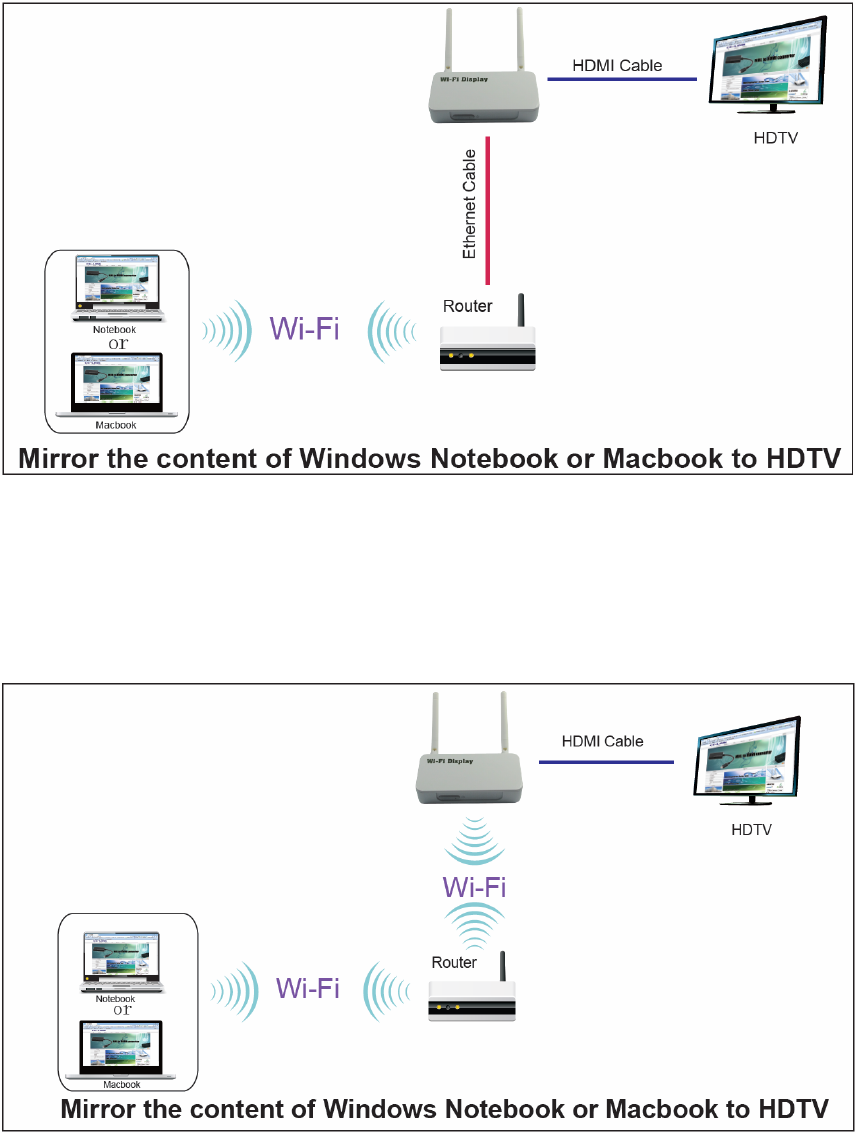
Wi-Fi Display is the one device that can show all contents of your
Windows® or Mac® computers on your TV wirelessly. You can easily
control computers with your mouse and/or keyboard. You can share any
content from your computers with your friends and family in your living
room.
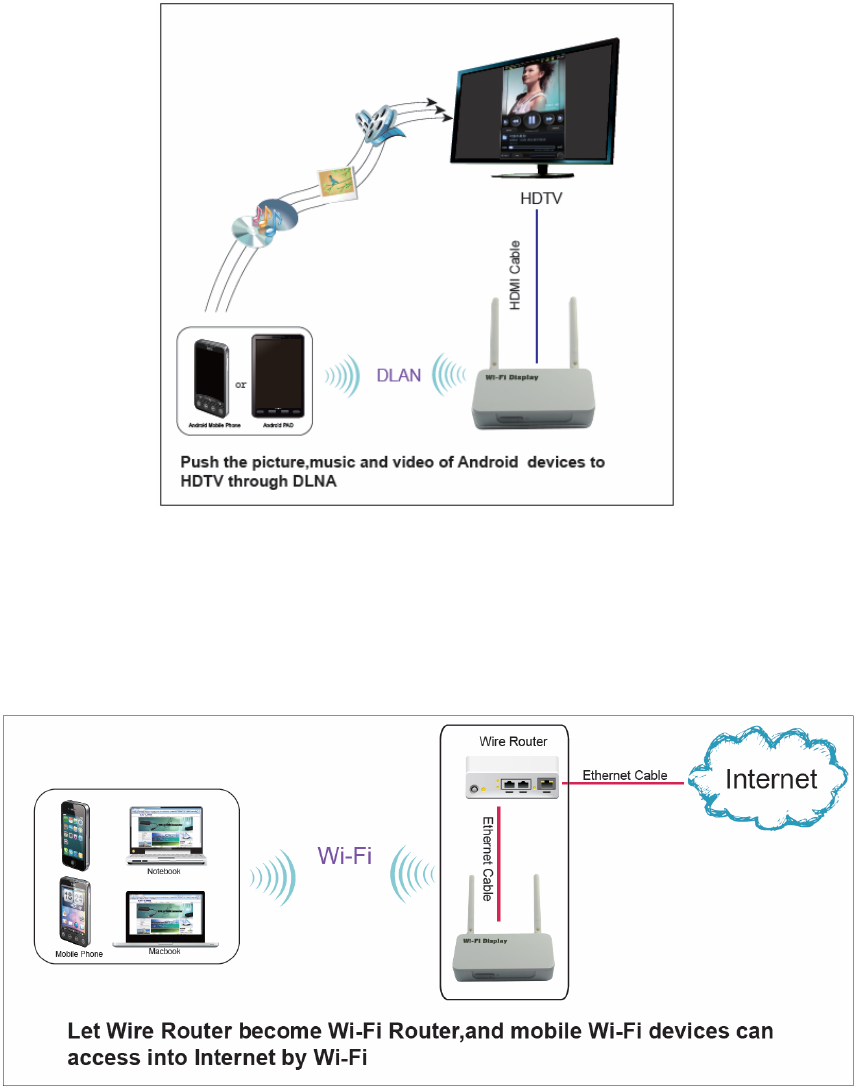
Also, if your mobile phone or pad is Android OS with a built-in DLNA
function, you can push the picture, music and audio from Android mobile
devices to HDTV for sharing a big screen.
Also,if your home Router have no Wi-Fi function, connecting this product
to your home Router,you will get a Wi-Fi Router, then all mobile network
devices can also access into the Internet,such as personal notebook,
mobile phone,etc.
Setup Possibilities:
a) Ethernet Connection: Best performance for Windows or Mac computer
Whenever possible, always use Ethernet cables to connect Wi-Fi Display
device to your home network. This setup provides best performance for
both remote operation and internet connection.
b) Partly wireless Connection: Reasonable Performance for Windows or
Mac computer
If wireless connection is preferred, you can connect your home AP and
Wi-Fi Display via cables, and access either from your home AP or Wi-Fi
Display.
Wi-Fi Display User’s Manual
- 5 -
c) Purely wireless Connection: Basic performance for Windows or Mac
computer
You can also try setting up Wi-Fi Display as a wireless client to your home
AP via AP-Client mode. However, this setup is more complicated and
vulnerable to any interference in Wi-Fi signal.
d) DLNA function for Android mobile devices
if your mobile phone or pad is Android OS with a built-in DLNA function,
you can push the picture, music and audio from Android mobile devices
to HDTV for sharing a big screen. For some mobile devices, maybe some
media format can not be supported on this product.
Wi-Fi Display User’s Manual
- 6 -
e) Wi-Fi Router Function
Let Wire Router become Wi-Fi Router and mobile Wi-Fi devices can
access into Internet by Wi-Fi, such as personal notebook, mobile
phone,etc.
Wi-Fi Display User’s Manual
‐7‐
3.
Quick Start
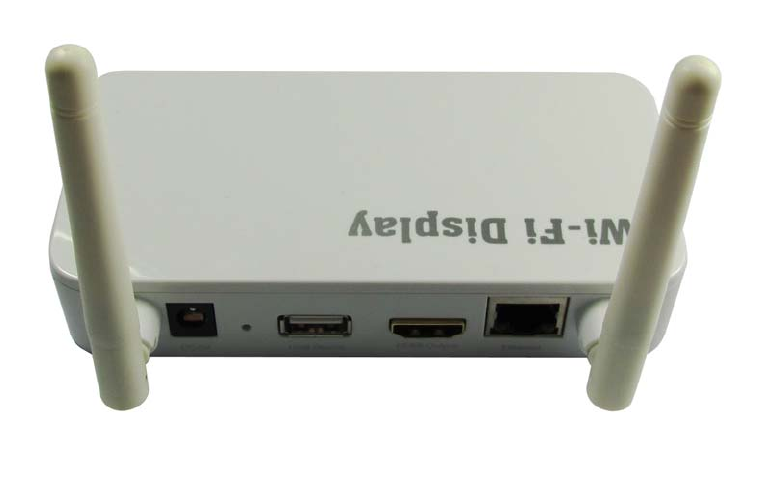
1. Connect the HDMI output on the Wi-Fi Display to your TV, and turn
on your TV.
2. Connect the power adapter to your Wi-Fi Display, and plug in to
your power outlet.
3. Press the Power button on Wi-Fi Display to turn on the device.
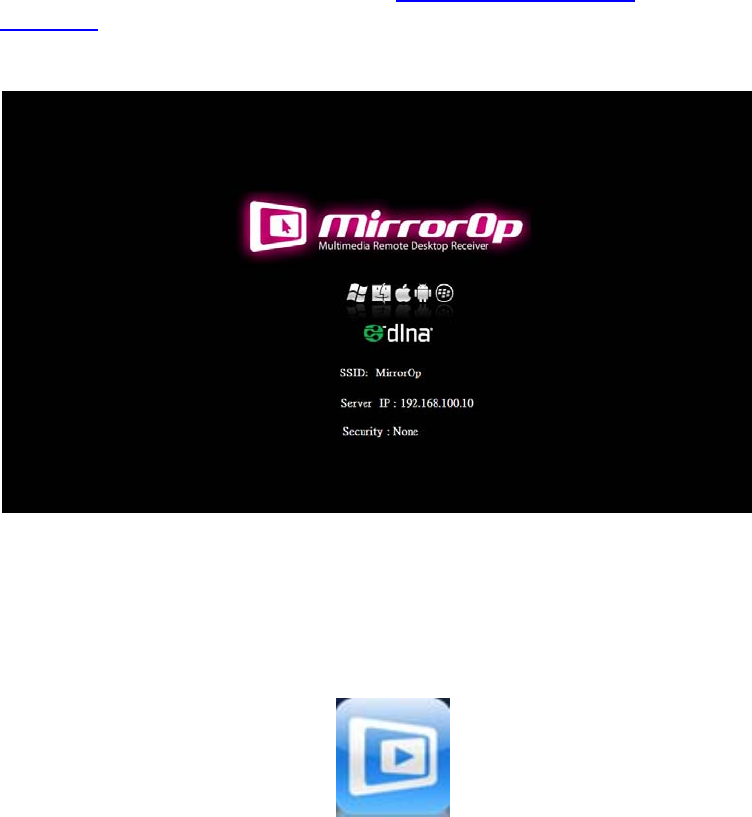
4. Wi-Fi Display will be powered ON. Waiting for about 35
seconds,the Main Menu as below will be shown on your TV
screen while system is ready.
5. Insert Wi-Fi Display CD and follow on-screen instructions to install
software from the CD-ROM.
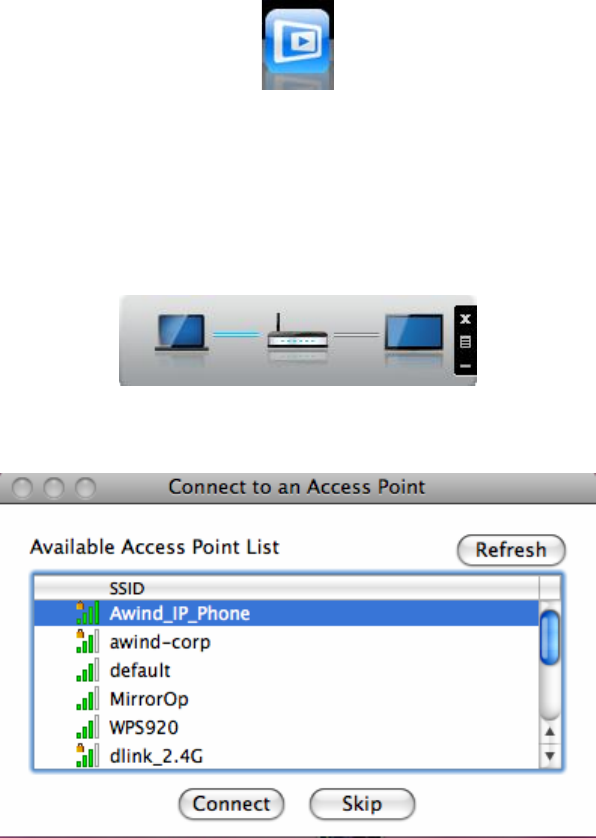
6. Find the following icon in "Applications\MirrorOp" folder (on Mac)
or "Programs\MirrorOp Sender" folder (on Windows) to launch
MirrorOp Sender.
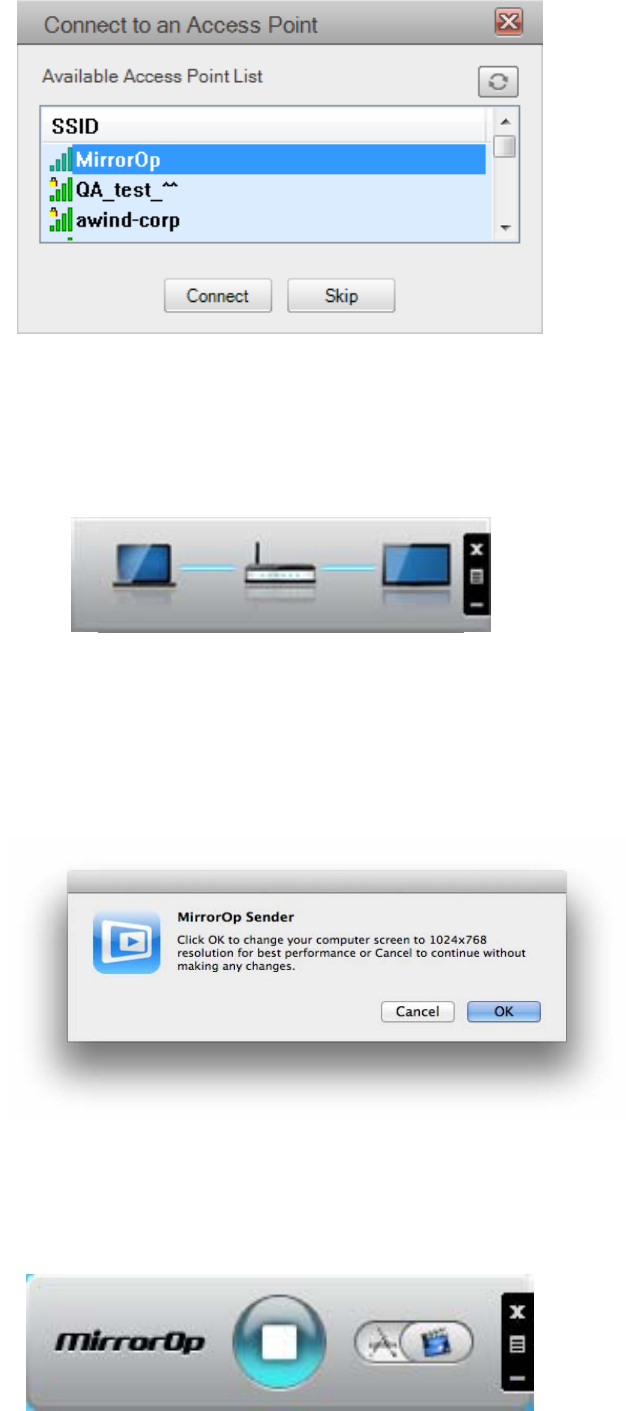
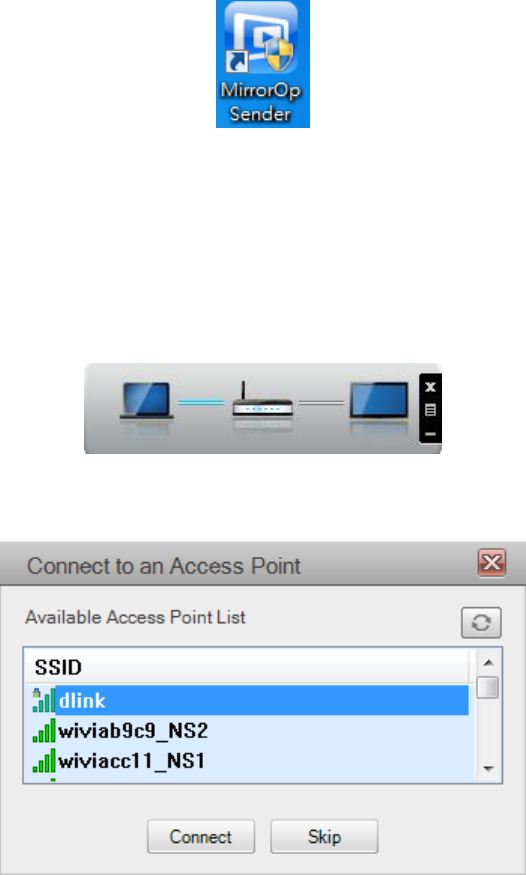
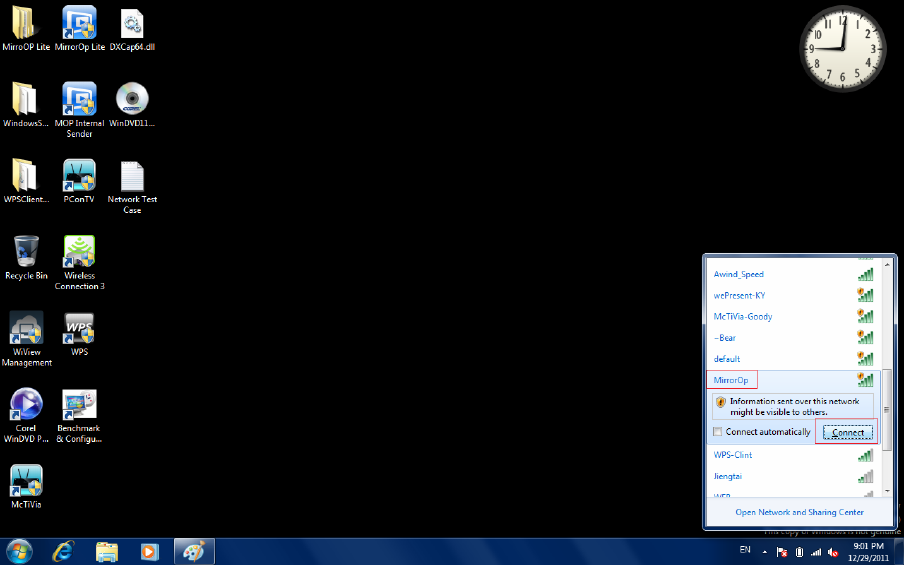
7. Search Wi-Fi Access Point. Select your Wi-Fi Display device (default
SSID is MirrorOp) from the list and click the Connect button.
Wi-Fi Display User’s Manual
‐8‐
8. Connect to selected access point.
9. Connect to MirrorOp server. If only one server is found, it will
automatically connect to the server.
10. The application will ask to adjust your PC resolution for best
projection result, and then project your screen to TV. You should
see your PC Desktop on TV screen now.
11. To finish projection, click the X button on the menu of MirrorOp
Sender to leave projection. Your screen resolution would be
restored to original one if you approve adjusting resolution with
above step.
Wi-Fi Display User’s Manual
‐9‐
4.
Using MirrorOp Sender for Win-OS
4.1 Start Program
After installing the program, you will see the MirrorOp icon on your
desktop:
1) Double click it to execute MirrorOp Sender client.
2) Program start to list all available Access Point List.(Auto Wi-Fi connect
enabled)
3) Program start to search all available MirrorOP devices.
4) After MirrorOP device is found, click it to start projection.
z Search for device
z While Auto Wi-Fi connect is enabled, list all available access point list

Wi-Fi Display User’s Manual
‐10‐
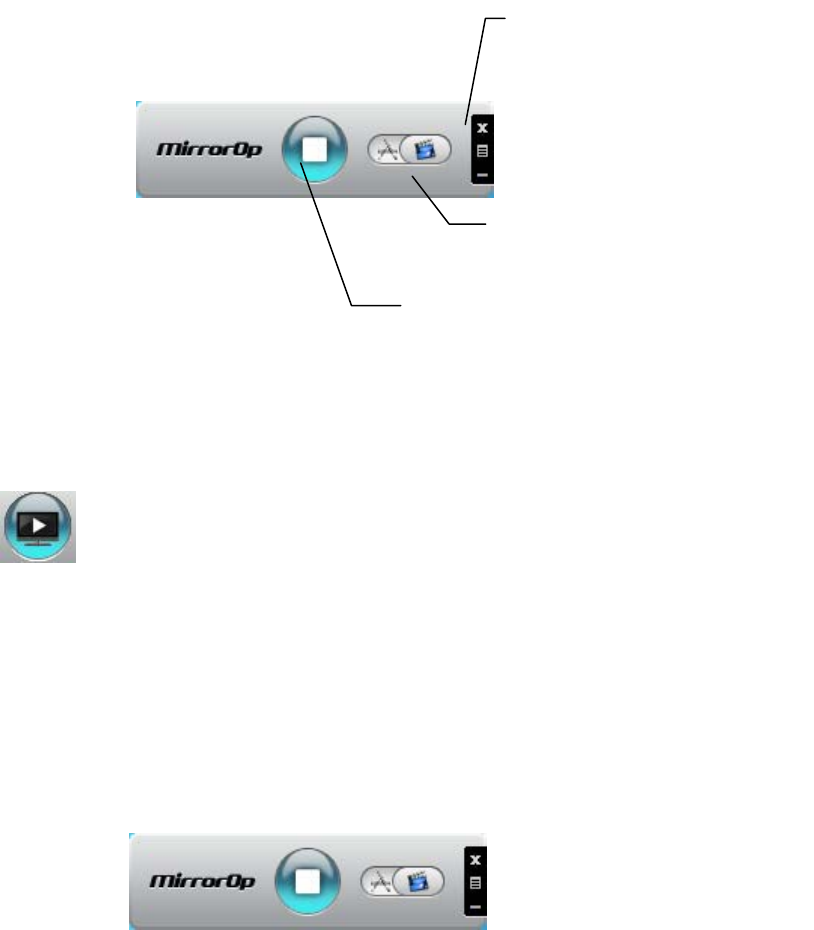
4.2 Main User interface
4.3 Screen Projection
Click the button for full or split screen; you can project the main
screen on to the display immediately.
Video Mode vs. App Mode
On MirrorOp Sender you can find a switch button for two modes:
Video Mode and App Mode; Video Mode is designed for smooth video
experiences, so by default it has longer latency between your PC and
TV.
If you have very good network connection (by Ethernet) and prefer to
use low latency mode at all times, you may drag the switch to App
Mode.
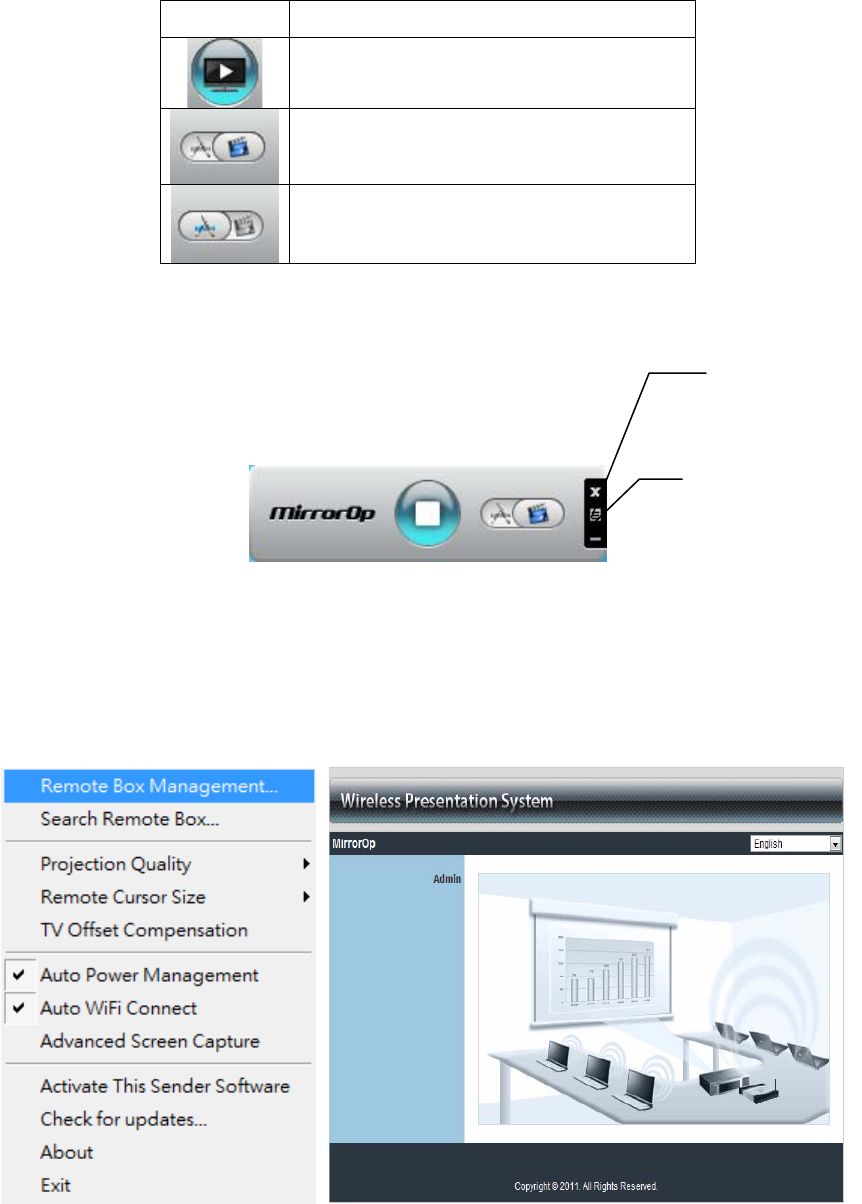
Menu
Area
Play/Stop button
App/Video mode
Wi-Fi Display User’s Manual
‐11‐
button Description
Full Screen Projection
Video Projection
Application Projection
4.4 Menu Description
4.4.1 Remote Box Management
Click <Remote Box Management> to initial web management.
Menu
Exit

Wi-Fi Display User’s Manual
‐12‐
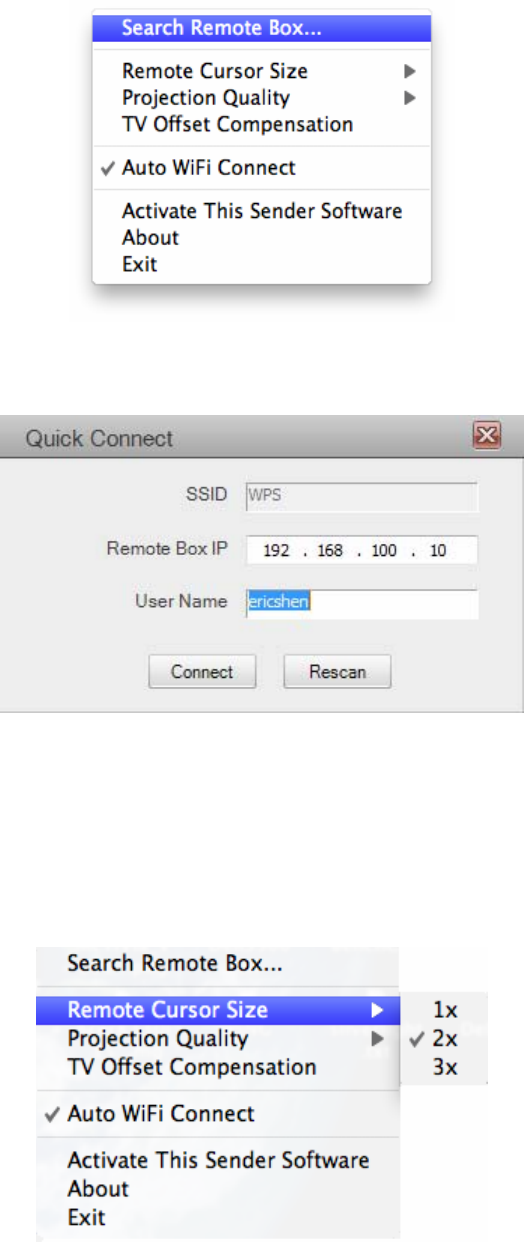
4.4.2 Search Remote Box
Click <Search Remote Box> to connect to another MirrorOp.
The last MirrorOp you connected is remembered. To connect another
one, please click <Rescan>.
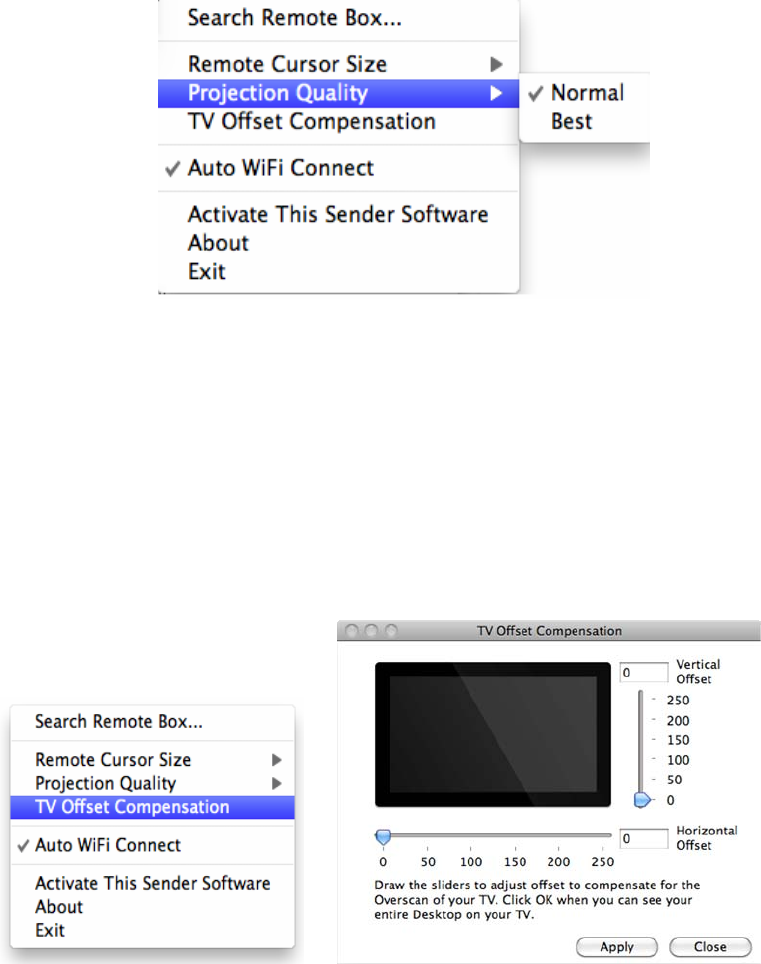
4.4.3 Projection Quality
Adjust projection image quality in <Projection Quality>. Higher quality
requires higher bandwidth. Default is Normal.

Wi-Fi Display User’s Manual
‐13‐
4.4.4 Remote Cursor Size
Adjust the cursor size on projection screen. When you select 3X option,
that will adjust the cursor to big size. The default is 2X.
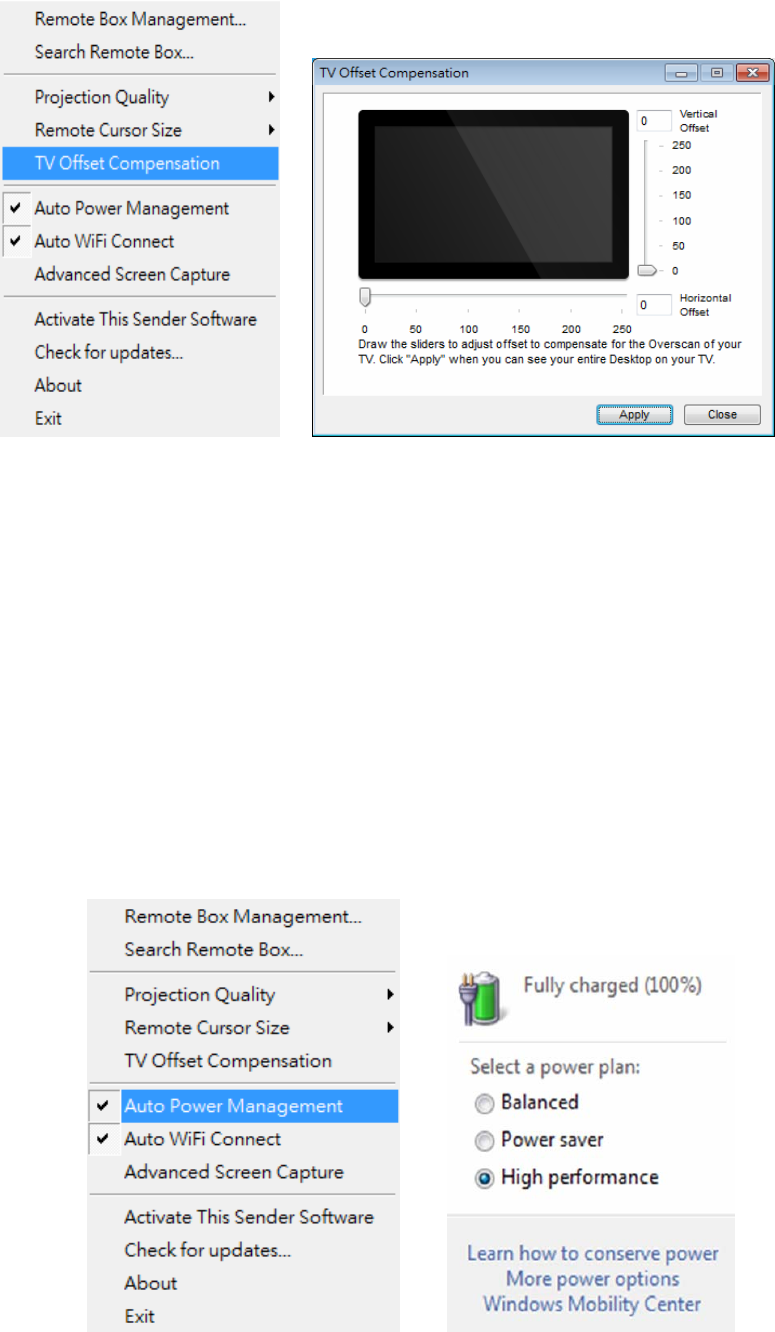
4.4.5 TV Offset Compensation
Most TVs has overscan design which will cut the edges of the
Desktop. If you cannot turn off overscan from your TV OSD, please
use the <TV Offset Compensation> to shrink projected screen to fit
your TV.
Wi-Fi Display User’s Manual
‐14‐
Drag the sliders to set offset value. Click <Apply> to update TV
projection. Check the TV screen. When the Desktop fits the TV, click
<Close>.
4.4.6 Auto Power Management
<Auto Power Management>To make the highest projection performance,
application will turn the PC’s windows power scheme from current
settings to “highest performance”, however, you can click the “Auto
Power Manage” to enable or disable this function and restore you power
scheme immediately.

Wi-Fi Display User’s Manual
‐15‐
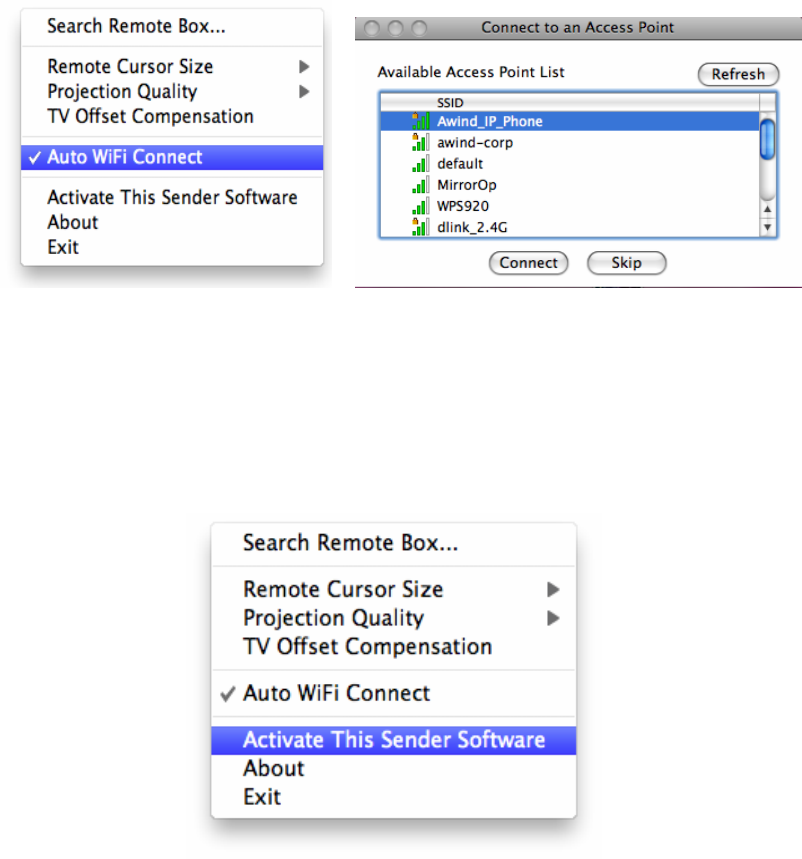
4.4.7 Auto Wi-Fi Connect
Check <Auto Wi-Fi Connect> to let MirrorOp search and connect to
access points, or turn it off to use your original Wi-Fi manager to
connect to access points manually.
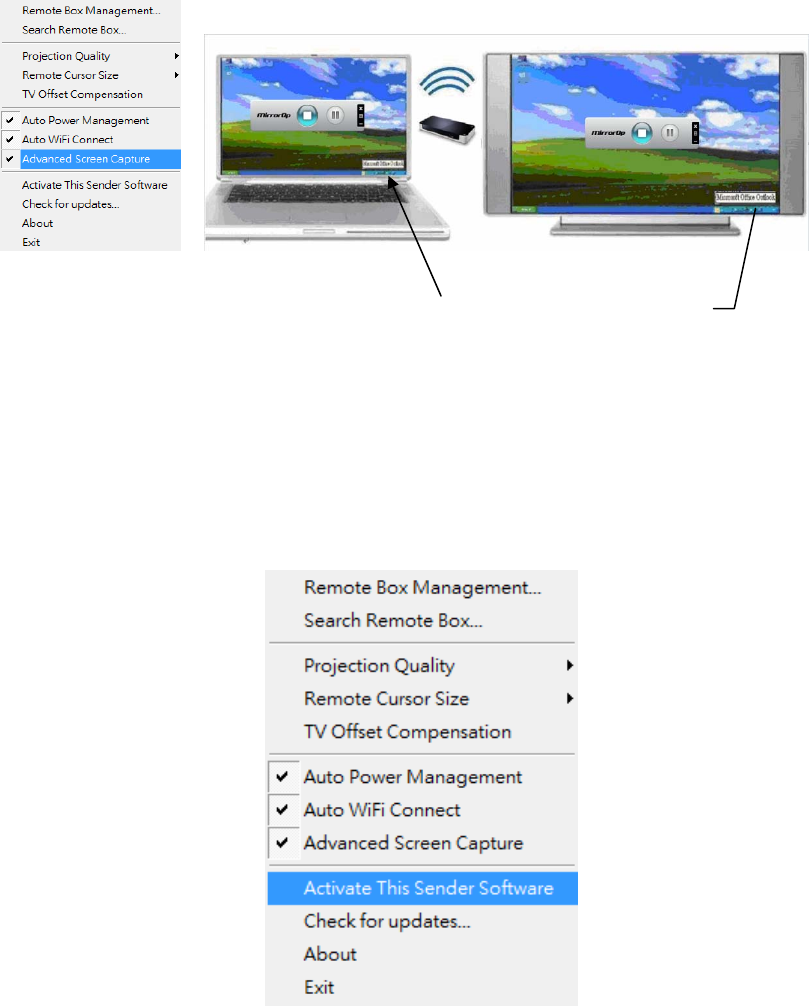
4.4.8 Advanced Screen Capture
Click the <Advanced Screen Capture>, you will be able to see tip
windows and other layered windows (include the main UI) on the
connected display.
However, the mouse cursor may blink from time to time when you are
projecting your PC screen!
z Disable “Advanced Screen Capture”.
z Enable “Advanced Screen Capture”.
Tip windows is not shown
in projector
Wi-Fi Display User’s Manual
‐16‐
s
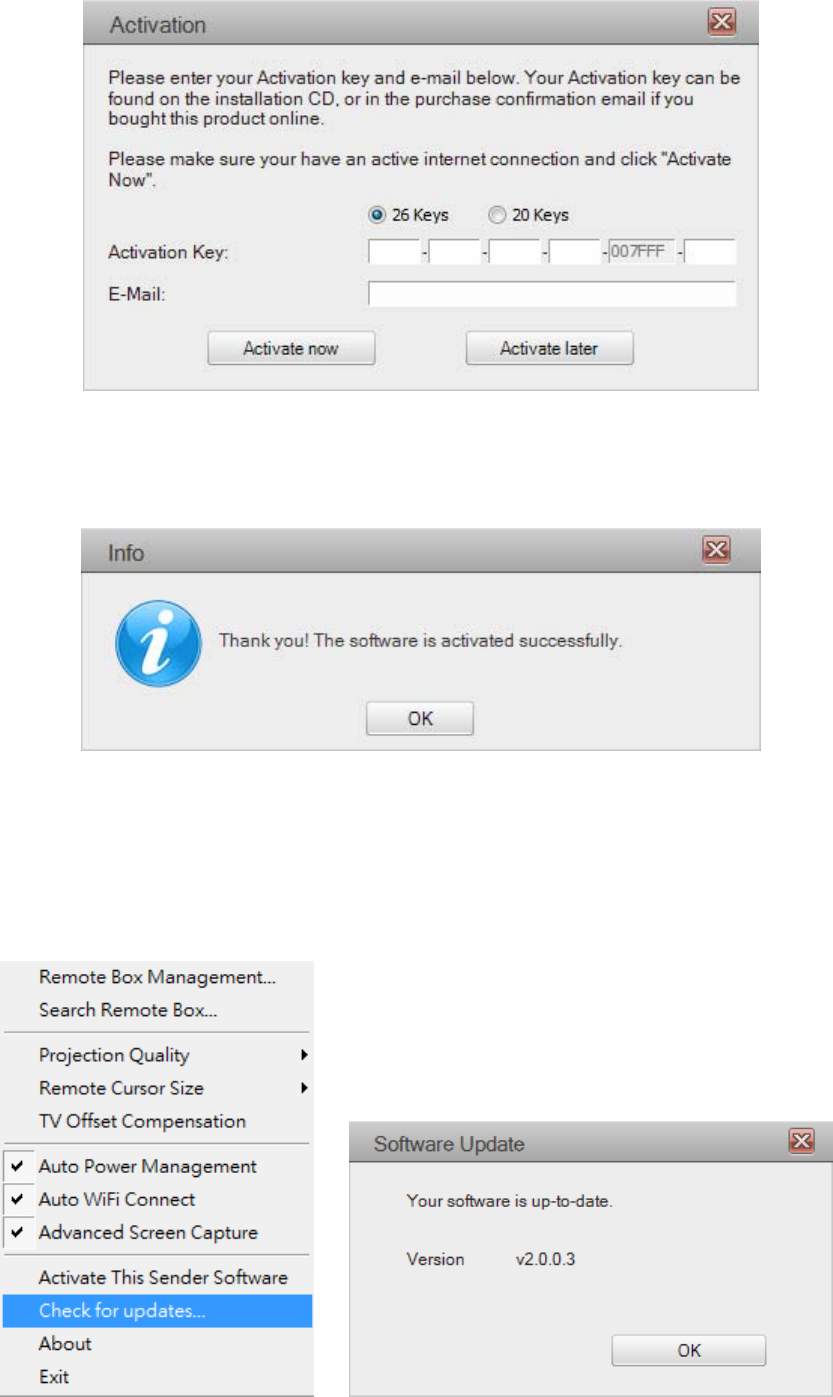
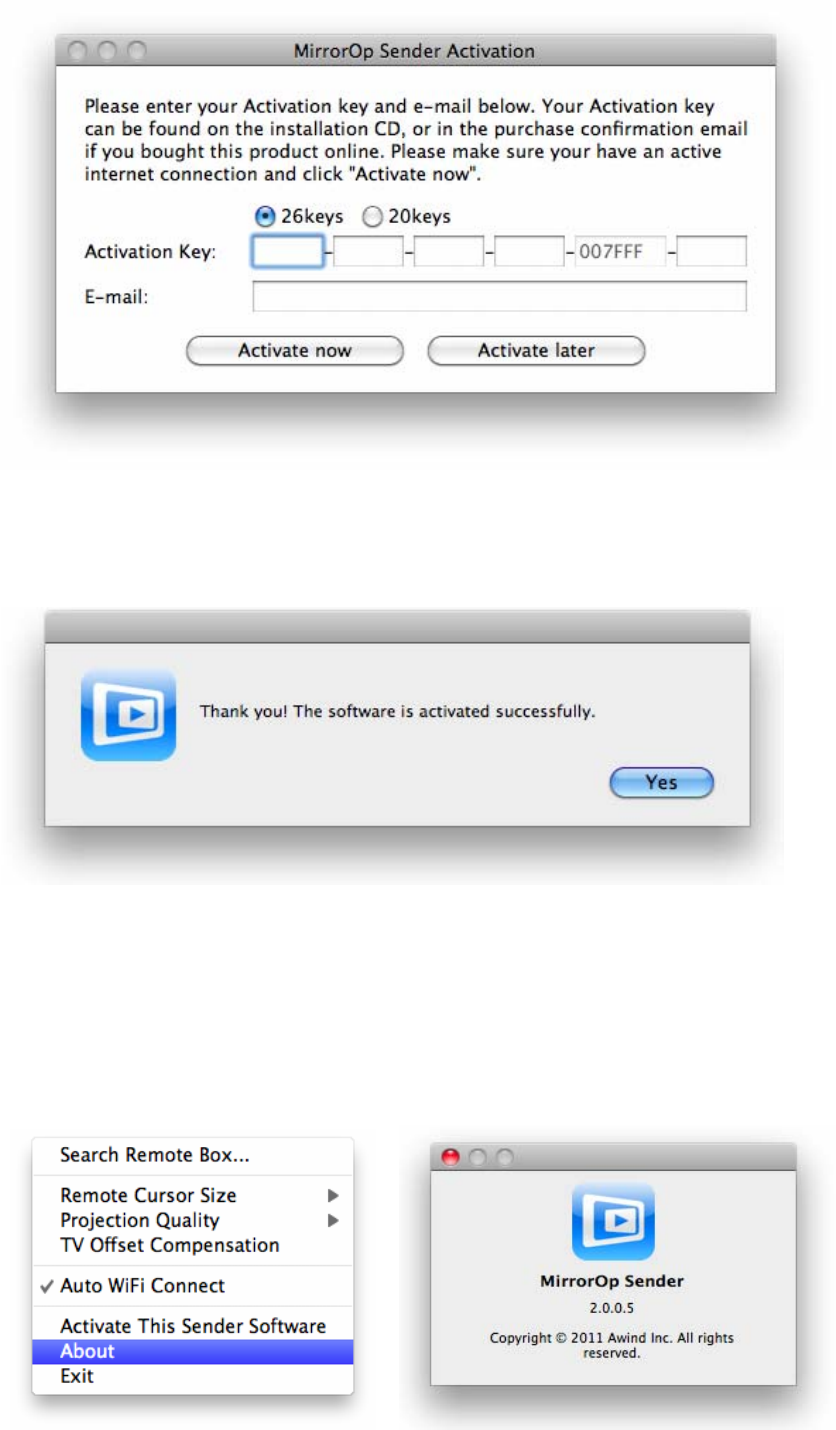
4.4.9 Activate This Sender Software
To activate, select <Activate This Sender Software> from the menu.
In the Activation dialog, input the activation key printed on the CD
envelops or received by mail. (The fifth field will be auto filled and
please ignore it if this field is different from your key.)
Click “Activate now” to activate online.
Tip windows is shown
in projector。
Wi-Fi Display User’s Manual
‐17‐
The software will connect to the activation server to validate the
information. When validation is passed, your software will be activated.
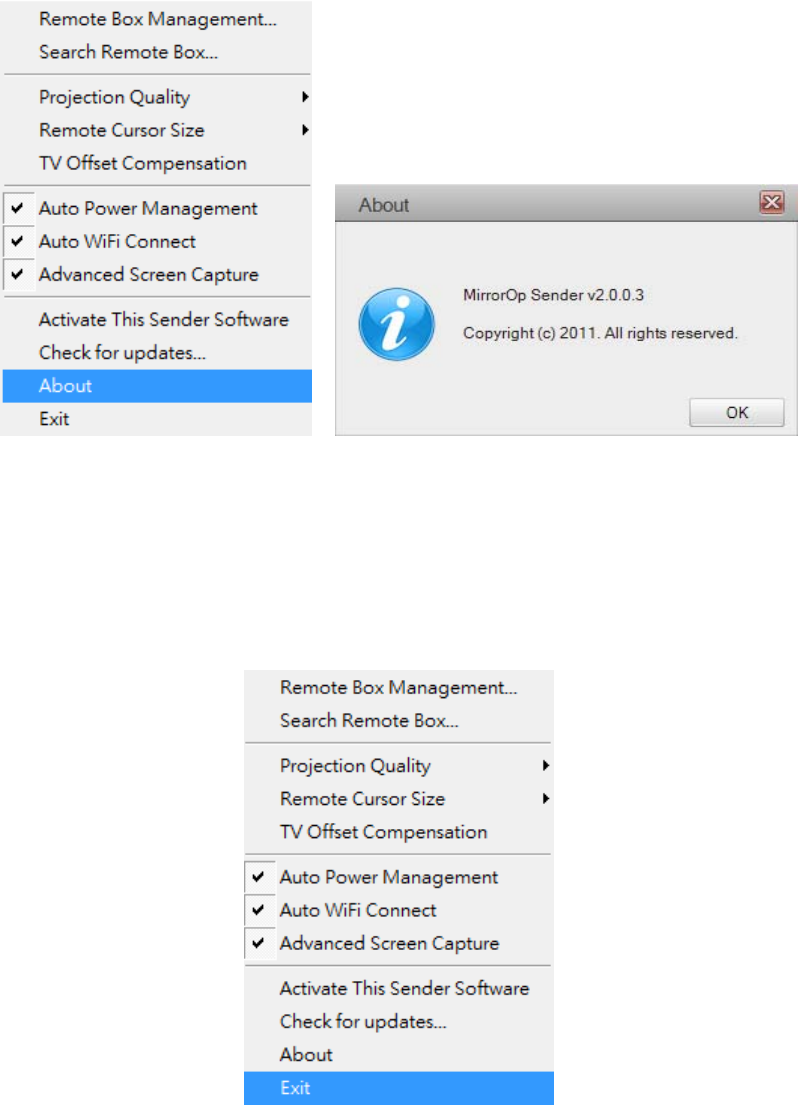
4.4.10 Check for updates
Click <Check for Updates> to check for updates.
Wi-Fi Display User’s Manual
‐18‐
4.4.11 About
Click <About> to show system information. It includes product model
name, Client version, IP address and other information
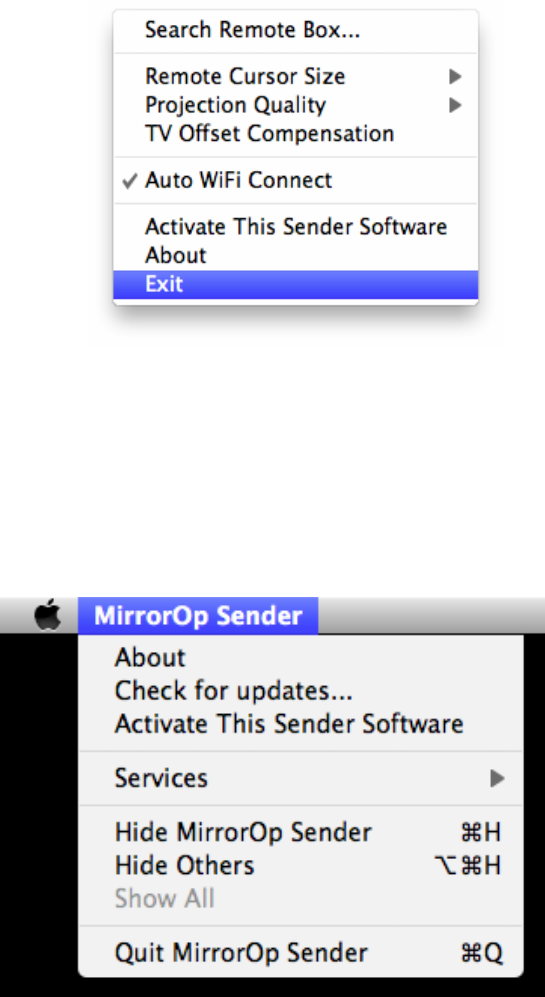
4.4.12 Exit
Click <Exit> to exit this application. It will stop current playing status and
close the application immediate.
Wi-Fi Display User’s Manual
‐19‐
5.
Using MirrorOp Sender for MAC-OS
Note:
For MAC-OS, you must purchase software and additional activation key.
http://www.mirrorop.com/product_Mac_Sender.html
5.1 Start Program
After installing the program (*.pkg file), you will see the MirrorOp icon on
your dock:
1) Clicking it to execute MirrorOp Sender client.
2) Program start to list all available Access Point List.(Auto Wi-Fi connect
enabled)
3) Program start to search all available MirrorOp devices.
4) After MirrorOP device is found, click it to start projection.
z Search for device
z While Auto Wi-Fi connect is enabled, list all available access point list
Wi-Fi Display User’s Manual
‐20‐
5.2 Main User interface
5.3 Screen Projection
Click the button for full or split screen, you can project the main
screen on to the display immediately.
Video Mode vs. App Mode
On MirrorOp Sender you can find a switch button for two modes:
Video Mode and App Mode. Video Mode is designed for smooth video
experiences, so by default it has longer latency between your PC and
TV.
If you have very good network connection (by Ethernet) and prefer to
use low latency mode at all times, you may drag the switch to App
Mode.
Menu Area
Play/Stop button
App/Video mode
Wi-Fi Display User’s Manual
‐21‐
button Description
Full Screen Projection
Video Projection
Application Projection
5.4 Menu Description
5.4.1 Search Remote Box
Click <Search Remote Box> to connect to another MirrorOp.
Menu
Exit
Wi-Fi Display User’s Manual
‐22‐
The last MirrorOp you connected is remembered. To connect to
another one, Click <Rescan>.
5.4.2 Remote Cursor Size
Adjust the cursor size on projection screen. When you select 3X option,
that will adjust the cursor to big size. The default is 2X.
5.4.3 Projection Quality
Adjust projection image quality in <Projection Quality>. Higher quality
requires higher bandwidth. Default is Normal.
Wi-Fi Display User’s Manual
‐23‐
5.4.4 TV Offset Compensation
Most TVs has overscan design which will cut the edges of the
Desktop. If you cannot turn off overscan from your TV OSD, please
use the <TV Offset Compensation> to shrink projected screen to fit
your TV.
Drag the sliders to set offset value. Click <Apply> to update TV
projection. Check the TV screen. When the Desktop fits the TV, click
<Close>.
5.4.5 Auto Wi-Fi Connect
Check <Auto Wi-Fi Connect> to let MirrorOp search and connect to
access points, or turn it off to use your original Wi-Fi manager to
connect to access points manually.
Wi-Fi Display User’s Manual
‐24‐
5.4.6 Activate This Sender Software
To activate, select “Activate This Sender Software” from the menu.
In the Activation dialog, input the activation key printed on the CD
envelops or received by mail. (The fifth field will be auto filled and
please ignore it if this field is different from your key.)
Click “Activate now” to activate online.
Wi-Fi Display User’s Manual
‐25‐
The software will connect to the activation server to validate the
information. When validation is passed, your software will be activated.
.
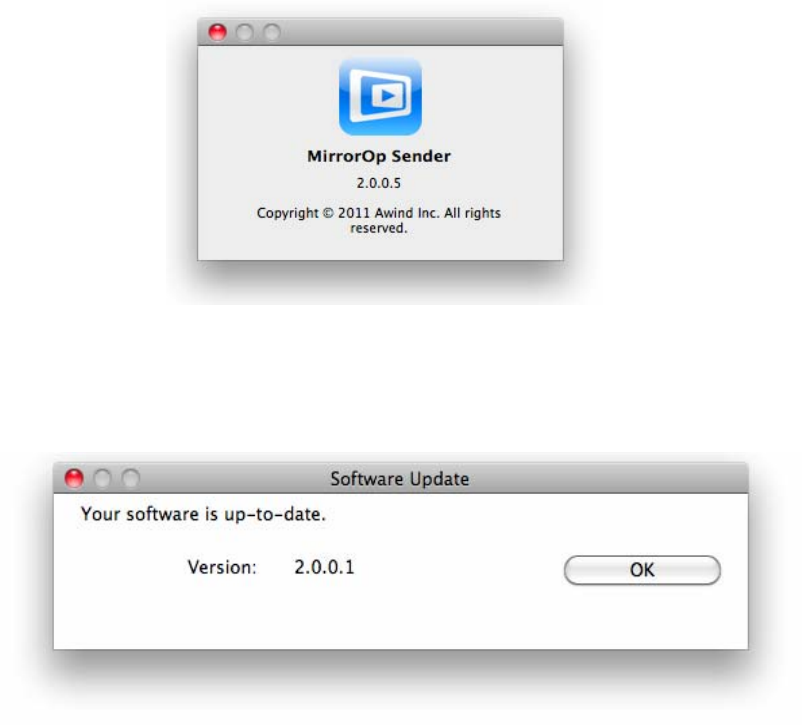
5.4.7 About
Click <About> to show system information. It includes product model
name, Client version, IP address and other information
Wi-Fi Display User’s Manual
‐26‐
5.4.8 Exit
Click <Exit> to exit this application. It will stop current playing status and
close the application immediate.
5.4.9 Main Menu Bar
The menu bar in Top left-hand corner, and click <MirrorOp Sender>
button.
Click <About> to show version information of this program.
Wi-Fi Display User’s Manual
‐27‐
Click <Check for Updates> to check for updates.
Wi-Fi Display User’s Manual
‐28‐
6 Web Management
Home Page
♦
Make sure your PC is connected to MirrorOp device successfully.
♦
Open your browser, and enter the IP address of your MirrorOp
device.
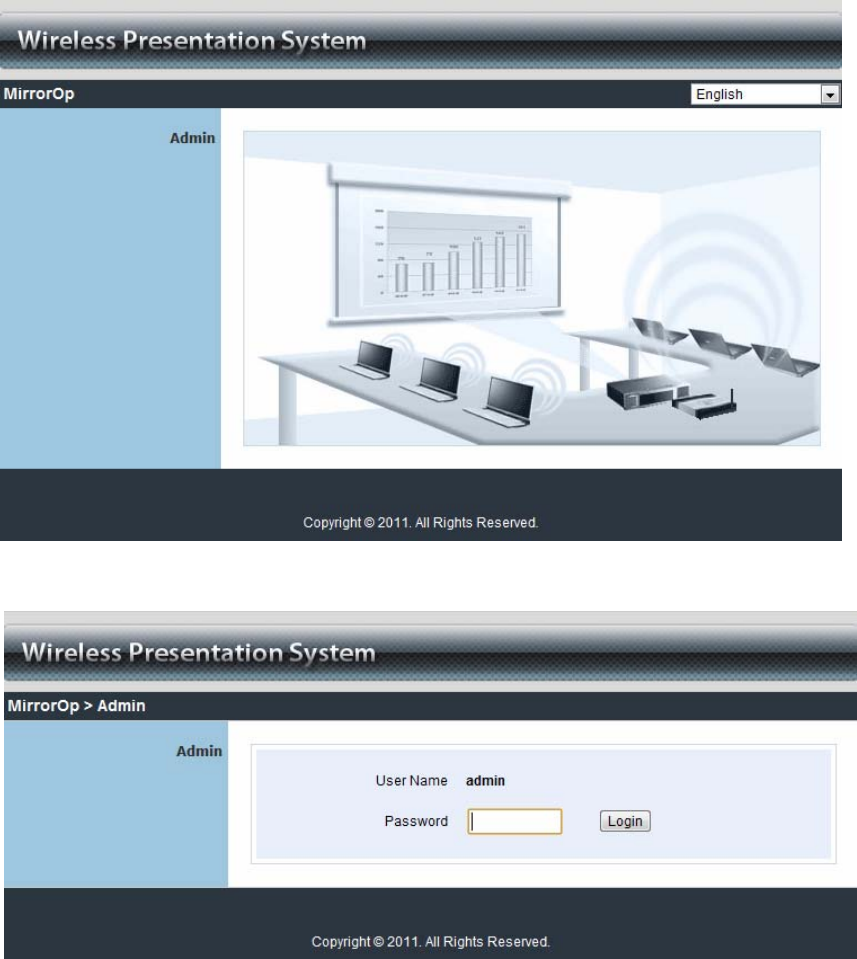
Login Web Admin
♦
Click [Admin] and then enter password to login web page.
♦
Default password is “admin”.
Wi-Fi Display User’s Manual
‐29‐
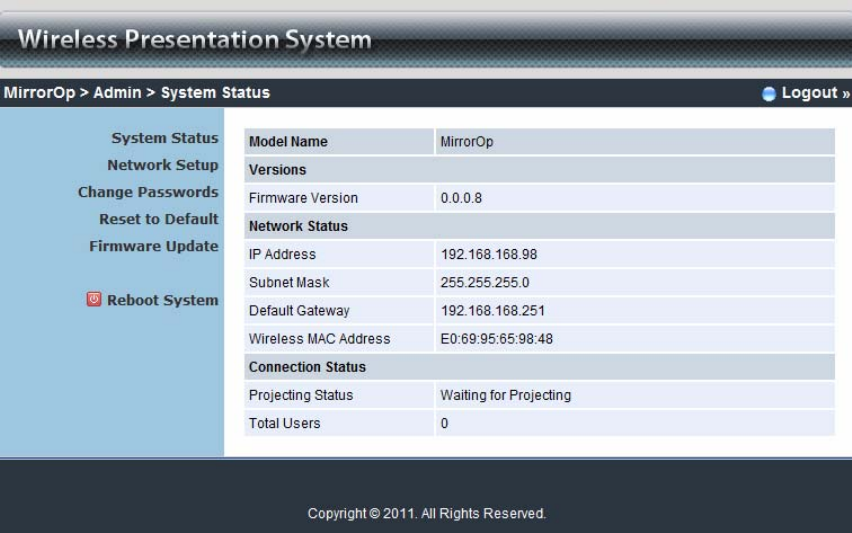
System Status
*** Click [System Status] to show current system status.
Model Name: Product model name
Versions:
♦
Firmware version: Product firmware version number.
Network Status:
♦
IP address: IP address of MirrorOp device.
♦
Subnet Mask: subnet mask
♦
Default Gateway: default gateway
♦
Wire MAC address: wire network MAC address
Wi-Fi Display User’s Manual
‐30‐
Network Setup
< IP Setup>
You can select “obtain IP address automatically” or “Use the following IP
address”
♦
IP Address: The default value is 192.168.100.10.
♦
Subnet Mask: The default value is 255.255.255.0
♦
Default Gateway: The default value is 192.168.100.10
<DHCP Server Setup>
You can select “Auto” or “Disable”. When “Auto” is selected, it will
automatically disable DHCP on MirrorOp is another DHCP server is
detected, otherwise it will enable its DHCP service.
♦
Start IP: The start IP address of DHCP Server.
♦
End IP: The end IP address of DHCP Server.
< Wireless Setup>
♦ Wireless LAN: you can select “Enable” or “Disable”
♦ Region: default value is “Worldwide”.

Wi-Fi Display User’s Manual
‐31‐
♦ SSID: SSID string, max. Length is 32 bytes.
♦ SSID Broadcast: you can select “Enable” or “Disable”
♦ Channel: to set fixed channel or Auto.
♦ Security: Disable/WEP/WPA/WPA2
♦ Key: Security key of your choice.
< AP Client>
♦ Connect to existing AP: Type in the Home AP SSID you want to
connect.
♦ Encryption: Disable/WEP/WPA/WPA2
♦ Key: Type the Home AP’s security key.
<Apply >: press button to select this mode
<Cancel>: press button to abort action.
<Back>: back to Operating mode main menu
Change Passwords
*** Click [Change Password] button to change password value.
<Enter New Password>: enter new password you want to change for
each category.
<Confirm New Password>: double confirm new password.
<Apply>: Confirmation and Save modifications.
Wi-Fi Display User’s Manual
‐32‐
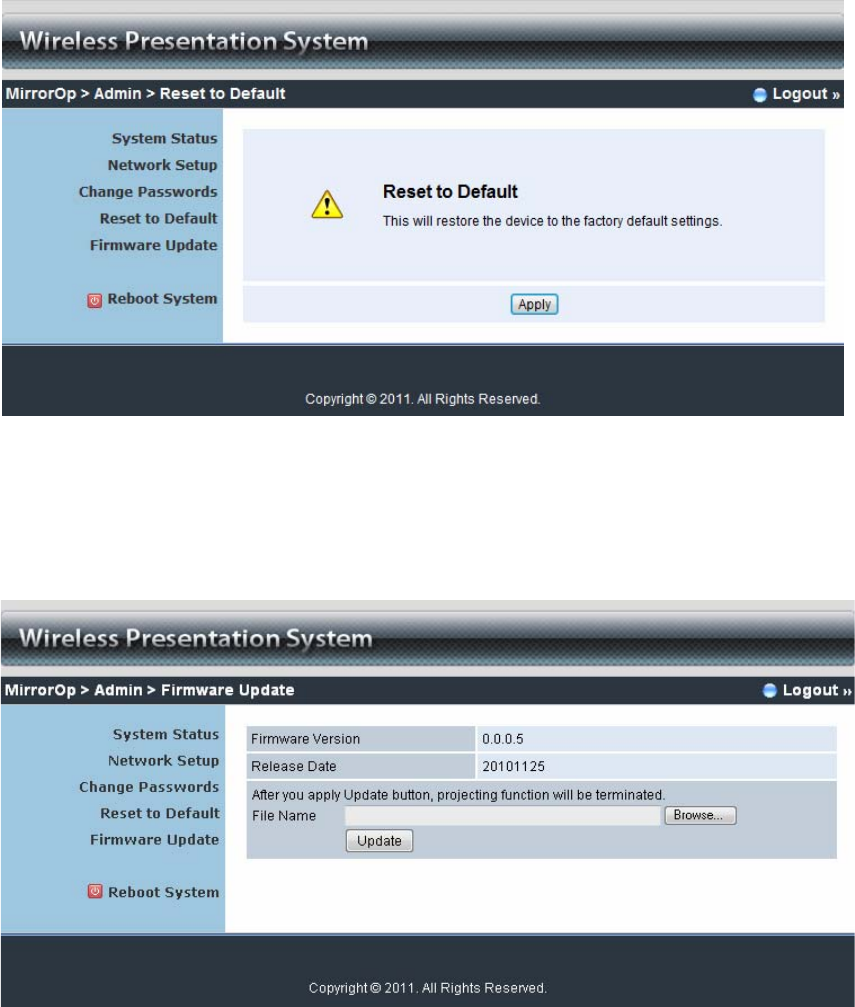
Reset to Default
*** Click [Reset to Default] button to restore factory default settings.
<Apply>: Confirmation and action.
Firmware Update
*** Click [Firmware Update] button to upgrade firmware.
♦
Firstly, you have to get latest firmware image file from your
vendor.
♦
Click <Choose File> to specify file name you want to upgrade.
♦
Click <Update> to start.
The upgrade process takes about 5 minutes to complete. The MirrorOp
device will reboot automatically when the process is completed.
Warning: Don’t power off MirrorOp while firmware upgrade in progress,
otherwise MirrorOp device may be damaged and have to be returned to
your vendor for repair.
Wi-Fi Display User’s Manual
‐33‐
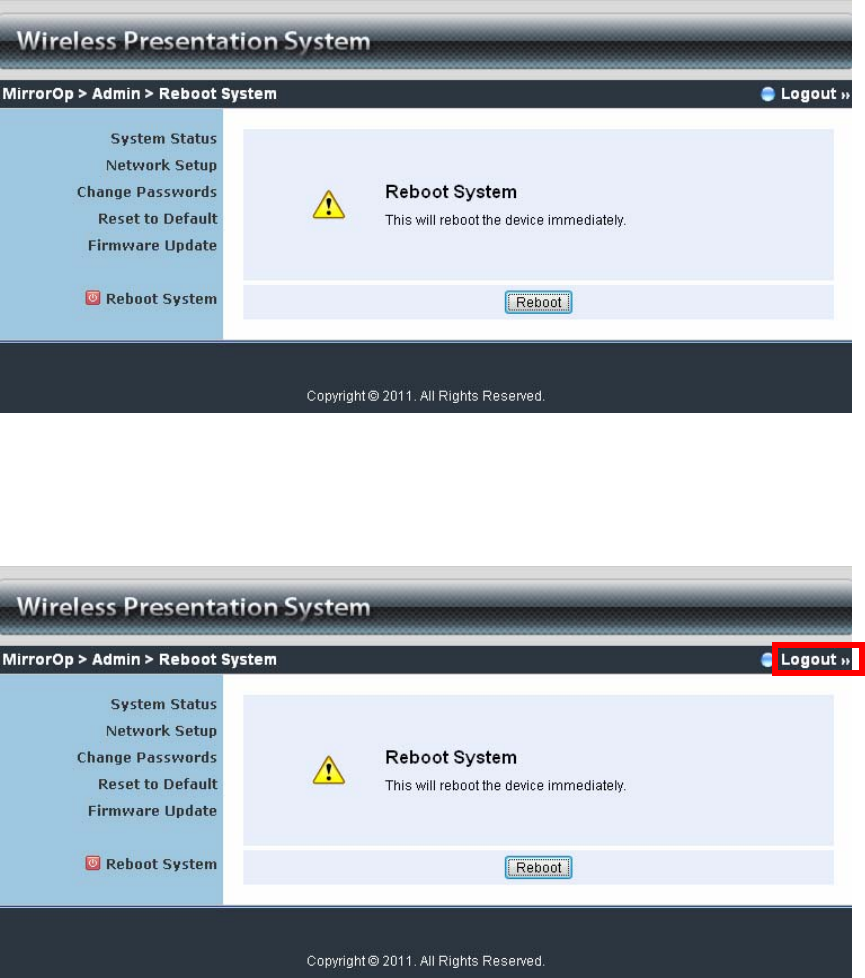
Reboot S
ystem
*** Click [Reboot System] button to restart system
<Reboot>: reboot system automatically.
Logout
*** Click [Logout] button to return to home page.
Wi-FiDisplay User’s Manual
‐34‐
7 Using DLNA Function via Wi-Fi Display
7-1 What is the support on Wi-Fi Display for DLNA function?
Wi-Fi Display is the one of DMR (Digital Media Renderer) can play media
contents which are streamed by DMC (Digital Media Player) from DMS
(Digital Media Server).
Support Media format:
Video: AVI / ASF / WMV / MKV / MP4 / MOV / 3GP / TS / RM / FLV / MPG
Audio: LPCM / MP3 / AAC / WMA
Image: JPEG / PNG
Notice: Wi-Fi Display supports above media format but some formats can
be streamed by specific DMC.
7-2 Preparation
a. Make sure the operation system is Windows Vista / Windows 7.
b. Make sure Wi-Fi Display is ready for connecting on standby
screen.
c. Connect Wi-Fi Display and laptop by wire or wireless.
7-3 Quick Start
a. Connect Wi-Fi Display device via wire or wireless.
b. Start Windows Media Player then click “Turn on media streaming” from
“Stream” in menu.
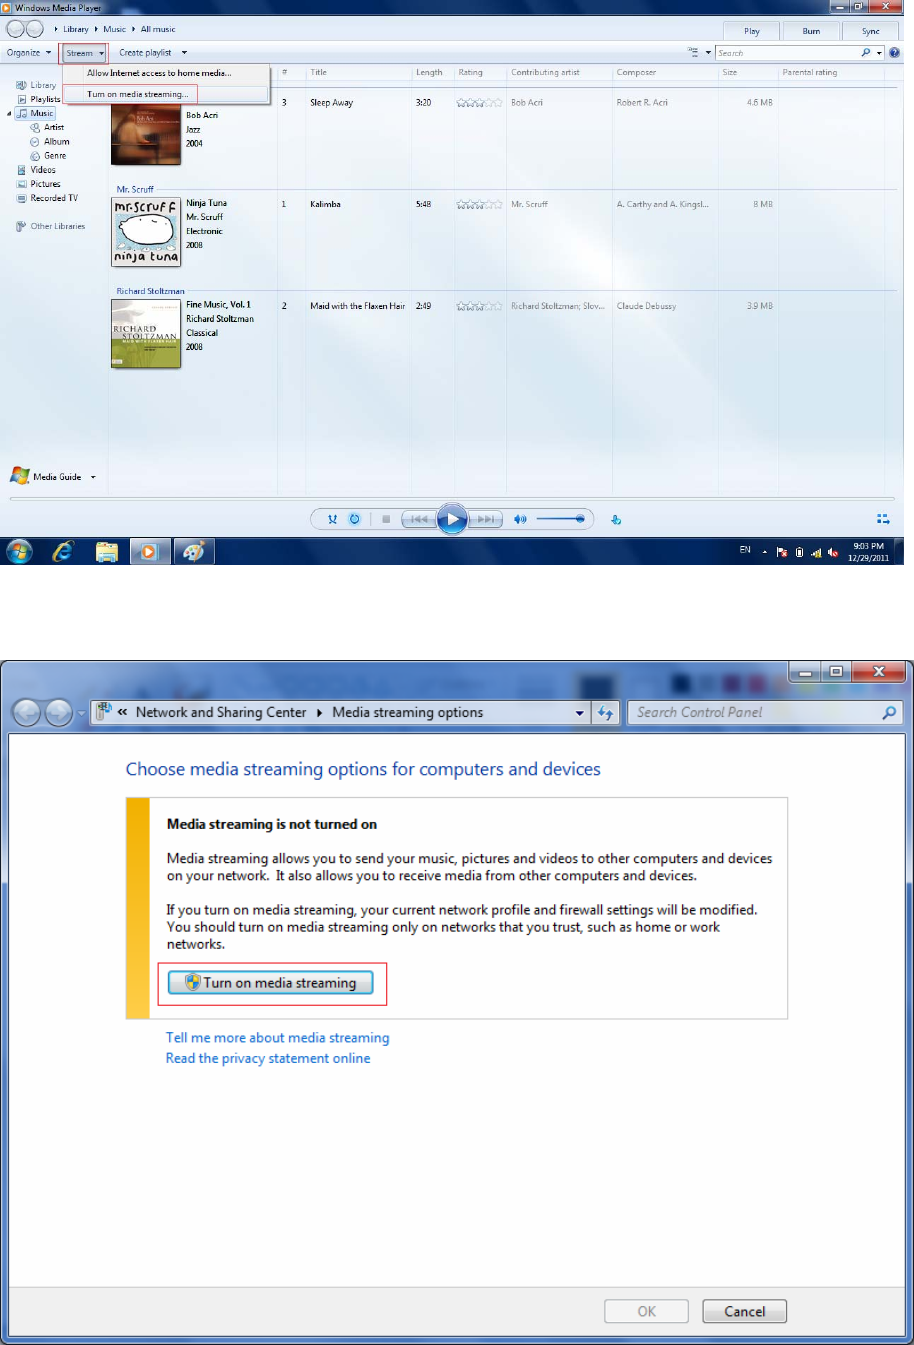
Wi-FiDisplay User’s Manual
‐35‐
c. Click “Turn on media streaming” button.
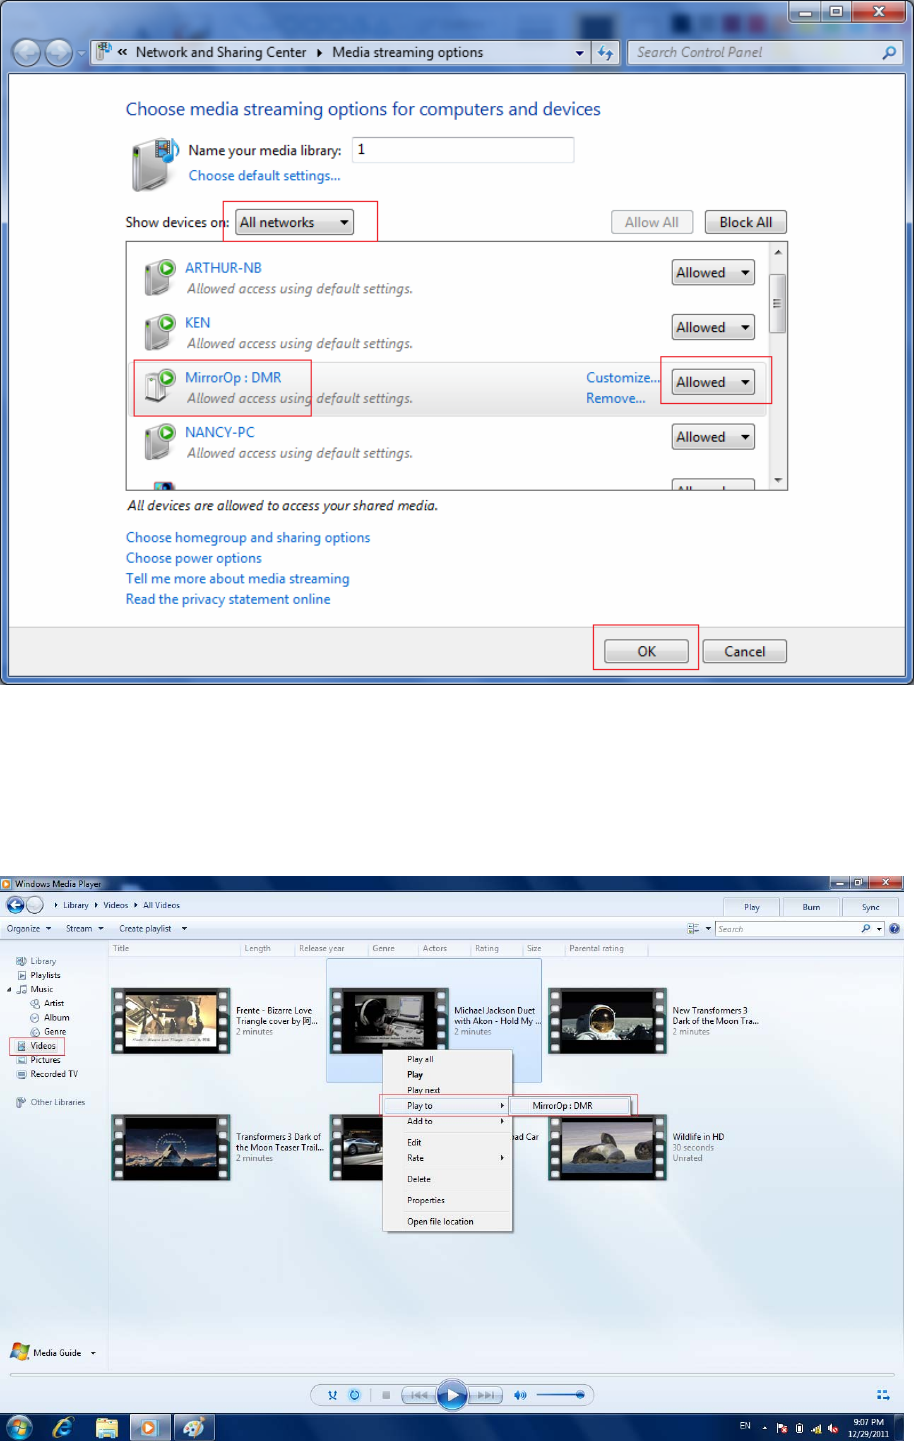
d. Select “All networks” from “Show device on:” and make sure “MirrorOp:
DMR” is selected as “Allowed” then click OK button to finish setting. After
finished setup, you can stream media content to DMR device direct.
Wi-FiDisplay User’s Manual
‐36‐
e. Video streaming: Go to Video Library then right-click on video file you want
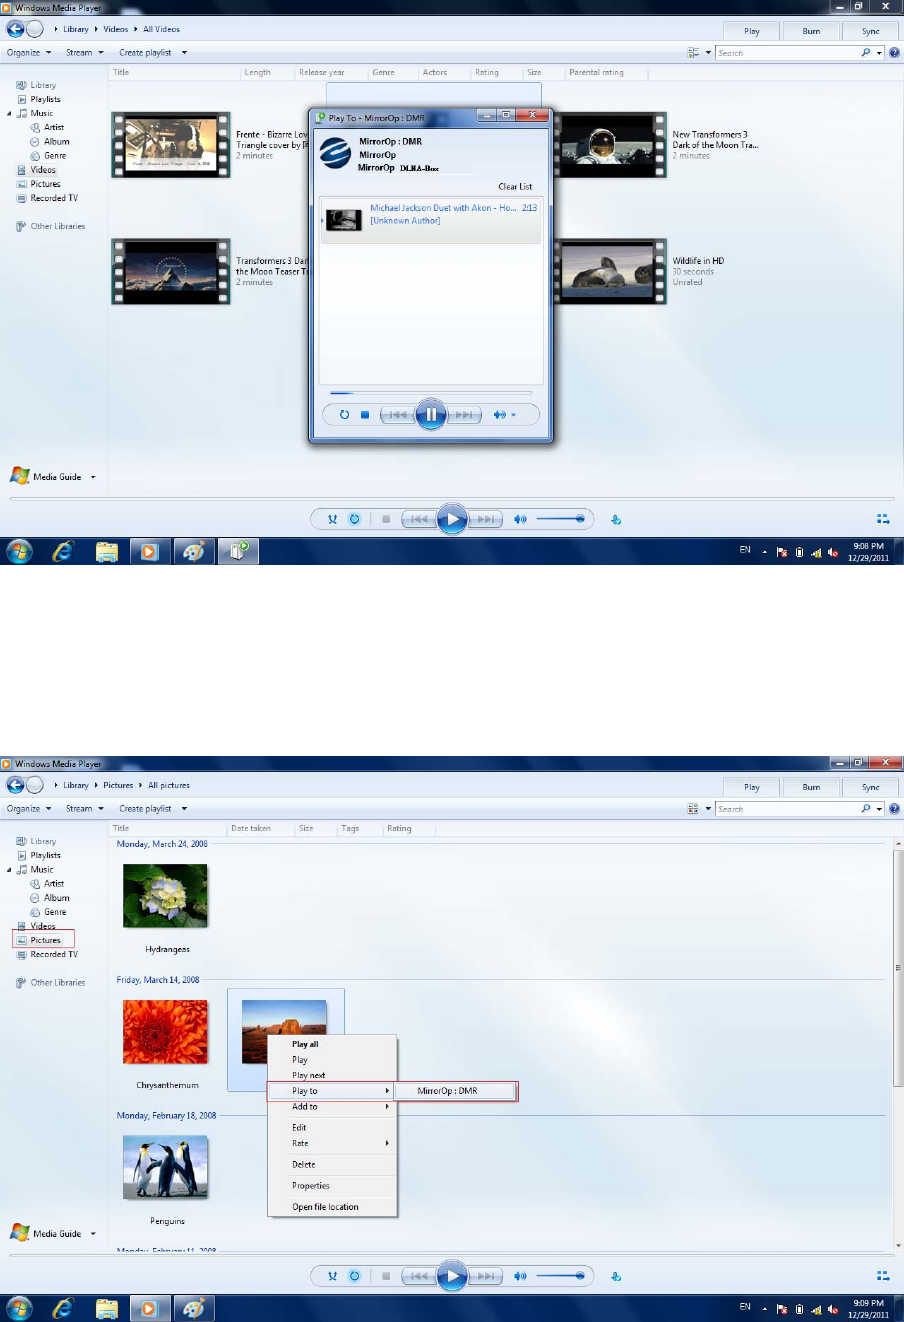
to stream. Then select MirrorOp DMR device from menu list of Play to. After
that, the video is streamed on your TV which connected with your MirrorOp
device.
Wi-FiDisplay User’s Manual
‐37‐
f. Photo streaming: Go to Picture Library then right-click on photo file you
want to stream. Then select MirrorOp DMR device from menu list of Play to.
After that, the photo is streamed on your TV which connected with your
MirrorOp device.
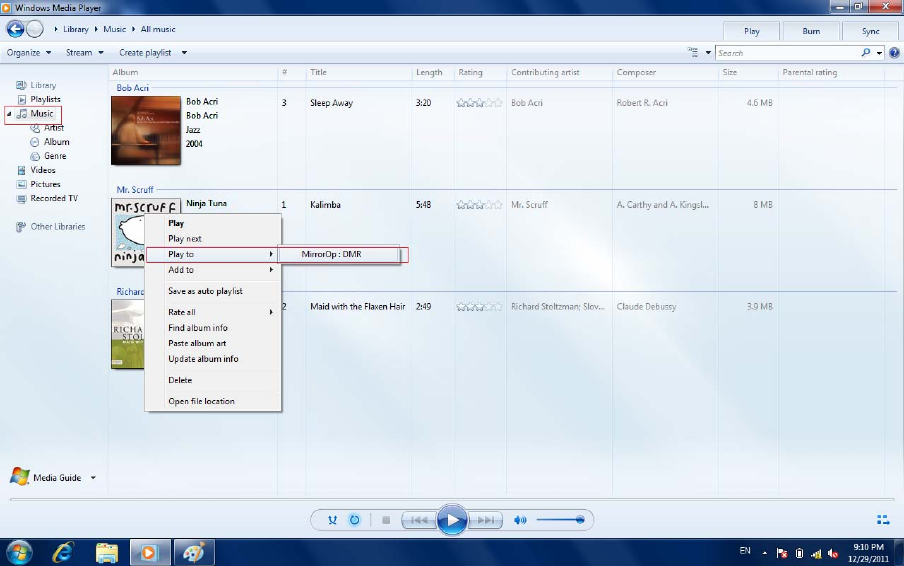
g. Music streaming: Go to Music Library then right-click on photo file you want
to stream. Then select MirrorOp DMR device from menu list of Play to. After
that, the music is streamed on your TV which connected with your MirrorOp
device.
Wi-FiDisplay User’s Manual
‐38‐
RF Exposure Statement
To maintain compliance with FCC's RF Exposure guidelines, this equipment
should be installed and operated with minimum distance between 20cm the
radiator your body: Use only the supplied antenna.
This device and its antenna(s) must not be co-located or
operation in conjunction with any other antenna or transmitter.

Wi-FiDisplay User’s Manual
‐39‐
8 System requirements
Mac PC Requirements
CPU Grade Intel Dual Core 1.4 GHz or better (PowerPC not supported)
Graphics nVIDIA or ATI graphic card with 64MB VRAM or above
Operating
System Mac OS X 10.5+
Recommended
Models MacBook after 2009-01-21
All series of MacBook Pro
MacBook Air after 2010-06-08
All Mac Desktops that meet the above hardware
requirements
Windows PC Requirements
CPU Grade Dual Core 1.8 GHz or better (excluding atom processor)
Display Adaptor nVIDIA or ATI graphic card with 64MB VRAM or above
Operating
System Windows Vista, Windows 7,Windows XP
WiFi 802.11n
FCC Warning:
z This device complies with Part 15 of the FCC Rules. Operation is subject to the following
two conditions:
z (1) this device may not cause harmful interference, and
z (2) this device must accept any interference received, including interference that may
cause undesired operation.
z Changes or modifications not expressly approved by the party responsible for compliance
could void the user's authority to operate the equipment.
z NOTE: This equipment has been tested and found to comply with the limits for a Class B
digital device, pursuant to Part 15 of the FCC Rules. These limits are designed to provide
reasonable protection against harmful interference in a residential installation. This
equipment generates, uses and can radiate radio frequency energy and, if not installed and
used in accordance with the instructions, may cause harmful interference to radio
communications. However, there is no guarantee that interference will not occur in a
particular installation. If this equipment does cause harmful interference to radio or
television reception, which can be determined by turning the equipment off and on, the
user is encouraged to try to correct the interference by one or more of the following
measures:
z -- Reorient or relocate the receiving antenna.
z -- Increase the separation between the equipment and receiver.
z -- Connect the equipment into an outlet on a circuit different from that to which the
receiver is connected.
z -- Consult the dealer or an experienced radio/TV technician for help.
P/N5024