CIDMATE Technology MH9910 900 MHz Cordless Phone User Manual quickset
CIDMATE International Technology Inc. 900 MHz Cordless Phone quickset
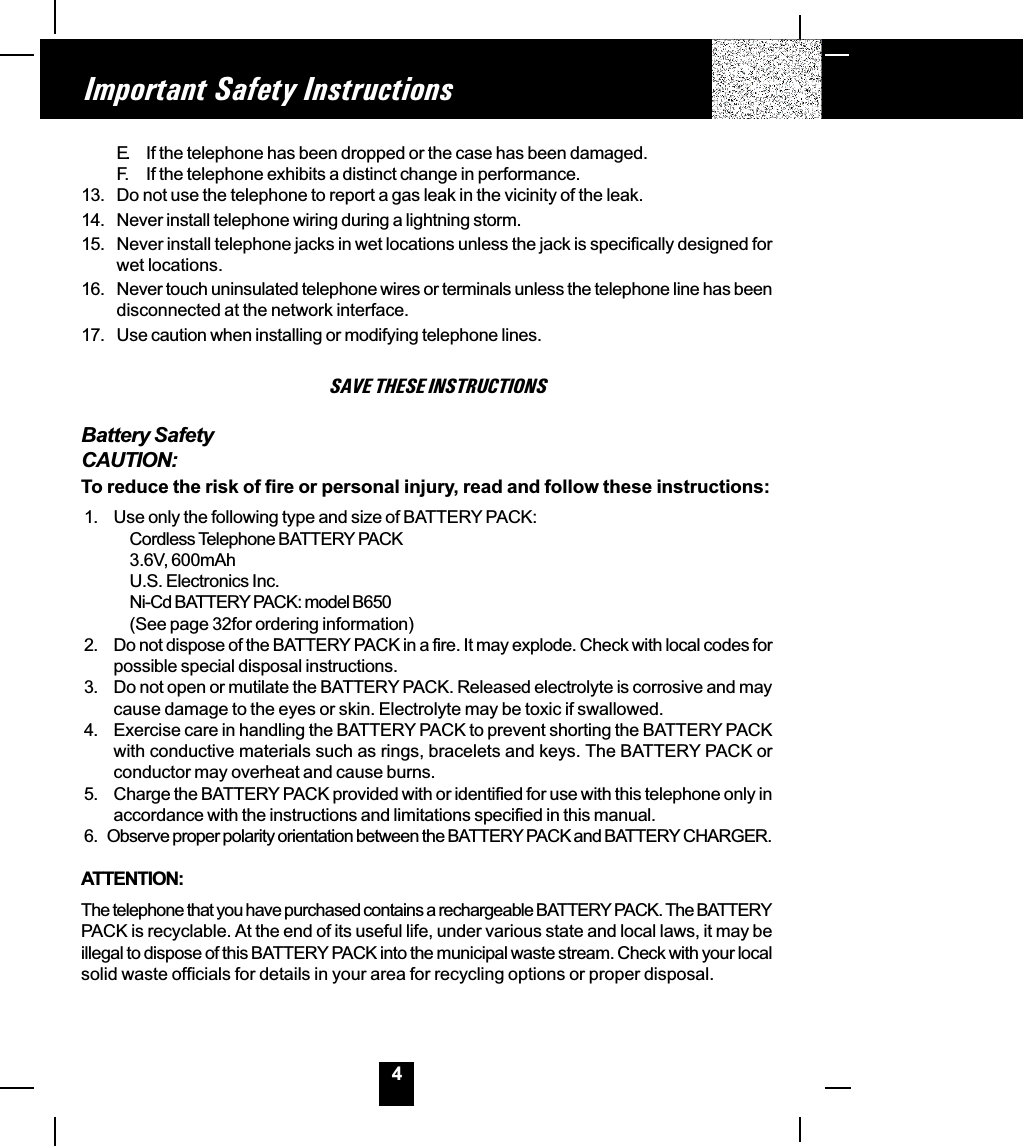
UserManual.wiki
>
CIDMATE Technology
>
MH9910 User Manual
users manual
Navigation menu
Upload a User Manual
Namespaces
Wiki Guide
HTML
PDF
Info
Views
User Manual
Discussion / Help
Navigation

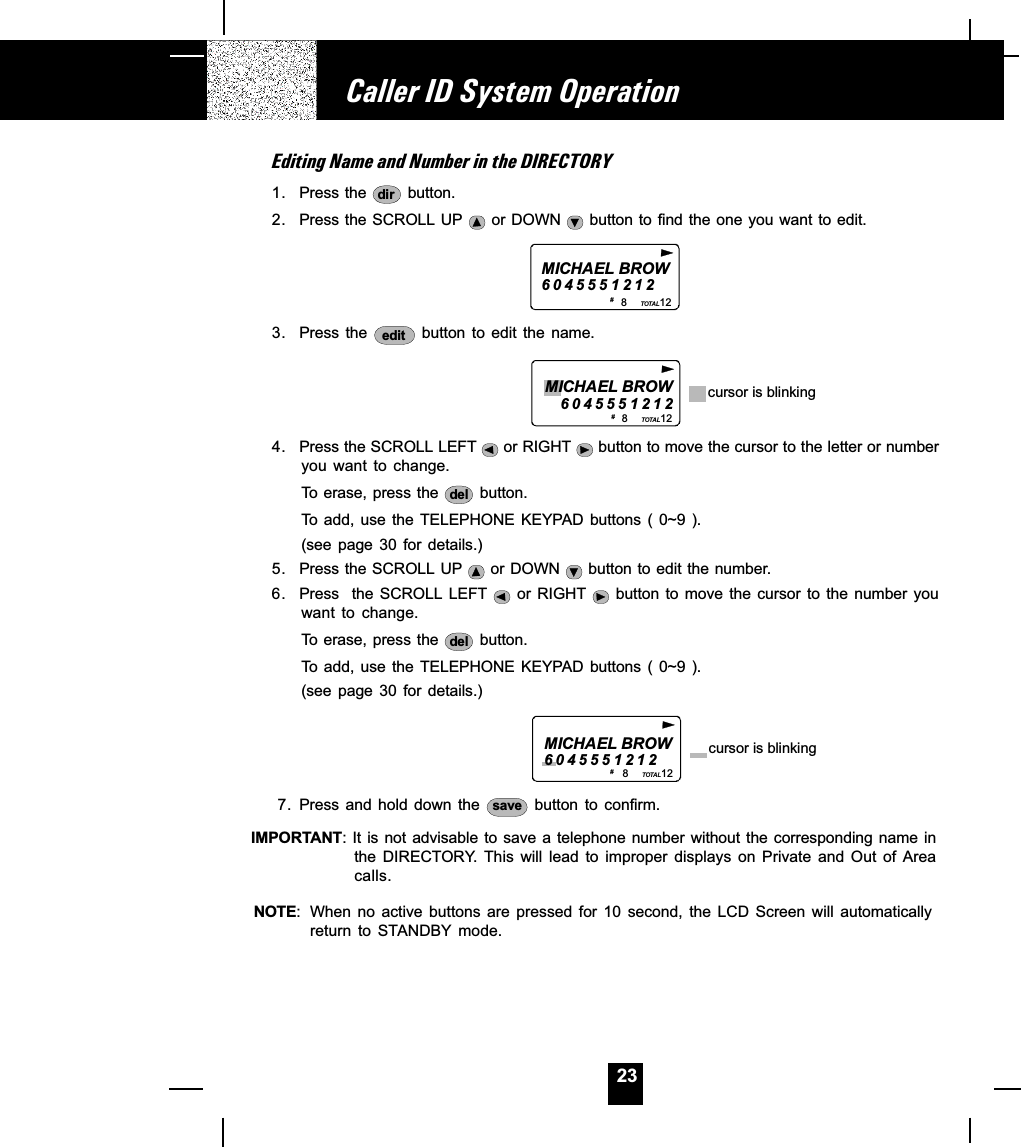
![18Caller ID SystemThis telephone automatically displays an incoming caller s name and telephone number togetherwith the date and time of the call. It records up to 80 calls and stores the data in Memory.IMPORTANT: You must subscribe to the Caller ID service from your local telephone company toutilize this feature.Viewing Caller Information During Incoming Calls1. When there is an incoming call, the name and the telephone number of the caller willautomatically appear after the second ring. Press the SHIFT RIGHT button to view aname of more than 11 digits.MICHAEL BROW604555121210:00 8/24 1AM NEWBROWING 604555121210:00 8/24 1AM NEW##Month/DateTimeNumber of calls recordedORCaller´s telephone number will appear if the caller´s name is not available.OR OUT OF AREA will appear if the origin of the incomingcall does not support the Caller ID system.OR UNKNOWN will appear if the origin of the incoming callhas no name and does not support the Caller ID system.OR PRIVATE and/or P--- --- ---- will appear if the caller´s name and/or telephone number isblocked.OR EXIT IN-USE will appear when an extension phone is being used.OR DATA ERROR will appear if wrong data was received from the telephone line.ORThe name stored in the DIRECTORY will appear for an incoming call with matching telephonenumbers.]MSG WAITING^ (Message Waiting)The MSG WAITING GREEN LED indicator will blink when there is a message for you from yourtelephone company if you have subscribed to Voice Mail message service and if you haverequested Visual Message Indication from your local telephone company. MSG WAITING willappear on the LCD Screen in STANDBY mode. (To remove the MESSAGE WAITING indicator,see page 29 for detail.)Caller ID System OperationOUT OF AREA0 - - - - - - - - - -10:00 8/24 13 42AM TOTALe.g.# UNKNOWNU - - - - - - - - - -e.g.10:00 8/24 13 42AM NE W TOTAL# Unknown nameU is Out of Area](https://usermanual.wiki/CIDMATE-Technology/MH9910/User-Guide-219853-Page-18.png)
![19Call WaitingWhen you have subscribed for Call Waiting service from your local telephone company, thistelephone will display the name and number of the second caller while you are having aconversation.1. When you are having a conversation, this telephonewill automatically display the name and number of thesecond caller.2. Press the flash button to answer the second caller.The first caller´s name and number will be displayed.3. When you have finished, press the flash button tocontinue with your conversation with the first caller.]CALL-FWD^ (Forwarded Call)Appears on the upper left hand side, when the incoming call has been assigned to your telephonenumber.]L-D-C^ (Long Distance)Appears on the upper left hand side, when the incoming call is a long distance call and theservice is provided by your local telephone company.Caller ListRecord call information for up to 80 incoming calls such as caller´s name and telephone numbertogether with the date and time of the call. After recording a new incoming call, the NEW CALLindicator will blink and the display will look as shown below:RING: HI10:00 8/24 13 42AM NEW TO TA LNo. of new callsMaximum calls= 80Viewing the Caller List1. Press the SCROLL DOWN button to view the latest record, or press the SCROLL UP button to view the first record, press the SHIFT RIGHT button if the name is more than11 digits.MICHAEL BROW604555121210:00 8/24 1AM NEWBROWING 6 0 4 555121210:00 8/24 1AM NEW##2. Press the dir button to go back to STANDBY mode. (If no active buttons are pressed for 10seconds or you have viewed the last record in the Caller´s List, the LCD Screen willautomatically return to STANDBY mode.)Caller ID System Operation10:00 8/24 13 AM NEWe.g.JOHN BROWN235-607-55121st Caller# 10:00 8/24 13 AM NEWe.g.ALEX BROWTH50455512122nd Caller#](https://usermanual.wiki/CIDMATE-Technology/MH9910/User-Guide-219853-Page-19.png)
![34Problem Solving SectionFor your assistance, we have listed below a few common problems.Phone does not work, check the following:1. BASE UNIT is plugged into power source.2. HANDSET is charged.3. TONE/PULSE SELECT switch is in the right position.4. TELEPHONE LINE CORD is plugged into the TELEPHONE JACK.Range of phone limited, check the following:1. ANTENNA on BASE UNIT is raised.2. BASE UNIT is centrally located in your residence.3. BASE UNIT is not located near appliances.No dial tone, check the following:1. TELEPHONE LINE CORD plugs are connected to the TELEPHONE JACK and TELEPHONELINE CONNECTION JACK.2. BASE UNIT is plugged into power source.3. If you had a power failure or had unplugged the BASE UNIT, replace the HANDSET on theBASE UNIT for 2 to 5 seconds to reset the system.Received signal flutters or fades, check the following:1. BATTERY PACK in HANDSET is fully charged.2. HANDSET is not too far from the BASE UNIT.3. ANTENNA on BASE UNIT is raised.Interference on reception, check the following:1. Noise may be picked up from electrical products in the home or electrical storms. Generally,this noise is a minor annoyance and should not be interpreted as a defect in your system.(See Technical Information on page 36.)2. Choose an alternate channel using the scan button on the HANDSET.Long Distance ]L-D-C^Indicator is not ON when receiving long distance call, check thefollowing:1. Your local telephone company can provide the Area Code on an incoming long distancecall.Problem Solving](https://usermanual.wiki/CIDMATE-Technology/MH9910/User-Guide-219853-Page-34.png)


![45900 MHz CORDLESS CALLER ID TELEPHONEWITH CALL WAITING40 CHANNEL AUTOSCANModel MH9919C 2001 BellSouth CorporationFor installation information, pleasesee ]Getting Started^instructionson page 9 or your separate QuickStart Guide.PLEASE READ THISMANUAL CAREFULLYBEFORE USE.KEEP FOR YOURREFERENCE.msgwaitingnewcallcaller id systemre/padirsavetalk123654789abcdefmnowxyjkltuvghiprs*funcflashscaneditdelete900MHzBELLSOUTH1-212-242-697810:00 8/24 18 30AMNEWPMTOTALL-D-C C-FMSG DIRCALLBATT0operdial#7101+900MHzin use/chargefil tered so undTMpageOWNER S MANUALINSTALLATION ANDOPERATINGINSTRUCTIONS](https://usermanual.wiki/CIDMATE-Technology/MH9910/User-Guide-219853-Page-45.png)

![HANDSET ControlsFor installation information, please see]Getting Started^instructions on page 9 oryour separate Quick Start Guide.0operdial#710 1+HANDSET ANTENNAPg.5VOLUME CONTROL(HI, MID, LOW)SWITCH Pg.6CHARGE CONTACTSPg.6LARGE LCD SCREENPg.5REDIAL/PAUSE/SAVE BUTTON Pg.5, 17, 20,22~24, 27~29 DIRECTORY BUTTONPg.5, 19, 21~25 TALK BUTTONPg.6, 10~11, 15~17,20, 24~25 1+DIAL/# BUTTONPg.6, 16, 20, 22, 24~25 10 DIAL BUTTONPg.6, 16, 20, 24~25 7 DIAL/TEMPORARYTONE(*) BUTTONPg.6, 16, 20, 22, 24~25 FUNCTION BUTTONPg.6, 26~29 FLASH BUTTONPg.6, 19 NEW CALL/MESSAGE WAITINGINDICATORPg.6, 18~19 SCROLL UP-DOWN/SHIFT LEFT-RIGHTBUTTON Pg.6, 18~30TELEPHONE KEYPADPg.6, 20, 22~24, 26~30HEADSET JACKPg.5, 15SCAN/DEL(DELETE)BUTTON Pg.6, 20~21,23~25, 30~31, 34 EDIT BUTTON Pg. 20, 23~24, 27~29msgwaitingnewcallcaller id systemre/padir savetalk123654789abc defmnowxyjkltuvghiprs*func flash scaneditdelet e900MHzBELLSOUTH1-212-242-697810:00 8/24 18 30AM NEWPM TOTALL-D-C C-F MSG DIRCALL BATT](https://usermanual.wiki/CIDMATE-Technology/MH9910/User-Guide-219853-Page-49.png)