CIG 802W WiFi Module for use in Extender Products User Manual Host
CIG SHANGHAI CO., LTD. WiFi Module for use in Extender Products Host
CIG >
Contents
- 1. Modular Assembly
- 2. User Manual (Host)
User Manual (Host)
Quick Start Guide
WF-802GW
G.hn+Wi-Fi extender
1. Overview
• G.hn wave 2 over powerline
• Integrated Wi-Fi mesh extender (*Note that
WF-802GW can be used in combination with WF-
802G which is not equipped with an integrated
Wi-Fi mesh extender)
• 2x2 2.4Ghz 802.11n and 2x2 5Ghz 802.11ac
• 1x GbE RJ45 LAN
• Push-button pairing
• Status LEDs
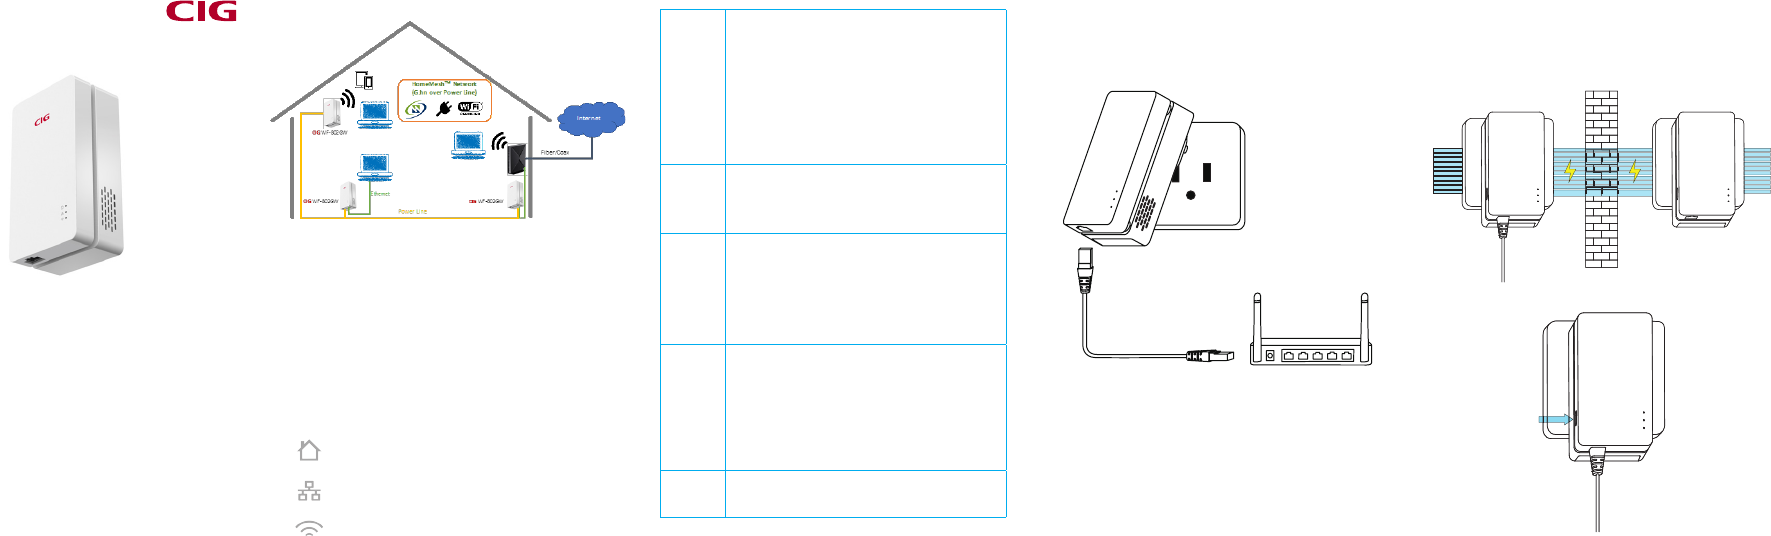
2. Installatation
Step 1: Plug a WF-802GW into the power outlet
close to the home gateway.
Step 2: Using Ethernet cable connect the
WF-802GW to a LAN port of your residential
gateway.
Step 3: Plug another WF-802GW into the power
outlet at the location that the Wi-Fi network
extension is required.
G.hn
Solid Amber: Device is ON but G.hn is not
paired with any device.
Blinking Amber: Trying to discover and
pair with other G.hn devices.
Solid Green: Device is paired with anther
G.hn device and link is up.
Fast blinking Green: G.hn is trying to
connect to other devices.
Slow blinking Green: G.hn connected as
the backhaul transmission
LAN
Solid Green: Ethernet port link is up
Slow blinking Green: G.hn connected as
the backhaul transmission
OFF: No Ethernet connectivity
Wi-Fi
Solid Amber: Default SSID is broadcasted
(“Guide_xxxxxxxx”)
Solid Green: Specied SSID is broad-
casted
Slow blinking Green: G.hn connected as
the backhaul transmission
OFF: No SSID is broadcasted
Pairing
button
G.hn pairing: Pressing the button more
than 1s, less than 10 seconds(Amber G.hn
LED starts blinking(0.5s on, 0.5s o)), af-
ter release it, starts the pairing procedure
and opens the conguration period.
Factory reset: Press the paring button
and hold until all LEDs turn on(It takes
longer than 10 seconds)
Boot
up
During booting, all green LEDs turn on until
the booting process completed
CIG Shanghai Co., Ltd.
5/F Building 8, 2388 Chenhang Rd.,
Minhang District Shanghai 201114,
China
Tel: +86-21-8023-3300
support@cambridgeig.com Wi-Fi: Green/Amber
Ethernet: Green
G.hn: Green/Amber
Step 4: Repeat Step 3 to add more WF-802GW
at dierent locations which Wi-Fi network exten-
sion is required.
3. Pairing
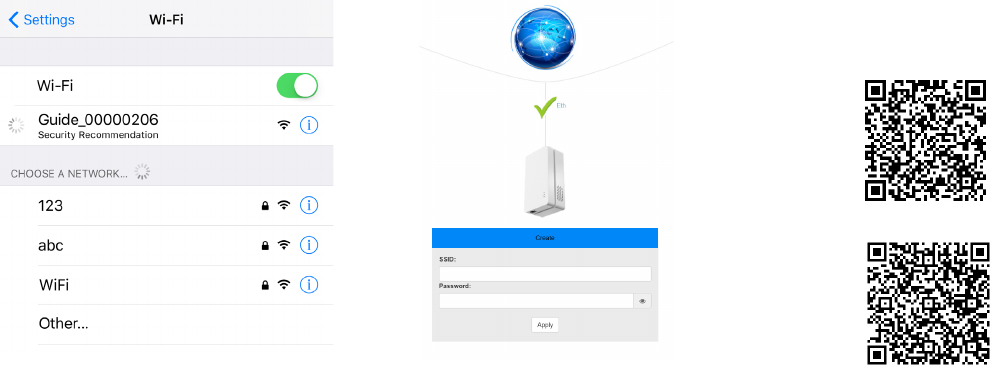
Step 2: Once the computer/smartphone is con-
nected to the Wi-Fi network, the below window
pops-up. If not, open an Internet browser and
enter a URL address (e.g., www.cambridgeig.
com) or IP address of 192.168.1.100.
Step 1: Once the G.hn LED is solid amber, push
the pairing button between 1 to 10 seconds,
until the G.hn LED is starts blinking.
Step 2: Repeat Step 1 for all plugged-in WF-
802GW devices.
Step 3: The green G.hn LED shows that the
WF-802GW devices are paired. If the G.hn LED
is OFF, factory reset is required by pushing the
paring button for more than 10 seconds and
then repeating Step 1 to pair the device with
the network.
Step 4: Repeat Steps 1-3 to connect a newly
installed WF-802GW.
4. Ethernet Connectivity
WF-802GW can be connected to computer via
Ethernet cable.
5. Wi-Fi initialization
Step 1: Use a computer/smartphone to search
and connect to the Wi-Fi network of Guide_
xxxxxxxx (x is a digit). Here is an example of
broadcasted Wi-Fi network.
Step 3: Within the webpage, set your home
network SSID and password (this information
will be used for your phone, tablet, or computer
to connect to the network). When apply button is
clicked, the information will be saved and applied
to the all paired WF-802GWs automatically. The
Wi-Fi LEDs of all devices will be changed from
solid amber to solid green.
6. Management App
You can download the HomeMesh App to monitor
and congure the WF-802GWs.
For IOS, please scan the following QR code to
download:
For Android, please scan the following QR code
to download:
After install and connected to your home Wi-Fi
network, please input your Wi-Fi password to
login.
Federal Communications Commission (FCC)
Interference Statement
This equipment has been tested and found to comply
with the limits for a Class B digital device, pursuant to
Part 15 of the FCC Rules.
These limits are designed to provide reasonable protection
against harmful interference in a residential installation.
This equipment may generate, uses and can radiate
radio frequency energy and, if not installed and used
in accordance with the instructions, may cause harmful
interference to radio communications.
However, there is no guarantee that interference will not
occur in a particular installation. If this equipment does
cause harmful interference to radio or television reception,
which can be determined by turning the equipment o and
on, the user is encouraged to try to correct the interference
by one of the following measures:
• Reorient or relocate the receiving antenna.
• Increase the separation between the equipment and
receiver.
• Connect the equipment into an outlet on a circuit dier-
ent from that to which the receiver is connected.
• Consult the dealer or an experienced radio/TV technician
for help.
This device complies with Part 15 of the FCC Rules.
Operation is subject to the following two conditions:(1)
This device may not cause harmful interference, and (2)
this device must accept any interference received, including
interference that may cause undesired operation.
FCC Caution: Any changes or modications not expressly
approved by the party responsible for compliance could
void the user’s authority to operate this equipment.
RF exposure warning
This equipment complies with FCC radiation exposure limits
set forth for an uncontrolled environment. This equipment
should be installed and operated with minimum distance
20cm between the device and your body.