CONTINENTAL AUTOMOTIVE RAMBOUILLET FRANCES NACEUR2 Multimedia System User Manual User guide
CONTINENTAL AUTOMOTIVE RAMBOUILLET FRANCE SAS Multimedia System User guide
User guide
Transversal-Citroen_en_Chap00_couverture_ed01-2016
AUDIO AND TELEMATICS GUIDE

Transversal-Citroen_en_Chap00_couverture_ed01-2016
On-line handbook
If the "MyCITROËN" function is not available on the CITROËN public
website for your country, you can fi nd your handbook at the following
address:
http://service.citroen.com/ddb/
Find your handbook and the audio and telematic systems on the
CITROËN website, under "MyCITROËN".
Find your handbook and the audio and telematic systems on the
CITROËN website, under "MyCITROËN".
Find your handbook and the audio and telematic systems on the
Select:
Select one of the following means of access to view your handbook on-
line...
the language,
the vehicle, its body style,
the print edition of your handbook appropriate for the date of
registration of your vehicle.
Referring to the handbook on-line also gives you access to the latest
information available, easily identifi ed by the bookmark, associated with
this symbol:
1
.
Audio and Telematics
CITROËN Connect Nav
GPS satellite navigation - Applications - Multimedia audio - Bluetooth
®
GPS satellite navigation - Applications - Multimedia audio - Bluetooth
®
GPS satellite navigation - Applications - Multimedia audio - Bluetooth
telephone
® telephone
®
Contents
First steps 2
Steering mounted controls 5
Menus 6
Voice commands 8
Navigation 14
Connected navigation 30
Applications 40
Radio Media 54
Telephone 66
Settings 78
Frequently asked questions 88
The system is protected in such a way
that it will only operate in your vehicle.
Displaying of the
Energy Economy
Mode
message signals that a change
to standby is imminent.
The different functions and settings
described vary according to the version
and configuration of your vehicle.
The link below gives access to OSS
(Open Source Software) codes for the
system.
http://www.psa-peugeot-citroen.com/oss
As a safety measure and because it
requires sustained attention by the
driver, the pairing of a Bluetooth mobile
telephone with the Bluetooth hands-
free system of your audio system must
be done with the
vehicle stationary
and the ignition on.
2
FM/87.5 MHz
87.5MHz
12:1318,5 21,523 °C
Audio and Telematics
First steps
With the engine running, a press
mutes the sound.
With the ignition off, a press turns the
system on.
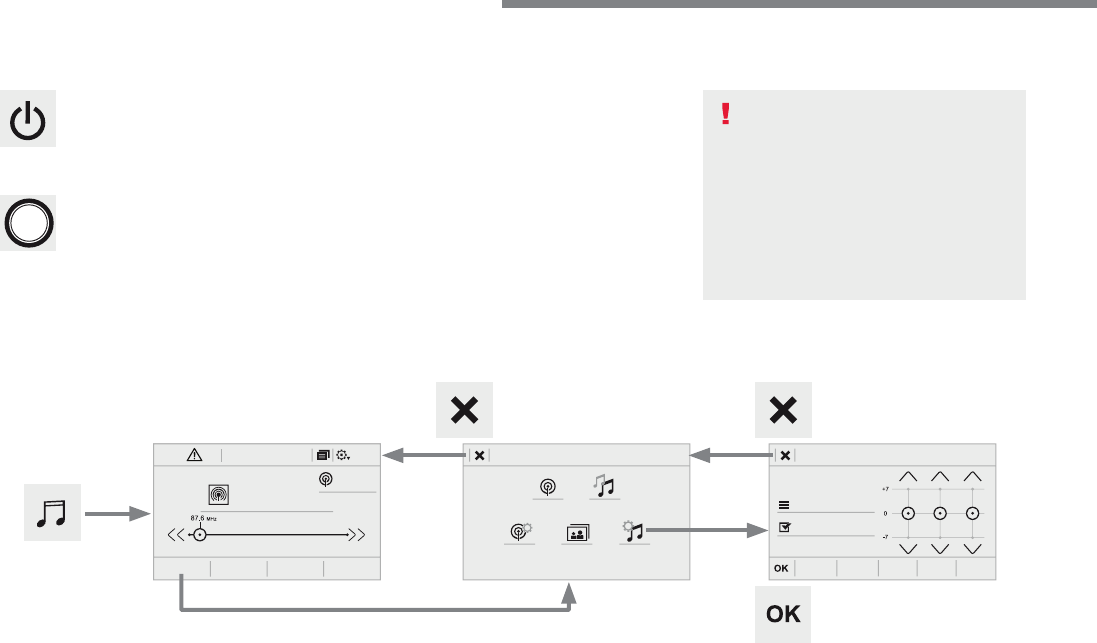
Volume.
Use the buttons either side of or below the
touch screen for access to the menus, then
press the virtual buttons in the touch screen. All
of the touch areas of the screen are white.
Press the cross to go back a level.
Press "OK" to confirm.
The touch screen is of the "capacitive"
type.
To clean the screen, use a soft, non-
abrasive cloth (spectacles cloth) with
no additional product.
Do not use sharp objects on the
screen.
Do not touch the screen with wet
hands.
3
.
12:1318,5 21,523 °C
Audio and Telematics
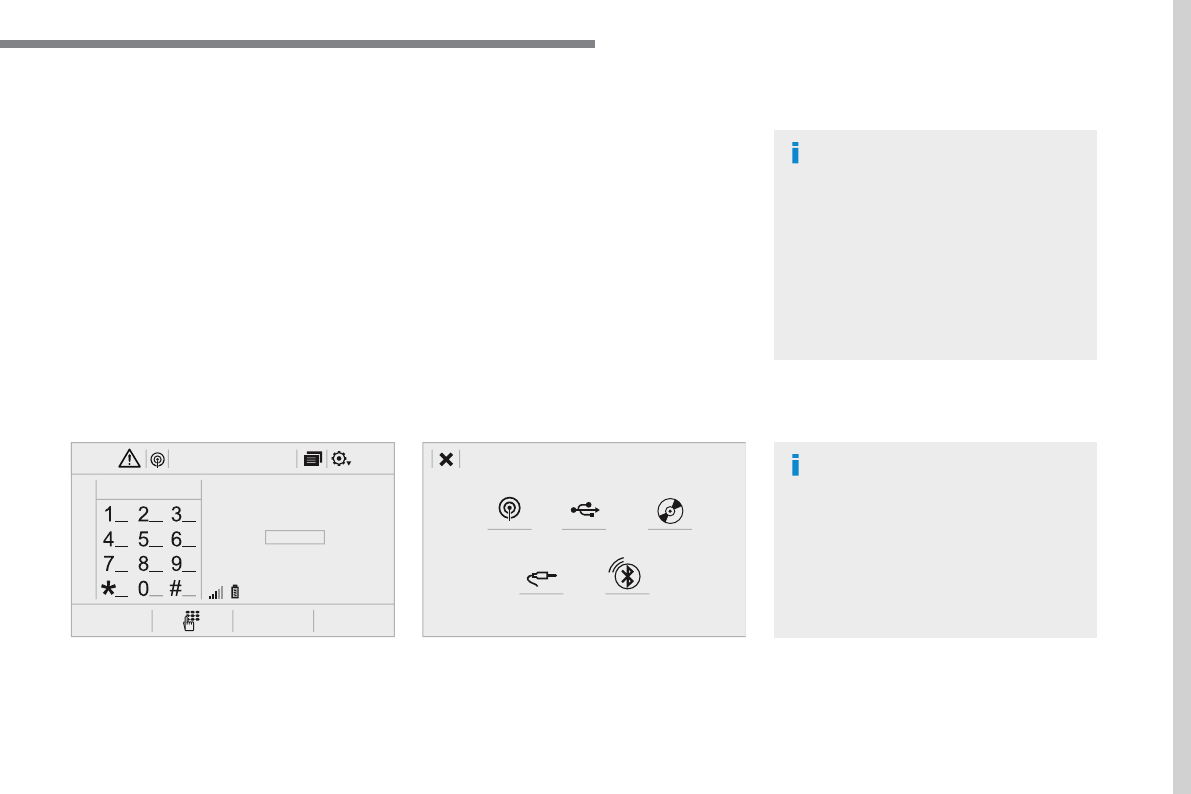
Select the audio source (depending on
version):
- FM / DAB * / AM * radio stations.
- USB memory stick.
- CD player.
- Media player connected via the auxiliary
socket (Jack, cable not supplied).
- Telephone connected by Bluetooth * using
Bluetooth * audio streaming.
* Depending on equipment.
Certain information is displayed permanently in
the upper band of the touch screen:
- Reminder of the air conditioning
information and direct access to the
corresponding menu.
- Go directly to the selection of the audio
source, to the list of radio stations (or list of
titles depending on the source).
- Go to the message notifications, emails,
map updates and, depending on the
services, the navigation notifications.
- Go to the settings for the touch screen and
the digital instrument panel.
In very hot conditions, the volume may
be limited to protect the system. It may
go into standby (screen and sound off)
for at least 5 minutes.
The return to normal takes place when
the temperature in the passenger
compartment has dropped.
In the "Settings" menu you can create
a profile for just one person or a group
of people with common points, with
the possibility of entering a multitude
of settings (radio presets, audio
settings, navigation history, contact
favourites, ...); these settings are taken
into account automatically.

5
.
Audio and Telematics
Steering mounted controls
Media
(short press): change the
multimedia source.
Telephone
(short press): call.
Call in progress
(short press):
access to telephone menu.
Telephone
(long press): reject an
incoming call, end call, access to
telephone menu.
Decrease volume.
Voice commands
:
Short press, system voice
commands.
Long press, smartphone voice
commands via the system.
Mute / Restore the sound.
Or
Mute by pressing the volume
increase and decrease buttons
simultaneously.
Restore the sound by pressing one of
the two volume buttons.
Radio
(rotate): automatic search for
the previous / next station.
Media
(rotate): previous / next track,
move in a list.
Short press
: confirm a selection;
other than selection, access to
presets.
Radio
: display the list of stations.
Media
: display the list of tracks.
Radio
(press and hold): update the
list of stations received.
Increase volume.
6
12:1318,5 21,523 °C
21,518,5
12:1323 °C 12:1318,5 21,523 °C
12:1318,5 21,523 °C
Audio and Telematics
Connected navigation
Driving
Applications
Enter navigation settings and choose a
destination.
Use services available in real time, depending
on equipment.
Activate, deactivate and configure certain
vehicle functions.
Operate certain applications on a smartphone
connected via CarPlay
®
or MirrorLink
® or MirrorLink
®
TM
.
Check the state of the Bluetooth
®
and Wi-Fi
® and Wi-Fi
®
connections.
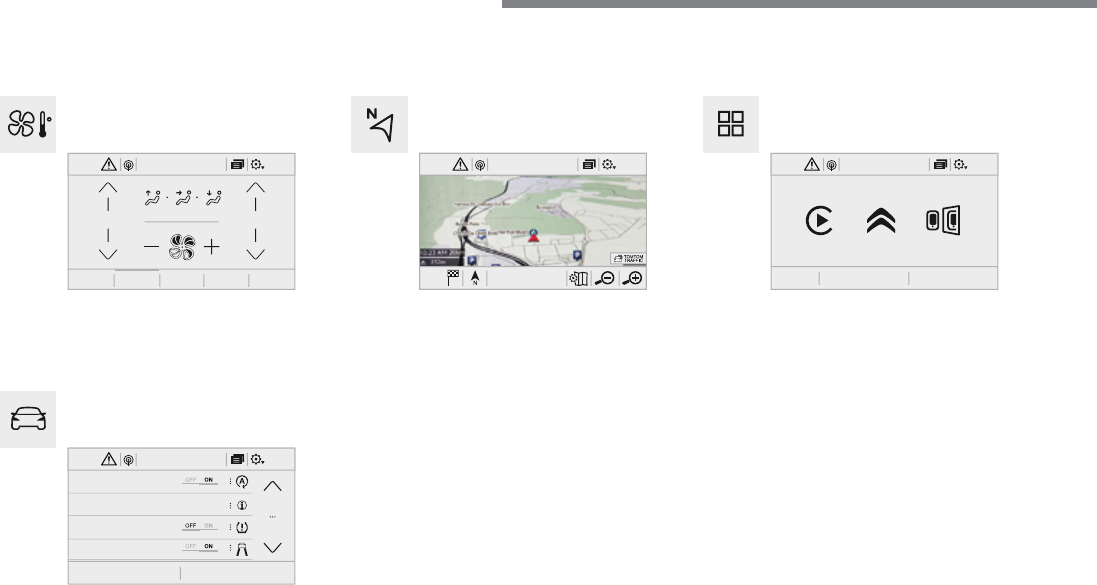
Menus
Air conditioning
Manage the various temperature and air flow
settings.
A c c o r d i n g t o v e r s i o n
7
.
FM/87.5 MHz
87.5MHz
12:1318,5 21,523 °C 12:1318,5 21,523 °C 12:1318,5 21,523 °C
Audio and Telematics
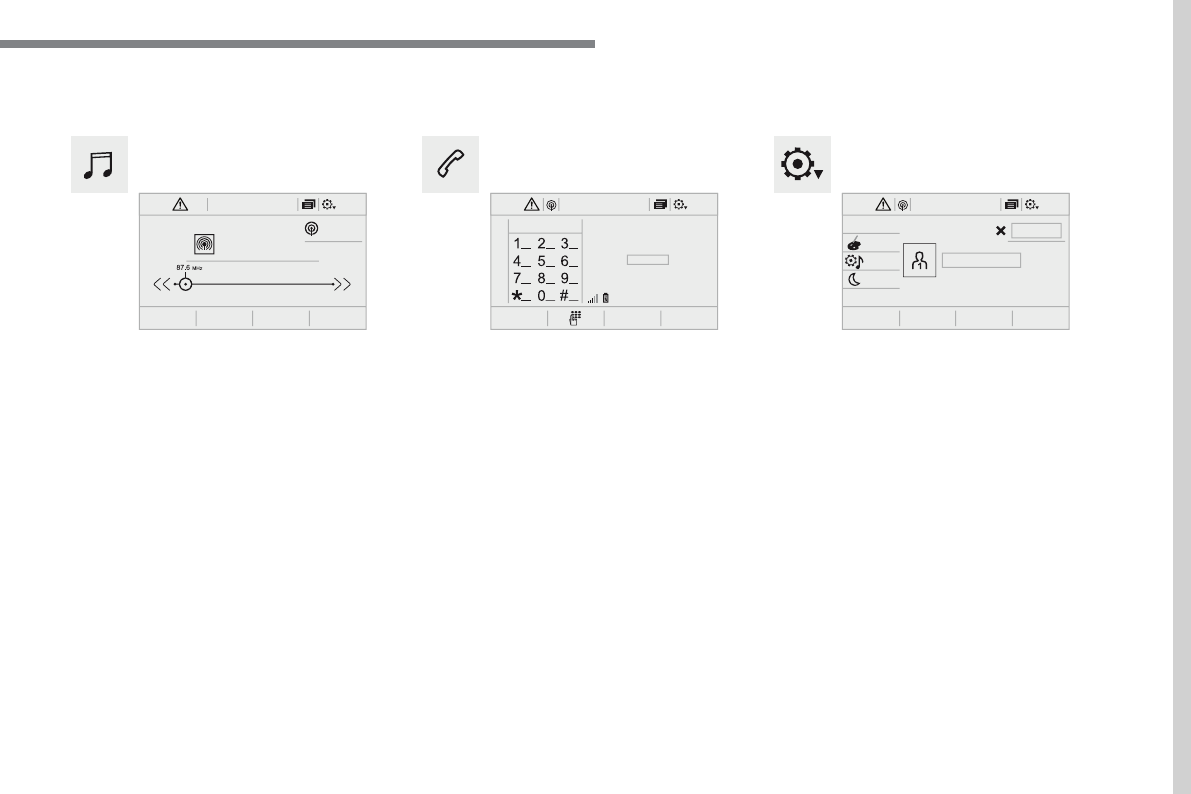
Settings
Radio Media
Telephone
Configure a personal profile and/or configure
the sound (balance, ambience, ...) and the
display (language, units, date, time, ...).
Select an audio source, a radio station, display
photographs.
Connect a telephone by Bluetooth
®
, read
messages and emails and send quick
messages.
8
Audio and Telematics
Voice commands
First steps
Steering mounted controls
Information - Using the system
Press the Push To Talk
button and tell me what you'd
like after the tone. Remember
you can interrupt me at any
time by pressing this button. If you
press it again while I'm waiting for you
to speak, it'll end the conversation. If
you need to start over, say "cancel".
If you want to undo something, say
"undo". And to get information and tips
at any time, just say "help". If you ask
to me do something and there's some
information missing that I need, I'll
give you some examples or take you
through it step by step. There's more
information available in "novice" mode.
You can set the dialogue mode to
"expert" when you feel comfortable.
To ensure that voice commands are
always recognised by the system,
please observe the following
recommendations:
- speak in a normal tone without
breaking up words or raising your
voice.
- always wait for the "beep" (audible
signal) before speaking.
- for best operation, it is
recommended that the windows
and opening roof be closed to
avoid extraneous interference
(according to version).
- before making a voice command,
ask other passengers to not speak.
The voice commands, with a choice
of 12 languages (English, French,
Italian, Spanish, German, Dutch,
Portuguese, Polish, Turkish, Russian,
Arabic, Brazilian), are made using the
language previously chosen and set in
the system.
The voice commands in Arabic for:
"Navigate to address" and "Display POI
in the city", are not available.
Alternative synonyms can be used for
some voice commands.
E.g. Guide to / Navigate to / Go to /...
Example of a "voice command" for
navigation:
"Navigate to address 11 Regent
Street, London"
.
Example of a "voice command" for
the radio and media:
"Play artist Madonna"
.
Example of a "voice command" for
the telephone:
"Call David Miller"
.
Pressing this button activates the
voice commands function.
9
.
Audio and Telematics
Global voice commands
These commands can be made from any screen page after pressing the "Voice command" or "Telephone" button located on the steering
wheel, as long as there is no telephone call in progress.
"Voice command"
Help message
Help
There are lots of topics I can help you with.
You can say: "help with phone", "help with navigation", "help with media" or "help with
radio". For an overview on how to use voice controls, you can say "help with voice
controls".
Voice command help
Navigation help
Radio help
Media help
Telephone help
Set dialogue mode as <...>
Select "beginner" or "expert" mode.
Select profile <...>
Select profile 1, 2 or 3.
Yes
Say "yes" if I got that right. Otherwise, say "no" and we'll start that again.
No
10
Audio and Telematics
"Navigation" voice commands
These commands can be issued from any screen page after pressing the "Voice command" or "Telephone" button on the steering wheel, as
long as there is no telephone call in progress.
Depending on the country, give the destination instructions (address) in the language used by the system.
"Voice command"
Help message
Navigate home
To start guidance or add a stopover, say "navigate to" and then the address or contact
name.
For example, "navigate to address 11 Regent Street, London", or "navigate to contact, John
Miller".
You can specify if it's a preferred or recent destination.
For example, "navigate to preferred address, Tennis club", "navigate to recent destination,
11 Regent Street, London". Otherwise, just say, "navigate home".
To see points of interest on a map, you can say things like "show hotels in Banbury" or
"show nearby petrol station".
For more information you can ask for "help with route guidance".
Navigate to work
Navigate to preferred address <...>
Navigate to contact <…>
Navigate to address <...>
Show nearby POI <...>
Remaining distance
To get information about your current route, you can say "tell me the remaining time",
"distance" or "arrival time".
Try saying "help with navigation" to learn more commands.
Remaining time
Arrival time
Stop route guidance
11
.
Audio and Telematics
"Radio Media" voice commands
These commands can be issued from any screen page after pressing the "Voice command" or "Telephone" button on the steering wheel, as
long as there is no telephone call in progress.
"Voice command"
Help message
Tune to channel <...>
You can pick a radio station by saying "tune to" and the station name or frequency.
For example "tune to channel Talksport" or "tune to 98.5 FM". To listen to a preset radio
station, say "tune to preset number". For example "tune to preset number five".
What's playing
To display the details of the current "track", "artist" and "album", you can say "What's
playing"
Play song <...>
Use the command "play" to select the type of music you'd like to hear.
You can pick by "song", "artist", or "album".
Just say something like "play artist, Madonna", "play song, Hey Jude", or "play album,
Thriller".
Play artist <…>
Play album <...>
Media voice commands are available only for a USB connection.
12
Audio and Telematics
"Voice command"
Help message
Call contact <...>
*
To make a phone call, say "call" followed by the contact name, for example: "Call David
Miller".
You can also include the phone type, for example: "Call David Miller at home". To make a
call by number, say "dial" followed by the phone number, for example,
"Dial 107776 835 417".
You can check your voicemail by saying "call voicemail".
To send a text, say "send quick message to", followed by the contact, and then the name of
the quick message you'd like to send.
For example, "send quick message to David Miller, I'll be late". To display the list of calls,
say "display calls".
For more information on SMS, you can say "help with texting".
Dial <...> *
Display contacts
*
Display calls
*
Call (message box | voicemail)
*
* This function is available only if the telephone connected to the system supports downloading of contacts and recent calls and if the download has
been done.
"Telephone" voice commands
If a telephone is connected to the system, these voice commands can be issued from any main screen page after pressing the "Telephone"
button on the steering wheel, as long as there is no telephone call in progress.
If there is no telephone connected by Bluetooth, a voice message announces: "Please first connect a telephone" and the voice session will be
closed.
13
.
Audio and Telematics
"Voice command"
Help message
Send text to <...>
To hear your messages, you can say "listen to most recent message".
When you want to send a text, there's a set of quick messages ready for you to use. Just
use the quick message name and say something like "send quick message to Bill Carter,
I'll be late".
Check the phone menu for the names of the supported messages.
Please say "call" or "send quick message to", and then select a line from the list.
To move around a list shown on the display, you can say "go to start", "go to end", "next
page" or "previous page". To undo your selection, say "undo".
To cancel the current action and start again, say "cancel".
Listen to most recent message
*
"Test message" voice commands
If a telephone is connected to the system these voice commands can be issued from any main screen page after pressing the "Telephone"
button on the steering wheel, as long as there is no telephone call in progress.
If no telephone has been connected by Bluetooth, a voice message announces: "Please first connect a telephone" and the voice session will be
closed.
* This function is only available if the telephone connected to the system supports downloading of contacts and recent calls and if the download has
been done.
The system only sends pre-recorded "Quick messages".
14
12:1318,5 21,523 °C
12:1318,5 21,523 °C
1
12:1318,5 21,523 °C
Audio and Telematics
Navigation
A c c o r d i n g t o v e r s i o n
Level 1
Level 2
Level 3
15
.
Audio and Telematics
Level 1
Level 2
Level 3
Comments
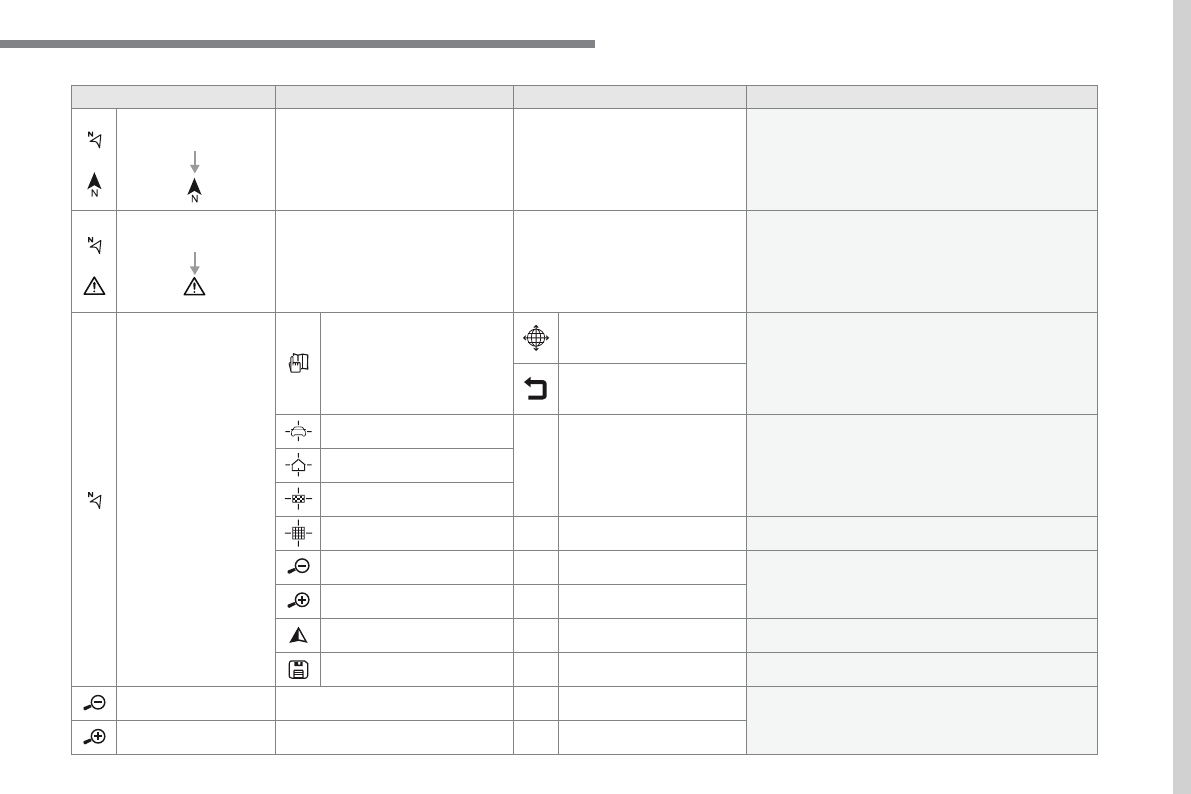
Navigation
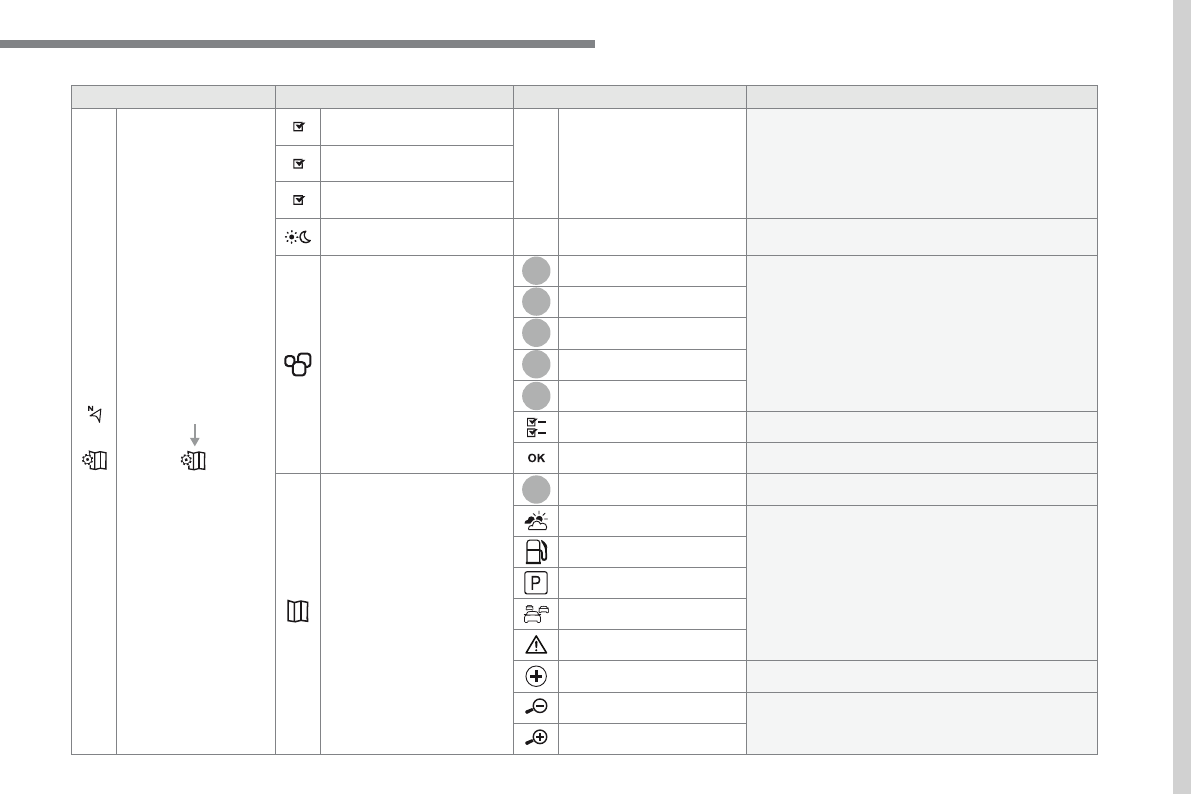
Select the orientation of the map; north up,
vehicle direction up or perspective.
Navigation
Display the traffic information available.
Navigation
World map
Manually locate an area on the world map or enter
the latitude and longitude coordinates.
Around the vehicle
Display the location criteria selected.
Around home
Around the destination
2D mode
Switch to a 2D map.
Zoom out / zoom in using the touch buttons or
with two fingers on the screen.
Start navigation to the current address.
Save the current address.
Zoom out / zoom in using the touch buttons or
with two fingers on the screen.
16
12:1318,5 21,523 °C
1
2
3
4
5
6
7
12:1318,5 21,523 °C
Audio and Telematics
Level 1
Level 2
Level 3
17
.
7
2
3
4
5
6
Audio and Telematics
Level 1
Level 2
Level 3
Comments
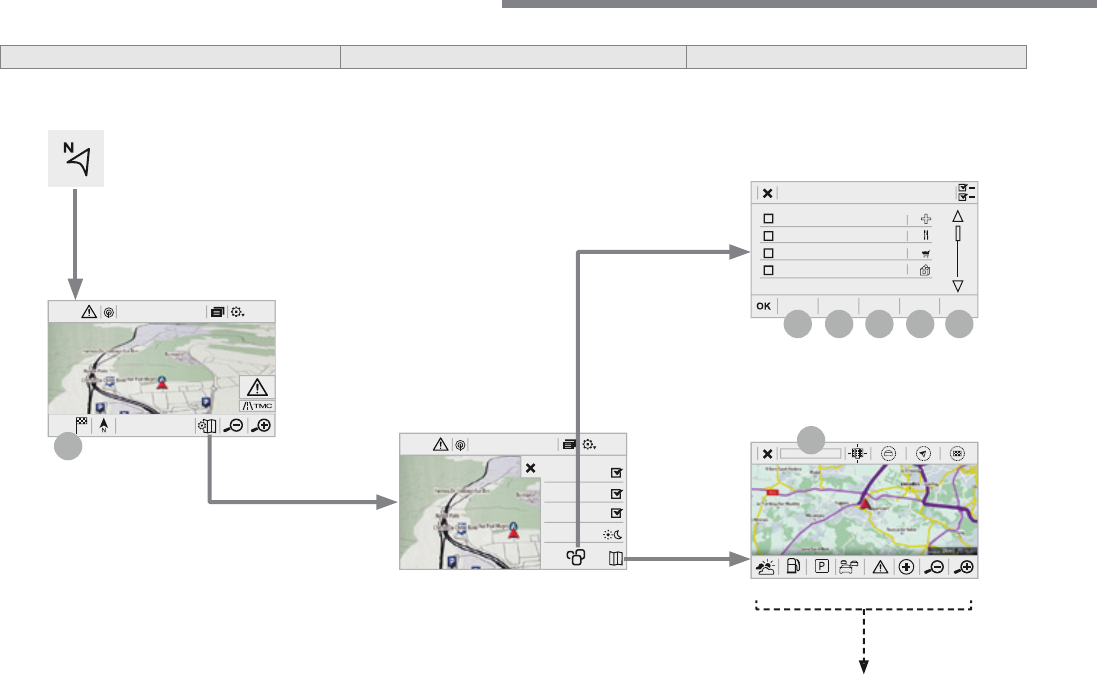
Navigation
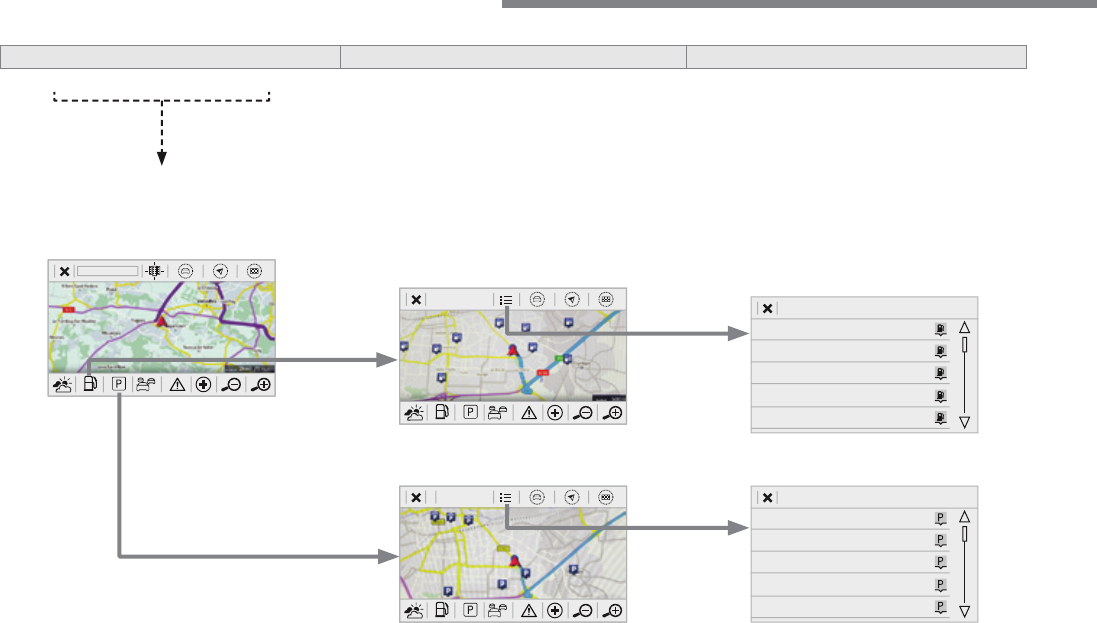
Stations
Activate or deactivate the content available
(stations, car parks, risk areas and danger areas).
Car park
Danger area
Map color
Select day or night mode for display of the map.
POI on map
Travel
Select the POIs available.
Active life
Commercial
Public
Geographic
Select all
Select or deselect all.
Save your choice or selection.
View map
Modify city
Select or modify a city.
Weather
Display on the map the content available in non-
connected mode.
Petrol Station
Car park
Traf fic
Danger area
Select POI
Select from the POIs available.
Zoom out / zoom in using the touch buttons or
with two fingers on the screen.
18
Audio and Telematics
Level 3
Level 4
Level 5
19
.
Audio and Telematics
Level 3
Level 4
Level 5
Comments
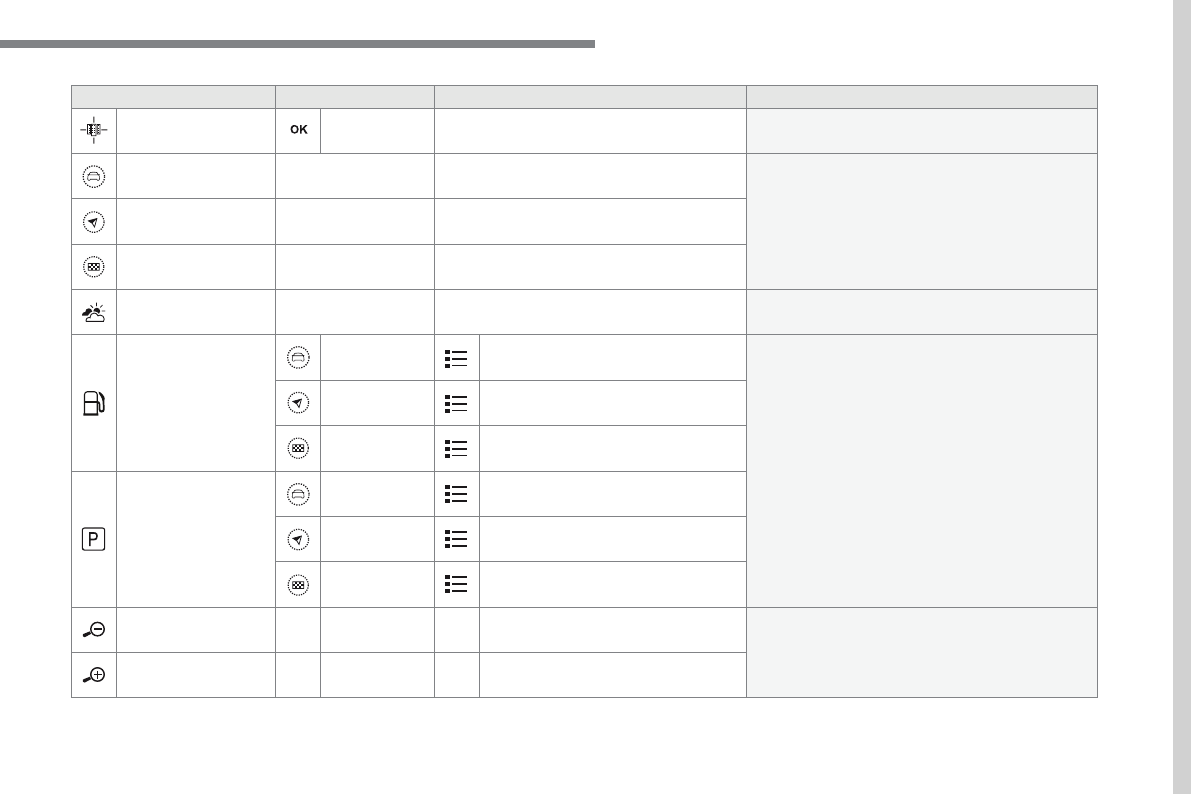
Zoom in
Zoom in around the city selected.
Around the vehicle
Select a location option.
On the route
At the destination
Weather
Weather information transmitted in TMC mode.
Filling stations
Filling stations around the vehicle
Display the list of POIs.
Filling stations on the route
Filling stations at the destination
Car park
Car parks around the vehicle
Car parks on the route
Car parks at the destination
Zoom out / zoom in using the touch buttons or
with two fingers on the screen.
20
Audio and Telematics
Level 3
Level 4
Level 5
21
.
Audio and Telematics
Level 3
Level 4
Level 5
Comments
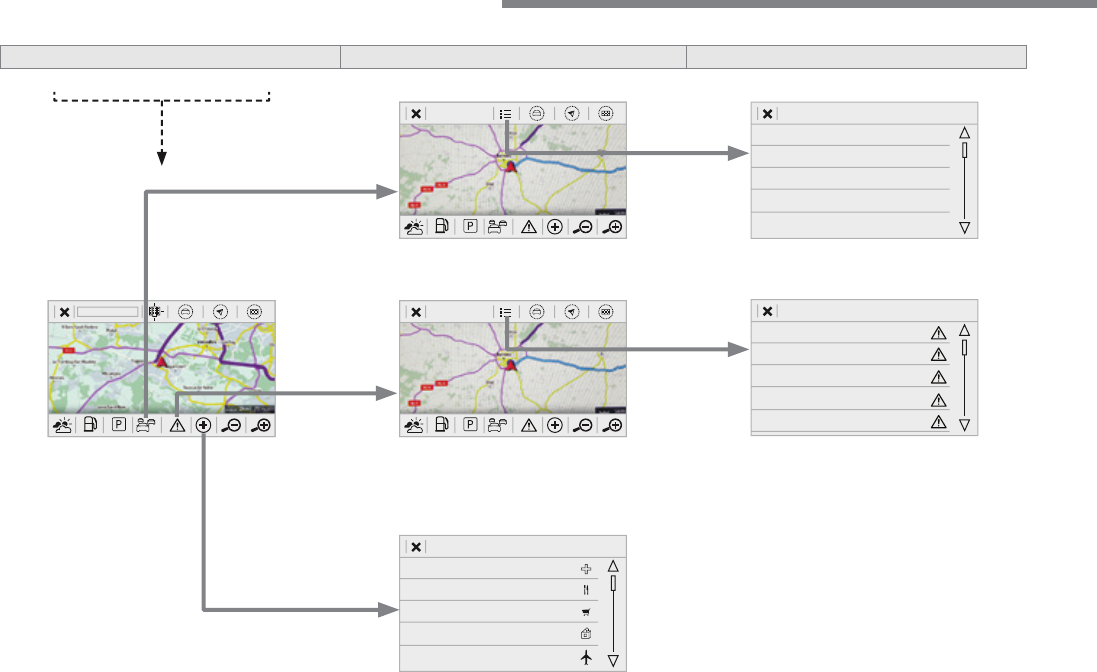
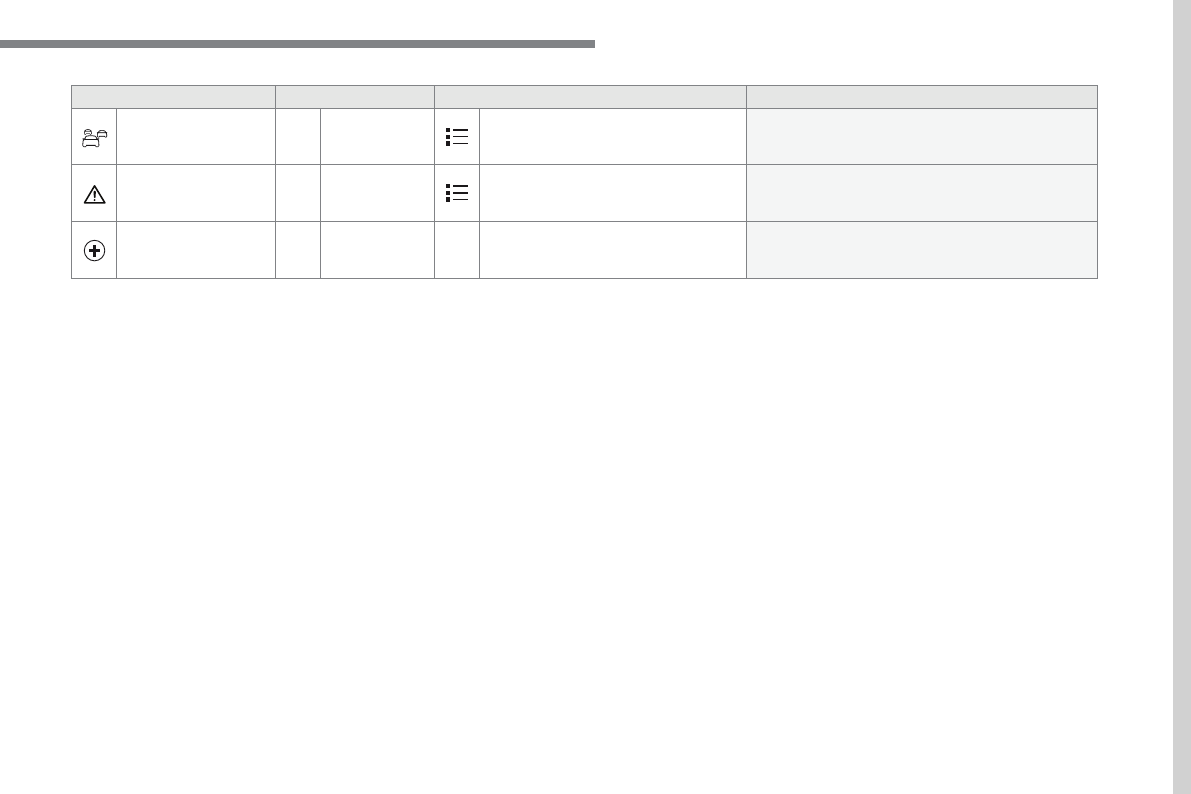
Traf fic
Traffic observed
Traffic information sent in real time.
Danger area
List of danger areas
Display the list of danger areas (roadworks,
breakdowns, accidents, ...).
Select POI
Configure a category of POI to display.
22
1
17
18
8
11
9
12
10
13
16
14
15
Audio and Telematics
Level 2
Level 3
Level 4
23
.
1
1
1
1
17
18
8
11
9
12
10
13
16
14
15
Audio and Telematics
Level 2
Level 3
Level 4
Comments
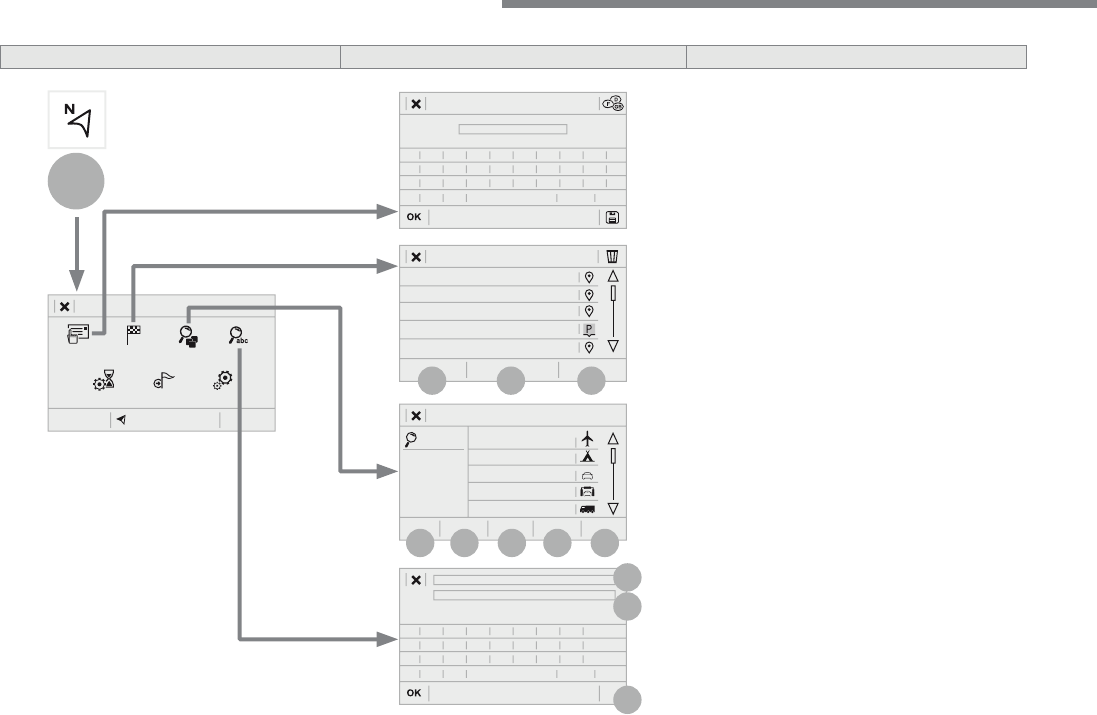
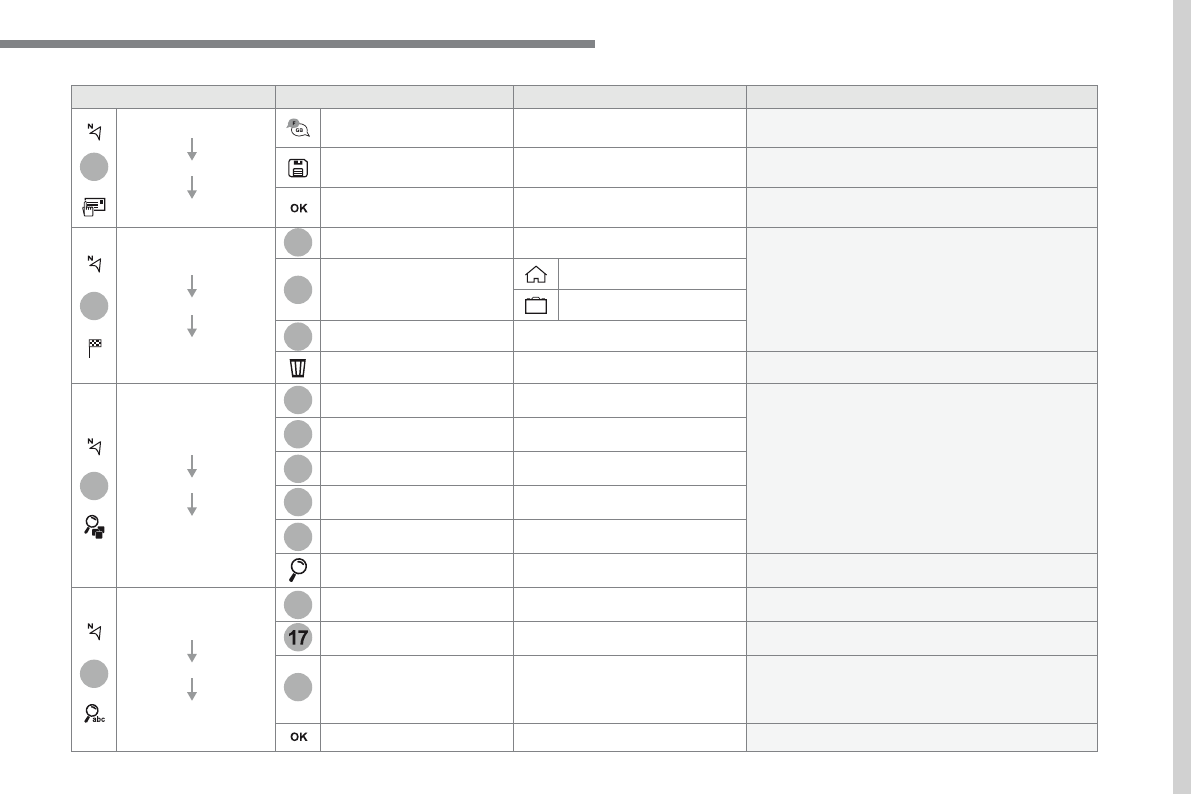
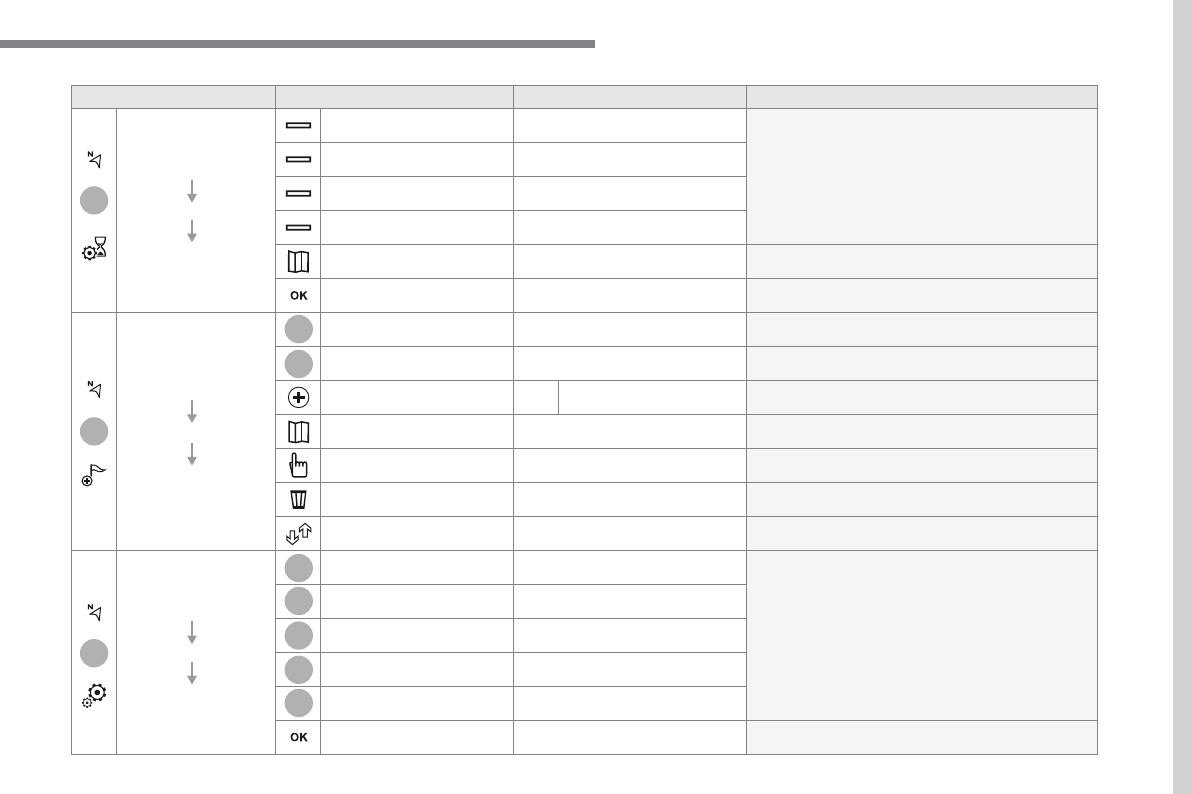
Navigation
MENU
Enter address
Select the country.
Save the current address.
Confirm the current address.
Navigation
MENU
My destinations
Recent
Display the lists of destinations and start
navigation.
Preferred
My home
My work
Contact
Delete one or more destinations.
Navigation
MENU
Points of interest
Travel
List of categories available.
After selection of category, select the point of
interest.
Active life
Commercial
Public
Geographic
Search
Search for a point of interest.
Navigation
MENU
Search
Point of interest
Enter a point of interest.
Address
Enter the address of a point of interest.
Local
/
Connected
Enter settings for the POI search mode in a local
or connected database depending on the services
subscribed to.
Confirm the entry.
24
1
19
21
20
22
23
24
25
Audio and Telematics
Level 2
Level 3
Level 4
25
.
1
1
1
19
21
20
23
22
24
25
Audio and Telematics
Level 2
Level 3
Level 4
Comments
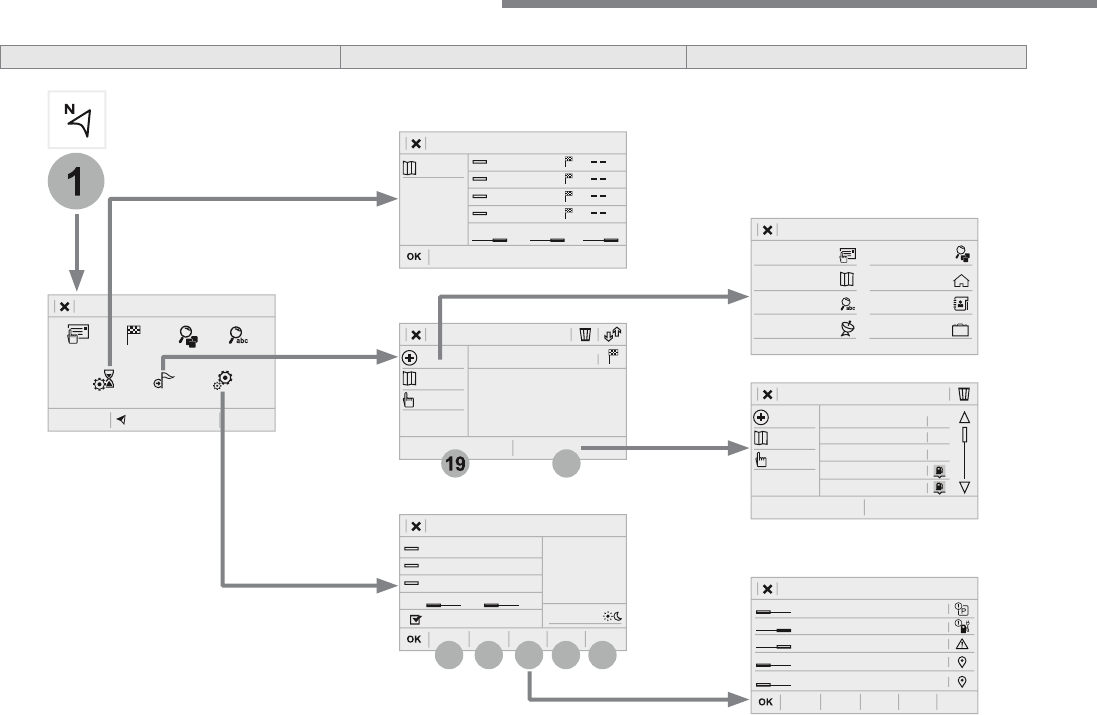
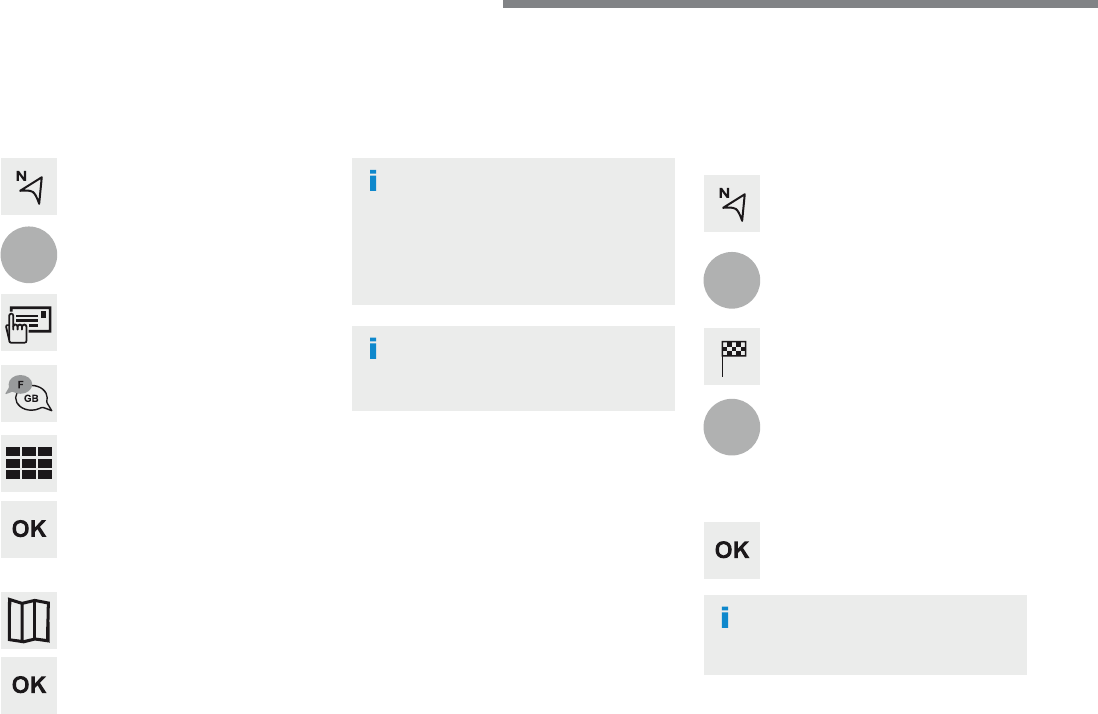
Navigation
MENU
Guidance criteria
Fast
Select the guidance criteria (motorways, tolls and
how traffic is taken into account).
Short
Compromise
Ecological
See on map
Display the route selected using the criteria.
Save your selections.
Navigation
MENU
Routes / waypoints
Waypoints
Display the waypoints saved.
Route
Display details of the route.
Add waypoint
Add a waypoint
Add a waypoint from a list offered.
Preview
Display the map.
Finish
Press to calculate the route.
Delete one or more waypoints.
Move a waypoint in the list.
Navigation
MENU
Settings
Aspects
Enter choices and select the volume for the voice
and stating the names of streets.
Options
Alerts
Vocal
Mapping
Save the selections adopted.
26
1
1
8
Audio and Telematics
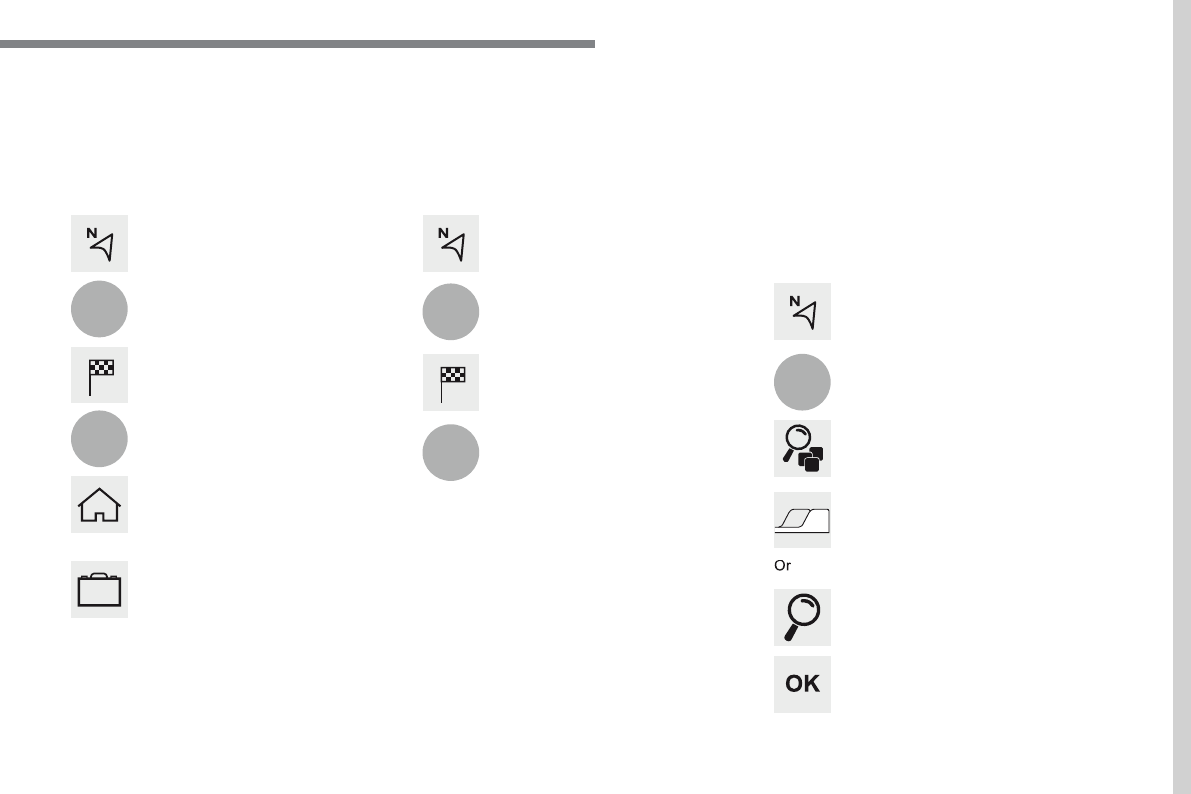
Choosing a new destination
Select "
Enter address
".
Select "
See on map
" to select the
"
Guidance criteria
".
Select the "
Country
".
Press "
OK
" to select the "
Guidance
criteria
".
Press "
OK
" to start navigation.
Press "
OK
" to start navigation.
And / Or
Press
Navigation
to display the
primary page.
Press the "
MENU
" button to go to the
secondary page.
Towards a new destination
Towards a recent destination
Select "
My destinations
".
Press
Navigation
to display the
primary page.
Press the "
MENU
" button to go to the
secondary page.
Enter the "
City
", the "
Street
" and the
"
Number
" and confirm by pressing
on the suggestions displayed.
Select the "
Recent
" tab.
Select the address chosen in the list to display
the "
Guidance criteria
".
To use the navigation system, it is
necessary to enter the "
City
", the
"
Street
" and the "
Number
" using the
virtual keypad, or to take them from the
list of "
Contacts
" or from the "
History
"
of addresses.
Without confirmation of the street
number, you will be guided to one end
of the street.
Select "
Position
" to see the point of
arrival geographically.
27
.
1
10
1
1
9
Audio and Telematics
Or
Towards a contact
Select "
My destinations
".
Select the "
Contact
" tab.
Press
Navigation
to display the
primary page.
Press the "
MENU
" button to go to the
secondary page.
Select a contact in the list offered to start
navigation.
Press "
OK
" to start calculation of the
route.
Towards points of interest (POI)
Points of Interest (POI) are listed in different
categories.
Press
Navigation
to display the
primary page.
Press the "
MENU
" button to go to the
secondary page.
Select "
Points of interest
".
Select "
Search
" to enter the name
and address of a POI.
Select the "
Travel
", or "
Leisure
"
or "
Commercial
" or "
Public
" or
"
Geographic
" tab.
Or
Or
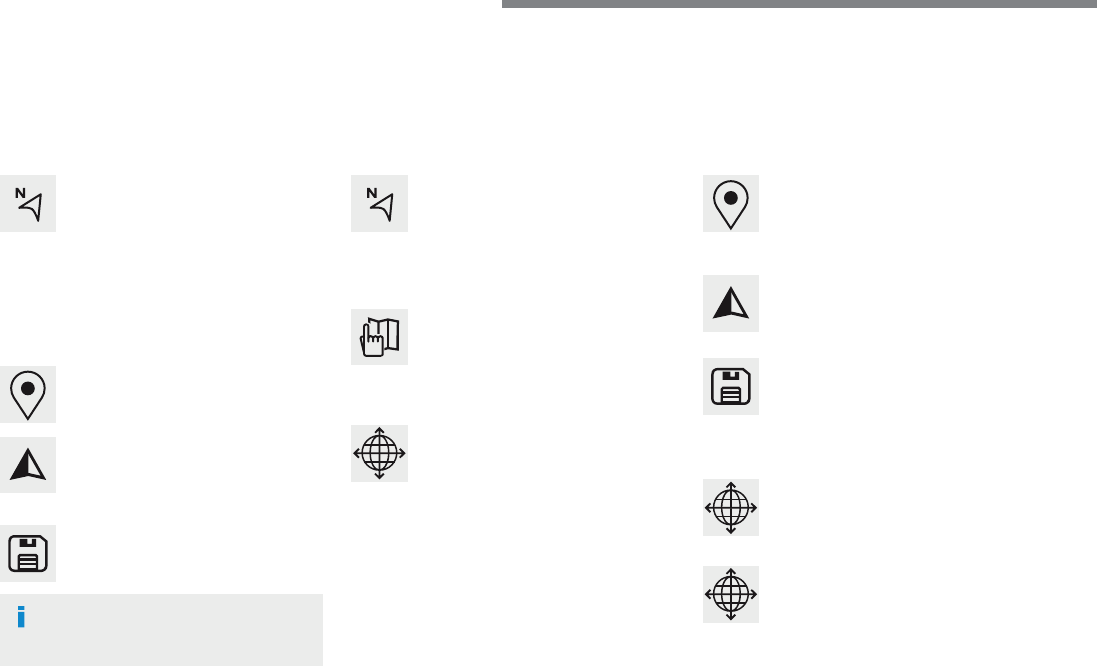
Towards "My home" or "My
work"
Select "
My destinations
".
Press
Navigation
to display the
primary page.
Press the "
MENU
" button to go to the
secondary page.
Select the "
Preferred
" tab.
Select "
My home
".
Select "
My work
".
Select a previously saved favourite destination.
28
Audio and Telematics
Towards GPS coordinates
Towards a point on the map
Press
Navigation
to display the
primary page.
Press
Navigation
to display the
primary page.
Explore the map by sliding a finger on the
screen.
Explore the map by sliding a finger on the
screen.
Tap the screen to place a marker and
display the sub-menu.
Or
Or
Or
And
Select the destination by pressing on the map.
Press this button to start navigation.
Press this button to start navigation.
Press this button to display the world
map.
Using the grid, select by zoom the
desired country or region.
Press this button to save the address
displayed
Press this button to save the address
displayed.
Press this button to enter the GPS
coordinates.
Press this button to enter the value
for "
Latitude
" using the virtual
k e y p a d .
Press this button to enter the value
for "
Longitude
" using the virtual
k e y p a d .
A marker is displayed in the middle of
the screen, with the "
Latitude
" and
"
Longitude
" coordinates.
A long press on a point opens a list of
POIs nearby.

29
.
Audio and Telematics
TMC (Traffic Message
Channel)
TMC (Traffic Message Channel)
messages are linked to a European
standard on the broadcasting of traffic
information via the RDS system on FM
radio, transmitting traffic information in
real time.
The TMC information is then displayed
on a GPS Navigation system map and
taken into account straight away during
navigation, so as to avoid accidents,
traffic jams and closed roads.
The display of danger areas depends
on the legislation in force and
subscription to the service.
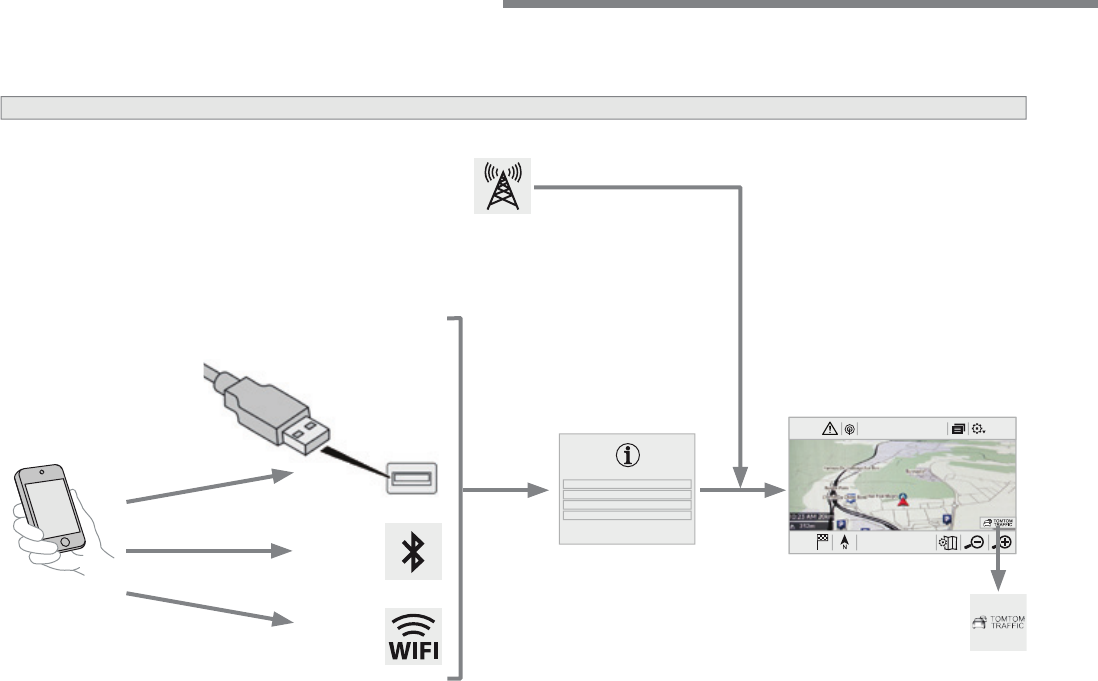
30
12:1318,5 21,523 °C
Audio and Telematics
Connected navigation
Network connection provided by the vehicle
OR
Network connection provided by the user
Depending on the equipment level of the vehicle
According to version
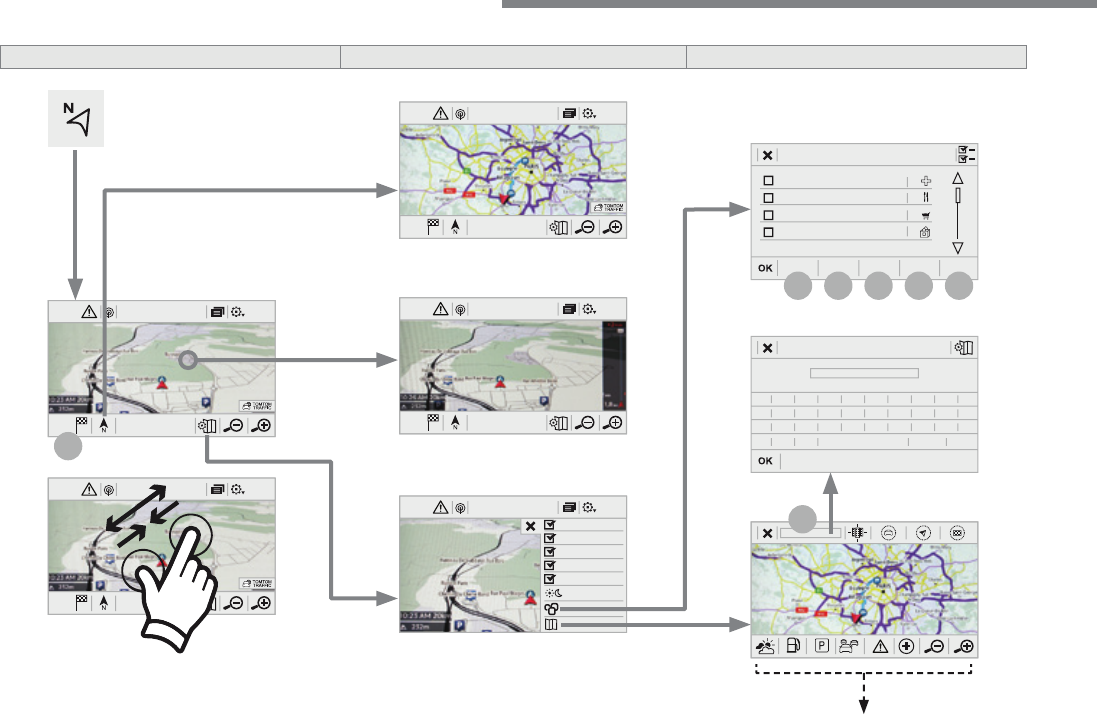
31
.
Audio and Telematics
As a safety measure and because it
requires sustained attention by the
driver, using a smartphone when
driving is prohibited.
All operations must be done with the
vehicle stationary
.
vehicle stationary . vehicle stationary
Connected navigation connection
The principles and standards
are constantly changing. For
communication between your
smartphone and the system to operate
correctly, we recommend that you
keep your smartphone's operating
system up to date, and the time and
date on your smartphone and the
system correct
.
The services offered with connected
navigation are as follows.
A Connected Services pack:
- Weather,
- Filling stations,
- Car park,
- Traffic,
- POI, local search.
A Danger area pack (option).
Activate the Bluetooth function on
the telephone and ensure that it is
visible to all (see the "Connect-App"
section).
Connect the USB cable.
The smartphone is in charge mode
when connected by USB cable.
The system is automatically
connected to the modem included
for the "Emergency or assistance
calls" services and does not require
a connection provided by the user via
their smartphone.
On the arrival of "TOMTOM
TRAFFIC", the services are
available.
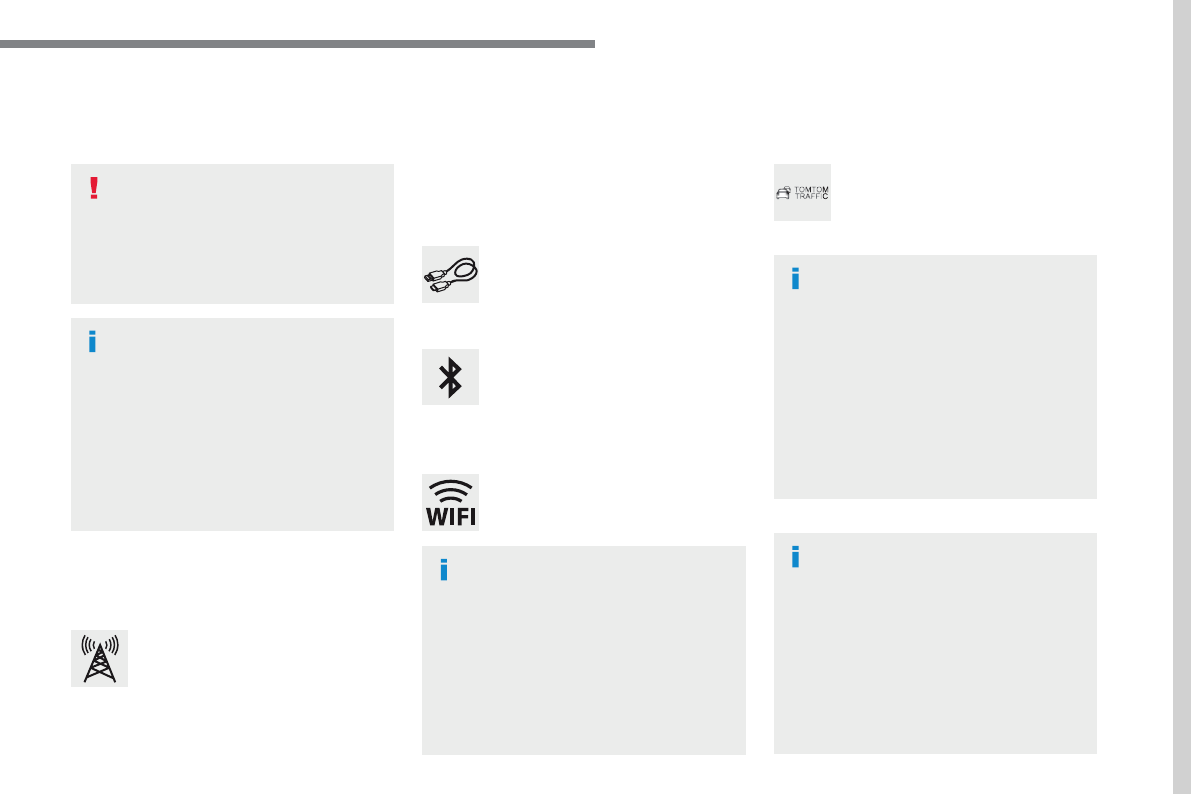
For access to connected navigation, you
can use the connection provided by the
vehicle via the "Emergency or assistance
call" services or use your smartphone as
a modem.
Activate and enter settings for
sharing the smartphone connection.
Restrictions of use:
- With CarPlay
®
, connection sharing is
only with a Wi-Fi connection.
- W i t h M i r r o r L i n k
TM
, connection
sharing is only with a USB
connection.
The quality of services depends on the
quality of the network connection.
Select a Wi-Fi connection found by
the system and connect to it (see the
"Connect-App" section).
USB connection
Network connection provided by
the vehicle
Network connection provided by
the user
Bluetooth connection
Wi-Fi connection
32
12:1318,5 21,523 °C
12:1318,521,523 °C
12:1318,521,523 °C
1
12:1318,5 21,523 °C
12:1318,5 21,523 °C
7
27
28
26
29
30
Audio and Telematics
Level 1
Level 2
Level 3
33
.
7
28
27
26
29
30
Audio and Telematics
Level 1
Level 2
Level 3
Comments
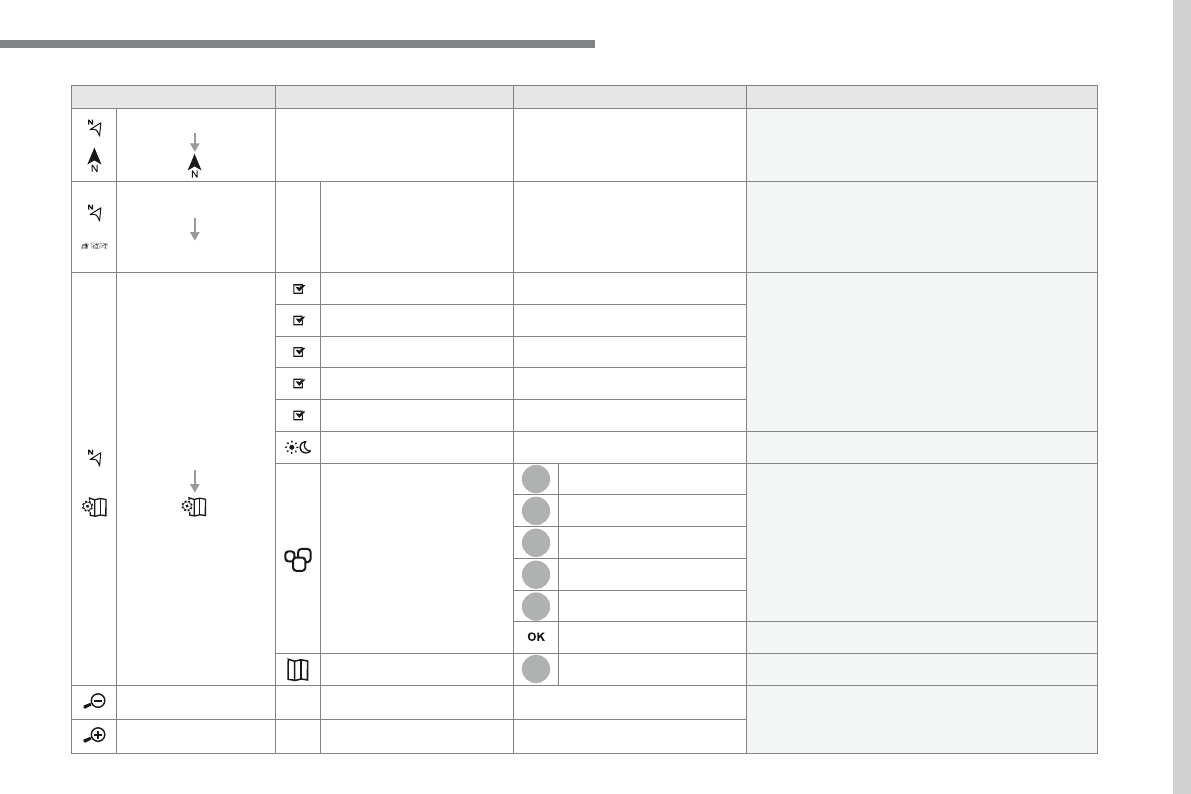
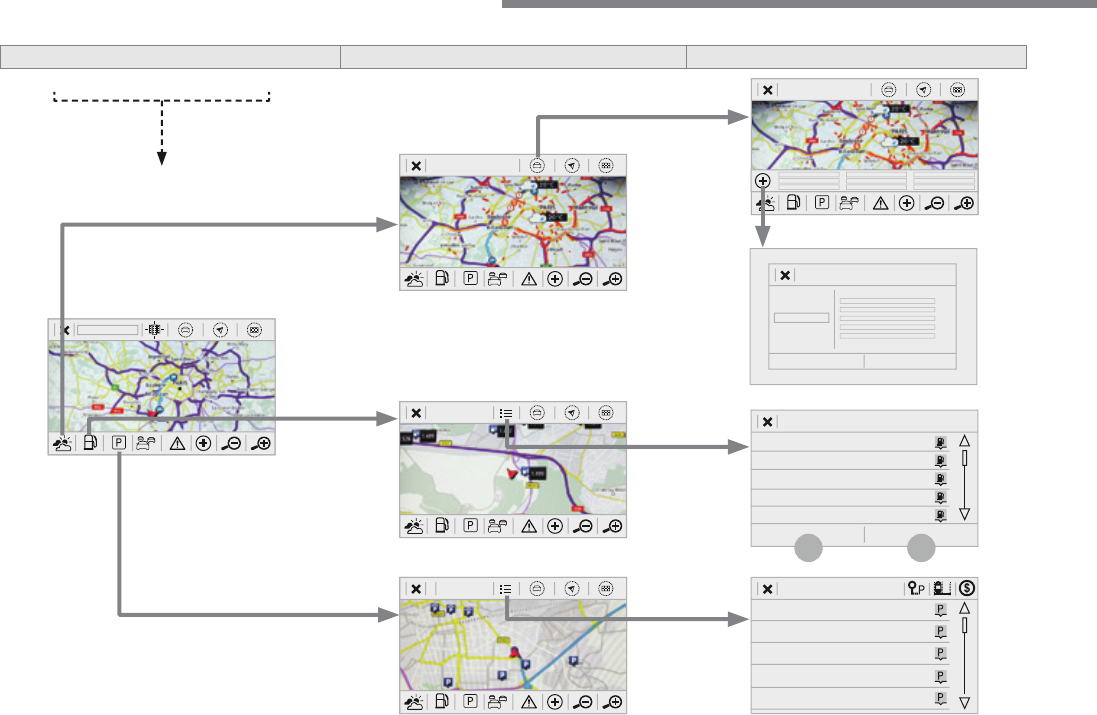
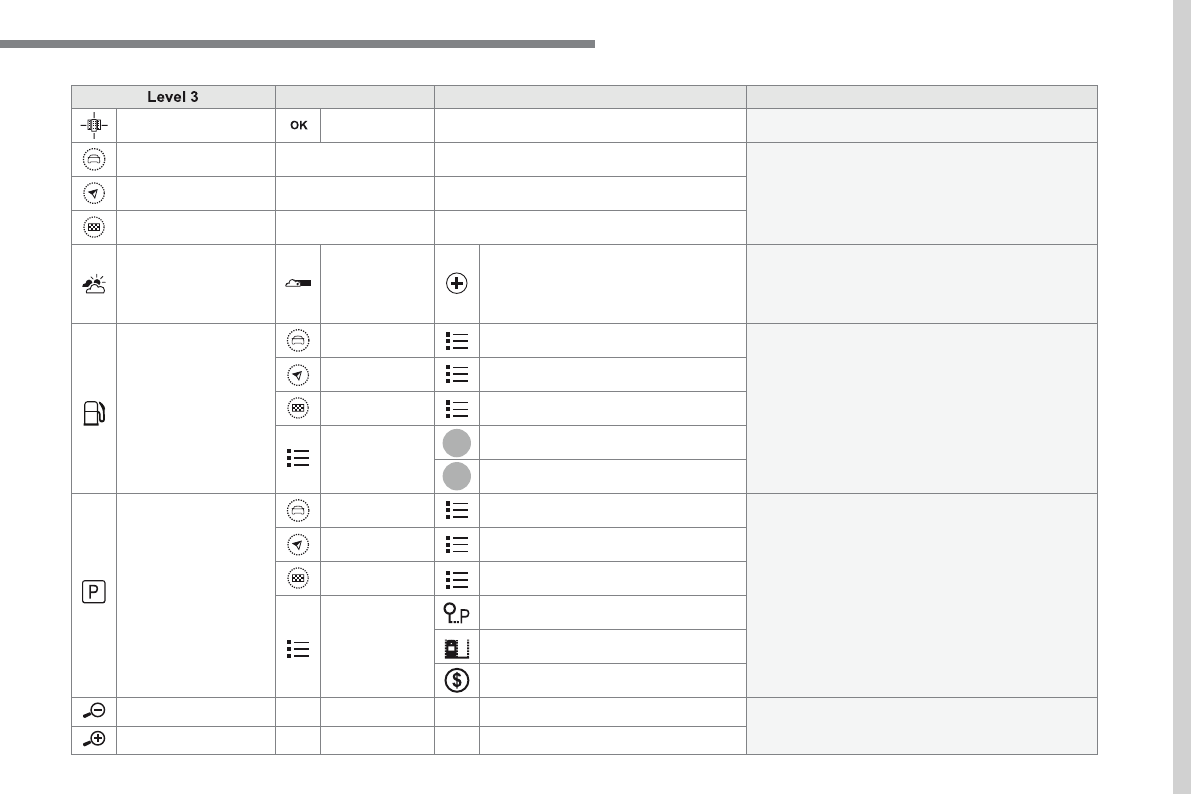
Navigation
Select the orientation of the map; north up,
vehicle direction up or perspective.
Navigation
TOMTOM TRAFFIC
On connection of the system to a network,
"TOMTOM TRAFFIC" is displayed instead of
"TMC", for use of all of the options available, in
real time.
Navigation
Weather
Select the options.
The map display the route chosen, depending on
options.
Stations
Car park
Traf fic
Danger area
Map color
Select the display mode for the map.
POI on map
Commercial
Select the POIs available.
Geographic
Leisure
Public
Travel
Save the options.
View map
Modify city
Select or change a city.
Zoom out / zoom in using the touch buttons or
with two fingers on the screen.
34
31
32
Audio and Telematics
Level 3
Level 4
Level 5
35
.
31
32
Audio and Telematics
Level 3
Level 4
Level 5
Comments
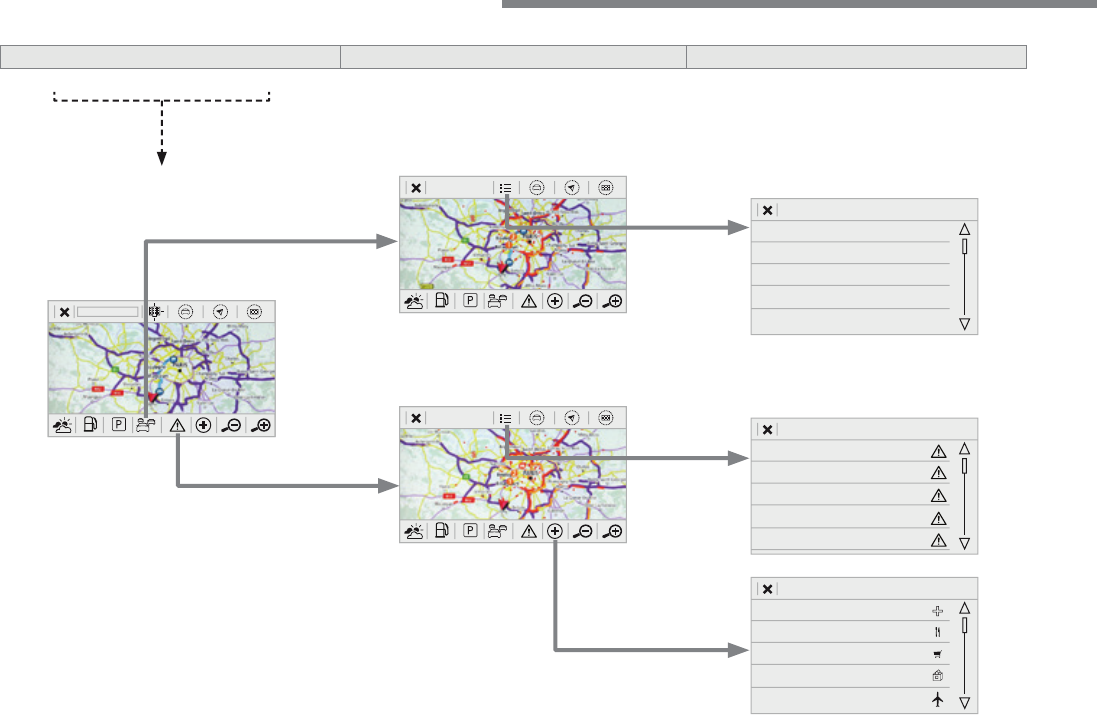
Select city
Select or change a city.
Around the vehicle
Select or change a city.
On the route
At the destination
Weather
Weather information
Display the weather forecast for the day or the
following days.
Filling stations
Filling stations around the vehicle
Display the list of filling stations and the
associated information (address, prices, fuels, ...).
Filling stations on the route
Filling stations at the destination
By distance
By price
Car park
Car parks around the vehicle
Display the list of car parks and the associated
information (address, distance, spaces available,
price, ...).
Car parks on the route
Car parks at the destination
Sort by distance
Sort by spaces
Sort by price
Zoom out / zoom in using the touch buttons or
with two fingers on the screen.
36
Audio and Telematics
Level 3
Level 4
Level 5
37
.
Audio and Telematics
Level 3
Level 4
Level 5
Comments
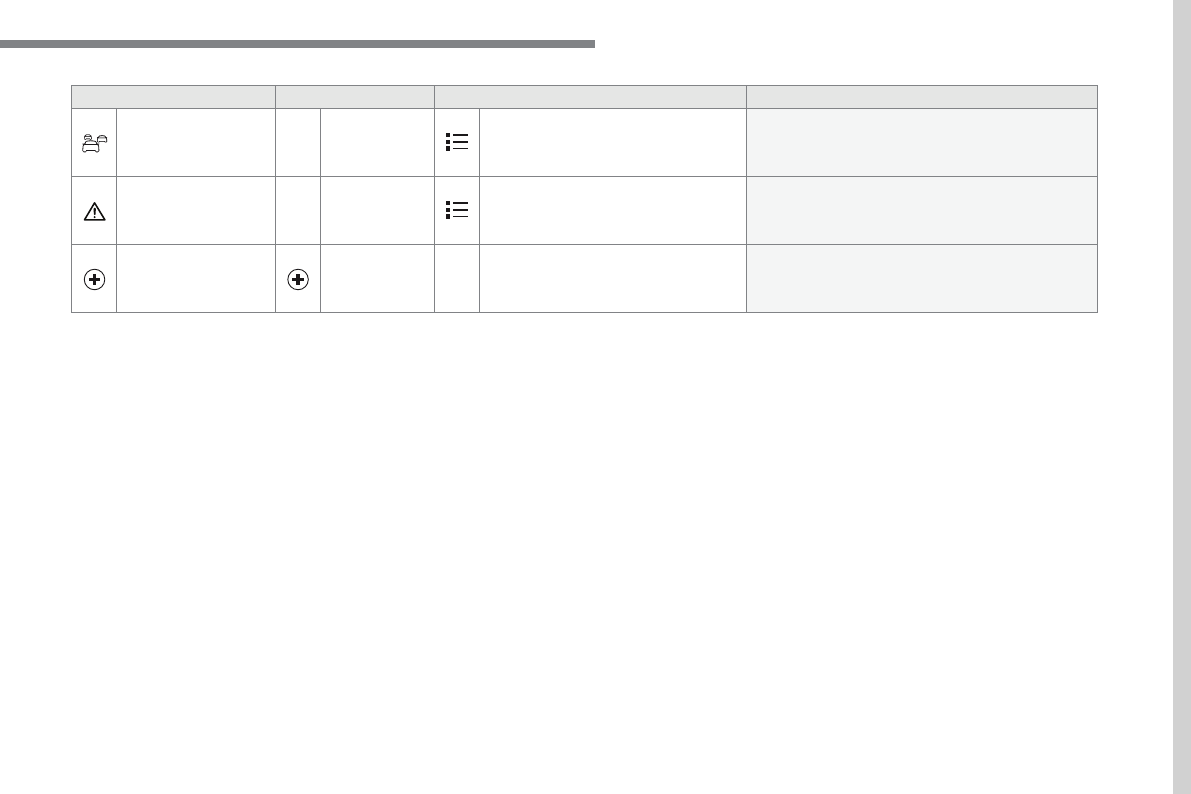
Traf fic
Traffic observed
Display traffic information in real time: type,
description and duration (in minutes).
Danger areas
List of danger areas
Display danger areas (roadworks, breakdowns,
accidents, ...) in real time.
Points of interest
Points of
interest
Select POI
Display the list of POIs for the location selected.
38
22
23
1
Audio and Telematics
Settings specific to
connected navigation
For access to connected navigation,
you have to select the option:
"
Authorise sending information
".
Select "
Options
".
Select "
Alerts
".
- "
Allow declaration of danger
areas
"
- "
Guidance to final destination
on foot
"
- "
Authorise sending
information
"
Activate or deactivate:
Activate or deactivate "
Warn of
danger zones
".
The display of danger zones is
conditioned by the legislation in force
and subscription to the service.
The temperature displayed at 6 o'clock in the
morning will be the maximum temperature for the
day.
The temperature displayed at 6 o'clock in the evening
will be the minimum temperature for the night.
Select "
Settings
".
Press
Navigation
to display the
primary page.
Press the "
MENU
" button to go to the
secondary page.
Display the weather
Select "
Weather
".
Press this button to display the first
level of information.
Press this button to display the
detailed weather information.
Select "
View map
".
Press
Navigation
to display the
primary page.
Press this button to display the list of
services.
39
.
1
Audio and Telematics
To distribute information on the
declaration of danger zones, you
should check the option: "
Allow
declaration of danger areas
".
Declaration of "Danger
areas"
Press
Navigation
to display the
primary page.
Press the "
Declare a new danger
area
" button located in the upper bar
of the touch screen.
Select the option "
Type
" to choose
the type of "Danger area".
Select the "
Speed
" option and enter
it using the virtual keypad.
Press "
OK
" to save and distribute the
information.
You can download the system and map
updates from the Brand's website.
The update procedure can also be
found on the website.
"Danger areas" pack
updates
Press
Settings
to display the primary
page.
Press the "
OPTIONS
" button to go to
the secondary page.
Select "
System settings
".
Select "
View
" to view the version of
the various modules installed in the
system.
Select "
Update(s) due
".
Select the "
System info
" tab.
40
12:1318,5 21,523 °C
3
2
1
12:1318,5 21,523 °C
Audio and Telematics
Applications
According to version / according to equipment
Level 1
Level 2
Level 3
41
.
2
2
3
Audio and Telematics
Internet Browser
Connectivity
Applications
Press "
Internet Browser
" to display
the browser home page.
Select your country of residence.
Press "
Connectivity
" to go to the
CarPlay
®
or
® or
®
MirrorLink
TM
function.
Press "
Connectivity
" to go to the
"
Internet Browser
" function.
Press "
Applications
" to display the
applications home page.
Connection to the internet is via one of
the network connections provided by
the vehicle or the user.
Press
Applications
to display the
primary page.
Press
Applications
to display the
primary page.
Press
Applications
to display the
primary page.
Press "
OK
" to save and start the
browser.
42
12:1318,5 21,523 °C
2
Audio and Telematics
CarPlay
®
CarPlay ®
CarPlay
smartphone connection
® smartphone connection
®
43
.
2
Audio and Telematics
As a safety measure and because it
requires the sustained attention of
the driver, using a smartphone when
driving is prohibited.
Operation must be with the
vehicle
stationary
.
stationary . stationary
The synchronisation of a smartphone
allows applications on a smartphone that
are adapted to the CarPlay
®
technology
® technology
®
to be displayed in the vehicle's screen,
having first activated the CarPlay
®
function in the smartphone.
As the principles and standards are
constantly changing,
it is recommended
that you keep your smartphone's
operating system updated
.
For the list of eligible smartphones, go
to the Brand's internet website in your
country.
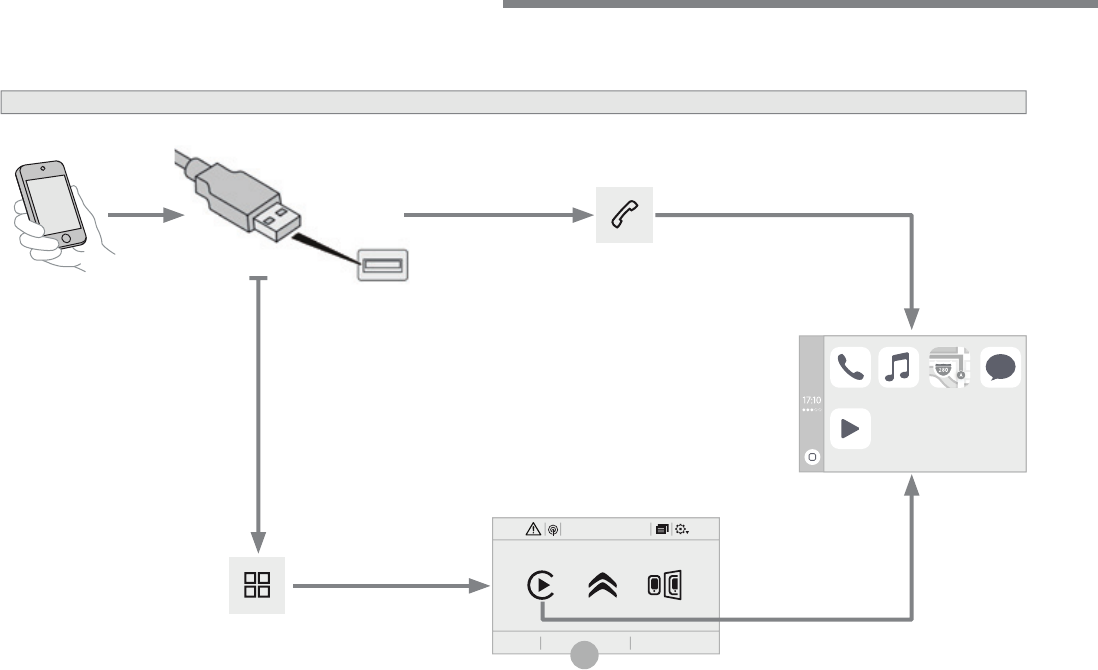
Connect a USB cable. The
smartphone charges when
connected by a USB cable.
Connect a USB cable. The
smartphone charges when connecte
d by a USB cable.
Press "
Telephone
" to display the
CarPlay
®
interface.
® interface.
®
Press "
CarPlay
" to display the
CarPlay
®
interface
® interface
®
On connecting the USB cable, the
CarPlay
®
function deactivates the
® function deactivates the
®
system's Bluetooth
®
mode.
® mode.
®
In the system, press "
Applications
"
to display the primary page.
Or
Press "
Connectivity
" to go to the
CarPlay
®
function.
® function.
®
44
12:1318,5 21,523 °C
2
Audio and Telematics
MirrorLink
TM
smartphone connection
45
.
2
Audio and Telematics
As a safety measure and because it
requires the sustained attention of
the driver, using a smartphone when
driving is prohibited.
Operation must be with the
vehicle
stationary
.
stationary . stationary
The synchronisation of a
smartphone allows applications on a
smartphone that are adapted to the
MirrorLink
TM
technology to be displayed
in the vehicle's screen.
The principles and standards
are constantly evolving. For the
communication process between
the smartphone and the system to
work correctly, the smartphone must
be unlocked;
update the operating
system of your smartphone as
well as the date and time in the
smartphone and the system
.
For the list of eligible smartphones,
connect to the Brand's internet website
in your country.
The "
MirrorLink
TM
" function requires
the use of a compatible smartphone
and applications.
There may be a wait for the availability
of applications, depending on the
quality of your network.
When connecting a smartphone to
the system, it is recommended that
Bluetooth
®
be started on the smartphone
® be started on the smartphone
®
Depending on the smartphone, it may be
necessary to activate the "
MirrorLink
TM
"
function.
During the procedure, several screen
pages relating to certain functions
are displayed.
Accept to start and end the
connection.
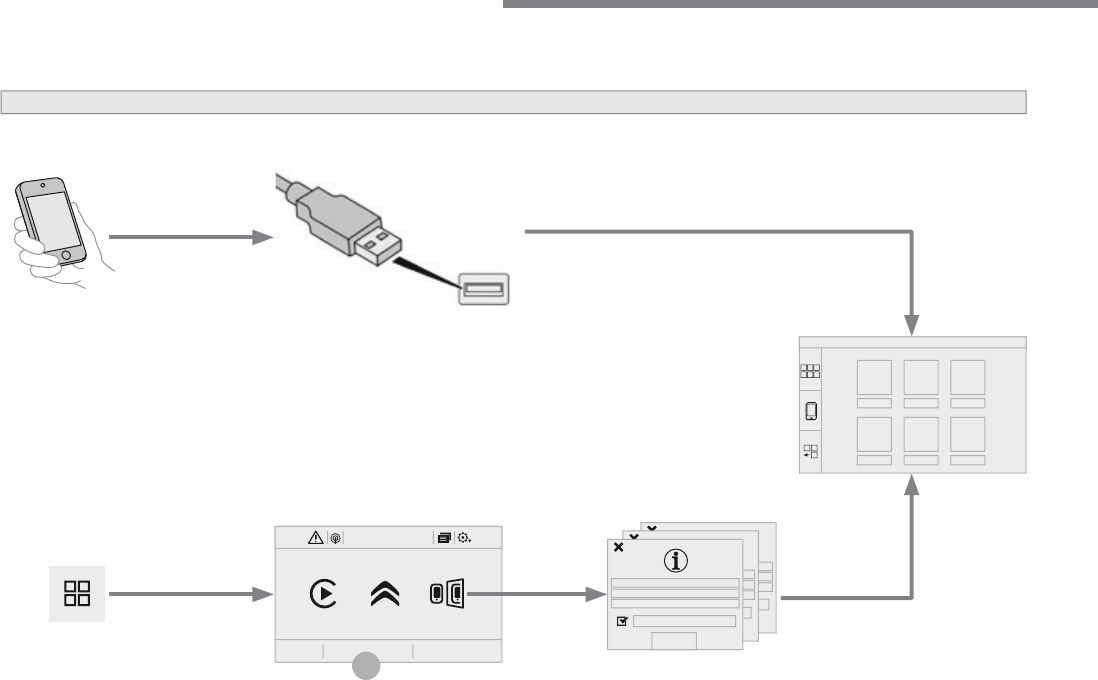
Connect a USB cable. The
smartphone charges when
connected by a USB cable.
Press "
MirrorLink
TM
" to start the
system's application.
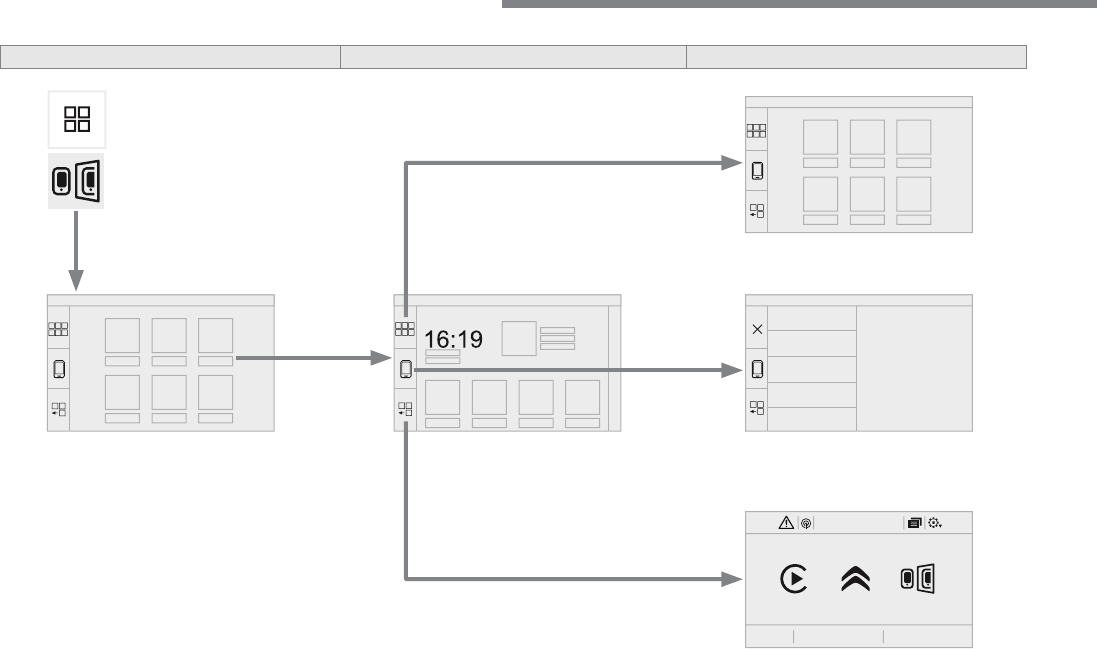
Once connection is established, a page
is displayed with the applications already
downloaded to your smartphone and adapted
to MirrorLink
TM
t e c h n o l o g y .
Access to the different audio sources remains
accessible in the margin of the MirrorLink
TM
display, using touch buttons in the upper bar.
Access to the menus for the system is possible
at any time using the dedicated buttons
From the system, press on
"
Applications
" to display the primary
page.
As a safety measure, applications
can only be viewed with the vehicle
stationary; display is interrupted once
the vehicle is moving.
Press "
Connectivity
" to go to the
MirrorLink
TM
function.
46
12:1318,521,523 °C
Audio and Telematics
Level 1
Level 2
Level 3
47
.
Audio and Telematics
Level 1
Level 2
Level 3
Comments
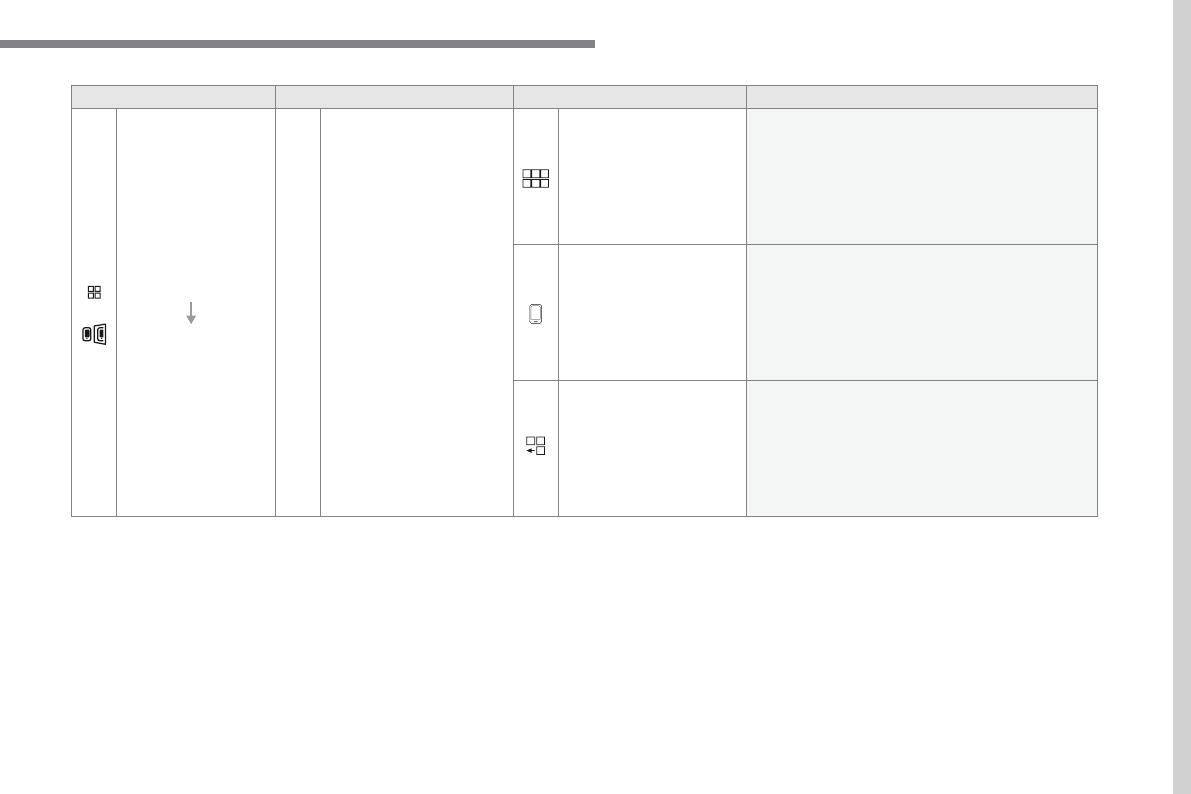
Applications
MirrorLink
TM
Go to or return to the applications already
downloaded to your smartphone and adapted to
MirrorLink
TM
technology.
Go to a menu list depending on the application
chosen.
"Back": abandon the current operation, go up one
level.
"Home": go to or return to the "Car mode" page on
your smartphone.
Go to the primary page of the "Applications"
menu.
48
12:1318,5 21,523 °C
3
3
2
1
4
6
5
Audio and Telematics
According to equipment
Level 2
Level 3
49
.
4
5
6
Audio and Telematics
Level 2
Level 3
Comments
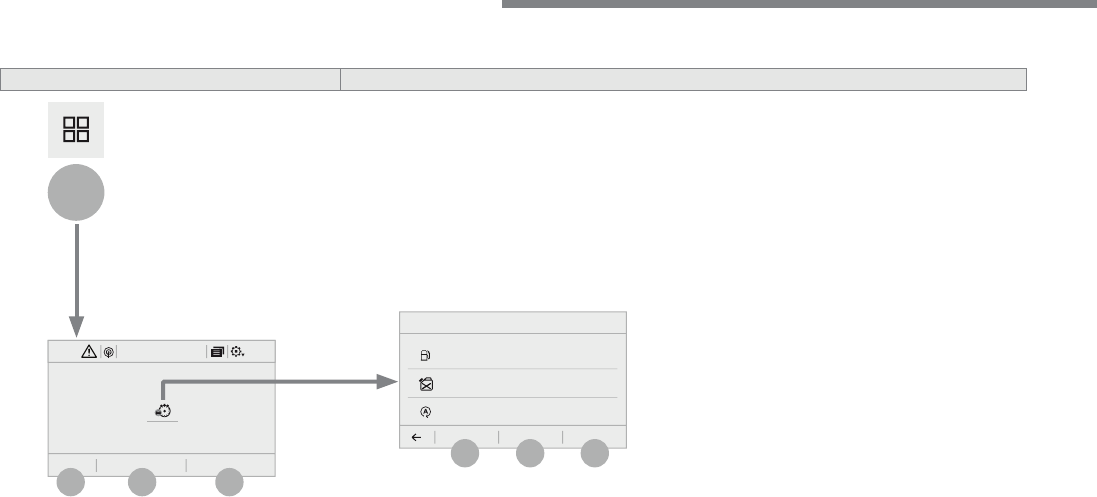
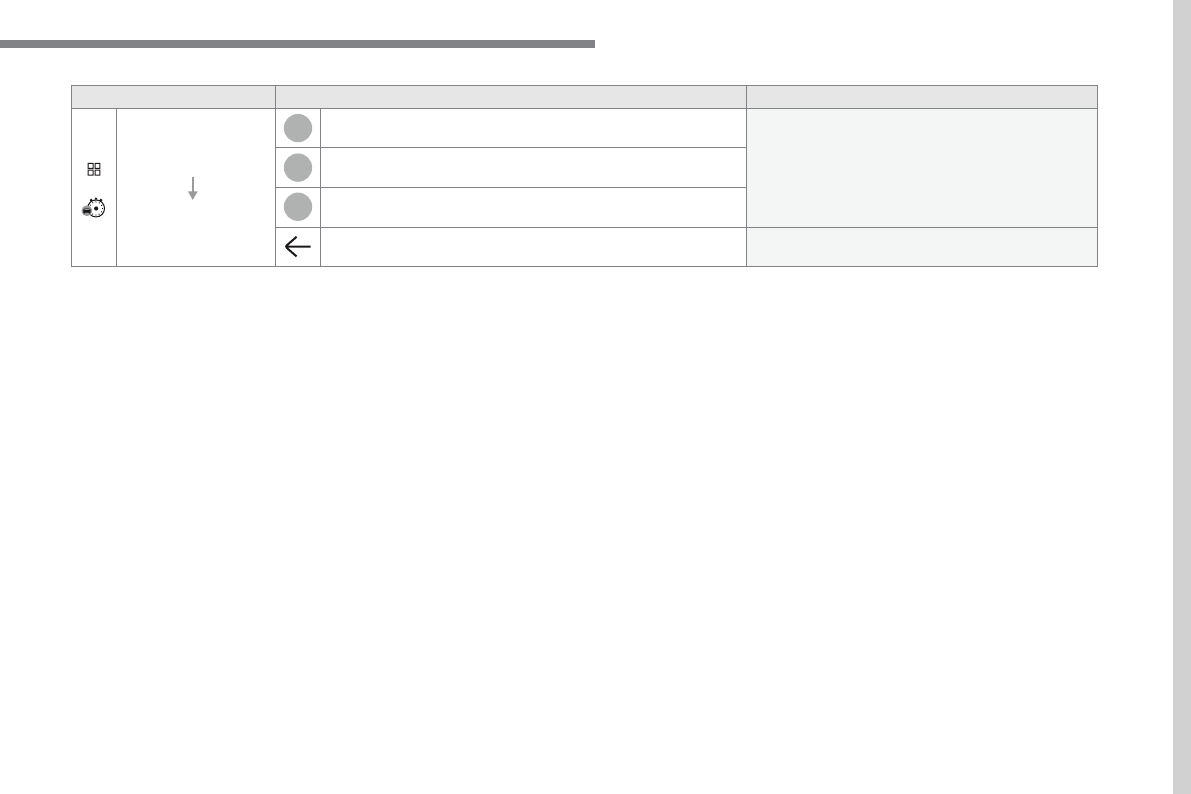
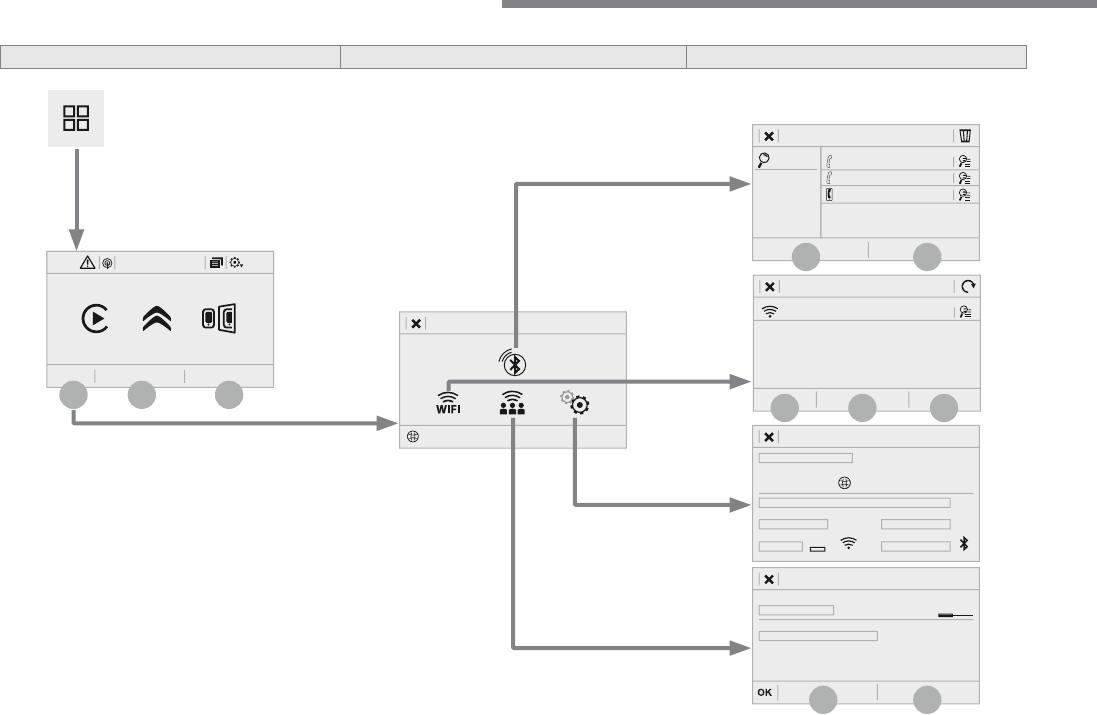
Applications
Trip computer
Instant
System providing information about the current
journey (range, fuel consumption…).
Trip 1
Trip 2
Back to the Applications page.
50
12:1318,5 21,523 °C
7
12
8
13
9
11
10
1
3
2
Audio and Telematics
Level 1
Level 2
Level 3
51
.
1
1
1
1
11
12
13
7
8
9
10
Audio and Telematics
Level 2
Level 3
Comments
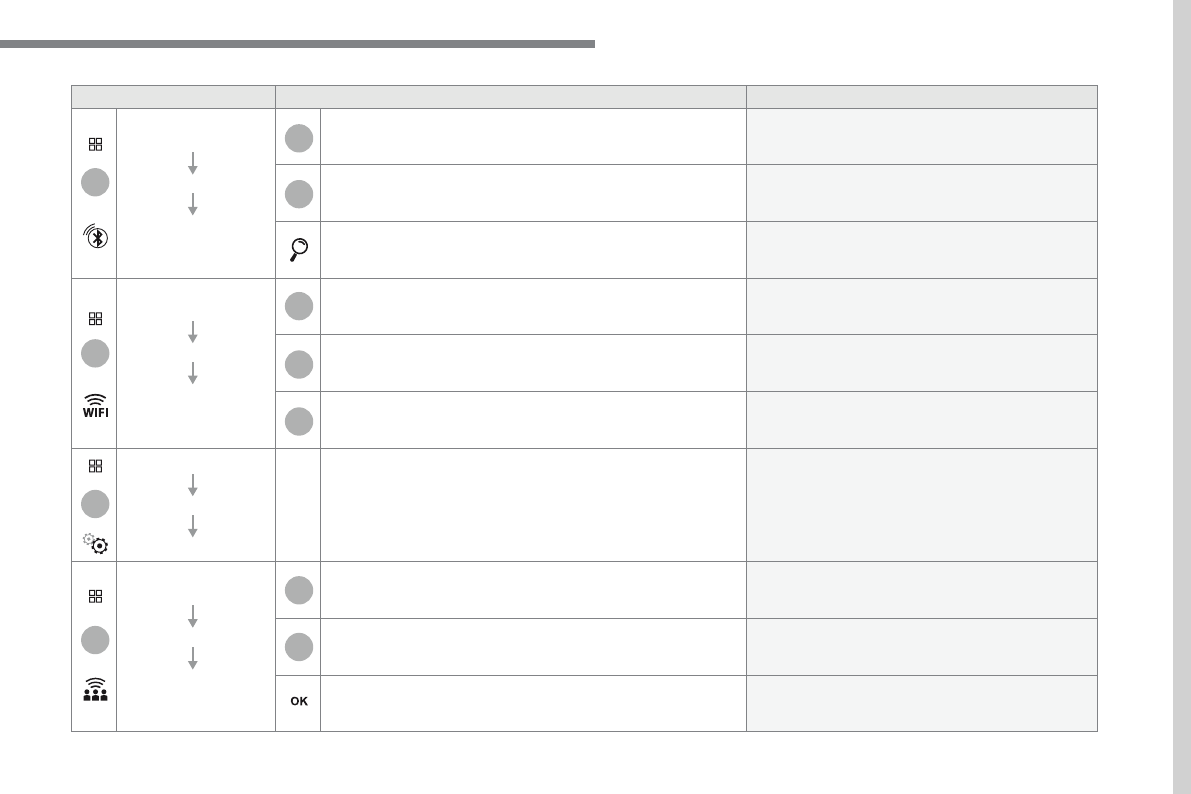
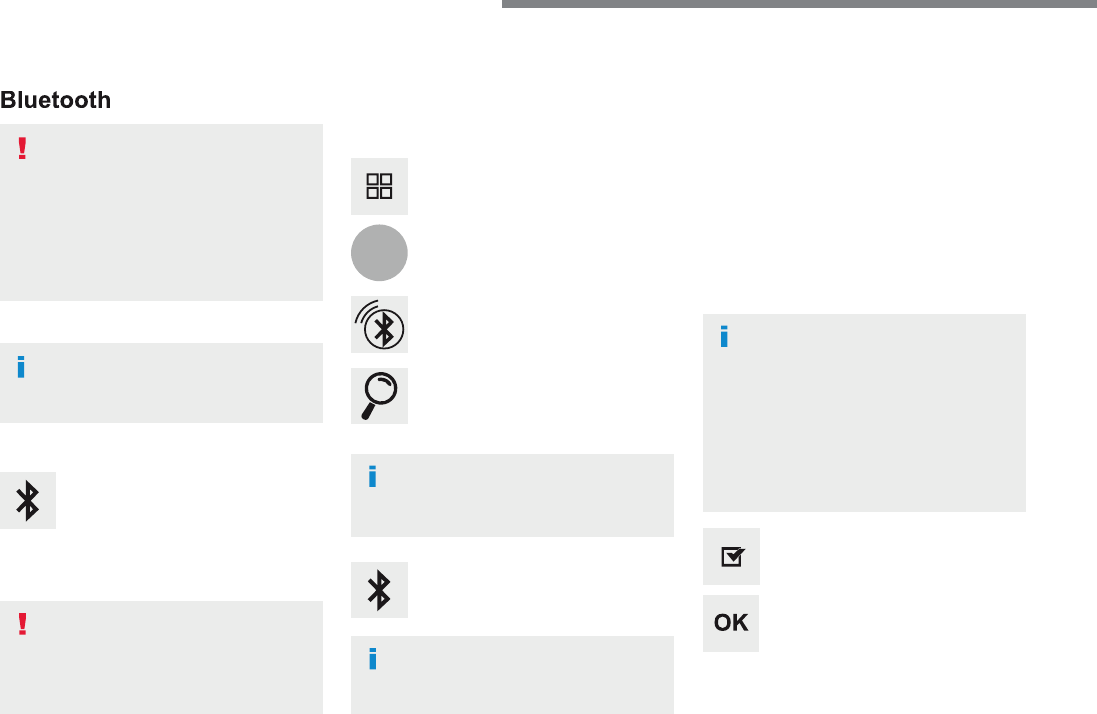
Applications
OPTIONS
Bluetooth
connection
All
Display all telephones detected and saved.
Connected
Display all telephones connected.
Search
Start the search for a device to be connected.
Applications
OPTIONS
Wi-Fi network
connection
Secured
Display the secured Wi-Fi networks.
Not secured
Display the not secured Wi-Fi networks.
Stored
Display the stored Wi-Fi networks.
Applications
OPTIONS
Manage connection
Display the status of the subscription to the
connected services, the status of the network
connection and the connection mode.
Applications
OPTIONS
Share Wi-Fi
connection
Activation
Activate or deactivate the Wi-Fi connection
sharing.
Settings
Select a Wi-Fi network found by the system and
connect.
Save the settings.
52
1
Audio and Telematics
Bluetooth
®
connection
® connection
®
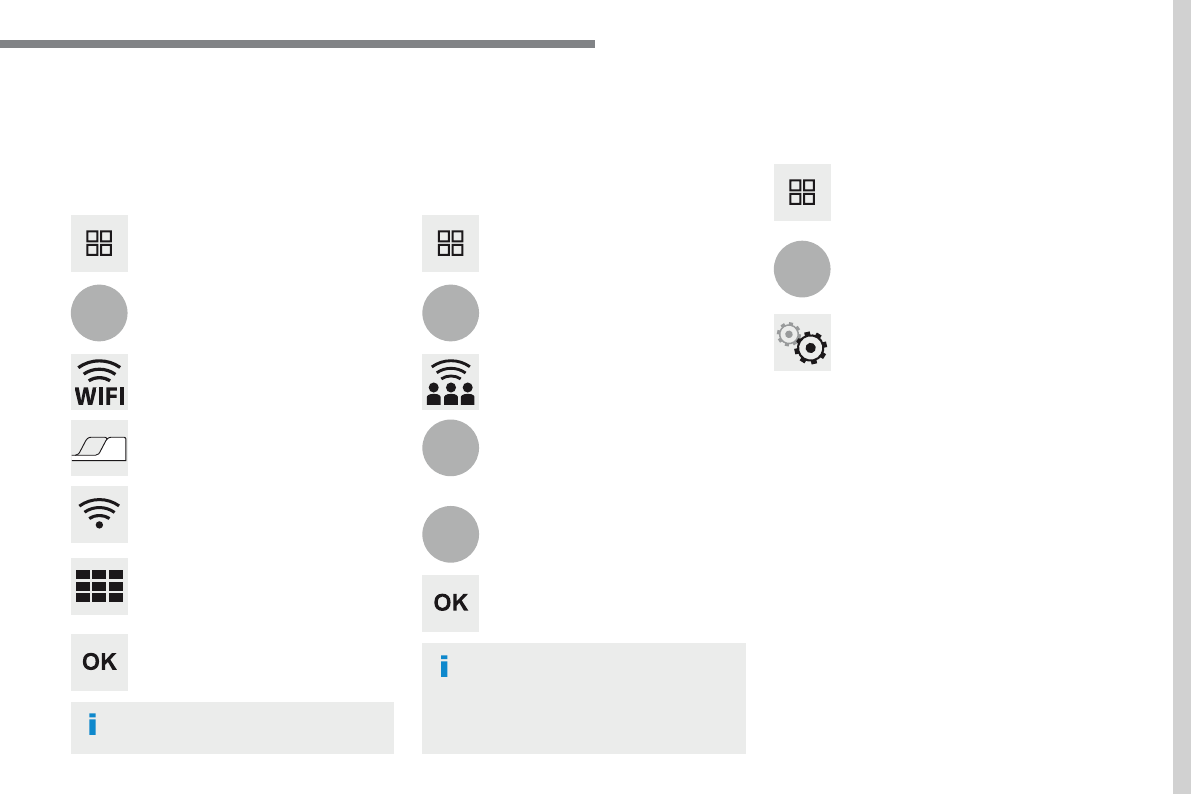
Procedure from the system
Connection sharing
Press on "
Connect-App
" to display
the primary page.
Press on "
Bluetooth connection
".
Select "
Search
".
The list of detected telephones is
displayed.
If the pairing procedure fails, it is recommended
that you deactivate and then reactivate the
"Bluetooth" function in your telephone.
The "
Mobile internet data
" profile
must be activated for connected
navigation (where the vehicle does not
have "Emergency and assistance call"
services), having first activated sharing
of this connection on your smartphone.
The system offers to connect the
telephone with 3 profiles:
- "
Telephone
" (hands-free kit, telephone
only),
- "
Streaming
" (wireless play of audio files
on the telephone),
- "
Mobile internet data
".
Select the name of the chosen
telephone in the list.
Press "
OK
" to confirm.
Select one or more profiles.
Press the "
OPTIONS
" button to go to
the secondary page.
As a safety measure and because it
requires sustained attention by the
driver, the pairing of a Bluetooth mobile
telephone with the Bluetooth hands-
free system of your audio system must
be done with the
vehicle stationary
and the ignition on.
Procedure from the telephone
Select the name of the system in the
list of devices detected.
In the system, accept the connection request
from the telephone.
Activate the Bluetooth function on the
telephone and ensure that it is "visible
to all" (telephone configuration).
To complete the pairing, whichever
procedure used (from the telephone or
from the system), ensure that the code
is the same in the system and in the
telephone.
Depending on the type of telephone,
you may be asked to accept or not the
transfer of your contacts and messages.
53
.
1
1
1
12
13
Audio and Telematics
Wi-Fi connection
Sharing the Wi-Fi connection
Managing connections
To protect from any piracy and provide
maximum security for your systems,
it is recommended that you use a
security code or a complex password.
The Wi-Fi connection and the sharing
of the Wi-Fi connection are exclusive.
Press "
OK
" to confirm.
Press "
OK
" to start the connection.
Press "
Connect-App
" to display the
primary page.
Network connection by the smartphone Wi-Fi.
Creation of a local Wi-Fi network by the
system.
Press
Connect-App
to display the
primary page.
Press
Connect-App
to display the
primary page.
Press the "
OPTIONS
" button to go to
the secondary page.
Press the "
OPTIONS
" button to go to
the secondary page.
Press the "
OPTIONS
" button to go to
the secondary page.
Select "
Wi-Fi network connection
".
Select "
Share Wi-Fi connection
".
Select "
Manage connection
".
And / Or
Select the "
Secured
", "
Not secured
"
or "
Stored
" tab.
Select the "
Activation
" tab to
activate or deactivate sharing of the
Wi-Fi connection.
Select the "
Settings
" to change the
name of the system network and the
password.
With this function you can view the access
to connected services, the availability of
connected services and modify the connection
mode.
Using the virtual keypad, enter the
"
Key
" for the Wi-Fi network and the
"
Password
".
Select a network.
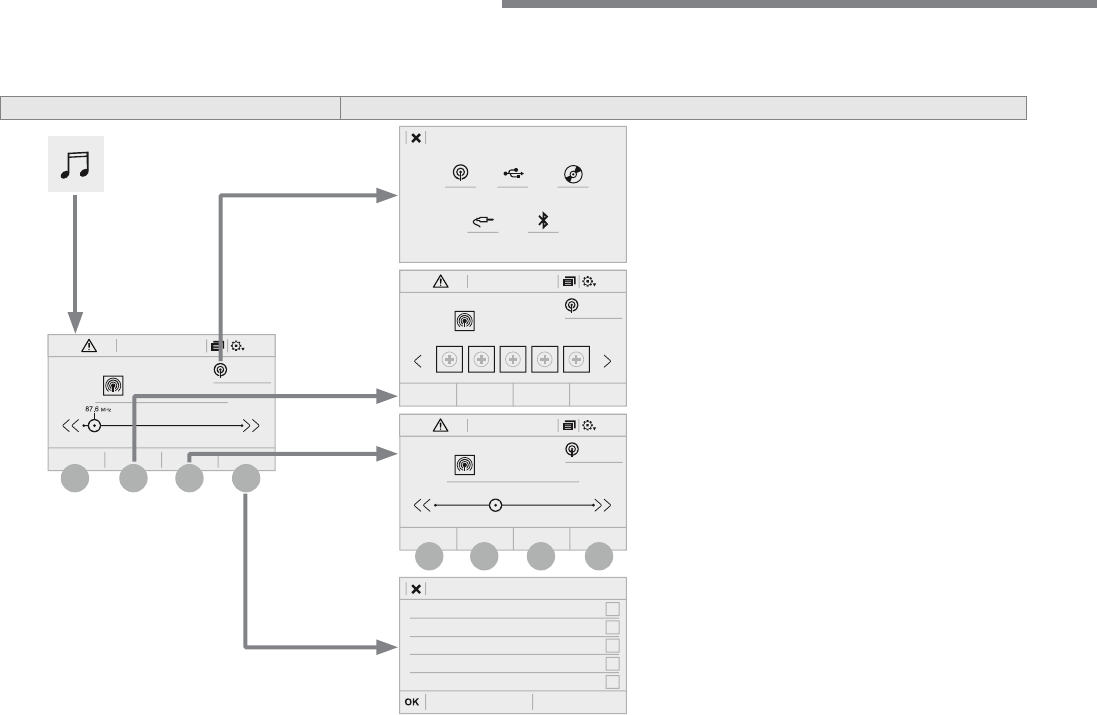
54
FM/87.5 MHz
87.5MHz
12:1318,5 21,523 °C
2
1
4
3
FM/87.5 MHz
87.5MHz
12:1318,5 21,523 °C
AM/531 kHz
PO kHz
12:1318,5 21,523 °C
2
1
3
4
Audio and Telematics
Radio Media
A c c o r d i n g t o v e r s i o n
Level 1
Level 2
55
.
3
2
4
Audio and Telematics
Level 1
Level 2
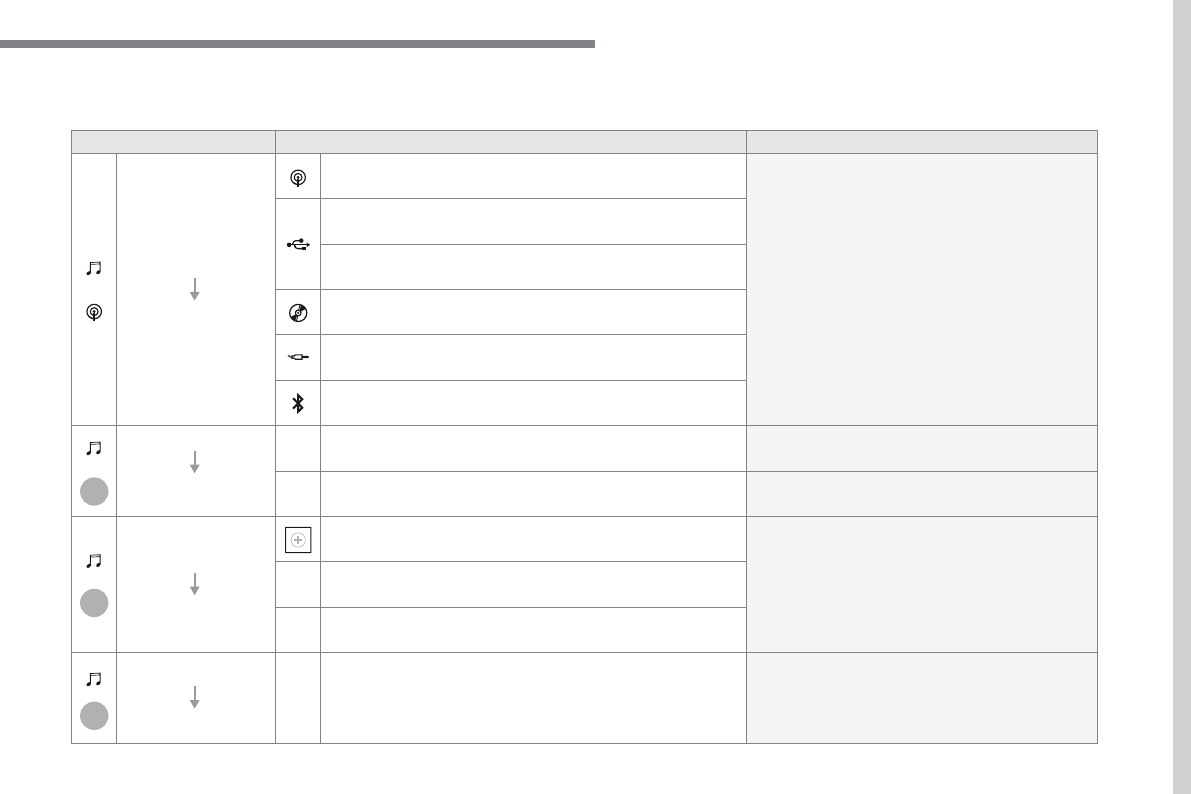
Comments
Radio Media
Source
Radio
Select change of source.
USB
iPod
CD
AUX
Bluetooth
Radio Media
Frequency / Presets
Frequency
Carry out an automatic or manual search for radio
stations.
Presets
Make a long press on an empty location to preset
a station.
Radio Media
Band
FM
Press the Band button to change waveband.
DAB
AM
Radio Media
List
Radio stations
Open the list and press a radio station to select it.
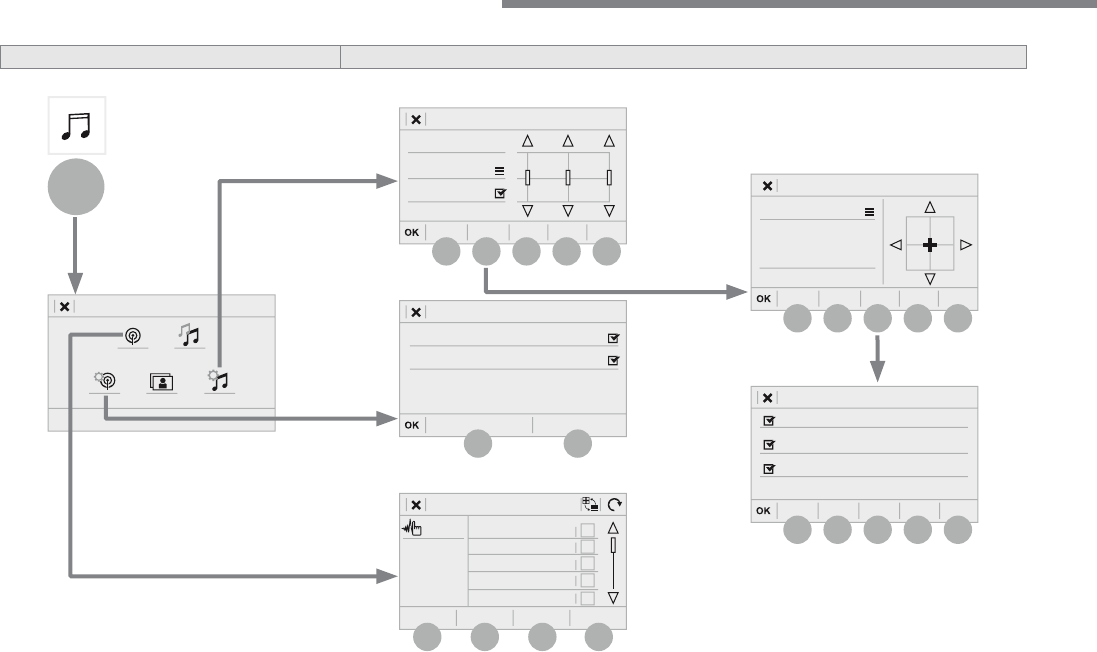
56
1
9
6
7
8
5
10
11
13
14
15
12
9
9
6
6
7
7
8
8
5
5
Audio and Telematics
Level 2
Level 3
57
.
5
12
8
6
13
14
15
9
7
10
11
1
1
1
Audio and Telematics
Level 2
Level 3
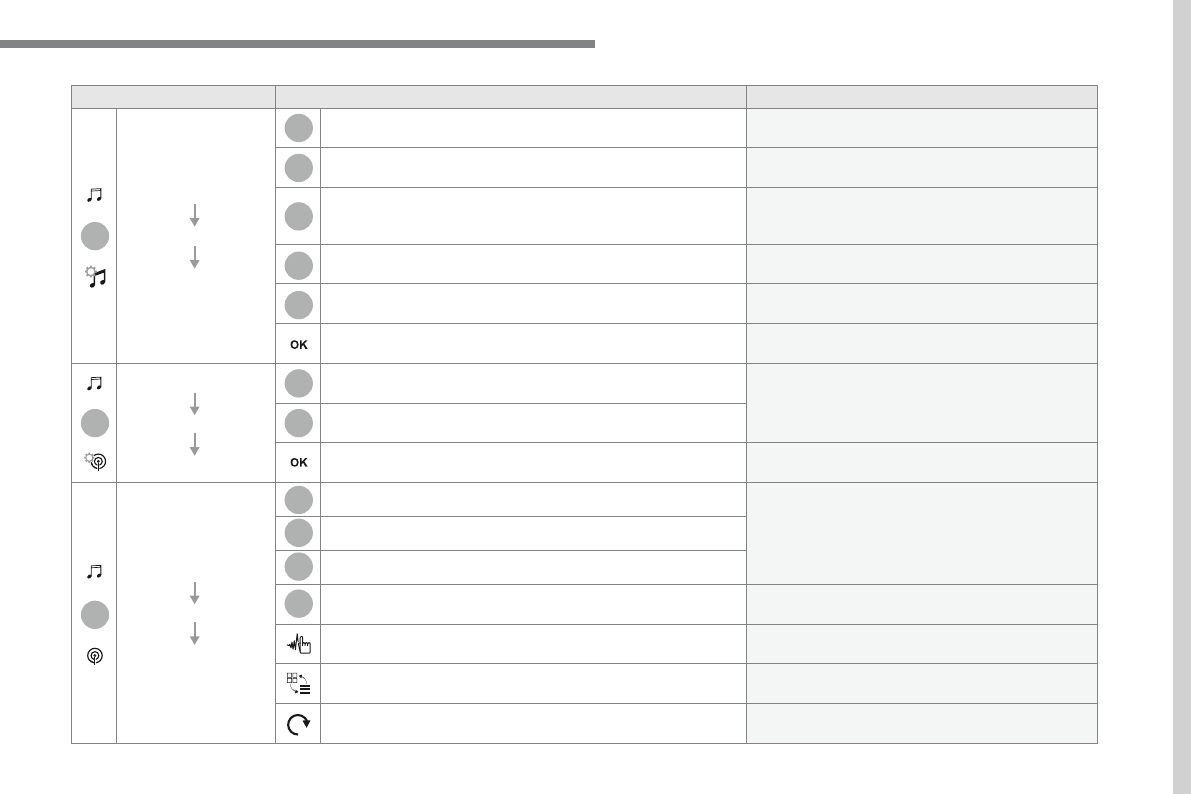
Comments
Radio Media
OPTIONS
Audio settings
Ambience
Select the sound ambience.
Distribution
Sound distribution by the Arkamys
®
system.
® system.
®
Sound
Adjust the volume or activate volume linked to
speed.
Voice
Adjust the voice volume.
Ringtone
Adjust the ringtone volume.
Save settings.
Radio Media
OPTIONS
Radio settings
General
Activate or deactivate settings.
Announcements
Save settings.
Radio Media
OPTIONS
Radio stations
FM
Display the list of radio stations for the band
selected.
DAB
AM
Presets
Select a preset radio station.
Frequency
Enter a frequency manually.
Change the screen display mode.
Update the list according to reception.
58
21
1
17
18
19
20
16
Audio and Telematics
Level 2
Level 3
59
.
17
20
18
21
19
1
1
16
Audio and Telematics
Level 2
Level 3
Comments
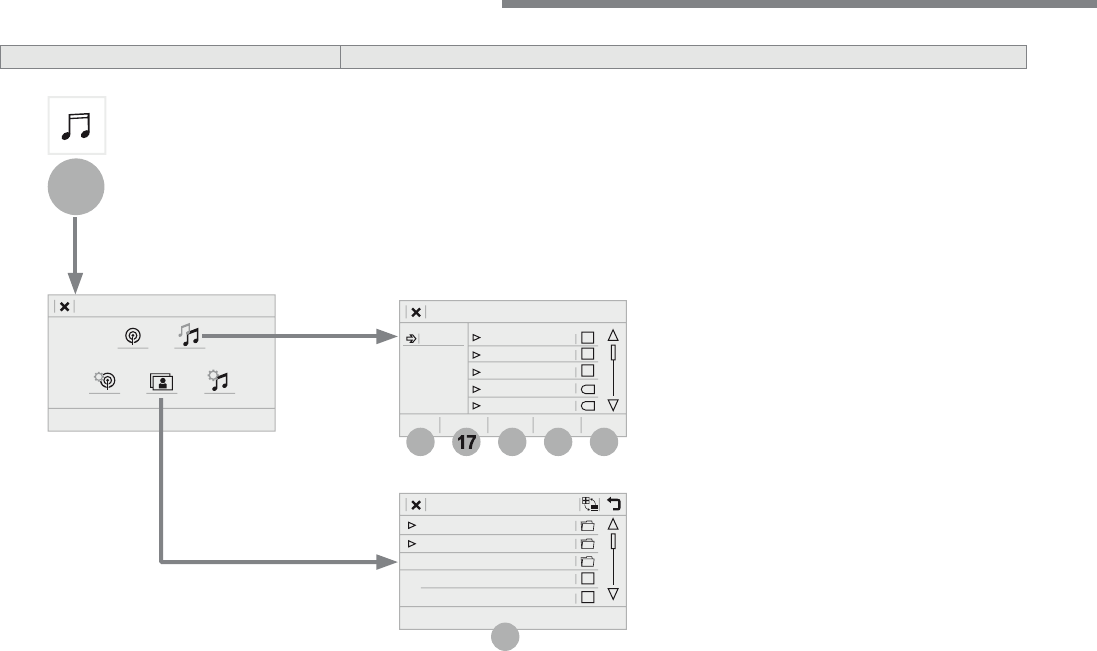
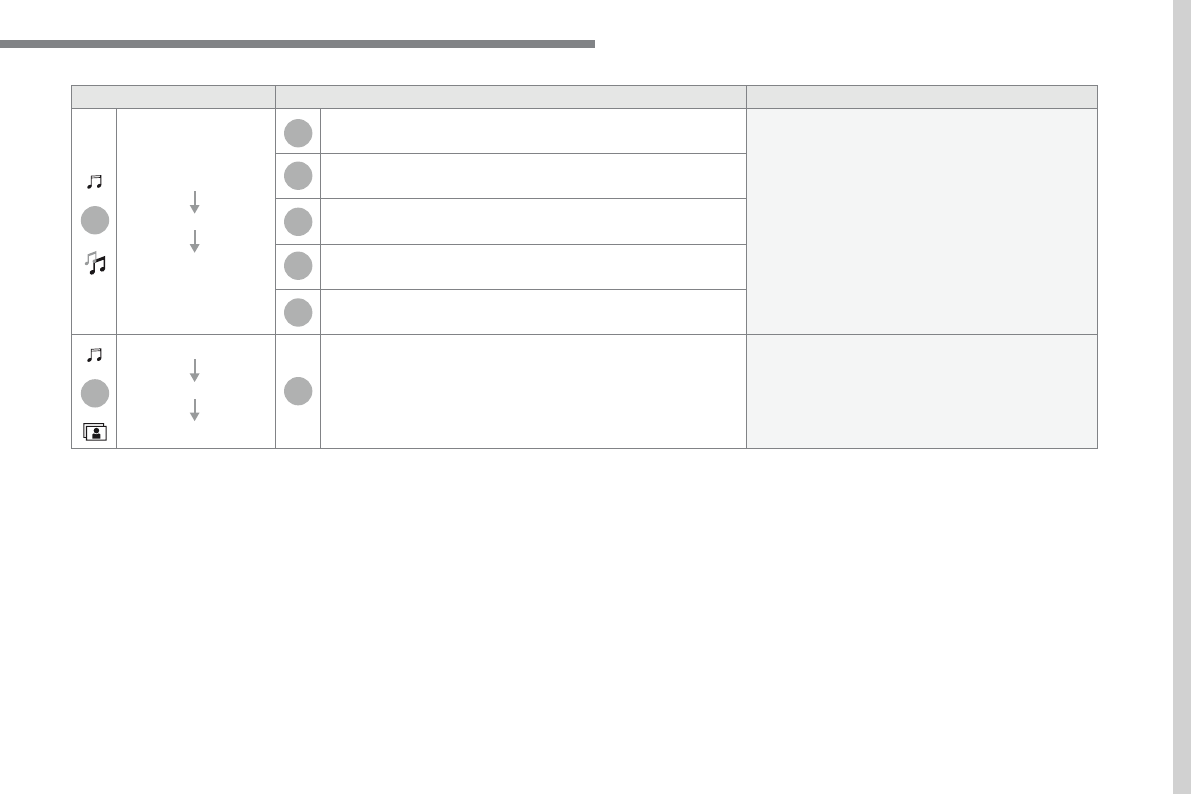
Radio Media
OPTIONS
Music files
Albums
Choose a selection mode.
Artists
Genres
Playlists
Folders
Radio Media
OPTIONS
Managing photos
USB
Display photos.
The system supports the following image formats:
.gif, .jpg, .jpeg, .bmp, .png, .raw and .tiff with a
maximum file size of 10 Mb per image.

61
.
1
2
2
2
Audio and Telematics
Press
Radio Media
to display the
menu.
Press the "
OPTIONS
" button to go to
the secondary page.
Press "
Frequency
".
Press "
Frequency
".
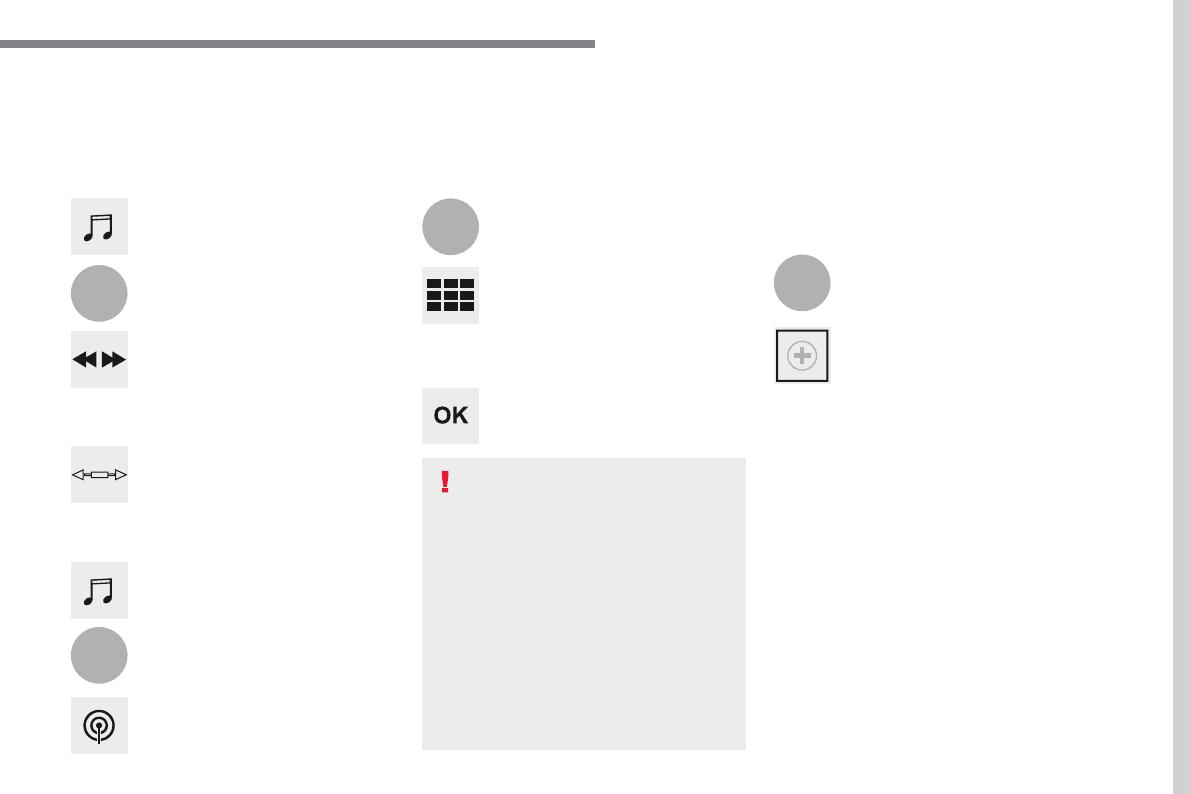
Enter the values using the virtual
keypad.
First enter the units then click on the
decimals zone to enter the figures
after the decimal point.
Press one of the buttons for an
automatic search for radio stations.
Press
Radio Media
to display the
primary page.
Radio
Selecting a station
Radio reception may be affected by
the use of electrical equipment not
approved by the Brand, such as a USB
charger connected to the 12 V socket.
The exterior environment (hills,
buildings, tunnel, car park, below
ground...) may prevent reception,
even in RDS station tracking mode.
This phenomenon is normal in the
propagation of radio waves and is in no
way indicative of a fault with the audio
system.
Select "
Radio stations
" in the
secondary page.
Or
Or
Move the cursor for a manual search
for frequencies up or down.
Select a radio station or frequency.
(refer to the corresponding section)
Press "
Presets
".
Make a long press on one of the
buttons to preset the station.
Preset a station
Press "
OK
" to confirm.
62
1
1
10
10
11
Audio and Telematics
Press
Radio Media
to display the
primary page.
Press
Radio Media
to display the
primary page.
Press the "
OPTIONS
" button to go to
the secondary page.
Press the "
OPTIONS
" button to go to
the secondary page.
Select "
Radio settings
".
Select "
Radio settings
".
Select "
General
".
Select "
General
".
Select "
Announcements
".
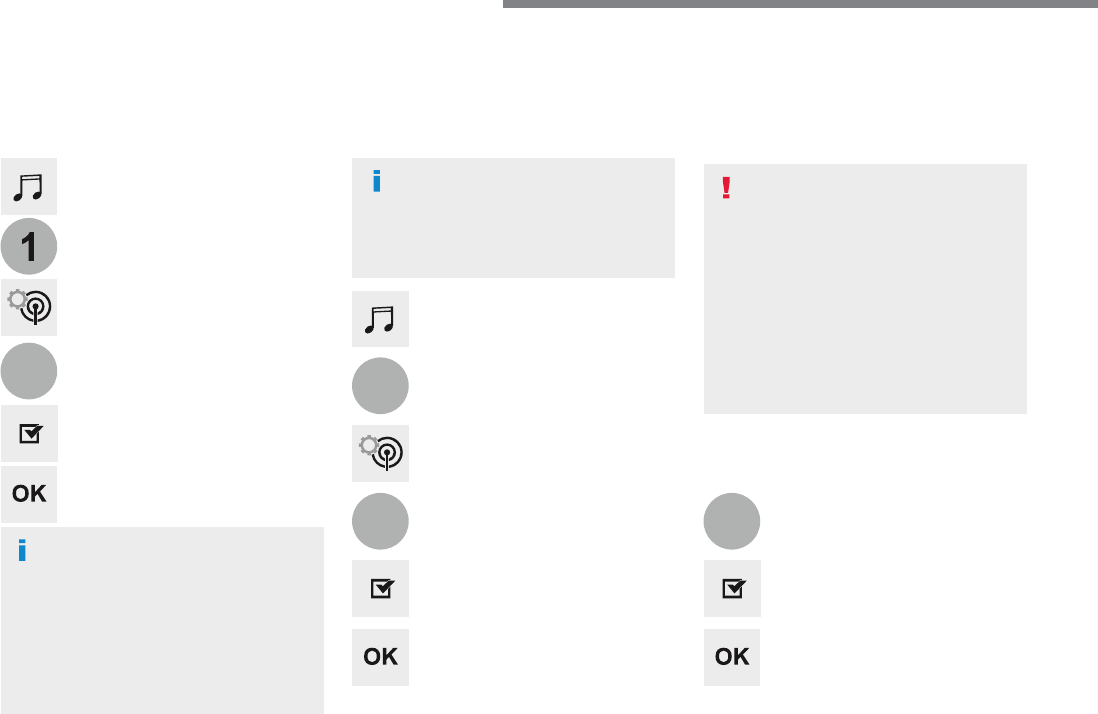
Activate/deactivate "
Station follow
".
Activate / Deactivate "
Display radio
text
".
Activate / Deactivate "
Traf fic
announcement
".
Activate/ Deactivate RDS
RDS, if activated, allows you to continue
listening to the same station by automatic
retuning to alternative frequencies.
However, in certain conditions, coverage
of an RDS station may not be assured
throughout the entire country as radio
stations do not cover 100 % of the
territory. This explains the loss of
reception of the station during a journey.
Press "
OK
" to confirm.
Press "
OK
" to confirm.
Press "
OK
" to confirm.
The "Radio Text" function allows
information transmitted by the radio
station, relating to the station or the
song playing, to be displayed.
Display text information
Play TA messages
The TA (Traffic Announcement)
function gives priority to TA alert
messages. To operate, this function
needs good reception of a radio station
that carries this type of message. While
traffic information is being broadcast,
the current media is automatically
interrupted so that the TA message can
be heard. Normal play of the media
previously playing is resumed at the
end of the message.
63
.
1
10
3
Audio and Telematics
Select the audio source.
Press
Radio Media
to display the
primary page.
Press "
Band
" to select the "
DAB
"
waveband.
Press
Radio Media
to display the
primary page.
Press the "
OPTIONS
" button to go to
the secondary page.
DAB-FM auto tracking
"DAB" does not cover 100% of the
territory.
When the digital radio signal is poor,
"DAB-FM auto tracking" allows you to
continue listening to the same station,
by automatically switching to the
corresponding "FM" analogue station
(if there is one).
If "DAB-FM auto tracking" is activated,
there is a difference of a few seconds
when the system switches to "FM"
analogue radio with sometimes a
variation in volume.
Once the digital signal is restored, the
system automatically changes back to
" D A B " .
Digital radio provides higher quality
reception.
The different multiplexes offer a
choice of radio stations arranged in
alphabetical order.
If the "DAB" station being listened to
is not available on "FM" ("
DAB-FM
"
option greyed out), or "DAB/FM auto
tracking" is not activated, the sound
will cut out while the digital signal is too
w e a k .
Select "
Radio settings
".
Select "
General
".
Activate / Deactivate "
Station
follow
".
Press "
OK
".
DAB radio (Digital Audio Broadcasting)
Terrestrial Digital Radio
64
Audio and Telematics
Media
USB port
Selecting the source
Select "
Source
".
Press
Radio Media
to display the
primary page.
The system builds playlists (in temporary
memory), an operation which can take from
a few seconds to several minutes at the first
connection.
Reduce the number of non-music files and the
number of folders to reduce the waiting time.
The playlists are updated every time the
ignition is switched off or connection of a USB
memory stick. The lists are memorised: if they
are not modified, the subsequent loading time
will be shorter.
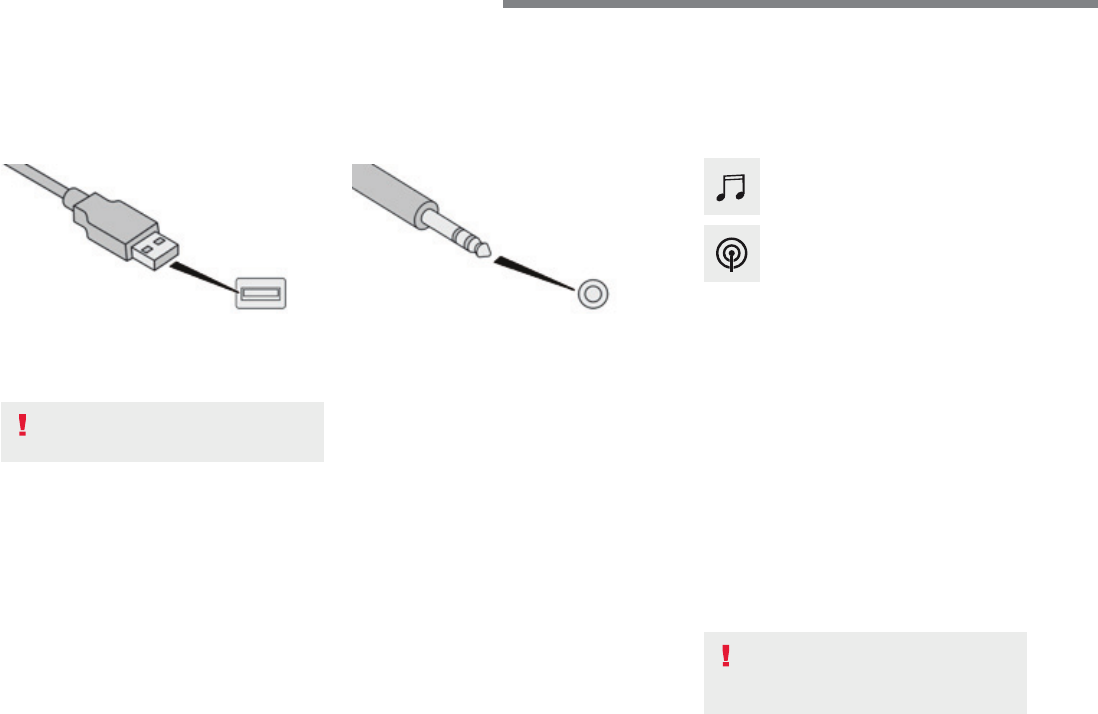
Insert the USB memory stick into the USB port
or connect the USB device to the USB port
using a suitable cable (not supplied).
Auxiliary (AUX) socket
First adjust the volume of your portable device
(to a high level). Then adjust the volume of your
audio system.
Display and management of the controls are
via the portable device.
This source is only available if "Auxiliary input"
has been checked in the audio settings.
(depending on equipment)
Connect the portable device (MP3 player…) to
the auxiliary Jack socket using an audio cable
(not supplied).
Choose the source.
Bluetooth
®
Bluetooth ®
Bluetooth
audio streaming
® audio streaming
®
Streaming allows you to listen to music from
your telephone.
The Bluetooth profile must be activated. First
adjust the volume on your portable device (to a
high level).
Then adjust the volume of your audio system.
If play does not start automatically, it may be
necessary to start the audio playback from the
telephone.
Control is from the portable device or by using
the system's touch buttons.
Once connected in streaming mode,
the telephone is considered to be a
media source.
To protect the system, do not use a
USB hub.
CD player
(depending on equipment)
Insert the CD in the player.
65
.
Audio and Telematics
Connecting Apple
®
Connecting Apple ®
Connecting Apple
players
® players
®
Connect the Apple
®
player to the USB port
® player to the USB port
®
using a suitable cable (not supplied).
Play starts automatically.
Control is via the audio system.
The classifications available are those
of the portable device connected
(artists / albums / genres / playlists /
audiobooks / podcasts).
The default classification used is by
artist. To modify the classification used,
return to the first level of the menu
then select the desired classification
(playlists for example) and confirm
to go down through the menu to the
desired track.
The version of software in the audio system
may not be compatible with the generation of
your Apple
®
player.
® player.
®
The audio equipment will only play audio
files with ".wma, .aac, .flac, .ogg and .mp3"
file extensions and with a bit rate of between
32 Kbps and 320 Kbps.
It also supports VBR (Variable Bit Rate) mode.
No other type of file (.mp4, ...) can be played.
".wma" files must be of the standard wma 9
type.
The sampling rates supported are 32, 44 and
48 KHz.
In order to be able to play a burned CDR or
CDRW, when burning it is preferable to select
standards ISO 9660 level 1, 2 or Joliet.
If the disc is burned in another format, it may
not be played correctly.
It is recommended that the same burning
standard is always used on an individual disc,
with as low a speed as possible (4x maximum)
for the best sound quality.
In the particular case of a multi-session CD, the
Joliet standard is recommended.
It is advisable to restrict file names to
20 characters, without using of special
characters (e.g.: " " ? ; ù) to avoid any playing
and displaying problems.
Information and advice
Use only USB memory sticks formatted FAT 32
(file allocation table).
The system supports USB mass
storage devices, BlackBerry
®
devices
® devices
®
or Apple
®
players via USB ports. The
® players via USB ports. The
®
adaptor cable is not supplied.
Control of the peripheral device is with
the audio system controls.
Other peripherals, not recognised on
connection, must be connected to the
auxiliary socket using a Jack cable (not
supplied) or via Bluetooth streaming,
depending on compatibility.
It is recommended that the original USB
cable for the portable device is used.
To protect the system, do not use a
USB hub.
66
12:1318,5 21,523 °C
12:1318,5 21,523 °C
4
1
1
8
14
5
3
9
12
6
2
10
7
11
13
Audio and Telematics
Telephone
A c c o r d i n g t o v e r s i o n
Level 1
Level 2
Level 3
67
.
14
12
13
3
2
5
6
7
4
8
9
10
11
Audio and Telematics
Level 1
Level 2
Level 3
Comments
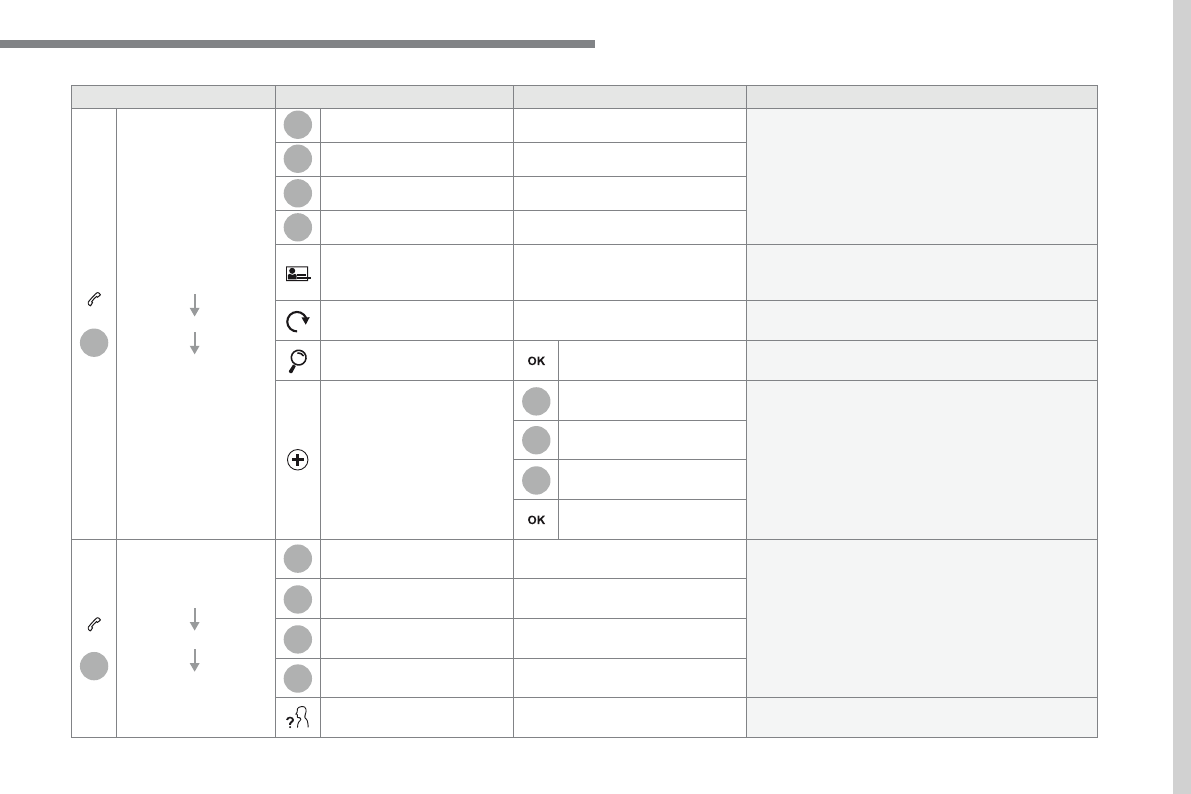
Telephone
Bluetooth
Contact
All
View contacts according to presentation choices.
Select a contact or a favourite saved in the
system via the profile selected to start the call.
Telephone
Address
Favourites
Sort the contacts by Surname-First name or First
name-Surname.
Update the contacts from the telephone.
Search
Search for a contact in the directory.
Create
Telephone
Create a new contact in the system.
Address
Email
Telephone
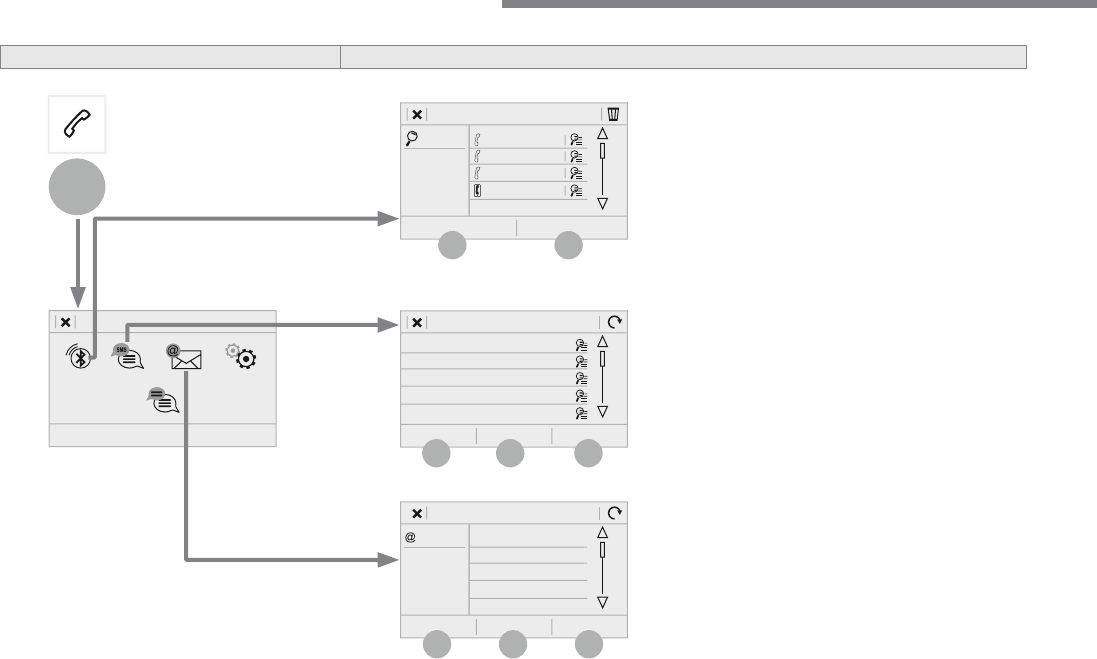
Bluetooth
Calls
All
View calls according to choice of presentation.
Select a contact to start the call.
Incoming
Outgoing
Missed
View details for the contact.
68
19
20
21
22
1
15
16
17
18
Audio and Telematics
Level 2
Level 3
69
.
1
1
1
19
20
21
22
15
16
17
18
Audio and Telematics
Level 2
Level 3
Comments
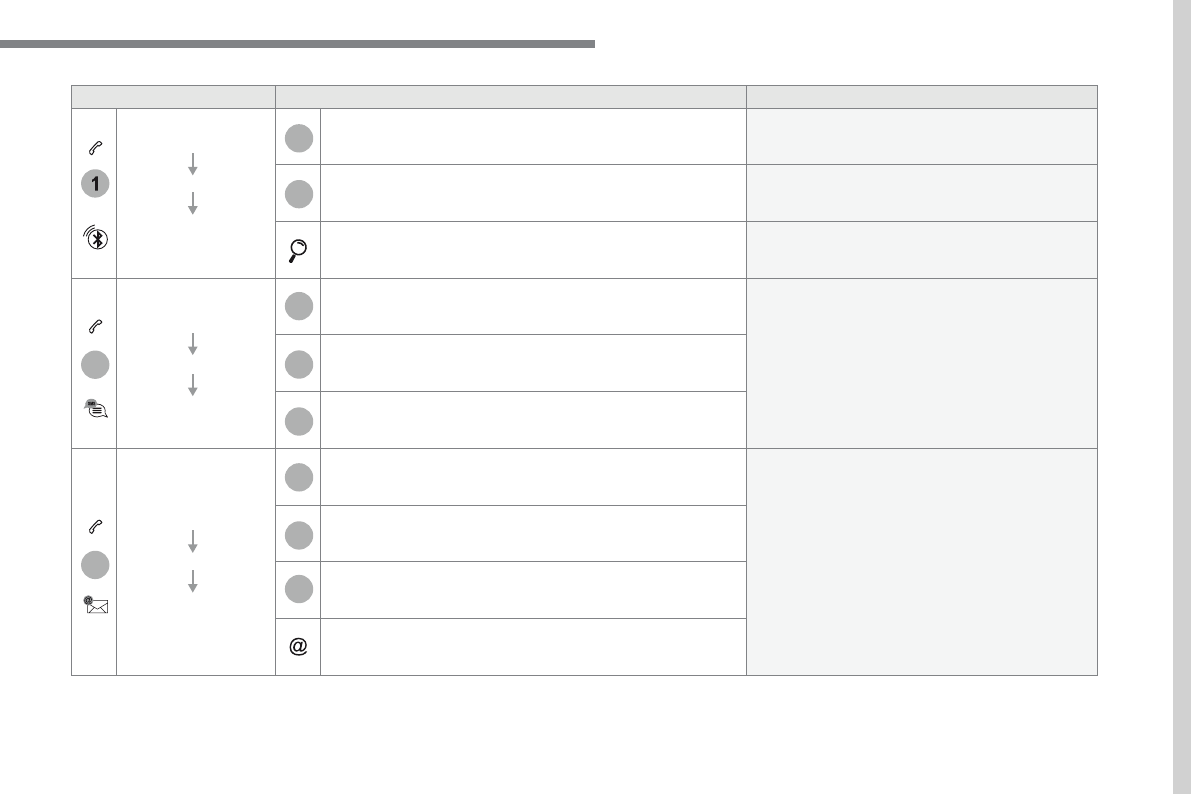
Telephone
OPTIONS
Bluetooth
connection
All
Display all telephones detected and saved.
Connected
Display all connected telephones.
Search
Start the search for a device to connect.
Telephone
OPTIONS
Messages
All
Display messages according to the choice made.
Received
Sent
Telephone
OPTIONS
Email
Received
Display emails according to the choice made.
Sent
Not read
Mailbox
70
23
27
24
28
25
29
26
30
1
23
24
25
26
Audio and Telematics
Level 2
Level 3
71
.
1
1
27
28
29
30
23
24
25
26
Audio and Telematics
Level 2
Level 3
Comments
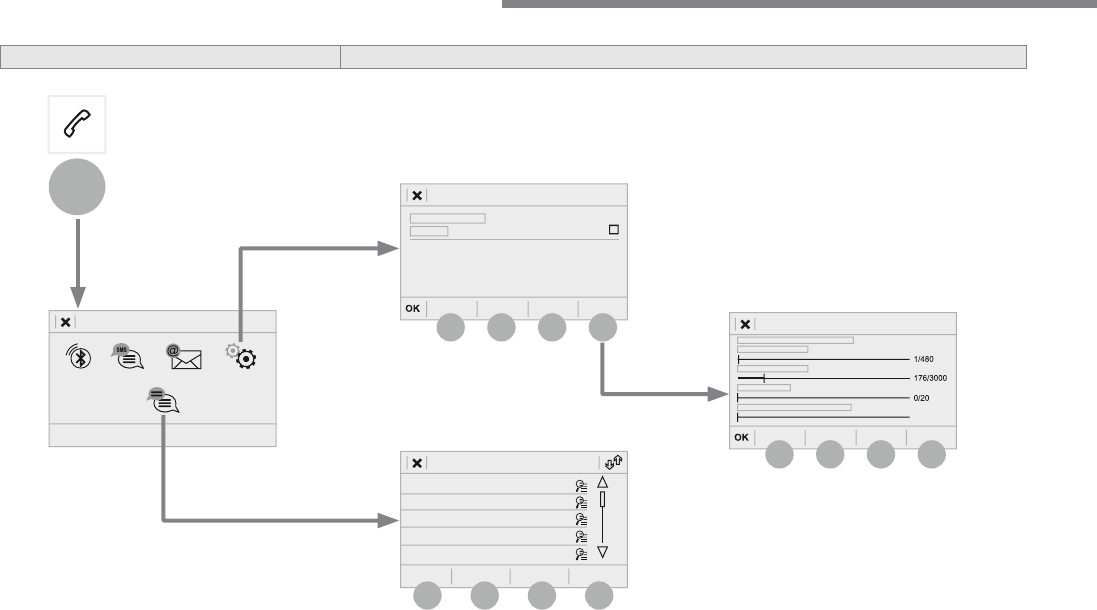
Telephone
OPTIONS
Settings
Security
Make driving safe.
Voicemail
Enter and save the number for the telephone
voicemail.
Ringtone
Adjust the ringtone volume.
Statistics
Display data for the telephone connected.
Save the options.
Telephone
OPTIONS
Quick messages
Delayed
Select a quick message from the categories, as
required.
My arrival
Not available
Other
72
Audio and Telematics
Pairing a Bluetooth
®
Pairing a Bluetooth ®
Pairing a Bluetooth
telephone
® telephone
®
As a safety measure and because it
requires sustained attention by the
driver, the pairing of a Bluetooth mobile
telephone with theBluetooth hands-free
system of your audio system must be
done with the
vehicle stationary
and
the ignition on.
Procedure from the telephone
Select the system name in the list of
devices detected.
In the system, accept the connection request
from the telephone.
Procedure from the system
Press on
Telephone
to display the
primary page.
Press on "
Bluetooth search
".
Select "
Search
".
The list of telephones detected is
displayed.
If the pairing procedure fails, it is recommended
that you deactivate and then reactivate the
"Bluetooth" function in your telephone.
The system offers to connect the telephone
with 3 profiles:
-
Telephone
(hands-free kit, telephone
only),
-
Streaming
(wireless play of audio files on
the telephone),
-
Mobile internet data
.
Depending on the type of telephone,
you may be asked to accept or not
the transfer of your contacts and
messages.
Select the name of the chosen
telephone in the list.
Press "
OK
" to confirm.
Select one or more profiles.
Or
Activate the Bluetooth function on the
telephone and ensure that it is "visible
to all" (telephone configuration).
To complete the pairing, whichever
procedure used (from the telephone or
from the system), ensure that the code
is the same in the system and in the
telephone.
The "
Mobile internet data
" profile
must be activated for connected
navigation, having first activated
sharing of the connection on your
smartphone.
Connection sharing
73
.
1
Audio and Telematics
Press
Telephone
to display the
primary page.
Select "
Bluetooth connection
" to
display the list of paired devices.
On return to the vehicle, if the last
telephone connected is present again,
it is automatically recognised and
within about 30 seconds of switching
on the ignition, the connection is
established without any action on your
part (Bluetooth activated).
The services available depend on
the network, the SIM card and the
compatibility of the Bluetooth devices
used. Check in your telephone's
manual and with your service provider
for the services available to you.
The ability of the system to connect
with just one profile depends on the
telephone.
All three profiles may connect by default.
Go to the Brand's website for more information
(compatibility, additional help, ...).
To modify the connection profile
:
Automatic reconnection
Press the "details" button.
Press the "
OPTIONS
" button to go to
the secondary page.
Press "
OK
" to confirm.
Select one or more profiles.
The profiles compatible with the system
are HFP, OPP, PBAP, A2DP, AVRCP,
MAP and PAN.
74
1
Audio and Telematics
Receiving a call
An incoming call is announced by a ring and a
superimposed display in the screen.
Make a short press on the steering
mounted
TEL
button to accept an
incoming call.
Make a long press
on the steering mounted
TEL
button
to reject the call.
Or
And
Select "
End call
".
Press on the name of the telephone
chosen in the list to disconnect it.
Press again to connect it.
Select the basket at top right of the
screen to display a basket alongside
the telephone chosen.
Press the basket alongside the
telephone chosen to delete it.
Managing paired telephones
This function allows the connection or
disconnection of a peripheral device as
well as the deletion of a pairing.
Press
Telephone
to display the
primary page.
Press the "
OPTIONS
" button to go to
the secondary page.
Select "
Bluetooth connection
" to
display the list of paired peripheral
devices.
Deleting a telephone
75
.
2
3
Audio and Telematics
on the steering mounted button.
Using the telephone is not
recommended while driving.
Park the vehicle.
Make the call using the steering
mounted controls.
Making a call
Calling a new number
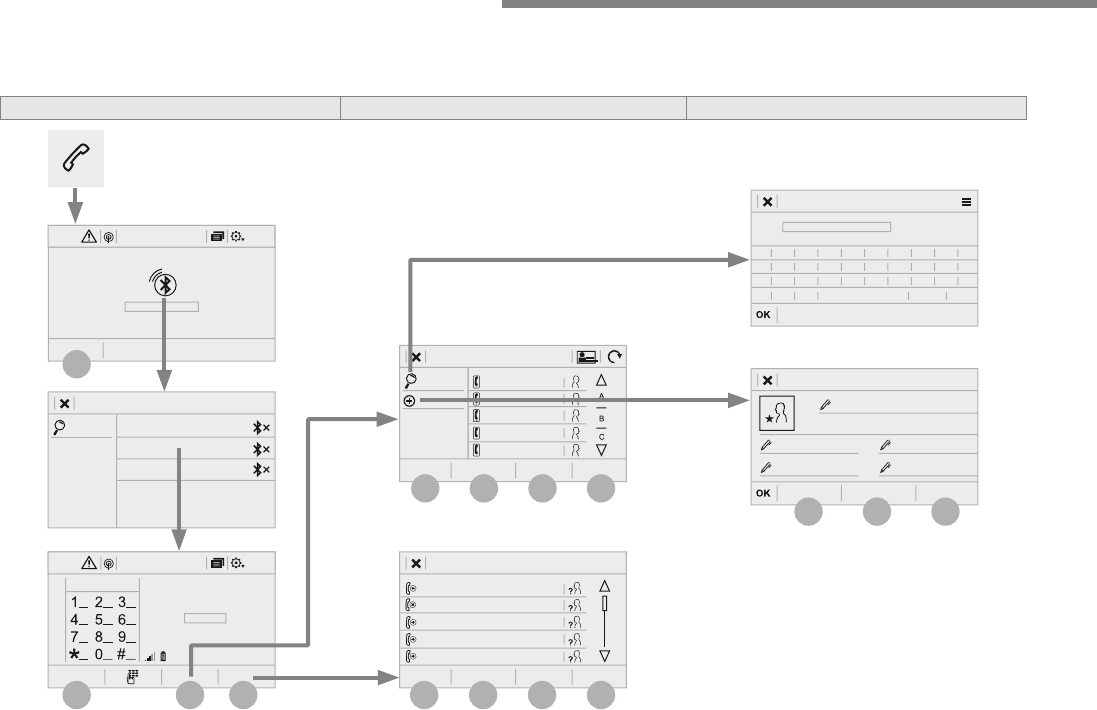
Press
Telephone
to display the
primary page.
Enter the phone number using the
digital keypad.
Press "
Call
" to start the call.
Calling a contact
Press
Telephone
to display the
primary page.
Or make a long press
on the steering mounted
TEL
button.
Select "
Contact
".
Select the desired contact from the list offered.
Select "
Call
".
Calling a recently used number
Press
Telephone
to display the
primary page.
Make a long press
Select "
Calls
".
Select the desired contact from the list offered.
It is always possible to make a call
directly from the telephone; as a safety
measure, first park the vehicle.
Or
76
2
12
13
14
1
Audio and Telematics
The access to "
Messages
" depends on
the compatibility of the smartphone and
the integral system.
Depending on the smartphone, access
to your messages or email may be
slow.
Managing messages
The "
Email
" function allows email
addresses to be entered for a contact,
but the system is not able to send
emails.
Managing contacts / entries
Press
Telephone
to display the
primary page.
Select "
Contact
".
Select "
Create
" to add a new contact.
In the "
Telephone
" tab, enter the
telephone numbers for the contact.
In the "
Address
" tab, enter the
addresses for the contact.
In the "
Email
" tab, enter the email
addresses for the contact.
Press "
Answer
" to send a quick
message stored in the system.
Press
Telephone
to display the
primary page.
Press the "
OPTIONS
" button to go to
the secondary page.
Select "
Messages
" to display the list
of messages.
Select the "
All
" or "
Received
" or
"
Sent
" tab.
Select the detail of the message
chosen in one of the lists
Press "
Call
" to start the call.
Press "
Play
" to hear the message.
The services available depend on
the network, the SIM card and the
compatibility of the Bluetooth devices
used.
Check in the manual for your
smartphone and with your service
provider for the services available to
you.
77
.
1
1
Audio and Telematics
Managing email
Press
Telephone
to display the
primary page.
Press the "
OPTIONS
" button to go to
the secondary page.
Select "
Email
" to display the list of
messages.
Select the "
Received
" or "
Sent
" or
"
Not read
" tab.
Select the email chosen in the list.
Press "
Play
" to start playing the
email.
Access to "
Email
" depends on the
compatibility of the smartphone and the
integral system.
Managing quick messages
Press
Telephone
to display the
primary page.
Press on the "
OPTIONS
" button to
go to the secondary page.
Select "
Quick messages
" to display
the list of messages.
Select the "
Delayed
" or "
My arrival
"
or "
Not available
" or "
Other
" tab
with the possibility of creating new
messages.
Select the message chosen in one of
the lists.
Press "
Create
" to write a new
message.
Press "
Transfer
" to select the
addressee(s).
Press "
Play
" to start playing the
m e s s a g e .
78
12:1318,5 21,523 °C
1
2
3
3
4
4
5
5
6
6
7
7
3
4
5
6
7
Audio and Telematics
S e t t i n g s
A c c o r d i n g t o v e r s i o n
Level 1
Level 2
79
.
2
5
6
7
3
4
Audio and Telematics
Level 1
Level 2
Comments
Settings
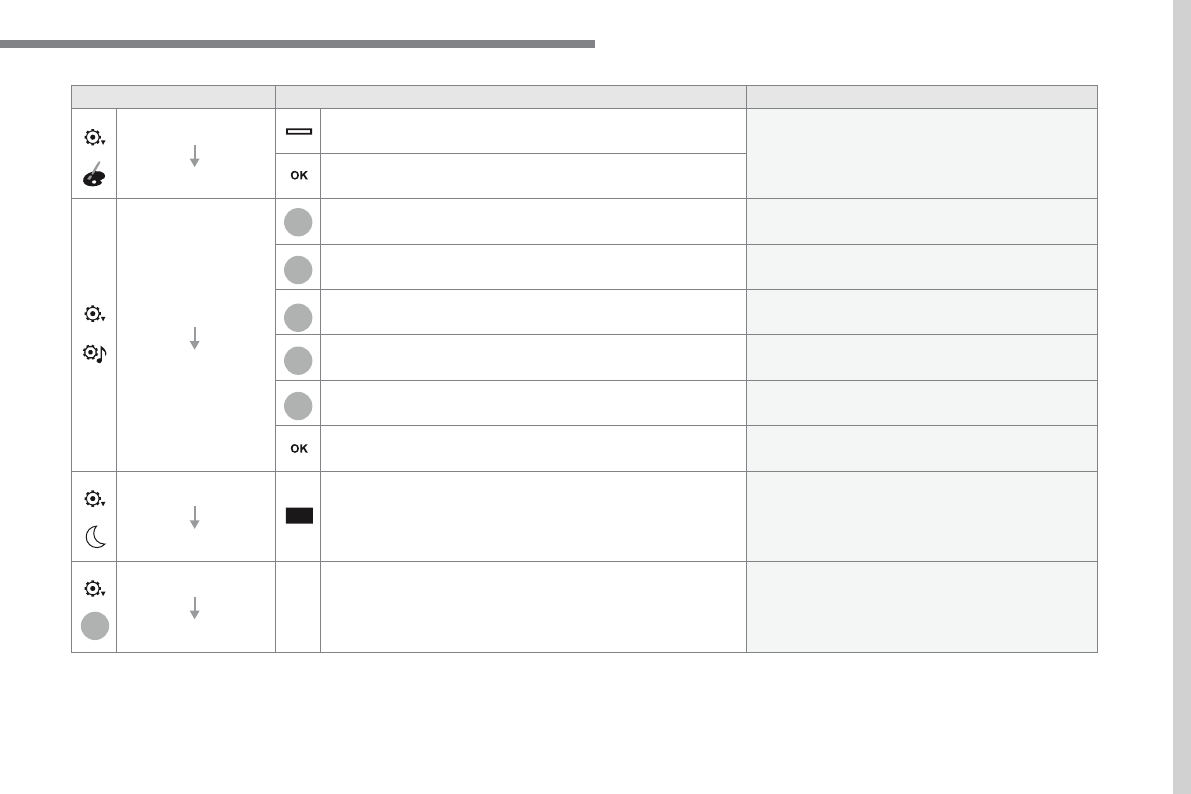
Color schemes
Color schemes: 1,2,3, ...
Having chosen the color scheme, save the
setting.
Settings
Audio settings
Ambience
Select the sound ambience.
Distribution
Sound distribution by the Arkamys
©
system.
© system.
©
Sound
Adjust the volume or activate linked to speed.
Voice
Adjust the voice volume.
Ringtone
Adjust the ringtone volume.
Save the settings.
Settings
Turn off screen
Function allowing the display to be switched off.
Pressing the screen reactivates it.
Settings
Profile (1, 2, 3)
Activate the profile selected.
80
1
15
16
15
16
9
8
10
11
12
13
14
Audio and Telematics
Level 2
Level 3
Level 4
81
.
1
15
16
1
1
11
12
13
14
9
8
10
Audio and Telematics
Level 2
Level 3
Level 4
Comments
Settings
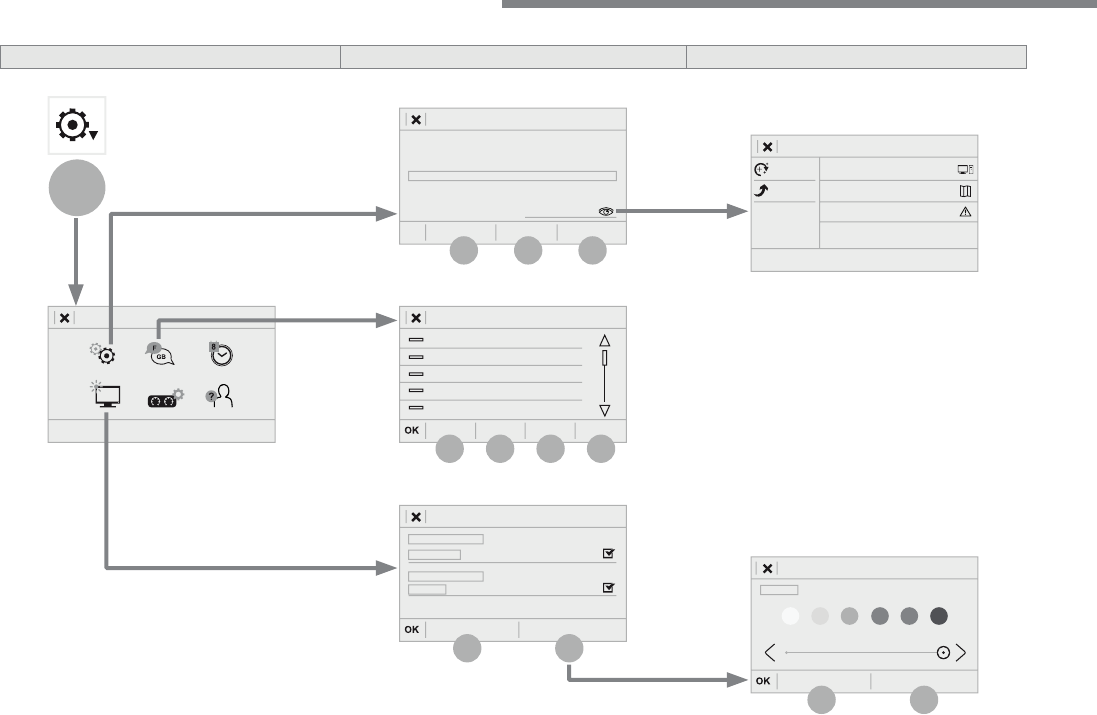
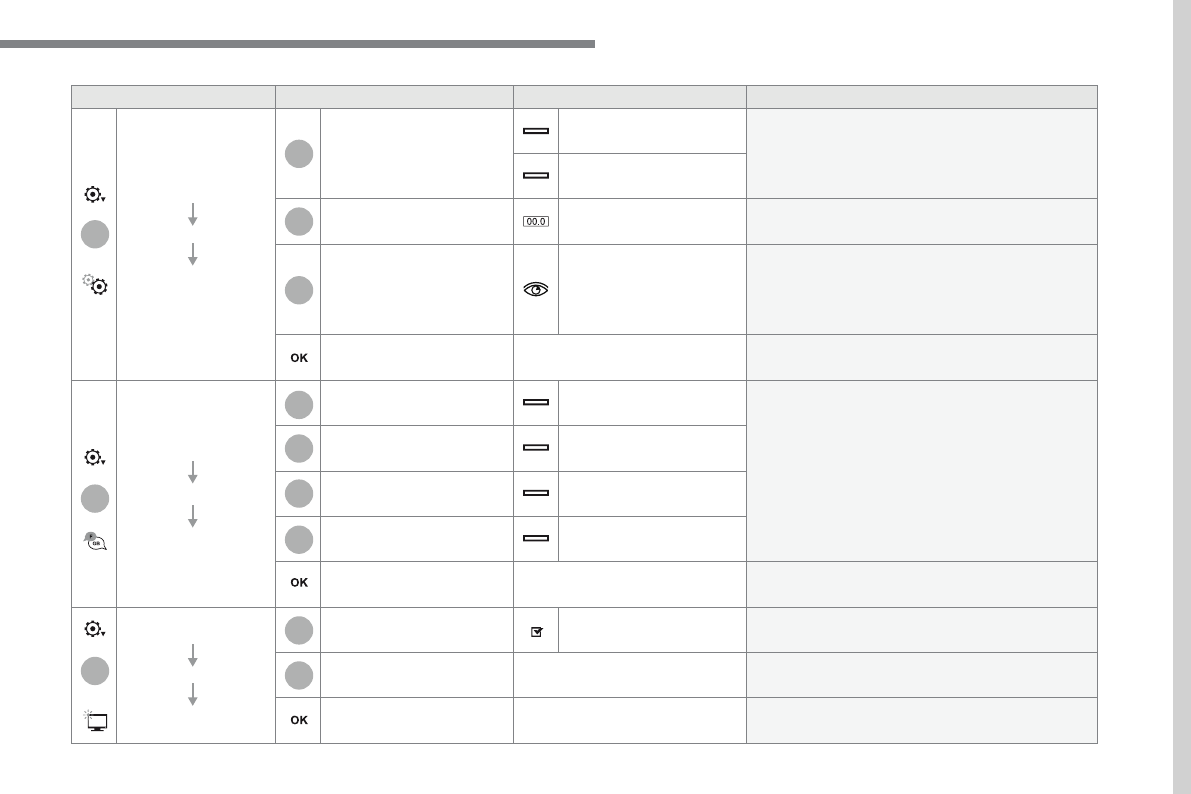
OPTIONS
System settings
Units
Distance and fuel
consumption
Set the units used for distance, fuel consumption
and temperature.
Temperature
Factory settings
Reinitialize
Restore the factory settings.
System info
View
View the versions of the different modules
(system, mapping, risk areas) installed in the
system as well as the updates available.
Save the settings.
Settings
OPTIONS
Languages
All
Select the language then confirm.
Europe
Asia
America
Having selected the language, save the setting.
Settings
OPTIONS
Screen configuration
Animation
Activate or deactivate settings.
Brightness
Move the cursor to adjust the brightness of the
screen and/or of the instrument panel.
Save the settings.
82
1
17
18
19
20
21
22
Audio and Telematics
Level 2
Level 3
Level 4
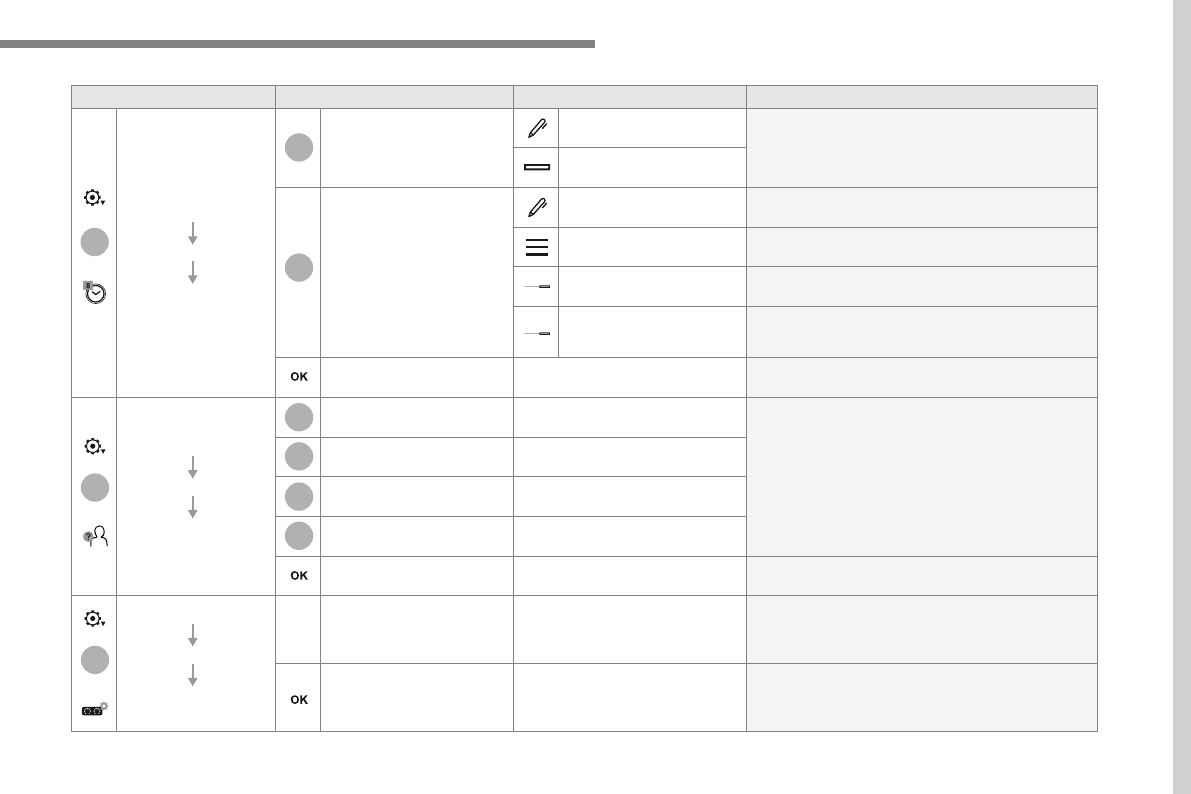
83
.
1
17
18
1
1
20
19
21
22
Audio and Telematics
Level 2
Level 3
Level 4
Comments
Settings
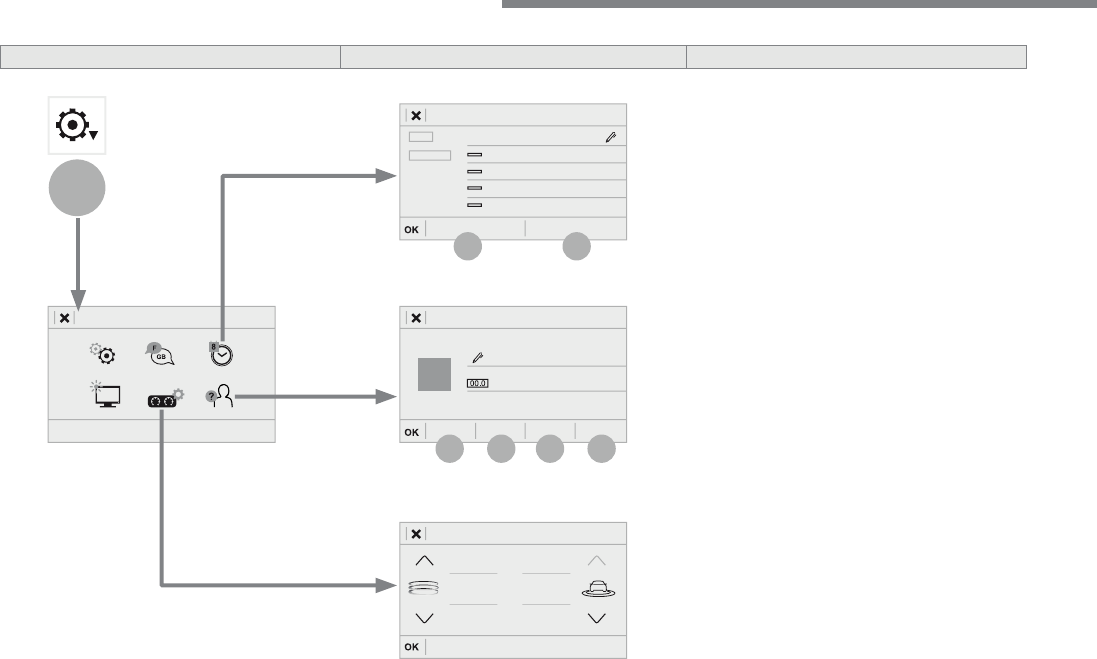
OPTIONS
Setting
the time-date
Date
Date
Enter the date and select the date format.
Date format:
Time
Time
Set the time.
Time Zone
Define the time zone.
Time format:
Select the time format: 12h / 24h.
Synchronisation with
GPS (UTC):
Activate or deactivate synchronisation with the
satellites.
Save the settings.
Settings
OPTIONS
Setting of the
profiles
Profile 1
Enter settings for the profiles.
Profile 2
Profile 3
Common profile
Save the settings.
Settings
OPTIONS
Driver screen
configuration
Personalisation of the
dashboard
Choose and select the display information
required on the dashboard.
Confirm the selections.
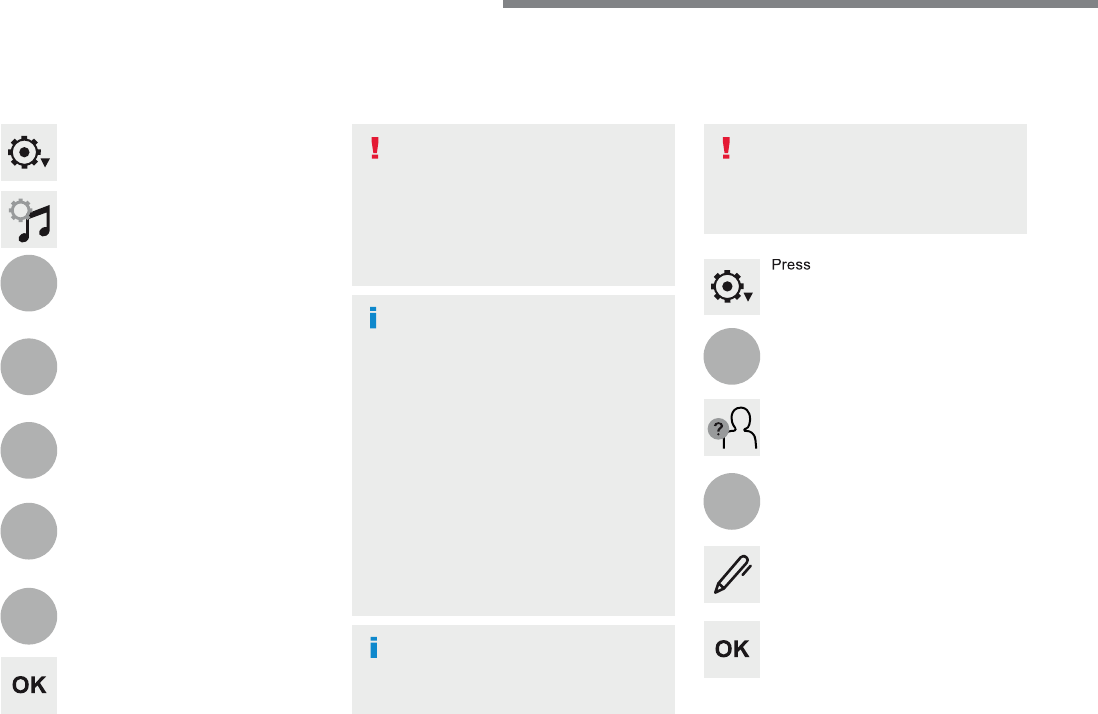
84
3
4
5
6
7
1
19
Audio and Telematics
Press
Settings
to display the primary
page.
Profile settings
Audio settings
Press
Settings
to display the primary
page.
Select "
Audio settings
".
Select "
Ambience
".
Or
"
Position
".
Or
"
Sound
".
Or
"
Voice
".
Or
"
Ringtone
".
On-board audio: Arkamys
©
Sound
© Sound
©
Staging optimises the distribution of
sound in the passenger compartment.
The settings for "
Position
" (All
passengers, Driver and Front only) are
common to all sources.
Activate or Deactivate "
Touch tones
",
"
Volume linked to speed
" and
"
Auxiliary input
".
The sound distribution (or spatialisation
with the Arkamys
©
system) is audio
© system) is audio
©
processing that allows the quality of the
sound to be adapted according to the
number of passengers in the vehicle.
Available only with the front and rear
speakers configuration.
The audio
Ambience
settings
(6 ambiences available) as well as the
Bass
,
Medium
and
Treble
settings
are different and independent for each
sound source.
Activate or Deactivate "
Loudness
".
Press "
OK
" to save the settings.
Press "
OK
" to confirm.
Press the "
OPTIONS
" button to go to
the secondary page.
Select "
Profile 1
", "
Profile 2
",
"
Profile 3
" or "
Common profile
".
Select "
Setting of the profiles
".
Press this button to enter a name for
the profile using the virtual keypad.
As a safety measure and because it
requires the sustained attention of the
driver, changes to settings must only be
done with the
vehicle stationary
.
vehicle stationary . vehicle stationary
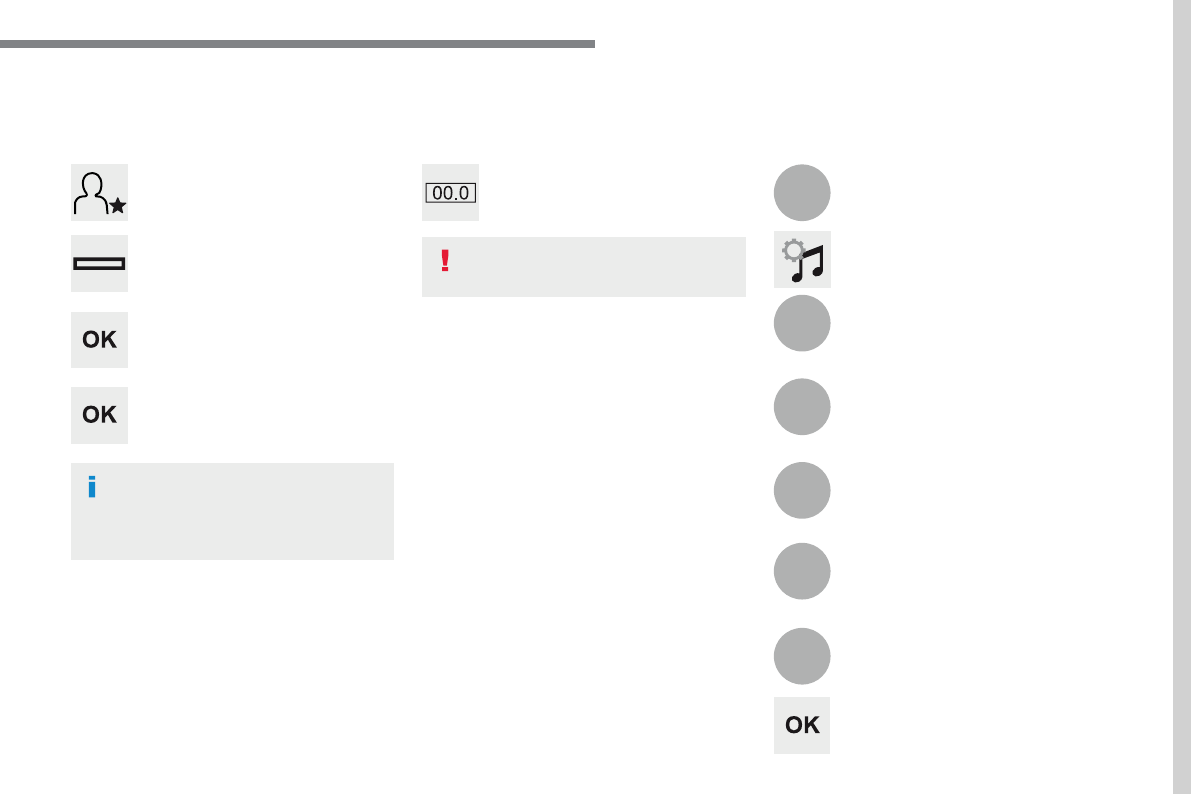
85
.
3
2
4
5
6
7
Audio and Telematics
Select a "
Profile
" (1 or 2 or 3) to
associate the "
Audio settings
" with
it.
Select "
Audio settings
".
Select "
Ambience
".
Or
"
Distribution
".
Or
"
Sound
".
Or
"
Voice
".
Or
"
Ringtone
".
The location for the photograph is
square; the system deforms the original
photograph if in another format.
Initialisation of the profile selected
activates the English language by default.
Press "
OK
" to save the settings.
Press "
OK
" to accept the transfer of
the photograph.
Press "
OK
" again to save the
settings.
Press this button to add a photograph
to the profile.
Insert a USB memory stick containing
the photograph in the USB port.
Select the photograph.
Press this button to initialise the
profile selected.
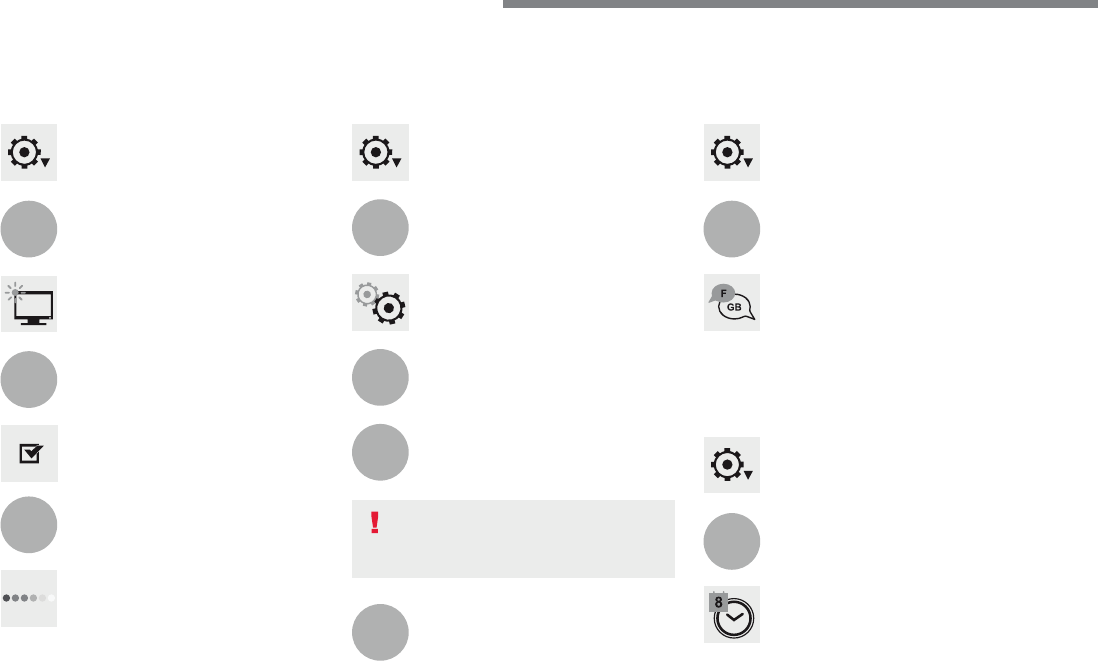
86
1
1
1
8
9
10
15
16
1
Audio and Telematics
Press
Settings
to display the primary
page.
Press
Settings
to display the primary
page.
Press
Settings
to display the primary
page.
Press the "
OPTIONS
" button to go to
the secondary page.
Press the "
OPTIONS
" button to go to
the secondary page.
Press the "
OPTIONS
" button to go to
the secondary page.
Select "
System settings
".
Select "
Screen configuration
".
Select "
Units
" to change the units
for distance, fuel consumption and
temperature.
Select "
Languages
" to change the
language.
Activate or deactivate "
Automatic
scrolling
".
Move the cursor to adjust the
brightness of the screen and/or of the
instrument panel.
Select "
Factory settings
" to return
to the initial settings.
Select "
System info
" to display the
versions of the different modules
installed in the system.
Modifying system settings
Returning the system to factory settings
activates the English language by
default.
Select "
Animation
".
Select "
Brightness
".
Select the language
Press
Settings
to display the primary
page.
Press the "
OPTIONS
" button to go to
the secondary page.
Select "
Setting the time-date
".
Setting the date
87
.
1
17
18
Audio and Telematics
Press
Settings
to display the primary
page.
Press the "
OPTIONS
" button to go to
the secondary page.
Select "
Date
".
Select "
Time
".
Select "
Setting the time-date
".
Adjustment of the time and date is only
available if "GPS synchronisation" is
deactivated.
The change between winter and
summer time is done by changing the
time zone.
The system does not automatically
manage the change between winter
and summer time (depending on
country).
Setting the time
Press this button to define the date.
Press this button to adjust the time
using the virtual keypad.
Press "
OK
" to confirm.
Press "
OK
" to confirm.
Press "
OK
" to confirm.
Press this button to define the time
z o n e .
Select the display format of the date.
Select the display format for the time
(12h / 24h).
Activate or deactivate
synchronisation with the satellites
(UTC).
Every time the color scheme is
changed, the system restarts,
temporarily displaying a black screen.
As a safety measure, the procedure
for changing the color scheme is only
possible with the vehicle stationary.
Press
Settings
to display the primary
page.
Select "
Color schemes
".
Select a color scheme in the list then
press "
OK
" to confirm.
Color schemes

88
Audio and Telematics
The following table groups together the answers to the most frequently asked questions concerning your audio system.
QUESTION
ANSWER
SOLUTION
The route calculation is not
successful.
The route settings may conflict with the current location (exclusion of
toll roads on a toll motorway).
Check the route settings in the "Navigation"
menu.
The POIs do not appear.
The POIs have not been selected.
Select the POIs in the list of POIs.
The audible warning of
"Danger areas" does not
work.
The audible warning is not active.
Activate audible warnings (without the possibility
of adjusting the volume) in the "Navigation" menu.
The system does not
suggest a detour around an
incident on the route.
The guidance criteria do not take account of TMC messages.
Select setting for the "Traffic info" function in
the list of route settings (Without, Manual or
Automatic).
I receive a "Danger area"
alert which is not on my
route.
Other than guidance, the system announces all "Danger areas"
positioned in a cone located in front of the vehicle. It may provide an
alert for "Danger areas" located on nearby or parallel roads.
Zoom in on the map to view the exact position of the
"Danger area". Select "On the route" to no longer
receive alerts other than navigation instructions or
to reduce the time for the announcement.
Frequently asked questions
Navigation
89
.
Audio and Telematics
QUESTION
ANSWER
SOLUTION
Certain traffic jams along
the route are not indicated
in real time.
On starting, it is several minutes before the system begins to receive
the traffic information.
Wait until the traffic information is being received
correctly (display of the traffic information icons
on the map).
In certain countries, only major routes (motorways...) are listed for
the traffic information.
This phenomenon is normal. The system is
dependent on the traffic information available.
The altitude is not
displayed.
On starting, the initialisation of the GPS may take up to 3 minutes to
receive more than 4 satellites correctly.
Wait until the system has started up completely so
that there is GPS coverage by at least 4 satellites.
Depending on the geographical environment (tunnel...) or the
weather, the conditions of reception of the GPS signal may vary.
This phenomenon is normal. The system
is dependent on the GPS signal reception
conditions.

90
Audio and Telematics
Radio
QUESTION
ANSWER
SOLUTION
The quality of reception of
the radio station listened
to gradually deteriorates
or the stored stations do
not function (no sound,
87.5 Mhz is displayed...).
The vehicle is too far from the transmitter used by the station
listened to or there is no transmitter in the geographical area
through which the vehicle is travelling.
Activate the "RDS" function by means of the
short-cut menu to enable the system to check
whether there is a more powerful transmitter in
the geographical area.
The environment (hills, buildings, tunnels, basement car parks...)
block reception, including in RDS mode.
This phenomenon is normal and does not indicate
a fault with the audio system.
The aerial is absent or has been damaged (for example when going
through a car wash or into an underground car park).
Have the aerial checked by a franchised dealer.
I cannot find some radio
stations in the list of
stations received.
The station is not received or its name has changed in the list.
Press on the "Update list" button in the "Radio
stations" secondary menu.
Some radio stations send other information in place of their name
(the title of the song for example).
The system interprets this information as the name of the station.
The name of the radio
station changes.
91
.
Audio and Telematics
Media
QUESTION
ANSWER
SOLUTION
Playback of my USB
memory stick starts only
after a very long wait
(around 2 to 3 minutes).
Some files supplied with the memory stick may greatly slow down
access to reading the memory stick (multiplication by 10 of the
catalogue time).
Delete the files supplied with the memory stick
and limit the number of sub-folders in the file
structure on the memory stick.
The CD is ejected
automatically or is not
played by the player.
The CD is inserted upside down, is unplayable, does not contain any audio
data or contains an audio format which the player does not recognise.
Check that the CD is inserted in the player the
right way up.
Check the condition of the CD: the CD cannot be
played if it is too badly damaged.
Check the content in the case of a recorded CD:
refer to the advice in the "AUDIO" section.
The audio system's CD player does not play
DVDs.
Some recorded CDs will not be played by the
audio system because they are not of adequate
quality.
The CD has been recorded in a format that is not compatible with the player (udf, ...).
The CD is protected by an anti-pirating protection system which is
not recognised by the audio system.
There is a long waiting
period following the
insertion of a CD or
connection of a USB
memory stick.
When a new medium is inserted, the system reads a certain
amount of data (directory, title, artist, etc.). This may take from a few
seconds to a few minutes.
This phenomenon is normal.
The CD player sound is
poor.
The CD used is scratched or of poor quality.
Insert good quality CDs and store them in suitable
conditions.
The audio equipment settings (bass, treble, ambiences) are
unsuitable.
Set the treble or bass level to 0, without selecting
an ambience.

92
Audio and Telematics
QUESTION
ANSWER
SOLUTION
I cannot connect my
Bluetooth telephone.
The telephone's Bluetooth function may be switched off or the
telephone may not be visible.
Check that your telephone's Bluetooth function is
switched on.
Check in the telephone settings that it is "visible
to all".
The Bluetooth telephone is not compatible with the system.
You can check the compatibility of your telephone
at the Brand's website (services).
The volume of the
telephone connected
in Bluetooth mode is
inaudible.
The volume depends both on the system and on the telephone.
Increase the volume of the audio system, to
maximum if required, and increase the volume of
the telephone if necessary.
The ambient noise level has an influence on the quality of telephone
communication.
Reduce the ambient noise level (close the windows,
reduce the booster fan speed, slow down, ...).
Telephone
QUESTION
ANSWER
SOLUTION
Some characters in the
media information are not
displayed correctly while
playing.
The audio system does not display some types of characters.
Use standard characters to name tracks and
folders.
Playing of streaming files
does not start.
The peripheral device connected does not support automatic play.
Start the playback from the device.
The names of tracks and
the track length are not
displayed on the screen
when streaming audio.
The Bluetooth profile does not allow the transfer of this information.
93
.
Audio and Telematics
QUESTION
ANSWER
SOLUTION
Some contacts are
duplicated in the list.
The options for synchronizing contacts are synchronizing the
contacts on the SIM card, the contacts on the telephone, or both.
When both synchronizations are selected, some contacts may be
duplicated.
Select "Display SIM card contacts" or "Display
telephone contacts".
Contacts are not shown in
alphabetical order.
Some telephones offer display options. Depending on the settings
chosen, contacts can be transferred in a specific order.
Modify the display setting in the telephone
directory.
The system does not receive
SMS text messages.
The Bluetooth mode does not permit sending SMS text messages to
the system.
QUESTION
ANSWER
SOLUTION
In changing the setting
of treble and bass the
equalizer setting is
deselected.
The selection of an equalizer setting imposes the settings for treble
and bass and vice-versa.
Modify the treble and bass or equalizer settings
to obtain the desired musical ambience.
In changing the equalizer
setting, treble and bass
return to zero.
When changing the
balance settings, the
distribution setting is
deselected.
The selection of a distribution setting imposes the balance settings
and vice-versa.
Modify the balance or distribution settings to
obtain the desired musical ambience.
When changing an
distribution setting,
the balance setting is
deselected.
Settings

94
Audio and Telematics
QUESTION
ANSWER
SOLUTION
There is a difference in
sound quality between the
different audio sources.
For optimum sound quality, the audio settings can be adapted to
the different sound sources, which may result in audible differences
when changing source.
Check that the audio settings are adapted to the
sources listened to. Adjust Balance, Treble, Bass
to the middle position, select the "None" musical
ambience and set the loudness correction to the
"Active" position in CD mode or to the "Inactive"
position in radio mode.
With the engine off, the
system switches off after a
few minutes of use.
When the engine is switched off, the system's operating time
depends on the state of charge of the battery.
The switch-off is normal: the system switches to economy mode
and switches off to prevent discharging of the vehicle's battery.
Start the vehicle's engine to increase the battery
charge.
The date and time cannot
be set.
Setting of the date and time is only available if the synchronisation
with the satellites is deactivated.
Settings menu / Options / Time-Date setting.
Select the "Time" tab and deactivate the "GPS
synchronisation" (UTC).
95
.
Audio and Telematics
Transversal-Citroen_en_Chap02_RCC-2-2-0_ed01-2016
CITROËN Connect Radio
Multimedia audio system - Applications - Bluetooth
®
Multimedia audio system - Applications - Bluetooth
®
Multimedia audio system - Applications - Bluetooth
telephone
® telephone
®
Contents
First steps 96
Steering mounted controls - Type 1 98
Steering mounted controls - Type 2 99
Menus 100
Applications 102
Radio Media 106
Telephone 118
Settings 132
Frequently asked questions 143
The system is protected in such a way
that it will only operate in your vehicle.
The display of the
Energy Economy
Mode
message signals that a change
to standby is imminent.
The different functions and settings
described vary according to the version
and configuration of your vehicle.
The link below gives access to OSS
(Open Source Software) codes for the
system.
http://www.psa-peugeot-citroen.com/oss
As a safety measure and because it
requires sustained attention by the
driver, the pairing of a Bluetooth mobile
telephone with the Bluetooth hands-
free system of your audio system must
be done with the
vehicle stationary
and the ignition on.
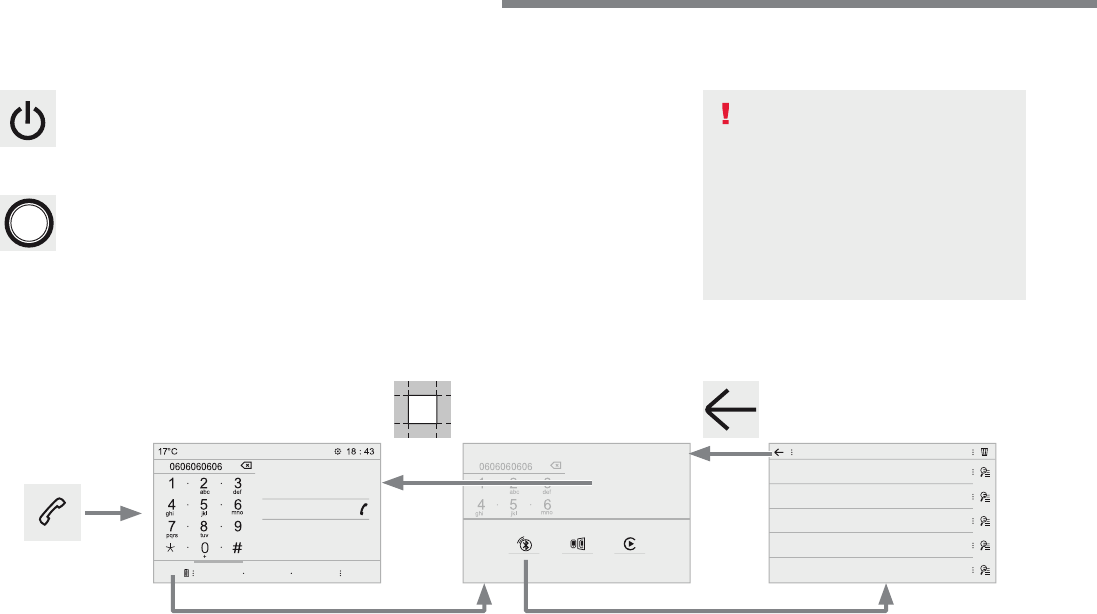
96
Audio and Telematics
Transversal-Citroen_en_Chap02_RCC-2-2-0_ed01-2016
First steps
With the engine running, a press
mutes the sound.
With the ignition off, a press turns the
system on.
Volume.
Use the buttons either side of or below the
touch screen for access to the menus, then
press the virtual buttons in the touch screen. All
of the touch areas of the screen are white.
Press in the grey zone to go back a level or
confirm.
Press the back arrow to go back a level or
confirm.
The touch screen is of the "capacitive"
type.
To clean the screen, use a soft, non-
abrasive cloth (spectacles cloth) with
no additional product.
Do not use sharp objects on the
screen.
Do not touch the screen with wet
hands.
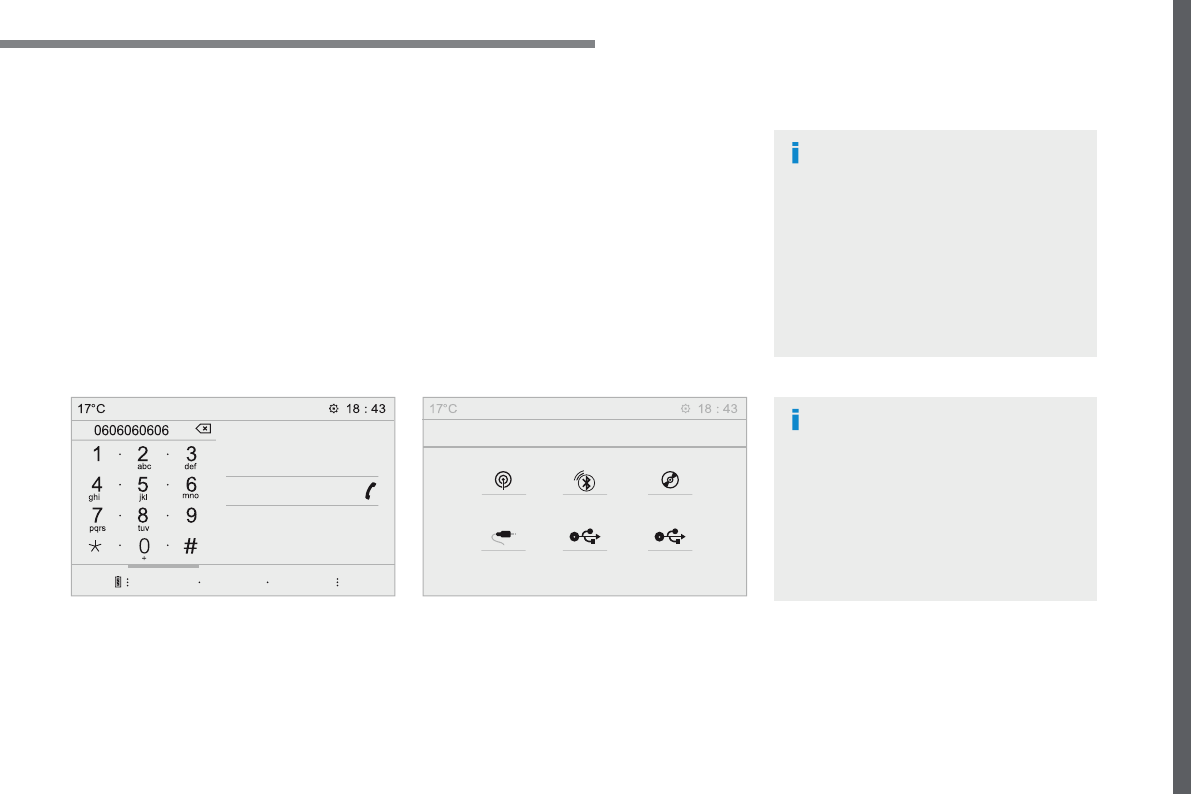
97
.
Audio and Telematics
Transversal-Citroen_en_Chap02_RCC-2-2-0_ed01-2016
Select the audio source (depending on
version):
- FM / DAB * / AM * stations.
- Telephone connected by Bluetooth * and
using Bluetooth * audio streaming.
- CD player.
- USB memory stick.
- Media player connected to the auxiliary
socket (Jack, cable not supplied).
* Depending on equipment.
Certain information is displayed permanently in
the upper band of the touch screen:
- Reminder of the air conditioning
information, and direct access to the
corresponding menu.
- Reminder of the Radio Media and
Telephone menu information.
- Access to the Settings of the touch screen
and digital instrument panel.
In very hot conditions, the volume may
be limited to protect the system. It may
go into standby (screen and sound off)
for at least 5 minutes
The return to normal takes place when
the temperature in the passenger
compartment has dropped.
In the "Settings" menu you can create
a profile for just one person or a group
of people with common points, with the
possibility of entering a multitude of
settings (radio presets, audio settings,
ambiences, ...); these settings are
taken into account automatically.
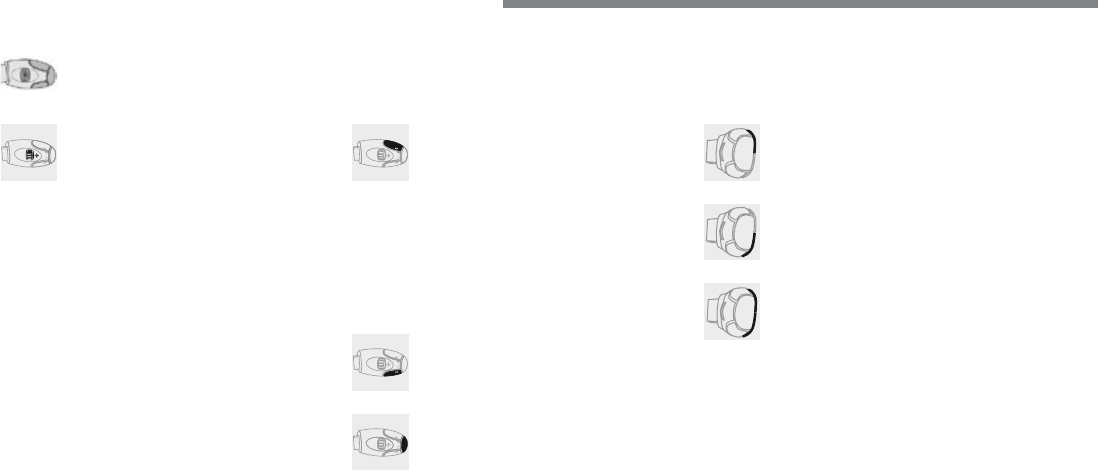
98
Audio and Telematics
Transversal-Citroen_en_Chap02_RCC-2-2-0_ed01-2016
Steering mounted controls - Type 1
Radio
:
Short press: display the list of radio
stations.
Long press: update the list.
Media
:
Short press: display the list of folders.
Long press: display the sorting
options.
Decrease volume.
Radio :
Select the previous / next preset
radio station.
Select the previous / next item in a
menu or a list.
Media:
Select of the previous / next track
Select the previous / next item in a
menu or a list.
Mute / Restore sound by
simultaneously pressing the increase
and decrease volume buttons.
Change audio source (Radio; USB;
AUX (if a device is connected); CD;
Streaming)
Confirm a selection.
Increase volume.
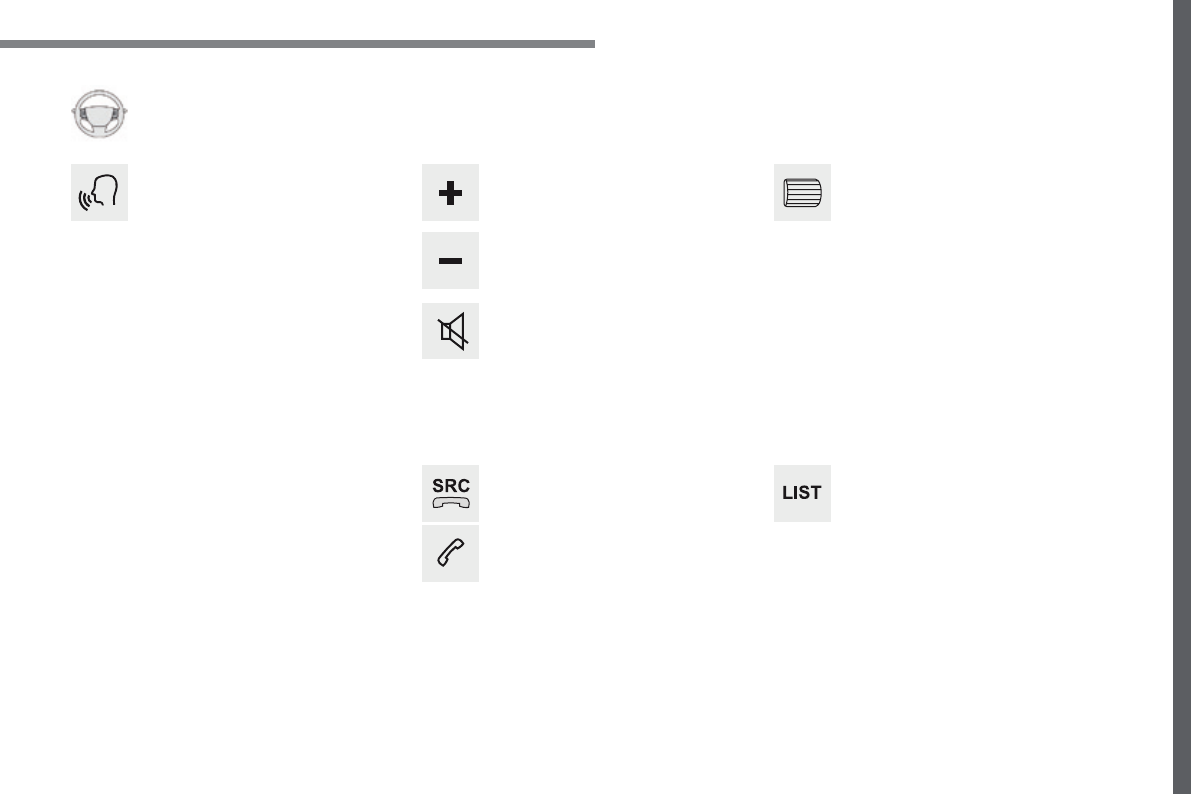
99
.
Audio and Telematics
Transversal-Citroen_en_Chap02_RCC-2-2-0_ed01-2016
Media
(short press): change the
multimedia source.
Telephone
(short press): call.
Call in progress
(short press):
access to telephone menu.
Telephone
(long press): reject an
incoming call, end call, access to
telephone menu.
Decrease volume.
Voice commands
:
Short press, smartphone voice
commands via the system.
Mute/ Restore the sound.
Or
Mute by pressing the volume
increase and decrease buttons
simultaneously.
Restore the sound by pressing one of
the two volume buttons.
Radio
(rotate): previous / next preset.
Media
(rotate): previous / next track,
move in a list.
Short press
: confirm a selection;
other than selection, access to
presets.
Radio
: display the list of stations.
Media
: display the list of tracks.
Radio
(press and hold): update the
list of stations received.
Increase volume.
Steering mounted controls - Type 2
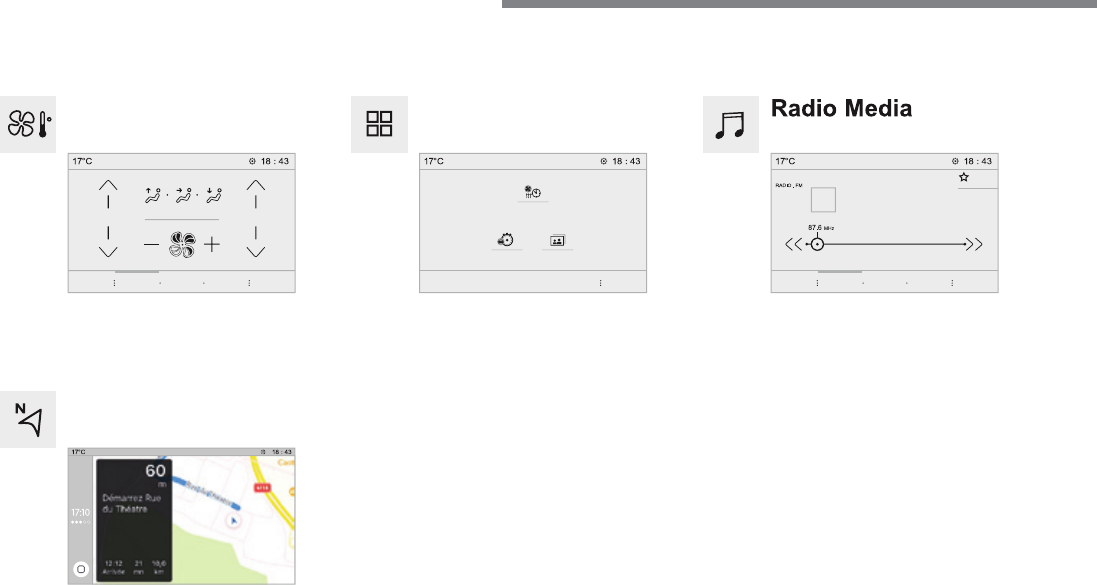
100
21,518,5
Audio and Telematics
Transversal-Citroen_en_Chap02_RCC-2-2-0_ed01-2016
Menus
Radio Media
Applications
Select an audio source or radio station.
Access configurable equipment.
Air conditioning
Manage the different temperature and air flow
settings.
Navigation
Configure the guidance and select your
destination via MirrorLink
TM
or CarPlay
®
.
According to version.
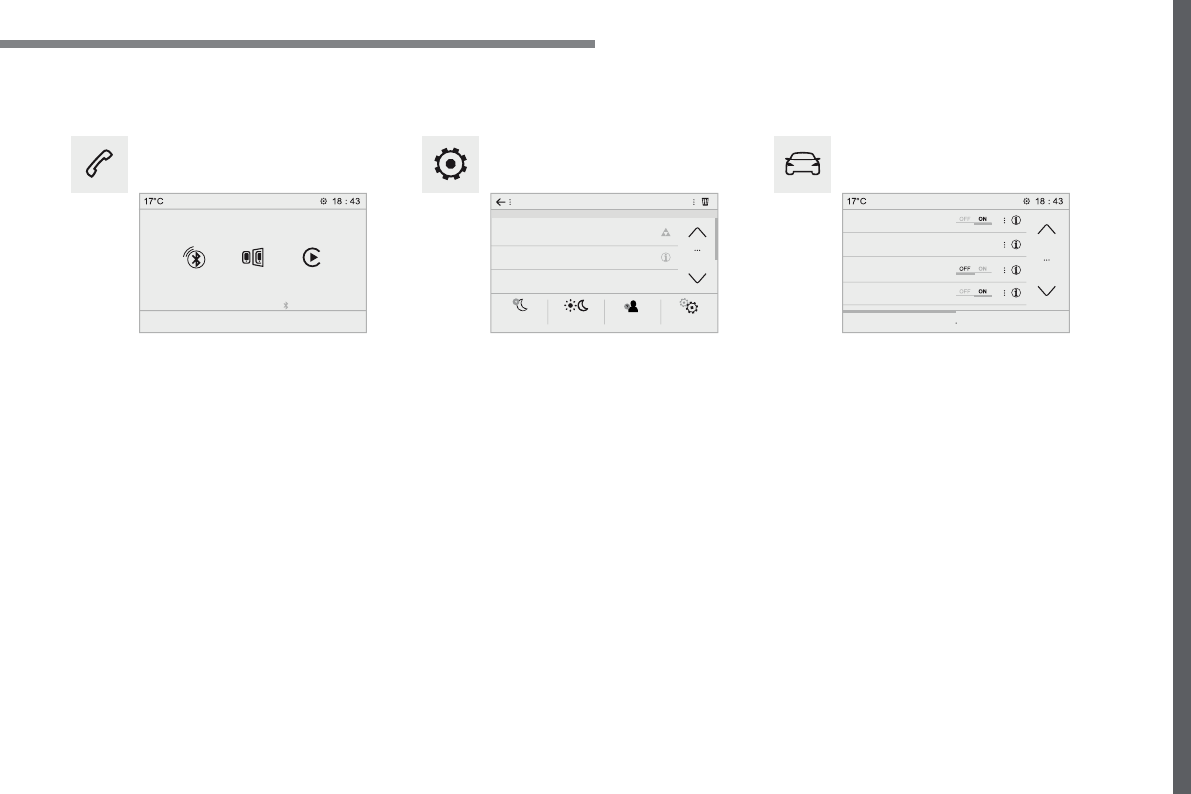
101
.
Audio and Telematics
Transversal-Citroen_en_Chap02_RCC-2-2-0_ed01-2016
Settings
Driving
Telephone
Configure a personal profile and/or configure
the sound (balance, ambience, ...) and the
display (language, units, date, time, ...).
Activate, deactivate or configure certain vehicle
functions.
Connect a telephone by Bluetooth
®
.
Operate certain applications on a smartphone
connected via MirrorLink
TM
or CarPlay
®
.
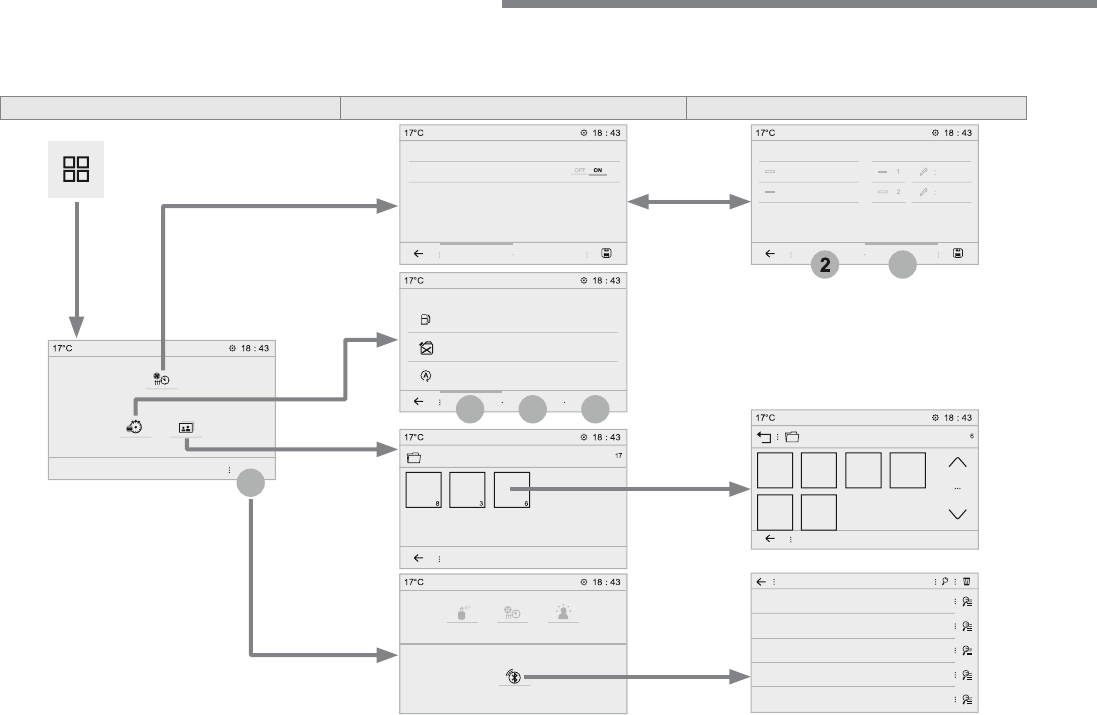
102
1
5
6
4
2
3
Audio and Telematics
Transversal-Citroen_en_Chap02_RCC-2-2-0_ed01-2016
Applications
According to version / according to equipment
Level 1
Level 2
Level 3
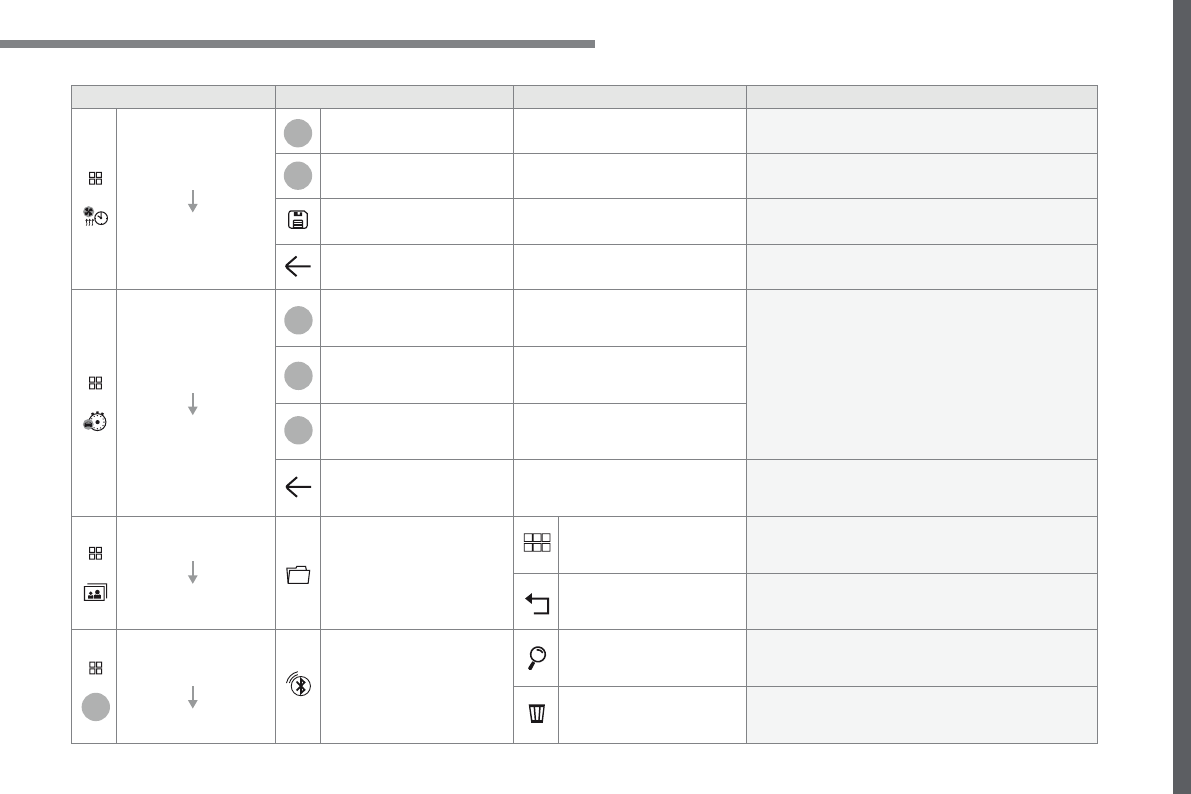
103
.
1
4
5
6
2
3
Audio and Telematics
Transversal-Citroen_en_Chap02_RCC-2-2-0_ed01-2016
Level 1
Level 2
Level 3
Comments
Applications
Temperature
conditioning
State
Activate / deactivate the temperature conditioning.
Settings
Configure the pre-conditioning.
Save the parameters.
Confirm the settings.
Applications
Trip computer
Instant
System providing information about the current
journey (range, consumption…).
Trip 1
Trip 2
Go back to the Applications page.
Applications
Photos
Photo gallery
Photos
Go to the photo gallery.
Go back a level.
Applications
OPTIONS
Bluetooth connection
Search
Start the search for a device to be connected.
Delete
Delete one or more devices.

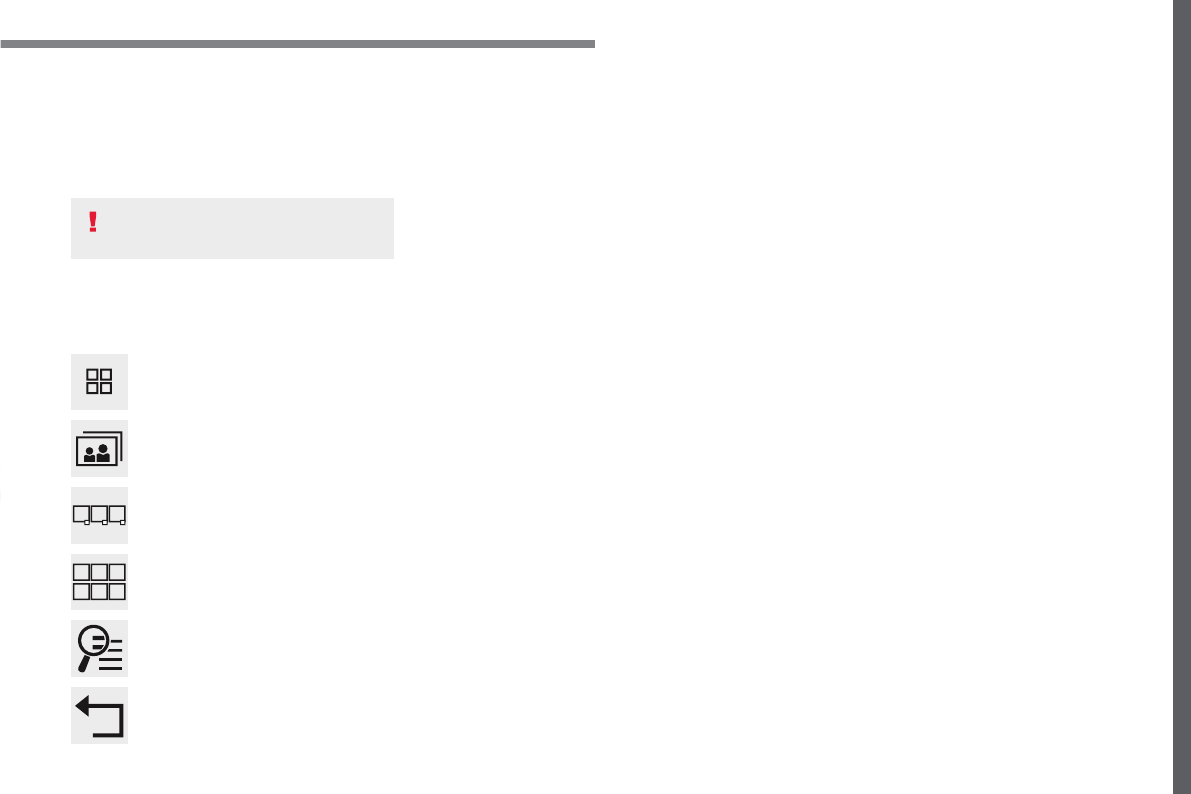
105
.
Audio and Telematics
Transversal-Citroen_en_Chap02_RCC-2-2-0_ed01-2016
Insert a USB memory stick in the USB port.
The system can read folders and image files in
the formats: .tiff; .gif; .jpg/jpeg; .bmp; .png.
Viewing photos
Press
Applications
to display the
primary page.
Press "
Photos
".
Select a folder.
Press this button to display the
details of the photo.
Press the back arrow to go back a
level.
Select an image to view.
To protect the system, do not use a
USB hub.
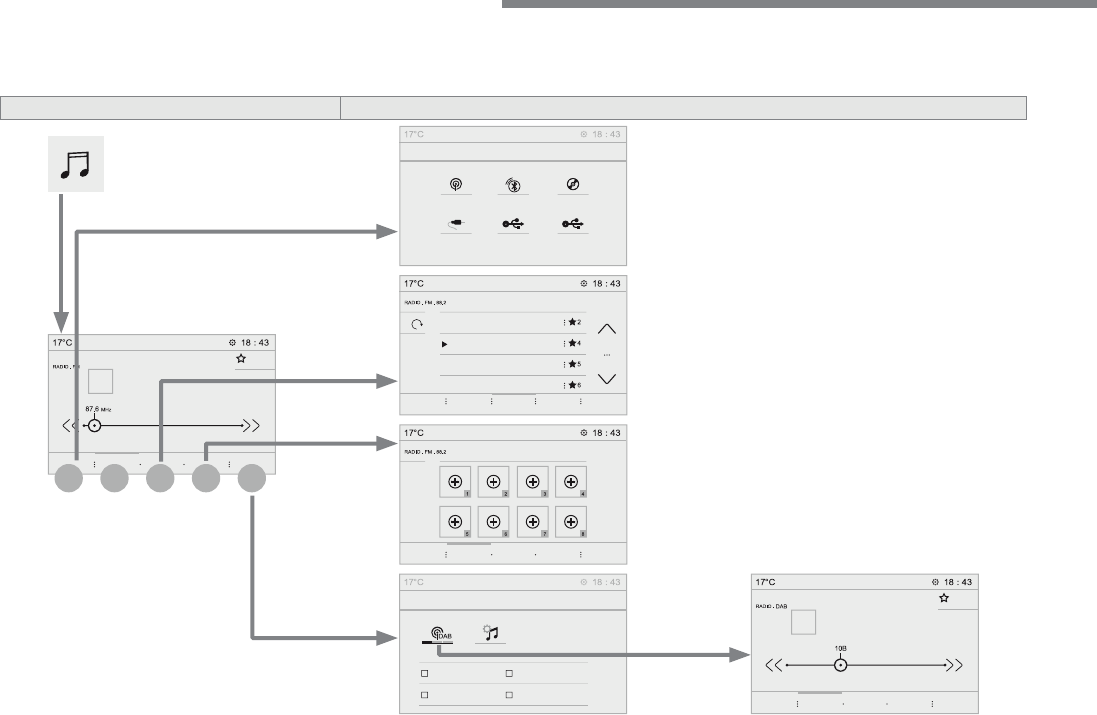
106
2
1
3
4
5
Audio and Telematics
Transversal-Citroen_en_Chap02_RCC-2-2-0_ed01-2016
Radio Media
According to version
Level 1
Level 2
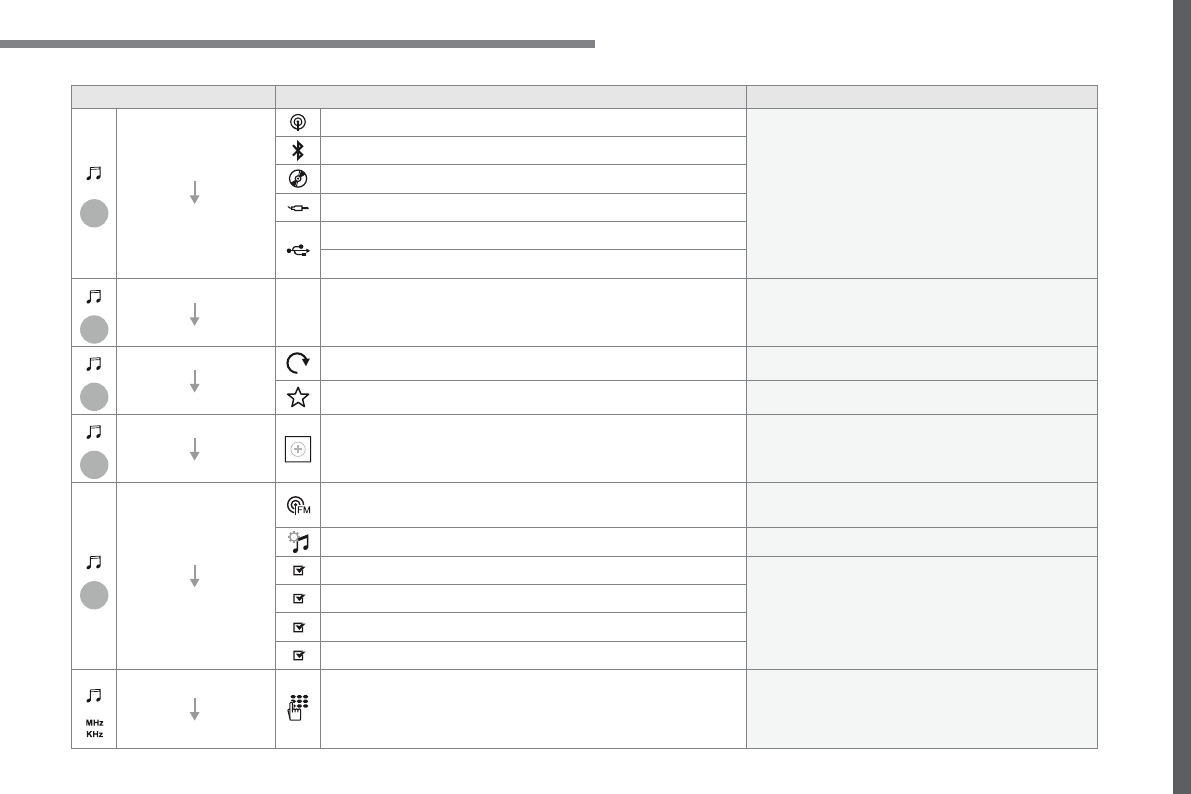
107
.
1
2
3
4
5
Audio and Telematics
Transversal-Citroen_en_Chap02_RCC-2-2-0_ed01-2016
Level 1
Level 2
Comments
Radio Media
SOURCES
Radio
Select change of source.
Bluetooth
CD
AUX
USB
iPod
Radio Media
Frequency
FM / DAB / AM
Display the current radio station.
Radio Media
List
Update the list according to the stations received.
Preset
Make a short press to preset the station.
Radio Media
Preset
Select a preset station or preset a station.
Radio Media
OPTIONS
AM band / DAB band / FM band
Press the Band button to change waveband.
Audio settings
Configure the audio settings.
News
Activate or deactivate the options.
TA
RDS
FM-DAB Follow-up
Radio Media
87.5 MH z
Enter a frequency of the FM and AM bands on the
virtual keypad.
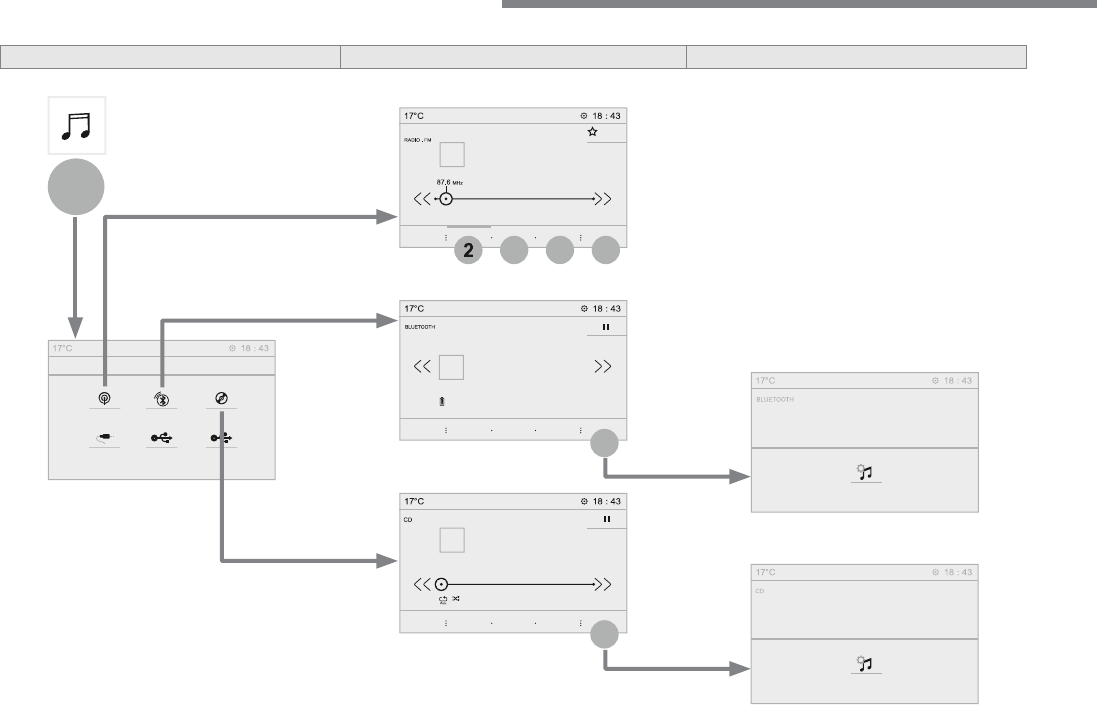
108
1
2
3
4
5
5
5
Audio and Telematics
Transversal-Citroen_en_Chap02_RCC-2-2-0_ed01-2016
Level 1
Level 2
Level 3
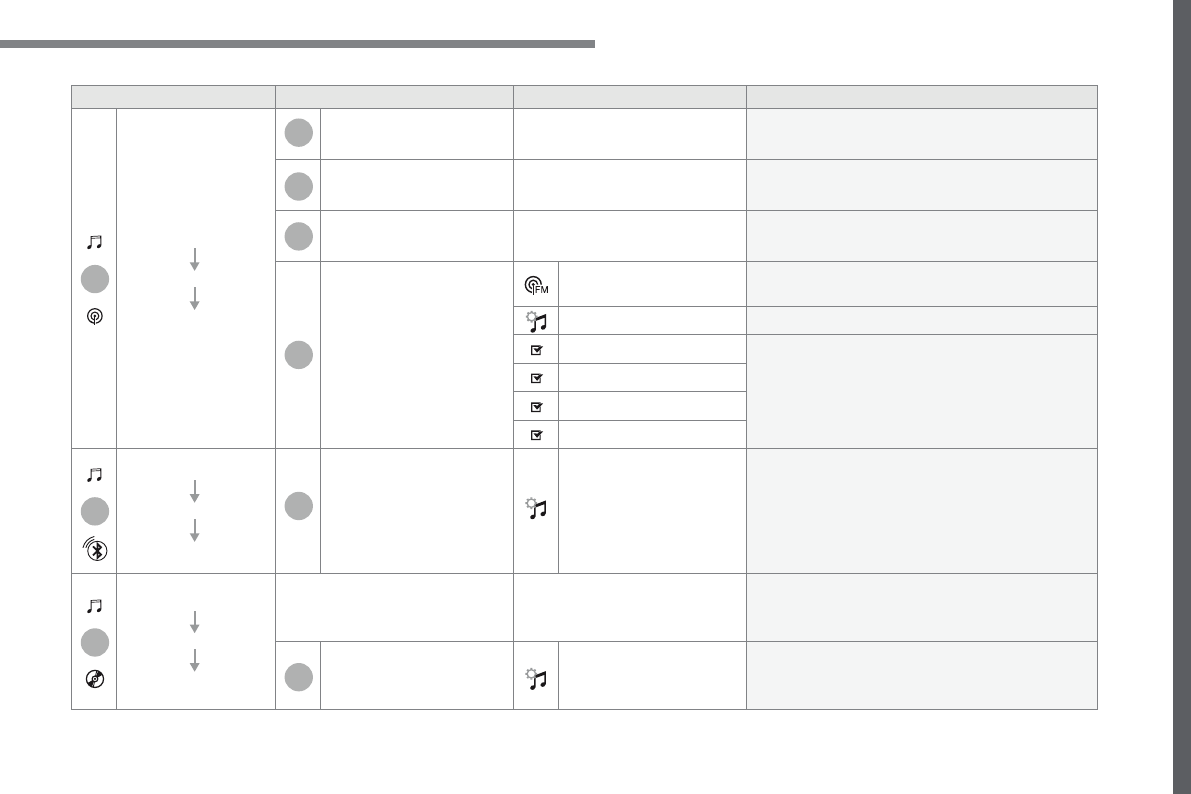
109
.
1
1
1
2
3
4
5
5
5
Audio and Telematics
Transversal-Citroen_en_Chap02_RCC-2-2-0_ed01-2016
Level 1
Level 2
Level 3
Comments
Radio Media
SOURCES
Radio
Frequency
Display the current radio station.
List
Display the list of stations received.
Preset
Select a preset station or preset a station.
OPTIONS
FM band / DAB band /
AM band
Press the band button to change band.
Audio settings
Configure the audio settings.
News
Activate or deactivate the options.
TA
RDS
FM-DAB Follow-up
Radio Media
SOURCES
Bluetooth
OPTIONS
Audio settings
Configure the audio settings.
Radio Media
SOURCES
CD
Display the details of the music being played.
OPTIONS
Audio settings
Configure the audio settings.
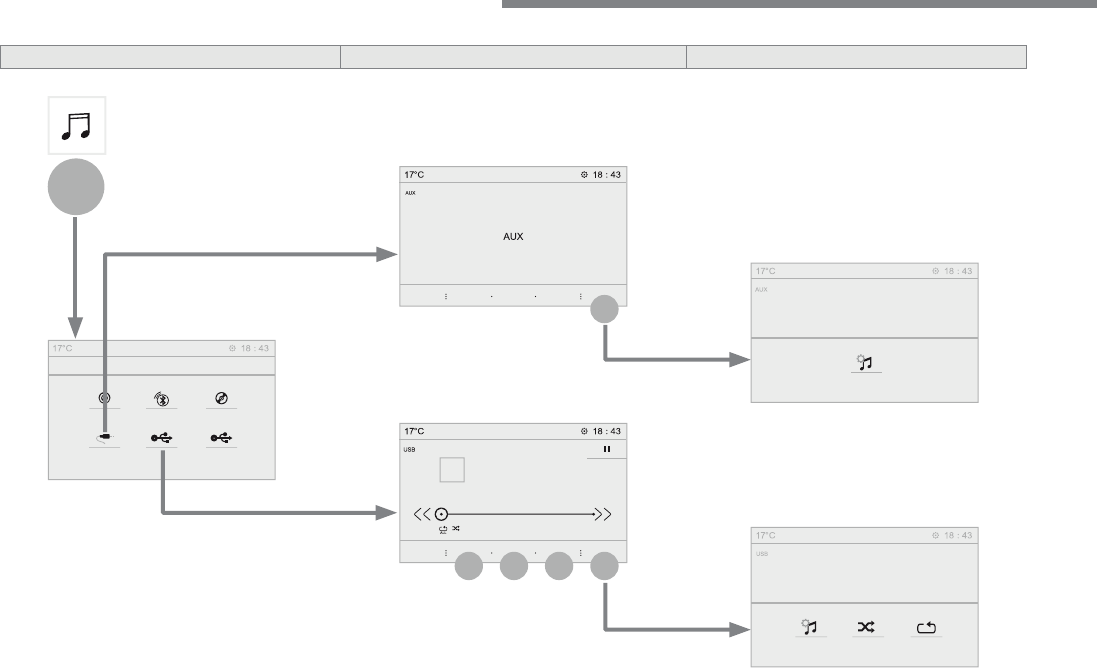
110
1
5
5
6
7
8
Audio and Telematics
Transversal-Citroen_en_Chap02_RCC-2-2-0_ed01-2016
Level 1
Level 2
Level 3
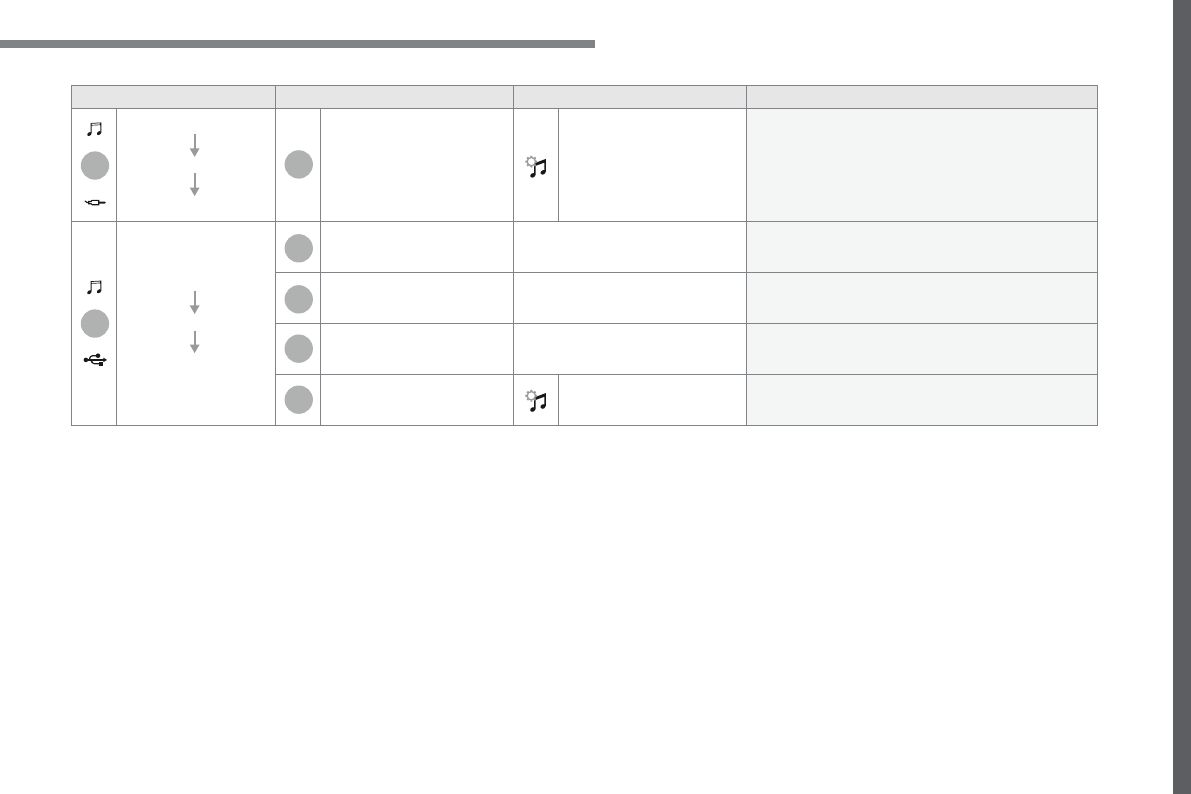
111
.
1
1
6
7
5
5
8
Audio and Telematics
Transversal-Citroen_en_Chap02_RCC-2-2-0_ed01-2016
Level 1
Level 2
Level 3
Comments
Radio Media
SOURCES
AUX
OPTIONS
Audio settings
Configure the audio settings.
Radio Media
SOURCES
USB
Player
Display the details of the music being played.
Tracks list
Display the current selection.
Library
Display the music library.
OPTIONS
Audio settings
Configure the audio settings.
112
4
5
Audio and Telematics
Transversal-Citroen_en_Chap02_RCC-2-2-0_ed01-2016
Press
Radio Media
to display the
menu.
Press
Radio Media
to display the
primary page.
Press the frequency.
Enter the FM and AM waveband
values using the virtual keypad.
Press one of the buttons for an
automatic search for radio stations.
Radio
Selecting a station
Radio reception may be affected by
the use of electrical equipment not
approved by the Brand, such as a USB
charger connected to the 12V socket.
The exterior environment (hills,
buildings, tunnel, car park, below
ground...) may prevent reception,
even in RDS station tracking mode.
This phenomenon is normal in the
propagation of radio waves and is in no
way indicative of a fault with the audio
system.
Or
Or
Or
Move the cursor for a manual search
for frequencies up or down.
Select a radio station or frequency.
Select a radio station or frequency.
Press "
Preset
".
Press the "
OPTIONS
" button to go to
the secondary page.
Make a short press on the star
outline. If the star is solid, the radio
station is already preset.
Make a long press on one of the
buttons to preset the station.
Press "
Band
" to change waveband.
Press in the grey zone to confirm.
Preset a station
Changing waveband
Press "
OK
" to confirm.
113
.
5
5
5
Audio and Telematics
Transversal-Citroen_en_Chap02_RCC-2-2-0_ed01-2016
Press in the grey zone to confirm.
Press in the grey zone to confirm.
Press in the grey zone to confirm.
Press
Radio Media
to display the
primary page.
Press
Radio Media
to display the
primary page.
Press
Radio Media
to display the
primary page.
Press the "
OPTIONS
" button to go to
the secondary page.
Press the "
OPTIONS
" button to go to
the secondary page.
Press the "
OPTIONS
" button to go to
the secondary page.
Activate/deactivate "
RDS
".
Activate / Deactivate "
NEWS
".
Activate / Deactivate "
TA
".
TA ". TA
Activate/ Deactivate RDS
RDS, if activated, allows you to continue
listening to the same station by automatic
retuning to alternative frequencies.
However, in certain conditions, coverage
of an RDS station may not be assured
throughout the entire country as radio
stations do not cover 100 % of the
territory. This explains the loss of
reception of the station during a journey.
The "Radio Text" function allows
information transmitted by the radio
station and related to the station or the
song playing to be displayed.
Display text information
Play TA messages
The TA (Traffic Announcement)
function gives priority to TAalert
messages. To operate, this function
needs good reception of a radio station
that carries this type of message. While
traffic information is being broadcast,
the current media is automatically
interrupted so that the TA message can
be heard. Normal play of the media
previously playing is resumed at the
end of the message.
114
5
Audio and Telematics
Transversal-Citroen_en_Chap02_RCC-2-2-0_ed01-2016
Audio settings
Press
Radio Media
to display the
primary page.
Press "
Audio settings
".
On-board audio: Arkamys
©
Sound
© Sound
©
Staging optimises the distribution of
sound in the passenger compartment.
The sound distribution (or spatialisation
with the Arkamys
©
system) is audio
© system) is audio
©
processing that allows the quality of the
sound to be adapted according to the
number of passengers in the vehicle.
On the "
Tone
" tab, the
Ambience
audio
settings and
Bass
,
Medium
and
Treble
are different and independent for each
audio source.
On the "
Balance
" tab, the
All
passengers
,
Driver
and
Driver and Driver
Front only
settings are common to all sources.
On the "
Sound
" tab, activate or
deactivate "
Volume linked to speed
",
"
Auxiliary input
" and "
Touch tones
".
Press the "
OPTIONS
" button to go to
the secondary page.
Select the "
Tone
" or "
Balance
" or
"
Sound
"
or
"
or " or
Ringtones
" tab to
configure the audio settings.
Press the back arrow to confirm.
115
.
5
5
Audio and Telematics
Transversal-Citroen_en_Chap02_RCC-2-2-0_ed01-2016
DAB radio (Digital Audio Broadcasting)
Press
Radio Media
to display the
primary page.
Press the "
OPTIONS
" button to go to
the secondary page.
FM-DAB Follow-up
Terrestrial Digital Radio
"DAB" does not cover 100% of the
territory.
When the digital radio signal is poor,
the "FM-DAB Follow-up" allows you to
continue listening to the same station,
by automatically switching to the
corresponding "FM" analogue station
(if there is one).
If the "FM-DAB Follow-up" is activated,
there is a difference of a few seconds
when the system switches to "FM"
analogue radio with sometimes a
variation in volume.
Once the digital signal is restored, the
system automatically changes back to
" D A B " .
Digital radio provides higher quality
reception.
The different multiplexes offer a
choice of radio stations arranged in
alphabetical order.
If the "DAB" station being listened
to is not available on "FM", or if the
"FM-DAB Follow-up" is not activated,
the sound will cut out while the digital
signal is too weak.
Activate / Deactivate "
FM-DAB
Follow-up
".
Press
Radio Media
to display the
primary page.
Press the "
OPTIONS
" button to go to
the secondary page.
Press "
Band
" to select "
DAB band
".
Press in the grey zone to confirm.
Press in the grey zone to confirm.
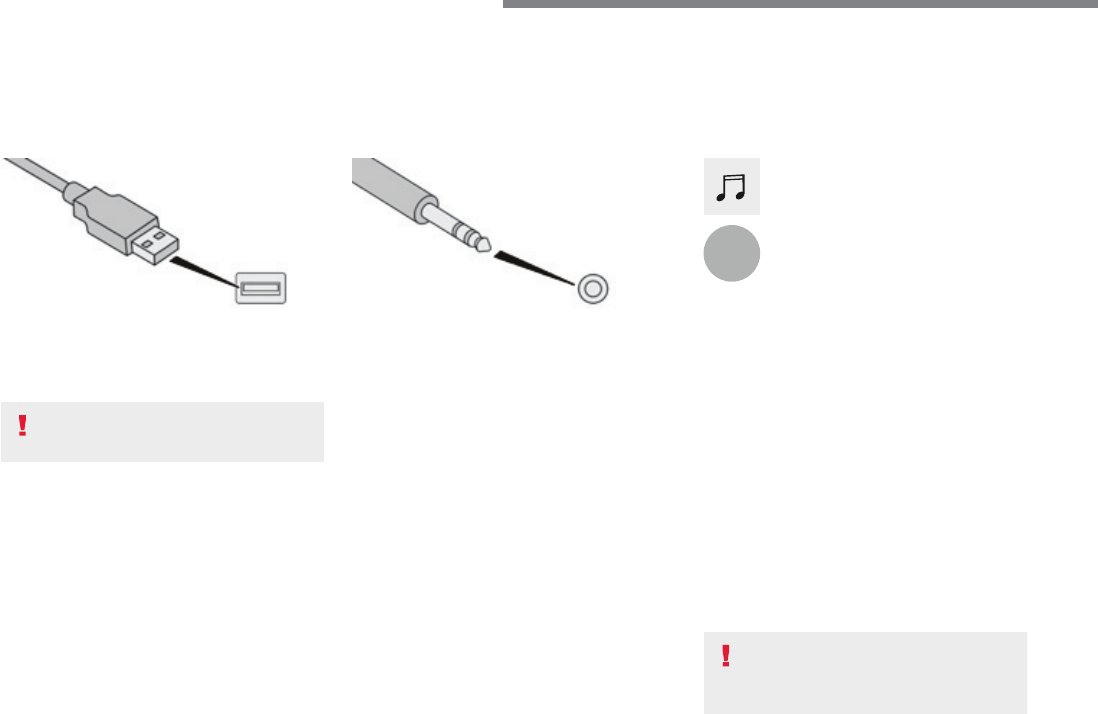
116
1
Audio and Telematics
Transversal-Citroen_en_Chap02_RCC-2-2-0_ed01-2016
Media
USB port
Selecting the source
Press the "
SOURCES
" button.
Press
Radio Media
to display the
primary page.
The system builds playlists (in temporary
memory), an operation which can take from
a few seconds to several minutes at the first
connection.
Reduce the number of non-music files and the
number of folders to reduce the waiting time.
The playlists are updated every time the
ignition is switched off or connection of a USB
memory stick. The lists are memorised: if they
are not modified, the subsequent loading time
will be shorter.
Insert the USB memory stick in the USB port or
connect the USB device to the USB port using
a suitable cable (not supplied).
Auxiliary socket (AUX)
First adjust the volume of your portable device
(to a high level). Then adjust the volume of your
audio system.
Display and management of the controls are
via the portable device.
This source is only available if "Auxiliary input"
has been checked in the audio settings.
Connect the portable device (MP3 player…) to
the auxiliary Jack socket using an audio cable
(not supplied).
Choose the source.
Bluetooth Streaming
®
Bluetooth Streaming
®
Bluetooth Streaming
Streaming allows you to listen to music from
your telephone.
The Bluetooth profile must be activated. First
adjust the volume on your portable device (to a
high level).
Then adjust the volume of your system.
If play does not start automatically, it may be
necessary to start the audio playback from the
smartphone.
Control is from the portable device or by using
the system's touch buttons.
Once connected in Streaming mode,
the smartphone is considered to be a
media source.
To protect the system, do not use a
USB hub.
117
.
Audio and Telematics
Transversal-Citroen_en_Chap02_RCC-2-2-0_ed01-2016
Connecting Apple
®
Connecting Apple
®
Connecting Apple
players
® players
®
Connect the Apple
®
player to the USB port
® player to the USB port
®
using a suitable cable (not supplied).
Play starts automatically.
Control is via the audio system.
The classifications available are those
of the portable device connected
(artists / albums / genres / playlists /
audiobooks / podcasts), you can also
use a classification structured in the
form of a library.
The default classification used is by
artist. To modify the classification used,
return to the first level of the menu
then select the desired classification
(playlists for example) and confirm
to go down through the menu to the
desired track.
The version of software in the audio system
may not be compatible with the generation of
your Apple
®
player.
® player.
®
The audio equipment will only play audio
files with ".wav, .wma, .aac, .ogg and .mp3"
file extensions and with a bit rate of between
32 Kbps and 320 Kbps.
It also supports VBR (Variable Bit Rate) mode.
No other type of file (.mp4, ...) can be played.
".wma" files must be of the
standard wma 9 type.
The sampling rates supported are 11, 22, 44
and 48 KHz.
It is advisable to restrict file names to
20 characters, without using of special
characters (e.g.: " " ? ; ù) to avoid any playing
and displaying problems.
In order to be able to play a burned CDR or
CDRW, select standards ISO 9660 level 1, 2 or
Joliet if possible when burning the CD.
If the disc is burned in another format, it may
not be played correctly.
It is recommended that the same burning
standard is always used on an individual disc,
with the lowest speed possible (4x maximum)
for the best acoustic quality.
In the particular case of a multi-session CD, the
Joliet standard is recommended.
Information and advice
Use only USB memory sticks formatted FAT 32
(file allocation table).
The system supports USB Mass
Storage devices, BlackBerry
®
devices
® devices
®
or Apple
®
players via USB ports. The
® players via USB ports. The
®
adaptor cable is not supplied.
Control of the peripheral device is with
the audio system controls.
Other peripherals, not recognised on
connection, must be connected to the
auxiliary socket using a Jack cable (not
supplied) or via Bluetooth streaming,
depending on compatibility.
It is recommended that the original USB
cable for the portable device is used.
To protect the system, do not use a
USB hub.
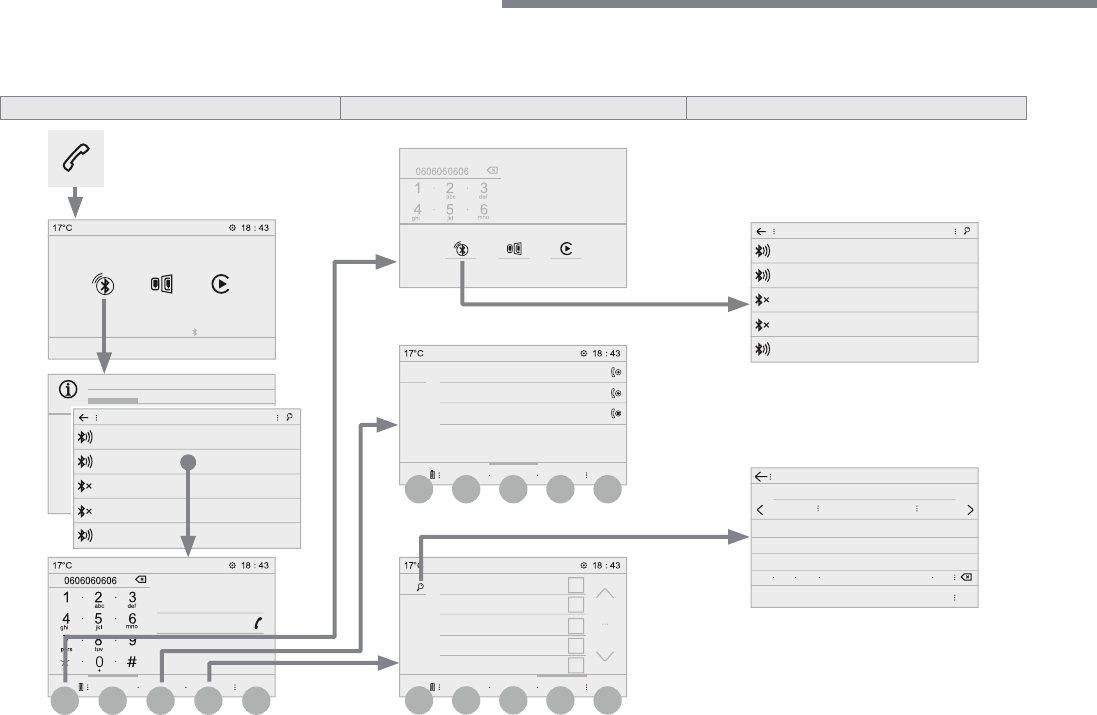
118
4
4
4
1
1
1
5
5
5
3
3
3
2
2
2
Audio and Telematics
Transversal-Citroen_en_Chap02_RCC-2-2-0_ed01-2016
Telephone
According to version
Level 1
Level 2
Level 3
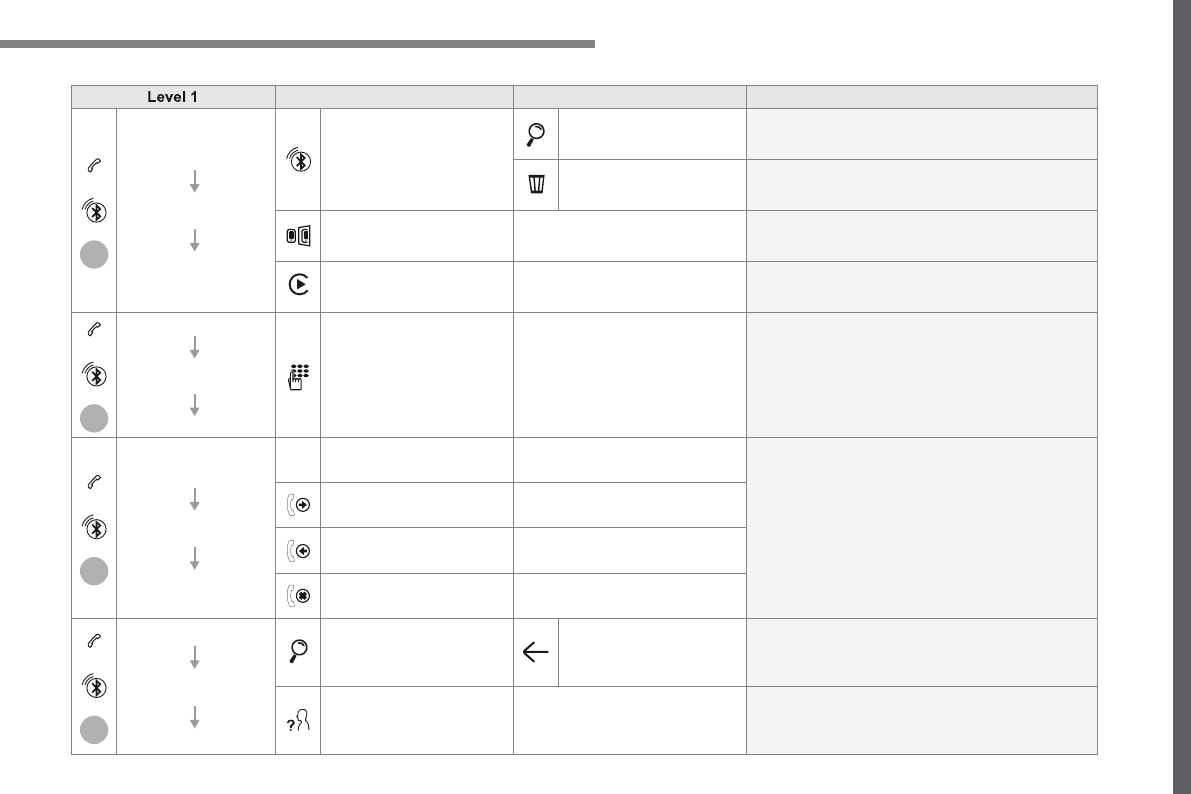
119
.
1
2
3
4
Audio and Telematics
Transversal-Citroen_en_Chap02_RCC-2-2-0_ed01-2016
Level 1
Level 2
Level 3
Comments
Telephone
Bluetooth
search
PHONE
Bluetooth connection
Search
Start the search for a device to be connected.
Delete
Delete one or more devices.
MirrorLink
Open the MirrorLink function.
CarPlay
Open the CarPlay function.
Telephone
Bluetooth
search
Keypad
Enter a telephone number.
Telephone
Bluetooth
search
Recent calls
All
View the calls according to the presentation
selected.
Select a contact to make the call.
Outgoing
Missed
Incoming
Telephone
Bluetooth
search
Contacts
Search
Confirm
Search for a contact in the contacts directory.
Telephone
Go to the details of the contact sheet.
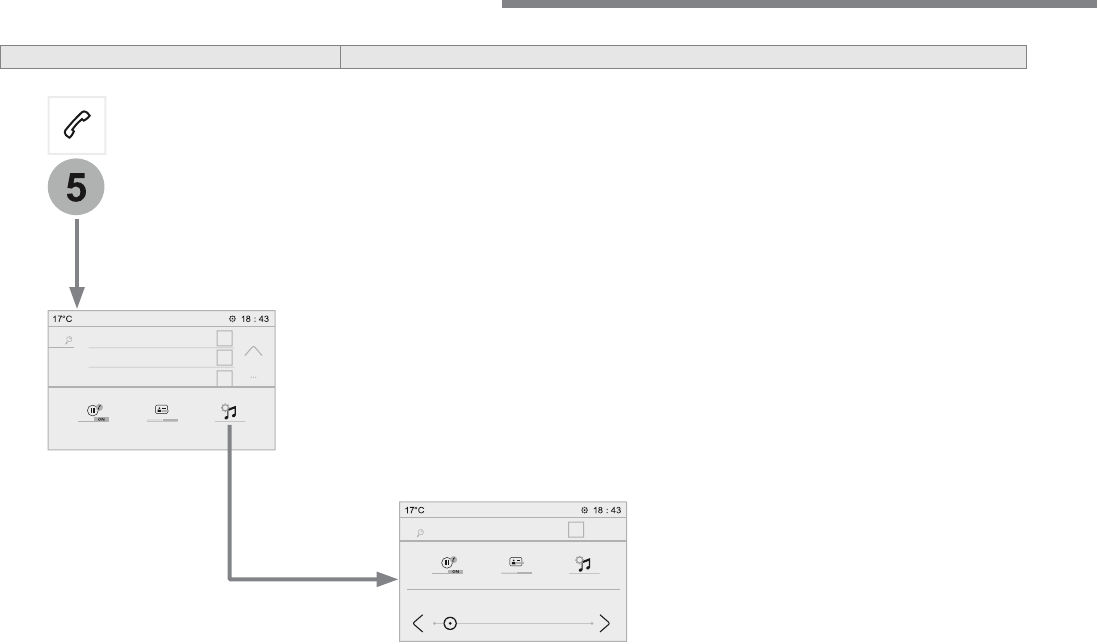
120
5
Audio and Telematics
Transversal-Citroen_en_Chap02_RCC-2-2-0_ed01-2016
Level 1
Level 2
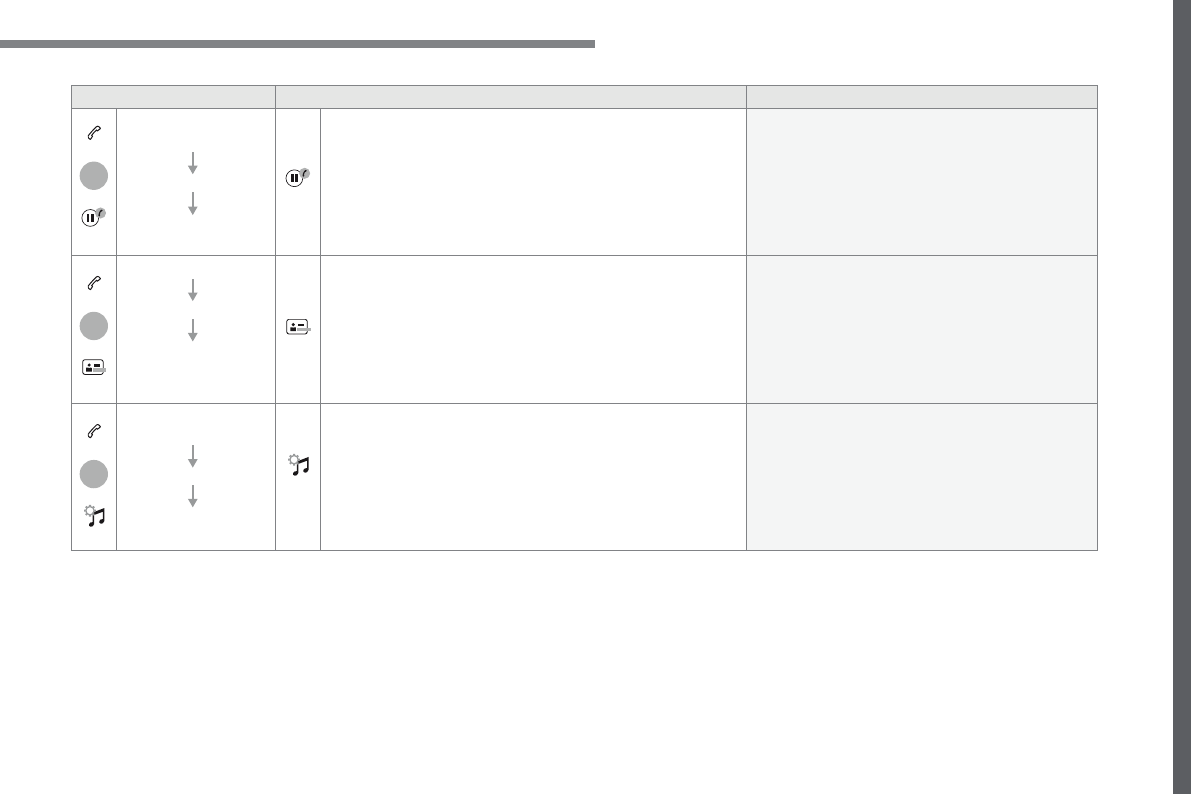
121
.
5
5
5
Audio and Telematics
Transversal-Citroen_en_Chap02_RCC-2-2-0_ed01-2016
Level 1
Level 2
Comments
Telephone
OPTIONS
On hold (auto)
ON - OFF
Activate or deactivate the automatic placing on
hold of the current conversation.
Telephone
OPTIONS
Sort contacts by name
Sort contacts by
first name
Sort the contacts by Surname-first name or First
name-surname.
Telephone
OPTIONS
Ring volume
Adjust the volume of the ringtone.
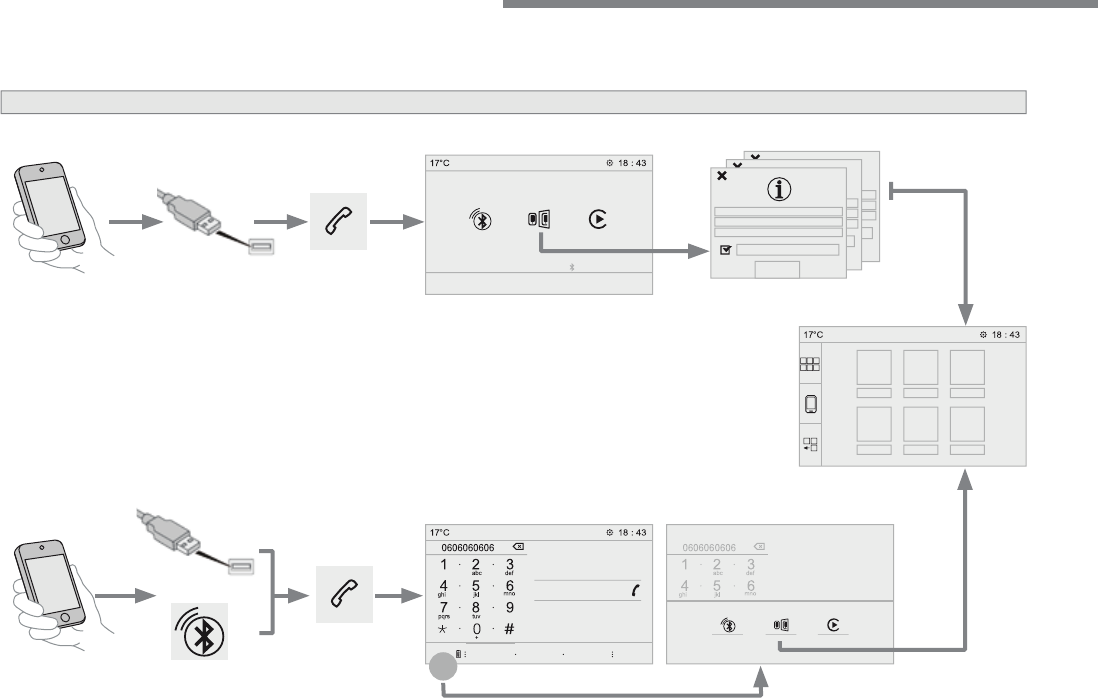
122
1
Audio and Telematics
Transversal-Citroen_en_Chap02_RCC-2-2-0_ed01-2016
MirrorLink
TM
smartphone connection
123
.
1
Audio and Telematics
Transversal-Citroen_en_Chap02_RCC-2-2-0_ed01-2016
As a safety measure and because it
requires the sustained attention of
the driver, using a smartphone when
driving is prohibited.
Operation must be with the
vehicle
stationary
.
stationary . stationary
The synchronisation of a
smartphone allows applications on a
smartphone that are adapted to the
MirrorLink
TM
technology to be displayed
in the vehicle's screen.
The principles and standards
are constantly evolving. For the
communication process between
the smartphone and the system to
work correctly, the smartphone must
be unlocked;
update the operating
system of your smartphone as
well as the date and time in the
smartphone and the system
.
For the list of eligible smartphones,
connect to the Brand's internet website
in your country.
T h e " M i r r o r L i n k
TM
" function requires
a compatible smartphone and
applications.
There may be a wait for the availability
of applications, depending on the
quality of your network.
When connecting a smartphone to the
system, it is recommended that "Bluetooth"
®
be started on the smartphone
Depending on the smartphone, it may be necessary
to activate the "
MirrorLink
TM
" function.
During the procedure, several screen
pages relating to certain functions
are displayed.
Accept to start and end the
connection.
Connect the USB cable. The
smartphone charges when
connected by a USB cable.
Press "
MirrorLink
TM
"
to start the
application in the system.
Once connection is established, a page
is displayed with the applications already
downloaded to your smartphone and adapted
to the MirrorLink
TM
t e c h n o l o g y .
Access to the different audio sources remains
accessible in the margin of the MirrorLink
TM
display, using touch buttons in the upper bar.
Access to the menus for the system is possible
at any time using the dedicated buttons
Telephone not connected by
Bluetooth
®
Bluetooth
®
Bluetooth
Telephone connected by Bluetooth
®
Telephone connected by Bluetooth
®
Telephone connected by Bluetooth
From the system, press "
Telephone
"
to display the primary page.
From the system, press "
Telephone
"
to display the primary page.
As a safety measure, applications
can only be viewed with the vehicle
stationary; display is interrupted once
the vehicle is moving.
Press the "
PHONE
" button to display
the secondary page.
Press "
MirrorLink
TM
" to start the
application in the system.
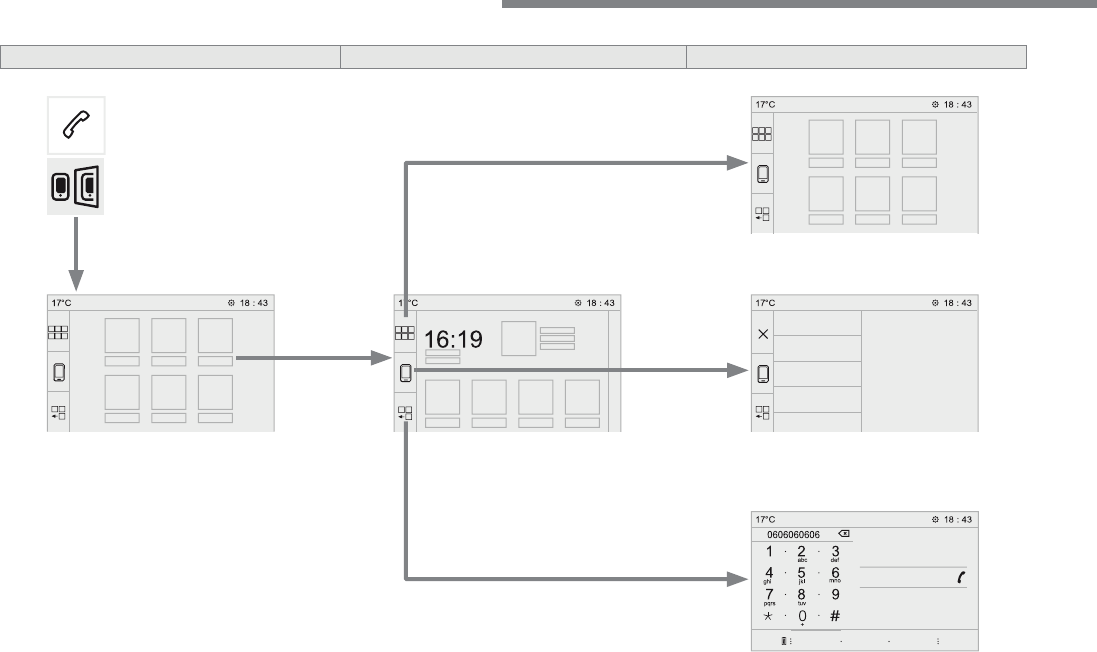
124
Audio and Telematics
Transversal-Citroen_en_Chap02_RCC-2-2-0_ed01-2016
Level 1
Level 2
Level 3
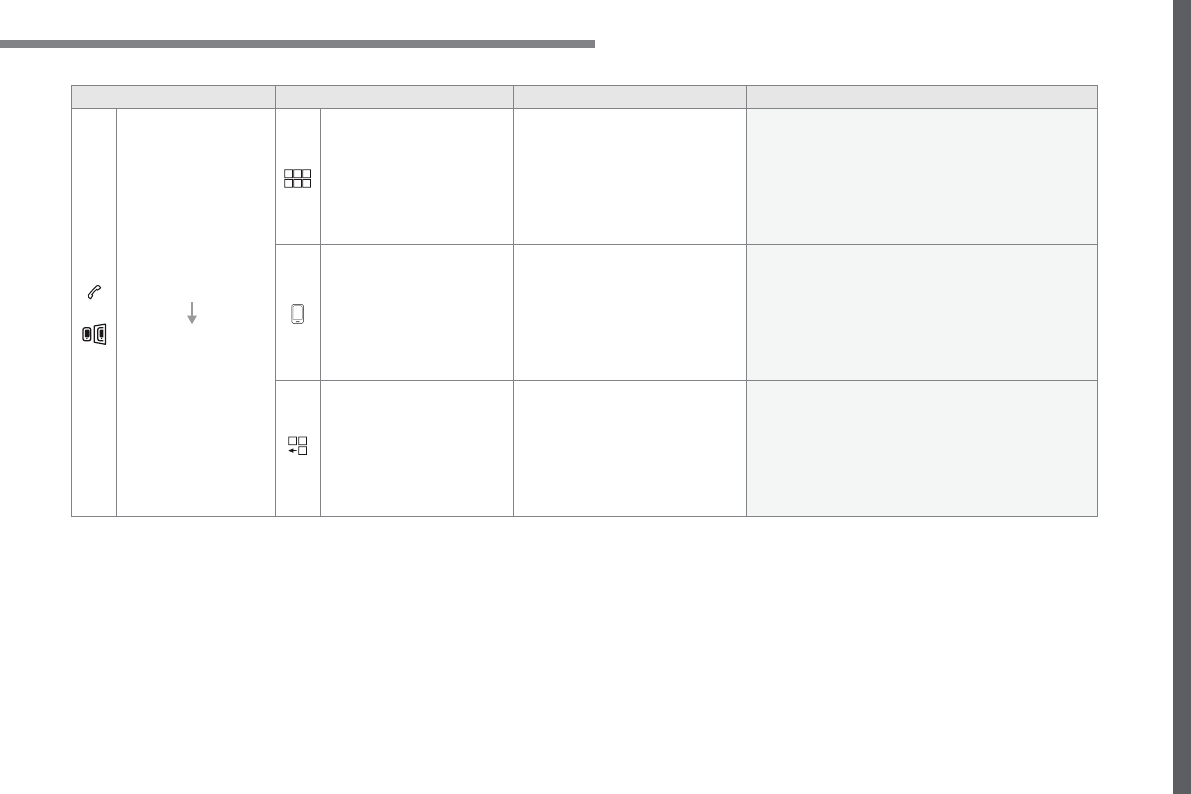
125
.
Audio and Telematics
Transversal-Citroen_en_Chap02_RCC-2-2-0_ed01-2016
Level 1
Level 2
Level 3
Comments
Telephone
MirrorLink
TM
Go to or return to the applications already
downloaded to your smartphone and adapted to
the MirrorLink
TM
technology.
Go to a menu list depending on the application
chosen.
"Back": abandon the current operation, go up one
level.
"Home": go to or return to the "Car mode" page on
your smartphone.
Go to the primary page of the "Telephone" menu.
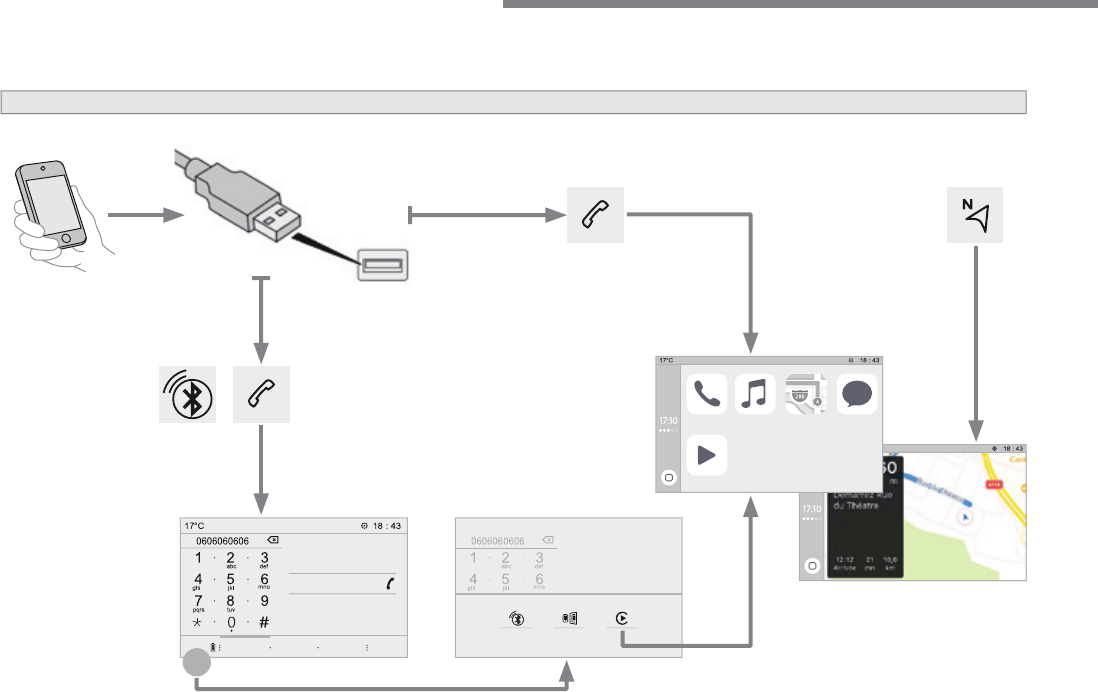
126
1
Audio and Telematics
Transversal-Citroen_en_Chap02_RCC-2-2-0_ed01-2016
CarPlay
®
CarPlay
®
CarPlay
smartphone connection
® smartphone connection
®
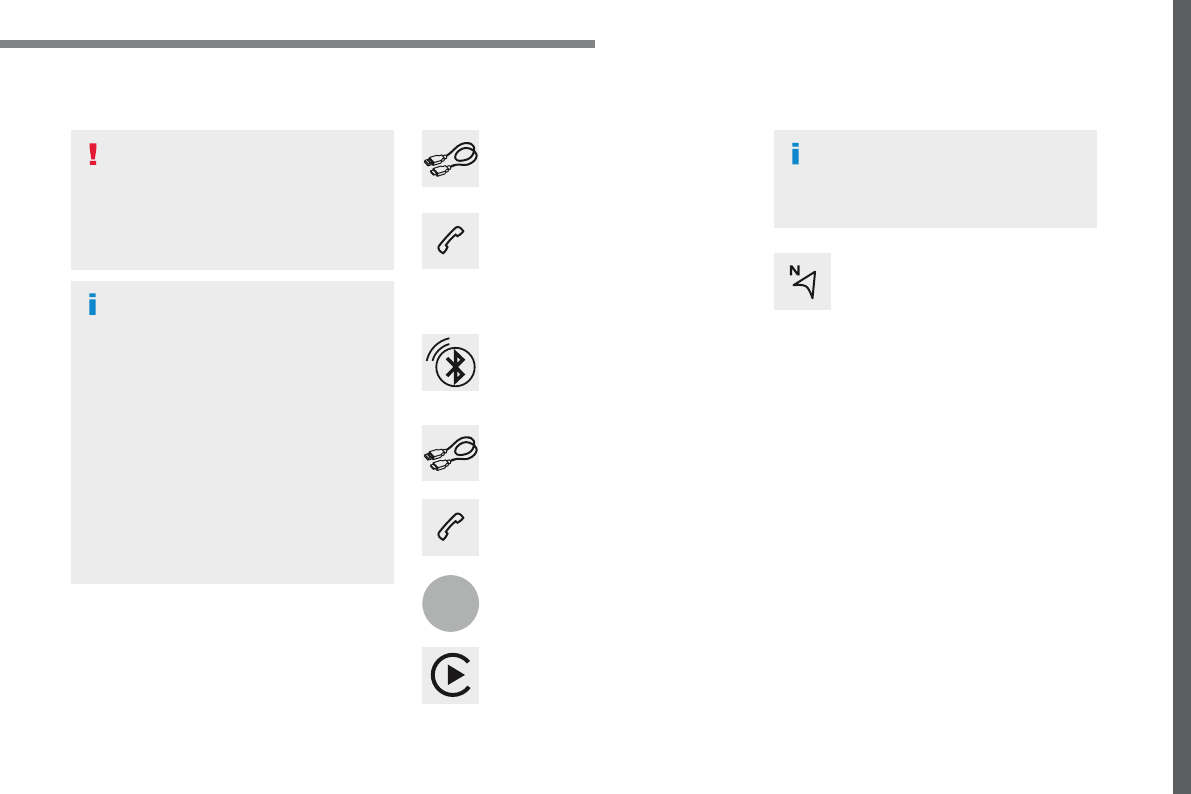
127
.
1
Audio and Telematics
Transversal-Citroen_en_Chap02_RCC-2-2-0_ed01-2016
As a safety measure and because it
requires the sustained attention of
the driver, using a smartphone when
driving is prohibited.
Operation must be with the
vehicle
stationary
.
stationary . stationary
The synchronisation of a
smartphone allows applications on a
smartphone that are adapted to the
CarPlay
®
technology to be displayed
® technology to be displayed
®
in the vehicle's screen, having first
activated the CarPlay
®
function in the
® function in the
®
smartphone.
As the principles and standards are
constantly changing,
it is recommended
that you keep your smartphone's
operating system updated
.
For the list of eligible smartphones, go
to the Brand's internet website in your
country.
Connect the USB cable. The
smartphone charges when
connected by a USB cable.
Connect the USB cable. The
smartphone charges when
connected by a USB cable.
From the system, press
Telephone
to display the Carplay
®
interface.
® interface.
®
Press "
CarPlay
" to display the
CarPlay
®
interface.
® interface.
®
On connecting the USB cable, the
CarPlay
®
function deactivates the
® function deactivates the
®
system's Bluetooth
®
mode.
® mode.
®
From the system, press
Telephone
to display the primary page.
Press the "
PHONE
" button to go to
the secondary page.
Or
If the smartphone is already
connected by Bluetooth
®
.
You can go to the CarPlay
®
navigation at any time by pressing
the system's
Navigation
button.
128
Audio and Telematics
Transversal-Citroen_en_Chap02_RCC-2-2-0_ed01-2016
Pairing a Bluetooth
®
Pairing a Bluetooth
®
Pairing a Bluetooth
telephone
® telephone
®
As a safety measure and because it
requires sustained attention by the
driver, the pairing of a Bluetooth mobile
telephone with the Bluetooth hands-
free system of your audio system must
be done with the
vehicle stationary
and the ignition on.
Procedure from the telephone
Select the name of the system in the
list of devices detected.
In the system, accept the connection request
from the telephone.
Procedure from the system
Press
Telephone
to display the
primary page.
Press "
Bluetooth search
".
The list of telephones detected is
displayed.
If the pairing procedure fails, it is recommended
that you deactivate and then reactivate the
Bluetooth function in your telephone.
Depending on the type of telephone,
you may be asked to accept or not
the transfer of your contacts and
messages.
Select the name of the chosen
telephone in the list.
Activate the Bluetooth function on the
telephone and ensure that it is "visible
to all" (telephone configuration).
To complete the pairing, whichever
procedure used (from the telephone or
from the system), ensure that the code
is the same in the system and in the
telephone.
129
.
1
Audio and Telematics
Transversal-Citroen_en_Chap02_RCC-2-2-0_ed01-2016
Press
Telephone
to display the
primary page.
Press "
Bluetooth connection
" to
display the list of paired devices.
On return to the vehicle, if the last
telephone connected is present again,
it is automatically recognised and
within about 30 seconds of switching
on the ignition, the connection is
established without any action on your
part (Bluetooth activated).
The services available depend on
the network, the SIM card and the
compatibility of the Bluetooth devices
used. Check in your telephone's
manual and with your service provider
for the services available to you.
The ability of the system to connect with
just one profile depends on the telephone.
All three profiles may connect by default.
Go to the Brand's website for more information
(compatibility, additional help, ...).
To modify the connection profile
:
Automatic reconnection
Press the "details" button of a paired
device.
Press the "
PHONE
" button to go to
the secondary page.
Press "
OK
" to confirm.
Select one or more profiles.
The profiles compatible with the system
are HFP, OPP, PBAP, A2DP, AVRCP,
MAP and PAN.
The system offers to connect the telephone
with 3 profiles:
- "
Telephone
" (hands-free kit, telephone
only),
- "
Streaming
" (wireless playing of the audio
files on the telephone),
- "
Internet data
".
130
1
Audio and Telematics
Transversal-Citroen_en_Chap02_RCC-2-2-0_ed01-2016
Receiving a call
An incoming call is announced by a ring and a
superimposed display in the screen.
Make a short press on the steering
mounted
PHONE
button to accept an
incoming call.
Make a long press
on the steering mounted
PHONE
button to reject the call.
Or
And
Press "
End call
".
Press on the name of the telephone
chosen in the list to disconnect it.
Press again to connect it.
Press the basket at the top right
of the screen to display a basket
alongside the telephone chosen.
Press the basket alongside the
telephone chosen to delete it.
Managing paired telephones
This function allows the connection or
disconnection of a peripheral device as
well as the deletion of a pairing.
Press
Telephone
to display the
primary page.
Press the "
PHONE
" button to go to
the secondary page.
Press "
Bluetooth connection
" to
display the list of paired peripheral
devices.
Deleting a telephone
Using the telephone is not
recommended while driving.
Park the vehicle.
Make the call using the steering
mounted controls.
Making a call
Calling a new number
Press
Telephone
to display the
primary page.
Enter the phone number using the
digital keypad.
Press "
Call
" to start the call.
131
.
4
3
5
Audio and Telematics
Transversal-Citroen_en_Chap02_RCC-2-2-0_ed01-2016
on the steering mounted button.
Calling a contact
Setting the ringtone
Press
Telephone
to display the
primary page.
Or make a long press
on the steering mounted
PHONE
button.
Press "
Contacts
".
Select the desired contact from the list offered.
Press "
Call
".
Calling a recently used number
Press
Telephone
to display the
primary page.
Make a long press
Press "
Recent calls
".
Select the desired contact from the list offered.
It is always possible to make a call
directly from the telephone; as a safety
measure, first park the vehicle.
Or
Press
Telephone
to display the
primary page.
Press "
Ring volume
" to display the
volume bar.
Press the arrows or move the cursor
to set the ring volume.
Press the "
OPTIONS
" button to go to
the secondary page.
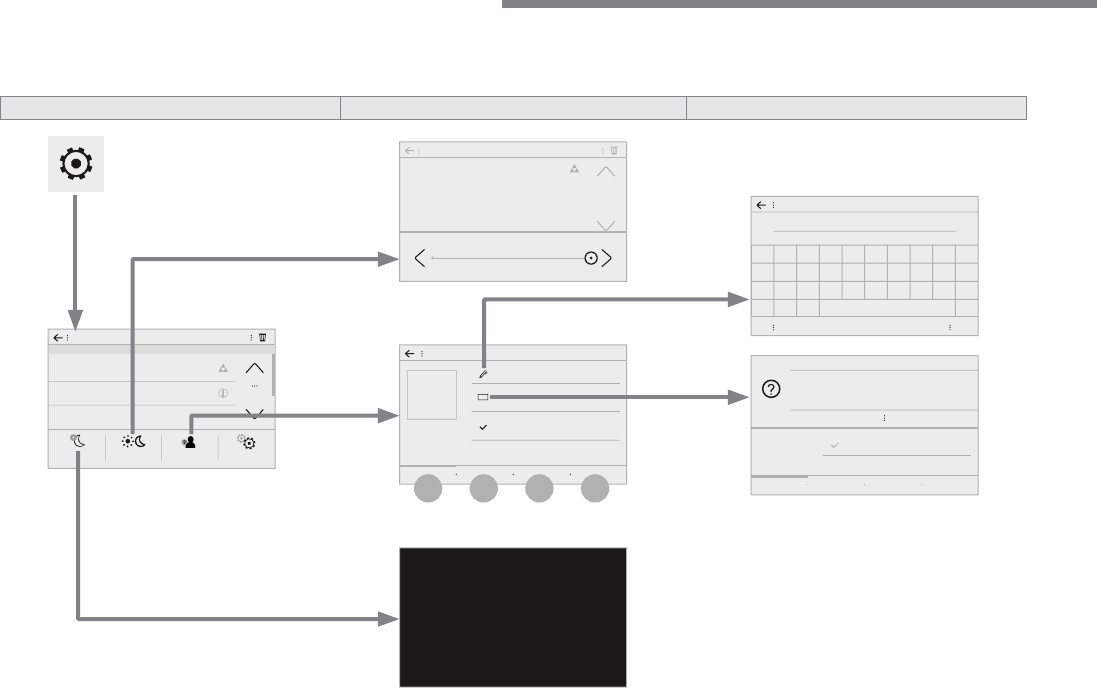
132
3
4
1
2
Audio and Telematics
Transversal-Citroen_en_Chap02_RCC-2-2-0_ed01-2016
S e t t i n g s
According to version / according to equipment
Level 1
Level 2
Level 3
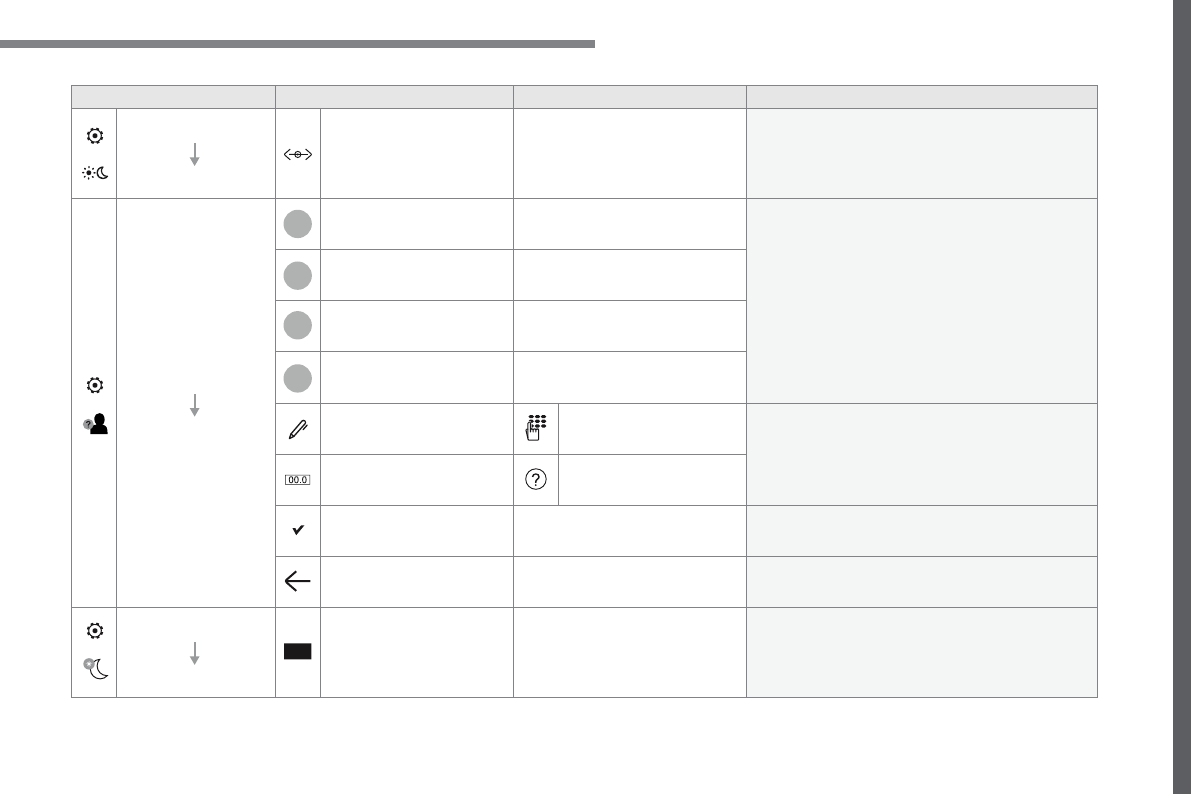
133
.
1
2
3
4
Audio and Telematics
Transversal-Citroen_en_Chap02_RCC-2-2-0_ed01-2016
Level 1
Level 2
Level 3
Comments
Settings
Brightness
Ambience
Move the cursor to adjust the brightness of the
screen and/or of the instrument panel.
Settings
Profiles
Profile 1
Select a profile.
Profile 2
Profile 3
Common profile
Name:
Profile name
modification
Configure the profiles.
Reset the profile
Yes / No
Profile activated
Activate/deactivate the profile selected.
Save the settings.
Settings
Dark
Function which switches off the lit display.
Pressing the screen reactivates it.
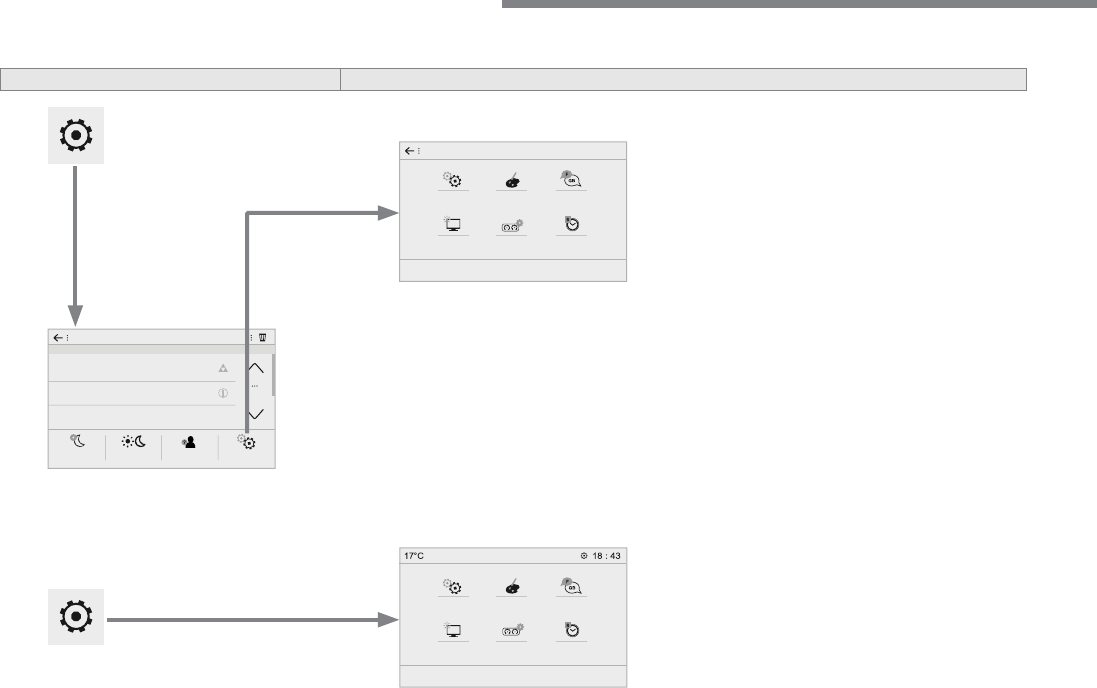
134
Audio and Telematics
Transversal-Citroen_en_Chap02_RCC-2-2-0_ed01-2016
According to equipment
Level 1
Level 2
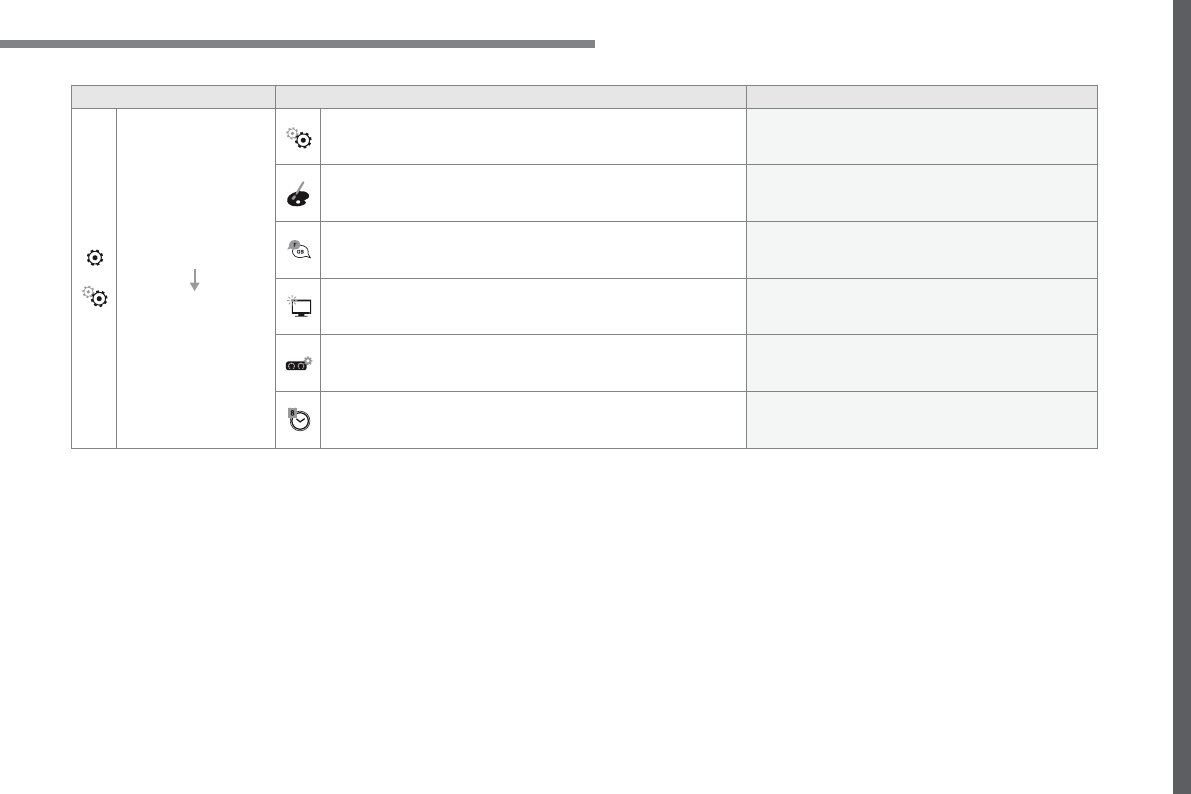
135
.
Audio and Telematics
Transversal-Citroen_en_Chap02_RCC-2-2-0_ed01-2016
Level 1
Level 2
Comments
Settings
Configuration
System configuration
Configure certain system parameters.
Ambience
Select an ambience for the screen integrated in
the system.
Language
Select the display language for the the screen
and/or the instrument panel.
Screen configuration
Set the configuration of the screen and/or the
instrument panel.
Customization
Configure the instrument panel for a personalised
display.
Date and time
Set the date and time and select the display
format.
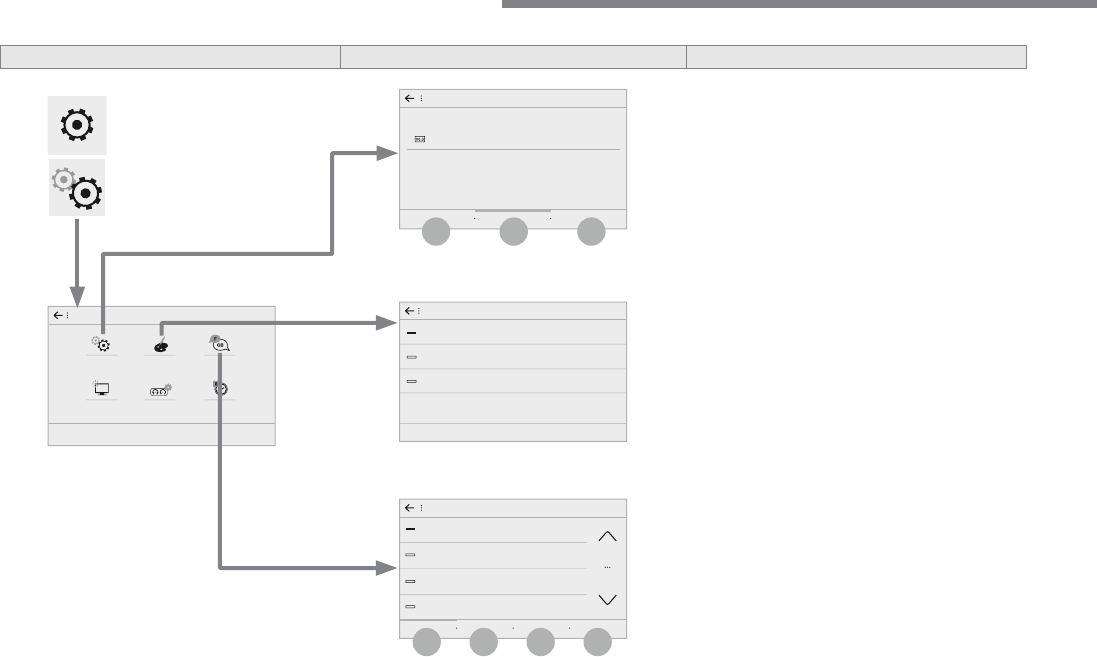
136
6
5
7
8
9
10
11
Audio and Telematics
Transversal-Citroen_en_Chap02_RCC-2-2-0_ed01-2016
Level 1
Level 2
Level 3
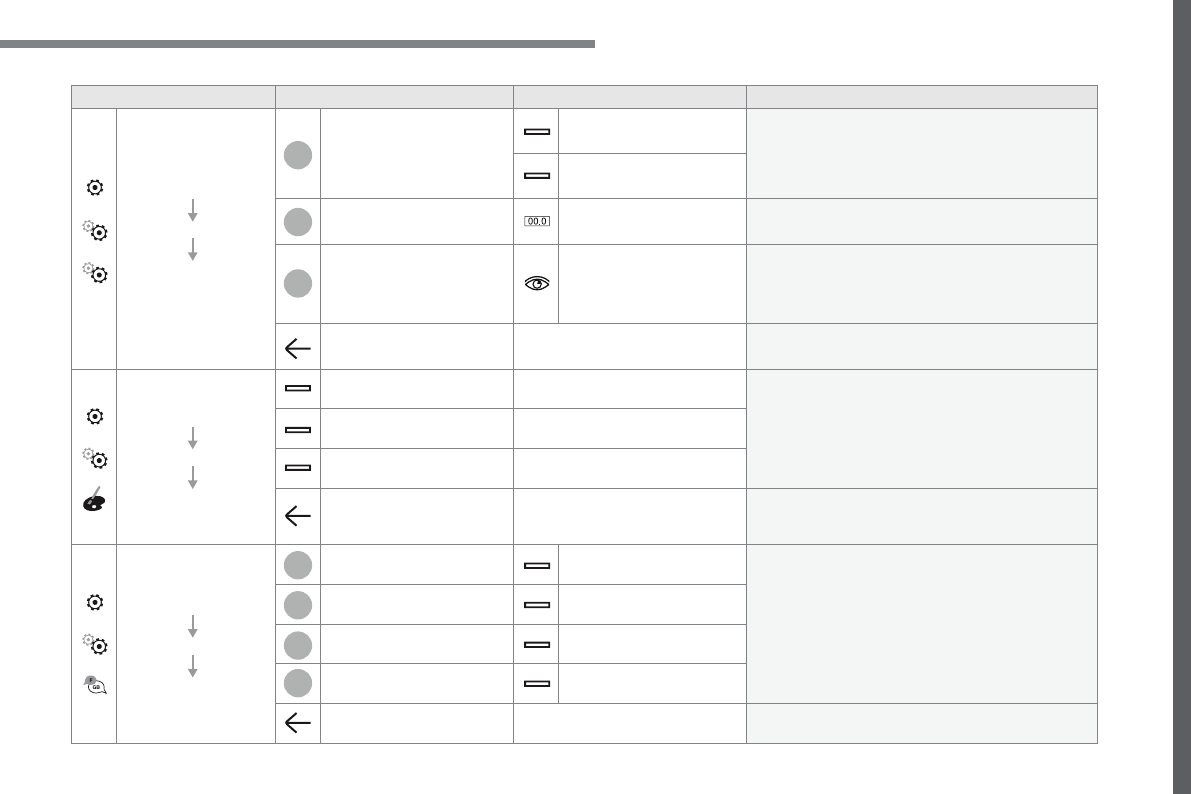
137
.
6
5
7
8
9
10
11
Audio and Telematics
Transversal-Citroen_en_Chap02_RCC-2-2-0_ed01-2016
Level 1
Level 2
Level 3
Comments
Settings
Configuration
System
configuration
Units
Distance and fuel
consumption
Configure the display units for the distance,
consumption and temperature.
Temperatures
Factory settings
Reset
Restore the original settings.
System info
View
Consult the version of the different modules
installed in the system.
Save the parameters.
Settings
Configuration
Ambience
Select an ambience for the screen integrated in
the system.
Confirm the selection and start the change of
ambience.
Settings
Configuration
Language
All
Select the display language for the screen and/or
the instrument panel.
Europe
Asia
America
Save the parameter.
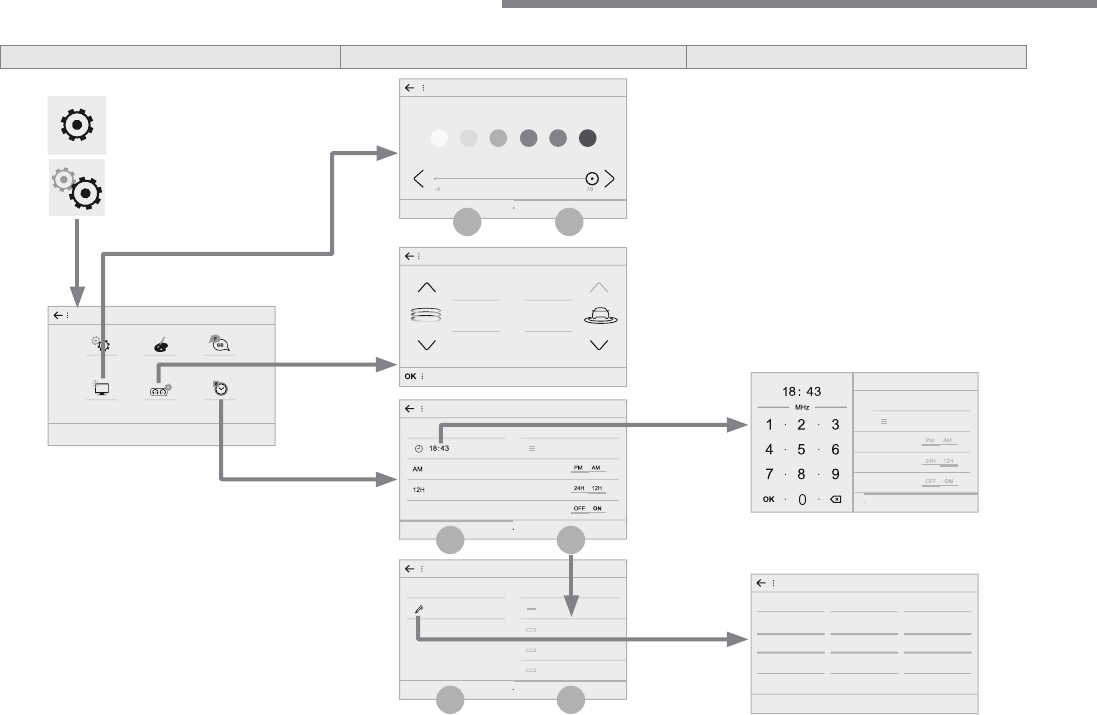
138
14
15
14
15
12
13
Audio and Telematics
Transversal-Citroen_en_Chap02_RCC-2-2-0_ed01-2016
Level 1
Level 2
Level 3
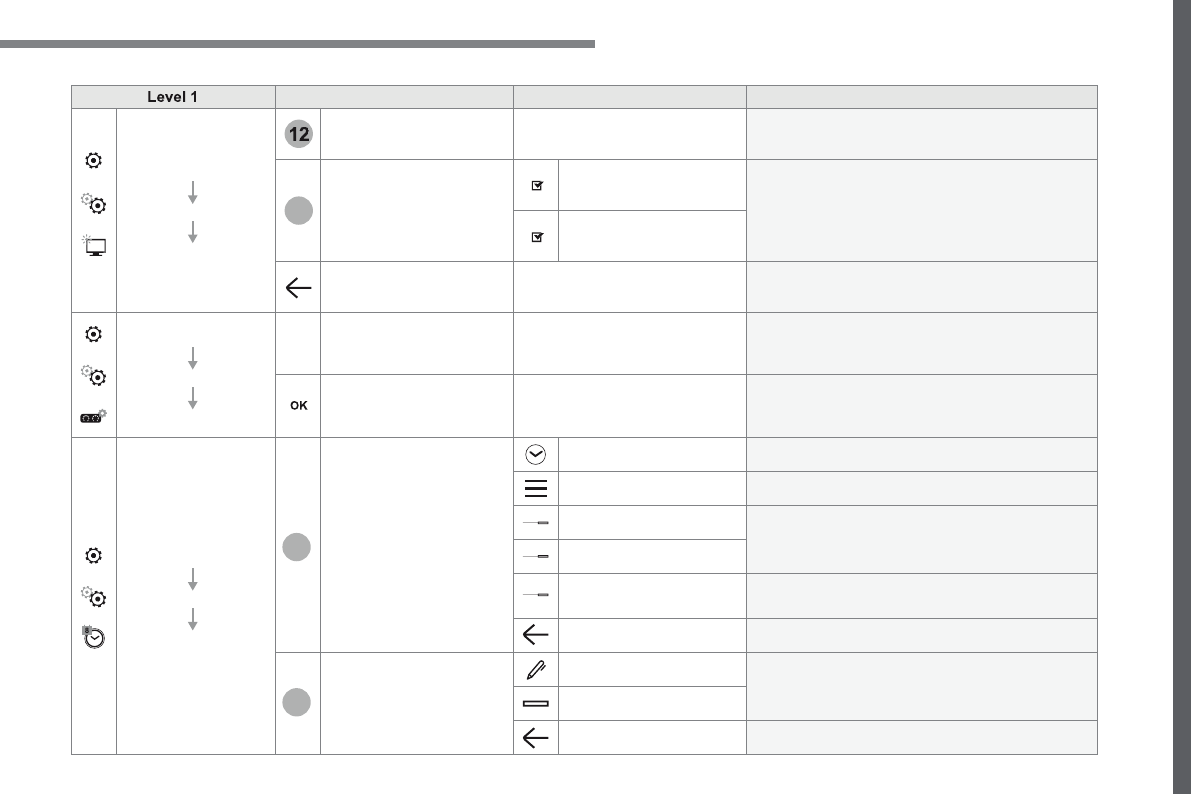
139
.
12
13
14
15
Audio and Telematics
Transversal-Citroen_en_Chap02_RCC-2-2-0_ed01-2016
Level 1
Level 2
Level 3
Comments
Settings
Configuration
Screen
configuration
Brightness
Select the display brightness level.
Animation
Automatic scrolling
Activate or deactivate the parameters.
Animated transitions
Save the parameters.
Settings
Configuration
Temperature conditioning
Customization
Choose and select the display information
required.
Confirm
Confirm the selections.
Settings
Configuration
Date and time
Time
Time
Set the time.
Time Zone
Set the time zone.
AM
Select the display format.
12h
GPS Synchronisation
Activate or deactivate the synchronisation with the
satellites.
Save the settings.
Date
Date
Set the date and select the display format.
Setting the date
Save the settings.
140
1
Audio and Telematics
Transversal-Citroen_en_Chap02_RCC-2-2-0_ed01-2016
Press
Settings
to display the primary
page.
Profile settings
Adjust the brightness
Press "
OK
" to save.
Select "
Profile 1
" or "
Profile 2
" or
"
Profile 3
" or "
Common profile
".
Press "
Profiles
".
Press this button to enter a name for
the profile using the virtual keypad
As a safety measure and because it
requires the sustained attention of the
driver, changes to settings must only be
done with the
vehicle stationary
.
vehicle stationary . vehicle stationary
Press this button to activate the
profile.
Press this button to initialise the
profile selected.
Press
Settings
to display the primary
page.
Move the cursor to adjust the brightness
of the screen and/or of the instrument
panel (according to version).
Press
Brightness
.
Press in the grey zone to confirm.
Press the back arrow to confirm.
Press the back arrow again to
confirm.
141
.
5
6
7
12
13
Audio and Telematics
Transversal-Citroen_en_Chap02_RCC-2-2-0_ed01-2016
Press
Settings
to display the primary
page.
Press
Settings
to display the primary
page.
Press
Settings
to display the primary
page.
Press "
Configuration
" to go to the
secondary page.
Press "
Configuration
" to go to the
secondary page.
Press "
Configuration
" to go to the
secondary page.
Press "
System configuration
".
Press "
Screen configuration
".
Press "
Units
" to change the units
for distance, fuel consumption and
temperature.
Select "
Language
" to change the
language.
Activate or deactivate: "
Automatic
scrolling
".
Select "
Animated transitions
".
Move the cursor to set the brightness
of the screen and/or instrument panel
(according to version).
Press "
Factory settings
" to return to
the initial settings.
Press "
System info
" to display the
versions of the different modules
installed in the system.
Modifying system settings
Returning the system to factory settings
activates the English language by
default (according to version).
Press "
Animation
".
Press "
Brightness
".
Select the language
Press the back arrow to confirm.
Press the back arrow to confirm.
Press the back arrow to confirm.
142
15
14
Audio and Telematics
Transversal-Citroen_en_Chap02_RCC-2-2-0_ed01-2016
Press
Settings
to display the primary
page.
Select "
Date
".
Select "
Time
".
Press "
Date and time
".
Adjustment of the time and date is only
available if "GPS Synchronisation:" is
deactivated.
The change between winter and
summer time is done by changing the
time zone.
The system does not automatically
manage the change between winter
and summer time (depending on the
country of sale).
Setting the time
Press this button to define the date.
Press this button to adjust the time
using the virtual keypad.
Press the back arrow to save the
date.
Press this button to define the time
z o n e .
Select the display format of the date.
Select the display format for the time
(12h / 24h).
Activate or deactivate
synchronisation with satellites (UTC).
Press
Settings
to display the primary
page.
Press "
Date and time
".
Setting the date
Press "
Configuration
" to go to the
secondary page.
Press "
Configuration
" to go to the
secondary page.
Press "
OK
" to save the time.
Press the back arrow to save the
settings.
Press the back arrow again to
confirm.
143
.
Audio and Telematics
Transversal-Citroen_en_Chap02_RCC-2-2-0_ed01-2016
Radio
QUESTION
ANSWER
SOLUTION
The quality of reception of
the radio station listened
to gradually deteriorates
or the stored stations do
not function (no sound,
87.5 Mhz is displayed...).
The vehicle is too far from the transmitter used by the station
listened to or there is no transmitter in the geographical area
through which the vehicle is travelling.
Activate the "RDS" function by means of the
upper band to enable the system to check
whether there is a more powerful transmitter in
the geographical area.
The environment (hills, buildings, tunnels, basement car parks...)
block reception, including in RDS mode.
This phenomenon is normal and does not indicate
a fault with the audio system.
The aerial is absent or has been damaged (for example when going
through a car wash or into an underground car park).
Have the aerial checked by a franchised dealer.
I cannot find some radio
stations in the list of
stations received.
The station is not received or its name has changed in the list.
Press the round arrow on the "List" tab of the
"Radio" page.
Some radio stations send other information in place of their name
(the title of the song for example).
The system interprets this information as the name of the station.
The name of the radio
station changes.
Frequently asked questions
The following table groups together the answers to the most frequently asked questions concerning your audio system.
144
Audio and Telematics
Transversal-Citroen_en_Chap02_RCC-2-2-0_ed01-2016
Media
QUESTION
ANSWER
SOLUTION
Playback of my USB
memory stick starts only
after a very long wait
(around 2 to 3 minutes).
Some files supplied with the memory stick may greatly slow down
access to reading the memory stick (multiplication by 10 of the
catalogue time).
Delete the files supplied with the memory stick
and limit the number of sub-folders in the file
structure on the memory stick.
Some characters in the
media information are not
displayed correctly while
playing.
The audio system does not display some types of characters.
Use standard characters to name tracks and
folders.
Playing of streaming files
does not start.
The peripheral device connected does not support automatic play.
Start the playback from the device.
The names of tracks and
the track length are not
displayed on the screen
when streaming audio.
The Bluetooth profile does not allow the transfer of this information.
145
.
Audio and Telematics
Transversal-Citroen_en_Chap02_RCC-2-2-0_ed01-2016
QUESTION
ANSWER
SOLUTION
I cannot connect my
Bluetooth telephone.
The telephone's Bluetooth function may be switched off or the
telephone may not be visible.
Check that your telephone's Bluetooth function is
switched on.
Check in the telephone settings that it is "visible
to all".
The Bluetooth telephone is not compatible with the system.
You can check the compatibility of your telephone
at the Brand's website (services).
The volume of the
telephone connected
in Bluetooth mode is
inaudible.
The volume depends both on the system and on the telephone.
Increase the volume of the audio system, to
maximum if required, and increase the volume of
the telephone if necessary.
The ambient noise level has an influence on the quality of telephone
communication.
Reduce the ambient noise level (close the
windows, reduce the booster fan speed, slow
down, ...).
Contacts are not shown in
alphabetical order.
Some telephones offer display options. Depending on the settings
chosen, contacts can be transferred in a specific order.
Modify the display setting in the telephone
directory.
Telephone

146
Audio and Telematics
Transversal-Citroen_en_Chap02_RCC-2-2-0_ed01-2016
QUESTION
ANSWER
SOLUTION
In changing the setting
of treble and bass the
equalizer setting is
deselected.
The selection of an equalizer setting imposes the settings for treble
and bass and vice-versa.
Modify the treble and bass or equalizer settings to
obtain the desired musical ambience.
In changing the equalizer
setting, treble and bass
return to zero.
When changing the
balance settings, the
distribution setting is
deselected.
The selection of a distribution setting imposes the balance settings
and vice-versa.
Modify the balance or distribution settings to
obtain the desired musical ambience.
When changing a
distribution setting,
the balance setting is
deselected.
There is a difference in
sound quality between the
different audio sources.
For optimum sound quality, the audio settings can be adapted to
the different sound sources, which may result in audible differences
when changing source.
Check that the audio settings are adapted to the
sources listened to. Adjust the audio functions to
the middle position.
With the engine off, the
system switches off after a
few minutes of use.
When the engine is switched off, the system's operating time
depends on the state of charge of the battery.
The switch-off is normal: the system switches to economy mode and
switches off to prevent discharging of the vehicle's battery.
Start the vehicle's engine to increase the battery
charge.
Settings
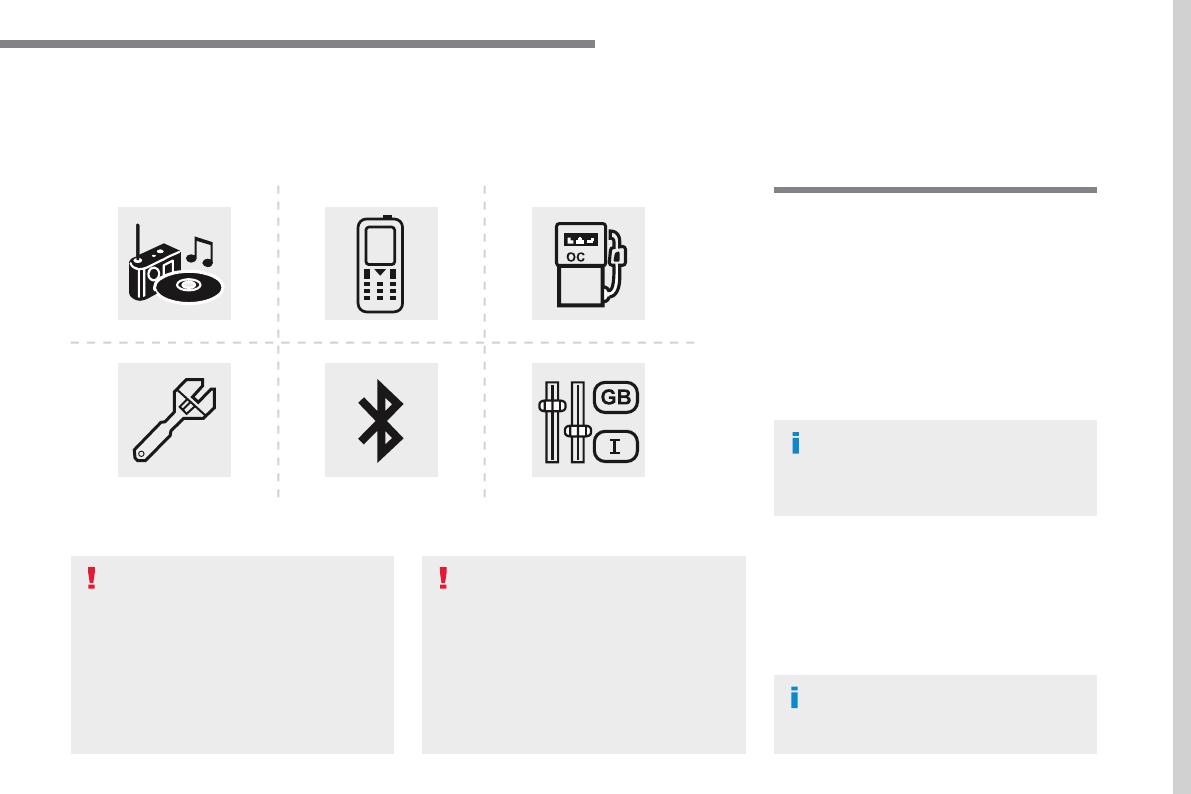
147
.
Audio and Telematics
Transversal-Citroen_en_Chap03_RD6_ed01-2016
B l u e t o o t h ® audio system
Contents
First steps 148
Steering mounted controls - Type 1 149
Steering mounted controls - Type 2 150
Menus 151
Radio 152
DAB (Digital Audio Broadcasting) radio 154
Media 156
Telephone 161
Frequently asked questions 166
Your audio system is coded in such
a way that it will only operate in your
vehicle.
All work on the system must be
carried out exclusively by a dealer or
qualified workshop, to avoid any risk of
electrocution, fire or mechanical faults.
To avoid discharging the battery, the
audio system may switch off after a few
minutes if the engine is not running.
The different functions and adjustments
described vary according to the version
and configuration of your vehicle.
As a safety measure and because it
requires the sustained attention of the
driver, the pairing of your Bluetooth
telephone to the Bluetooth hands-free
audio system must only be carried out
with the
vehicle stationary
and the
ignition on.
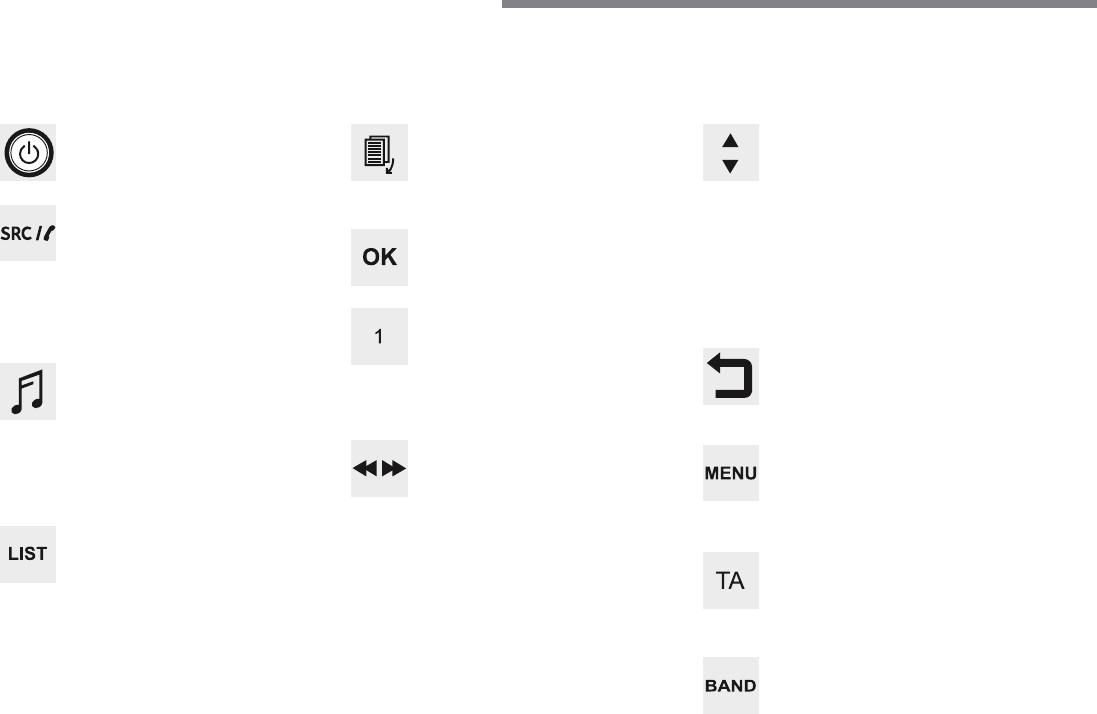
148
Audio and Telematics
First steps
Press: On / Off
Rotate: adjust volume.
Short press: change audio source
(Radio; USB; AUX (if a device is
connected); CD; Streaming).
Long press: display the
Telephone
menu (if a telephone is connected).
Radio
:
Short press: display the list of radio
stations.
Long press: update the list.
Media:
Short press: display the list of folders.
Long press: display the sorting
options.
Select the screen display mode,
between:
Date; Audio functions; Trip computer;
Telephone.
Adjust audio settings:
Front/rear fader; left/right balance;
bass/treble; loudness; audio
ambience.
Activation / Deactivation of automatic
volume adjustment (linked to the
speed of the vehicle).
Radio
:
Manual step by step search up /
down for radio stations.
Select previous / next MP3 track.
Media:
Select previous / next folder / genre /
artist / playlist on the USB device.
Scroll in a list.
Abandon the current operation.
Go up one level (menu or folder).
Confirm or display contextual menu.
Buttons 1 to 6.
Short press: select the preset radio
station.
Long press: preset a station.
Radio:
Automatic step by step search up /
down for radio stations.
Media:
Select previous / next CD, USB,
streaming track.
Scroll in a list.
Access to main menu.
Activate / Deactivate TA (traffic
announcements)
Long press: select type of
announcement.
Select waveband: FM / DAB / AM.
149
.
Audio and Telematics
Transversal-Citroen_en_Chap03_RD6_ed01-2016
Steering mounted controls - Type 1
Radio
:
Short press: display the list of radio
stations.
Long press: update the list.
Media
:
Short press: display the list of folders.
Long press: display the sorting
options.
Decrease volume.
Radio
:
Select the previous / next preset
radio station.
Select the previous / next item in a
menu or a list.
Media
:
Select of the previous / next track.
Select the previous / next item in a
menu or a list.
Mute / Restore sound by
simultaneously pressing the increase
and decrease volume buttons.
Other than telephone calls
:
Short press: change audio source
(Radio; USB; AUX (if a device is
connected); CD; Streaming), confirm
if the "
Telephone
" menu is open.
Long press: open the "
Telephone
"
menu.
In the event of a telephone call
:
Short press: accept the call.
Long press: reject the call.
During a telephone call:
Short press: open the contextual
telephone menu.
Long press: end the call.
Confirm a selection.
Increase volume.
150
Audio and Telematics
Steering mounted controls - Type 2
Decrease volume.
Mute / Restore sound.
Other than telephone call
:
Short press: change audio source
(Radio; USB; AUX (if a device is
connected); CD; Streaming), confirm
if the "
Telephone
" menu is open.
Long press: open the "
Telephone
"
menu.
In the event of a telephone call:
Short press: accept the call.
Long press: reject the call.
During a telephone call:
Short press: open the contextual
telephone menu.
Long press: end the call.
Increase volume.
Access to the main menu.
Start voice recognition of your
smartphone via the system.
Radio
:
Short press: display the list of radio
stations.
Long press: update the list.
Media:
Short press: display the list of folders.
Long press: display the sorting
options.
Radio:
Select the previous / next preset
radio station.
Select the previous / next item in a
menu or a list.
Media:
Select the previous / next track.
Select the previous / next item in a
menu or a list.
Press the thumbwheel: confirm.
151
.
Audio and Telematics
Transversal-Citroen_en_Chap03_RD6_ed01-2016
Menus
"
Multimedia
": Media settings, Radio
settings.
D e p e n d i n g o n v e r s i o n .
Move from one menu to another.
Enter a menu.
"
Trip computer
".
"
Maintenance
": Diagnosis, Warning
log, ...
"
Connections
": Manage
connections, search for devices.
"
Telephone
": Call, Directory
management, Telephone
management, End call.
"
Personalisation-configuration
":
Define the vehicle settings, Choice
of language, Display configuration,
Choice of units, Date and time
adjustment.
Press the "
MENU
" button.
152
Audio and Telematics
RDS
Short procedure
Long procedure
The external environment (hills,
buildings, tunnels, basement car
parks, ...) may block reception,
including in RDS mode. This is a
normal effect of the way in which radio
waves are transmitted and does not
indicate any failure of the audio system.
Press the "
MENU
" button.
Select "
Audio functions
".
Press
OK
.
Select the "
FM waveband
preferences
" function.
Press
OK
.
Select "
RDS
".
Press
OK
, RDS is displayed in the
screen.
In "
Radio
" mode, press the
OK
button to
activate or deactivate RDS directly.
RDS, if activated, enables you to continue
listening to the same station by automatic
retuning to alternative frequencies.
However, in certain conditions, coverage
of an RDS station may not be assured
throughout the country as radio stations
do not cover 100 % of the territory. This
explains the loss of reception of a station
that can occur during a journey.
If RDS is not available, the RDS symbol
appears barred in the screen.
Radio
Selecting a station
Press the
SOURCE
button
repeatedly and select the radio.
Press this button to select a
waveband (FM / AM / DAB).
Press one of the buttons to carry
out an automatic search for radio
stations.
Press one of the buttons to carry out
a manual search up / down for radio
frequencies.
Press this button to display the list of
stations received locally.
To update this list, press for more
than two seconds. The sound is cut
while updating.
153
.
Audio and Telematics
Transversal-Citroen_en_Chap03_RD6_ed01-2016
Receiving TA messages
Press the
TA
button to activate or
deactivate traffic messages.
The TA (Traffic Announcement)
function gives priority to TA alert
messages. To operate, this function
needs good reception of a radio station
transmitting this type of message.
When a traffic report is transmitted, the
current audio source (Radio, CD, ...)
is interrupted automatically to play the
TA message. Normal playback of the
audio source resumes at the end of the
transmission of the message.
Take care when increasing the volume
while listening to TA messages. The
volume may prove too high on return to
the original audio source.
Select "
RadioText (TXT) display
"
and confirm
OK
to save.
Select or deselect categories.
With the radio displayed on the
screen, press
OK
to display the
contextual menu.
Make a long press on this button to
display the list of categories.
Receiving INFO messages
The INFO function gives priority to TA
traffic announcements. To be active,
this function needs good reception
of a radio station that transmits this
type of message. When a message is
transmitted, the current audio source
(Radio, CD, USB, ...) is interrupted
automatically to receive the INFO
message. Normal play resumes at the
end of the message transmission.
Radio text is information transmitted by
the radio station related to the current
programme or song.
Display RADIO TEXT
Activate or deactivate the reception of
the corresponding messages.
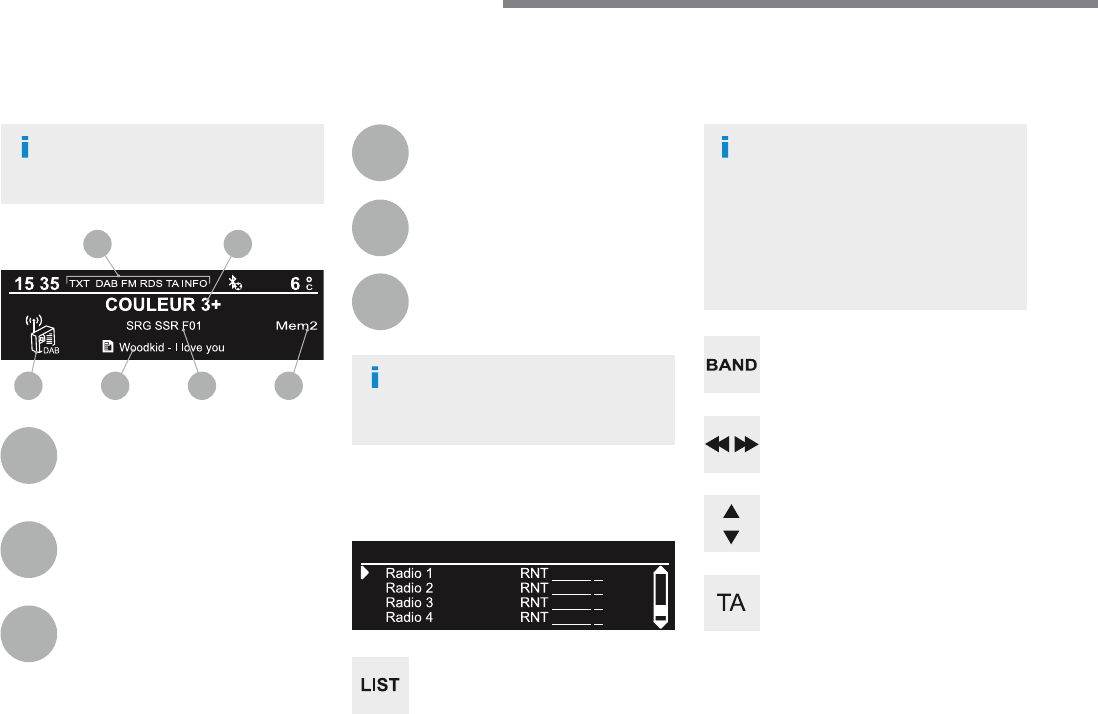
154
1
3
5
2
4
6
6 5 4 3
21
Audio and Telematics
Long press: select the desired
categories of announcements from
Transport, News, Entertainment and
Flash special (availability according
to the station).
Change of station within the same
"multiplex service".
Starting of a search for the previous /
next "multiplex service".
Change of band (FM1, FM2, DAB,...)
Digital radio provides a superior audio
quality and also additional categories of
traffic announcements (TA INFO).
The different "multiplex services"
offer a choice of radio stations in
alphabetical order.
Terrestrial digital radio
DAB (Digital Audio Broadcasting) radio
Display options:
if active but not available, the display
will be struck out.
A c c o r d i n g t o v e r s i o n
Preset radio station, buttons 1 to 6.
Short press: select the preset radio
station.
Long press: preset a radio station.
Display the name of the multiplex
service being used.
Display the list of all radio stations
and "multiplexes".
Represents the signal strength for
the band being listened to.
Display RadioText (TXT) for the
current radio station.
Display the name of the current radio
station.
If the current "DAB" radio station is not
available on "FM", "DAB FM" is struck out.
When changing region, an update
of the list of preset radio stations is
advisable.
155
.
Audio and Telematics
Transversal-Citroen_en_Chap03_RD6_ed01-2016
Select "
Multimedia
" and confirm.
Select "
DAB / FM auto tracking
"
and confirm
Press the "
MENU
" button.
When the radio station is displayed in
the screen, press on "
OK
" to display
the contextual menu.
(Frequency search (RDS), DAB / FM
auto tracking, RadioText (TXT) display,
Information on the station, ...)
DAB / FM tracking
"DAB" does not have 100% coverage of
the country.
When the digital signal is weak,
"DAB / FM auto tracking" allows you to
continue listening to the same station,
by automatically switching to the
corresponding analogue "FM" station
(if there is one).
When "DAB / FM auto tracking" is
active, the DAB station will be selected
automatically.
If "DAB / FM auto tracking" is
activated, there will be a difference of
a few seconds in the programme when
the system changes to analogue "FM"
radio, with sometimes a variation in
volume.
If the "DAB" station you are listening
to is not available on "FM" ("
DAB/FM
"
option barred), or if "DAB / FM auto
tracking" is not on, the sound will be cut
when the digital signal is too weak.
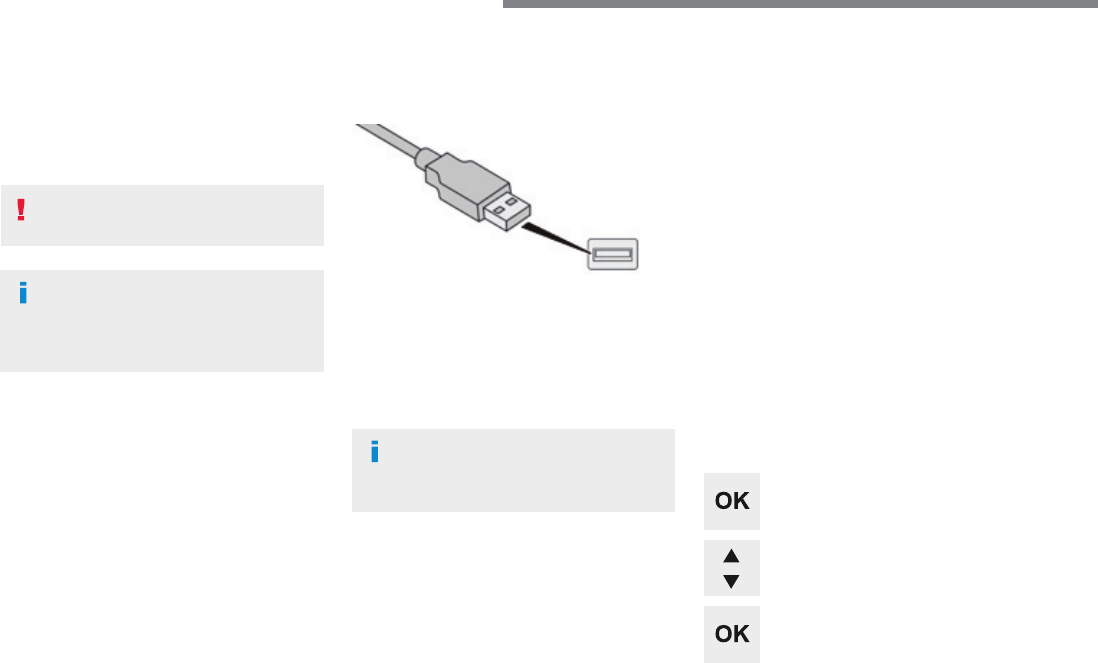
156
Audio and Telematics
Media
USB port
This unit consists of a USB port and an
auxiliary Jack socket, depending on version.
Insert a USB memory stick into the USB port
or connect a USB peripheral device to the USB
port using a suitable cable (not supplied).
The system changes automatically to "USB"
source.
The system creates playlists (temporary
memory), which can take from a few seconds
to several minutes on the first connection.
Reducing the number of non-music files and
the number of folders reduces this waiting
time. Playlists are updated every time a new
USB memory stick is connected.
Press this button to display the
contextual menu for the Media
function.
Press this button to select the play
mode.
Press this button to confirm.
Play mode
The play modes available are:
-
Normal
: the tracks are played in order,
depending on the classification of the
selected files.
-
Random
: the tracks in an album or folder
are played in a random order.
-
Random on all media
: all of the tracks
saved in the media are played in random
order.
-
Repeat
: the tracks played are only those
from the current album or folder.
The choice made is displayed at the top of the
screen.
While connected by USB, the portable
device may be charged automatically.
To protect the system, do not use a
USB hub.
Any additional equipment connected
to the system must conform to
the standard of the product or
standard IEC 60950-1.
157
.
Audio and Telematics
Transversal-Citroen_en_Chap03_RD6_ed01-2016
Choosing a track to play
F i l e c l a s s i fi c a t i o n
P l a y i n g fi l e s
Make a long press on this button to
display the different classifications.
Choose by "
Folder
" / "
Artist
" /
"
Genre
" / "
Playlist
" * .
Press
OK
to select the desired
classification, then press
OK
again
to confirm.
Make a long press on this button to
display the chosen classification.
Navigate in the list using the left /
right and up / down buttons.
Confirm the selection by
pressing
OK
.
Press one of these buttons to go to
the previous / next track in the list.
Press and hold one of these buttons
for fast forward or fast back.
Press one of these buttons to go
to the next "
Folder
" / "
Artist
" /
"
Genre
" / "
Playlist
" * in the list.
* Depending on availability and the type of
device used.
Press one of these buttons to go to
the previous / next track.
Press one of these buttons to go to
the previous / next folder.
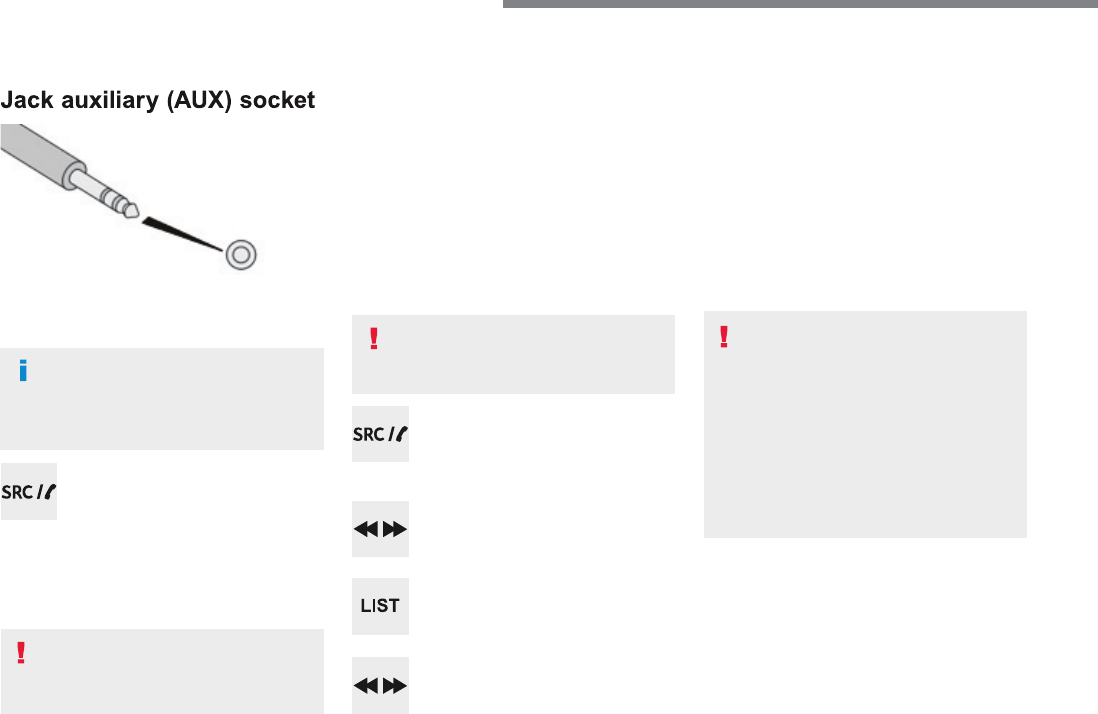
158
Audio and Telematics
Jack auxiliary (AUX) socket
Connect the portable device (MP3 player, …) to
the auxiliary Jack socket using an audio cable
(not supplied).
Press the
SOURCE
button several
times in succession and select
"
AUX
".
First adjust the volume on your portable device
(to a high level). Then adjust the volume on
your audio system. Operation of controls is via
the portable device.
Do not connect a device to both the
Jack auxiliary socket and the USB port
at the same time.
CD player
Insert circular compact discs only.
Some anti-pirating systems, on original discs
or CDs copied using a personal recorder, may
cause faults which are no reflection on the
quality of the vehicle's player.
Insert a CD in the player, play begins
automatically.
To play a disc which has already
been inserted, press the
SOURCE
button several times in succession
and select
CD
.
Press one of the buttons to select a
track on the CD.
Press the
LIST
button to display the
list of tracks on the CD.
Press and hold one of the buttons for
fast forward or fast back.
Playing an MP3 compilation
Insert an MP3 CD compilation in the player.
The audio equipment searches for all of the
music tracks, which may take anything between
a few seconds and several tens of seconds,
before play begins.
On a single disc, the CD player can
read up to 255 MP3 files spread over
8 folder levels.
However, it is advisable to keep to a
limit of two levels to reduce the access
time before the CD is played.
While the CD is being played, the folder
structure is not followed.
All of the files are displayed on a single
level.
External CD players connected via the
USB port are not recognised by the
system.
Any additional equipment connected
to the system must conform to the
standard of the product or standard
IEC 60950-1.
159
.
Audio and Telematics
Transversal-Citroen_en_Chap03_RD6_ed01-2016
To play a disc which has already
been inserted, press the
SOURCE
button several times in succession
and select
CD
.
Press one of the buttons to select a
folder on the CD.
Press one of the buttons to select a
track on the CD.
Press the
LIST
button to display
the list of directories of the MP3
compilation.
Press and hold one of the buttons for
fast forward or backward play.
Bluetooth
®
Bluetooth ®
Bluetooth
audio streaming
® audio streaming
®
Streaming allows music files on the telephone
to be played via the audio system.
Connect the telephone.
(Refer to the "
Pairing a telephone
" section).
Audio files can be selected using the buttons
on the audio system control panel and the
steering mounted controls ** . Contextual
information may be displayed in the screen.
Activate the streaming source by
pressing the
SOURCE
* b u t t o n .
Connecting Apple
®
Connecting Apple ®
Connecting Apple
players
® players
®
Connect the Apple
®
player to the USB port
® player to the USB port
®
using a suitable cable (not supplied).
Play starts automatically.
Control is via the audio system.
The classifications available are those of the
portable device connected (artists / albums /
genres / playlists).
The version of software in the audio system
may not be compatible with the generation of
your Apple
®
player.
® player.
®
* In certain cases, play of the audio files must
be initiated from the keypad.
** If the telephone supports the function. The
audio quality depends on the quality of
transmission by the telephone.
160
Audio and Telematics
The CD player can play files with .mp3, .wma,
.wav and .aac file extensions, with a bit rate of
of 32 to 320 Kbps.
It also supports TAG mode (ID3 tag, WMA TAG).
Other file types (mp4, ...) may be played.
Files of the ".wma" type should be to the
wma9 standard.
The sampling rates supported are 11, 22, 44
and 48 KHz.
Via the USB port, the system can play audio
files with the extension ".mp3, .wma, .wav, .cbr,
.vbr" with a bit rate of 32 to 320 Kbps.
No other file types (.mp4, ...) can be played.
Files of the ".wma" type should be to the
wma9 standard.
The sampling rates supported are 11, 22, 44
and 48 KHz.
File names should have less than
20 characters, avoiding special characters
(e.g.: " ? ; ù) so as to avoid any reading or
display problems.
In order to be able to play a recorded CDR or
CDRW, the ISO 9660 level 1. 2 or Joliet file
format is recommended when recording.
If the disc is recorded in another format, it may
not be played correctly.
It is recommended that the same recording
format is always used for an individual disc,
with as low a speed as possible (4x maximum)
for optimum sound quality.
In the particular case of a multi-session CD, the
Joliet format is recommended.
Information and advice
To protect the system, do not use a USB hub.
It is recommended that you use
genuine Apple
®
USB cables for correct
® USB cables for correct
®
operation.
Use only USB memory sticks formatted
FAT32 (File Allocation Table).
161
.
Audio and Telematics
Transversal-Citroen_en_Chap03_RD6_ed01-2016
Telephone
Pairing a Bluetooth
®
Pairing a Bluetooth ®
Pairing a Bluetooth
telephone
® telephone
®
As a safety measure and because it
requires the sustained attention of the
driver, the pairing of your a Bluetooth
telephone to the Bluetooth hands-free
audio system must only be carried
out with the vehicle stationary and the
ignition on
The services available depend on
the network, the SIM card and the
compatibility of the Bluetooth telephone
used.
Refer to the instructions for your
telephone and to your service provider
for the services available to you.
Activate the telephone's Bluetooth
function and ensure that it is "visible to
all" (telephone configuration).
Go to the Brand's website for more
information (compatibility, more
help, ...).
* If your telephone is fully compatible.
The "
Telephone
" menu gives access to the
following functions in particular: "
Directory
" * ,
"
Calls list
", "
View paired devices
".
Depending on the type of telephone, you may
be asked to accept or confirm access by the
system to each of these functions.
If pairing fails, the number of attempts is not
restricted.
A message appears in the screen confirming
the pairing.
Procedure from the telephone
Completing the pairing
Procedure from the system
Select the name of the system in the
list of devices detected.
To complete the pairing, whichever
procedure is used (from the telephone
or from the system), check that the
code displayed in the system and the
telephone is the same and confirm.
Press the
MENU
button.
Select the "
Connections
" menu.
Confirm with
OK
.
A window is displayed with a search in progress
message.
In the list of devices detected, select a
telephone to pair. Only one telephone can be
paired at a time.
Confirm with
OK
.
Select "
Search for a Bluetooth
device
".
Information and advice
162
Audio and Telematics
Confirm with
OK
.
Confirm with
OK
.
Confirm with
OK
.
Confirm with
OK
.
The telephone connection
automatically includes hands-free
operation and audio streaming.
The ability of the system to connect
to just one profile depends on the
telephone. Both profiles may connect
by default.
A number indicates the profile of the
connection with the system:
- 1 for media or 1 for telephone.
- 2 for media and telephone.
When you delete a pairing in the
system, remember to delete it from your
telephone as well.
Indicates that a device is connected.
Indicates the audio streaming profile.
Indicates the hands-free telephone
profile.
Press the
MENU
button.
Managing connections
Select "
Connections
".
Select "
Connections management
"
and confirm. The list of paired
devices is displayed.
Select a telephone.
Then select and confirm:
- "
Connect telephone
" /
"
Disconnect telephone
":
to connect / disconnect the
telephone or the hands-free kit
only.
- "
Connect media player
" /
"
Disconnect media player
":
to connect / disconnect
streaming only.
- "
Connect telephone +
media player
" / "
Disconnect
telephone + media player
":
to connect / disconnect the
telephone (hands-free kit and
streaming).
- "
Delete connection
": to delete
the pairing.
163
.
Audio and Telematics
Transversal-Citroen_en_Chap03_RD6_ed01-2016
Receiving a call
An incoming call is announced by a ring and a
superimposed display in the screen.
Select the "
YES
Select the " YES Select the "
" tab in the screen
using the buttons.
Confirm with
OK
.
Confirm with
OK
.
Press this button at the steering
mounted controls to accept the call.
Making a call
In the "
Telephone
" menu.
Select "
Call
".
Select "
Calls list
".
Select "
Dial
".
Or
Or
Select "
Directory
".
Press this button for more than
two seconds for access to your
directory, then navigate using the
thumb wheel.
In the "
Telephone
" menu.
Select "
End call
".
Ending a call
During a call, press one of the
buttons for more than 2 seconds.
Confirm with
OK
to end the call.
The system accesses the telephone's
contacts directory, depending on its
compatibility, and while it is connected
by Bluetooth
With certain telephones connected by
Bluetooth, you can send a contact to
the directory of the audio system.
Contacts imported in this way are
saved in a permanent directory
visible to all, whatever the telephone
connected.
The menu for the directory is not
accessible if it is empty.
164
Audio and Telematics
During a call, press
OK
to display the
contextual menu.
In the contextual menu, select "
End
call
" to end the call.
Managing calls
Hang up
(so that the caller cannot hear)
In the contextual menu:
- select "
Micro OFF
" to switch off
the microphone.
- deselect "
Micro OFF
" to switch
the microphone on.
In the contextual menu:
- select "
Telephone mode
" to
transfer the call to the telephone
(for example, to leave the vehicle
while continuing a conversation).
- deselect "
Telephone mode
" to
transfer the call to the vehicle.
Microphone off
Telephone mode
If the contact has been cut off, when you
reconnect on returning to the vehicle,
the Bluetooth connection will be restored
automatically and sound returned to the
system (depending on the compatibility of the
telephone).
In some cases telephone mode must be
activated from the telephone.
From the contextual menu, select
"
DTMF tones
" and confirm to use
the digital keypad to navigate in the
interactive voice response menu.
From the contextual menu, select
"
Switch
" and confirm to return to a
call left on hold.
Interactive voice response
Dual call
Confirm with
OK
.
Confirm with
OK
.
Confirm with
OK
.
Confirm with
OK
.
Confirm with
OK
.
165
.
Audio and Telematics
Transversal-Citroen_en_Chap03_RD6_ed01-2016
To modify the contacts saved in the
system, press
MENU
then select
"
Telephone
" and confirm.
Select "
Directory management
"
and confirm.
You can:
- "
Consult an entry
",
- "
Delete an entry
",
- "
Delete all entries
".
Make a long press on
SRC/TEL
.
The system accesses the telephone's
contacts directory, depending on
its compatibility, and while it is
connected by Bluetooth.
With certain telephones connected
by Bluetooth you can send a contact
to the directory of the audio system.
Contacts imported in this way are
saved in a permanent directory
visible to all, whatever the telephone
connected.
The menu for the directory is not
accessible if it is empty.
Select "
Directory
" to see the list of
contacts.
Directory
Confirm with
OK
.
OR
Voice recognition
This function allows you to use your
smartphone's voice recognition via the system.
To start voice recognition, depending on the
type of steering mounted controls:
Make a long press on the end of the lighting
control stalk.
Press this button.
Voice recognition requires the use of a
compatible smartphone first connected
to the vehicle by Bluetooth.

166
Audio and Telematics
The table below gives answers to the most frequently asked questions on your audio system.
QUESTION
ANSWER
SOLUTION
With the engine off, the
audio system switches off
after a few minutes of use.
When the engine is switched off, the audio system operating time
depends on the state of charge of the battery.
The switch-off is normal: the audio equipment switches to economy
mode and switches off to prevent discharging of the vehicle's
battery.
Start the vehicle's engine to increase the battery
charge.
The message "the audio
system is overheated"
appears on the display.
In order to protect the installation if the surrounding temperature
is too high, the audio system switches to an automatic thermal
protection mode leading to a reduction in volume or CD play
stopping.
Switch the audio system off for a few minutes to
allow the system to cool.
Frequently asked questions
QUESTION
ANSWER
SOLUTION
There is a difference in
sound quality between the
different audio sources
(radio, CD...).
For optimum sound quality, the audio settings (Volume, Bass,
Treble, Ambience and Loudness) can be adapted to the different
sound sources, which may result in audible differences when
changing source (radio, CD...).
Check that the audio settings (Volume, Bass,
Treble, Ambience and Loudness) are adapted to
the sources listened to. It is advisable to set the
audio functions (Bass, Treble, Front-Rear Balance
and Left-Right Balance) to the middle position,
select the musical ambience "None" and set the
loudness correction to the "Active" position in CD
mode or to the "Inactive" position in radio mode.
Radio
167
.
Audio and Telematics
Transversal-Citroen_en_Chap03_RD6_ed01-2016
QUESTION
ANSWER
SOLUTION
The preset stations do
not function (no sound,
87.5 Mhz is displayed...).
An incorrect waveband is selected.
Press the BAND button to return to the waveband
(FM, FM2, DAB, AM) on which the stations are
preset.
The traffic announcement
(TA) is displayed. I do
not receive any traffic
information.
The radio station is not part of the regional traffic information
network.
Tune to a radio station which broadcasts traffic
information.
The quality of reception of
the radio station listened
to gradually deteriorates
or the stored stations do
not function (no sound,
87.5 Mhz is displayed...).
The vehicle is too far from the transmitter used by the station
listened to or there is no transmitter in the geographical area
through which the vehicle is travelling.
Activate the RDS function to enable the system
to check whether there is a more powerful
transmitter in the geographical area.
The environment (hills, buildings, tunnels, underground car parks...) block
reception, including in RDS mode.
This phenomenon is normal and does not indicate
a fault in the audio system.
The aerial is absent or has been damaged (for example when going
through an automatic car wash or into an underground car park).
Have the aerial checked by a franchised dealer.
Sound cut-outs of 1 to
2 seconds in radio mode.
During this brief sound cut-out, the RDS searches for another
frequency giving better reception of the station.
Deactivate the RDS function if the phenomenon is
too frequent and always on the same route.

168
Audio and Telematics
Media
QUESTION
ANSWER
SOLUTION
The Bluetooth connection
is broken.
The state of charge of the device may be too low.
Charge the battery of the portable device.
The message "USB device
error" is displayed in the
screen.
The USB memory stick is not recognised.
The USB memory stick may be corrupt.
Reformat the USB memory stick.
The CD is ejected every
time or is not played.
The CD is upside down, cannot be read, does not contain audio
files or contains audio files of a format not recognised by the audio
system.
The CD is protected by an anti-pirating system not recognised by
the audio system.
- Check that the CD is inserted in the player the
right way up.
- Check the condition of the CD: the CD cannot
be played if it is too damaged.
- Check the content in the case of a recorded
CD: consult the advice in the "Audio" section.
- Due to their quality level, certain writeable
CDs will not be played by the audio system.
The sound from the CD is
poor.
The CD used is scratched or of poor quality.
Insert a good quality CD and store them in
suitable conditions.
The audio settings (base, treble, ambience) are unsuitable.
Return bass and treble settings to 0, without
selecting an ambience.
I am unable to play
the music files on my
smartphone via the USB
port.
Depending on the smartphone, access by the audio system to music
on the smartphone may have to be approved on the latter.
Manual activate the MTP profile on the
smartphone (USB settings menu).
169
.
Audio and Telematics
Transversal-Citroen_en_Chap03_RD6_ed01-2016
QUESTION
ANSWER
SOLUTION
I am unable to access my
voicemail.
Few telephones or service providers allow the use of this function.
Call your voicemail box, via the telephone menu,
using the number supplied by your service
provider.
I am unable to access my
directory of contacts.
Check the compatibility of your telephone.
You did not give access to your contacts when pairing the telephone.
Accept or confirm access by the system to the
contacts on your telephone.
I am unable to continue a
conversation when getting
into my vehicle.
Telephone mode is activated.
Deselect telephone mode to transfer the call to
the vehicle.
I am unable to pair my
telephone by Bluetooth.
Telephones (models, versions of operating systems) have their own
specific aspects in the pairing procedure and some telephones are
not compatible.
Before starting the pairing procedure, delete the
pairing of the telephone from the system AND of
the system from the telephone, so as to see the
compatibility of the telephones.
Telephone


05-16
Transversal-Citroen_en_Chap00_couverture_ed01-2016
4Dconcept
Diadeis
Interak

Transversal-Citroen_en_Chap00_couverture_ed01-2016
16SYSCC040
Anglais
*16SYSCC040*

Annex
Regulatory Notices
Manufacturer: Continental Automotive Czech Republic, s.r.o.
Europe
1999/5/EC Directive regulatory notices
This device has been evaluated against the essential requirements of the 1999/5/EC Directive.
Bulgarian
С настоящето ““Continental Automotive Czech Republic, s.r.o.” декларира, че ““NAC EUR
WAVE2”отговаря на съществените изисквания и другите приложими изисквания на
Директива 1999/5/ЕС.
Croatian
Ovime “Continental Automotive Czech Republic, s.r.o.”, izjavljuje da je ovaj “NAC EUR WAVE2” je
u skladu s osnovnim zahtjevima i drugim relevantnim odredbama Direktive 1999/5/EC.
Czech
““Continental Automotive Czech Republic, s.r.o.” tímto prohlašuje, že tento ““NAC EUR WAVE2”je
ve shodě se základními požadavky a dalšími příslušnými ustanoveními směrnice 1999/5/ES.
Danish
Undertegnede ““Continental Automotive Czech Republic, s.r.o.” erklærer herved, at følgende
udstyr ““NAC EUR WAVE2”overholder de væsentlige krav og øvrige relevante krav i direktiv
1999/5/EF.
Dutch
Hierbij verklaart ““Continental Automotive Czech Republic, s.r.o.” dat het toestel ““NAC EUR
WAVE2”in overeenstemming is met de essentiële eisen en de andere relevante bepalingen van
richtlijn 1999/5/EG.
English
Hereby, ““Continental Automotive Czech Republic, s.r.o.”, declares that this ““NAC EUR WAVE2”is
in compliance with the essential requirements and other relevant provisions of Directive
1999/5/EC.
Estonian
Käesolevaga kinnitab ““Continental Automotive Czech Republic, s.r.o.” seadme ““NAC EUR
WAVE2”vastavust direktiivi 1999/5/EÜ põhinõuetele ja nimetatud direktiivist tulenevatele teistele
asjakohastele sätetele.
German
Hiermit erklärt ““Continental Automotive Czech Republic, s.r.o.”, dass sich das Gerät ““NAC EUR
WAVE2”in Übereinstimmung mit den grundlegenden Anforderungen und den übrigen
einschlägigen Bestimmungen der Richtlinie 1999/5/EG befindet.
Greek
ΜΕ ΤΗΝ ΠΑΡΟΥΣΑ ““Continental Automotive Czech Republic, s.r.o.” ΔΗΛΩΝΕΙ ΟΤΙ ““NAC EUR
WAVE2”ΣΥΜΜΟΡΦΩΝΕΤΑΙ ΠΡΟΣ ΤΙΣ ΟΥΣΙΩΔΕΙΣ ΑΠΑΙΤΗΣΕΙΣ ΚΑΙ ΤΙΣ ΛΟΙΠΕΣ ΣΧΕΤΙΚΕΣ ΔΙΑΤΑΞΕΙΣ
ΤΗΣ ΟΔΗΓΙΑΣ 1999/5/ΕΚ.

Hungarian
Alulírott, ““Continental Automotive Czech Republic, s.r.o.” nyilatkozom, hogy a ““NAC EUR
WAVE2”megfelel a vonatkozó alapvetõ követelményeknek és az 1999/5/EC irányelv egyéb
elõírásainak.
Finnish
““Continental Automotive Czech Republic, s.r.o.” vakuuttaa täten että ““NAC EUR
WAVE2”tyyppinen laite on direktiivin 1999/5/EY oleellisten vaatimusten ja sitä koskevien
direktiivin muiden ehtojen mukainen.
French
Par la présente ““Continental Automotive Czech Republic, s.r.o.” déclare que l'appareil ““NAC EUR
WAVE2”est conforme aux exigences essentielles et aux autres dispositions pertinentes de la
directive 1999/5/CE.
Icelandic
Hér með lýsir ““Continental Automotive Czech Republic, s.r.o.” yfir því að ““NAC EUR WAVE2”er í
samræmi við grunnkröfur og aðrar kröfur, sem gerðar eru í tilskipun 1999/5/EC
Italian
Con la presente ““Continental Automotive Czech Republic, s.r.o.” dichiara che questo ““NAC EUR
WAVE2ӏ conforme ai requisiti essenziali ed alle altre disposizioni pertinenti stabilite dalla
direttiva 1999/5/CE.
Latvian
Ar šo ““Continental Automotive Czech Republic, s.r.o.” deklarē, ka ““NAC EUR WAVE2”atbilst
Direktīvas 1999/5/EK būtiskajām prasībām un citiem ar to saistītajiem noteikumiem.
Lithuanian
Šiuo ““Continental Automotive Czech Republic, s.r.o.” deklaruoja, kad šis ““NAC EUR
WAVE2”atitinka esminius reikalavimus ir kitas 1999/5/EB Direktyvos nuostatas.
Maltese
Hawnhekk, ““Continental Automotive Czech Republic, s.r.o.”, jiddikjara li dan ““NAC EUR
WAVE2”jikkonforma mal-ħtiġijiet essenzjali u ma provvedimenti oħrajn relevanti li hemm fid-
Dirrettiva 1999/5/EC.
Norwegian
““Continental Automotive Czech Republic, s.r.o.” erklærer herved at utstyret ““NAC EUR
WAVE2”er i samsvar med de grunnleggende krav og øvrige relevante krav i direktiv 1999/5/EF.
Polish
Niniejszym ““Continental Automotive Czech Republic, s.r.o.” oświadcza, że ““NAC EUR
WAVE2”jest zgodny z zasadniczymi wymogami oraz pozostałymi stosownymi postanowieniami
Dyrektywy 1999/5/EC
Portuguese
““Continental Automotive Czech Republic, s.r.o.” declara que este ““NAC EUR WAVE2”está
conforme com os requisitos essenciais e outras disposições da Directiva 1999/5/CE.
Slovak
““Continental Automotive Czech Republic, s.r.o.” týmto vyhlasuje, že ““NAC EUR WAVE2”spĺňa
základné požiadavky a všetky príslušné ustanovenia Smernice 1999/5/ES.
Slovenian
““Continental Automotive Czech Republic, s.r.o.” izjavlja, da je ta ““NAC EUR WAVE2”v skladu z
bistvenimi zahtevami in ostalimi relevantnimi določili direktive 1999/5/ES.
Spanish
Por medio de la presente ““Continental Automotive Czech Republic, s.r.o.” declara que ““NAC EUR
WAVE2”cumple con los requisitos esenciales y cualesquiera otras disposiciones aplicables o
exigibles de la Directiva 1999/5/CE.
Swedish
Härmed intygar ““Continental Automotive Czech Republic, s.r.o.” att denna ““NAC EUR
WAVE2”står I överensstämmelse med de väsentliga egenskapskrav och övriga relevanta
bestämmelser som framgår av direktiv 1999/5/EG.

In order to satisfy the essential requirements of 1999/5/EC Directive, the product is compliant with
the following standards:
The conformity assessment procedure referred to in Article 10 and detailed in Annex IV of Directive
1999/5/EC has been followed with the involvement of the following Notified Body:
AT4 wireless, S.A.
Parque Tecnologico de Andalucía
C/ Severo Ochoa 2
29590 Campanillas – Málaga
SPAIN
Notified Body No: 1909
Thus, the following marking is included in the product (Label on top):
There is no restriction for the commercialization of this device in all the countries of the European
Union.
Specific instructions of installation and proper use of the equipment
This Multimedia System Equipment must be fixed in a car dashboard.
Electrical Safety (Art. 3(1)(a)):
EN 60950-1:2006 + A11:2009 + A1:2010
+ A12:2011 + AC:2011 + A2:2013
EMF Exposure (Art. 3(1)(a)): EN 62311:2008
EMC (Art. 3(1)(b)):
EN 301 489-1 V1.9.2
EN 301 489-17 V2.2.1
EN 55013 (2013)
EN 55020(2007)
Radio Spectrum Use (Art. 3(2)): EN 300 328 v 1.9.1
ETSI EN 300 440-1 v 1.6.1
ETSI EN 300 440-2 v 1.4.1
This Equipment is intended to be installed by service persons or qualified operators in a
restricted access location that can only accessed by using a tool.
The external devices and accessories connected to the equipment shall comply its product
standard in order to prevent fire risks.
Fuse characteristics:
MINI AUTO FUSE W Yellow 20:
Voltage rated: 32V (Volts)
Current rated: 20A (Amperes)
600
0.30 seconds
0.100 seconds
350
0.080 seconds
0.250 seconds
200
0.15 seconds
5 seconds
135
0.75 seconds
600 seconds
110
100 hours
-
% of rating
Minimum
Maximum
Blow Time
List of countries within the EU or geographical zones where it can be used.
There is no restriction for the commercialization of this device in all the countries of the European
Union:
Austria, Belgium, Bulgaria, Croatia, Cyprus, Czech Republic, Denmark,
Estonia, Finland, France, Germany, Greece, Hungary, Ireland, Italy,
Latvia, Lithuania, Luxembourg, Malta, Netherlands, Poland, Portugal,
Romania, Slovakia, Slovenia, Spain, Sweden, United Kingdom,
Information about the license that apply to it.
There is no specific license.
Restrictions or possible additional restrictions when trying to achieve the authorisation of use
of the equipment.
There is no specific restriction to achieve the authorisation of use of the equipment.

USA – Federal Communications Commission (FCC)
FCC ID: ZFW-NACEUR2
1. Modification Statement
“Continental Automotive Rambouillet France S.A.S.” has not approved any changes or
modifications to this device by the user. Any changes or modifications could void the user’s
authority to operate the equipment.
2. Interference statement
This device complies with part 15 of the FCC Rules. Operation is subject to the following two
conditions:
(1)This device may not cause harmful interference, and
(2) This device must accept any interference received, including interference that
may cause undesired operation.
3. Wireless notice:
This device complies with FCCC radiation exposure limits set forth for an uncontrolled
environment and meets the FCC radio frequency (RF) Exposure Guidelines. This transmitter
must not be co-located or operating in conjunction with any other antenna or transmitter.
4. FCC Class B digital device notice
This equipment has been tested and found to comply with the limits for a Class B digital
device, pursuant to part 15 of the FCC Rules. These limits are designed to provide reasonable
protection against harmful interference in a residential installation. This equipment
generates, uses and can radiate radio frequency energy and, if not installed and used in
accordance with the instructions, may cause harmful interference to radio communications.
However, there is no guarantee that interference will not occur in a particular installation. If
this equipment does cause harmful interference to radio or television reception, which can
be determined by turning the equipment off and on, the user is encouraged to try to correct
the interference by one or more of the following measures:
—Reorient or relocate the receiving antenna.
—Increase the separation between the equipment and receiver.
—Connect the equipment into an outlet on a circuit different from that to which the receiver
is connected.
—Consult the dealer or an experienced radio/TV technician for help.