CONTINENTAL AUTOMOTIVE RAMBOUILLET FRANCES RENBPAUTOS Automotive Embedded PC User Manual Supplier Recommendations AutOS BP V5
Continental Rambouillet France SAS Automotive Embedded PC Supplier Recommendations AutOS BP V5
Contents
- 1. User Manual 1
- 2. User Manual 2
User Manual 2

Supplier Recommendations
AutOS
1
Purpose of this document
This document is intended to explain how to handle, mount, use and dismount the AutOS.
CAUTION : FCC REGULATORY REQUIREMENTS
This device complies with Part 15 of the FCC Rules. Operation is subject to the following two
conditions:
(1) This device may not cause harmful interference, and
(2) This device must accept any interference received, including interference that may
cause undesired operation.
Any change or modification to the product not expressly approved by the manufacturer could void
the user's authority to operate the device.
FCC RF Radiation Exposure Statement:
This equipment contains a radio transmitter. It is designed and manufactured not to exceed the
emission limits for exposure to radio frequency energy set by the Federal Communications
Commission of the US Government.
This equipment complies with FCC radiation exposure limits set forth for an occupational/controlled
environment when used at a distance greater than 20cm from the body.
1 Dash board integration
1.1 Support and housing
AutOS must be fasten properly on front and rear side (rear buffer) in order to prevent excessive vibrations. It
must be mounted in the Multimedia support as written in Continental drawing (ref. : 40387289).
1.2 Insertion
AutOS must be guided gently toward its position in the dash board. In particular, rear buffer must not hit the
sleeve of the dash board.
Supplier Recommendations
AutOS
2
2 Factory process.
2.1 Mounting of the AutOS into the dash board.
2.1.1 Handling
• Work with clean gloves (changed on regular basis).
• The AutOS must be unpacked as close as possible to the production line.
• Do not stack, hit, scratch in any way the unpacked AutOSs.
• In order to avoid mixing of security codes, unpack and mount only one AutOS at the same time.
• Do not push on connectors (especially SIM connector) during mounting of AutOS in the sleeve. Push on
the specified area of heat sink (see annex).
• Do not handle the AutOS by the rear buffer.
• Should you remove the removable label, do it in a gentle manner so that the remaining part of the
product label is not torn away.
• Do not scratch or tear the label.
• Make sure that no cable is pinched or damaged behind the AutOS.
• Do not exert any pressure on plastic cover (on rear side of product).
• Do not store the product on its front or on one of its side.
• Be sure that the cooling holes on the top cover and the heat sink are free and not blocked by any kind of
object.
• If product falls down , it must be scraped.
• Do not remove the AutOS the springs of which are half inserted without using the proper dismounting
tool.
2.1.2 Electrical Connections
• Check that the connectors of the vehicle are not damaged and the wires not entangled.
• SIM and SD card must be inserted in the right way and without excessive strength. Check that they
are properly locked. Continental will deny any liability if these recommendations are not observed.
Please, refer to picture page 6 and 7.
• Before powering the product, connections must be done in this order :
- video connector GT17,
- Fakra GPS connector,
- TH24 connector,
- SIM card (SIM card must be inserted before powering up the product otherwise it will
not be detected),
- SD card (refer to picture page 7),
- TH4 connector (power supply).
• Check that the connectors and cards from the vehicle are properly inserted and clipped (if a clip is
available on connector). SIM card must be locked by the sliding fastener of SIM connector (picture
page 6).
2.1.3 Recommendations about connections
• Cables must not touch the top cover or the heat sink of AutOS (on left side of the AutOS).
• If cables touch Autos :
- They must not hamper thermic dissipation,
- They must not make noise (coming from vibrations),
- They must be protected against wear and tear coming from friction on autOS or on the sleeve.
2.2 Instruction for removable label
Usually, in the normal process, the removable label is not used. Should it be used:

Supplier Recommendations
AutOS
3
• Peel off the removable label. Do it in a gentle manner so that the remaining part of the product label is
not torn away.
• Remove the tip of the protective strip and stick the label on the appropriate sheet of paper.
3 Direction for use
• Use AutOS only with the appropriate and validated accessories (radio, display, cables, SIM card, SD
card...)
• In the vehicle, use AutOS in the appropriate place and with the right mounting and fastening.
• For other information, refer to the end user D.F.U.
Supplier Recommendations
AutOS
4
4 Operation, trouble analysis and dismounting of the AutOS.
Dismounting and analysis ot the AutOS
Before removing the AutOS
from the dash board.
•
Describe and characterize the symptoms carefully.
• Describe the system configuration (display, radio, satellite, ...)
• Do not touch to SD and SIM card. You could make the defect disappear.
Removing he AutOS from
the dash board.
•
Unlocking the AutOS is done via the four holes of the front.
• Use the proper tools.
• Take care not to damage AutOS with the tools.
• Insert completely the two tools and pull them in order to remove the
AutOS from the dash board.
• Do not remove the SD card and SIM card.
Disconnection of AutOS.
•
SIM and SD card must stay within product.
• Disconnection must be done in the following order :
- TH24 connector,
- TH4 connector (power supply),
- Fakra GPS connector,
- video connector GT17.
• Unlock carefully the connectors before removing them.
• Pull the connectors, not the wires.
AutOS analysis on the
bench.
•
Connect all the accessories before switching on the power of the AutOS.
• Never open the AutOS.
•
Inform us quickly after having dismounting the AutOS.
• In order to help us in the trouble analysis, we would like to know all the
electrical "events" which occurred on the vehicle.
• Send the product back with its SD card and SIM card.
Supplier Recommendations
AutOS
5
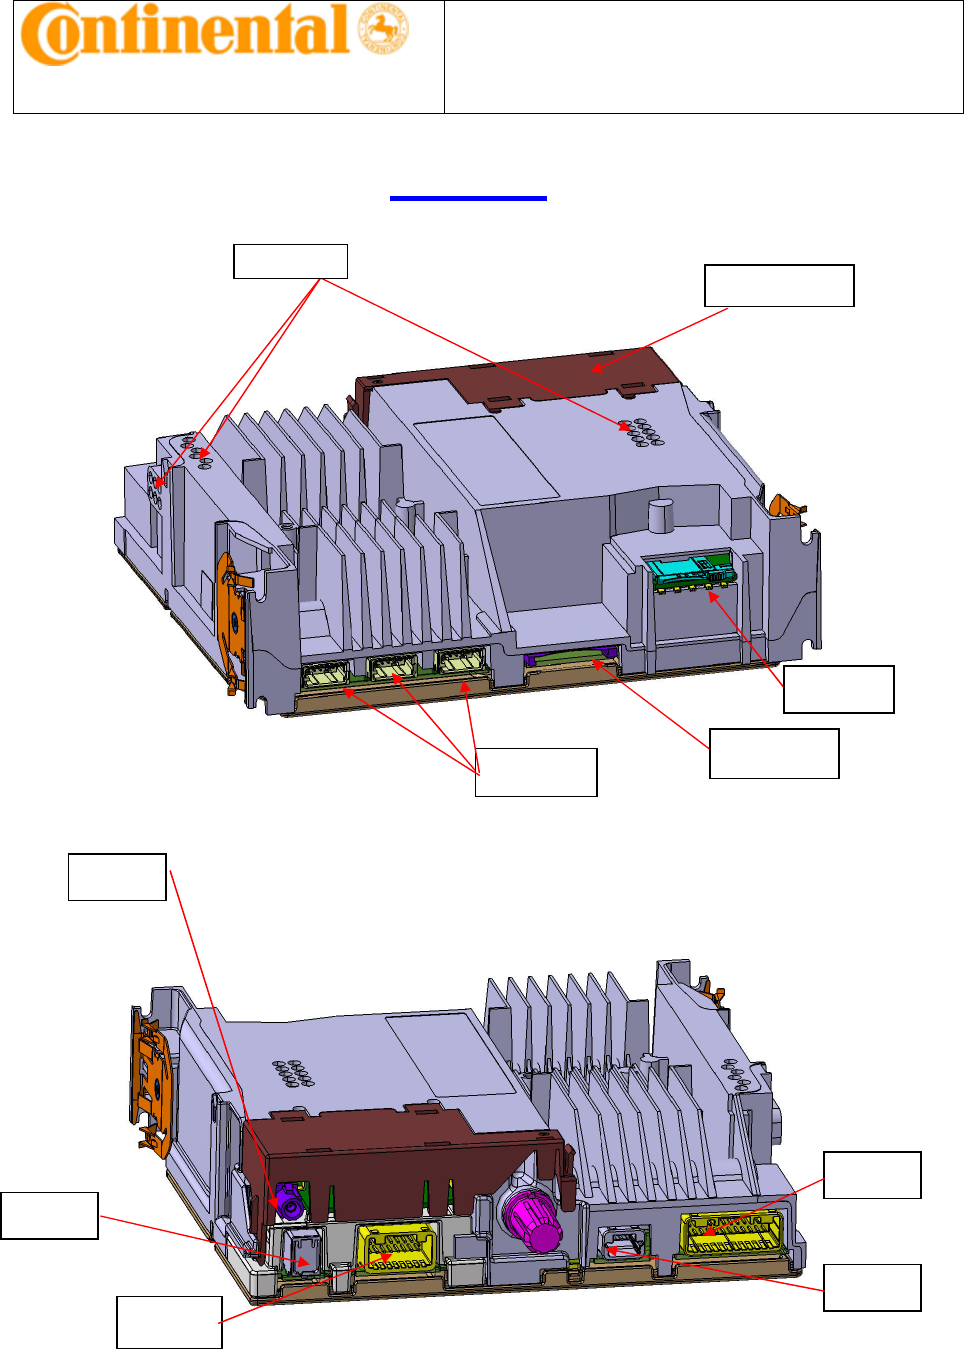
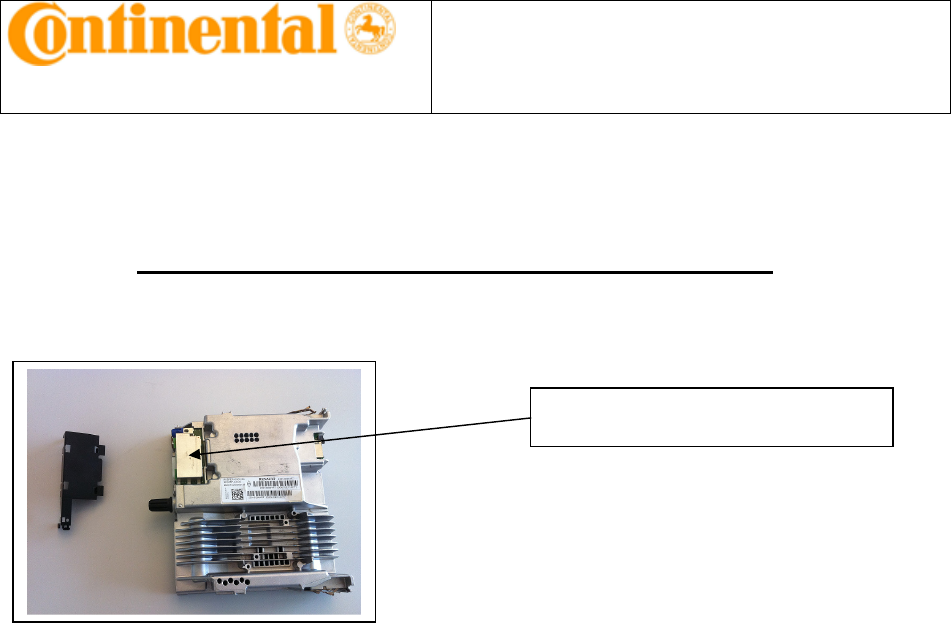
Annexes
Plastic cover
SD memory card
connector
USB
connectors
SIM card
connector
Cooling holes
GT17 video
connector
Connecteur
Fakra GPS
TH 16
connector
TH4
connector
TH24
connector
Supplier Recommendations
AutOS
6
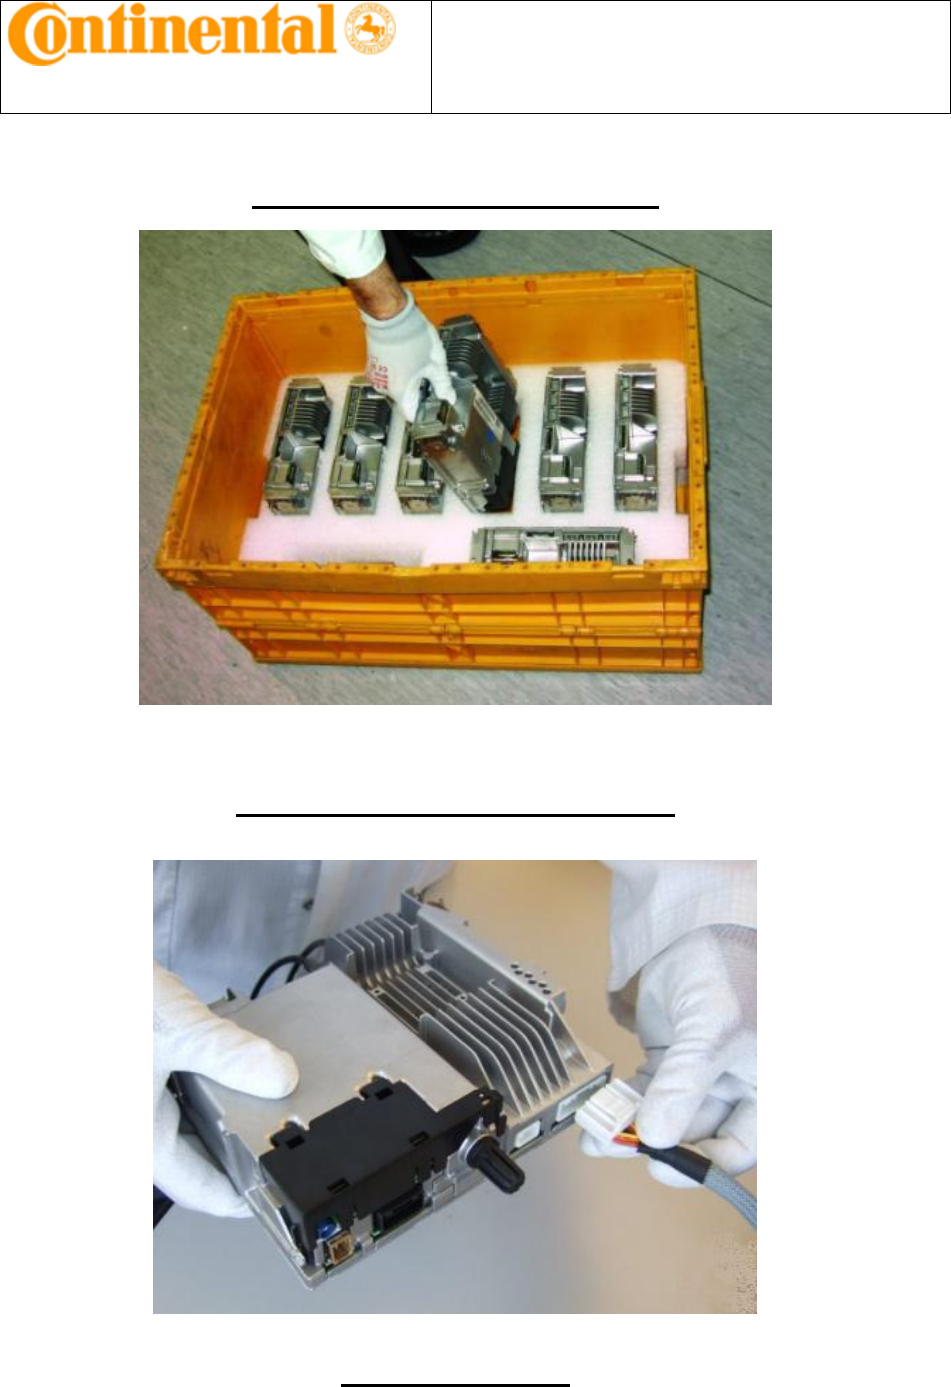
Taking AutOS off the packaging.
Handling of AutOS for connections
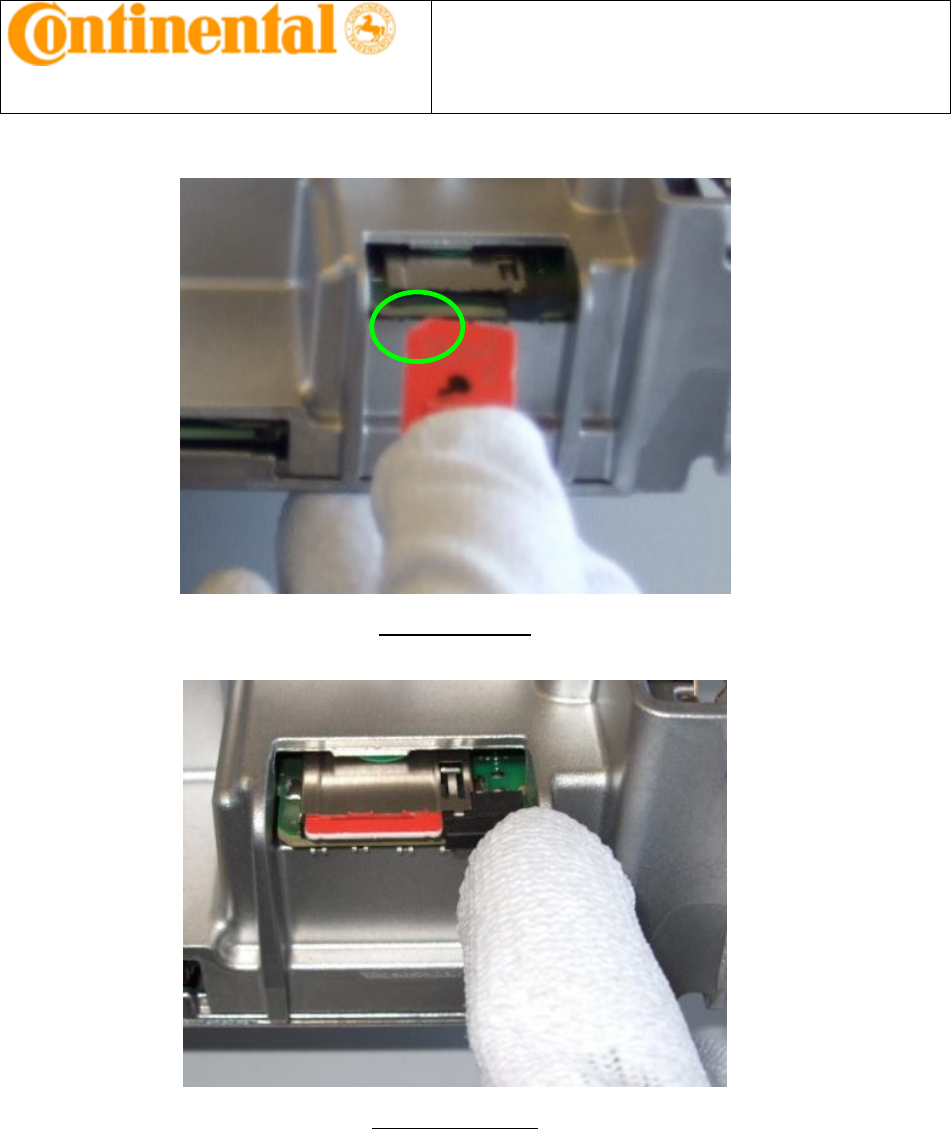
Sim card insertion
Supplier Recommendations
AutOS
7
SIM card insertion
Locking of SIM card
Supplier Recommendations
AutOS
8
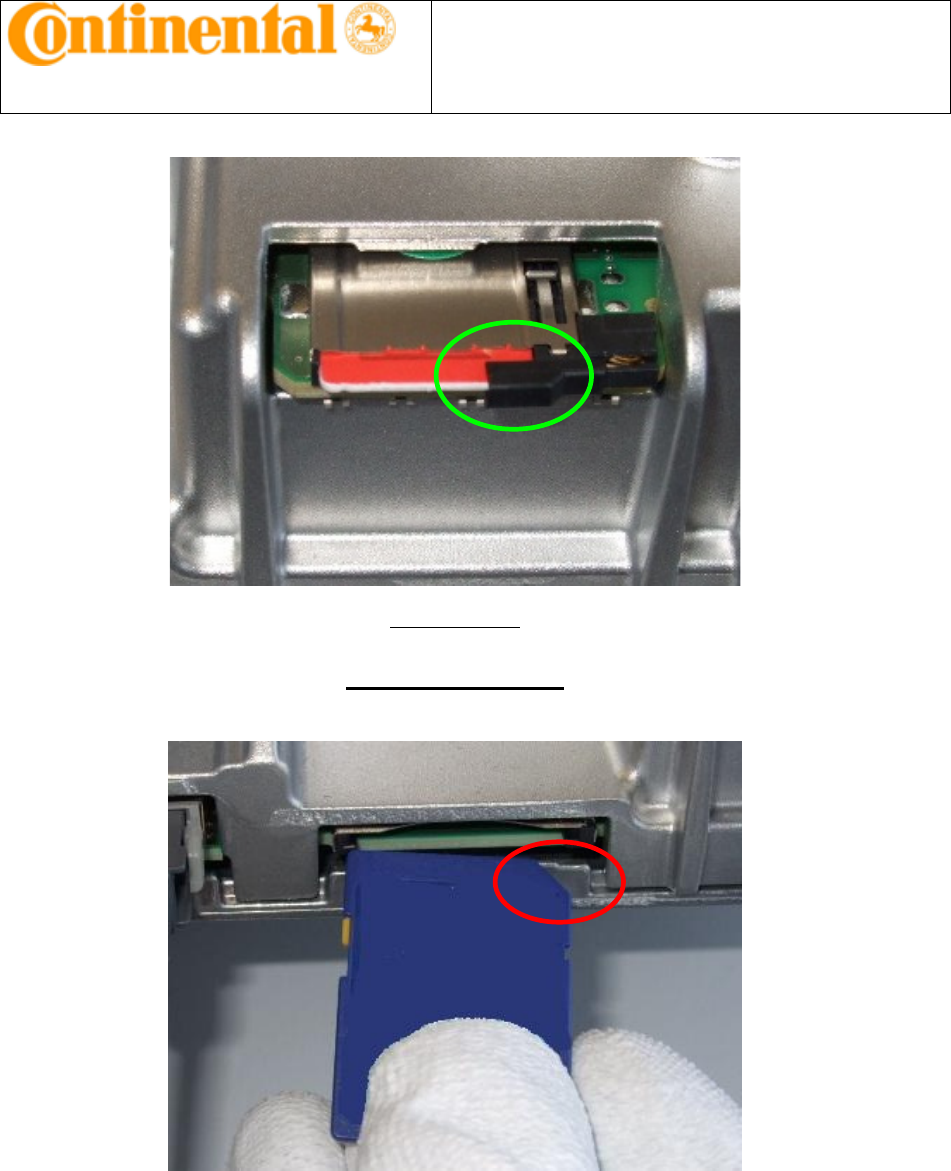
SIM cart locked
SD card insertion
Supplier Recommendations
AutOS
9
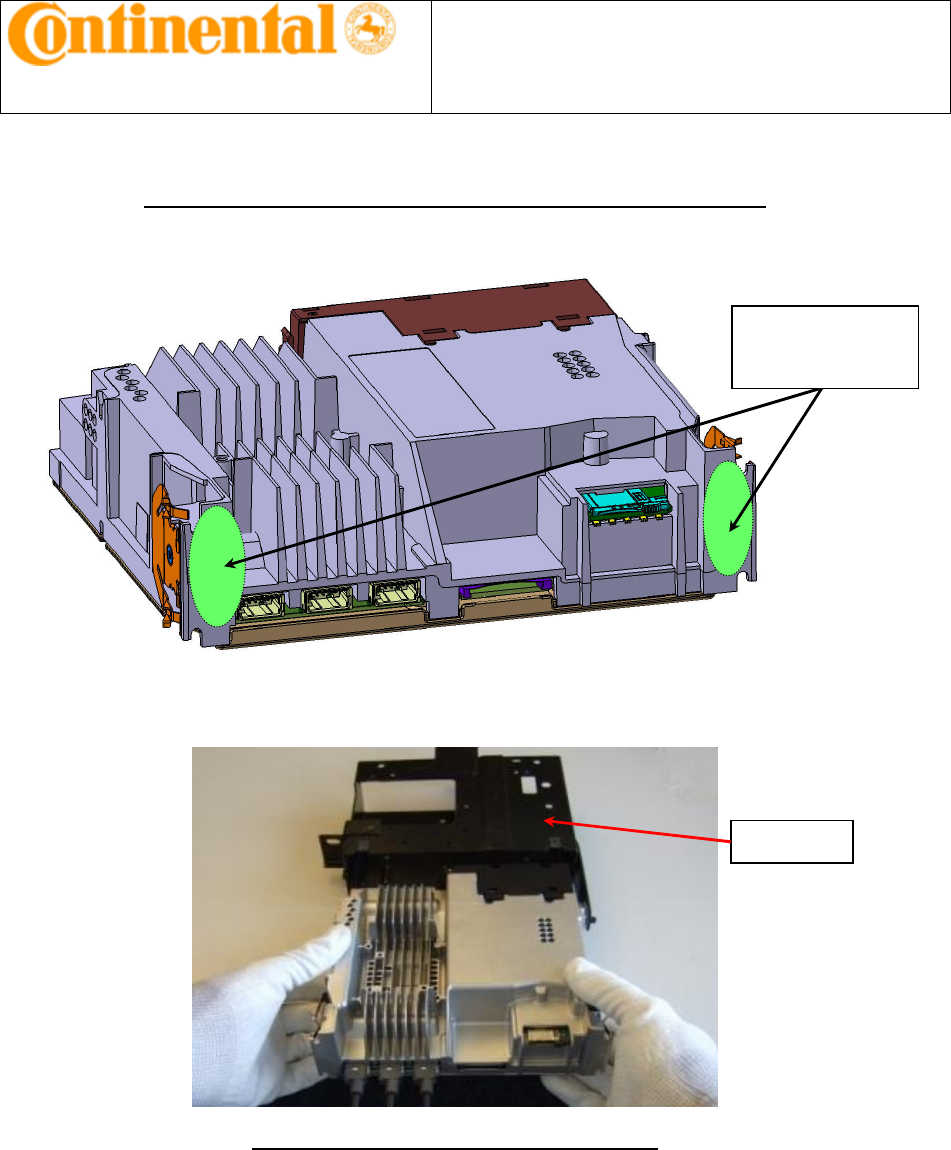
Handling of Autos during insertion inside sleeve :
Insertion of AutOS into the sleeve (in vehicle)
Surfaces on which
effort to insert
Autos is allowed
Sleeve
Supplier Recommendations
AutOS
10
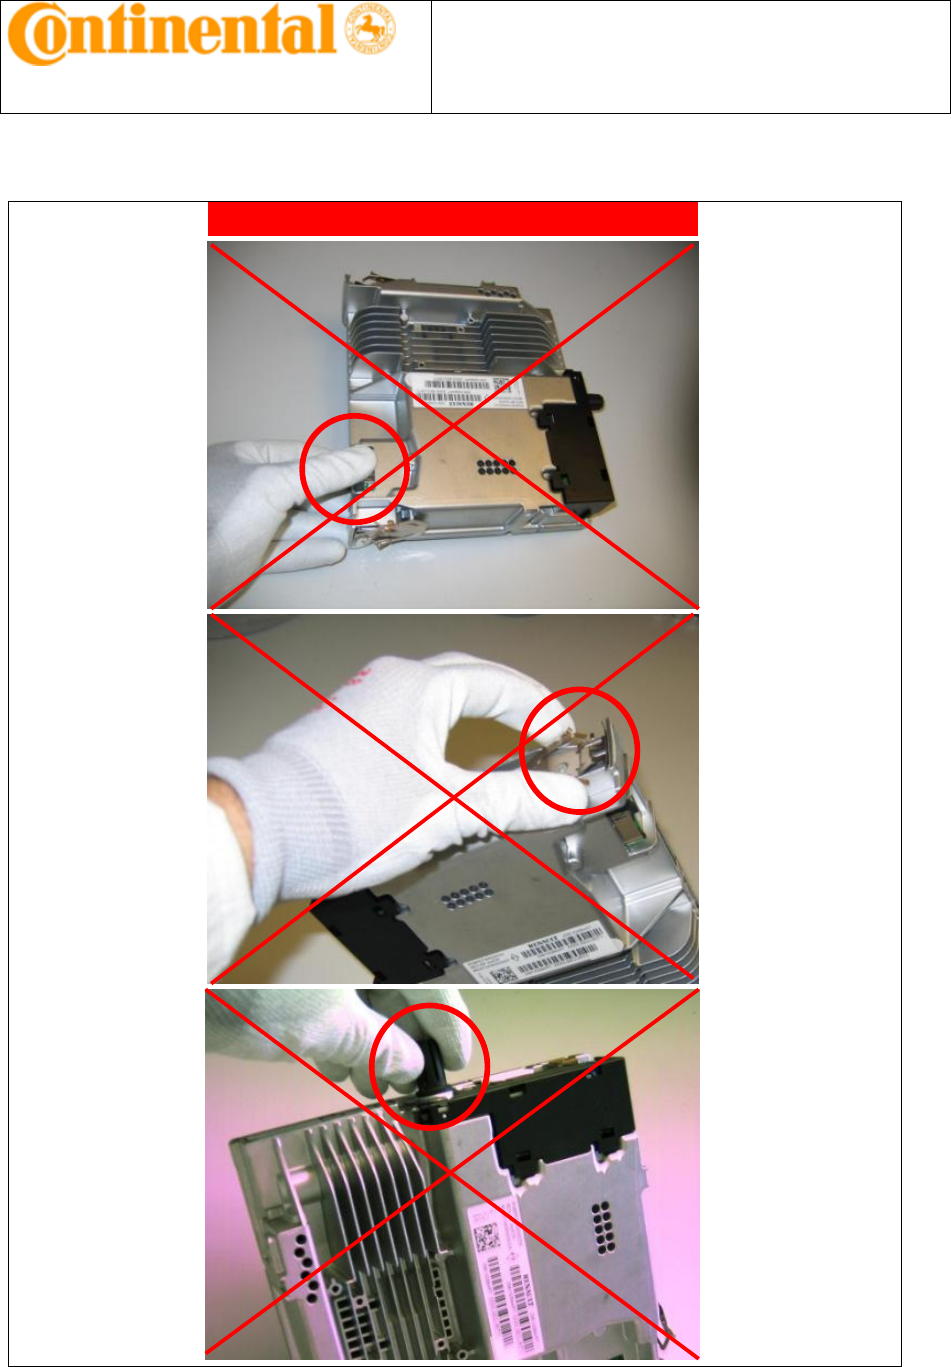
Do not handle AutOS t
hese ways :
Supplier Recommendations
AutOS
11
Specific information related to antenna positioning
As explained in page 8, the AutOS unit is inserted in an existing sleeve in vehicle (only one mounting
positioning).
This sleeve is located in the dashboard, behind the glove box. The end user has no access to the unit itself
and the product is not powered before the end of vehicle assembly.
Antenna must be installed in accordance with the above instructions.
Multi function antenna is located under
the plastic cover