CRAFTSMAN Wet/Dry Vacuum Manual L0809086
User Manual: CRAFTSMAN CRAFTSMAN Wet/Dry Vacuum Manual CRAFTSMAN Wet/Dry Vacuum Owner's Manual, CRAFTSMAN Wet/Dry Vacuum installation guides
Open the PDF directly: View PDF ![]() .
.
Page Count: 36
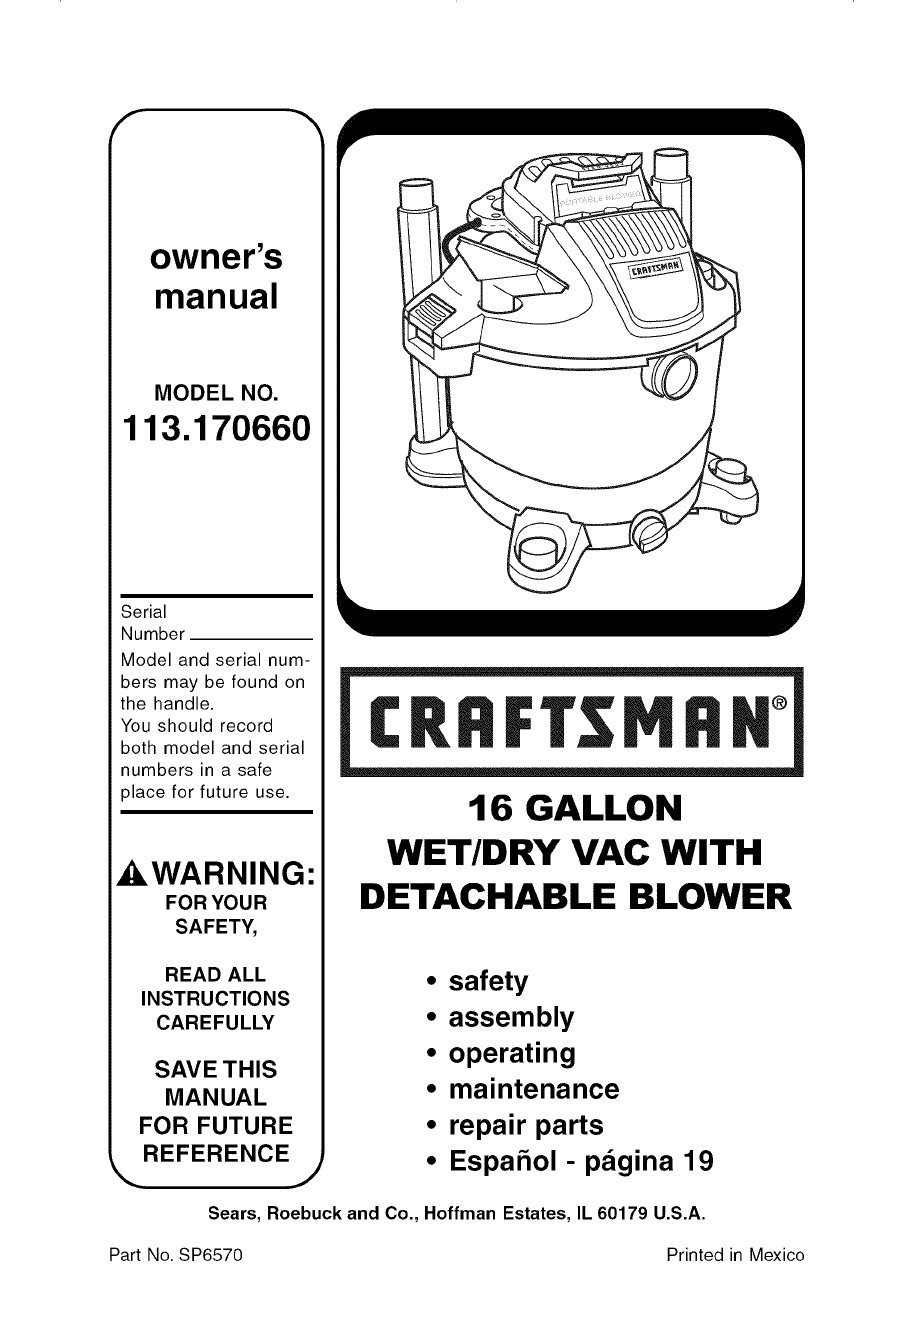
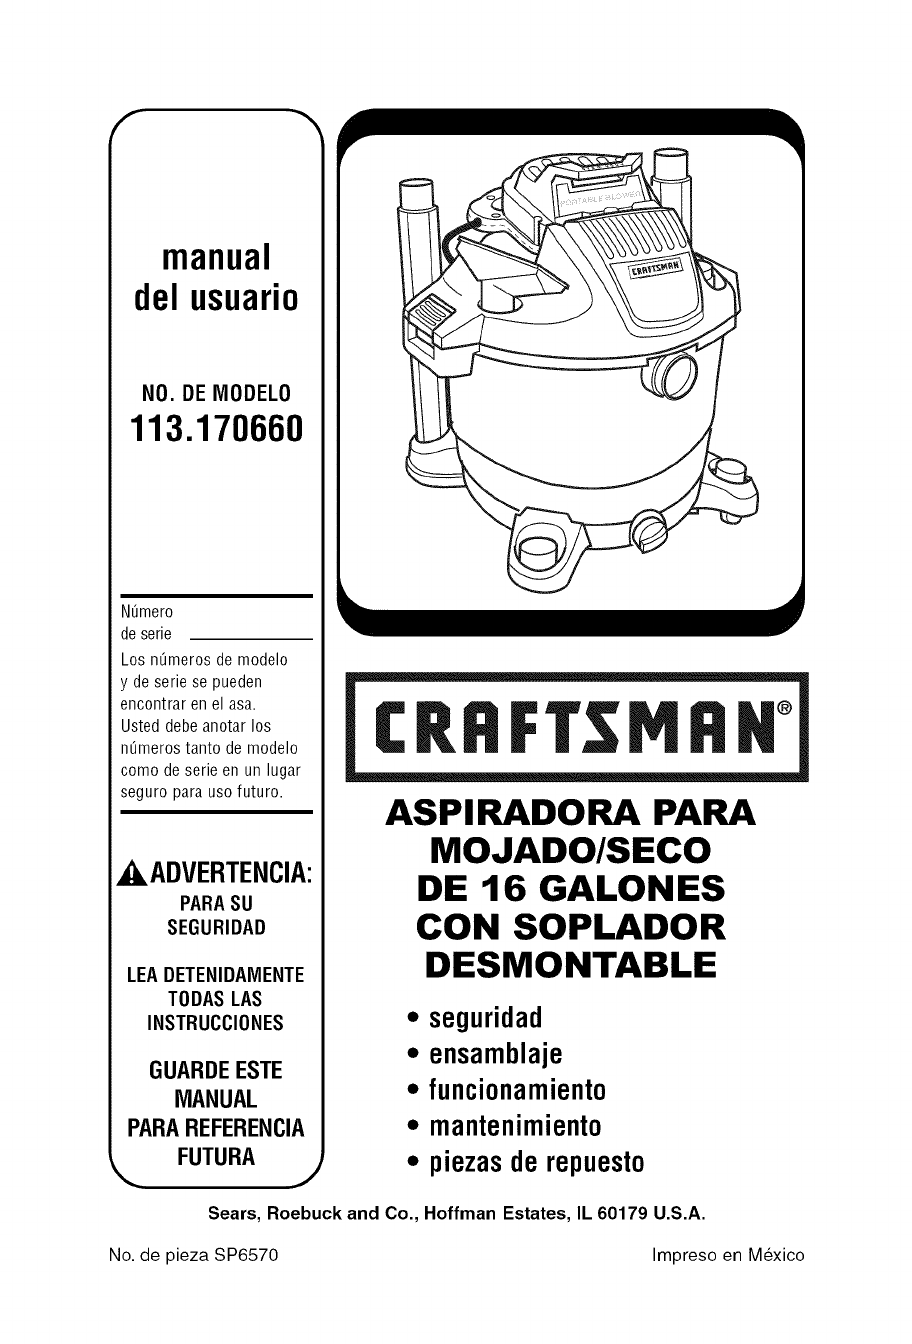
owner's
manual
MODEL NO.
113.170660
Serial
Number
Model and serial num-
bers may be found on
the handle.
You should record
both model and serial
numbers in a safe
place for future use.
_WARNING:
FOR YOUR
SAFETY,
READ ALL
INSTRUCTIONS
CAREFULLY
SAVETHIS
MANUAL
FOR FUTURE
REFERENCE J
CRRFT MRII °
16 GALLON
WET/DRY VAC WITH
DETACHABLE BLOWER
•safety
•assembly
•operating
•maintenance
•repair parts
•Espahol- pagina 19
Sears, Roebuck and Co., Hoffman Estates, IL 60179 U.S.A.
Part No. SP6570 Printed in Mexico

Table of Contents
Section Page
Table of Contents .................. 2
Warranty ........................ 2
Important Safety Instructions ......... 3
Introduction ...................... 5
Unpacking and Checking
Carton Contents ................. 5
Carton Contents List ............. 5
Accessory Caddy/Caster Foot/
Caster Assembly ................ 6
Float/Cage Assembly .............. 7
Filter Assembly ................... 8
Wet/Dry Vac Assembly ............. 8
Position Detachable Blower
Power Head Assembly ............ 9
Insert Hose ................... 9
Operation ....................... 10
Vacuuming Dry Materials ......... 10
Vacuuming Liquids .............. 11
Emptying the Dust Drum ......... 11
Section Page
To Store Your Accessories ........ 12
Cord Wrap .................... 12
Moving the Wet/Dry Vac .......... 12
Blowing Feature ................ 13
Assemble the Detachable Blower
for "Blowing" . ................ 13
Maintenance .................... 14
Blower Intake .................. 14
Cleaning Vac Filter .............. 14
Filter Removal ................. 14
Cleaning a Dry Filter ............ 15
Cleaning a Wet Filter ............ 15
Installation .................... 15
Cleaning and Disinfecting
the Wet/Dry Vac .............. 15
Casters ....................... 15
Storage ....................... 15
Repair Parts ..................... 16
Warranty
•Craftsman One Year Full Warranty
If this Craftsman product fails due to a defect in material or workmanship
within one year from the date of purchase, return it to any Sears store,
Sears Service Center, or other Craftsman outlet for free repair (or replace-
ment if repair proves impossible).
This warranty applies for only 90 days from the date of purchase if this
product is ever used for commercial or rental purposes.
This warranty does not include bags or filters, which are expendable
parts that can wear out from normal use within the warranty period.
This warranty gives you specific legal rights, and you may also have other
rights, which vary, from state to state.
Sears, Roebuck and Co., Hoffman Estates, IL 60179
IMPORTANT SAFETY INSTRUCTIONS
Safety is a combination of common sense,
staying alert, and knowing how your
wet/dry vacuum cleaner ("Vac") works.
Safety Signal Words
,_ DANGER: Indicates an imminently
hazardous situation which, if not avoided,
will result in death or serious injury.
A, WARNING: Indicates a potentially
hazardous situation which, if not avoided,
could result in death or serious injury.
CAUTION: Indicates a potentially
hazardous situation which, if not avoided,
may result in minor or moderate injury, or
property damage.
When using your Vac, always follow basic
safety precautions including the following:
WARNING -Toreduce
the risk of fire, electric shock, or
injury:
•Read and understand this manual and
all labels on the Wet/Dry Vac before
operating.
• Use only as described in this manual.
• Do not leave Vac running while unat-
tended.
• Sparks inside the motor can ignite
flammable vapors or dust. To reduce
the risk of fire or explosion, do not
vacuum or use near flammable or
combustible liquids, gases, or explosive
dusts, such as gasoline or other fuels,
lighter fluid, cleaners, oil-based paints,
natural gas, hydrogen, coal dust, mag-
nesium dust, aluminum dust, grain
dust, or gun powder.
• Do not vacuum anything that is burning
or smoking, such as cigarettes,
matches, or hot ashes.
• Do not vacuum drywall dust or cold
fireplace soot or ash with standard
filter. This is a very fine dust which may
be exhausted back into the air. Use a
fine dust filter instead.
• To reduce the risk of health hazards
from vapors or dust, do not vacuum
toxic materials.
• Do not use or store near hazardous
materials.
To reduce the risk of electric shock, do
not expose to rain or allow liquid to
enter motor compartment. Store
indoors.
Do not allow to be used as a toy. Close
attention is necessary when used by or
near children.
Do not use with a torn filter or without
the filter installed except when
vacuuming liquids as described in the
Operation section of this manual. Dry
debris ingested by the impeller may
damage the motor or be exhausted
back into the air.
• WARNING: The power cord on this
product contains lead, a chemical
known in the State of California to cause
birth defects or other reproductive harm.
Wash hands after handling.
• Do not leave Vac when plugged in.
Unplug from outlet when not in use and
before servicing.
• Turn off Vac before unplugging.
• To reduce the risk of injury from
accidental starting, unplug power cord
before changing or cleaning filter.
• Do not unplug by pulling on cord. To
unplug, grasp the plug, not the cord.
• Do not use with damaged cord, plug or
other parts. If your Vac is not working
as it should, has missing parts, has
been dropped, damaged, left outdoors,
or dropped into water, return it to a
Sears Service Center.
• Do not pull or carry by cord, use cord
as handle, close a door on cord, or pull
cord around sharp edges or corners.
Do not run Vac over cord. Keep cord
away from heated surfaces.
• Do not handle plug, switch, or the Vac
with wet hands.
• Do not put any object into ventilation
openings. Do not vacuum with any ven-
tilation openings blocked; keep free of
dust, lint, hair or anything that may
reduce air flow.
• Keep hair, loose clothing, fingers, and
all parts of body away from openings
and moving parts.
• To reduce the risk of falls, use extra
care when cleaning on stairs.
• Toreducetheriskofbackinjuryor
falls,donotliftaVacthatisheavywith
liquidordebris.PartiallyemptytheVac
byscoopingordrainingliquidtomake
itcomfortabletolift.
• Toreducetheriskofpersonalinjuryor
damagetoVac,useonlyCraftsman
recommendedaccessories.
• Whenusingasadetachedblower:
Directairdischargeonlyatwork
area.
Turnunitoffbeforesettingon
groundorreleasinggraspfrom
handle.
Donotsetdowninliquid;electric
shockcouldoccur.
Donotdirectairatbystanders.
Keepchildrenawaywhenblowing.
Donotuseblowerforanyjobexcept
blowingdirtanddebris.
Donotuseasasprayer.
Wearsafetyeyewear
• Toreducetheriskofeyeinjury,wear
safetyeyewear.Theoperationofany
utilityVacorblowercanresultin
foreignobjectsbeingblownintothe
eyes,whichcanresultinsevereeye
damage.
• ThisWet/DryVacisdouble-insulated,
eliminatingtheneedforaseparate
groundingsystem.Useonlyidentical
replacementparts.Readthe
instructionsforServicingDouble-
InsulatedWet/DryVacsbefore
servicing.
• Useonlyextensioncordsthatarerated
foroutdooruse.Extensioncordsin
poorconditionorthataretoosmallin
wiresizecanposefireandshock
hazards.Toreducetheriskofthese
hazardswhenusinganextensioncord,
besureitisingoodconditionandthat
theconnectiondoesnotcomeinto
contactwithliquid.Tokeeppowerloss
toaminimum,usethefollowingtable
tochoosetheminimumwiresize
extensioncord.
Extension Cord Length Gauge A.W.G.
0-50 Ft. 14
50-100 Ft. 12
CAUTION:
• To reduce the risk of hearing damage,
wear ear protectors when using for
extended hours or using in a noisy area.
• For dusty operations, wear dust mask.
NOTE: Static shocks are common in
dry areas or when the relative humidity of
the air is low. Vacuuming fine debris with
your Vac can deposit static charge on the
hose or on the Vac. The best remedy to
reduce the frequency of static shocks in
your home or when using this Vac is to
add moisture to the air with a humidifier.
Observe the following warnings that
appear on the motor housing of your Vac:
._ DOUBLE INSULATED
GROUNDING NOT REQUIRED.
WHEN SERVICING USE ONLY
IDENTICAL REPLACEMENT PARTS.
A WARNING: For your own safety,
read and understand owner's manual.
Do not run unattended.
Do not pick up hot ashes, coals, toxic,
flammable or other hazardous
materials. Do not use around explosive
liquids or vapors.
I WARNING: To reduce the risk of I
electric shock - do not expose to rain -
store indoors.
SAVE THIS MANUAL I
Introduction
This Wet/Dry Vac is intended for house-
hold use. It may be used for vacuuming of
wet or dry media and may be used as a
blower.
Read this owner's manual to familiarize
yourself with the product features and to
understand the specific usage of your new
wet/dry vac.
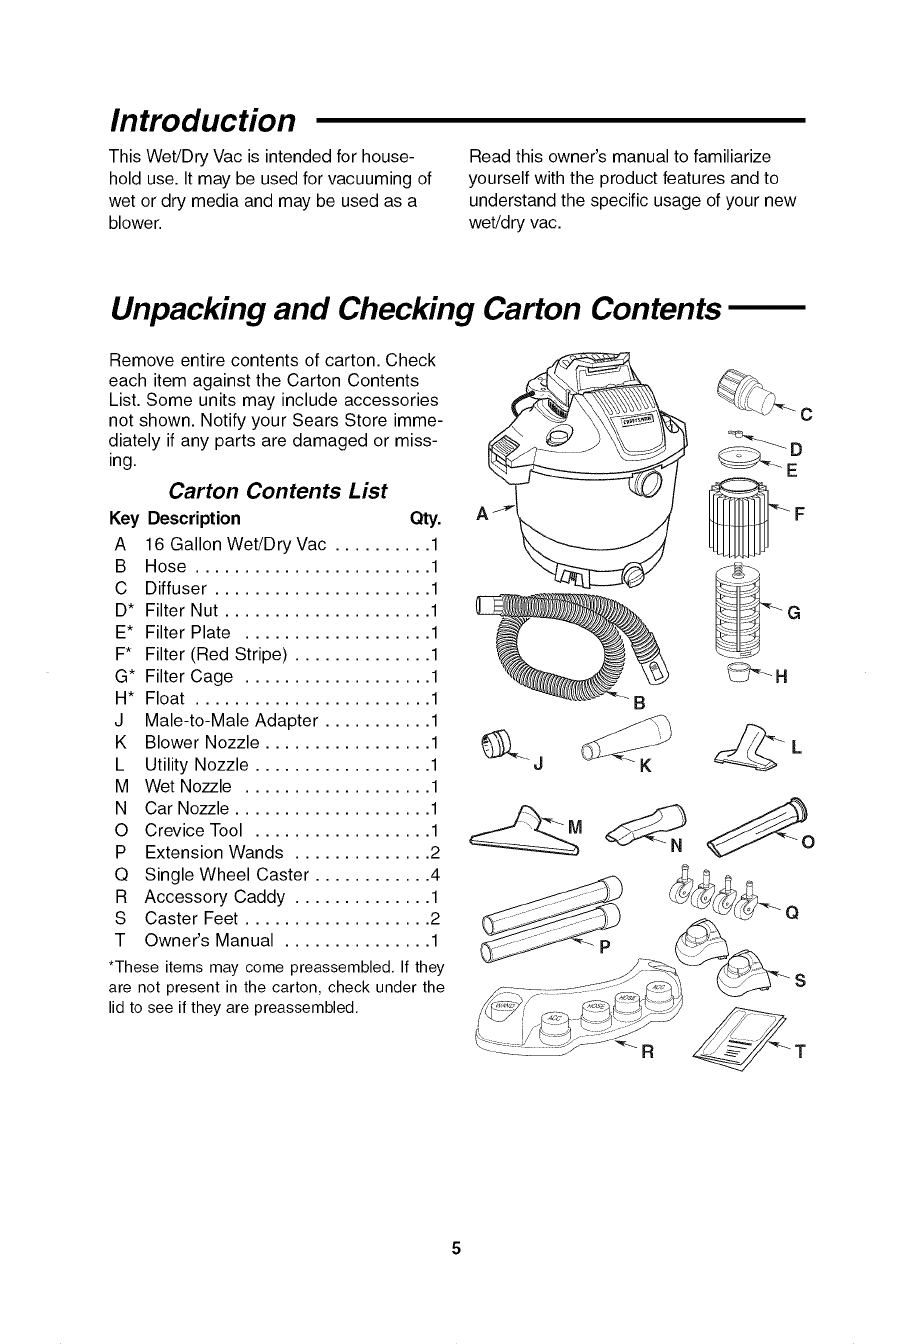
Unpacking and Checking Carton Contents
Remove entire contents of carton. Check
each item against the Carton Contents
List. Some units may include accessories
not shown. Notify your Sears Store imme-
diately if any parts are damaged or miss-
ing.
Carton Contents List
Key Description Qty.
A 16 Gallon Wet/Dry Vac .......... 1
B Hose ........................ 1
C Diffuser ...................... 1
D* Filter Nut ..................... 1
E* Filter Plate ................... 1
F* Filter (Red Stripe) .............. 1
G* Filter Cage ................... 1
H* Float ........................ 1
J Male-to-Male Adapter ........... 1
K Blower Nozzle ................. 1
L Utility Nozzle .................. 1
M Wet Nozzle ................... 1
N Car Nozzle .................... 1
0 Crevice Tool .................. 1
P Extension Wands .............. 2
Q Single Wheel Caster ............ 4
R Accessory Caddy .............. 1
S Caster Feet ................... 2
T Owner's Manual ............... 1
*These items may come preassembled. If they
are not present in the carton, check under the
lid to see if they are preassembled.
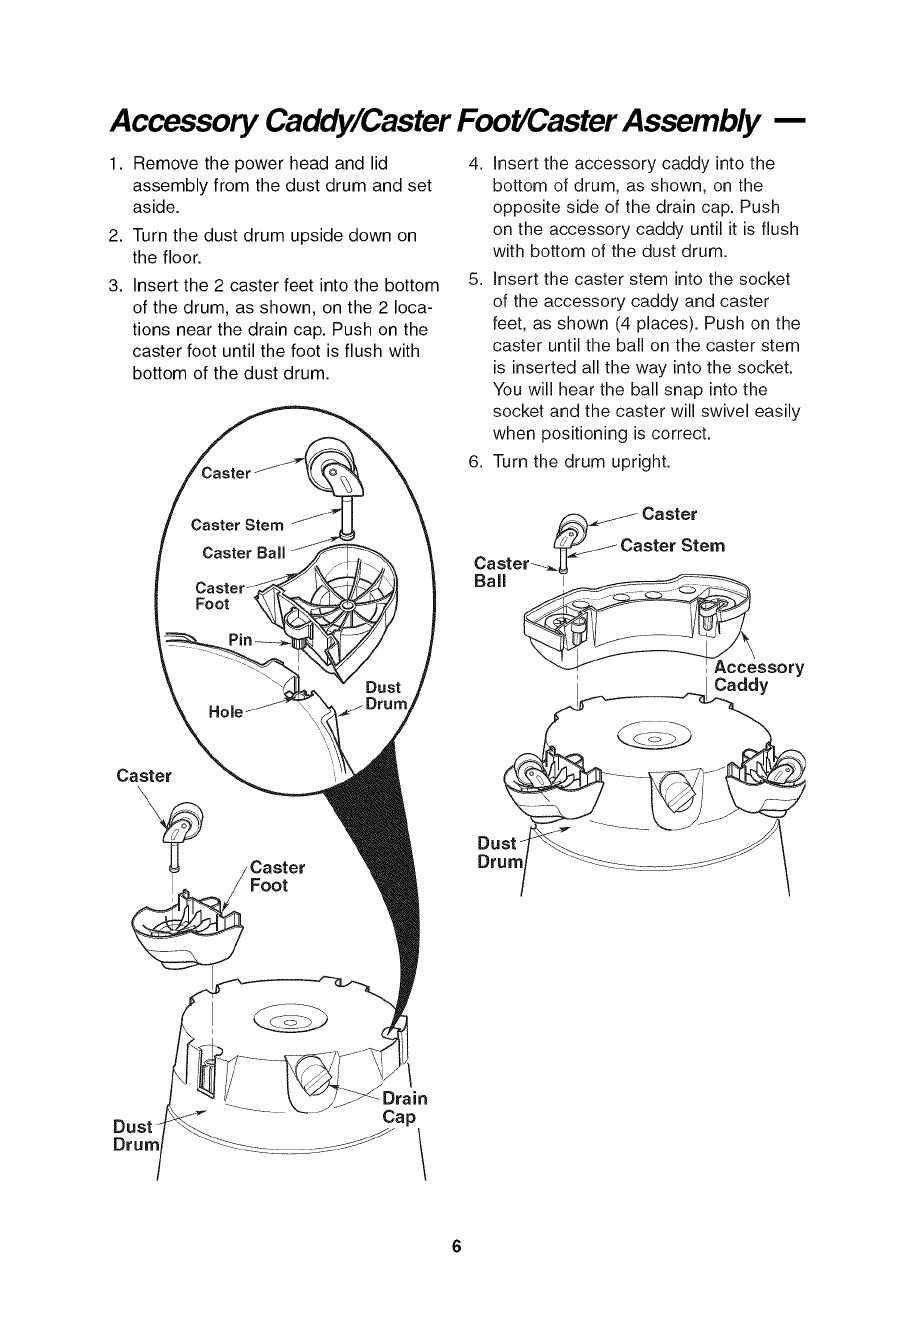
Accessory Caddy/Caster Foot/Caster Assembly --
1. Remove the power head and lid
assembly from the dust drum and set
aside.
2. Turn the dust drum upside down on
the floor.
3. Insert the 2 caster feet into the bottom
of the drum, as shown, on the 2 loca-
tions near the drain cap. Push on the
caster foot until the foot is flush with
bottom of the dust drum.
4.
5.
Insert the accessory caddy into the
bottom of drum, as shown, on the
opposite side of the drain cap. Push
on the accessory caddy until it is flush
with bottom of the dust drum.
Insert the caster stem into the socket
of the accessory caddy and caster
feet, as shown (4 places). Push on the
caster until the ball on the caster stem
is inserted all the way into the socket.
You will hear the ball snap into the
socket and the caster will swivel easily
when positioning is correct.
6. Turn the drum upright.
Caster
Foot
Drum
Dust
Drain
Cap /

Float/Cage Assembly
,_k WARNING: For your own safety,
never connect plug to power source
outlet until all assembly steps are
complete and you have read and
understood the safety and operation
instructions. Do not operate vac with
any parts damaged or missing.
1. Remove the detachable blower from
the power head assembly by pressing
down on the power head latch
beneath the carry handle of the
detachable blower. Set the detachable
blower off to the side. Place lid upside
down on the drum.
2. Locate the float and filter cage.
3. Place the float over the opening in the
center of the lid with the words "This
Side Towards Lid" laying face down
over the hole. (See illustration.)
WARNING: To avoid personal
injury or damage to vac be sure to
keep hands, fingers, or any other for-
eign objects out of the center opening
when assembling the float.
4. Line up filter cage tabs, as shown,
with the slots in the center ring of the
lid assembly. Push on the filter cage
until the tabs snap into slots for a
secure fit.
NOTE: If filter cage needs to be removed,
or replaced, because the float is placed in
the wrong way, use a flat blade screwdriv-
er and insert the blade near one of the
tabs between the filter cage and the cen-
ter ring of the lid. Pry the tab out of the
slot. Tilt the cage and lift away from the
lid. To replace, follow Float/Cage
Assembly instructions.
Carry Handle Power Head
Assembly
Power
Assembly
_ilter Cage
Tabs (3)
Slots (3)
Slots (3)
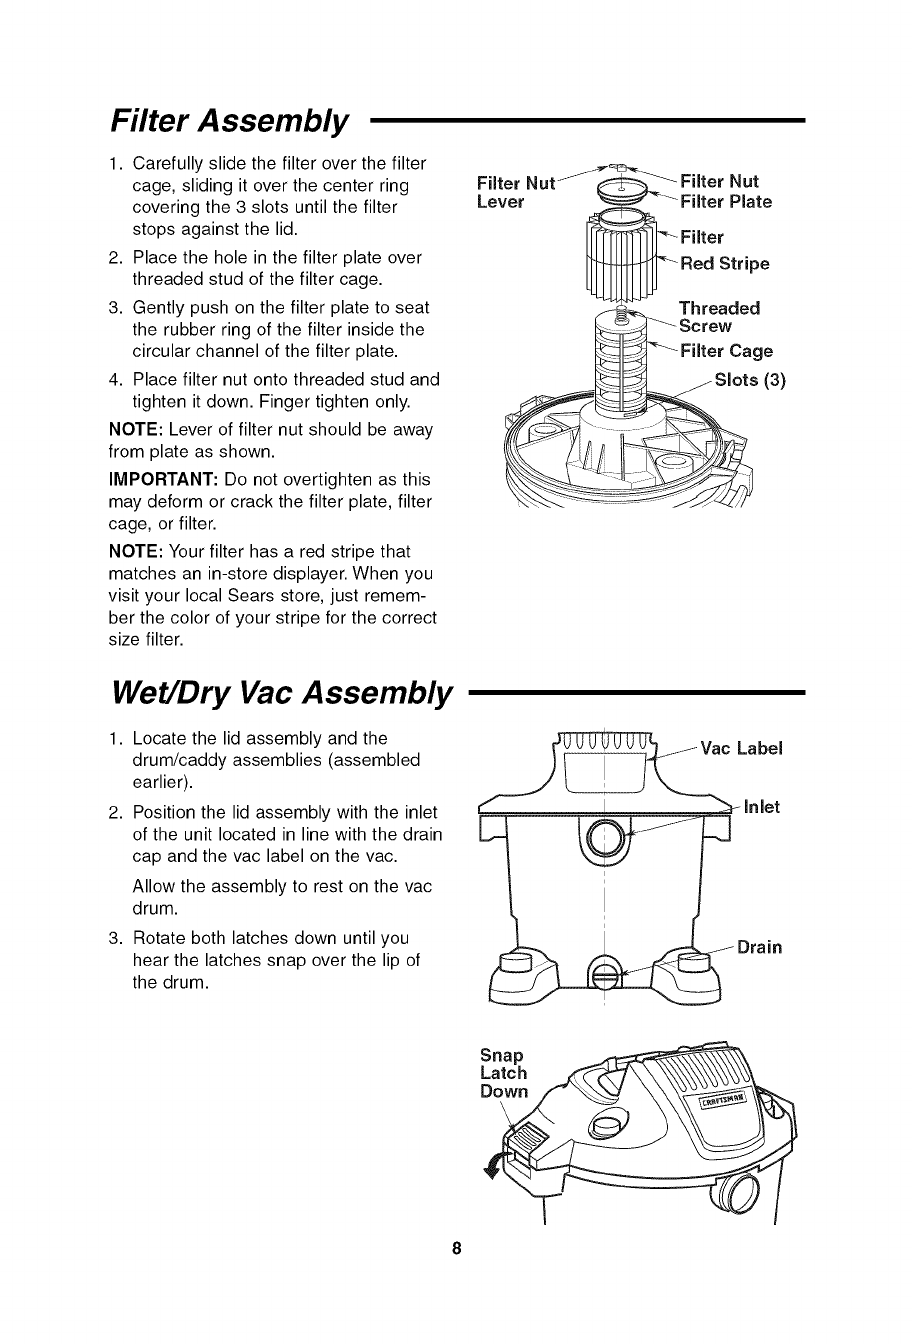
Filter Assembly
1. Carefully slide the filter over the filter
cage, sliding it over the center ring
covering the 3 slots until the filter
stops against the lid.
2. Place the hole in the filter plate over
threaded stud of the filter cage.
3. Gently push on the filter plate to seat
the rubber ring of the filter inside the
circular channel of the filter plate.
4. Place filter nut onto threaded stud and
tighten it down. Finger tighten only.
NOTE: Lever of filter nut should be away
from plate as shown.
IMPORTANT: Do not overtighten as this
may deform or crack the filter plate, filter
cage, or filter.
NOTE: Your filter has a red stripe that
matches an in-store displayer. When you
visit your local Sears store, just remem-
ber the color of your stripe for the correct
size filter.
Filter Nut_"_ ----_ Filter Nut
Lever _--"- Filter Plate
[IFl l q-]lJ'-Filter
f_.__ Threaded
_:;_ Screw
[_ _ ''--- FiJter Ca ge
_::ql_ jSlots (3)
J
Wet/Dry Vac Assembly
1. Locate the lid assembly and the
drum/caddy assemblies (assembled
earlier).
2. Position the lid assembly with the inlet
of the unit located in line with the drain
cap and the vac label on the vac.
Allow the assembly to rest on the vac
drum.
3. Rotate both latches down until you
hear the latches snap over the lip of
the drum. JDrain
Snap
Latch _ZC'_\\\\\\\\\\\\\_'_\
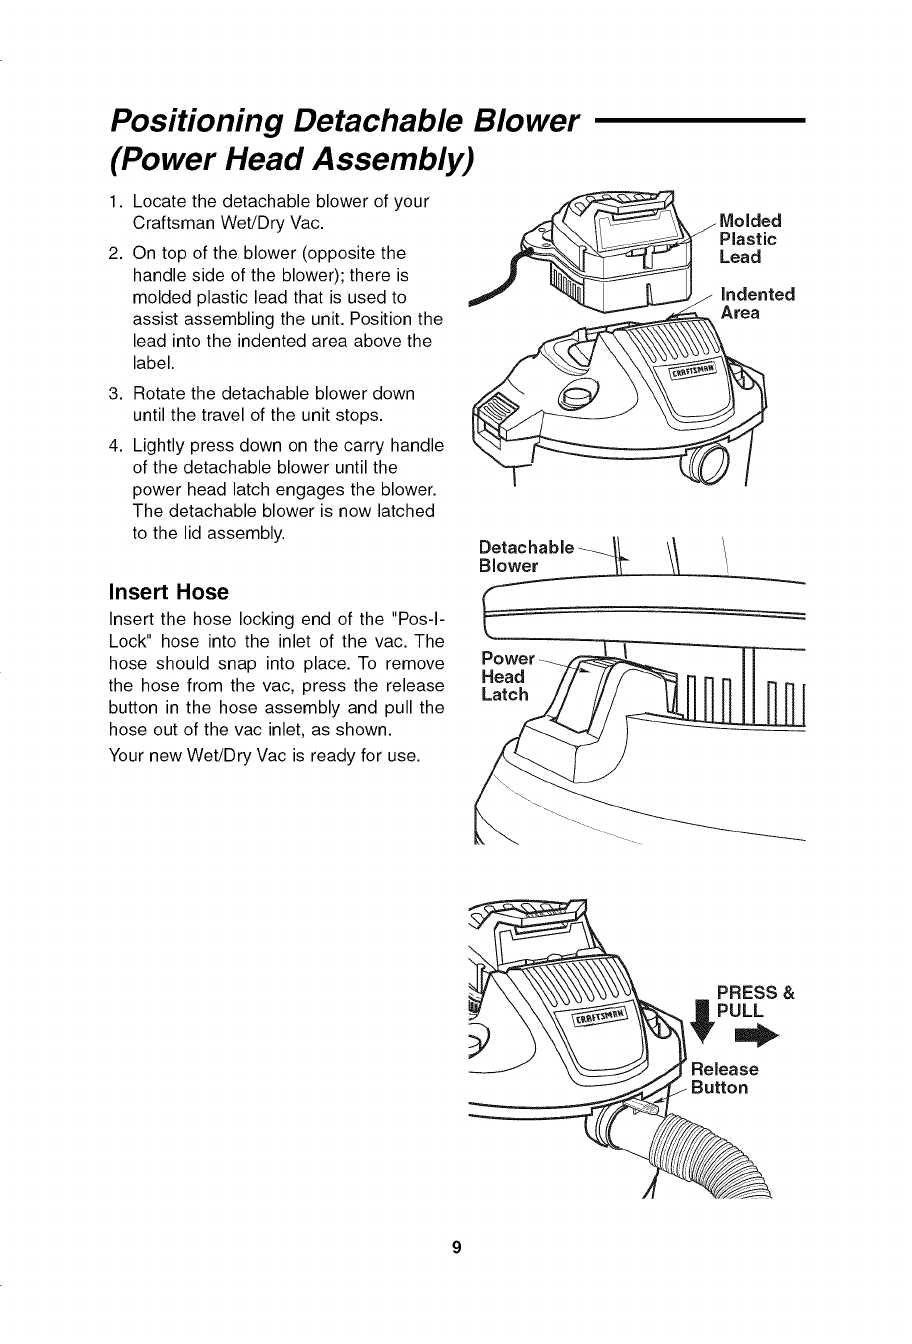
Positioning Detachable Blower
(Power Head Assembly)
1. Locate the detachable blower of your
Craftsman Wet/Dry Vac.
2. On top of the blower (opposite the
handle side of the blower); there is
molded plastic lead that is used to
assist assembling the unit. Position the
lead into the indented area above the
label.
3. Rotate the detachable blower down
until the travel of the unit stops.
4. Lightly press down on the carry handle
of the detachable blower until the
power head latch engages the blower.
The detachable blower is now latched
to the lid assembly.
Insert Hose
Insert the hose locking end of the "Pos-I-
Lock" hose into the inlet of the vac. The
hose should snap into place. To remove
the hose from the vac, press the release
button in the hose assembly and pull the
hose out of the vac inlet, as shown.
Your new Wet/Dry Vac is ready for use.
Detach
Blower
Power
Bead
Latch
PRESS &
PULL
Release
Button
Operation
Ai, WARNING
To reduce the risk of fire or explosion, do not operate this vac in areas with flamma-
ble gases, vapors or explosive dust in the air. Flammable gases or vapors include
but are not limited to; lighter fluid, solvent type cleaners, oil-base paints, gasoline,
alcohol or aerosol sprays. Explosive dusts include but are not limited to; coal, mag-
nesium, aluminum, grain or gun powder. Do not vacuum explosive dust, flammable
or combustible liquids or hot ashes. Do not use this vac as a sprayer.
To reduce the risk of health hazards from vapors or dusts, do not vacuum toxic
materials.
AWARNING: Always wear safety
eyewear complying with ANSI Z87.1
(or in Canada, CSA Z94.3) before
starting operation. Safety eyewear are
available at many local retail stores.
The operation of any utility vac can
result in foreign objects being blown
into the eyes, which can result in
severe eye damage.
A CAUTION: To reduce risk of hear-
ing damage, wear ear protectors when
using the vac for extended hours or
when using it in a noisy area.
To reduce the risk of electric shock, this
appliance has a polarized plug (one blade
is wider than the other). This plug will fit
in a polarized outlet only one way. If the
plug does not fit fully in the outlet, reverse
the plug. If it still does not fit, contact a
qualified electrician to install the proper
outlet. Do not change the plug in any way.
After you plug the power cord into the
outlet, turn the unit on by pushing the
switch from position "O" to position "1".
The symbols used on the switch actuator
are international "On & Off" symbols. "O"
is the symbol for "OFF" and "1"is the
symbol for "ON".
= OFF I = ON
Ak WARNING: To reduce the risk of
fire or electric shock, do not run vac
unattended.
NOTE: When using the unit in the vacu-
uming mode, always insert the air diffuser
in the exhaust port on the detachable
blower. This breaks up the direct flow of
air and diffuses it.
Vacuuming Dry Materials
1. The filter must always be in correct
position to reduce the risk of leaks and
possible damage to the vac.
2. When using your vac to pick up very
fine dust, it will be necessary for you
to empty the vac canister and clean
the filter at more frequent intervals to
maintain peak vac performance.
NOTE: A dry filter is necessary to pick up
dry material. If you use your vac to pick
up dust when the filter is wet, the filter will
clog quickly and be very difficult to clean.
3. If your filter is wet but you need to use
the vac to pick up dry material, you
can quickly dry the filter by running the
vac without hose attached for about
10 minutes. The clean air rushing
through the vac will help dry the filter.
The optional HEPA Rated Media Filter,
stock number 9-17912 will do a better job
stopping very fine particles than the
9-17816 filter. This filter material is
99.97% efficient down to .3 microns.
10
Vacuuming Liquids
1. When picking up small amounts of liq-
uid the filter may be left in place.
2. When picking up large amounts of liq-
uid we recommend that the filter be
removed. If the filter is not removed, it
will become saturated and misting may
appear in the exhaust.
3. After using the vac to pick up liquids,
the filter must be dried to reduce the
risk of possible mildew and damage to
the filter.
4. When the liquid in the drum reaches a
predetermined level, the float mecha-
nism will rise automatically to cut off
airflow. When this happens, turn off
the vac, unplug the power cord, and
empty the drum. You will know that the
float has risen because vac airflow
ceases and the motor noise will
become higher in pitch, due to
increased motor speed.
IMPORTANT: To reduce the risk of dam-
age to the vac do not run motor with float
in raised position.
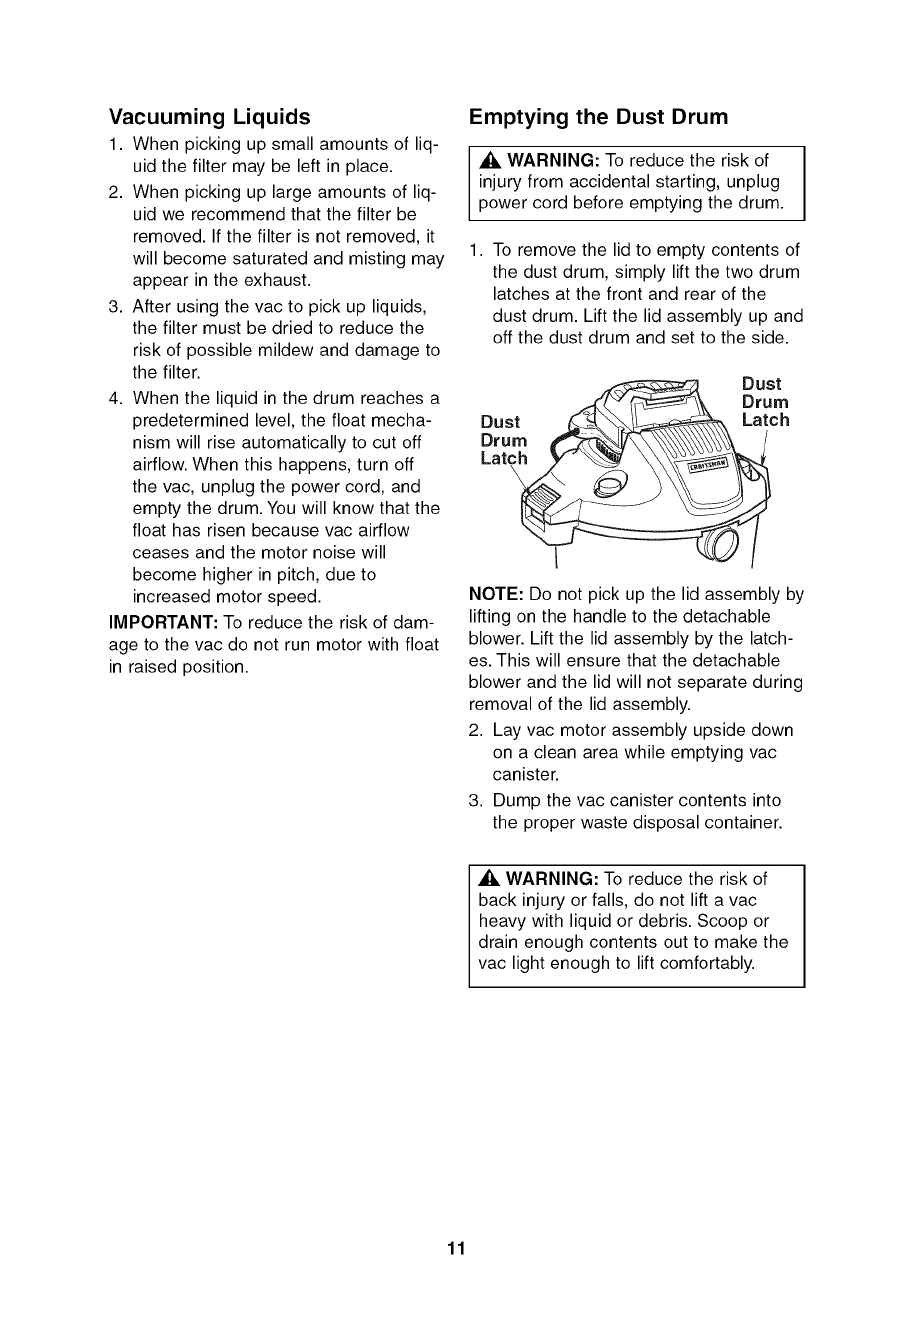
Emptying the Dust Drum
_, WARNING: To reduce the risk of
injury from accidental starting, unplug
power cord before emptying the drum.
1. To remove the lid to empty contents of
the dust drum, simply lift the two drum
latches at the front and rear of the
dust drum. Lift the lid assembly up and
off the dust drum and set to the side.
Dust
.._,/,4, _\ Drum
Dust t_._o_",__ Latch
Drum /
NOTE: Do not pick up the lid assembly by
lifting on the handle to the detachable
blower. Lift the lid assembly by the latch-
es. This will ensure that the detachable
blower and the lid will not separate during
removal of the lid assembly.
2. Lay vac motor assembly upside down
on a clean area while emptying vac
canister.
3. Dump the vac canister contents into
the proper waste disposal container.
,_k WARNING: To reduce the risk of
back injury or falls, do not lift a vac
heavy with liquid or debris. Scoop or
drain enough contents out to make the
vac light enough to lift comfortably.
11
Operation (continued)
To Store Your Accessories
Your Craftsman Wet/Dry Vac caddy is
designed to provide better stability and
accessory storage. There are six storage
locations at the rear of the vac caddy, two
storage locations on caster feet and two
storage locations on the vac lid.
Conveniently store accessory nozzles
and extension wands on the rear of the
caddy and use the front storage for hose
storage and/or male-to-male and air dif-
fuser storage.
Craftsman recommended accessories are
available at Sears retail stores.
Cord Wrap
When vacuuming is complete, unplug the
cord and wrap it around the cord wrap
ears on top of vac.
Cord Wrap Area
Moving the Wet/Dry Vac
Should it become necessary to pick the
vac up to move it, the handle on the sides
of the dust drum are used to lift. To maneu-
ver the vac, the push/pull handle in the
rear of the unit should be used.
Handle
12
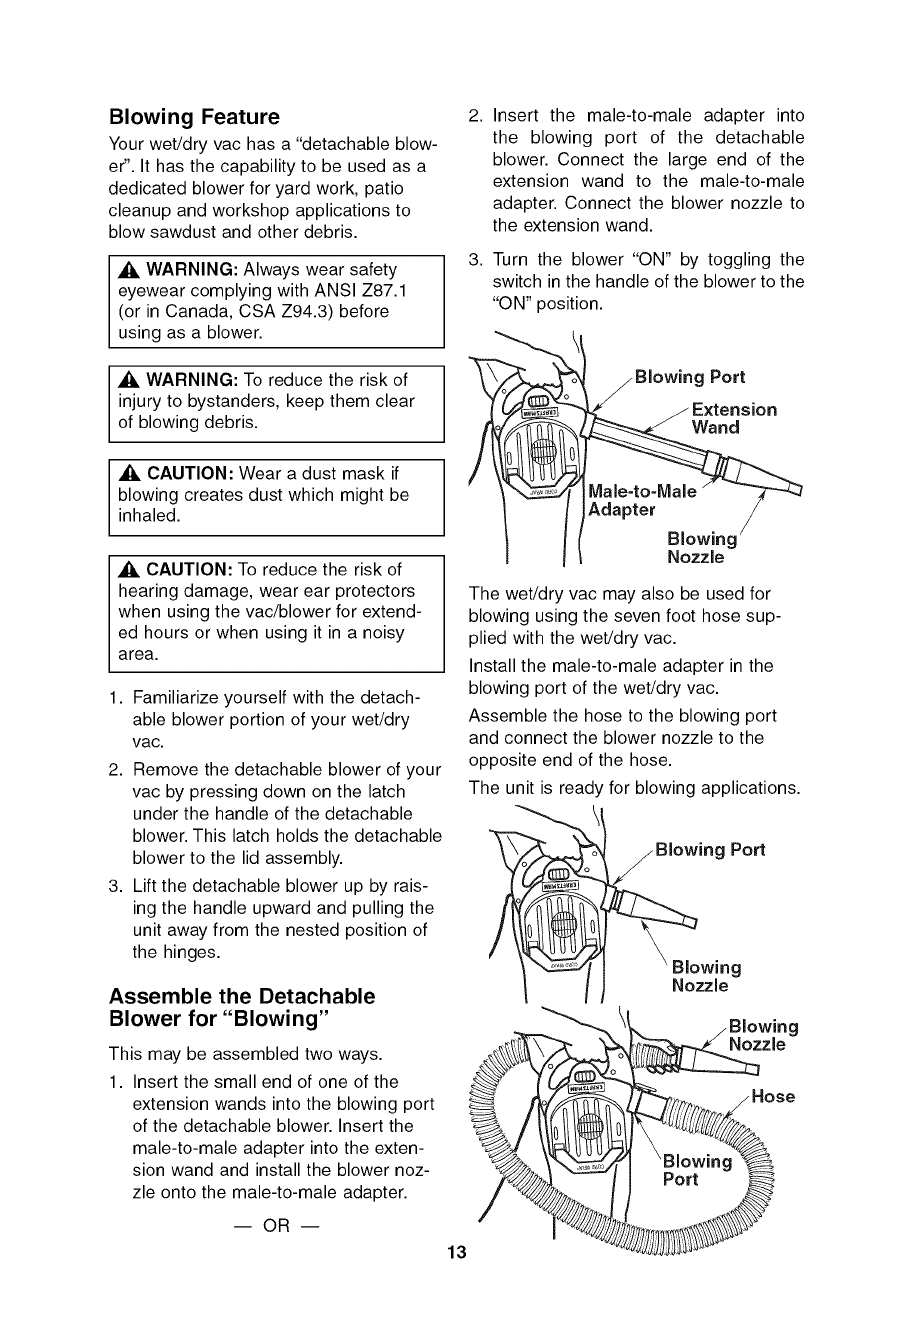
Blowing Feature
Your wet/dry vac has a "detachable blow-
er". It has the capability to be used as a
dedicated blower for yard work, patio
cleanup and workshop applications to
blow sawdust and other debris.
_, WARNING: Always wear safety
eyewear complying with ANSI Z87.1
(or in Canada, CSA Z94.3) before
using as a blower.
_, WARNING: To reduce the risk of
injury to bystanders, keep them clear
of blowing debris.
Ai, CAUTION: Wear a dust mask if
blowing creates dust which might be
inhaled.
_, CAUTION: To reduce the risk of
hearing damage, wear ear protectors
when using the vac/blower for extend-
ed hours or when using it in a noisy
area.
1. Familiarize yourself with the detach-
able blower portion of your wet/dry
vac.
2. Remove the detachable blower of your
vac by pressing down on the latch
under the handle of the detachable
blower. This latch holds the detachable
blower to the lid assembly.
3. Lift the detachable blower up by rais-
ing the handle upward and pulling the
unit away from the nested position of
the hinges.
Assemble the Detachable
Blower for "Blowing"
This may be assembled two ways.
1. Insert the small end of one of the
extension wands into the blowing port
of the detachable blower. Insert the
male-to-male adapter into the exten-
sion wand and install the blower noz-
zle onto the male-to-male adapter.
i OR i
2. Insert the male-to-male adapter into
the blowing port of the detachable
blower. Connect the large end of the
extension wand to the male-to-male
adapter. Connect the blower nozzle to
the extension wand.
3. Turn the blower "ON" by toggling the
switch in the handle of the blower to the
"ON" position.
BIowing Port
Wand
Adapter
Blowinc
Nozzle
The wet/dry vac may also be used for
blowing using the seven foot hose sup-
plied with the wet/dry vac.
Install the male-to-male adapter in the
blowing port of the wet/dry vac.
Assemble the hose to the blowing port
and connect the blower nozzle to the
opposite end of the hose.
The unit is ready for blowing applications.
Port
Blowing
Nozzle
Nozzle
13
Maintenance
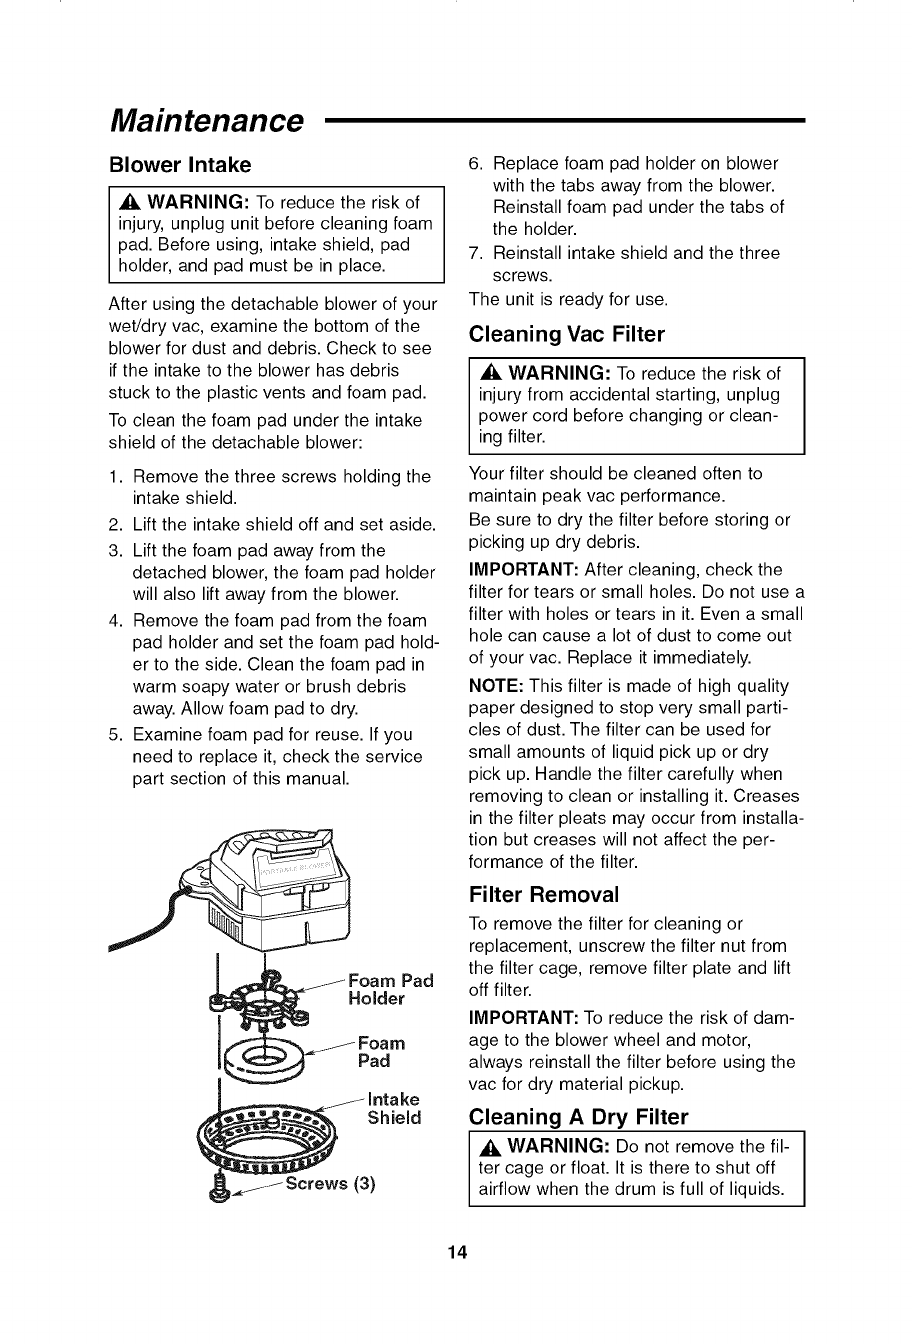
Blower Intake
WARNING: To reduce the risk of
injury, unplug unit before cleaning foam
pad. Before using, intake shield, pad
holder, and pad must be in place.
After using the detachable blower of your
wet/dry vac, examine the bottom of the
blower for dust and debris. Check to see
if the intake to the blower has debris
stuck to the plastic vents and foam pad.
To clean the foam pad under the intake
shield of the detachable blower:
1. Remove the three screws holding the
intake shield.
2. Lift the intake shield off and set aside.
3. Lift the foam pad away from the
detached blower, the foam pad holder
will also lift away from the blower.
4. Remove the foam pad from the foam
pad holder and set the foam pad hold-
er to the side. Clean the foam pad in
warm soapy water or brush debris
away. Allow foam pad to dry.
5. Examine foam pad for reuse. If you
need to replace it, check the service
part section of this manual.
Pad
Holder
im
Pad
_3 Intake
Shield
)
6. Replace foam pad holder on blower
with the tabs away from the blower.
Reinstall foam pad under the tabs of
the holder.
7. Reinstall intake shield and the three
screws.
The unit is ready for use.
Cleaning Vac Filter
Ak WARNING: To reduce the risk of
injury from accidental starting, unplug
power cord before changing or clean-
ing filter.
Your filter should be cleaned often to
maintain peak vac performance.
Be sure to dry the filter before storing or
picking up dry debris.
IMPORTANT: After cleaning, check the
filter for tears or small holes. Do not use a
filter with holes or tears in it. Even a small
hole can cause a lot of dust to come out
of your vac. Replace it immediately.
NOTE: This filter is made of high quality
paper designed to stop very small parti-
cles of dust. The filter can be used for
small amounts of liquid pick up or dry
pick up. Handle the filter carefully when
removing to clean or installing it. Creases
in the filter pleats may occur from installa-
tion but creases will not affect the per-
formance of the filter.
Filter Removal
To remove the filter for cleaning or
replacement, unscrew the filter nut from
the filter cage, remove filter plate and lift
off filter.
IMPORTANT: To reduce the risk of dam-
age to the blower wheel and motor,
always reinstall the filter before using the
vac for dry material pickup.
Cleaning A Dry Filter
A. WARNING: Do not remove the fil-
ter cage or float. It is there to shut off
airflow when the drum is full of liquids.
14
1. Lightcleaningofsomedrydebriscanbe
accomplishedwithoutremovingthefilter
fromthevac.Simplyslapyourhandon
topofthelidwhilethevacisturnedoff.
2. Forbestcleaningresultsduetoaccu-
mulateddust,cleanthefilterinan
openarea.CleaningSHOULDbe
doneoutdoorsandnotintheliving
quarters.
3. Afterfilterremovalfromvac,remove
thedrydebrisbygentlytappingthefil-
teragainsttheinsidewallofyourdust
drum.Thedebriswillloosenandfall.
4. Forthoroughcleaningofdryfilterwith
finedust(nodebris),runwater
throughitasdescribedunder
"CleaningAWetFilter".
Cleaning A Wet Filter
After filter is removed, run water through
the filter from a hose or spigot. Take care
that the water pressure from the hose is
not strong enough to damage the filter.
Remember: To dry a filter quickly, reinstall
the filter on the vac and allow the unit to
run for approximately 10 minutes. The
clean air rushing through the filter will dry
it.
Installation
Refer to "Replacement Filter Assembly"
Section of this manual.
Allow the filter to dry before storing the
vac.
Cleaning and Disinfecting the
Wet/Dry Vac
To keep your Wet/Dry Vac looking its
best, clean the outside with a cloth damp-
ened with warm water and mild soap.
To clean the drum:
1. Dump debris out.
2. Wash drum thoroughly with warm water
and mild soap.
3. Wipe out with dry cloth.
Before prolonged storage or as needed
(i.e., waste water pick up) the drum
should be disinfected.
To disinfect the drum:
1. Pour 1 gallon of water and 1 teaspoon
chlorine bleach into the drum.
2. Let solution stand for 20 minutes, care-
fully swishing every few minutes, mak-
ing sure to wet all inside surfaces of
the drum.
3. Empty drum after 20 minutes. Rinse
with water until bleach smell is gone.
Allow drum to dry completely before
sealing the motor on the drum.
Casters
If your casters are noisy, you may put a
drop of oil on the roller shaft to make them
quieter.
Storage
Before storing your vac, the drum should
be emptied and cleaned. The cord should
be wrapped around the unit and the hose
should be stored as described in this
manual. Accessories should be kept in the
same area as the vac so they can be
readily available. The vac should be stored
indoors.
_, WARNING: To assure product
SAFETY and RELIABILITY, repairs
and adjustment should be performed
by Sears Service Centers, always
using Sears replacement parts.
15
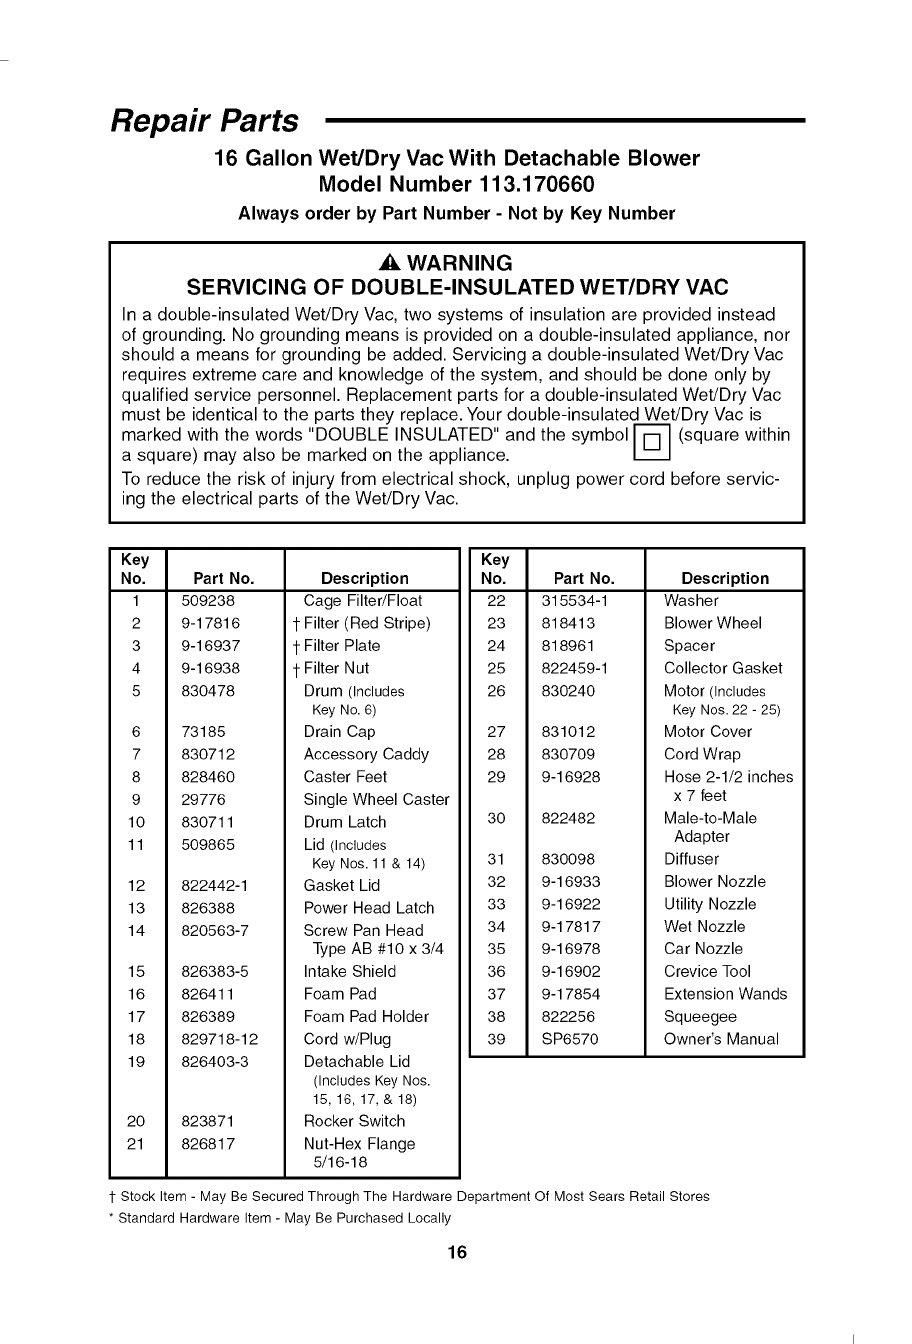
Repair Parts
16 Gallon Wet/Dry Vac With Detachable Blower
Model Number 113.170660
Always order by Part Number - Not by Key Number
WARNING
SERVICING OF DOUBLE-INSULATED WET/DRY VAC
In a double-insulated Wet/Dry Vac, two systems of insulation are provided instead
of grounding. No grounding means is provided on a double-insulated appliance, nor
should a means for grounding be added. Servicing a double-insulated Wet/Dry Vac
requires extreme care and knowledge of the system, and should be done only by
qualified service personnel. Replacement parts for a double-insulated Wet/Dry Vac
must be identical to the parts they replace. Your double-insulated Wet/Dry Vac is
marked with the words "DOUBLE INSULATED" and the symbol _-] (square within
a square) may also be marked on the appliance.
To reduce the risk of injury from electrical shock, unplug power cord before servic-
ing the electrical parts of the Wet/Dry Vac.
Key
No. Part No.
1 509238
2 9-17816
3 9-16937
4 9-16938
5 830478
6 73185
7 830712
8 828460
9 29776
10 830711
11 509865
12 822442-1
13 826388
14 820563-7
15 826383-5
16 826411
17 826389
18 829718-12
19 826403-3
20 823871
21 826817
t
t
t
Description
Cage Filter/Float
Filter (Red Stripe)
Filter Plate
Filter Nut
Drum (Includes
Key No. 6)
Drain Cap
Accessory Caddy
Caster Feet
Single Wheel Caster
Drum Latch
Lid (includes
Key Nos. 11 & 14)
Gasket Lid
Power Head Latch
Screw Pan Head
Type AB #10 x 3/4
Intake Shield
Foam Pad
Foam Pad Holder
Cord w/Plug
Detachable Lid
(Includes Key Nos.
15, 16, 17, & 18)
Rocker Switch
Nut-Hex Flange
5/16-18
Key
No. Part No.
22 315534-1
23 818413
24 818961
25 822459-1
26 830240
27 831012
28 830709
29 9-16928
30 822482
31 830098
32 9-16933
33 9-16922
34 9-17817
35 9-16978
36 9-16902
37 9-17854
38 822256
39 SP6570
Description
Washer
Blower Wheel
Spacer
Collector Gasket
Motor (Includes
Key Nos.22 - 25)
Motor Cover
Cord Wrap
Hose 2-1/2 inches
x 7 feet
Male-to-Male
Adapter
Diffuser
Blower Nozzle
Utility Nozzle
Wet Nozzle
Car Nozzle
Crevice Tool
Extension Wands
Squeegee
Owner's Manual
1-Stock Item - May Be Secured Through The Hardware Department Of Most Sears Retail Stores
* Standard Hardware Item - May Be Purchased Locally
16
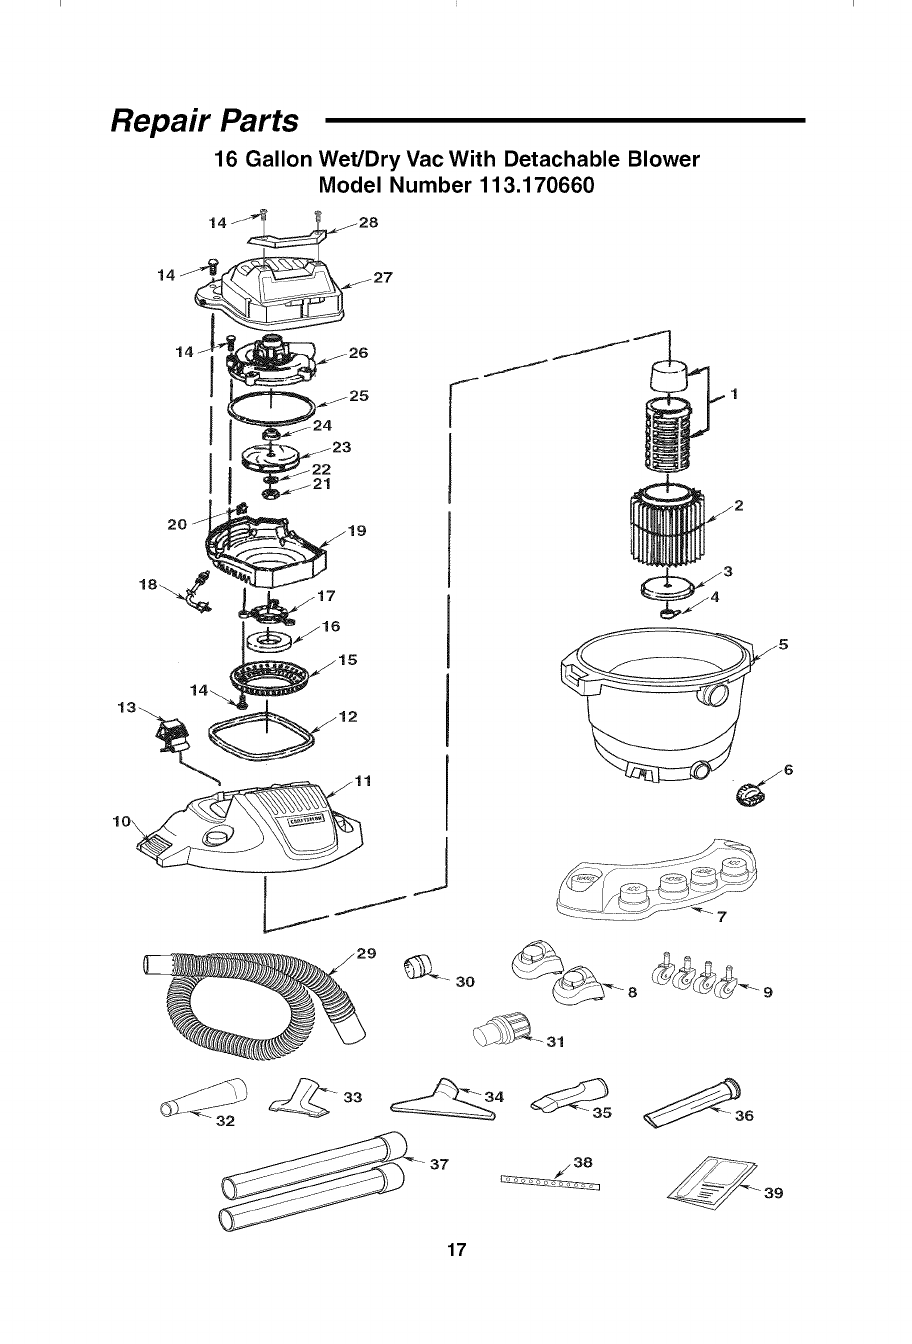
Repair Parts
16 Gallon Wet/Dry Vac With Detachable Blower
Model Number 113.170660
9
_33
-32
17
__35 _36
/38 39
Notes
18
manual
del usuari0
NO. DEMODELO
113.170660
NQmero
de serie
Los nQmeros de modelo
y de serie se pueden
encontrar en el asa.
Usted debe anotar los
n_meros tanto de modelo
como de serie en un lugar
seguro para uso futuro.
_ADVERTENCIA:
PARASU
SEGURIDAD
LEADETENIDAIVlENTE
TODASLAS
INSTRUCCIONES
GUARDEESTE
MANUAL
PARAREFERENCIA
FUTURA
®
ASPIRADORA PARA
MOJADO/SECO
DE 16 GALONES
CON SOPLADOR
DESMONTABLE
• seguridad
•ensamblaje
•funcionamiento
•mantenimiento
•piezasde repuesto
Sears, Roebuck and Co., Hoffman Estates, IL 60179 U.S.A.
No. de pieza SP6570 Impreso en Mexico
indice
Articulo P;_gina
[ndice ............................... 20
Garantia ............................. 20
Instrucciones de seguridad .............. 21
Introducci6n ......................... 23
Desempaquetado y comprobaci6n
del contenido de la caja de cart6n ...... 23
Lista del contenido de la caja de cart6n ... 23
Ensamblaje de la base portaaccesorios,
los pies de ruedecilla y las ruedecillas ...24
Ensamblaje del flotador y la jaula .......... 25
Ensamblaje del filtro .................... 26
Ensamblaje de la aspiradora .............. 26
Posicionamiento del soplador desmontable
(ensamblaje del cabezal del motor) ......... 27
Introduzca la manguera ................ 27
Funcionamiento ....................... 28
Recogida de materiales secos
con la aspiradora .................. 28
Recogida de liquidos con la aspiradora ...29
Articulo P;_gina
Vaciado del tambor para polvo .......... 29
Para almacenar los accesorios .......... 30
Enrollador del cord6n ................. 30
Transporte de la aspiradora ............. 30
Dispositivo de soplado ................ 31
Ensamble el soplador desmontable
para "soplar" . ..................... 31
Mantenimiento ....................... 31
Entrada del soplador .................. 32
Limpieza del filtro de la aspiradora ....... 32
Remoci6n del filtro ................... 32
Limpieza de un filtro seco .............. 33
Limpieza de un filtro mojado ............ 33
Instalaci6n ......................... 33
Limpieza y desinfecci6n de
la aspiradora para mojado/seco ........ 33
Ruedecillas ......................... 33
Almacenamiento ...................... 33
Piezas de repuesto .................... 35
Garantia
•Garantia completa Craftsman de un afio
Si esteproductoCraftsmanfalla debidoa undefectode materialo defabricaci6ndentrodel
plazode unafioa partirdela fechadecompra,devu_lvaloa cualquiertiendaSears,Centro
de ServicioSearsu otropuntodeventaCraftsmanpara quesea reparadogratuitamente(o
reemplazadosi la reparaci6nresultaimposible).
Estagarantiase aplicasolamentedurante90 diasa partirde la fechadecompra,si estepro-
ductose utilizaalgunavezparafinescomercialeso dealquiler.
Estagarantianoincluyelasbolsasni losfiltros,quesonpiezasperecederasquesepueden
desgastarporcausadel usonormaldentrodel periodode garantia.
Estagarantiale confierea ustedderechoslegalesespecificosyes posiblequeustedtenga
tambi_notrosderechosquevariande unestadoa otro.
Sears RoebuckandCo. HoffmanEstates IL60179
20
INSTRUCCIONESDESEGURIDADIMPORTANTES
Laseguridades unacombinaci6ndesentido
com_n,permaneceralertay saberc6mofunciona
laaspiradoraparamojado/seco("la aspiradora').
Palabras de serial de seguridad
_, PELIGRO:indicaunasituaci6ninminentemente
peligrosaque,sino seevita,causar_la muerteo
lesionesgraves
_, ADVERTENCIA:indicaunasituaci6npotencial-
mentepeligrosaque,si noseevita,podriacausar
la muerteo lesionesgraves
_, PRECAUCION:indicaunasituaci6npotencial-
mentepeligrosaque,si noseevita,pudieracausar
lesionesleveso moderadas.
Cuando utilice la aspiradora siga siempre las
precauciones b_.sicasde seguridad, incluyendo las
siguientes.
ADVERTENCIA_
Parareducirel riesgode incendio,sacudidas
el_ctricaso lesiones:
• Leay entiendaestemanualdel usuarioy todas
lasetiquetasqueest_.ncolocadasen la
aspiradoraparamojado/secoantesdeutilizarla.
• Utilicelaaspiradora_nicamentede lamanera
quese describeenestemanual.
• Nodejelaaspiradoraen marchamientrasest6
desatendida.
• Laschispasquese producenenelinterior del
motor puedenincendiarlosvaporesinflamables
o el polvo.Parareducirel riesgode incendioo
explosi6n:No recojacon la aspiradoraliquidoso
gasesinflamableso combustibles,o polvos
explosivoscomo gasolinau otros combustibles,
liquidoencendedor,limpiadores,pinturasa base
deaceite,gasnatural,hidr6geno,polvode
carb6n,polvode magnesio,polvode aluminio,
polvode granosdecerealo p61vora,ni usela
aspiradoracercadeestosmateriales.
• No recojaconla aspiradoranadaqueest6
ardiendoo humeando,como cigarrillos,f6sforos
o cenizascalientes.
• No recojaconla aspiradorapolvode panelde
yesoni hollin frio o cenizafria dechimeneacon
unfiltro est_.ndar.Estematerialesun polvomuy
fino quepuedeserexpulsadodevueltaalaire.
Utiliceun filtro parapolvofino enlugar deun
filtro est_.ndar.
• Parareducirel riesgodequese produzcan
peligrosparalasaludcausadospor vaporeso
polvo,no recojaconla aspiradoramateriales
t6xicos.
21
• No useni almacenelaaspiradoracercade
materialespeligrosos.
• Parareducirel riesgodedescargasel6ctricas,
noexpongalaaspiradoraa la Iluvianidejeque
entrenliquidosenel compartimientodel motor.
Guardelaaspiradoraen unlugarinterior.
• Nopermitaquela aspiradorase utilicecomo un
juguete.Senecesitaprestarm_.ximaatenci6n
cuandoseautilizadapor nifios o cercade 6stos.
• No useestaaspiradoraconunfiltro desgarrado
o si notieneelfiltro instalado,exceptocuando
recojaliquidosdela maneraquese describeen
lasecci6n"Funcionamiento"deestemanual.
Losresiduossecosabsorbidospor el impulsor
podriandafiarel motor o serexpulsadosde
vueltaal aire.
• ADVERTENCIA:Elcord6ndeenergiadeeste
productocontieneplomo,unasustanciaquimica
queseg_nlos conocimientosdel estadode
Californiacausadefectosdenacimientou otros
dafiosa la reproducci6n.L#vese/asmanos
despu#sde manejarel producto.
• Noabandonelaaspiradoracuandoest6
enchufada.Desench_feladeltomacorriente
cuandonola est6utilizandoy antesderealizar
serviciode revisi6n.
• Apaguelaaspiradoraantesde desenchufarla.
• Parareducirel riesgodelesionesdebidasa un
arranqueaccidental,desenchufeel cord6nde
energiaantesdecambiaro limpiarel filtro.
• Nodesenchufelaaspiradoratirandodel cord6n.
Paradesenchufarla,agarreel enchufey noel
cord6n.
• No usela aspiradoraconel cord6ndafiado,el
enchufedafiadou otraspiezasdafiadas.Si la
aspiradorano funcionacomodebe,lefaltan
piezas,se hacaido,hasido dafiada,se ha
dejadoa la intemperieo sehacaidoal agua,
devu61valaa unCentrode ServicioSears.
• Notire de laaspiradorausandoelcord6nni la
Ilevepor el cord6n,ni useel cord6ncomoasa,
ni cierreunapuertasobreel cord6n,ni tire del
cord6nalrededordehordeso esquinasafilados.
Nopaselaaspiradoraen marchasobreel
cord6n.Mantengael cord6nalejadode las
superficiescalientes.
• No manejeelenchufe,el interruptoro la
aspiradoracon lasmanosmojadas.
• Noponganing_nobjetoen lasaberturasde
ventilaci6n.Norecojanadacon laaspiradora
cuandocualquierade lasaberturasdeventi-
laci6nest6bloqueada;mantengadichasaber-
turasfibresdepolvo,pelusa,peloo cualquier
cosaquepuedareducirel flujo deaire.
Mantengaelpelo,laropaholgada,losdedosy
todaslaspartesdelcuerpoalejadosdelasaber-
turasydelaspiezasm6viles.
Parareducirelriesgodecafdas,tengacuidado
adicionalallimpiarenescaleras.
Parareducirelriesgodelesionesdeespaldao
cafdas,nolevanteunaaspiradoraquepese
muchodebidoaquecontieneIfquidooresiduos.
Saquepartedelcontenidodelaaspiradorao
dr6nelaparcialmenteparahacerqueseaIo
suficientementelivianacomoparapoder
levantarlac6modamente.
Parareducirelriesgodelesionescorporaleso
da_osalaaspiradora,utiliceOnicamente
accesoriosCraftsmanrecomendados.
Cuandoutilicelaaspiradoracomosoplador:
Dirijaladescargadeairesolamentehaciael
Areadetrabajo.
Apaguelaunidadantesdedejarlaenelpisoo
soltarelasa.
NopongalaaspiradoraenunIfquido;podria
producirseunadescargael6ctrica.
Nodirijaelairehacialaspersonasqueest6n
presentes.
Mantengaalejadosalosni_osdurantela
operaci6ndesoplado.
Noutiliceelsopladorparatrabajosqueno
seansoplarsuciedadyresiduos.
Nouselaaspiradoracomorociador.
Useprotecci6noculardeseguridad.
Parareducirelriesgodelesionesenlosojos,
useprotecci6noculardeseguridad.Lautilizaci6n
decualquieraspiradorautilitariaosoplador
utilitariopuedehacerquesesoplenobjetos
extra_oshacialosojos,Iocualpuedecausar
da_osgravesenlosojos.
Estaaspiradoraparamojado/secotiene
aislamientodoble,Iocualeliminalanecesidad
deunsistemaindependientedeconexi6na
tierra.UtiliceOnicamentepiezasderepuesto
id6nticas.Lealasinstruccionesdeserviciode
revisi6ndelasaspiradorasparamojado/seco
conaislamientodobleantesderealizardicho
servicio.
UtiliceOnicamentecordonesdeextensi6nque
tengancapacidadnominalparausoala
intemperie.Loscordonesdeextensi6nque
est6nenmalascondicionesocuyotama_ode
alambreseademasiadopeque_opueden
conllevarpeligrosdeincendioysacudidas
el6ctricas.Parareducirelriesgodeestos
peligroscuandoutiliceuncord6ndeextensi6n,
asegOresedequeelcord6nest6enbuenas
condicionesydequelaconexi6nnoentreen
contactoconIfquido.Paramantenerlap6rdida
almfnimo,utilicelatablaqueapareceaconti-
nuaci6nparaseleccionarelcord6ndeextensi6n
coneltama_odecablemfnimo.
Longituddel ¢ord6n Calibre del cable
deextensi6n (A.W.G.)
0-50pies 14
50-1O0pies 12
_, PRECAUCION:
• Parareducirel riesgo deda_osa laaudici6n,
useprotectoresde ofdos cuandoutilice la
aspiradoradurantemuchashorasseguidaso
cuandola empleeen un _.rearuidosa.
• Paraoperacionesquegeneranpolvo, useuna
m_.scaraantipolvo.
NOTA:Las descargasde est;_ticason¢omunesen
Areassecaso cuandola humedadrelativadelaire
es baja.Si recogeresiduosfinos conlaaspiradora,
se puededepositarcargaest_.ticaenla manguerao
enlaaspiradora.Elmejorremedioparareducirla
frecuenciadelas descargasde est_.ticaensu casa
o cuandouseestaaspiradoraes a_adirhumedadal
aireconun humidificador.
Siga las siguientes advertencias que aparecen en la
caja del motor de la aspiradora.
._ ISLAMIENTODOBLE. NO SEREQUIERE
CONEXIONA TIERRA.
CUANDOHAGASERVICIO DE REVISIONDE
LA ASPIRADORA, UTILICE ONICAMENTEPIEZAS DE
REPUESTOIDt_NTICAS.
_, ADVERTENClA:Para su propia seguridad,
lea y entienda el manual del operador. No tenga
en marcha la aspiradora desatendida. No recoja
cenizas calientes, carb6n caliente, materiales
t6xicos ni inflamables ni otros materiales
peligrosos. No use la aspiradora alrededor de
Ifquidos o vapores explosivos
ADVERTENClA: Para reducir el riesgo de sacu-
didas el6ctricas, no exponga la aspiradora a la
Iluvia y gu_,rdela en interiores.
GUARDEESTEMANUAL
22
I
Introducci6n
Estaaspiradoraparamojado/secoest,.dise_ada
solamenteparausodom6stico.Sepuedeutilizar
pararecogermaterialesmojadoso secosy se
puedeusarcomo soplador.
Leaestemanualdel operadorparafamiliarizarse
conlascaracteristicasdelproductoy paraentender
la utilizaci6nespecificade su nuevaaspiradora.
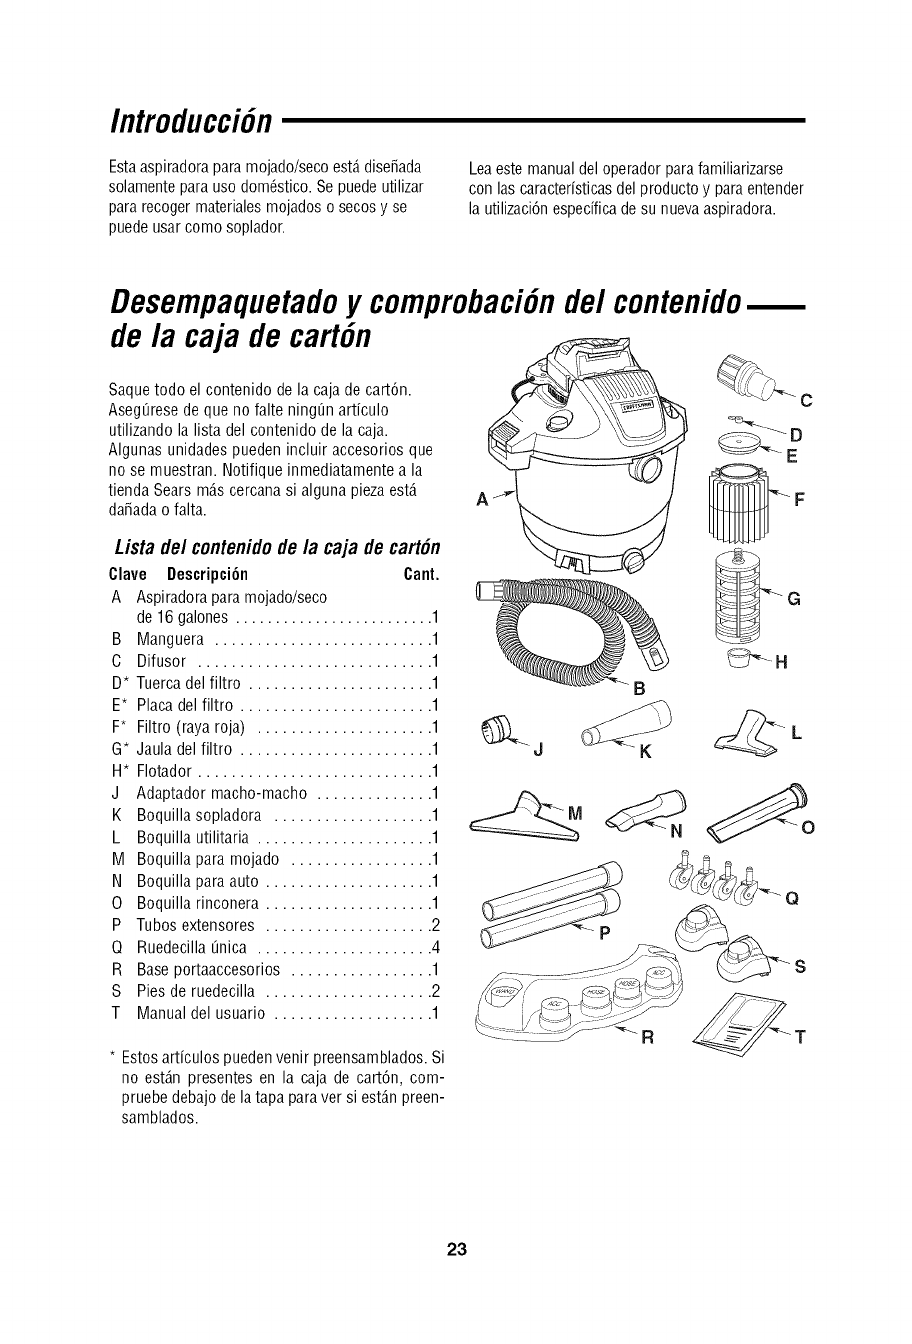
Desempaquetadoy comprobaci6nde/contenido
de/a caja de cart6n
Saquetodo el contenido dela caja decart6n.
Aseg_resede queno falte ning_narticulo
utilizandolalista del contenidodela caja.
Algunasunidadespuedenincluir accesoriosque
no se muestran.Notifiqueinmediatamentea la
tiendaSearsm_.scercanasi algunapiezaest,.
da_adao falta.
Lista de/contenido de/a caja de cart6n
Clave Descripci6n Cant.
A Aspiradoraparamojado/seco
de16 galones......................... 1
B Manguera .......................... 1
C Difusor ............................ 1
D* Tuercadel filtro ...................... 1
E* Placa del filtro ....................... 1
F* Filtro (rayaroja) ..................... 1
G* Jaula del filtro ....................... 1
H* Flotador ............................ 1
J Adaptadormacho-macho .............. 1
K Boquillasopladora ................... 1
L Boquilla utilitaria ..................... 1
M Boquillapara mojado ................. 1
N Boquillaparaauto .................... 1
0 Boquilla rinconera .................... 1
P Tubosextensores .................... 2
Q Ruedecilla[inica ..................... 4
R Baseportaaccesorios ................. 1
S Pies de ruedecilla .................... 2
T Manualdel usuario ................... 1
* Estos articulos pueden venir preensamblados. Si
no est_.n presentes en la caja de cart6n, com-
pruebe debajo de la tapa para ver si est_.npreen-
samblados.
B
23

Ensamblaje de la base portaaccesorios,
/os pies de ruedecilla y/as ruedecillas
1. Quitedel tamborparapolvoelensamblajedel
cabezaldel motory latapa y pongadicho
ensamblajea unlado.
2. Pongaeltamborparapolvoen )osici6n
invertidaenel piso.
3. Introduzcalos dospies deruedecillaenla parte
inferiordel tambor,de la maneraquese muestra
enla ilustraci6n,en las dosubicacionesque
est_.ncercade latapadel drenaje.Empujesobre
cadauno delos piesde ruedecillahastaque
est6nal rasconla parteinferiordeltambor
parapolvo.
4. Introduzcala baseportaaccesoriosenlaparte
inferiordel tambor,de la maneraquese muestra
enla ilustraci6n,en el ladoopuestodelatapa
del drenaje.Empujesobrelabaseportaacce-
sorioshastaqueest_al rascon la parteinferior
deltamborparapolvo.
5. Introduzcael vb,stagode la ruedecillaenel
receptb,culode labaseportaaccesoriosy elpie
deruedecilla,dela maneraquese muestraenla
ilustraci6n(cuatrolugares).Empujesobrela
ruedecillahastaque la bolaubicadaen el
vb,stagodela ruedecillaest6introducida
completamenteenel receptb,culo. Ustedoirb,un
sonidocuandola bolase acoplea presi6nenel
recept_.culoy la ruedecillagirard,f_.cilmente
cuandoest_bienpuesta.
6. Pongaeltamborenposici6nderecha.
Ruedecilla
Bola de la _V_stago
de la ruedecilla
ruedecilla
'\
_ase
portaaccesorios
Ruedecilla
Pie de
ruedecilla
Tambor
para
polvo
Tambor
para
polvo
Tapadel
drenaje
24
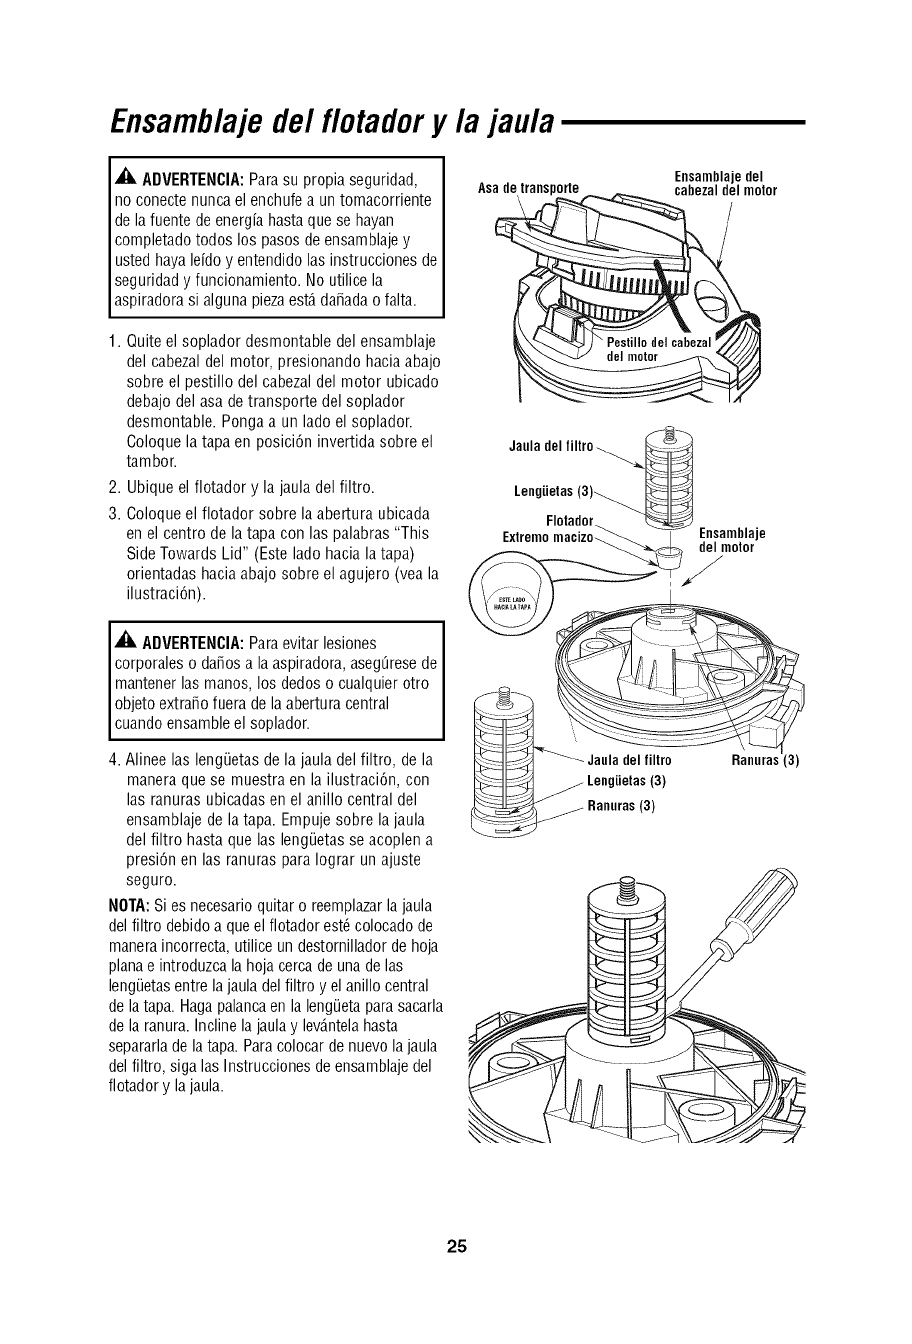
Ensamblaje de/flotador y la jau/a
A_, ADVERTENCIA:Para su propia seguridad,
no conecte nunca el enchufe a un tomacorriente
de la fuente de energia hasta que se hayan
completado todos los pasos de ensamblaje y
usted haya lefdo y entendido las instrucciones de
seguridad y funcionamiento. No utilice la
aspiradora si alguna pieza est,. dafiada o falta.
Ensamblajedel
Asade trans cabezaldel motor
1. Quite el soplador desmontable del ensamblaje
del cabezal del motor, presionando hacia abajo
sobre el pestillo del cabezal del motor ubicado
debajo del asa de transporte del soplador
desmontable. Ponga a un lado el soplador.
Coloque la tapa en posici6n invertida sobre el
tambor.
2. Ubique el flotador y la jaula del filtro.
3. Coloque el flotador sobre la abertura ubicada
en el centro de la tapa con las palabras "This
Side Towards Lid" (Este lado hacia la tapa)
orientadas hacia abajo sobre el agujero (vea la
ilustraci6n).
_, ADVERTENCIA:Para evitar lesiones
corporales o dafios a la aspiradora, aseg0rese de
mantener las manos, los dedos o cualquier otro
objeto extra_o fuera de la abertura central
cuando ensamble el soplador.
4. Alinee las leng0etas de la jaula del filtro, de la
manera que se muestra en la ilustraci6n, con
las ranuras ubicadas en el anillo central del
ensamblaje de la tapa. Empuje sobre la jaula
del filtro hasta que las leng0etas se acoplen a
presi6n en las ranuras para Iograr un ajuste
seguro.
NOTA: Si es necesario quitar o reemplazar la jaula
del filtro debido a que el flotador est6 colocado de
manera incorrecta, utilice un destornillador de hoja
plana e introduzca la hoja cerca de una de las
leng0etas entre la jaula del filtro y el anillo central
de la tapa. Haga palanca en la leng0eta para sacarla
de la ranura. Incline la jaula y lev_.ntelahasta
separarla de la tapa. Para colocar de nuevo la jaula
del filtro, siga las Instrucciones de ensamblaje del
flotador y la jaula.
Jauladeltiltro_.._..._
Lengiietas(3)__
Ext.emo ; 'aiO,z°o' E.sam,, e
Jauladelfiltro Ranuras(3)
_ _ LengUetas(3)
/Ranuras(3)
25
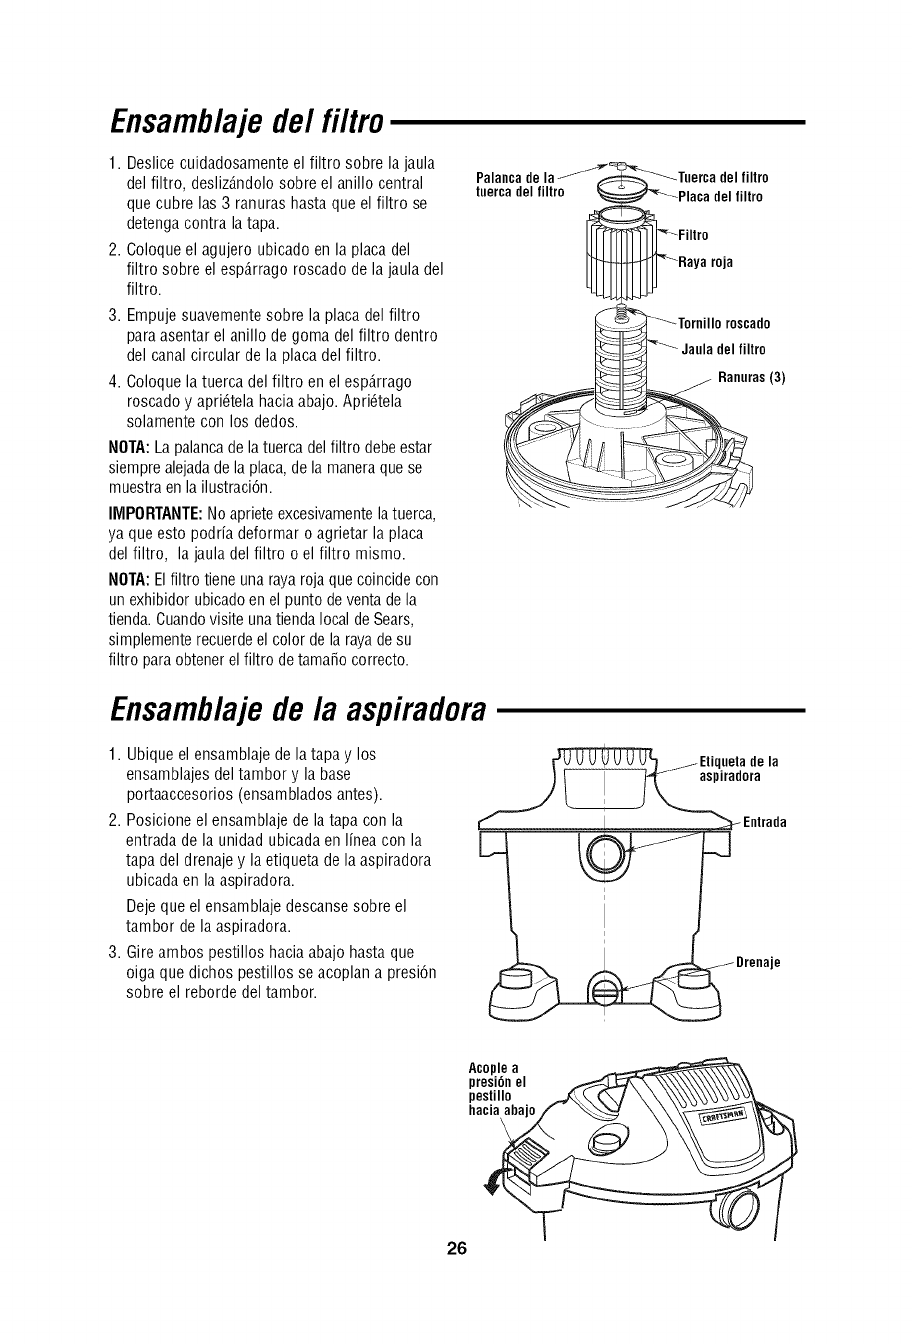
Ensamblaje de/filtro
1. Deslicecuidadosamenteel filtro sobre lajaula
del filtro, desliz_.ndolosobre el anillo central
que cubrelas3 ranurashastaque el filtro se
detengacontrala tapa.
2. Coloqueel agujeroubicadoenla placadel
filtro sobreel esp_.rragoroscadode lajaula del
filtro.
3. Empujesuavementesobre la placadel filtro
paraasentarel anillo de goma del filtro dentro
del canalcircular de la placadel filtro.
4. Coloquelatuerca del filtro en el esp_.rrago
roscadoy apri6telahaciaabajo.Apri6tela
solamenteconlos dedos.
NOTA:La palancade latuercadel filtro debeestar
siemprealejadadelaplaca,dela maneraquese
muestraenlailustraci6n.
IMPORTANTE:Noaprieteexcesivamentelatuerca,
ya queesto podrfa deformar o agrietarla placa
del filtro, lajauladel filtro o el filtro mismo.
NOTA:Elfiltro tieneunarayarojaquecoincidecon
unexhibidorubicadoenel puntodeventadela
tienda.Cuandovisite unatiendalocal deSears,
simplementerecuerdeel colordela rayadesu
filtro paraobtenerelfiltro detama_ocorrecto.
Palanca de la
tuerca del filtro del filtro
roja
filtro
Ranuras (3)
Ensamblaje de la aspiradora
1. Ubiqueel ensamblajede la tapa y los
ensamblajesdel tambor y la base
portaaccesorios(ensambladosantes).
2. Posicioneel ensamblajedela tapa conla
entradade la unidadubicadaenIfneacon la
tapa del drenajey laetiqueta de la aspiradora
ubicadaen laaspiradora.
Dejequeel ensamblajedescansesobreel
tambor dela aspiradora.
3. Gireambospestilloshaciaabajohasta que
oigaque dichos pestillos seacoplana presi6n
sobreel rebordedel tambor.
Etiqueta de la
iradora
Entrada
Drenaje
Acople a
presi6n el
pestillo
hacia 1
26
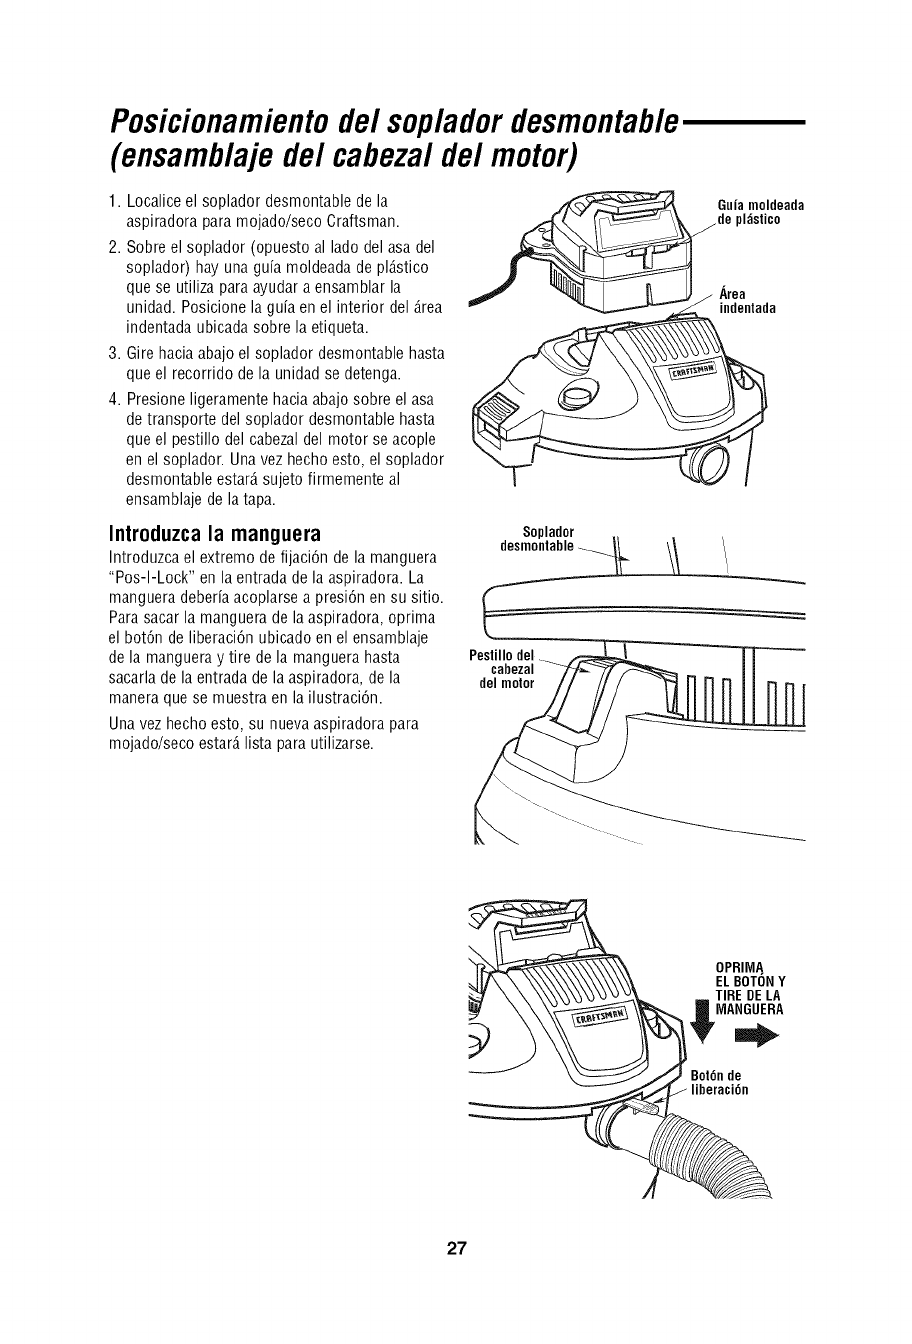
Posicionamientode/sopladordesmontab/e
(ensamb/ajede/cabeza/de/motor)
1. Localiceel sopladordesmontabledela
aspiradoraparamojado/secoCraftsman.
2. Sobreel soplador (opuestoal ladodel asa del
soplador)hay unaguia moldeadadepl_.stico
quese utilizaparaayudara ensamblarla
unidad.Posicionela guiaen el interior del _.rea
indentadaubicadasobrela etiqueta.
3. Girehaciaabajoel soplador desmontablehasta
queel recorrido dela unidadse detenga.
4. Presioneligeramentehaciaabajosobreel asa
de transportedel soplador desmontablehasta
queel pestillodel cabezaldel motor se acople
enel soplador.Unavezhecho esto,el soplador
desmontableestar_,sujetofirmementeal
ensamblajede latapa.
Introduzca la manguera
Introduzcael extremode fijaci6n de la manguera
"Pos-I-Lock" en la entradade la aspiradora.La
mangueradeberiaacoplarsea presi6nen su sitio.
Parasacar la mangueradela aspiradora,oprima
el bot6n de liberaci6nubicadoen el ensamblaje
dela mangueray tire de la manguerahasta
sacarlade la entradade la aspiradora,dela
maneraque se muestraen la ilustraci6n.
Unavez hechoesto, su nuevaaspiradorapara
mojado/secoestar_,lista parautilizarse.
Soplador
Pestillo del
cahezal
del motor
Guia moldeada
]l;_stico
Area
indentada
OPRIMA.
EL BOTONY
TIRE DELA
MANGUERA
BotOnde
liberaci6n
27
Funcionamiento
_, ADVERTENCIA
Parareducirel riesgo de incendioso explosi6n,no hagafuncionar estaaspiradoraen _.reasen las
que hayagasesinflamables,o vaporesinflamableso polvo explosivoen el aire. Entrelos gasesy
vaporesinflamablesse incluye,perosin limitarse a ellos, liquidos deencendedor,limpiadoresa base
dedisolventes,pinturasa basede aceite,gasolina,alcohol o rociadoresaerosoles.Entrelos polvos
explosivosse incluye,perosin limitarse a ellos, el carb6n,magnesio,aluminio,polvo de granoso
_61vora.Norecojacon laaspiradorapolvo explosivo,liquidos infiamableso combustibles,ni cenizas
calientes.No useestaaspiradoracomo rociador.A fin de reducirlos peligrosparala saluddebidosa
vaporeso polvos, no recojacon la aspiradoramaterialest6xicos.
_. ADVERTENCIA:Usesiempreprotectores
ocularesdeseguridadquecumplanconla norma
ANSIZ87.1 (oen Canada.,conla normaCSA
Z94.3)antesdecomenzarlaoperaci6n.Los
}rotectoresocularesdeseguridadse pueden
obtenerenmuchastiendasminoristaslocales.
Elfuncionamientodecualquieraspiradorade uso
jeneralpuedetenercomo resultadoquesalgan
proyectadoshacialos ojosobjetosextrafios,Io
cualpuedeproducirdafiosgravesen los ojos.
_. PRECAUCION: Para reducir el riesgo de
dafios a la audici6n, use protectores de oidos
al utilizar la aspiradora o durante muchas
horas seguidas o al emplearla en un _.rea
ruidosa.
Para reducir el riesgo de sacudidas el6ctricas, este
aparato electrodom6stico tiene un enchufe pola-
rizado (una hoja es m_.sancha que la otra). Este
enchufe entrar_,en un tomacorriente polarizado
solamente de una manera. Si el enchufe no entra
por completo en el tomacorriente, d61ela vuelta.
Si sigue sin entrar, p6ngase en contacto con un
electricista competente para instalar el toma-
corriente adecuado. No haga ning_n tipo
de cambio en el enchufe.
Despu6s de enchufar el cord6n de energia en el
tomacorriente, encienda la unidad empujando el
interruptor de la posici6n "O" a la posici6n 'T'. Los
simbolos utilizados en el accionador del interruptor
son los simbolos internacionales de "encendido y
apagado". "O" es el simbolo de "APAGADO" y 'T'
es el simbolo de "ENCENDIDO".
=APAGADO I =ENCENDIDO
I_. ADVERTENCIA:Para reducir el riesgo de I
I
incendio o sacudidas el6ctricas, no deje desaten- I
dida la aspiradora mientras est6 en marcha.
NOTA: Cuando utilice la unidad en el modo de
aspiraci6n, introduzca siempre el difusor de aire
en el orificio de escape del soplador
desmontable. Esto interrumpe el flujo directo de
aire y Io disipa.
Recogidade materiales secos
con la aspiradora
1. El filtro debe estar siempre en la posici6n
correcta para reducir el riesgo de fugas y
posibles dafios a la aspiradora.
2. Cuando utilice la aspiradora para recoger polvo
muy fino, ser_. necesario que usted vacie el
recipiente de la aspiradora y limpie el filtro a
intervalos m_.sfrecuentes para mantener el
m_.ximo rendimiento de la aspiradora.
NOTA: Se necesita un filtro para medios secos
para recoger material seco. Si utiliza la
aspiradora para recoger polvo cuando el filtro
est6 mojado, 6ste se taponar_, r_.pidamente y ser_.
muy dificil limpiarlo.
3. Si el filtro est,. mojado pero usted necesita
usar la aspiradora para recoger material seco,
puede secar r_.pidamente el filtro haciendo
funcionar la aspiradora sin tener la manguera
conectada a ella durante aproximadamente
10 minutos. El aire limpio que atravesar_.
r_.pidamente la aspiradora ayudar_, a secar
el filtro.
El filtro opcional para medios con calificaci6n
HEPA (filtro de aire de alta eficiencia para
particulas), n_mero de existencias 9-17912,
har_.un mejor trabajo a la hora de atrapar las
particulas de polvo muy finas que el filtro
9-17816. El material de este filtro tiene una
eficiencia del 99.97% hasta un tama_o tan
peque_o como 0,3 micrones.
28
Recogidadeliquidosconlaaspiradora
1. Cuandorecoja cantidadespeque_asde liquido,
se podr_,dejarcolocadoel filtro en la
aspiradora.
2. Cuandorecojacantidadesgrandesdeliquido,
recomendamosquitarel filtro. Si nose quitael
filtro, est6se saturar_,yes posiblequeaparezca
nieblaenel escape.
3. Despu6sde utilizarla aspiradorapararecoger
liquidos,se debesecarel filtro paraevitaruna
posibleformaci6nde mohoy posiblesda_osal
filtro.
4. Cuandoel liquido contenidoenel tambor de la
aspiradoraalcanceun nivel predeterminado,el
mecanismodeflotador subir_.
autom_.ticamenteparacortar la circulaci6n de
aire. Cuandoesto ocurra,apaguela
aspiradora,desenchufeel cord6n de energiay
vacieel tambor.Sabraqueel flotador hacor-
tado la circulaci6nde aireporque la succi6n
cesar_,y el ruido del motor alcanzar_,una
frecuenciam_.saltadebidoal aumentodela
velocidaddel motor.
IMPORTANTE:Parareducir el riesgo de da_arla
aspiradora,no hagafuncionarel motor con el
flotador en la posici6nsubida.
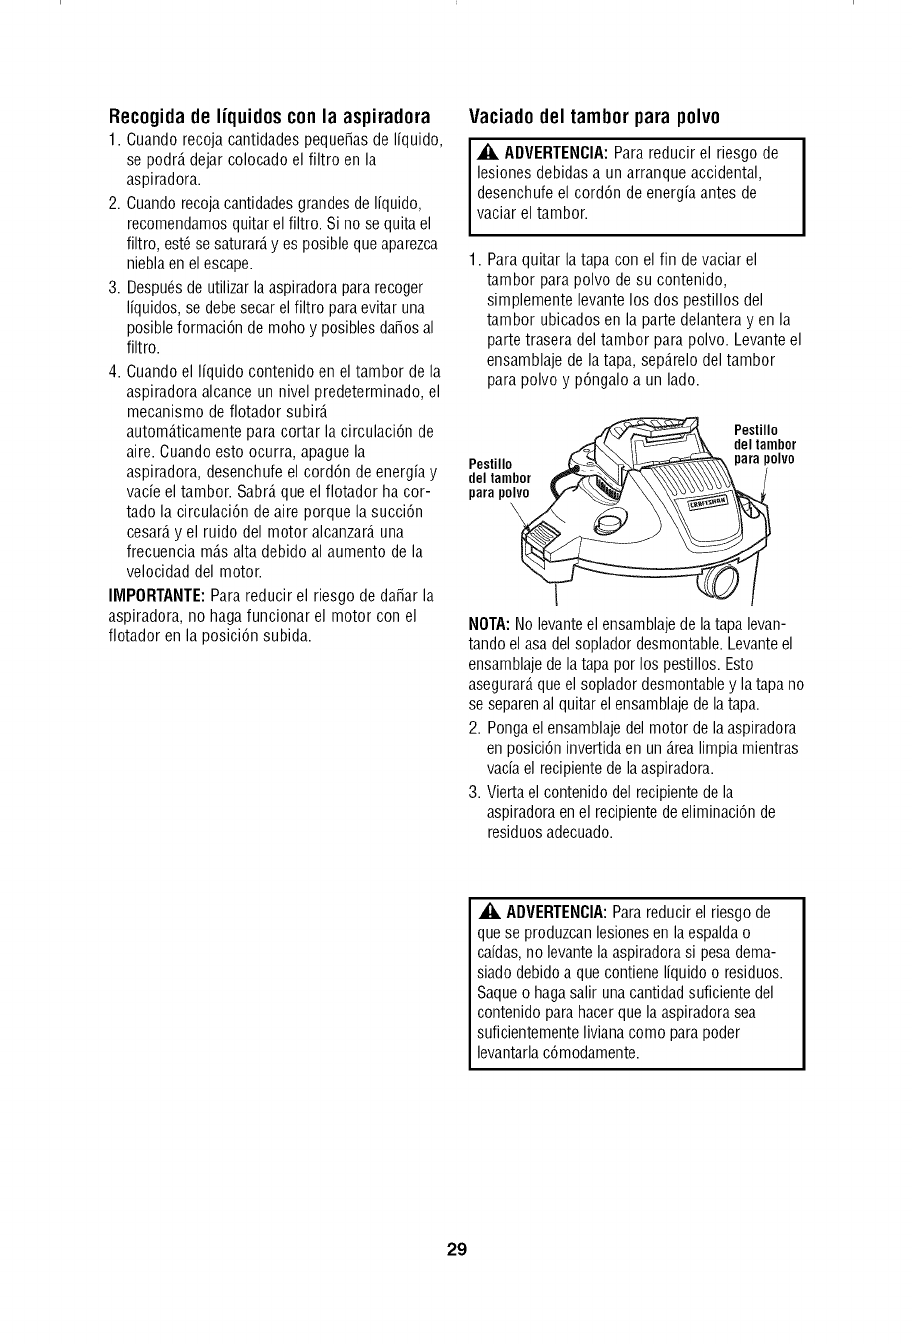
Vaciado del tambor para polvo
_. ADVERTENCIA:Para reducirel riesgode
lesionesdebidasa un arranqueaccidental,
desenchufeel cord6nde energiaantes de
vacare tambor.
1. Paraquitar la tapa con el fin devaciarel
tambor parapolvo de su contenido,
simplementelevantelos dos pestillosdel
tambor ubicadosen la parte delanterayen la
partetrasera del tamborparapolvo. Levanteel
ensamblajede latapa, sep_.relodeltambor
parapolvo y p6ngaloa un lado.
Pestillo
.f_K\ I_ _ d.lt_mbor
Pestillo _ _._ para polvo
d. t .,bor /
para po_
NOTA:Nolevanteelensamblajedela tapalevan-
tandoel asadel sopladordesmontable.Levanteel
ensamblajede latapapor los pestillos.Esto
asegurar_,queel sopladordesmontabley latapano
seseparenal quitarelensamblajede latapa.
2. Pongaelensamblajedel motor de laaspiradora
enposici6ninvertidaen un _.realimpiamientras
vaciael recipientedelaaspiradora.
3. Viertaelcontenidodel recipientede la
aspiradoraen el recipientedeeliminaci6nde
residuosadecuado.
_, ADVERTENCIA:Para reducir el riesgo de
que se produzcan lesiones en la espalda o
caidas, no levante la aspiradora si pesa dema-
siado debido a que contiene liquido o residuos.
Saque o haga salir una cantidad suficiente del
contenido para hacer que la aspiradora sea
suficientemente liviana como para poder
levantarla c6modamente.
29
Funcionamiento(continuaci6n)
Para almacenar los accesorios
Labaseportaaccesoriosdelaaspiradorapara
mojado/secoCraftsmanest,.dise_adapara
proporcionarmejorestabilidady almacenamiento
deaccesorios.Hayseisubicacionesde
almacenamientoenla partetraseradela base
portaaccesoriosde laaspiradora,dos ubicaciones
dealmacenamientoenlos piesde ruedecillay dos
ubicacionesdealmacenamientoen latapadela
aspiradora.
Almaceneconvenientementelasboquillas
accesoriasy lostubosextensoresen lapartetrasera
dela baseportaaccesoriosy utiliceel_.readelantera
dealmacenamientoparaalmacenarlamangueray/o
paraalmacenarel adaptadormacho-machoy el
difusordeaire.
LosaccesoriosCraftsmanrecomendadosse
puedenconseguiren lastiendas minoristas
Sears.
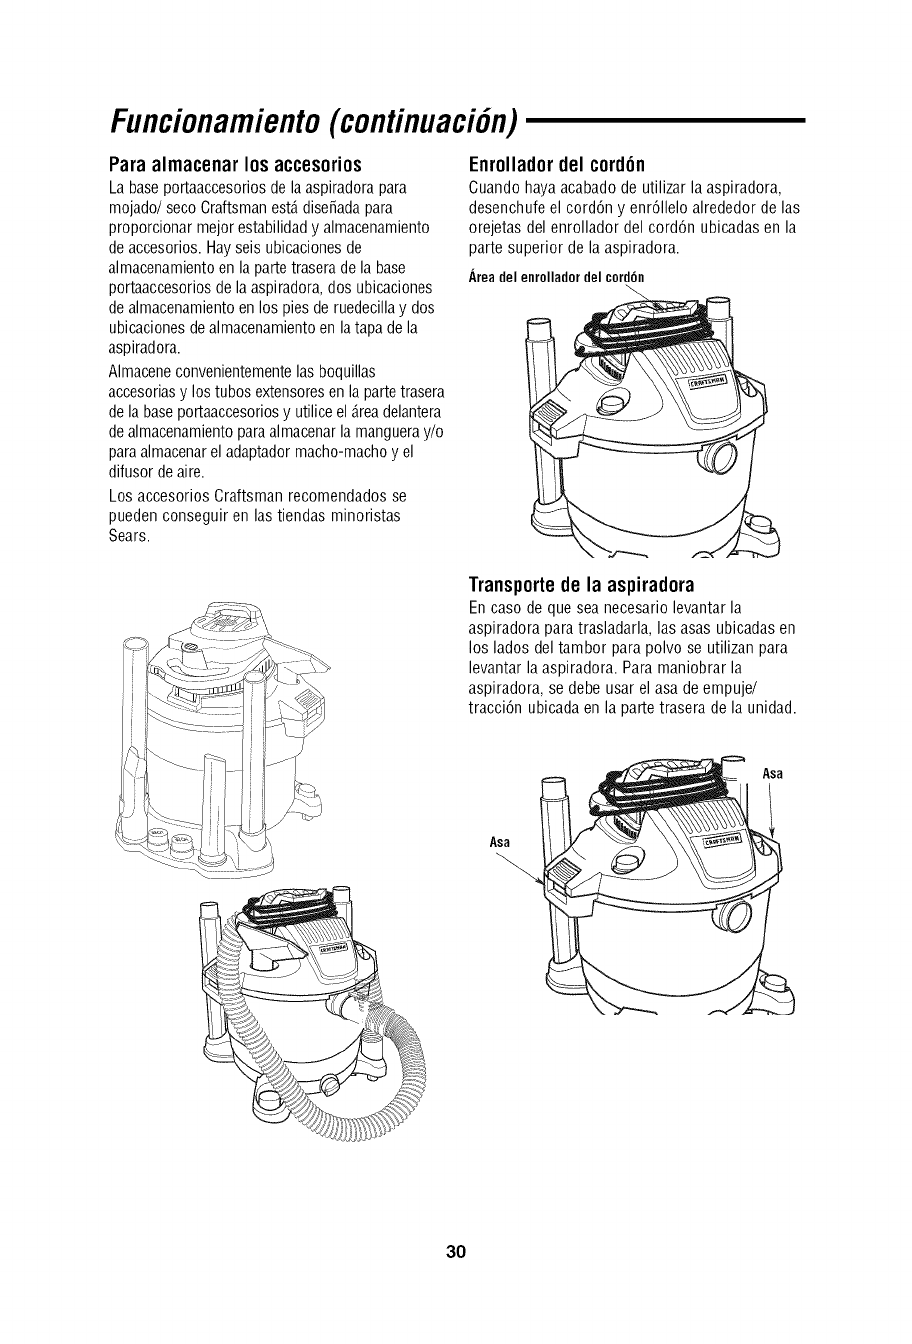
Enrollador del cord6n
Cuandohayaacabadode utilizarla aspiradora,
desenchufeel cord6n y enr611eloalrededordelas
orejetasdel enrolladordel cord6n ubicadasen la
partesuperiorde ia aspiradora.
Area del enrollador del cord6n
Transporte de la aspiradora
Encaso deque seanecesariolevantarla
aspiradoraparatrasiadaria,ias asasubicadasen
los iados deltambor parapoivo se utiiizanpara
ievantariaaspiradora.Paramaniobraria
aspiradora,se debeusar el asa deempuje!
tracci6n ubicadaen la partetrasera dela unidad.
Asa
Asa
30
Dispositivo de soplado
Laaspiradoraparamojado/secotiene un
"soplador desmontable'. Laaspiradoratiene
capacidadpara utilizarsecomo un soplador
especializadopararealizartrabajode jardin,
limpiezadepatiosy aplicacionesdetaller para
soplaraserriny otros residuos.
,_, ADVERTENClA:Usesiempreprotectores
ocularesdeseguridadquecumplanconla norma
ANSIZ87.1 (oen Canada.,conla norma
CSAZ94.3)antesde utilizarla aspiradora
comosoplador.
_. ADVERTENCIA:Parareducirel riesgode
lesionesalas personasqueest@presentes,
mant@galasalejadasde los residuossoplados.
_. ADVERTENCIA:Useunam_.scaraantipolvosi
elsopladogenerapolvo quepodriaserinhalado.
_, PRECAUCION:Para reducir el riesgo de
da_os a la audici6n, use protectores de oidos
cuando utilice la aspiradora/soplador durante
muchas horas seguidas o cuando la utilice en un
_,rearuidosa.
1. Familiaricese con la parte del soplador des-
montable de la aspiradora para mojado/seco.
2. Quite el soplador desmontable de la
aspiradora, presionando hacia abajo sobre el
pestillo ubicado debajo del asa del soplador
desmontable. Este pestillo sujeta el soplador
desmontable al ensamblaje de la tapa.
3. Levante el soplador desmontable subiendo el
asa y tirando de la unidad de modo que se
aleje de la posici6n encajada de las bisagras.
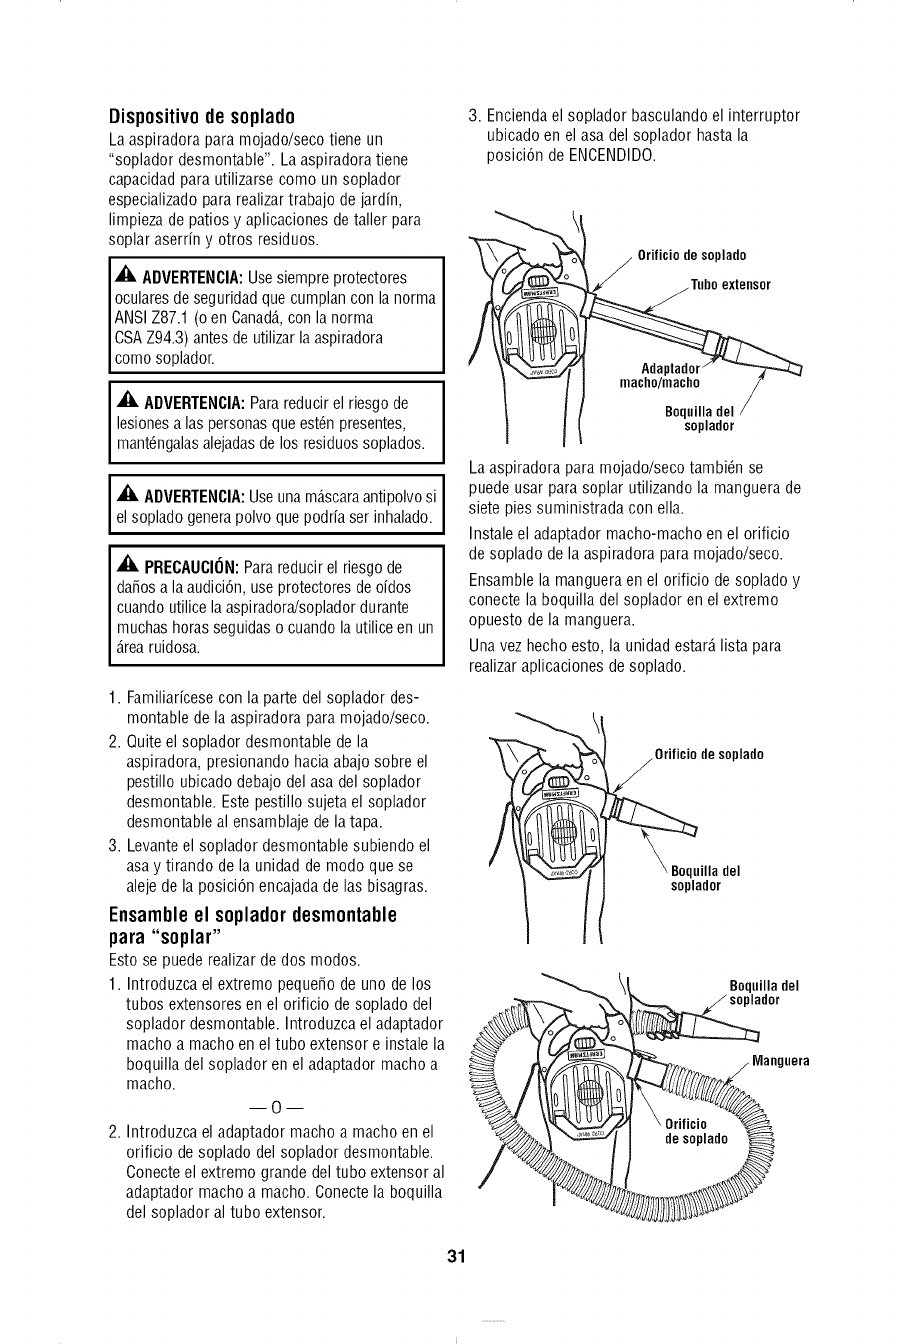
Ensambleel sopladordesmontable
para "soplar"
Esto se puede realizar de dos modos.
1. Introduzca el extremo peque_o de uno de los
tubos extensores en el orificio de soplado del
soplador desmontable. Introduzca el adaptador
macho a macho en el tubo extensor e instale la
boquilla del soplador en el adaptador macho a
macho.
0
2. Introduzca el adaptador macho a macho en el
orificio de soplado del soplador desmontable.
Conecte el extremo grande del tubo extensor al
adaptador macho a macho. Conecte la boquilla
del soplador al tubo extensor.
3. Encienda el soplador basculando el interruptor
ubicado en el asa del soplador hasta la
posici6n de ENCENDIDO.
tOrificio de soplado
Tubeextensor
Adaptador
macho/macho
Boqnilla del
soplador
La aspiradora para mojado/seco tambi6n se
puede usar para soplar utilizando la manguera de
siete pies suministrada con ella.
Instale el adaptador macho-macho en el orificio
de soplado de la aspiradora para mojado/seco.
Ensamble la manguera en el orificio de soplado y
conecte la boquilla del soplador en el extremo
opuesto de la manguera.
Una vez hecho esto, la unidad estar_, lista para
realizar aplicaciones de soplado.
,Orificio de soplado
]nilla del
soplador
1
Boqnilladel
dor
_/Manguera
31
Mantenimiento
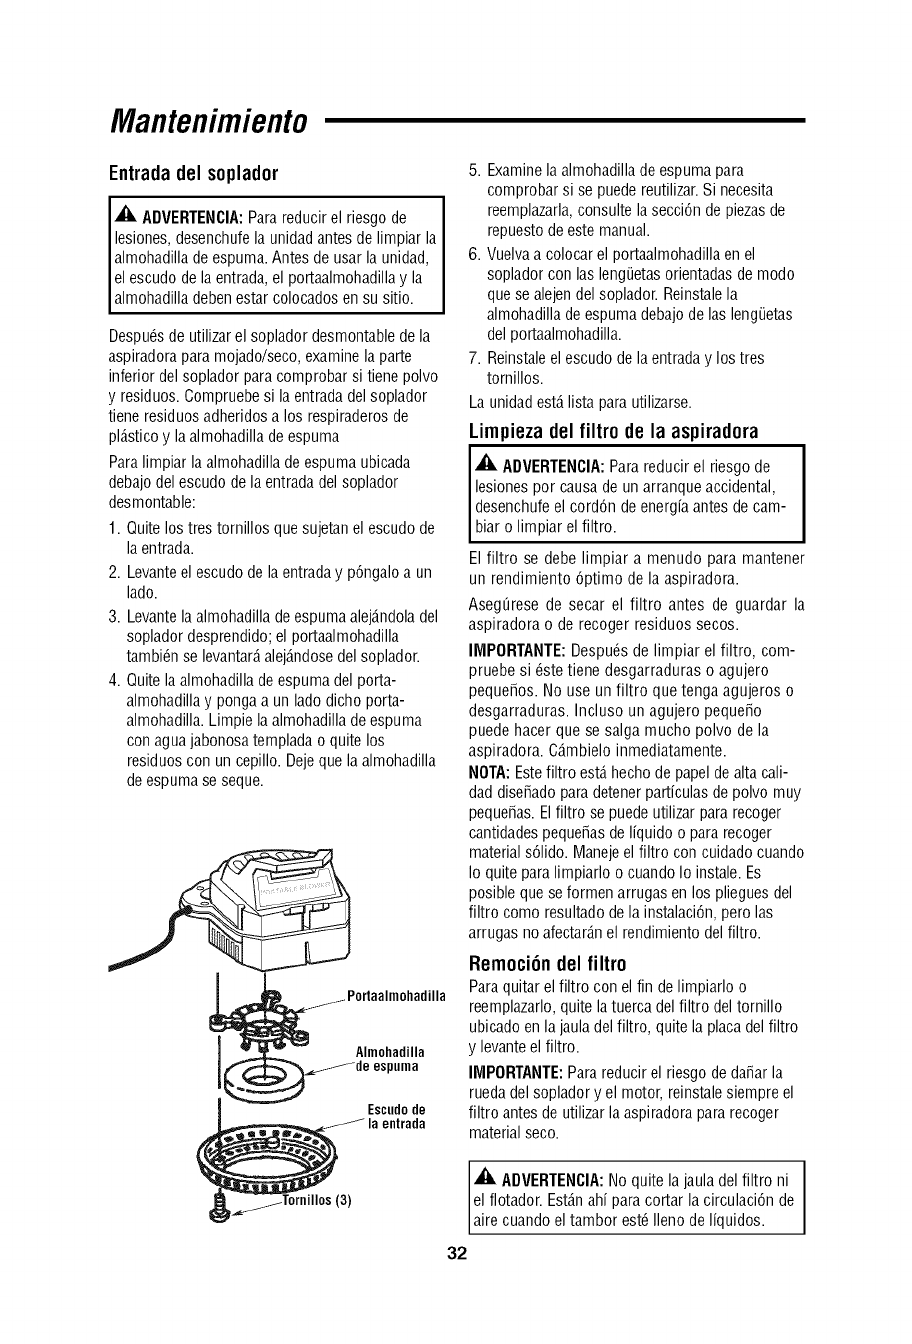
Entradadel soplador
,_ ADVERTENCIA:Para reducir el riesgo de
lesiones, desenchufe la unidad antes de limpiar la
almohadilla de espuma. Antes de usar la unidad,
el escudo de la entrada, el portaalmohadilla y la
almohadilla deben estar colocados en su sitio.
Despu6s de utilizar el soplador desmontable de la
aspiradora para mojado/seco, examine la parte
inferior del soplador para comprobar si tiene polvo
y residuos. Compruebe si la entrada del soplador
tiene residuos adheridos a los respiraderos de
pl_.stico y la almohadilla de espuma
Para limpiar la almohadilla de espuma ubicada
debajo del escudo de la entrada del soplador
desmontable:
1. Quite los tres tornillos que sujetan el escudo de
la entrada.
2. Levante el escudo de la entrada y p6ngalo a un
lado.
3. Levante la almohadilla de espuma alej_.ndola del
soplador desprendido; el portaalmohadilla
tambi6n se levantar_,alej_.ndosedel soplador.
4. Quite la almohadilla de espuma del porta-
almohadilla y ponga a un lado dicho porta-
almohadilla. Limpie la almohadilla de espuma
con agua jabonosa templada o quite los
residuos con un cepillo. Deje que la almohadilla
de espuma se seque.
Almohadilla
espuma
Escudo de
la entrada
5. Examine la almohadilla de espuma para
comprobar si se puede reutilizar. Si necesita
reemplazarla, consulte la secci6n de piezas de
repuesto de este manual.
6. Vuelva a colocar el portaalmohadilla en el
soplador con las leng_Jetasorientadas de modo
que se alejen del soplador. Reinstale la
almohadilla de espuma debajo de las lengiJetas
del portaalmohadilla.
7. Reinstale el escudo de la entrada y los tres
tornillos.
La unidad est,. lista para utilizarse.
Limpieza del filtro de la aspiradora
AADVERTENCIA:Para reducir el riesgo de
lesiones por causa de un arranque accidental,
desenchufe el cord6n de energia antes de cam-
baro mpare ftro.
El filtro se debe limpiar a menudo para mantener
un rendimiento 6ptimo de la aspiradora.
Aseg[irese de secar el filtro antes de guardar la
aspiradora o de recoger residuos secos.
IMPORTANTE: Despu6s de limpiar el filtro, com-
pruebe si 6ste tiene desgarraduras o agujero
pequefios. No use un filtro que tenga agujeros o
desgarraduras. Incluso un agujero pequefio
puede hacer que se salga mucho polvo de la
aspiradora. C_.mbielo inmediatamente.
NOTA: Estefiltro est,. hecho de papel de alta call-
dad dise_ado para detener particulas de polvo muy
peque_as. Elfiltro se puede utilizar para recoger
cantidades peque_as de liquido o para recoger
material s6lido. Maneje el filtro con cuidado cuando
Io quite para limpiarlo o cuando Io instale. Es
posible que se formen arrugas en los pliegues del
filtro como resultado de la instalaci6n, pero las
arrugas no afectar_.n el rendimiento del filtro.
Remoci6ndel filtro
Para quitar el filtro con el fin de limpiaflo o
reemplazarlo, quite la tuerca del filtro del tornillo
ubicado en la jaula del filtro, quite la placa del filtro
y levante el filtro.
IMPORTANTE: Para reducir el riesgo de da_ar la
rueda del soplador y el motor, reinstale siempre el
filtro antes de utilizar la aspiradora para recoger
material seco.
Al_ ADVERTENCIA:No quite la jaula del filtro ni
el flotador. Est_.nahi para cortar la circulaci6n de
a re cuando e tambor est6 eno de iqu dos.
32
Limpieza de unfiltro seco
1. La limpieza ligera para quitar una peque_a can-
tidad de residuos secos se puede realizar sin
quitar el filtro de la aspiradora. Simplemente d6
una palmada con la mano en la parte superior
de la tapa mientras la aspiradora est,. apagada.
2. Para obtener 6ptimos resultados de limpieza
debido a la acumulaci6n de polvo, limpie el filtro
en un _.reaabierta. La limpieza SE DEBE realizar
al aire libre y no en el interior de la vivienda.
3. Despu6s de quitar el filtro de la aspiradora,
saque los residuos secos golpeando suavemente
el filtro contra la pared interior del tambor para
polvo. Los residuos se soltar_.n y caer_.n.
4. Para una limpieza a fondo del filtro seco con
polvo fino (sin residuos), haga pasar agua a
trav6s del filtro tal como se describe bajo
"Limpieza de un filtro mojado".
Limpieza de unfiltro mojado
Despu6s de quitar el filtro, haga pasar agua a
trav6s de 61usando una manguera o desde una
espita. Tenga cuidado de que la presi6n del agua
procedente de la manguera no sea tan fuerte
como para da_ar el filtro. Recuerde: Para secar
r_.pidamente un filtro, reinstale el filtro en la
aspiradora y deje que la unidad funcione durante
aproximadamente 10 minutos. El aire limpio que
atravesar_,el filtro har_. que 6ste se seque.
Instalaci6n
Consulte la secci6n "Ensamblaje de un filtro" de
este manual.
Deje que el filtro se seque antes de guardar la
aspiradora.
Limpieza y desinfecci6nde la aspiradora
paramojado/seco
Para mantener el mejor aspecto posible de la
aspiradora para mojado/seco, limpie su exterior
con un paso humedecido con agua templada y
un jab6n suave.
Para limpiar el tambor:
1. Vacie los residuos del tambor.
2. Lave a fondo el tambor con agua templada y
un jab6n suave.
3. Limpie el tambor con un paso seco.
Antes de un almacenamiento prolongado o seglin
sea necesario (por ejemplo, si se recogen aguas
residuales), se debe desinfectar el tambor.
Para desinfectar el tambor:
1. Eche 1 gal6n de agua y 1 cucharadita de
blanqueador de cloro en el tambor.
2. Deje que la soluci6n repose durante 20
minutos y agitela cuidadosamente cada pocos
minutos, asegur_.ndose de mojar todas las
superficies interiores del tambor.
3. Vacie el tambor despu6s de 20 minutos.
Enju_.guelo con agua hasta que el olor a
blanqueador desaparezca. Deje que el tambor
se seque completamente antes de sellar el
motor sobre el tambor.
Ruedecillas
Si las ruedecillas hacen ruido, puede poner una
gota de aceite en el eje del rodillo para que hagan
menos ruido.
Almacenamiento
Antes de almacenar la aspiradora, se debe vaciar y
limpiar el tambor para polvo. El cord6n se debe
enrollar alrededor de la unidad y la manguera se
debe almacenar de la manera descrita en este
manual. Los accesorios se deben mantener en la
misma _.reaque la aspiradora para que est6n al
alcance de la mano cuando se necesiten. La
aspiradora se debe almacenar en interiores.
ADVERTENCIA: Para garantizar la
SEGURIDAD y CONFIABILIDAD del producto,
las reparaciones y el ajuste deben ser
realizados por Centros de Servicio Sears,
utilizando siempre piezas de repuesto Sears.
33
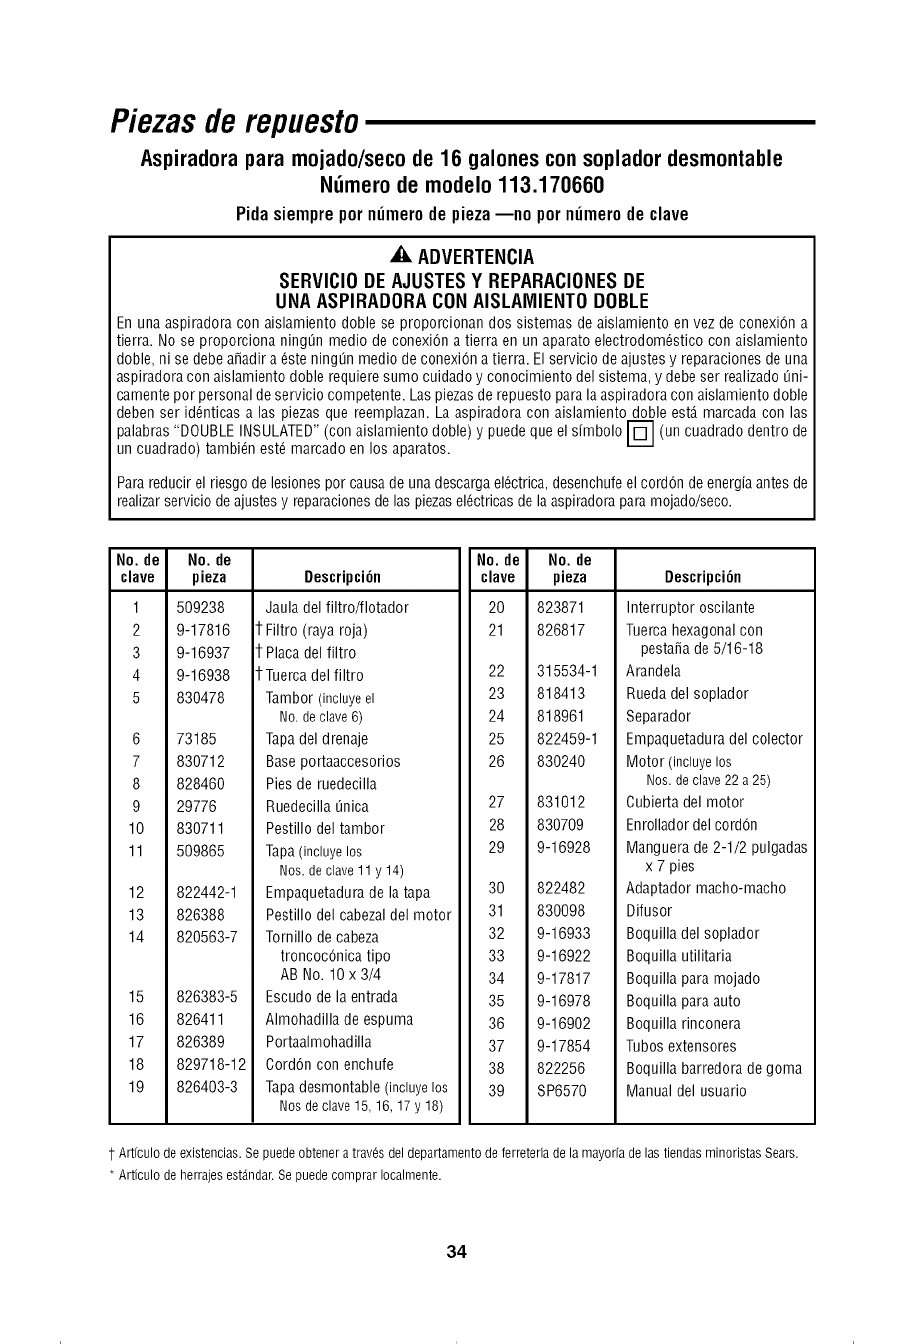
Piezas de repuesto
Aspiradora para mojado/seco de 16 galones con soplador desmontable
N_mero de modelo 113.170660
Pidasiempreporn_merodepieza--no porn_merodeclave
,4_ ADVERTENCIA
SERVICI0 DEAJUSTESY REPARACIONESDE
UNAASPIRADORACONAISLAMIENT0DOBLE
En una aspiradora con aislamiento done se proporcionan dos sistemas de aislamiento en vez de conexi6n a
tierra. No se proporciona ning_n medio de conexi6n a tierra en un aparato electrodom_stico con aislamiento
done, ni se debe aSadira _ste ning_n medio de conexi6n a tierra. El servicio de ajustes y reparaciones de una
aspiradora con aislamiento done requiere sumo cuidado y conocimiento del sistema, y debe ser realizado _ni-
camente por personal de servicio competente. Las piezasde repuesto para la aspiradora con aislamiento doble
deben ser id_nticas alas piezas que reemplazan. La aspiradora con aislamiento done est_ marcada con las
_alabras "DOUBLEINSULATED" (con aislamiento doble) y puede que el simbolo _ (un cuadrado dentro de
un cuadrado) tambi_n est_ marcado en los aparatos.
Para reducir el riesgode lesiones por causa de una descargael_ctrica, desenchufeel cord6n de energiaantes de
realizarservicio de ajustesy reparacionesde las piezasel_ctricasde la aspiradora para mojado/seco.
No. de
clave
1
2
3
4
5
No. de
pieza
509238
9-17816
9-16937
9-16938
830478
6 73185
7 830712
8 828460
9 29776
10 830711
11 509865
12 822442-1
13 826388
14 820563-7
15 826383-5
16 826411
17 826389
18 829718-12
19 826403-3
Descripci6n
Jaula del filtro/flotador
1-Filtro (raya roja)
1-Placadel filtro
1-Tuerca del filtro
Tambor (incluyeel
No. declave6)
Tapadel drenaje
Baseportaaccesorios
Pies de ruedecilla
Ruedecilla anica
Pestillo del tambor
Tapa(incluyelos
Nos.declave11y 14)
Empaquetadura de la tapa
Pestillo del cabezal del motor
Tornillo de cabeza
troncoc6nica tipo
AB No. 10 x 3/4
Escudo de la entrada
Almohadilla de espuma
Portaalmohadilla
Oord6n con enchufe
Tapadesmontable (incluyelos
Nosde clave15,16, 17 y 18)
No. de No. de
clave pieza
20 823871
21 826817
22 315534-1
23 818413
24 818961
25 822459-1
26 830240
27
28
29
831012
830709
9-16928
30 822482
31 830098
32 9-16933
33 9-16922
34 9-17817
35 9-16978
36 9-16902
37 9-17854
38 822256
39 SP6570
Descripci6n
Interruptor oscilante
Tuerca hexagonal con
pesta_a de 5/16-18
Arandela
Rueda del soplador
Separador
Empaquetadura del colector
Motor (incluyelos
Nos.de clave22 a 25)
Cubierta del motor
Enrollador del cordon
Manguera de 2-1/2 pulgadas
x 7 pies
Adaptador macho-macho
Difusor
Boquilla del soplador
Boquilla utilitaria
Boquilla para mojado
Boquilla para auto
Boquilla rinconera
Tubos extensores
Boquilla barredora de goma
Manual del usuario
1-Articulo de existencias.Se puede obtener atrav6s del departamento de ferreteria de la mayoria de las tiendas minoristas Sears.
* Articulo de herrajes est_ndar. Sepuede comprar Iocalmente.
34
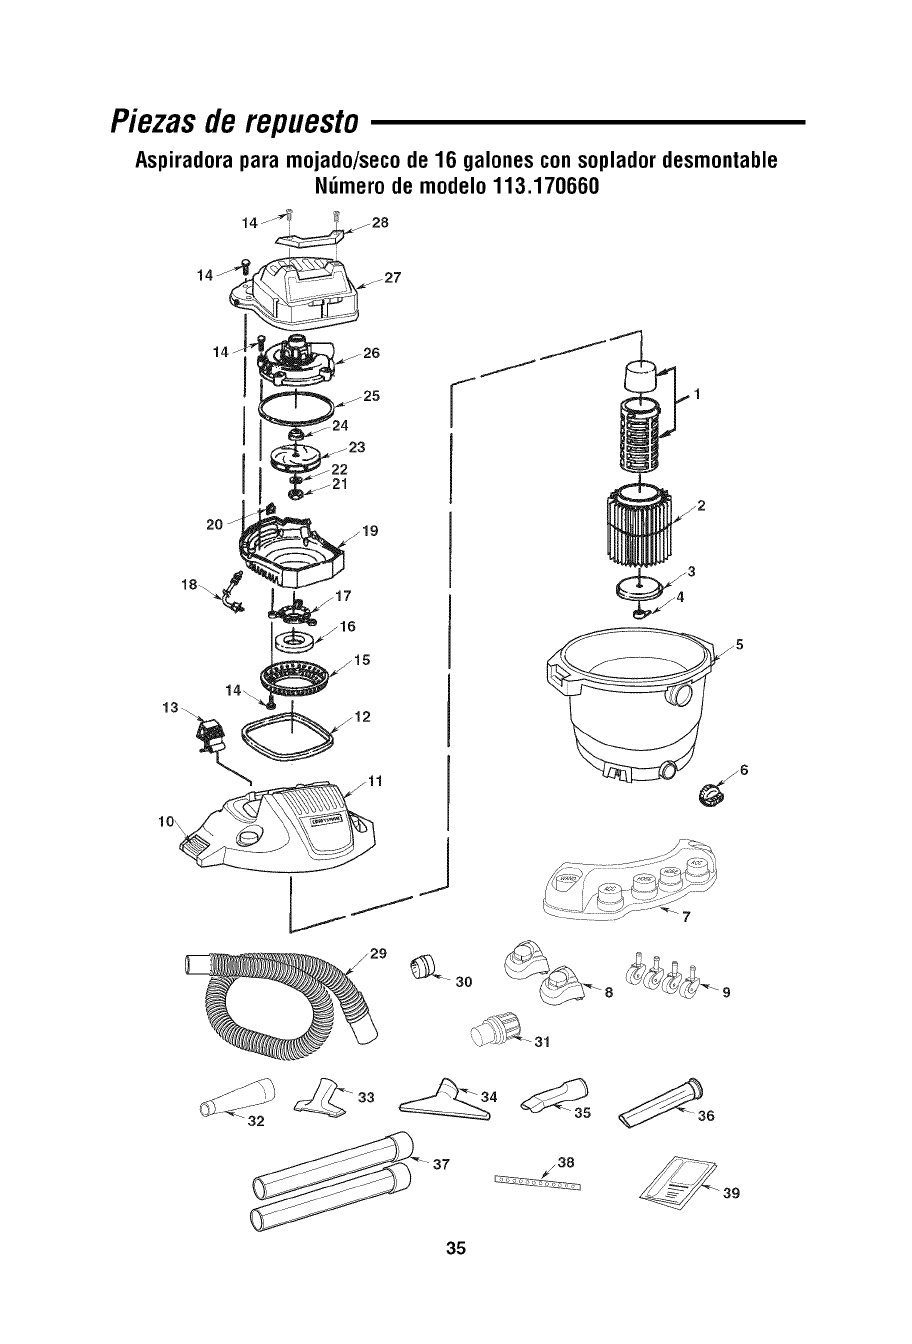
Piezas de repuesto
Aspiradora para mojado/seco de 16 galones con soplador desmontable
Nlimero de modelo 113.170660
14___27
14 _ _26
_25
_23
_21
20
6
31
_33
35
SP6570 Sears 16 gallon detach.qxd !O/lp_iq7!:28 PM Page 36
........_:i::7.......
Your Home
For repair - in your home - of all major brand appliances,
lawn and garden equipment, or heating and cooling systems,
no matter who made it, no matter who sold it!
For the replacement parts, accessories and
owner's manuals that you need to do-it-yourself.
For Sears professional installation of home appliances
and items like garage door openers and water heaters.
1-800-4-MY-HOME ®
(1-800-469-4663)
www.sears.com
Anytime, day or night
(U.S.A. and Canada)
www.sears.ca
Our Home
For repair of carry-in products like vacuums, lawn equipment,
and electronics, call or go on-line for the nearest
Sears Parts and Repair Center.
1-800-488-1222 Anytime, day or night (U.S.A. only)
www.sears.com
To purchase a protection agreement (U.S.A.) or
maintenance agreement (Canada) on a product serviced by Sears:
1-800-827-6655 (U.S.A.) 1-800-361-6665 (Canada)
Para pedir servicio de reparaci6n a
domicilio, y para ordenar piezas:
1-888-SU-HOGAR sM
(1-888-784-6427)
Au Canada pour service en frangais:
1-800-LE-FOYER Mc
(1-800-533-6937)
www.sears.ca
........::::7.......
(:_ Sears, Roebuck and Co.
® Registered Trademark /_-MTrademark /sMService Mark of Sears, Roebuck and Co.
® Marca Registrada /_-MMarca de Fabrica /sMMarca de Servicio de Sears, Roebuck and Co.
Mc Marque de commerce /MoMarque d_pos_e de Sears, Roebuck and Co.
Part No. SP6570 Form No. SP6570-2 Printed in Mexico 09/07
