CRE Electronic Technology X3001 Projector User Manual
CRE Electronic Technology Company Limited Projector Users Manual
User Manual

M a n u a l
CRE Multimedia Projector
CHUANGRONG
Add: A5/F, Block A3, Jinrong Tongxin High-tech Park,
Wanglei Road, Yuelu District, Changsha City,
Hunan Province, China
Web: www.creprojector.com
Tel: +86 731-83751062 CRE Electronic Technology Co., limited, Hunan, China
Directory
Chapter 2 Equipment connection Settings
---- -- -- -- - 03
Chapter 3 Android Desk -- -- -- -- -- --- 06
Chapter 4 External channel (OSD) Setting
---- -- -- -- - 12
Chapter 5 Maintenance - -- -- -- -- -- --- 13
Chapter 1 Overview ----------------- 01
Chapter 1, Overview
Accessories
Projector--- --- --- --- - 1pc --- Instruction Manual -------------- 1pc
Power Plug 1pc --- --- -- --- --- Remote Control ----------- ------ 1pc
4 Bolts for Fixing 4pcsHDMI Cable--- --- --- --- --1pc --- --- -- --- --- - -
●
●
●
●
●
●
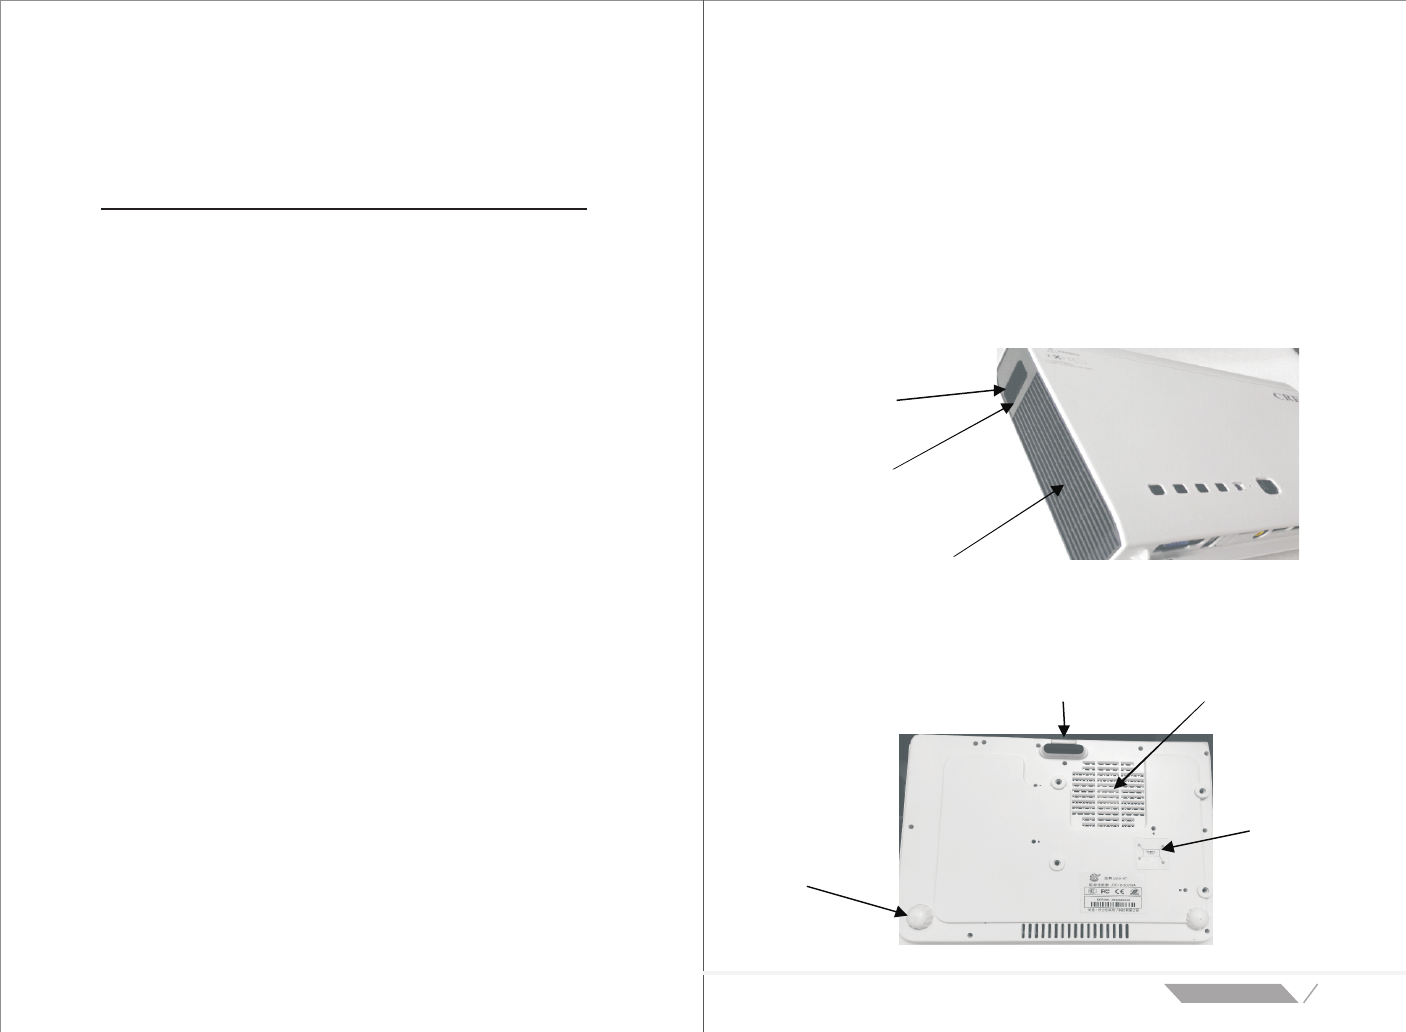
Overview
Top/Right Side Overview
Focus
( Adjust definition)
Bottom Overview
01
product specific a tion
Zoom
(Adjust screen size)
Left and Right Heat Vent
(pls do not cover it)
Projection Image
Height Adjustment
Heat Emission Hole
( Don’t cover)
Installation Diagram
(Follow it to install )
Tilt Adjustment Knob
(Rotate it to adjust the
left and right height of
the projection image)
0302
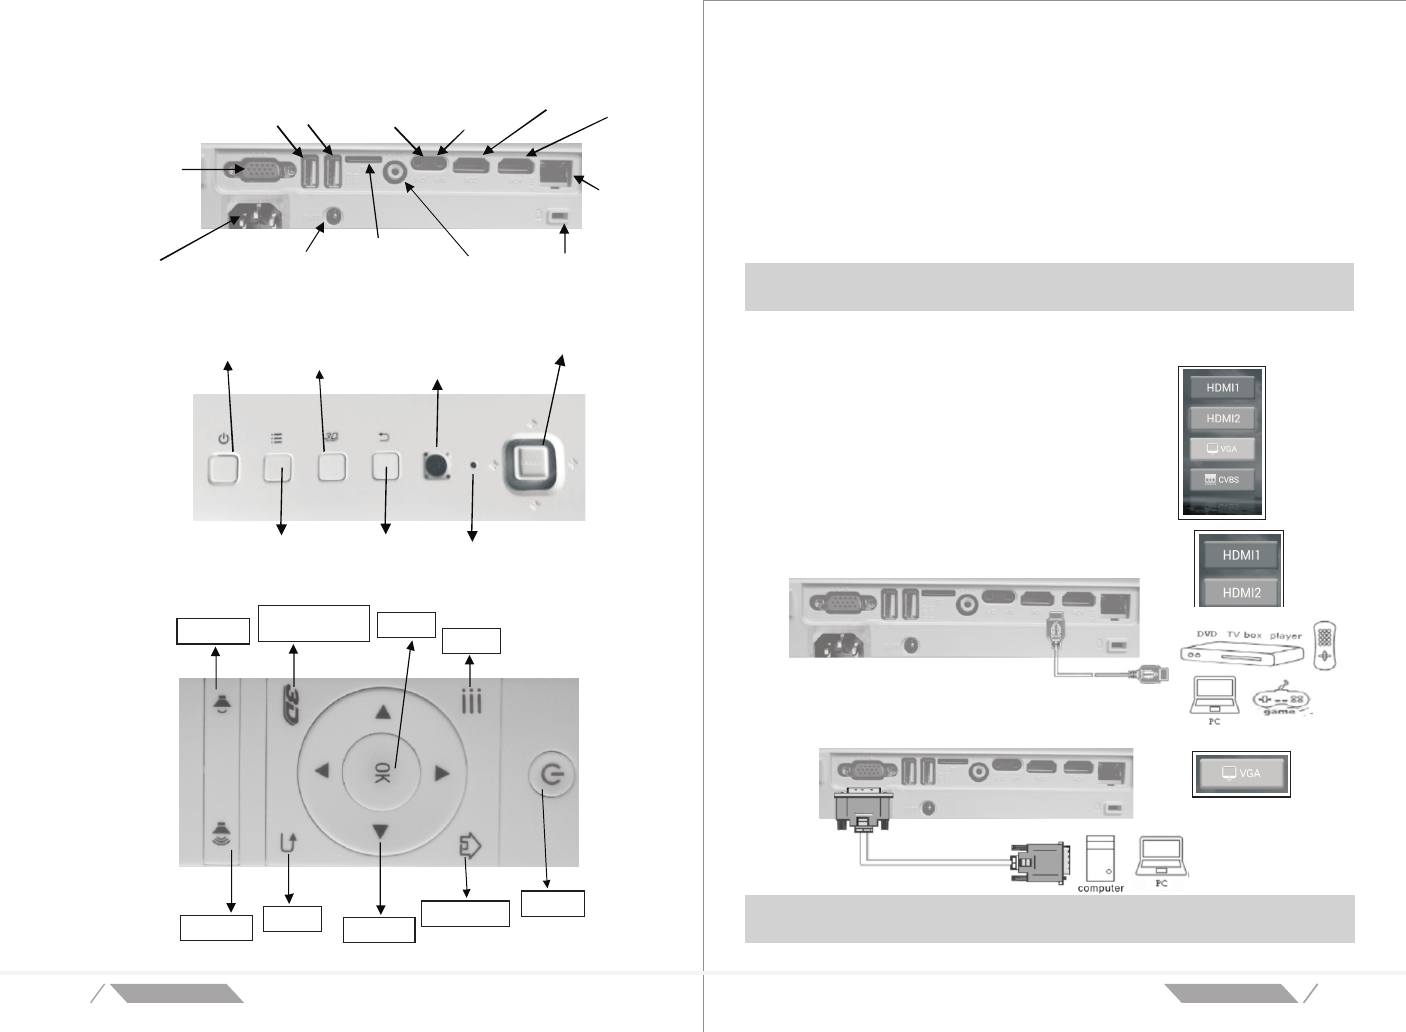
TF Card
Audio-out
HDMI-2HDMI-1
Power
Voice -
Importance:
1. Make sure no obstacle between remote control and projector. If there is obstacle between
them, remote control signal may be reflected back by the particular surface ,which will
affect operation.
2. Buttons and keys on projector have the same function with buttons of remote control.Our
manual introduces functions based on remote control.
Warning: To be safe, cut power between projector and relative equipment before
connect cable.projector
When you connect projector with different equipment, you should
choose corresponding input channel on main interface.
Otherwise, there will have no image to be projected out.
1.Choose the connection input channel.by direction key
2.Press Ok to confirm
3.Press Return key to last step
Back Overview
Audio-in
Rj45
Anti-theft Lock Video Input
VGA Computer
Internet connection
Adapter Battery
Key Overview
3D Multifunction Key IR Sensor
Direction & Enter
MENU
Return Key
Indicator Light
Remote Control Overview
3D Multifunction
Key Enter
Menu
Voice + Return Direction
Main Interface On/Off
Chapter 2
Equipment connection Settings
Select the Signal for the Projector
Projector Connection Setting
Connect with HDMI device
Use HDMI cable to connect projector with HDMI device.
Connect with Personal Computer
Use VGA to connect projector with personal computer.
cable
Note:
PC must have a VGA output port, then you can use VGA cable to connect projector.
product specific a tionproduct specific a tion
USB3.0 USB2.0
0504
Insert USB flash driver T F card/
Insert the storage device into the corresponding port, then the USB flash driver/TF card
will be connected to the projector..
Connect the Video
Connect the video equipment to the projector by video cable.
Connect the Audio
Insert earphone or 3.5mm audio cable to the projector audio output ,insert the audio cable
from DVD , Set Top Box or other signal devices to the audio input .Then there will be audio
out to the earphone or external mini speaker.
Turn on/off the Projector
1.Connect one end of the power cord to the
wall power supply socket (A), and the other
end connected to the three hole socket (B)
of the projector.
Adjust Image
Using image focusing control button (Located
on the side of the projector)
Adjust the projected image sharpness(A).
Using image zoom control button (Located on
the side of the projector)
Adjust the projected image size (B).
Set the Remote Control
The remote control is equipped with a 3V lithium battery
(CR2032). Battery was pre-installed in the remote control.
If shipping way does not support battery, you need to buy it.
Before using the remote control, take out the plastic
sheet from the battery compartment.
Change Remote Control battery
1.Toward the direction of arrow ,move and pull out of the cover.
2.Remove the old battery, install new battery(the positive upward).
3.Fit on battery’s cover.
Note:
1. Can only use 3V lithium battery (Cr2032
2. In accordance with the relevant local regulations dispose the waste batteries.
3. The battery should be taken out if you do not use the equipment for long time.
)
The remote control controls the projector through the infrared transmission . Remote
controlling the radius of about 7 m (23 ft) and above or below projector’s range of 15
degrees ,it can work normally (but the remote control can not be perpendicular to the
bottom of the projector ).
If the projector does not response to the remote control instruction, please move it near
to the projector.
product specific a tionproduct specific a tion
2.Press remote control button or press button
“ POWER” to turn on /off the projector
Chapter 3,Android Desk
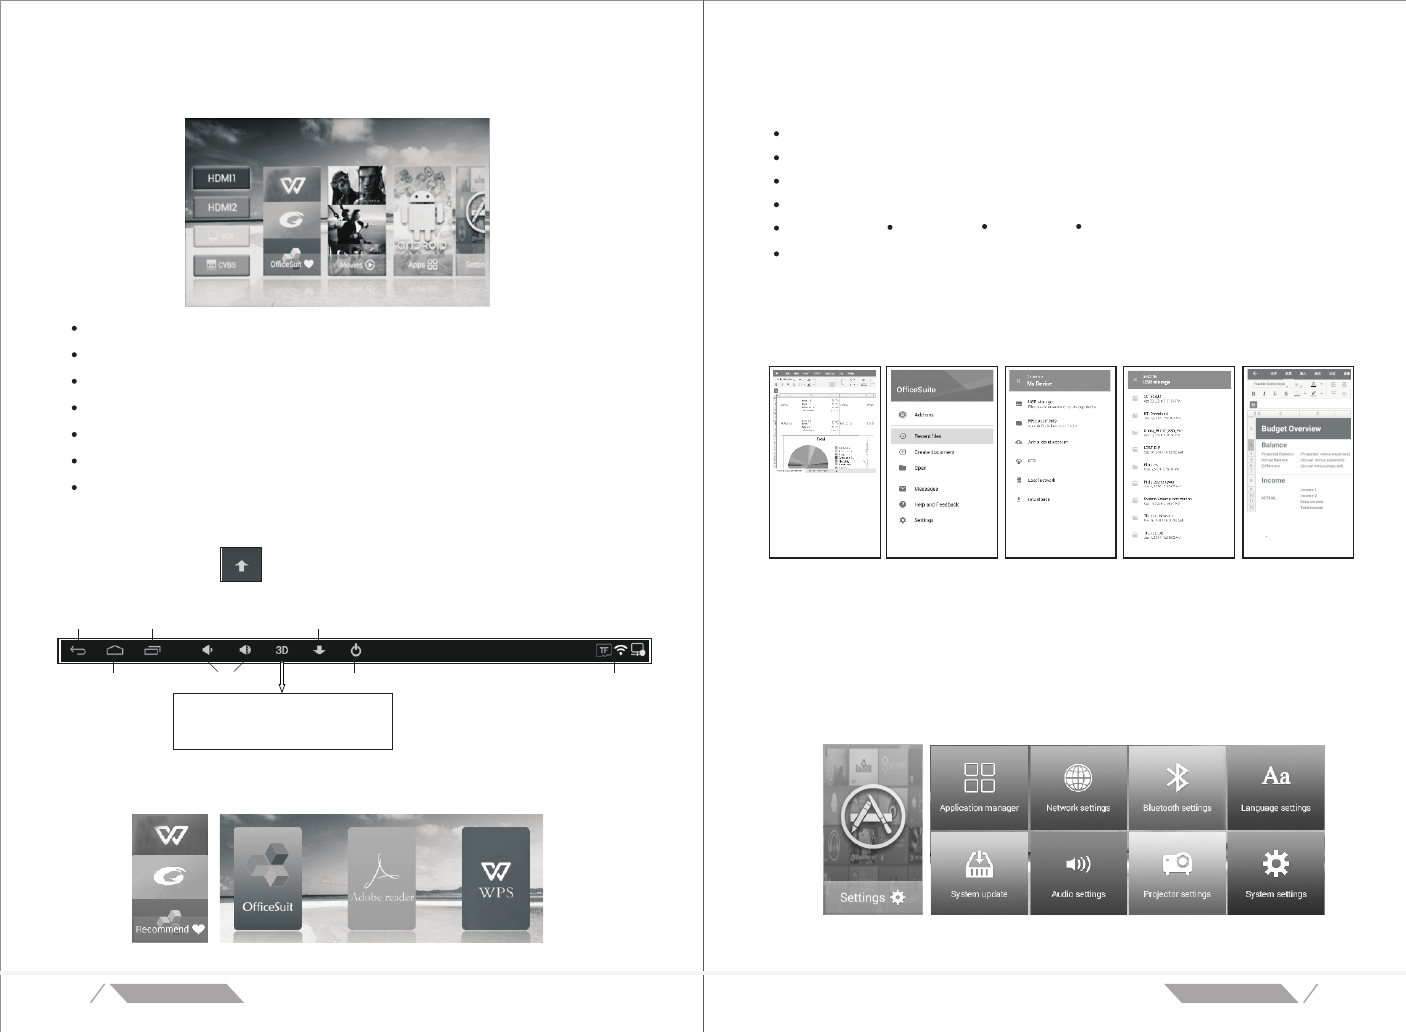
Overview
HDMI VGA CVBS – An external device fast connection
Office – Some commonly used office document browser
Movies – Some commonly used network player
Application – All applications after installation
Setting – Projector and system settings
File Browser – Browse the mobile device resource
Video,Music,Picture – Play the corresponding file in the mobile storage device
Click the left corner at the bottom of the screen
return
homepage
backstage
connection status
Document browser can open the following types of documents:
MS office word ver97/2000XP/2003/2007/2010
MS office Excel ver97/2000XP/2003/2007/2010
MS office PPT ver97/2000XP/2003/2007/2010
Adobe PDF 1.2/1.3/1.4/1.5/1.6/1.7
TXT text Epub CHM HTML
Image files (bmp gif png jpeg)
1.Click the button menu” at the upper left corner
2. Click the button of ”open”
3. Select file storage device
4. Select a file
5. Open the file and browse
”
0706
Screen Tools
volume control
hide
turn off
multi-function key, you can
set the 3D format,image,
sound and light working modes
Office document browsing
supported formats
View the document
To open a document file in a browser,please follow these steps:
Settings
product specific a tionproduct specific a tion
08
Setting the location of app installation
System confirmation/ SD card / internal storage
App settings
App management
Start up / unload / clear data
Network settings
Wireless network settings Wired network settings
Open the wired connection and select
auto IP or connect to IPv6 protocol
Select the network you want to connect,
enter the password and click save,
it will connect the network automatically.
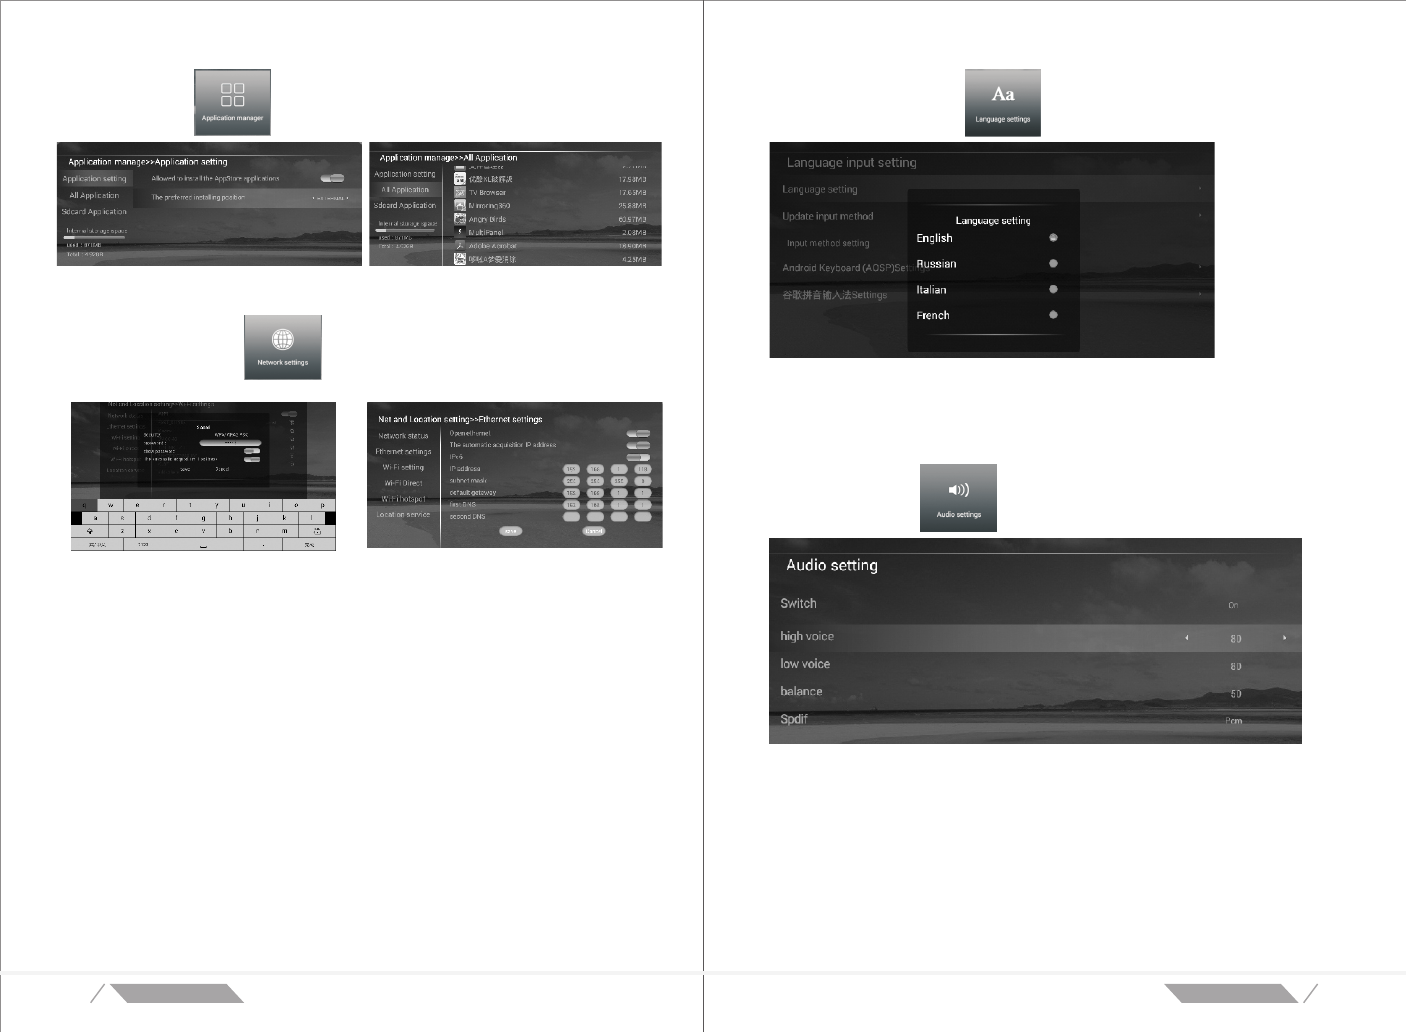
Language settings
Language settings Modify system language
Modify the default input method Modify the input methods of keyboard
Audio settings
Switch Set the sound output on / off
High voice Audio treble setting 0-100
Low voice Audio bass setting 0-100
Balance Set the left and right speaker volume balance 0-100
Spdif Set audio interface signal output type
09
product specific a tionproduct specific a tion
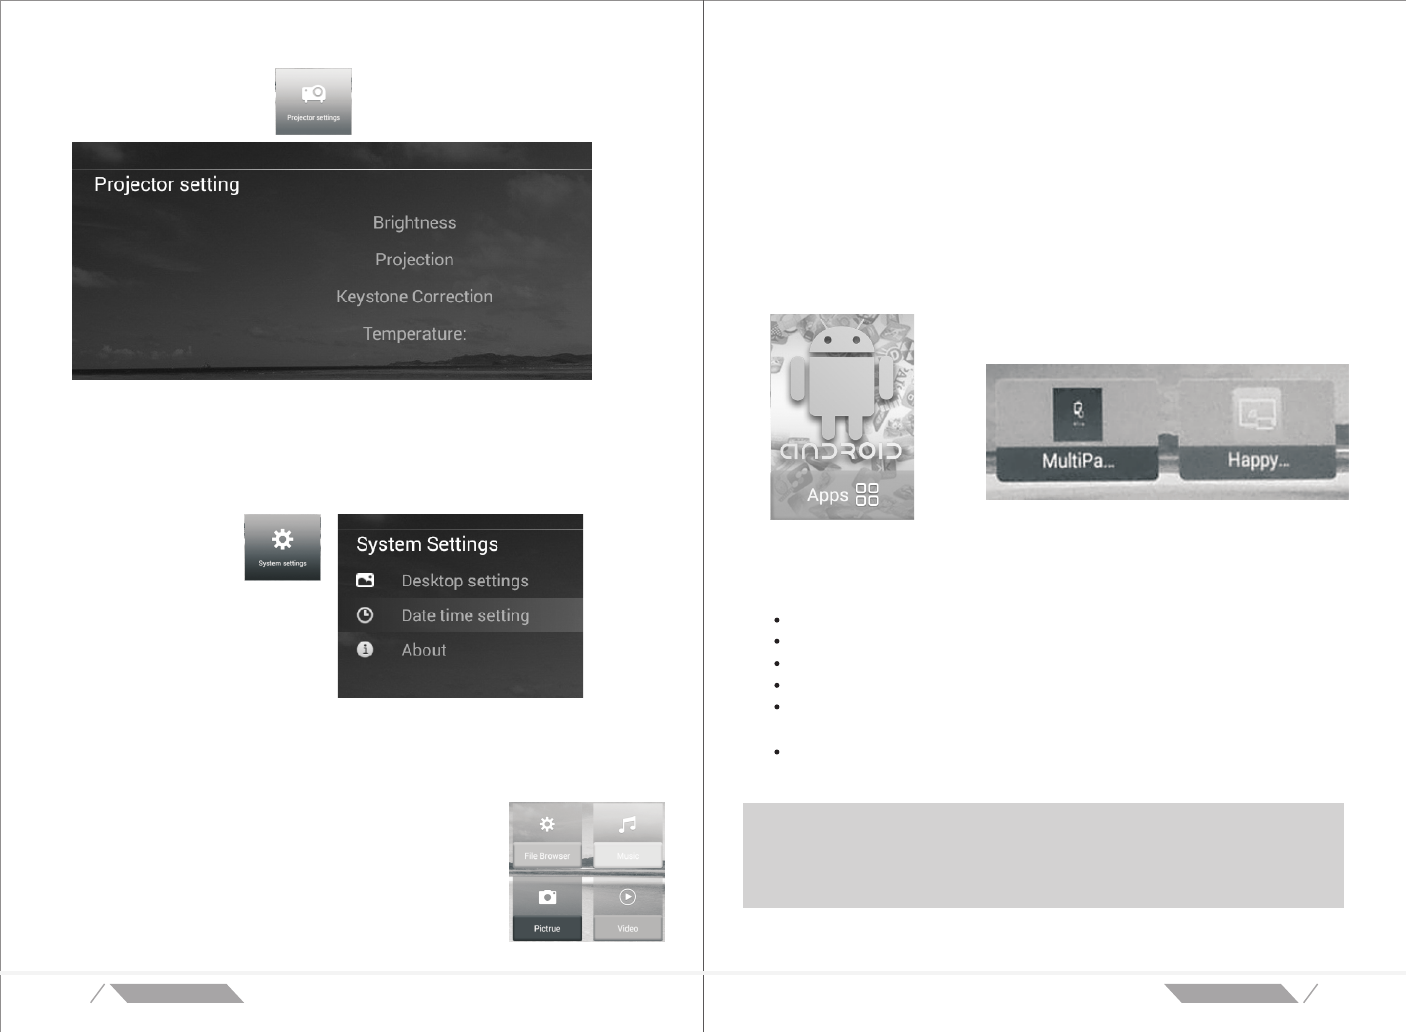
Projector settings
Brightness Saving mode / highlight mode / office mode
Projection Front projection / rear projection / upside down front
projection / upside down rear projection
Keystone correction Keystone correction manual correction ± 100
Temperature 0°-70°
System Settings
Desktop settings Modify the desktop background picture
Date time setting Modify the system time
About Display system information
Playing mobile stored devices
When you want to play a file in a mobile device,please select
the correct type of window and enter.
Resource manager Browser or play all types of files
Music Only play the supported formats of music file
Album Only play the supported formats of pictures
Video Only play the supported formats of videos
10 11
Support following music file formats:
MP3, WMA, WAV, OGG, FLAC, AAC, LC-AAC, APE
Support following image file formats:
JPG/JPEG, BMP, PNG,TIFF, GIF
Support following video file formats:
RM/RMVB, AVI, TS, M2TS, MTS, MKV, MOV, FLV, DVD-ISO,
BD-ISO, VOB, MPG, DAT, ASF,TP, TRP, WMV, IFO, SWF, 3GP,
EVO, DIVX, MP4, OGM
Multi-screen interaction
Android Series ISO Series
Choose the corresponding application icon to enter, according to the
following ways to connect.
Common android mobile phone wireless screen mirroring setup steps:
Samsung Settings - > Settings - > more Allsharecast
HTC Settings - > media output
Xiaomi Setting - >more wireless connection - > wireless display
Huawei Settings - > display - > wireless display
Lenovo Settings - > display - > wireless display
Apple's IOS system setup steps
Airplay - > Search equipment - > Connection - > Click on the mirror image - >
Click finish
Note:
Using equipment and projection must work in the same network conditions.
Use the wireless screen mirroring function, the mobile phone devices should
support with screen function, and setup the devices in correct way .
product specific a tionproduct specific a tion
▲
▲
Item
1312
Chapter 4
External channel (OSD) Setting
OSD menu control
The projector external channel has screen display (OSD)setup menu
can be used to adjust and change the settings.
Four submenu in OSD menu :
Picture- Adjust the image quality in this menu.
Sounds Adjust sound effect in this menu.-
Setting Adjust menu display time in this menu.-
Time Setting automatic switch time.-
If you want to to adjust the Settings menu,
please perform the following steps:
1. Press key to enter the OSD menu and
then press choose the menu need to setting.
2. Press ▲ or ▼ button,choose the item need
to adjust and then press OK to entry.
3. Press or button set parameters.
4. Press to save setting.
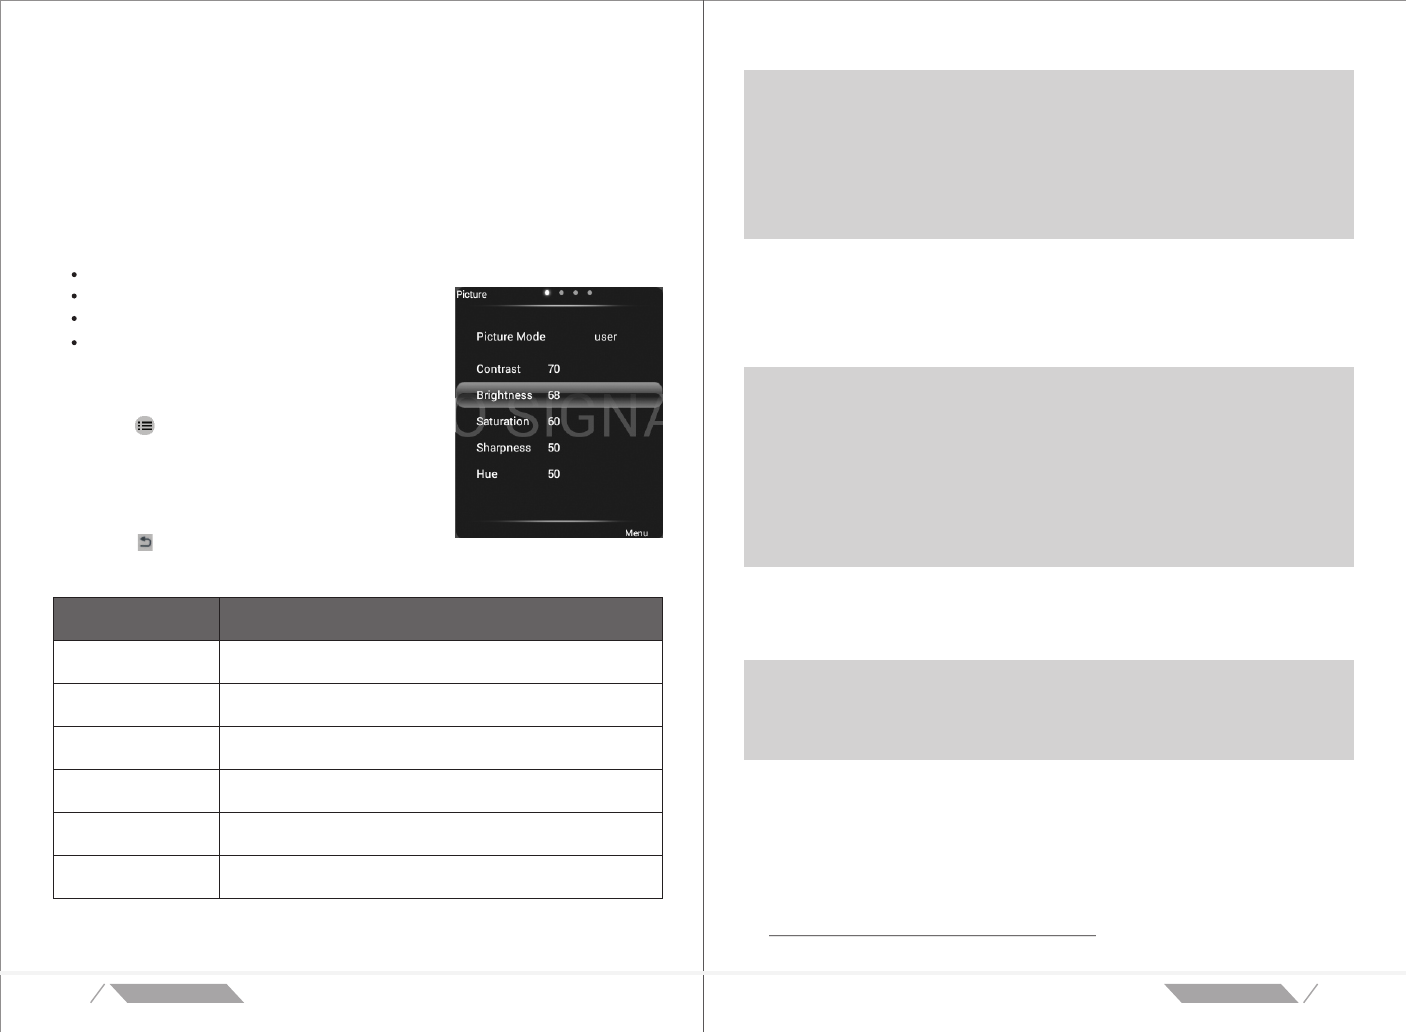
Instructions
Picture mode
Color Temperature
Zoom Mode
Image noise reduction
MPEG noise reduction
PC iamge adjust
Setting picture display mode,adjust picture effect.
(User,Bright, Standard Soft )
Adjust the image display different color temperature.
(standard warm cold)
Adjust the image display aspect ratio.
(Automatic point-to-point 16:9 4:3)
Setting reduce noise level
(Low Middle High Automatic Off)
Setting reduce noise level (Low Middle High Off)
Setting reduce noise level (Low Middle High Off)
Chapter 5, Maintenance
Cleaning the Projector
Cleaning the projector to remove dust and grime will help running normally.
Warning:
1 Before cleaning, turn off the projector and unplug the power cord. Otherwise,
it may result in injury or damage to the system.
2. When cleaning ,you should only use a damp cloth . Do not allow water to enter
the ventilation of the projector.
3. If a little water enter the interior of the projector when cleaning, please don’t
connect the projector to power ,the projector should be placed in a well ventilated
area for several hours before using.
.
Cleaning the Lens
Cleaning fluid of optical lens can be purchased from most camera stores and other
retail shops. To clean the projector lens, perform the following steps:
Note:
1. Do not use abrasive cleaners or solutions.
2. To prevent discoloration or fading, do not let the cleaning liquid contact projector
cabinet.
Note:
Some parameters need to adjust it in user mode.
Because of the different signal sources, OSD items could be settled will be
different . For example, when the projector is connected to PC via VGA , user can
alter the " "horizontal position/vertical position" of "picture> PC image adjust" menu.
If connected to other signal source , this setting could not be changed and
display by gray color.
Simple Troubleshooting
The operation of the machine is very simple , generally in use will not encounter any
problems . Sometimes on the operation and connection of peripheral equipment of the
machine will caused by some fault illusion, please refer to the following for
troubleshooting. If malfunction cannot be solved in the end, please contact the
company's after-sales service.
After-sales service no:+86 731-83751062
product specific a tionproduct specific a tion
▲
1514
Problem of no Image
Use another electrical device to confirm the power socket is normal.
Ensure the projector is turned on.
Make sure all connections are secure.
Make sure selected the correct signal input source.
Make sure the connected device is turned on.
Ensure a connected PC is not in suspend or sleep mode.
Make sure the laptop is configured with external display correctly.
Problem of Remote Control
1. Point the remote control at the remote sensor of the projector.
2. Make sure there are no obstructions between the remote control and the sensor.
3. Turn off the fluorescent lights in the room.
4. Check the battery polarity.
5. Replace the battery.
6. Turn off other equipment infrared enabled in the near region.
7. Send remote control for repair.
Problem: The projector does not respond to remote control commands.
FAQ
1. Can the projector be used together with PC, notebook or netbook?
Yes. Use a VGA cable or HDMI cable that comes. If there is a corresponding
HDMI or VGA port on the PC, laptop or netbook, the projector can connect to
these devices. To play the audio, you need a stereo audio cable to connect the
projector’s audio jack.
Yes. The projector can display content from the Xbox or PS3 console. Just use
the HDMI cable to connect the game console with the projector.
2. Can the projector be connected to a game console, such as Microsoft Xbox or
Sony PS3?
®
®
3. Can the projector project the content from TV?
TV can generate image on its own screen. If you want to watch TV content,
then need to connect a cable box, digital set-top box or satellite receiver. For
example, if you use a cable box, you can connect it to the projector via the
video cable or HDMI cable.
4 .How to display images from a digital camera or USB flash driver?
By connecting the following devices to the projector, you can display the
corresponding image or other content:
USB flash driver hard disk card reader, ,
Digital camera
Smart phone
Media storage browser
After connecting the devices, you can use the projector media channel display
images.
5. What kind of cables will be needed to connect video equipment to the projector?
If the video device configured the appropriate port, you can use the audio/
video cable or HDMI cable to connect it to the projector. If you want to play
audio, RCA cable can also be connected to the projector.
Distance and Screen Size
Disclaimer:
Our company reserve the right to make changes to the contents of this instruction manual
without any advance notice.
Continuous upgrading of the software may bring some differences to the OSD operation
menu and the picture of this instruction manual, but does not affect the normal operation
of the functional operation described in this instruction manual. We are sorry if this brings
inconvenience to you, please kindly understand.
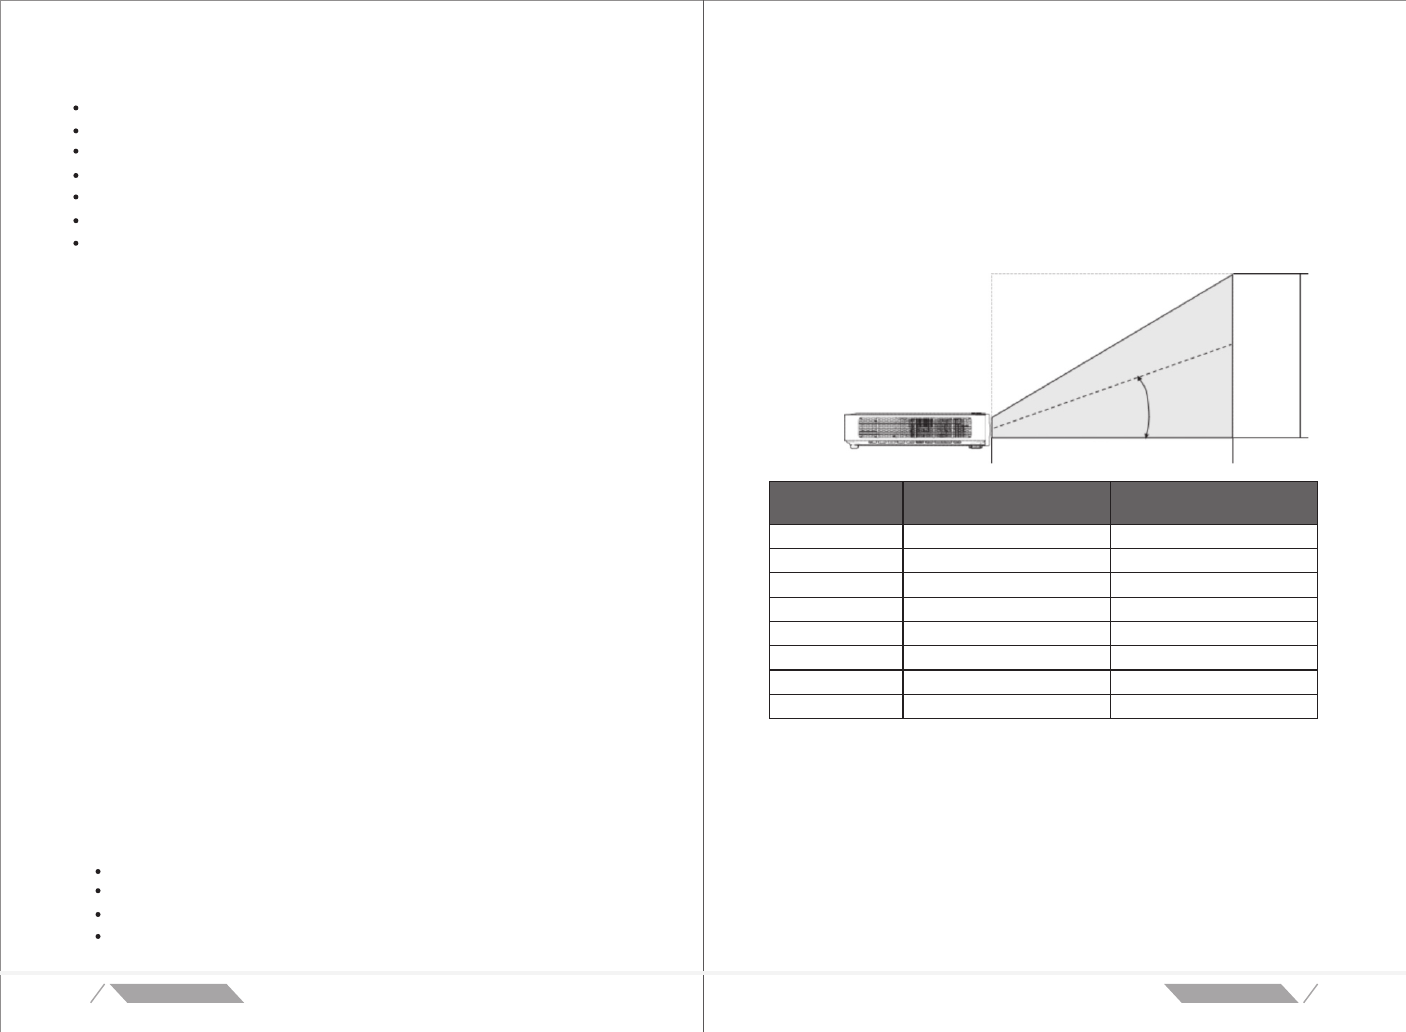
Distance
Keystone Angle
Image Height
product specific a tionproduct specific a tion
Image Size
(Inch)
50
60
70
80
100
120
150
Projection Distance
Max/Min (m)
Projection Area
(㎡)
1.41--1.55 1.077*0.673
1.70--1.87 1.292*0.807
1.99--2.19 1.507*0.942
2.28--2.50 1.723*1.077
2.86--3.15 2.153*1.346
3.43--3.78 2.584*1.615
4.30--4.74 3.230*2.019
5.75--6.33 4.307*2.692
200
§ 15.19 Labelling requirements.
This device complies with part 15 of the FCC Rules. Operation is subject to the
following two conditions: (1) This device may not cause harmful interference, and (2)
this device must accept any interference received, including interference that may cause
undesired operation.
§ 15.21 Information to user.
Any Changes or modifications not expressly approved by the party responsible for
compliance could void the user's authority to operate the equipment.
§ 15.105 Information to the user.
Note: This equipment has been tested and found to comply with the limits for a Class B
digital device, pursuant to part 15 of the FCC Rules. These limits are designed to
provide reasonable protection against harmful interference in a residential installation.
This equipment generates uses and can radiate radio frequency energy and, if not
installed and used in accordance with the instructions, may cause harmful interference
to radio communications. However, there is no guarantee that interference will not
occur in a particular installation. If this equipment does cause harmful interference to
radio or television reception, which can be determined by turning the equipment off and
on, the user is encouraged to try to correct the interference by one or more of the
following measures:
-Reorient or relocate the receiving antenna.
-Increase the separation between the equipment and receiver.
-Connect the equipment into an outlet on a circuit different from that to which the
receiver is connected.
-Consult the dealer or an experienced radio/TV technician for help.
*RF warning for Mobile device:
This equipment complies with FCC radiation exposure limits set forth for an
uncontrolled environment. This equipment should be installed and operated with
minimum distance 20cm between the radiator & your body.