Cambium Networks XS3700A XS-3700 Wireless LAN Array User Manual xirrus array userguide2
Xirrus, Inc. XS-3700 Wireless LAN Array xirrus array userguide2
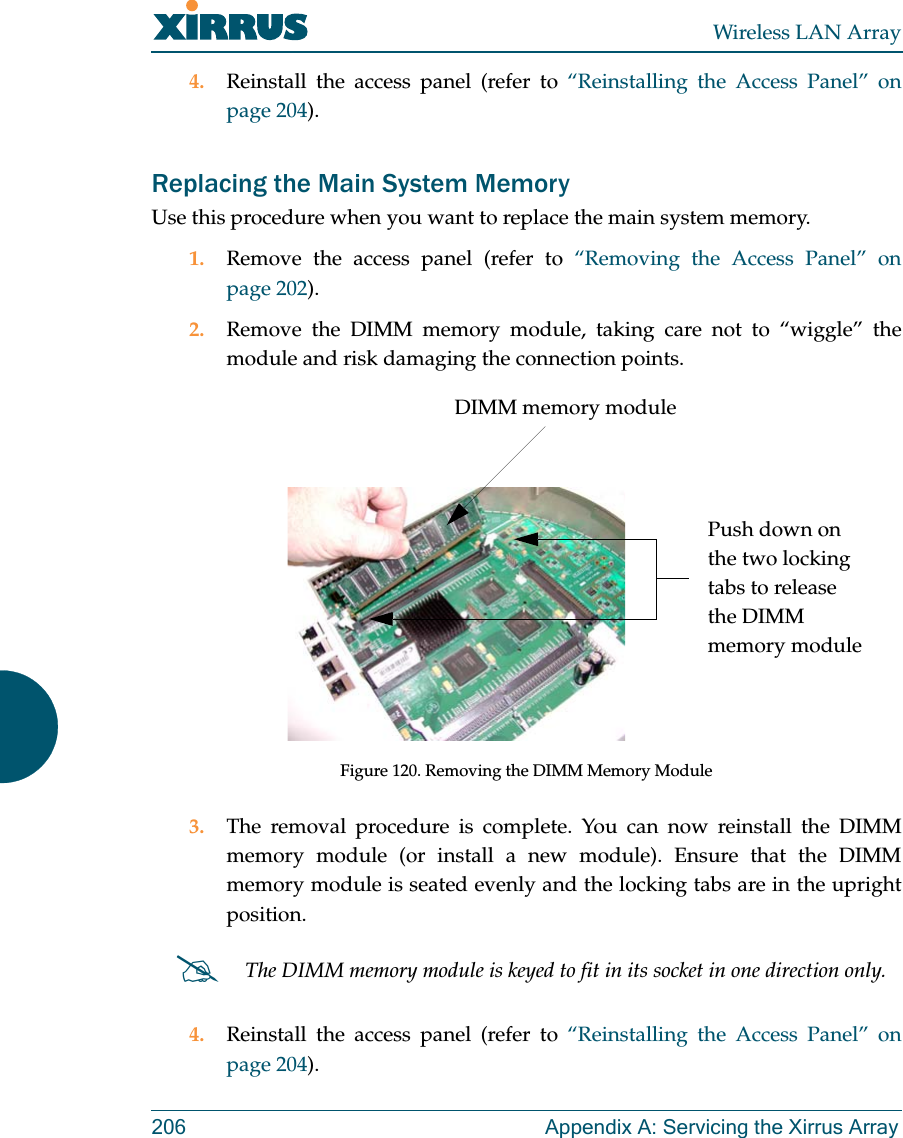
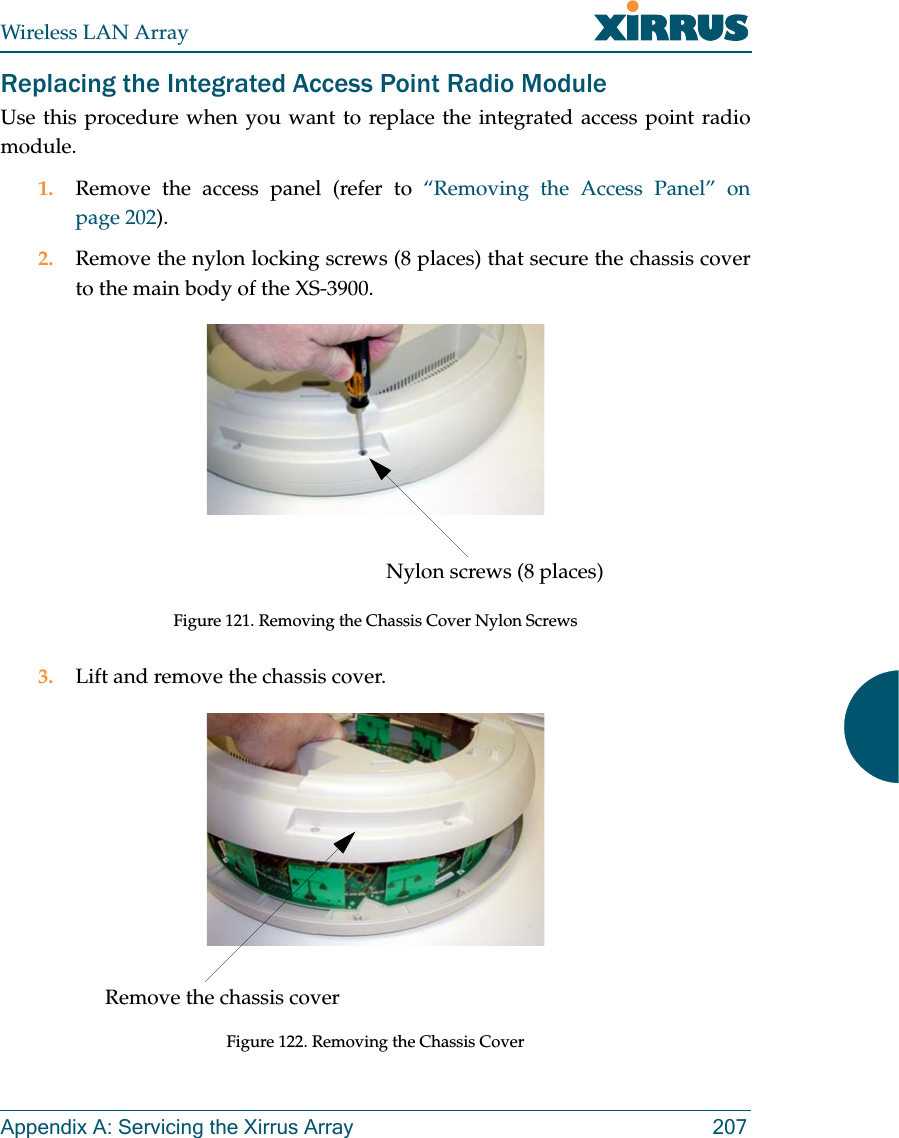
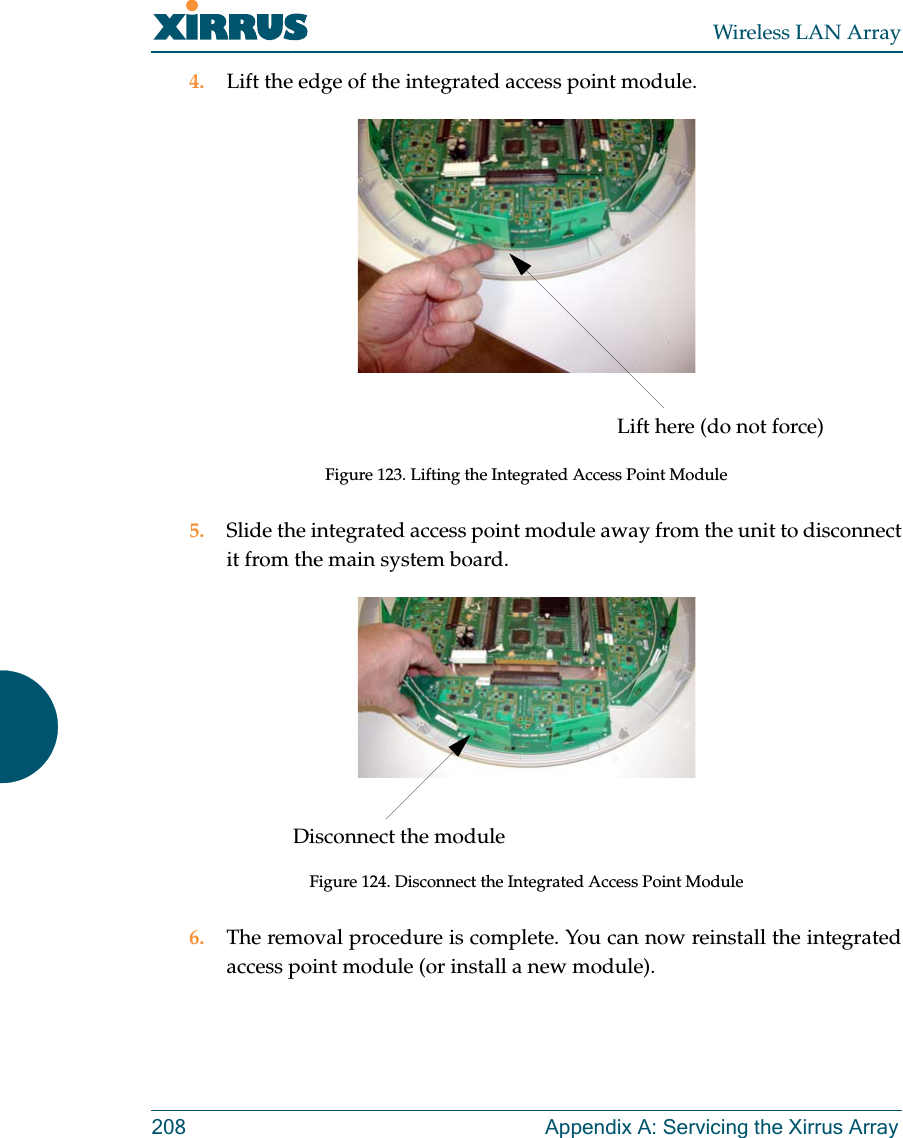
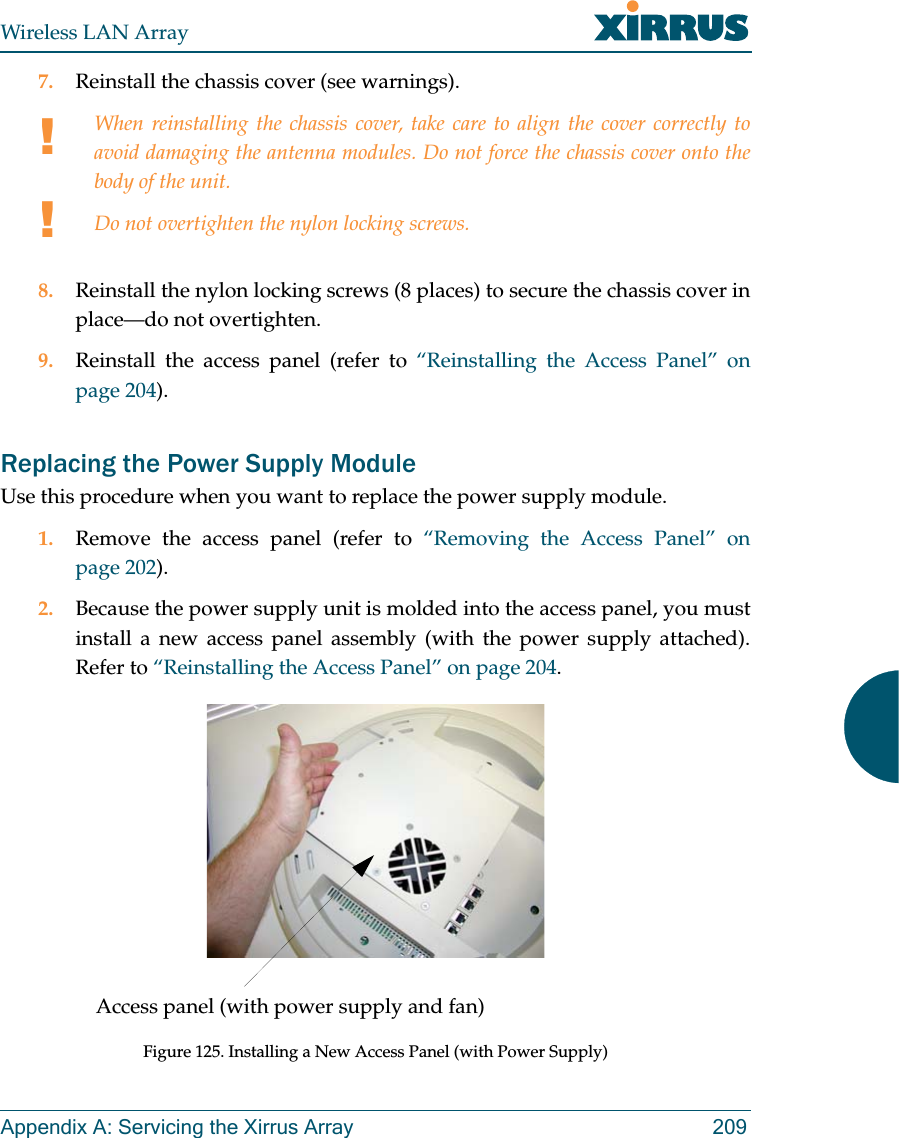
UserManual.wiki
>
Cambium Networks
>
XS3700A User Manual
>
Users Manual Part 2
Contents
1.
Users Manual Part 1
2.
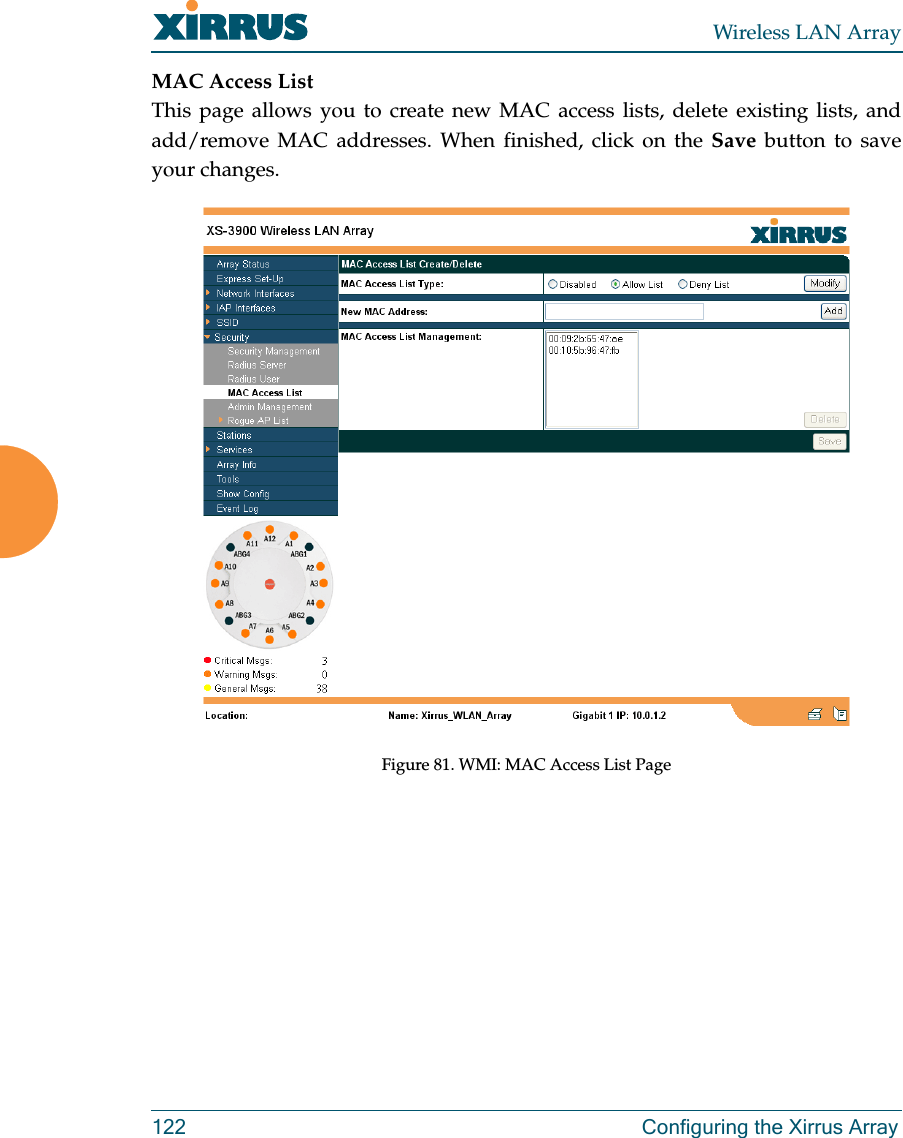
Users Manual Part 2
Users Manual Part 2
Navigation menu
Upload a User Manual
Namespaces
Wiki Guide
HTML
PDF
Info
Views
User Manual
Discussion / Help
Navigation


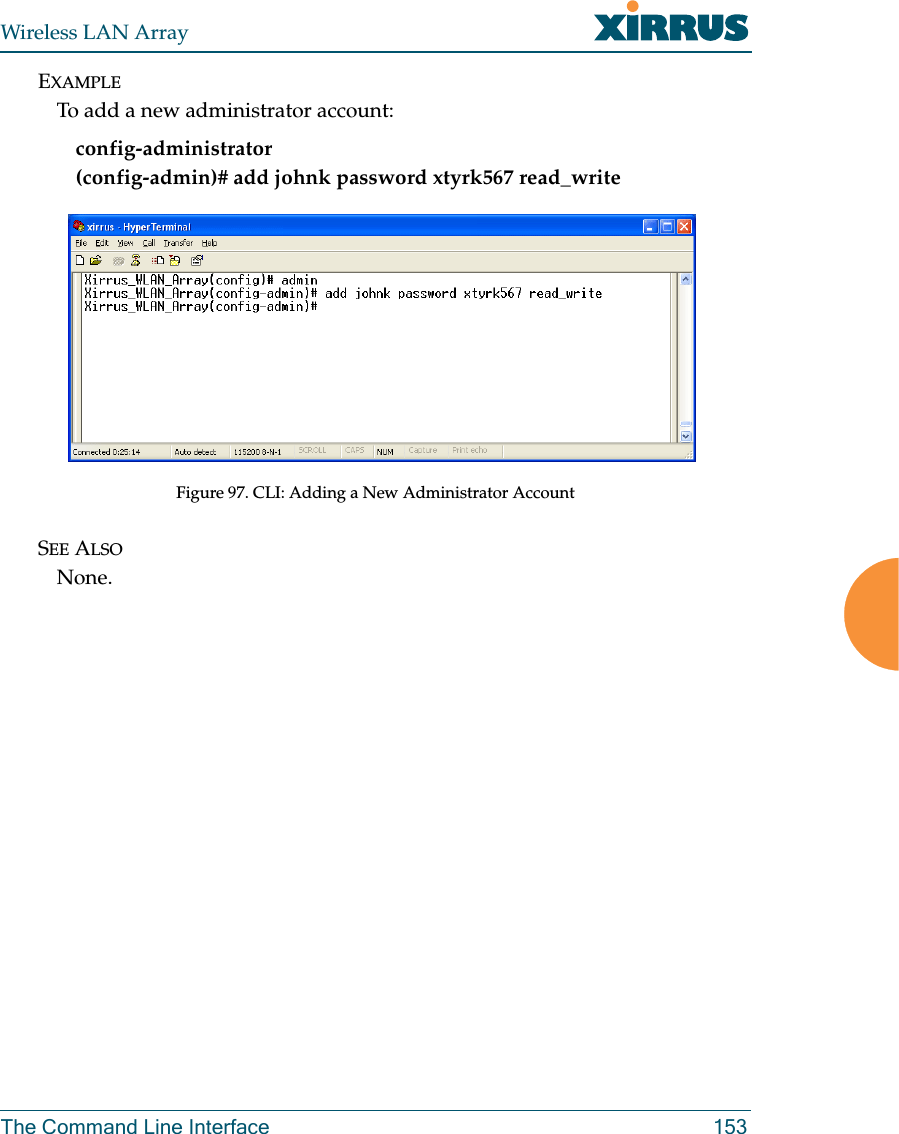
![Wireless LAN Array152 The Command Line InterfaceadministratorDESCRIPTIONAdds and edits administrator accounts and privileges—available from theconfig command mode.SYNTAXadministrator [add <uid> password [enc] <passwd> {read_only |read_write} | del <uid> ]PARAMETERSadd <uid> Add user IDread_only Read only permissionsread_write Read/write permissionspassword Define user passwordenc Enter password in encrypted form (must be in quotes)DEFAULTSNone.USAGE GUIDELINESThe show command within the config-admin mode will display alladministrator accounts and privileges.](https://usermanual.wiki/Cambium-Networks/XS3700A.Users-Manual-Part-2/User-Guide-649367-Page-47.png)
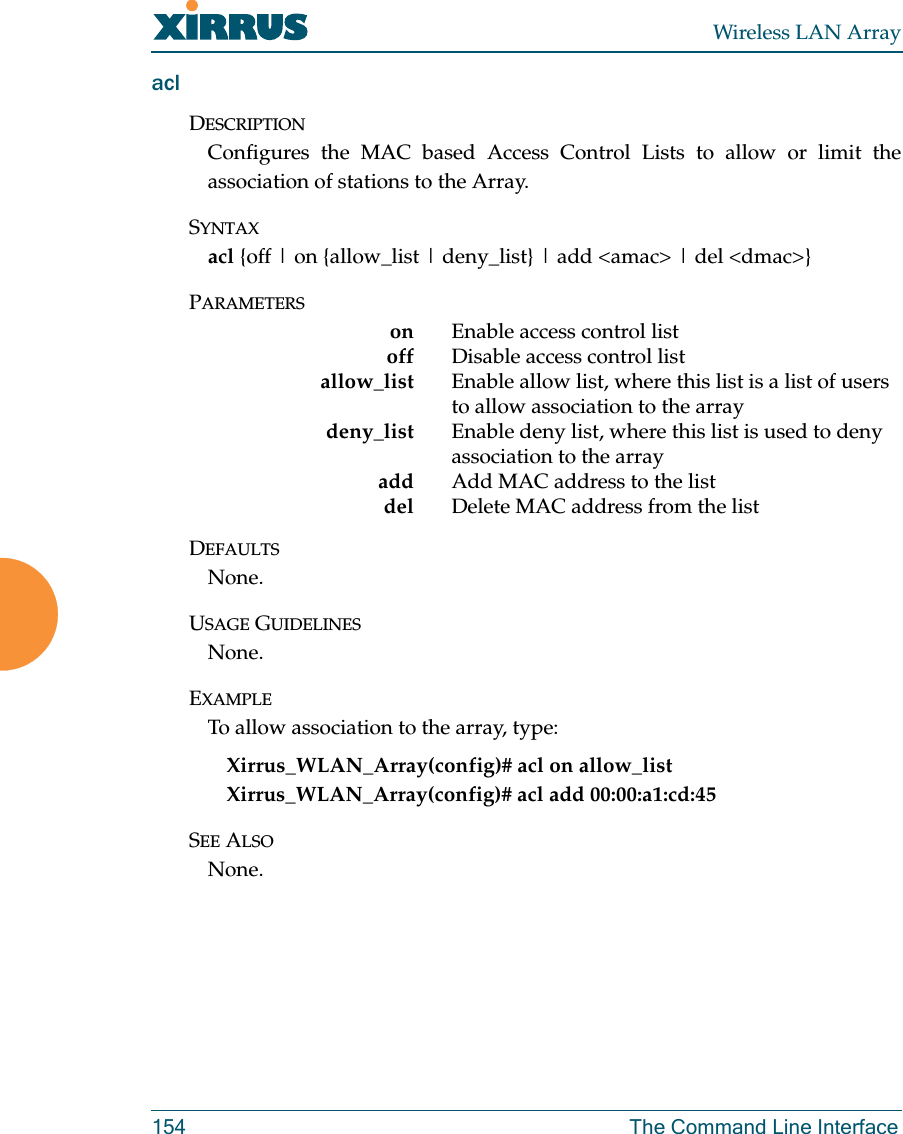
![Wireless LAN ArrayThe Command Line Interface 157contact-infoDESCRIPTIONSets the contact information for this Array—available from the configcommand mode.SYNTAXcontact-info {name [<conname>] | email [<emailcontact>] | phone[<contele>]}@PARAMETERScontact-info Contact information for assistance on this Arrayname Contact name (must be within quotes)email Contact email address (must be within quotes)phone Contact telephone number (must be within quotes)DEFAULTSNone.USAGE GUIDELINESNone.EXAMPLETo add new contact information (name and telephone number):config-contact-info (config-contact-info)# name Bill phone 8181239876Figure 100. CLI: Adding a New Administrator Account](https://usermanual.wiki/Cambium-Networks/XS3700A.Users-Manual-Part-2/User-Guide-649367-Page-52.png)

![Wireless LAN ArrayThe Command Line Interface 163dnsDESCRIPTIONUsed to configure the DNS settings—available from the Config-> dnscommand mode.SYNTAXdns { domain [<dom>] | server1 [<srv1>] | server2 [<srv2>] | server3[<srv3>]}PARAMETERSdomain Enter your domain name (Example: www.mydomain.com)server1 Enter the first DNS server IP addressserver2 Enter the second DNS server IP addressserver3 Enter the third DNS server IP addressDEFAULTSNone.USAGE GUIDELINESServer1, Server2, and Server3 IP addresses must be entered using thestandard A.B.C.D notation.EXAMPLETo configure the first DNS server, type:Xirrus_WLAN_Array(config)# dnsyXirrus_WLAN_Array(config-dns)# server1 10.10.10.1SEE ALSONone.](https://usermanual.wiki/Cambium-Networks/XS3700A.Users-Manual-Part-2/User-Guide-649367-Page-58.png)
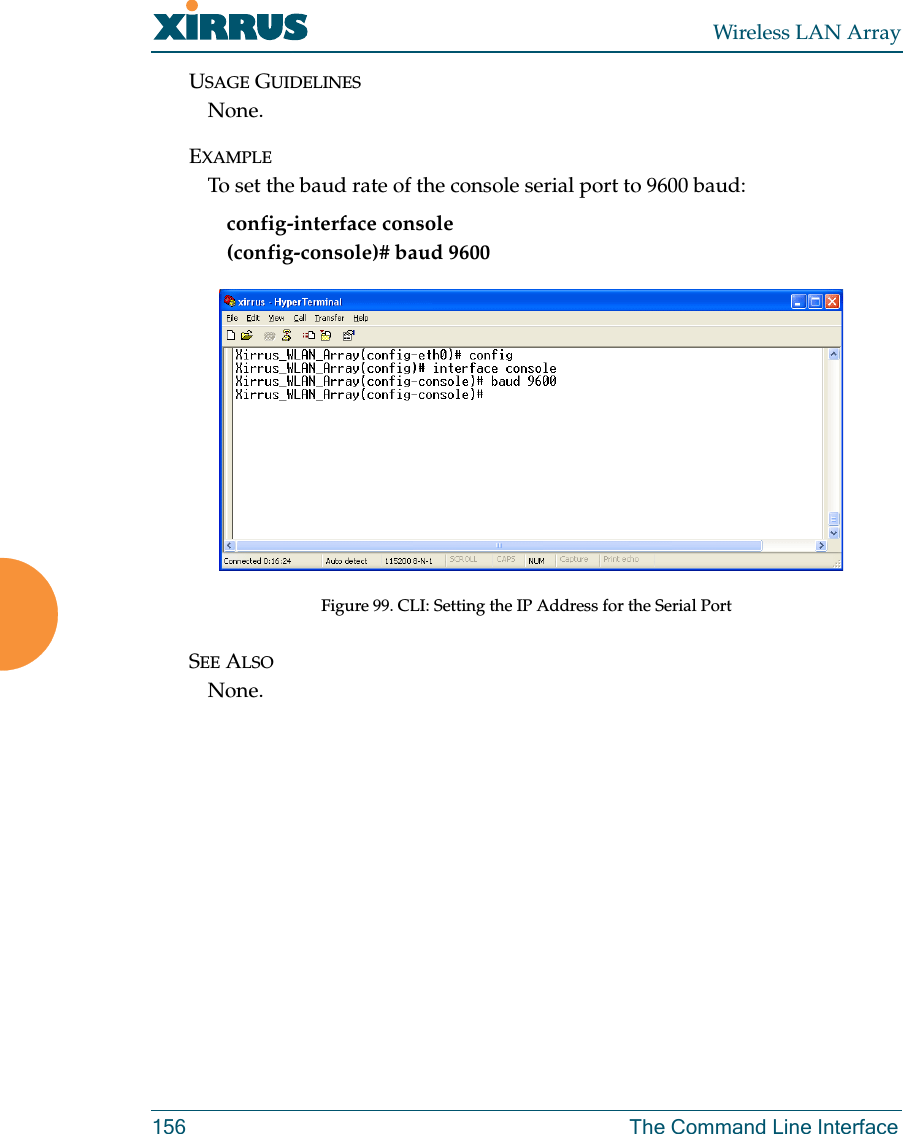
![Wireless LAN ArrayThe Command Line Interface 165eth0DESCRIPTIONConfigures the 10/100 Ethernet Interface Settings—available from theconfig-interface command mode.SYNTAXeth0 {[no] autoneg [on | off] | defaults | duplex {half | full} | speed<spdsel> | mtu <mtusz> | down | up | ip {dhcp | {addr <statip> | mask<ipmask> | gateway <gway>}@}}PARAMETERShalf Half duplexfull Full duplexmtu Set the maximum MTU size allowed (64-17940)defaults Reset the interface to default valuesduplex Half or full duplex modespeed 10M or 100M operationsdown Shut this interface downup Bring this interface upip Set IP address (A.B.C.D)dhcp IP address, mask and gateway are obtained through DHCPaddr <IP Address> Static IP address (A.B.C.D)gateway <IP Address> Gateway IP address (A.B.C.D)mask <mask> IP mask (A.B.C.D)autoneg Autonegotiation on or offon Enable autonegotiationoff Disable autonegotiationDEFAULTSNone.USAGE GUIDELINESNone.](https://usermanual.wiki/Cambium-Networks/XS3700A.Users-Manual-Part-2/User-Guide-649367-Page-60.png)
![Wireless LAN Array168 The Command Line Interfacegig1DESCRIPTIONConfigures the Gigabit 1 Ethernet Interface Settings—available from theconfig-interface command mode.SYNTAXgig1 {[no] autoneg [on | off]; | [no] management [on | off] | down | up |defaults | duplex {half | full} | speed <spdsel> | mtu <mtusz> | ip {dhcp| {addr <statip> | mask <ipmask> | gateway <gway>}@}}PARAMETERShalf Half duplexfull Full duplexmtu Set the maximum MTU size alloweddefaults Reset the interface to default valuesduplex Half or full duplex modespeed <speed> 100M or 1000M operationdown Shut this interface downup Bring this interface upip Set the IP addressdhcp IP address, mask and gateway are obtained through DHCPaddr <IP Address> Static IP address (A.B.C.D)gateway <IP Address> Gateway IP address (A.B.C.D)mask <mask> IP mask (A.B.C.D)management Enable or disable management via interfaceno Managed elsewhereon Enable managementoff Disable managementautoneg Autonegotiation on or offno Disable selected featureon Enable autonegotiationoff Disable autonegotiation](https://usermanual.wiki/Cambium-Networks/XS3700A.Users-Manual-Part-2/User-Guide-649367-Page-63.png)
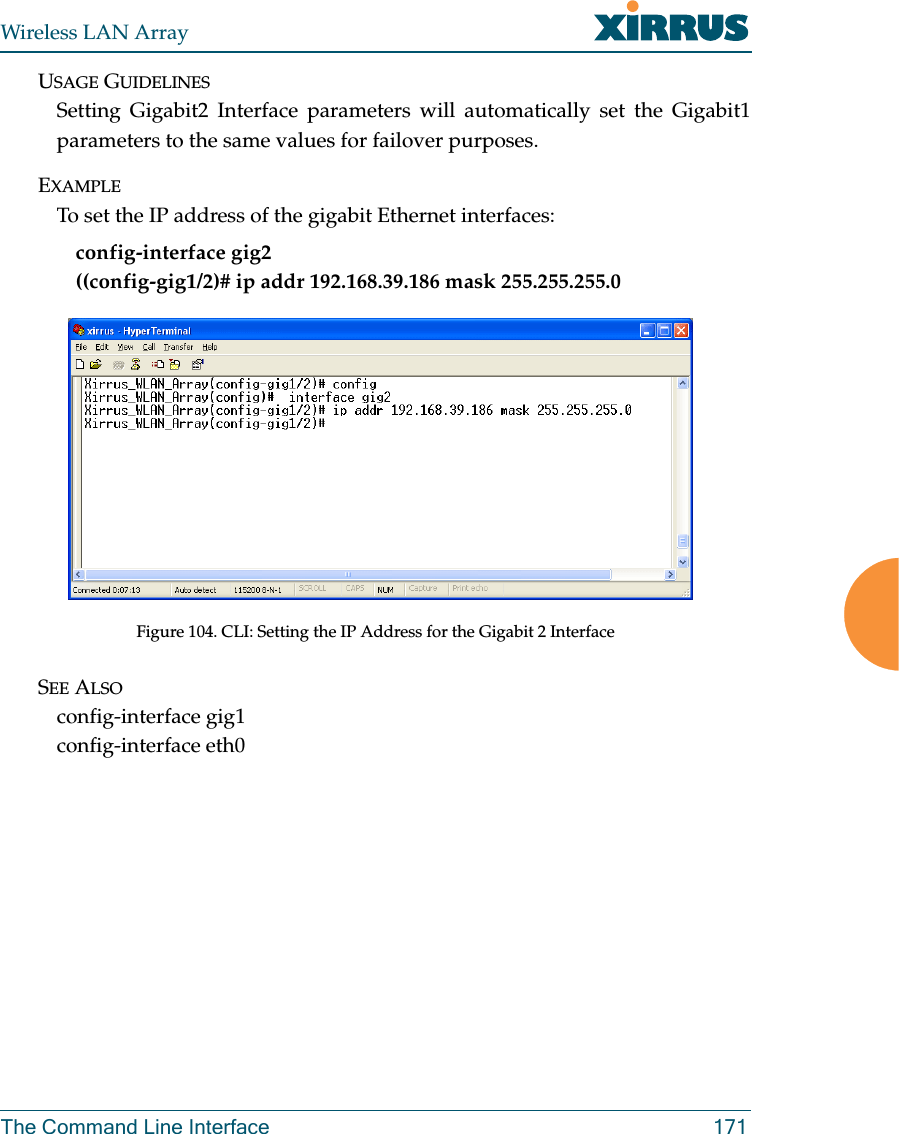
![Wireless LAN Array170 The Command Line Interfacegig2DESCRIPTIONConfigures the Gigabit 2 Ethernet Interface Settings—available from theconfig-interface command mode.SYNTAXgig2 {[no] autoneg [on | off]; | [no] management [on | off] | down | up |defaults | duplex {half | full} | speed <spdsel> | mtu <mtusz> |ip {dhcp | {addr <statip> | mask <ipmask> | gateway <gway>}@}}PARAMETERShalf Half duplexfull Full duplexmtu Set the maximum MTU size alloweddefaults Reset the interface to the default valuesduplex Half or full duplex modespeed <speed> 100M or 1000M operationdown Shut this interface downup Bring this interface upip Set the IP addressdhcp IP address, mask and gateway are obtained through DHCPaddr <IP Address> Static IP address (A.B.C.D)gateway <IP Address> Gateway IP address (A.B.C.D)mask <mask> IP mask (A.B.C.D)management Enable or disable management via interfaceno Managed elsewhereon Enable managementoff Disable managementautoneg Autonegotiation on or offno Disable selected featureon Enable autonegotiationoff Disable autonegotiationDEFAULTSNone.](https://usermanual.wiki/Cambium-Networks/XS3700A.Users-Manual-Part-2/User-Guide-649367-Page-65.png)
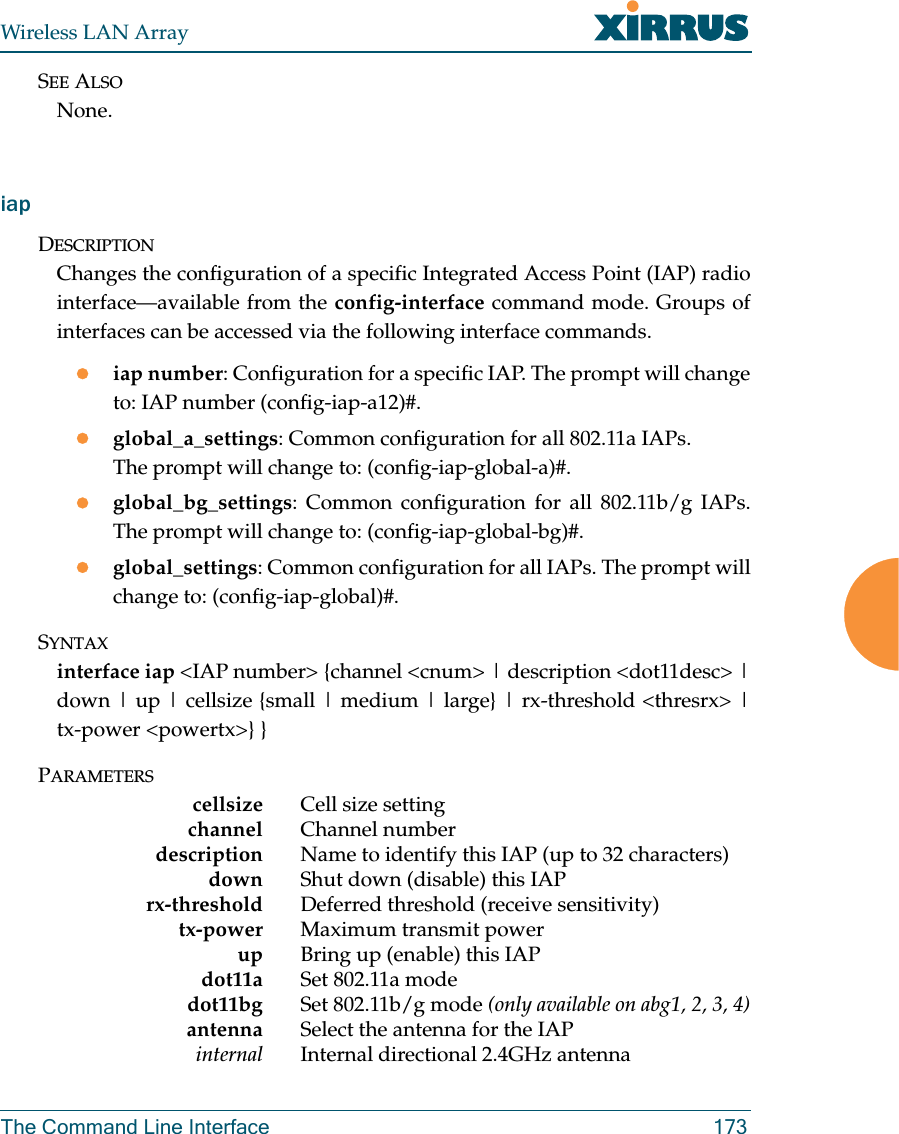
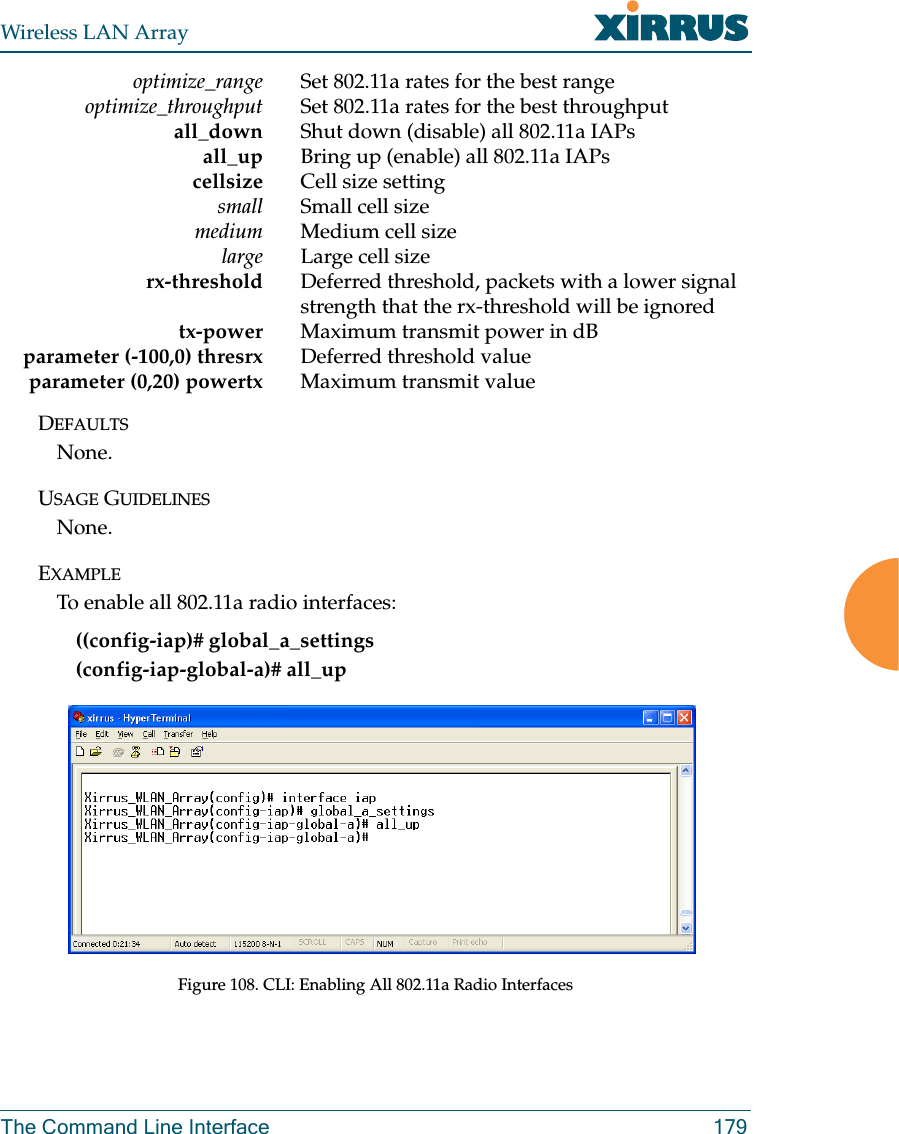
![Wireless LAN ArrayThe Command Line Interface 175iap global_settingsDESCRIPTIONMakes global configuration changes to all Integrated Access Point (IAP)radio interfaces—available from the config-interface command mode.This command allows configuration changes to all IAP interfaces. Otherglobal settings can be made for specific groups of IAPs by using one of thebelow parameters in the interface IAP command mode:ziap number: Configuration for a specific IAP. The prompt will changeto: IAP number (config-iap-a12)#zglobal_a_settings: Common configuration for all 802.11a IAPs. Theprompt will change to: (config-iap-global-a)#zglobal_bg_settings: Common configuration for all 802.11b/g IAPs.The prompt will change to: (config-iap-global-bg)#zglobal_settings: Common configuration for all IAPs. The prompt willchange to: (config-iap-global)#SYNTAXiap global_settings {all_down | all_up | [no] rogue_detect [ on | off |add <ssa> {approved | known} | del <ssd> | list ] | auto_channel[no][power_up [ on | off ] | schedule [<ts>]] | long-retries <lrl> | short-retries <srl> | cellsize {small | medium | large} | rx-threshold <thresrx> |tx-power <powertx> | beacon-rate <brate> | beacon-dtim <bdtim> |inactive-time <at> | reauth-period <ht> | led {disable | enable {iap_up |associated}} | led_activity {beacon | tx_data | rx_data | tx_mgmt |rx_mgmt | broadcast | probe_req | assoc}}PARAMETERSled Enable or disable the IAP ledsdisable Do not turn IAP leds onenable Turn an IAP led on when up (default) or when a station is associatediap_up Turn an IAP led on when the IAP is upassociated Turn an IAP led on when at least one station is associated with it](https://usermanual.wiki/Cambium-Networks/XS3700A.Users-Manual-Part-2/User-Guide-649367-Page-70.png)

![Wireless LAN Array178 The Command Line Interfaceiap global_a_settingsDESCRIPTIONMakes global configuration changes to all 802.11a Integrated Access Point(IAP) radio interfaces—available from the Config->Interface commandmode.This command allows configuration changes to all 802.11a IAP interfaces.Other global settings can be made for specific groups of IAPs by using oneof the following parameters in the interface IAP command mode:ziap number: Configuration for a specific IAP. The prompt will changeto: IAP number (config-iap-a12)#zglobal_bg_settings: Common configuration for all 802.11b/g IAPs.The prompt will change to: (config-iap-global-bg)#zglobal_settings: Common configuration for all IAPs. The prompt willchange to: (config-iap-global)#SYNTAXiap global_a_settings {all_down | all_up | rts-threshold <rtst> | frag-threshold <fragt> | auto_channel | cellsize {small | medium | large} | rx-threshold <thresrx> | tx-power <powertx> | rates {defaults |optimize_range | optimize_throughput | { basic { <br1> [<br2> [<br3>[<br4> [<br5> [<br6> [<br7> [<br8>]]]]]]]} | supported { [<sr1> [<sr2>[<sr3> [<sr4> [<sr5> [<sr6> [<sr7> [<sr8>]]]]]]]]}}}}PARAMETERSfrag-threshold 802.11a fragmentation threshold packet size above which a packet will be fragmentedrts-threshold 802.11a RTS threshold packet size above which an RTS is issued before sendingauto_channel Automatically assign channels to 802.11a IAPsrates Set allowed 802.11a data rates by listing the rates that will be used ( 6, 9, 12, 18, 24, 36, 48, 54, etc.)basic Set 802.11a basic (required) rates by listing the rates a client must support to associatesupported Set the 802.11a supported (accepted) ratesdefaults Use the default 802.11a rates](https://usermanual.wiki/Cambium-Networks/XS3700A.Users-Manual-Part-2/User-Guide-649367-Page-73.png)
![Wireless LAN Array180 The Command Line InterfaceSEE ALSOiap global_bg_settingsiap global_settingsshow iap alliap global_bg_settingsDESCRIPTIONMakes global configuration changes to all 802.11bg Integrated Access Point(IAP) radio interfaces—available via the Config-> Interface commandmode.This command allows configuration changes to all 802.11bg IAP interfaces.Other global settings can be made for specific groups of IAPs by using oneof the below parameters in the Interface IAP command mode::ziap number: Configuration for a specific IAP. The prompt will changeto: IAP number (config-iap-a12)#zglobal_bg_settings: Common configuration for all 802.11b/g IAPs.The prompt will change to: (config-iap-global-bg)#zglobal_settings: Common configuration for all IAPs. The prompt willchange to: (config-iap-global)#SYNTAXIAPGlobalBG {all_down | all_up | slot_time {short_slot | long_slot} |[no] dot11g_protect [on | off] | [no] dot11g_only [on | off] | cellsize {small| medium | large} | rx-threshold <thresrx> | tx-power <powertx> |preamble {short_preamble | long_preamble} | auto_channel |rts-threshold <rtst> | frag-threshold <fragt> | rates {defaults |optimize_range | optimize_throughput | { basic { <br1> [<br2> [<br3>[<br4> [<br5> [<br6> [<br7> [<br8> [<br9> [<br10> [<br11>[<br12>]]]]]]]]]]]} | supported { [<sr1> [<sr2> [<sr3> [<sr4> [<sr5> [<sr6>[<sr7> [<sr8> [<sr9> [<sr10> [<sr11> [<sr12>]]]]]]]]]]]]}}}}](https://usermanual.wiki/Cambium-Networks/XS3700A.Users-Manual-Part-2/User-Guide-649367-Page-75.png)
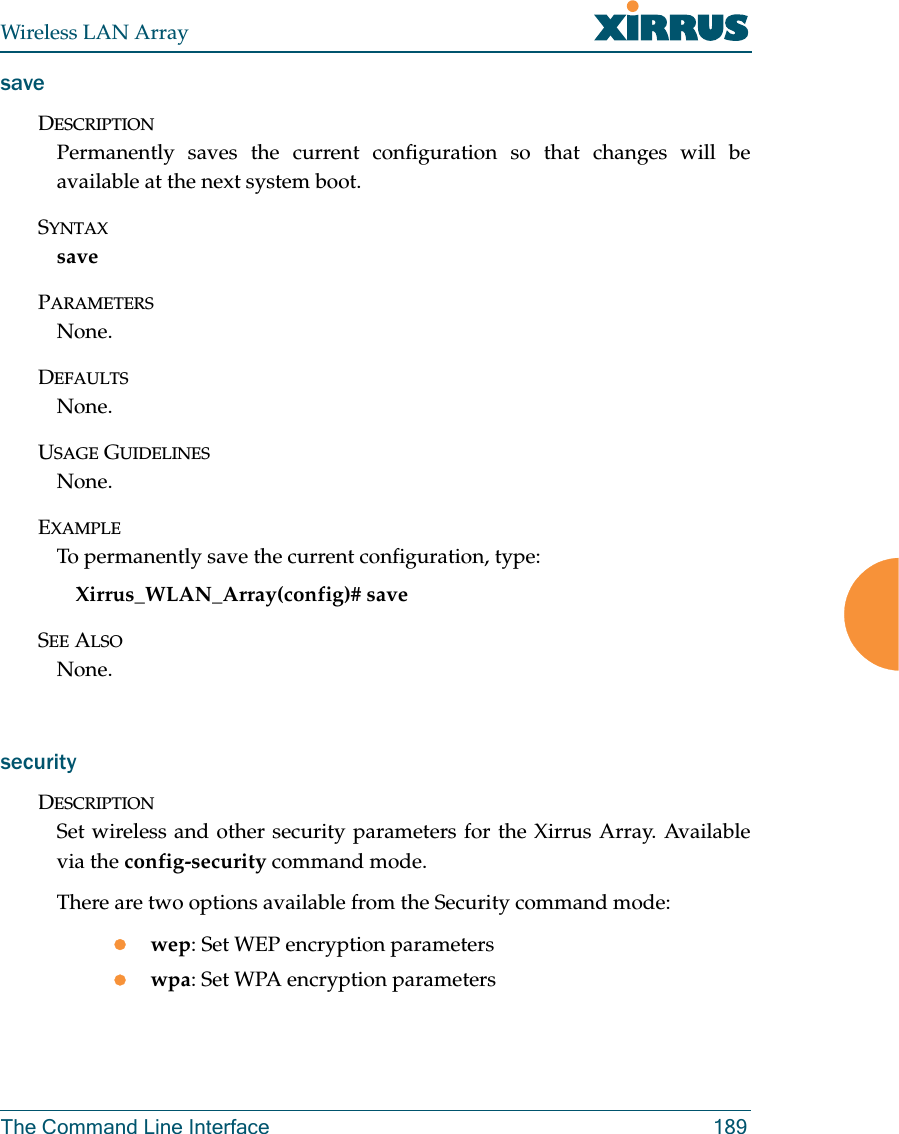
![Wireless LAN ArrayThe Command Line Interface 183moreDESCRIPTIONLists the contents of a file, one screen at a time.SYNTAXMore <file name>PARAMETERS<file name> The file name for which to display the contentsDEFAULTSNone.USAGE GUIDELINESNone.EXAMPLENone.SEE ALSONone.radius-serverDESCRIPTIONConfigures the external or internal (local) radius server settings—availablefrom the Config-> radius-server command modeSYNTAXradius-server [no] external [ {on | off | ip <pri_ip> | port <pri_port> |secret [enc] [<pri_secret>] | timeout <tmout>}@ ] | secondary [ {ip[<sec_ip>] | port [<sec_port>] | secret [enc] [<sec_secret>]}] | [no] internal [ {on | off | {add <aid> password [enc] <passwd> ssid <ss>} |del <did>} ]](https://usermanual.wiki/Cambium-Networks/XS3700A.Users-Manual-Part-2/User-Guide-649367-Page-78.png)
![Wireless LAN ArrayThe Command Line Interface 185rebootDESCRIPTIONReboots the Xirrus Array.SYNTAXrebootPARAMETERSNone.DEFAULTSNone.USAGE GUIDELINESWhen rebooting the Array, you must respond to the following prompts:zThe system will prompt you to save any unsaved configurationchanges.zThe system will prompt you to confirm the reboot action.EXAMPLETo reboot the Xirrus Array type the following. Xirrus_WLAN_Array(config)# rebootDo you want to save changes to flash? [yes/no]: yare you sure you want to reboot? [yes/no]: ySEE ALSONone.](https://usermanual.wiki/Cambium-Networks/XS3700A.Users-Manual-Part-2/User-Guide-649367-Page-80.png)
![Wireless LAN Array186 The Command Line InterfaceresetDESCRIPTIONResets all settings to the factory defaults, then reboots the Xirrus Array.SYNTAXresetPARAMETERSNone.DEFAULTSNone.USAGE GUIDELINESWhen you enter the reset command, the system will prompt you to confirmthe reset action.EXAMPLETo reset the Xirrus Array back to factory defaults, type:Xirrus_WLAN_Array(config)# resetAre you sure you want to reset to factory settings and reboot? [yes/no]:ySEE ALSOrebootrun-scriptDESCRIPTIONRun a CLI command script.SYNTAXrun-script <file name>PARAMETERS<file name> name of command script file](https://usermanual.wiki/Cambium-Networks/XS3700A.Users-Manual-Part-2/User-Guide-649367-Page-81.png)

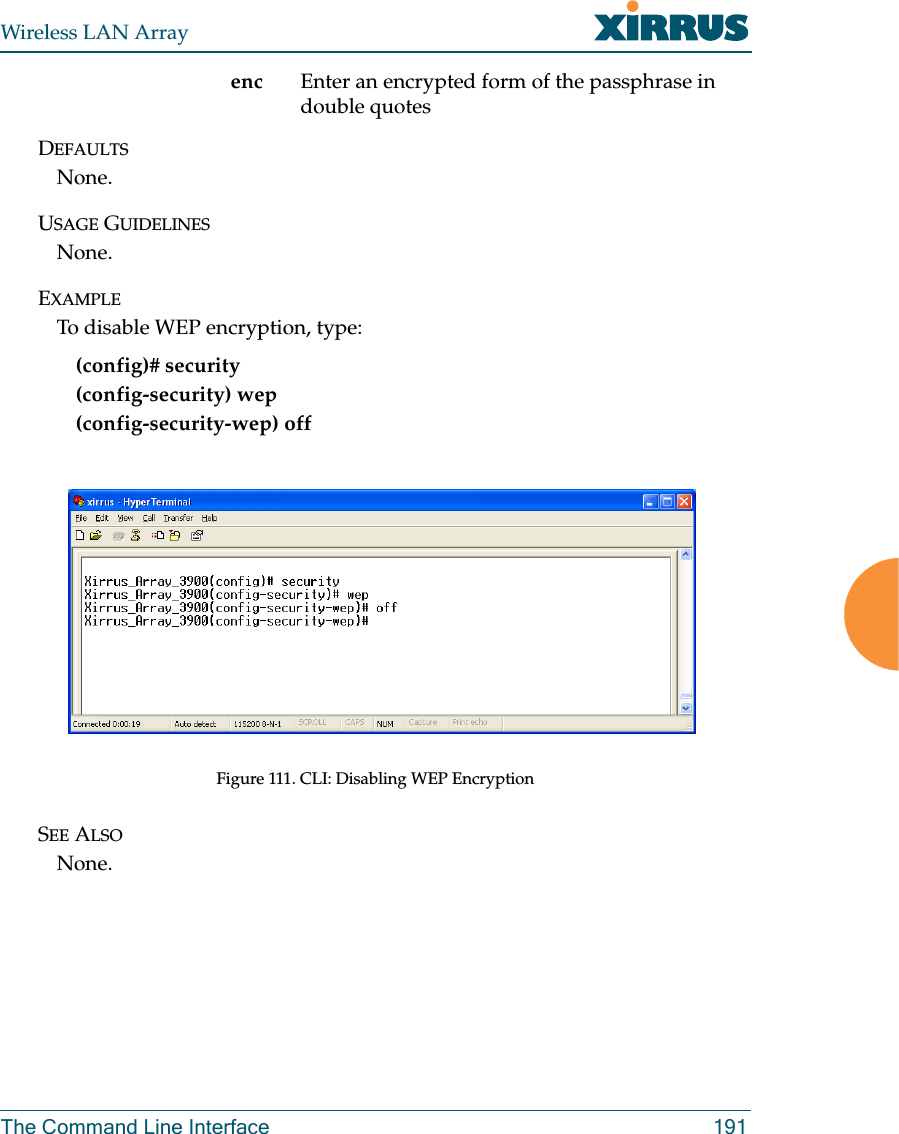
![Wireless LAN Array190 The Command Line InterfaceSYNTAXwep { on | off | default_key <keyid> | key {<keynum> size [not_set |<wepsz> { ascii | hex | enc } <keystr> ] } }PARAMETERSon Enable WEP encryptionoff Disable WEP encryptionkey Set static WEP key number 1-4size Key size (40 or 128 bits, default = 128)ascii ASCII charactershex Hex digitsenc Encrypted formdefault_key Default key ID 1-4SYNTAXwpa { on | off | rekey { never | <ti> } | { no ] tkip [ on | off } | [ no ] aes [ on| off ] | [ no ] eap [ on | off ] | [ no ] psk [ on | off ] | passphrase { not_set |<pstr> | enc <epstr> }}PARAMETERSon Enable WPA encryptionoff Disable WPA encryptionrekey Time interval for rekeying broadcast encryption keysnever Disable rekeying broadcast encryption keystkip Enable or disable Temporal Key Integrity Protocol (TKIP)on Enable TKIPoff Disable TKIPaes Enable or disable AES in counter mode with CBC-MAC (CCMP)on Enable AESoff Disable AESeap Enable or disable 802.1x EAPon Enable EAPoff Disable EAPpsk Enable or disable Pre-Shared Key (PSK)on Enable PSKoff Disable PSKpassphrase WPA PSK (Pre-Shared Key) passphrase](https://usermanual.wiki/Cambium-Networks/XS3700A.Users-Manual-Part-2/User-Guide-649367-Page-85.png)
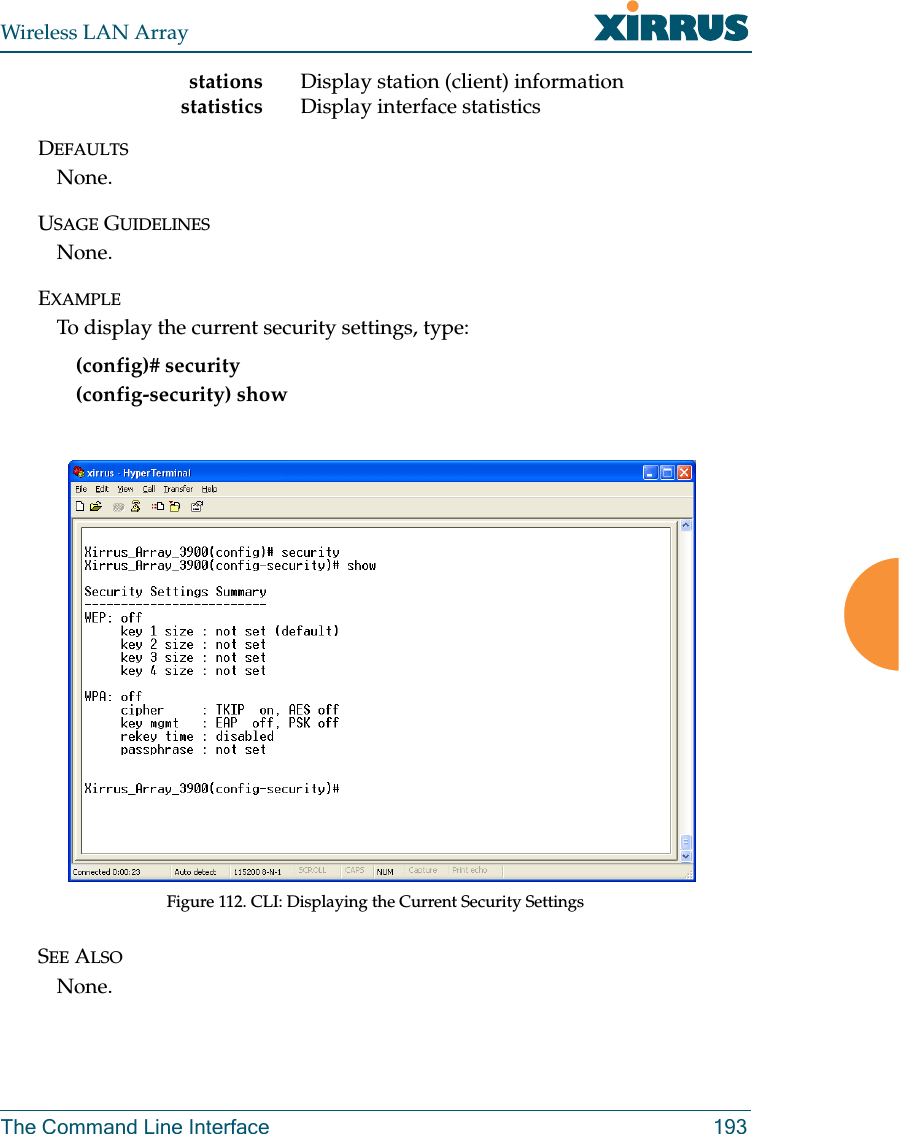
![Wireless LAN Array192 The Command Line InterfaceshowDESCRIPTIONDisplays settings and information, and is useful when verifying the currentconfiguration of the Array.SYNTAXshow [ acl| admin | array_info | console | contact_info | date_time |dhcp_server | diff | dns | ethernet | external_radius | factory_config | iap| internal_radius | log | rogue_ap | running_config | saved_config |security | snmp | ssid | startup_config | stations | statistics ]PARAMETERSacl Display access control listadmin Display administrator accounts listarray_info Display system informationconsole Display terminal settingscontact_info Display contact informationdate_time Display date and time settings summarydhcp_server Display internal DHCP server settings summarydiff Display the differences between configurationsdns Display DNS summaryethernet Display eth0 and gig1/gig2 interface summaryexternal_radius Display external RADIUS server settings summaryfactory_config Display the array configuration from the factoryiap Display IAP configuration summaryinternal_radius Display all users defined for the embedded RADIUS serverlog Display the event logrogue_ap Display rogue AP informationrunning_config Display the array configuration that is currently runningsaved_config Display the array configuration that was last savedsecurity Display security settings summarysnmp Display SNMP summaryssid Display SSID summarystartup_config Display the array configuration from the last boot](https://usermanual.wiki/Cambium-Networks/XS3700A.Users-Manual-Part-2/User-Guide-649367-Page-87.png)
![Wireless LAN Array194 The Command Line InterfacesnmpDESCRIPTIONConfigures SNMP (Simple Network Management Protocol). This commandis available from the config->snmp command mode.SYNTAXsnmp {on | off | [no] trap [enable | disable] | host [<thsnmp>] | port<tpsnmp> | community <csnmp>}PARAMETERSon E n a b l e S N M P off D i s a b l e S N M P host S N M P t r a p I P a d d r e s s o r h o s t n a m e port S N M P t r a p p o r t community S N M P c o m m u n i t y s t r i n g N o t e n o s p a c e s o r special characters may be used trap S e n d t r a p s f o r a u t h e n t i c a t i o n f a i l u r e s no D i s a b l e s e l e c t e d f e a t u r e enable E n a b l e t r a p s disable D i s a b l e t r a p s DEFAULTSSNMP is disabled by default.USAGE GUIDELINESSNMP community string cannot have spaces or special characters.EXAMPLENone.SEE ALSONone.](https://usermanual.wiki/Cambium-Networks/XS3700A.Users-Manual-Part-2/User-Guide-649367-Page-89.png)

![Wireless LAN Array196 The Command Line InterfacesyslogDESCRIPTIONConfigures the syslog server settings. This command is available from theconfig->syslog command mode.SYNTAXsyslog {on | off | {ipsyslog <ip address> | [no] console [on | off] | level<slev> | buffered <logfilesz> | show}}PARAMETERSon E n a b l e S y s l o g s e r v e roff Disable Syslog serveripsyslog <ip address> Syslog IP address (in A.B.C.D format)level S y s l o g m e s s a g e l e v e l ( l o g a l l m e s s a g e s w i t h this level and lower)buffered Set the size of the local Syslog fileconsole Enable or disable display of Syslog messages on the console no Disable console feature on Enable Syslog messages on the console off Disable Syslog messages on the consoleshow Show current syslog messagesDEFAULTSNone.USAGE GUIDELINESNone.EXAMPLENone.SEE ALSONone.](https://usermanual.wiki/Cambium-Networks/XS3700A.Users-Manual-Part-2/User-Guide-649367-Page-91.png)